
In this SharePoint 2016 tutorial, we will discuss the SharePoint server 2016 installation step by step in windows server 2016. And also, we will see what are the SharePoint 2016 installation requirements.
You can also check out SharePoint Server 2016 new features and deprecated features in SharePoint 2016 and browsers supported in SharePoint 2016.
First, download SharePoint Server 2016 from this Microsoft URL.
SharePoint 2016 Product Keys
Microsoft provides 180 trial of SharePoint server for both the standard and enterprise versions. Below are the Product keys:
- SharePoint Server 2016 Enterprise trial product key: NQGJR-63HC8-XCRQH-MYVCH-3J3QR
- SharePoint Server 2016 Standard trial product key: RTNGH-MQRV6-M3BWQ-DB748-VH7DM
Note: You must use an Enterprise product key for SharePoint to enable Project Server 2016.
SharePoint 2016 Installation requirements
Hardware and software requirements for SharePoint Server 2016
Below are the hardware and software requirements for SharePoint Server 2016, we should follow before installing the SharePoint server 2016.
Based on your requirement there can be various installation scenarios, so make sure you should have the below guidelines for your web servers or application servers.
Based on your requirement there can be various installation scenarios, so make sure you should have the below guidelines for your web servers or application servers.
| Scenario | Deployment type | Processor | RAM | Hard disk |
| Database server running a single SQL instance | Development | 64-bit, 4 cores | 12-16 GB | 80GB |
| Database server running a single SQL instance | QA/Production | 64-bit, 4 cores | 16-24 GB | 80GB |
| Web server or application server in a three-tier farm | Development | 64-bit, 4 cores | 12-16 GB | 80GB |
| Web server or application server in a three-tier farm | QA/Production | 64-bit, 4 cores | 16-24 GB | 80GB |
Operating System Requirement:
SharePoint Server 2016 will be supported any one of the below operating system:
- Windows Server 2012 R2 Standard or Datacenter
- Windows Server 2016 Standard or Datacenter
.Net Framework:
- Windows Server 2012 R2: SharePoint 2016 requires .NET Framework 4.5.2
- Windows Server Technical Preview “Threshold”: SharePoint 16 requires .NET Framework 4.6 Preview, which comes with Windows Server Technical Preview “Threshold”.
Database Requirements:
SharePoint Server 2016 requires any one of the below sql server:
- Microsoft SQL Server 2014 SP1
- Microsoft SQL Server 2016 RTM
- Microsoft SQL Server 2017 RTM for Windows
Prerequisites for SharePoint 2016:
Below are the prerequisites required to install SharePoint 2016. Like SharePoint 2013, SharePoint 2016 has a Prerequisite Installer (prerequisiteinstaller.exe) which will install the required components.
- Application Server Role, Web Server (IIS) Role.
- Microsoft SQL Server 2012 Native Client
- Microsoft ODBC Driver 11 for SQL Server
- Microsoft Sync Framework Runtime v1.0 SP1 (x64)
- Windows Server AppFabric 1.1
- Cumulative Update Package 1 for Microsoft AppFabric 1.1 for Windows Server (KB2671763)
- Microsoft Identity Extensions
- Microsoft Information Protection and Control Client
- Microsoft WCF Data Services 5.0
- Microsoft WCF Data Services 5.6
- Microsoft .NET Framework 4.5.2
- Update for Microsoft .NET Framework to disable RC4 in Transport Layer Security (KB2898850)
- Visual C++ Redistributable Package for Visual Studio 2013
SharePoint Server 2016 installation steps
The complete process is a 3 steps process.
- Install Prerequisite
- Install SharePoint Server 2016
- Configure SharePoint Server 2016
SharePoint 2016 prerequisites installation
Before installing SharePoint server 2016, we need to install prerequisites.
Step-1:
Extract the setup file to folder and click on prerequisiteinstaller.exe file as shown in the below figure. This will install all the required prerequisites required for SharePoint Server 2016.

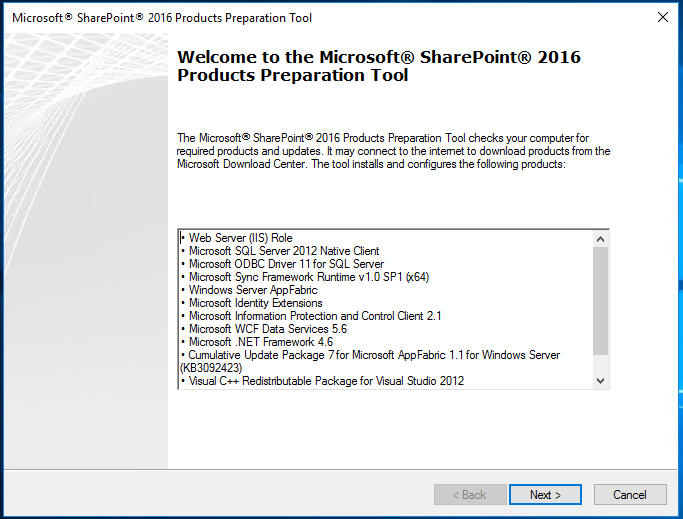
Step-2: After clicking the prerequisite installer, a Microsoft SharePoint 2016 product preparation Tool welcome screen is appearing which will display all the prerequisite names. Then click on next as shown in the figure.

Step-3: After clicking next, a Microsoft software license terms will come. Here select “I accept the terms of the License Agreement(s)” and click to next.

Then it will start the prerequisites installation.
Step-4: All the prerequisites will get installed.

Once the installation over, you can see all the prerequsites status should be successful. You can see the Installation Complete screen like below:

Note: If any one the prerequisites are fail, then resolve that before proceeding for SharePoint server 2016 installation process.
SharePoint Server 2016 Installation
Once the prerequisites installation over, we can install SharePoint server 2016.
Step-1: Now go to the folder again and click on setup.exe file.

Step-2: Then it will ask you to give enter your product key which is 25 characters and click on to continue. You can insert the trial version keys if you want.

Step-3: Read the Microsoft Software License Terms and select the check box of “I accept the terms of this agreement” and click on continue.

Step-4: In this “choose a file location”, no need to browse anything. So just go for ‘Install Now’ as below in the screenshot. If you want to change the installation location, you can change also.

Step-5: Then the installation will progress and in “installation progress” dialog box you can see. The installation will be running and it will take some time to complete the installation process.
[thrive_leads id=’2483′]

Configure SharePoint Server 2016
Once the installation over, we can start the SharePoint server 2016 configuration wizard.
Step-1: After installation complete, it will open the “Run Configuration Wizard” will come. To configure your server, just select the checkbox of ‘Run the SharePoint Products Configuration Wizard now’ and click to close as below screenshot.

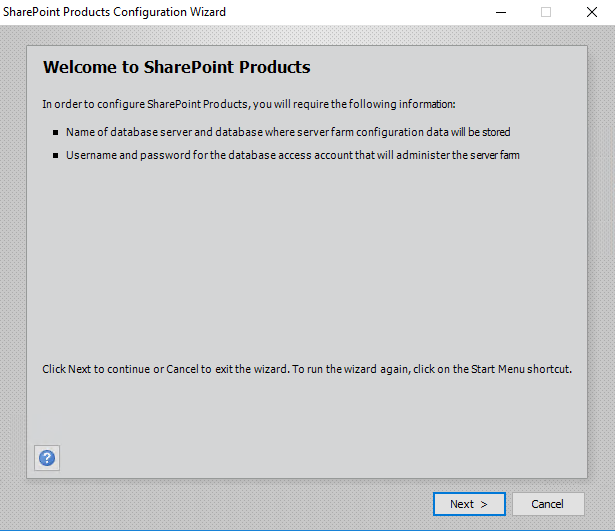
Step-2: Then it will display the Welcome to SharePoint Products dialog box. Here it will ask to keep the Name of the databases server and database and also to keep the Username and password to access the database. Those things will required in the following screens.

Step-3: Once you click Next, it will show that the below services may be started or reset during installation.
- Internet Information Services
- SharePoint Administration Service
- SharePoint Timer Service
Click on Yes like below:

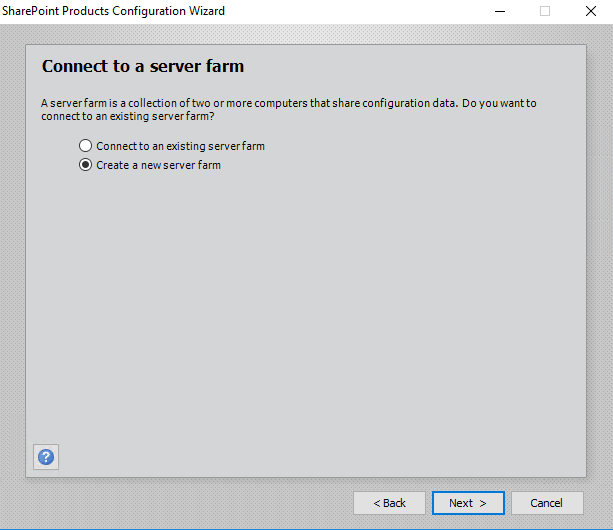
Step-4: In this connect to a server farm, choose to “create a new server farm” and then click on next. If you want to connect to an existing farm, you can choose Connect to an existing server farm.

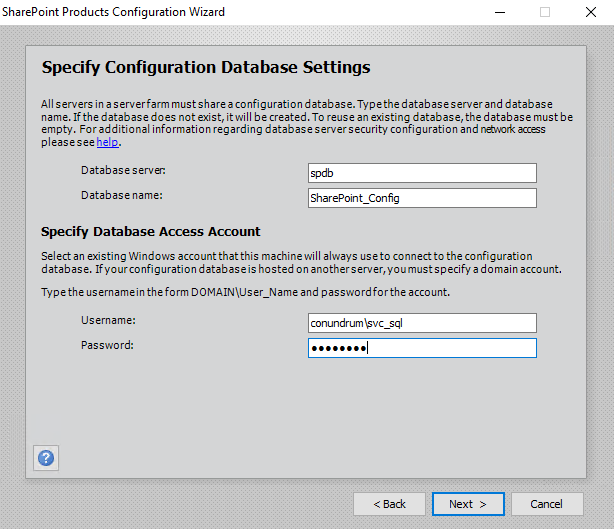
Step-5: In the “configuration database settings”, give the ‘database server’ and the ‘database name. Similarly in the “database access account”, give the ‘username’ and ‘password’ and click on next as shown in below screenshot.

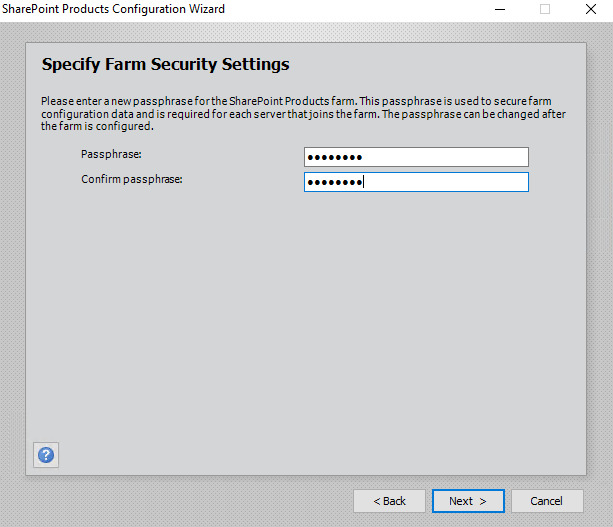
Step-6: In “Farm Security Settings”, give the passphrase and confirm the passphrase and click on next.

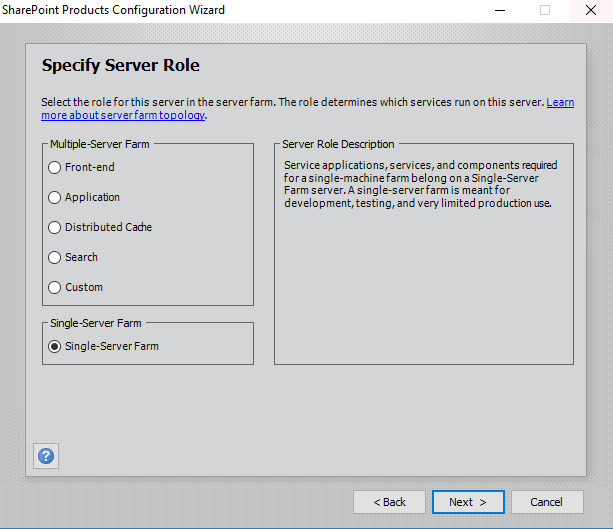
Step-7: The below step is know an Min role which is a new feature in SharePoint 2016. Here we can define the role for the server. Since we are installing as a single server farm, select the ‘Single-Server Farm’ and click to next as below.

Apart from this, you can choose role as:
- Front-end
- Application
- Distributed Cache
- Search
- Custom
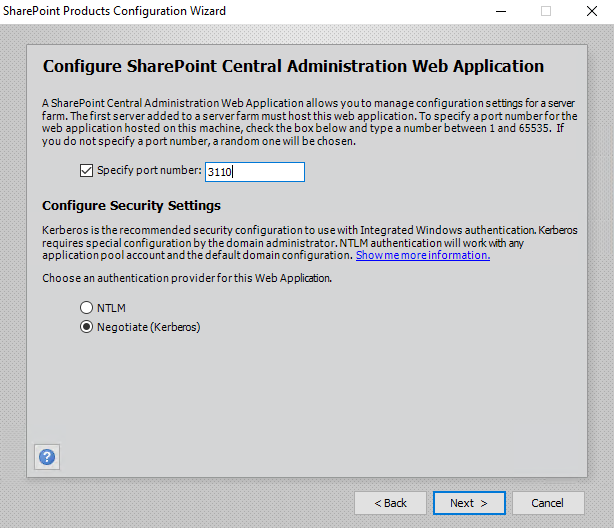
Step-8: In this web application, specify your port number (by default it is there but if you want to change then you can change it), then select the NTLM and click on next.

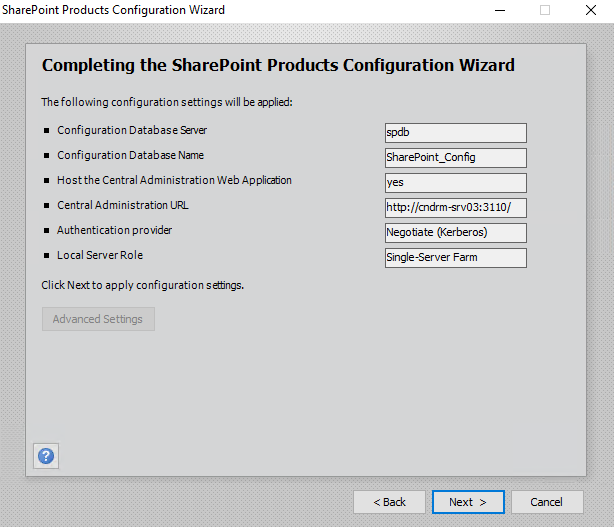
Step-9: In this, just click to next for applying configuration settings.

Step-10: In “configuring share point products”, it will finalize the share point product configuration. So it will take some time.

Step-11: Once the Configuration over, it will display the Configuration Successful dialgo box like below, then click on Finish.

Step-12: It will show you for sign up and select the option as given below in the screenshot and click to ok.

Step-13: Then it will open the SharePoint server 2016 central administration Welcome page like below:

Here you will be able to configure SharePoint farm. Just choose a managed account and then choose the Service Applications and click Next.

Download SharePoint 2016 Installation PDF Guide
You can also download SharePoint server 2016 installation PDF guide.
SharePoint 2016 Features
Let us check out the new features in SharePoint 2016 and also the deprecated features in SharePoint 2016.
Overall, SharePoint server 2016 has an improved user experience like app launcher, few UI changes for better user experiences and it has improved the mobile experience. And also SharePoint 2016 has a hybrid OneDrive for Business which users can use for cloud storage.
New features in SharePoint 2016
Below are a few new features in SharePoint 2016.
- Large file support
- No SharePoint 2016 central administration
- Document Library Accessibility
- Supported Special Characters in File Name
- Image and Video file Preview
- Open Document Format (ODF) format supported
- MinRole
- Durable Link
- Data Loss Prevention
- Zero Downtime Patching Installation
- Automatic Index Management
- First Site Collection Creation
- SMTP Encryption
- Project Server Integration
- SharePoint 2016 Hybrid Feature
- SharePoint Search Service application improvements
1. No SharePoint 2016 central administration in all server
When you run SharePoint Products Configuration Wizard, then SharePoint Server 2016 Central Administration is provisioned on the first server in a farm by default, it is not provisioned on additional servers in a farm by default.
2. Large File Support
In SharePoint 2013, the maximum file size was 2GB or 2047 MB. But in SharePoint 2016, Microsoft has increased the maximum file size limit to 10GB as a supported limit.
As a SharePoint administrator, you can change to beyond recommended 10GB limit from SharePoint 2016 central administration.
Open SharePoint 2016 central administration, click on “Manage web applications” which is under Application Management and then select the particular web application and then click on General settings -> General Settings. In the web application General Settings page you can change the “Maximum Upload Size” to your required number.

If you have increased this limit, as an administrator you need to do your own load and performance testing.
3. Document Library Accessibility
Document library accessibility is another new SharePoint 2016 feature. Few new features are introduced to work with SharePoint 2016 document libraries. Like:
- Landmarks to a page make it easier to navigate, and there are alt text improvements for all major navigation links.
- Keyboard shortcuts are provided for the following document tasks:
- Alt + N -> New
- Alt + E -> Edit
- Alt + U -> Upload
- Alt + M -> Manage
- Alt + S -> Share
- Alt + Y -> Synchronization
- Focus improvements, such as keeping the focus on prior elements and focus trapping.
- Announcements for upload progress.
- Announcements for the file name and file types when browsing folder and file lists.
- Improved callout reading.
- Fixed use of color issues for views switcher.
- Updates to the Help documentation.
4. Supported Special Characters in File Name
In previous versions of SharePoint, there were restrictions on file names, that included the &, ~, {, and } characters, file names that contained a GUID, file names with leading dots, and file names longer than 128 characters. These are now allowed in SharePoint server 2016. But characters such as % and # are still not allowed in file names.
5. Image and Video file Preview
In SharePoint 2016, you can see images and videos preview on mouse hover. This is another new features of SharePoint 2016.
6. Open Document Format (ODF) available for document libraries
In SharePoint 2016, the Open Document Format (ODF) enables you to create new files in a document library and save as ODF files so that users can edit the new file with a program they choose.
7. MinRole
Another very important new features of SharePoint 2016 is MinRole.
In SharePoint 2013, we need to start services manually in each server, whether it is an application server, search server you have to manually start required services. Microsoft has simplified this deployment process by introducing new topology known as MinRole.
In MinRole, instead of starting services manually on servers, Microsoft hard-coded which services run on which server.
In each server in MinRole topology farm, there will be 6 roles:
- Front-End
- Application
- Distributed Cache
- Search
- Custom
- Single-Server Farm
Once you choose a role, SharePoint will automatically start the services required for the server and stop those services if the Service Application no longer required in the farm.
8. Durable Link
A durable link is another useful feature in SharePoint 2016. In previous versions of SharePoint the document URLs are path-based URLs like below:
https://onlysharepoint2013.sharepoint.com/sites/bhawana/TestDocLib/TestDoc.docxSo if someone renames the document or move it to a different folder or document library then the URL will be broken and if a user clicks on the link to open the document, it will give file or document not found exception.
But in SharePoint 2016 the Durable link feature allows users to rename the document or even it allows to move the document throughout the same site collection without breaking the link URL. Whatever you do, the link will work.
The feature will be available after you install and configure Office Web Apps service. The feature works for Office documents like Word, Excel, OneNote, PowerPoint, and PDF file types.
9. Data Loss Prevention
Data Loss Prevention (DLP) has been already introduced in SharePoint Online and Microsoft brings this feature in SharePoint server 2016. By using the DLP feature, SharePoint administrators and enterprise compliance managers can find sensitive information in documents, and make sure their use respects the company’s policies.
In SharePoint server 2016, the DLP system finds, report and also it can block so that other users can not access the document from the whole SharePoint farm.
It can find over 51 sensitive information types like credit cards, Social Security Numbers, bank account numbers, passports, etc. Only site owners, users who created the document, and the last person who modified the document can be able to see the documents.
For other users it will give access errors like “Access to this item is blocked. It conflicts with a policy in your organizations.”
So Data Loss Prevention is another very useful SharePoint 2016 feature.
10. Zero Downtime Patching Installation
In previous versions of SharePoint, it takes a sufficient amount of times, even hours to install patching or cumulative updates. But in SharePoint server 2016, there will not be any downtime for cumulative updates.
11. List View Threshold
Microsoft has recommended a 5000 item threshold limit while retrieving list items from a SharePoint list. The recommendation is to make sure the list loads fast.
At a time, if you try to retrieve items more than 5000 list items, then List View Threshold issue will come. In SQL Server also whenever you will execute a query that will return more than 500 items then SQL will lock that table until the query finishes executing.
12. First Site Collection Creation
In the previous versions of SharePoint whenever you will create a site collection, SharePoint will create a blank site, and then it will activate the features which are necessary, which will take a significant amount of time. Microsoft has introduced the Fast site collection creation process, by which administrators can create site collections faster.
In the Fast Site Collection Creation process, a copy of a template would be saved in the database, and every time you create a Site Collection with that template by using Fast Site Collection Creation, SharePoint will copy the site directly in the Content Database, making the site creation a lot faster.
Fast site creation can be possible by using PowerShell only.
This is another SharePoint 2016 new features.
13. SMTP Encryption
In SharePoint 2013, the outgoing e-mail was always sent unencrypted and on port 25 which is not secure. Now in SharePoint server 2016, the outgoing email settings allow us to use TLS connection encryption.

14. Project Server Integration
In previous versions of SharePoint, the project server was coming as an add-on which needs to be installed and patched. But in SharePoint server 2016, Project Server comes simply a Service application which you needs to configure.
15. SharePoint 2016 Hybrid Feature
SharePoint server 2016 provides new hybrid features.
a- Hybrid sites:
Hybrid sites features allow your users to have an integrated experience while using SharePoint Server and SharePoint Online sites. Users can follow SharePoint Server and SharePoint Online sites, and see them consolidated in a single list. Users have a single profile in Office 365, where all of their profile information is stored.
b- Hybrid OneDrive for Business:
By using Hybrid OneDrive for Business feature, Users can sync files with Office 365 and share them with others. Users can access their files directly through Office 365 from any device.
c- Cloud hybrid search:
By using cloud hybrid search:
You index all of your crawled content, including on-premises content, to your search index in Office 365. You can set up the crawler in SharePoint Server 2016 to crawl the same content sources and use the same search connectors in Office SharePoint Server 2007, SharePoint Server 2010, and SharePoint Server 2013.
When users query your search index in Office 365, they get unified search results from both on-premises and Office 365 content.
17. SharePoint Search Service application
Now in SharePoint server 2016, Search supports indexing of up to 500 million items per Search Server application.
SharePoint 2016 deprecated features
There are also a few features that are deprecated in SharePoint 2016. Below are the features deprecated or removed in SharePoint Server 2016.
1. No SharePoint Foundation
There is no SharePoint foundation version in SharePoint server 2016. In previous versions of SharePoint, there was always a foundation version, which is a free edition of SharePoint that included most of the core functionality.
2. No Standalone Installation Mode
SharePoint Server 2016 doesn’t support the standalone install option, you have to use the MinRole feature during installation and choose one of the available install options.
3. ForeFront Identity Manager client (FIM)
Earlier versions of SharePoint used ForeFront Identity Manager client (FIM) to synchronize between Active Directory and SharePoint. SharePoint Server 2016 no longer uses FIM as the synchronization client. The default process is Active Directory Import.
4. No Excel Services in SharePoint
Excel Services and its associated business intelligence capabilities are no longer hosted on SharePoint Server. Excel Services functionality is now part of Excel Online in Office Online Server and SharePoint users can use the services from there.
5. Tags and Notes
The Tags and Notes feature is deprecated in SharePoint Server 2016. This means that users can still create new tags and notes and access any existing ones. But the recommendation from Microsoft is not to use this feature anymore.
6. No STSADM command line tool
Microsoft has deprecated Stsadm.exe tool and recommending to use PowerShell instead.
These are the SharePoint 2016 new features and SharePoint 2016 deprecated features.
SharePoint managed accounts
Let us see, what are managed accounts in SharePoint 2016 and how to register a managed account from SharePoint 2016 central administration and also we will discuss how to register a managed account using PowerShell.
What are managed accounts in SharePoint 2016?
Managed accounts are active directory accounts for SharePoint’s whose credentials are managed by SharePoint. Manage account credentials are encrypted and are associated with an active directory account.
If we try to register the account which is not the valid Active Directory User Account and not available in the managed accounts list, we would encounter the SharePoint Exception.
Before configuring and registering to manage account we must have an active user with permissions being added to groups.
Register managed account in SharePoint 2016
We can register a management account:
- From SharePoint 2016 central administration
- By using PowerShell cmdlets
Register managed account from SharePoint 2016 Central Administration
We can easily register managed accounts from SharePoint 2016 Central Administration.
Step-1:
Open SharePoint 2016 Central Administration and click on security.

Step-2:
Click on Configure managed accounts from General Security.

Step-3:
To configure the managed account click on Register Managed Account. In this step we can also view registered accounts and edit those.

Step-4:
Here we pass through credentials to manage the account. This also provides facilities that account passwords can be set to automatically change on a schedule and before any scheduled Active Directory enforced password change event. And can click on ok to configure.
Registers new managed account using PowerShell
With PowerShell script, we can register a new managed account for the specified Credential or Username and Password.
Below is the script to register a new managed account in SharePoint 2016 which you can run using windows PowerShell ISE or by using visual studio code.
Add-PSSnapin "Microsoft.SharePoint.PowerShell"
$cred = Get-Credential
New-SPManagedAccount –Credential $cred
Running the above script we get a page pop-up to enter valid credentials of user and password combination.
Description:
The cmdlet Add-PSSnapin “Microsoft.SharePoint.PowerShell”
Is basically a PowerShell extension that gives you a series of commands for working with SharePoint objects.
The New-SPManagedAccount cmdlet registers a new managed account for the specified Credential or Username and Password.
–Credential Indicates the Credential object that specifies the credentials of the new managed account.
In this, we came to know how to register managed accounts using SharePoint Central Administration 2016 and by PowerShell script.
Here, we discussed, what are managed accounts in SharePoint 2016? How to register a managed account in SharePoint 2016/2013 and how to registers a new managed account using PowerShell in SharePoint 2016/2013.
How to Change SharePoint managed account password
Let us check out how to change managed account password using PowerShell in SharePoint 2013/2016 or SharePoint 2019.
Below is the PowerShell command to change managed account password in SharePoint 2013/2016/2019.
Microsoft provides Set-SPManagedAccount PowerShell cmdlets to work with manage accounts in SharePoint 2013/2016/2019 like we can set password expiration and notification settings.
$accountName  =  Get-SPManagedAccount -Identity "MYSP\Bijay"
$accPassword = ConvertTo-SecureString 'NewPassword@123#' -AsPlainText -Force
Set-SPManagedAccount -Identity $accountName -NewPassword $accPassword
Also, you can write like below:
Set-SPManagedAccount -identity MYSP\Bijay -NewPassword (Converto-Securestring "NewPassword@123#" -AsPlainText -Force) -SetNewPasswordThe below PowerShell cmdlets we can use to set a random password for a managed account in SharePoint 2013/2016.
$accountName  =  Get-SPManagedAccount -Identity "MYSP\Bijay"
Set-SPManagedAccount -Identity $accountName -AutoGeneratePassword true
Read some SharePoint tutorials below:
- Site collection vs Site in SharePoint 2013
- SharePoint Online Office 365 Delete and Restore Site Collection using PowerShell
- Blog site, Project site and Community site in SharePoint 2016
- User Information List in SharePoint 2016/2013/2010
- SharePoint 2013 Read Outlook Emails and Add Email Content in SharePoint List
- SharePoint 2016 installation errors
Conclusion
Here, we checked SharePoint 2016 installation step by step and also hardware and software requirements for SharePoint server 2016. And, what are managed accounts in SharePoint and how to register a managed account in SharePoint server 2016. Also, we have checked the new features of sharepoint 2016 and sharepoint 2016 deprecated features.

I am Bijay a Microsoft MVP (8 times – My MVP Profile) in SharePoint and have more than 15 years of expertise in SharePoint Online Office 365, SharePoint subscription edition, and SharePoint 2019/2016/2013. Currently working in my own venture TSInfo Technologies a SharePoint development, consulting, and training company. I also run the popular SharePoint website EnjoySharePoint.com
Table of Contents
- Before Start
- Hardware Requirement.
- Software Requirements:
- Operating System For SharePoint Servers:
- SQL Server:
- Prerequisites:
- Service Accounts:
- Supported Scenario:
- Single Server Installation
- Prerequisite Installations:
- SharePoint Installation:
- Configure the SharePoint Server:
- SharePoint Configuration Wizard.
- Post Installation:
As SharePoint 2016 RTM is released by Microsoft it’s another exciting version of Sharepoint with a lot of improvement. Installation and Configuration process is still the same we witnessed in Sharepoint 2013 /2010 with a slight difference of the MinRole.
The MinRole feature in SharePoint Server 2016 lets SharePoint farm administrators assign each server’s role in a farm topology. The role of a server is specified when you create a new farm or join a server to an existing farm.
In this post, let’s walk through the step by step process of installation and configuration of SharePoint Server 2016.
Before Start
Before you start deploying SharePoint, let’s remind you of the hardware and software requirement of the SharePoint. We want to make sure our servers meets the min requirement set by Microsoft. We are on the supported deployment scenarios.
Hardware Requirement.
As per Microsoft, you need the 64-bit processor with 4 cores. Please see below table for the minimum Hardware requirement for the SharePoint Server 2016.
| Installation scenario | Deployment type and scale | RAM | Processor | Hard disk space |
| Single server role that uses SQL Server | Development or evaluation installation of SharePoint Server 2016 Release Candidate with the minimum recommended services for development environments. For information, see Minimum recommended services for development environments. | 12–16 GB | 64-bit, 4 cores |
80 GB for system drive
100 GB for second drive |
| Single server role that uses SQL Server | Pilot or user acceptance test installation of SharePoint Server 2016 Release Candidate running all available services for development environments. | 16–24 GB | 64-bit, 4 cores |
80 GB for system drive
100 GB for second drive and additional drives |
| Web server or application server in a three-tier farm | Development or evaluation installation of SharePoint Server 2016 Release Candidate with a minimum number of services. | 8–12 GB | 64-bit, 4 cores |
80 GB for system drive
80 GB for second drive |
| Web server or application server in a three-tier farm | Pilot, user acceptance test, or production deployment of SharePoint Server 2016 Release Candidate running all available services. | 12–16 GB | 64-bit, 4 cores |
80 GB for system drive
80 GB for second drive and additional drives |
Software Requirements:
Operating System For SharePoint Servers:
- · The 64-bit edition of Windows Server 2012 R2 Standard or Datacenter
- · Windows Server 2016 Technical Preview 4
SQL Server:
- · The 64-bit edition of Microsoft SQL Server 2014 Service Pack 1 (SP1)
- · The 64-bit edition of Windows Server 2012 R2 Standard or Datacenter
Note: SQL Server Express is not supported anymore.
Prerequisites:
The SharePoint Server 2016 prerequisite installer (prerequisiteinstaller.exe) installs the following software if it has not already been installed on the target server, in the following order:
- Application Server Role, Web Server (IIS) Role
-
Microsoft
SQL Server 2012 SP1 Native Client -
Microsoft
ODBC Driver 11 for SQL Server -
Microsoft
Sync Framework Runtime v1.0 SP1 (x64) -
Windows
Server AppFabric 1.1 -
Windows
Identity Foundation (KB974405) -
Microsoft
Information Protection and Control Client 2.1 -
Microsoft
WCF Data Services 5.6 -
Microsoft
.NET Framework 4.6 -
Cumulative
Update Package 7 for Microsoft AppFabric 1.1 for Windows Server (KB 3092423) -
Visual
C++ Redistributable Package for Visual Studio 2012 -
Visual
C++ Redistributable Package for Visual Studio 2015
Service Accounts:
It is highly recommended to use the different service account with least-privilege to install and configure the SharePoint. This will enhance the security of the farm. As we are going to install Single-Server farm, we, at least, need 3 accounts (SQL, Setup
A/C, FarmAdmin A/C).
| Account | Purpose | Requirements |
| SQL Server service account |
The SQL Server service account is used to run SQL Server. It is the service account for the following SQL Server services:
|
Use domain user account.
(Krossfarm\KF-SQL). |
| Setup user account (Install Account) |
The Setup user account is used to run the following:
|
|
| Server farm account ( Farm Admin Account) |
The server farm account is used to perform the following tasks:
|
Additional permissions are automatically granted for the server farm account on Web servers and application servers that are joined to a server farm. The server farm account is automatically added as a SQL Server login on the computer that runs SQL Server. The account is added to the following SQL Server security roles:
|
Supported Scenario:
There is little change in the supported scenario for developer/stand alone installation. Below tables mention all supported scenarios:
scenario SharePoint Server 2016 Workgroup Unsupported Domain Controller Developer Installation Client OS Unsupported Dynamic Memory Unsupported Windows Web Server Unsupported
There are mainly two types of installation:
single server or multiple server deployments (more
than 1 server).
Single Server Installation
This type of installation is usually used for developers, proof of concept, testing the functionalities or if you have a small number of users. You can have SQL on the same server as well as use a separate SQL Server. If this will be used in production, go
with separate SQL Server approach (1 SharePoint server, 1 SQL Server) because it gives more flexibility in future to add more SharePoint servers in the farm.
There are 3 steps to complete:
- Install the prerequisites
- Install the SharePoint
- Run the PSconfig wizard to set up the farm.
- Post-Installation Work
Before proceeding with installation, please make sure:
- SQL Server Installed (SQL server 2014 SP1 x64).
- Windows server 2012 R2 x64.
- Make sure it is clean installation (fresh OS).
- You have the installation media ready (downloaded on the one of the server’s drives or CD/DVD).
- Product Key for the SharePoint Server 2016.
- The account which will be used during the installation should have the proper permission.
- Disk Drive space meets the minimum requirement.
- Max degree of Parallelism set to 1 on the SQL Server.
- The server has access to the internet.
- Disable the anti-virus during installation and configuration.
- Make sure firewall is not blocking.
Prerequisite Installations:
There are two ways to install the prerequisite on the SharePoint server.
- If Server is connected to the internet, then you can use the prerequisite.exe and let the wizard install it.
- If your server is not connected to the internet, then you can download all prerequisites and install using the command line.
Let’s install the prerequisite using the .exe.
SharePoint Installation:
Once we successfully install the prerequisites on the server then our next step is to install SharePoint Server 2016. We need the Product Key during the installation of SharePoint.
-
On the Splash Screen, click on the Install SharePoint Server.

-
Now enter the SharePoint Server 2016 Key (the key showed below is the Trial Key.). Click Continue.

-
Now Accept the Software Terms and click Continue.

-
On this screen, you can mention the location of the SharePoint Installation. Click Install Now.

-
This will start the installation of SharePoint.
-
Once it’s Installed successfully you will get this.


Configure the SharePoint Server:
-
Click on the SharePoint Products Configuration Wizard.
-
On the Welcome to SharePoint Products Page, click Next.

-
Click Yes on the Warning Page.

-
Connect to a Server Farm Screen, please Click the Create a new Server Farm radio button and click Next.

-
On Configuration Database Windows, please provide the following details:
-
Database Server Name
-
Database Name (name of the Configuration Database)
-
UserName in the following format: domain\UserName (this should your farm admin account)
-
Password for the account

-
-
Please specify the Passphrase (write it down to some place safe as you need it if a new server joins to farm). Click Next.

-
New MinRole feature in SharePoint 2016. As this is single-server farm configuration, please select Single-Server-Farm and
click Next.
-
Please specify the Port Number for the Central Admin website and click Next.

-
On this page, please review the configuration and click Next.

-
Now it will start configuring the SharePoint.

-
Finally, you will get this successful screen.
- Click Finish.


SharePoint Configuration Wizard.
Once you click the Finish button, this will launch the Central admin with SharePoint
Configuration Wizard.
This will complete the SharePoint Installation and Configuration. Now time to configure the additional service applications and create the Web Application and site collections. If you go to the Central
Admin > System Settings > Server in the Farm. You will see something like this. 
Post Installation:
It is not over. You can use SharePoint and start adding the content but it is highly recommended to complete the following steps:
- Configure incoming e-mail
- Configure diagnostic logging
- Configure usage and health data collection
- Configure Search settings
- Configure the Workflow Manager
- Exclude the SharePoint Folders from the Anti-Virus
Installing SharePoint 2016 on Windows Server 2016
Most of the installation prerequisites and windows features are similar to SharePoint 2016 on Windows Server 2012 R2 but some of them are deprecated in Windows Server 2016.
To enable Windows features, run the following:
Add-WindowsFeature Web-Server,Windows-Identity-Foundation,NET-Framework-45-ASPNET,Web-Mgmt-Console,Web-Mgmt-Compat,Web-Metabase,Web-Lgcy-Mgmt-Console,Web-Lgcy-Scripting,Web-Mgmt-Tools,Web-WMI,Web-Common-HTTP,NET-HTTP-Activation,NET-Non-HTTP-Activ,NET-WCF-HTTP-Activation45 -source Z:\sources\sxs
Prerequisites offline download and installation:
Download the following perquisites:
SQL Client (SQLnCli.msi)
Microsoft Identity Extension (MicrosoftIdentityExtensions-64.msi)
Microsoft Sync Framework 1.0 SP1 (Synchronization.msi)Extract the appropriate file from the ZIP package.
AppFabric 1.1 (WindowsServerAppFabricSetup_x64.exe)
Cumulative Update 7 (KB3092423) for Microsoft AppFabric 1.1 for Windows Server (AppFabric-KB3092423-x64-ENU.exe)
Active Directory Rights Management Services Client 2.1 (setup_msipc_x64.exe)
Windows Communications Framework Data Services 5.6.0 (WcfDataServices56.exe)
.NET Framework 4.6.2 (NDP462-KB3151800-x86-x64-AllOS-ENU.exe)
Visual C++ 2012 Redistributable Package (vcredist_x64.exe)
Visual C++ 2015 Redistributable Package (vc_redist.x64.exe)
Save the above download to folder for e.g. “c:\SharePointPreReq” . Mount SharePoint 2016 installation DVD – in my case it is D:\. Run the following two PowerShell commands as administrator:
$SharePoint2016Path = "C:\SharePointPreReq"
Start-Process "D:\PrerequisiteInstaller.exe" -ArgumentList "/SQLNCli:$SharePoint2016Path\sqlncli.msi /IDFX11:$SharePoint2016Path\MicrosoftIdentityExtensions-64.msi /Sync:$SharePoint2016Path\Synchronization.msi /AppFabric:$SharePoint2016Path\WindowsServerAppFabricSetup_x64.exe /MSIPCClient:$SharePoint2016Path\setup_msipc_x64.exe /WCFDataServices56:$SharePoint2016Path\WcfDataServices.exe /DotNetFx:$SharePoint2016Path\NDP462-KB3151800-x86-x64-AllOS-ENU.exe /MSVCRT11:$SharePoint2016Path\vcredist_x64.exe /MSVCRT14:$SharePoint2016Path\vc_redist.x64.exe /KB3092423:$SharePoint2016Path\AppFabric-KB3092423-x64-ENU.exe"
Recently there was an article on StarWind Blog dedicated to Exchange 2016 installation written by Nicolas Prigent, so I decided that some folks might want to get something similar for SharePoint 2016, so here you are. Disclaimer: I did not touch on scripting SharePoint installation with PowerShell or any other advanced stuff, but I promise that you’ll find some interesting details beyond of “how do I click my way through setup wizard” information.
Microsoft’s SharePoint evolved quite dramatically in three previous major releases (2007, 2010, 2013) and now we have yet another version – SharePoint 2016. As usual, in this release, you can find additional functionality and loads of things to learn. But I think what you may be interested in it is just how to do a quick install to play with the latest version of SharePoint and test if it works well for your scenarios whatever they are. For example, in my case, I am going to test different scenarios of integration between K2 blackpearl and SharePoint 2016 among many other things. Disclaimer: if you in a mood to read somewhat dry and lengthy official installation guide – it exists and should be perused before doing production installation, but as the usual official documentation does not go as a pleasant easy read for the majority of people.
SharePoint 2016 is the first version of SharePoint product which has been fully developed in the cloud and then released as an on-prem product, as Microsoft likes to say these days battletested in the cloud and ready for hyper-scale :-). If you followed SharePoint product line closely enough you might also know that this is a version which Microsoft didn’t want to release at all until demand from client base made them reconsider this and release yet another version of on-premise product (as a result it is geared heavily towards integration with SharePoint Online and Office 365).
Yes, I do confirm that you can do so-called “spousal mode” installation when you just click Next/OK in each prompt and not going into any details. Yet at the same time, real-life production installation will be well out of scope for the introductory article. Hence here we just try to properly install single-box SharePoint 2016 server for test purposes covering just enough details to make it right, and additionally touching a bit on some stuff beyond just installation process covering best practices related to the configuration of SQL Server for SharePoint and installation of language packs.
I think I will later do another blog post on specific new features of this release but for now, I mention that in this version Microsoft introduced new and improved patching process and that the only supported upgrade scenario to this version is database attach.
Before you run SP 2016 setup there is some ground work to do. You will need the following platform wise (refer to official Hardware and software requirements for SharePoint Server 2016 for more details):
- Windows Server on which you install SharePoint 2016 – this can be VM with Windows Server 2012 R2 or 2016 Standard or Datacenter.
- SQL Server – which is the crucial component for your SharePoint farm. You will need either the 64-bit edition of Microsoft SQL Server 2014 SP1 or Microsoft SQL Server 2016 RTM.
For this tutorial, I decided to use new and shiny things so I’m using Windows Server 2016 Standard as base OS for SharePoint 2016 installation and separate VM with Server 2016 Standard and SQL Server 2016 Enterprise.
First important piece of a groundwork we must do is provisioning of dedicated SQL Server instance for SharePoint. Obviously, I won’t be covering entire SQL Server instance installation process, but I will explain below how to setup SQL alias as well as couple of settings you want to take care of for your SharePoint SQL Server just to avoid time you may otherwise waste later rebuilding your environment just because you did not get the basics right (AKA “rip and replace” time).
First of all, your SQL server collation must be configured for case-insensitive. The SQL Server database collation must be configured for case-insensitive, accent-sensitive, Kana-sensitive, and width-sensitive. This is to ensure file name uniqueness consistent with the Windows operating system (sources: 1, 2). I would suggest you set your instance to have the same collation as SharePoint data bases – Latin1_General_CI_AS_KS_WS – just don’t forget to do this during SQL installation (it is very easy to rush through SQL Server Setup without even noticing that tab where this setting can be configured):

Additional SharePoint SQL instance settings we have to take care of are covered below. First, we need to set Max Degree of Parallelism to 1 to make sure that a single SQL Server process serves each request:
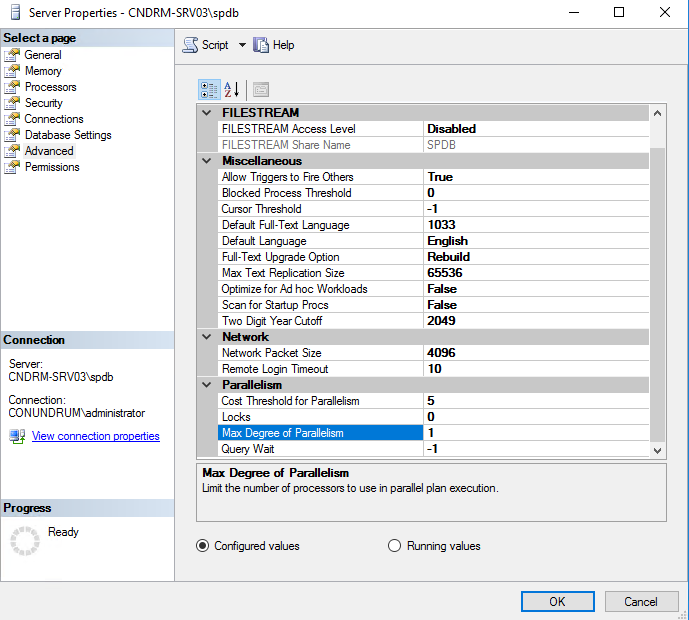
Once this is done another thing to remember is that you should not enable auto-create statistics on SharePoint content databases – SharePoint databases use a stored procedure that maintains the statistics (proc_UpdateStatistics). To make sure that auto-create statistics is not enabled you can use the following SQL script which lists all databases on your server which have auto-create statistics enabled:
|
SELECT name FROM sys.databases WHERE is_auto_create_stats_on = 1; |
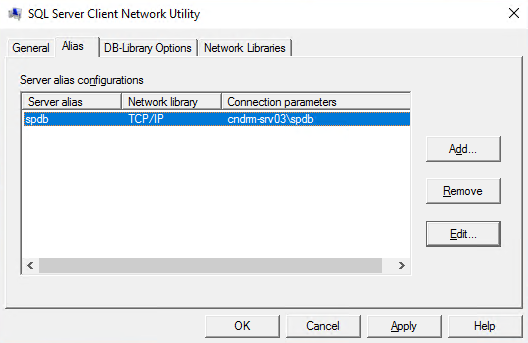
Last thing, which will ensure better flexibility for us is SQL alias – having it will simplify maintenance and make it easier to move SharePoint databases to another server without the need to change anything on SharePoint side. Fire off SQL Server Client Network Utility and create a new alias for your SharePoint SQL Server instance. Just to be on a safe side create the alias using both x86 and x64 versions of cliconfg.exe – “C:\windows\syswow64\cliconfg.exe” and “C:\windows\system32\cliconfg.exe”, they write alias configuration in different registry hives and bitness of application which reads these settings defines where this application will look for alias properties. For example, SharePoint 2016 setup is x86 application and will look for alias parameters in x86 registry hive.
Now with dedicated SQL service instance/server configured and alias created we have due application isolation and flexibility on our application backend side. Essentially by doing this, we covered most of best practices mentioned in Best practices for SQL Server in a SharePoint Server 2016 farm TechNet article.
Once servers with required features are in place you can employ splash screen to kick off installation of prerequisites:
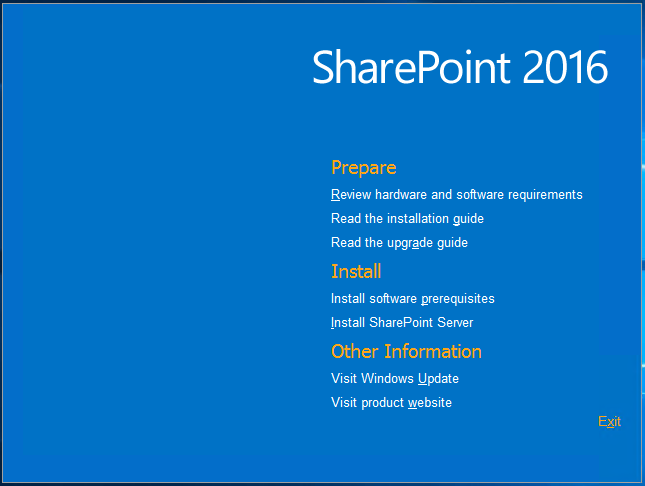
Alternatively, you can directly execute prerequisiteinstaller.exe. As I’m running this on Windows Server 2016 this is my first step, but in case you run older versions of Windows Server make sure to install the following update Windows RT 8.1, Windows 8.1, and Windows Server 2012 R2 update: April 2014 before running prerequisites installer. Prerequisites installer takes care of required Windows Server features and other software prerequisites like .NET Framework 4.6:
This handy tool downloads and installs all these prerequisites for you – it will take some time depending on your VM and internet connectivity speed. It won’t prompt you for restart after completion but I would recommend you to do it anyway as reboot never hurts after installing a bunch of additional software on the server.
We are done with prerequisites now, and ready to start the installation of SharePoint Server itself – this is also the two-step process. First setup just installs files asking you about location for SharePoint Server and SharePoint Search files (index), and on the second step you start Configuration Wizard to configure your SharePoint Server:
Be informed that configuration process may start/reset IIS in the process – so take this possible service interruption into account (not a big deal if you installing test box and wizard warns you about this). First, we opt out to Create a new server farm:
Next, specify our SQL alias in Database server field as well as database access account (in case you can’t connect though you sure that alias, credentials, and rights are in order make sure alias has been created using x86 version of cliconfg.exe):
On the next step, specify your farm passphrase – this one will be required for adding additional servers to your farm and can be changed afterward:
After this Specify Server Role step presented to you. This one is no brainer in a single-server farm scenario (and distributed installation is a bit out of scope for this article). This is an interesting step as here you can see so-called SharePoint MinRoles which is also a new thing introduced in SharePoint 2016. MinRole is a new farm topology based on a set of predefined server roles introduced in SharePoint Server 2016. When configuring your SharePoint farm, you now select the role of a server when you create a new farm or join a server to an existing farm. Once again we installing single-server farm here:
And finally, we need to configure SharePoint Central Administration Web Application – we can specify port number as well as select security settings (NTLN or Negotiate (Kerberos), with the latter option being more secure). Make sure enter port number you like at this step, otherwise you end up with some auto-generated random port for your Central Administration web application:
Next review your selections and if everything is OK just click next to begin actual configuration process which will create your configuration database:
Once configuration process is completed you should receive confirmation that configuration was successful:
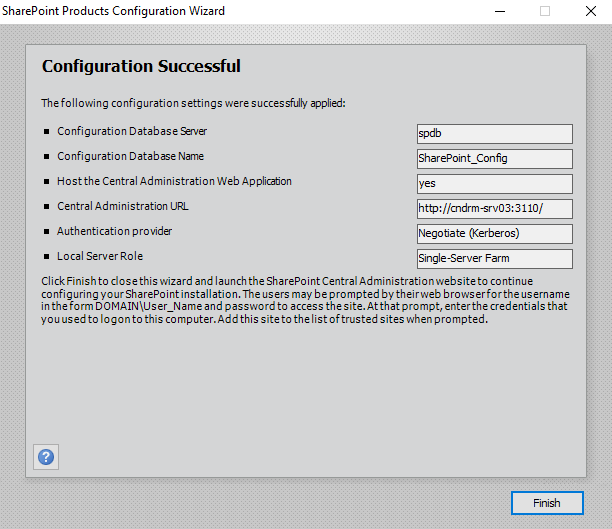
After clicking Finish button, Configuration Wizard will launch a browser window with SharePoint Central Administration page where after replying to CEITP participation prompt you can select whether you will use Wizard or Manual way of configuring your SharePoint farm.

We will opt out for the simplest option “Start the Wizard”, and it will provision service application and services for us:
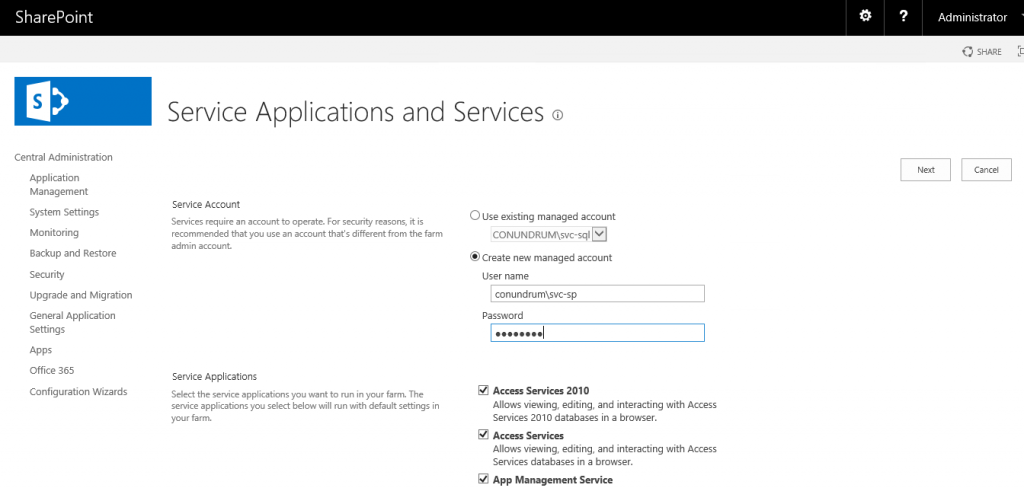
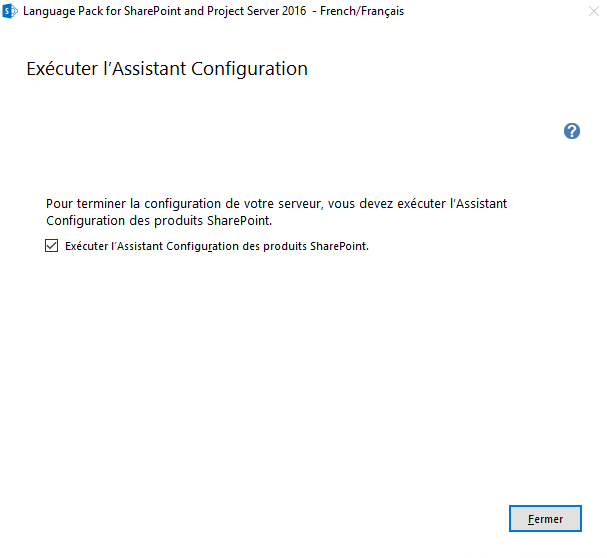
After famous “This shouldn’t take long” message which can take the arbitrary (large) amount of time we finally have done with the installation process and can start working with our SharePoint farm – we will be presented with Create Site Collection page. But before we wrap up with installation let’s also apply language pack or two for SharePoint 2016 (depending on your needs 🙂 ). That language which was used when you initially installed SharePoint (in my case it was English) becomes SharePoint installation base language, and additional ones may be added as language packs. Download language pack you need and install it, once binaries are installed make sure you keep ticket by default check box to run Configuration Wizard as you need to run through it to have your language pack applied:
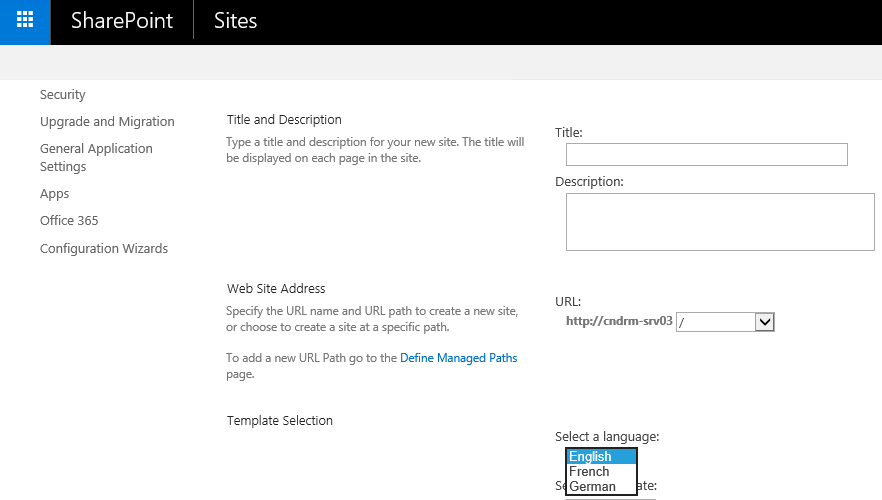
As an aspiring polyglot, I’ve applied both French and German language packs for my farm, and the easiest way to verify that language packs were installed is Language drop down on Create New Site Collection page which presents additional languages:
I hope this article was useful for you and I’m going to write a bit more about new features introduced in SharePoint 2016 soon.
- Installing Exchange Server 2016 on Windows Server 2016
- The High Availability Features in SQL Server 2016 Standard Edition
SharePoint 2016 is in RTM finally with all new features. As a SharePoint administrator, you’re probably excited about the release of SharePoint 2016. In this blog post, Let’s walk through SharePoint 2016 standalone installation process step by step. We will provide a step-by-step guide for installing SharePoint 2016. We will cover the prerequisites, installation steps, and configuration settings.
System Requirements: What’s my Server Farm Configuration?
Here is my SharePoint 2016 farm’s server configuration (Hardware/software).
- Windows Server 2012 R2 Standard as Server Operating system and SQL Server 2014 Standard SP1 as my SQL Server instance.
- All my servers running with 24 GB of RAM (minimum requirement: 16 GB. For single server installation: 24 GB) and Quad-core processors. (64 bit of course!) and 120 GB in system drive and 250 GB as secondary drive (Min: 80 GB for system drive and 100 GB for applications).
Service Accounts:
For the sake of SharePoint 2016 standalone installation (single server), I’m using these two service accounts.
- Crescent\SP16_Setup – Setup account used for installation. You must manually assign Member of Local Administrator group on all SharePoint Servers and SQL server and SysAdmin role at SQL Server instance. (In fact, it just needs: DBcreator & SecurityAdmin server roles and DBO rights on each SharePoint Databases).
- Crescent\SP16_Farm – Farm account / Database access account. Necessary rights will be automatically granted on the SQL Server instance when you run SharePoint products configuration wizard.
What’s new in SharePoint 2016 Installation?
It’s pretty much the same as SharePoint 2013 installation, except for the “Server Role” selection page. MinRole is introduced newly in SharePoint 2016. In a typical SharePoint installation, the installation order goes like SQL servers, App Servers, Distributed Cache, Search Servers, and Web Front End.
- Install SharePoint 2016 prerequisites
- Install SharePoint Server 2016
- Run Products configuration wizard
SharePoint 2016 Server Farm Topology:
Here is my small server farm topology for SharePoint 2016 with three servers. All these servers joined to my domain: Crescent.com

Where to start Installation? Start with your Application Server! Your Application server hosts SharePoint 2016 central administration site and other necessary service applications.
Step 1: Install Prerequisites
We need to install SharePoint 2016 prerequisites before installing SharePoint Server 2016. Login with Setup account and start your SharePoint Server 2016 installation by installing the prerequisites. Prerequisites installer will add all necessary server roles (Application Server Role, Web Server (IIS) Role), downloads and installs all necessary components for SharePoint 2016.
Step 2: SharePoint Server 2016 Installation
Step 3: Run SharePoint Products Configuration Wizard
Once you click the “Finish” button, you’ll be taken to the Initial Farm Configuration Wizard page in SharePoint 2016 Central Administration site. Instead of using the wizard which would create GUIDs in database names, use this PowerShell to start creating SharePoint 2016 farm: Create SharePoint 2016 Farm using PowerShell

For multi-server Farm: Repeat all these steps for the rest of your servers, like Application server, Web Front end Server. Choose to connect to the existing farm and select the farm configuration you created on the first server. Pick the appropriate server role, such as “Front-End”. Once done, you can proceed with creating web applications, Service applications, and site collections.
- Can I use a Single Server for SharePoint 2016 installation?
Sure, You can use a single server. However, You need to have SQL Server 2014 installed on the server first! Unlike SharePoint 2013, SharePoint 2016 doesn’t install SQL Server Express automatically as part of Single server mode.
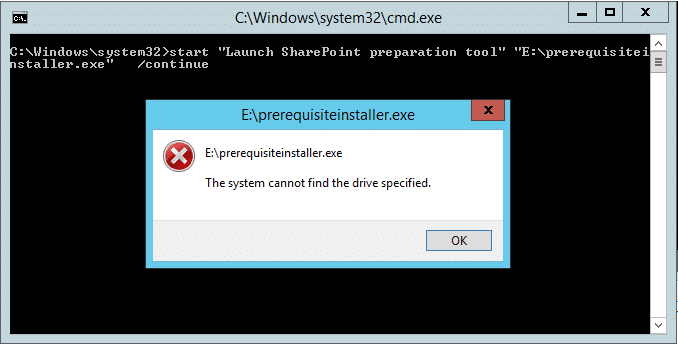
- Prerequisiteinstaller.exe: The system cannot find the drive specified

This happens when you mount an ISO file and after a server reboot, it doesn’t get mounted automatically. The remedy is simple: Mount the ISO and run: Start “Launch SharePoint preparation tool” “E:\Prerequisiteinstaller.exe” /continue

Salaudeen Rajack
Salaudeen Rajack — SharePoint Expert with Two decades of SharePoint Experience. Love to Share my knowledge and experience with the SharePoint community, through real-time articles!
