С помощью встроенного пакета OpenSSH для Windows вы можете легко настроить безопасную передачу файлов между клиентом и серверов Windows по защищенному протоколу передачи файлов SFTP (Secure FTP). В этой статье мы покажем, как установить и настроить установить SFTP сервер в Windows 10/11 или Windows Server 2022/2019/2016/2012R2 с помощью встроенных средств (Win32-OpenSSH).
Содержание:
- Установка OpenSSH в Windows
- Настройка SFTP сервера на базе OpenSSH в Windows
- Подключение к SFTP серверу с помощью PowerShell и WinSCP
- Настройка SFTP аутентификации по ключам
Протокол SFTP (Secure File Transfer Protocol , Secure FTP или SSH FTP) это расширение протокола SSH, являющимся стандартом мира UNIX/Linux систем. Хотя с точки зрения пользователей он похож на FTP, но на самом деле это абсолютно другой протокол, не имеющий с FTP ничего общего. Данные между клиентом и сервером передаются по порту 22 через SSH туннель.
Основные преимущества протокола SFTP:
- Передача файлов и команд происходит внутри защищенной SSH-сессии;
- Для передачи файлов и команд используется одно соединение;
- Поддерживаются символические ссылки, доступны функций прерывания, возобновления передачи, удаления файла и другие;
- Обычно на каналах, где FTP работает медленно или с перебоями, SFTP-соединение работает более надежно и быстро;
- Возможность аутентификации с помощью SSH ключей.
Не нужно путать протоколы SFTP и FTPS. FTPS – это по сути обычный FTP с SSL сертификатом, а SFTP – это передача FTP данных и команд внутри SSH сессии.
В современные версии Windows по-умолчанию встроен порт OpenSSH для win32 (Win32-OpenSSH). Вы можете использовать его для организации защищенного SFTP сервера вместо таких сторониих продуктов как Core FTP, FileZilla, CYGWIN, OpenSSH, FTP Shell, IPSwitch и пр.
Установка OpenSSH в Windows
Пакет OpenSSH уже включен в операционную систему в современных билдах Windows 10 (начиная с 1803), Windows 11, Windows Server 2022/2019 в виде Feature on Demand (как и RSAT).
В этих версиях Windows вы можете установить сервер OpenSSH с помощью PowerShell:
Add-WindowsCapability -Online -Name OpenSSH.Server*
Или с помощью DISM:
dism /Online /Add-Capability /CapabilityName:OpenSSH.Server~~~~0.0.1.0
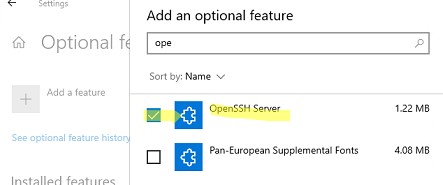
Также можно установить OpenSSH из графического интерфейса Windows 10 (Settings -> Apps -> Optional Features -> Add a feature -> Open SSH Server -> Install).
Чтобы проверить, установлен ли пакет:
Get-WindowsCapability -Online | ? Name -like 'OpenSSH*'
Исполняемые файлы OpenSSH находятся в каталоге:
C:\windows\system32\OpenSSH\
Конфигурационный файл sshd_config находится в каталоге C:\ProgramData\ssh (каталог создается после первого запуска службы).
Лог — c:\windows\system32\OpenSSH\logs\sshd.log
Файл authorized_keys и ключи хранятся в каталоге %USERPROFILE%\.ssh\.
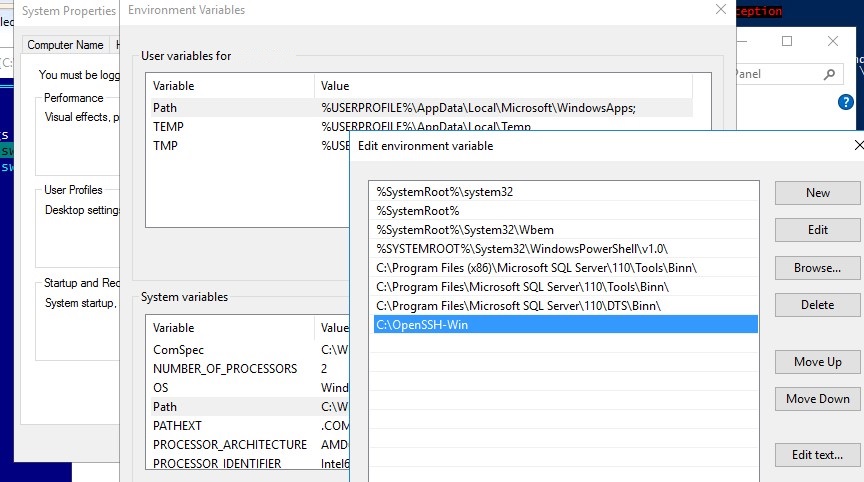
В предыдущих версиях Windows 10, в Windows 8.1 или в Windows Server 2016/2012 R2 вам придется скачать Win32-OpenSSH для Windows с GitHub и установить вручную (https://github.com/PowerShell/Win32-OpenSSH/releases). Нам нужна версия для 64 битной версии Windows: OpenSSH-Win64.zip (4,15 Мб).
- Распакуйте содержимое архива в целевой каталог, к примеру:
C:\OpenSSH-Win - Запустите командную строку PowerShell с правами администратора и перейдите в каталог OpenSSH:
cd C:\OpenSSH-Win - Добавьте путь к каталогу OpenSSH в переменную окружения Path;

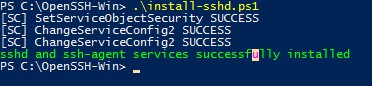
- Установите сервер OpenSSH:
.\install-sshd.ps1
должно появиться зеленое сообщение “sshd and ssh-agent services successfully installed”).
Настройка SFTP сервера на базе OpenSSH в Windows
Теперь вам нужно настроить OpenSSH для режима SFTP.
Включите автозапуск для службы SSHD и запустите ее с помощью следующих PowerShell команд управления службами:
Set-Service -Name sshd -StartupType ‘Automatic’
Start-Service sshd
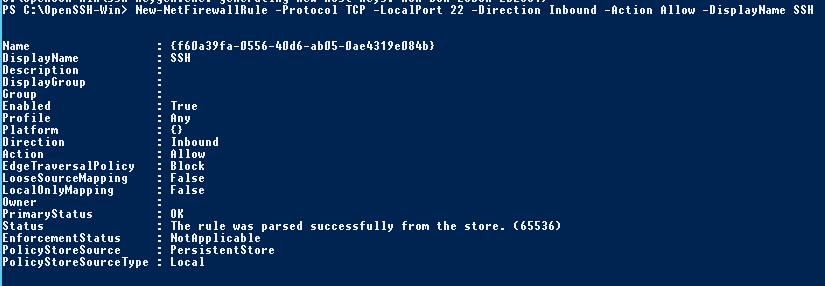
С помошью PowerShell отройте в брандмауэре Windows порт TCP 22 для входящего трафика на SSH сервер:
New-NetFirewallRule -Protocol TCP -LocalPort 22 -Direction Inbound -Action Allow -DisplayName SSH
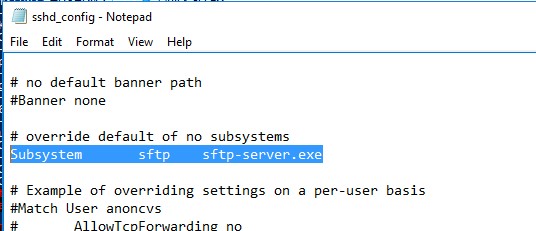
 Откройте в любом текстовом редакторе конфигурационный файл «C:\ProgramData\SSH\sshd_config», найдите и проверьте значение директивы Subsystem sftp. Здесь должен быть указан файл sftp-server.exe.
Рассмотрим полезные директивы в конфигурационном файле sshd_config:
# разрешить подключение к OpenSSH только для пользователей из этой группы
AllowGroups corp\admingroup
# включить аутентификацию по паролю (нельзя использовать ключи SSH)
AuthenticationMethods password
ForceCommand internal-sftp
#каталог для SFTP пользователей (по умолчанию пользователь подключается в каталог со своим профилем в папке C:\users\username)
ChrootDirectory C:\SFTPRoot
#Для каждого пользователя можно индивидуальную chrootdirectory:
Match User user1
ChrootDirectory c:\SFTPRoot\user1
ForceCommand internal-sftp
X11Forwarding no
 AllowTcpForwarding no
Match User user2
ChrootDirectory c:\SFTPRoot\user2
ForceCommand internal-sftp
X11Forwarding no
AllowTcpForwarding no
Подключение к SFTP серверу с помощью PowerShell и WinSCP
Теперь вы может подключиться к вашему SSH серверу на Windows по протоколу SFTP. Ниже мы покажем, как подключиться к SFTP серверу с помощью бесплатного клиента клиент WinSCP, консоли PowerShell и встроенной утилиты sftp.exe.
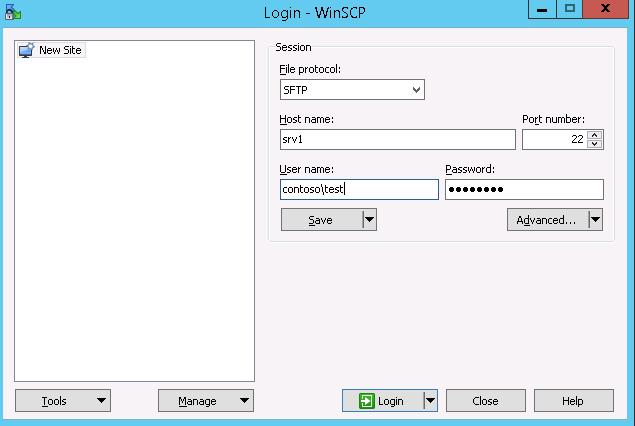
В окне настройки подключения выберите протокол передачи файлов SFTP, укажите имя сервера и данные учетной записи Windows (в формате
user@domain
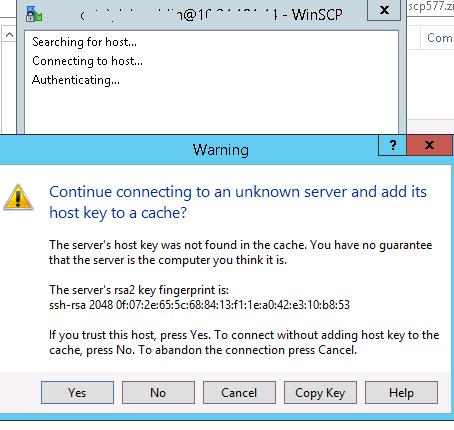
для доменных пользователей), под которой осуществляется подключение (возможно также настроить авторизацию по ключам). При первом подключении появится окно с предупреждением о том, что ключ хоста отсутствует в локальном кеше.
 При первом подключении появится окно с предупреждением о том, что ключ хоста отсутствует в локальном кеше.
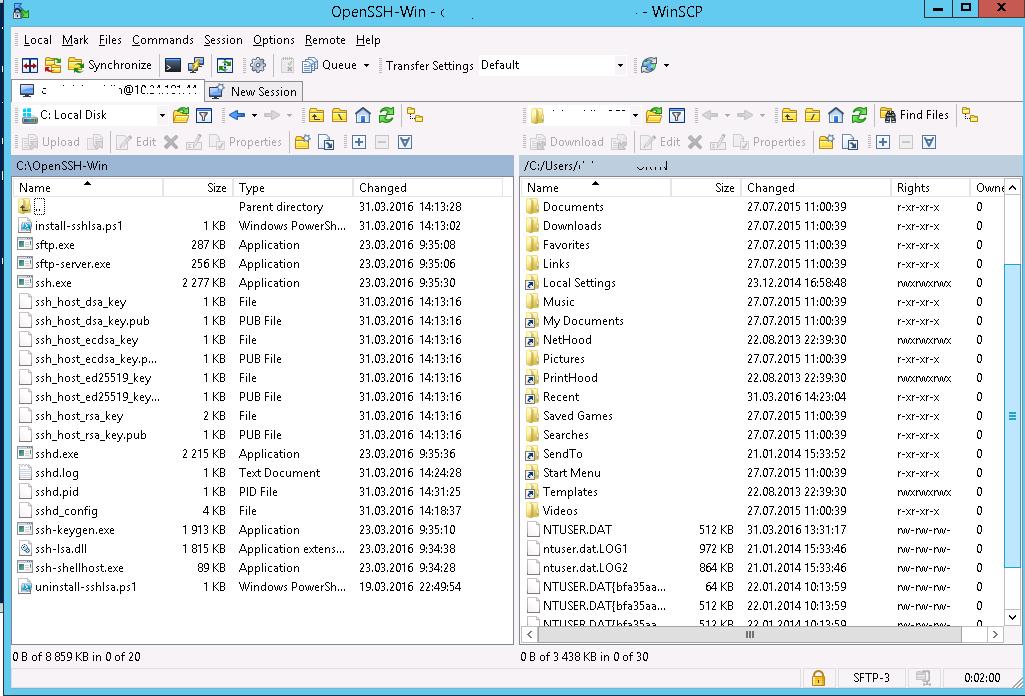
 Если все настроено правильно, клиент должен подключиться к SFTP серверу и отобразить список файлов в домашнем каталоге пользователя (по умолчанию каталог с профилем пользователя).
С помощью привычного интерфейса файлового менеджера можно безопасно копировать файлы между сервером и клиентом по защищённому протоколу SFTP.
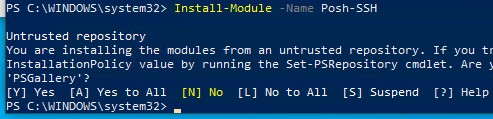
Для подключения к SFTP серверу из PowerShell можно использовать модуль Posh-SSH. Вы можете скачать установить модуль из PowerShell Gallery или офлайн:
Install-Module -Name Posh-SSH
Для подключения к SFTP серверу с помощью пароля, нужно получить имя пользователя и пароль через Get-Credential:
$usrCreds= Get-Credential
Теперь можно подключиться к вашем SFTPS серверу:
$SFTPSession = New-SFTPSession -ComputerName 192.168.13.200 -Credential $usrCreds
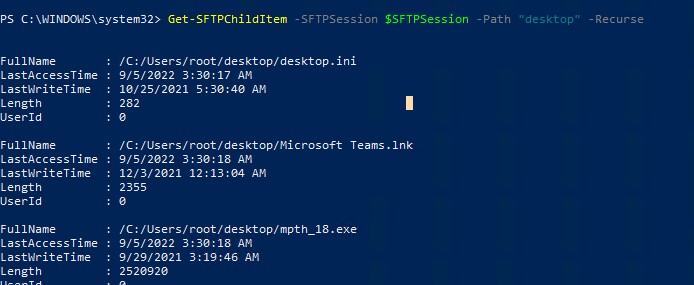
Теперь вы можете вывести список файлов в удаленном каталоге на SFTP сервере. В этом примере я получу список файлов на рабочем столе пользователя (профиль пользователя в этом случае будет являться корнем)
Get-SFTPChildItem -SFTPSession $SFTPSession -Path "desktop" –Recurse
Чтобы скачать файл с удаленного SFTP сервера:
Get-SFTPItem -SessionId $SFTPSession.SessionId -Path "desktop/OpenVPNScript.log" -Destination c:\temp
Чтобы закачать файл с вашего компьютера на удаленный SFTP хост:
Set-SFTPItem -SessionId $SFTPSession.SessionId -Path C:\Temp\mytestfile.log -Destination “desktop”

Завершить SFTP сессию:
Remove-SFTPSession -SFTPSession $SFTPSession
В Windows вы можете использоваться встроенную утилиту sftp.exe (устанавливается вместе с клиентом OpenSSH) для подключения к SFTP серверу.
Подключиться к sftp серверу:
sftp [email protected]
Подключиться с помощью ssh ключа:
sftp -i .ssh/id_rsa [email protected]
Вывести список файлов в удаленном каталоге:
pwd
Скачать файл с SFTP в локальный каталог на ваш компьютер:
get file-test1.txt
Загрузить файл с вашего компьютера на SFTP сервер:
put file-test2.txt
Закрыть сессию:
exit

Настройка SFTP аутентификации по ключам
Вы можете настроить SFTP аутентификацию по ключам. В этом случае при подключении к SFTP серверу вам не нужно будет указывать пароль пользователя.
Подробно настройка SSH аутентификации по ключам описана в этой статье.
Для этого нужно:
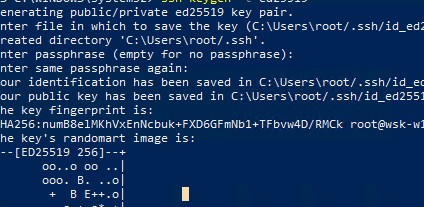
- Создать на вашем компьютере (SFTP клиент) ключи для пользователя, под которым вы будете подключаться к серверу:
ssh-keygen -t ed25519

- Утилита сгенерирует два файла
id_ed25519
(закрытый ключ для клиента) и
id_ed25519.pub
(открытый ключ для сервера); - Теперь нужно добавить ваш SSH ключ на сервер. Скопируйте файл id_ed25519.pub(или id_rsa.pub в зависимости от типа ключа) в каталог .ssh профиля пользователя, под которым вы будете подключаться к SFTP серверу. Переименуйте файл в authorized_keys (например для пользователя alex путь будет выглядеть так:
C:\Users\alex\.ssh\authorized_keys
)
Теперь вы можете использоваться файл id_ed25519 для аутентификации на SFTP сервере в настройках WinSCP (настройки подключения Advanced -> to SSH > Authentication page -> Private key file).
Если вы хотите задать SSH ключ при подключении к SFTP из PowerShell, используйте такую команду:
New-SFTPSession -ComputerName 192.168.13.200 -Credential user1 -KeyFile C:\Users\alex\.ssh\id_ed25519" -Verbose
— Advertisement —
Hello, how are you? Windows Server users want the ability to install servers with secure protocols. This in order to be able to exchange data and keep it safe from possible intrusions. As a matter of fact, Here at googez.com, we show you how to install an FTP server on Windows Server 2019. But this server is criticized for its lack of security, as the communication is not encrypted. On the other hand, Secure File Transfer Protocol (SFTP) is a secure version of File Transfer Protocol (FTP), which facilitates data access and data transfer over a Secure Shell (SSH) data stream. In other words, it allows you to upload or download files with a server. However, SFTP is considered secure. It protects file transfers through data-in-motion encryption and secure authentication methods. For that reason, in this post, we will see how to install an SFTP/SSH server on Windows Server 2019.
Prerequisites. Installing OpenSSH server.
To achieve better stability on our server, it is imperative to assign a static IP address. If you do not know how to do it, please look here. Furthermore, we are going to install the OpenSSH server, which will allow us to configure access to the SFTP server. Thereupon, it is necessary to enter the settings menu. And once there, select Apps.

Next, the menu corresponding to Apps and features will be displayed. In this window, click on manage optional features.

In the following window, please scroll down through the different options until you find OpenSSH Server. Check if the service is already installed, if it is not, click on Add a feature

A list of functions will appear, please navigate until you find OpenSSH Server and select it. Wait until the installation is completed.

Configuring the Ssh server to start at Windows startup.
All right, we have already installed both the agent and the OpenSSH server. Now, let is configure the services to be activated every time Windows starts. In order to do that, please press Windows +R, and type services.msc.

The service window will then open. Locate OpenSSH Authentication Agent and OpenSSH Server

In the column to the right of the service description, you can see the startup type. In my case, the authentication agent is disabled and the OpenSSH server is manual. What we are going to do is to automatically set the startup. With this in mind, do right-click over the service to enter properties.

In the next window, we have to select automatic in startup type and then click on apply. Finally, press Start to begin the service.

Please do the same procedure with the OpenSSH Authentication Agent.
Check server and client status.
After installing the services and setting up the autostart, we need to check their status. For that, we’ll open a PowerShell with administrator privileges and write the following:
Get-Service -Name *ssh*

If we have done everything right, we should see this message.
Connect to an SFTP server installed on Windows Server 2019, through OpenSSH.
We can connect to the SFTP server using a client like WinSCP, FTP Rush, in my case I will use FileZilla. Just go to the download page and select download client.

Run the file, and start the program. In the main window of the program, there are some boxes that we must fill with the credentials of the serve. In host type, the server name, in username adds the name of the user, type the password in the next box and finally type 22 on the Port box. Please note that at the time of installing the OpenSSH server, a firewall rule is automatically created. This rule opens port 22 to allow network access. For that reason, we have to set that number.

Finally, we have installed and configured the access to an SFTP server in Windows Server 2019. As can be seen, the procedure has been simplified since Microsoft included OpenSSH server in Windows 10 and later versions as Server 2019. Please visit our post about the expiration of accounts in Windows 10. And if you want to keep up with the latest technology, subscribe to our Telegram channel.
Windows Server 2019 and Windows 10 (build 1809) have support for OpenSSH out-of-the-box, so there is no need to use any third-party library to run an SSH server or SFTP. In this post, I will demonstrate how to configure an SFTP server in Windows and use it to transfer files.
Contents
- FTPS vs. SFTP
- Install and configure the SFTP server.
- Custom SSH port [optional]
- Allow or deny connections
- Connect to OpenSSH server using SFTP
- Change the default SFTP directory
- Troubleshooting SFTP connections
- Author
- Recent Posts

Surender Kumar has more than twelve years of experience in server and network administration. His fields of interest are Windows servers, Active directory, PowerShell, web servers, networking, Linux, virtualization, and Kubernetes. He loves writing for his blog.
FTPS vs. SFTP
The File Transfer Protocol (FTP) is no longer considered safe for use as it lacks the ability to encrypt data while it is in transit. If you still use FTP over a traditional FTP port number (TCP 21), all your data and commands are transmitted in clear text. Anyone can intercept this server–client communication, which is a big security concern as per modern IT standards. Two alternatives to FTP exist:
- FTPS (FTP over SSL/TLS)—This method is just like the traditional FTP with the added support of a TLS certificate to offer encryption.
- SFTP (FTP over SSH)—This method uses SSH for transferring files, which encrypts the communication by default.
Although both can serve the purpose of transferring files, they are totally different by design. FTPS is not very firewall friendly and is difficult to configure. Thus, I will focus on SFTP in this post.
I am using two VMs in a lab environment for this demo:
- Windows Server 2022—This will work as an OpenSSH server.
- Windows 10—This will work as a client.
I have also installed the FileZilla FTP client in a Windows 10 VM, which will connect to the OpenSSH server using the SFTP protocol. Of course, you can use WinSCP or any other FTP client that supports the SFTP protocol.
Install and configure the SFTP server.
First, log in to Windows Server VM and enable the optional OpenSSH feature. To do so, launch an elevated PowerShell console, and run the following command:
Add-WindowsCapability -Online -Name OpenSSH.Server~~~~0.0.1.0

Installing an OpenSSH server in Windows using PowerShell
The installation was successful if the output includes Online : True. The command will automatically configure the required firewall rule, so there is nothing you need to do manually.
Now use the following command to change the startup mode of the OpenSSH server service (sshd) to automatic and start it at the same time:
Get-Service -Name "sshd" | Set-Service -Startup "Automatic" -PassThru | Start-Service -PassThru

Change the service start mode and start the service using PowerShell
You can see that the service is now running. The main configuration file of the OpenSSH server on Windows is %ProgramData%\ssh\sshd_config, but Windows can also read the configuration from the user profile (%UserProfile%\.ssh\config) if available. Furthermore, it allows you to specify a custom configuration file using the -f switch (e.g., sshd.exe -f «c:\users\administrator\.ssh\custom_config»).
Custom SSH port [optional]
By default, the OpenSSH server listens on TCP Port 22. But you can change the port to something else by running the following PS command:
(Get-Content "C:\ProgramData\ssh\sshd_config").replace("#Port 22", "Port 2223") | Set-Content "C:\ProgramData\ssh\sshd_config"
Restart-Service "sshd"

Changing the OpenSSH server port on Windows using PowerShell
The first command replaces the port number with the one you specify in the system-wide configuration file (%ProgramData%\ssh\sshd_config), and the second command restarts the service. The following command can be used to make sure the server is now listening on a new port number:
Get-NetTCPConnection -LocalPort 2223 | select Local*, State,`
@{n="ProcessName";e={(Get-Process -Id $_.OwningProcess).ProcessName}},`
@{n="ProcessPath";e={(Get-Process -Id $_.OwningProcess).Path}} | ft -Auto

Verify the custom port of the OpenSSH server using PowerShell
You can see that the OpenSSH server is now listening on Port 2223.
Allow or deny connections
The OpenSSH server in Windows also lets you control which users or groups are allowed to connect to the server (or denied a connection) using SFTP (and SSH). To do so, you can add the following directives to the configuration file:
- DenyUsers
- AllowUsers
- DenyGroups
- AllowGroups
Note that these directives are processed in the same order as written. By default, the OpenSSH server will allow every local or domain user to connect, but if you want to allow (or deny) a particular user or group, specify that in the configuration file, as shown in this line of code:
AllowGroups testlab\developers testlab\ssh_admins
Remember, these allow or deny directives must come before the Match Group administrators directive, as pointed out in the screenshot; otherwise, it won’t work as expected.

Using the SSH configuration file to allow or deny users and groups
Adding the above line inside the SSH configuration file will allow the members of the developers and ssh_admins groups in the TestLab domain to connect, while denying everyone else. It is recommended to specify the account names in lowercase only. Furthermore, to specify a domain account in UPN format, you must replace the @ character with ? to avoid any conflicts with regular Linux patterns. For example, to specify user@domain.com with an allow or deny directive, you must type it as user?domain*.
Connect to OpenSSH server using SFTP
The OpenSSH server is now set to accept connections from the client. Head over to your Windows 10 machine, launch FileZilla, and make a connection to the server with the settings shown in the screenshot.

Connecting to the SFTP server using the FileZilla FTP client
Make sure the protocol SFTP – SSH File Transfer Protocol and the correct SSH server port are specified. When you connect for the first time, you will see an Unknown host key warning. Click OK to trust the host and continue connecting.

The servers host key is unknown. You have no guarantee that the server is the computer you think it is.
You will now be connected to the server using the SFTP protocol, and you can start transferring files.

Using FileZilla client with the SFTP protocol to transfer files
Change the default SFTP directory
By default, you will land in your user profile directory when you connect to the server. However, you can specify a custom directory in the sshd_config file to change the default root directory for SFTP. To do so, open the C:\ProgramData\ssh\sshd_config file on the server in any text editor, and add the following line:
ChrootDirectory "C:\inetpub\wwwroot"
See the following screenshot for reference:

Change the default SFTP root directory in Windows
Restart the sshd service after making this change, and reconnect the server. You will now land in the specified directory (C:\inetpub\wwwroot). This is particularly useful on web servers, where you want users to land directly inside the website’s root directory instead of their home directory.

FileZilla FTP client connecting to a predefined root directory in Windows
There are many other settings supported by the OpenSSH server, but covering everything is beyond the scope of this article.
Troubleshooting SFTP connections
If you run into any issues while working with OpenSSH server, you can always view the event logs under Applications and Services Logs OpenSSH, as shown in the following screenshot:

Viewing event logs related to OpenSSH in Windows
The OpenSSH server also supports file-based logging, so if you’re interested in that, add the following lines to the SSH configuration file and restart the sshd service.
SyslogFacility LOCAL0
LogLevel Debug3

Enabling file based debug logging using the OpenSSH configuration file
Once you do this, you will be able to view the debug logs in the %ProgramData%\ssh\logs directory. As you can see in the following screenshot, the debug log showed that the user test\john wasn’t able to connect to the server because they are not a member of any group specified in the AllowGroups directive.
Subscribe to 4sysops newsletter!

Viewing OpenSSH debug logs to troubleshoot problems
The procedure described here also allows you to connect to a Windows system using the SSH shell, which means that users who can connect using SFTP can also connect using any SSH client (like putty) and run commands. This is why it is very important to allow only a limited number of groups containing trusted people. I hope this guide helped you get started with SFTP as a safer alternative to an FTP server on Windows.
![]()
Introduction
In this tutorial, we will show you how to set up a SFTP server in Windows. If you have a cloud computer with V2 Cloud and you’re looking to setup a secure FTP server in your cloud computer instead, follow this link. The main difference between FTP and SFTP is the security aspect. Running applications that use SFTP for file transfers is the answer to protecting that data in transit.
This tutorial will provide the steps required to set up an SFTP Server using Windows Server 2019’s OpenSSH Server feature. Our SFTP client computer will be a Windows 10 computer, and we will be using Filezilla as the client application to connect to the server.
You can browse the different sections of this tutorial. This is what you need to setup a SFTP server in Windows:
- Configure the SFTP server feature (OpenSSH Server) in Windows Server 2019
- Create the root SFTP directory
- Create the user account that will be used for file transfers
- Install and configure the SFTP client for data transfers
- Perform an SFTP transfer between client and server
Note: the terms “directory” and “file folder” refer to the same object. They are used interoperably in this tutorial.
Section 1: Configure the SFTP server feature (OpenSSH Server) in Windows Server 2019
STEP 1
Login to your server. Then type apps and features in the search bar. Under Apps and Features (the section in the middle of the page), click Manage optional features.

STEP 2
Scroll among the options, find OpenSSH Server, click it, then click Install.

The installation will now begin in the background. We are going to make some changes to the Windows Services to allow for the newly installed OpenSSH server to be started automatically.
STEP 3
Type services in the search bar. Then click the Services Desktop app. Locate the OpenSSH SSH Server option from the list. Right-click it, then select Properties.

STEP 4
Change the Startup type to Automatic. Click Start afterward.


STEP 5
Once the service has started the Service status: will change from Stopped to Running. Click OK to proceed.

STEP 6
Locate the OpenSSH Authentication Agent service. Right-click it, then select Properties.

STEP 7
Repeat Steps 3 to 5 where you will make the same changes as you did with the OpenSSH SSH Server with this service (OpenSSH Authentication Agent).
When done, you’ll notice the status of the two services is now set to Running.

STEP 8
Browse to the following folder, C:\\ProgramData\\ssh in the address bar. You may have to type the location as the ProgramData folder is normally hidden by default. Click the “drop-down arrow” beside Text documents then select All Files. Select sshd_config from the files list, then click Open.


STEP 9
When the sshd_config file opens, click Ctrl+F on your keyboard to launch the Find app. Type “root”, then click Find Next. We are looking for the entry #ChrootDirectory.

STEP 10
Edit the entry to this ChrootDirectory C:\\SFTPRoot. This is the location where our SFTP files will be stored from the server side. Click File then click Save.

Let’s now create the actual folder/root directory we just referenced as our location to save SFTP files.
Section 2: Create the root SFTP directory
STEP 11
Browse to the C:\\ drive on your server. Right-click in any empty space then select New from the drop-down menu then click Folder. Name the folder SFTPRoot. Ensure that it is exactly the same as the folder name referenced in the path in Step 10.


Now let us add the user account on this server that will be used to do the SFTP transfers.
Section 3: Create the user account that will be used for file transfers
STEP 11
Open the Server Manager, then select Tools and click Computer Management.

STEP 12
Click the drop-down arrow beside Local Users and Groups. Click the Users folder. In the middle pane, right-click on any white space and select New User from the drop-down menu.

STEP 13
Create the user account by entering your username and password. Record these credentials as we will be using them for our SFTP transfers. Uncheck the option User must change password at next logon and check the options User cannot change password and Password never expires. Click Create once finished.

Now let us find and record the IP address of our SFTP server. This will be needed along with the username and password we just created for our SFTP connection.
STEP 14
Type cmd at the search bar. Select Command Prompt. Type ipconfig at the prompt then hit the Enter key on your keyboard.

The Ip address of our server is 192.168.50.4.
Our server-side configuration is now complete. We now need to configure our client computer to connect to this newly configured SFTP server and transfer data to it.
Section 4: Install and configure the SFTP client for data transfers
In this example, we will be using Filezilla as our SFTP client. To continue, download the Filezilla client application and install it on your computer. Let’s now create our SFTP site.
STEP 15
Launch the Filezilla app. Click the File option from the menu bar then click Site Manager.

STEP 16
Select the My Sites folder under the left section under Select entry: Then click the New site button.

STEP 17
Name the site, we’ll call it SFTP-Site1. On the General tab in the left section of the Site Manager window, configure the following; Protocol: SFTP – SSH File Transfer Protocol, Host:
192.168.50.4, Port: 22, Logon Type: Normal, User: the User/username that will be used to connect to the SFTP site/server, Password: password for the user. When done click Connect.

STEP 18
Save the password and click OK. Click OK at the Unknown host key pop-up box. Note, you can check the checkbox Always trust the host, add this key to the cache.

Once connected successfully the following will be what you’ll see.

We’ll now proceed to create and configure the remote SFTP directory.
STEP 19
Right-click in any white space in the bottom-right-hand quadrant of the Filezilla GUI window. Then select Create Directory. This will create a file folder in the root SFTP folder on the SFTP server.

STEP 20
Create a name for the new directory, then click OK.

You’ll now see that our newly created directory has been created successfully on our client computer.

If we browse to the SFTPRoot folder on the SFTP server, we’ll see that our directory has been automatically created.

Now that our two sites have been configured. Let’s move on to the final step to perform a secure file transfer.
STEP 21
Select the “source file folder”, from the top left-hand file folder listing with the label Local site: that has the file/files that you want to transfer to your server. Our folder is C:\Users\Kurwin\Downloads\. On the Remote site: select your destination file folder. Locate your file under the bottom-left hand file listings then right-click it and select Upload.

You’ll now see that your file has been transferred successfully.

SFTP server verifies our successful transfer. We see our file in our target directory within our root directory.

That’s it. We have now successfully set up a SFTP server in a Windows environment.
 There is a better way to do IT with V2 Cloud
By using V2 Cloud, you get access to a fully-integrated virtual desktop solution, without the traditional complexity of other cloud providers.
There is an easier way to enable secure remote access to employees without sacrificing end-user experience and performance.
V2 Cloud offers a cloud desktop infrastructure with
- No hidden fees
- No complicated setup
- No contracts
- Flat-rate pricing model
We’re the #1 virtualization solution for small businesses. Create virtual desktops, servers, and applications to improve productivity and significantly reduce your IT costs.
Learn more about V2 Cloud and our cloud VDI solution. Get started with a risk-free 7-day trial, and experience the simplicity, scalability and power of V2 Cloud.
SFTP – FTP Server for Windows Server 2019 is a perfect solution to transfer files securely over encrypted network layers (using SSH2 protocol). SFTP is not just a simple “FTP over SSH” wrapper – it is a newer protocol, supported by all SSH2 servers.
This is a quick deployment and ready-to-run image.
Simple and rapid installation. Easy to maintain.
Configuration and connection to SFTP – FTP Server for Windows Server 2019 OpenSSH
First you need to open TCP port 22 in the network properties of the Azure Firewall.
The c:\sftp folder is created on the VM. Subfolders with user names are creating automatically when they enter first time on SFTP.
To authenticate a local user on the server, add the user by opening “Users” shortcuts.

After creating the user in Windows, you need:
1. Stop the SFTP server service by running the “stop ftp” shortcut on the desktop.
2. Create the necessary users in the server admin panel.
To add a user to the server, you need to click the shortcut on the desktop “freeFTPd”. When launched, the main window will not open, but immediately gets into the tray:

To open the main application window, click right mouse button on the icon in the tray and select “Configure”. When opened, the following will displayed:
To add SFTP users, go to the “Users” tab and click the “Add” button:

In the user registration window, enter “Login”.
Select “Password stored as SHA1 hash” in the drop-down list of the “Authorization” field,
Next, in the “Password” field, enter any user-friendly password and confirm it in the “Password (again)” field.
Disable the use of “FTP server” and click Apply.

3. After creating the necessary users, you need to:
- go to the SFTP tab and make sure that “Server status: Stopped!”
- start the service by clicking the “Start” button (“Server status” will become “Running…”)
- click the “Apply & Save” button
- click “Stop” (“Server status” will become “Stopped!”)
- close the application window by clicking on the cross (the application minimizes to tray)
- open the Windows tray, click right mouse button on the freeFTPd icon and select “Quit”.
4. Start the SFTP server service using the “start ftp” shortcut on the desktop.
To connect to ftp, it is recommended to use the “FileZilla Client” application (you can download it following the link: https://filezilla-project.org/download.php?platform=win64).
When launched, the application looks like this:

In the “Host” field enter: sftp://SFTP, where SFTP is the address of your machine in the personal account in Azure.
In the “Username” field enter the user’s login of the virtual machine.
In the “Password” type the user’s password of the virtual machine.
When the data is entered click on “Quickconnect”.
Then you will see the next window which asks if you can trust the host and its signatures, in this window you need to click “OK”:

SFTP user folder is automatically created in the “C:\sftp” folder, when the a user connects to SFTP first time. You can transfer files in this folder, so a user can view them.
FAQ:
Question: I get the error “The specified address is already in use”
Answer: This error occurs because of freeFTPd instance background running. To resolve this, you need to cancel all other instances of freeFTPd in the task manager, and then open it again. Also you can just stop freeFTPService and restart it.