In this article, we will show you how to securely transfer files between your local machine and a remote machine, using SFTP (Secure File Transfer Protocol), also known as the SSH File Transfer Protocol.
The command line provides other alternative file transfer capabilities such as SCP, which also uses the SSH (secure shell) under the hood. In the examples, we will use a sample file netflix_titles.csv.zip hosted on our local machine, and we will securely transfer it using SFTP.
See Also: (Live Webinar) Meet ServerMania: Transform Your Server Hosting Experience
Log into Remote Server using SSH
SSH creates a secure connection between two systems. For this example, you would need a local and a remote system in place. If you don’t have a remote system, quickly provision a remote server on Windows or Linux and log in using your root (user name) and password for authentication:
ssh root@172.105.186.216
root@172.105.186.216's password:
Last login: Fri Feb 26 14:28:52 2021 from 180.150.39.150
[root@sm2134-216 ~]#
Alternatively, you can generate SSH keys (public and private key pair) for authentication and log into the remote server using that. To ensure that no files exist on your remote server, check your current directory and list the content of the directory:
[root@sm2134-216 ~]# pwd
/root
[root@sm2134-216 ~]# ls
If you have provisioned a new server, there will be no files in the root directory. Exit the remote machine and hop back to your local machine and list the files and subdirectories in the current directory:
[root@sm2134-216 ~]# exit
░▒▓ ~/Projects/ServerMania ▓▒░─────────────────░▒▓ took 6m 1s ≡ at 12:10:39 ▓▒░
❯
netflix_titles.csv.zip
The directory contains one file netflix_titles.csv.zip, which we will transfer to the remote machine using the SFTP command. In this example, we have used the root user, but please make sure that your user has the write permission on the remote server. Learn more about how to SSH on our blog.
Log into Remote Server using SFTP
SFTP or secure file transfer protocol is an upgrade from the traditional FTP (file transfer protocol). SFTP uses the SSH (secure shell) for securing the connection.
Let us login to the remote machine using the SFTP command and start an SFTP session and run the ? or help command:
❯ sftp root@172.105.186.216
root@172.105.186.216's password:
Connected to 172.105.186.216.
sftp> ?
This will list all the possible SFTP commands, but we want to look at only a couple of them. Most of these commands resemble basic shell commands for navigation, file and directory creation, etc. Let’s look at some of the examples of SFTP commands:
- sftp> put – Upload file
- sftp> get – Download file
- sftp> cd path – Change remote directory to ‘path’
- sftp> pwd – Display remote working directory
- sftp> lcd path – Change the local directory to ‘path’
- sftp> lpwd – Display local working directory
- sftp> ls – Display the contents of the remote working directory
- sftp> lls – Display the contents of the local working directory
In the following code snippet, you can see the examples of some of the commands mentioned above run on the SFTP prompt:
░▒▓ ~/Projects/ServerMania
▓▒░──────────────────────────────░▒▓ ≡ at 20:51:54 ▓▒░
❯ sftp root@172.105.186.216
root@172.105.186.216's password:
Connected to 172.105.186.216.
sftp> pwd
Remote working directory: /root
sftp> ls
sftp> lpwd
Local working directory: /Users/kovid/Projects/ServerMania
sftp>
sftp> mkdir files
sftp> cd files
sftp> pwd
Remote working directory: /root/files
sftp> cd ..
sftp> rmdir files
sftp>
Now that you know how to navigate the file system of both the local machine and the remote server, you will learn how to transfer files from one to another.
Transfer Files from Local Machine to Remote Server
First, let us see how a file can be transferred from a local machine to a remote machine using the secure file transfer protocol. Log in to the server to access the SFTP prompt and navigate to the local directory, which has the file to be transferred:
Connected to 172.105.186.216.
sftp> lpwd
Local working directory: /Users/kovid
sftp> lcd /Users/kovid/Projects/ServerMania
sftp> lpwd
Local working directory: /Users/kovid/Projects/ServerMania
sftp> lls
netflix_titles.csv.zip
sftp> put netflix_titles.csv.zip
Uploading netflix_titles.csv.zip to root/netflix_titles.csv.zipnetflix_titles.csv.zip 100% 1207KB 1.5MB/s 00:00
sftp>
As you can see, using the put command, we have successfully transferred the file netflix_titles.csv.zip from our local machine to the remote machine. Notice that we did not provide any path on the remote machine, so the file got copied in the remote machine’s current directory. Verify if the file has been copied or not by running the ls command:
sftp> pwd
Remote working directory: /root
sftp> ls
netflix_titles.csv.zip
sftp> bye
Use the bye command to close the connection (SFTP session).
Transfer Files from Remote Server to Local Machine
Now, let us delete the local file from our local machine and copy it back from the remote server fetching the remote file using the get command:
❯ pwd
/Users/kovid/Projects/ServerMania
❯ ls
netflix_titles.csv.zip
░▒▓ ~/Projects/ServerMania ▓▒░──────────────────────────░▒▓ ≡ at 21:16:22 ▓▒░
❯ rm netflix_titles.csv.zip
░▒▓ ~/Projects/ServerMania ▓▒░──────────────────────────░▒▓ ≡ at 21:16:32 ▓▒░
❯ ls
░▒▓ ~/Projects/ServerMania ▓▒░──────────────────────────░▒▓ ≡ at 21:16:34 ▓▒░
❯
After removing the file from the local system, establish an SFTP connection with the remote machine again:
❯ sftp root@172.105.186.216
root@172.105.186.216's password:
Connected to 172.105.186.216.
sftp> get netflix_titles.csv.zip
Fetching /root/netflix_titles.csv.zip to netflix_titles.csv.zip/root/netflix_titles.csv.zip 100% 1207KB 4.8MB/s 00:00
sftp>
sftp> lpwd
Local working directory: /Users/kovid/Projects/ServerMania
sftp> lls
netflix_titles.csv.zip
sftp> bye
Alternatively, you can also copy the remote file to your local system using the SFTP command without establishing a persistent connection from your local command line. This doesn’t have to use the get command. Look at the following command:
░▒▓ ~/Projects/ServerMania ▓▒░──────────────────────────░▒▓ ≡ at 21:25:12 ▓▒░
❯ sftp root@172.105.186.216:netflix_titles.csv.zip.
root@172.105.186.216's password:
Connected to 172.105.186.216.
Fetching /root/netflix_titles.csv.zip to ./netflix_titles.csv.zip/root/netflix_titles.csv.zip 100% 1207KB 4.8MB/s 00:00
░▒▓ ~/Projects/ServerMania ▓▒░─────────────────░▒▓ took 4s ≡ at 21:25:22 ▓▒░
❯
Next Steps
The SFTP command is an easy and secure method to transfer files directly between two servers. Now you have all that is required to use this command with ease!
Still looking for some help getting all this running on your ServerMania servers? Contact our support team, or share your feedback in the comments below!
ServerMania not only supports businesses with technical tutorials, but also through enterprise focused solutions such as colocation and server cluster configurations. For these advanced partnership opportunities, please book a free consultation with our account executives today.
- Parameters
- Session
- Logging
- Console/scripting mode
- Operations
- Configuration
- Mass-modification of sites
- Private key conversion and modification
- Auxiliary
- Syntax
- Executables
- Hint
- Running from Bash
Advertisement
Parameters
Parameters for winscp.exe executable:
winscp.exe site|workspace|folder
winscp.exe <session_url>[/path/[file]]
winscp.exe [mysession] [/sessionname=<name>]
winscp.exe [mysession] [/newinstance]
winscp.exe [mysession] /edit <path>
winscp.exe [mysession] /browse[=<file>]
winscp.exe [mysession] /synchronize [local_directory] [remote_directory] [/defaults[=secs]]
winscp.exe [mysession] /keepuptodate [local_directory] [remote_directory] [/defaults[=secs]]
winscp.exe [mysession] /refresh [path]
winscp.exe [mysession] /upload file1 file2 file3 ... [/defaults[=secs]]
winscp.exe [mysession] [/privatekey=<file> [/passphrase=<passphrase>]]
winscp.exe [mysession] [/hostkey=<fingerprint>]
winscp.exe [mysession] [/username=<user>] [/password=<pass>]
winscp.exe [mysession] [/passwordsfromfiles]
winscp.exe [mysession] [/clientcert=<file> [/passphrase=<passphrase>]]
winscp.exe [mysession] [/certificate=<fingerprint>]
winscp.exe [mysession] [/passive[=on|off]] [/implicit|explicit]
winscp.exe [mysession] [/timeout=<sec>]
winscp.exe [mysession] [/rawsettings setting1=value1 setting2=value2 ...]
winscp.exe [/console] [/script=<script_file>] [/command command1 command2 ...]
           [/parameter // param1 ...]
winscp.exe [/log=<logfile>  [/loglevel=<level>] [/logsize=[<count>*]<size>]]
           [/xmllog=<logfile> [/xmlgroups]]
winscp.exe [/ini=<inifile>]
winscp.exe [/rawconfig config1=value1 config2=value2 ...]
winscp.exe [/rawtransfersettings setting1=value1 setting2=value2 ...]
winscp.exe /batchsettings <site_mask> setting1=value1 setting2=value2 ...
winscp.exe /keygen keyfile [/output=<file>] [/changepassphrase]
winscp.exe /keygen keyfile [/comment=<text>] [/certificate=<file>]
winscp.exe /update
winscp.exe /info
winscp.exe /help
Advertisement
Parameters for winscp.com executable:
winscp.com [/script=script_file] [/command command1 command2 ...]
           [/parameter // param1 ...]
winscp.com [/stdout[=binary|chunked]] [/stdin]
winscp.com [/log=<logfile> [/loglevel=<level>] [/logsize=[<count>*]<size>]]
           [/xmllog=<logfile> [/xmlgroups]] [/nointeractiveinput]
winscp.com [/ini=<inifile>]
winscp.com [/rawconfig config1=value1 config2=value2 ...]
winscp.com /batchsettings <site_mask> setting1=value1 setting2=value2 ...
winscp.com /keygen keyfile [/output=<file>] [/changepassphrase]
winscp.com /keygen keyfile [/comment=<text>] [/certificate=<file>]
winscp.com /info
winscp.com /help
Session
The first syntax opens the site. To open site, stored in folder, use path syntax “folder/site”. You can also open workspace or all sites in site folder.
The second creates the session specified by session URL and optionally by initial remote path. If the remote path is not ended by slash (/), it is treated as path to file (or even directory) that should be downloaded.
The parameter /sessionname specifies a custom name of the session to be used instead of the automatically generated name in a format username@hostname or to override the name of the saved site.
If there’s already idle WinSCP instance running, the session(s) opens in the existing instance. To force session open in new instance of WinSCP, use /newinstance parameter.
The parameter /privatekey specifies a local path to an SSH private key file. If the key file is encrypted, use the /passphrase to specify its passphrase. The passphrase can be read from a file.
The parameter /hostkey specifies the fingerprint of the expected SSH host key (or several alternative fingerprints separated by a semicolon). It makes WinSCP automatically accept the host key with the fingerprint.
You can use the parameters /username and /password as an alternative way to specify the credentials. The credentials are normally part of the session URL. Using these switches has the advantage of not needing to URL-encode special characters. The password can be read from a file.
With parameter /passwordsfromfiles, the values of /password, /passphrase and in general all passwords from all sources are interpreted as paths to files, where the actual passwords are read from. The files must use UTF-8 or UTF-16 encoding.1
The parameter /clientcert specifies a local path to FTPS or WebDAVS TLS/SSL client certificate. If the certificate is encrypted, use the /passphrase to specify its passphrase.
When a FTPS or WebDAVS server TLS/SSL certificate is not trusted (typically a self-signed certificate), use the parameter /certificate to specify the fingerprint of the untrusted certificate. It makes WinSCP trust the certificate. Several alternative fingerprints can be separated by a semicolon.
The parameter /passive enables a passive (=on) or an active (=off) transfer mode (FTP protocol only).
The parameters /implicit, and /explicit enable respective method of invoking FTPS.
Advertisement
The parameter /timeout specifies server response timeout.
The parameter /rawsettings allows configuring any site settings using raw format as in an INI file. E.g. to enable an SSH compression and an agent forwarding, use /rawsettings Compression=1 AgentFwd=1. The parameter must come after the session URL (if any).
When using scripting, use the open command (and its switches) instead.
Examples:
winscp.exe "My site"
winscp.exe sftp://martin:password@example.com/ /hostkey="ssh-rsa 2048 xxxxxxxxxxx..."
winscp.exe scp://test@example.com:2222/ /privatekey=mykey.ppk
winscp.exe ftps://martin:password@example.com/
Logging
With /log parameter you may turn on session logging to file specified by local path. In the path you can use the same patterns as in the logging preferences.
Use parameter /loglevel to change logging level. The value can be in range -1…2 (for Reduced, Normal, Debug 1 and Debug 2 logging levels respectively). Append additional * to enable password logging (e.g. /loglevel=2*).2
Use parameter /logsize to configure log file size limit and log file rotation. Specify maximum size in bytes, optionally with K, M or G units. Optionally you can limit number of archived log files using count* prefix. For example /logsize=5*10M will limit log file size to 10 MB and will allow up to 5 archived logs.
winscp.exe sftp://martin@example.com/ /log="C:\winscp.log" /loglevel=0
With /xmllog parameter you may turn on XML logging to file specified by local path.3 In the path you can use the same patterns as in the logging preferences.
Use parameter /xmlgroups along with /xmllog, to group all XML log elements belonging to the same command under parent group element.
Console/scripting mode
Parameter /console executes WinSCP in console (scripting) mode. Note that when using winscp.com, the console mode is implicit, so using /console parameter is redundant.
To run batch script either pass script file using /script parameter or specify the commands directly on command line using /command. In the latter case each following parameter is treated as single command. See syntax section and examples below for details how to deal with spaces and double-quotes.
If both /script and /command parameters are used, commands from script file are executed first. When the last command is not exit, regular non-batch mode follows.
Use parameter /parameter to specify list of arguments to be passed to script. It is recommended to escape the arguments with // switch.
With winscp.exe, if /console parameter is not used along with /script or /command, the script/command is executed without visual feedback (window).
Use the parameter /stdout to enable streaming files to the standard output of winscp.com. When the parameter is used, the get command will stream the downloaded file(s) to the standard output, when - is used as a download target. By default (or with the binary flag), the files are streamed unmodified. With the chunked flag, the files are individually encoded using Chunked transfer encoding, what allows separating contents of multiple streamed files. When the parameter is used, all console output that would normally be printed to the standard output is redirected to the error output. Streaming is supported with the SFTP and FTP protocols only.
Advertisement
Use the parameter /stdin to enable streaming files from the standard input of winscp.com. When the parameter is used, the put command will stream the standard input to the remote server, when - is used as an upload source. Implies /nointeractiveinput. Streaming is supported with the SFTP and FTP protocols only.
Use parameter /nointeractiveinput, when feeding commands to winscp.com using standard input, to make sure prompts for anything other than commands (such as password prompts) are cancelled. Also prevents error message popping up when fatal error occurs while starting WinSCP. When combined with /xmllog the fatal error is recorded in the XML log.
Examples:
winscp.com /script="C:\Users\martin\Documents\myscript.txt"
winscp.com /command "open sftp://martin@example.com/ -hostkey=""ssh-rsa 2048 xxxx...""" "exit"
winscp.exe /console /script="myscript.txt" /log="myscript.log"
You can have WinSCP generate a scripting command-line for you.
Operations
The following parameters can be used to create a shortcut that initiates operation in GUI mode. They are not intended for automation, for that see scripting.
Use /edit to open a remote file in WinSCP internal editor.
Use /browse to select the specified file in (both) file panel(s). The switch can also be used together with a file URL for the same effect, overriding the default download action.
With /synchronize or /keepuptodate parameter WinSCP performs Synchronize or Keep remote directory up to date commands respectively on the specified session and directories. A dialog to set options is displayed first.
With /upload parameter WinSCP uploads specified files to initial remote directory of session.4 A dialog to set options is displayed first.
Use /defaults parameter along with /upload, /synchronize or /keepuptodate to skip the settings dialog and start the operation straight away with default settings. Alternatively you can specify a number of seconds, to actually show the settings dialogs, but have them automatically submit after the specified time elapses.
Use the /refresh parameter to reload remote panel of all running instances of WinSCP. If a session is specified on command-line, only instances that have that session as active are refreshed. If a path is specified after the /refresh, only that directory is refreshed.
It is recommended to escape the arguments with // switch.
Example:
winscp.exe /defaults /synchronize // "C:\Users\martin\Documents\MySite" /home/martin/public_html
Configuration
With /ini parameter you may specify local path to configuration INI file. It effectively disables using registry as configuration storage. If the file does not exist, default configuration will be used and the file will be created.
winscp.exe /ini="C:\Users\martin\Documents\myconfig.ini"
Advertisement
Use nul instead of path to force WinSCP start with its default configuration and not save the configuration on exit.
With /rawconfig parameter you can set any configuration settings using raw format as in an INI file. E.g. to configure an external IP address use /rawconfig Interface\ExternalIpAddress=198.51.100.10. The parameter must come after a session URL (if any). The configuration set this way is preserved.
With /rawtransfersettings you can set any transfer settings using raw format as in an INI file. E.g. to enable preserving of directory timestamps, use /rawtransfersettings PreserveTimeDirs=1. The configuration set this way is preserved. In scripting, it is better to use -rawtransfersettings switch of individual scripting commands, like get, put, etc.
Mass-modification of sites
Use /batchsettings to mass-modify stored sites. The first argument is a mask to select sites to modify. Use a syntax of basic file masks. You can also use path mask to select sites based on their folders. The other arguments define new values for site settings. Use the same syntax as for /rawsettings.
For example to configure a proxy for all sites in a “clients” folder, use:
winscp.exe /batchsettings clients/* ProxyMethod=3 ProxyHost=proxy
Private key conversion and modification
Use the /keygen switch to convert private keys from other formats to a PuTTY .ppk format or to change their passphrase or comment or to add a certificate. You can combine a conversion and key changes into one command.
A parameter after the /keygen switch specifies a path to an input private key file. The input key can be in OpenSSH or ssh.com format (when converting the key to the PuTTY format) or in the PuTTY format (when modifying the key).
When converting the key from other format, you need to specify an output key path using the /output switch. When modifying a PuTTY key, the existing file is overwritten, if /output is not specified.
Use /changepassphrase switch to change the key passphrase.
Use /comment switch to change the key comment.
Use /certificate switch to add an certificate to the key.
For example, to convert key mykey.pem from OpenSSH format to mykey.ppk in PuTTY format and set its comment:
winscp.com /keygen mykey.pem /output=mykey.ppk /comment="Converted from OpenSSH format"
To change the passphrase of existing mykey.ppk:
winscp.com /keygen mykey.ppk /changepassphrase
Advertisement
For a compatibility with *nix puttygen, the -o, -P, -C, --old-passphrase and --certificate switches are understood as aliases to /output, /changepassphrase, /comment, /passphrase and /certificate respectively. The --new-passphrase is recognized too. So, for features supported by WinSCP, you can use the same arguments as for puttygen, just prefixed with /keygen:
winscp.com /keygen mykey.pem -o mykey.ppk -C "Converted from OpenSSH format"
Auxiliary
When run with /update parameter, WinSCP only checks for its updates.
The parameter /info lists the supported SSH and TLS/SSL algorithms.
Parameter /help shows usage (overview similar to this).
Syntax
Command-line parameters that include space(s) must be surrounded by double-quotes:
winscp.exe /ini="C:\Users\martin\Documents\myconfig.ini"
To use the double-quote as a literal, use two double-quotes sequentially. For example, the /command expects that each script command is surrounded by double quotes, so that it is passed as a single command-line argument. In addition, any script command argument that includes spaces is expected to be surrounded by double-quotes within the command (see doubling double-quotes):
winscp.com /command "open sftp://... -hostkey=""ssh-rsa ...""" "put ""C:\my file.dat"""
                    <-           Script command 1           -> <-  Script command 2  ->
When executing such command from PowerShell, you additionally have to escape the doubled inner double-quotes with ` (backtick) to prevent PowerShell from interpreting them on its own:5
winscp.com /command "open sftp://... -hostkey=`"`"ssh-rsa ...`"`"" "put `"`"C:\my file.dat`"`""
                    <-             Script command 1             -> <-    Script command 2    ->
To debug the quoting, enable session logging on level Debug 1 (/loglevel=1). The log will show how WinSCP understands your command-line.
An argument that begins with a slash is considered a switch. To pass a parameter that itself starts with the slash in its syntax (i.e. a remote path like /root), use the special switch // (two slashes) before the argument. The switch // denotes that all following arguments are not switches. Example:
winscp.exe /synchronize // "C:\Users\martin\Documents\MySite" /root
Executables
Learn about two WinSCP executables, winscp.exe and winscp.com.
Advertisement
Hint
If you are going to run WinSCP from command-line often, you may wish to add WinSCP installation directory to search path.
Running from Bash
When running WinSCP from a shell, where /switch is interpreted as a path, such as Git Bash, use a dash (-) instead of the slash (/) for switches. For example:
./WinSCP.com -script="myscript.txt" -log="myscript.log"
| To download a printable cheat sheet, click here |
|---|
SFTP is a secure file transfer protocol, based on SSH (Secure Shell) which is the standard way to connect to UNIX/LINUX servers. SFTP works in a client-server architecture, meaning that a client connects to a server and uploads files to it or downloads files from it. Additionally, the SFTP client allows you to list or delete files, create directories, and change file ownership and permissions.
To begin an SFTP session, you can either use the option of password authentication, or create SSH keys for a passwordless SFTP login.
There are several ways to connect to SFTP:
- CLI — this stands for Command Line Interface. All modern operating systems come equipped with an SFTP CLI program, allowing users to type out text commands to communicate with an SFTP server.
- GUI — or Graphical User Interface, which allows you to list, download, and upload files using a graphical interface which is friendlier and supports the mouse or trackpad as an input device to allow drag & drop to upload and download files. The most popular SFTP GUI clients are Filezilla and Cyberduck.
- Programming libraries — There are a number of standard programming libraries, for pretty much any programming language, that let programmers interact with SFTP servers in their code.
In this post, we’ll focus on the command line interface route.
Getting started
To start the command line, open your terminal (cmd on Windows; Terminal on Mac and Linux) and type in sftp user@host/remote-dir (replace the placeholders with the actual user name, sftp host name and remote directory). Then, either type in your chosen password or utilize the private/public key authentication option to login.
Once you’re in, it can only go up from here. Using the command line is quite simple once you understand the meaning of each given command. In this post, we got you covered and will explain the important and useful commands .
Note: Some commands have arguments (Don’t worry, we’ll explain what those do as well). Optional arguments (i.e. ones you can choose to drop) are enclosed in <angle brackets>.
Listing Files
Command: ls <options> <path>
ls lists the contents of the current directory on the remote server.
When using ls with no arguments, all the files found within the current directory will be displayed in a jumbled fashion. To change the current directory, use the cd command as demonstrated below.
Two optional arguments are available when using the ls command:
<options>— The <options> argument can be populated with any of the following options or a combination of them; for example: the command `-alt` is acceptable.
-1— List the output in a single column-a— Show all files — include files that start with a dot (.)-h— Show human readable file sizes-l— Long listing format, including additional file information such as file sizes and permissions.
Use the following options to change the order of files in the list:
-S— Sort list by file size-t— Sort list by last modification time-r— Sort in reverse order
<path>— Passing the path argument to the ls command allows you to display the list of files in a specified remote path. The example below indicates how to do it. Use the command ls -l and a directory file list should be available like so:
sftp> ls -l /outgoing-invoices
-rwxr--r--   1        -        -    21451 Nov 24 08:28 inv-UIf2IS.json
-rwxr--r--   1        -        -    69070 Nov 22 09:12 inv-UPrGAT.json
-rwxr--r--   1        -        -    15714 Jul 14 15:18 inv-v5rg8c.j
Note: To list files within your local host, use lls instead of ls in the sftp console.
Switching Directories
Command: cd path
Use cd to switch from one directory to another on the remote server.
To switch the full, absolute, path to the directory, prefix the path with a /. To switch to a relative path (e.g. a directory that resides within your current directory), simply type in its name.
Example:
sftp> cd outgoing-invoicesCommand: lcd path
lcd works just like cd, except it only changes the active directory on the local host.
Example:
sftp> lcd /Users/john/Documents/invoicesDownload and Upload Files
Command: get remote-file <local-dir>
Get lets you download a file (or files) from the remote server to the local computer. The get command has two arguments:
- remote-file — the path to the remote file(s) to download. To download multiple files in a single command, add a wild card (*) to the remote-file argument. This argument is mandatory.
- <local-dir> — The target directory to place the downloaded files on the local host. If left empty, files will be automatically downloaded to the current local directory. This argument is optional.
Example:
sftp> get inv-UIf2IS.json
Fetching /outgoing-invoices/inv-UIf2IS.json to inv-UIf2IS.json
/inv-UIf2IS.json                                                                                                                                          100% 21451     9.1KB/s   00:00
The following example makes use of a wildcard to download any json file whose name starts with inv:
sftp> get inv*.jsonCommand: put local-file <remote-path>
Use put to upload a file (or files) from the local computer to the remote host. Two arguments can be added to the put command:
- local-file — the path to the local file(s) to upload. Use wildcards (*) to upload multiple files in a single command.
- <remote path> — The target directory to place the uploaded files on the remote server. If left empty, files will be automatically uploaded to the current remote directory.
Example:
sftp> put inv-jKv72b.json /outgoing-invoices/
Uploading inv-jKv72b.json to /outgoing-invoices/inv-jKv72b.json
inv-jKv72b.json                                                                                                                                           100% 34596     9.0KB/s   00:00
Cloud FTP with maximum security and reliability
SFTP To Go offers managed cloud storage service — highly available, reliable and secure. Great for companies of any size, any scale.

![]()
Check Present Working Directories
Command: pwd
This command shows the present working directory path on the remote host.
Example:
sftp> pwd
Remote working directory: /outgoing-invoices
Command: lpwd
lpwd shows the present working directory on the local computer.
Example:
sftp> lpwd
Local working directory: /Users/john/Documents/invoices
Create or remove Directories
Command: mkdir remote-path
Create a new directory on the remote machine. For example:
sftp> mkdir outgoing-invoicesCommand: rmdir remote-path
Remove an empty directory on the remote host. If the directory is not empty, an error message will appear. Another example follows:
sftp> rmdir dummy-dirRemove files
Command: rm remote-path
Delete a file or files on the remote host. You can use wildcards(*), just like with the get command.
Example:
sftp> rm inv-jKv72b.json
Removing /outgoing-invoices/inv-jKv72b.json
Disconnecting
Command: quit or bye
When you’re done fiddling with files on your SFTP server, close the connection and leave the SFTP CLI program.
sftp> quitWe hope this guide has proven how non-intimidating commonly used SFTP commands are to use and encourage you to get your command line interface on and try it out for yourself!
| To download a printable cheat sheet, click here |
|---|
Post Photo by Athul Cyriac Ajay on Unsplash
When you are at the command line, the command used to start an SFTP connection with a remote host is:
- sftp username@hostname.
- sftp [email protected].
- sftp>
- Use cd .. in order to move to the parent directory, e.g. from /home/Documents/ to /home/.
- lls, lpwd, lcd.
How do I SFTP from command prompt?
How to Connect to SFTP. By default, the same SSH protocol is used to authenticate and establish an SFTP connection. To start an SFTP session, enter the username and remote hostname or IP address at the command prompt. Once authentication is successful, you will see a shell with an sftp> prompt.
How do I manually use SFTP?
Establish an sftp connection.
- Establish an sftp connection. …
- (Optional) Change to a directory on the local system where you want the files copied to. …
- Change to the source directory. …
- Ensure that you have read permission for the source files. …
- To copy a file, use the get command. …
- Close the sftp connection.
What is the SFTP command in Windows?
In this article, we will show you how to securely transfer files between your local machine and a remote machine, using SFTP (Secure File Transfer Protocol), also known as the SSH File Transfer Protocol.
How do I upload to SFTP?
Upload a file using SFTP or SCP commands
- Using your institution’s assigned username, enter the following command: sftp [username]@[data center]
- Enter your institution’s assigned password.
- Choose directory (see directory folders): Enter cd [directory name or path]
How to use SFTP Commands to Copy Files to/from a Server
How do I set up SFTP?
To set up SFTP:
- Open the MFT service web portal in your browser.
- Go to the Connections section ( on the toolbar), on the My Connection tab, click Setup SFTP.
- In the Setup SFTP Connection dialog, you can view the following parameters: Parameter. Description. User. …
- Click Save.
How do I enable SFTP on Windows?
Installing SFTP/SSH Server
- On Windows 11: Go to Settings > Apps > Optional features and click on View features. Locate “OpenSSH server” feature, select it, click Next, and then click Install.
- On Windows 10 (version 1803 and newer): Go to Settings > Apps > Apps & features > Optional features and click on Add a feature.
How do I use SFTP on Windows 10?
Install SFTP Server on Windows 10
- Download the Tool. Download the Solarwinds SFTP server installation file using the link https://www.solarwinds.com/free-tools/free-sftp-server.
- Install the Utility on Windows 10. …
- Accept and Install Software onto your Windows desktop.
How do I know if SFTP is enabled Windows?
Test sftp Connection from Windows
- Press “Windows Key + R” to open Command Prompt.
- Type Telnet and press Enter. cmd – telnet.
- Enter sftp path after keyword “o” in following format and press Enter. o sftppath port. …
- We will get to following screen if sftp connection was successful or sftp url was reachable.
How do I enable SFTP on Linux?
Setup SFTP Server Ubuntu
- Step 1: Install SSH. As we mentioned earlier, SFTP works over SSH. …
- Step 2: Change SSHD configuration for SFTP group. …
- Step 3: Restart SSH services. …
- Step 4: Create SFTP users group. …
- Step 5: Create a new SFTP user. …
- Step 6: Grant permissions to the specific directory.
How do I FTP from command line?
To use FTP commands at Windows command prompt
- Open a command prompt and navigate to the folder containing the files that you want to transfer, then press ENTER. …
- At the C:\> prompt, type FTP. …
- At the ftp> prompt, type open followed by the name of the remote FTP site, then press ENTER.
How do I transfer a folder using SFTP?
This works for me:
- connect via sftp to remote host.
- change into the remote directory you wish to copy. ( Example: cd Music)
- change to the local directory you wish to copy stuff to. ( Example: lcd Desktop)
- Issue this command: get -r *
How do I transfer files using SFTP in Windows?
To transfer files to or from a server using SFTP, use an SSH or SFTP client.
…
WinSCP
- Open WinSCP. …
- In the «User name» field, enter your username for the host you specified.
- In the «Password» field, type the password associated with the username you entered in the previous step.
- Click Login.
Does Windows 10 have SFTP?
SFTP is supported on the command-line only via the Win32-OpenSSH sftp.exe , which is built-in on Windows 10 version 1803 or newer.
How do I find my SFTP server?
Minimum SFTP server access requirements
- Connect to the server and log in.
- Get a directory listing.
- Create directories.
- Change directory.
- Create files.
- Rename files.
- Change permissions (when using rollbacks)
- Browse the test file.
How do you use PUT command?
To copy a single file, use the put command. To copy multiple files at once, use the mput command. You can supply a series of individual file names and you can use wildcard characters. The mput command will copy each file individually, asking you for confirmation each time.
Which command is used to upload the files through FTP?
To upload file on FTP server use put command from FTP prompt.
What is FTP commands?
The ftp command uses the File Transfer Protocol (FTP) to transfer files between the local host and a remote host or between two remote hosts. Remote execution of the ftp command is not recommended. The FTP protocol allows data transfer between hosts that use dissimilar file systems.
How do I transfer files to an FTP?
How to Copy Files to a Remote System ( ftp )
- Change to the source directory on the local system. …
- Establish an ftp connection. …
- Change to the target directory. …
- Ensure that you have write permission to the target directory. …
- Set the transfer type to binary. …
- To copy a single file, use the put command.
What is FTP port command?
PORT FTP command
The PORT command is issued by the client to initiate a data connection required to transfer data (such as directory listings or files) between the client and server. This command is used during «active» mode transfers.
How do I enable SFTP but not SSH?
How to Setup Chroot SFTP in Linux (Allow Only SFTP, not SSH)
- Create a New Group. Create a group called sftpusers. …
- Create Users (or Modify Existing User) …
- Setup sftp-server Subsystem in sshd_config. …
- Specify Chroot Directory for a Group. …
- Create sftp Home Directory. …
- Setup Appropriate Permission. …
- Restart sshd and Test Chroot SFTP.
How do I know if SFTP is enabled Linux?
When the AC functions as an SFTP server, run the display ssh server status command to check whether the SFTP service is enabled on the AC. If the SFTP service is disabled, run the sftp server enable command in the system view to enable the SFTP service on the SSH server.
What is SFTP server in Linux?
sftp-server is a program that speaks the server side of SFTP protocol to stdout and expects client requests from stdin. sftp-server is not intended to be called directly, but from sshd(8) using the Subsystem option. Command-line flags to sftp-server should be specified in the Subsystem declaration.
How do I connect to SFTP server using PowerShell?
Downloading Files and Folders from the SSH server
To set up a session, provide a PSCredential object via Get-Credential and specify the remote SFTP server you’d like to connect to using the New-SFTPSession command. When invoked via the command below, PowerShell will prompt you for a username and password.
WinSCP is a secure file transfer graphical utility. But, it has more features than what you can see with a GUI. The WinSCP command line also exists to help you manage and automate file transfers from your console too!
To learn the ins and outs of the WinSCP GUI, check out this post’s complementing post, The WinSCP GUI: The Ultimate Guide.
In this WinSCP Command-Line Ultimate Guide, you’re going to learn, step-by-step, just about every command-line feature WinSCP provides to help you do more with WinSCP.
Let’s do it!
Prerequsites
- A Windows XP+ PC – This tutorial will use Windows 10 Enterprise.
- A remote Linux host – This tutorial will use an Ubuntu 18.04.5 LTS machine.
- A user account on the remote SSH host with sudo permissions.
Generating a Session URL
When you work with WinSCP in the GUI, you have the luxury of the Login window shown below. This window allows you to specify remote connection properties. The command-line doesn’t have windows and interactivity like this. Instead, you must define those attributes another way.
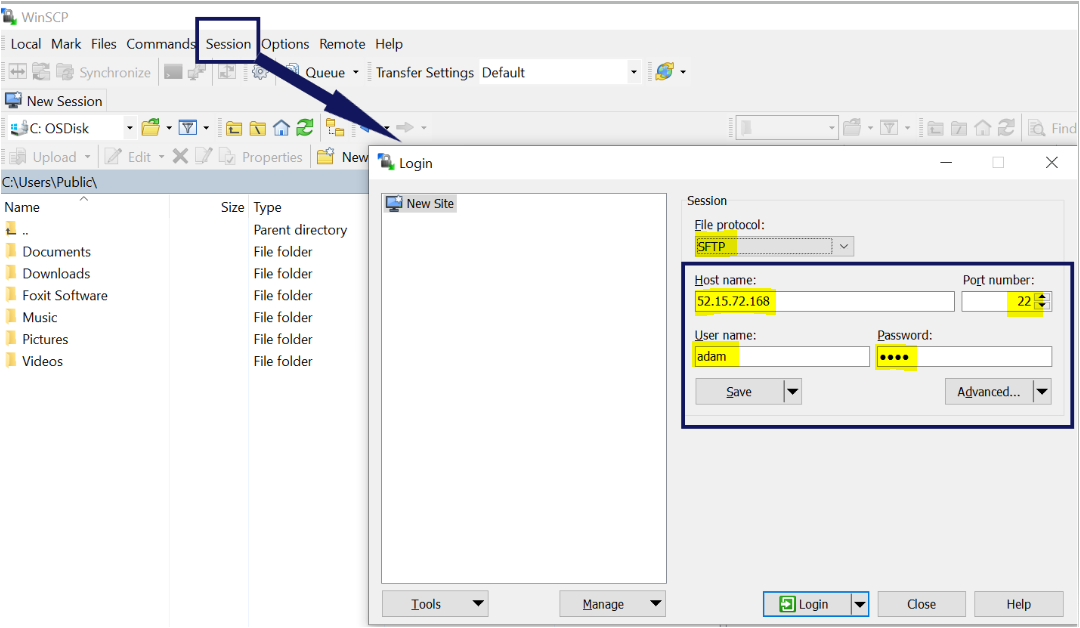
To tell the WinSCP command line where to connect, you must provide a string called a session URL. This session URL is a combination of each of the connection attributes you had defined in the GUI above.
A session URL, at it’s simplest, is defined via the schema:
<protocol>://<username>:<password>@<host name>/<folder path>For example, if you’d like to connect to the 1.1.1.1 remote host with the user adam , password pw via the SFTP protocol with WinSCP, your session URL would look like this:
If you’ve already created a WinSCP site, you can find the site’s session URL by opening the WinSCP GUI, clicking on the Session menu, right-clicking on the site, and choosing to Generate Session URL/Code.
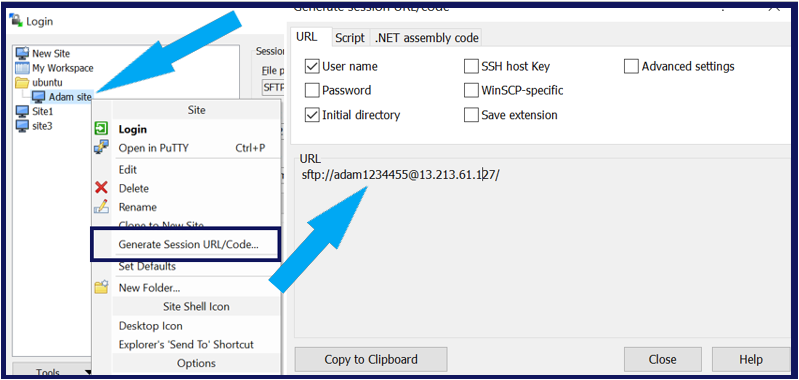
In the Session URL dialog box above, you have various options to customize the session URL, which will dictate how WinSCP connects to a remote host.
- Initial directory – The remote directory that WinSCP will bring up when first connecting.
- SSH host key – An existing SSH key to authenticate to the remote host.
- WinSCP-specific – Generates a “WinSCP-specific” session URL such as
WinSCP-sftp://orwinscp-<ftp://>. A WinSCP-specific URL is useful when you only need WinSCP to understand the URL. If you’d generate a session URL for FTP, for example, you’d be contending with your default web browser if you’d click the link. - Save extension – This option is sometimes used with the WinSCP-specific option to prevent other applications from conlficting when accessing the URL.
The syntax of the session URL with all options enabled should look like the following.
<protocol>://<username>:<password>@<host name>/<folder path><save extension>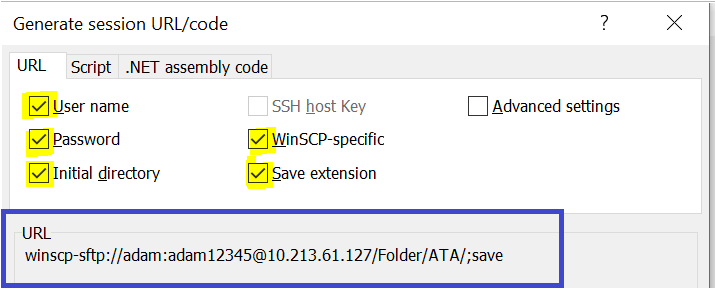
Generating Session Connection Code
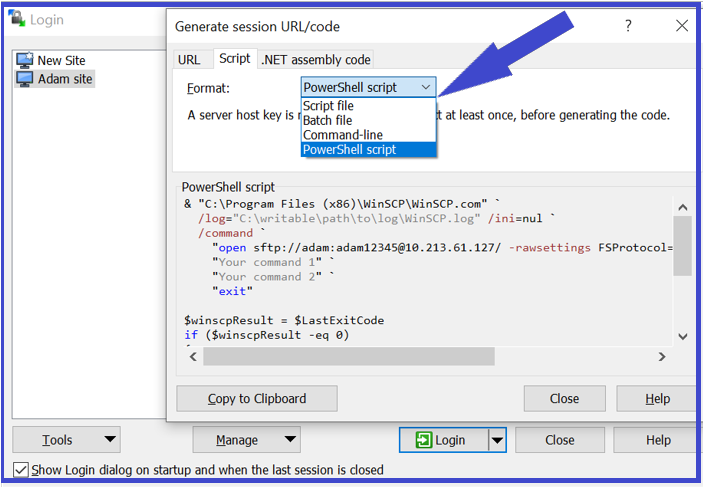
Once you have created the session URL, WinSCP also provides code examples via the Script tab in the Generate session URL/code window. By selecting the type of code:
- Script file
- Batch file
- Command-line
- PowerShell script
WinSCP will create the syntax to connect to the remote host with WinSCP in any of these script types.
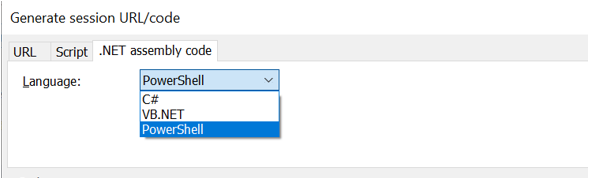
Similarly, to discover the code to execute WinSCP as .NET, C#, or PowerShell, click on the .NET assembly code tab, as shown below.
WinSCP.exe vs. WinSCP.com
Now that you know how to generate a session URL, it’s time to actually use one and learn how to connect to a host with WinSCP on the command line. But first, you must understand the two different WinSCP CLI tools; winscp.exe and winscp.com.
Winscp.exe is actually the same utility used to invoke the GUI, but you can also perform some command-line tasks with it too. But, you can perform some simple commands with it on the command line if you specify a few parameters.
Winscp.exe is only a command-line way to interact with various features of the WinSCP GUI.
Although winscp.exe is great on the command-line for simple, ad-hoc transfers, if you need to run WinSCP in a script, it won’t work. In that case, you need winscp.com. Winscp.com is a utility that comes with WinSCP that supports only console operations and is great for automation scripts.
Winscp.com can perform a lot of SSH functions you may be familiar with. WinScp.com is a true, non-interactive, command-line experience you’ll learn a bit later.
Regardless of which tool you choose, you must open a command prompt (either cmd.exe or PowerShell) and navigate to the WinSCP installation directory.
cd 'C:\Program Files (x86)\WinSCP'Now that you’re in a command prompt, let’s get started!
WinSCP.exe: Connecting to Remote Hosts with Session URLs
The simplest way to connect to a remote host with WinSCP is running winscp.exe with the session URL as a parameter. In the example below, WinSCP will connect to the 54.179.19.216 host using a username and automate and a password of automate over sftp. When connected, it will drop into the /tmp directory.
Rather than use a password, you could also connect to a remote host using a private key by specifying the /privatekey parameter. Using a private key is more secure than using a simple password but is out of the scope of this tutorial.
Below you can see an example of connecting to the 54.179.19.216 host using a username and automate over scp with a private key called mykey.ppk.
WinSCP.exe: Downloading Files without a Site
Using winscp.exe on the command line, you can transfer files using a quick, ad-hoc connection, or you can call upon a pre-created WinSCP site. Let’s first download a file without using a site. To demonstrate, perhaps you’d like to download all files in the remote host 54.179.19.216’s /tmp directory using SFTP.
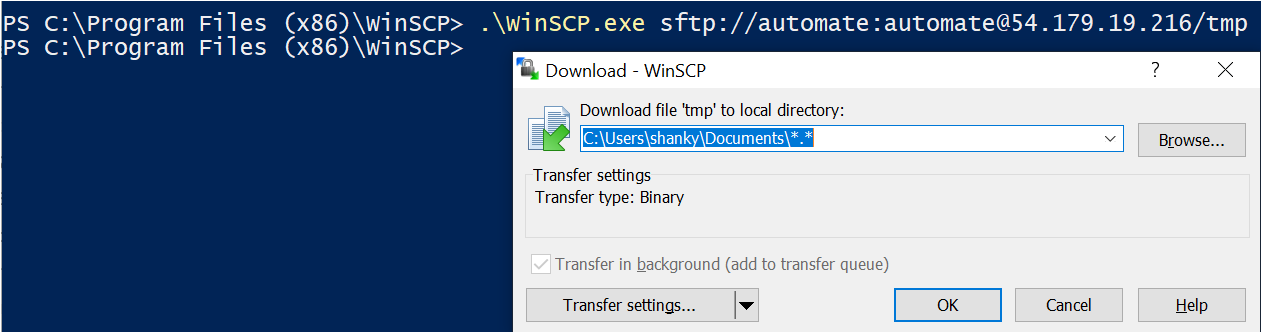
1. First, generate a session URL. The below example shows connecting to the remote host with a username of automate and a password of automate dropping into the /tmp remote directory.
2. Next, run winscp.exe to connect to the remote host to bring up the graphical WinSCP transfer settings dialog box. You’ll see that the local directory will be, by default ~\Documents, as shown below.
WinSCP will also default to the \\*.* pattern meaning to download all files with any name (*) with any file extension (*).
 # Syntax of the command is winscp.exe [/path/[file]]
 winscp.exe sftp://automate:[email protected]/tmp
3. Click OK to begin the transfer. WinSCP will attempt to download all files in the remote /tmp directory over SFTP to the local directory chosen in the popup box.
WinSCP.exe: Uploading Files without a Site
Now that you have learned how to download files on a local machine from a remote host let’s check now perform the opposite and upload files to a remote host.
Uploading files with winscp.exe without a site isn’t much different than downloading files. You must still provide your session URL. But this time, you must also use the /upload switch followed by the folder or file name, as shown below.
# Uploading the file a.txt using winscp.exe on the remote server without site.
 .\WinSCP.exe sftp://automate:au[email protected]/tmp/ /upload  C:\Users\shanky\Desktop\a.txt
After you run the winscp.exe command above, WinSCP will bring up the graphical WinSCP upload dialog box, as shown below, indicating that all files defined with /upload (*.*) will upload to the remote host’s /tmp directory.

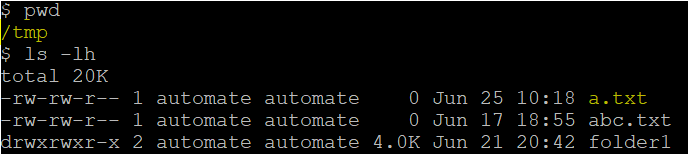
Logging into the remote host with an SSH client and running pwd to check the file andls -lh to list all files in the directory, you’ll see the file was uploaded successfully.
WinSCP.exe: Downloading Files using a Site
In the previous examples, you had to specify a session URL. Session URLs are useful when you don’t have a WinSCP site to reference, containing all of the connection settings. If you’ve been using WinSCP for a while, chances are you have a few sites created.
Using winscp.exe, you can leverage those sites created with the GUI and use them to connect to a remote host saving yourself from remembering how to create a session URL!
To find saved sites in WinSCP, click on the Session menu —> Sites —> Site Manager.
To demonstrate using sites with winscp.exe, let’s first cover downloading files using a site.
1. First, connect to the remote host defined in the site. The example below already has a WinSCP site created called Adamsite.
 # winscp.exe site|workspace|folder
 winscp.exe Adamsite
WinSCP will then display a status notification, as shown below.

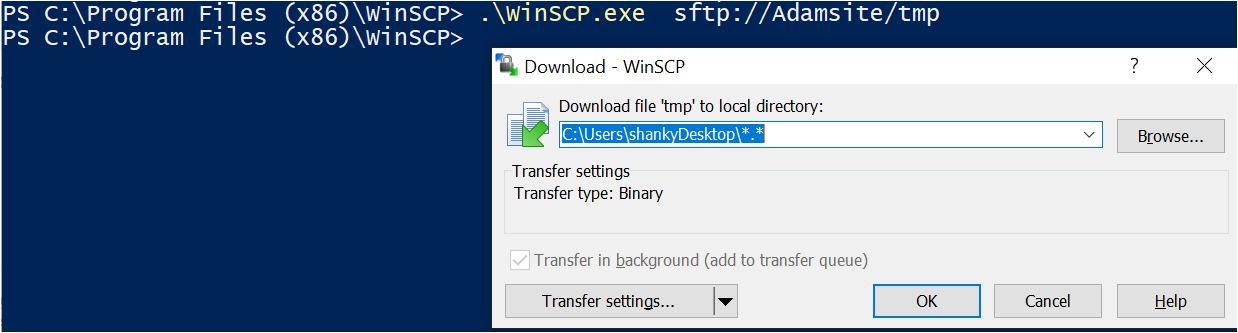
2. Once connected, run winscp.exe to open a session providing just the protocol (sftp), site name (Adamsite), and remote directory (/tmp) this time.
WinSCP will bring up the graphical WinSCP transfer settings dialog box again with the folder to download the files to and the pattern (\*.*) indicating all files in the directory.
 # Connecting to remote mahine with Site
 winscp.exe  sftp://Adamsite/tmp
Click OK, and WinSCP will attempt to download all files in the /tmp directory on the remote host over SFTP to the local directory chosen in the popup box.
Uploading a file or entire folder from your local machine to a remote host is similar. But, you must also specify the
/uploadswitch with the file or directory path to upload, e.g.,winscp.exe Site3 /upload .\license.txt. Note that you don’t have to use the full URL (sftp://Adamsite/tmp).
WinSCP.exe: Editing Remote Files
Once you have a text file on a remote host, maybe you’d like to keep it there, but you need to edit it. Rather than manually downloading, editing, and uploading a file with WinSCP, you can do everything in one shot with the /edit parameter.
To edit a file, provide the site name (Adamsite), the /edit parameter, followed by the remote file path to edit.
# Syntax: winscp.exe Site /edit <path>
.\WinSCP.exe Adamsite /edit /tmp/a.txt
Once you execute the above command, your default editor will pop up, allowing you to edit the file as necessary.

When complete, simply save the file and WinSCP will save the file on the remote host!
WinSCP.exe: Session Logging
As you run commands with winscp.exe, you may want a record of what commands you’ve run. If so, WinSCP’s session logging is for you. WinSCP logs commands via the command line on a per-session basis defined when you connect to the session.
To enable session logging requires up to three different parameters when connecting to a session, as shown below.
/log="<log file path>" /loglevel=<level 1,2> /logsize=<size>/log– The path to the local file to store command history in./loglevel– An optional parameter changing the level of verbosity logged. By default, the log level is set to Normal. But, you can change the level to Reduced or1for the least granular logging to Debug or2for the most granular logging./logsize– An optional parameter used to define how big the log file can get and how long until WinSCP rotates the log file. This parameter value is defined as<total archived logs>*<max log file in K, M, or GB>.
You can see an example below. In this example, winscp.exe will connect to the 54.179.19.216 host and log all activity to the C:\winscp.log file at a Debug level and will keep (5) 10MB log files (5*10MB).
winscp.exe sftp://[email protected]/tmp/ /log="C:\\winscp.log" /loglevel=2* /logsize=5*10MAlthough you have seen various ways to connect to a remote host and do many different things, you were doing so with training wheels on. You were using winscp.exe.
WinSCP.exe is only a small part of what you can truly do on the command line. If you want to really learn about the command line, it’s time you learned winscp.com.
Assuming you’ve still got a command line up and you’re still in C:\Program Files (x86)\WinSCP, let’s begin using winscp.com and first connecting to a remote computer.
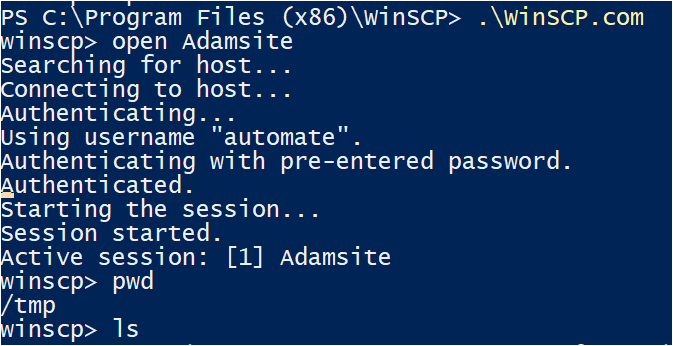
Run winscp.com with no parameters, which will bring you into an interactive session similar to SSH. You’ll know you’re in a WinSCP session when the prompt changes to winscp>.
Next, run the open command to open a session followed by the site you’d like to connect to.
You’ll now see below that WinSCP connects to the remote host defined in the site (Adamsite), in this case. Once connected, you can initiate commands and receive output just like you were in a typical SSH session.
Connecting to a Session with a New Key Pair (Host Key)
If you’d like to connect to a session via public-key authentication, you may do so by first finding the host key fingerprint for your site’s session. To do that, you’ll need to execute the ssh-keygen command in the WinSCP folder using the syntax below.
The ssh-keygen command below verifies an SSH key pair which you’ll use to authenticate to the remote host. Run the command as shown below. You’ll soon see a fingerprint you’ll need to then provide to winscp.com to connect to a session.
ssh-keygen -l -f /etc/ssh/ssh_host_rsa_key
Once you have the fingerprint, run the open command to create a session using the hostkey parameter providing the fingerprint you just generated.
Always preface the fingerprint with
ssh-rsa 2048if usingssh-keygenas described above.
winscp.com open sftp://automate:[email protected]/ -hostkey="ssh-rsa 2048 x4DeZzv4jcWEk2zeeJgr5JeJ+z0xA+lGa3LC0q/B+88="Previously, you’ve created an interactive session and ran some commands inside of it while connected. You only established a session once and kept it open. Although this method is efficient, it doesn’t allow you to run scripts or other commands that need to be run non-interactively.
To run winscp.com in “non-interactive” mode, you must use the /command parameter. This parameter allows you to connect to a new session, run a command, and disconnect from that session all in one command.
To demonstrate, run the below winscp.com command to copy the local file stored at C:\abc\abc.txt to the remote host’s (13.213.61.127) /tmp directory.
You’ll notice that the /command parameter supports two arguments as strings: the command to create the session (open sftp://adam:[email protected]/tmp) and the command to actually run in the session (put C:\abc\abc.txt).
# Copying the file abc.txt using winscp.com on the remote servers tmp directory.
WinSCP.com /command "open sftp://adam:[email protected]/tmp" "put C:\\abc\\abc.txt"
Searching for host...
Connecting to host...
Authenticating...
Using username "adam".
Authenticating with pre-entered password.
Authenticated.
Starting the session...
Session started.
Active session: [1] [email protected]
C:\abc\abc.txt | 0 B | 0.0 KB/s | binary | 0%
Running single commands on remote computers is fine when you’re performing some ad-hoc management task. But single commands won’t work if you’re trying to automate some process in a remote session. To do that, you need to look into the /script parameter.
1. To demonstrate the /script parameter, open your favorite text editor and create a text file called upload_file_script.txt on your desktop using your favorite editor.
2. Create a blank text file called a.txt in the /tmp directory of your remote computer.
3. Create the local directory C:\abc.
4. Paste the below contents into upload_file_script.txt and save it. You’ve now created a WinSCP script!
In summary, the below script downloads the a.txt file from the /tmp remote directory and uploads it back to /tmp as new_file.txt.
 # Connect to remote machine
 open sftp://automate:[email protected]/  -hostkey="ssh-rsa 2048 x4DeZzv4jcWEk2zeeJgr5JeJ+z0xA+lGa3LC0q/B+88="
 # Change remote directory
 cd /tmp
 # Download file to the local directory C:\abc
 get a.txt C:\abc\
 # Disconnect
 close
 # Again Connect
 open sftp://automate:[email protected]/ -hostkey="ssh-rsa 2048 x4DeZzv4jcWEk2zeeJgr5JeJ+z0xA+lGa3LC0q/B+88="
 # Change the remote directory
 cd /tmp
 # Upload the file to current working directory
 put C:\abc\new_file.txt
 # Disconnect
 close
 # Exit WinSCP
 exit
5. Now, execute the script file with the following WinSCP command using the /script parameter providing the path to the script just created.
The
/ini=nulparameter switch tells WinSCP to ignore the site configuration you’re currently connected to and will not save the configuration on exit.
   > winscp.com /ini=nul /script=upload_file_script.txt
   Searching for host…
   Connecting to host…
   Authenticating…
   Using username "automate".
   Authenticating with pre-entered password.
   Authenticated.
   Starting the session…
   Session started.
   Active session: [1] [email protected]
   /tmp
   a.txt                     |           10 B |    0.0 KB/s | binary | 100%
   Session '[email protected]' closed.
   No session.
   Searching for host…
   Connecting to host…
   Authenticating…
   Using username "automate".
   Authenticating with pre-entered password.
   Authenticated.
   Starting the session…
   Session started.
   Active session: [1] [email protected]
   /tmp
   C:\abc\new_file.txt       |            0 B |    0.0 KB/s | binary |   0%
   Session '[email protected]' closed.
   No session.
As you learned earlier, WinSCP can connect to a remote host in one of two ways; password or certificate-based or public-key authentication. If using public-key authentication, you must provide winscp.com with a private key. But not all private keys are created equal.
If, for example, you have a private key in PEM format generated by the AWS EC2 service but want to use the popular SSH utility, Putty, you’re stuck. But WinSCP can help by converting keys for you.
Using the /keygen parameter, winscp.com can convert keys to various formats for you. To do that:
- Use the
/keygenparameter followed by the key to convert (PEM in this case). - Specify the
-oparameter and provide the output file path of the new key type. - Optionally, specify the
-cparameter and provide a comment.
.\WinSCP.com /keygen C:\Users\shanky\Desktop\testing.pem -o C:\Users\shanky\Desktop\testing.ppk -c "Converted from OpenSSH format"Conclusion
WinSCP is a free tool with a whole lot of features. With this CLI guide and the WinSCP GUI Guide, you should now understand what’s possible with this feature-rich tool! From transferring files, running commands, running scripts, and even converting key types for you, WinSCP can do a lot.
What are you plans for using WinSCP now?