Средство проверки системных файлов — это служебная программа в Windows, которая проверяет наличие проблем с файлами на компьютере. Чтобы запустить ее, выполните следующие действия.
-
Убедитесь, что установлены последние обновления для Windows, а затем перезапустите компьютер. Дополнительные сведения см. в статье Обновление Windows.
-
В поле поиска на панели задач введите командную строку и щелкните правой кнопкой мыши или нажмите и удерживайте командную строку (классическое приложение) в списке результатов. Выберите Запуск от имени администратора, а затем —Да.
-
Введите DISM.exe /Online /Cleanup-image /Restorehealth (обратите внимание на пробел перед каждой косой чертой «/»), а затем нажмите ВВОД. (Примечание. Запуск и завершение этого шага может занять несколько минут.)
-
После того как появится сообщение «Операция успешно завершена», введите sfc /scannow (обратите внимание на пробел между «sfc» и «/») и нажмите клавишу ВВОД.
-
Когда появится сообщение «Проверка 100 % завершена», введите exit и нажмите клавишу ВВОД.
Дополнительные сведения о системной проверке файлов
Нужна дополнительная помощь?
Нужны дополнительные параметры?
Изучите преимущества подписки, просмотрите учебные курсы, узнайте, как защитить свое устройство и т. д.
В сообществах можно задавать вопросы и отвечать на них, отправлять отзывы и консультироваться с экспертами разных профилей.
 Проверка целостности системных файлов Windows 10 может пригодиться в том случае, если у вас есть основания полагать, что такие файлы были повреждены или же возникли подозрения о том, что какая-либо программа могла изменить системные файлы операционной системы.
В Windows 10 присутствует два инструмента для проверки целостности защищенных системных файлов и их автоматического восстановления при обнаружении повреждений — SFC.exe и DISM.exe, а также команда Repair-WindowsImage для Windows PowerShell (использующая DISM для работы). Вторая утилита служит дополнением первой, в случае, если SFC не удается восстановить поврежденные файлы.
Примечание: описываемые в инструкции действия безопасны, однако, в том случае, если до этого вы проделывали какие-либо операции, связанные с заменой или изменением системных файлов (например, для возможности установки сторонних тем и т.п.), в результате восстановления системных файлов, эти изменения будут отменены.
Использование SFC для проверки целостности и исправления системных файлов Windows 10
Многим пользователям знакома команда проверки целостности системных файлов sfc /scannow которая автоматически проверяет и исправляет защищенные системные файлы Windows 10.
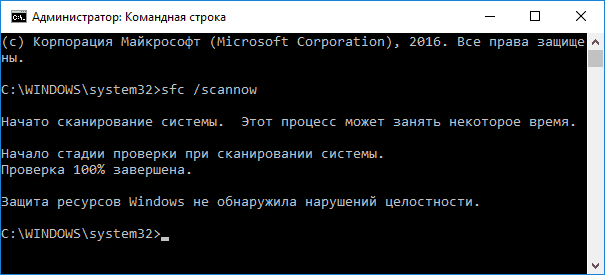
Для запуска команды стандартно используется командная строка, запущенная от имени администратора (запустить командную строку от администратора в Windows 10 можно, введя «Командная строка» в поиске в панели задач, затем — правый клик по найденному результату — Запуск от имени администратора), вводим в нее sfc /scannow и нажимаем Enter.
После ввода команды, начнется проверка системы, по результатам которой найденные ошибки целостности, которые можно исправить (о том, какие нельзя — далее) будут автоматически исправлены с сообщением «Программа защиты ресурсов Windows обнаружила поврежденные файлы и успешно их восстановила», а в случае их отсутствия вы получите сообщение о том, что «Защита ресурсов Windows не обнаружила нарушений целостности».
Также имеется возможность проверить целостность конкретного системного файла, для этого можно использовать команду
sfc /scanfile="путь_к_файлу"
Однако при использовании команды есть один нюанс: SFC не может исправить ошибки целостности для тех системных файлов, которые используются в настоящий момент времени. Чтобы решить проблему, можно запустить SFC через командную строку в среде восстановления Windows 10.
Запуск проверки целостности Windows 10 с помощью SFC в среде восстановления
Для того, чтобы загрузиться в среде восстановления Windows 10, вы можете использовать следующие способы:
- Зайти в Параметры — Обновление и безопасность — Восстановление — Особые варианты загрузки — Перезагрузить сейчас. (Если пункт отсутствует, то вы можете также использовать такой метод: на экране входа в систему, кликните по значку «вкл» справа внизу, а затем, удерживая Shift, нажмите «Перезагрузка»).
- Загрузиться с заранее созданного диска восстановления Windows.
- Загрузиться с установочного диска или загрузочной флешки с дистрибутивом Windows 10, а в программе установки, на экране после выбора языка, слева внизу выбрать «Восстановление системы».

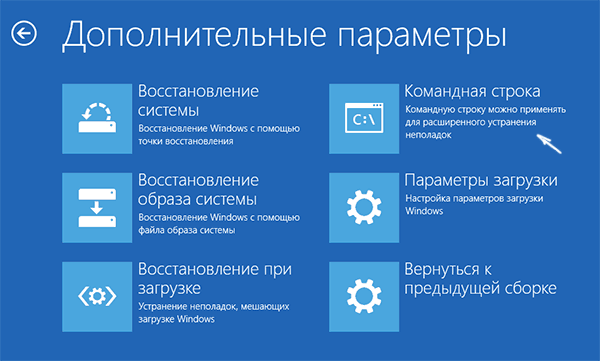
- После этого, зайдите в «Поиск и устранение неисправностей» — «Дополнительные параметры» — «Командная строка» (в случае если вы использовали первый из указанных выше способов, вам также потребуется ввести пароль администратора Windows 10). В командной строке по порядку используйте следующие команды:
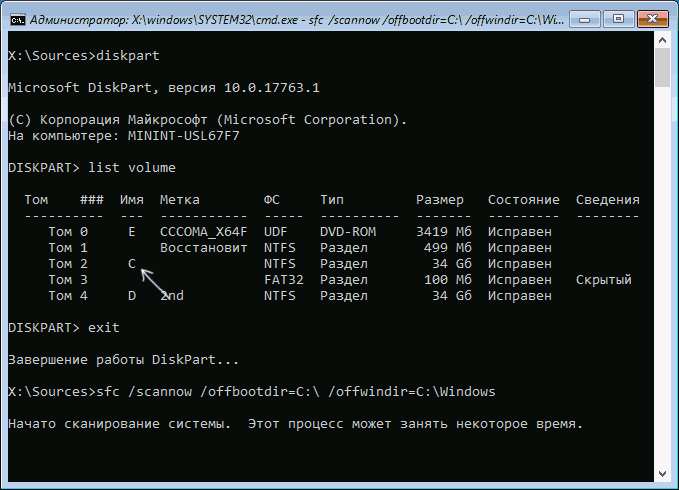
- diskpart
- list volume
- exit
- sfc /scannow /offbootdir=C:\ /offwindir=C:\Windows (где C — раздел с установленной системой, а C:\Windows — путь к папке Windows 10, у вас буквы могут отличаться).

- Запустится сканирование целостности системных файлов операционной системы, при этом в этот раз команде SFC будет доступно восстановление всех файлов, при условии, что не повреждено хранилище ресурсов Windows.
Сканирование может продолжаться в течение значительного времени — пока мигает указатель подчеркивания, ваш компьютер или ноутбук не завис. По завершении закройте командную строку и перезагрузите компьютер в обычном режиме.
Восстановление хранилища компонентов Windows 10 с помощью DISM.exe
Утилита для развертывания и обслуживания образов Windows DISM.exe позволяет выявить и исправить те проблемы с хранилищем системных компонентов Windows 10, откуда при проверке и исправлении целостности системных файлов копируются оригинальные их версии. Это может быть полезным в тех ситуациях, когда защита ресурсов Windows не может выполнить восстановление файлов, несмотря на найденные повреждения. В этом случае сценарий будет следующим: восстанавливаем хранилище компонентов, а после этого снова прибегаем к использованию sfc /scannow.
Для использования DISM.exe, запустите командную строку от имени администратора. После чего можно использовать следующие команды:
Примечание: в случае, если команда восстановления хранилища компонентов не работает по той или иной причине, вы можете использовать файл install.wim (или esd) со смонтированного ISO образа Windows 10 (Как скачать Windows 10 ISO с сайта Microsoft) в качестве источника файлов, требующих восстановления (содержимое образа должно соответствовать установленной системе). Сделать это можно с помощью команды:
dism /Online /Cleanup-Image /RestoreHealth /Source:wim:путь_к_файлу_wim:1 /limitaccess
Вместо .wim можно использовать файл .esd тем же образом, заменив в команде все wim на esd.
При использовании указанных команд, журнал выполненных действий сохраняется в Windows\Logs\CBS\CBS.log и Windows\Logs\DISM\dism.log.
DISM.exe также можно использовать в Windows PowerShell, запущенном от имени администратора (запустить можно из меню правого клика по кнопке Пуск) с помощью команды Repair-WindowsImage. Примеры команд:
- Repair-WindowsImage -Online -ScanHealth — проверка наличия повреждений системных файлов.
- Repair-WindowsImage -Online -RestoreHealth — проверка и исправление повреждений.
Дополнительные методы восстановления хранилища компонентов, если описанные выше не срабатывают: Восстановление хранилища компонентов Windows 10.
Как видите, проверка целостности файлов в Windows 10 — не такая уж и сложная задача, которая порой может помочь исправить самые разные проблемы с ОС. Если не смогла, возможно, вам поможет что-то из вариантов в инструкции Восстановление Windows 10.
Как проверить целостность системных файлов Windows 10 — видео
Также предлагаю ознакомиться с видео, где использование основных команд проверки целостности показано наглядно с некоторыми пояснениями.
Дополнительная информация
Если sfc /scannow сообщает о том, что защите системы не удалось выполнить восстановление системных файлов, а восстановление хранилища компонентов (с последующим повторным запуском sfc) не помогло решить проблему, вы можете просмотреть, какие именно системные файлы были повреждены, обратившись к журналу CBS.log. Для того, чтобы экспортировать нужные сведения из журнала в текстовый файл sfc на рабочем столе, используйте команду:
findstr /c:"[SR]" %windir%\Logs\CBS\CBS.log > "%userprofile%\Desktop\sfc.txt"
Также, по некоторым отзывам, проверка целостности с помощью SFC в Windows 10 может обнаруживать повреждения сразу после установки обновления с новой сборкой системы (без возможности исправить их, не установив новую сборку «начисто»), а также для некоторых версий драйверов видеокарт (в данном случае ошибка находится для файла opencl.dll. Если что-то из этих вариантов случилось и у вас, возможно, не следует предпринимать никаких действий.
Summary: Learn how to run SFC scannow command to fix functional errors in the system files. We’ve mentioned the steps to help you run this command in both online and offline (Safe) mode.
Contents
- System File Checker: Overview
- How to Run System File Checker in Windows 10
Your Windows system may experience malfunctioning, complete crash, or BSOD error at any moment. Out of many reasons for your system not functioning properly, missing or corrupted system files could be the primary culprit. Don’t worry, though! Windows has its own troubleshooting utility called System File Checker (SFC) that checks for corruption and other problems with system files and repairs them efficiently.
In this blog, let’s learn how to run the System File Checker on Windows 10.
You might already have an idea of what the SFC tool is all about, yet we’re sharing an overview for better understanding.
System File Checker: Overview
It is a Windows built-in troubleshooting utility that checks for system file corruption. When you run SFC/scannow command, it scans the integrity of the protected system files. Once the scanning process is finished, and it finds any error, it replaces the corrupted, incorrect, changed, or damaged file with the correct one.
Now, let’s move to the process of running the SFC scannow command.
Remember, System File Checker helps you modify the files, which may damage the files if not done correctly. Hence, either take a backup of your system files before performing the SFC scan or recover data using a robust and free data recovery software.
How to Run System File Checker in Windows 10
There are two ways to run the System File Checker – (I) Online mode and (II) Offline mode. Go through the instructions mentioned below to successfully run the SFC scan and fix the corrupted, or damaged versions of system files.
Steps to Run SFC Scannow Command in Online Mode
The System File Checker with the Scannow command can resolve multiple system errors, including the Blue Screen of Death (BSOD) errors. Follow the given steps to learn how to run a system file checker on Windows 10:
- Press Windows + X to open the Start menu.
- Next, click Command Prompt (Admin) to open it. (You can also find Windows PowerShell (Admin) be listed instead.)

- You can also directly type cmd in Windows Search Box and run Command Prompt as administrator.

- Click ‘Yes’ if it asks your permission to run the tool.
- Now, if you’re Windows 8, 8.1, or 10 users, type DISM.exe /Online /Cleanup-image /Restorehealth and hit Enter.
- Once the process is done, type SFC/scannow command and hit Enter.

- The command will check for the corrupted or damaged versions of system files. It will take some time. Make sure you don’t interrupt the process while it scans.
Once done, check if you receive any of the following messages on the screen:
Windows Resource Protection did not find any integrity violations. (It indicates there is no missing or corrupted system file.)
Windows Resource Protection could not perform the requested operation. (It indicates issues with the system files. Run System File Checker in safe mode to fix this. Additionally, ensure that the PendingDeletes and PendingRenames folders remain under %WinDir%\WinSxS\Temp.)
Windows Resource Protection found corrupt files and successfully repaired them. Details are included in the CBS.Log %WinDir%\Logs\CBS\CBS.log. (It means that the faulty system files are fixed. You can view details of the System File Checker process. )
Steps to Run SFC Scannow Command in Offline (Safe) Mode
If you face problems while running the SFC scan in online mode, try to run it offline (Safe) mode. Follow the given steps:
- Press Windows + R to open the Run dialog box.
- In the Run dialog box, type msconfig to open System Configurations.
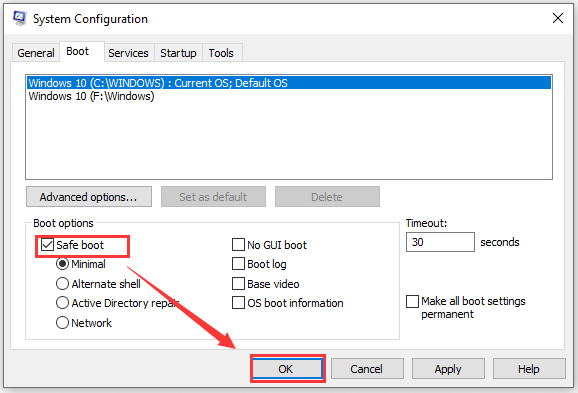
- Navigate to the Boot tab and select Safe Boot > Minimal.
- Then click Apply > OK.

You can also choose to enter the safe mode and run an SFC scan by following the given steps:
- Open System Settings > Update & Security.
- Now, navigate to Recovery, and under the Advanced Startup,click Restart now.

- The System will reboot, and you’ll reach the Troubleshoot screen.

- Now, select Advanced options > Command Prompt.

- In the command prompt, type the DISM command mentioned above and then run the SFC scan command.
- Let the process complete, as it may take a while.
- Once done, restart your system normally.
Facing errors when running SFC Scannow command?
There are some common SFC errors that you may encounter while performing this method. Check if you’ve experienced any of the following and their solutions:
SFC /scannow will not complete- stops at 73% – Fix it by first running DISM (Deployment Image Service Management) tool with the Dism.exe /online /cleanup-image /scanhealth and Dism.exe /online /cleanup-image /restorehealth respectively in the SAFE MODE. Once done, run the System File Checker.
SFC /scannow frozen Windows 10 – To fix this issue, restore your PC using System Restore and reboot your system to check if that solves the error.
SFC Scan doesn’t get past verification – It could be due to corrupted files. So you may first run the DISM command and then perform the System File Checker tool to repair missing or corrupted system files.
SFC -scannow failure – This error may occur due to corrupt system files. You can perform the DISM tool before the SFC scan command. If the error doesn’t get solved, perform a clean install of Windows 10.
In this blog, we’ve explained how to run SFC scannow command in Windows 10. Methods to run System File Checker in both online and offline (Safe) mode are well-described above. However, this process requires you to edit/modify the system files, make sure that you already have a backup of your system data before running this process. You can also use powerful data recovery software, such as Stellar Free Data Recovery software to retrieve data. It supports recovery from Windows PCs/laptops and external storage devices.
Moreover, you may sometimes face errors while running the System File Checker, as mentioned above. So read out the solutions given against them to get rid of those SFC scan errors.
About The Author
Mansi Verma
Mansi Verma is a Senior Technology Writer at Stellar®. She is a Tech enthusiast, holding over 8 years of experience in Data Recovery, IoT, Artificial Intelligence, and the Robotics technology domain. She loves researching and providing DIY solutions to solve Windows technical issues. In her spare time, she likes reading novels, and poetry. She also enjoys Travelling, Rafting, Trekking, etc.
What is System File Checker in Windows 10? What should you do when System File Checker Windows 10 fails to work? If these confusions are bothering you, come to MiniTool Solution. In this article, you will learn all the answers about the sfc /scannow command.

What Is Windows 10 System File Checker?
System File Checker (SFC) is a kind of Windows built-in utility that enables user to scan and restore corrupted system files. In Windows 10, this utility works with Windows Resource Protection (Hereinafter referred to as WRP) that can be used to protect registry keys and folders as well as critical system files.
If there are some incorrect, damaged, changed or corrupted system files in your Windows 10, you can run sfc /scannow command to scan the integrity of all protected operating system files and repair some errors with the correct version.
So how to use Windows 10 System File Checker? Let’s see the detailed information in the following part.
How to Use Windows 10 System File Checker?
Note: Before you do, please make sure you have installed the latest updates for Windows 10.
Step 1. Type “Command Prompt” in the search box on the taskbar. And then right-click the app in the list to select Run as administrator.
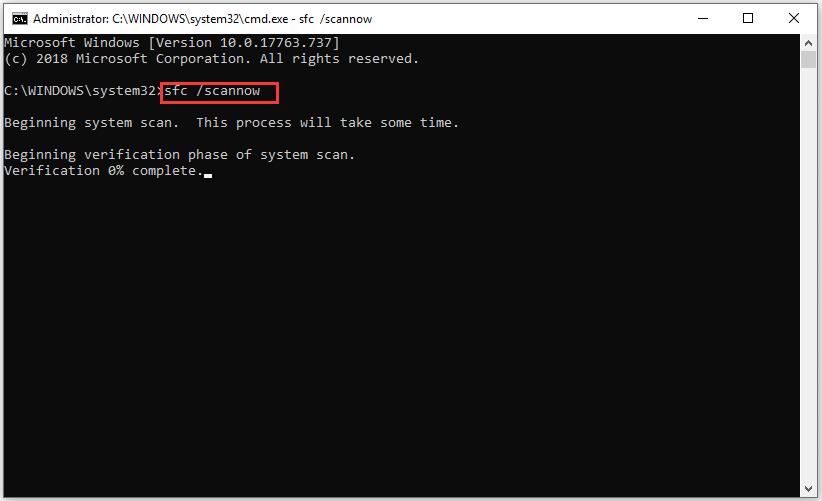
Step 2. Type sfc /scannow command in the command prompt. This process may take your much time to scan, please wait patiently.
Tip: It would be better to back up your system files beforehand in case some unexpected situations occur, causing data loss.
Step 3. It’s a good thing if Windows did not find any integrity violation or WRP found corrupt files and repaired them. Then you can restart your computer to confirm whether there are still corrupted system files.
Cases of the System File Checker Windows 10 Not Working
Although Windows 10 File System Checker is a useful utility, many users often complain that they cannot use this utility to scan and repair the corruption in Windows 10. Most of the time, they receive the following error messages when sfc /scannow fails to work.
Case 1. Not Enough Memory Resources Are Available to Process This Command
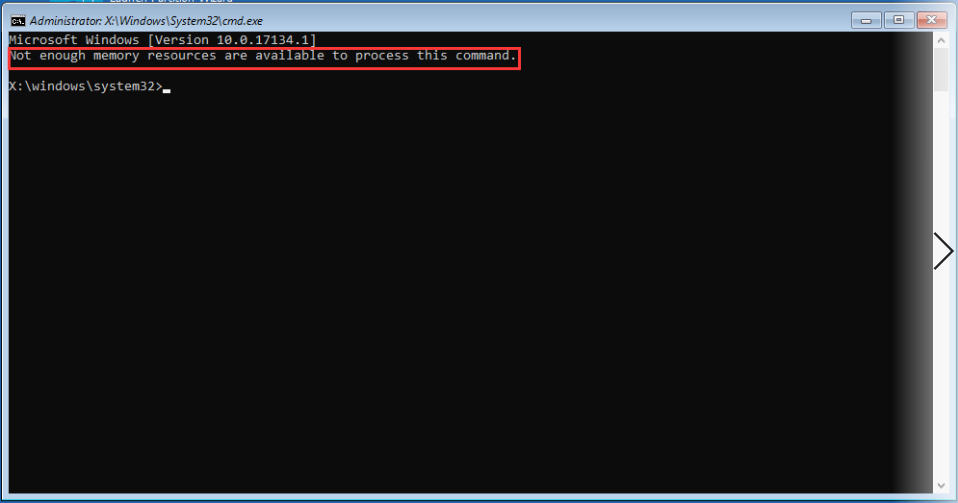
In fact, the reason causing this issue is that the resource file is not included in the components that are used to keep these copyright strings. When this command tries to read the string, it cannot find the string and provide that the reason is a low-memory condition.
You need to know there is no low-memory condition, and this problem can be ignored because it won’t impact on any features.
Case 2. Windows Resource Protection Could Not Perform the Requested Operation
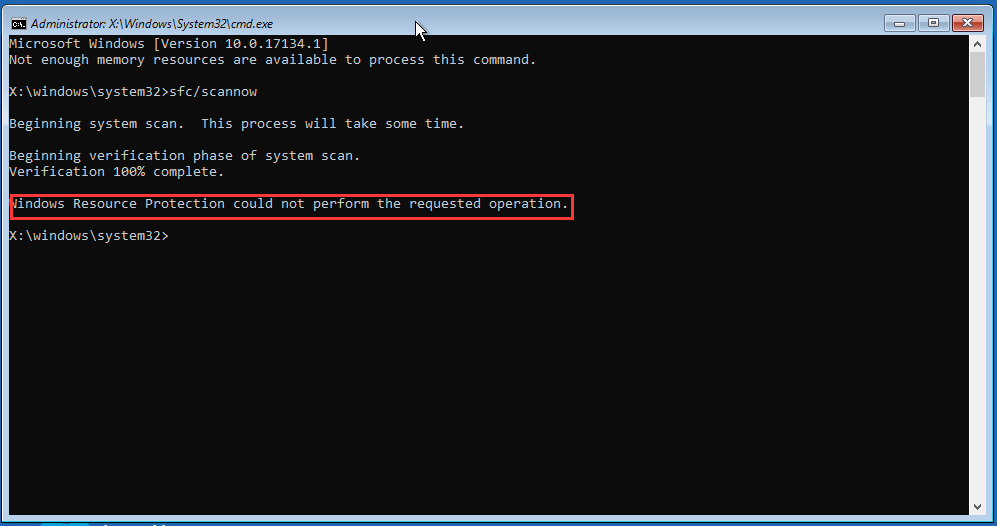
This problem usually occurs at the end of this scanning or when sfc /scannow gets struck.
Case 3. Windows Resource Protection Could Not Start the Repair Service.
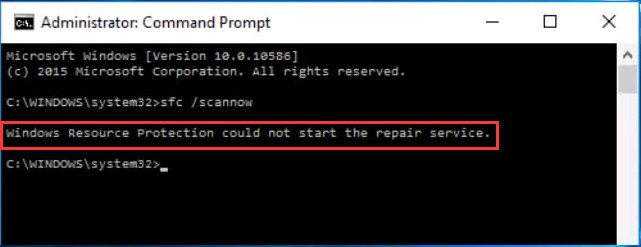
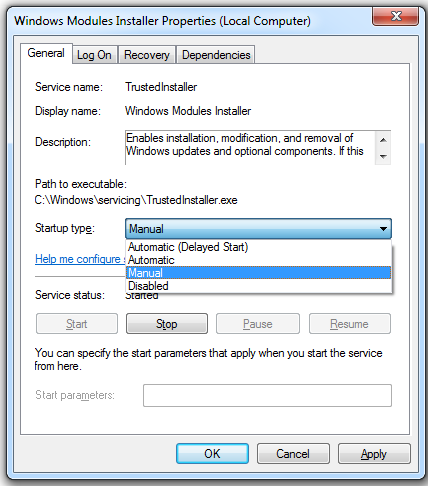
This error may emerge when Windows Modules Installer services are disabled. Such services have access to Windows Resource Protection files and registry keys.
As mentioned in the above part, WRP protects registry keys and folders as well as critical system files. In other words, if you want to run the sfc /scannow command to repair WRP resources, Windows Modules Installer services should be able to run.
Case 4. Windows Resource Protection Could Not Repair some of Corrupted Files
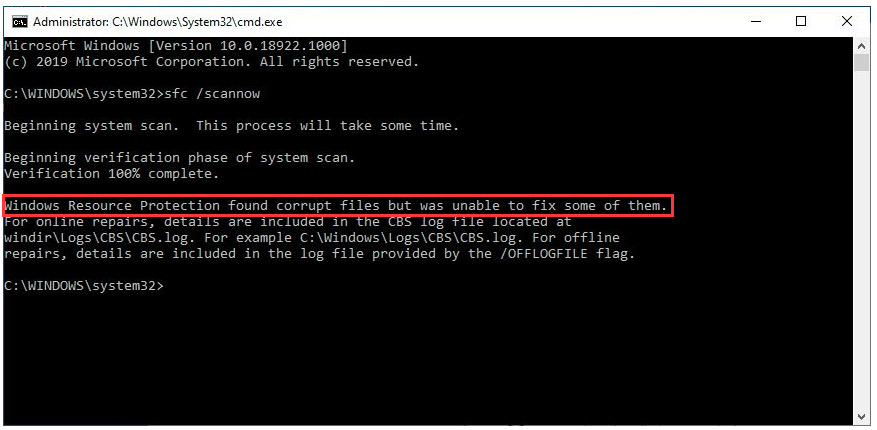
This error message means corrupted files have been found but were unable to repair some of them. And you need to view the details in the CBS log file for online repairs or in log files provided by the /OFFLOGFILE flag for offline repairs.
Do we have any alternative solutions for these different error messages? The answer is YES! In the following part, 7 accessible solutions with detailed steps will be discussed. I believe there is always the best method for you.
How to Solve System File Checker Windows 10 Not Working?
Solution 1. Run sfc /scannow Command in Safe Mode
If you come across WRP could not perform the requested operation, running sfc /scannow command in Safe Mode may be a good try. Next, we will walk you through with step-by-step guide to operate.
Step 1. Press Win + R on the keyboard simultaneously to open Run box.
Step 2. Input msconfig in the box and hit Enter to continue.
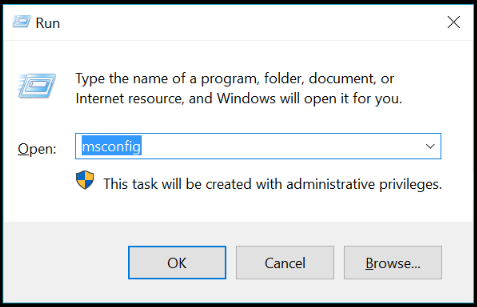
Step 3. Then navigate to Boot tab. Check Safe boot and hit OK button to continue.
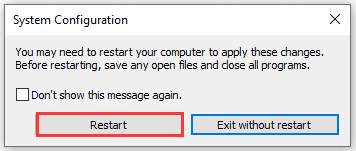
Step 4. Then you receive the system configuration. You need to restart the computer to execute this change, so click the Restart button.
Then your computer will enter into Safe Mode, and you can input sfc /scannow command in the search box again to check whether this problem still exists.
If this problem is still not solved, perhaps you may consider it results from the errors on your hard disk. You can try to check the hard disk. There are three major solutions to check hard disk errors. Let’s see the following part.
Solution 2. Use the Check File System Feature of MiniTool Partition Wizard
MiniTool Partition Wizard, a professional partition management software, boasts many powerful features such as rebuild MBR, and check the file system. More important, users can enter WinPE to perform these features by creating a USB bootable disc or CD/DVD bootable disc when Windows fails to boot.
Now, let see the detailed steps to check the file system.
Step 1. Open this powerful software to get its main interface
Note: This feature cannot be used when the selected partition has no drive letter. So, you need to assign a drive letter for the partition without a drive letter in advance.
MiniTool Partition Wizard DemoClick to Download100%Clean & Safe
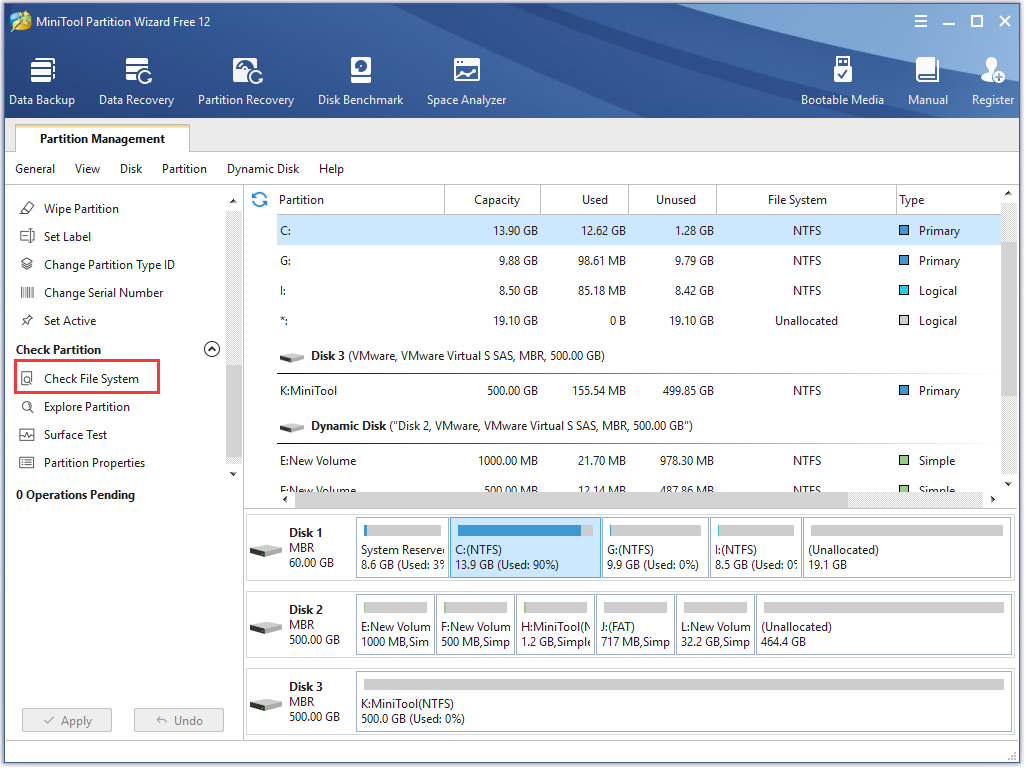
Step 2. Select the target partition and click the Check File System feature from the left action panel.
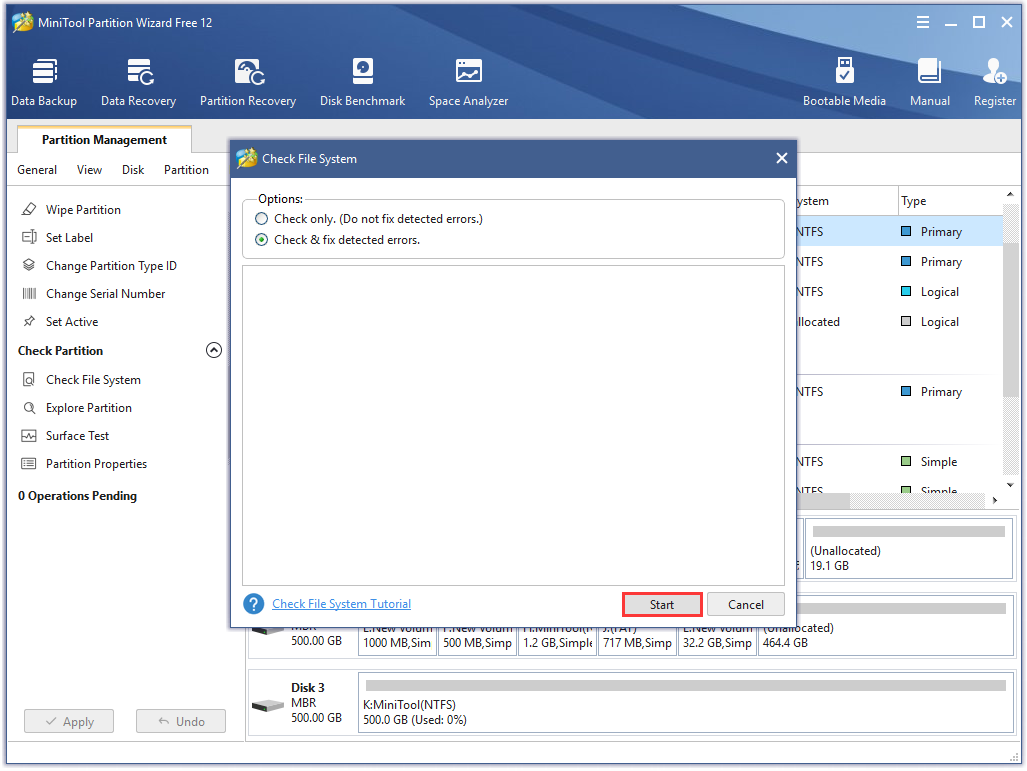
Step 3. Then there are two options listed: Check only and Check & fix detected errors. Users can choose one option based on the need. Here we take the second option for example.
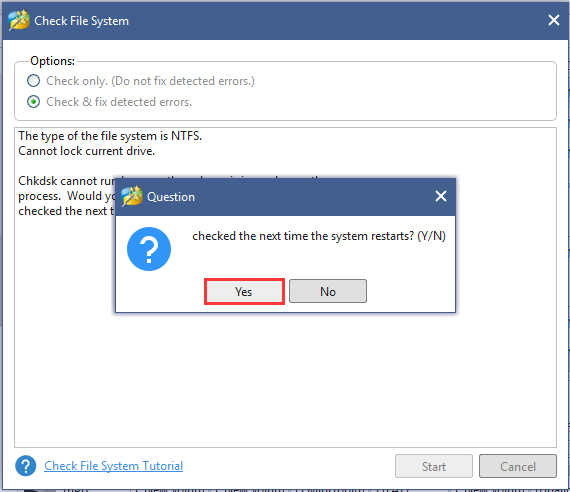
If you select the system partition, you will receive the Question note after hitting the Start button, which means the detected error will be repaired in the process of computer restart.
After finishing all the above steps, you can try to run the sfc /scannow command again to see whether the issue WRP could not perform the requested operation is solved.
In addition to using this third-party software, you can also choose windows snap-in CHKDSK utility to check and repair disk errors.
Solution 3. Use CHKDSK Utility to Check Hard Disk Errors
Step 1. Input cmd in the search box of Windows 10 and right-click the Command Prompt to select Run as administrator.
Step 2. Input chkdsk /r command in the Command Prompt and press Enter.
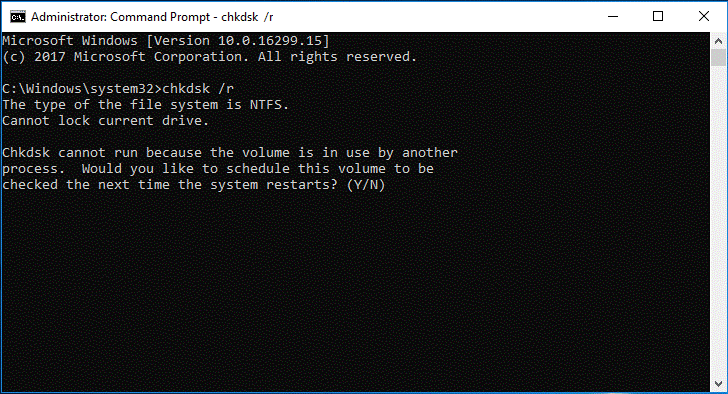
Step 3. Then type Y to continue. Later, the errors on hard disk will be fixed automatically during the process of restarting.
Step 4. Then exit the command prompt and restart your computer.
In the same way, you can run the sfc /scannow command to check whether this issue is solved.
Solution 4. Run Startup Repair
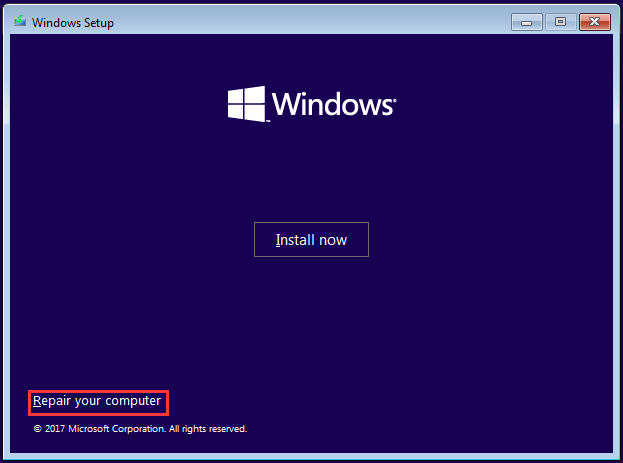
Step 1. You need to connect your Windows 10 installation disc with your computer and boot your Windows from it. Then you will enter the welcome interface and click Next to continue.
Step 2. In the pop-up window, click Repair your computer in the bottom left corner to continue.
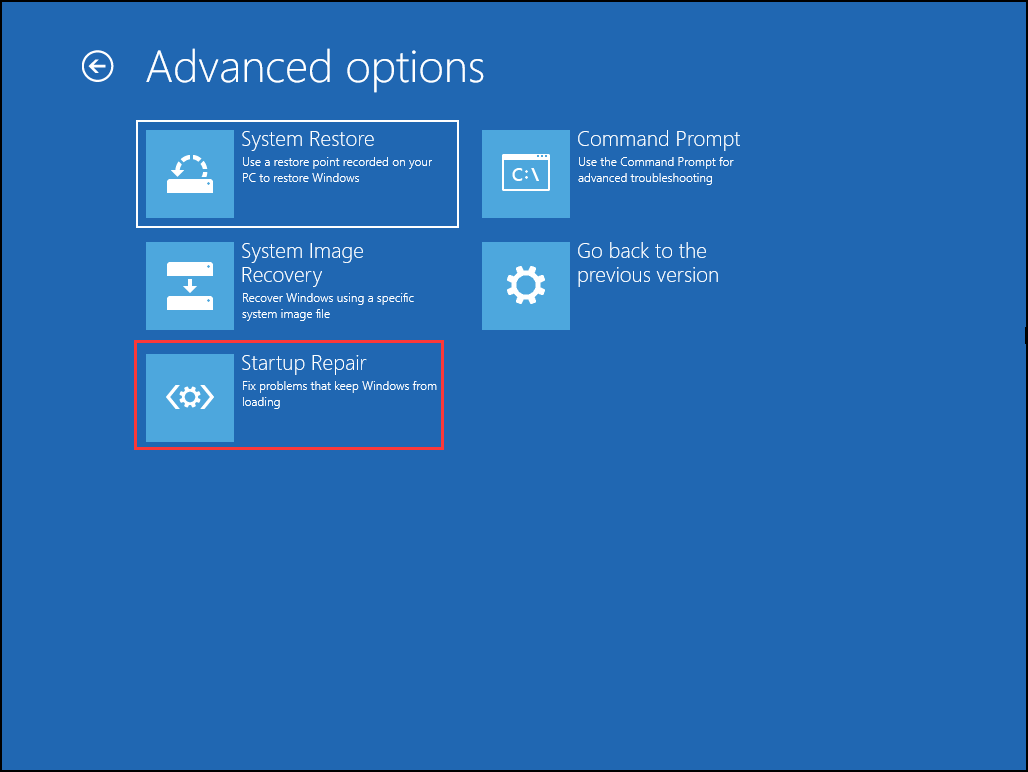
Step 3. Then in the boot menu, click Troubleshoot, Advanced options, Startup Repair one by one. Then you need to wait a few minutes patiently to repair your computer.
After this process is finished, you can restart your computer to check whether this issue is solved and try to run sfc /scannow again.
Solution 5. Change the Security Descriptors on the Winsxs Folder
One of the possible causes for System File Checker Windows 10 failing is that this utility cannot access the winsxs folder, which exists some errors with the folder’s security descriptors. You can have a try to get rid of the errors through the following steps.
Step 1. Input cmd in the search box and right-click this app to select Run as administrator.
Step 2. In the Command Prompt, type ICACLS C:Windowswinsxs and hit Enter.
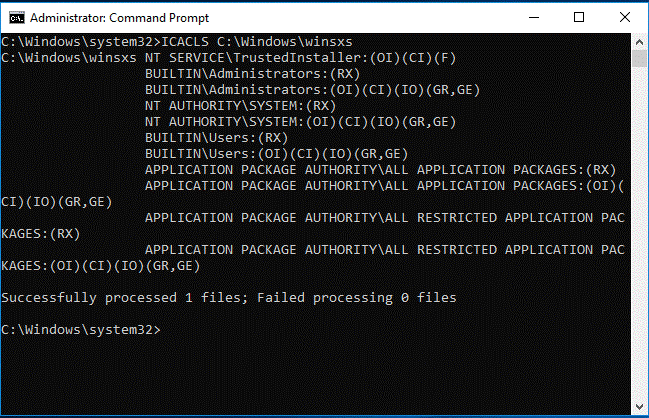
Step 3. After executing this command successfully, exit the elevated Command Prompt. Then restart your computer and run the sfc /scannow command again to check whether this issue is solved.
Well, if all above solutions are still not working, perhaps you can try to run Startup Repair.
How to deal WRP could not start repair service? Please keep reading the following steps to solve this issue.
Solution 6. Enable Windows Modules Installer
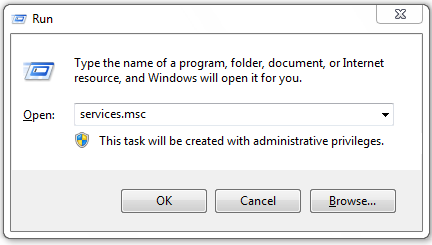
Step 1. Press Win + R on the keyboard simultaneously to open the Run dialog. Then input services.msc in the box and hit Enter to continue.
Step 2. Find Windows Modules Installer and double click it in the pop-up window.
Step 3. In the Windows Modules Installer Properties window, set Startup type as Manual, then click Apply and OK to confirm this change.
Step 4. After that, open the Command Prompt and type cmd in the search box. Then right-click this app to choose Run as administrator.
Step 5. In the pop-up window, type sc config trustedinstaller start= demand command and hit Enter. After changing service config successfully, type net start trustedinstaller command and hit Enter.
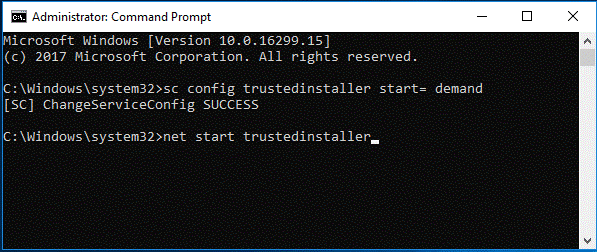
Now, you can restart your computer and try to run sfc /scannow command again.
Solution 7. Run DISM Restorehealth Command
What should you do if you encounter WRP found the corrupt file but could not repair some of the corrupted files? It a good try to run the DISM Restorehealth command.
Step 1. Type cmd in the search box and right-click this app to select Run as administrator.
Step 2. In the pop-up window, input DISM.exe /Online /Cleanup-Image /Restorehealth command and hit Enter.
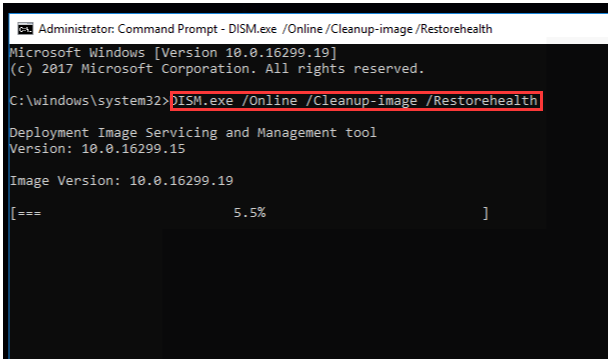
After finishing this command, you can re-run sfc /scannow command to make sure all corrupted system files are fixed.
Right now, all accessible solutions about Windows 10 System File Checker not working are told to you. If these issues are still not solved, you may consider whether there are bad sectors on the hard disk. You can make a surface test for this hard drive.
Thanks for this timely post, I have solved Windows resource protection could not perform the requested operation. Now, have a try! Click to tweet
Bottom Line
In a word, this article mainly talks about how to use System File Checker in Windows 10. And if System File Checker Windows 10 Not Working occurs, how to quickly fix it. Now, it is your turn to have a try.
Besides, welcome to leave your ideas in the comment area. If you have any questions, please contact us via the email [email protected].
System File Checker FAQ
What files does SFC check?
The SFC command can be used to check and replace the corrupted system files in your Windows. The sfc / scannow is a useful command when you encounter some issues with the protected system files like many .dll files.
Why do files get corrupted?
The major cause behind file corruption is the problems with your storage devices. If there are bad sectors on the hard drive, your files may become corrupted. Besides, a power outage or crashes of your computer can also lead to file corruption.
What does a corrupted file mean?
Corrupted files indicate that you will not be able to operate or use these files as normal. In most cases, you can use System File Checker to scan and replace them with an earlier saved version.
Where is the Windows Update database stored?
Windows update database is a special folder that is stored in your update installation files. You can navigate to the root of your system drive and find the folder C:WindowsSoftwareDistributionDownload.
- Как использовать sfc scannow в Windows?
- Атрибуты для команды sfc
- Как использовать дополнения?
- Как восстановить файлы Windows, находясь в другой системе?
Служба sfc в Windows позволяет выполнять проверку и восстановление файлов системы автоматически. Утилита может найти повреждения компонентов ОС и исправить их. Она работает через Командную строку. Для службы доступно несколько различных параметров и атрибутов. Рассмотрим, как использовать команду и дополнения к ней.
Как использовать sfc scannow в Windows?
Команда sfc /scannow работает в консоли Windows. Чтобы выполнить ее, нужно запустить Командную строку с правами администратора. Для этого:
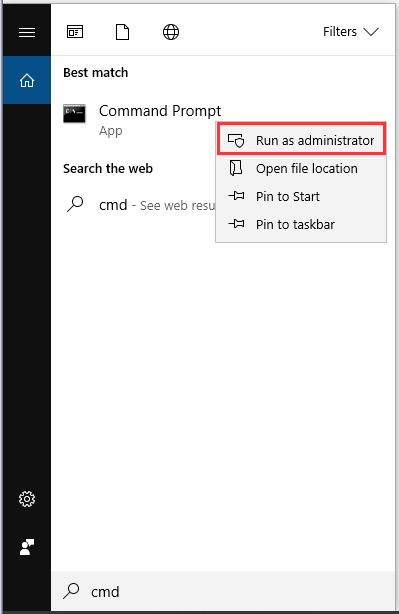
1. Введите в поиске на строке задач или в меню Пуск команду cmd
![]()
2. Найдите в результатах поиска Командную строку, кликните по ней ПКМ и выберите опцию запуска от имени администратора.

3. В открывшемся окне консоли введите команду sfc /scannow и нажмите Enter на клавиатуре. Это запустит выполнение службы.
4. Завершив работу, утилита выведет на экран результат выполнения и сообщит, были ли найдены и исправлены повреждения.
5. Перезагрузите компьютер, чтобы завершить процесс восстановления.
Эта последовательность действий позволяет выполнить проверку и исправление повреждений системных файлов в Командной строке стандартным способом.
Атрибуты для команды sfc
Для выполнения сервиса sfc в Windows существует несколько дополнений, которые
помогают оптимизировать ее работу. Рассмотрим их подробнее. /?
Выводит в окно Командной строки подробную справку о доступных атрибутах утилиты sfc.
/scannow
Стандартный и наиболее распространенный атрибут. Позволяет выполнить полную проверку файлов операционной системы и сразу восстановить их, если это будет возможно. Обычно после использования команды sfc с этим параметром требуется перезагрузка ПК.
/verifyonly
Дополнение позволяет выполнить полную проверку системных файлов без дальнейшего восстановления. В таком случае, завершив работу, программа сообщит, были ли найдены повреждения.
/scanfile
Атрибут позволяет ограничить радиус действия службы до одного файла. Программа проверит и восстановит только его. Использовать параметр нужно с указанием полного пути к нужному файлу после знака «=». Например: /scanfile=C: \Windows\System32\ieframe. dll.
/offwindir и /offbootdir
Используются в тех случаях, когда проверка установленной ОС выполняется в другой системе (например, в WinPE) или в автономном режиме. Для опции /offbootdir после знака «=» нужно указать путь к каталогу загрузки проверяемой Windows. Например: /offbootdir=C: \Windows. Для /offwindir потребуется ввести путь к корню раздела, в который установлена система. Например: /offwindir=C: \.
Как использовать дополнения?
Все атрибуты для sfc нужно ставить после команды через пробел, не забывая ставить знак «/» перед каждым параметром. Например:
sfc /verifyonly (позволит выполнить проверку без восстановления)
sfc /scannow (выполнит поиск и устранение повреждений)
sfc /scanfile=C: \Windows\System32\ieframe.dll (проверит и восстановит только указанный файл)
sfc /offwindir=C: \ /offwindir=C: \Windows (выполнит проверку системы, установленной на диске «C», находясь в другой копии Windows)
Атрибуты позволяют оптимизировать работу утилиты под текущую ситуацию.
Как восстановить файлы Windows, находясь в другой системе?
Если вы загрузились в другую копию Windows (например, WinPE) и вам нужно проверить файлы ОС, установленной на компьютер, для этого также можно использовать команду sfc. В таком случае потребуется использовать некоторые дополнительные опции, чтобы программа сработала корректно и восстановила нужную систему. Нужно использовать атрибуты /offwindir и /offwindir после sfc. Команда будет выглядеть следующим образом:
sfc /offwindir=C: \ /offwindir=C: \Windows
Обратите внимание на то, что раздел с нужной копией Windows может быть помечен другой буквой. Например, в WinPE диск с установленной на компьютер ОС обычно получает метку «D». Перед выполнением команды стоит проверить буквы дисков в Проводнике, чтобы указать путь к системе корректно.