Предисловие
Во внутренней сетевой среде мы часто используем NAS или Samba для подключения сетевых дисков в Windows, чтобы облегчить совместное использование и обмен данными в реальном времени пользователями локальной сети. Но когда любой файл, хранящийся в сети или подключенной сети, удаляется, файл будет удален безвозвратно. Он не попадает в корзину локального компьютера и не попадает в корзину сервера. Я искал много методов в mydigitallife и microsoft technet через Google, но для различных операционных систем и сложных ситуаций, связанных с управлением пользователями домена, Простое использование модификаций реестра может больше не поддерживать расширение спроса. Использование сетевой корзины во всех методах может легко решить проблему корзины на подключенном сетевом диске.
Используйте сетевую корзину, чтобы настроить «корзину» для локальной сети.
История обновлений
20 апреля 2018 г. — Первый вариант
Прочтите исходный текст — https: //wsgzao.github.io/post/network-recycle-bin/
Расширенное чтение
Network Recycle Bin Tool — http://www.networkrecyclebin.info/index.html
Как включить корзину на подключенном сетевом диске
Подключенный диск — это не что иное, как подключение локального диска к специально выделенному общему каталогу или папке на другом компьютере. После сопоставления диска вы можете получить доступ к общему ресурсу и обращаться с ним так, как если бы он был локальным для вашей системы. Вы можете подключить несколько дисков компьютера к общим ресурсам и использовать это сетевое пространство.
При удалении любого файла, хранящегося в сети или подключенной сети, файл будет удален без возможности восстановления. Он не попадет ни в корзину локального компьютера, ни в корзину сервера. Чтобы избежать такой потери данных в будущем, вы можете включить корзину на подключенном сетевом диске. Следуйте инструкциям ниже, чтобы включить корзину на подключенном сетевом диске.
- Подключите сетевой диск к общему сетевому ресурсу, который вы хотите использовать. Не забудьте повторно подключить диск после входа в систему.
- Затем перейдите в C:> Пользователь> Имя пользователя.
- Щелкните правой кнопкой мыши любую папку в расположении и выберите Свойства> Вкладка «Местоположение».
- Нажмите Переместить и найдите корневой диск (сопоставленный на шаге 1), затем нажмите, чтобы выбрать папку.
- Затем нажмите ОК, и когда появится диалоговое окно, нажмите Да.
- Просто повторите эти шаги для каждого пользователя на ПК.
Примечание. Чтобы убедиться, что этот процесс работает правильно, щелкните корзину правой кнопкой мыши, перейдите в свойства и проверьте, указан ли сетевой диск в столбце местоположения корзины.
На заметку
Это относится только к файлам, доступ к которым осуществляется через подключенные сетевые диски, а не через UNC-пути. Приведем пример: если вы сопоставили \ server \ share с E: и что-то удалили с диска E :, оно попадет в корзину. Однако, если вы перейдете к \ server \ share и сотрете файл, он будет удален безвозвратно.
Enable Recycle Bin on mapped network drives
Решение 1. Я протестировал его в Windows 10, перенаправив местоположение файла, но Windows 7 не удалось.
https://forums.mydigitallife.net/threads/tip-network-recycle-bin.16974/
You may have noticed that when you delete a file stored on a network location or mapped network drive that the file is permanently deleted. It does not go to the local computer’s recycle bin and does not go to the server’s recycle bin. I have discovered a work-around that extends recycle bin coverage to include mapped network drives. The solution is not 100% perfect, but works extremely well and does not rely on Shadow Copies or 3rd-party software.
Here’s how:
- Map a network drive to the network share you want to use. Make sure that the drive is re-connected on logon. If you don’t know how to do this, search Google.
- Browse to C:\users<user name>.
- Right-click on one of the folders in this location (I chose saved games) and click properties.
- Select the Location tab.
- Click Move, browse to to root of the drive you mapped in step 1, and click Select Folder.
- Click Ok and click yes in the dialogue box that appears.
- Repeat these same steps for all users on the computer.
Вариант 2, устраните проблему с корзиной, изменив реестр, фактический тест смешанный, универсальность невысока, не рекомендуется
https://social.technet.microsoft.com/Forums/windows/en-US/a349801f-398f-4139-8e8b-b0a92f599e2b/enable-recycle-bin-on-mapped-network-drives
Just copy and paste the following into notepad and save it as «Network Recycling Bin — auto make registry file.bat»
echo off
REM ========== MAIN FUNCTION  ========================

Call :CreateREGfile
PAUSE
goto :eof


REM ========== SUB FUNCTIONS  ========================

:CreateREGfile
set /p RelativePath=Enter current mapped path of drive (e.g. X:\FileShare\D_Drive):
REM replace \ with \\ (for reg value its a requirement)
Set RelativePath=%RelativePath:\=\\%


set /p MaxBinSize_Dec=Enter max size (in mb) (eg 11gb=11000):
call :toHex %MaxBinSize_Dec% MaxBinSize_Hex


Set outputREG="Network Recycling Bin - %RelativePath:~0,1% Drive (%MaxBinSize_Dec%mb).reg"


call :MakeGUID_VBS NewGUID
REM echo My new GUID : %NewGUID%


echo Windows Registry Editor Version 5.00 > %outputREG%
echo [HKEY_LOCAL_MACHINE\SOFTWARE\Microsoft\Windows\CurrentVersion\Explorer\FolderDescriptions\%NewGUID%] >> %outputREG%
echo "RelativePath"="%RelativePath%" >> %outputREG%
echo "Category"=dword:00000004 >> %outputREG%
echo "Name"="NetworkDrive2RecyclingBin_%NewGUID:~1,5%" >> %outputREG%
      REM The "Name" value is required, but is not the name that will be shown if you right-click on the Recycle Bin and select properties. That will be autoset to the network drive name.
echo.>> %outputREG%
echo [HKEY_CURRENT_USER\Software\Microsoft\Windows\CurrentVersion\Explorer\BitBucket\KnownFolder\%NewGUID%]  >> %outputREG%
echo "MaxCapacity"=dword:%MaxBinSize_Hex% >> %outputREG%
echo "NukeOnDelete"=dword:00000000 >> %outputREG%
goto :eof


:MakeGUID_VBS
echo set obj = CreateObject("Scriptlet.TypeLib") > TEMP_generateGUID.vbs
echo WScript.Echo obj.GUID >> TEMP_generateGUID.vbs
FOR /F "usebackq tokens=*" %%rin (`CSCRIPT "TEMP_generateGUID.vbs"`)DO SET RESULT=%%r
set %1=%RESULT%

del TEMP_generateGUID.vbs
goto :eof


:toDec
:: todec hex dec -- convert a hexadecimal number to decimal
::             -- hex [in]      - hexadecimal number to convert
::             -- dec [out,opt] - variable to store the converted decimal number in
SETLOCAL
set /a dec=0x%~1
( ENDLOCAL & REM RETURN VALUES
    IF "%~2" NEQ "" (SET %~2=%dec%)ELSE ECHO.%dec%
)
EXIT /b


:toHex
:: eg  call :toHex dec hex -- convert a decimal number to hexadecimal, i.e. -20 to FFFFFFEC or 26 to 0000001A
::             -- dec [in]      - decimal number to convert
::             -- hex [out,opt] - variable to store the converted hexadecimal number in
::Thanks to 'dbenham' dostips forum users who inspired to improve this function
:$created 20091203 :$changed 20110330 :$categories Arithmetic,Encoding
:$source http://www.dostips.com
SETLOCAL ENABLEDELAYEDEXPANSION
set /a dec=%~1
set "hex="
set "map=0123456789ABCDEF"
for /L %%Nin (1,1,8)do (
    set /a "d=dec&15,dec>>=4"
    for %%Din (!d!)do set "hex=!map:~%%D,1!!hex!"
)
rem !!!! REMOVE LEADING ZEROS by activating the next line, e.g. will return 1A instead of 0000001A
rem for /f "tokens=* delims=0" %%A in ("%hex%") do set "hex=%%A"&if not defined hex set "hex=0"
( ENDLOCAL & REM RETURN VALUES
    IF "%~2" NEQ "" (SET %~2=%hex%)ELSE ECHO.%hex%
)
EXIT /b


:eof
Скопировать код
Введение в средство сетевой корзины
В этой статье в основном используется клиент Network Recycle Bin Tool Personal Client Machine Edition.
Server Edition
version 6.1.1.3
This version has been designed for the server usage. You should install it on the server to monitor shared folders. When network user will delete a shared file it will copy it to the «network recycle bin». You have not install any additional software on client machines.
Personal Client Machine Edition
version 5.2.3.8
When you delete a file stored on a network location or mapped network drive that the file is permanently deleted. It does not go to the local computer’s recycle bin and does not go to the server’s recycle bin.
How to enable a recycle bin for shared folders on a network ? There is the proper solution of restoring and securing your information even after deleting it — The Network Recycle Bin Tool allows you to recover deleted files.
Once you have this tool in your system, it will automatically keep a track of all the network deleted files and you can easily recover them. Instead of removing the files, this tool sends them directly to its predefined recycle bin folder.
There are various options to tune it up. For example: you can set size limits for files stored in the Network Recycle Bin, you can define the list of network drives or network folders to track deleted files.
Additionaly it offers you the Protect Files tool which prevents deletion of network files for specified folders according the file mask. Export and import functions help you to install software with same options on network machines. The password control disallows unauthorized access.
In the long run, losing your important network files and information accidentally is not an issue these days. Instead of getting anxious and worried, feel free to download network recycle bin tool from any reliable source and make sure that you have pre-installed this recovery tool.
Как использовать Network Recycle Bin Tool
Метод использования очень прост: для установки Network Recycle Bin Tool требуется всего 4 шага, и вы можете настроить параметры для других нужд.
- Выбрать
Protect FoldersДобавьте подключенный сетевой диск, который необходимо защитить - в
OptionsПодтвердите путь хранения удаленного файла в файле, значение по умолчанию не может быть изменено - Попробуйте удалить тестовый файл на подключенном сетевом диске в
Deleted FilesВы можете увидеть удаленные файлы - Вы можете выбрать файлы для восстановления или удаления партиями и нажать
Recovery FilesилиDelete Files
Можно ли создать аналог корзины на сетевом диске?
Коллеги, доброго времени суток!
Есть ли возможность создать аналог корзины на сетевом диске для пользователей? Либо помещать все удаленные данные в такую корзину, доступную только для системного администратора? Цель — оперативное восстановление удаленных данных.
Я нашел пару программных продуктов:
www.condusiv.com/business/undelete/professional
www.1securitycenter.com/network_recycle_bin.html
Если кто-то пользуется чем-то подобным, поделитесь, пожалуйста, впечатлениями.
-
Вопрос задан
-
8670 просмотров
Пригласить эксперта
Я знаю и использую только один способ: сетевой диск поднимается не на Windows-машине, а на любом *nix сервере при помощи Samba, а далее — тривиальная настройка (man vfs_recycle, www.samba.org/samba/docs/man/manpages/vfs_recycle.8.html).
Также есть различные способы заставить локальную машину при удалении файлов на сетевом диске помещать их в локальную же корзину (на Windows 7 и выше — из коробки, а для всех — при помощи разного рода утилит).
Использую Executive Software Undelete Server Edition, работает нормально.
Для особо критичных данных кроме теневых копий деюа банальный бекап раз в 5-10-15-30 минут.
Натравить обычный ntbackup на два десятка конкретных общих файлов, критичных для вип персон компании не такая уже и большая нагрузка на сервер, схд и сеть. Раз в месяц эти архивы чистятся, чтобы не было переизбытка бекапов — файлы мелкие, но набегают пару сотен метров на каждый архив.
также есть различные способы заставить локальную машину при удалении файлов на сетевом диске помещать их в локальную же корзину (на Windows 7 и выше — из коробки
, а у меня на windows 7 SP1 удаленные файлы не помещаются в корзину, что делать?
-
Показать ещё
Загружается…
ЛАНИТ
•
Санкт-Петербург
от 80 000 ₽
10 окт. 2023, в 13:56
10000 руб./за проект
10 окт. 2023, в 13:55
2000 руб./в час
10 окт. 2023, в 13:38
1500 руб./в час
Минуточку внимания
Activate Recycle Bin in Windows Server 2019
In all Microsoft operating systems, there are certain functions already integrated into the system through which it is possible to execute certain actions both at the system level and at the applications, one of the most recognized and used is the recycle bin . Normally, when we delete an item, it goes directly to the trash and after a while we proceed with its total elimination, unless we use the Shift + Delete key combination and thus permanently delete the objects..
In the case of Windows Server 2016 and 2019, the recycle bin plays a fundamental role since it is not only where the deleted items are directed , but also has additional functions such as the following.
Features Recycle Bin
- Possibility of recovering objects such as user, equipment, OUs and other elements of the active directory that were accidentally deleted.
- The forest functional level is required to be a minimum Windows Server 2016 R2.
- The objects remain in the recycle bin for 180 days.
- Its use can be through a graphical interface and not through Windows PowerShell.
- After activation it will not be possible to disable it.
- It is not possible to retrieve sub-objects of an object in a single process.
- Activating the recycle bin automatically increases the size of the Active Directory database.
In this case we will use the Windows Server 2019 version but it is also valid for the 2016 version. If you want to know more about this latest version you can consult this tutorial:
Now TechnoWikis will explain how we can activate this bin in Windows Server 2019 and this same process applies to Windows Server 2016..
To keep up, remember to subscribe to our YouTube channel! SUBSCRIBE
Activate Recycle Bin in Windows Server 2019
Step 1
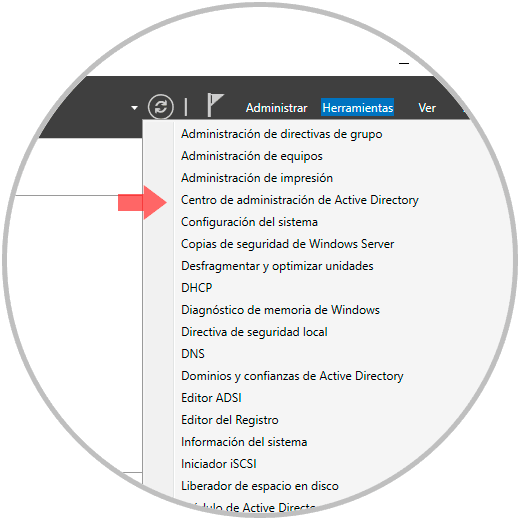
For this, we access the Server Administrator and in the «Tools» section select «Active Directory Administration Center»:
Step 2
The following window will be displayed where we will go to the left side section where we find the name of the server and the indication (local): 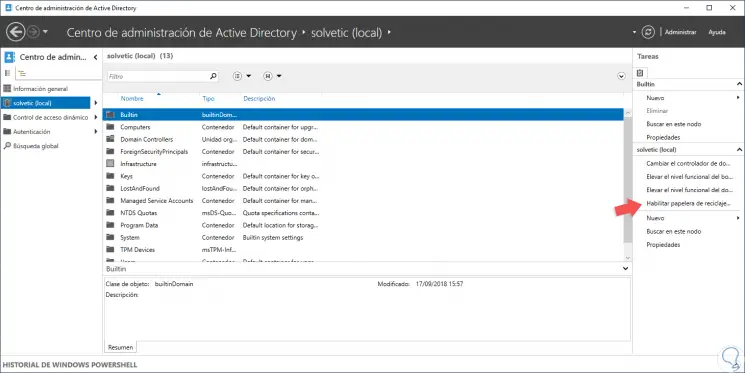
Step 3
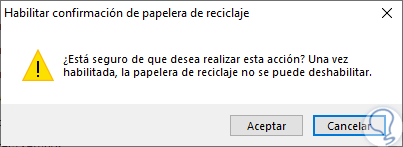
On the right side we find the “Enable recycle bin†line, we will click on it and the following message will be displayed. Click OK to confirm the enable of the recycle bin in Windows Server 2019.
Step 4
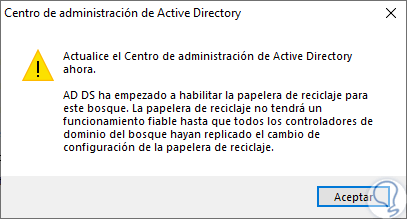
After this we will see that the process of enabling the recycle bin in the domain begins. Click OK to exit the wizard.
Step 5
There we update the Active Directory administration center and we will see that the trash is already enabled: 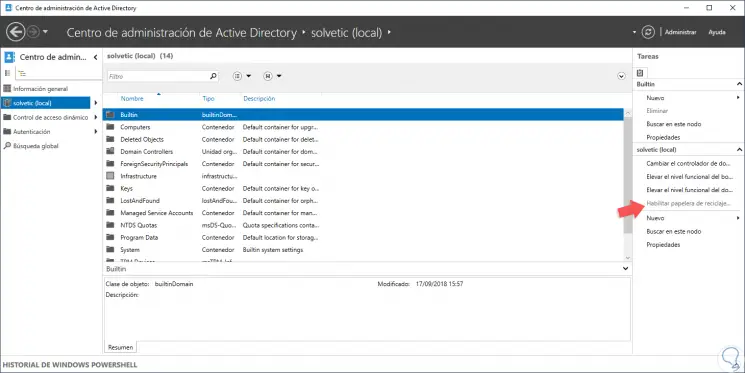
Step 6
Now, when an object is deleted, it will be placed in the “Deleted Objects†folder, and there it is enough to right click on the deleted object and select the option to restore that object to the same root from which it was deleted or select a different option: 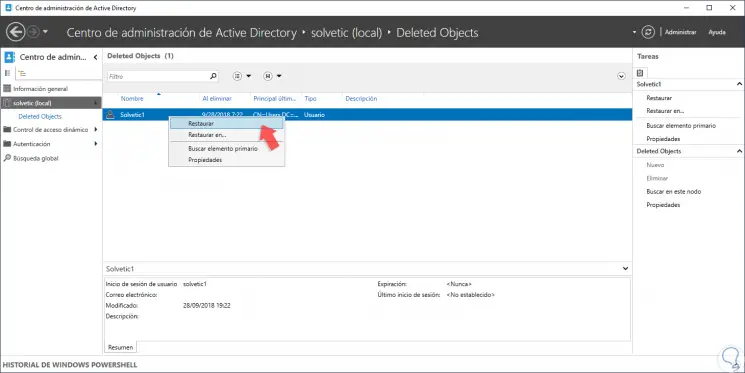
In this way, it is possible to enable the recycle bin in Windows Server 2016/2019 to take full advantage of its features in case any object is deleted without cause.
A few years ago I discovered how redirected user profile folders in Windows get Recycle Bin protection, even when the folders are redirected to a network location. This was a huge find for me, and I used this feature to add Recycle Bin coverage to some of
my mapped network drives. I shared this information on another forum here:
http://forums.mydigitallife.info/threads/16974-Tip-Network-Recycle-bin
Today I figured out a better way to achieve the same goal that doesn’t rely on user profile folder redirection, and am sharing that information for other users to try out. You might want to take a look at these forum topics for additional information:
- http://technet.microsoft.com/en-us/library/cc787939(v=ws.10).aspx
- http://blogs.technet.com/b/askds/archive/2012/07/16/managing-the-recycle-bin-with-redirected-folders-with-vista-or-windows-7.aspx
- http://msdn.microsoft.com/en-us/library/bb882665.aspx
- http://social.technet.microsoft.com/Forums/windowsserver/en-US/10bfcfb9-14f3-434e-9ffa-0289b8b32e01/folder-redirection-recycle-bin
The standard disclaimer applies — this might break stuff. I’ve only tested in Windows 8, and my testing is limited. Try this at your own risk.
This is what I’ve learned (or think I’ve learned — I might be wrong):
- Windows Vista and later store the configuration settings for the Recycle Bin for redirected user profile folders in this registry key: HKEY_CURRENT_USER\Software\Microsoft\Windows\CurrentVersion\Explorer\BitBucket\KnownFolder
- Under this key are separate keys for each redirected folder that is protected by the Recycle Bin. The keys contain the configuration information for each protected folder, and are named to match the GUIDs for «Known Folders.» A list of the Known
Folder to GUID mappings is available in one of the links above. - The registry also contains a list of «known folders» at this location: HKEY_LOCAL_MACHINE\SOFTWARE\Microsoft\Windows\CurrentVersion\Explorer\FolderDescriptions
So, I reasoned that if I could create my own custom «known folder,» I could add that to the list of folders that were protected by the Recycle Bin and protect any mapped network drive I wanted. So I looked at the list of existing «known folders»
and created a key that was similar to the Documents key. I then fiddled with the values in the key until I narrowed it down to the minimum number needed to make the recycle bin work.
This .reg file will protect a mapped X: drive with a ~50GB recycle bin. You should modify the file to fit your needs:
Windows Registry Editor Version 5.00

[HKEY_LOCAL_MACHINE\SOFTWARE\Microsoft\Windows\CurrentVersion\Explorer\FolderDescriptions\{9147E464-33A6-48E2-A3C9-361EFD417DEF}]
"RelativePath"="X:\\"
"Category"=dword:00000004
"Name"="XDrive"

[HKEY_CURRENT_USER\Software\Microsoft\Windows\CurrentVersion\Explorer\BitBucket\KnownFolder\{9147E464-33A6-48E2-A3C9-361EFD417DEF}]
"MaxCapacity"=dword:0000c7eb
"NukeOnDelete"=dword:00000000
A few things of note:
- The GUID in the above .reg file {9147E464-33A6-48E2-A3C9-361EFD417DEF} came from this PowerShell command: «{«+[guid]::NewGUID().ToString().ToUpper()+»}»
- Each «known folder»/Recycle Bin combination requires a unique GUID. If you don’t want to use PowerShell to generate a GUID, you can use an online GUID generator.
- I don’t know what the «Category» value does, but the key I copied had it set to 4, and that works, so I didn’t test any other values.
- The «Name» value is required, but is not the name that will be shown if you right-click on the Recycle Bin and select properties. (At least not in my environment.) In my environment, the name that is shown is the name of the network drive.
- Making this change adds a «Location» tab to the properties page of your mapped network drives. I suspect this could be removed by changing the «Category» value, but didn’t bother to find out.
- I only tested with mapped network drives. I suspect this would work with UNC paths as well, but I didn’t bother testing.
I hope you’re as excited to find this as I was to figure it out. Let me know if this works for you. I now plan to deploy the registry keys with Group Policy Preferences and will update this forum post with any information I discover.
Best regards
—Russel
Update: I am now using Group Policy Preferences to deploy the needed registry keys, and all my mapped network drives are now protected by the recycle bin.
Update 2: I have tested now with UNC paths, and this works fine. I still use mapped network drives, but if your environment requires UNC paths instead, you can use them. Note however that if you have a mapped network drive that points to a UNC path, and
you protect the UNC path with a registry change, if a user deletes a file from the mapped network drive that points to that UNC path, the file will be permanently deleted. See below for more details.
-
Edited by
Friday, September 26, 2014 1:13 PM
По различными причинам, случается так что какой то файл может быть удален с файлового сервера и в этом случае он будет потерян на всегда. Для того чтобы иметь возможность восстановить удаленный файл на файловом сервере samba предусмотрен модуль VFS (Virtual File System) — recycle (сетевая корзина), рассмотрим его применение.
Мое личное мнение что не стоит давать повсеместный доступ к сетевой корзине, а лучше ее вынести в отдельную общую папку и по необходимости подключать тому или иному человеку, а лучше всегда процесс восстановления удаленных файлов оставить на системном администраторе. Исходя из этого ниже будет рассмотрен именно такой сценарий, с выносом сетевой корзины в отдельную папку.
В файле конфигурации samba (/etc/samba/smb.conf) в секцию [global] добавим следующие параметры:
vfs object = recycle

recycle:repository = /samba/recycle/%S
recycle:keeptree = yes
recycle:versions = yes
recycle:touch = yes
recycle:exclude = ~$* *.tmp *.TMP *.temp *.bak *.log .DS_Store

[RECYCLE$]
path = /samba/recycle
read only = no

recycle:exclude = *.*
Пояснения по параметрам recycle:
recycle:repository — Задаем каталог расположения сетевой корзины. Если параметр не задан, то по-умолчанию сетевая корзина (.recycle) будет располагаться в корне каждой общей папки.
recycle:keeptree — Сохранять структуру каталогов для удаленных файлов.
recycle:versions — В случае если у удаленных файлов их имена совпадают, то к удаленном файлу в начале имени будет добавляться Copy #N of.
recycle:touch — Задавать дату изменения файла на время удаления файла.
recycle:exclude — Список исключений для файлов.
Сетевая корзина может располагаться только в той же FS что и общая папка для которой задается сетевая корзина. В случае если указать путь к сетевой корзине на другом диске, то в этом случае удаленные файлы не будут туда помещены, так как хард-линк можно сделать только в рамках одной FS.
Если уже используется какой-то модуль VFS, то перечисляем все объекты через пробел, например:
vfs object = recycle full_audit
Если необходимо включение сетевой корзины для какой то определенной общей папке, то тогда выше описанные параметры необходимо прописывать в секцию описания общей папки.
Что бы сетевая корзина не разрасталась, ее необходимо чистить. Для примера создадим скрипт (прим. recycle-clean.sh) для автоматического удаления файлов старше 30 дней. Содержание скрипта:
#!/bin/bash
find /samba/recycle/ -type f -mtime +30 -exec rm -rf {} \;
Добавим в cron выполнение созданного скрипта каждый день в 21:00:
7 21 * * * root /root/recycle-clean.sh
ПОНРАВИЛАСЬ ИЛИ ОКАЗАЛАСЬ ПОЛЕЗНОЙ СТАТЬЯ, ПОБЛАГОДАРИ АВТОРА
ПОНРАВИЛАСЬ ИЛИ ОКАЗАЛАСЬ ПОЛЕЗНОЙ СТАТЬЯ, ПОБЛАГОДАРИ АВТОРА
![]() Загрузка…
Загрузка…