Introduction
Environment variables are key-value pairs a system uses to set up a software environment. The environment variables also play a crucial role in certain installations, such as installing Java on your PC or Raspberry Pi.
In this tutorial, we will cover different ways you can set, list, and unset environment variables in Windows 10.
Prerequisites
- A system running Windows 10
- User account with admin privileges
- Access to the Command Prompt or Windows PowerShell
Check Current Environment Variables
The method for checking current environment variables depends on whether you are using the Command Prompt or Windows PowerShell:
List All Environment Variables
In the Command Prompt, use the following command to list all environment variables:
set
If you are using Windows PowerShell, list all the environment variables with:
Get-ChildItem Env: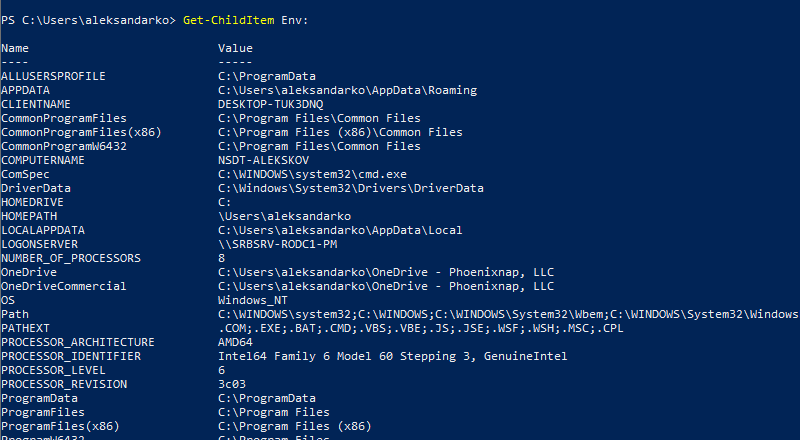
Check A Specific Environment Variable
Both the Command Prompt and PowerShell use the echo command to list specific environment variables.
The Command prompt uses the following syntax:
echo %[variable_name]%
In Windows PowerShell, use:
echo $Env:[variable_name]
Here, [variable_name] is the name of the environment variable you want to check.
Follow the steps to set environment variables using the Windows GUI:
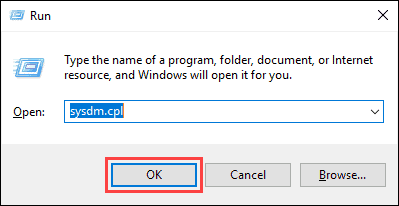
1. Press Windows + R to open the Windows Run prompt.
2. Type in sysdm.cpl and click OK.
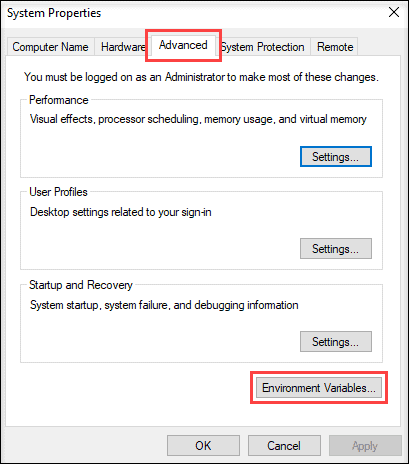
3. Open the Advanced tab and click on the Environment Variables button in the System Properties window.
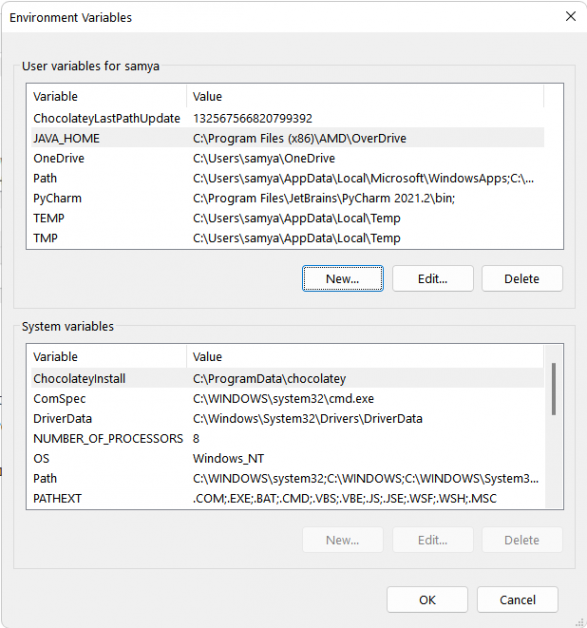
4. The Environment Variables window is divided into two sections. The sections display user-specific and system-wide environment variables. To add a variable, click the New… button under the appropriate section.
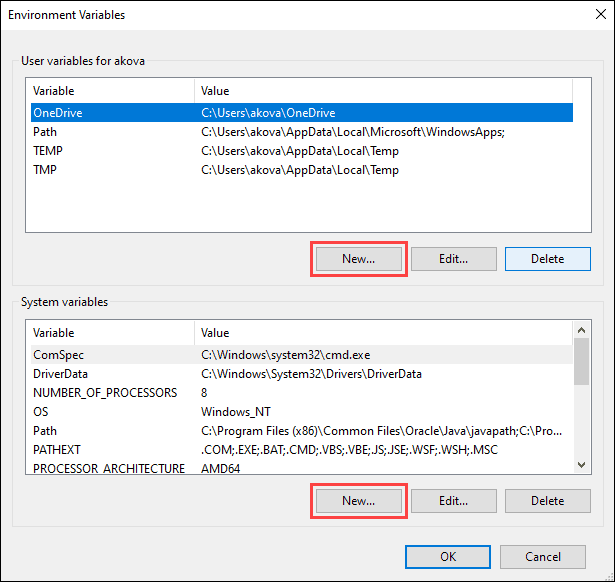
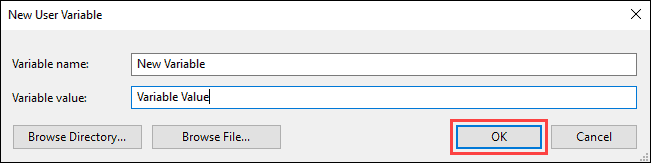
5. Enter the variable name and value in the New User Variable prompt and click OK.
Set Environment Variable in Windows via Command Prompt
Use the setx command to set a new user-specific environment variable via the Command Prompt:
setx [variable_name] "[variable_value]"Where:
[variable_name]: The name of the environment variable you want to set.[variable_value]: The value you want to assign to the new environment variable.
For instance:
setx Test_variable "Variable value"
Note: You need to restart the Command Prompt for the changes to take effect.
To add a system-wide environment variable, open the Command Prompt as administrator and use:
setx [variable_name] "[variable_value]" /M
Unset Environment Variables
There are two ways to unset environment variables in Windows:
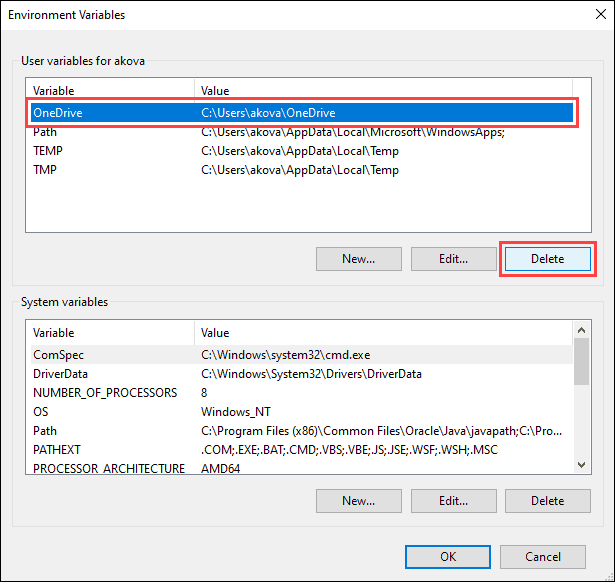
Unset Environment Variables in Windows via GUI
To unset an environment variable using the GUI, follow the steps in the section on setting environment variables via GUI to reach the Environment Variables window.
In this window:
1. Locate the variable you want to unset in the appropriate section.
2. Click the variable to highlight it.
3. Click the Delete button to unset it.
Unset Environment Variables in Windows via Registry
When you add an environment variable in Windows, the key-value pair is saved in the registry. The default registry folders for environment variables are:
- user-specific variables: HKEY_CURRENT_USEREnvironment
- system-wide variables: HKEY_LOCAL_MACHINESYSTEMCurrentControlSetControlSession ManagerEnvironment
Using the reg command allows you to review and unset environment variables directly in the registry.
Note: The reg command works the same in the Command Prompt and Windows PowerShell.
Use the following command to list all user-specific environment variables:
reg query HKEY_CURRENT_USEREnvironment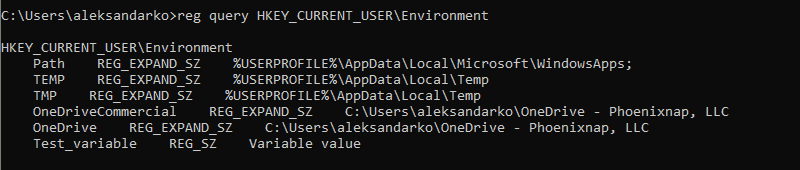
List all the system environment variables with:
reg query "HKEY_LOCAL_MACHINESYSTEMCurrentControlSetControlSession ManagerEnvironment"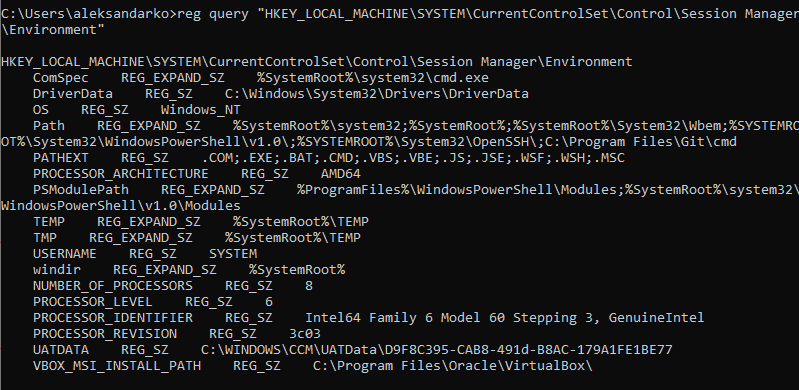
If you want to list a specific variable, use:
reg query HKEY_CURRENT_USEREnvironment /v [variable_name]
or
reg query "HKEY_LOCAL_MACHINESYSTEMCurrentControlSetControlSession ManagerEnvironment" /v [variable_name]
Where:
/v: Declares the intent to list a specific variable.[variable_name]: The name of the environment variable you want to list.
Use the following command to unset an environment variable in the registry:
reg delete HKEY_CURRENT_USEREnvironment /v [variable_name] /f
or
reg delete "HKEY_LOCAL_MACHINESYSTEMCurrentControlSetControlSession ManagerEnvironment" /v [variable_name] /f
Note: The /f parameter is used to confirm the reg delete command. Without it, entering the command triggers the Delete the registry value EXAMPLE (Yes/No)? prompt.
Run the setx command again to propagate the environment variables and confirm the changes to the registry.
Note: If you don’t have any other variables to add with the setx command, set a throwaway variable. For example:
setx [variable_name] trash
Conclusion
After following this guide, you should know how to set user-specific and system-wide environment variables in Windows 10.
Looking for this tutorial for a different OS? Check out our guides on How to Set Environment Variables in Linux, How to Set Environment Variables in ZSH, and How to Set Environment Variables in MacOS.
 Настройка переменных среды Windows может помочь сократить время, необходимое для набора команд в командной строке или, если вы часто пишете скрипты для собственных задач, сделать их более читаемыми. В большинстве случаев обычные пользователи добавляют записи в системную переменную среды PATH, хотя бывают и другие задачи.
В этой пошаговой инструкции базовая информация о том, как открыть переменные среды Windows 11 и Windows 10, создать или отредактировать их.
Что такое переменные среды
Переменные среды в Windows — записи о расположении системных папок, свойствах системы и другие, которые доступны для любой программы или скрипта.
Одна из наиболее часто используемых переменных среды — PATH, указывающая на папки, в которых выполняется поиск файлов, вызываемых в командной строке, терминале Windows, файле bat или из других источников. В качестве примера её назначения:
- Если вы откроете командную строку (или диалоговое окно «Выполнить»), введёте regedit и нажмете Enter — вы сможете запустить редактор реестра, не указывая полный путь к файлу regedit.exe, поскольку путь C:\Windows добавлен в переменную среды Path.
- Если же тем же образом в командной строке написать имя программы, путь к которой не добавлен в Path (chrome.exe, adb.exe, pip и другие), вы получите сообщение «Не является внутренней или внешней командой, исполняемой программой или пакетным файлом».
Если предположить, что вы часто используете команды adb.exe (например, для установки приложений Android в Windows 11), pip install (для установки пакетов Python) или любые другие то для того, чтобы не писать каждый раз полный путь к этим файлам, имеет смысл добавить эти пути в переменные среды.
Также вы можете добавлять и иные переменные среды (не обязательно содержащие пути), а в дальнейшем получать и использовать их значения в сценариях BAT (командной строки) или PowerShell. Пример получения и отображения значения системной переменной PATH для обоих случаев:
echo %PATH%
echo $Env:PATH
Получить список всех переменных среды в командной строке и PowerShell соответственно можно следующими командами:
set
ls env:
Редактирование переменных среды Windows 11/10
Прежде чем приступать, учтите: изменение системных переменных среды по умолчанию может привести к проблемам в работе системы, не удаляйте уже имеющиеся переменные среды. Возможно, имеет смысл создать точку восстановления системы, если вы не уверены в своих действиях.
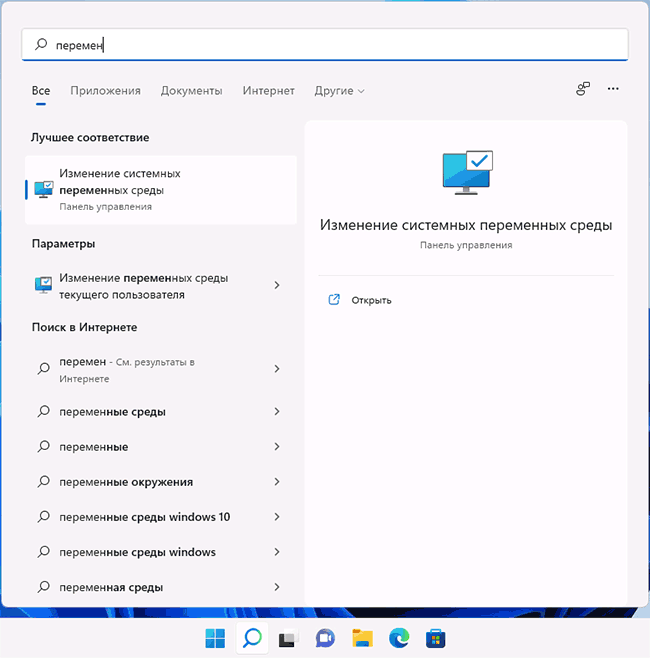
- Чтобы открыть переменные среды Windows вы можете использовать поиск в панели задач (начните вводить «Переменных» и откройте пункт «Изменение системных переменных среды») или нажать клавиши Win+R на клавиатуре, ввести sysdm.cpl и нажать Enter.

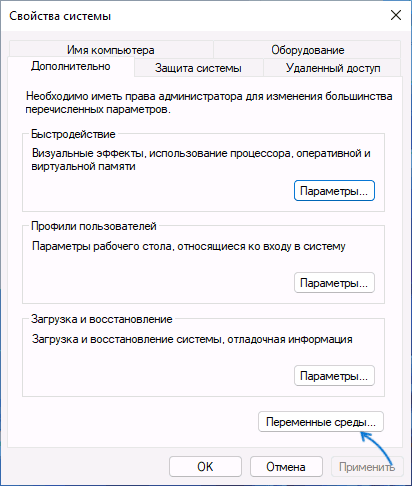
- На вкладке «Дополнительно» нажмите кнопку «Переменные среды…»

- В разделе «Переменные среды пользователя» (если требуется изменение только для текущего пользователя) или «Системные переменные» выберите переменную, которую нужно изменить и нажмите «Изменить» (обычно требуется именно это), либо, если необходимо создать новую переменную — нажмите кнопку «Создать». В моем примере — добавляем свои пути в системную переменную Path (выбираем эту переменную и нажимаем «Изменить»).

- Для добавления нового значения (пути) в системную переменную в следующем окне можно нажать кнопку «Создать», либо просто дважды кликнуть по первой пустой строке, затем — ввести нужный путь к папке, содержащей нужные нам исполняемые файлы.

- Также вы можете использовать кнопку «Изменить текст», в этом случае окно изменения системной переменной откроется в ином виде: имя переменной, а ниже — её значение. В случае указания путей значение будет представлять собой все пути, хранящиеся в переменной, разделенные знаком «точка с запятой».

- При создании новой переменной среды окно будет тем же, что и в 5-м шаге: необходимо будет указать имя системной переменной в верхнем поле, а её значение — в нижнем.


После создания или изменения переменной среды и сохранения сделанных настроек, переменная или обновленные значения сразу становятся доступны для текущего пользователя или в системе в целом в зависимости от того, какие именно переменные редактировались или создавались. Также есть методы добавления переменных среды в командной строке или PowerShell, подробнее в статье: Как добавить путь в переменную среды PATH
The environment variables are the key-value pairs that act as information containers for all the programs running on Windows. Simply put, they are the string variables an OS uses to manage all the apps and services.
Every application has its own set of environment variables, and it helps them determine where to install and store files. These variables contain names and values that help control the operational environment. Further, they have a significant effect and enable your computer’s active processes.
Without environment variables, you’ll need to inform your scripts every time to find the same path to a specific file. But if you set a dedicated variable, the information becomes available everywhere.
Whether you’re trying to feed data into a database or secure your configuration, the environment variables will help keep your code and data separated. Apart from that, they hold the following importance on Windows or any other OS:
- Helps secure sensitive information
- No need to worry about scheduled tasks and production mistakes
- Provides better development experience
- Easy navigation and configuration
Table of Contents
In Windows, the environment variables are categorized into two – User and System. While the former deals with user-defined settings (user profiles, files, etc.), the latter contains the values used by the operating system.
In this section, you will learn how to set Windows environment variables via the graphical user interface, command line interface (Command Prompt and Windows Powershell), and Registry Editor. So, without further delay, let’s get right into them in detail.
Using Windows GUI
Before setting up a Windows environment variable in the graphical user interface, you’ll need to navigate to the dedicated window:
- Use Windows + I to launch Settings on your PC.
- Now, move to System > About.

- Here, expand Device Specifications and select Advanced system settings.
- This will open the Advanced tab in the System Properties dialogue box. Here, find and click on the Environment Variables button.


Another way to open Environment Variables window is from the Control Panel utility. Kindly follow the below instructions on how you can do so:
- Press Windows + R and run the
controlCommand to open Control Panel. - Now, navigate to User Accounts.

- Again, choose User Accounts.
- Then, select Change my environment variables from the left pane.


Alternatively, you can directly launch it from the Run dialogue box by running the following command:rundll32.exe sysdm.cpl,EditEnvironmentVariables
Also, this is possible from the Start menu, where you can search for “Edit the system environment variables” or “Edit environment variables for your account”.
Once the Environment Variables window pops up, go through the following guide to learn how to set the system environment variables on Windows 11:
- Press the New button under ‘User variables for [Your PC Name]’ to add a user variable.

For adding a new system variable, use the New button under the System variables section. - Next, enter a desired name in the Variable name field.

- To add a path, press Browse Directory or Browse Field. Now, navigate to the path and tap the Open button. If you already know the correct location or want to add different data, you can directly enter it in the Variable value field.
- Finally, click Ok and check the list.


You can select the system or user variable if you want to change its name or value. Then, press the Edit button, and proceed with the same steps as above. Likewise, to delete an existing environment variable, select it and choose Delete.
In Registry Editor
Another way to set Windows environment variables is from the built-in Registry Editor tool. In fact, this is the precise location where all the user and system values are stored. Here’s a quick guide on how to do it the right way:
- Press Windows + R and run the following to open the utility:
regedit.exe - Now, copy and paste one of the below paths to view all the user or system variables on your computer:
Computer\HKEY_CURRENT_USER\Environment(for user)
HKEY_LOCAL_MACHINE\System\CurrentControlSet\Control\Session Manager\Environment(for system) - Next, go to Edit > New.
- Here, select any of the following value options – String, Binary, DWORD, QWORD, Multi-string, Expandable String.
- Move to the right pane and name the variable.
- Then, double-click on it and enter an appropriate value in the Value data field.
- Hit Ok, which should set the Windows environment variable.


To edit the value, simply double-click the variable and change it to an appropriate one. Furthermore, you can right-click and pick Delete to remove the environment variable permanently.
In Command Prompt
If you prefer CLI (Command Line Interface) over GUI, the good news is that you can use simple commands to set Windows environment variables. Although you can create both user and system variables, there’s no individual section to display each of them.
Follow the below steps to view, set, edit, and delete Windows environment variables using Command Prompt:
- Firstly, press the Windows key to open the start menu. Then, search and launch Command Prompt.
- Use the below command to view all the environment variables (for both user and system):
set
- Next, you can use the below syntax to create a user variable of your own:
setx variable_name “variable_value”
For demonstration, we have used the following command to create a user variable named “Example” and set its value to “0”:setx Example “0”
To create a system environment variable, you’ll need to use a slightly different syntax:setx /m variable_name “value” - Now, restart the Command Prompt and use the
setcommand again to confirm that the environment variable is created successfully.
- To edit the value, you can use the same syntax used to create the environment variable. Here’s a simple example that should clear your doubt:
setx Example “1”(for user) setx /m variable “1”(for system) - Restart CMD and use the
setcommand again to check the edited value. - In case you wish to delete an environment variable, you’ll need to use the following registry commands:
REG delete HKCU\Environment /F /V variable_name(user) REG delete "HKLM\SYSTEM\CurrentControlSet\Control\Session Manager\Environment" /F /V variable_name(system)


In Windows Powershell
Although Command Prompt is quite popular, most advanced Windows users prefer Powershell due to its extensibility. If you fall into this category, follow our guide to view, set, edit, and delete Windows environment variables via Powershell:
- Press Windows + X and select Windows Terminal to enter the Powershell interface.

- Here, use the below cmdlets to view the present environment variables on your PC:
Get-ChildItem Env:(view all environment variables) [Environment]::GetEnvironmentVariables("User")(view the user variables)
[Environment]::GetEnvironmentVariables("Machine")(view the system variables) - To add a new variable, kindly use the appropriate syntax from below:
[Environment]::SetEnvironmentVariable("variable_name","value","User")(for user) [Environment]::SetEnvironmentVariable("Ex","0","Machine")(for system) - Now, simply use the view cmdlet to confirm that the variable was created.
- If you’re unsatisfied with the value, you can quickly change it using the same commands used for creating the environment variable.
- To delete the Windows environment variable, kindly have a look at the below command lines:
[Environment]::SetEnvironmentVariable("variable_name", $null ,"User")(user) [Environment]::SetEnvironmentVariable("variable_name", $null ,"Machine")(system)


Environment variables are not often seen directly when using Windows. However there are cases, especially when using the command line, that setting and updating environment variables is a necessity. In this series we talk about the various approaches we can take to set them. In this article we look at how to interface with environment variables using the Command Prompt and Windows PowerShell. We also note where in the registry the environment variables are set, if you needed to access them in such a fashion.
Print environment variables
You can use environment variables in the values of other environment variables. It is then helpful to be able to see what environment variables are set already. This is how you do it:
Command Prompt
List all environment variables
Command Prompt — C:\>
Output
1
2
3
4
5
6


ALLUSERSPROFILE=C:\ProgramData
APPDATA=C:\Users\user\AppData\Roaming
.
.
.
windir=C:\Windows
Print a particular environment variable:
Command Prompt — C:\>
Output
Windows PowerShell
List all environment variables
Windows PowerShell — PS C:\>
Output
1
2
3
4
5
6
7
8


Name                           Value
----                           -----
ALLUSERSPROFILE                C:\ProgramData
APPDATA                        C:\Users\user\AppData\Roaming
.
.
.
windir                         C:\Windows
Print a particular environment variable:
Windows PowerShell — PS C:\>
Output
Set Environment Variables
To set persistent environment variables at the command line, we will use setx.exe. It became part of Windows as of Vista/Windows Server 2008. Prior to that, it was part of the Windows Resource Kit. If you need the Windows Resource Kit, see Resources at the bottom of the page.
setx.exe does not set the environment variable in the current command prompt, but it will be available in subsequent command prompts.
User Variables
Command Prompt — C:\>
setx EC2_CERT "%USERPROFILE%\aws\cert.pem"
Open a new command prompt.
Command Prompt — C:\>
Output
1


C:\Users\user\aws\cert.pem
System Variables
To edit the system variables, you’ll need an administrative command prompt. See HowTo: Open an Administrator Command Prompt in Windows to see how.
Command Prompt — C:\>
1


setx EC2_HOME "%APPDATA%\aws\ec2-api-tools" /M
Warning This method is recommended for experienced users only.
The location of the user variables in the registry is: HKEY_CURRENT_USER\. The location of the system variables in the registry is: HKEY_LOCAL_MACHINE\.
When setting environment variables through the registry, they will not recognized immediately. One option is to log out and back in again. However, we can avoid logging out if we send a WM_SETTINGCHANGE message, which is just another line when doing this programatically, however if doing this on the command line it is not as straightforward.
One way is to get this message issued is to open the environment variables in the GUI, like we do in HowTo: Set an Environment Variable in Windows — GUI; we do not need to change anything, just open the Environment Variables window where we can see the environment variables, then hit OK.
Another way to get the message issued is to use setx, this allows everything to be done on the command line, however requires setting at least one environment variable with setx.
Printing Environment Variables
With Windows XP, the reg tool allows for accessing the registry from the command line. We can use this to look at the environment variables. This will work the same way in the command prompt or in powershell. This technique will also show the unexpanded environment variables, unlike the approaches shown for the command prompt and for powershell.
First we’ll show the user variables:
Command Prompt — C:\>
1


reg query HKEY_CURRENT_USER\Environment
Output
1
2
3


HKEY_CURRENT_USER\Environment
    TEMP    REG_EXPAND_SZ    %USERPROFILE%\AppData\Local\Temp
    TMP    REG_EXPAND_SZ    %USERPROFILE%\AppData\Local\Temp
We can show a specific environment variable by adding /v then the name, in this case we’ll do TEMP:
Command Prompt — C:\>
1


reg query HKEY_CURRENT_USER\Environment /v TEMP
Output
1
2


HKEY_CURRENT_USER\Environment
    TEMP    REG_EXPAND_SZ    %USERPROFILE%\AppData\Local\Temp
Now we’ll list the system environment variables:
Command Prompt — C:\>
1


reg query "HKEY_LOCAL_MACHINE\SYSTEM\CurrentControlSet\Control\Session Manager\Environment"
Output
1
2
3
4
5
6
7
8
9
10
11
12
13
14
15
16


HKEY_LOCAL_MACHINE\SYSTEM\CurrentControlSet\Control\Session Manager\Environment
    ComSpec    REG_EXPAND_SZ    %SystemRoot%\system32\cmd.exe
    FP_NO_HOST_CHECK    REG_SZ    NO
    NUMBER_OF_PROCESSORS    REG_SZ    8
    OS    REG_SZ    Windows_NT
    Path    REG_EXPAND_SZ    C:\ProgramData\Oracle\Java\javapath;C:\WINDOWS\system32;C:\WINDOWS;C:\WINDOWS\System32\Wbem;C:\WINDOWS\System32\WindowsPowerShell\v1.0\;%SystemRoot%\system32;%SystemRoot%;%SystemRoot%\System32\Wbem;%SYSTEMROOT%\System32\WindowsPowerShell\v1.0\
    PATHEXT    REG_SZ    .COM;.EXE;.BAT;.CMD;.VBS;.VBE;.JS;.JSE;.WSF;.WSH;.MSC
    PROCESSOR_ARCHITECTURE    REG_SZ    AMD64
    PROCESSOR_IDENTIFIER    REG_SZ    Intel64 Family 6 Model 60 Stepping 3, GenuineIntel
    PROCESSOR_LEVEL    REG_SZ    6
    PROCESSOR_REVISION    REG_SZ    3c03
    PSModulePath    REG_EXPAND_SZ    %SystemRoot%\system32\WindowsPowerShell\v1.0\Modules\;C:\Program Files\Intel\
    TEMP    REG_EXPAND_SZ    %SystemRoot%\TEMP
    TMP    REG_EXPAND_SZ    %SystemRoot%\TEMP
    USERNAME    REG_SZ    SYSTEM
    windir    REG_EXPAND_SZ    %SystemRoot%
And same as with the user variables we can query a specific variable.
Command Prompt — C:\>
1


reg query "HKEY_LOCAL_MACHINE\SYSTEM\CurrentControlSet\Control\Session Manager\Environment" /v PATH
Output
1
2


HKEY_LOCAL_MACHINE\SYSTEM\CurrentControlSet\Control\Session Manager\Environment
    PATH    REG_EXPAND_SZ    C:\ProgramData\Oracle\Java\javapath;C:\WINDOWS\system32;C:\WINDOWS;C:\WINDOWS\System32\Wbem;C:\WINDOWS\System32\WindowsPowerShell\v1.0\;%SystemRoot%\system32;%SystemRoot%;%SystemRoot%\System32\Wbem;%SYSTEMROOT%\System32\WindowsPowerShell\v1.0\
Unsetting a Variable
When setting environment variables on the command line, setx should be used because then the environment variables will be propagated appropriately. However one notable thing setx doesn’t do is unset environment variables. The reg tool can take care of that, however another setx command should be run afterwards to propagate the environment variables.
The layout for deleting a user variable is: reg delete HKEY_CURRENT_USER\. If /f had been left off, we would have been prompted: Delete the registry value EXAMPLE (Yes/No)?. For this example we’ll delete the user variable USER_EXAMPLE:
Command Prompt — C:\>
1


reg delete HKEY_CURRENT_USER\Environment /v USER_EXAMPLE /f
Output
1


The operation completed successfully.
Deleting a system variable requires administrator privileges. See HowTo: Open an Administrator Command Prompt in Windows to see how to do this.
The layout for deleting a system variable is: reg delete "HKEY_LOCAL_MACHINE\. For this example we’ll delete the system variable SYSTEM_EXAMPLE:
Command Prompt — C:\>
1


reg delete "HKEY_LOCAL_MACHINE\SYSTEM\CurrentControlSet\Control\Session Manager\Environment" /v SYSTEM_EXAMPLE /f
If this was run as a normal user you’ll get:
Output
1


ERROR: Access is denied.
But run in an administrator shell will give us:
Output
1


The operation completed successfully.
Finally we’ll have to run a setx command to propagate the environment variables. If there were other variables to set, we could just do that now. However if we were just interested in unsetting variables, we will need to have one variable left behind. In this case we’ll set a user variable named throwaway with a value of trash
Command Prompt — C:\>
Output
1


SUCCESS: Specified value was saved.
Resources
- Windows XP Service Pack 2 Support Tools
- Windows Server 2003 Resource Kit Tools
- Reg — Edit Registry | Windows CMD | SS64.com
- Reg — Microsoft TechNet
- Registry Value Types (Windows) — Microsoft Windows Dev Center
- How to propagate environment variables to the system — Microsoft Support
- WM_SETTINGCHANGE message (Windows) — Microsoft Windows Dev Center
- Environment Variables (Windows) — Microsoft Windows Dev Center
Windows Server 2003 Resource Kit Tools will also work with Windows XP and Windows XP SP1; use Windows XP Service Pack 2 Support Tools with Windows XP SP2. Neither download is supported on 64-bit version.
Parts in this series
- HowTo: Set an Environment Variable in Windows
- HowTo: Set an Environment Variable in Windows — GUI
- HowTo: Set an Environment Variable in Windows — Command Line and Registry

Windows uses environment variables to store valuable information about system processes, resource usage, file path, and more.
Let’s learn how to set up system environment variables in Windows.
What are Environment Variables in Windows?
Environment variables help Windows set up a software environment and act as information containers for all applications running on the operating system. Imagine an application that wants to know the path to a specific file on your computer. The program can either go through the entire system and keep searching until it finds the file. A more innovative way is to call the PATH environment variable that contains the paths to all the system files.
Moreover, system environment variables also affect the installation of Java Development Kit, Java Runtime Environment, and other essential software. Just like the above examples, there are a plethora of small and extensive real-world use cases of environment variables that overall make Windows a snappier version of itself.
Types of Environment Variables
Windows creates and uses several environment variables, some of which are user-dependent and others remain the same for all users on a single machine. We can categorize environment variables using user dependence as a parameter and term them as system environment variables and user environment variables.
Information like the location of temporary files from an account, location of your user profile, etc., are stored under user variables. Windows gives the user account the privilege to edit the user variables, but other user accounts cannot edit them.
Other than this, Windows contains system environment variables created by the operating system, programs, drivers, and more. You cannot tweak the system environment variables, but Windows offers the option to tweak user environment variables’ values.
Methods to Setup System Environment Variables in Windows
You can set up system environment variables using different methods in Windows. Although the command line methods remain unchanged for all Windows versions, the GUI-based methods differ slightly for different Windows versions. Let’s look at all these methods in-depth.
GUI Based Methods
The GUI-based methods include using the Start search menu, the Run Window, and the Settings menu to tweak system environment variables. Let’s look at how you can access the GUI from various Windows versions.
Steps for Windows 11
Click on the Start Menu and search for “environment variables.”
The “Edit the system environment variables” option will appear in the search results. Click on the same, and Windows 11 will display the list of all environment variables.

Steps for Windows 10
Go to settings and enter the “About” menu.
Now go to “Advanced system settings.” The System Properties dialogue box should appear on your screen.
Click on the “Advanced” tab and select “Environment Variables.” Windows 10 will now display the entire list of user and system variables stored on your computer.

Using Run Window
Press Windows +R to explore the Run Window.
Now enter the following command:
rundll32.exe sysdm.cpl,EditEnvironmentVariables
All these methods should open the list of all the environment variables categorized under separate sections for user and system environment variables. You can create new user variables, edit the existing ones, or delete them using the same dialogue box.
Steps to create a new environment variable
Click on the “New” option using the Environment Variables dialogue box.
Now enter the Variable Name and its Value under the respective columns and press OK.
Creating the JAVA_HOME environment variable is a crucial step for installing Java Development Kit. So, let’s create the JAVA_HOME variable and later verify its existence. Click on the New option and enter “JAVA_HOME” as the variable name. Also, enter the installation path for the JDK as the variable value for JAVA_HOME.

The JAVA_HOME variable is now visible on the list of all environment variables, with the variable value as the path to the JDK. You can verify it by going to the “edit system variable” settings, and the JAVA_HOME variable should be present right there.

Steps to Edit environment variables
Click on the environment variable you want to edit and press the “Edit” option.
Now enter the Variable Name and its Value and press the OK button.
Let’s now edit the JAVA_HOME variable that we just created and change its value to another folder. Click on the variable and select the “Edit” option. Now enter a different variable value replacing the previous value and click OK.

Here also, you can verify the changed value on the environment variable list.
The updated variable is present on the user variable list.
Steps to Delete environment variables
Click on the environment variable you want to Delete.
Now Press the “Delete” option and press OK.
As an example, let’s delete the JAVA_HOME variable that we recently tweaked. Select the variable and press “Delete” and “OK” subsequently. The selected variable gets deleted from the list of variables.

The JAVA_HOME variable gets deleted from the list.
Command Prompt Method
You can use the Command Prompt or Windows PowerShell to set up environment variables. Let’s first look at how to use the command prompt method.
Viewing the environment variables
Open the command prompt in Windows.
Now enter “set” and press Enter. You can see the entire list of environment variables without any categorization, unlike the GUI-based method.

Creating new environment variables
Open the command prompt.
Use the following syntax using the setx command and press Enter:
setx [variable_name] “[variable_value]”[variable_name] stands for the name of the variable you want to enter.
[variable_value] stands for the value for the newly created variable.
For example, let’s create a “TEST_VARIABLE” with a value “XYZ” and then verify its existence using Command Prompt. We use the following command:
setx [TEST_VARIABLE] “[XYZ]”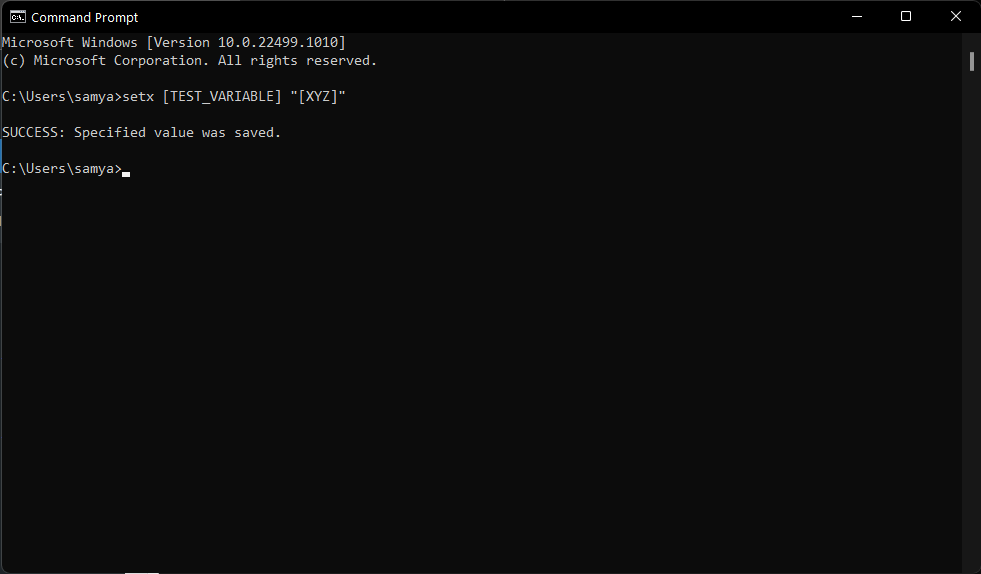
Congratulations! You just created a new user variable using Command Prompt. Now, let’s verify its existence. Use the “set” command to see the list of all the variables.

Windows PowerShell Method
PowerShell gives you more flexibility with the environment variables and lets you view, edit, and create them, but these are only valid for a single PowerShell session. The variable list returns to its original form once you close a PowerShell session.
Viewing system variables
Open the Windows PowerShell.
Now enter the following command:
Get-ChildItem Env:Windows PowerShell will display the complete list of environment variables.

The environment variables won’t get categorized under system and user variables, but you can use the following commands to only view system variables using PowerShell:
[Environment]::GetEnvironmentVariables("Machine")Otherwise, you can use the following command to only view the user environment variables:
[Environment]::GetEnvironmentVariables("User")Creating and Editing environment variables
You can edit and create new environment variables using the $env built-in variable. Use the following command to create a new variable using PowerShell:
$env:Variable_name = 'Variable_value'Here Variable_name stands for the name of the newly created environment variable, and the variable_value stands for its value.
Let’s create another test variable TEST_VARIABLE as an example and then verify its existence. We use the following command in the PowerShell:
$env:TEST_VARIABLE = '[ABC]'
We have also confirmed the variable value for TEST_VARIABLE using the following code:
$env:TEST_VARIABLEPowerShell shows the output for the TEST_VARIABLE variable as [ABC].
Moreover, you can also tweak the value for an existing environment value using the following command:
$env:Variable_name = ';Variable_value2'This would append the newly mentioned value to the original value for the environment variable.
Conclusion 🧑💻
Creating and tweaking system environment variables is crucial to direct programs and utilize their functionality. Windows gives you GUI-based and Command Line options to do the same. The GUI-based methods are simple and easy to follow. On the other hand, the Command-Line methods are swifter but more complicated.
Now you may check Tuning MySQL system variables for high performance.