Для правильного функционирования доменной среды Windows Server 2008 R2/2012 R2, является корректная работа службы времени Windows (W32Time).
Схема работы синхронизации времени в доменной среде Active Directory:
- Контроллер корневого домена в лесу AD, которому принадлежит FSMО-роль PDC-эмулятора, синхронизируется с внешними источниками точного времени. Он же является источником времени для всех остальных контроллеров этого домена.
- Контроллеры дочерних доменов в AD, синхронизируют время с вышестоящих контроллеров домена AD.
- Рядовые члены домена (сервера и рабочие станции) синхронизируют свое время с ближайшим к ним доступным контроллером домена, соблюдая топологию AD.
Служба времени в Windows (W32Time) не имеет графического интерфейса и настраивается из командной строки (утилита w32tm), с помощью реестра (HKLM\System\CurrentControlSet\Services\W32Time\Parameters) и посредством Групповой политики (Group Policy Managment)
Для определения какому контроллеру домена принадлежит FSMО-роль PDC-эмулятора, в командной строке, выполним команду: netdom query FSMO
Включение NTP-сервера
NTP-сервер по-умолчанию включен на всех контроллерах домена, но его можно включить и на рядовых серверах:
- [HKEY_LOCAL_MACHINE\SYSTEM\CurrentControlSet\Services\W32Time\TimeProviders\NtpServer] — «Enabled»=1
Конфигурация NTP-сервера
Задаем тип синхронизации внутренних часов, на использование внешнего источника. (Командная строка/Реестр):
- w32tm /config /syncfromflags:manual
- [HKEY_LOCAL_MACHINE\SYSTEM\CurrentControlSet\Services\W32Time\Parameters] — «Type»=NTP
Допускаются следующие значения:
NoSync — NTP-сервер не синхронизируется с каким либо внешним источником времени. Используются системные часы, встроенные в микросхему CMOS самого сервера.
NTP — NTP-сервер синхронизируется с внешними серверами времени, которые указаны в параметре реестра NtpServer.
NT5DS — NTP-сервер производит синхронизацию согласно доменной иерархии.
AllSync — NTP-сервер использует для синхронизации все доступные источники.
Задание списка внешних источников для синхронизации, с которыми будет синхронизировать время данный сервер. По-умолчанию в этом параметре прописан NTP-сервер Microsoft (time.windows.com, 0×1). (Командная строка/Реестр):
- w32tm /config /manualpeerlist:»0.ru.pool.ntp.org,0x1 1.ru.pool.ntp.org,0x1 2.ru.pool.ntp.org,0x1″
- [HKEY_LOCAL_MACHINE\SYSTEM\CurrentControlSet\Services\W32Time\Parameters] — «NtpServer»=0.ru.pool.ntp.org,0x1 1.ru.pool.ntp.org,0x1 2.ru.pool.ntp.org,0x1
Допускаются следующие значения:
0×1 – SpecialInterval, использование временного интервала опроса.
0×2 – режим UseAsFallbackOnly.
0×4 – SymmetricActive, симметричный активный режим.
0×8 – Client, отправка запроса в клиентском режиме.
Задание интервала синхронизации с внешним источником (для источников помеченных флагом 0×1). По-умолчанию время опроса задано — 3600 сек. (1 час). (Командная строка/Реестр):
- [HKEY_LOCAL_MACHINE\SYSTEM\CurrentControlSet\Services\W32Time\TimeProviders\NtpClient] — «SpecialPollInterval»=3600
Объявление NTP-сервера в качестве надежного. (Командная строка/Реестр):
- w32tm /config /reliable:yes
- [HKEY_LOCAL_MACHINE\SYSTEM\CurrentControlSet\Services\W32Time\Config] — «AnnounceFlags»=0000000a
После настройки необходимо обновить конфигурацию сервиса. Выполняем команду:
- w32tm /config /update
Принудительная синхронизация времени от источника:
- w32tm /resync /rediscover
Отобразить текущую конфигурацию службы времени:
- w32tm /query /configuration
Получения информации о текущем сервере времени:
- w32tm /query /source
Отображение текущих источников синхронизации и их статуса:
- w32tm /query /peers
Отображение состояния синхронизации контроллеров домена с компьютерами в домене:
- w32tm /monitor /computers:192.168.1.2
Отобразить разницу во времени между текущим и удаленным компьютером:
- w32tm /stripchart /computer:192.168.1.2 /samples:5 /dataonly
Удалить службу времени с компьютера:
- w32tm /unregister
Регистрация службы времени на компьютере. Создается заново вся ветка параметров в реестре:
- w32tm /register
Остановка службы времени:
- net stop w32time
Запуск службы времени:
- net start w32time
Конфигурация NTP-сервера/клиента групповой политикой
Для централизованной настройки службы времени Windows, на серверах и рабочих станциях в доменной среде Active Directory, воспользуемся групповой политикой. На примере, выполним настройку для рабочих станций.
Переходим в ветку: Конфигурация компьютера (Computer Configuration) — Политики (Policies) — Административные шаблоны (Administrative Templates) — Система (System) — Служба времени Windows (Windows Time Service) — Поставщики времени (Time Providers).
Открываем параметр: Настроить NTP-клиент Windows (Configure Windows NTP Client)

- NtpServer — 192.168.1.2 (Адрес контроллера домена с ролью PDC)
- Type — NT5DS
- CrossSiteSyncFlags — 2
- ResolvePeerBackoffMinutes —15
- Resolve Peer BackoffMaxTimes — 7
- SpecilalPoolInterval — 3600
- EventLogFlags — 0
Понравилась или оказалась полезной статья, поблагодари автора
ПОНРАВИЛАСЬ ИЛИ ОКАЗАЛАСЬ ПОЛЕЗНОЙ СТАТЬЯ, ПОБЛАГОДАРИ АВТОРА
![]() Загрузка…
Загрузка…
NTP or Network Time Protocol is a networking protocol that is used for synchronizing clocks across networks and computers around the world. An NTP server is very important for a system to provide you with the correct time.
As a result, it is also very important to configure NTP correctly on your system. But, it is a bit complicated process. Due to that, we have created this post where we will be covering how to configure NTP server in Windows 2012 R2 in a step by step manner. Added to that, we will also provide screenshots of the entire procedure.
So, let’s dive right in…
There are a couple of methods you can follow. We will be sharing one by one in the following sections.
Method 1:
- First, right-click on the ‘Start’ button and click on the ‘Run’ option from there
- Next, type in ‘gpedit.msc’ on the box and click on ‘OK’ or press the ‘Enter’ key
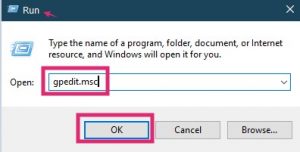
- In doing so, the ‘Local Group Policy Editor’ window will open up
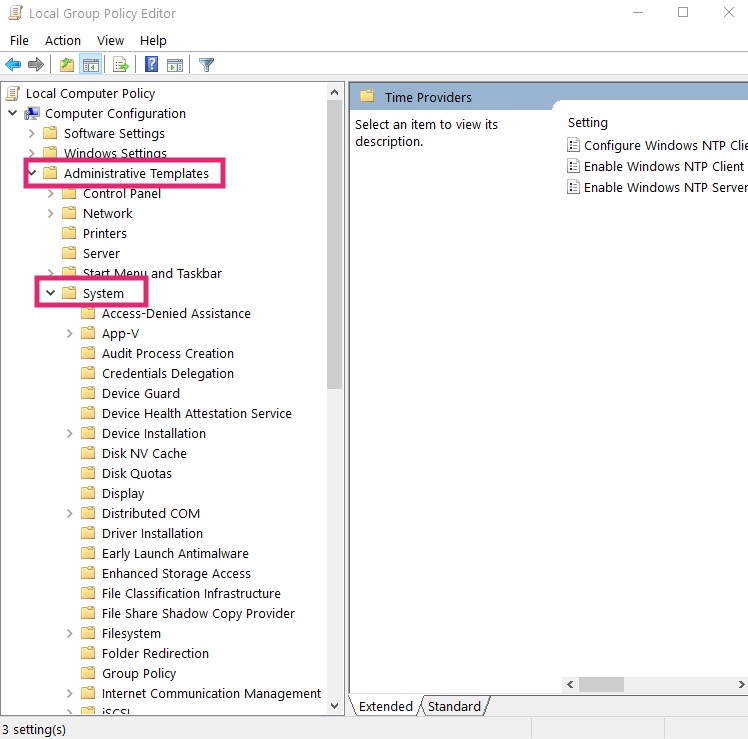
- From the left pane of the new window, you will have to navigate to ‘Administrative template>System>Windows Time Service>Time Providers’
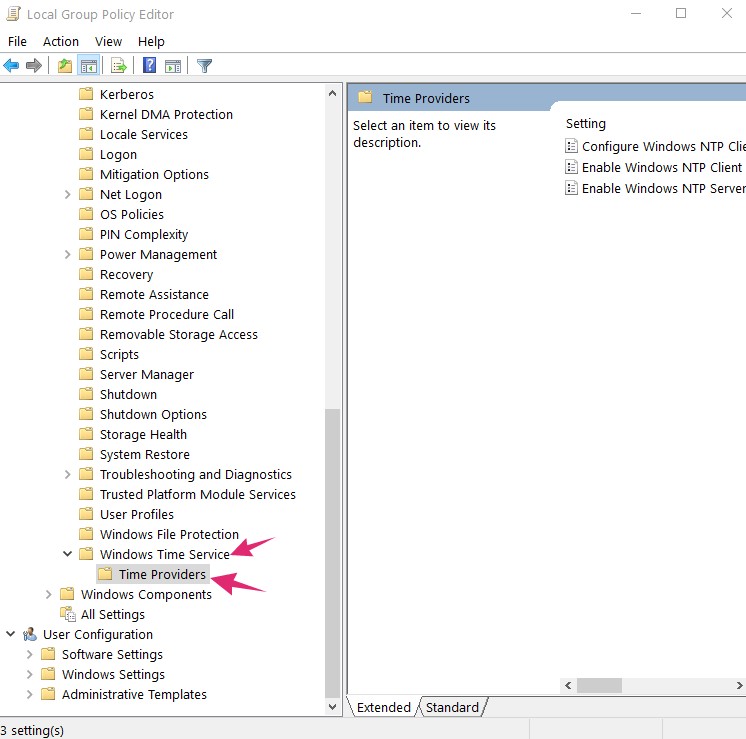
- Now, you will have to open the ‘Enable Windows NTP Server’ option from the right pane
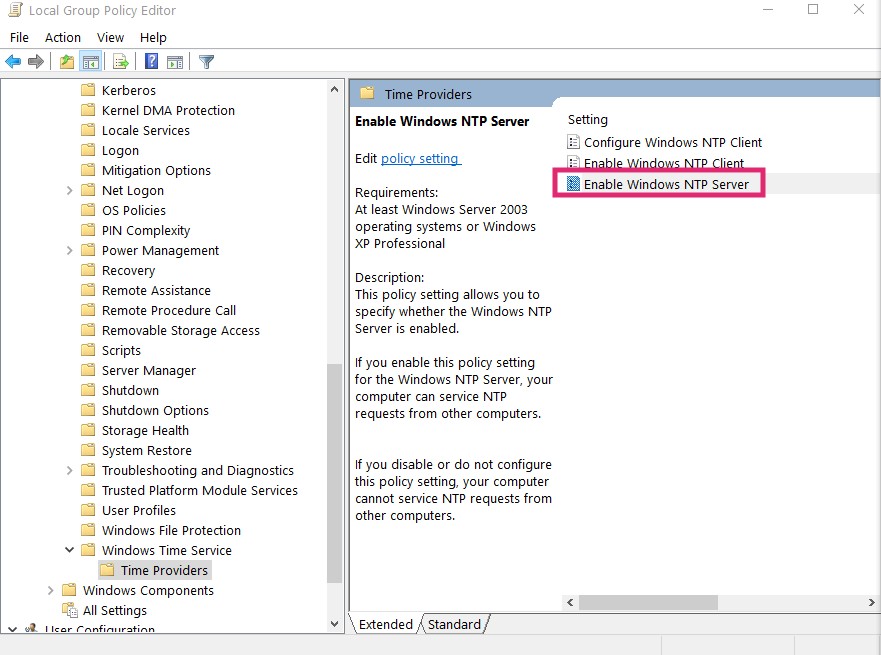
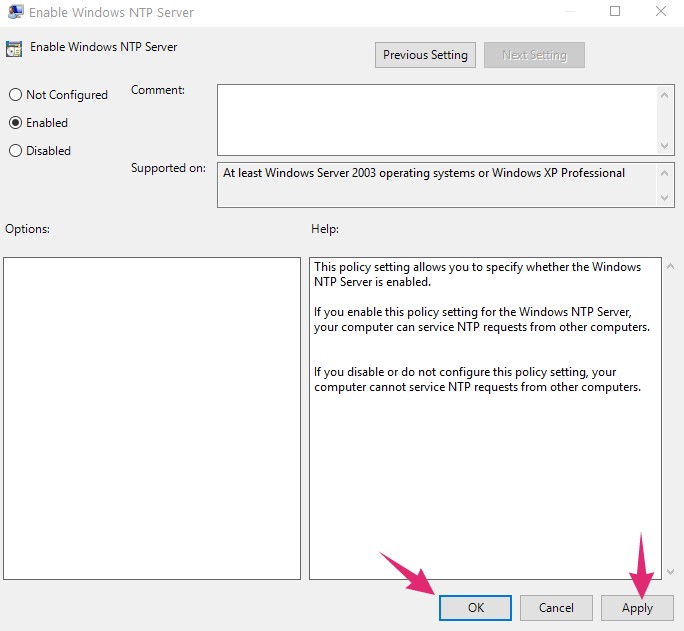
- Next, checkmark the ‘Enabled’ option on the upper left corner from the new popup window
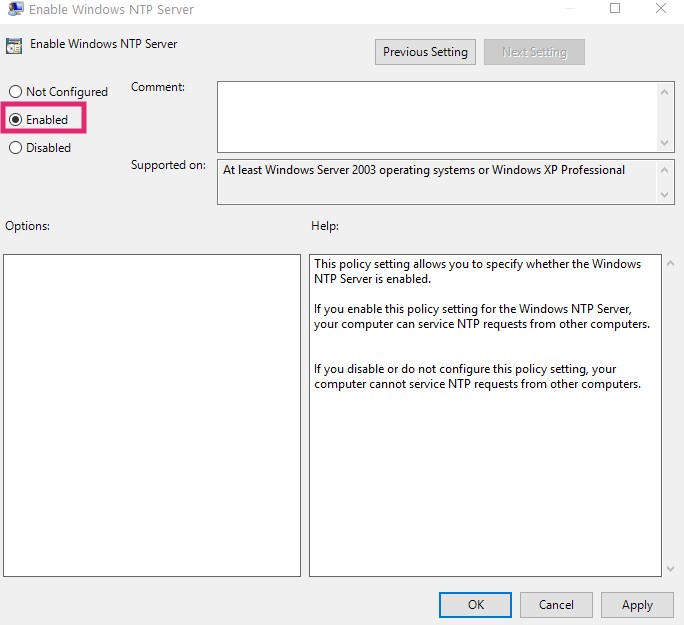
- Close the window by clicking on the ‘OK’ or ‘Apply’ button
- Now, select the ‘Windows Time Service’ option from the left pane once again

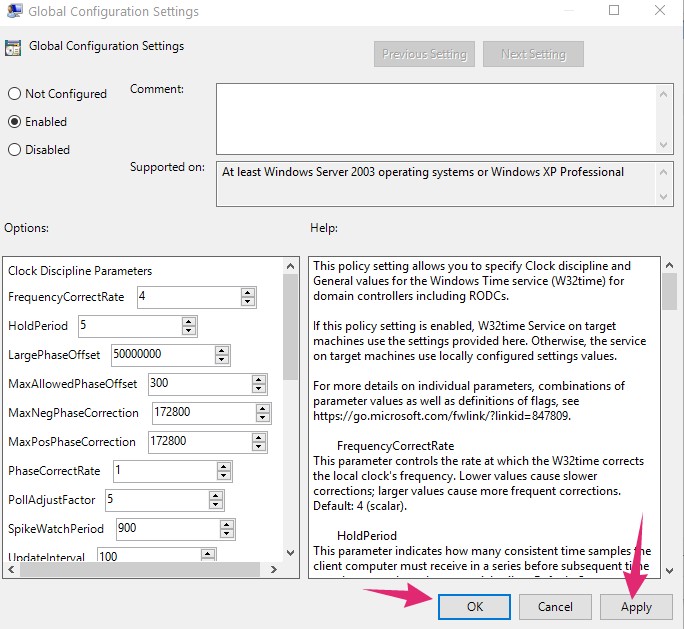
- And, open the ‘Global Configuration Settings’ option from the right pane
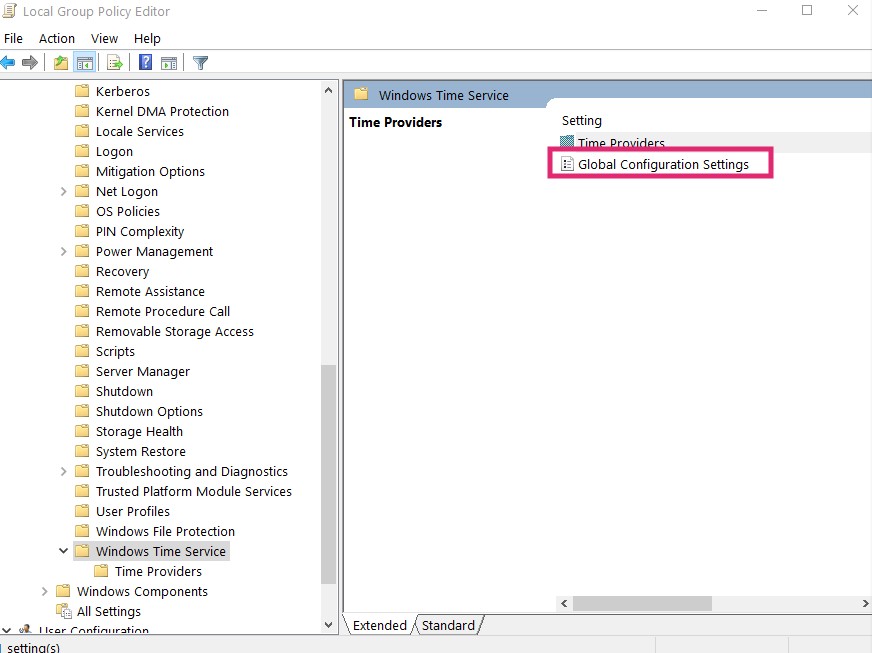
- Again, checkmark the ‘Enabled’ option on the upper left corner from the new popup window
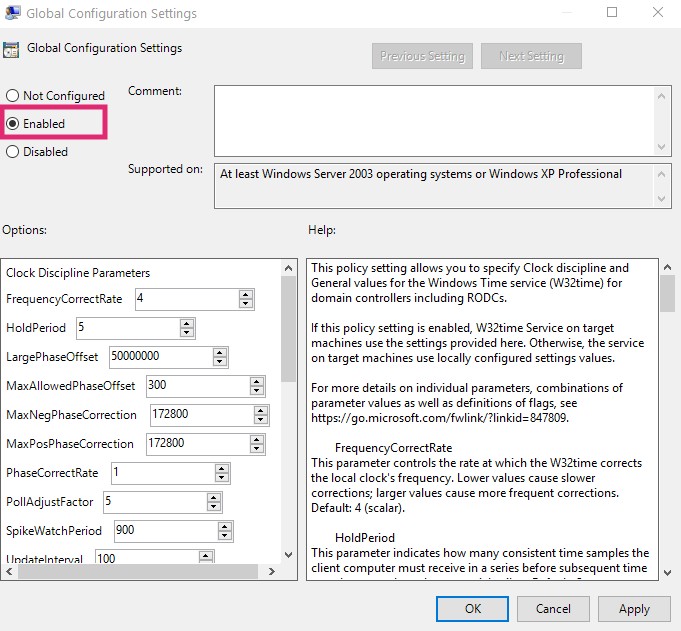
- Also, you have to change the ‘AnnounceFlag’ to ‘5’
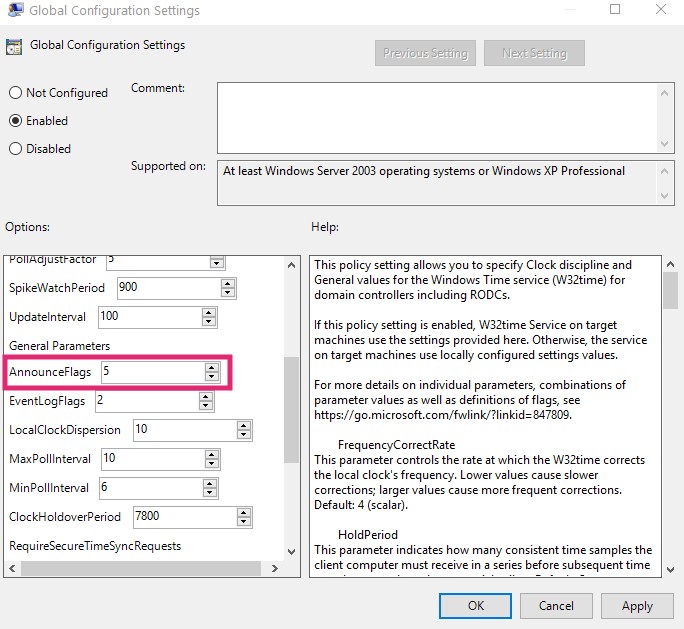
- And click on the ‘OK’ button from the bottom right corner
- Finally, close the ‘Local Group Policy Editor’ window
At this moment, you will have to open the ‘Server Manager’ on your machine. And, follow accordingly…
- After opening the ‘Server Manager’, click on ‘Tools’ and then select ‘Services’
- Now, scroll down and right-click on the ‘Windows Time’ option
- Then click on ‘Start’ or ‘Restart’ from the submenu
Method 2:
In this method, you will have to obtain a list of trusted and working NTP servers. You can find them here. Now, follow these steps…
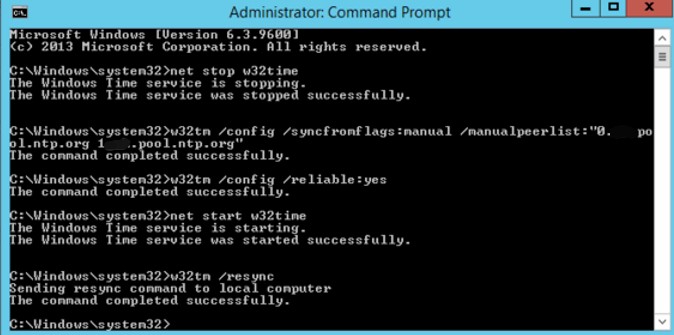
- Launch command prompt in your system
- Now, you will stop the time service with this command: type net stop w32time and press Enter
- Also, you can use this command as well: Stop-Service w32time
- In doing so, you will see the confirmation message like this: Windows Time Service was stopped successfully
- Now a enter this new command for configuring the NTP servers: w32tm /config /syncfromflags:manual /manualpeerlist:”0.pool.ntp.org 1.pool.ntp.org 2.pool.ntp.org 3.pool.ntp.org”
- Here, we have used the timeservers that we have obtained from here
- For older versions of Windows, you can use the command instead: net time /setsntp:”0.pool.ntp.org 1.pool.ntp.org 2.pool.ntp.org”
- Next, enter this command to specify the system that these timeservers are reliable: w32tm /config /reliable:yes
- Now, start the time service by entering this command on CMD: net start w32time or Start-Service w32time
Now, you have configured the NTP timeservers on your system. But we have a few steps to make sure this procedure works. Let’s begin…
- To check if the timeservers are working, use this command: w32tm /query /configuration
- You can also check using this command: w32tm /query /status
- If it shows any error, use this command to re-sync the timeservers: w32tm /resync
- Still, if you see this error: ‘The computer did not resync because no time data was available’. You should redo the whole process
This is how you can configure NTP servers in Windows 2012 R2. If you have followed the instructions above, it should work as usual. Still, there are a few things you should keep on mind. Let’s learn about those in the following section.
Related read:
Install Windows 10 on Android using Limbo Emulator
Things to Remember:
Firewall:
If you are behind a firewall and the UDP/123 port is blocked, then configuring NTP might not work. So, you should open the UDP/123 port on your system for better results.
Avoid Copy-Paste:
You might be tempted to directly copy and paste the commands we have shared above. But, we would forbid you to do that. Because there might be some formatting issue after you paste the commands copying directly from the web. Thus, you should try to manually type the commands for the best result.
Set the Correct Time Zone in your System:
NTP only helps to synchronize the time. But, it cannot set the time zone on your system. Thus, you would need to manually set the time zone on your computer. Otherwise, the synchronization will not be accurate.
Don’t Use More than 4 Timeservers:
You can use as many timeservers as you want. However, if you are using the timeservers from the ntp.org, then you should not use more than 4 at once. First off, it is even enough if you use 1 timeserver. However, for redundancy, you can use multiple time servers. But, ntp.org has a limited number of timeservers. Thus, using extra timeservers will put additional load on the servers.
If you face any issues following our instruction above. Don’t forget to leave your comment down below. We hope this post will help you to configure NTP time servers in Windows 2012 R2 without any hassle.
- on Ноя 27, 2017
-
in
Система
Настройка времени в серверных операционных системах Windows с помощью протокола NTP является критичной для многих служб. Без правильного настроенного времени, а точнее при рассогласовании часов на сервере и рабочих станциях не могут правильно работать многие протоколы Active Directory и сервисы синхронизации. Установка и поддержка часов с помощью NTP является простой задачей, связанной иногда, однако, с некоторыми сложностями, которые мы попытаемся рассмотреть в этой статье.
Для примера будем использовать не самую свежую систему — Windows Server 2012. Она является наиболее распространенной и, в то же время, для многих других систем, включая Windows Server 2008, Windows Server 2016 применимы аналогичные команды и правила. Следует отметить, что описание касается настройки окружения с единственным главным контроллером PDC. Более сложные варианты не рассматриваются.
Содержание
Сброс настроек NTP
Для того, чтобы перевести службу NTP в «дефолтное» состояние, необходимо выполнить следующие команды:
Stop-Service w32time
w32tm /unregister
w32tm /register
В данном случае они останавливают сервис, разрегистрируют сервис и регистрируют его в системе заново. Следует выполнять эти команды только в случае существенной необходимости. Как правило, нужды в них нет — NTP настраивается, если учтены другие обстоятельства системы.
Команды установки NTP в обычном случае
Для того, чтобы настроить протокол сетевого времени на контроллере Windows Server, прежде всего необходимо отключить синхронизацию посредством Hyper-V, если контроллер виртуализирован с помощью этой технологии. Для этого нужно зайти в настройки и снять галочку с пункта Time Synchronization в разделе Management -> Integration Services

Для тех, кто не использует Hyper-V, предыдущий шаг можно опустить.
Далее, запустить Power-Shell и ввести команды:
w32tm /config /manualpeerlist:pool.ntp.org /syncfromflags:MANUAL
Stop-Service w32time
Start-Service w32time
На этом установка в качестве основного ntp-сервера одного из pool.ntp.org закончена.
Выбор ntp-сервера
Однако нет жесткой необходимости использовать именно этот сервер. Для тех, кто находится в интранете, для тех, у кого есть предпочтения по геолокации или другим параметрам, можно указать другой сервер. Или даже список в кавычках, разделенный пробелами:
w32tm /config /manualpeerlist:"0.de.pool.ntp.org 1.de.pool.ntp.org" /syncfromflags:MANUAL
Протокол UDP для NTP и блокировка файрволом
Протокол времени использует для своей связи порт UDP с номером 123 в стандартной конфигурации. Необходимо следить за тем, чтобы файрвол не блокировал этот порт. В случае, если блокировка происходит, в логах ntp будет масса информации о том, что соединение невозможно:
Log Name: System
Source: Microsoft-Windows-Time-Service
Event ID: 47
Level: Warning
Description: Time Provider NtpClient: No valid response has been received from manually configured peer pool.ntp.org after 8 attempts to contact it. This peer will be discarded as a time source and NtpClient will attempt to discover a new peer with this DNS name. The error was: The peer is unreachable.
Для того, чтобы убедиться, что проблема именно в этом, можно включить вывод дополнительной отладочной информации. Настраиваем логи Windows Server таким образом, чтобы в них писалась вся необходимая информация, но они не росли больше, чем 20 мегабайт:
w32tm /debug /enable /file:C:\tmp\ntp.log /size:20971520 /entries:0-300
Следите за тем, чтобы на диске присутствовал каталог C:\tmp куда будут записаны логи.
После того, как ошибка будет отловлена, вывод дополнительной отладочной информации можно будет отключить:
Блокировка ntp файрволом отлавливается по фразе в отладке:
— Logging error: NtpClient has been configured to acquire time from one or more time sources, however none of the sources are currently accessible and no attempt to contact a source will be made for 1 minutes. NTPCLIENT HAS NO SOURCE OF ACCURATE TIME.
В этом случае (да, в общем, сразу с целью проверки) необходимо проверить правило в файрволе

И, в случае необходимости, поменять правило или добавить его.
Проверка правильности работы ntp
Чтобы проверить — все ли работает правильно, можно запустить синхронизацию вручную:
Если все прошло успешно, получите сообщение:
Sending resync command to local computer
The command completed successfully.
Если есть проблемы — сообщение:
The computer did not resync because no time data was available.
Во втором случае необходимо проверить все сначала: файрвол, правильность заданных серверов (не ошиблись ли в имени). Если что — информацию о сбросе настроек мы уже приводили.
Introduction
Time synchronization is one one of the most important aspect in a modern computer network. Network Time Protocol (UDP 123) is the protocol designed to synchronize the clocks of your computers over the network. This tutorial will guide you to configure an NTP Time server in your network. This server will act like an authoritative time server in your domain which will serve the client computers. The NTP Time server in your network will get time from an external time source like time.windows.com or time.nist.gov or from the system BIOS. In our scenario I am going to configure an NTP Server in a PDC Emulator that will obtain time from an external source.But Windows recommend us to configure an NTP server to obtain the time from a hardware source for improved security and accuracy. So optionally I will mention how to get the time from an internal source too.

Here I am listing out few importance of Time synchronization in a network:
1. Effective DC & DFS Replication.
2. Tracking security breaches, network usage, or problems affecting a large number of components can be nearly impossible if timestamps in logs are inaccurate. Time is often the critical factor that allows an event on one network node to be mapped to a corresponding event on another.
3. To reduce confusion in shared filesystems, it is important for the modification times to be consistent, regardless of what machine the filesystems are on.
This document will help you to configure a NTP Time server in Windows Server 2008.
Enabling & Configuring NTP Server
1. Change the server type to NTP.
Click Start, click Run, type regedit, and then click OK.
Locate and then click the following registry subkey: HKEY_LOCAL_MACHINE\SYSTEM\CurrentControlSet\Services\W32Time\Parameters\Type
In the pane on the right, right-click Type, and then click Modify. In Edit Value, type NTP in the Value data box, and then click OK.
2. Set AnnounceFlags to 5.
Locate and then click the following registry subkey: HKEY_LOCAL_MACHINE\SYSTEM\CurrentControlSet\Services\W32Time\Config\AnnounceFlags
In the pane on the right, right-click AnnounceFlags, and then click Modify. In Edit DWORD Value, type 5 in the Value data box, and then click OK.

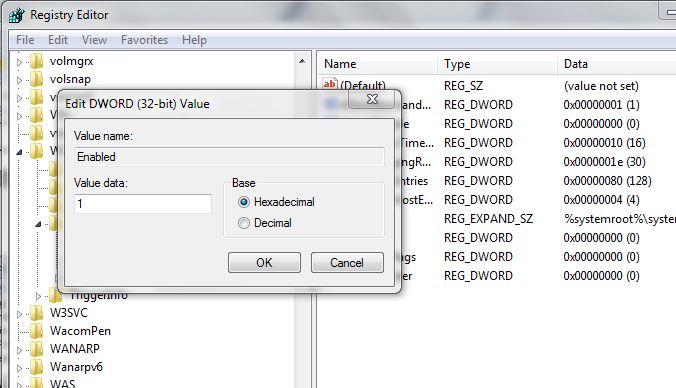
3. Enable NTPServer.
Locate and then click the following registry subkey: HKEY_LOCAL_MACHINE\SYSTEM\CurrentControlSet\Services\W32Time\TimeProviders\NtpServer
In the pane on the right, right-click Enabled, and then click Modify .In Edit DWORD Value, type 1 in the Value data box, and then click OK.
4. Specify the time sources.
Open a command prompt and type the command as below: w32tm /config /manualpeerlist:peers /syncfromflags:manual /reliable:yes /update
peers: time.windows.com or time.nist.gov
eg: w32tm /config /manualpeerlist:time.windows.com /syncfromflags:manual /reliable:yes /update
5. At the command prompt, type the following command to restart the Windows Time service, and then press Enter:
net stop w32time
net start w32time
Some Useful commands
Make sure that you run these commands from an elevated command prompt
1. To resynchronize time : w32tm /resync or w32tm /resync /rediscover
2. To verify the configuartion : w32tm /query /configuration and w32tm /query /status
3. Display the current time zone settings : w32tm /tz
4. To reset the registry settings of NTP server:
net stop w32time
w32tm /unregister
w32tm /register
net start w32time
5. To synchronize time on a linux client : ntpdate server_IP
Allow UPD Port 123 through Firewall
Make an exception in your firewall to allow UDP port number 123.
Apply the NTP client settings via Group Policy(Optional)
Now we have to tell the client computers to obtain the time from the NTP Server. The policy is applied via GPO. The procedure is as follows:
1. Locate the Group Policy Object : Computer configuration/ Policies/Administrative Templates/ System /Windows Time Services/ Time providers
2. Enable the below settings:
Configure Windows NTP Client (In our case, it is the IP of the PDC)
Enable Windows NTP Client


This configuration forces the PDC master to announce itself as a reliable time source and uses the built-in complementary metal oxide semiconductor (CMOS) clock. To configure the PDC master by using an internal hardware clock, follow these steps:
1. Click Start, click Run, type regedit, and then click OK.
Locate and then click the following registry subkey: HKEY_LOCAL_MACHINE\SYSTEM\CurrentControlSet\Services\W32Time\Config\AnnounceFlags
In the right-pane, right-click AnnounceFlags, and then click Modify.
In Edit DWORD Value, type A in the Value data box, and then click OK.
Close Registry Editor.
At the command prompt, type the following command to restart the Windows Time service:
net stop w32time && net start w32time
By accomplishing the above tasks you can configure an NTP server in your domain.
For more information about NTP you can visit : http://www.ntp.org/