Need to migrate Windows Server 2012 to Server 2019 / 2022? This tutorial will show you how.
Server 2012 R2 End Of Support is October 23, 2023 – so, naturally, you are not alone: 2012’s should be migrated ASAP. Of course, you want to minimize the time and effort spent on that, and to automate as much of that migration as possible.
In this guide, we’ll cover how to natively migrate server applications, databases, user profiles, shares, data from Server 2012 / 2012 R2, to a new Server 2022 / 2019. We will also cover role migration best practices and tutorials. (Note: this works for non-2012 servers as well, we are just focusing on 2012 due to its 2023 EOL)
Migration covered here is native migration – not app virtualization. You can use these methods to migrate from physical to physical, physical to virtual / Cloud, Cloud to Cloud etc. For example, you can migrate from an on-prem physical 2012 to an on-prem 2022 VM, from an on-premise Server 2012 to an Azure Server 2022, or from a Private Cloud 2012 R2 server to an EC2 Server 2019. You can even use this to implement an in-place upgrade of a Server 2012 running on Azure / AWS.
The goal of this how to is to allow to complete a server migration in less than 4 hours for application and file servers, and less than 24 hours for role-focused servers (although complicated cases may require more time).
Just want to find out how to automate the migration, and don’t need a general tutorial?
Click here to skip to the part with the actual migration process.
Or, if you need to migrate workstations, click here for migration to Windows 11.
Evaluation licenses and pricing are available here
Video demo – automatic Server 2012 Migration tool
Before you begin: Audit your 2012 servers and plan your migration.
Audit your servers: In a typical environment, you’ll have quite a few different server types. There will be role-oriented servers, which focus on Windows Server roles such as Domain Controller, Active Directory, IIS, Exchange, DNS, DHCP. The more common group, however, are application and file servers, which run the actual Line of Business applications (LOB) and store the company data. They typically outnumber the role-based group.
Migration is done differently for these two. Roles are migrated manually, or with utility tools that are typically focused on one specific role (see below).
Application and file servers, however, can be migrated automatically and on massive scale, using server migration software such as Zinstall WinServ.
In the planning stage, you need to prepare a list of servers in the environment, and figure out what each of them is responsible for.
Even just knowing how many role servers and how many application servers is already a big step. Since application server migration can be automated, you will be able to develop a fairly accurate estimate of time and effort that will be required for the migration.
Schedule your migration time slot: Migrations take time, and during that time, your users may be affected to some extent. If possible, try and schedule the actual migration to be performed after hours or during a weekend. Note that you don’t actually have to stay there yourself at that time: application migration can be performed remotely or launched in advance in unattended mode.
Verify your backups are up to date, and are actually restorable: Any major upgrade may go wrong, and without a valid up-to-date backup, you risk losing everything you’ve had on the server. Make sure to verify that the backup you have is not damaged and ready to be restored if needed!
Decide on replacement type: Once you have decided to replace a server, you have several options regarding what the replacement will be. It may be an on-premise physical Windows 2022 / 2016 server, a on-prem VM server (ESX / Hyper-V, for example), or a Cloud-based server running off premise (such as migration to Azure or migration to Amazon AWS). If you are using WinServ, it supports any of those transfers, so migration difficulty does not vary significantly with your choice.
How to migrate Server 2012 to Windows Server 2022 / 2019
The process below outlines the migration steps for moving from Server 2012 / 2012 R2, to a new Windows Server 2016 / 2019 / 2022.
Option 1: Direct migration from 2012 to 2022 / 2019 over network
- Before you begin, consider disabling the firewall on the old 2012 server, or at least adding Zinstall to its whitelist, so that the firewall does not interfere with the migration.
- Run Zinstall WinServ on both servers.
Note: You can get Zinstall WinServ here, and its user guide here. - Select the first option, “Moving between two machines”, on both servers.
- If you do NOT want to transfer server applications, and are only interested in a profile, data and shares transfer, switch the radio button on the main screen to “profile and settings only” mode.
- On the source server, choose the “Source system” option, and leave it running. It will be waiting for connection from the new one.
- On the new Server 2022 / 2019, choose the “Target system” option.
- WinServ will automatically detect the source server. Alternatively, if the servers are on different networks, you can manually specify the source server’s IP address.
- If you’d like to select exactly what you want to transfer, press the Advanced menu. If you just want to transfer everything, you don’t need to go to the Advanced menu.
- Click Next and then Go to start the migration.
- The transfer will take a while (depending on how much data you have to transfer), and report to you when done.
- That’s it!
Option 2: Indirect migration, via intermediate storage
- Run Zinstall WinServ on both servers.
Note: You can get Zinstall WinServ here, and its user guide here. - On the source server, select the 3rd option, “Moving from Machine to Container”
- Choose the container location (such as a network share, a NAS, a USB hard drive – any type of storage), and press Go to perform a full capture of the source server to that location.
- On the new 2022 / 2019 server, select the 4th option, “Moving from Container to Machine”
- If you do NOT want to transfer programs, and are only interested in a profile, data and shares transfer, switch the radio button on the main screen to “profile and settings only” mode.
- Specify the location of the container created in step 3.
- If you’d like to select exactly what you want to transfer, press the Advanced menu. If you just want to transfer everything, you don’t need to go to the Advanced menu.
- Click Next and then Go to start the migration.
- The transfer will take a while (depending on how much data you have to transfer), and report to you when done.
- That’s it!
Server Roles migration
This part of the migration is done manually, and multiple tutorials exist that may help. We recommend John Savill’s excellent guide: Winding Down Windows Server 2003 in Your Organization. Information below is based on the article above.
- IIS migration: If all you have running on IIS 8 are basic HTML pages or Active Server Pages (ASP), you can copy the content to the IIS version running on your new server, then update the DNS records to point to the new IIS server. Of course, usually if you have IIS, you use it for more than static sites (such as Sharepoint), so simple copy won’t cut it. The good news is that you can use a migration toolkit named Web Deploy 3.6. If you need to migrate websites to Microsoft Azure Web Apps, there’s a separate tool available named Azure Web App Migration Assistant.
- DC and AD migration: Providing you have followed best practices, your domain controllers (DCs) don’t run any other software, which means the existing domain and forest will be prepared for Server 2022 / 2019. In this case, you need to create new DCs running the new OS, migrate the Flexible Single-Master Operation (FSMO) roles, migrate any certificates or other items, then decommission the Server 2012 DCs. For detailed guidance on migrating DCs, see Upgrade Domain Controllers to a newer version of Windows Server .
- DHCP migration: DHCP scopes provide the IP addresses given to clients, along with their IP configuration (e.g., gateway, DNS server). To migrate DHCP scopes, the best option is to export the scopes from the Server 2012 instance, then import them to the Server 2022 / 2019 instance.
- DNS migration: If you’re hosting DNS on Windows, you’re likely integrating it with AD and your DNS servers are DCs. Therefore, when you migrate AD, the DNS configuration will move as well. It’s important to remember to migrate any DNS server configurations, such as forwarding. If the DNS servers will be hosted on new IP addresses, you need to make sure that you update any static IP configurations and all DHCP configurations. To avoid this time-consuming task, most organizations will change the IP addresses of the new servers to that of the old servers once the old servers are retired.
- Print services: Like file services, printer configurations and shares must be migrated from the source server to the target server. In addition, you’ll need new printer drivers that are 64-bit and compatible with Server 2022 or 2019 as well as with modern clients.
Dealing with incompatible applications:
Some legacy 3rd party applications running on Windows Server 2012 may be incompatible with Windows Server 2022 / 2019. This is not as common as it once was with Server 2003 / 2008, but it may still happen – usually for legacy software, which has not been updated for newer OS versions.
Note that “old” does not necessarily mean “won’t work”. Quite a few applications ah
If these applications cannot be eliminated immediately, and are mission-critical for continued operation of the organization, the recommended option to preserve them operation is to perform a virtualized migration of those applications, into a virtual Server 2003 instance running on newer replacement server. Then, continue to take the steps required to phase those applications out and stop running the virtualized 2003 instances.
WinServ is application-generic, and can migrate even custom and in-house applications that have not been seen by the outside world – as long as they are capable of running on the new server. Here is a partial list of common applications that our customers have migrated in the past:
- SQL Server
- MS SQL
- MySQL
- SAP (including SAP Business One)
- Oracle
- Sybase
- DB2
- Java Application Server
- Crystal Reports
- Avaya
- PeopleSoft
- JD Edwards Enterprise One (JDE E1)
- Citrix
- Apache (Windows only)
- WebSphere
- Microsoft Dynamics
After the migration:
Once the migration process is complete, it is time to verify the results.
- You may need to adjust your domain’s DNS to point to the new server where needed. For example, changing your old CRM Server DNS entry to the new server’s address.
- Same goes for login scripts and GPO policy.
- Launch every application and console you use, and verify they load correctly.
- Using a client workstation, verify that clients can access the migrated server correctly and their applications run without issues.
Congratulations! Your server migration is now complete.
Ready to migrate to Windows Server 2022 / 2019 / 2016?
Get Zinstall WinServ here
You can also contact us for assistance, volume licensing, and help in setting up a POC.
Categories
- Transfer Programs from C Drive to D Drive
- Transfer Installed Software to New PC
- Transfer Files from Old PC to New PC
- Transfer Microsoft Office
- Find Office Product Key
- Move User Folder
- Move Google Chrome Bookmarks
| Workable Solutions | Step-by-step Troubleshooting |
|---|---|
| Windows Server Migration Checklist | #1. Download essential Windows server migration tool; #2. Find out your goals in Windows server migration…Full steps |
| Solution 1. Migration (Data, Apps, Account) | Step 1. Launch EaseUS Todo PCTrans on your source and target computers, connect both PCs via the internet…Full steps |
| Solution 2. In-place Upgrade (Everything) | Step 1. Create an image of all important data, apps, and even accounts on Windows Server 2012…Full steps |
Methods on this page are also applicable to Windows Server 2008/2008 R2/2012/2012 R2/2016/2019. It also works to upgrade and migrate Windows Server essentials to standards.
According to Microsoft, the new end-of-extended support date for Windows Server 2012 is October 10, 2023. The original date had been January 10, 2023.
How to Successfully Migrate Windows Server 2012 to 2016?
It’s confirmed that Windows Server 2012 and Windows Server 2012 R2 supports will end by Oct.10th, 2023. And Microsoft has released two new Windows Servers — 2016 and 2019 for personal and enterprise users to explore their businesses on the new Windows Server systems. And it’s a smart choice to get things ready in advance. Therefore, it’s time to make a full plan of upgrading or migrating Windows Server 2012/2012 R2 to new Windows Server 2016/2019.
So how to successfully migrate your Windows Server 2012 to 2016 with all applications, data, and even accounts? If you are having the same doubts as listed here, stay calm and follow the provided tips in the following to get problems resolved:
- 1. Will I lose data while migrating Windows Server 2012 to 2016?
- 2. How do I upgrade Windows Server 2012 to 2019?
- 3. How to keep applications, data, accounts while migrating Windows Server 2012 to 2016/2019?
Windows Server Migration Checklist (2 Steps)
Here is a checklist that can be applied to upgrade and migrate Windows Servers applications, data, and accounts, etc., for all Windows Server users. Take the following two steps to get the right tool and resolution for Windows Server Migration:
- #1. Download Essential Windows Server Migration Tool
For most Windows Server users, the biggest challenge of migrating Windows Server is about how to fully transfer data, installed applications, and even Windows Server accounts to the new Windows Server machine. Advanced Windows Server PC transfer software — EaseUS Todo PCTrans Technician specializes in Windows Server data, app, account and settings migration between Windows Servers.
EaseUS Todo PCTrans Technician supports to transfer data, application, accounts via network or image on all Windows Servers, including Windows Server 2019/2016/2012/2012 R2/2008/2008 R2, etc.
EaseUS Todo PCTrans Technician
- ☆ Deploy & install Todo PCTrans on multiple PCs.
- Transfer unlimited files, programs, apps between Servers.
- Transfer account, domain account, and settings.
- Data rescue, find product key of installed programs.
- One license for multiple PCs.
- #2. Find Out Your Goals in Windows Server Migration
To find out the right way to migrate Windows Server, you should first find out your goals.
- If you want to transfer Windows Server OS to a new computer, try EaseUS Windows Server Migration Tool. You will successfully migrate Windows Server OS to a new computer without reinstalling the Server OS.
- If you only want to transfer Windows Server 2012 data, installed applications, account and settings to Windows Server 2016/2019 computer, follow Solution 1 listed below for help.
- If you want to perform an in-place upgrade from Windows Server 2012 to 2016/2019 or fresh install Windows Server 2016/2019 on old Windows Server 2012 but keep all data, installation apps, and account, follow Solution 2 on this page for help.
Applies to: Transfer data, installed applications, account and settings from Windows Server 2012 to new Windows Server 2016/2019 computers. No reinstallation is required.
To transfer Windows Server 2012 data, applications, and account, etc., to a new Windows server computer like 2016 or 2019, all you need is a reliable Windows Server PC Transfer software. EaseUS Todo PCTrans Technician is capable to help. It enables all levels of users to efficiently transfer everything from an old Windows Server computer to a new Server machine via the network connection.
See how to migrate Windows Server 2012 data, application, and even account to new Server step by step:
Step 1. Launch EaseUS Todo PCTrans on your source and target computers, connect both PCs via the internet.
1. At the «PC to PC» section, click «PC to PC» to continue.

2. Select your target computer via its device name, then enter its account password or verification code and select the transfer direction. Then click «Connect» to continue.
You can check the verification code on the right top of «PC to PC» mainscreen on the target computer.

Step 2. Select the categories Applications, Files, and Accounts to transfer via the internet.
If you want to transfer data selectively, click «Edit» under each category, and choose the specific items.

Step 3. Click «Transfer» to start transferring your apps/files/accounts from one computer to another computer via the Internet.

After the migration, you can restart the new Windows Server 2016 or 2019 computer and then continue using the software again. If some applications require reactivation, use your old key to activate the programs again.
Solution 2. In-place Upgrade Windows Server 2012 to 2016/2019, Keep Everything on Server
Applies to: In-place upgrade Windows Server 2012 to 2016 or 2019 and keep everything on the Server, including data, applications, and account, etc.
If you need to in-place upgrade Windows Server 2012 to newer Windows Server, keeping everything on the machine, follow the tutorial steps below carefully.
Step 1. Create an image of all important data, apps, and even accounts on Windows Server 2012
EaseUS Todo PCTrans with its Backup and Restore feature supports you to create an image backup of all important data, applications, accounts, etc., from Windows Server 2012 to an external hard drive.
Video Tutorial of Image Transfer using EaseUS Todo PCTrans:
Step 2. Perform in-place upgrade from Windows Server 2012 to 2016/2019, or fresh install Windows server 2016 on old Server PC.
If you don’t know how to perform Windows Server in-place upgrade, follow to the Microsoft tutorial: Upgrade Windows Server 2012 to Windows Server 2016 for help.
If you need to fresh install Windows Server 2016 or 2019 on the old Server machine, you need first download a Windows Server ISO and then follow the video below to clean install the Windows Server:
Video Tutorial to Install Windows Server 2016 produced by Server Academy on YouTube:
Step 3. Restore data, applications, accounts to new Windows Server via EaseUS Todo PCTrans using its Image Transfer feature.
If you lost some apps or data, you can use EaseUS Todo PCTrans Technician to selectively restore applications, data, and accounts to your new Windows Server 2016/2019.
Conclusion
On this page, we collected two solutions to help Windows Server users migrating Windows Server 2012 with data, applications, and accounts, etc., to Windows Server 2016/2019 using reliable PC transfer — EaseUS Todo PCTrans.
We also provide extra tips to help users to perform in-place upgrade or fresh install Windows Server 2016/2019 on old Windows Server machine. By following the provided tips, you can effortlessly move everything to the new Windows Server computer.
Windows Server 2012 Migration FAQs
If you have more questions about Windows Server migration, check the following questions and find answers here immediately.
1. Can Windows Server 2012 be upgraded to 2016?
Yes. Windows Server 2012 can be upgraded to 2016 in many ways. Here, we have collected all the possible ways that you can try to upgrade to Windows Server 2016 from 2012:
- Method 1. Use Windows Server migration tool: back up Windows Server 2016 OS and restore to the Windows Server 2012.
- Method 2. Perform in-place Windows Server upgrade from 2012 to 2016.
- Method 3. Clean install Windows Server 2016 on the old Windows Server 2012 computer.
2. Can Windows Server 2008 r2 be upgraded to 2016?
Sure. You can upgrade Windows Server 2008 r2 to 2016 by performing an in-place upgrade or fresh installing Windows Server 2016 on the computer. If you need to move data, applications, and account from the old Windows Server 2008 to new Windows server 2016, refer to Migrate Windows Server 20018 (R2) to 2016 step by step guide for help.
3. How do I migrate Windows Server 2012 R2 to 2019?
The ways to migrate Windows Server 2012 R2 to 2019 is similar to the ways as recommended on this page — migrating Windows Server 2012 to 216.
First, you need a reliable Windows PC transfer software that supports you to migrate old Windows Server data, apps, accounts to the new server computer.
Next, confirm your goals — to transfer data, apps, accounts between server machines, or to upgrade Windows server to 2019 but keep everything on the computer.
Last, take the right solution to migrate Windows Server 2012 R2 to 2019:
- If you need to migrate everything to a new Server computer, use the PC to PC feature in EaseUS Todo PCTrans Technician and migrate data, apps, accounts to Windows Server 2019 without losing anything.
- If you need to perform in-place upgrade or clean install Windows Sever 2019 on the old Server 2012 R2 computer, use Image Transfer feature in EaseUS Todo PCTrans to create an image of all important things, in-place upgrade or fresh install new Server, and then recover the image back to the computer.
Time is about to run out on your Windows Server 2012 file server’s lifespan, making it imperative to make the switch soon.
Windows Server 2012 and 2012 R2 are rapidly approaching their end-of-life date. After Oct. 10, Microsoft will not provide security patches and bug fixes for these legacy server operating systems. Enterprises that rely on an on-premises file server should consider their options to execute a Windows Server 2012 file server migration and put those workloads to a newer operating system, such as Windows Server 2022.
What is the Storage Migration Service?
IT pros tend to be apprehensive when it comes to file server migrations. These operations can be complex, time consuming and expensive. Any issues that stymie the migration process can disrupt the organization and hinder users who need access to files to do their jobs.
To address these types of problems, Microsoft created the Storage Migration Service, which is a feature in the Windows Admin Center. The Storage Migration Service attempts to prevent the difficulties associated with migrating Windows Server file servers, Linux Samba file shares and NetApp Common Internet File System (CIFS) servers to a newer version of Windows Server on either a physical box or a virtual machine. The Storage Migration Service can also migrate this workload to the Azure cloud platform, including Azure IaaS or Azure Files.
The Storage Migration Service orchestrates file server migrations by executing a cutover migration to minimize downtime. The Storage Migration Service handles the communication and data transfer between the source and destination servers. The Storage Migration Service gives the option to add the identity of the source server and apply it to the destination server to avoid problems with changing links or paths so apps and users have a more seamless experience.
The Storage Migration Service is helpful in situations where you don’t use distributed file system (DFS) or have unusual applications that can only bind directly to the file shares.
Steps for the Storage Migration Service process include the following:
- Install an orchestrator for Storage Migration Service on a server.
- Create a migration job with one or several source servers and one destination server.
- Transfer the data from the source server to the orchestrator and then to the destination server.
- Perform a final cutover by assigning a new name and IP address to the source server and assigning the source server’s original name and IP address to the destination server.
What are the Storage Migration Service requirements?
To use the Storage Migration Service, you will need the following:
- A domain-joined source server that needs to be migrated. For this article, we will migrate a Windows Server 2012 R2 server, although the Storage Migration Service supports older Windows Server versions.
- A domain-joined destination server running Windows Server 2022. The destination server should reside in the same subnet as the source server.
- A domain-joined orchestration server to coordinate the migration process. For this article, this will be a Windows Server 2022 server with the Windows Admin Center installed.
- The source, destination and orchestration servers need the following ports open: Remote Procedure Call (RPC), Web Services Management (WSMAN), Windows Management Instrumentation (WMI) and Server Message Block (SMB).
- A domain administrator account to perform the migration.
Adjust the time-to-live for a smoother file-server migration
While it’s not mandatory, it’s helpful to shorten the time-to-live (TTL) on the source server’s DNS record. This reduces the downtime during the cut-over. This only helps when assigning a new IP address. If the destination server will inherit the source server’s address, then there is no benefit to adjust the TTL.
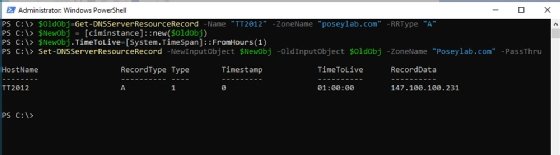
The Domain Name System (DNS) Manager cannot change the TTL for a single host, so you can use PowerShell. Start by opening an elevated PowerShell window on your DNS server and enter these commands, substituting names for the ones in your environment.
$OldObj = Get-DnsServerResourceRecord -Name "TT2012" -ZoneName "poseylab.com" -RRType "A"
$NewObj = [ciminstance]::new($OldObj)
$NewObj.TimeToLive = [System.TimeSpan]::FromHours(1)
Set-DnsServerResourceRecord -NewInputObject $NewObj -OldInputObject $OldObj -ZoneName "poseylab.com" -PassThru
Install Storage Migration Proxy on the destination server
On the Windows Server 2022 destination server, open an elevated PowerShell session and enter the following command.
Install-WindowsFeature SMS-Proxy
This installs the Storage Migration Proxy that communicates with the orchestrator.
Next, configure the Storage Migration Service on Windows Admin Center to set up the migration job.
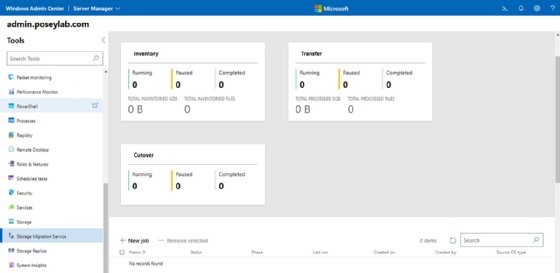
Set up the Storage Migration Service on the orchestrator
Open the Windows Admin Center and click on Storage Migration Service under the Tools section. If this is the first time running the Storage Migration Service, then click the Install button to set it up.
How to create the storage migration job with the Storage Migration Service
Next, set up the file-server migration job. In the Windows Admin Center’s Storage Migration Service section, click New Job.
Give the job a name and set the source devices — Windows server and clusters, Linux servers or NetApp FAS array — and press OK.
Click Next to bypass the Check prerequisites screen. Enter credentials for an account with local admin privileges on the source server and press Next.
Click Next and the Install required features menu will appear. Let the system install the necessary features and click Next.
At the Add and scan devices screen, click on Add a device, enter the fully qualified domain name (FQDN) or name of the source server, and click Add.

Click the More icon and then choose the Start scan command. The Storage Migration Service will launch an inventory job on the source server. Wait for the scan to finish and press Next on the bottom of the page to start mapping the source disks to the destination server hard drive.
Enter a set of credentials for the destination device and click Next. You will be prompted to specify the destination device. Choose the option to use an existing server or VM, specify the FQDN of the destination device, and click the Scan button.
When the scan completes, map each source volume to a destination volume. For example, the C: disk on source is being mapped to the C: drive on the destination server in the figure below.
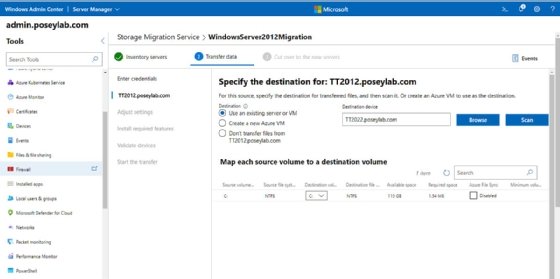
You don’t have to worry about accidentally overwriting the destination server’s operating system. If you scroll to the bottom of the page, you will see a list of the file shares that exist on the source server. Just select the shares that you want to migrate and then click Next.
At the Adjust transfer settings screen, we are using domain accounts. Click Next to accept the default settings.
At the Install required features menu, wait for the system to install the necessary features on the destination server. You might get a prompt for a password. Click Next when the process finishes.
At the Validate devices menu, select your migration job from the list and then click the Validate button. The validation process, which should not take long to complete, confirms that the source and destination servers are ready for the file-server migration. Scroll to the bottom of the screen and click Next.
Start the Windows Server 2012 file server migration
With the configuration work done, the Storage Migration Service can start the data copying process. Click the Start transfer button.
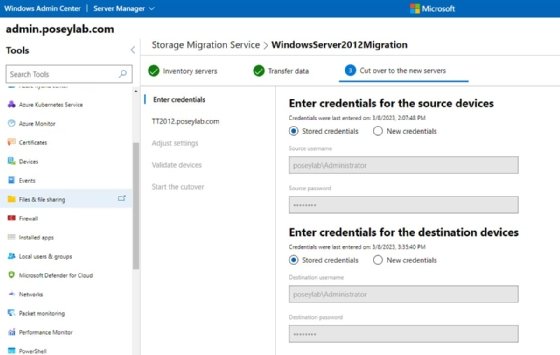
The next step is the most critical of the operation: the cutover migration. The Storage Migration Service will execute a differential transfer, then change the IP and name on the source server.
Start by either entering new credentials for the source and destination servers or by telling the wizard to use the stored credentials. In most cases, you should be able to use the stored credentials without issue. Click Next to continue.
The next menu migrates the network settings to a network adapter on the destination server. Although this screen is set up for use with static IP addresses, there is an option to use DHCP for address assignments.
The cutover process also requires the source server to be renamed because the destination server will inherit the source server’s original name. You can either assign a randomly generated name to the source server or you can give it your own name.
Click Next to go to the Adjust settings screen, which only requires your Active Directory credentials. Click Next.
Click the Validate button on the Validate devices screen. The Storage Migration Service will run tests to ensure it can execute the cutover migration. When complete, click Next.
The final screen gives the option to perform the cutover once you click Start cutover. This section also features buttons to stop and resume the cutover process. The Resume button is helpful if you encounter an error and need to restart the cutover process.
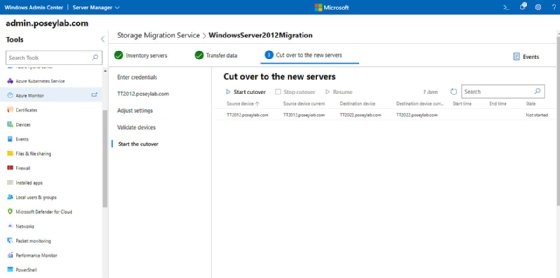
The time to complete the cutover process will vary based on the network configuration, but in my experience, the cutover migration only takes several minutes.
Before you start
Objectives: Learn how to prepare the Windows Server Migration Tools which can be used to migrate to Windows Server 2012. We will only prepare the necessary tools, we won’t do the actual migration of roles and features.
Prerequisites: no prerequisites.
Key terms: server, migration, tools, Windows, PowerShell, command, features, case, machine, R2, migrate, roles
Which Editions Can Be Migrated
All the tools we mention here are actually PowerShell commandlets. We can use those tools to migrate from Windows Server 2003, either SP2, or R2. We can also migrate from Windows Server 2008, either the full edition, or the full edition running R2. We can’t migrate from Windows Server 2008 Core edition because it doesn’t have .NET framework which is necessary for migration. We can also transfer features from Windows Server 2012, either full or core edition.
We can migrate from physical machine to virtual machine, and we can also transfer from virtual machine to the physical machine. Actually, we can go in any direction. We can do a physical to physical, virtual to virtual, physical to virtual, and virtual to physical migration. It doesn’t matter if the system is physical or virtual.
When transferring to the Win Server 2012, we can only transfer to the same user interface language. For example, if we have a Server installed in Croatian language, and we want to migrate to the Server which is using English language, it’s not going to work.
User which is performing the migration has to have administrative rights on both machines. By using PowerShell scripts we can migrate features, shares, data, system settings, roles, etc.
Installing Migration Tools Using Wizard
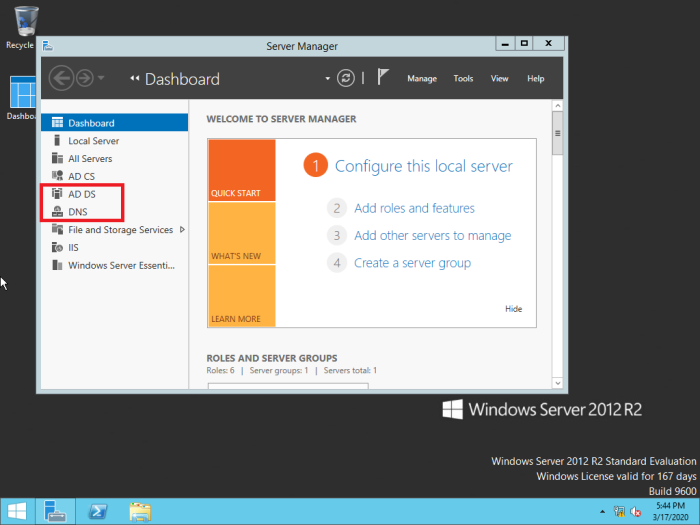
We can install Migration Tools in Windows Server 2012 in several ways. When we log on to the Win Server 2012, we will see a Dashboard. On this window we can click on the “Add roles and features” option. We can also click on the Manage option in the upper right hand corner. Notice that here we also have options to remove roles and features, add servers, and create server groups.

Dashboard
We can use the Add Servers option to manage remote servers trough the same console. Using Server Groups we can make single configuration change which will affect multiple servers at once.
When we click on the “Add roles and features” option, the wizard will appear. We will click Next on the introduction page. The first thing we have to do is select the installation type.

Installation Type
In our case we will select Role-based or feature-based installation. On the next screen we have to select the destination server. In our case we will select the server from the server pool and select the only available server which is the server on which we are working on.

Server Selection
On the next screen we can select server roles. Our feature is not listed here, so we will simply click on the Next button.

Server Roles
On the features window we have to check the “Windows Server Migration Tools” option.

Features
On the next screen we simply confirm our selection by clicking the Install button. So, this is one way of installing migration tools on our server. Let’s see how to install Migration Tools by using PowerShell.
Installing Migration Tools Using PowerShell
We have to run PowerShell as administrator. To do that, right-click on the PowerShell icon and select the “Run as administrator” option.

Right-click PowerShell
So, now we have to enter the command to install Migration tools. The whole command to do just that is: “Install-WindowsFeature Migration“.

Install Migration Command
If we have to install this feature remotely, we also have to add the computer name to the command. For example, the command to install Migration Tools on computer named “cicnavi” would be: “Install-WindowsFeature Migration – ComputerName cicnavi”.
Once the installation is complete, we will see the result of our action. The exit code should be Success as in our case.

Success
Deploying Tools With CMD on Server 2012
The next thing we need to do is go to the CMD. We will click on the Start charm and start typing CMD. This will automatically take us to the Search feature. Again, we have to run CMD as administrator, so once we find it, we have to right-click it and then select the “Run as administrator” option.
The first thing we have to do in CMD run the Server Migration Deployment utility. This utility is located in C:\Windows\System32\ServerMigrationTools directory. The name of the tool is SmigDeploy.exe. We have to extract this utility and we have to specify the architecture of the operating system that we are migrating from (x86 or amd64). We also have to specify the OS that we are migrating from and also the path to where the package will be extracted. The OS parameter can contain “WS08” if we are migrating from Win Server 2008, “WS08R2” if we are migrating from Server 2008 R2, or “WS03” if we are migrating from Windows Server 2003. The path can be local, or we can enter the UNC path to the directory on the remote machine. In our case we will be migrating from 64-bit version of Windows Server 2008 R2. We will extract files directly to the Server 2008 machine by using its IP address (192.168.77.129 in our case). We have created a shared folder on Server 2008 machine called “WMT”. The whole command is: “smigdeploy.exe /package /architecture amd64 /os WS08R2 /path \\192.168.77.129\WMT“.
![]()
simgdeploy Command
Once this is complete, we will go to the Windows Server 2008 R2 system and check the “WMT” folder, in which we have deployed our migration utilities. In WMT we will now see a new folder called “SMT_ws08R2_amd64”. The name of this folder depends on the options we set during deployment, so your folder might be different.
There are some requirements for Server Migration Tools. When it comes to Windows Server 2003, we have to ensure that we have at least 25 MB of free space, we have to have .NET Framework 2.0 and SP1, and we have to have PowerShell 2.0. On Windows Server 2008 we have to have 25 MB of free space and PowerShell installed. On Windows Server 2008 R2 we have to ensure that we have 25 MB of free space.
The next step in the migration is to register the Migration Tools in Windows Server 2008 R2. For that we will be using CMD again with elevated privileges (run as administrator). Once in CMD we will have to change to our migration tools directory, which is C:\WMT in our case (we defined this ourselves) and then to the folder created during deployment (SMT_ws08R2_amd64 in our case).

WMT Directory Content
The next thing we have to do is enter the command: “.\smigdeploy” on the source computer (2008 R2 in our case is the source, 2012 is the destination system).
![]()
Register Migration Tools
Once this command is finished we will see a PowerShell prompt which we can use to start typing in migration commands.

PowerShell Prompt
Basically, that’s it. We have prepared the tools necessary to do the migration of roles and features from other machine.

KEEP IN MIND
- In this scenario, the Active Directory and DNS are migrated from Microsoft Server 2012 to Microsoft Server 2019.
- The migration process is configured in Virtual lab environment using VMware workstation.
- This migration is conducted without a migration tool and ideal for small to medium sized business environment.
- Before the migration, it is advised to back up the DC and remove the shares from ‘Files and Storage Services’.
- To make it easier to follow, the tutorial is mainly divided into 4 sections.
-
- Pre-configuration tasks
- Install Active Directory and promote the new Server 2019
- Confirm Replication & DNS in Server 2012 and 2019
- Transfer FSMO roles to the new server (Server 2019)
01 Pre-configuration tasks
The domain is already configured as ‘techin.com’
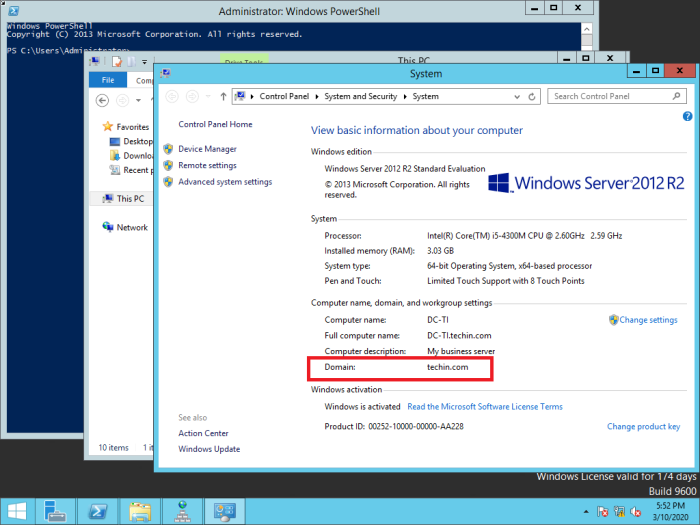
The old server 2012 is already installed with Active Directory, DNS
Windows 10 computer is added to the domain
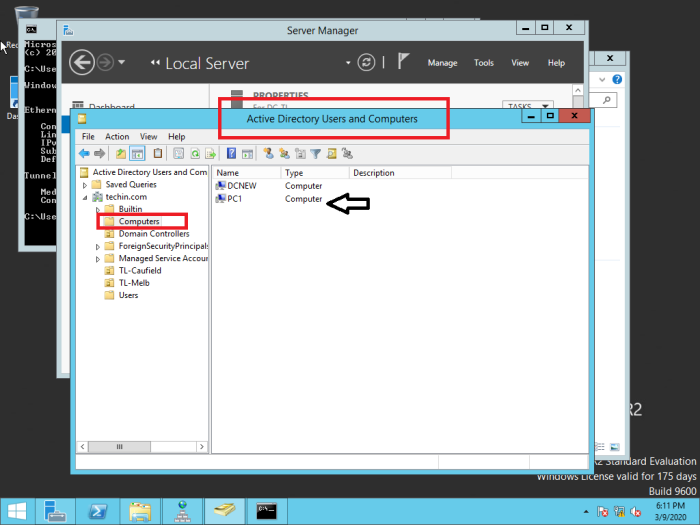
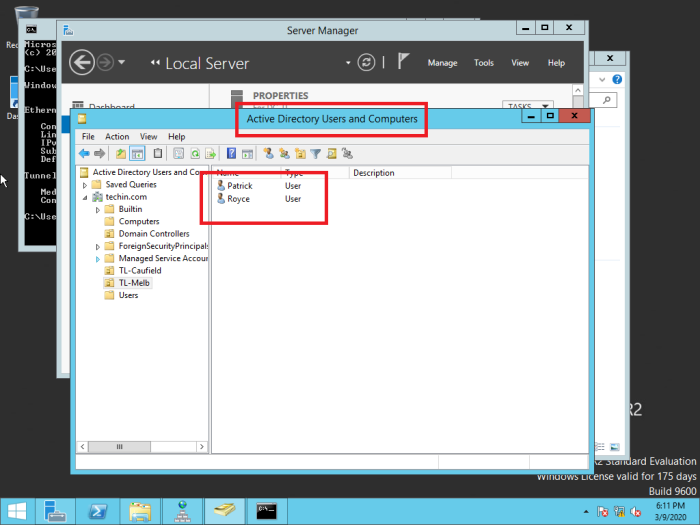
Users are created in ‘Active Directory Users and Computers’
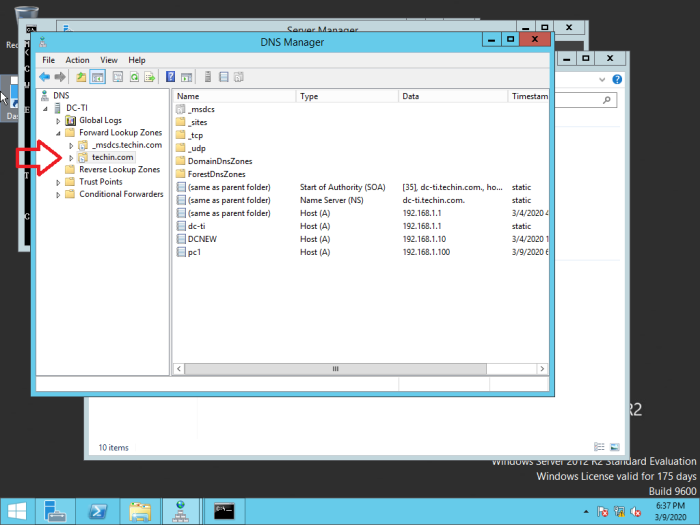
The following DNS configurations are visible
02 Install Active Directory and promote the new Server 2019
Firstly, you have to install Windows Server 2019 to a new server machine.
Refer article : https://techencyclopedia.wordpress.com/2020/02/15/microsoft-windows-server-2019-installation-step-by-step-guide/
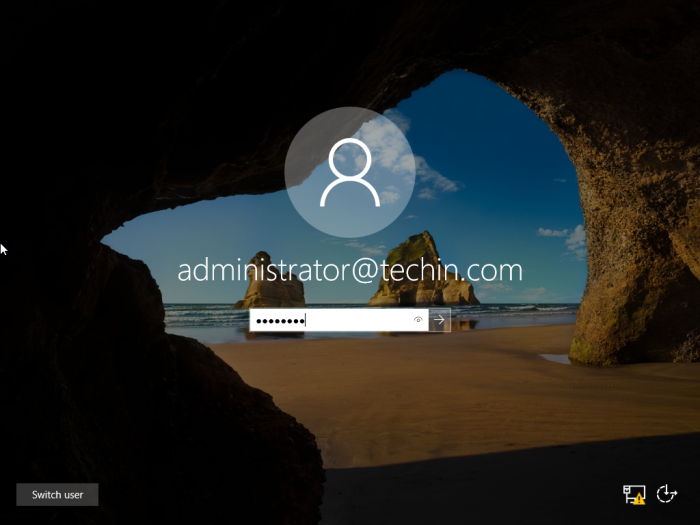
After Installing Windows Server 2019, add the new server to the existing domain (In this case techin.com). And log in as the domain administrator
After adding to the domain install active directory and DNS
You can get an idea from the following article on how to install AD DS and DNS properly. However, you have to make slight changes during installation and screenshots are provided below.
Refer article : https://techencyclopedia.wordpress.com/2020/02/16/how-to-install-active-directory-in-windows-server-2019-step-by-step-guide/
When the server is promoted, instead of adding a new forest and providing a root domain name you have to add the domain controller to the existing domain which is ‘techin.com’.
And also make sure the credentials provided have permission to perform installation
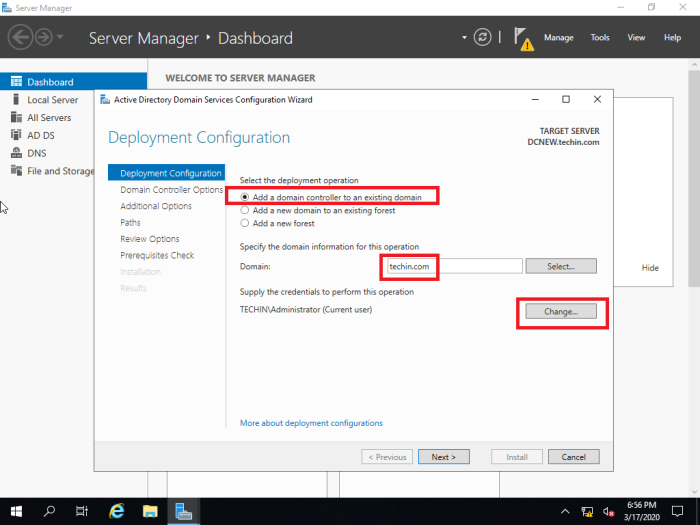
The replication should be from the main server 2012. This needs to be chosen correctly and will be an issue if the organization has multiple domain controllers.

03 Confirm Replication & DNS in Server 2012 and 2019
After the active directory and DNS installation you have to confirm the replication from old 2012 server to new 2019 server
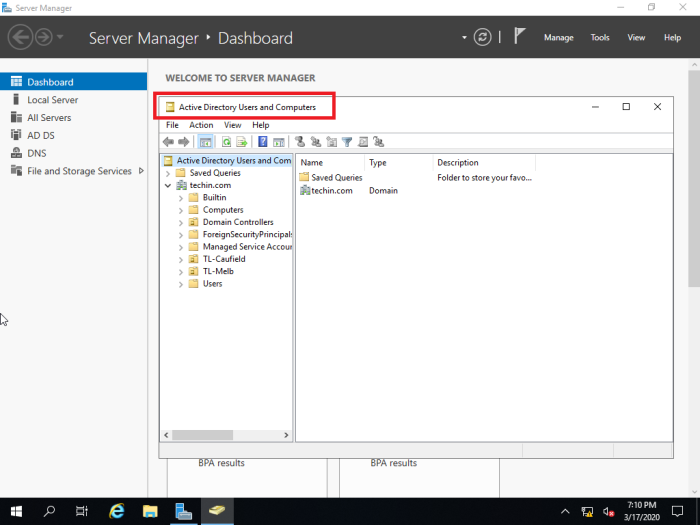
Check Active Directory Users and Computers
Check DNS Manager

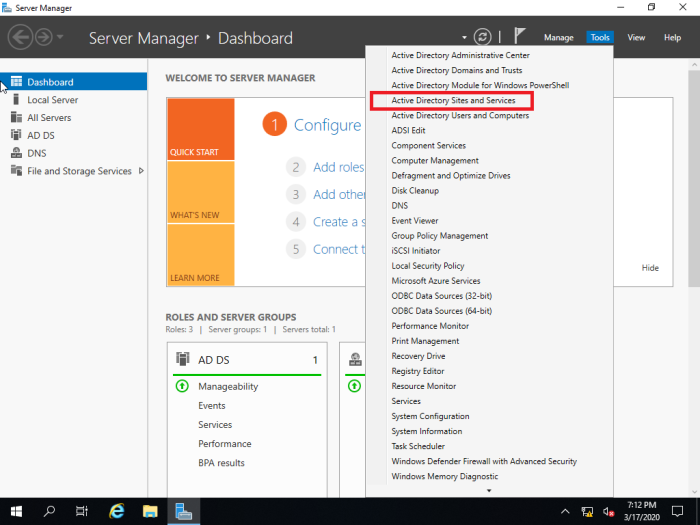
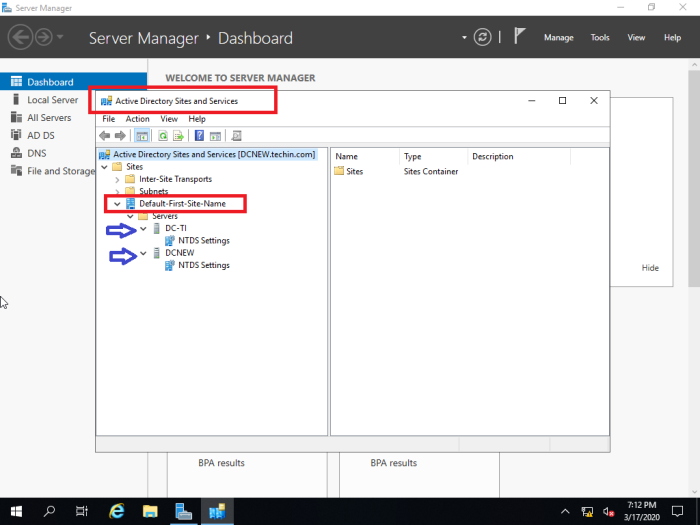
If it is not replicated from old DC you have to use ‘Active Directory Sites and Services’ to replicate manually.
Following is done in the newly installed 2019 server. The manual replication can also be done from the old 2012 server as well.

After confirming replication, you can login to the already added workstation from a domain user to check the success of the replication process. Before log in make sure that you configure the DNS accordingly. It should be the DNS of the newly configured Server.
04 Transfer FSMO roles to the new server (Server 2019)
Finally, you have to transfer the Flexible Single-Master Operations (FSMO) roles. There are 5 FSMO roles that needs to be transferred namely Schema master, Domain naming master, RID master, PDC emulator and Infrastructure master.
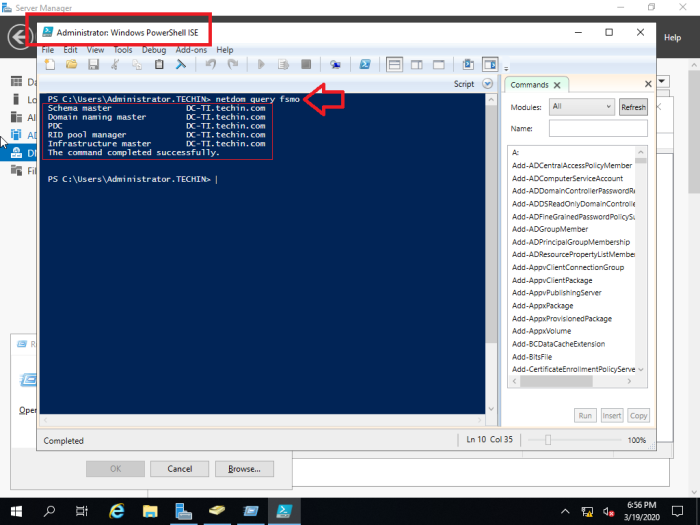
Firstly, open the PowerShell and run ‘netdom query fsmo’ command to locate the server where the FSMO roles are based. (In this case it is the old 2012 server and we need to transfer them to the new 2019 server one by one)
netdom query fsmo
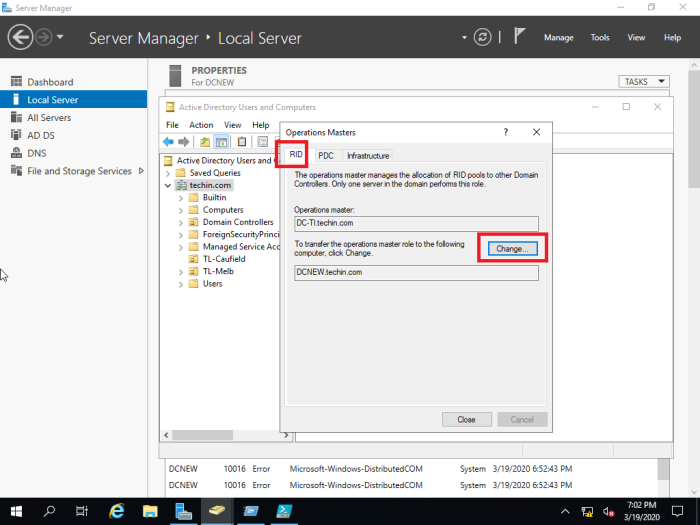
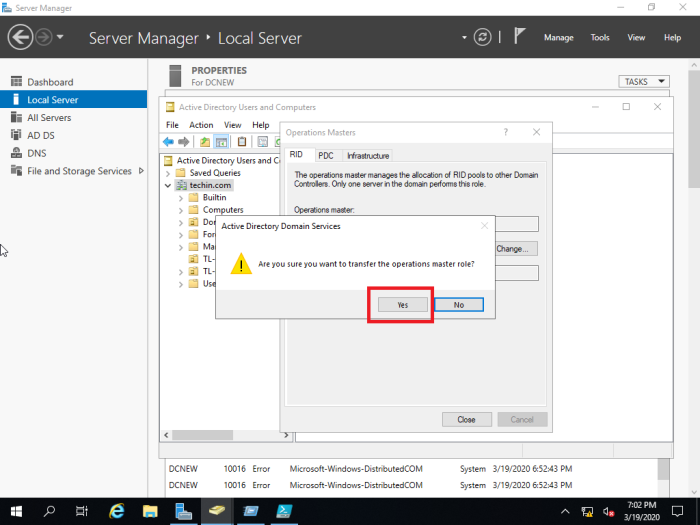
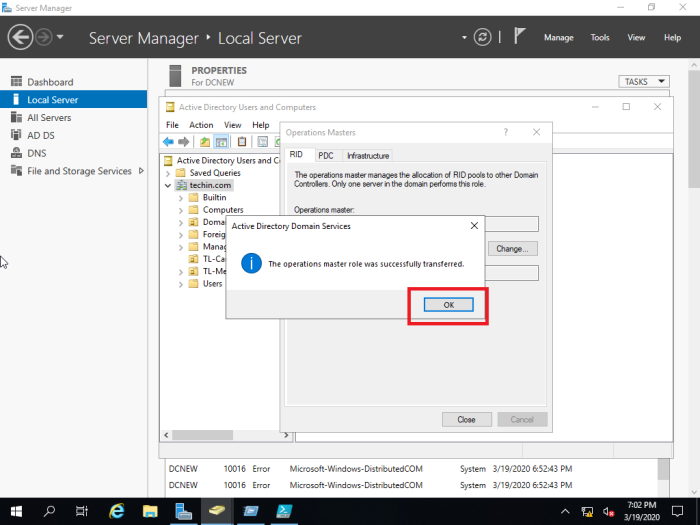
Transfer the RID master, PDC emulator and Infrastructure Master Roles
These three FSMO roles can be transferred using single MMC
go to
Server Manager > Tools > Active Directory Users and Computers
In the MMC right click on the domain name and select operations masters
Change all three of them
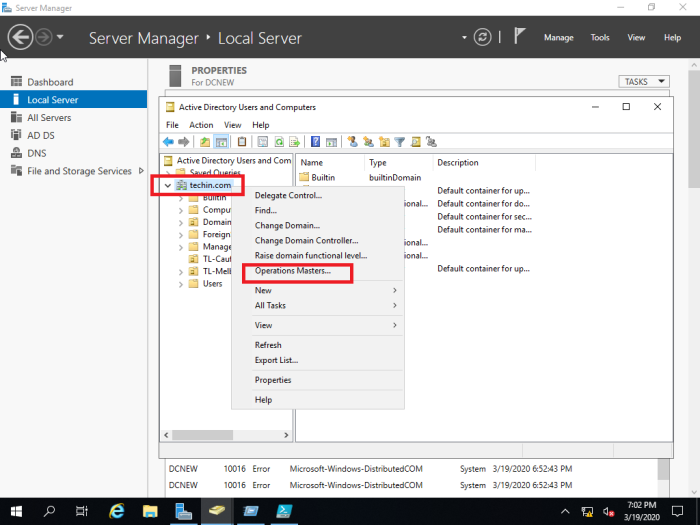
In this case only RID master role is shown and PDC and Infrastructure can be transferred in the same manner.
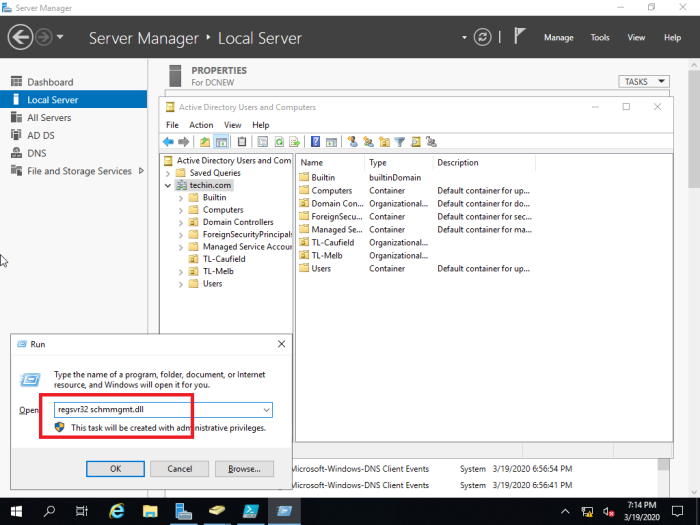
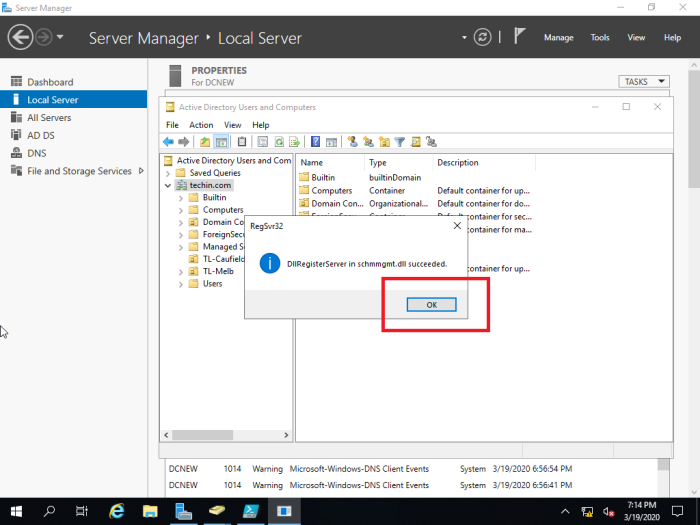
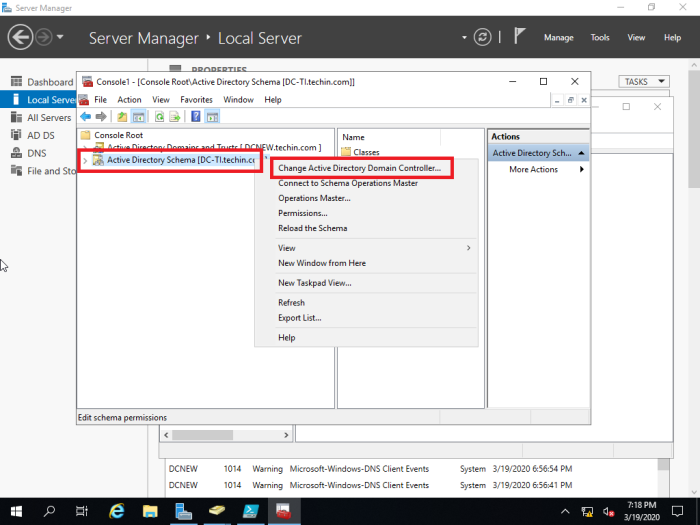
Transfer schema master role
Type run command regsvr32 schmmgmt.dll and Press OK in the next window
Type run command mmc
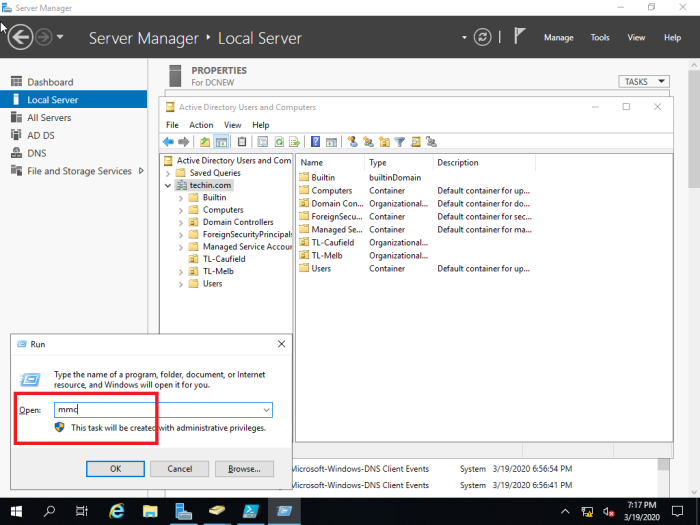
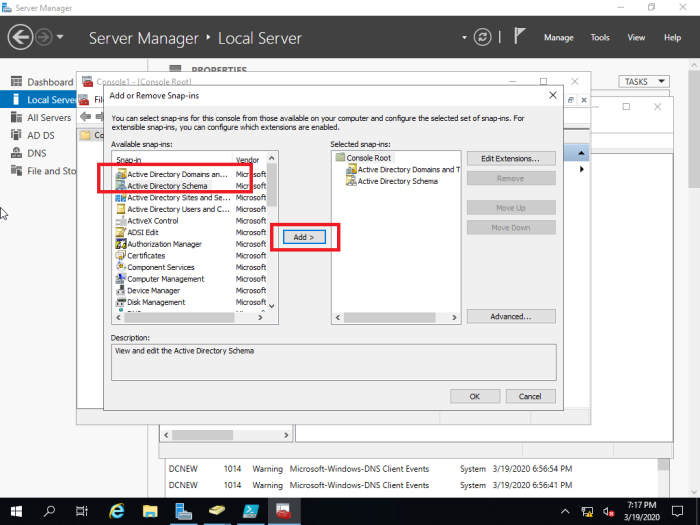
File > Add/Remove Snap-in…
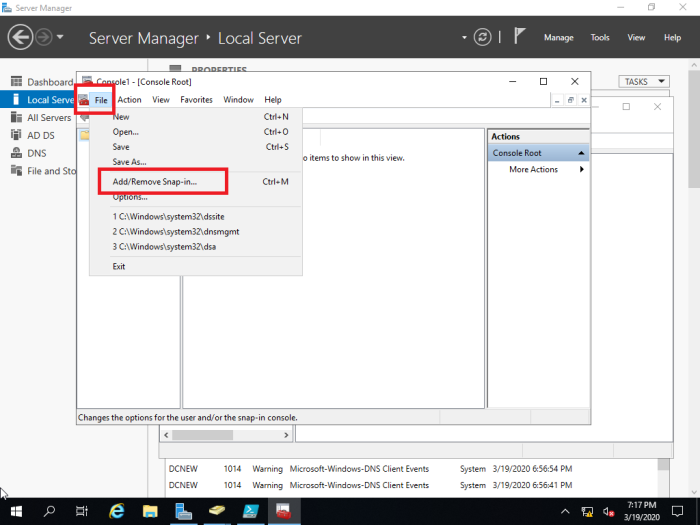
Choose and add ‘Active Directory Schema’ from ‘Available snap-ins’ and ‘Selected snap-ins’ (in this case ‘Active Directory Domains and Trusts’ are also added since it is needed to transfer ‘domain naming master role’)
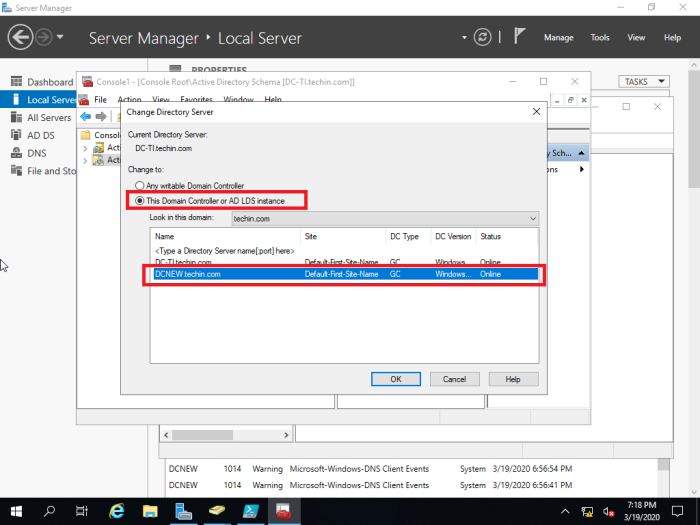
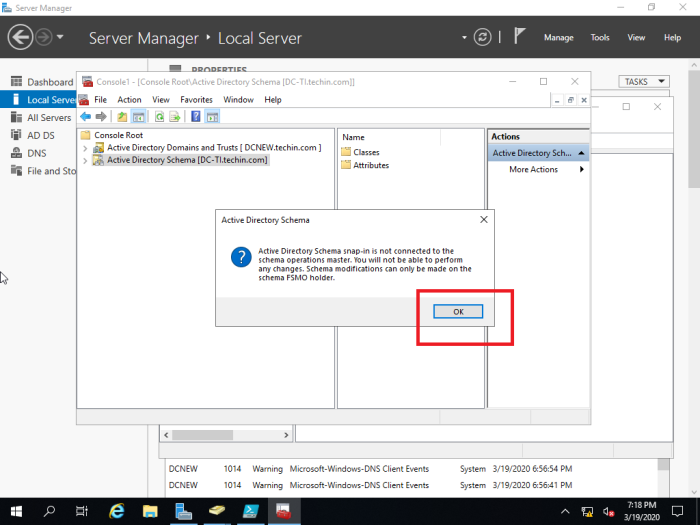
You have to change the domain controller to the new DC to proceed and steps are shown below
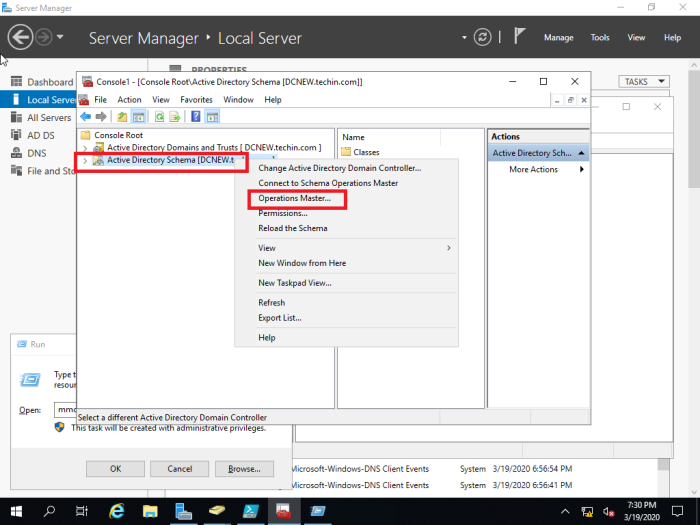
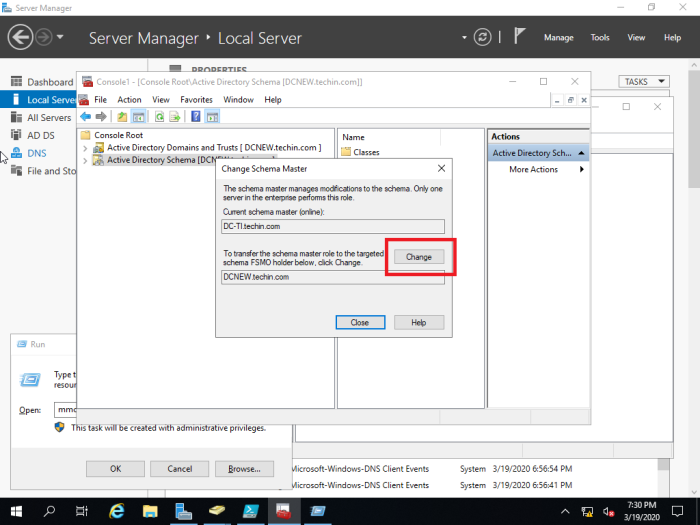
Transfer Domain Naming Master
This is similar to transferring ‘Schema master role’


Uninstall Old DC (Server 2012)
Lastly, you can uninstall old Domain controller (server 2012) from the network.