DNS (Domain Name System, Система Доменных имен) – система, позволяющая преобразовать доменное имя в IP-адрес сервера и наоборот.
DNS-сервер – это сетевая служба, которая обеспечивает и поддерживает работу DNS. Служба DNS-сервера не требовательна к ресурсам машины. Если не подразумевается настройка иных ролей и служб на целевой машине, то минимальной конфигурации будет вполне достаточно.
Настройка сетевого адаптера для DNS-сервера
Установка DNS-сервера предполагает наличие доменной зоны, поэтому необходимо создать частную сеть в личном кабинете и подключить к ней виртуальные машины.
После того, как машина будет присоединена к двум сетям, важно не перепутать, какое из подключений требует настройки. Первичный сетевой адаптер настроен автоматически с самого начала, через него открыт доступ к интернету, в то время как на дополнительно подключенных сетевых адаптерах доступа в интернет нет, пока не будет произведена ручная настройка:
Наведя курсор на значок сети в системном трее, можно вызвать всплывающую подсказку с краткими сведениями о сетях. Из примера выше видно, что присоединённая сеть это Network 3.
Далее предстоит проделать цепочку действий:
- Необходимо нажать правой клавишей мыши по значку сети в системном трее, в выпадающем меню выбрать Центр управления сетями и общим доступом, в левой части появившегося окна открыть ссылку Изменение параметров адаптера:
- Правой кнопкой мыши нажать на необходимый сетевой адаптер, в меню выбрать Свойства;
- В окне свойств выбрать IPv4 и нажать на кнопку Свойства;
- Заполнить соответствующие поля необходимыми данными:
Здесь в качестве предпочитаемого DNS-сервера машина назначена сама себе, альтернативным назначен dns.google [8.8.8.8].
Установка роли DNS-сервера
Для установки дополнительных ролей на сервер используется Мастер Добавления Ролей и Компонентов, который можно найти в Диспетчере Сервера.
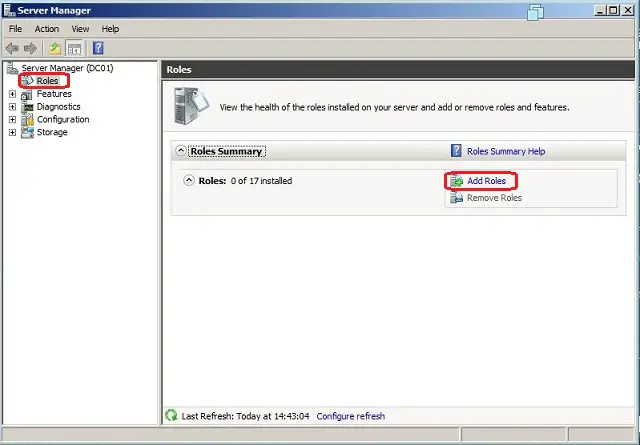
- В левой части окна Диспетчера сервера откройте раздел Роли, после чего в правой части окна отобразится команда Добавить Роли:
- Откроется окно Мастера, в котором рекомендуют убедиться что:
1. Учётная запись администратора защищена надёжным паролем.
2. Настроены сетевые параметры, такие как статические IP-адреса.
3. Установлены новейшие обновления безопасности из центра обновления Windows.
- Убедившись, что все условия выполнены, нажмите Далее;
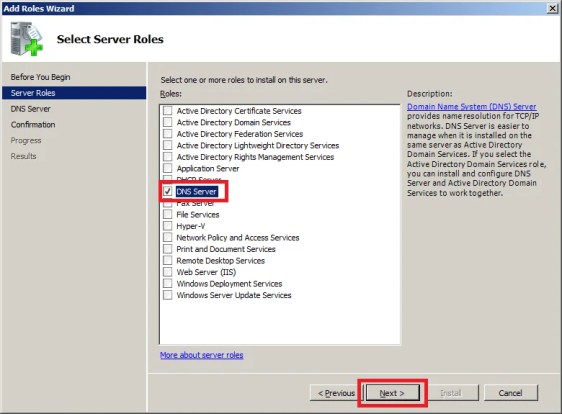
- Отметьте чек-боксом роль DNS-сервер и перейдите Далее:
- Прочитайте информацию и нажмите Далее:
- Убедитесь, что выбор сделан правильно, и подтвердите нажатием кнопки Установить:
- Дождитесь завершения установки и закройте Мастер установки:
Создание зон прямого и обратного просмотра
Доменная зона — совокупность доменных имён в пределах конкретного домена.
Зоны прямого просмотра предназначены для сопоставления доменного имени с IP-адресом.
Зоны обратного просмотра работают в противоположную сторону и сопоставляют IP-адрес с доменным именем.
Создание зон и управление ими осуществляется при помощи Диспетчера DNS.
Данный инструмент открывается из навигационного дерева Диспетчера Сервера:
Создание зоны прямого просмотра
- Выделите каталог Зоны Прямого Просмотра, запустите Мастер Создания Новой Зоны с помощью кнопки Новая зона на панели инструментов сверху:
- Откроется окно Мастера с приветствием, нажмите Далее:
- Из предложенных вариантов выберите «Основная зона» и перейдите Далее:
- Укажите имя зоны и нажмите Далее:
- При необходимости поменяйте название будущего файла зоны и нажмите Далее:
- Выберите, разрешить динамические обновления или нет. Разрешать не рекомендуется в силу значимой уязвимости. Перейдите Далее:
- Проверьте правильность выбранной конфигурации и завершите настройку, нажав кнопку Готово:
Создание зоны обратного просмотра
- Выделите в Диспетчере DNS каталог Зоны Обратного Просмотра и нажатием кнопки Новая зона на панели инструментов сверху запустите Мастер создания новой зоны:
- Выберите тип «Основная Зона», перейдите Далее:
- Выберите назначение для адресов IPv4, нажмите Далее:
- Укажите идентификатор сети (первые три октета сетевого адреса) и следуйте Далее:
- При необходимости поменяйте название будущего файла зоны и перейдите Далее:
- Выберите, разрешить динамические обновления или нет. Разрешать не рекомендуется в силу значимой уязвимости. Перейдите Далее:
- Проверьте правильность выбранной конфигурации и завершите настройку, нажав кнопку Готово:
Создание A-записи
Данный раздел инструкции в большей степени предназначен для проверки ранее проделанных шагов.
Ресурсная запись — единица хранения и передачи информации в DNS, заключает в себе сведения о соответствии какого-либо имени с определёнными служебными данными.
Запись A — запись позволяющая по доменному имени узнать IP-адрес.
Запись PTR — запись обратная A записи.
- В Диспетчере DNS выберите каталог созданной ранее зоны внутри каталога Зон Прямого Просмотра. В правой части Диспетчера, где отображается содержимое каталогов, правой кнопки мыши вызовите выпадающее меню и запустите команду «Создать узел (A или AAAA)…»:
- Откроется окно создания Нового узла, где понадобится вписать в соответствующие поля имя узла (без доменной части, в качестве доменной части используется название настраиваемой зоны) и IP-адрес. Здесь же имеется чек-бокс «Создать соответствующую PTR-запись» — чтобы проверить работу обеих зон (прямой и обратной), чекбокс должен быть активирован:
Если поле имени остается пустым, указанный адрес будет связан с именем доменной зоны.
- Также можно добавить записи для других серверов:
- Добавив все необходимые узлы, нажмите Готово.
Проверка
- Проверьте изменения в каталогах обеих зон (на примере ниже в обеих зонах появилось по 2 новых записи):
- Откройте командную строку (cmd) или PowerShell и запустите команду nslookup:
Из вывода команды видно, что по умолчанию используется DNS-сервер example-2012.com с адресом 10.0.1.6.
Чтобы окончательно убедиться, что прямая и обратная зоны работают как положено, можно отправить два запроса:
- Запрос по домену;
- Запрос по IP-адресу:
В примере получены подходящие ответы по обоим запросам.
- Можно попробовать отправить запрос на какой-нибудь внешний ресурс:
В дополнение к имени домена и адресам появилась строчка «Non-authoritative answer:», это значит, что наш DNS-сервер не обладает необходимой полнотой информации по запрашиваемой зоне, а информация выведенная ниже, хоть и получена от авторитетного сервера, но сама в таком случае не является авторитетной.
Для сравнения все те же запросы выполнены на сервере, где не были настроены прямая и обратная зоны:
Здесь машина сама себе назначена предпочитаемым DNS-сервером. Доменное имя DNS-сервера отображается как неопознанное, поскольку нигде нет ресурсных записей для IP-адреса (10.0.1.7). По этой же причине запрос 2 возвращает ошибку (Non-existent domain).
220140
Минск
ул. Домбровская, д. 9
+375 (173) 88-72-49
700
300
ООО «ИТГЛОБАЛКОМ БЕЛ»
220140
Минск
ул. Домбровская, д. 9
+375 (173) 88-72-49
700
300
ООО «ИТГЛОБАЛКОМ БЕЛ»
What is DNS?
DNS stands for Domain Name System. To know more about DNS visit Wikipedia DNS. In short DNS maps complex 32-bit IP addresses to human readable and rememberable domain names i.e. gopalthorve.com. DNS consists of a very large globally distributed database which hold zones for domains and consequently these zones hold various resource records of the domain. As we all know every device connected with the global internet is identified by a logical 32-bit number. This IP address is further divided into 4 octal numbers separated by dot (.) i.e. 192.168.0.1 (dotted decimal format). It is DNS due to which we don’t need to remember those complex 32-bit IP addresses. Say thanks to DNS due to which we only need to enter say www.wordpress.com and DNS takes care of resolving this name to respective IP address. To know how DNS Server works and for detailed description about each and every term associated with DNS Server you may find DNS on Windows Server 2003 interesting. I learned a lot of stuffs about DNS Server from DNS and BIND (5th Edition).
Install DNS Server in Windows Server 2008
- Launch Server Manager by clicking Start > Administrative Tools > Server Manager. Click Roles and then Add Roles.
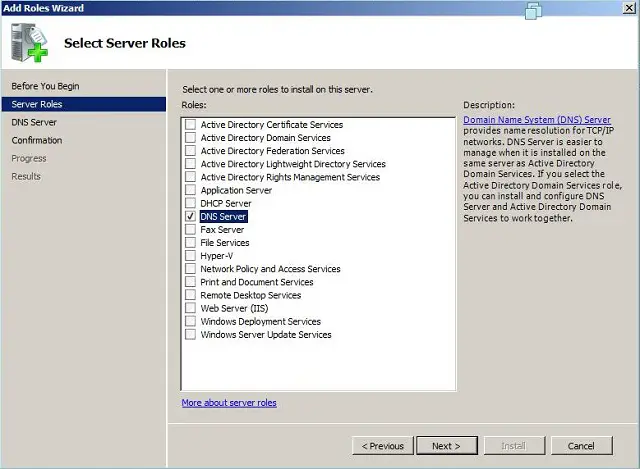
- Select DNS Server from the list and then click Next button.
- A little introduction to DNS Server and a few useful links for further details as shown in below image. Click Next to move on.
- Click Install button.
- DNS Server has been installed successfully as per below snapshot. Click Close to finish the Add Roles Wizard.
Creating Forward Lookup Zone
- Launch DNS Manager by clicking Start > Administrative Tools > DNS or type dnsmgmt.msc in Run window (Press Windows Key + R) and press Enter.
- Expand Server (e.g. WIN2008) > Right click Forward Lookup Zones > New Zone which will launch New Zone wizard.
- Click Next on Welcome to the New Zone wizard.
- Since this is our primary DNS Server for the zone select Primary zone. Then move on by clicking Next button.
- Enter the domain name for which you want to create the zone for e.g. gopalthorve.com. Say you want to build up DNS Server for your own Windows Server 2008 based hosting server then enter your registered domain name here otherwise if it is for intranet only it can be anything (domain naming conventions must be followed). The zone can also be created for subdomain e.g. us.gopalthorve.com.
- Zone File Options:
- Create a new file with this file name: Enter the physical zone file name where all zone information will be stored for this domain/subdomain. This file will be created under %systemroot%\system32\dns. Follow standard zone file naming convention e.g. gopalthorve.com.dns.
- Use this existing file: If you already have a zone file for this domain/subdomain then select this option and specify zone file name here. You need to put this zone file under %systemroot%\system32\dns folder
- Dynamic Update: Here you can specify if this DNS zone will accept secure, nonsecure or no dynamic updates from client.
- Allow only secure dynamic updates (recommended for Active Directory): This is available only for Active Directory integrated zones. This setting allows Active Directory client machines to register their name as resource records pointing towards their dynamic/static IP address.
- Allow both nonsecure and secure dynamic updates: This should never be enabled because it allows all clients secure and nonsecure both to update from all clients.
- Do not allow dynamic updates: This should be the preferred setting if you are setting up this zone for your own hosting server. This denies dynamic updates to zone resource records from all client and you will need to change them manually whenever required. We will choose this option and then move on.
- Forward lookup zone has been created successfully for gopalthorve.com and shows the summary as in below image. Click Finish to close the New Zone Wizard.
Configure Forward Lookup Zone
- Right click on gopalthorve.com (forward lookup zone recently created) and then click Properties.
- Name Servers: Here we can configure nameservers for the zone gopalthorve.com.
- Remove the default entry from the list.
- Click Add… button to add new nameserver record.
- Tye fully qualified domain name (FQDN) of the nameserver for your domain. I am configuring my own live DNS Server and hence I entered ns1.gopalthorve.com.
- Enter the IP addresses to which ns1.gopalthorve.com will resolve to. I am entering private IP address of my computer here for example purpose only. Please replace it by your Public IP Address allotted by your ISP or dedicated or VPS hosting provider.
- Similarly create another nameserver record. I created it as ns2.gopalthorve.com pointing to 192.168.0.99 (Please replace it by your Public IP Address allotted by your ISP or dedicated or VPS hosting provider.). Second nameserver record is required because your domain name registrar will require atleast two nameservers for pointing your domain to the DNS server we are configuring. We are configuring both nameservers pointing to the same DNS Server configured with multiple IP Addresses. (ns1.gopalthorve.com >> 192.168.0.98 and ns2.gopalthorve.com >> 192.168.0.99).
- Click Apply to save changes.
- Start of Authority (SOA)
- Serial number: This is the serial number for the zone. This should be set to YYYYMMDDNN where YYYY is the year, MM is the month, DD is the day and NN is the count is the count indiciating how many times the zone modified on that particular day. Whenever you change zone data occurs this serial number must be incremented by one. When slave nameserver contacts master for zone data it compares its own serial number with master’s serial number and its less than masters serial number then slave nameserver updates its zone data from master.
- Primary server: This is the FQDN of nameserver which you want to set as primary nameserver for this zone. In my case its ns1.gopalthorve.com.
- Responsible person: Specify the email address of the administrator who is responsible for maintaining this zone. Here email address must be specified in dotted format e.g. hostmaster@gopalthorve.com must be specified as hostmaster.gopalthorve.com. This is required when other webmasters wants to contact the maintainer of the zone in case of any issues.
- Refresh interval: This value instructs the slave nameserver how often to check that the data for this zone is up to date. Set this to 1 day if zone doesn’t change frequently. For the DNS server for hosting purpose 1 day is idle.
- Retry interval: In case slave nameserver failed to connect to master after Refresh interval (in case master is down or unreachable), slave tries to connect to master every interval specified here. Generally Retry interval is shorter than Refresh interval but its not compulsory. Enter 2 hours here.
- Expires after: If the slave fails to connect master for this much time, the slave expires the zone. Expiring the zone means it slave stops responding to queries for this zone because the zone data that slave is having is very old. Enter 7 days here.
- Minimum (default) TTL: TTL stands for Time To Leave. This applies to all negative responses from the authoratative nameservers. Enter 1 day here.
- TTL for this record: TTL for SOA record.
- Click Apply to save changes.
- Zone Transfers: Zone transfer is the process of transferring entire zone to the requesting server/client. The best practice is to not allow every one to connect and transfer the zones. You can allow only specific server for zone transfers i.e. the slave nameserver for the zone. We can setup to notify the servers if any zone updates happen on this zone.
- Allow zone transfers: Enables/disables zone transfers.
- To any server: All server/clients will be allowed to transfer zones. Not recommended.
- Only to servers listed on the Name Servers tab: Zone transfers will only be allowed to the nameservers specified under Name Servers tab (ns1.gopalthorve.com, ns2.gopalthorve.com). Highly recommended for DNS Servers for web hosting servers.
- Only to the following servers: If you want to enter IP/FQDN to which zone transfers will be allowed select this option and then click on Edit button and list all IP/FQDN allowed for zone transfers.
- Allow zone transfers: Enables/disables zone transfers.
- Notify…:
- Automatically notify: Enables/disables automatic notification of zone changes to either nameserver listed on Nameservers tab or specified IP addresses/FQDN names.
- Servers listed on the Name Servers tab: Selecting this will only zone update notification will only be sent to nameservers listed under Name Servers tab. This is the recommended setting.
- The following servers: You can specify list of other name servers to whom you want to send automatic notification of zone updates.
Configure DNS Server Properties
- Open DNS Manager by clicking Start > Administrative Tools > DNS.
- Right Click on the DNS Server for which you want to configure Properties for and click Properties.
- Interfaces: You can configure DNS Server to listen on specific interfaces/IP Addresses or all IP addresses. If the server has multiple interfaces then you can configure DNS Server to listen on specific interface. If the server is having only single interface with multiple IP addresses configured then you can configure it to listen on specific IP addresses. By default it is configured to listen on all interfaces and all IP addresses.
- Forwarders: You can add other DNS Servers provided by your ISP to forward DNS queries to in case this server doesn’t hold zones for the domains. These forwarder addresses are only used recursion is enabled. Forwarders are required if you are having an intranet/extranet DNS server serving a few zones and want to allow same server to resolve other DNS queries too.
- Advanced: You can configure some advanced aspects of DNS Server here. A very important options I want to discuss here is Disable recursion (also disables forwarders). If you are setting up this DNS server to serve zones for domains hosted on your DNS server (dedicated server, VPS Server, Cloud VPS Server) then enable “Disable recursion” which also disables forwarders, doing this will only allow the zones hosted on this server to be served.
- Root Hints: This is the list of root name servers.
- Debug Logging: For debugging purpose the debug logs can be enabled from here.
- Event Logging: DNS Server events can be enabled for troubleshooting purpose.
DNS Server listens on TCP and UDP port 53, so make sure to allow traffic on these ports in Windows Firewall. Also make sure that if you are having any router or firewall device and DNS server is behind any of these device, do necessary configuration to allow connection to DNS Server.
Register Name Servers at Domain Name Registrar
If you have a registered domain name and want to host DNS services for the domain on the DNS Server you recently configured then you have to create child name server at your Domain Name Registrar. If you have administrative control of your domain you can do this with the help of your domain name registrar otherwise ask them to do this for you. Create child name server like this:
ns1.gopalthorve.com >> 192.168.0.98
ns2.gopalthorve.com >> 192.168.0.99
Replace private IP addresses with public IP addresses on which DNS Server will listen on.
Update Name Servers at Domain Name Registrar
After creating child name servers you have to update name servers for your domain at Domain Name Registrar. If you have administrative control of your domain you can do this with the help of your domain name registrar otherwise ask them to do this for you. Update name servers as below:
Name Server 1: ns1.gopalthorve.com
Name Server 2: ns2.gopalthorve.com
To learn how to create various DNS Resource records (A, NS, CNAME, SPF, TXT, MX) visit this link.

Most importantly, it translates domain names meaningful to humans into the numerical identifiers associated with networking equipment for the purpose of locating and addressing these devices worldwide.
However, most Windows administrators still rely on the Windows Internet Name Service (WINS) for name resolution on local area networks and some have little or no experience with DNS. We’ll explain how to install, configure, and troubleshoot a Windows Server 2008 DNS server.
Installation:
Step 1: Install a DNS server from the Control Panel, follow these steps:
- Go to Start —> Control Panel —> Administrative Tools —> Server Manager.
- Expand and click Roles
- Click on Add Roles
Step 2 : The new window will open with the list of roles available to install. Select DNS server and Click Next.
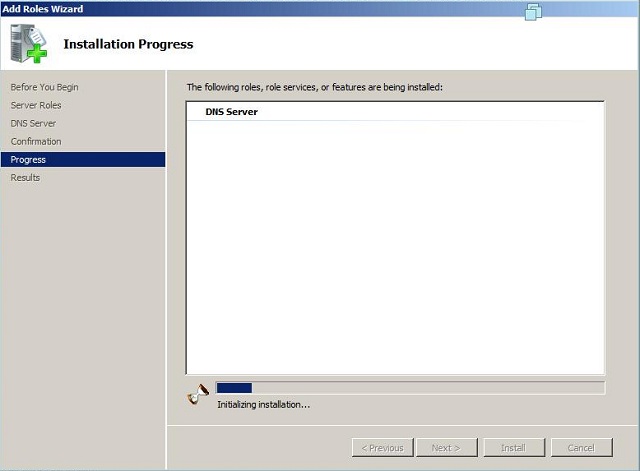
Step 3: Click Next on the introduction windows. In the last window click on install. It will start installation, the following window shows the progress of installation.
Configuring DNS:
After installing DNS, you have to go Start —> All Programs —> Administrative Tools —> DNS for managing DNS server.
Whenever configuring your DNS server, you must be know about following concepts:
- Forward lookup zone
- Reverse lookup zone
- Zone types
A forward lookup zone is helps to resolve host names to IP addresses. A reverse lookup zone allows a DNS server to discover the DNS name of the host. Basically, it is the exact opposite of a forward lookup zone. A reverse lookup zone is not required, but it is easy to configure and will allow for your Windows Server 2008 Server to have full DNS functionality.
When selecting a DNS zone type, you have the following options: Active Directory (AD) Integrated, Standard Primary, and Standard Secondary. AD Integrated stores the database information in AD and allows for secure updates to the database file. This option will appear only if AD is configured. If it is configured and you select this option, AD will store and replicate your zone files.
A Standard Primary zone stores the database in a text file. This text file can be shared with other DNS servers that store their information in a text file. Finally, a Standard Secondary zone simply creates a copy of the existing database from another DNS server. This is primarily used for load balancing.
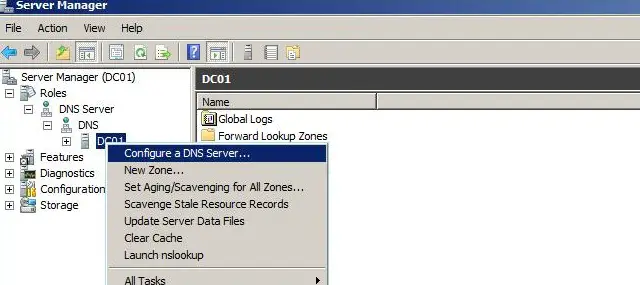
Step 1: Right Click on the name of the server in the DNS management console, Select on the Configure DNS server.
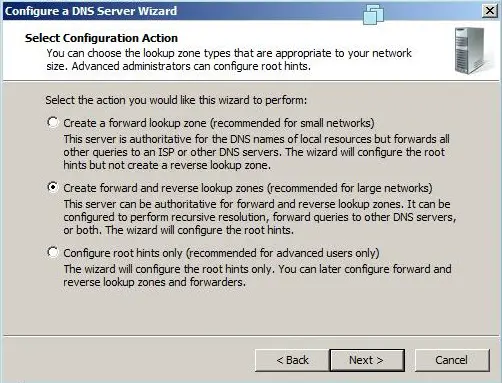
Step 2: Click on Create forward and reverse lookup zone, then click next.
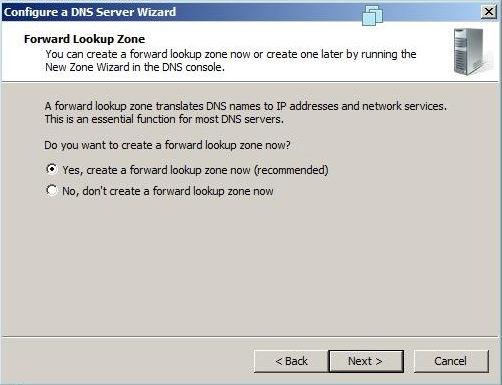
Step 3: Click on the Yes,create the forward lookup zone now on the forward lookup zone window.
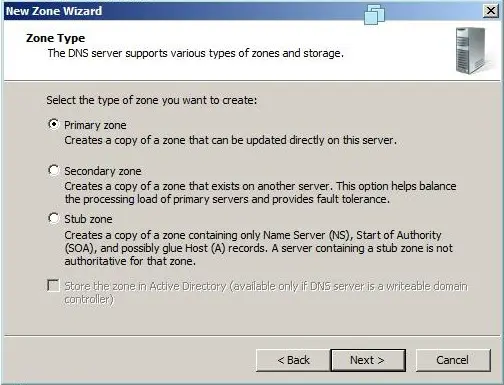
Step 4: Click on the desired zone that you want to create, in this case Primary Zone.
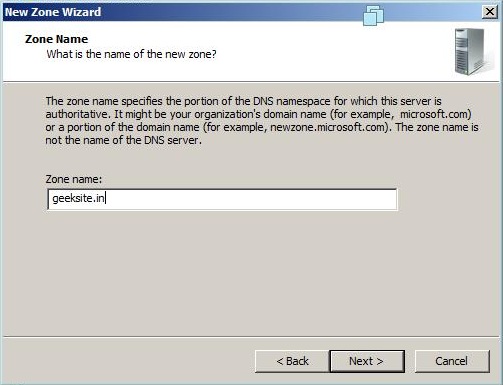
Step 5: Type the Name of the Zone and click Next.
Step 6: Click Next on the Zone File Name.
Step 7: Select the Allow both nonsecure and Secure dynamic updates and click Next to Continue.
Step 8: Select Yes, I want to create reverse lookup zone now, Click Next to continue.
Step 10: Select Primary Zone in Zone creating Window.
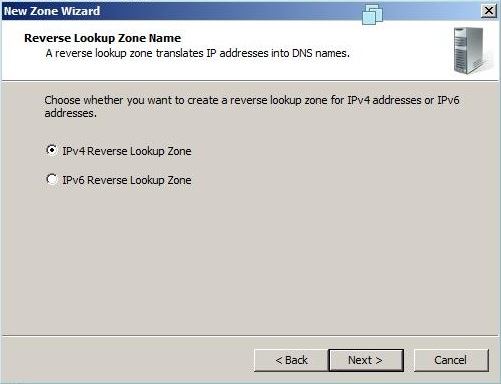
Step 11: Choose whether you want to create IPv4 or IPv6 reverse lookup zone.( in mycase IPv4 Reverse lookup zone).
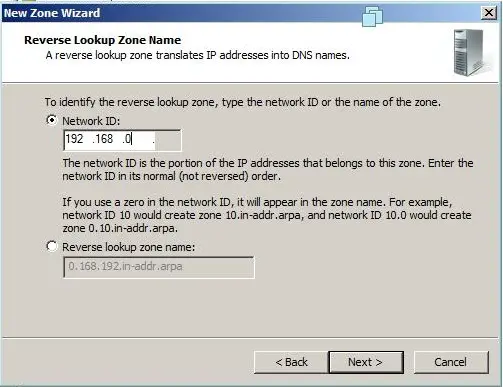
Step 12: Type you netword ID in the following window.
Step 13: Click Next on the Reverse lookup Zone file name window.
Step 14: Select the Allow both nonsecure and Secure dynamic updates and click Next to Continue.
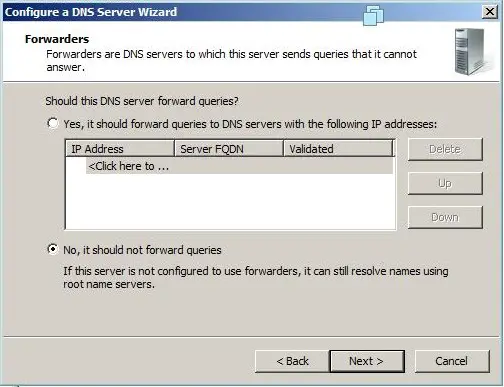
Step 15: Select No, i should not forward queries, then click Next.
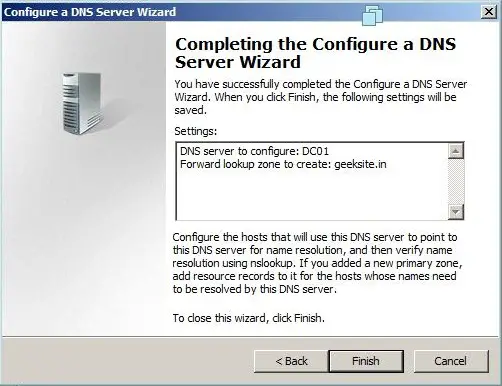
Step 16: Click finish on the final window.
Managing DNS Server:
After the installation and configuration of the forward and reverse lookup zone, now the server is ready to create the other records associated with the DNS and Zones. There are several records available, here i am listing some of the important records.
- Start of Authority (SOA)
- Name Servers
- Host (A)
- Pointer (PTR)
- Canonical Name (CNAME) or Alias
- Mail Exchange (MX)
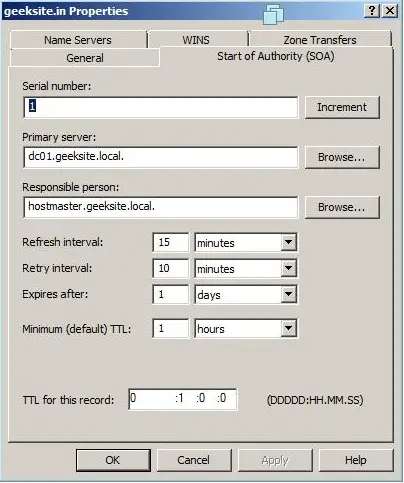
Start of Authority (SOA):
Specifies authoritative information about a DNS zone, including the primary name server, the email of the domain administrator, the domain serial number, and several timers relating to refreshing the zone. The following properties window shows the information about the SOA record of the Geeksite.in Zone.
Name Servers (NS Record):
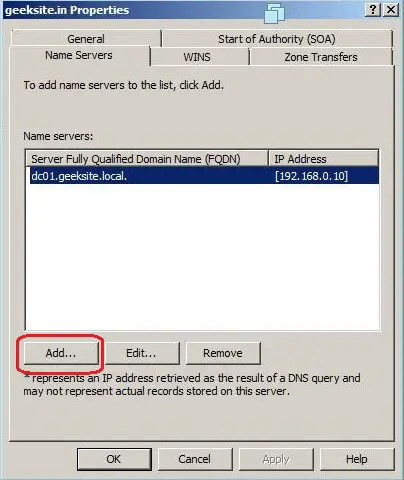
Name Servers that specify name servers for a particular domain. You set up all primary and secondary name servers through the Properties window of the Zone.
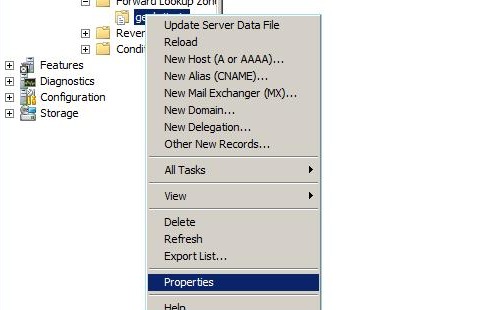
Step 1: Right Click on the Zone name and click on properties.
Step 2: Click on the Name server Tab.
Step 3: If require, add the name server by clicking Add button. You require FQDN of the server name and IP Address.
Host Records (A Record):
It is mainly used for mapping the Host name with IP address, you can able to create Pointer Record at the same time.
Here is the Steps to create the A record.
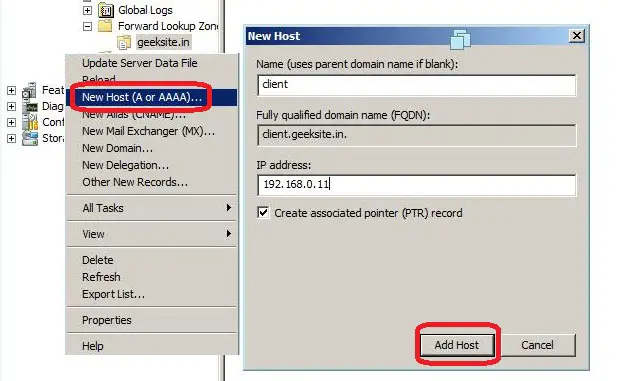
Step 1: Right click on the Zone name, Select the New Host (A or AAAA)
Step 2: Type the Name of the New Host and IP Address, then Click Add Host.
Following window shows the both Step 1 and Step 2.
Canonical Name (CNAME) or Alias records
A Canonical Name (CNAME) or Alias record allows a DNS server to have multiple names for a single host. For example, an Alias record can have several records that point to a single server in your environment. This is a common approach if you have both your Web server and your mail server running on the same machine.
Here is the Steps to create CNAME record.
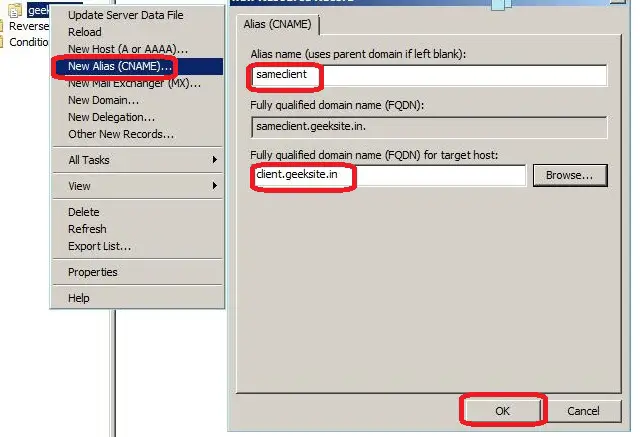
Step 1: Right Click on the Zone name and click on New Alias (CNAME )
Step 2: Type your Alias Name.
Step 3: Browse for or Type the Fully Qualified Domain Name (FQDN) of the Target Host.
Step 4: Click OK.
Following window shows Step 1-4.
Mail Exchanger (MX Records):
Mail exchanger records to identify the mail server for the particular domain. We can create the mail servers records with the priority, the mail server with highest priority will be preferred first for receiving the mail.
Here are the Steps to create the Mail Exchanger record.
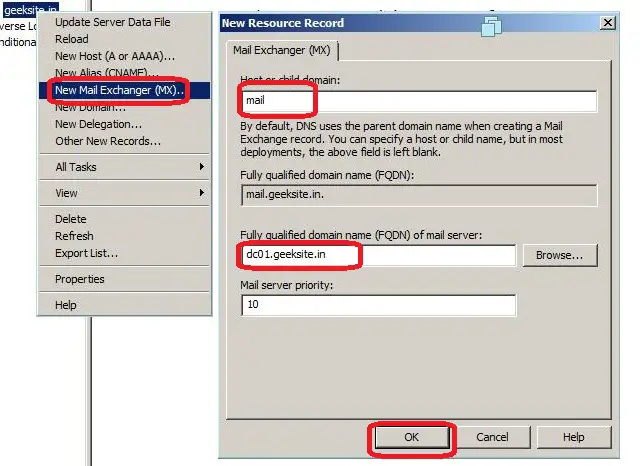
Step 1: Right click on the Zone name. click on the New Mail Exhanger (MX).
Step 2: Type the Host or child domain name.
Step 3: Browse for or Type FQDN of the mail server.
Following Window Shows Step 1-3.
Testing DNS Server:
The DNS server is now up and ready for resolving the domain names. Change DNS name server ip address in your local area connection, then use the Nslookup utility. Nslookup is the main utility for testing and trouble shooting the DNS server. It helps to get all the information of the prticular domain.
The following image shows the example of the nslookup command.
That’s All!
on
How do I… Install and configure a DNS server in Windows Server 2008?
Without DNS, computers would have a very tough time communicating with each other. However, most Windows administrators still rely on WINS for name resolution on local area networks and some have little or no experience with DNS. Steven Warren explains how to install, configure, and troubleshoot a Windows Server 2008 DNS server.

This blog post is also available in PDF form as a TechRepublic Download and as a TechRepublic Photo Gallery.
Installation
You can install a DNS server from the Control Panel or when promoting a member server to a domain controller (DC) (Figure A). During the promotion, if a DNS server is not found, you will have the option of installing it.
Figure A
Domain controller
To install a DNS server from the Control Panel, follow these steps:
- From the Start menu, select | Control Panel | Administrative Tools | Server Manager.
- Expand and click Roles (Figure B).
- Choose Add Roles and follow the wizard by selecting the DNS role (Figure C).
- Click Install to install DNS in Windows Server 2008 (Figure D).
Figure B
Expand and click Roles
Figure C
DNS role
Figure D
Install DNS
DNS console and configuration
After installing DNS, you can find the DNS console from Start | All Programs | Administrative Tools | DNS. Windows 2008 provides a wizard to help configure DNS.
When configuring your DNS server, you must be familiar with the following concepts:
- Forward lookup zone
- Reverse lookup zone
- Zone types
A forward lookup zone is simply a way to resolve host names to IP addresses. A reverse lookup zone allows a DNS server to discover the DNS name of the host. Basically, it is the exact opposite of a forward lookup zone. A reverse lookup zone is not required, but it is easy to configure and will allow for your Windows Server 2008 Server to have full DNS functionality.
When selecting a DNS zone type, you have the following options: Active Directory (AD) Integrated, Standard Primary, and Standard Secondary. AD Integrated stores the database information in AD and allows for secure updates to the database file. This option will appear only if AD is configured. If it is configured and you select this option, AD will store and replicate your zone files.
A Standard Primary zone stores the database in a text file. This text file can be shared with other DNS servers that store their information in a text file. Finally, a Standard Secondary zone simply creates a copy of the existing database from another DNS server. This is primarily used for load balancing.
To open the DNS server configuration tool:
- Select DNS from the Administrative Tools folder to open the DNS console.
- Highlight your computer name and choose Action | Configure a DNS Server… to launch the Configure DNS Server Wizard.
- Click Next and choose to configure the following: forward lookup zone, forward and reverse lookup zone, root hints only (Figure E).
- Click Next and then click Yes to create a forward lookup zone (Figure F).
- Select the appropriate radio button to install the desired Zone Type (Figure G).
- Click Next and type the name of the zone you are creating.
- Click Next and then click Yes to create a reverse lookup zone.
- Repeat Step 5.
- Choose whether you want an IPv4 or IPv6 Reverse Lookup Zone (Figure H).
- Click Next and enter the information to identify the reverse lookup zone (Figure I).
- You can choose to create a new file or use an existing DNS file (Figure J).
- On the Dynamic Update window, specify how DNS accepts secure, nonsecure, or no dynamic updates.
- If you need to apply a DNS forwarder, you can apply it on the Forwarders window. (Figure K).
- Click Finish (Figure L).
Figure E
Configure
Figure F
Forward lookup zone
Figure G
Desired zone
Figure H
IPv4 or IPv6
Figure I
Reverse lookup zone
Figure J
Choose new or existing DNS file
Figure K
Forwarders window
Figure L
Finish
Managing DNS records
You have now installed and configured your first DNS server, and you’re ready to add records to the zone(s) you created. There are various types of DNS records available. Many of them you will never use. We’ll be looking at these commonly used DNS records:
- Start of Authority (SOA)
- Name Servers
- Host (A)
- Pointer (PTR)
- Canonical Name (CNAME) or Alias
- Mail Exchange (MX)
Start of Authority (SOA) record
The Start of Authority (SOA) resource record is always first in any standard zone. The Start of Authority (SOA) tab allows you to make any adjustments necessary. You can change the primary server that holds the SOA record, and you can change the person responsible for managing the SOA. Finally, one of the most important features of Windows 2000 is that you can change your DNS server configuration without deleting your zones and having to re-create the wheel (Figure M).
Figure M
Change configuration
Name Servers
Name Servers specify all name servers for a particular domain. You set up all primary and secondary name servers through this record.
To create a Name Server, follow these steps:
- Select DNS from the Administrative Tools folder to open the DNS console.
- Expand the Forward Lookup Zone.
- Right-click on the appropriate domain and choose Properties (Figure N).
- Select the Name Servers tab and click Add.
- Enter the appropriate FQDN Server name and IP address of the DNS server you want to add.
Figure N
Name Server
Host (A) records
A Host (A) record maps a host name to an IP address. These records help you easily identify another server in a forward lookup zone. Host records improve query performance in multiple-zone environments, and you can also create a Pointer (PTR) record at the same time. A PTR record resolves an IP address to a host name.
To create a Host record:
- Select DNS from the Administrative Tools folder to open the DNS console.
- Expand the Forward Lookup Zone and click on the folder representing your domain.
- From the Action menu, select New Host.
- Enter the Name and IP Address of the host you are creating (Figure O).
- Select the Create Associated Pointer (PTR) Record check box if you want to create the PTR record at the same time. Otherwise, you can create it later.
- Click the Add Host button.
Figure O
A Host (A) record
Pointer (PTR) records
A Pointer (PTR) record creates the appropriate entry in the reverse lookup zone for reverse queries. As you saw in Figure H, you have the option of creating a PTR record when creating a Host record. If you did not choose to create your PTR record at that time, you can do it at any point.
To create a PTR record:
- Select DNS from the Administrative Tools folder to open the DNS console.
- Choose the reverse lookup zone where you want your PTR record created.
- From the Action menu, select New Pointer (Figure P).
- Enter the Host IP Number and Host Name.
- Click OK.
Figure P
New Pointer
Canonical Name (CNAME) or Alias records
A Canonical Name (CNAME) or Alias record allows a DNS server to have multiple names for a single host. For example, an Alias record can have several records that point to a single server in your environment. This is a common approach if you have both your Web server and your mail server running on the same machine.
To create a DNS Alias:
- Select DNS from the Administrative Tools folder to open the DNS console.
- Expand the Forward Lookup Zone and highlight the folder representing your domain.
- From the Action menu, select New Alias.
- Enter your Alias Name (Figure Q).
- Enter the fully qualified domain name (FQDN).
- Click OK.
Figure Q
Alias Name
Mail Exchange (MX) records
Mail Exchange records help you identify mail servers within a zone in your DNS database. With this feature, you can prioritize which mail servers will receive the highest priority. Creating MX records will help you keep track of the location of all of your mail servers.
To create a Mail Exchange (MX) record:
- Select DNS from the Administrative Tools folder to open the DNS console.
- Expand the Forward Lookup Zone and highlight the folder representing your domain.
- From the Action menu, select New Mail Exchanger.
- Enter the Host Or Domain (Figure R).
- Enter the Mail Server and Mail Server Priority.
- Click OK.
Figure R
Host or Domain
Other new records
You can create many other types of records. For a complete description, choose Action | Other New Records from the DNS console (Figure S). Select the record of your choice and view the description.
Figure S
Create records from the DNS console
Troubleshooting DNS servers
When troubleshooting DNS servers, the nslookup utility will become your best friend. This utility is easy to use and very versatile. It’s a command-line utility that is included within Windows 2008. With nslookup, you can perform query testing of your DNS servers. This information is useful in troubleshooting name resolution problems and debugging other server-related problems. You can access nslookup (Figure T) right from the DNS console.
Figure T
Nslookup utility
-
Developer
Windows Server 2008 R2 предлагает мощный инструмент для настройки сервера DNS, который позволяет управлять именами доменов и их разрешением. В этой статье мы расскажем о том, как настроить сервер DNS на Windows Server 2008 R2 и предоставим пошаговую инструкцию для установки и конфигурации данной службы.
Настройка сервера DNS начинается с установки роли DNS Server на компьютере с ОС Windows Server 2008 R2. После установки нужно настроить основные параметры сервера, такие как префикс DNS имени компьютера и доменное имя, чтобы клиенты могли обращаться к серверу по его имени. Важно также установить правильные настройки приватного и публичного сетевых соединений для обеспечения надежности и безопасности работы сервера DNS.
Как только сервер DNS настроен, можно приступить к созданию зон и записей DNS. Зона DNS — это логическая единица, содержащая информацию об именах доменов и соответствующих им IP-адресах. Существуют различные типы зон, такие как прямые и обратные зоны, их необходимо создать для управления разрешением имен. После создания зоны нужно добавить записи DNS, которые определат, какие имена и IP-адреса связаны друг с другом.
Настраивая сервер DNS на Windows Server 2008 R2, необходимо учитывать требования и особенности сети, а также ее будущее развитие. Бесперебойная работа сервера DNS не только обеспечит стабильность работы сети, но и повысит качество обслуживания пользователей. Следуйте данной пошаговой инструкции и настройте сервер DNS на Windows Server 2008 R2 с легкостью и надежностью.
Содержание
- Как настроить сервер DNS на Windows Server 2008 R2: шаг за шагом
- Установка Windows Server 2008 R2
- Установка роли DNS Server
- Создание новой зоны DNS
- Конфигурация DNS-сервера DNS
- Проверка работоспособности DNS-сервера
Как настроить сервер DNS на Windows Server 2008 R2: шаг за шагом
Настройка сервера DNS (Domain Name System) на Windows Server 2008 R2 позволяет вам управлять именами доменов в вашей сети и осуществлять их разрешение в IP-адреса. Это важный шаг в создании и управлении сетью. В этой статье мы шаг за шагом рассмотрим процесс настройки DNS-сервера на Windows Server 2008 R2.
Шаг 1: Установка роли сервера DNS
Первым шагом является установка роли сервера DNS на вашем сервере Windows Server 2008 R2. Это можно сделать через меню «Управление сервером».
Шаги:
- Запустите «Сервер менеджер».
- Выберите «Роли», а затем нажмите «Добавить роли».
- В открывшемся окне выберите «Службы домена Active Directory» и нажмите «Далее».
- Выберите «Службы сервера DNS» и нажмите «Далее».
- Продолжайте с установкой по умолчанию, нажимая «Далее» или настраивая параметры по вашему выбору.
- После завершения установки роли, нажмите «Закрыть».
Шаг 2: Настройка зон DNS
После установки роли сервера DNS, необходимо настроить зоны DNS, чтобы указать, какие домены будут разрешаться на вашем сервере.
Шаги:
- Запустите «DNS-сервер».
- Нажмите правой кнопкой мыши на «Зоны DNS» и выберите «Новая зона».
- Выберите тип зоны (обычно применяется «Зона первичной области»).
- Введите имя вашего домена и нажмите «Далее».
- Выберите опции для репликации зоны, а затем нажмите «Далее».
- Продолжайте с установкой по умолчанию или настройте параметры по вашему выбору.
- Завершите настройку зоны, нажав «Готово».
Шаг 3: Создание записей DNS
После настройки зон DNS вы можете создать записи DNS, которые связывают домены с IP-адресами или другими записями.
Шаги:
- Выберите созданную вами зону DNS в окне «DNS-сервер».
- Нажмите правой кнопкой мыши на зону и выберите «Новая запись».
- Выберите тип записи (например, «A» для создания записи описывающей соответствие между именем домена и IP-адресом) и нажмите «Создать запись».
- Заполните необходимые поля, такие как имя хоста и IP-адрес (в случае A-записи), и нажмите «ОК».
- Продолжайте создавать необходимые записи DNS для вашей сети.
Теперь у вас настроен сервер DNS на Windows Server 2008 R2, и вы можете использовать его для разрешения имён доменов в IP-адреса в вашей сети. Учтите, что настройка DNS-сервера является ответственностью сетевого администратора и может потребовать дополнительных настроек в зависимости от вашей сетевой инфраструктуры и требований.
Установка Windows Server 2008 R2
Перед началом установки Windows Server 2008 R2 необходимо убедиться, что системные требования устройства соответствуют минимальным. Проверьте, что у вас есть достаточно оперативной памяти, свободного места на жестком диске и процессор соответствующей мощности.
- Подготовьте установочный носитель: Скачайте образ Windows Server 2008 R2 с официального сайта Microsoft или приобретите дистрибутив на DVD. Если у вас есть DVD-диск, вставьте его в оптический привод компьютера.
- Загрузите компьютер с установочного носителя: Если у вас есть DVD-диск, перезагрузите компьютер и выберите загрузку с оптического привода. Если вы работаете с образом ISO или USB-накопителем, вам необходимо настроить компьютер для загрузки с соответствующего источника.
- Выберите язык и параметры установки: При загрузке с установочного носителя вы увидите экран с выбором языка и параметров установки. Выберите нужные настройки и щелкните «Далее».
- Произведите установку: Нажмите на кнопку «Установить» и приступите к процессу установки. Принимайте все предложенные по умолчанию параметры, если не уверены в своих знаниях.
- Дождитесь завершения установки: После завершения процесса установки компьютер перезагрузится. Дождитесь, пока система запустится в первый раз и войдите в систему с использованием учетной записи администратора.
Теперь вы успешно установили Windows Server 2008 R2. Можете переходить к настройке сервера DNS по инструкции.
Установка роли DNS Server
Перед настройкой сервера DNS необходимо установить роль DNS Server на сервере Windows Server 2008 R2. Для этого следуйте инструкциям ниже:
- Откройте Server Manager (Менеджер сервера).
- В Server Manager выберите пункт меню «Roles» (Роли).
- В разделе «Roles Summary» (Сводка ролей) нажмите «Add Roles» (Добавить роли).
- В мастере добавления ролей выберите «DNS Server» (Сервер DNS).
- Появится диалоговое окно «DNS Server» (Сервер DNS). Нажмите «Next» (Далее).
- Нажмите «Install» (Установить), чтобы начать процесс установки роли DNS Server.
- По завершении установки роли DNS Server нажмите «Close» (Закрыть).
После завершения установки роли DNS Server на сервере Windows Server 2008 R2, вы сможете приступить к настройке сервера DNS.
Создание новой зоны DNS
Для создания новой зоны DNS на сервере Windows Server 2008 R2 необходимо выполнить следующие шаги:
- Откройте консоль управления DNS. Для этого щелкните правой кнопкой мыши на значке «Пуск» и выберите «Сервисы DNS».
- Щелкните правой кнопкой мыши на сервере DNS и выберите «Зоны DNS».
- В контекстном меню выберите «Создать новую зону».
- В мастере создания новой зоны DNS нажмите «Далее».
- Выберите тип зоны. Рекомендуется выбрать «Поддерживающая зону стандарта» для создания зоны, которая будет содержать информацию об узлах в сети.
- Введите имя зоны. Можно использовать полное имя домена или указать только его часть.
- Выберите файл для хранения зоны или оставьте значение по умолчанию.
- Выберите, каким серверам разрешать обновлять записи в зоне. Рекомендуется выбрать «Только серверам в зоне DNS».
- Продолжайте следовать инструкциям мастера для завершения создания новой зоны DNS.
После завершения создания новой зоны DNS она будет отображаться в списке зон DNS на сервере Windows Server 2008 R2. Вы можете настроить параметры зоны и добавить записи DNS для управления именами и адресами в вашей сети.
Конфигурация DNS-сервера DNS
После установки и настройки сервера DNS на Windows Server 2008 R2, необходимо выполнить его конфигурацию. В этом разделе рассмотрим основные шаги, которые позволят вам правильно настроить DNS-сервер.
- Откройте «DNS Manager» через «Start» → «Programs» → «Administrative Tools».
- В открывшемся окне «DNS Manager» щелкните правой кнопкой мыши на сервере, для которого вы хотите настроить DNS, и выберите «Properties».
- Перейдите на вкладку «Interfaces». Здесь вы найдете список всех сетевых интерфейсов сервера.
- Выберите интерфейс, на котором будет работать DNS-сервер, и нажмите кнопку «Properties».
- В открывшемся окне «Interface Properties» установите флажок «Enable DNS» и введите IP-адрес DNS-сервера.
- Нажмите «OK», чтобы сохранить изменения.
В результате этих шагов, вы успешно настроили DNS-сервер на Windows Server 2008 R2. Теперь ваш сервер готов к обработке DNS-запросов и управлению DNS-зонами. Вы можете продолжить настройку дополнительных параметров DNS-сервера по необходимости.
Проверка работоспособности DNS-сервера
После настройки сервера DNS на Windows Server 2008 R2 необходимо проверить его работоспособность. Для этого можно выполнить следующие шаги:
- Откройте командную строку на компьютере, к которому подключен DNS-сервер.
- Введите команду «nslookup» и нажмите клавишу Enter. Это позволит вам проверить работу сервера DNS.
- Введите имя домена или IP-адрес, который вы хотите проверить. Например, «www.example.com» или «192.168.0.1».
- Если DNS-сервер настроен правильно, вы получите ответы с информацией о запрошенном домене или IP-адресе. Если DNS-сервер не может найти запрошенную информацию, вы получите сообщение об ошибке или сообщение «Non-existent domain».
Также вы можете проверить работоспособность DNS-сервера с помощью специальных онлайн-инструментов. Некоторые из них предоставляют возможность проверить доступность DNS-сервера и получить дополнительную информацию о его работе.
| Инструмент | Ссылка |
|---|---|
| DNSstuff | https://www.dnsstuff.com/ |
| IntoDNS | https://www.intodns.com/ |
| MXToolbox | https://mxtoolbox.com/ |
Используя эти инструменты, вы сможете получить дополнительную информацию о работе сервера DNS, проверить его настройки и выполнить другие диагностические действия.


