The Server Administrator on Windows Server 2008 certification is for IT professional who are responsible for the operations and day-to-day management of an infrastructure of Windows Server 2008 R2 servers for an enterprise organization. Windows server administrators
manage the infrastructure, Web, and IT application servers. The Windows server administrators use scripts and batch files written by others or those that they occasionally write themselves to accomplish tasks on a regular basis. They conduct most server management
tasks remotely by using Remote Desktop Server or administration tools installed on their local workstation. A server administrator’s primary tasks include:
- Managing the server operating system, file, and directory services
- Software distribution and updates
- Profiling and monitoring assigned servers
- Troubleshooting
Server administrators also support engineering projects. Server administrators are responsible for server builds and configuration. Their job role involves 60 percent operations, 20 percent engineering, and 20 percent support tasks.
Required exams
- Exam 70-640 — TS: Windows Server
2008 Active Directory, Configuring - Exam 70-642 — TS:
Windows Server 2008 Network Infrastructure, Configuring - Exam 70-646 — Pro: Windows Server 2008, Server
Administrator
Community
- Wiki: Training and Certification Portal (en-US)
- Forum: Training and Certification (en-US)
Related Forum Posts
If one of the posts in the following threads helps you answering your question, please vote them as helpful so other community members will find helpful information faster.
- Need online training suggestions for MCITP:
Server Administrator on Windows Server 2008 - Which
is more appealing for employers? MCITP: Windows Server 2008 R2, Virtualization Administrator or MCITP: Server Administrator - Server Administrator or Enterprise Administrator?
Other Languages
This article is also available in the following languages:
Deutsch
- MCITP: Server Administrator on Windows Server 2008
(de-DE)
Администрирование Windows Server 2008. Учебный курс Microsoft (70-646) (2013).pdf скачать

Администрирование Windows Server 2008. Учебный курс Microsoft. Экзамен 70-646.
Авторы — Орин Томас, Йен Маклин
Данный учебный курс Microsoft, написанный Орином Томасом и Йеном Маклином, предназначен для администраторов серверов и доменов, имеющих двух- или трехлетний опыт управления серверами Windows и инфраструктурой в среде с 250–5000 (и даже более) пользователями, находящимися в трех или более физических местоположениях, и тремя и более контроллерами доменов.
В задачи администратора входит поддержка сетевых служб и ресурсов: серверов передачи сообщений, серверов баз данных, служб файлов и печати, прокси-серверов, брандмауэров, ресурсов Интернета и интрасети, удаленного доступа и клиентов. Также администратор отвечает за сетевую связь, в том числе подключение удаленных филиалов и отдельных пользователей к корпоративной сети и подключение корпоративных сетей к Интернету. Данный учебный курс, как и сертификационный экзамен 70-646, посвящен сетевым технологиям Windows Server 2008 и 2008 R2, поддерживающим распределенный доступ к веб-содержимому, мультимедиа, операционным системам и приложениям. Темы учебного курса соответствуют темам экзамена, описанным на странице экзамена на вкладке Skills Measured (http://www.microsoft.com/learning/en/us/exam.aspx?ID=70-647&locale=en-us).
Изучив излагаемый здесь материал, вы научитесь: планировать и выполнять развертывание серверов под управлением Windows Server 2008 и Windows Server 2008 R2; планировать и выполнять управление серверами Windows Server 2008 и Windows Server 2008 R2; выполнять мониторинг, обслуживание и оптимизацию серверов; планировать развертывание приложений и подготовку данных; планировать и внедрять стратегии обеспечения высокой готовности и бесперебойной работы инфраструктуры.
Книга предназначена для системных администраторов, квалифицированных пользователей и всех тех, кто хочет получить исчерпывающие знания в области развертывания и обслуживания Windows Server 2008 R2.
Скачать
Еще из рубрик Скачать и Книги.
 Данная книга – краткий исчерпывающий справочник по администрированию новейшей серверной операционной системы Windows Server 2008. В ней содержится описание архитектуры системы, сведения по ее установке и развертыванию, а также информация о различных ролях и компонентах сервера. Подробно рассказывается об управлении сервером Windows Server 2008, о мониторинге процессов и событий, об использовании групповой политики. Ряд глав посвящен различным аспектам работы с Active Directory – ее администрированию, работе с учетными записями пользователей, групп и компьютеров. Приводятся сведения о настройке и администрировании различных серверов: файлового сервера, сервера печати, DHCP-сервера и DNS-сервера. Особое внимание уделено вопросам производительности системы, безопасности данных, а также их архивации и восстановлению.
Книга состоит из 20 глав, хорошо иллюстрирована и предназначена для администраторов и ИТ-специалистов общего профиля.

Нажмите на звезду, чтобы оценить!
Прочитали: 415
Консоль Диспетчер сервера (Server Manager) предназначена для выполнения основных задач системного администрирования. Вы проведете немало времени, работая с этим инструментом, и потому вам следует изучить его в подробностях.
Откройте консоль Диспетчер сервера (Server Manager) одним из следующих способов:
• Щелкните кнопку Пуск (Start), выберите команды Администрирование (Administrative Tools) и Диспетчер сервера (Server Manager).
• Щелкните значок Диспетчер сервера (Server Manager) на панели быстрого запуска.
Главное окно диспетчера разделено на две панели, наподобие консоли Управление компьютером (Computer Management).
Дерево консоли палевой панели используется для навигации и выбора инструментария. Узлы дерева разделены на пять основных категорий:
• Роли (Roles) Сведения о состоянии ролей, установленных на сервере, а также команды для управления ими. Для каждой установленной роли в дереве имеется собственный узел, выделив который вы определите состояние роли, просмотрите события, произошедшие за последние 24 часа, увидите список установленных и неустановленных служб роли, а также ссылки на ресурсы. Раскройте узел роли, чтобы получить доступ к инструментам для управления ею.
• Компоненты (Features) Сведения о состоянии компонентов, установленных на сервере, а также команды для управления ими. Установленные компоненты, добавляются в дерево диспетчера сервера.
• Диагностика (Diagnostics) Основные инструменты для управления службами и устройствами, мониторинга производительности и просмотра событий.
• Конфигурация (Configuration) Основные конфигурационные инструменты.
• Хранилище (Storage) Инструменты для управления устройствами хранения информации.
Правая панель — область сведений. Когда вы выбираете в левой панели узел самого верхнего уровня Диспетчер сервера (Server Manager), на правой отображается обзор конфигурации сервера. В разделе Информация о компьютере (Computer Information) показаны имя компьютера, имя рабочей группы или домеиа, сетевая конфигурация и код продукта. Также вы найдете здесь следующие ссылки:
• Изменить свойства системы (Change System Properties) Используйте эту ссылку, чтобы открыть диалоговое окно Свойства системы (System Properties), в котором настраиваются основные параметры системы.
• Отобразить сетевые подключения (View Network Connections) Используйте эту ссылку, чтобы открыть консоль Сетевые подключения (Network Connections), в которой настраиваются сетевые подключения.
• Настроить удаленный рабочий стол (Configure Remote Desktop) Используйте эту ссылку чтобы открыть диалоговое окно Свойства системы (System Properties) на вкладке Удаленное использование (Remote). Эта вкладка позволяет настроить параметры удаленного рабочего стола.
В разделе Сведения системы безопасности (Security Information) показаны состояние Брандмауэра Windows (Windows Firewall), конфигурация Центра обновления Windows (Windows Update), последнее время проверки и установки обновлений, а также состояние конфигурации усиленной безопасности Internet Explorer (Internet Explorer Enhanced Security Configuration). Вы найдете здесь следующие ссылки:
• Перейти к брандмауэру Windows (Go То Windows Firewall) Используйте эту ссылку для открытия панели Брандмауэр Windows в режиме повышенной безопасности (Windows Firewall With Advanced Security), где вы зададите необходимые правила безопасности подключений, входящего и исходящего трафика.
• Настроить обновления (Configure Updates) Используйте эту ссылку, чтобы открыть Центр обновления Windows (Windows Update), который используется для включения автоматического обновления (если оно выключено) или проверки наличия обновлений вручную (если автоматическое обновление включено).
• Проверить наличие новых ролей (Check For New Roles) Используйте эту ссылку, чтобы проверить, не устанавливались ли на сервер новые роли с момента последнего обновления или перезапуска диспетчера сервера.
• Запустить мастер настройки безопасности (Run Security Configuration Wizard) Используйте эту ссылку, чтобы запустить Мастер настройки безопасности (Security Configuration Wizard), предназначенный для создания, редактирования, применения или отмены политик безопасности. Политики безопасности, представляют собой один из способов настройки обширного набора параметров безопасности. Для настройки безопасности сервера используются также шаблоны безопасности. Чтобы объединить преимущества двух этих методик, включите шаблон безопасности в файл политики безопасности.
• Настроить конфигурацию усиленной безопасности Internet Explorer (Configure IE ESC) Используйте эту ссылку, чтобы включить или выключить усиленную безопасность Internet Explorer (IE ESC). Щелки vis эту ссылку, вы сможете включить или выключить этот компонент для администраторов, пользователей или и тех, и других. При использовании конфигурации усиленной безопасности повышаются уровни для зон безопасности Internet Explorer, а также меняются настройки Internet Explorer по умолчанию. Благодаря IE ESC сервер менее подвержен потенциальным атакам. По умолчанию конфигурация IE ESC включена как для администраторов, так и для пользователей.
В разделе Сводка по ролям (Roles Summary) перечислены роли, установленные на сервере. Здесь вы также найдете следующие ссылки:
• Перейти к ролям (Go То Roles) Открывает узел Роли (Roles) диспетчера сервера с подробными сведениями о каждой установленной роли.
• Добавить роли (Add Roles) Запускает Мастер добавления ролей (Add Roles Wizard), применяемый для установки ролей на сервере.
• Удалить роли (Remove Roles) Запускает Мастер удаления ролей (Remove Roles Wizard), применяемый для удаления ролей с сервера.
В разделе Сводка компонентов (Features Summary) представлены компоненты, установленные на сервере. Здесь вы также найдете следующие ссылки:
• Добавить компоненты (Add Features) Запускает Мастер добавления компонентов (Add Features Wizard), применяемый для установки компонентов на сервере.
• Удалить компоненты (Remove Features) Запускает Мастер удаления компонентов (Remove Features Wizard), применяемый для удаления компонентов с сервера.
В разделе Ресурсы и поддержка (Resources And Support) представлены текущие параметры программы улучшения качества програм много обеспечения (Customer Experience Improvement Program) и отчетов об ошибках Windows (Windows Error Reporting). Помимо ссылок на соответствующие веб-сайты Майкрософт и команды для отправки отчета, вы найдете здесь следующие ссылки:
• Участвовать в программе улучшения качества программного обеспечения (Configure CEIP) Используйте эту ссылку для настройки параметров программы CEIP. Участие в ней позволяет Майкрософт получать информацию об использовании вашего сервера. Майкрософт собирает эти данные с целью усовершенствования будущих версий Windows. Ни в каких данных, собираемые в рамках программы CEIP, ни вы, ни ваша компания не идентифицируются; Решив поучаствовать в программе, вы также можете предоставить информацию о числе серверов и настольных компьютеров в вашей организации, а также описать сферу ее деятельности. Выключив компонент CEIP, вы упустите возможность помочь в улучшении Windows.
• Включить отчеты об ошибках Windows (Configure Windows Error Reporting) Используйте эту ссылку, чтобы изменить параметры отчетов об ошибках Windows (Windows Error Reporting, WER). В большинстве стоит включить отчеты об ошибках, по крайней мере, на первые два месяца после установки операционной системы. Отчеты об ошибках передаются с ваших серверов в Майкрософт, и вам предлагаются возможные решения проблемы. Чтобы просмотреть отчеты об ошибках и возможные решения, дважды щелкните значок Отчеты о проблемах и решениях (Problem Reports And Solutions) в классическом представлении панели управления.
| Previous | Table of Contents | Next |
| Configuring BitLocker Drive Encryption on Windows Server 2008 R2 | Adding New GPT and MBR Disks to Windows Server 2008 R2 Systems |
<google>BUY_WINSERV_2008R2</google>
Windows Server 2008 R2 is, as the name suggests, a server operating system. In the real world this means that systems running Windows Server 2008 R2 will most likely be located in large rack systems in a server room. As such, it is highly unlikely that system administrators are going to want to have to physically visit each of these servers to perform routine administrative tasks such as system configuration and monitoring. A far preferable scenario involves these administrators remotely logging into the servers from their own desktop systems to perform administrative tasks. Fortunately Windows Server 2008 R2 provides precisely this functionality through Remote Desktop and the remote administration features of the Server Manager. In this chapter we will look at the steps necessary to remotely administer Windows Server 2008 R2 systems using each of these approaches.
Contents
Contents
|
||
Remote Administration Using Server Manager
The Windows Server 2008 R2 Server Manager tool provides the ability to perform some administrative tasks on a remote server. Unfortunately, the administrative tasks that can be performed using this approach are quite restrictive and, as such, the following activities are disabled:
- Addition or removal of roles
- Addition or removal of features
- Modification of Windows Update settings
- Modification of network configuration
- Modification of domain settings
- Alteration of computer name
- Configuration of Internet Explorer security settings
- Execution of Security configuration wizard
- Management of Remote Desktop configuration settings
- System Properties configuration
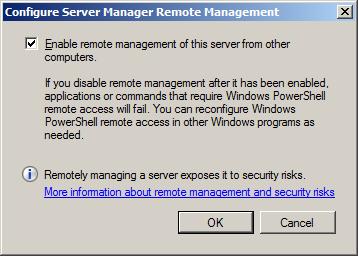
In order to enable remote administration using the Server Manager, remote administration must first be enabled on the remote server. This can be achieved by launching Server Manager on the remote server and selecting the Configure Server Manager Remote Management link located in the Server Summary section. Within the resulting dialog, ensure that the option to Enable remote management of this server from other computers check box is selected before clicking on the OK button:
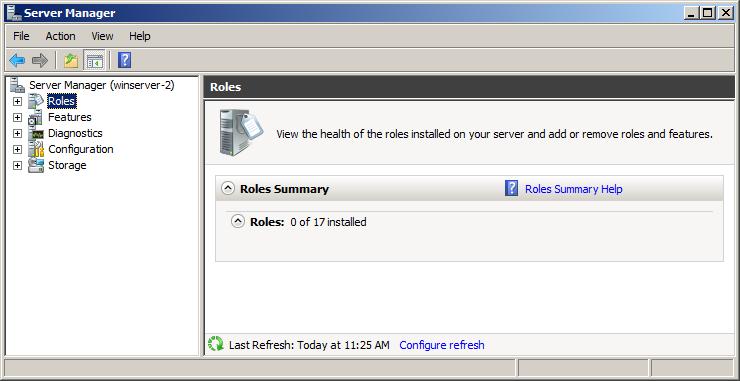
Once remote administration using Server Manager has been enabled, launch Server Manager on another computer located on the same domain or workgroup as the remote server, launch Server Manager and select the Action -> Connect to Another Computer menu option. Within the resulting dialog box, enter the name of the remote server to which you wish to connect and click on the OK button. A progress dialog will be displayed as the connection to the remote server is established. After a short delay the name of the current computer in the left hand pane of the Server Manager will change from the local computer to the remote server. Once the connection has been established, all the information displayed by Server Manager relates to the remote system. As you explore the various options you will begin to notice that a number of options are missing. For example, in the following figure there are no options listed to add or remove roles from the remote server:
In order to perform a wider range of remote administrative tasks than those provided by the Server Manager, it is necessary to use Remote Desktop access.
What is Remote Desktop?
Remote Desktop allows the graphical interface of a remote Windows system to be displayed over a network onto a local system. In addition, keyboard and mouse events on the local system are transmitted to the remote system enabling the local user to perform tasks on the remote system as if they were physically sitting at the remote system. Conversely, resources (such as printers and disk drives) on the local system can be made available to the remote system for the duration of the connection. This remote control can be established in a number of ways, including over wide area networks (WAN), local area networks (LAN) or over the internet.
In the case of Windows Server 2008 R2, this service is provided by Remote Desktop Services (known as Terminal Services in previous versions of Windows Server) running on the remote system and the Remote Desktop Connection (RDC) client on the local system.
Remote Desktop Services run in two different modes, Administration and Virtual Session. Remote Desktop for Administration provides full administration functionality to the remote administrator (including access to the console session and visibility of notification messages). Remote Desktop for Administration is the equivalent to working directly at the remote system’s console. In virtual session mode the user is subject to some limitations such as the ability to install applications and view console notification messages.
Windows Server 2008 R2 imposes some administrator logon restrictions. Specifically, a maximum of two administrators may be logged on at any one time, either two logged on remotely, or one local and one remote administrator. This assumes, however, that different accounts are being used to log on. In other words, the same user may not log on locally and remotely simultaneously.
Enabling Remote Desktop Administration on the Remote Server
As mentioned previously, remote desktop functionality on the server is provided by Remote Desktop Services. It is important to note, however, that Remote Desktop Services do not have to be explicitly enabled on the server in order to support Remote Desktop Administration. In fact, all that needs to be done is to enable Remote Desktop Administration. This is configured by opening the Control Panel from the Start menu and selecting the System and Security icon followed by the System icon. In the section in the top left hand corner of the System page select Remote settings to display the following properties window:
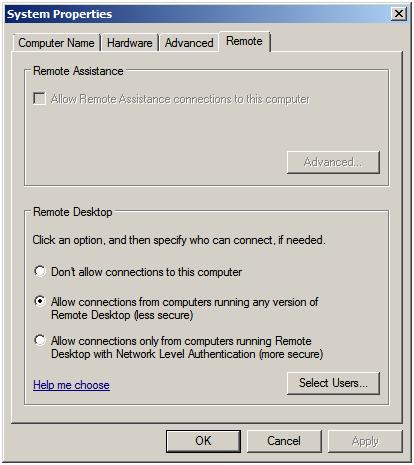
The Remote properties dialog provides a number of options. The default setting is to disallow remote connections to the computer system. The second option allows remote desktop connections from any version of the Remote Desktop client. The third, and most secure option, will only allow connections from Remote Desktop clients with Network Level Authentication support. This typically will only allow access to systems providing secure network authentication such as Windows Vista, Windows 7 and Windows Server 2008.
If the Windows Firewall is active, the act of enabling Remote Desktop administration also results in the creation of a firewall exception allowing Remote Desktop Protocol (RDP) traffic to pass through on TCP port 3389. This default port can be changed by changing this setting in the Registry key:
HKEY_LOCAL_MACHINE\System\CurrentControlSet\Control\TerminalServer\WinStations\RDP-tcp\PortNumber.
The easiest way to locate this registry key value is to execute regedit from the Run window or a command prompt, select Edit — > Find and enter RDP-tcp. In the resulting list, scroll down until you reach the PortNumber entry and double click on it to change the current value.
Controlling Remote Desktop Access
<google>WIN28BOX</google>
The default configuration for Remote Desktop is to allow all members of the Administration group to connect remotely. Active Directory also contains a Remote Desktop Users group to which users may be added to provide Remote Desktop access privileges. To provide users with remote desktop access, open the Control Panel -> System and Security -> System -> Remote settings panel and click on the Select Users button to invoke the Remote Desktop Users dialog illustrated in the following figure:
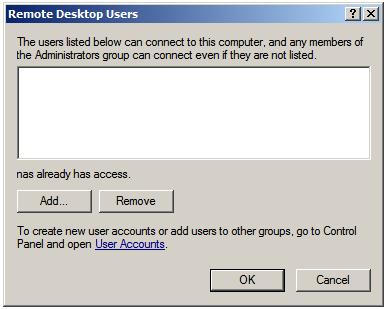
Note that users with administrative privileges do not need to be added to this list; by default they already have Remote Desktop access. To add additional users click on the Add… button to display the Select Users dialog. Enter the name of the user in the text box entitled Enter object names to select and click on Check names to list names that match the name entered. Select the appropriate name from the list. The following example shows user Bill on server winserver-2:

Click on OK to apply the change. The new user will now appear in the list of users with Remote Desktop access on the Remote Users screen. Click OK to close this screen and click on Apply in the System Settings screen. The specified user will now have remote desktop access to the system.
Starting the Remote Desktop Client
With the appropriate configuration tasks completed on the remote system the next step is to launch the Remote Desktop Client on the local system. The client can be run in either administration mode which provides full integration with the console of the remote server, or virtual session mode which provides some administrative privileges but does not provide console access or allow applications to be installed.
To invoke the Remote Desktop Client in virtual session mode either select Start -> All Programs -> Accessories -> Remote Desktop Connection or enter the following in the Run dialog or at a command prompt:
mstsc
To start the Remote Desktop Client in administrator mode run the following command:
mstsc /admin
In either case the following initial screen will appear requesting details of computer to which the client is to connect:

This can either be an IP address or a computer name. If previous connections have been established the User name field will be populated with the user name used in the preceding session. If you need to log in as a different user this option will be provided on the next screen which appears after the Connect button is pressed:
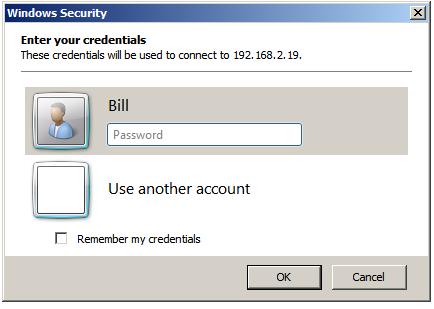
In this screen enter the password for the selected user (note that remote desktop access is only available for user accounts which are password protected). If a user other than the one displayed is required, simply click on the Use another account link and enter the necessary details. Click on OK to establish the connection. After a short delay the remote desktop will appear on the local computer screen.
Remote Desktop Client Configuration Options
The Options>> button displayed on the initial screen of the Remote Desktop Client provides six tabs, each containing a range of configuration options:
- General — Allows login credentials to be configured and session information to be saved.
- Display — Configures the resolution and color settings to be used when displaying the remote desktop on the local system.
- Local Resources — Specifies which local resources (sound, disk drives, printers etc) are to be made accessible to the remote system during the Remote Desktop session. This page also provides options to control the situations under which special key combinations such as Ctrl-Alt-Del are interpreted by the local or remote systems.
- Programs — Allows specified programs to be automatically invoked each time a remote sessions is established.
- Experience — Controls which desktop features are enabled or disabled for the Remote Desktop session. For example, over a slow dial-up connection it is unwise to have the desktop background displayed and font smoothing enabled. Either select the connection type and speed to see recommended settings, or use Custom to configure your own settings. This particular screen also provides the option to have the connection automatically re-established in the event that a session is dropped.
- Advanced — Enables and disables remote server verification. This ensures that the remote server to which you are connected is indeed the server you wanted. Also available are TS Gateway settings. By default the Remote Desktop Client is configured to automatically detect TS Gateway settings.
Remote Session Tracking
With Remote Desktop access implemented it is often useful to find out at times who is logged into a system. This can be achieved using the quser command-line tool. To obtain details of logged in users on a local system simply run quser at a command prompt or in a Run dialog:
C:Users\Administrator> quser
 USERNAME              SESSIONNAME        ID  STATE   IDLE TIME  LOGON TIME
 administrator                             1  Disc         3:18  7/11/2008 12:36 PM
 bill                  rdp-tcp#0           2  Active          .  7/14/2008 9:11 AM
 nas                   console             3  Active      none   7/11/2008 12:58 PM
To obtain information for a remote system simply run quser with the /server:<hostname> command-line option. For example:
C:\Users\Administrator> quser /server:winserver-2
 USERNAME              SESSIONNAME        ID  STATE   IDLE TIME  LOGON TIME
 administrator                             1  Disc         3:22  7/11/2008 12:36 PM
 bill                  rdp-tcp#0           2  Active          .  7/14/2008 9:11 AM
 nas                   console             3  Active      none   7/11/2008 12:58 PM
Logging out from a Remote Desktop Session
When the Remote Desktop Client is exited by pressing the ‘X’ on the control panel the remote session continues to run on the server even though no client is connected. Next time the user connects the desktop session will appear exactly as it was left before.
To end the session select Start in the remote desktop session, click on the right arrow button in the bottom right hand corner of the menu and select Log Off. This will close down the remote desktop session and close the remote desktop client.
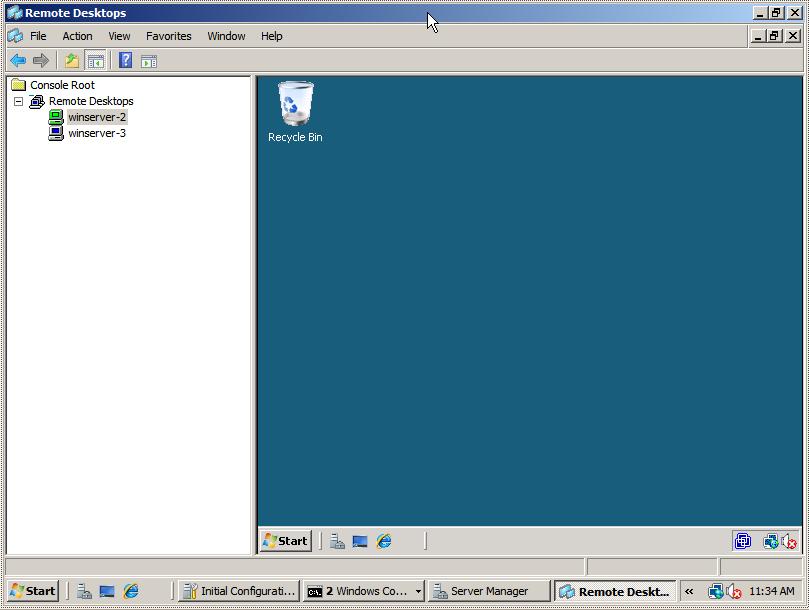
Running Multiple Remote Desktops
Multiple concurrent remote desktops can be run and managed within a single window using the MMC Remote Desktops snap-in. This may either be snapped into the MMC or launched from the command-line or a Run dialog by typing:
tsmmc.msc
Once launched, right click on the Remote desktops item in the tree in the left hand panel and select Add a new connection from the menu. Once selected the Add New Connection dialog will appear as follows:
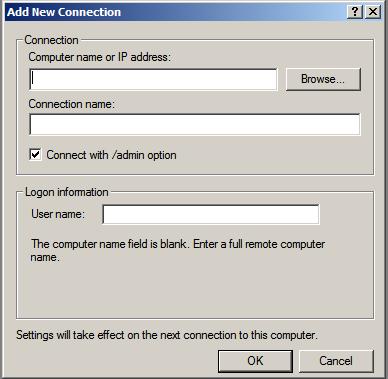
In this dialog enter the IP address or computer name of the remote system together with the User name and the name to be assigned to this connection (this is essentially the name by which this connection will be listed and administered inside the Remote Desktops snap-in). For an administrative session (as opposed to a virtual session) set the Connect with /admin box. Click OK to add the session to the snap-in. Once added, the session will appear in the left hand panel under Remote Desktops. Repeat these steps to add connections to any additional remote systems required.
To establish a remote desktop connection, right click on the name of the session from the left hand panel and select Connect from the menu. The remote session will appear in the window. To start another session simply right click on the session name and once again select Connect. To switch between sessions simply click on the name of the session in the left hand panel and the corresponding desktop will be displayed. The following figure illustrates two sessions running in Remote Desktops:
To change configuration options for each session right click on the desired session in the left hand panel and select Properties. This panel has a number of tabs which enable credentials, screen size and program start properties to be defined.
<google>BUY_WINSERV_2008R2_BOTTOM</google>