В Диспетчере задач можно заметить высокую активность процесса «SedLauncher.exe». Его исполняемый файл был загружен на компьютер с пакетом KB4023057. Узнаем подробнее, что это за процесс, а также попытаемся решить проблему, из-за которой SedLauncher сильно грузит диск.

Что это за процесс?
Файл SedLauncher.exe является частью пакета KB4023057 и был разработан для повышения безопасности и ускорения процесса обновления Windows 10. Он хранится в папке Rempl, которая находится внутри каталога Program Files.
С процессом связана служба Windows Remediation Service, которая отвечает за обновление компонентов. Загружаемые пакеты предназначены для повышения защиты и оптимизации, в основном включают незначительные исправления. Служба установлена в системе в виде приложения и находится в разделе «Приложения и возможности».
Несмотря на то, что SedLauncher был разработан с целью оптимизации скорости загрузки и установки обновлений, многие сталкиваются с проблемой, когда процесс сильно грузит ЦП, память и диск. Пользователи сообщают, что после установки KB4023057 диск почти загружен на 100% и компьютер настолько замедляется, что даже простые задачи, как копирование, занимают много времени.
Нагрузка на диск возрастает, когда SedLauncher загружает объемное обновление или при его установке. Поэтому есть два варианта: либо подождать, пока нагрузка снизится после установки обновления или завершить его вручную. Также под этот процесс может замаскироваться вредоносная программа, поэтому нужно проверить систему на вирусы.
Для решения проблемы перейдем к способам, с помощью которых можно снизить нагрузку на диск, вызываемой службой исправления и ее компонентами sedlauncher.exe, sedsvc.exe и другими.
Удаление из раздела Приложения
Поскольку служба установлена в системе как приложение, то можно его полностью удалить.
Откройте Параметры нажатием на клавиши Win + I и перейдите в раздел Приложения.
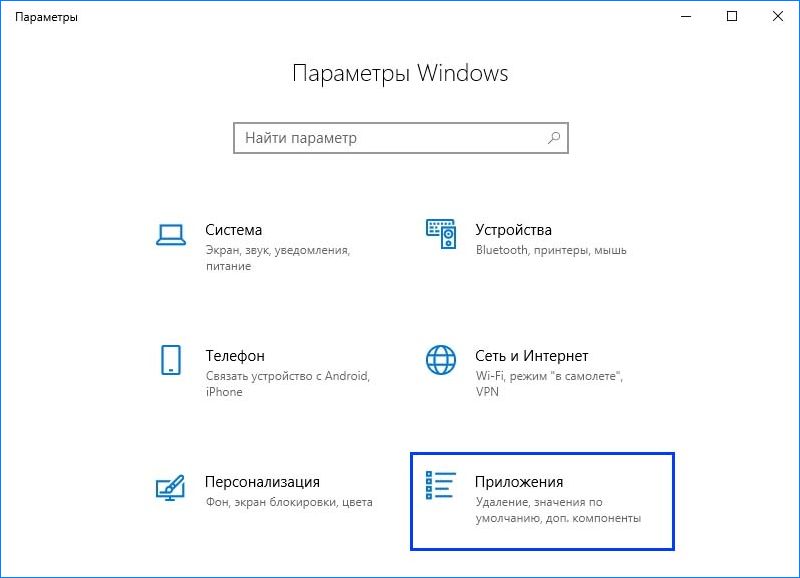
На вкладке «Приложения и возможности» найдите «Update for Windows 10 for x64-based System (KB4023057)».
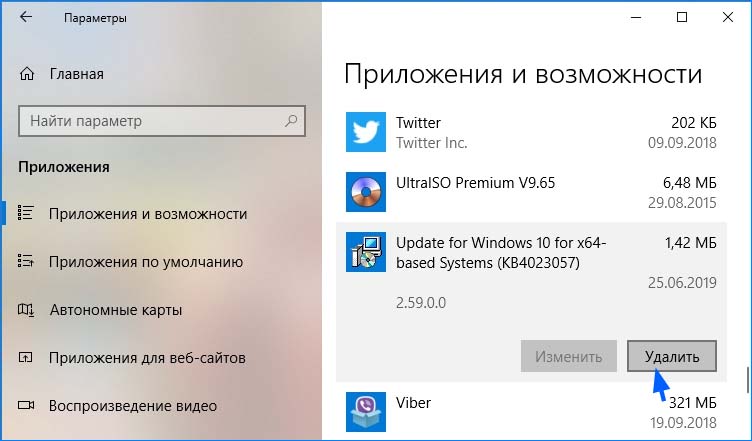
Нажмите кнопку «Удалить» и следуйте инструкциям на экране. Перезагрузите ПК и посмотрите, насколько указанный процесс теперь грузит диск.
Отключение службы
Еще один способ снизить высокую нагрузку на диск, вызываемую SedLauncher, заключается в отключении связанной с ним службы.
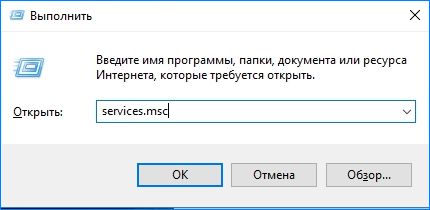
В окне «Выполнить», которое вызывается клавишами Win + R, наберите команду services.msc и нажмите Enter.
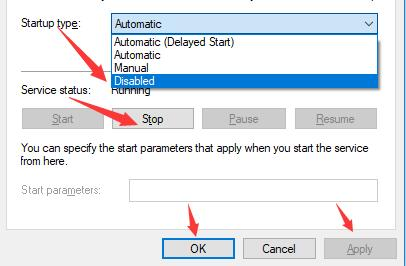
В списке найдите и дважды щелкните на «Windows Remediation Service» для входа в ее свойства.
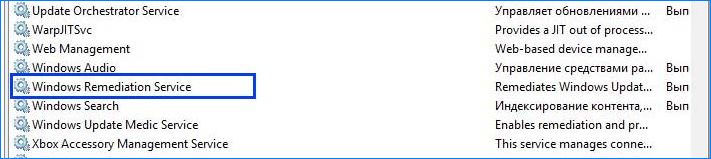
Выберите значение «Остановлена» из раскрывающегося меню «Типа запуска». Сохраните изменения на «Применить», закройте окно.
Удаление расписания из Планировщика заданий
Система запланировала загрузку и установку обновлений через Планировщик заданий. Когда видите, что SedLauncher чрезмерно грузит ресурсы системы, попробуйте удалить из расписания его запланированную задачу.
Откройте окно «Выполнить» нажатием на клавиши Win + R, наберите команду taskschd.msc и подтвердите ее запуск на Enter.
В левой части меню перейдите по пути:
Библиотека планировщика заданий – Microsoft – Windows — Rempl
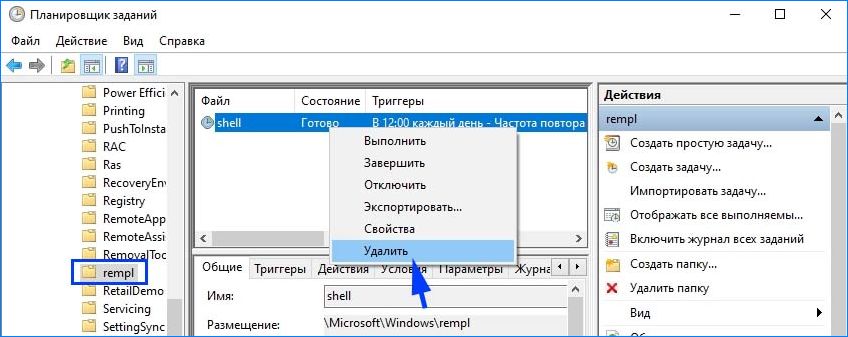
Кликните правой кнопкой на задаче Shell, выберите из контекстного меню пункт «Удалить».
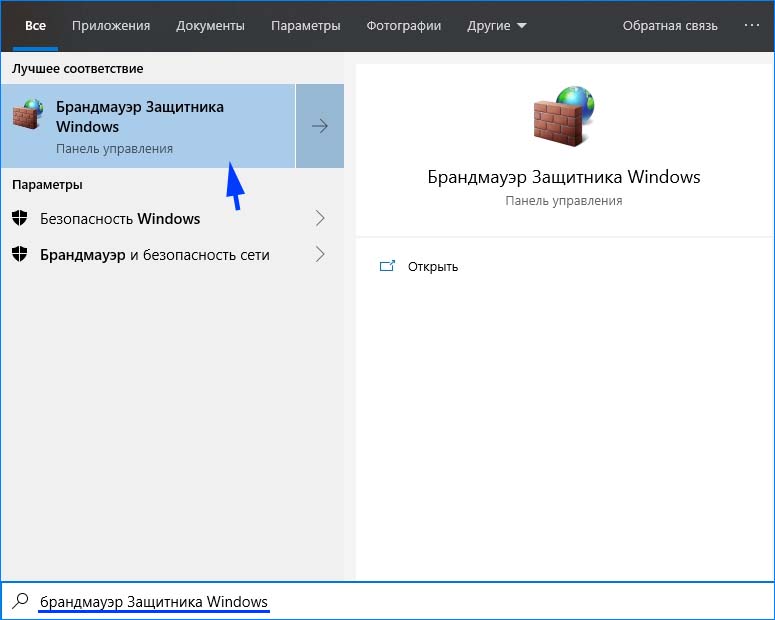
Блокировка службы в Брандмауэре
Если процессы, связанные со службой Windows Remediation Service, грузят процессор, память и диск, попробуйте заблокировать их в Брандмауэре.
Наберите в строке системного поиска «Брандмауэр Защитника Windows» и кликните на найденный результат.
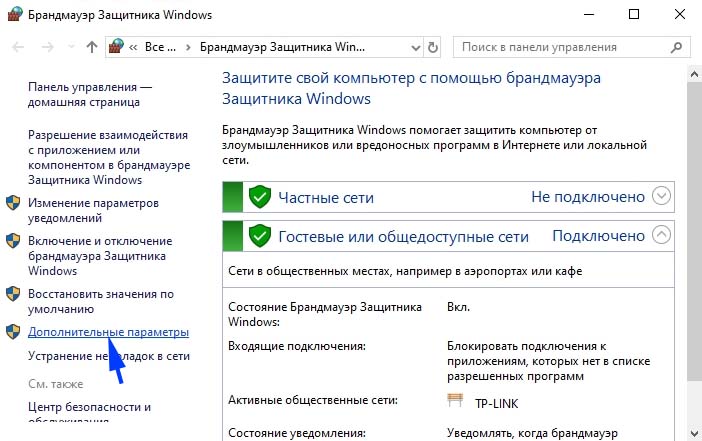
В меню с левой стороны перейдите на вкладку «Дополнительные параметры».
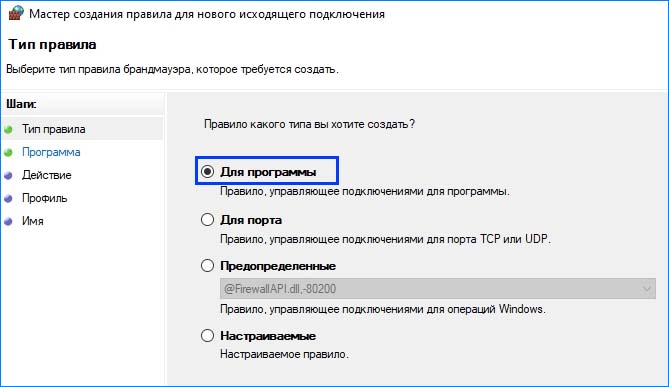
Щелкните на «Правило для исходящего подключения». В правой части окна нажмите на кнопку «Создать правило».

Укажите тип правила «Для программы», нажмите Далее.
Перейдите к расположению компонентов:
C:\Program Files\Rempl
Выберите файл sedsvc.exe или sedlauncher.exe, тот который в этот момент грузит диск в Диспетчере задач.

На вкладке «Действие» установите значение «Блокировать подключение».
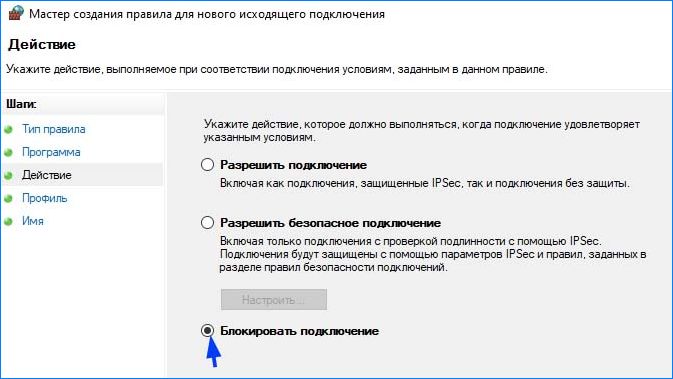
Укажите имя для нового правила, нажмите кнопку «Готово».
Чрезмерная активность приложений и процессов, отслеживаемая в Диспетчере задач, может привести к заметному снижению производительности компьютера, что становится проблемой для пользователя устройства. С обновлением KB4023057 в числе процессов, сильно нагружающих ресурсы, можно заметить и «Sedlauncher.exe». Чем является этот исполняемый файл и как исправить высокую загрузку диска, мы и рассмотрим.

Что это за процесс
Назначение «Sedlauncher» интересует любого пользователя, обнаружившего в Диспетчере задач сильную нагрузку на ресурсы компьютера со стороны процесса. Исполняемый файл, имеющий расширение «.exe», появился после обновления KB4023057 для Windows 10, когда Microsoft интегрировала службу восстановления Windows. Так, он является компонентом программного средства Remediation Service, отвечающего за безопасность и оптимизацию системных обновлений. Элемент Sedlauncher безопасен и находится в каталоге по адресу C:\Program Files\Rempl. Сама же служба инсталлирована в ОС как приложение, и найти её можно среди других установленных системой или пользователем программ в подразделе «Приложения и возможности».
При скачивании и инсталляции объёмных апдейтов можно заметить высокие, даже максимальные показатели нагрузки на процессор и диск со стороны sedlauncher.exe или sedsvc.exe. При этом работа устройства замедляется, что делает выполнение других задач проблематичным. Так, обнаружив высокую загрузку ресурсов, можно либо ждать окончания процедуры инсталляции обновлений, либо решить вопрос путём отключения или удаления Sedlauncher. Теперь, когда вы знаете, что это за процесс, перейдём к способам устранения проблемы.
Удаление из раздела «Приложения»
Если в Диспетчере задач вы заметили повышенную нагрузку на ресурсы со стороны процесса, его можно просто завершить (ПМК – Снять задачу). Но это будет временная мера. Полностью избавиться от Sedlauncher.exe можно разными методами. В Windows 10 решить проблему легко путём удаления службы из подраздела приложений системных параметров, так как сервис инсталлирован в Windows именно как приложение. Поступаем следующим образом:
Отключение службы
Ещё один простой метод, который может помочь, если Sedlauncher.exe грузит диск, предполагает деактивацию связанной службы. Для этого выполняем следующие действия:
Удаление расписания из Планировщика заданий
Чтобы процесс перестал грузить ресурсы, запланированную системой задачу можно удалить. В Windows для планирования загрузок обновлений есть специальный инструмент. Выполняем следующие действия:
Блокировка службы в брандмауэре
Компоненты Remediation Service, нагружающие ресурсы компьютера, можно также заблокировать посредством Брандмауэра Windows:
Запущенные процессы sedsvc.exe и sedlauncher.exe, являющиеся компонентами службы восстановления системы, хотя и не являются вредоносными, могут потреблять слишком много ресурсов. Справиться с проблемой чрезмерной нагрузки вы всегда сможете, применив любой из вышеописанных методов отключения или удаления процесса.
На чтение 4 мин Просмотров 24 Опубликовано
Чрезмерная активность приложений и процессов, отслеживаемая в Диспетчере задач, может привести к заметному снижению производительности компьютера, что становится проблемой для пользователя устройства. С обновлением KB4023057 в числе процессов, сильно нагружающих ресурсы, можно заметить и «Sedlauncher.exe». Чем является этот исполняемый файл и как исправить высокую загрузку диска, мы и рассмотрим.

Содержание
- Что это за процесс
- Удаление из раздела «Приложения»
- Отключение службы
- Удаление расписания из Планировщика заданий
- Блокировка службы в брандмауэре
Что это за процесс
Назначение «Sedlauncher» интересует любого пользователя, обнаружившего в Диспетчере задач сильную нагрузку на ресурсы компьютера со стороны процесса. Исполняемый файл, имеющий расширение «.exe», появился после обновления KB4023057 для Windows 10, когда Microsoft интегрировала службу восстановления Windows. Так, он является компонентом программного средства Remediation Service, отвечающего за безопасность и оптимизацию системных обновлений. Элемент Sedlauncher безопасен и находится в каталоге по адресу C:Program FilesRempl. Сама же служба инсталлирована в ОС как приложение, и найти её можно среди других установленных системой или пользователем программ в подразделе «Приложения и возможности».
При скачивании и инсталляции объёмных апдейтов можно заметить высокие, даже максимальные показатели нагрузки на процессор и диск со стороны sedlauncher.exe или sedsvc.exe. При этом работа устройства замедляется, что делает выполнение других задач проблематичным. Так, обнаружив высокую загрузку ресурсов, можно либо ждать окончания процедуры инсталляции обновлений, либо решить вопрос путём отключения или удаления Sedlauncher. Теперь, когда вы знаете, что это за процесс, перейдём к способам устранения проблемы.
Удаление из раздела «Приложения»
Если в Диспетчере задач вы заметили повышенную нагрузку на ресурсы со стороны процесса, его можно просто завершить (ПМК – Снять задачу). Но это будет временная мера. Полностью избавиться от Sedlauncher.exe можно разными методами. В Windows 10 решить проблему легко путём удаления службы из подраздела приложений системных параметров, так как сервис инсталлирован в Windows именно как приложение. Поступаем следующим образом:
- открываем оснастку «Параметры» любым удобным способом, например, при помощи меню «Пуск» или сочетанием клавиш Win+I, идём в раздел приложений;

- в подразделе «Приложения и возможности» находим «Updatefor Windows 10 for x64-based System (KB4023057)». Выбрав из списка, жмём «Удалить» и подтверждаем действие;


- после удаления перезагружаем устройство и смотрим, исчезла ли проблема повышенной нагрузки.


Отключение службы
Ещё один простой метод, который может помочь, если Sedlauncher.exe грузит диск, предполагает деактивацию связанной службы. Для этого выполняем следующие действия:
- открываем консоль «Выполнить» (Win+R), в строчке задаём запрос services.msc и жмём «Ок» или Enter на клавиатуре;

- в появившемся окне служб ищем в списке «Windows Remediation Service» (Служба исправления Windows), двойным щелчком по ней открываем свойства;

- жмём кнопку «Остановить», а в раскрывающемся меню «Тип запуска» выберем «Отключена», применяем изменения и закрываем окно.


Удаление расписания из Планировщика заданий
Чтобы процесс перестал грузить ресурсы, запланированную системой задачу можно удалить. В Windows для планирования загрузок обновлений есть специальный инструмент. Выполняем следующие действия:
- с помощью консоли «Выполнить» (Win+R) и запроса taskschd.msc открываем встроенное средство системы Планировщик задач;

- в меню слева идём по пути Microsoft– Windows – Rempl;
- идём в папку «rempl», выбираем задачу Shell, жмём ПКМ, из меню выбираем опцию «Удалить»и подтверждаем действие.


Блокировка службы в брандмауэре
Компоненты Remediation Service, нагружающие ресурсы компьютера, можно также заблокировать посредством Брандмауэра Windows:
- открываем защитник любым удобным способом, например, через поисковую строку или с помощью консоли «Выполнить» (Win+R) и запроса wf.msc;

- в меню слева выберем «Правила для исходящего подключения», в области справа выбираем действие – «Создать правило»;

- указываем тип правила «Для программы», жмём «Далее»;

- жмём «Обзор…» – открываем проводник, где переходим к местоположению элементов C:ProgramFilesRempl. Выбираем в каталоге файл sedsvc.exe или sedlauncher.exe, который грузит диск. Жмём «Далее»;
- на вкладке «Действие» должно быть выставлено значение «Блокировать подключение», переходим к следующему шагу;
- правило должно быть применено к домену, частной и общественной сети (здесь должны быть проставлены галочки), жмём «Далее»;
- присваиваем имя новому правилу и жмём «Готово».


Запущенные процессы sedsvc.exe и sedlauncher.exe, являющиеся компонентами службы восстановления системы, хотя и не являются вредоносными, могут потреблять слишком много ресурсов. Справиться с проблемой чрезмерной нагрузки вы всегда сможете, применив любой из вышеописанных методов отключения или удаления процесса.
Microsoft brings out several updates to fix bugs and problems in your Windows 10 PC. But, these updates may bring some conflicts affecting the normal function of your computer. For example, after the Windows 10 KB4023057 update was released, several users complained that their PCs have gone very slow and after analyzing, they found that Sedlauncher.exe program has occupied much of its disk space. Working in a dead slow system due to Sedlauncher.exe high disk usage is a frustrating issue and must be sorted out as quickly as possible. In this article, we bring some information content on REMPL Sedlauncher processes with troubleshooting methods to fix Sedlauncher.exe Windows 10 high disk usage issue. Let’s read on!

Table of Contents
The Windows 10 patch update KB4023057 was released to improvise the reliability and user experience of Windows 10 computers and Update Service Components. This update patch is supported by several versions of Windows 10 as listed below:
- Version 1507
- Version 1511
- Version 1607
- Version 1703
- Version 1709
- Version 1803.
The interesting advantage is that Windows 10 patch update KB4023057 helps you free up disk space if your computer struggles to update any new Windows Updates. To implement all these tasks, Sedlauncher.exe Windows 10 file is there to assist you to go through the process without any errors and problems. This sedlauncher.exe program is located in the C:\Program Files path within the REMPL folder on your computer.
The Sedlauncher.exe Windows 10 program is similar to other Windows update programs like sedsvc.exe, rempl.exe, Sedplugins.dll, Luadgmgt.dll. The Sedlauncher.exe program is included as a part of the Windows Remediation Service to protect and speed up the update processes. The Windows Remediation Service is responsible for Windows servicing stack update processes like fixing any corrupt updates, ensuring your PC is awake for update processes, freeing up your disk space to install new updates and a lot more. Still, it may cause some other problems like REMPL Sedlauncher high disk usage and lot more troubles.
Should I Disable Sedlauncher.exe in Windows 10?
Sedlauncher.exe Windows 10 is digitally verified by Microsoft and it is not at all a virus. The answer to the question will depend on the users’ requirements. If you definitely want to install the real new security patches on your computer in addition to some associated features, you might not disable this REMPL Sedlauncher program. Whereas, in the other case, if you do not care about these security patch updates and new features, you can disable it from your Windows 10 computer to fix Sedlauncher.exe high disk usage issue.
However, if you do not find Sedlauncher.exe Windows 10 program file in either of these locations; C:\Windows or C: \Windows\System32 folder, there are few possibilities of malware attacks. To remove these suspicious files from your computer, you are advised to perform a full system scan as instructed in our guide How do I Run a Virus Scan on my Computer?

Also, if you want to remove malware from your computer, check our guide How to Remove Malware from your PC in Windows 10.
Once you have confirmed that there are no harmful programs or files on your computer, you are now ready to troubleshoot Sedlauncher.exe high disk usage issue. Here we go!
There are several reports over the internet saying that the SedLauncher or SedSvc.exe service causes high disk and RAM usage in Windows 10 computers. Sometimes, this issue might take place on your computer if the launcher is downloading/installing a large feature update file. On the other hand, the same issue might take place if there are any troubles during the mentioned process. Nevertheless, you can fix this problem by following the below-mentioned troubleshooting methods. Follow as instructed to get rid of the problem.
Also Read: How to Fix High CPU Usage on Windows 10
Basic Troubleshooting Methods
Before disabling the launcher, you are advised to follow some simple hacks that will smoothen the troubleshooting process.
1. Restart PC
If there are any temporary glitches in your PC, you will face Sedlauncher.exe high disk usage issues. The general trick to resolve all the temporary glitches is to restart your computer. You can restart your PC by following the steps.
1. Press the Windows + D keys together to go to the Desktop.
2. Now, press the Alt + F4 keys simultaneously.
3. Then, select the Restart option from the drop-down menu and hit Enter key.

2. Close Background Tasks
Several users have confirmed that Sedlauncher.exe high disk usage issue can be resolved by closing all the background tasks running on your PC. To implement the task, follow our guide How to End Task in Windows 10 and proceed as instructed.

3. Run Windows Update Troubleshooter
If there are any corrupt Windows update components on your PC, you may face several conflicts like REMPL Sedlauncher high disk usage issue. To fix buggy update components in your computer, use Windows 10 built-in tool. Running Windows Update built-in troubleshooter tool will fix network connectivity issues, corrupt Windows Update components, and invalid registry keys in your computer that are contributing to the discussed issue. Follow the steps instructed in our guide on How to Run Windows Update Troubleshooter.

Perform as demonstrated and thereby resolve the problems identified by the troubleshooter.
3. Update Device Drivers
Device drivers establish a connecting link between the hardware and Operating System of your computer. Also, faulty or corrupt drivers lead to high disk usage issues. Many users have reported that updating the drivers has helped them fix the issue. You are also advised to update the drivers to improve the reliability of your adapters, fix compatibility issues, and resolve the discussed issue. Follow our guide on How to Update Network Adapter Drivers on Windows 10 to do so. Likewise, install the latest updates for all the drivers available on your PC.

So, your computer is now ready to fix the Sedlauncher.exe Windows 10 issue. Follow the below-discussed methods to deal with the same.
Method 1: Close Sedlauncher.exe
This is a simple workaround that will help you fix Sedlauncher.exe high disk usage issue easily. This method involves ending the process of the launcher through the Task Manager and it is instructed as below.
1. Hit the Ctrl + Shift + Esc keys together to open Task Manager.
2. Now, scroll down and search for Windows Remediation Service. Then, right-click on this service and select End task as depicted below.

Method 2: Disable Sedlauncher.exe Service
You can also fix Sedlauncher.exe high disk usage issue in your Windows 10 computer by disabling Sedlauncher.exe in Windows Services. Turning off this service in the PC management tool will involve the following steps.
1. Type Services in the search menu and click on Run as administrator.

2. Now, scroll down and right-click on the Windows Remediation Service. Then, select Properties as shown.
Note: You can also double-click on Windows Remediation Service to open the Properties window.

3. Now, in the new pop up window, change the Startup type to Disabled, as depicted.
4. Then, if the Service status is Running, click on Stop.

5. Click on Apply > OK to save the changes.
Also Read: Fix Ntoskrnl.exe High CPU Usage
Method 3: Block Sedlauncher.exe in Firewall
Even though the KB4023057 update plays an important role in maintaining the security of your computer, to fix all the problems associated with it, you are advised to remove/block the service from your Firewall or security suites. Either you can block this program through any third-party antivirus programs or through your inbuilt Windows Defender Firewall as instructed below.
1. Hit the Windows key and type Windows Defender Firewall with Advanced Security. Then, click on Open.

2. Now, in the left pane, click on Inbound Rules as depicted.

3. Then, in the right pane, click on New rule… as shown.

4. Now, make sure you select the Program option under What type of rule would you like to create? menu and click on Next> as shown.

5. Then, click on the Browse… button corresponding to This program path: as shown.

6. Then, navigate to the C:\Program Files\rempl path and double-click on sedsvc.exe file. Then, click on the Open button.

7. Then, click on Next > in the New Inbound Rule Wizard window as shown.

8. Now, select the radio button next to Block the connection and click on Next > as depicted.

9. Make sure Domain, Private, Public boxes are selected and click on Next > as shown.

10. Finally, add a name to your new rule and click on Finish.

All done! Check if Sedlauncher.exe high disk usage issue is fixed or not.
Note: There are a few other processes in your Windows 10 computer that will consume your CPU space and disk resources. They are listed below.
- osrrb.exe
- remsh.exe
- WaaSMedic.exe
- rempl.exe
- sedlauncher.exe
- disktoast.exe
- sedsvc.exe
You can also block these processes (found in C:\Program Files\rempl\folder) by repeating the steps as instructed in this method.
Method 4: Update Windows
Once you have updated Windows 10 KB4023057, still there are furthermore updates pending in action, and you might face Sedlauncher.exe high disk usage issue. Updating your computer to newer versions might help you fix any buggy patches contributing to the problem. Hence, ensure if you have updated your Windows Operating System and if any updates are pending in action, use our guide How to Download and Install Windows 10 Latest Update

Also Read: Fix Service Host: Diagnostic Policy Service High CPU Usage
Method 5: Remove or Rename REMPL Folder
The REMPL folder is created during Windows update processes and it is solely responsible to make the update process smoother and fine. This folder contains several other subfolders and executables such as disktoast.exe, rempl.exe, remsh.exe, WaaSMedic.exe, Sedlauncher.exe, Sedsvc.exe, osrrsb, in addition to some other Logs folders. Removing this folder does not harm your computer in any way and you can remove the same to fix Sedlauncher.exe high disk usage issue. But, before removing this folder, try to rename it and check if it fixes the problem.
1. Press and hold Windows + E keys together to open File Explorer.
2. Then, navigate to the C:\Program Files path.
3. Now, right-click on rempl folder and select the Rename option. Rename the folder to something else like rempl. old.
4. Then, check if you can fix Sedlauncher.exe Windows 10 issue. If you cannot fix the same, then, click on the Delete option as depicted.

5. Finally, reboot the PC.
Method 6: Delete REMPL via Task Scheduler
Windows Task Scheduler schedules and maintains your update processes and if there is no fix for Sedlauncher.exe high disk usage issue even after renaming/removing rempl folder via File Explorer, then you can delete the same via Task Scheduler as instructed below.
1. Hit the Windows key and type Task Scheduler, then click on Run as administrator.

2. Then, double-click on Task Scheduler Library as depicted.

3. Then, double-click on Microsoft to expand it and double-click on Windows as shown.

4. Again, click on the rempl folder and in the right pane, click on Delete Folder option as shown.
Note: Here, the Registry folder is taken as an example. Follow the same for rempl folder.

5. Confirm any prompt and check if you have fixed REMPL Sedlauncher high disk usage issue.
Also Read: Fix .NET Runtime Optimization Service High CPU Usage
Method 7: Uninstall Windows Setup Remediations
If you are still dealing with Sedlauncher.exe Windows 10 high disk usage problem, you can remove the installed files like Windows Setup Remediations (x64) (KB4023057) or Update for Windows 10 for x64-based Systems (KB4023057) from your system and check if this works for you. Here are a few instructions regarding the same.
1. Press the Windows key, type apps and features, and click on Open.

2. Now, search for the following.
- Windows Setup Remediations (x64) (KB4023057)
- Update for Windows 10 for x64-based Systems (KB4023057)
3. Once you have found either of these files, click on Uninstall and confirm the prompt if any.
Note: An example reference to uninstall Windows KB update file is demonstrated below.

4. Once you have uninstalled the listed file, restart the PC.
Method 8: Uninstall Recent Updates
If you face REMPL Sedlauncher high disk usage problem after updating Windows OS, your system program files and configurations might be incompatible with the new update and, in this case, uninstall recent updates on your PC. You will also get the stability of your PC after uninstalling a faulty update. Here is how to do it.
1. Hit the Windows key, type Control Panel and click on Open.

2. Set View by > Category, then click on Uninstall a program under the Programs menu as shown.

3. Now, click on View installed updates in the left pane as shown here.

4. Now, select the most recent update and click on Uninstall option as shown below.

5. Then, confirm the prompt, if any, and reboot your PC.
Check if you have fixed Sedlauncher.exe Windows 10 high disk usage problem.
Also Read: Fix WSAPPX High Disk Usage in Windows 10
Method 9: Reinstall Recently Installed Apps
In several cases, the most recent application that you have installed on your computer might interfere with the REMPL Sedlauncher processes. So, in this case, consider reinstalling the software or application.
Note: In this guide, steps to reinstall Zoom are demonstrated. Follow the steps according to your software.
1. Press and hold Windows + I keys together to open Windows Settings.
2. Now, click on Apps.

3. Now, search and click on Zoom and select Uninstall option.

4. Now, confirm the prompt if any, and reboot your PC once you have uninstalled Zoom.
5. Visit the official Zoom download page and click on the Download button as depicted.

6. Now, navigate to My downloads and double-click on the Zoom setup file to launch it.

7. Follow the on-screen instructions to complete the installation on your PC.
8. Finally, you have reinstalled Zoom on your computer. Now check if you can fix Sedlauncher.exe high disk usage issue.
Method 10: Perform System Restore
There are many circumstances where the latest Windows update has broken the wireless mechanism of your computer. If the current version of your Windows 10 PC interferes with the existing architecture of network configurations, you will face the discussed problem. System Restore will bring back the computer to the version where it was working without any errors. To do so, follow our guide on How to use System Restore on Windows 10 and implement the instructions as demonstrated.

Also Read: Fix keyboard Input lag in Windows 10
Method 11: Reset PC
If none of the methods has helped you fix REMPL Sedlauncher high disk usage issue, then you have to clean install your Windows Operating System. To clean boot your computer, implement the steps as instructed in our guide How to do a Clean Install of Windows 10

Recommended:
- Fix Vizio Remote Not Working
- Fix Stuck on Diagnosing your PC in Windows 10
- Fix ETD Control Center High CPU Usage in Windows 10
- Fix SoftThinks Agent Service High CPU Usage in Windows 10
We hope that this guide was helpful and you could fix Sedlauncher.exe high disk usage in Windows 10. Let us know which topic you want us to explore next. Also, if you have any queries/suggestions regarding this article, then feel free to drop them in the comments section.
It is standard practice to conduct Windows Updates to fix OS issues and other bugs that might affect your Windows performance. Updates often include driver updates, service packs, and Windows patches. However, sometimes updates can bring issues to your Windows OS that affects user experience.
A case example is the Sedlauncher.exe file Windows 10 Update that often causes high disk usage and other OS issues. Many Windows users have encountered high CPU usage after updating the Sedlauncher.exe file in Windows 10 patch KB4023057.
In this article, we answer the question ‘what ‘sedlauncher.exe’ file is. As a bonus, we discuss if it should be disabled?

Table of Content
- What is Sedlauncher.exe?
- Should you disable Sedlauncher.exe?
- How to Fix Sedlauncher.exe Full Disk Usage on Windows 10
- Fix #1: Disable Sedlauncher.exe from Task Manager
- Fix #2: Turning off Sedlauncher.exe in Services
- Fix #3: Block Sedlauncher.exe with Windows Firewall or Antivirus Program
- Wrapping Up
What is Sedlauncher.exe?
Immediately after updating Windows 10 update patch KB4023057, you’ll see the sedlauncher.exe program occupying much of your disk space. This can slow your PC’s performance.
Microsoft explained that Windows 10 update patch KB4023057 was released to improve the reliability and user experience of Windows 10 Update Service Components. It supports different versions of Windows 10, including items in this image:
- Version 1507,
- Version 1511,
- Version 1607,
- Version 1703,
- Version 1709,
- Version 1803.
The Update patch KB4023057 may also help free up your device’s disk space if your PC runs out of disk space to install Windows updates successfully. Additionally, this Windows 10 update patch KB4023057 patch is what comes with the sedlauncher.exe file to help update Windows 10 successfully without any unexpected error.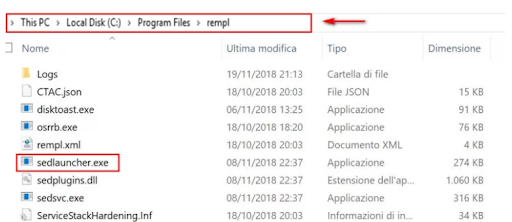
The sedlauncher.exe program is located in the ‘C:\Program Files ‘within the folder’ rempl. ‘It is included in the Windows Remediation Service to speed up and safeguard the Windows 10 update process. But this can also cause the issue of high disk usage. It works like other Windows Update support programs, such as:
- sedsvc.exe,
- rempl.exe,
- Luadgmgt.dll,
- Sedplugins.dll
The high disk space usage can disappoint users who may ask why an update file can consume such high volumes of RAM and CPU.
Should you disable Sedlauncher.exe?
It is worth noting that sedlauncher.exe a digitally signed Microsoft product. It is not malware or a virus.
However, if sedlauncher.exe is not located in the ‘C:\Windows ‘or ‘C: \Windows\System32’ folder, you should conduct a full system scan for your AV to remove it if it is malware. Some malware camouflage as a legit process located in the same file locations.
Besides, if sedlauncher.exe is causing High CPU usage (sometimes up to 100%) and lowering your PC’s speed and functionality, you can disable it temporarily or permanently.
How to Fix Sedlauncher.exe Full Disk Usage on Windows 10
Use the following solutions to fix the sedlauncher.exe full disk Usage on Windows 10:
Note: before you proceed to disable and fix the sedlauncher.exe using the solutions, scan your PC with quality antivirus software to ensure that it is not malware or a virus. If it is a virus, the antivirus software will remove it automatically.
Fix #1: Disable Sedlauncher.exe from Task Manager
You can fix the Sedlauncher.exe high CPU usage issue by ending its process in the Task Manager. To do this:
- Right-click your Task Bar
- Select Task Manager

- In Task Manager, scroll down until you see Windows Remediation Service (WRS)

- Right-click the WRS and select End task.


After ending the Windows Remediation Service, which also contains the Sedlauncher.exe, restart your PC then check if there is an improvement in your PC system’s speed.
Fix #2: Turning off Sedlauncher.exe in Services
Windows Services is also a PC management tool. You can disable the sedlaucher.exe in the Services utility and change the properties of the service. To turn off Sedlauncher.exe in services, use the following steps:
- Launch the Run utility; Press Wins Key + R
- In the Run dialog box, type ‘services.msc ‘then press Enter.
- In the Services, scroll down to locate Windows Remediation Service.

- Right-click on Windows Remediation Service > and choose properties.
- Under the General tab, click Startup type.
- In the dropdown menu, choose Disabled > then select Apply.
- Under the Service status, click Stop.


One done, Restart your computer, then go to the Task Manager and see of the Sedlauncher.exe is still running.
Fix #3: Block Sedlauncher.exe with Windows Firewall or Antivirus Program
Sedlauncher.exe is important in the KB4023057 update patch. After that, it doesn’t have much work on the PC. You can disable it if you realize that it consumes much disk space.
If, after disabling it, you realize that it downloads again on your PC, set your Windows Firewall or a third-party antivirus block it. Once it is blocked, it won’t be able to run on your PC.
Wrapping Up
A program that consumes much of your PC’s disk space can reduce your computers’ speed and affect its functionality. It is best to remove it. We believe that this post has helped you learn how to fix the Sedlauncher.exe file on Windows 10 to free up your disk Usage.
Would you like to receive promotions, deals, and discounts to get our products for the best price? Don’t forget to subscribe to our newsletter by entering your email address below! Receive the latest technology news in your inbox and be the first to read our tips to become more productive. Don’t let a chance go.
Next Article
You may like reading:
> Fixed: Print Spooler Keeps Stopping on Windows 10
> Fix Page Fault In Nonpaged Area Error In Windows
> Fix “Windows Update components must be repaired” Error on Windows 10