Windows 10 Home edition is the most basic out of all that are available. Like the Group Policy Editor, it also lacks a Local Security Policy Manager (secpol.msc). Without this, users cannot manage the various security policies applied to their system and are exposed to certain threats without the required checks in place.
It would be absurd to pay for a new edition of Windows to have this feature. Therefore, we have come up with a way by which you can install the Local Security Policy manager on your system running Windows 10 Home edition.
What is SecPol.msc
 1")
The Local Security Policy Manager is used to manage and administer different security parameters of the host computer. This includes policies like managing a user’s account password. For instance, what should be the minimum length requirement, should it include special characters. The Security Manager also includes administration of the User Account Control (UAC) that aids in preventing unauthorized and unconfirmed changes to the system itself.
Amongst many other useful security concerns, the SecPol allows its users to customize how other users behave on the PC and what privileges they may have. A user account with administrative privileges can access the Local Security Policy Manager.
How to enable SecPol.msc in Windows 10 Home
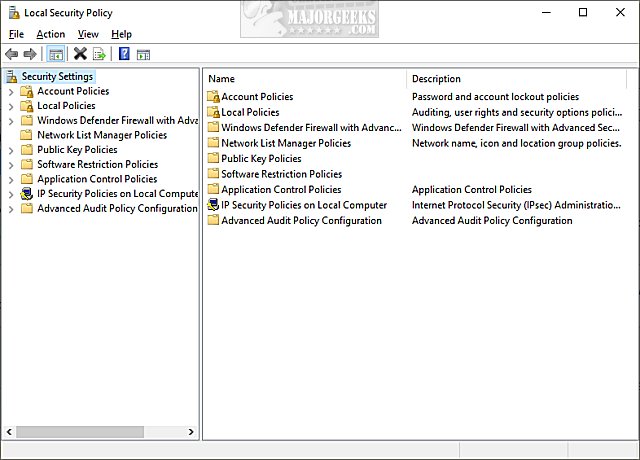
It is important to understand that Local Security Policy management is a subsection of Group Policy management. All SecPol.msc settings can be found in the Security Settings of the Group Policy Editor.
 2")
Comparing this image with the one above of the Local Security Policy manager, you can see that both are the same. Hence, installing the Group Policy Editor will automatically install the SecPol as well.
Here is how you can install the Local Security Policy manager in Windows 10 Home edition.
- Download SecPol.msc script on your Windows 10 Home PC.
GPEdit Enabler for Windows 10 Home Edition (393 bytes, 261,747 hits)
- Now right-click the batch file and click Run as administrator from the Context Menu.
 4")
- The file will run in the Command Prompt as in the image below. Please wait while the process is complete.
 5")
- Once installed, go to Run –> secpol.msc. This will open the local security policy manager for you. You may also access the Local Security Policy through the Control Panel at the following location:
Control Panel -> System and Security -> Administrative Tools -> Local Security Policy
 4")
 5")
You have now installed both the Group Policy Editor as well as the Security Policy manager on your Windows 10 Home edition.
Closing words
Having the SecPol enables you to secure your computer from the outside world, as well as from other people that use your PC by tightening the security protocols and requirements. Moreover, it can also prohibit unauthorized users from making changes to your computer.
This post will cover ways to enable and fix the missing Local Security Policy in Windows 11/10. Many Windows Home Edition users have reported that the Local Security Policy Manager (secpol.msc) is missing from their systems running Windows 11 or Windows 10. If you are trying to open the Local Security Policy Manager using the Run dialog box, you get the error message:
Windows cannot find ‘secpol.msc’. Make sure you typed the name correctly and then try again.
This means that your Windows OS is missing secpol.msc or that it’s not enabled.

Windows 11/10 comes with Microsoft Management Consoles that help users manage their operating systems. However, some consoles, like Local Security Policy Management and Group Policy Editor, are only available to Enterprise and Professional operating system users. We will assist you in resolving this issue because secpol.msc is missing in Windows Home editions. There is no need to buy another OS in order to get the consoles, you can install, find, or enable them with your current OS. Keep it here for more insights on this topic.
What is secpol.msc and why is it missing on Windows 10/11?
Local Security Policy (secpol.msc) is a management console that is used by an administrator to set and configure security settings on the host computer. For instance, an administrator can set password requirements, like the number of characters, length, and type.
The security policies also have User Account Control (UAC), which is used to prevent and control changes in the systems that are not confirmed or authorized. Secpol also grants permissions and privileges based on how a user is interacting with a computer and what they can access. If a user account has administrative permissions, they can access and edit the Local Security Policy Manager.
The Local Security Policy Manager, or secpol, is missing on your PC because you are using a Windows Home edition operating system. You will get an error indicating that Windows can’t find secpol.msc. These settings are under Group Policy Editor, which is an advanced Windows feature only found in Windows 10/11 Pro, Education, and Enterprise editions. Another reason why secpol.msc is missing is that it’s not enabled on your PC. So, you will need to manually enable it using different methods, like PowerShell commands.
To fix the Local Security Policy missing error on your Windows, you need to install or enable secpol.msc using the command prompt or downloading a gpedit.msc script. It’s good to note that the Local Security Policy Management is a collection of settings under the Local Group Policy console. This means that when you enable gpedit.msc, you activate the Group Policy and consequently enable Local Security Policy.
You have the following options:
- Install Local Security Policy using Command Prompt
- Download and run GPEDIT Enabler
- Upgrade from Windows Home to Pro, Professional, or Education
Before you begin, check which version of Windows 11/0 you have installed. If it is Windows 11/10 Enterprise, Pro or Education and you still do not see secpol.msc, then run the System File Checker, DISM or Reset This PC to repair potentially corrupted system files. If you are using Windows 11/10 Home, then read on.
Windows cannot find ‘secpol.msc’
1] Install Local Security Policy using Command Prompt

Here, you will need to run some commands using DISM on Windows Home OS. It is a straightforward method that needs no robot to perform.
If the Local Security Policy (secpol.msc) is missing on your Windows 11/10 computer, type cmd on the search box and select Run as administrator to open Command Prompt.
Put the following commands in the Command Prompt windows and press the Enter button after each.
FOR %F IN ("%SystemRoot%\servicing\Packages\Microsoft-Windows-GroupPolicy-ClientTools-Package~*.mum") DO (DISM /Online /NoRestart /Add-Package:"%F")
FOR %F IN ("%SystemRoot%\servicing\Packages\Microsoft-Windows-GroupPolicy-ClientExtensions-Package~*.mum") DO (DISM /Online /NoRestart /Add-Package:"%F")
Wait for the commands to run up to 100%.
Once done, restart your PC.
After that, open the Run dialog box by pressing the Windows key + R.
Type gpedit.msc and then click OK or press Enter. The error should not appear. That’s it.
The steps above will enable the Group Policy Editor and hence activate the Local Security Policy. Your OS will now have all necessary and functional policies available on Windows Enterprise, Pro, or Education versions.
2] Download and run GPEDIT Enabler BAT file
This step involves using a third-party installer. We have looked at many GPEDIT enablers and we believe many of them are safe to download. In our case, we will use a Mediafire .zip file.
To download and install gpedit.msc, create a system restore point first and then follow the steps below:
- First, download gpedit enabler BAT file from our servers
- Locate the zip file in your Downloads folder and right-click on it, then choose Extract here.
- After extracting, you should see a GPEDIT-Enabler.bat in the folder. Right-click on the file and click Run as administrator.
- A Command Prompt window will appear and start to install gpedit.msc automatically.
- Give your PC to finish the process, it will indicate the progress in percentage.
- You will see the message Press any key to continue on the same window, go ahead and hit any key on the keyboard. This will exit the Command Prompt.
- Restart your computer and test gpedit.msc in the Run dialog box. It should open.
3] Upgrade from Windows Home to Pro, Professional, or Education

If you wish and can upgrade your Windows Home edition, you can do so. Upgrading your OS will not require any other steps because Group Policy Editor comes natively with Windows Pro, Education, and Professional versions. Here is how to upgrade your Windows Home edition:
- Go to your PC Settings by pressing the Windows key + I.
- Go to Update & Security, and then to Activation.
- Click on the Go to the Store option.
- Go ahead to buy the Pro edition of Windows 111/10
- Test gpedit.msc as we did in the methods above. It should work now.
We hope one of the methods above works for you.
How do I refresh the Local Security Policy?
To refresh the Local Security Policy manually, type gpupdate in PowerShell and press Enter. When the policy is refreshed, the local host is auto-enrolled by the certification authority (CA). Group policy is usually refreshed automatically when a user signs in to the domain user’s computer or when you restart the domain user’s computer. There is also periodic refreshment, which is performed after every 1 hour and 30 minutes.
Related: Windows cannot find GPEDIT.MSC on Windows 11
How do I import Local Security Policy?
To import Local Security Policy, open the Local Security Policy Editor and, on the left pane, right-click on the Security Settings. Click on the Import Policy option. Navigate and locate where you saved the security settings file, and then see the INF file. Click on the Open button, and then reboot your PC to save and apply the local security policy you imported. That’s all.
By Timothy Tibbetts |
The Local Security Policy (secpol.msc) in Windows 10 contains information about the security of a local computer. If you’re trying to access the Local Security Policy in Windows 10 Home, you will receive an error that says Windows 10 can’t find secpol.msc. In this tutorial, we show you how to enable the Local Security Policy in Windows 10 Home.
The trick here is to enable Group Policy Editor, allowing the Local Security Policy.
%20in%20windows%2010%20home%201.jpg)
We’ve created a batch file that simplifies the process and is the best way to enable the Local Security Policy (secpol.msc).
Video tutorial:
Download Add Group Policy Editor to Windows 10 Home and extract the files.
Right-click on gpedit-enabler.bat and click on Run as administrator.
You will see text scroll by, and press Enter to close the window when prompted.
If you see an error 740, you forgot to Run as administrator.
This tweak is included as part of MajorGeeks Registry Tweaks.
Troubleshooting
If you couldn’t get Group Policy working, here are some troubleshooting steps.
1: Reboot While a reboot might not be required, some users report that Group Policy Editor works after rebooting.
2: Copy Some File and Folders
It appears that on 64-bit versions of Windows 10 Home that typing in gpedit.msc doesn’t work. Go to C:\Windows\SysWOW64 and copy the following folders and files to C:WindowsSystem32 — GroupPolicy, GroupPolicyUsers, and gpedit.msc.
3: MMC Could Not Create the Snap-In Error
In rare cases, some people are receiving an «MMC Could Not Create the Snap-In» error when running gpedit.msc. Download this file from ITECHTICS and run either the 32-bit or 64-bit batch file.
Similar:
comments powered by Disqus
Microsoft’s commitment to versatile computing solutions is evident in its variety of Windows offerings. Catering to a wide array of users, the tech giant has rolled out three distinct versions of its renowned operating system: Professional, Enterprise, and Home editions. The former duo, Professional and Enterprise, are tailored for expansive corporate environments, where intricate administrative tools and vast network functionalities are imperative. Conversely, the Home edition is designed to satiate the daily computational needs of the average user. Graced with a majority of the quintessential features synonymous with Windows, the Home edition stands as a testament to user-friendly and efficient computing. However, it’s pertinent to underline the word “majority.” Not all functionalities found in the upscale Professional and Enterprise versions trickle down to the Home edition. Among these omitted features, the absence of the Local Group Policy Editor and the Local Security Policy Editor are glaringly conspicuous. Although these tools might not feature in one’s daily routine, sidelining their significance would be an oversight. These editors play pivotal roles in specific scenarios, accentuating the system’s security and customizability.
Understanding this gap, our RiseWindows post endeavors to bridge it. We aim to illuminate the pathway for enthusiasts and advanced users of the Windows 11/10 Home edition, guiding them towards enabling the Local Security Policy (secpol.msc). By following the steps delineated in this guide, users can unlock a layer of customization and control, previously believed to be exclusive to the higher-tier versions.
Quick Note: An additional perk of enabling the Local Security Policy (secpol.msc) is the simultaneous activation of the Local Group Policy (gpedit.msc) on your system.

How to Enable SecPol.msc in Windows 11/10 Home?
Follow these steps to turn on SecPol.msc in Windows 11/10 Home:-
Step 1. Firstly, download the SecPol.msc script on your PC.
Step 2. Now, right-click on the downloaded files and click the Extract All option.

Step 3. Then click the Extract button at the bottom of the window.

Step 4. After that, when the script file is extracted in a folder, right-click on the “gpedit-enabler.bat” file and select the Run as administrator option.

Once you complete the above steps, a command prompt window will automatically open, download, and install the required files on your PC.

Now, in the command prompt window, you will see “Press any key to continue.” When you’re on the command prompt window, press any key from the keyboard to exit it.
Now, your Windows 11/10 is ready to run Local Security Policy (secpol.msc) and Local Group Policy Editor (gpedit.msc) on your computer. That’s it.
Now, to run “secpol.msc” or “gpedit.msc” on your computer, first open the Run dialog box by pressing the Windows + R keys from the keyboard. In the Run box, type “secpol.msc” or “gpedit.msc” and then hit Enter from the keyboard.
Conclusion
Microsoft has consistently delivered versatile computing solutions, with its different Windows versions being a prime example. While the Professional and Enterprise editions are feature-rich, catering to expansive corporate environments, the Home edition is geared towards the everyday user. Nonetheless, some essential tools, like the Local Group Policy Editor and Local Security Policy Editor, are absent in the Home version. Recognizing the significance of these tools, the above guide offers a method for Windows 11/10 Home users to enable the Local Security Policy. By following these steps, users can augment their system’s security and
Локальная политика безопасности (Local Security Policy) — мощный инструмент, который позволяет контролировать различные параметры безопасности на вашем компьютере в операционной системе Windows. Локальная политика безопасности Windows позволяет ограничить использование некоторых функций или разрешить доступ к ним только определенным пользователям.
Вы можете использовать функции локальной политики безопасности для повышения безопасности своего локального компьютера с операционной системой Windows. Оснастка «Локальная политика безопасности» позволяет пользователю управлять политиками паролей, учетных записей, прав пользователей, аудита, управления приложениями и так далее.
Содержание:
- Как открыть локальную политику безопасности через поиск Windows
- Запуск локальной политики безопасности с помощью команды «Выполнить»
- Открытие локальной политики безопасности с помощью меню «Пуск»
- Вход в локальную политику безопасности через Панель управления
- Как открыть локальную политику безопасности с помощью Диспетчера задач
- Переход к локальной политики безопасности из адресной строки Проводника
- Как запустить локальную политику безопасности из системной папки Windows
- Как запустить утилиту локальная политика безопасности с помощью командной строки или PowerShell
- Запуск локальной политику безопасности с помощью редактора локальной групповой политики
- Как закрепить локальною политику безопасности на панели задач
- Выводы статьи
- Как открыть локальную политику безопасности Windows (видео)
Перед пользователем встает вопрос, где находится локальная политика безопасности, чтобы воспользоваться функциями этого инструмента. Существует несколько способов для получения доступа к политикам безопасности локального компьютера.
Вы можете столкнуться с тем, что локальная политика безопасности отсутствует на вашем компьютере. В этом случае непонятно, где локальные политики безопасности находятся на данном ПК.
Необходимо учитывать, что локальная политика безопасности используется только в старших версиях операционной системы Windows: Корпоративной, Профессиональной и для образовательных учреждений. В Домашних версиях Windows этого инструмента нет, поэтому вы не сможете войти в управление локальными политиками безопасности.
Для выполнения настройки локальных политик безопасности необходимо войти в Windows с учетной записью администратора или у вас должны быть права администратора.
В этом руководстве перечислены способы открыть локальную политику безопасности в Windows 10 или Windows 11, используя разные методы системного средства.
Как открыть локальную политику безопасности через поиск Windows
Панель поиска Windows помогает найти нужные файлы, папки и приложения на вашем устройстве, в том числе и системные инструменты.
Выполните следующие действия:
- Щелкните по значку поиска на панели задач, чтобы открыть поиск Windows.
- В строке поиска ведите выражение «локальная политика безопасности».
- Откройте локальную политику безопасности.

- На экране вашего компьютера откроется редактор локальной политики безопасности, в котором вносятся необходимые изменения в параметрах безопасности компьютера.

Запуск локальной политики безопасности с помощью команды «Выполнить»
С помощью выполнения команд в окне «Выполнить» вы можете быстро открывать программы или системные средства на вашем компьютере. Вызывает приложение «Локальная политика безопасности» команда «secpol.msc», которую мы будем использовать в разных методах из этой статьи.
Проделайте следующее:
- Нажмите на клавиатуре «Win» + «R».
- В диалоговое окно «Выполнить» введите команду «msc», а затем нажмите «Enter».

Это действие запустит локальную политику безопасности.
Открытие локальной политики безопасности с помощью меню «Пуск»
В меню «Пуск» в Windows вы можете найти большинство программ на вашем компьютере, включая системные средства Windows.
Локальная политика безопасности Windows 11 запускается следующим образом:
- Откройте меню «Пуск», нажмите на кнопку «Все приложения» в правом верхнем углу.
- Прокрутите страницу вниз, а затем щелкните по «Инструменты Windows».
- В окне «Инструменты Windows» найдите «Локальная политика безопасности» и дважды щелкните по ней.

Локальная политика безопасности Windows 10 открывается из меню «Пуск» таким способом:
- Войдите в меню «Пуск».
- В списке программ найдите папку «Средства администрирования Windows».
- Щелкните по значку «Локальная политика безопасности».

Вход в локальную политику безопасности через Панель управления
Панель управления Windows обеспечивает доступ к различным системным инструментам и настройкам операционной системы.
Сделайте следующее:
- Нажимайте на клавиши «Win» + «R»,
- Введите «control panel» в диалоговом окне «Выполнить» и нажмите кнопку «ОК».
- В окне «Все элементы панели управления» выберите представление для просмотра крупными или мелкими значками.
- Нажмите на «Инструменты Windows».

- В окне «Инструменты Windows» дважды щелкните по значку «Локальная политика безопасности».
Как открыть локальную политику безопасности с помощью Диспетчера задач
Диспетчер задач Windows предоставляет сведения об активных процессах и программах, запущенных на компьютере, другую полезную информацию. Этот инструмент можно использовать не только для завершения или остановки процессов и служб, но и для запуска программ на вашем компьютере.
Воспользуйтесь этими рекомендациями:
- Щелкните правой кнопкой мыши по меню «Пуск».
- В контекстном меню выберите «Диспетчер задач».
- Во вкладке «Процессы» нажмите «Запустить новую задачу» на верхней панели в Windows В Windows 10 откройте меню «Файл», а там кликните «Запустить новую задачу».
- В открывшемся окне, в поле «Открыть:» введите «secpol.msc».
- Нажмите «ОК».

Переход к локальной политики безопасности из адресной строки Проводника
Проводник Windows имеет адресную строку, которую можно использовать для доступа к локальной политике безопасности.
Выполните инструкцию:
- Откройте Проводник Windows.
- Щелкните по адресной строке, введите «secpol.msc».
- Нажмите «Enter» или на стрелку справа от адресной строки.

Как запустить локальную политику безопасности из системной папки Windows
Вы можете запустить локальную политика безопасности непосредственно из папки «Windows», в которой располагается операционная система на компьютере.
Пройдите шаги:
- Откройте окно Проводника.
- Перейдите в следующую папку:
C:\Windows\System32
- Найдите и дважды щелкните по файлу «secpol» для запуска системного средства.

Как запустить утилиту локальная политика безопасности с помощью командной строки или PowerShell
Если вам более удобно, вы можете применить методы командной строки для запуска локальной политики безопасности на своем ПК. С этой целью можно использовать командную строку или Windows PowerShell, в обоих средствах выполняется одинаковая команда.
Выполните следующее:
- В поле поиска Windows введите «cmd» или «powershell».
- Откройте командную строку или Windows PowerShell.
- В окне системного средства введите «secpol», а затем нажмите на «Enter».

На экране вашего компьютера появится окно «Локальная политика безопасности».
Запуск локальной политику безопасности с помощью редактора локальной групповой политики
Вы можете использовать редактор локальной групповой политики для запуска локальной политики безопасности.
Пройдите следующие шаги:
- В поле поиска Windows введите «gpedit.msc».
- Откройте окно «Редактор локальной групповой политики».
- Перейдите по пути:
Конфигурация компьютера ➜ Конфигурация Windows ➜ Параметры безопасности
- Здесь вы найдете все модули локальной политики безопасности.

Как закрепить локальною политику безопасности на панели задач
Вы можете открыть локальную политику безопасности, используя любой из перечисленных выше методов. Намного проще получить доступ к политикам безопасности прямо из панели задач. Для этого значок инструмента локальной политики безопасности необходимо закрепить на панели задач.
Необходимо выполнить следующее:
- Нажмите на клавиши «Win» + «S».
- В поле поиска введите «локальная политика безопасности».
- В результатах поиска отобразится нужное приложение, выберите «Закрепить на панели задач».

Теперь вы можете запускать локальную политику безопасности непосредственно с панели задач Windows.
Потом можно открепить этот значок от панели задач, если вам больше не нужно, чтобы локальная политика безопасности находилась на этом элементе интерфейса системы.
Выводы статьи
В операционной системе Windows используется локальная политика безопасности, с помощью которой пользователь может управлять некоторыми параметрами безопасности компьютера. Этот инструмент доступен в версиях Windows Корпоративная, Профессиональная и для образовательных учреждений. Вы можете воспользоваться несколькими способами, чтобы открыть локальную политику безопасности на своем компьютере.
Как открыть локальную политику безопасности Windows (видео)
Похожие публикации:
- Как установить пароль на папку в Windows — 3 способа
- Как перенести панель задач Windows 11 — 2 способа
- Как включить и использовать сенсорную клавиатуру Windows 11
- Как в Windows 11 вернуть меню «Пуск» Windows 10
- Исправление ошибки восстановления системы 0x81000203 в Windows