Deploying software and patching systems was always a challenge for system administrators because of the lack of automation, control and reporting. WSUS solves some of these issues but as you probably know, it has some limitations which do not suit well in medium to large environments. Off course, we ca use scripting with WSUS to make it work even better, but what about the advanced reporting and software deployment? To overcome all these limitations and improve the work for system administrators, Microsoft created Endpoint Configuration Manager (MECM), formerly System Center Configuration Manager or SCCM for short. Using MECM we are not just deploying software and patching systems, but also create baselines, deploy certificates on endpoint devices, install Windows OSs and some other very useful and nice stuff.
In this article I am going to use the names SCCM and MECM interchangeably since it points to the same product, just different branding, but SCCM is mostly used because of the popularity in the industry.
SCCM it’s a very complicated service when you deploy it in large environments since it has multiple parts which I am going to treat in some future series articles. Right now, let’s start small then expand. The first part of SCCM is the installation, which is not just clicking the Next button of the wizard but doing things like extending the Schema, creating entries in the Active Directory Configuration partition and some other security tasks that I am going to show in this article. Since there are a lot of software prerequisites for SCCM, I really like taking care of them one-by-one since the installation wizard shows us the ones that are missing/needed.
For this article we are going to deploy SCCM with a single Primary Site System role which is one server doing it all. There are multiple Site System server roles in SCCM and I am going to explain them in the series that will come up, since these are more like design things.
1. Installing the SCCM prerequisites
For this lab I have three machines: the Domain Controller, the SCCM (build 2002) machine with 6GB of RAM, two vCPUs and a second disk for hosting the software/patches. The third machine is a SQL Server 2019 VM with Reporting Services installed for the SCCM database having 12 GB of RAM and two vCPUs. All the VMs are running Windows Server 2019 with the latest updates installed and joined to an Active Directory domain. Again, you will have to size your machines accordingly once you go into production, and as an idea, you can take a look at this Technet article. When it comes to the firewall configuration, I am going to allow everything between the mentioned machines since this is a large subject and it requires it’s own topic.
As it comes to hardware requirements it all depends how large the SCCM infrastructure is and how many clients it will manage. Microsoft posted some recommendations which are huge, but I find SCCM working for way less. Depending on the number of endpoints you have in your infrastructure you can start small and increase the resources as you go; virtualization makes it very easy.
SCCM has a lot of software requirements and if we do one or two new deployments in a year, we are not going to remember them. A better approach that I like to use is to let SCCM tell me what prerequisite should I install, and this way I know that everything it needs it’s in the system and configured for the deployment.
1.1 Running the SCCM prerequisites checker
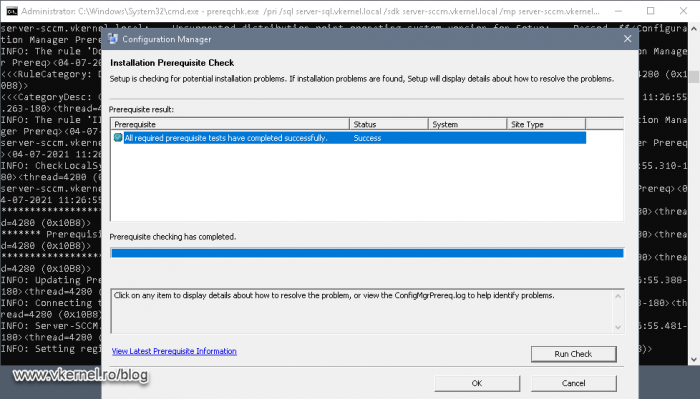
The first thing that I like to do in order to see what’s needed for the SCCM installation, is to launch the SCCM Prerequisites Checker from the installation ISO.
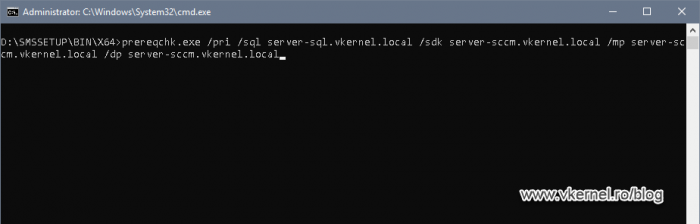
On the SCCM server, mount the downloaded SCCM ISO then open a command prompt and browse to Configuration Manager installation media > SMSSETUP > BIN > X64. Here, type the bellow command line to launch the Prerequisites Checker on the server so we can see what prerequisites are missing and what configurations we need to fix. Off course you will need to replace the server names with your own, like the SQL server name and the SCCM one; and don’t freak out about the errors and warnings presented in the wizard, because remember…this is a clean servers with nothing on it, so it is expected.
prereqchk.exe /pri /sql <SQL server FQDN> /sdk <SCCM (local server) FQDN> /mp <SCCM (local server) FQDN> /dp <SCCM (local server) FQDN>
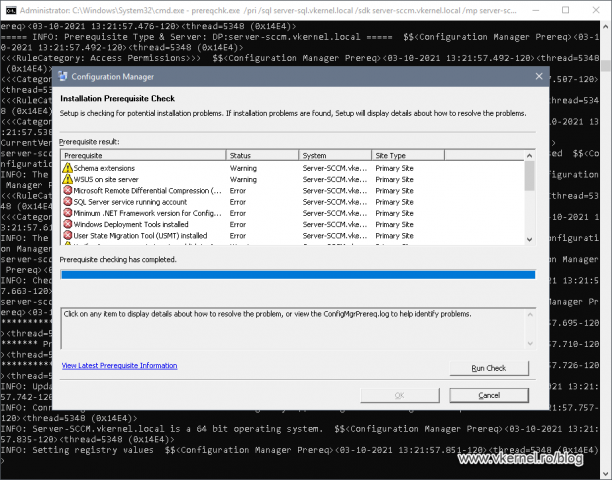
The operation will take a few minutes to complete, and once it is done, we will have all the missing software and miss-configurations in a nice colored list. The next thing is to go over all the prerequisites one-by-one until the list it’s empty on the next prerequisites check. The Prerequisites Checker also creates a log file on the root of the C drive if you want more details about what it finds.
1.2 Extending the AD schema for SCCM
This is the first task in the list and it’s not mandatory, but it’s recommended so we can benefit from all the SCCM features. By extending the Active Directory schema we are simplifying the deployment and configuration of clients and also let them locate resources (content servers) more efficiently.
In order to extend the AD schema we need to mount the SCCM ISO on a domain controller, open the command prompt and browse to Configuration Manager installation media > SMSSETUP > BIN > X64. From this path just type extadsch.exe and press Enter. In a few seconds the process of schema extension will be done.
To extend the Schema, the account used will need to be part of the Schema Admins security group
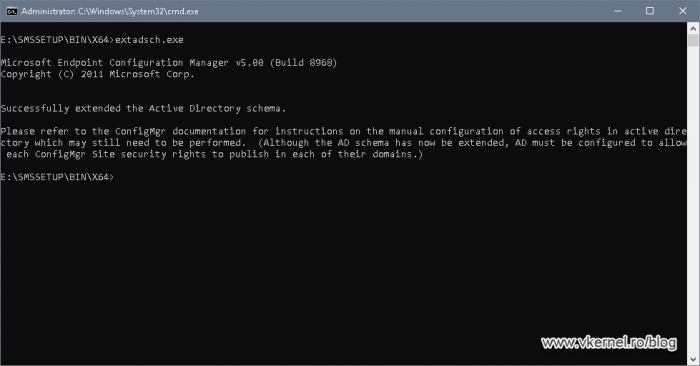
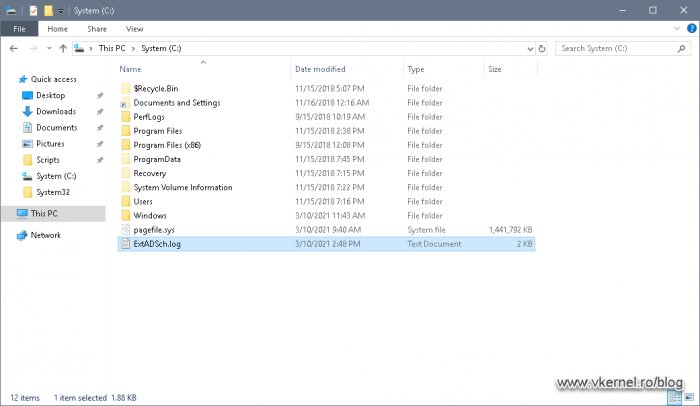
The command also creates a log file –ExADSch.log– on the root of the C drive if we want to see what classes and attributes it adds to the schema.
1.3 Creating the System Management Container
Since we are on the domain controller, we will go a little bit out of order from the SCCM prerequisites check list so we don’t have to come back later on. What we are trying to resolve here is the Verify site server permissions to publish to Active Directory warning. This is also not mandatory, but highly recommended to do so Configuration Manager can publish data like Management Points (MP) and Boundary details in order for clients to select the best one possible.
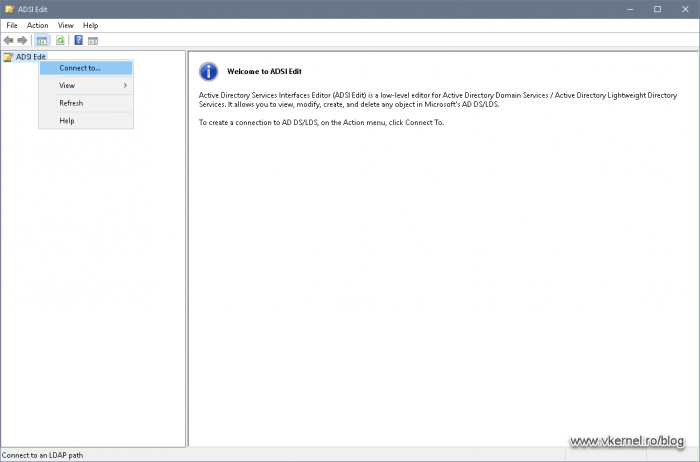
On one of the domain controllers, open the ADSI Editor console, right-click the ADSI Edit node and choose Connect to.
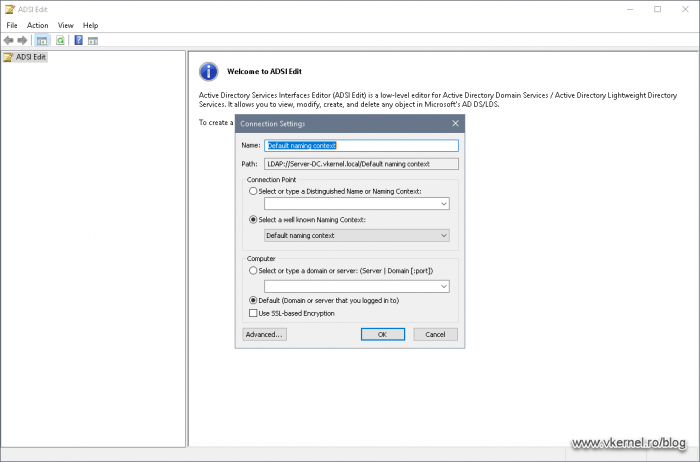
On the Connection Settings window that pops-up, just leave the defaults and hit OK.
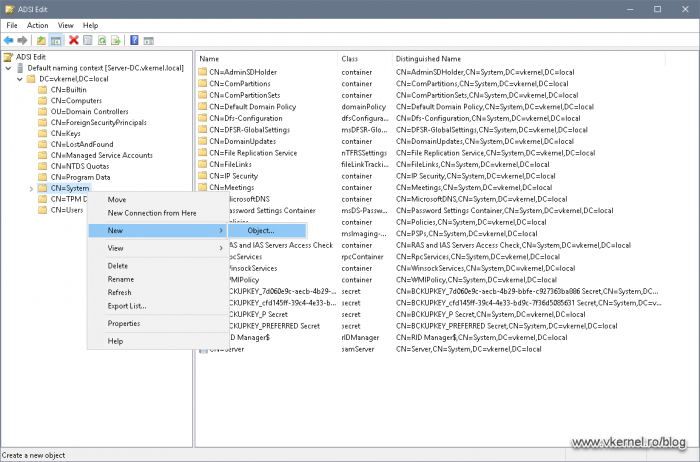
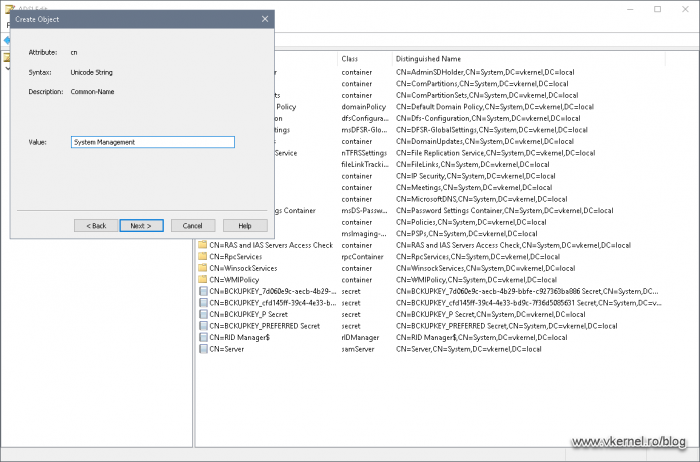
Expand the Default naming context then the domain name. Right-click CN=System and choose New > Object.
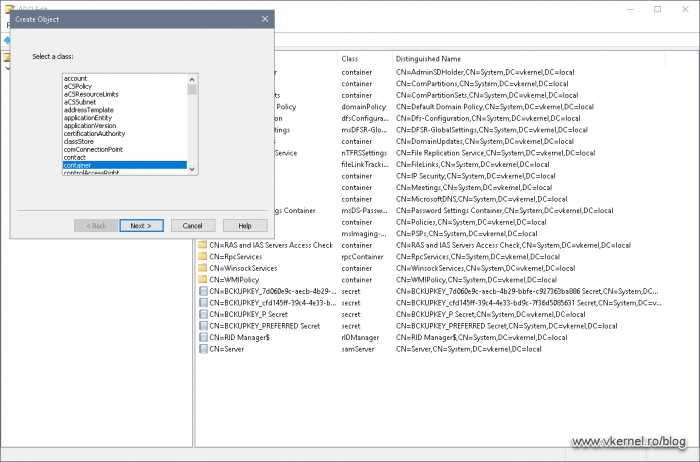
From the Create Object wizard that opens up, select container and click Next.
In the Value box type System Management then continue the wizard.
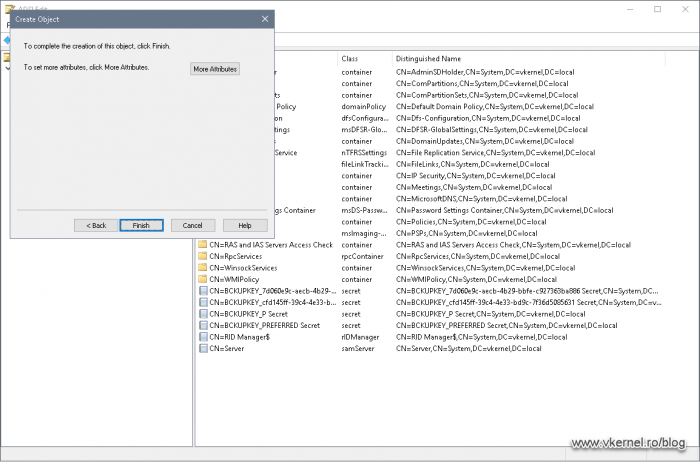
Click Finish to close the wizard.
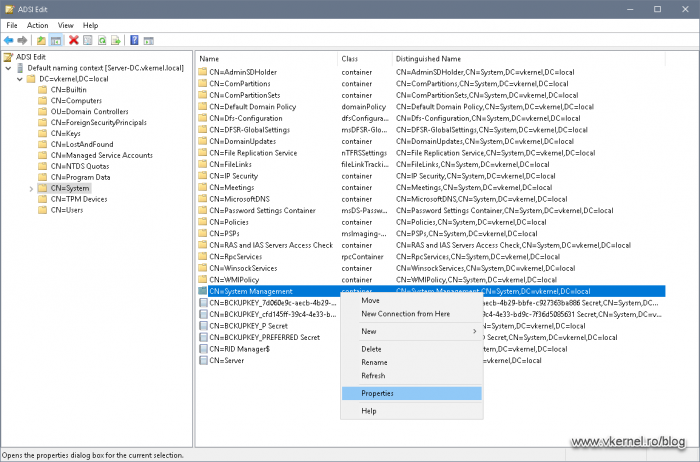
Now that our container is created, we need to set up the proper security permissions so SCCM can publish the necessary data in it. Right-click the System Management container and choose Properties.
From the Security tab hit the Add button and search for the SCCM server.
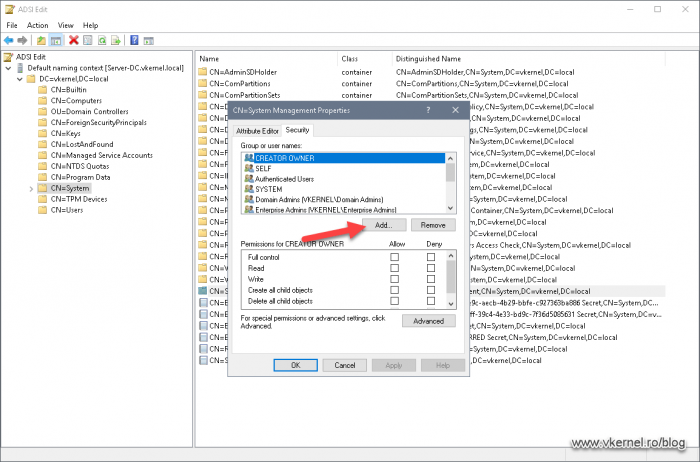
Once the SCCM server is in the Access Control List (ACL) give it full permissions on the System Management container by clicking the Full control box.
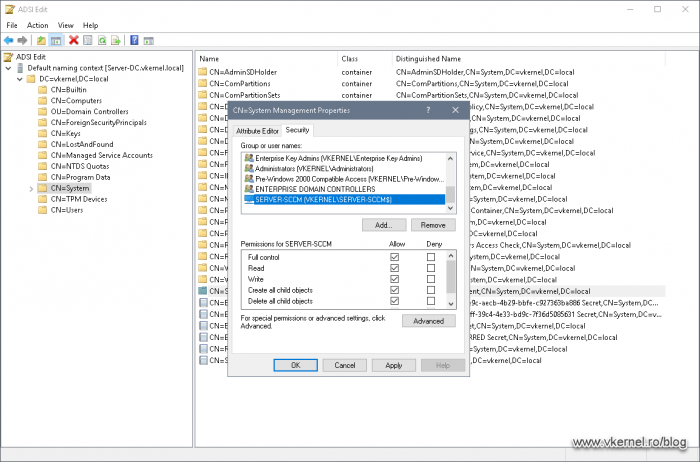
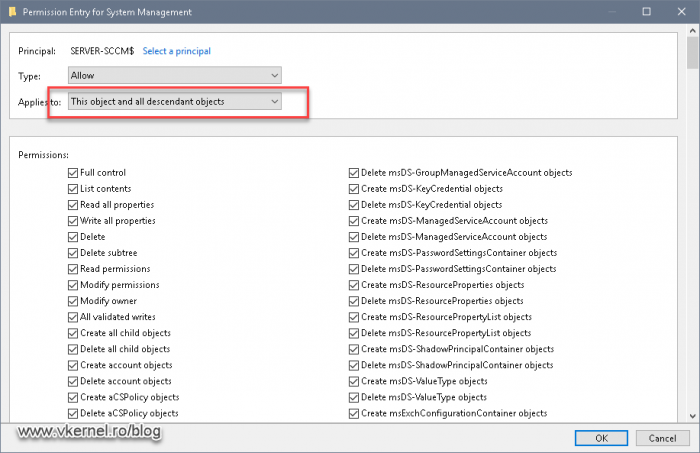
Click the Advanced button. From the Advanced Security Settings window that opens up, select our SCCM server then hit Edit.
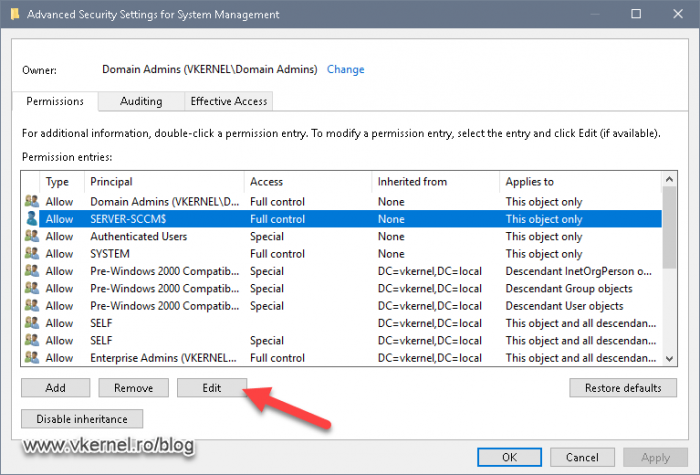
From the Applies to drop-down box select This object and all descendant objects. Click OK on all properties windows to close them and save the changes.
1.4 Creating the SQL Server service account
Still on the domain controller, open Active Directory Users and Computers (ADUC) and create a simple user account which later on we are going to use it a service account for our SQL Server instance. Make sure you set the password for the account to never expire.

1.5 Configuring the SQL Server
SCCM supports a wide majority of SQL Server versions, and since we are using SQL 2019 for this SCCM instance, we need to have at least CU5 installed on our SQL server. More details can be found in this Technet article.
| SQL Server Version | Edition | Min Cumulative Update |
| SQL Server 2019 | Standard, Enterprise | CU5 |
| SQL Server 2017 | Standard, Enterprise | CU2 |
| SQL Server 2016 SP2 | Standard, Enterprise | Not CU Required |
| SQL Server 2016 | Standard, Enterprise | Not CU Required |
| SQL Server 2014 SP3 | Standard, Enterprise | No CU Required |
| SQL Server 2012 SP3 | Standard, Enterprise | No CU Required |
1.5.1 Adding the service account and SCCM host to the local Administrators group
Presuming you already have your SQL Server and the SQL Server Reporting Services installed, we can move forward with our SCCM setup by login into our SQL host and open the Local Users and Groups console (lusrmgr.msc). Once the console opens, click the Groups folder, and open the Administrators group properties.
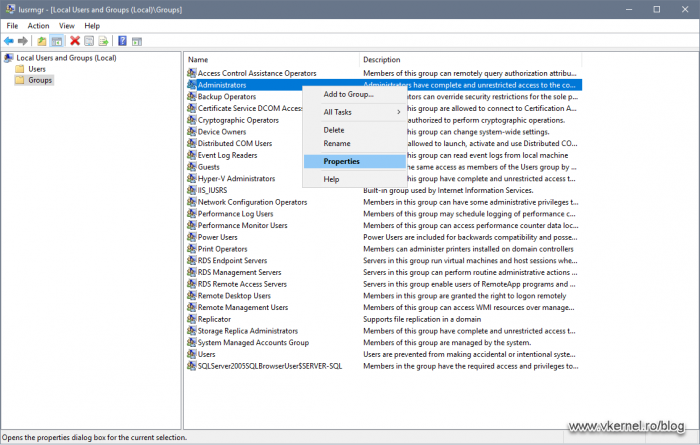
Click the Add button and search for the service account that we created in section 1.4.

Add the account to the Administrators group then click Apply to save the changes. Don’t close the Administrators Properties window yet!
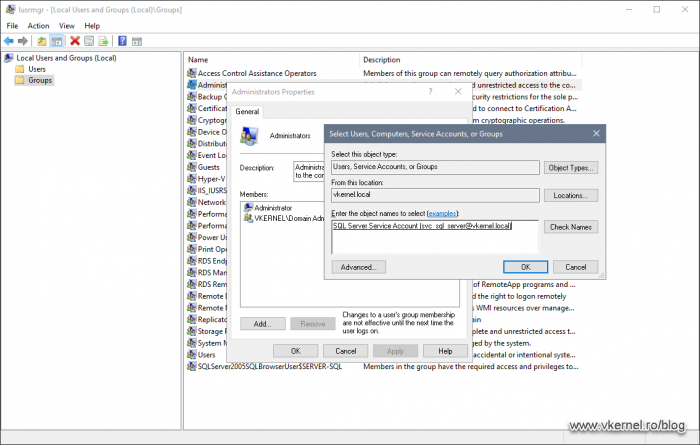
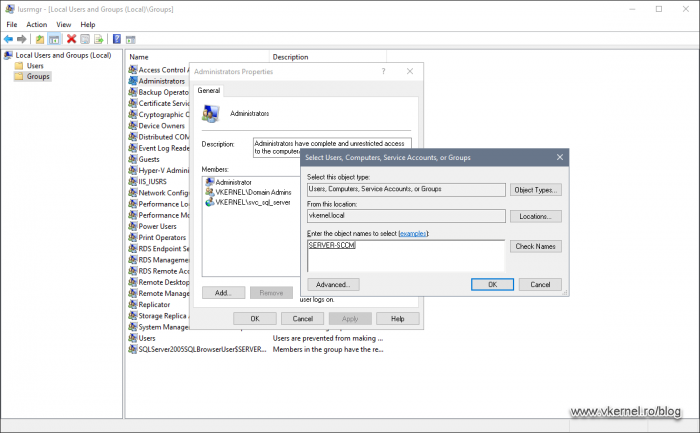
Click the Add button again, and this time we need to add the SCCM computer account as a member of the local Administrators group on our SQL server. Click OK when done.
1.5.2 Configuring the SQL service running account
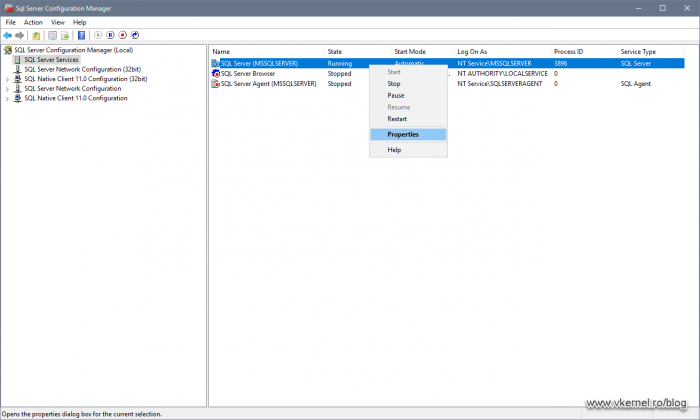
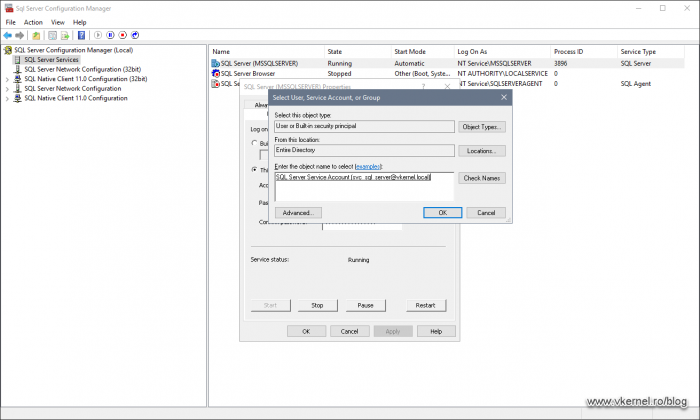
Now we need to set our SQL service to use the domain service account, and for that, we are going to use the SQL Server Configuration Manager console that can be found in the Start menu. Once the console opens and we click the SQL Server Services object, we can see on the right-hand side that our SQL Service is running under a local account. To change that, right-click the SQL Server service and choose Properties.
From the Log On tab, click the Browse button.
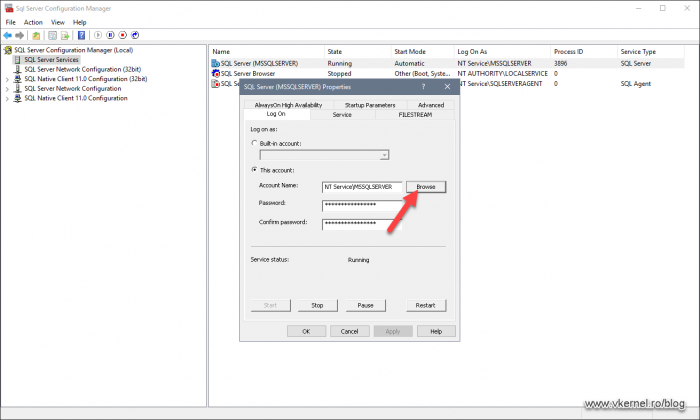
Here we need to add our SQL service account created in section 1.4. To be able to add the account we need to select our domain using the Locations button then search for the account. Click OK when done.
Back on the SQL Server service Properties window, we need to provide the service account password in the two password boxes then hit OK. Choose Yes on the warning that pops-up to restart the SQL service and apply the changes.
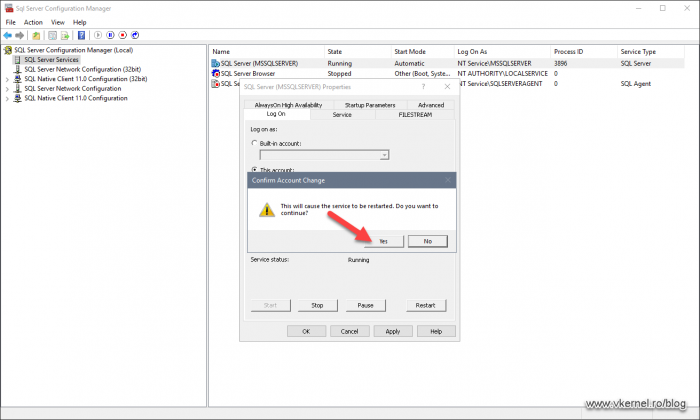
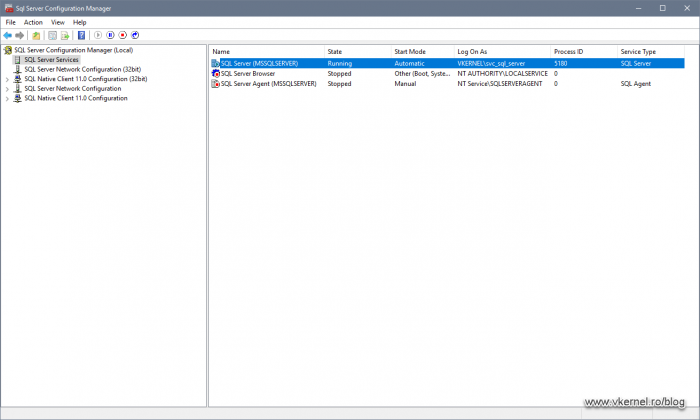
And there you have it, our SQL Server service is now running under a domain service account, which is what SCCM wants for us.
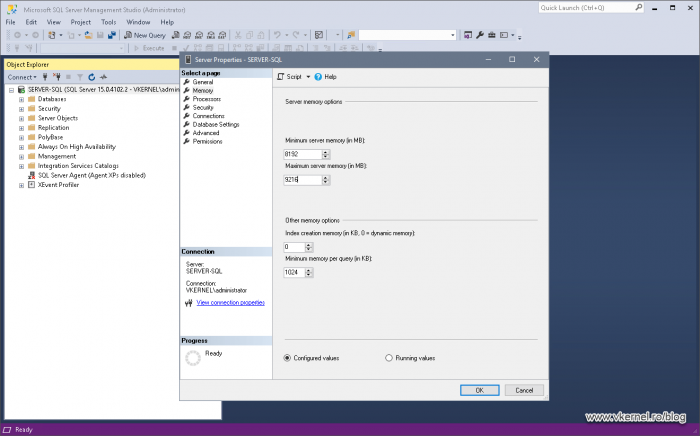
1.5.3 Setting up memory usage for the SQL instance
We still have one more to go on the SQL Server configuration side, and that is setting up a minimum and maximum memory for the instance to use. For this, we are going to use SQL Management Studio. Once we log in, we need to right-click the server name and choose Properties.
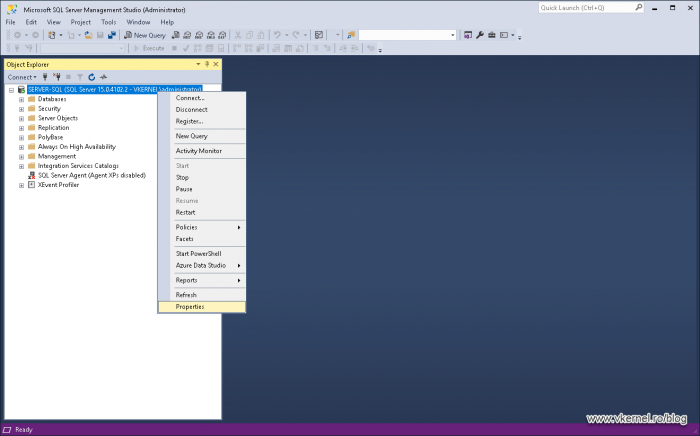
On the Properties window, click the Memory page then on the right-hand side set a minimum value of 8GB of RAM -which is what SCCM requires- and as a maximum value set it close to what your SQL system has. Since I have 12 GB of RAM on this host, I will set the maximum value to 9 GB and leave something for the system. Click OK when done.
1.6 Installing missing features on the SCCM server
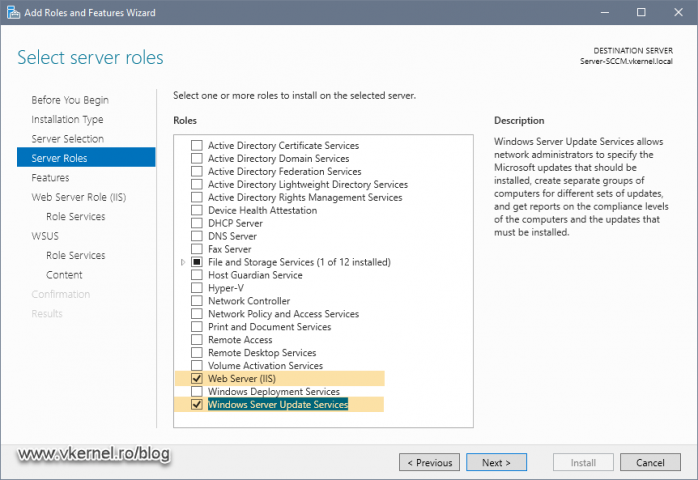
The next prerequisite will be WSUS, which is also not mandatory but since we are deploying a single Primary Site which is also our Management Point and Distribution Point site, we need this role. Also, by opening the Add Roles and Features Wizard, it will be a good time to install the rest of the missing features and roles for SCCM not just WSUS.
On the SCCM server open Server Manager and click Manage > Add Roles and Features.

Once at the Select server roles screen, tick the Web Server (IIS) and Windows Server Update Services boxes then click Next.
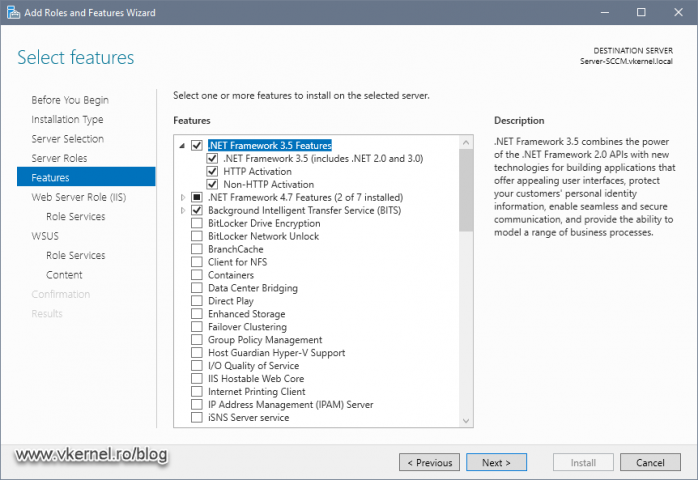
On the next screen of the wizard select .NET Framework 3.5 Features and all sub-features, Background Intelligent Transfer Service (BITS), Remote Differential Compression and click Next.
In the IIS Role Services page, scroll down at the bottom, expand Management Tools > IIS 6 Management Compatibility then tick the IIS 6 WMI Compatibility box.

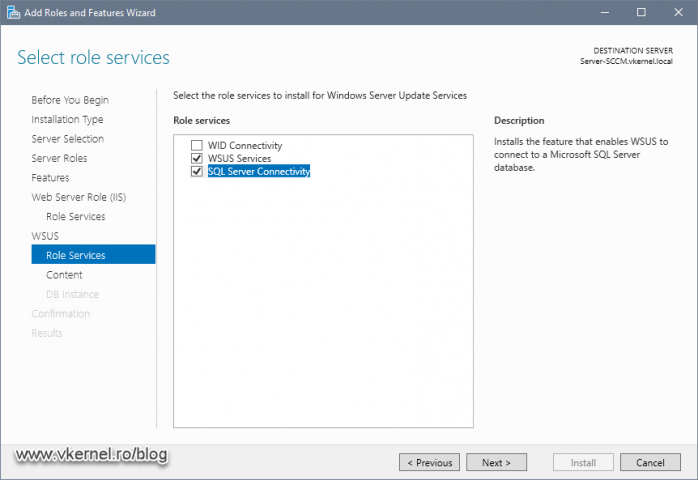
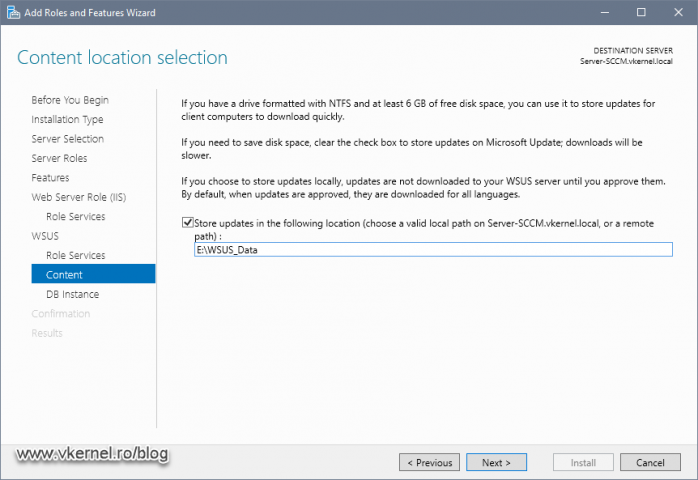
Since we already have a SQL server deployed, we can use it to store our WSUS database. On the WSUS Role services screen select the SQL Server Connectivity option and continue the Add Roles and Features Wizard.
Here we tell WSUS where to store the updates. This is a bit misleading in this case since updates will be stored on the so called SCCM Distribution Point, but we need to set this up so we can continue the wizard.
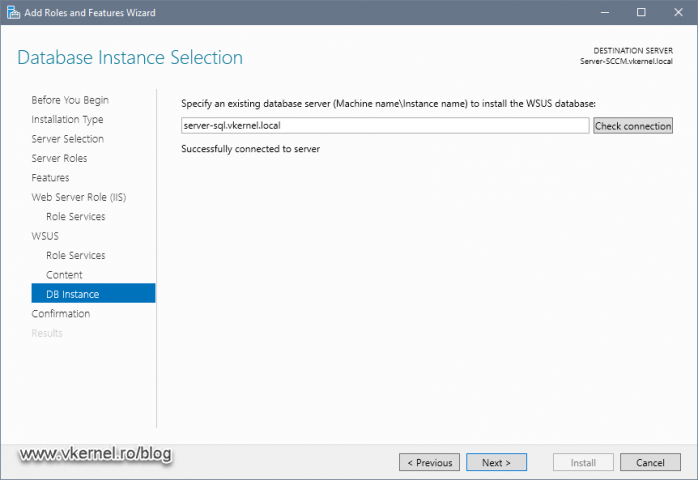
On the next screen of the wizard we configure the SQL server for our WSUS instance.
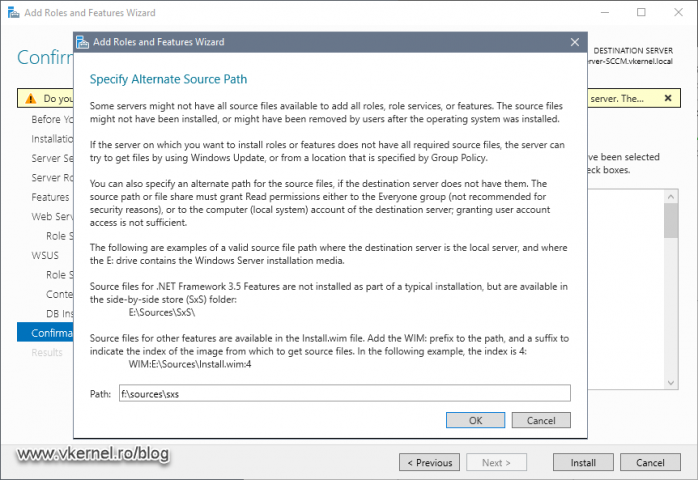
One other thing that I like to do is to provide a custom path for the .NET Framework 3.5 source files. It is way faster than letting the wizard connect to Microsoft’s update site.
Mount the Windows Server 2019 ISO then click Specify and alternate source path link from the bottom of the wizard.
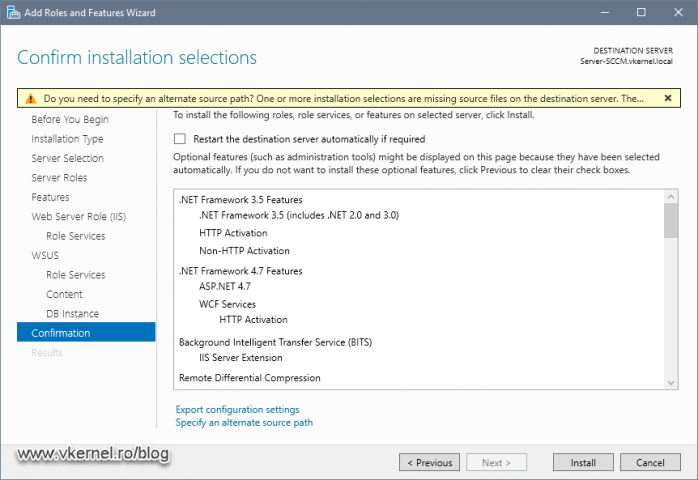
In the Path box type <Windows Server installation media> > sources > sxs and click OK.
Click the Install button and let the wizard install all the features and roles we selected. After a few minutes everything should be set up. One important thing is NOT to launch the post-installations tasks of WSUS. The role is configure from SCCM after we finish it’s installation, so just hit Close here.
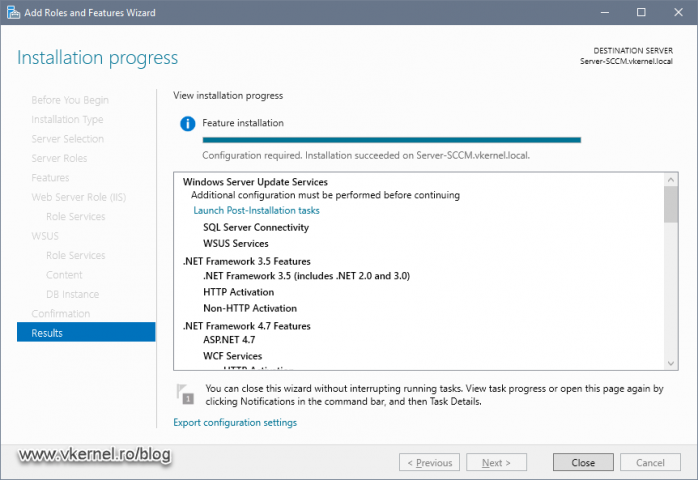
1.7 Installing Windows ADK
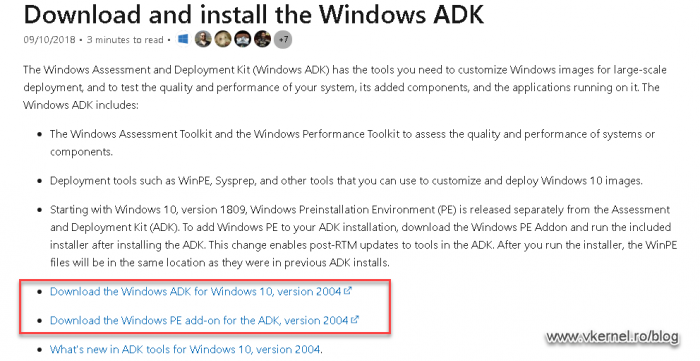
Another SCCM prerequisite that we need to take care of, is the Windows Assessment and Deployment Kit (Windows ADK) which is mandatory as we can see in the prerequisites checker tool. Go and download the latest version of ADK from Microsoft’s website but make sure you download both components of ADK since the Windows PE add-on and ADK were separated starting with version 1809.
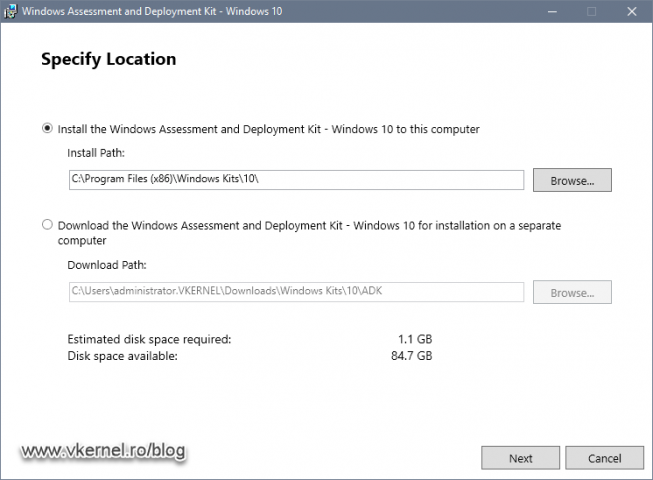
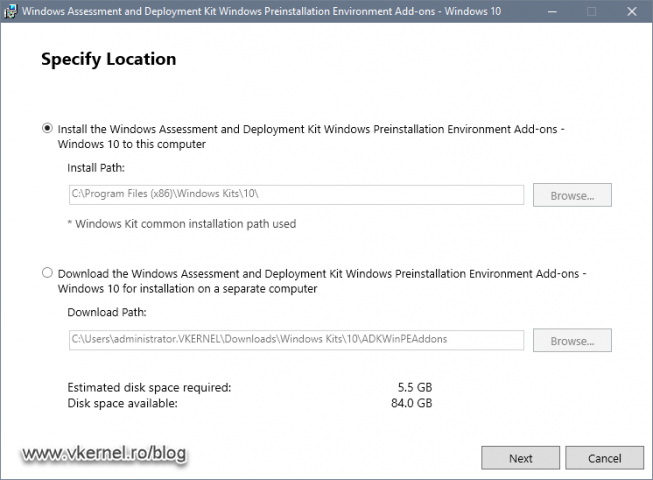
Once both packages were downloaded, let’s run the installation of ADK first by executing adksetup.exe. Right from the start we are given the option to change the installation path of the software, but most of the times the default one will work just fine. Click Next.
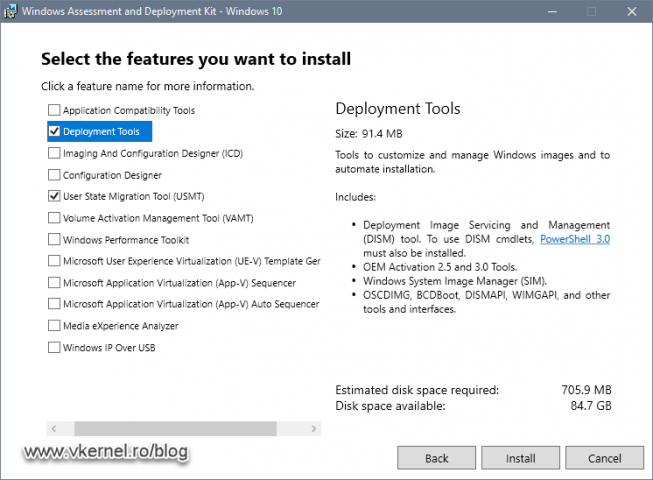
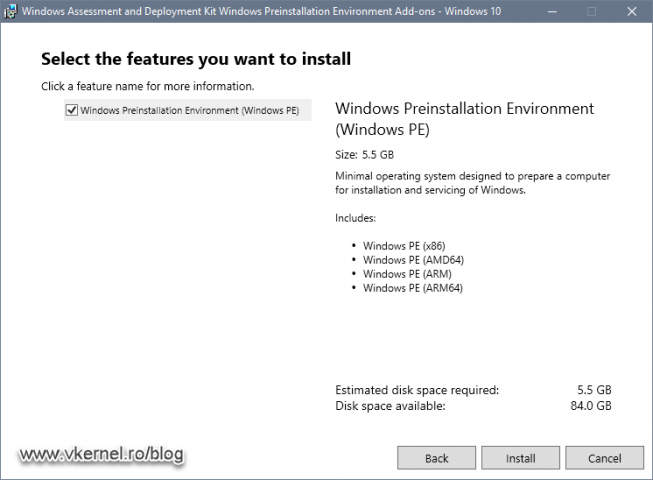
In the Select the features you want to install screen all we need are the Deployment Tools and the User State Migration Tool options. Select just the two then hit Install.
Now let’s go to our Windows PE ADK add-on and run the adkwinpesetup.exe to start the installation wizard. The installer automatically find where our ADK software was installed and it will set itself up to the same installation path with no possibility to change it. Click Next.
In the features screen, all we have is one option. Click the Install button to begin the ADK Windows PE add-on.
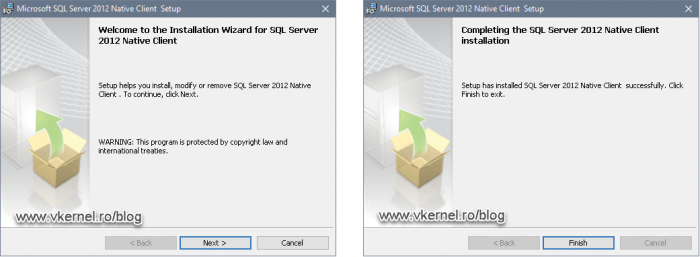
1.8 Installing the SQL Native client
This requirement it’s an easy and fast one. All we need to do, is go and download the SQL Native client installer and run it.
1.9 Re-run the Prerequisite Check
Now let’s take a look and see if we have any more warnings or errors in the prerequisite checker. If we click click the Run Check button again, after a few minutes we should have a green check mark and a message saying that we have passed all the prerequisites. If you have some warning or errors, I recommend you treat them first then continue with the deployment.
2. Installing System Center Configuration Manager
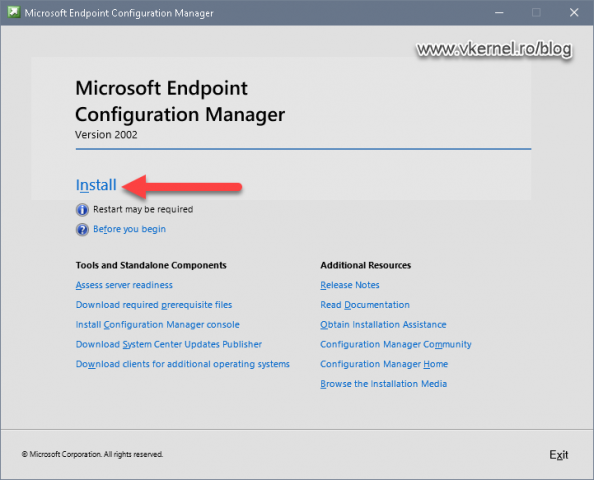
After a long road of installing and configuring the prerequisites for our SCCM instance, we are finally at the point of deploying it. So go and download the installation media if you don’t have it already, mount the ISO then launch the installer. Once we launch the installer, all we have to do is click the Install button to open the SCCM installation wizard.
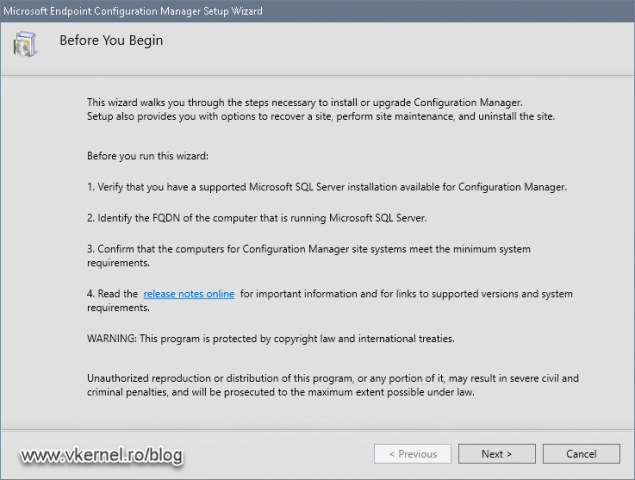
On the Before You Begin page just click the Next button since all the prerequisites are already set up.
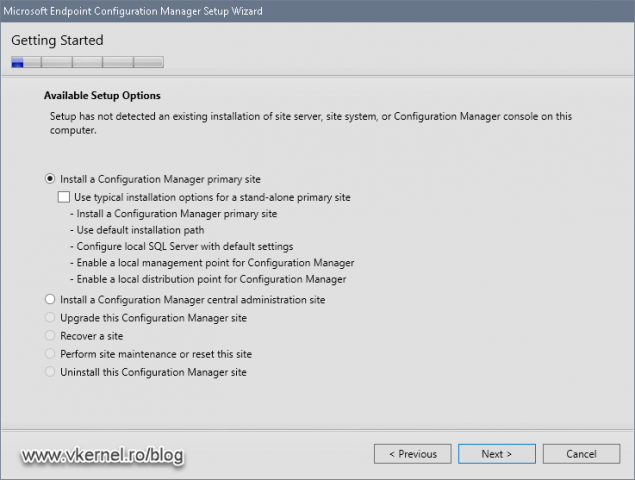
In the next wizard screen we have a few options to choose from on how we want to install SCCM, but since we are deploying just a single primary site, we will go with the default option Install a Configuration Manager primary site. Since I am not a fan of a typical installation, and because we have a dedicated SQL Server for this SCCM instance, we are NOT going to tick the box Use typical installation options for a stand-alone primary site. The second radio button Install a Configuration Manager central administration site, it’s there in case we have a large environment with multiple primary sites. This way we centralize them with an administration site. Click Next to continue the wizard.
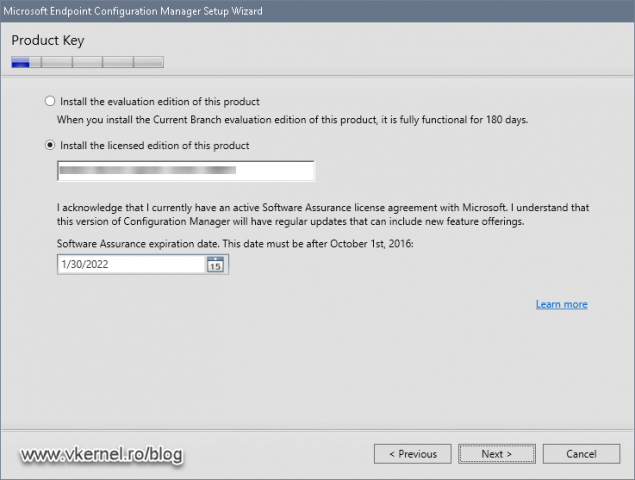
Type the product key and set the expiration of your software assurance then hit Next. If you want to evaluate the product just select the first radio button Install the evaluation edition of this product.
Accept the license agreements and continue the wizard.
This is where the wizard needs to download some prerequisite files from Microsoft that are needed for the installation, but we also have the choice to use previously downloaded files. Since this is our first deployment, we don’t have those files and we need to download them, so select the option Download required files and then, by using the Browse button, provide a directory to store the files.
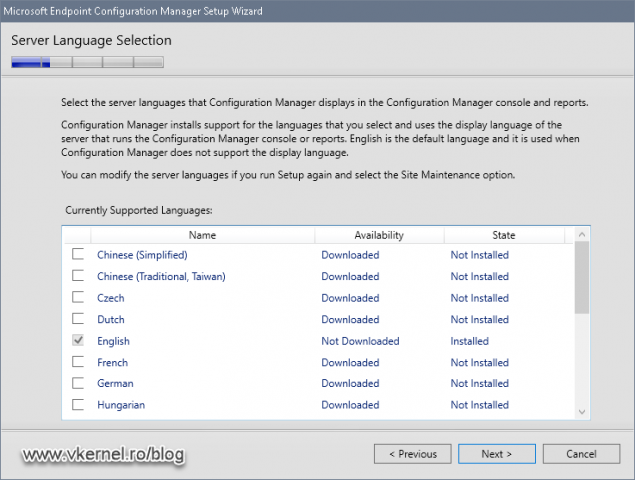
In the Server Language Selection page we have the option to install additional languages for our SCCM server which will change the language on the console and reports.
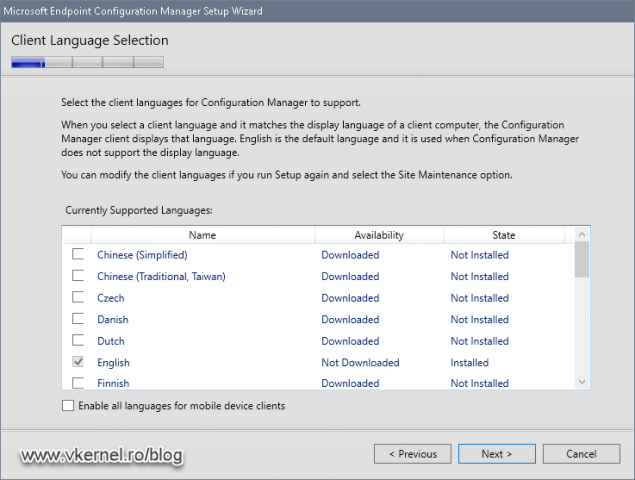
This wizard screen is similar with the previous one, but this time the installed language(s) will apply to the SCCM clients/agents. Make your selection then click Next.
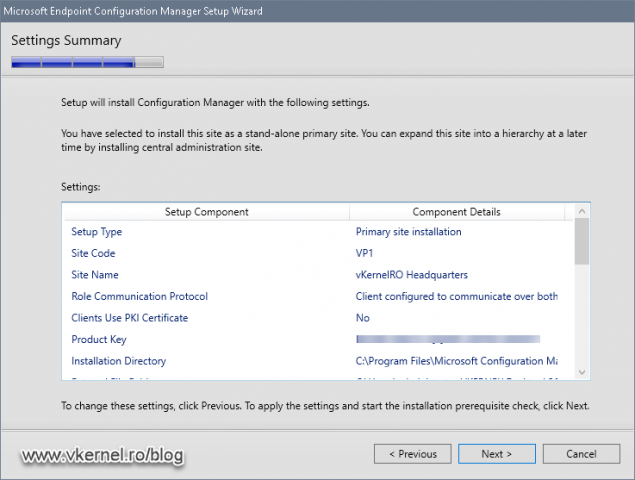
Here we have an important box, and that’s the side code box which uniquely identifies this configuration manager site in the hierarchy. That’s true, we don’t have much of a hierarchy right now with only one server, but the site code still needs to be present and unique. The side code can have only letters from A to Z and numbers from 0 (zero) to 9 and cannot use the following names since they are reserved for Configuration Manager: AUX, CON, NUL, PRN, SMS, ENV. Make sure you give it a thought about what site code you want to type in because it cannot be changed after the installation is done. Type a three letter/number code then move to the Site name box and give this site a name -which will be displayed in the SCCM console-.
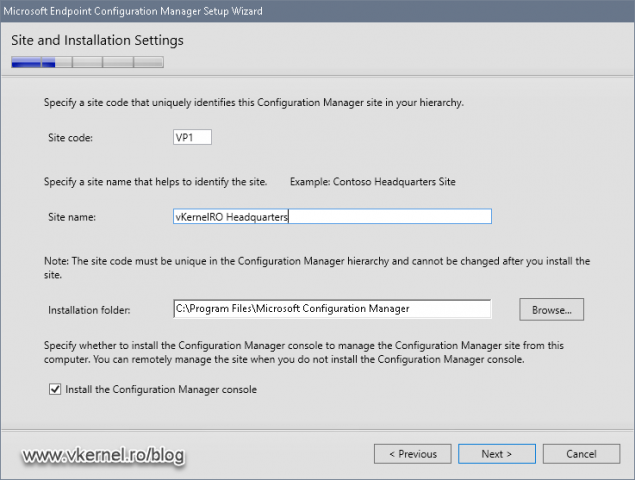
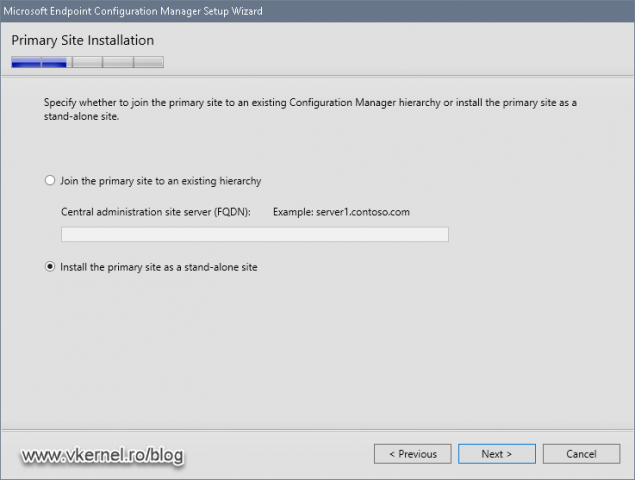
Since this is our first site, and we also don’t have an administration site to join it to, we need to choose the second option Install the primary site as a stand-alone site then continue the wizard. Click Yes on the warring that pops-up.
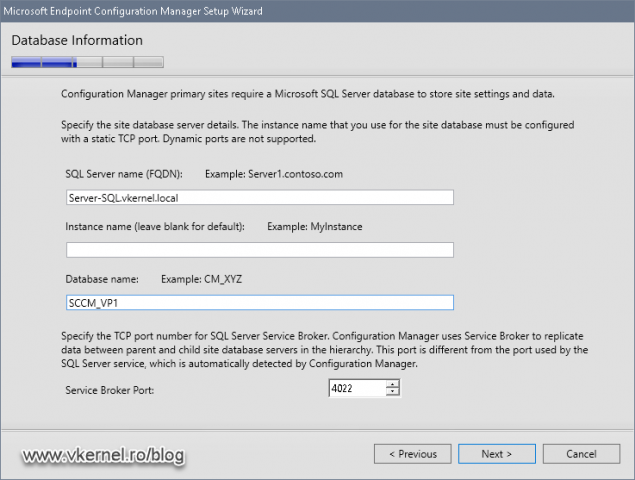
We are now given the option to type in our remote SQL server name, instance and SCCM database. Type your values then click Next.
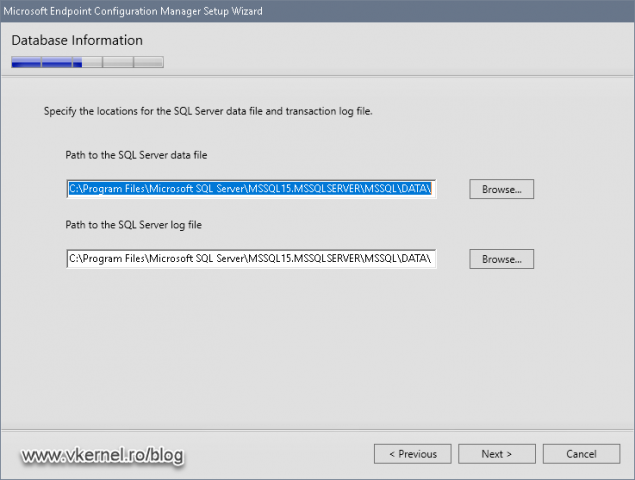
In the Database information screen we have the option to change the default SCCM database and log files location on the remote SQL server. If you have a dedicated volume for your databases on the SQL server, type the new path here.
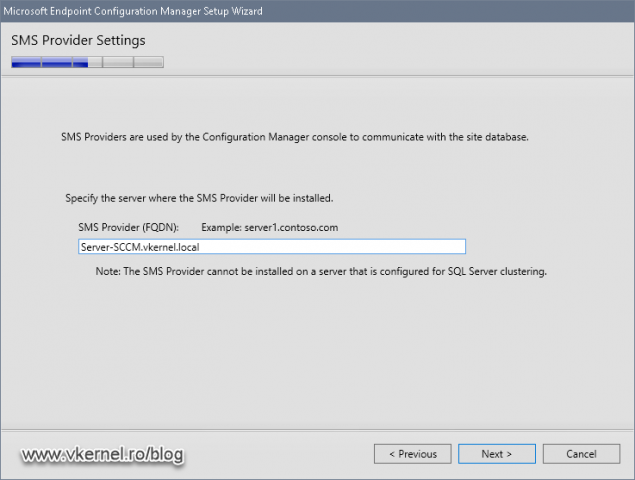
All we have to do here is click Next since we want the SMS provider to be installed on the SCCM server.
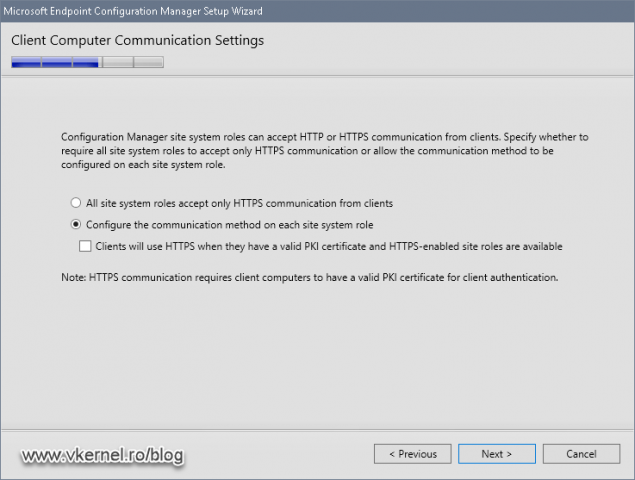
Because we want our clients/agents to be able to communicate with our primary site server, we need to choose the second option here Configure the communication method on each site site role and click Next. Going with HTTPS it’s a little bit complicated and involves deploying certificates to clients and changing some configurations in the SCCM site server(s) that are not always friendly. I will threat this subject in a future article of these SCCM series.
In the Site System Roles screen we have the options to install the management and distribution points on this server or on a different one. Since we want to start small and grow as our infrastructure grows, we are going to install these two site roles on this server. These can be moved later on to a different site server if needed.

In this wizard screen we have no option to configure so click Next to continue.
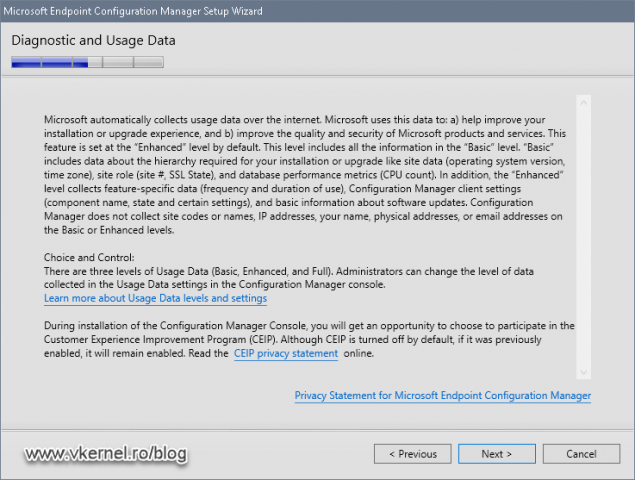
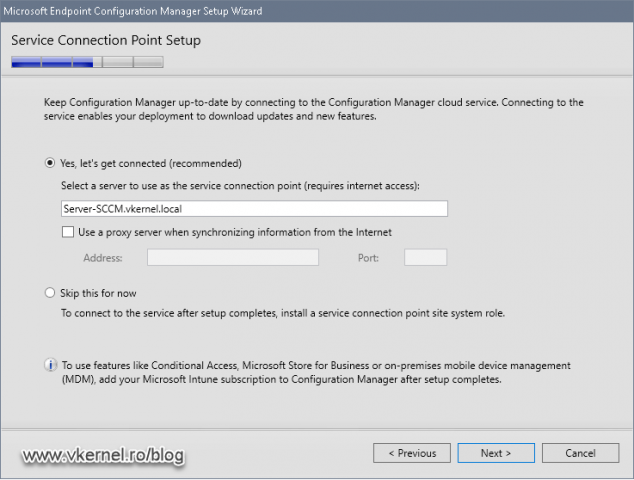
In order to keep SCCM updated with the latest builds and features, we need to connect to the Microsoft cloud. We can do this here in the wizard or later on after the installation completes. For the sake of this example I will just leave the default option so the wizard can configure the connection.
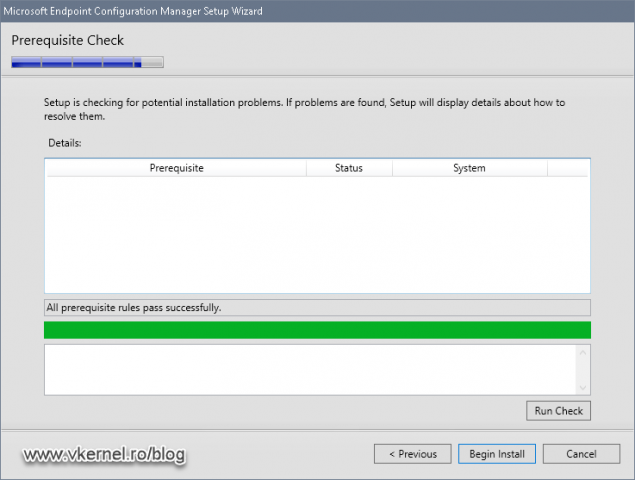
And here is a summary of all our configuration trough the wizard. Click Next and let the wizard have another prerequisite check.
Since we already installed and configured all of the prerequisites for this site system installation, we should have an empty list with no errors or warnings. If that’s not the case, please review and fix the errors/warnings before continuing. You can also ask for help in the comments area.
Click the Begin Install button to start the SCCM installation.
Once the installation starts, the wizard will show all the steps that is doing. We also have a log view button just in case we need more details about the deployment.
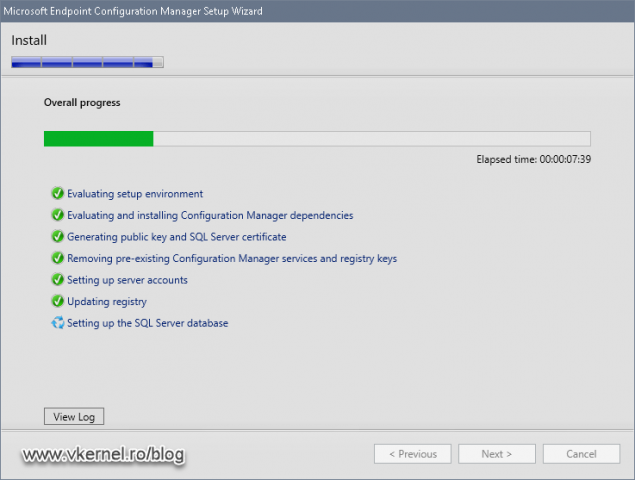
Depending on the system, the installation can take anywhere between 40 and 90 minutes and in the end we should have a nice success message. If everything is green, the installation was a success.

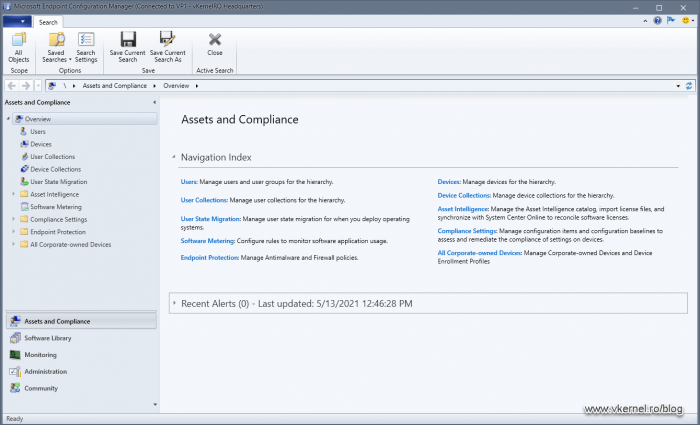
And from the Start menu we can open the console and view our first SCCM Primary site system.
Summary
In this article we have successfully installed our first SCCM Primary site which was not that easy if you are just starting to learn the product. Beside the multitude of software prerequisites we also had to do a lot of configurations. The thing that helps with all of this is the prerequisite checker, which I encourage you to use. Let me know in the comments area how your installation worked.
Want content like this delivered right to your
email inbox?
Item Preview
There Is No Preview Available For This Item
This item does not appear to have any files that can be experienced on Archive.org.
Please download files in this item to interact with them on your computer.
Show all files
1,634
Views
DOWNLOAD OPTIONS
Uploaded by
packprocloud
on
SIMILAR ITEMS (based on metadata)
Подготовка Active Directory
Создание контейнера System Management
Первым делом создаем контейнер System Management, для этого открываем редактор ADSI Edit.
Из командной строки:
adsiedit.msc


Далее мы настраиваем доступ к созданному контейнеру System Management. Добавляем сервер, на котором будет установлен SCCM и настраиваем права.
P.S. Сервер с именем CM01 уже существует и подключен к домену.

Следующим шагом в дополнительных свойствах (Advanced) необходимо задать наследование.

Расширение схемы
Для того чтобы расширить схему, выполняем с установочного диска SCCM от имени администратора extadsch. Для изменения схемы необходимо членство в группе «Администраторы схемы», в нашем случаем мы выполняем от доменного администратора.
D:\SMSSETUP\BIN\X64\extadsch.exe

Результаты расширения схемы мы можем посмотреть в корневой директории системного диска C:\ExtADSch.log
Подготовка SCCM сервера
Установка компонентов
Необходимо добавить следующие роли и сервисы.
Roles:
Select Web Server (IIS)
Features:
.Net Framework 3.5 Features [Устанавливаем все фичи]
.Net Framework 4.7 Features [Устанавливаем все фичи]
Background Intelligent Transfer Service (BITS)
Remote Differential Compression
Web Server Role (IIS)
Role Services:
Web Server
Common HTTP Features
Static Content
Default Document
Directory Browsing
HTTP Errors
HTTP Redirection
WebDAV Publishing
Health and Diagnostics
HTTP Logging
Custom Logging
Logging tools
Request Monitor
Tracing
Performance
Static Content Compression
Security
Request Filtering
Basic Authentication
Client Certificate Mapping Authentication
URL Authorization
IP and Domain Restrictions
Windows Authentication
Application Development
ASP.NET 3.5 and 4.7
.NET Extensibility 3.5 and 4.7
ASP
ISAPI Extensions
ISAPI Filters
Management Tools
IIS Management Console
IIS 6 Management Compatibility
IIS 6 Metabase Compatibility
IIS 6 WMI Compatibility
IIS 6 Scripting Tools
IIS 6 Management Console
IIS Management Scripts and Tools
Management Service


Проверка IIS
Запускаем IIS Manager. Выбираем Default Web Site и проверяем, что включена Anonymous Authentication.


Установка Windows ADK
Загружаем ADK and Win PE :
- Download the Windows ADK for Windows 10, version 1903
- Download the Windows PE add-on for the ADK
Устанавливаем Windows ADK for Windows 10, version 1903

Устанавливаем Windows PE add-on for the ADK

Установка SQL Server 2017

Указываем учетные записи, в нашем случае это за ранее добавленные в AD учетки SC_SQL_SA и SC_SQL_DE

На вкладке Collation проверяем сопоставление SQL_Latin1_General_CP1_CI_AS

Указываем учетные записи служб. Мы используем отдельные учетные записи для каждой службы сервера SQL.
В нашем случае это SC_SQL_SA и SC_SQL_DE за ранее добавленные в DC

После установки SQL необходимо установить накопительное обновление, сделать это можно через Windows Update, либо скачать Cumulative Update.
Следующая таблица отображает правильную версию SQL-сервера для SCCM 1902.

Установка SQL Server Management Studio
Следующим шагом нам необходимо установить SQL Server Management Studio 18.1

Установка на сервер роли WSUS
Для развертывания обновлений при помощи SCCM нам необходимо установить роль WSUS
Выбираем роль Windows Server Update Services

На этапе выбора WSUS — Role Services, отключаем WID Database и выбираем SQL Server Connectivity

Указываем путь

Указываем имя сервера SQL и проверяем соединение

По завершению установки необходимо настроить роль, запускаем Launch Post-Installation tasks

По завершению процесса настройки, запускаем SQL Server Management Studio и мы должны увидеть новую базу SUSDB

Установка SQL Server 2017 Reporting Services
При установке SQL Server 2017 он не включает Reporting Services. Загружаем и устанавливаем SQL Server 2017 Reporting Services.

По завершению установки перезагружаем сервер, настраивать Reporting Services мы будем позже.

Настройка Firewall для SCCM 1902
Так как мы установили все на одном сайте, нет необходимости открытия портов для взаимодействия между сайтами SCCM
Про настройку Firewall клиентских машин описано тут.
Установка SCCM
Для запуска установки SCCM, запускаем splash.html с установочного носителя.

Выбираем Install a Configuration Manager Primary site

Создаем директорию и указываем путь куда мастер загрузит установочные файлы

Указываем код сайта и название сайта
Имя сайта должно состоять из трех символов и содержать только стандартные символы (A–Z, a–z, 0–9)

Имя сервера для установки верно, продолжаем.

Продолжаем установку

На предварительной проверке мы получили одну ошибку:
Verify site server permissions to publish to Active Directory, это права доступа на контейнер System Management.
Мы настроили доступ на шаге создания контейнера, игнорируем это предупреждение.

На этом установка завершена

The SCCM 2103 baseline version will be available for download from the Microsoft Evaluation Center beginning April 29, 2021. In addition to that, the SCCM 2103 update is also generally available to all customers.
The baseline version of ConfigMgr 2103 enables clean installations without version upgrades. The setup files that you need to install SCCM 2103 from scratch are included in the baseline build for SCCM 2103. Configuration Manager assists IT in maintaining software updates, configuring security policies, and monitoring system status on PCs and servers while enabling employee access to corporate applications on their preferred mobile devices.
Customers of both VLSC and MSDN should be able to get the SCCM 2103 baseline media download. If you already have the product key for Configuration Manager, you can download an evaluation copy and use a license key to make it fully functional. Here is a guide to convert SCCM evaluation version to full version. If you wish to download it from VLSC, you can do that as well.
To apply the Configuration Manager 2103 update, your site must be running SCCM version 1910 or higher. Furthermore, if you plan to upgrade your Configuration Manager to version 2103, you can refer this guide – https://www.prajwaldesai.com/sccm-2103-upgrade-guide/.
Ways to Download ConfigMgr 2103 baseline media
There are 3 locations from where you can download the baseline media for Configuration Manager 2103:
- Download 2103 from Microsoft Evaluation Center Portal.
- Access the ConfigMgr 2103 baseline media from VLSC.
- Download SCCM 2103 install media from Visual Studio Subscriptions (MSDN).
Download SCCM 2103 Baseline Version from Microsoft Evaluation Center
To download SCCM 2103 baseline media, visit the Microsoft evaluation-center. Under the Microsoft Endpoint Manager products and resources section, look for Microsoft Endpoint Configuration Manager (current branch – version 2103) | 32-bit and 64-bit.

To download the ConfigMgr 2103 baseline media, you need to fill up some details first. Enter all the details (all of them are mandatory). Click Continue. Next, click the “Download” button. Save the file as MEM_ConfigMgr_2103.exe. The file size is approximately 1.6 GB.
When the download is done, you can either double-click this file or use WinRAR or 7Zip to manually extract it to a folder. You can then use the setup file to begin the Configuration Manager 2103 installation.

Prajwal Desai is a Microsoft MVP in Intune and SCCM. He writes articles on SCCM, Intune, Windows 365, Azure, Windows Server, Windows 11, WordPress and other topics, with the goal of providing people with useful information.
This post will show the step-by-step process on how to install System Center Configuration Manager (Current Branch) version 1902 as a Standalone Primary Server in a Windows Server 2019 lab environment from scratch and later on we will upgrade it to SCCM Current Branch version 1906.
I have broken down this post in a series of steps:
- Step 1. Primary Site Server Installation Prerequisites
- Virtual Environment
- Installation Media
- AD Accounts
- Server Configuration
- Create System Management Container and Delegate of Permission
- Extend Active Directory Schema for SCCM 1902
- Configure Windows Firewall
- Step 2. Install Web Server (IIS) Role and other Features
- Step 3. Installing and Configuring SQL Server 2017
- SQL Server 2017 Installation
- MS SQL Server Management Studio Installation
- Configure SQL Server Memory Allocation
- Step 4. Windows ADK Installation
- Installing Windows ADK for Windows 10
- Installing Windows PE add-on
- Step 5. Install Windows Server Update Services
- Step 6. Configuration Manager 1902 Installation
- Step 7. Configuration Manager 1906 Upgrade Installation
- Step 8. Optional: MDT 8456 Installation and ConfigMgr Integration
Step 1. Primary Site Server Installation Prerequisites
Virtual Environment
For the virtual environment I usually use Hyper-V in Windows 10/Windows Server 2016/2019 or VMWare Workstation.

- A host computer with enough disk space (1TB to 2TB SSD recommended) and RAM (32GB or higher)
- Virtual Machines:
- DC01 = Domain Controller (I have a server core setup)
- C:\ | Windows | 80 GB
- 2GB RAM
- CM01 = Primary Site Server (Domain joined)
- Recommend Partition setup:
- C:\ | Windows | 100 GB
- D:\ | SCCM / SQL /Logs | 200 GB
- 16 GB RAM or higher is recommended (70% to be allocated for the database)
- Recommend Partition setup:
- DC01 = Domain Controller (I have a server core setup)
Installation Media
What you need:
- Windows Server 2019
- SCCM 1902
- SQL Server 2017
- MS SQL Management Studio
- Windows ADK 1903 and Windows PE add-on
Download the iso files from your Visual Studio Subscription or Microsoft Evaluation Center
AD Accounts
For this installation I have created accounts
- SCCMAdmin – account to be used for administering ConfigMgr
- SQLSvrAgent – account to be used as the SQL Server Account

You can go ahead and create the rest of the required SCCM Accounts
- SCCM Network Access Account
- SCCM Client Push Install Account
- SCCM Domain Join Account (for OSD)
- SCCM Admins Group
- SCCM SQL Reporting Account (If you’re uninstalling Reporting Services)
Server Configuration
Add LAB\SCCMAdmin and LAB\CM01 to the local Administrators group for CM01.

Create System Management Container and Delegate of Permission
Open ADSI Edit to create the System Management container

In the left pane, browse the Default naming context > expand DC and look for CN=System > make a right-click > in the context menu select New > Object…

In the Create Object window, scroll and select container and click Next.

In the Value: type System Management (it’s important to take note of the spelling, capitalization and the space between the two words).

click Finish to close the window.
Launch Active Directory Users and Computers and on the View tab, click on Advance Features

Browse for System > System Management > Right-click and select Delegate Control.

In the Delegation of Control Wizard click Next.

Add the Primary Site Server, CM01 once the server is added, click Next.

In the Task to Delegate, select Create a custom task to delegate click Next.

In the Active Directory Object Type select This folder, existing objects in this folders, and creation of new objects in this folder and click Next.

Tick on the 3 permissions General, Property-specific and Creation/deletion of specific child objects. Under Permissions tick on Full Control and click Next.

Click Finish to close the wizard.

Back in the System Management Properties, confirm that the Primary Site Server has Full Control Permission.

Note: As my Domain Controller was installed as a Server Core, I installed the Remote Server Administrator Tool (RSAT) for ADDS in the Primary Site Server to have access to the Active Directory Services Interface (ADSI Edit) tooland Active Directory Users and Computers.
Extend Active Directory Schema for SCCM 1902
In the Primary Site Server, mount the installation file of System Center Configuration Manager 1902 and browse to its directory <Drive>:\SMSSETUP\BIN\X64\ you’ll find the extadsch.exe file.

You can either double click on it or run it from your command prompt

When you run the Extadsh.exe its actually running ConfirMgr_ad_schema.ldf, this LDF file contains the instructions for what needs to be changed in Active Directory to support the schema extensions.

You can examine its content by opening ConfirMgr_ad_schema.ldf in Notepad.

If you’re curious go and browse through the SMS Schema Attributes. This will give you better understanding on how Active Directory schema extensions work for Configuration Manager.

From the LDF file:
# ———————————————————————-
# This section adds a new attribute for SMS Capabilities information. This is a
# new attribute for SMS V4.
#
# This attribute updates the MS-SMS-Management-Point class.
# ———————————————————————-
dn: CN=mS-SMS-Capabilities,CN=Schema,CN=Configuration,DC=x ← this is the path of where the change is going to happen
changetype: add ← it’s going to add something
objectClass: top
objectClass: attributeSchema ← theres an obect class that attributes schema
cn: mS-SMS-Capabilities ←in this folder location
attributeID: 1.2.840.113556.1.6.29.2.1.14 ← here is the ID
attributeSyntax: 2.5.5.4 ←Syntax value
#schemaIDGUID:: y1C8EEwlBkWgB+T2V+XESA== ← here its showing the GUID
isSingleValued: TRUE
oMSyntax: 20
searchFlags: 0
isMemberOfPartialAttributeSet: TRUE
dn:
changetype: modify
replace: schemaupdatenow ← this portion will update the schema
schemaupdatenow: 1
For more information about Extending the Schema in Configuration Manager go to this link
In the root directory for your Primary Site Server, you’ll see a small text file ExtADSch.txt and when you open it, you’ll find the line: Successfully extended the Active Directory schema.

Configure Windows Firewall
To open TCP port 1433 and 4022 for SQL replication you need to launch the Windows Defender Firewall and Advance Security to do that, press Windows logo key, type wf.msc and click on it

In the Windows Defender Firewall and Advance Security right-click Inbound Rules, and then click New Rule.

In the Rule Type dialog box, select Port and then click Next.

In the Protocol and Ports dialog box, select TCP. Select Specific local ports, and then type port numbers 1433 for SQL Server default instance and 4022 for Inter-site communications use the SQL Server Service Broker. Click Next.

In the Action dialog box, select Allow the connection, and then click Next.

In the Profile dialog box, select Domain and then click Next.

In the Name dialog box, type a profile name,like SQL ports for ConfigMgr and then click Finish.

Step 2. Install Web Server (IIS) Role and other Features
In the Primary Site Server we will need to install the follow Roles and Features from the Server Manager:
In the Server Roles, select Web Server (IIS)
When prompted to “Add features that are required for Web Server (IIS)?” click the Add Features button.and click Next.

In Features, select .NET Framework 3.5 Feature and Background Intelligent Transfer Service (BITS)

Note: BITS – is the technology that allows us to throttle all the network communication that occurs between servers to client where it utilizes idle bandwidth to transfer data.

Still in the Features page, scroll down and select Remote Differential Compression (RDC) and click Next.
Note: RDC – is a client–server synchronization algorithm which BITS leans on to ensure that the files goes in the most efficient way possible.
In the Web Server Role (IIS) > Role Services select the following:
Web Server (IIS)
- Web Server
- Common HTTP Features: Default Document, Directory Browsing, HTTP Errors Static Content, HTTP Redirection
- Health and Diagnostics: HTTP logging, Logging tools, Request Monitor Tracing, Tracing
- Performance: Static Content Compression
- Security: Windows Authentication
- Application Development: .NET Extensibility 3.5, .NET Extensibility 4.7, ASP.NET 3.5, ASP.NET 4.7, ISAPI Extensions, ISAPI Filters
- Management Tools
- IIS Management Console
- IIS 6 Management Compatibility: IIS 6 Metabase Compatibility, IIS 6 WMI Compatibility
- IIS Management Scripts and Tools

In the Add Roles and Feature Wizard > Confirm installation selection page, review the Roles and Features selected:
- NET Framework 3.5 Features
- .NET Framework 4.7 Features
- Background Intelligent Transfer (BITS)
- Remote Differential Compression
- Web Server (IIS)
- Web Server
- Common HTTP Features: Default Document, Directory Browsing, HTTP Errors Static Content, HTTP Redirection
- Health and Diagnostics: HTTP logging, Logging tools, Request Monitor Tracing, Tracing
- Performance: Static Content Compression
- Security: Windows Authentication
- Application Development: .NET Extensibility 3.5, .NET Extensibility 4.7, ASP.NET 3.5, ASP.NET 4.7, ISAPI Extensions, ISAPI Filters
- Management Tools
- IIS Management Console
- IIS 6 Management Compatibility: IIS 6 Metabase Compatibility, IIS 6 WMI Compatibility
- IIS Management Scripts and Tools
- Web Server
Click the Install button to complete the installation of the Web Server Roles and Features.

Verify that the installation is successful from this point you can now click the Close button to proceed to the next step.

Step 3. Installing and Configuring SQL Server 2017
SQL Server 2017 Installation
In this section we will install and configure the Primary Site’s database server and it’s components. Go a head an mount the SQL Server 2017 installer and run the setup.exe.
In the SQL Server Installation Center > Installation, click on the New Server stand-alone installation or add features to an existing installation.

In the Product Key page, choose for the Evaluation or enter a product key then click Next to continue.

Agree to the License Terms then click Next.

In the Microsoft Update we’ll skip the check updates for now, click Next.

In the Install Rules, make sure that everything pass else rectify by clicking the Status links, as for Windows Firewall we’ll ignore the Warning as the required ports for SQL replication was previously configured. We will now and proceed to the Feature Selection page.

In the Feature Selection, tick the Database Engine Services then click Next.

In the Instance Configuration, leave the default instance ID, MSSQLSERVER click Next to continue.

In the Server Configuration, Service Accounts tab, make sure to configure ALL SQL services to run under a domain user account (e.g., LAB\SQLSvrAgent) instead of the local system or network services.
Note: Best practice in Production, the SQL Server Agent and SQL Server Database Engineer should each have a domain accounts. For their account’s passwords should be configured not to expire and cannot be changed (so make sure these service accounts are restricted not have an interactive logon rights as well).

…Moving on, in the same window click the Collation tab.

In the Database Engine Configuration, click Add Current User or add another user/SCCM Admin groups and click Next.

SQL Server 2017 is ready to install, click the Install button.

Note: Notice the Configure file path, you can go to the directory and explore the ConfigurationFile.ini if you’re interested to install SQL Server using the configuration file.

Confirm that SQL Server 2017 is successfully installed, click the Close button to complete the installation.

MS SQL Server Management Studio Installation
Beginning SQL Server 2016 the release of SQL Server Management Studio (SSMS) was a stand-alone install outside of the SQL Server release. That is why we need to do a separate install of the SSMS.
Download and install SSMS

After the installation is complete you are required to restart the Primary Server.

Configure SQL Server Memory Allocation
Launch the SQL Server Management Studio, Right-click on the CM01 (SQL Server) and select Properties.

In the Server memory options I have set the Minimum and Maximum memory size to 12288 if it’s not set to at least 8192 you’ll have a little warning during the installation of Config Manager. Setting the Memory b/w 2048 to 4096 will still work.
By default the Minimum server memory (in MB) is set to 0 and the Maximum server memory (in MB) is set to 2147483647.

Click OK to close the Server Properties window and complete the SQL configuration.
Step 4. Windows ADK Installation
In any Configuration Manager deployment I strongly recommend to install the lasted Windows 10 ADK in preparation for Windows 10 Operating Systems Deployment with Configuration Manager, the Windows ADK is a required external dependency.
Note: As of this blog post, the latest version of ADK is 1903.
From docs.microsoft.com: The following table lists the versions of the Windows 10 ADK that you can use with different versions of Configuration Manager.

In this section we will install Windows ADK 1903 and Windows PE add-on for ADK
Installing Windows ADK for Windows 10
Download and run the adksetup.exe

The installation is very straight forward, in the Specify Location leave the default and click Next.

In the Select the features you want to install, as for this installation we will only select the following:
- Deployment Tools
- Imaging and Configuration Designer – this can be used later on for provisioning packages.
- Configuration Designer
- User State Migration Tool
After selecting the features to to install, click Install button.

You’ll get the Welcome screen to Windows 10 ADK once the installation is completed. Click Close to finish the installation.

Installing Windows PE add-on
Starting Windows 10 1809, Windows Preinstallation Environment (PE) has been released separately from the Windows ADK.
To add Windows PE to the ADK installation, we need to download the Windows PE add-on and run the included installer after installing the ADK.
Similarly to Windows ADK the WinPE Add-on is a straight forward install. Download and run the adkwinpesetup.exe
In the Specify Location, click Next.

There’s nothing else to select in the Select the features you want to install other than Windows PE. Click the Install button to complete the installation.

Step 5. Install Windows Server Update Services
For us to deploy software updates using Configuration Manager we need to install the WSUS Server Role. WSUS will be later on be integrated with the Software Update Point (SUP) Site System Role.
In the Server Manager select Windows Server Update Services and click Next.

In the Role Services, tick WSUS Services and SQL Server Connectivity, in this example we will make use of the SQL Server database that we just installed in Step 3 instead of Windows Internal Database (WID).

In the Content location selection define a local or network share to store the updates. In this example I have pointed it to C:\WSUS.

For the Database Instance Selection we’ll use the Primary Site’s database CM01.sg,lab.demo.

Click Install to proceed installing the WSUS role.

In the Installation progress once you see the installation succeeded go and click on the Launch Post-Install task then click on the Close button.

You can see the status of the Post-deployment Configuration from the Server Manager. Verify that the Configuration is completed.

We can also verify from SSMS that SUSDB has been created under the Databases.

Step 6. Configuration Manager 1902 Installation
Finally after all the preparation we are now ready to the install SCCM 1902. Go and mount the SCCM 1902 ISO and run the Setup.exe.
Download Required Prerequisite Files
Optional: We can download the required prerequisite files prior to the installation of Configuration Manager. This is usually done if your server is in an isolated network.
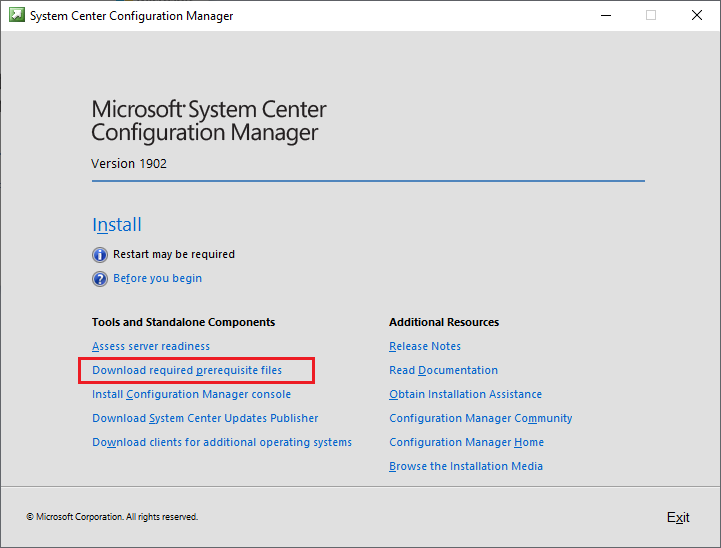
After click the Download required prerequisite files the Configuration Manager Setup Downloader will pop-up, select a directory where to download the file and click Download.


The downloader tool will close automatically after the download is complete, for this download I got 56 files in my Prereqs folder.

Install SCCM v1902
In the SCCM installation screen click Install

Click Next.

Select Install a Configuration Manager primary and tick the Use typical installation options for stand-alone primary site box.
A pop-up box will appear, read through and click on the Yes button.

In the Product Key. select an option and click on Next.

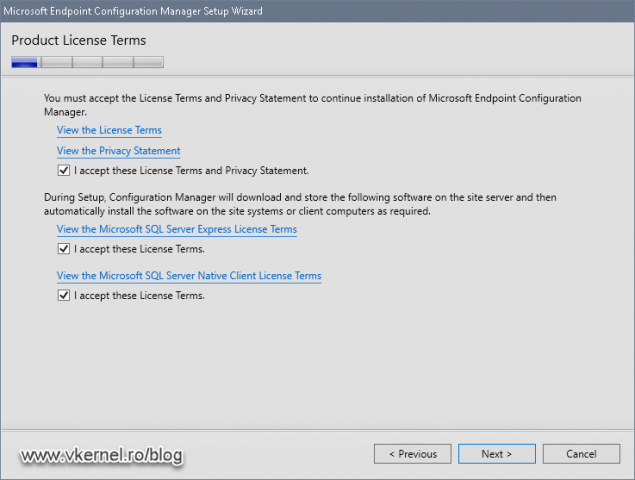
In the Product License Terms, tick all the 3 boxes and click Next.

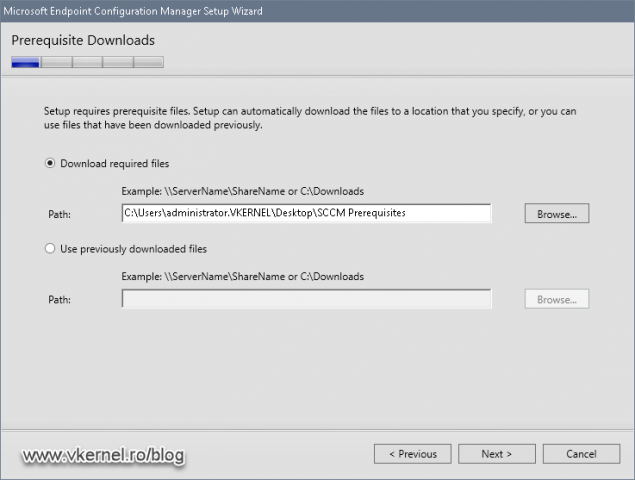
For the Prerequisite Downloads we’ll be using the Use previously downloaded file option and point it the folder where we downloaded the files.

Let wizard finish verifying the files

In the Site and Installation Settings , enter a 3 character site code and site name that normally pertains to the site location and click Next.

In the Diagnostic and Usage Data click Next.

In the Service Connection Point Setup in this example, we will select the Yes, let’s go connected (recommended) as my server has internet connectivity, if you’re server is in an isolated network select the Skip this for now option.

Click the Next button for the final Prerequisite Check.

In the Prerequisite Check page, make sure there’s no problem found and if there is fix it first before clicking the Begin Install button.

After clicking the Begin Install you’ll be brought to the Install page to see the over all progress. You may want to grab a coffee or a beer at this point (you deserve it) and come back after an hour.

To see the detailed progress you can click the View log button, make sure to set and use CM Trace.exe as the default log viewer.
Note: CMTrance can be found in the SCCM installer’s directory e.g., D:\SMSSETUP\TOOLS

After an hour later, your Configuration Manager 1902 installation core setup is completed – Congratulations!

There’s a Post-Setup-Configuration Tasks link in the wizard which will lead you this Post-update checklist link: http://go.microsoft.com/fwlink/p/?LinkId=626562 go ahead an open the link

for version 1902 here’s the post-update check list: https://docs.microsoft.com/en-us/sccm/core/servers/manage/checklist-for-installing-update-1902#post-update-checklist
Now go ahead launch the SCCM Console and open the About window

and verify that the SCCM version is on 1902.

Don’t configure the Configuration Manager server yet as we will update it first to version 1906 in the next step.
Step 7. Configuration Manager 1906 Upgrade Installation
Before we begin to upgrade our SCCM 1902 to 1906 you may want go through on the what’s new in version 1906 of SCCM Current branch https://docs.microsoft.com/en-us/sccm/core/plan-design/changes/whats-new-in-version-1906
Support for Configuration Manager current branch versions
Also its good to get to know about the Servicing Support/end of support dates for Configuration Manager versions from this link: https://docs.microsoft.com/en-ca/sccm/core/servers/manage/current-branch-versions-supported

SCCM 1906 Prerequisite Check
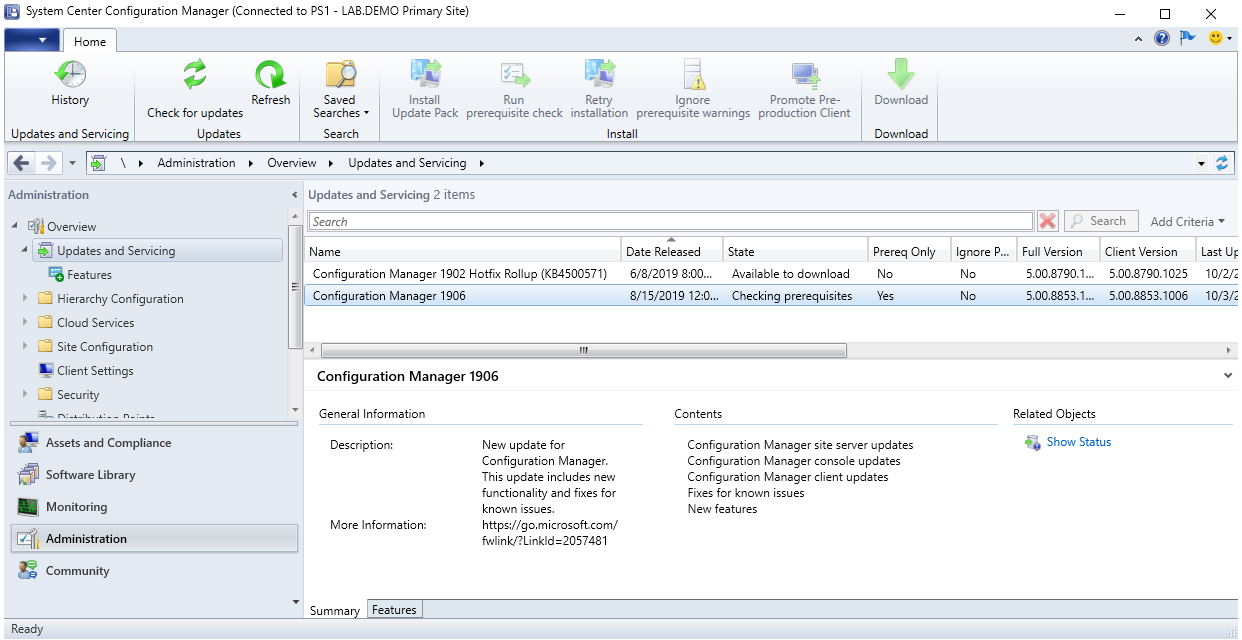
Launch the SCCM console and go to Administration > Updates and Servicing and verify that the Configuration Manager 1906 is in Ready to install State. (This will appear if your SCCM is connected to the internet for sometime)

Highlight Configuration Manager 1906 and Run prerequisite check

You will see that the Status is now Checking prerequisites.
We can see the progress by opening the C:\ConfigMgrPrereq.log with CMTrace.

Alternatively we can also view the progress from the Monitoring workspace > Updates and Servicing Status right-click on the Configuration Manager 1906 and select Show Status.

The Update Pack Installation Status window will pop-up. At anytime you can click the OK button to close the window.

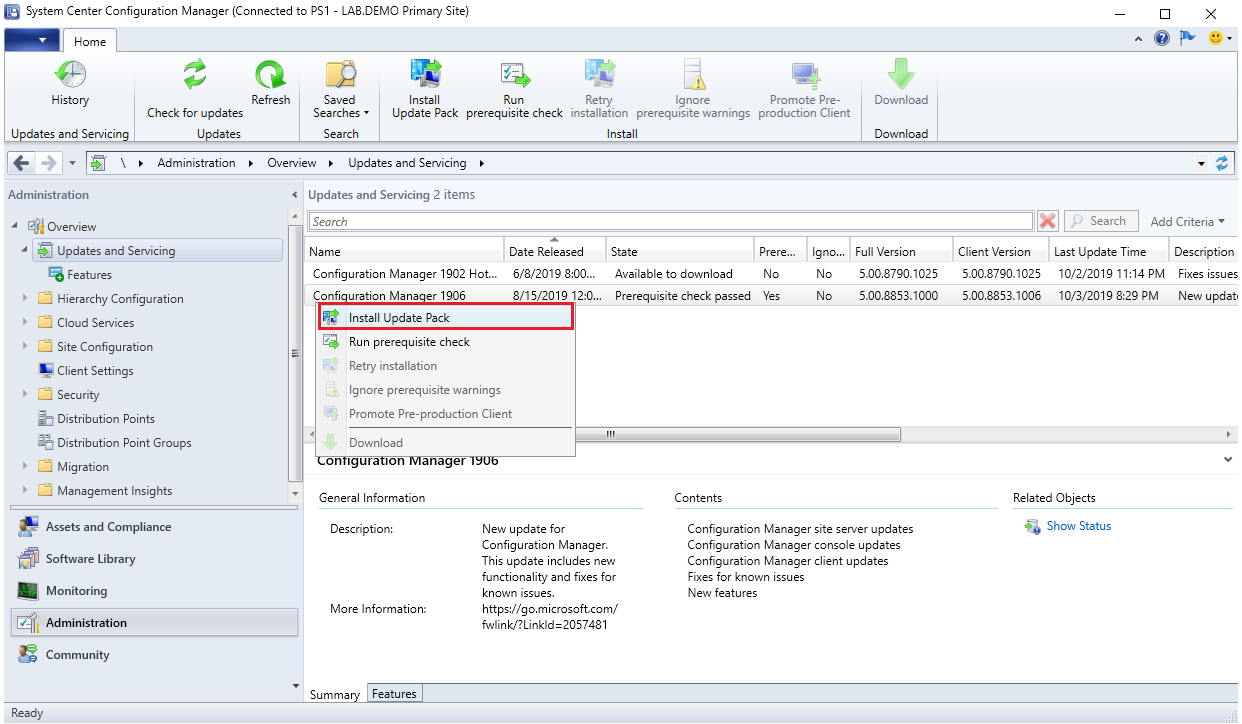
Back in the SCCM Console wait until the Prerequisite check passed

Select and right-click the Configuration Manager 1906 update and select Install Update Pack
SCCM 1906 Update
The Configuration Manager Updates Wizard will launch and in the General click on Next.

In the Features, select the feature you need to install, in my case the check boxes are pre-selected already I just needed to click Next.
Note: if you don’t want to select any of the features you can always enable it later, from the SCCM console Administration workspace > Updates and Servicing > Features.

In the Client Update Options, I will select Upgrade without validating as I don’t have any active client yet.

In the License Terms tick and accept the license terms box and click Next and in the Summary click on Next.

Click Close and go back to the SCCM Console to monitor the progress of the update.

In the Monitoring workspace > Updates and Servicing Status you can see that the status is Installing, go and right-click on the Configuration Manager 1906 and select Show Status to further view the detailed status.

It will take something for the installation to complete. Once completed, click the OK button to close the Status window.

In the SCCM Console, you will get a notification that “A new version of the console is available…. ” go and click on the Install the new console version link.

The SCCM console will close and go through the installation process.


You can view the progress from the log files C:\ConfigMgrAdminUISetup.log and C:\ConfigMgrAdminUISetupVerbose.log and after the installation is completed the new SCCM Console will automatically launch.

In the console, go and verify that the SCCM version is now in 1906.

We can refer the Configuration Manager versions from this link: https://docs.microsoft.com/en-us/sccm/core/servers/manage/updates#supported-versions

We can further confirm the Primary Site version from its Properties you can see that the Version and Build number refers back from the table above.

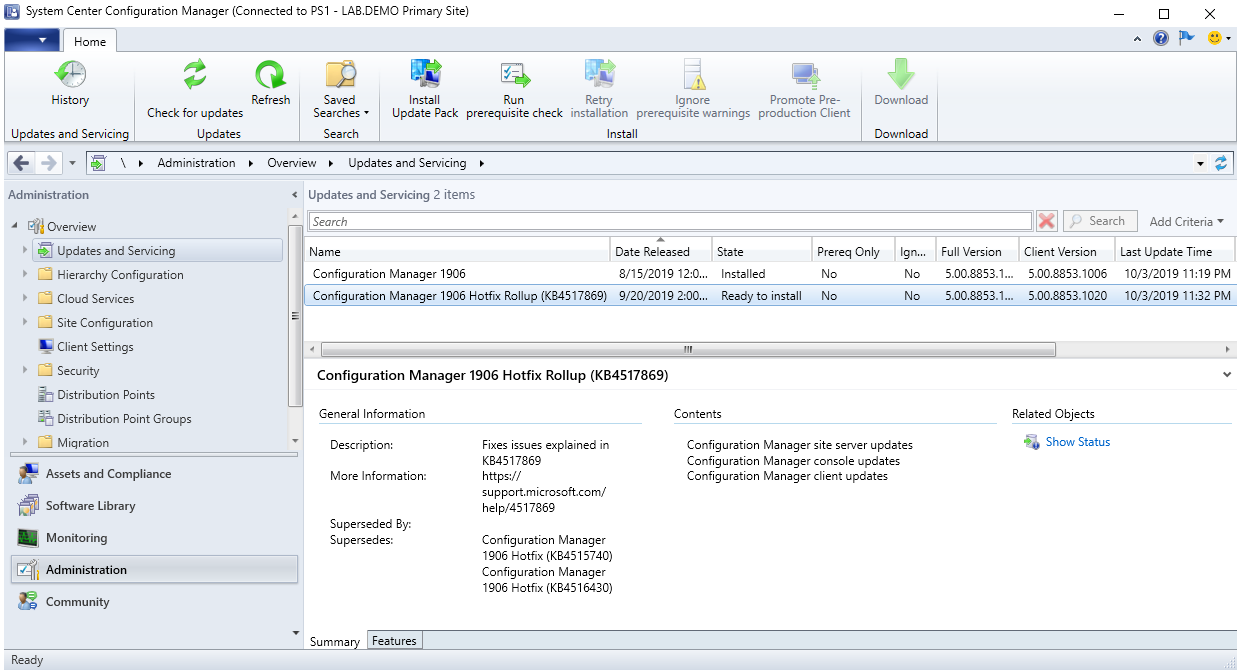
Later on you may see a Configuration Manager 1906 Hotfix Rollup, you can go a head and install it as at this point our SCCM Lab is still empty, the procedure of install the hotfix is the same as the SCCM 1906 Update do Run prerequisite check and Install Update Pack.
That concludes our SCCM 1906 installation process. Congratulation you made it this far!
Step 8. Optional: MDT 8456 Installation and ConfigMgr Integration
This section will show how to integrate the Microsoft Deployment Toolkit with Configuration Manager 1906 and understand the benefits of integrating MDT with SCCM.
I strongly recommend that you always include MDT to your SCCM infrastructure as this will add many enhancements (280 to be exact) in the Windows Operating System Deployment with Configuration Manager. enhancements that MDT adds to Configuration Manager.
Note: as of writing the latest version used is MDT 8456
Install MDT
After you download MDT copy it over to your Primary Site Server and run the MicrosoftDeploymentToolkit_x64.msi file.
In the MDT Setup Wizard click Next

Accept the License Agreement and click on Next

In the Custom Setup leave the defaults (as we will not be using MDT as the deployment tool) and click Next.

In the CEIP click Next

In the next page, click Install.

Once the MDT setup is complete click the Finish button to close the window.

Integrate MDT 8456 with SCCM 1906
To integrate MDT with SCCM we need to run the Configure ConfigMgr Integration as administrator from the Start Menu > Microsoft Deployment Toolkit

In the Options, the Install the MDT extensions for Configuration Manager is selected by default. The check boxes have been ticked, the Site server name and Site code boxes have been automatically populated with the SCCM server details. Click Next to proceed.

Verify that the integration is successful. Click Finish to close the window.

In the SCCM 1906 Console, go to the Software Library workplace > Overview > Operating Systems > Task Sequences
You will that there will a Create MDT Task Sequence available in ribbon.

Summary
In this post we have completed the following
- Build a SCCM 1902 lab environment
- Upgrade SCCM 1902 to 1906
- Integrate MDT with SCCM
Now you are ready to perform Software Deployment Services and Operating System Deployment with the lab that we’ve built. Thanks for taking time to read this post.