Версия для оценки Windows Server 2016 Evaluation Edition доступна для скачивания с официального сайта Microsoft. Версия имеет полный функционал и нормально работает в течении триального периода (180 дней).Беда заключается в том, что по истечении триального периода сервер пишет в логи:
Процесс C:\Windows\system32\wlms\wlms.exe (<имя>) инициировал действие «Завершить работу» для компьютера <имя> от имени пользователя NT AUTHORITY\СИСТЕМА по причине: Другое (Запланированное)
Код причины: 0x80000000
Тип выключения: Завершить работу
Комментарий: Истек срок действия лицензии для этой установки Windows. Компьютер завершает работу.
и выключается.
Такая ситуация имеет два варианта решения: Вариант 1 (не правильный) — сбросить триальный период. Вариант 2 (правильный) — обновить до нормальной версии и активировать через KMS-сервер или с помощью MAK/Retail ключа.
Вариант 1. Сброс триала.
Запускаем Powershell и вводим команду:
slmgr -rearm
Дожидаемся сообщения «Command completed successfully» и перезагружаем сервер.
Вариант 2. Upgrade до Standard/Datacenter.
Проверяем что стоит Evaluation Edition.
DISM /online /Get-CurrentEdition
Должно быть: Current Edition ServerStandardEval.
Смотрим список доступных версий
DISM /online /Get-TargetEditions
Выбираем нужную версию и выполняем апгдейд с помощью общедоступного KMS-ключа.
Для версии Standard:
dism /online /set-edition:ServerStandard /productkey:WC2BQ-8NRM3-FDDYY-2BFGV-KHKQY /accepteula
Для версии Datacenter:
DISM /online /Set-Edition:ServerDatacenter /ProductKey:CB7KF-BWN84-R7R2Y-793K2-8XDDG /AcceptEula
Перезагружаем сервер.
Далее можно активировать операционку через KMS-сервер либо MAK/Retail ключом.
Оглавление
- Сброс/продление триала Windows Server 2016 Evaluation
- Апгрейд Windows Server 2016 Evaluation до Standard/Datacenter
Введение
Windows Server 2016 Evaluation Edition – это бесплатная пробная (триальная версия Windows) для ознакомительных целей и проведения различных тестов. Evaluation свободно можно скачать с сайта Microsoft и она даёт ознакомительный период в 180 дней.
Что делать, если вы уже всё настроили и ходите протестированную и настроенную машину пустить в продакшен? Нам нужно изменить редакцию и сделать апгрейд с ознакомительной версии до рабочей.
В Свойствах системы сейчас отображается редакция Windows Server 2016 Evaluation Edition.
Теперь проверим какие выпуски нам доступны для апгрейда с триала следующей командой (WIN + R cmd):
DISM /online /Get-CurrentEdition
В ответ должны появится следующие варианты:
Конечный выпуск : ServerStandard
Конечный выпуск : ServerDatacenter
И так. Перед нами есть два пути. Продлить триальную версию ещё на 180 дней или апнуть систему до Standard/Datacenter
Сброс/продление триала Windows Server 2016 Evaluation
Запускаем PowerShell и выполняем команду:
slmgr -rearm
Должны получить подтверждение о сбросе триала: Command completed successfully. Для того, чтобы изменения вступили в силу необходимо перезагрузить операционную системму.
Таким образом можно сбросить триал только до 6 раз. Но это уже 3 года. Однако с такой лицензией мы не имеем право использовать её в коммерчиских целях, а можем только гонять её в тестах. Ну да, ну да 😌…
Апгрейд Windows Server 2016 Evaluation до Standard/Datacenter
Версию мы узнали ранее, теперь дело за малым. Запускаем PowerShell и выполняем команду в зависимости от необходимой версии:
Для Windows Server Standard:
DSIM /online /set-edition:ServerStandard /productkey:WC2BQ-8NRM3-FDDYY-2BFGV-KHKQY /accepteula
Для Windows Server Datacenter:
DISM /online /Set-Edition:ServerDatacenter /ProductKey:CB7KF-BWN84-R7R2Y-793K2-8XDDG /AcceptEula
Перезапускаем систему. И вводим лицензионный ключ от Windows Server 🤣. Далее каK ваM Sамим систему активировать уже знаете :).
In this blog post I will show you how to extend your trial period to three years. The evaluation version of Windows Server 2016 / 2022 is valid for 180 days and you can convert your trial version to retail.
After installing, you can try it out for 180 days. After 180 days you and your system will run into troubles for sure. But the good news is: You can extend the period to another 180 days up to 3 years.
Extending the Trial Period
First, take a look at your desktop. You should see the countdown in the corner down right.

Or start PowerShell and run slmgr.
slmgr -dlvPay attention to the Timebased activation expiration and the Remaining Windows rearm count. You can rearm the period 6 times. (180 days * 6 = 3 years).
When the period comes to an end, run slmgr -rearm to extend it by another 180 days.
slmgr -rearm
Next restart your computer.
Restart-ComputerOnce restarted, open PowerShell and check your settings.
slmgr -dli
Important Note
The evaluation version may not be used for commercial purposes. Have fun playing with the Windows Server 2016 Evaluation Version!
By the way: You can do the same with Windows 10711. But the Windows 10/11 Evaluation Version can be used only for 180 days in total.


![]()
Published by Patrick Gruenauer
Microsoft MVP on PowerShell [2018-2023], IT-Trainer, IT-Consultant, MCSE: Cloud Platform and Infrastructure, Cisco Certified Academy Instructor.
View all posts by Patrick Gruenauer
If you have a home lab environment or another lab where you continually test various solutions, licensing, and trial expiration is a challenge that you constantly tend to run into. It is just part of the fun of lab environments. While most trials are fairly “hard and fast” and don’t allow you to reset the trial expiration, if you work with Microsoft Windows Server and Remote Desktop Services (RDS), there is a “hack” that allows you to effectively reset the expiration of Remote Desktop Services grace period where you can essentially rewind the clock on your RDS licensing if you are making use of this role inside your lab environment. I am using Windows Server 2019 for my Windows workloads in my lab environment. In this post, I will show how to reset 120 day RDS licensing Grace period on 2016 and 2019 Windows Server. Let’s see.
Remote Desktop Services RDS Licensing
When you install Windows Server 2016 or 2019 as with previous Windows versions, you get the normal ability to have the two sessions you generally have available for administering.
However, when you install the true Remote Desktop Services role, you can have multiple sessions on your server. This is similar to the legacy Terminal Server role in previous versions of windows.
Production vs testing purposes
Typically in a production environment, you will have remote desktop license servers that house the client access licenses and then you will have multiple session host server instances configured for hosting user sessions.

When you install the role, by default, you have a 120-day grace period that Microsoft gives you to license the server for use as an RDS installation properly. This is accomplished by configuring remote desktop license servers with client access licenses. If you are using a server in a lab environment, most likely, you are not going to license this type of server outside of production in a testing environment, using a license server with a remote desktop session host.
RDS grace period error message
Once the 120 day grace period has expired, you will see the following error when you attempt to RDP to the server, referring to the licensing server needed for the proper license past the grace period:
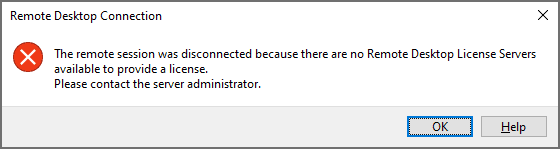
You can either redeploy your Windows Server which will allow you to spin up a new 120 day grace period, or you can actually reset the grace period. If you are like me, the latter is certainly the path of least resistance and work involved. Let’s take a look at how to reset the 120 day RDS grace period.
You can take a closer look at the official licensing documentation for Remote Desktop Services here:
- https://docs.microsoft.com/en-us/windows-server/remote/remote-desktop-services/rds-client-access-license
For resetting the 120 day grace period for the RDS role, the registry editor is your friend and makes this process easy. Before we begin, there are a couple of disclaimers to make here. Editing the registry can result in totally destroying a Windows system, so proceed with any low-level registry edits with caution. Creating a quick snapshot of the Windows virtual machine before you begin is always a good practice if you are working with a virtual machine.
Overview of resetting the grace period
Additionally, for production systems, resetting the 120 day grace period should only be done for systems that are not in production, as you should have proper licensing installed for production use.
To reset the grace period, there are actually just 3 steps involved:
- Change permissions on the RCM > GracePeriod key
- Delete the “Timebomb” registry entry
- Reboot the server
Now that we have level-set, once you have your snapshot or other backup created, you need to navigate to the following key location on your RDS server:
Computer\\HKEY_LOCAL_MACHINE\\SYSTEM\CurrentControlSet\\Control\\Terminal Server\\RCM\\GracePeriodChange Permissions on the RDS GracePeriod key and delete the key
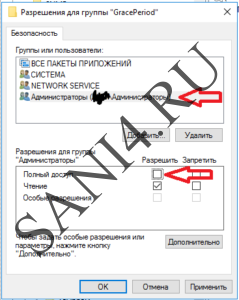
Open a command prompt, and type regedit. After you have navigated to the key documented above, right-click GracePeriod and select Permissions.
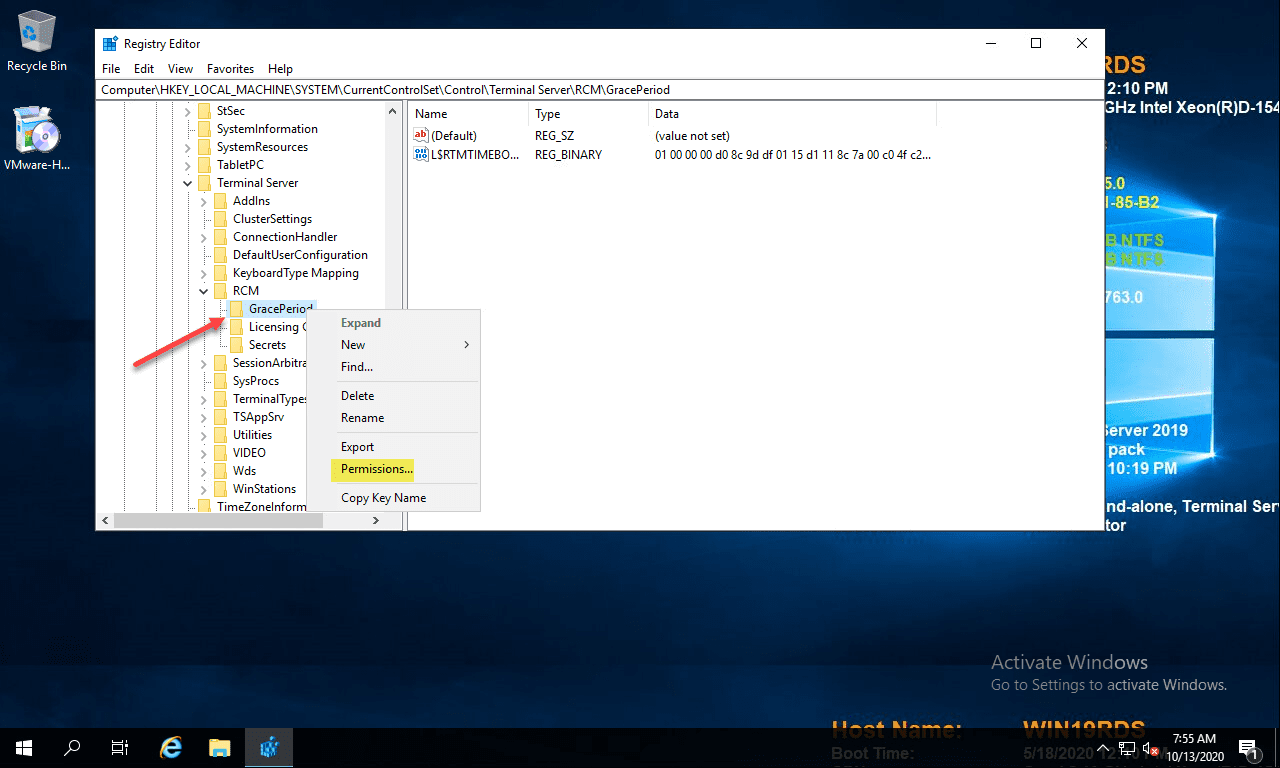
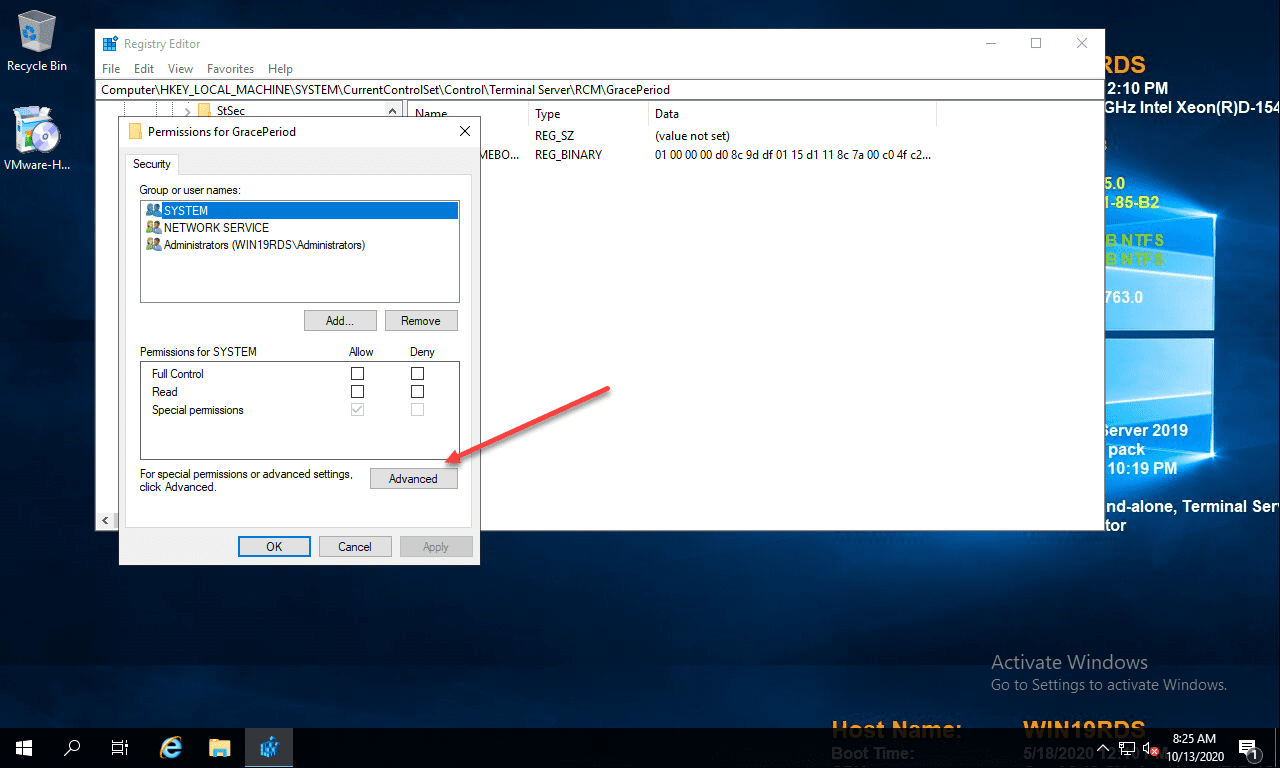
For obvious reasons, there are no default permissions on this key for even Administrators. So you have to first take ownership of the key before you can delete the timebomb value. Click the Advanced button on the permissions dialog box.
Click the Change button next to the Owner.
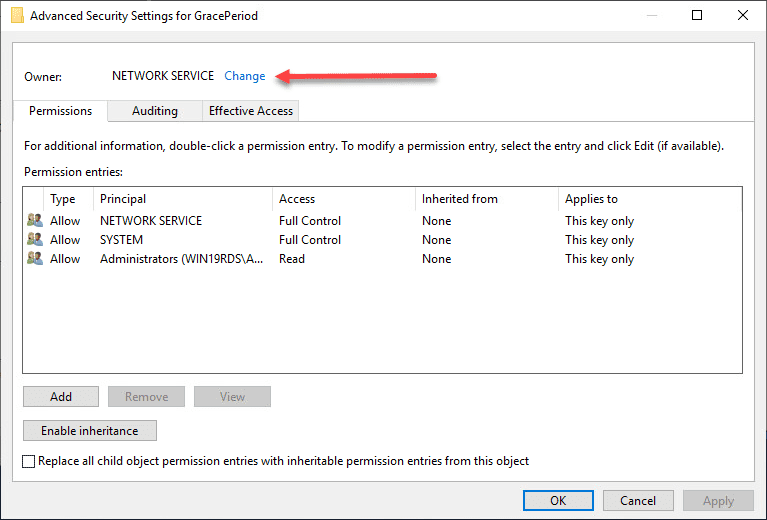
Here I have selected local administrators group as the owner of the key. However, you will want to choose whichever user/group you want to use to delete the registry key. Select the options to replace owners and replace all child object permissions.
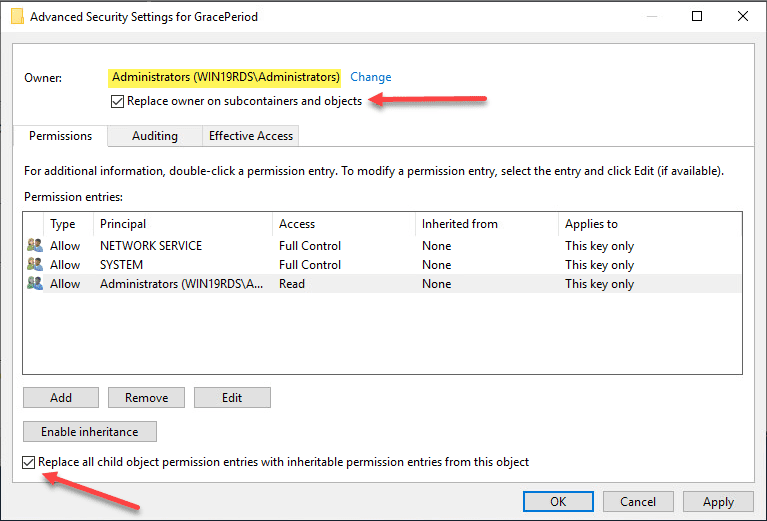
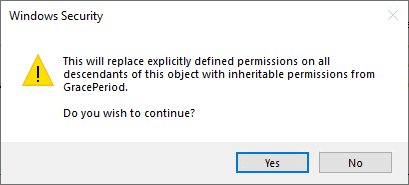
Confirm the replacement of permissions on the registry key.
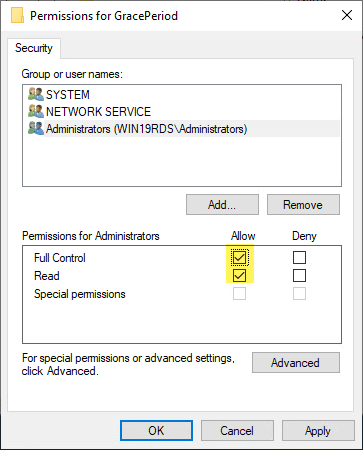
Now that we have changed ownership on the key, we can actually set permissions without getting permissions errors. Here I am granting administrators full control on the key.
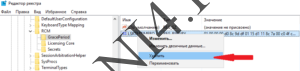
Now, with permissions set, right-click the timebomb value in the GracePeriod key and Delete.
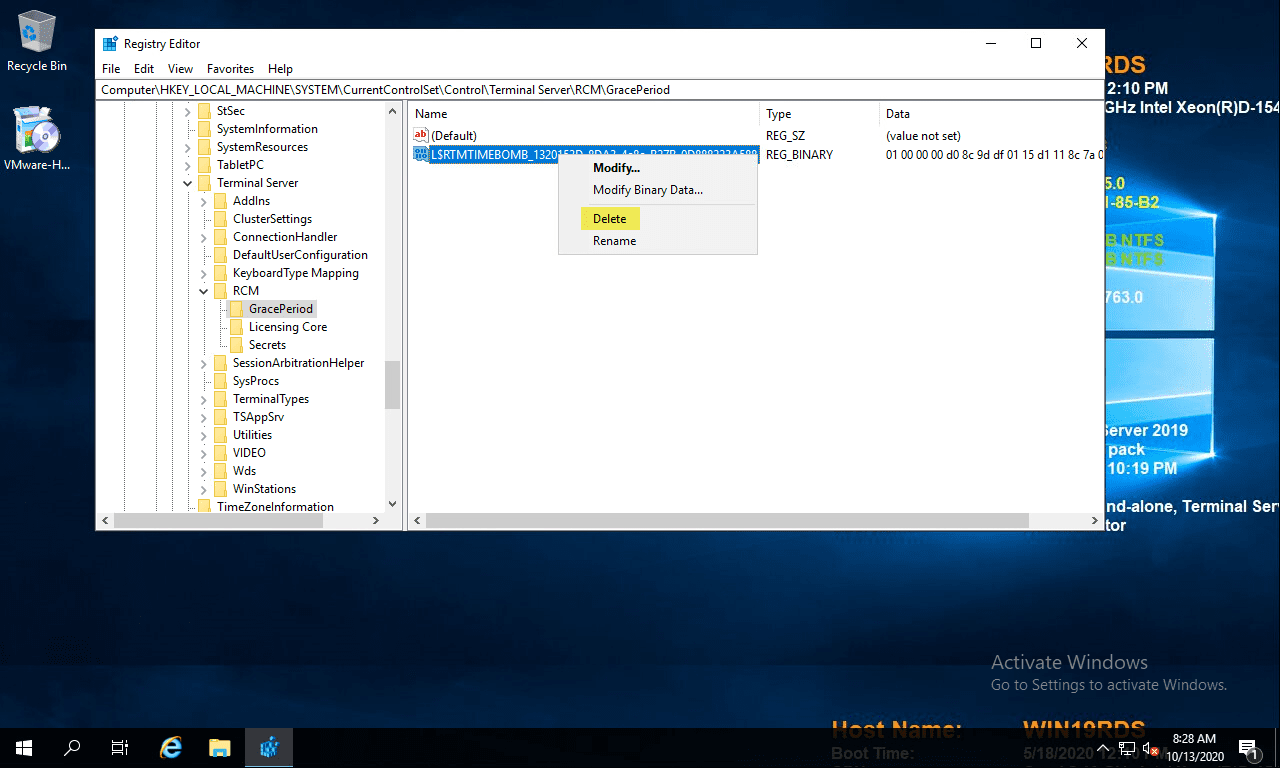
Confirm the deletion of the registry entry.

Next, the only thing left to do is reboot your server. Once the server is rebooted, you can enjoy once again having the full 120 day grace period for your RDS server in the lab environment.
Video Overview of the Process
If you want to take a look at a video of the process, you can watch the video walkthrough below.
https://www.youtube.com/watch?v=zQ_GrVAfK6Q
Wrapping up
The process to reset 120 day RDS Grace period on 2016 and 2019 Windows Servers as well as older server versions such as Windows Server 2012 and 2012 R2 is very straightforward using this process to delete the timebomb registry key.
Keep in mind this is not supported and certainly not a process for running in production. However, it is very handy for lab environments to keep from having to redeploy Windows Server virtual machines to have a fresh 120 day grace period.
После завершения настройки Терминального доступа появляется сообщение о 120 дневном льготном периоде
И вот Чтобы сбросить 120-дневный льготный период в Windows Server 2012 или Windows Server 2016 Необходимо в реестре удалить REG_BINARY. И вот как это сделать:
1. Подключитесь к вашему серверу RDS в качестве администратора и откройте regedit.

2. Перейдите в раздел
HKEY_LOCAL_MACHINE\SYSTEM\CurrentControlSet\Control\Terminal Server\RCM\GracePeriod
3. Дайте разрешение на полный доступ к данному разделу
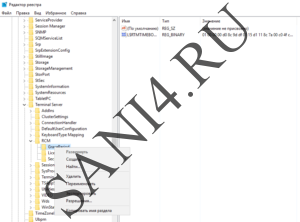
4. Удаляем REG_BINARY
5. Перезагружаем Windows Server
После перезагрузки система автоматически генерировала новый REG_BINARY и начала новый отсчет 120 дней