
![]()
Срок действия пробного периода в любой версии Windows можно продлить, сбросив лицензионное состояние компьютера. Например, срок действия пробного периода Windows Server 2019 составляет 180 дней. После истечения срока выполняем команду:
slmgr /rearm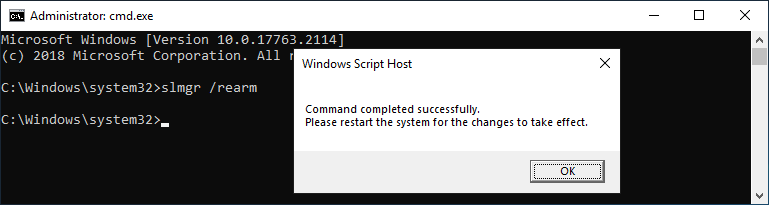
Перезагружаем компьютер.
И снова у нас есть 180 дней пробного периода.
Сделать так можно 5 раз, после этого придётся активировать Windows. А это на серверной системе — 900 дней. Оставшееся количество сбросов можно узнать командой:
slmgr /dlv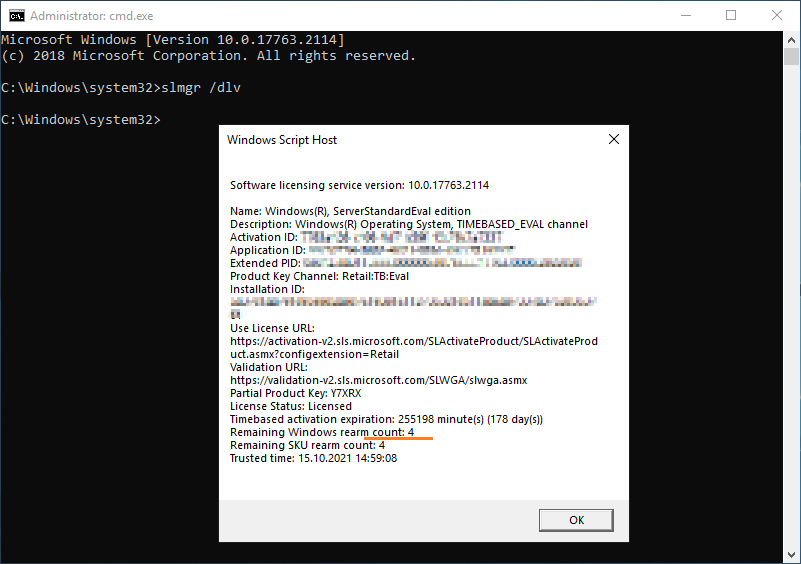
Здесь же выводится информация об оставшемся сроке пробного периода, её также можно узнать командой:
slmgr /dli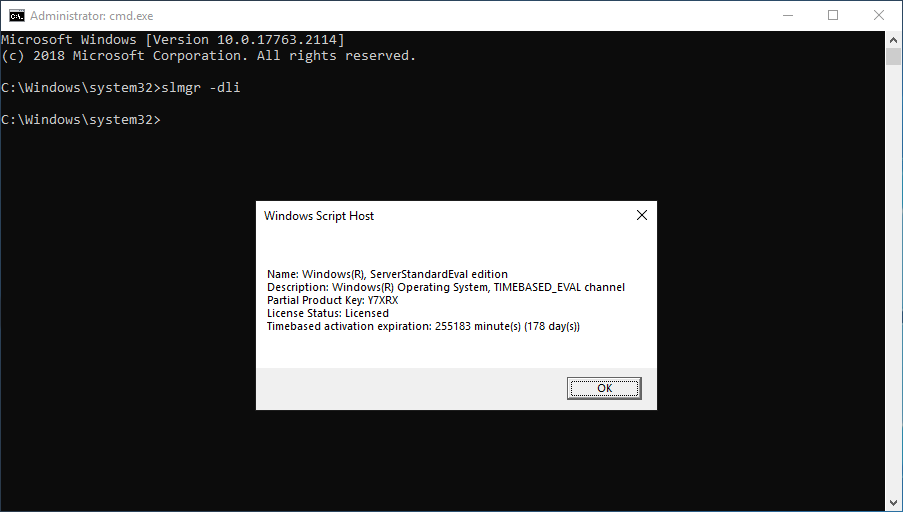
Дату истечения пробного периода покажет команда:
slmgr /xpr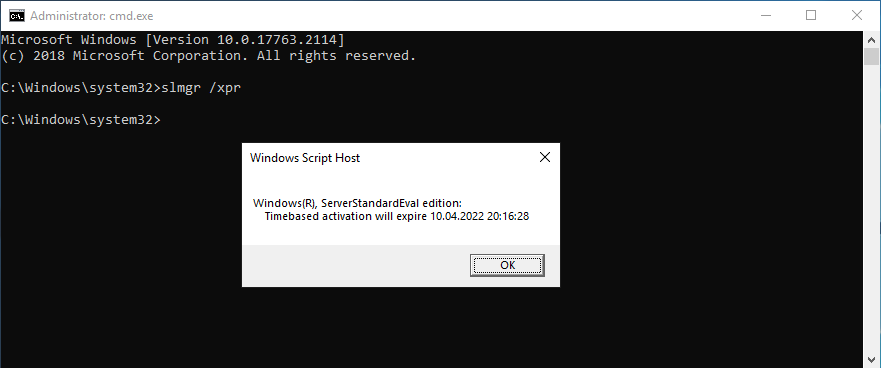
Пробный период у обычных версий Windows (7, 8, 8.1) составляет 30 дней, продлять его можно 3 раза.
В Windows 10 Enterprise и Enterprise LTSB пробный период составляет 90 дней, продлять его можно 3 раза.
Пробный период в Windows 10 Pro, Home, Education и Pro for WorkStations составляет 30 дней, продлять его можно 3 раза.
Windows Server 2019 – это популярная операционная система сервера, которую широко используют различные организации и бизнесы. Но у нее есть одно ограничение: пробный период, после окончания которого требуется активировать лицензию. Если вы не хотите покупать новую, существует несколько способов сбросить пробный период и продолжить использование Windows Server 2019 бесплатно.
В этом руководстве мы рассмотрим несколько основных методов, которые помогут вам сбросить пробный период Windows Server 2019. Однако, учтите, что использование таких способов может нарушать авторские права Microsoft и привести к негативным последствиям. Поэтому перед использованием этих методов, внимательно прочтите соответствующие положения ограничения использования программного обеспечения.
Один из самых простых способов сбросить пробный период – это переустановка Windows Server 2019. Для этого вам потребуется загрузочный носитель операционной системы и лицензионный ключ. При установке Windows Server 2019 укажите этот ключ в соответствующем поле, и операционная система будет активирована. Однако, перед переустановкой не забудьте создать резервную копию всех важных данных, чтобы избежать их потери.
Еще одним способом сбросить пробный период Windows Server 2019 является использование различных инструментов активации, доступных в сети Интернет. Однако, вам следует быть предельно осторожными и избегать сомнительных источников. Проверяйте репутацию и отзывы о выбранных инструментах и использовать их на свой страх и риск.
Содержание
- Правовая сторона сброса пробного периода Windows Server 2019
- Понятие пробного периода и его ограничения
- Законность сброса пробного периода и возможные риски
- Техническая сторона сброса пробного периода Windows Server 2019
- Методы сброса пробного периода
Правовая сторона сброса пробного периода Windows Server 2019
Сброс пробного периода Windows Server 2019 может иметь юридические последствия, и важно учитывать соответствующие правовые нормы и лицензионные соглашения.
Во-первых, необходимо отметить, что сброс пробного периода Windows Server 2019 является нарушением лицензионных условий, установленных Microsoft. Пробный период предоставляется для ознакомления с продуктом и его функциональностью, а не для бесплатного использования в качестве полноценной операционной системы.
Лицензионное соглашение Microsoft, которое вы принимаете при установке Windows Server 2019, ясно указывает на запрет на сброс пробного периода и требование приобретения соответствующей лицензии для дальнейшего использования продукта.
Сброс пробного периода может привести к несанкционированному использованию продукта и нарушению авторских прав Microsoft. Важно понимать, что компания вправе принять правовые меры в отношении пользователей, которые нарушают эти условия.
Чтобы избежать потенциальных юридических проблем, рекомендуется приобрести лицензию на полноценную версию Windows Server 2019, если вам требуются длительные сроки использования продукта или его функций.
Важно помнить, что использование программного обеспечения без соответствующей лицензии является нарушением закона и может повлечь за собой юридические последствия.
Понятие пробного периода и его ограничения
Однако, важно знать, что во время пробного периода возможны некоторые ограничения. Например:
- Ограничение по количеству пользователей или устройств, которые могут подключаться к серверу;
- Ограничение функциональности определенных служб или возможностей операционной системы;
- Отсутствие доступа к некоторым продвинутым функциям или инструментам, доступным только в платной версии;
- Отображение предупреждающих сообщений или напоминаний о пробном периоде.
Для получения полного функционального доступа и продолжения использования Windows Server 2019 после истечения пробного периода, пользователи должны приобрести лицензию на продукт.
Важно отметить, что незаконное использование пробного периода или сброс его ограничений может быть незаконным и нарушать правила использования Microsoft. Поэтому рекомендуется следовать официальным инструкциям или обратиться к специалистам для получения дополнительной информации о продукте и лицензионных возможностях.
Законность сброса пробного периода и возможные риски
Попытка сбросить пробный период несанкционированным способом может привести к возникновению серьезных юридических проблем. В некоторых странах использование нелицензионного программного обеспечения, включая сброс пробного периода, может рассматриваться как нарушение авторских прав и вести к уголовной или гражданской ответственности.
Кроме того, сброс пробного периода может привести к негативным последствиям для системы. Неофициальное изменение настроек и удаление файлов, связанных с пробным периодом, может привести к нестабильности системы и потере данных. Кроме того, при последующей активации Windows Server 2019 компания Microsoft может обнаружить несанкционированные изменения и заблокировать активацию или предпринять юридические действия.
Таким образом, рекомендуется законопослушно подходить к использованию программного обеспечения и приобретать лицензии или активировать продукты официальным способом. Подобные действия помогут избежать нежелательных юридических проблем и обеспечить надежную и безопасную работу системы.
Техническая сторона сброса пробного периода Windows Server 2019
Сброс пробного периода Windows Server 2019 связан с определенными техническими аспектами, которые необходимо учитывать при проведении данной процедуры. В первую очередь, следует располагать учетной записью с правами администратора системы.
Для начала процедуры сброса пробного периода, необходимо открыть командную строку с правами администратора. Для этого можно использовать сочетание клавиш Win + X и выбрать пункт «Командная строка (администратор)» или «Windows PowerShell (администратор)».
После открытия командной строки необходимо ввести следующую команду:
slmgr.vbs -rearm
После выполнения данной команды необходимо перезагрузить сервер, чтобы изменения вступили в силу. После перезагрузки количество оставшихся дней пробного периода будет сброшено, и вы получите дополнительные 180 дней для использования Windows Server 2019 без ограничений.
Важно отметить, что данная процедура можно повторять неограниченное количество раз, что позволяет продлить использование пробной версии Windows Server 2019 на неопределенный срок. Однако, необходимо помнить, что данная процедура не является легальным способом использования Windows Server 2019 в коммерческих целях, и рекомендуется приобретение официальной лицензии для дальнейшего использования системы.
Методы сброса пробного периода
Если вам истек пробный период Windows Server 2019 и вы хотите продолжить использование операционной системы, не приобретая лицензии, вы можете воспользоваться следующими методами сброса пробного периода:
1. Использование командной строки:
Один из самых простых и быстрых способов сбросить пробный период — использовать командную строку и ввести команду «slmgr -rearm». Эта команда сбросит счетчик пробного периода и позволит вам использовать Windows Server 2019 еще на несколько дней.
2. Использование системной утилиты Task Scheduler:
Второй метод включает использование системной утилиты Task Scheduler. Вам нужно создать новую задачу, которая будет выполнять команду «slmgr -rearm» каждый раз при запуске системы. Это автоматизирует процесс сброса пробного периода и вы сможете продолжать использование Windows Server 2019 без проблем.
3. Использование программного обеспечения:
Существуют также сторонние программы, которые позволяют сбросить пробный период Windows Server 2019. Они обычно имеют простой и понятный интерфейс, что делает процесс сброса еще более удобным. Однако, перед использованием такого программного обеспечения, убедитесь в его надежности и безопасности.
Эти методы могут помочь вам продлить пробный период Windows Server 2019 и продолжить использование операционной системы бесплатно. Важно отметить, что использование операционной системы без приобретенной лицензии может нарушать законодательство, поэтому перед применением этих методов оцените юридические последствия.
On Windows Server 2022, 2019, and older versions, you can extend the evaluation period beyond 180 days, and in this guide, you will learn how.
Although you can install virtually any version of Windows Server without a license and use all the features fully unlocked for an evaluation period of 180 days, after this period, you’re required to supply a valid product key to activate the installation. However, since the activation code for the server version of Windows can be expensive, Microsoft allows you to use a command to reset the trial period a few times, allowing you to continue using the operating system fully unlocked.
However, you can only perform this action a few times since the command will reset the evaluation period to 180 days and will decrease the “rearm” count by “1.” If the rearm count reaches “0,” you will not be able to rearm the license again.
This guide will teach you the steps to reset the trial period of a Windows Server installation.
To rearm the evaluation copy of Windows Server 2022, 2019, 2016, and older versions, use these steps:
-
Open Start on Windows Server.
-
Search for Command Prompt (or PowerShell), right-click the top result, and select the Run as administrator option.
-
Type the following command to view the details of the current license and press Enter:
slmgr /dlv
-
Type the following command to reset the trial period of Windows Server and press Enter:
slmgr /rearm

-
Restart the server.
-
Open Command Prompt again.
-
Type the following command to confirm the extension of the trail and press Enter:
slmgr /dli

Once you complete the steps, the Windows Server installation will continue to be valid for another 180 days.
It is important to note that rearming a Windows Server trial does not activate the product. You will still need to purchase a full license if you want to continue using Windows Server after the evaluation period expires.
Finally, rearming a Windows Server trial license will not reset any changes that you have made to the operating system, and it’ll not remove any data from your server.
We may earn commission for purchases using our links to help keep offering the free content. Privacy policy info.
All content on this site is provided with no warranties, express or implied. Use any information at your own risk. Always backup of your device and files before making any changes. Privacy policy info.
If you have a home lab environment or another lab where you continually test various solutions, licensing, and trial expiration is a challenge that you constantly tend to run into. It is just part of the fun of lab environments. While most trials are fairly “hard and fast” and don’t allow you to reset the trial expiration, if you work with Microsoft Windows Server and Remote Desktop Services (RDS), there is a “hack” that allows you to effectively reset the expiration of Remote Desktop Services grace period where you can essentially rewind the clock on your RDS licensing if you are making use of this role inside your lab environment. I am using Windows Server 2019 for my Windows workloads in my lab environment. In this post, I will show how to reset 120 day RDS licensing Grace period on 2016 and 2019 Windows Server. Let’s see.
Remote Desktop Services RDS Licensing
When you install Windows Server 2016 or 2019 as with previous Windows versions, you get the normal ability to have the two sessions you generally have available for administering.
However, when you install the true Remote Desktop Services role, you can have multiple sessions on your server. This is similar to the legacy Terminal Server role in previous versions of windows.
Production vs testing purposes
Typically in a production environment, you will have remote desktop license servers that house the client access licenses and then you will have multiple session host server instances configured for hosting user sessions.

When you install the role, by default, you have a 120-day grace period that Microsoft gives you to license the server for use as an RDS installation properly. This is accomplished by configuring remote desktop license servers with client access licenses. If you are using a server in a lab environment, most likely, you are not going to license this type of server outside of production in a testing environment, using a license server with a remote desktop session host.
RDS grace period error message
Once the 120 day grace period has expired, you will see the following error when you attempt to RDP to the server, referring to the licensing server needed for the proper license past the grace period:
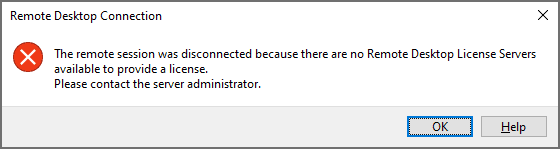
You can either redeploy your Windows Server which will allow you to spin up a new 120 day grace period, or you can actually reset the grace period. If you are like me, the latter is certainly the path of least resistance and work involved. Let’s take a look at how to reset the 120 day RDS grace period.
You can take a closer look at the official licensing documentation for Remote Desktop Services here:
- https://docs.microsoft.com/en-us/windows-server/remote/remote-desktop-services/rds-client-access-license
For resetting the 120 day grace period for the RDS role, the registry editor is your friend and makes this process easy. Before we begin, there are a couple of disclaimers to make here. Editing the registry can result in totally destroying a Windows system, so proceed with any low-level registry edits with caution. Creating a quick snapshot of the Windows virtual machine before you begin is always a good practice if you are working with a virtual machine.
Overview of resetting the grace period
Additionally, for production systems, resetting the 120 day grace period should only be done for systems that are not in production, as you should have proper licensing installed for production use.
To reset the grace period, there are actually just 3 steps involved:
- Change permissions on the RCM > GracePeriod key
- Delete the “Timebomb” registry entry
- Reboot the server
Now that we have level-set, once you have your snapshot or other backup created, you need to navigate to the following key location on your RDS server:
Computer\\HKEY_LOCAL_MACHINE\\SYSTEM\CurrentControlSet\\Control\\Terminal Server\\RCM\\GracePeriodChange Permissions on the RDS GracePeriod key and delete the key
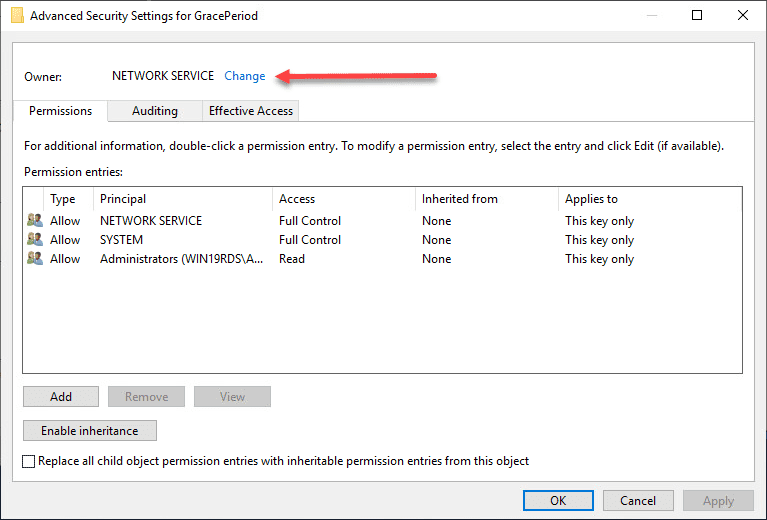
Open a command prompt, and type regedit. After you have navigated to the key documented above, right-click GracePeriod and select Permissions.
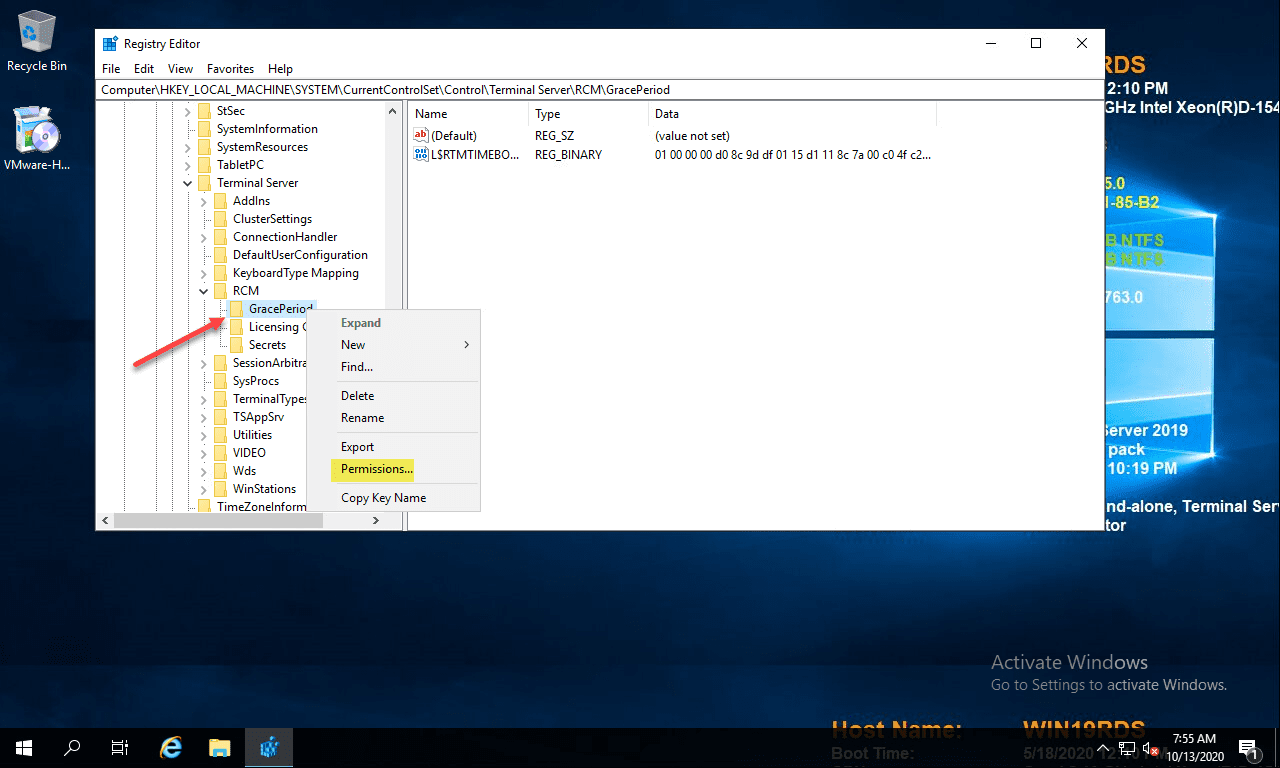
For obvious reasons, there are no default permissions on this key for even Administrators. So you have to first take ownership of the key before you can delete the timebomb value. Click the Advanced button on the permissions dialog box.
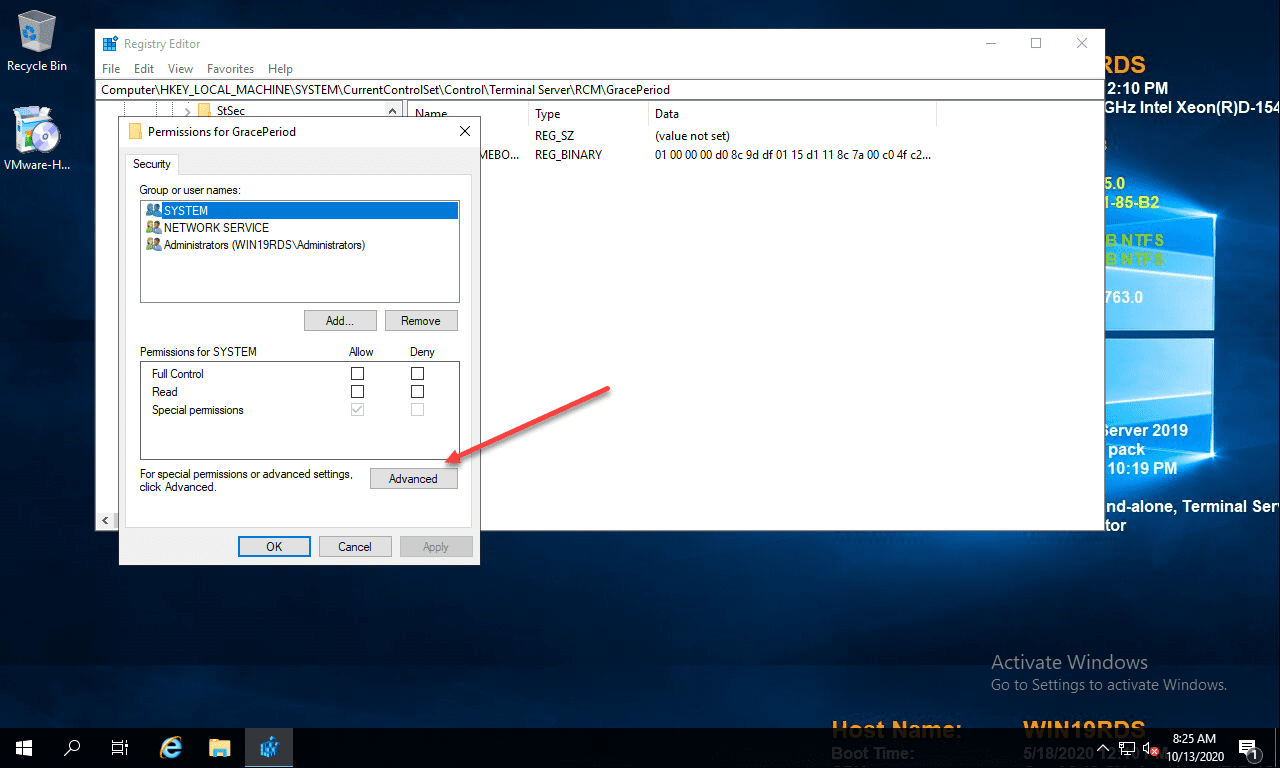
Click the Change button next to the Owner.
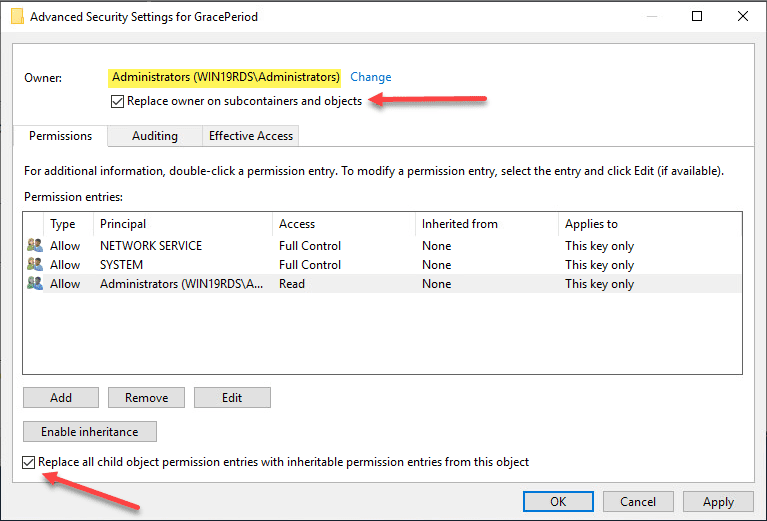
Here I have selected local administrators group as the owner of the key. However, you will want to choose whichever user/group you want to use to delete the registry key. Select the options to replace owners and replace all child object permissions.
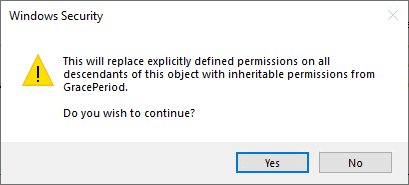
Confirm the replacement of permissions on the registry key.
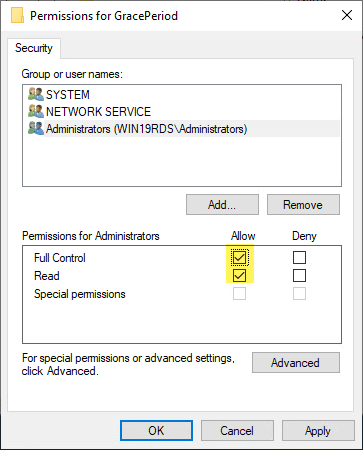
Now that we have changed ownership on the key, we can actually set permissions without getting permissions errors. Here I am granting administrators full control on the key.
Now, with permissions set, right-click the timebomb value in the GracePeriod key and Delete.
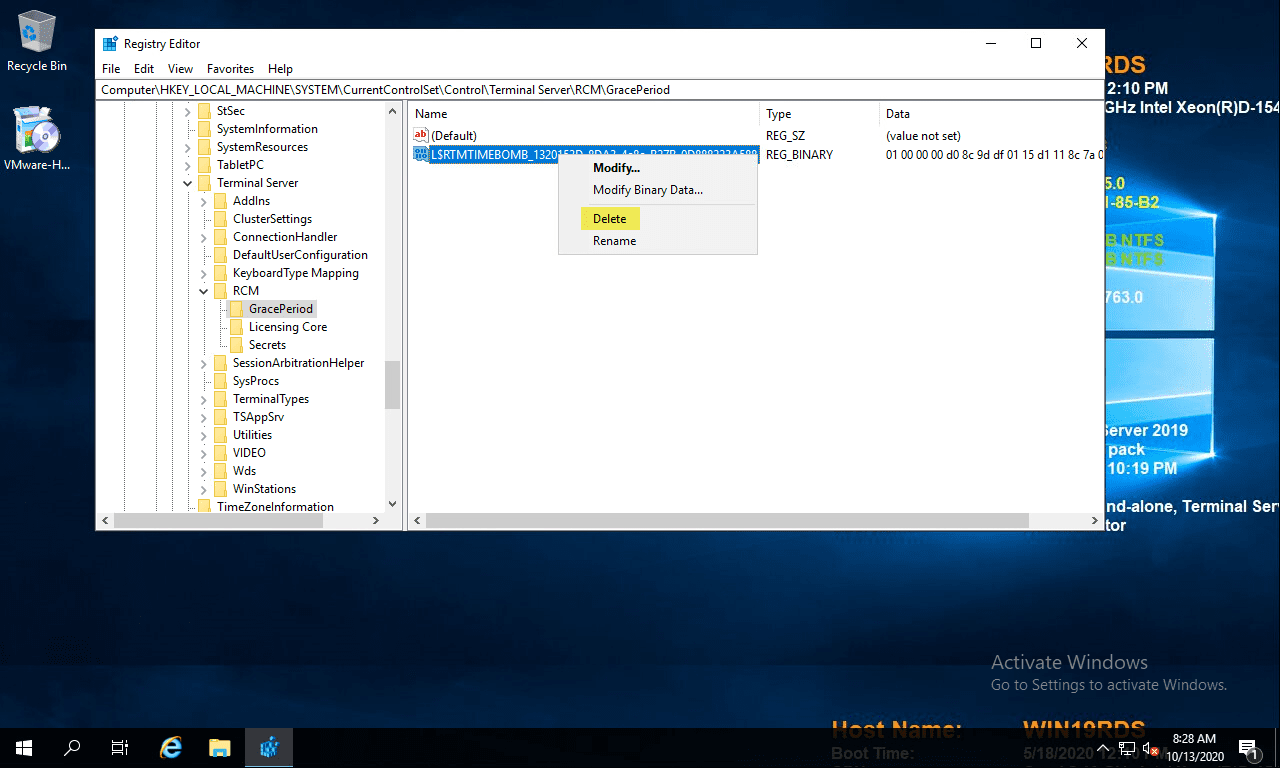
Confirm the deletion of the registry entry.

Next, the only thing left to do is reboot your server. Once the server is rebooted, you can enjoy once again having the full 120 day grace period for your RDS server in the lab environment.
Video Overview of the Process
If you want to take a look at a video of the process, you can watch the video walkthrough below.
https://www.youtube.com/watch?v=zQ_GrVAfK6Q
Wrapping up
The process to reset 120 day RDS Grace period on 2016 and 2019 Windows Servers as well as older server versions such as Windows Server 2012 and 2012 R2 is very straightforward using this process to delete the timebomb registry key.
Keep in mind this is not supported and certainly not a process for running in production. However, it is very handy for lab environments to keep from having to redeploy Windows Server virtual machines to have a fresh 120 day grace period.
In this blog post I will show you how to extend your trial period to three years. The evaluation version of Windows Server 2016 / 2022 is valid for 180 days and you can convert your trial version to retail.
After installing, you can try it out for 180 days. After 180 days you and your system will run into troubles for sure. But the good news is: You can extend the period to another 180 days up to 3 years.
Extending the Trial Period
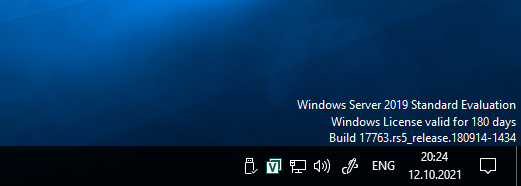
First, take a look at your desktop. You should see the countdown in the corner down right.

Or start PowerShell and run slmgr.
slmgr -dlvPay attention to the Timebased activation expiration and the Remaining Windows rearm count. You can rearm the period 6 times. (180 days * 6 = 3 years).
When the period comes to an end, run slmgr -rearm to extend it by another 180 days.
slmgr -rearm
Next restart your computer.
Restart-ComputerOnce restarted, open PowerShell and check your settings.
slmgr -dli
Important Note
The evaluation version may not be used for commercial purposes. Have fun playing with the Windows Server 2016 Evaluation Version!
By the way: You can do the same with Windows 10711. But the Windows 10/11 Evaluation Version can be used only for 180 days in total.


![]()
Published by Patrick Gruenauer
Microsoft MVP on PowerShell [2018-2023], IT-Trainer, IT-Consultant, MCSE: Cloud Platform and Infrastructure, Cisco Certified Academy Instructor.
View all posts by Patrick Gruenauer