
I realize this is not a very exciting post, especially compared to my other wonderful musing on this site, but I felt I really had to write it to share the pain!
A colleague I work with needed to enable this feature on an Azure Windows Server 2019 machine to communicate with some old system that only supports Server Message Block version 1 (SMB1). Easy enough to add that right?
Trying the installation
Let’s first get some information about the feature:
Get-WindowsOptionalFeature -Online -FeatureName SMB1Protocol
The output:

Notice the State property? The feature is disabled and the payload (installation files) are not on the Azure virtual machine.
When you try to install the feature, you get:
I guess I need the Windows Server 2019 sources!
Downloading Windows Server 2019
I downloaded Windows Server 2019 (November 2019 version) from https://my.visualstudio.com/Downloads?q=SQL%20Server%202019. I am not sure if you can use the evaluation version of Windows Server 2019 because I did not try that. I downloaded the ISO to the Azure virtual machine.
Mount ISO and copy install.wim
On recent versions of Windows, you can right click an ISO and mount it. In the mounted ISO, search for install.wim and copy that file to a folder on your C: disk like c:wim. Under c:wim, create a folder called mount and run the following command:
dism /mount-wim /wimfile:c:wiminstall.wim /index:4 /mountdir:c:wimmount /readonly
The contents of install.wim is now available in c:wimmount. Now don’t try to enable the feature by pointing to the sources with the -source parameter of Enable-WindowsOptionalFeature. It will not work yet!
Patch the mounted files
The Azure Windows Server 2019 image (at time of writing, June 2020) has a cumulative update installed: https://support.microsoft.com/en-us/help/4551853/windows-10-update-kb4551853. For this installatin to work, I needed to download the update from https://www.catalog.update.microsoft.com/home.aspx and put it somewhere like c:patches.
Now we can update the mounted files offline with the following command:
Dism /Add-Package /Image:"C:wimmount" /PackagePath="c:patcheswindows10.0-kb4551853-x64_ce1ea7def481ee2eb8bba6db49ddb42e45cba54f.msu"
It will take a while to update! You need to do this because the files mounted from the downloaded ISO do not match the version of the Windows Server 2019 image. Without this update, the installation of the SMB1 feature will not succeed.
Enable the SMB1 feature
Now we can enable the feature with the following command:
dism /online /Enable-Feature /FeatureName:SMB1Protocol /All /source:c:wimmountwindowswinsxs /limitaccess
You will need to reboot. After rebooting, from a PowerShell prompt run the command below to check the installation:
Get-WindowsOptionalFeature -Online -FeatureName SMB1Protocol
The State property should say: Enabled
Conclusion
Something this trivial took me way too long. Is there a simpler way? Let me know! 👍
And by the way, don’t enable SMB1. It’s not secure at all. But in some cases, there’s just no way around it.
Adding a Windows 2019 DC to Your Samba Domain
In this document MSAD 2016 or 2019 joins a Samba-AD with version 4.15.
This documentation is intended for system administrators that need an MS-AD domain controller in their Samba-AD domain for technical reasons (Azure-Sync, etc.).
❗Hint
Since version 4.12, Samba-AD manages a 2012R2 schema level but still with a functional level in 2008R2. It is therefore possible to join a Windows Server 2012R2 configured in 2008R2 functional level with a Samba-AD domain as an AD.
✅Important
Since version 4.12, Samba-AD manages a 2012R2 schema level but still with a functional level in 2008R2. It is therefore possible to join a Windows Server 2012R2 configured in 2008R2 functional level with a Samba-AD domain as an AD.
Microsoft Active Directory 2019
Preparing your Samba-AD for the future junction
- Backup the Samba-AD because irreversible changes will be made;
- Upgrade Samba to its latest 4.15 version;
- Install the required dependencies to join the Windows Server:
# RedHat8 and derived distributions
yum install python3-markdown
# Debian
apt install python3-markdown
Enter fullscreen mode
Exit fullscreen mode
- Then run the following commands, these will join the MS Server 2019 in your domain:
samba-tool domain schemaupgrade
samba-tool domain functionalprep --function-level=2012_R2 --forest-prep --domain-prep
Enter fullscreen mode
Exit fullscreen mode
- Set schema version to 2019
priv=$(smbd -b | grep -i private_dir | cut -d : -f 2 | xargs)
defaultNamingContext=$(ldbsearch -H ldap://127.0.0.1 -s base -b "" defaultNamingContext | grep defaultNamingContext | cut -d : -f 2 | xargs)
schemaNamingContext=$(ldbsearch -H ldap://127.0.0.1 -s base -b "" schemaNamingContext | grep schema | cut -d : -f 2 | xargs)
ldbedit -e "sed -i 's/objectVersion:.*/objectVersion: 88/g'" -H $priv/sam.ldb '(objectClass=dMD)' -b $schemaNamingContext
Enter fullscreen mode
Exit fullscreen mode
- Check the directory database:
samba-tool dbcheck --cross-ncs --fix --yes --reset-well-known-acls
Enter fullscreen mode
Exit fullscreen mode
☑️Note
It is possible that errors appear when launching the command the first time, just run it a second time.
- Enable schema updates in Samba AD:
if grep -q "dsdb:schema update allowed" /etc/samba/smb.conf; then
    sed -i '/dsdb:schema update allowed=true/d' /etc/samba/smb.conf
fi
sed -i '/global/a dsdb:schema update allowed=true' /etc/samba/smb.conf
systemctl restart samba-ad-dc
Enter fullscreen mode
Exit fullscreen mode
Preparing and joining the Microsoft Active Directory 2019
☑️Note
It is recommended to use an English version of Windows Server for infrastructure services. This allows you to have logs in English and feel less lonely when searching on the Internet.
-
If not already done, set the server to a fixed IP and configure the DNS redirector to point to the main AD;
-
Force the activation of the Sysvol directory on the MS-AD:
  Set-ItemProperty -Path "HKEY_LOCAL_MACHINESYSTEMCurrentControlSetServicesNetlogonParameters"  -Name "SysVolReady" -Value  0
  Restart-Computer
Enter fullscreen mode
Exit fullscreen mode
- Install the Active Directory components. In a PowerShell console run the following commands:
Install-WindowsFeature AD-Domain-Services
Add-WindowsFeature RSAT-ADLDS
Add-WindowsFeature RSAT-ADDS-Tools
Add-WindowsFeature RSAT-DNS-Server
Add-WindowsFeature RSAT-DFS-Mgmt-Con
Add-WindowsFeature GPMC
Enter fullscreen mode
Exit fullscreen mode
- Now that the role is installed, promote the server to AD and set it up;
☑️Note
The following command will open a popup that will ask for the Domain Admins credentials to join the server (in graphical mode), then the credentials for the AD restore mode (in text mode).
☑️Note
- If not already done, synchronize the time between MS-AD domain controller in their Samba-AD domain with the following command:
w32tm /config /syncfromflags:manual /manualpeerlist:”NTP Server” /reliable:yes /update
w32tm /resync /force
Enter fullscreen mode
Exit fullscreen mode
☑️Note
Of course modify the values Credential, DomainName, SiteName and ReplicationSourceDC.
There is a back quote character at the end of each line. Do not remove it or PowerShell will interpret this command as multiple commands.
Install-ADDSDomainController  `
   -Credential (Get-Credential "MIGRATEAdministrator") `
   -DomainName 'migrate.lab' `
   -SiteName 'Default-First-Site-Name' `
   -ReplicationSourceDC smb-adds01.migrate.lab `
   -CreateDnsDelegation:$false  `
   -DatabasePath 'C:WindowsNTDS' `
   -InstallDns:$true  `
   -LogPath 'C:WindowsNTDS' `
   -NoGlobalCatalog:$false `
   -SysvolPath 'C:WindowsSYSVOL'  `
   -NoRebootOnCompletion:$true  `
   -Force:$true
Restart-Computer
Enter fullscreen mode
Exit fullscreen mode
☑️Note
At this stage, the Windows Active Directory is properly attached to the domain. However, some options need to be adjusted on the sysvol, DNS and NTP parts.
- Force the activation of the Sysvol directory on the MS-AD:
Set-ItemProperty -Path "HKLM:SYSTEMCurrentControlSetServicesNetlogonParameters" -Name "SysvolReady" -Value "1"
Enter fullscreen mode
Exit fullscreen mode
-
Copy the contents of the
SYSVOLfrom the Samba-AD server. To do this, in a file explorer, type\srvads\sysvol, then go to the folder corresponding to your domain name (for example ad.mydomain.lan) and copyPoliciesandScriptsintoC:windowsSYSVOLdomain(but not the domain name). After the copy we will have these two directories:- C:windowsSYSVOLdomainPolicies;
- C:windowsSYSVOLdomainScripts;
⚠️Warning
Samba does not support DFS-R or FRS protocols.
Therefore, it will be necessary to manually synchronize the SYSVOL directory each time a GPO is created or modified.
☑️Note
There is a link from C:windowsSYSVOLsysvolad.mydomain.lan to C:windowsSYSVOLdomain.
- Restart the MS-AD server:
shutdown -r -t 0
Enter fullscreen mode
Exit fullscreen mode
-
Reverse DNS servers on the network card. The primary DNS server must be itself (
127.0.0.1), and the secondary DNS server is the Samba-AD server (Microsoft does the opposite when joining) -
In the DNS console, change the DNS redirector to the network recursor (by default Windows sets the first domain controller as the recursor when joining).
-
The change the NTP configuration in the MS-AD registry:
Set-ItemProperty -Path "HKLM:SYSTEMCurrentControlSetServicesW32TimeParameters" -Name "Type" -Value "NTP"
Enter fullscreen mode
Exit fullscreen mode
- Then restart the NTP service with a command prompt on the MS-AD server:
  net stop w32time
  net start w32time
Enter fullscreen mode
Exit fullscreen mode
- Finally, update the DNS and Kerberos configuration of the Samba-AD server by updating the information about the new Windows server. To do this, modify the files
/etc/hosts,/etc/resolv.confand/etc/krb5.conf;
Final Checks
- Check the directory database in Samba-AD server:
samba-tool dbcheck --cross-ncs --fix --yes --reset-well-known-acls
Enter fullscreen mode
Exit fullscreen mode


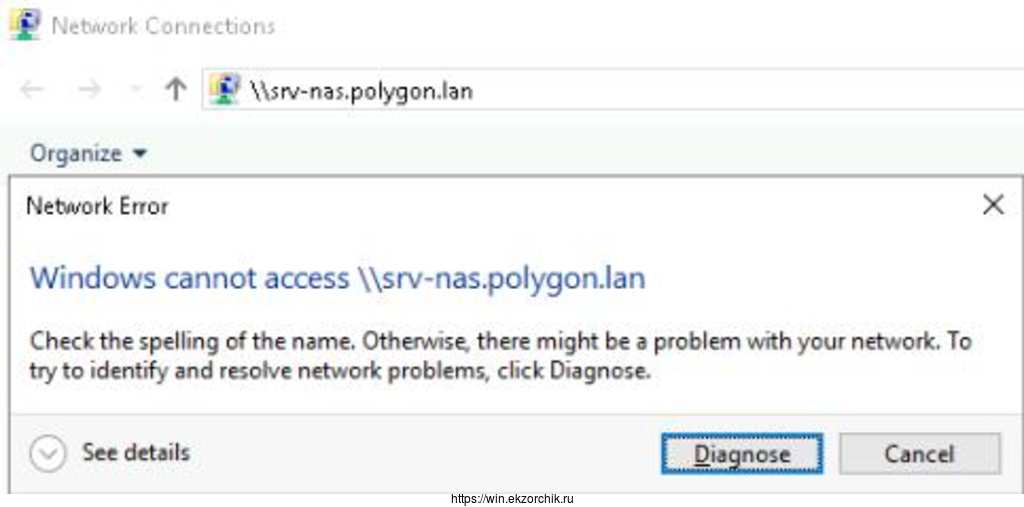
При проработке различных настроек на Windows Server 2019 Standard (Version 10.0.17763.2114) на тестовом полигоне Debian 10 + Proxmox 6 в своей локальной сети столкнулся, что не вижу свой ресурс на базе Samba 2.4.3 on Ubuntu 14.04.5 (моя локальная сетевая папка, где у меня лежат образа, софт, книги, видеоуроки). А данная система успешно работает, как виртуальная машина на HP MicroServer Gen8. При попытке обращения к нему по DNS имени (\srv-nas.polygon.lan) или же по IP адресу (\172.35.35.4) получаю сетевую ошибку вида:
Windows cannot access \srv-nas.polygon.lan
Check the spelling of the name. Otherwise, there might be a problem with your network. To try to identify and resolve network problem
На заметку: Если посмотреть See details то может быть код ошибки
Код ошибки 0x80070035 (Не найден сетевой путь)
Код ошибки 0x80004005 (Неопознанная ошибка)
Вот только данный ресурс работает и к нему я успешно обращаюсь, с Windows 7,10, Server 2012 R2, Ubuntu систем, а почему же для Windows Server 2019 нужно что-то еще?
Для начала проверяю конфигурационный файл smb.conf дабы убедиться, что я в нем ничего не запретил, ну мало ли:
|
1 2 3 4 5 6 7 8 9 10 11 12 13 14 15 16 17 18 19 20 21 22 23 24 25 26 27 |
ekzorchik@srv—nas:~$ cat /etc/samba/smb.conf | grep —v «^$» | grep —v «#» | grep —v «;» [global] workgroup = WORKGROUP server string = %h server (Samba, Ubuntu) dns proxy = no log file = /var/log/samba/log.%m max log size = 1000 syslog = 0 panic action = /usr/share/samba/panic—action %d server role = standalone server passdb backend = tdbsam obey pam restrictions = yes unix password sync = yes passwd program = /usr/bin/passwd %u passwd chat = *Entersnews*spassword:* %nn *Retypesnews*spassword:* %nn *passwordsupdatedssuccessfully* . pam password change = yes map to guest = bad password usershare allow guests = yes [nas] path = /nas guest ok = yes read only = no create mask = 0777 directory mask = 0777 hide files = /$RECYCLE.BIN/desktop.ini/lost+found/Thumbs.db/ acl allow execute always = true ekzorchik@srv—nas:~$ |
и вывода вижу, что доступ возможен как авторизацией так и гостем.
Чтобы включить авторизацию гостем с Windows Server 2019 нужно
Win + R -> gpedit.msc - Local Computer Policy - Computer Configuration - Administrative Templates - Network - Lanman Workstation
Enable insecure guest logons: Enable
На заметку: Все выше указанное можно сделать через правку реестра:
HKLMSYSTEMCurrentControlSetServicesLanmanWorkstationParameters
изменяем значение параметра AllowInsecureGuestAuth на 1
и нужно после перезагрузить сервер, либо
|
cmd.exe — Run as Administrator echo y | net stop LanmanWorkstation && echo y | net start LanmanWorkstation |
теперь мой сетевой диск успешно открывается

Итого в моем случаем дома авторизация на сетевой папке ни к чему и можно оставить так. Главное что я разобрал как получить доступ к нужной информации в локальной сети.
На этом я прощаюсь, с уважением автор блога Олло Александр aka ekzorchik.
— Advertisement —
Hello, in this opportunity, we are going to talk a little about Windows Server 2019. Specifically about the file server and how to enable it. This is a server that is configured to provide a central location in the local network. The goal is to store files and share them with domain users. In this way, users can have access to files and applications. In other words, the file server is a simple and effective solution for sharing data. For that reason, let’s see how to enable the file server in Windows Server 2019
How to create a shared folder in Windows Server 2019
The first thing we have to do is create a new folder inside the server. This folder will function as a file server. Once created, you need to enter its properties. Next, go to the Sharing tab. Additionally, click on Advanced Sharing

In the next window, check the box corresponding to Share this folder. It is also possible to limit the number of simultaneous users in the folder. Press accept to continue.

From the same window, click on the Permissions menu. In this way, we will modify the access permissions of the folder. In the first place, remove the Everyone user group. This is done for security. In addition, click on the Add menu.

Then choose the group of users you want to have access to the folder:

For the purposes of this example, we have selected the Domain Users. Then give it read and write permission in the folder. This guarantees full access to the files by the selected users.

After applying the changes, press OK to set them. In the same way, the access path for the client machines is shown. With these steps, the folder for the file server has already been correctly configured. To check its functionality, simply log in from any client computer. Then access the newly created folder.

Configuring the file server in Windows Server 2019.
Next, we will manage the file server in Windows Server 2019. With this in mind, please enter the Server Dashboard and from the left menu select File and Storage Services.

In the next window click on Shares. Immediately view the shared folder:

Then double click on the folder to enter the properties of the folder. In this menu go to the Settings section. Additionally, click on the first option corresponding to Enable acces-based enumeration. This option allows users to only see the folders that have permission to be edited, the ones that are read-only will be hidden. This configuration is very useful to protect the privacy of the folders.

Adding the File Server Resource Manager
This function is enabled from the Server Dashboard. Specifically with the Add roles and features wizard. If you want to know how to do it, I invite you to check our post about IIS in Windows Server 2019. In this case, choose Server Roles. Then scroll down to File and Storage Services. Then check the box File Server Resources Manager.

Press next and wait while the wizard enables the resource.

Access to the File Server Resources Manager.
To access the recently created tool, please open the Server Dashboard. Now open the Tools menu and select it.

Immediately the menu will be displayed with the different options.

Some options shown in the window are as follows:
- Quota manager: this option allows you to define a space limit for users to add files to the shared folder. Consequently, the capacity of the disk on the server is not affected.
- File Screening Manager: This option allows access to a series of templates where elements such as executable files, video, audio, etc. are blocked.
Conclusion
Ultimately we have seen how to enable the file server in Windows Server 2019. With this option we give the ability to the clients of the server, to enter the desired data. In addition, it is possible to control the quota, size and amount of information available. All right, that’s it for the moment. See you later.
My old Synology NAS for home use had started to show signs of wear and was in need of replacement. It had plenty of disk space and performed well enough — but the version I had lacked any real power or cloud connectivity. I decided it was time to repurpose one of my «home lab» servers to be a replacement and wanted to take a kick at the can of setting it up as a headless Windows Server 2019 File Server that I could connect up with Azure File Sync for some «cloud connected» storage. I came across a few interesting things took a bit of time to solve so I thought I’d share my experience making this server with you here – in case you come across these yourself in your travels.
Windows Server 2019 default install
In case you didn’t know — it does not have a GUI. This can pose some challenges when you complete the install and need to fine tune and configure it. I’m going to be managing this system (once it’s configured) using Windows Admin Center, but completing the setup will take a bit of wrangling. I’m not going to cover a vanilla install of Windows Server, so I pickup from just after the first logon where I have the opportunity to set the local Administrators password. The first stop in this manual install is your old friend SCONFIG.

As you can see – I have already enabled and configured some important settings here:
- I have changed the Computer Name (Option 2)
- I have enabled and configured Remote Management (Option 4)
- I have configured Windows Update to be Automatic and check for updates every day at 3am localtime (Option 5)
- I have Downloaded and installed updates (Option 6)
- I have gone ahead and input my product key and proceeded to activate Windows Server (Option 11)
This was the easy part – we have an (almost forgotten) tool with SCONFIG to get this part done. You’ll notice I didn’t join a domain – this is a simple NAS for some clients here in the house, I no longer have local domain controllers running for the family / lab.
Power Management
Since this machine is essentially a Server and it will be running headless, it won’t be going to sleep or turning off monitors as it’s going to be headless after this configuration is complete. As such – I want to change the Power Profile to High Performance. It’s a bit harder with no GUI, but you can use the PowerCfg.exe tool to do this. To list off your settings it’s as simple as running PowerCfg /list and then you can copy the scheme GUID for High Performance and then run PowerCfg /Set 8c5e7fda-e8bf-4a96-9a85-a6e23a8c635c

Command Line Driver Installs
Once I got around to wanting to configure a Storage Space and tried to list off my physical disks with a Get-PhysicalDisk command, I realized that my HP workstation was still missing drivers for the controller card. Doing some digging, I realized that I needed to download the drivers from the HP support site, transfer them via USB stick on to the system – but they required a GUI for the install. I extracted the drivers into C:SWSetup folder and then found the docs about how to go about adding driver packages into the drive store. In my case – one command did the missing controller software install and updated my chipset drivers: pnputil /add-driver *.inf /subdirs /install

Storage Configuration
This server has an SSD for the main OS drive and a few spinning rust disks for data who had previously been part of a Windows Storage Space in an old configuration. I had to dig around to figure out how to clear out the old Storage Space information as it’s stamped on each disk – so unless you are using pristine / unused disks – you’ll want to remove any old unhealthy storage pools from the system. You can then delete them with a simple Get-StoragePool -HealthStatus Unhealthy | Remove-StoragePool. This should free up the disks to be included in a net new Storage pool and be configured into a new Storage Space. Storage Spaces is documented in the Deploy StorageSpaces on a stand-alone server doc from way back in the 2012 documentation space, but it still applies to 2019. You can list off your visible disks on the system even if you are repurposing hardware – you’ll want to ensure you are clean and starting from scratch. List off your disks with Get-PhysicalDisk and you should see all of them with a “CanPool” status of True.

To create you Storage Space from the CanPool disks, first off group them together as a variable with $PhysicalDisks = (Get-PhysicalDisk -CanPool $True) Then you can group them together into a Storage Pool so you can make a virtual disk with the redundancy you like. First make the Storage Pool with New-StoragePool -FriendlyName Storage – StorageSubsystemFriendlyName “Windows Storage*” -PhysicalDisks $PhysicalDisks

Because I am using old disks of mismatched sizes and want to gain all the space possible for my resilient storage, I am going to create a RAID 5 equivalent setup using the ResiliancySettingName of Parity with New-VirtualDisk -StoragePoolFriendlyName Storage -FriendlyName data -ResiliencySettingName Parity -UseMaximumSize

Finally it’s time to initialize the disk, create the volume and format the partition as NTFS with Get-VirtualDisk -FriendlyName data | Get-Disk | Initialize-Disk -Passthru | New-Partition -AssignDriveLetter -UseMaximumSize | Format-Volume -FileSystem ntfs

Local User Creation
Next up – making some standard SMB Shares that my workstations can access the stored data. Since this is for home use, I only have regular Users and if you remember – I no longer have a domain in use, so I will need some local accounts created. You can read the full New-LocalUser command reference from the doc page. I create a secure password with $Password = Read-Host -AsSecureString and then create the local account with New-LocalUser «Mackenzie» -Password $Password -FullName «Mackenzie» -Description «Son» -PasswordNeverExpires

I went ahead and created a user for each member of the family and myself and proceeded to make a note to visit each family members machine to map drives to the server using their unique local user ID in order to authenticate to the server. This part made me cringe as a consultant who has designed over 140+ Active Directory domains for enterprise customers over the years. Maybe I should make this simpler and create a local domain for home again – but honestly this is a small setup, not something for a small / medium business so I’ll let it pass.
Creating the SMB Shares
I create the necessary folder structure on the new E: drive, in this example it’s E:sharesDocuments that I want to share out with Change access to the Users group and Full access to the Administrators group. You can read the full New-SmbShare command reference from the docs page. For this I use New-SmbShare -Name «Documents» -Path «E:sharesDocuments» -ChangeAccess «Users» -FullAccess «Administrators»

Once the shares were made it was time to transfer the data. I decided to keep things simple and simply mapped a drive from the new server over to the old NAS and then proceeded to robocopy the files down to their new locations. Needless to say – this took a long time, multiple days in fact – but we made it in the end. Because this was a simple NAS for home use, there wasn’t a very complex security structure in place.
And we’re done.
To review – I wanted to replace an aging home NAS device with a Windows Server 2019 file server running on some repurposed home lab hardware. Because Windows Server 2019 runs without a GUI I managed to figure out the following from the command line / PowerShell prompt:
- Configuring the basics with SCONFIG
- Changed the Power Profile to High Performance
- Added and Installed 3rd party drivers
- Deleted old Storage Space
- Created a new Storage Space / Virtual Drive / Resilient volume
- Created new Local Users
- Created new SMB shares
Now how about managing this server going forward? Well for that, you will have to wait for my next blog post.
По-умолчанию в Windows Server 2016/2019 и Windows 10 (начиная с билда 1709) отключена поддержка сетевого протокола для общего доступа к файлам в сетевых папках Server Message Block 1.0 (SMBv1). Этот протокол в большинстве случаев нужно только для обеспечения работы устаревших систем, например снятых с поддержки Windows XP, Windows Server 2003 и т.д. В этой статье мы рассмотрим, как включить или корректно отключить поддержку клиента и сервера SMBv1 в Windows 10 и Windows Server 2016/2019.
Если вашей сети не осталось устройств, которые поддерживают только протокол SMB 1.1, нужно полностью отключить протокол SMBv1 на всех Windows компьютерах в целях безопасности. Отключив SMB 1, вы защитите компьютеры Windows от большого количества уязвимостей, которые есть в этом устаревшем протоколе (самый известный публичный эксплоит для SMBv1 — EternalBlue). В результате клиенты при доступе к общим сетевым SMB шарам будут использовать новые более производительные, безопасные и
функциональные
версии протокола SMB.
В одной из предыдущих статей мы приводили таблицу совместимости версий протокола SMB на стороне клиента и сервера. Согласно этой таблице, старые версии клиентов (XP, Server 2003 и некоторые устаревшие *nix клиенты) могут использовать для доступа к файловым ресурсам только протокол SMB 1.0. Если таких клиентов в сети не осталось, можно полностью отключить SMB 1.0 на стороне файловых серверов (в том числе контролерах домена AD) и клиентских станциях.
В Windows 10 и Windows Server 2016 протокол SMBv1 разделен на два отдельных компонента – SMB клиент и SMB сервер, которые можно включать/отключать отдельно.
Содержание:
- Аудит доступа к файловому серверу по SMB v1.0
- Включение/отключение SMB 1.0 в Windows Server 2016/2019
- Включить/отключить SMB 1.0 в Windows 10
- Отключение SMBv1 с помощью групповых политик
Аудит доступа к файловому серверу по SMB v1.0
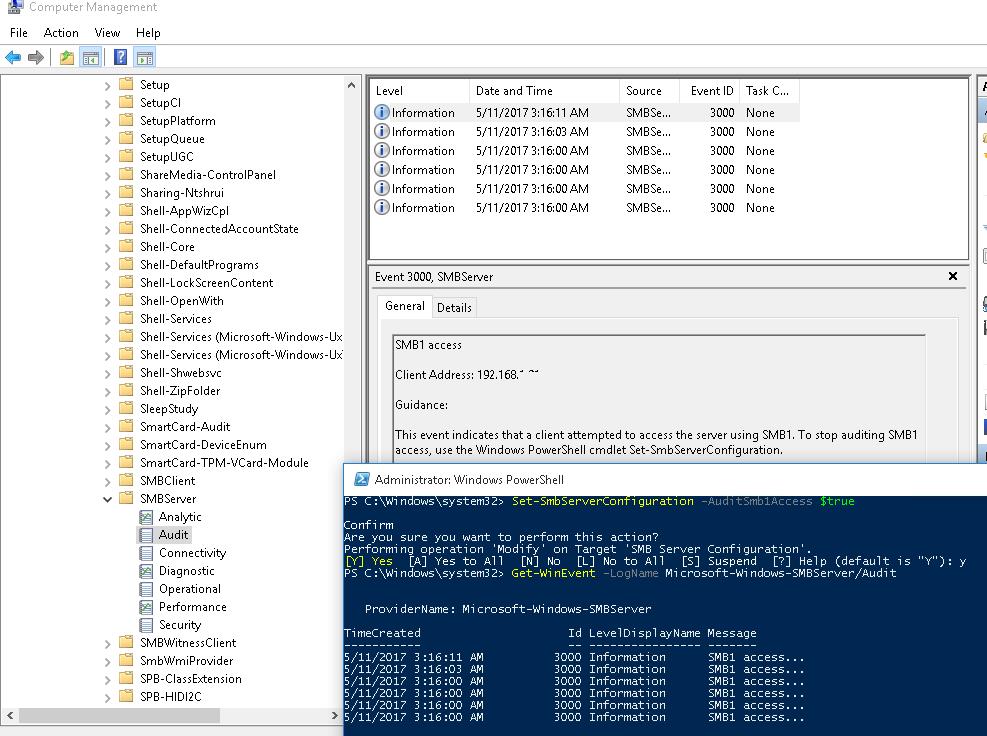
Перед отключением и полным удалением драйвера SMB 1.0 на стороне файлового SMB сервера желательно убедится, что в сети не осталось устаревших клиентов, которые используют для подключения протокол SMB v1.0. Для этого, нужно включить аудит доступа к файловому серверу по SMB1 протоколу с помощью команды PowerShell:
Set-SmbServerConfiguration –AuditSmb1Access $true
Через пару дней откройте на сервере журнал событий Applications and Services -> Microsoft -> Windows -> SMBServer -> Audit и проверьте, были ли зафиксированы попытки доступа к ресурсам сервера по протоколу SMB1.
В нашем примере в журнале обнаружено событие с EventID 3000 от источника SMBServer, в котором указано что клиент 192.168.1.10 пытается обратиться к сервереу по протоколу SMB1.
SMB1 access Client Address: 192.168.1.10

Guidance: This event indicates that a client attempted to access the server using SMB1. To stop auditing SMB1 access, use the Windows PowerShell cmdlet Set-SmbServerConfiguration.
Вам нужно найти в сети этот компьютер или устройство, при необходимости обновить ОС или прошивку, до версии поддерживающий, более новые протоколы SMB: SMBv2 или SMBv3.
В данном случае, мы проигнорируем эту информацию, но нужно учитывать тот факт, что в дальнейшем данный клиент не сможет получить SMB доступ к общим папкам на этом сервере.
Включение/отключение SMB 1.0 в Windows Server 2016/2019
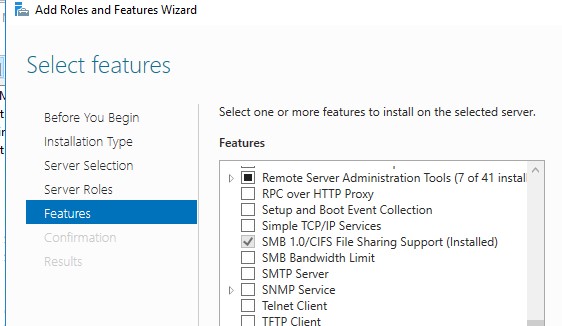
В Windows Server 2016, начиная с билда 1709, и Windows Server 2019 по умолчанию отключен протокол SMBv1. Чтобы включить поддержку клиентского протокола SMBv1в новых версиях Windows Server, нужно установить отдельный компонент SMB 1.0/CIFS File Sharing Support.
Вы можете установить компонент поддержки клиента SMBv1 с помощью Server Manager, или через PowerShell.
Проверить, что SMBv1 включен можно командой PowerShell:
Get-WindowsFeature | Where-Object {$_.name -eq "FS-SMB1"} | ft Name,Installstate

Чтобы установить компонент FS-SMB1, выполните:
Install-WindowsFeature FS-SMB1
Для удаления SMBv1 клиента (понадобится перезагрузка), выполните:
Uninstall-WindowsFeature –Name FS-SMB1 –Remove
Еще одна PowerShell команда, которая также позволяет удалить протокол SMB1Protocol:
Disable-WindowsOptionalFeature -Online -FeatureName SMB1Protocol -Remove
Чтобы ваш сервер мог обрабатывать доступ клиентов по протоколу SMBv1, кроме компонента FS-SMB1 нужно, чтобы поддержка протокола SMBv1 была включена на уровне файлового сервера SMB. Чтобы проверить, что на вашем сервере включен доступ по SMBv1 к сетевым папкам, выполните:
Get-SmbServerConfiguration
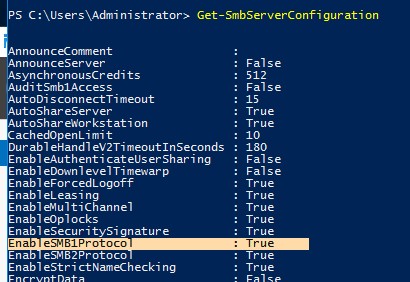
Строка “
EnableSMB1Protocol: True
” говорит о том, что у вас разрешен доступ по протоколу SMBv1 к сетевым папкам на сервере. Чтобы отключить поддержку сервера SMBv1 в Windows Server, выполните команду:
Set-SmbServerConfiguration -EnableSMB1Protocol $false -Force
Теперь с помощью командлета
Get-SmbServerConfiguration
убедитесь, что протокол SMB1 отключен.

Чтобы включить поддержку протокола SMBv1 на сервере, выполните команду:
Set-SmbServerConfiguration -EnableSMB1Protocol $True -Force
В Windows 7/8 и Windows Server 2008 R2/ 2012 для отключения клиента SMB нужно отключать службу и драйвер доступа по SMBv1 командами:
sc.exe config lanmanworkstation depend= bowser/mrxsmb20/nsi
sc.exe config mrxsmb10 start= disabled

Включить/отключить SMB 1.0 в Windows 10
Как мы уже говорили, начиная с Windows 10 1709, во всех новых билдах поддержка протокола SMB1 отключена (также отключен гостевой доступ по протоколу SMBv2).
В Windows 10 вы можете проверить статус компонентов SMBv1 протокола командой DISM:
Dism /online /Get-Features /format:table | find "SMB1Protocol"
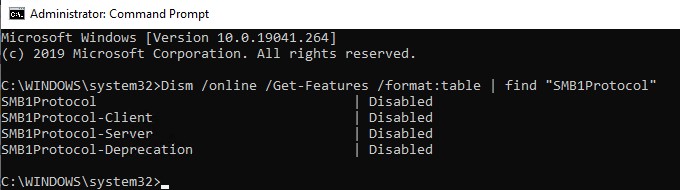
В нашем примере видно, что все компоненты SMBv1 отключены:
SMB1Protocol                                | Disabled
SMB1Protocol-Client                         | Disabled
 SMB1Protocol-Server                         | Disabled
SMB1Protocol-Deprecation                    | Disabled
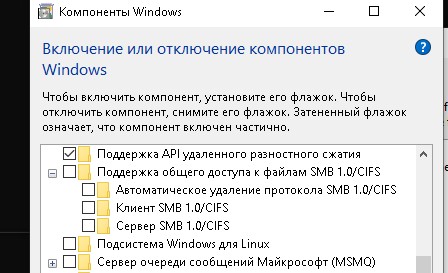
В Windows 10 также можно управлять компонентами SMB 1 из панели управления компонентами (
optionalfeatures.exe
). Разверните ветку Поддержка общего доступа к файлам SMB 1.0 /CIFS. Как вы видите здесь также доступны 3 компонента:
- Клиент SMB0/CIFS
- Сервер SMB0/CIFS
- Автоматическое удаление протокола SMB0/CIFS
Вы можете включить клиент и сервер SMBv1 в Windows 10 из окна управления компонентами или командой:
Dism /online /Enable-Feature /FeatureName:"SMB1Protocol"
Dism /online /Enable-Feature /FeatureName:"SMB1Protocol-Client"
Dism /online /Enable-Feature /FeatureName:"SMB1Protocol-Server"
Также можно включить сервер и клиент SMBv1 с помощью PowerShell:
Enable-WindowsOptionalFeature -Online -FeatureName SMB1Protocol-Server
Enable-WindowsOptionalFeature -Online -FeatureName SMB1Protocol-Client
Если после включения SMBv1 клиента, он не используется более 15 дней, он автоматически отключается.
Автоматическое отключение клиента SMBv1 это разовая операция. Если администратор включит SMBv1 вручную еще раз, он не будет отключаться автоматически.
Чтобы отключить поддержку клиента и сервера SMB1 в Windows 10, выполните следующие команды DISM:
Dism /online /Disable-Feature /FeatureName:"SMB1Protocol"
Dism /online /Disable-Feature /FeatureName:"SMB1Protocol-Client"
Dism /online /Disable-Feature /FeatureName:"SMB1Protocol-Server"
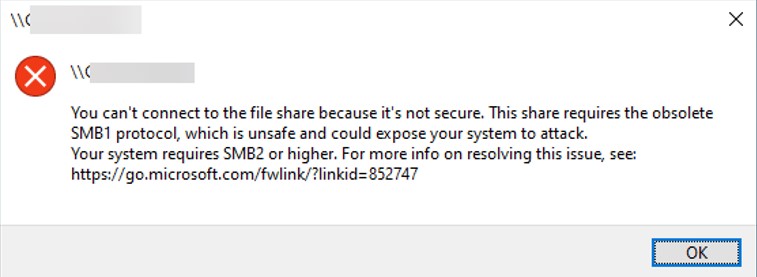
Если вы отключили поддержку SMBv1 клиента в Windows 10, то при доступе к сетевой папке на файловом сервере, который поддерживает только SMBv1 (протоколы SMBv2 и v3 отключены или не поддерживаются), появятся ошибки вида:
- 0x80070035 — не найден сетевой путь;
-
Вы не можете подключиться к общей папке, так как она небезопасна. Эта общая папка работает по устаревшему протоколу SMB1, который небезопасен и может подвергнуть вашу систему риску атаки. Вашей системе необходимо использовать SMB2 или более позднюю версию.
Unable to connect to file shares because it is not secure. This share requires the obsolete SMB1 protocol, which is not secure and could expose your system to attacks
;

-
Вы не можете подключиться к общей папке, так как она небезопасна. Эта общая папка работает по устаревшему протоколуSMB1, который небезопасен и может подвергнуть вашу систему риску атаки. Вашей системе необходимо использовать SMB2 или более позднюю версию.
You can’t connect to the file share because it’s not secure. This share requires the obsolete SMB1 protocol, which is unsafe and could expose your system to attack. Your system requires SMB2 or higher).
Также при отключении клиента SMBv1 на компьютере перестает работать служба Computer Browser (Обозреватель компьютеров), которая используется устаревшим протоколом NetBIOS для обнаружения устройств в сети. Для корректгого отобрражения соседних компьютеров в сети Windows 10 нужно настроить службу Function Discovery Provider Host (см. статью).
Отключение SMBv1 с помощью групповых политик
В доменной среде Active Directory вы можете отключить протокол SMBv1 на всех серверах и компьютеров с помощью групповой политики. Т.к. в стандартных политиках Windows нет политики настройки компонентов SMB, придется отключать его через политику реестра.
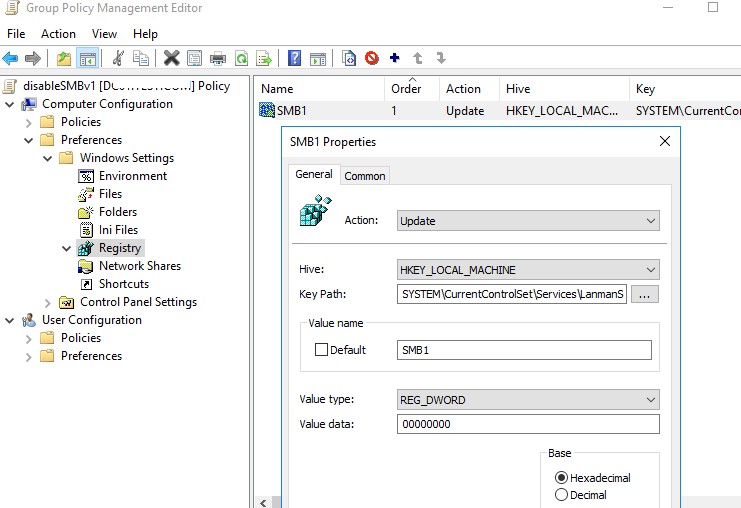
- Откройте консоль управления Group Policy Management (gpmc.msc), создайте новый объект GPO (disableSMBv1) и назначьте его на OU с компьютерами, на которых нужно отключить SMB1;
- Перейдите в режим редактирования политики. Выберите Computer Configuration -> Preferences -> Windows Settings -> Registry;
- Создайте новый параметр реестра (Registry Item) со следующими настройками:
Action:
UpdateHive:
HKEY_LOCAL_MACHINEKey Path:
SYSTEMCurrentControlSetServicesLanmanServerParametersValue name:
SMB1Value type:
REG_DWORDValue data:
0

Данная политика отключит через реестр поддержку компонента сервер SMBv1 на всех компьютерах.Если в вашем домене остались компьютеры с Windows XP/Server 2003, можно использовать отдельный WMI фильтр политики, чтобы исключить эти версии Windows из-под действия политики.
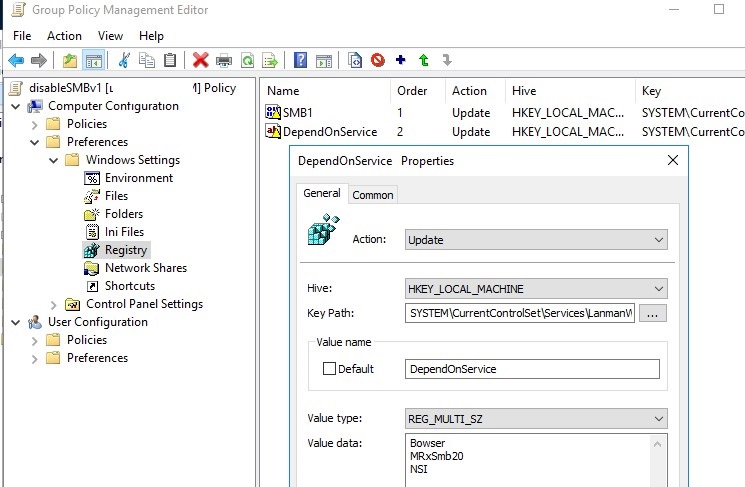
Если вы хотите через GPO отключить на компьютерах SMB клиент, создайте дополнительно два параметра реестра:
- Параметр Start (типа REG_DWORD) со значением 4 в ветке реестра HKLMSYSTEMCurrentControlSetservicesmrxsmb10;
- Параметр DependOnService (типа REG_MULTI_SZ) со значением Bowser, MRxSmb20, NSI (каждое значение с новой строки) в ветке реестра HKLMSYSTEMCurrentControlSetServicesLanmanWorkstation.
Осталось обновить настройки групповых политик на клиентах и после перезагрузки проверить, что компоненты SMBv1 полностью отключены.
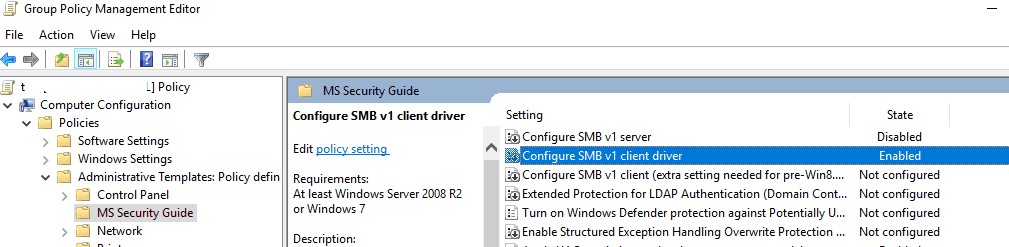
В групповых политиках Security Baseline из Microsoft Security Compliance Toolkit есть отдельный административный шаблон (файлы SecGuide.adml и SecGuide.ADMX), в которых есть отдельные параметры для отключения сервера и клиента SMB:
- Configure SMB v1 server;
- Configure SMB v1 client driver.
Часто при реализации структуры на базе Windows Server возникают задачи связанные с настройкой сервера для файлов и распределением прав на пользователейгруппы.
В нашем случае мы будем настраивать файловый сервер на Windows Server 2019.
1. Подготовка.
Для того чтобы настроить файловый сервер на Windows Server 2019, требуется установить операционную систему на виртуальную или физическую машину. Активировать операционную систему и подключиться на сервер с правами администратора.
2. Установка роли файлового сервера.
Чтобы установить роль файлового сервера, требуется:
- Зайти в диспетчер серверов.
- Управление => Добавить роли и компоненты.
- В мастере добавления ролей нажимаем “Далее” до Ролей сервера.
- Устанавливаем роль “Файловый сервер” и нажимаем “Далее”.
- Нажимаем “Установить”Нажимаем “Установить”.
3. Настройка файлового сервера.
- Заходим в Диспетчер Серверов => Файловые службы и службы хранилища => Общие ресурсы.
- Нажимаем “Задачи” и выбираем “Новый общий ресурс”.
- Выбираем подходящий нам профиль общего файлового сервера. В нашем случае мы выбираем “Общий ресурс SMB — быстрый профиль” и нажимаем “Далее”.
- Выбираем том на котором будет располагаться папка для доступа по сети, нажимаем “Далее”.
- Создаем имя общего ресурса, нажимаем “Далее”.
- В следующем окне выбираем требуемые параметры и нажимаем “Далее”.
- В окне “Распределения разрешение для управления доступом” мы настраиваем параметры безопасности на сетевую папку. А именно распределяем правами разрешения для определенных пользователей или групп, нажимаем “Далее”.
- В подтверждающем окне мы видим какие параметры будут сделаны и нажимаем “Создать”.

Рисунок 1 — Подтверждение выбора в мастере создания ресурсов
Убеждаемся в правильной настройки общей папки.
4. Проверка работоспособности файлового сервера.
Заходим на рабочую машину расположенную внутри локальной сеть. Подключаемся через проводник на сервер в нашем случае мы подключаемся к \10.15.73.38 так же можно вводить адрес сервера \domain.site.ru или по имени сервера \file-server
После авторизации мы подключились на сервере и видим нашу общую папку:

Рисунок 2 — Созданная общая папка
Мы провели настройку файлового сервера, чтобы можно было пользоваться общими папками и распределять права на определенные файлы. В дальнейшем можно увеличивать количество папок и строить файловую структуру по нуждам компании.
Эти и другие настройки для наших клиентов мы осуществляем в рамках ИТ-аутсорсинга.
Adding a Windows 2019 DC to Your Samba Domain
In this document MSAD 2016 or 2019 joins a Samba-AD with version 4.15.
This documentation is intended for system administrators that need an MS-AD domain controller in their Samba-AD domain for technical reasons (Azure-Sync, etc.).
❗Hint
Since version 4.12, Samba-AD manages a 2012R2 schema level but still with a functional level in 2008R2. It is therefore possible to join a Windows Server 2012R2 configured in 2008R2 functional level with a Samba-AD domain as an AD.
✅Important
Since version 4.12, Samba-AD manages a 2012R2 schema level but still with a functional level in 2008R2. It is therefore possible to join a Windows Server 2012R2 configured in 2008R2 functional level with a Samba-AD domain as an AD.
Microsoft Active Directory 2019
Preparing your Samba-AD for the future junction
- Backup the Samba-AD because irreversible changes will be made;
- Upgrade Samba to its latest 4.15 version;
- Install the required dependencies to join the Windows Server:
# RedHat8 and derived distributions
yum install python3-markdown
# Debian
apt install python3-markdown
Enter fullscreen mode
Exit fullscreen mode
- Then run the following commands, these will join the MS Server 2019 in your domain:
samba-tool domain schemaupgrade
samba-tool domain functionalprep --function-level=2012_R2 --forest-prep --domain-prep
Enter fullscreen mode
Exit fullscreen mode
- Set schema version to 2019
priv=$(smbd -b | grep -i private_dir | cut -d : -f 2 | xargs)
defaultNamingContext=$(ldbsearch -H ldap://127.0.0.1 -s base -b "" defaultNamingContext | grep defaultNamingContext | cut -d : -f 2 | xargs)
schemaNamingContext=$(ldbsearch -H ldap://127.0.0.1 -s base -b "" schemaNamingContext | grep schema | cut -d : -f 2 | xargs)
ldbedit -e "sed -i 's/objectVersion:.*/objectVersion: 88/g'" -H $priv/sam.ldb '(objectClass=dMD)' -b $schemaNamingContext
Enter fullscreen mode
Exit fullscreen mode
- Check the directory database:
samba-tool dbcheck --cross-ncs --fix --yes --reset-well-known-acls
Enter fullscreen mode
Exit fullscreen mode
☑️Note
It is possible that errors appear when launching the command the first time, just run it a second time.
- Enable schema updates in Samba AD:
if grep -q "dsdb:schema update allowed" /etc/samba/smb.conf; then
    sed -i '/dsdb:schema update allowed=true/d' /etc/samba/smb.conf
fi
sed -i '/global/a dsdb:schema update allowed=true' /etc/samba/smb.conf
systemctl restart samba-ad-dc
Enter fullscreen mode
Exit fullscreen mode
Preparing and joining the Microsoft Active Directory 2019
☑️Note
It is recommended to use an English version of Windows Server for infrastructure services. This allows you to have logs in English and feel less lonely when searching on the Internet.
-
If not already done, set the server to a fixed IP and configure the DNS redirector to point to the main AD;
-
Force the activation of the Sysvol directory on the MS-AD:
  Set-ItemProperty -Path "HKEY_LOCAL_MACHINE\SYSTEM\CurrentControlSet\Services\Netlogon\Parameters"  -Name "SysVolReady" -Value  0
  Restart-Computer
Enter fullscreen mode
Exit fullscreen mode
- Install the Active Directory components. In a PowerShell console run the following commands:
Install-WindowsFeature AD-Domain-Services
Add-WindowsFeature RSAT-ADLDS
Add-WindowsFeature RSAT-ADDS-Tools
Add-WindowsFeature RSAT-DNS-Server
Add-WindowsFeature RSAT-DFS-Mgmt-Con
Add-WindowsFeature GPMC
Enter fullscreen mode
Exit fullscreen mode
- Now that the role is installed, promote the server to AD and set it up;
☑️Note
The following command will open a popup that will ask for the Domain Admins credentials to join the server (in graphical mode), then the credentials for the AD restore mode (in text mode).
☑️Note
- If not already done, synchronize the time between MS-AD domain controller in their Samba-AD domain with the following command:
w32tm /config /syncfromflags:manual /manualpeerlist:”NTP Server” /reliable:yes /update
w32tm /resync /force
Enter fullscreen mode
Exit fullscreen mode
☑️Note
Of course modify the values Credential, DomainName, SiteName and ReplicationSourceDC.
There is a back quote character at the end of each line. Do not remove it or PowerShell will interpret this command as multiple commands.
Install-ADDSDomainController  `
   -Credential (Get-Credential "MIGRATE\Administrator") `
   -DomainName 'migrate.lab' `
   -SiteName 'Default-First-Site-Name' `
   -ReplicationSourceDC smb-adds01.migrate.lab `
   -CreateDnsDelegation:$false  `
   -DatabasePath 'C:\Windows\NTDS' `
   -InstallDns:$true  `
   -LogPath 'C:\Windows\NTDS' `
   -NoGlobalCatalog:$false `
   -SysvolPath 'C:\Windows\SYSVOL'  `
   -NoRebootOnCompletion:$true  `
   -Force:$true
Restart-Computer
Enter fullscreen mode
Exit fullscreen mode
☑️Note
At this stage, the Windows Active Directory is properly attached to the domain. However, some options need to be adjusted on the sysvol, DNS and NTP parts.
- Force the activation of the Sysvol directory on the MS-AD:
Set-ItemProperty -Path "HKLM:\SYSTEM\CurrentControlSet\Services\Netlogon\Parameters" -Name "SysvolReady" -Value "1"
Enter fullscreen mode
Exit fullscreen mode
-
Copy the contents of the
SYSVOLfrom the Samba-AD server. To do this, in a file explorer, type\\srvads\\sysvol, then go to the folder corresponding to your domain name (for example ad.mydomain.lan) and copyPoliciesandScriptsintoC:windowsSYSVOLdomain(but not the domain name). After the copy we will have these two directories:- C:windowsSYSVOLdomainPolicies;
- C:windowsSYSVOLdomainScripts;
⚠️Warning
Samba does not support DFS-R or FRS protocols.
Therefore, it will be necessary to manually synchronize the SYSVOL directory each time a GPO is created or modified.
☑️Note
There is a link from C:\windows\SYSVOL\sysvol\ad.mydomain.lan to C:\windows\SYSVOL\domain.
- Restart the MS-AD server:
shutdown -r -t 0
Enter fullscreen mode
Exit fullscreen mode
-
Reverse DNS servers on the network card. The primary DNS server must be itself (
127.0.0.1), and the secondary DNS server is the Samba-AD server (Microsoft does the opposite when joining) -
In the DNS console, change the DNS redirector to the network recursor (by default Windows sets the first domain controller as the recursor when joining).
-
The change the NTP configuration in the MS-AD registry:
Set-ItemProperty -Path "HKLM:\SYSTEM\CurrentControlSet\Services\W32Time\Parameters" -Name "Type" -Value "NTP"
Enter fullscreen mode
Exit fullscreen mode
- Then restart the NTP service with a command prompt on the MS-AD server:
  net stop w32time
  net start w32time
Enter fullscreen mode
Exit fullscreen mode
- Finally, update the DNS and Kerberos configuration of the Samba-AD server by updating the information about the new Windows server. To do this, modify the files
/etc/hosts,/etc/resolv.confand/etc/krb5.conf;
Final Checks
- Check the directory database in Samba-AD server:
samba-tool dbcheck --cross-ncs --fix --yes --reset-well-known-acls
Enter fullscreen mode
Exit fullscreen mode
При проработке различных настроек на Windows Server 2019 Standard (Version 10.0.17763.2114) на тестовом полигоне Debian 10 + Proxmox 6 в своей локальной сети столкнулся, что не вижу свой ресурс на базе Samba 2.4.3 on Ubuntu 14.04.5 (моя локальная сетевая папка, где у меня лежат образа, софт, книги, видеоуроки). А данная система успешно работает, как виртуальная машина на HP MicroServer Gen8. При попытке обращения к нему по DNS имени (\\srv-nas.polygon.lan) или же по IP адресу (\\172.35.35.4) получаю сетевую ошибку вида:
Windows cannot access \\srv-nas.polygon.lan
Check the spelling of the name. Otherwise, there might be a problem with your network. To try to identify and resolve network problem
На заметку: Если посмотреть See details то может быть код ошибки
Код ошибки 0x80070035 (Не найден сетевой путь)
Код ошибки 0x80004005 (Неопознанная ошибка)
Вот только данный ресурс работает и к нему я успешно обращаюсь, с Windows 7,10, Server 2012 R2, Ubuntu систем, а почему же для Windows Server 2019 нужно что-то еще?
Для начала проверяю конфигурационный файл smb.conf дабы убедиться, что я в нем ничего не запретил, ну мало ли:
|
1 2 3 4 5 6 7 8 9 10 11 12 13 14 15 16 17 18 19 20 21 22 23 24 25 26 27 |
ekzorchik@srv—nas:~$ cat /etc/samba/smb.conf | grep —v «^$» | grep —v «#» | grep —v «;» [global] workgroup = WORKGROUP server string = %h server (Samba, Ubuntu) dns proxy = no log file = /var/log/samba/log.%m max log size = 1000 syslog = 0 panic action = /usr/share/samba/panic—action %d server role = standalone server passdb backend = tdbsam obey pam restrictions = yes unix password sync = yes passwd program = /usr/bin/passwd %u passwd chat = *Enter\snew\s*\spassword:* %n\n *Retype\snew\s*\spassword:* %n\n *password\supdated\ssuccessfully* . pam password change = yes map to guest = bad password usershare allow guests = yes [nas] path = /nas guest ok = yes read only = no create mask = 0777 directory mask = 0777 hide files = /$RECYCLE.BIN/desktop.ini/lost+found/Thumbs.db/ acl allow execute always = true ekzorchik@srv—nas:~$ |
и вывода вижу, что доступ возможен как авторизацией так и гостем.
Чтобы включить авторизацию гостем с Windows Server 2019 нужно
Win + R -> gpedit.msc - Local Computer Policy - Computer Configuration - Administrative Templates - Network - Lanman Workstation
Enable insecure guest logons: Enable
На заметку: Все выше указанное можно сделать через правку реестра:
HKLM\SYSTEM\CurrentControlSet\Services\LanmanWorkstation\Parameters\
изменяем значение параметра AllowInsecureGuestAuth на 1
и нужно после перезагрузить сервер, либо
|
cmd.exe — Run as Administrator echo y | net stop LanmanWorkstation && echo y | net start LanmanWorkstation |
теперь мой сетевой диск успешно открывается
Итого в моем случаем дома авторизация на сетевой папке ни к чему и можно оставить так. Главное что я разобрал как получить доступ к нужной информации в локальной сети.
На этом я прощаюсь, с уважением автор блога Олло Александр aka ekzorchik.
Часто при реализации структуры на базе Windows Server возникают задачи связанные с настройкой сервера для файлов и распределением прав на пользователей\группы.
В нашем случае мы будем настраивать файловый сервер на Windows Server 2019.
1. Подготовка.
Для того чтобы настроить файловый сервер на Windows Server 2019, требуется установить операционную систему на виртуальную или физическую машину. Активировать операционную систему и подключиться на сервер с правами администратора.
2. Установка роли файлового сервера.
Чтобы установить роль файлового сервера, требуется:
- Зайти в диспетчер серверов.
- Управление => Добавить роли и компоненты.
- В мастере добавления ролей нажимаем “Далее” до Ролей сервера.
- Устанавливаем роль “Файловый сервер” и нажимаем “Далее”.
- Нажимаем “Установить”Нажимаем “Установить”.
3. Настройка файлового сервера.
- Заходим в Диспетчер Серверов => Файловые службы и службы хранилища => Общие ресурсы.
- Нажимаем “Задачи” и выбираем “Новый общий ресурс”.
- Выбираем подходящий нам профиль общего файлового сервера. В нашем случае мы выбираем “Общий ресурс SMB — быстрый профиль” и нажимаем “Далее”.
- Выбираем том на котором будет располагаться папка для доступа по сети, нажимаем “Далее”.
- Создаем имя общего ресурса, нажимаем “Далее”.
- В следующем окне выбираем требуемые параметры и нажимаем “Далее”.
- В окне “Распределения разрешение для управления доступом” мы настраиваем параметры безопасности на сетевую папку. А именно распределяем правами разрешения для определенных пользователей или групп, нажимаем “Далее”.
- В подтверждающем окне мы видим какие параметры будут сделаны и нажимаем “Создать”.
Рисунок 1 — Подтверждение выбора в мастере создания ресурсов
Убеждаемся в правильной настройки общей папки.
4. Проверка работоспособности файлового сервера.
Заходим на рабочую машину расположенную внутри локальной сеть. Подключаемся через проводник на сервер в нашем случае мы подключаемся к \\10.15.73.38\ так же можно вводить адрес сервера \\domain.site.ru\ или по имени сервера \\file-server\
После авторизации мы подключились на сервере и видим нашу общую папку:
Рисунок 2 — Созданная общая папка
Мы провели настройку файлового сервера, чтобы можно было пользоваться общими папками и распределять права на определенные файлы. В дальнейшем можно увеличивать количество папок и строить файловую структуру по нуждам компании.
Эти и другие настройки для наших клиентов мы осуществляем в рамках ИТ-аутсорсинга.
- Does Windows Server 2019 support SMB2?
- How do I enable SMB 1 server 2019?
- Is SMB enabled on server 2019?
- What version of SMB does Windows Server 2019 use?
- How do I enable Samba?
- How do I create a shared file in Windows Server 2019?
- What is the difference between SMB and Samba?
Does Windows Server 2019 support SMB2?
Thanks for your update. Guest access in SMB2 will be disabled by default in Windows Server 2019. Note: By enabling insecure guest logons, this setting reduces the security of Windows clients.
How do I enable SMB 1 server 2019?
Under Control Panel Home, select Turn Windows features on or off to open the Windows Features box. In the Windows Features box, scroll down the list, clear the check box for SMB 1.0/CIFS File Sharing Support and select OK. After Windows applies the change, on the confirmation page, select Restart now.
Is SMB enabled on server 2019?
Enable/Disable SMB 1.0 on Windows Server 2016/2019
In Windows Server 2016 starting with build 1709 and Windows Server 2019, SMBv1 is disabled by default. To enable support for the SMBv1 client protocol in newer versions of Windows Server, you need to install the separate SMB 1.0/CIFS File Sharing Support feature.
What version of SMB does Windows Server 2019 use?
This topic describes the SMB 3 feature in Windows Server 2019, Windows Server 2016, Windows Server 2012 R2, and Windows Server 2012—practical uses for the feature, the most significant new or updated functionality in this version compared to previous versions, and the hardware requirements.
How do I enable Samba?
Enabling SMB Signing
To start, open the Group Policy Management tool, this can be done either through Server Manager > Tools > Group Policy Management or by running ‘gpmc. msc’ in PowerShell or Command Prompt. Then, depending upon your preferences, either create a new Group Policy or edit an existing one.
How do I create a shared file in Windows Server 2019?
Right-Click the Folder you’d like to set Sharing and Open [Properties]. Next, move to [Sharing] tab and Click [Advanced Sharing] button. Check a box [Share this folder] and input any Share name you like on [Share name] field. Next, Click [Permissions] button.
What is the difference between SMB and Samba?
Samba is a free software re-implementation of the SMB networking protocol, and was originally developed by Andrew Tridgell. … The name Samba comes from SMB (Server Message Block), the name of the proprietary protocol used by the Microsoft Windows network file system.