If you are searching for a compatible and open source software for accessing and sharing files, folders and other data, then come across the Samba share. It provides a cross-platform adaptable environment between Windows and other systems. In this tutorial, I have outlined every ins and outs on how to access Samba share from Windows. So, go over it, try accessing Samba share from your Windows and leverage the benefits of this interoperable service.
Key Takeaways
- Learning basic commands of the command prompt, PowerShell.
- Understanding the fact of accessing Samba shares from Windows.
- Learning how to connect and disconnect Samba drives.
Requirements
- Users must have Samba already installed and configured properly.
- Users must have Samba connection on.
Process Flow Chart
[Windows Used Throughout the Tutorial: Windows 10]
You can easily access samba share from Windows only employing some compact and effortless steps. Here, I am going to introduce two types of methods that will help you to access the Samba share.
You can read the Comparative Analysis of Methods to know more related terms regarding samba shares.
In the following section, I will show two cases of GUI (Graphical User Interface) for accessing Samba share from Windows.
To access Samba share using File Explorer follow the manual procedure shown below:
Steps to Follow >
➊ Press WIN+E or you can click on the Folder icon like the image below to open file explorer:❷ Enter the path of the Samba share in the address bar like the format below and click ENTER:
\\192.168.231.128\sambashareEXPLANATION
- \\192.168.231.128: Represents Samba server IP address.
- \sambashare: Indicates the shared folder.
Here, ‘192.168.231.128’ is my system’s IP address and ‘sambashare’ is the folder I want to share.
❸ Now, enter your network credentials when prompted to you and click OK.

Map Network Drive is another way of accessing Samba share. Follow the steps to exercise it:
Steps to Follow >
➊ Go to file explorer and click on Map network drive under the Computer tab like the following image:

❸ If there prompts the credential requirements, then provide your user name and Samba password.


Read More: Install, Configure and Connect Samba on Ubuntu Using GUI
Below I will demonstrate two different cases of ‘Command line shell’ for accessing Samba share from Windows.
To access the Samba shares’ contents from the command prompt follow the steps below:
Steps to Follow >
➊ Press WIN+R, type cmd and hit ENTER. You will prompt to the command line interface.
❷ Now, write the following command in the command prompt to connect to the Samba share:
net use P: \\192.168.231.128\sambashare /user:nadiba 1234EXPLANATION
- net use: Manages network connectivity.
- P: Indicates the assigned drive letter for the Samba share. I have chosen ‘P’ drive.
- \\192.168.231.128\sambashare: Represents Samba server IP address and the shared folder.
- /user:nadiba: Specifies the Samba username. ‘nadiba’ is my Samba username.
- 1234: Represents Samba user password. Here, my system’s Samba user password is ‘1234’.

❸ You will find then that the Samba share has been mapped to the assigned drive letter like the following image:
You can also access Samba shares from PowerShell by following the given steps:
Steps to Follow >
➊ First, open PowerShell and write the following command to create a new drive:
New-PSDrive -Name A -PSProvider FileSystem -Root \\192.168.231.128\sambashare -Credential (Get-Credential)EXPLANATION
- New-PSDrive: Creates a new PowerShell drive.
- -Name A: Represents the letter of the drive you want to assign. I have preferred ‘A’ for my drive.
- -PSProvider FileSystem: Filesystem provider is used for the new drive.
- -Root \\192.168.231.128\sambashare: Specifies the path location of the Samba share.
- -Credential: The requirements to access the Samba share.
- (Get-Credential): Prompts you to provide the username and password to access Samba share.


cd A:EXPLANATION
- cd A: Navigates to the drive A.

Read More: How to Install, Configure and Connect Samba Client on Ubuntu
Comparative Analysis of Methods
While accessing Samba share from Windows, you have two options- using GUI or command line shell. Let’s make a comparative analysis between these two methods.
| Methods | Pros | Cons |
|---|---|---|
| Method 1 |
|
|
| Method 2 |
|
|
Overall, both methods are preferable with their individual specifications. Which method to choose totally depends on the user’s preference, experience level and individual perspective.
Complementary Information
Besides the previous discussion regarding access to Samba share, the below information might interest you.
How to Open PowerShell
There are several ways to open PowerShell in Windows. I have mentioned three easy processes below:
1. Open PowerShell Using File Explorer
Press WIN+E and type powershell in the address bar and tap ENTER.
2. Open PowerShell Using Run Dialog
Press WIN+R, write powershell and click OK.
Click on the Start menu at the bottom-left of the screen, scroll and expand the Windows PowerShell folder and then click on ‘Windows PowerShell’ option.
How to Perform Several Tasks on Samba Drive Using PowerShell
Using PowerShell you can view the listed contents, add new items or remove the whole Samba drive. Follow the detailed execution mentioned below:
List Contents
After navigating to the assigned Samba drive, you can list all the contents inside the Samba share using the command below:
Get-ChildItemEXPLANATION
- Get-ChildItem: Returns collection of contents within the shared path.

Create New Items
To create new files in a mounted Samba drive use the command below:
New-Item -ItemType File -Path A:\new_samba\samba.txtEXPLANATION
- New-Item: Creates new item.
- -ItemType File: Specifies the item’s type as file.
- -Path A:\new_samba\samba.txt: Indicates the location of the new file. I have created ‘samba.txt’ as a new file inside ‘A’ drive.

Remove Drive Mapping
Once done accessing Samba share, you can remove the mapped Samba drive using the following command:
Remove-PSDrive -Name AEXPLANATION
- Remove-PSDrive: Removes the assigned drive.
- -Name A: Represents the letter of the drive you want to assign. I have preferred ‘A’ for my drive.
Also, you can check if the drive has successfully been removed or not by running the syntax below:
Get-PSDrive -Name AEXPLANATION
- Get-PSDrive: Displays information about the given drive.
- -Name A: Represents the letter of the drive you want to assign.

Conclusion
Samba share integrates collaboration in mixed operating systems. So, to confirm seamless access to Samba share from Windows you must configure the Samba server and set permissions properly. Also, ensure that Windows and Linux machines are on the same network.
People Also Ask
Can I install Samba on Windows?
Yes, you can install Samba on Windows because it’s free and open-source software.
How to see SMB shares in CMD?
To view SMB shares click on the search box, then type cmd and press ENTER. At the prompt, write net share and hit ENTER.
How to find out my SMB IP Address?
Open the command prompt and type ipconfig and hit ENTER.
Do all Windows share use SMB file sharing protocol?
Yes, all Windows shares use SMB.
Can I block SMB traffic using Windows firewall?
You can block all inbound SMB traffic using Windows firewall configuration.
What is the security risk of SMB in Windows 10?
The SMB vulnerability lets an unauthenticated attacker execute any code as an application.
Related Articles
- How to Share Files between Linux and Windows
- How to Configure NFS Server in Linux? [5 Steps]
- How to Access Shared Folder in Ubuntu [2 Methods]
- How to Install and Configure Samba Server in Ubuntu? [4 Steps]
- How to Copy File from Windows to Linux Using SSH [2 Methods]
- How to Share Files between Linux and Windows Dual Boot [3 Methods]
Пожалуй нет ни одного офиса, в котором не применялись бы общие ресурсы локальной сети, будь то папки или принтеры. Крупные и средние компании используют возможности Active Directory, компании поменьше – используют штатные средства ОС Windows или Samba, но на серверах под управлением ОС Linux. Рассмотрим все случаи, как настроить Samba.
Что такое Samba?
Samba – серверное приложение, реализующее доступ клиентских терминалов к папкам, принтерам и дискам про протоколу SMB/CIFS.
Настройка общих папок в Linux
Установка и настройка Samba-сервер для Ubuntu выполняется следующими этапами.
Обновляем информацию о репозиториях и устанавливаем обновления для существующих пакетов в системе:
apt-get update && apt-get upgrade
Устанавливаем пакет Samba:
apt-get install -y samba samba-client
Создадим резервную копию файла конфигурации:
cp /etc/samba/smb.conf /etc/samba/smb.conf_sample
Создадим директории для файлов, например в каталоге /media:
mkdir /media/samba
Важно! По умолчанию, директория /media располагается в корне системы /, для нее редко создается свой раздел. По этой причине возможно переполнение корневого раздела. Во избежание этой неприятной ситуации, рекомендуем монтировать отдельный жесткий диск в /media/samba.
Создаем каталог для всех пользователей:
mkdir /media/samba/public
Изменим права доступа к каталогу:
chmod -R 0755 /media/samba/public
Также следует воспользоваться командой chown для смены владельца и/или группы.
Создаем директорию для ограниченного круга лиц:
mkdir /media/samba/private
С помощью системных инструментов создадим группу пользователей:
groupadd smbgrp
Добавляем пользователей Samba:
useradd user1
Созданных пользователей добавляем в группу:
usermod -aG smbgrp user1
Изменим группу, которой принадлежит приватная директория:
chgrp smbgrp /media/samba/private
С помощью инструментов Samba создадим пароль для добавленного пользователя:
smbpasswd -a user1
С помощью текстового редактора, например, nano, редактируем конфигурационный файл samba:
nano /etc/samba/smb.conf
Удаляем все строки из файла. Вставляем следующие:
[global]

workgroup = WORKGROUP

security = user

map to guest = bad user

wins support = no

dns proxy = no

[public]

path = /media/samba/public

guest ok = yes

force user = nobody

browsable = yes

writable = yes

[private]

path = /media/samba/private

valid users = @smbgrp

guest ok = no

browsable = yes

writable = yes
Сохраняем используя сочетание Ctrl + X, затем нажимаем Y и Enter.
Объясним значения строк. конфигурационный файл состоит из трех секций:
global – данная секция отвечает за общие настройки Samba-сервера;
public и private – секции описания настроек директорий общего доступа.
В секции global присутствуют пять параметров:
- workgroup – рабочая группа. Для упрощения работы пользователей WORKGROUP указывается, как группа по умолчанию. Если в вашей сети имя рабочей группы изменено, то следует изменить это значение и для Samba;
- security – уровень безопасности сервера. Значение user означает авторизацию по паре логин/пароль;
- map to guest – параметр определяет способ обработки запросов. Значение bad user означает, что запросы с неправильным паролем будут отклонены, даже если такое имя пользователя существует;
- wins support – включить или выключить поддержку WINS;
- dns proxy – возможность проксирования запросов к DNS.
Настройки директорий выполняются в соответствующих секциях:
path – полный путь до директории на жестком диске;
guest ok – возможность доступа к каталогу без пароля (гостевой);
browsable – показывать ли каталог (“шару”) на сервере среди прочих. Если параметр установлен как “no”, то доступ будет возможен по полному пути, например ip-addresshidden_directory;
force user – пользователь от которого ведется работа с каталогом. Для повышения безопасности сервера, обычно используют nobody. Главное, не использовать пользователя root – это небезопасно.
writable – установка значения как “yes” позволяет пользователю выполнять действия над файлами внутри каталога – переименование, добавление, удаление, перемещение в подкаталог и копирование;
valid users – список пользователей у которых есть доступ к каталогу. Если пользователей несколько, их имена указываются через запятую. Если необходим доступ для пользователей принадлежащих группе, перед именем группы устанавливается символ ”at” @ (“собака”).
Важно! Имя директории общего доступа, отображаемое пользователям, равно имени секции в которой оно описано.
Проверяем настройки с помощью команды:
testparm -s
Перезапускаем сервер:
service smbd restart
service nmbd restart
Настроим межсетевой экран. Для этого в правилах откроем TCP-порты 139 и 445, а также UDP-порты 137 и 138, но только для тех подсетей, которым доверяете. Для указания собственного диапазона адресов, замените значение после ключа “-s”:
iptables -A INPUT -p tcp -m tcp --dport 445 -s 10.0.0.0/24 -j ACCEPT

iptables -A INPUT -p tcp -m tcp --dport 139 -s 10.0.0.0/24 -j ACCEPT
iptables -A INPUT -p udp -m udp --dport 137 -s 10.0.0.0/24 -j ACCEPT
iptables -A INPUT -p udp -m udp --dport 138 -s 10.0.0.0/24 -j ACCEPT
Для сохранения правил и применения их после перезагрузки сервера следует воспользоваться пакетом iptables-persistent. Установим его:
apt-get install iptables-persistent
Входе установки пакета, программа предложит запомнить существующие правила iptables. Подтверждаем это действие.
Для проверки существующих правил используем:
iptables -L
Настройка общих папок в Windows
По аналогии с Linux, настроим общий доступ к папкам public и private, но в ОС Windows.
Для создания общего доступа к каталогу без парольной защиты, необходимо настроить ограничения защиты в панели управления. Для этого открываем:
Панель управления → Сеть → Центр управления сетями и общим доступом → Расширенные настройки общего доступа.
В обновленном окне открываем раздел “Все сети” и ищем секцию “Общий доступ с парольной защитой”. Устанавливаем параметр в положение “Отключить общий доступ с парольной защитой”. Для сохранения значений параметра кликаем по кнопке “Сохранить изменения”.
Теперь откроем доступ к самому каталогу. Кликаем по папке правой кнопкой мыши, в контекстном меню выбираем “Свойства”. Открываем вкладку “Доступ” и кликаем по “Расширенная настройка”.
В открывшемся окне расширенных настроек общего доступа отмечаем галочкой “Открыть общий доступ к этой папке”, в поле “Имя общего ресурса” указываем название, которое будет отображено пользователям. Кликаем по кнопке “Разрешения”.
В открывшемся окне, в группах пользователей выбираем “Все”, а в разрешениях для группы, устанавливаем галку “Полный доступ”. Нажимаем “OK” в этом и остальных окнах.
В окне свойств папки public кликаем по кнопке “Общий доступ”.
В открывшемся окне добавляем пользователя “Все”, а также делегируем права на “Чтение и запись”. Кликаем по кнопке “Поделиться”.
В обновленном окне нажимаем “Готово”.
Настроим папку общего доступа, но для ограниченного круга лиц.
Кликаем правой кнопкой мыши по папке, выбираем “Свойства”.
В открывшемся окне переходим на вкладку “Доступ”. Кликаем по кнопке “Расширенные настройки”.
В новом открывшемся окне, устанавливаем галку “Открыть общий доступ к этой папке”. Затем кликаем по кнопке “Разрешения”.
В открывшемся окне, в поле “Группы или пользователи” выбираем “Все” и нажимаем кнопку “Удалить”.
Таким образом установлен запрет на анонимный доступ к папке.
Окно обновится. Кликаем по кнопке “Добавить”.
В открывшемся окне кликаем по кнопке “Дополнительно”.
Окно изменится в размере. Кликаем по кнопке “Поиск”. Двойным кликом выбираем пользователя, которому необходим доступ к этому каталогу, например, buhgalter.
В открывшемся окне, при желании, можем добавить еще одного пользователя через “Дополнительно” – “Поиск”. Аналогичным образом можно добавить группу пользователей, например, “Администраторы”, при этом следует понимать, что доступ будет предоставлен всем пользователям из этой группы.
Установим права доступа для пользователя “buhgalter”. Если требуется полный доступ к директории, устанавливаем галку в соответствующем месте.
Нажимая кнопки “OK” возвращаемся к окну свойств папки, в котором кликаем по кнопке “Общий доступ”.
В данном окне необходимо найти и добавить пользователя “бухгалтер”.
В окне выбора пользователей и групп кликаем по кнопке “Дополнительно”.
Окно снова изменит свои размеры. Кликаем по кнопке “Поиск”. В найденном ниже списке пользователей и групп выбираем искомого пользователя. Выбираем его двойным кликом.
В оставшемся окне проверяем правильно ли указан пользователи и нажимаем кнопку “OK”.
Устанавливаем требуемый уровень разрешений для пользователя и кликаем по кнопке “Поделиться”.
Кликаем по кнопке “Готово”.
Подключение к общим папкам из Linux
Для подключения к общим папкам из среды Linux требуется установка отдельного программного обеспечения – smbclient. Установим:
sudo apt-get install smbclient
Для подключения к серверу используется следующий формат команды:
smbclient -U <Имя_пользователя> <IP-адрес><Имя_каталога_на_сервере>
Пример:
smbclient -U buhgalter 10.0.0.1public
Для того, Чтобы не вводить эту команду каждый раз, можно настроить монтирование общей директории как сетевого диска. Для этого установим пакет cifs-utils:
sudo apt-get install cifs-utils
Монтирование выполняется по следующему шаблону:
mount -t cifs -o username=<Имя_пользователя>,password= //<IP-адрес>/<Общий каталог> <Точка монтирования>
Пример:
mount -t cifs -o username=Everyone,password= //10.0.0.1/public /media
Важно! Если требуется подключение к общим папкам расположенным на Windows-сервере, то в для не защищенных паролем директорий, в качестве имени пользователя, следует использовать “Everyone”. Для подключения к Linux-серверу рекомендуем использовать в качестве имени пользователя “nobody”. В случае доступа к защищенным директориям следует использовать те учетные данные, которые вы указали.
Подключение к общим папкам из Windows
Подключение к удаленным папкам из среды Windows выполняется немного иначе. Для этого в проводнике или окне запуска программ (Windows + R), следует использовать следующий шаблон:
<IP-адрес><имя_папки>
Указав просто IP-адрес сервера вы получите список общих папок.
При подключении к Windows-серверу, система безопасности может потребовать ввод учетных данных. Для подключения к общей открытой папке используем Everyone, а поле пароля оставляем пустым.
При подключении к Linux-серверу из ОС Windows, следует использовать указанный ранее шаблон:
<IP-адрес><имя_папки>
или просто адрес сервера:
<IP-адрес>
Как создать общий сетевой ресурс в Samba
Создайте директорию, которую в хотите сделать общей:
mkdir /home//
Создайте бэкап, если что-то пойдет не так:
sudo cp /etc/samba/smb.conf ~
Отредактируйте файл “/etc/samba/smb.conf”:
sudo nano /etc/samba/smb.conf
Добавьте следующее содержимое в файл:
[]

path = /home//

valid users =

read only = no
Заполните файл своими данными, сохраните его и затем закройте
Перезапустим Samba:
sudo service smbd restart
Использую данную команду проверьте вашу директорию smb.conf на ошибки:
testparm
Чтобы получить доступ к вашему общему сетевому ресурсу:
sudo apt-get install smbclient

# Просмотр всех общих ресурсов:

smbclient -L /// -U

# Подключение:

smbclient /// -U
Note 1: Чтобы подключиться к вашему общему сетевому ресурсу используйте имя вашего пользователя () и пароль, который находится “smb:////”
Учтите, что “” значение передается в “[]”,
другими словами, имя общего ресурса, которое вы ввели в “/etc/samba/smb.conf”.
Note 2: Группа пользователей samba по умолчанию это – “WORKGROUP”.
on
How to connect to Linux Samba shares from Windows
If you’re having trouble figuring out how to connect Windows 10 or 11 to your data center Samba shares, Jack Wallen eases your concern with the simple steps to make this work.

When Windows 10 was released, it seemingly broke the ability to easily connect to Linux Samba shares. It appeared one could not write to Linux share from Windows 10. Considering how many businesses rely on Samba for the sharing of folders, this was a bad move on the part of Microsoft. Fortunately, the ability to connect to Samba shares wasn’t actually removed from the Windows platform, it was merely tucked a bit out of sight.
I want to walk you through the process of making that connection between Windows 10/11 and your Linux shares.
For this tutorial, I will assume you have both Windows 10 or 11 installed on a machine (or multiple machines) and a Samba share at the ready from your data center. With that said: Let’s connect.
Connecting to your server
Open up File Explorer and then right-click on This PC (in the left pane). From the resulting context menu, select Add A Network Location (Figure A).
Figure A
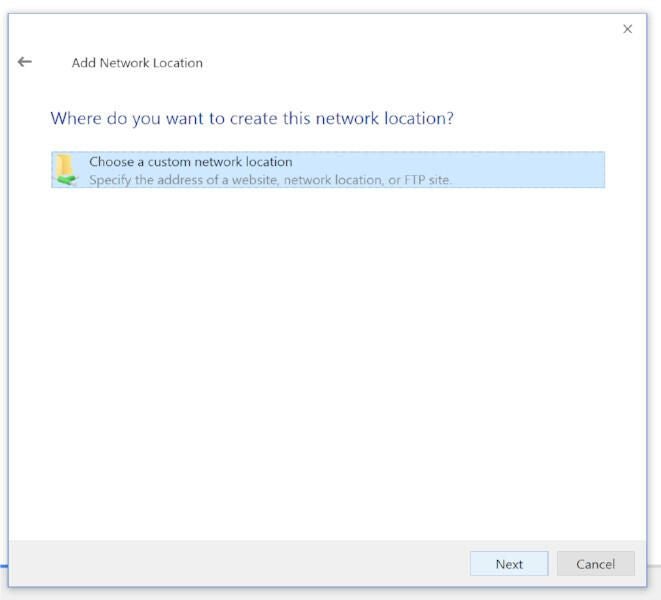
A new wizard will open, one that will walk you through the process of creating a shortcut for a new network location within File Explorer. Click Next in the Welcome window. In the resulting screen (Figure B), click Choose A Custom Network Location (the only option) and then click Next.
Figure B
Next you must enter the IP address of your Samba server (Figure C) in the form of //SERVER_IP/SHARE, where SERVER_IP is the IP address of your Samba server and SHARE is the name of the share you want to add.
Figure C
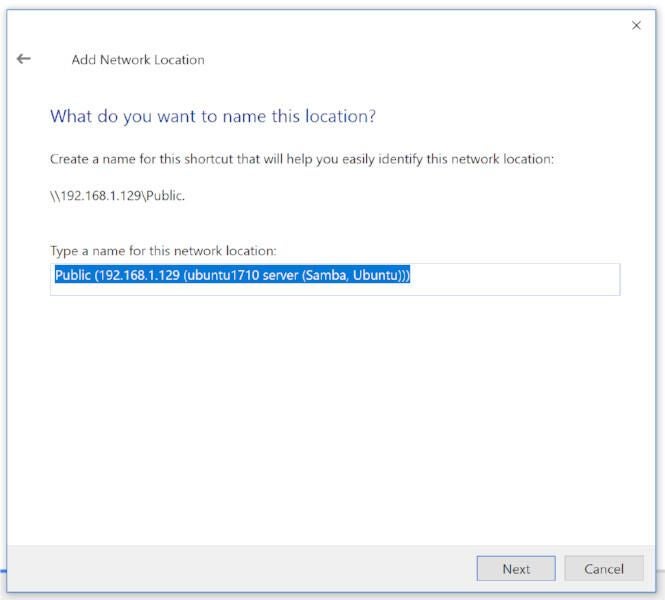
Click Next to continue on. In the next window (Figure D), type a name for the network location. A default name will be picked up by the Samba server, you can either use that or enter a custom name that makes it easier for you to remember either where the share is or what is housed within the share.
Figure D
Click Next to reach the final screen of the wizard. Here (Figure E) click Finish and the share is now ready for you to use.
Figure E
And that is all there is to connecting a Windows 10 machine to a Samba share in your data center. It’s not quite as easy as it once was, but the feature is, in fact, still there.
How to connect from Windows 11
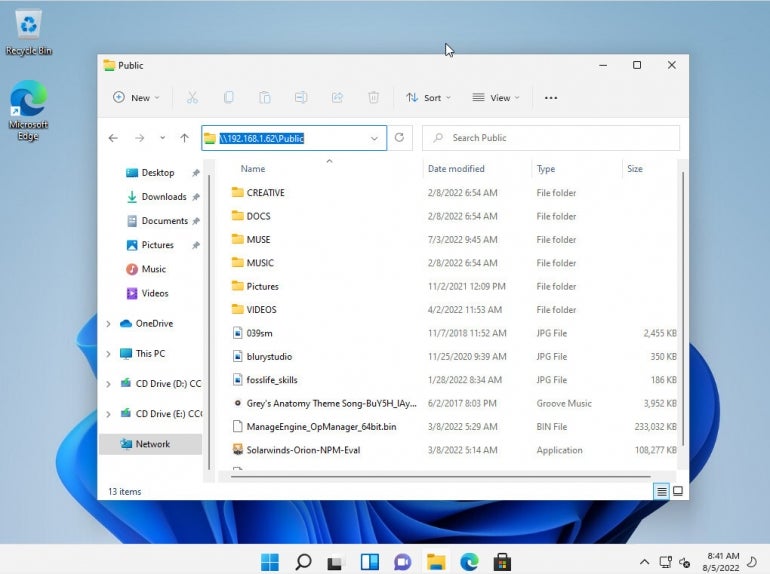
With Windows 11, it is much easier to make the connection. Simply open the file manager and in the address bar (Figure F) and type \\SERVER\SHARE, where SERVER is the IP address of the machine hosting the Samba share and SHARE is the name of the actual share.
Figure F
After hearing a number of people coming to me asking why they can not write to Linux share from Windows 10, I’m happy to tell you that it is not, in fact, broken. Although it’s a bit hidden away, you can still make that much needed desktop to data center connection.
Also See
-
How to protect Samba from the SambaCry exploit
(TechRepublic) -
How to set up Samba shares for groups
(TechRepublic) -
How to configure Ubuntu Linux server as a Domain Controller with samba-tool
(TechRepublic) -
Ethical Hacking Using Kali Linux From A to Z
(TechRepublic Academy)
-
Data Centers
-
Microsoft
-
Open source


