Samba version: Version 4.1.17-Ubuntu
Ubuntu 15.10
When accessing a Samba share in windows, I can see the share but whenever I try and access it — entering the same username and password as the Samba user created with sudo smbpasswd -a benjamin (same as system user), I only get «Access is Denied». Here are my smb settings
[global]
server string = %h server (Samba, Ubuntu)
#encrypt passwords = No
map to guest = Bad User
obey pam restrictions = Yes
passdb backend = tdbsam
pam password change = Yes
passwd program = /usr/bin/passwd %u
passwd chat = *Enter\snew\s*\spassword:* %n\n *Retype\snew\s*\spassword:* %n\n *password\supdated\ssuccessfully* .
unix password sync = Yes
syslog = 0
log file = /var/log/samba/log.%m
max log size = 1000
dns proxy = No
usershare allow guests = Yes
panic action = /usr/share/samba/panic-action %d

wins support = yes

name resolve order = wins lmhosts host bcast


[TVShare]
path = /media/MEDIA2/TV
available = yes
valid users = benjamin
read only = no
browsable = yes
public = yes
writable = no
Where ls -dl /media/MEDIA2/TV/ reads
drwxrwxr-x 40 benjamin benjamin 4096 Sep 5 16:18 /media/MEDIA2/TV/
Sample log:
[2015/12/20 12:52:02,  2] ../source3/lib/tallocmsg.c:124(register_msg_pool_usage)
  Registered MSG_REQ_POOL_USAGE
[2015/12/20 12:52:02,  2] ../source3/lib/dmallocmsg.c:78(register_dmalloc_msgs)
  Registered MSG_REQ_DMALLOC_MARK and LOG_CHANGED
[2015/12/20 12:52:02.517860,  2] ../source3/param/loadparm.c:543(max_open_files)
  rlimit_max: increasing rlimit_max (1024) to minimum Windows limit (16384)
[2015/12/20 12:52:02.517954,  2] ../source3/param/loadparm.c:3582(do_section)
  Processing section "[TVShare]"
[2015/12/20 12:52:02.518169,  2] ../source3/lib/interface.c:341(add_interface)
  added interface eth0 ip=192.168.0.5 bcast=192.168.0.255 netmask=255.255.255.0
[2015/12/20 12:52:02.522658,  0] ../lib/util/become_daemon.c:136(daemon_ready)
  STATUS=daemon 'smbd' finished starting up and ready to serve connectionsFailed to fetch record!
Здравствуйте. Пока борьба идет с громким матом, но хоть что-то уже получается. Итак.
Поставил самбу, настроил как здесь: http://bloglinux.ru/2011/06/26/kak-rassharit-papki-na-mashine-s-linux-dlya-se/
На винде диск видится, но выдает «отказано в доступе». Под линуксом такая же беда. Захожу в браузере smb://192.168.1.7/
Видно расшаренную папку и принтеры, в принтеры заходит, а вот в папку нет. Где копать?
#
# Sample configuration file for the Samba suite for Debian GNU/Linux.
#
#
# This is the main Samba configuration file. You should read the
# smb.conf(5) manual page in order to understand the options listed
# here. Samba has a huge number of configurable options most of which
# are not shown in this example
#
# Some options that are often worth tuning have been included as
# commented-out examples in this file.
#  - When such options are commented with ";", the proposed setting
#    differs from the default Samba behaviour
#  - When commented with "#", the proposed setting is the default
#    behaviour of Samba but the option is considered important
#    enough to be mentioned here
#
# NOTE: Whenever you modify this file you should run the command
# "testparm" to check that you have not made any basic syntactic
# errors.
#======================= Global Settings =======================
[global]
usershare owner only = false
## Browsing/Identification ###
# Change this to the workgroup/NT-domain name your Samba server will part of
workgroup = workgroup
# server string is the equivalent of the NT Description field
server string = %h server (Samba, Ubuntu)
host allow = ALL
# Windows Internet Name Serving Support Section:
# WINS Support - Tells the NMBD component of Samba to enable its WINS Server
# wins support = no
# WINS Server - Tells the NMBD components of Samba to be a WINS Client
# Note: Samba can be either a WINS Server, or a WINS Client, but NOT both
; wins server = w.x.y.z
# This will prevent nmbd to search for NetBIOS names through DNS.
dns proxy = no
#### Networking ####
# The specific set of interfaces / networks to bind to
# This can be either the interface name or an IP address/netmask;
# interface names are normally preferred
; interfaces = 127.0.0.0/8 eth0
# Only bind to the named interfaces and/or networks; you must use the
# 'interfaces' option above to use this.
# It is recommended that you enable this feature if your Samba machine is
# not protected by a firewall or is a firewall itself. However, this
# option cannot handle dynamic or non-broadcast interfaces correctly.
; bind interfaces only = yes
#### Debugging/Accounting ####
# This tells Samba to use a separate log file for each machine
# that connects
log file = /var/log/samba/log.%m
# Cap the size of the individual log files (in KiB).
max log size = 1000
# If you want Samba to only log through syslog then set the following
# parameter to 'yes'.
# syslog only = no
# We want Samba to log a minimum amount of information to syslog. Everything
# should go to /var/log/samba/log.{smbd,nmbd} instead. If you want to log
# through syslog you should set the following parameter to something higher.
syslog = 0
# Do something sensible when Samba crashes: mail the admin a backtrace
panic action = /usr/share/samba/panic-action %d
####### Authentication #######
# Server role. Defines in which mode Samba will operate. Possible
# values are "standalone server", "member server", "classic primary
# domain controller", "classic backup domain controller", "active
# directory domain controller".
#
# Most people will want "standalone sever" or "member server".
# Running as "active directory domain controller" will require first
# running "samba-tool domain provision" to wipe databases and create a
# new domain.
server role = standalone server
# If you are using encrypted passwords, Samba will need to know what
# password database type you are using.
; passdb backend = tdbsam
obey pam restrictions = yes
# This boolean parameter controls whether Samba attempts to sync the Unix
# password with the SMB password when the encrypted SMB password in the
# passdb is changed.
unix password sync = yes
# For Unix password sync to work on a Debian GNU/Linux system, the following
# parameters must be set (thanks to Ian Kahan <<kahan@informatik.tu-muenchen.de> for
# sending the correct chat script for the passwd program in Debian Sarge).
passwd program = /usr/bin/passwd %u
passwd chat = *Enter\snew\s*\spassword:* %n\n *Retype\snew\s*\spassword:* %n\n *password\supdated\ssuccessfully* .
# This boolean controls whether PAM will be used for password changes
# when requested by an SMB client instead of the program listed in
# 'passwd program'. The default is 'no'.
pam password change = yes
# This option controls how unsuccessful authentication attempts are mapped
# to anonymous connections
map to guest = bad user
########## Domains ###########
#
# The following settings only takes effect if 'server role = primary
# classic domain controller', 'server role = backup domain controller'
# or 'domain logons' is set
#
# It specifies the location of the user's
# profile directory from the client point of view) The following
# required a [profiles] share to be setup on the samba server (see
# below)
; logon path = \\%N\profiles\%U
# Another common choice is storing the profile in the user's home directory
# (this is Samba's default)
# logon path = \\%N\%U\profile
# The following setting only takes effect if 'domain logons' is set
# It specifies the location of a user's home directory (from the client
# point of view)
; logon drive = H:
# logon home = \\%N\%U
# The following setting only takes effect if 'domain logons' is set
# It specifies the script to run during logon. The script must be stored
# in the [netlogon] share
# NOTE: Must be store in 'DOS' file format convention
; logon script = logon.cmd
# This allows Unix users to be created on the domain controller via the SAMR
# RPC pipe. The example command creates a user account with a disabled Unix
# password; please adapt to your needs
; add user script = /usr/sbin/adduser --quiet --disabled-password --gecos "" %u
# This allows machine accounts to be created on the domain controller via the
# SAMR RPC pipe.
# The following assumes a "machines" group exists on the system
; add machine script = /usr/sbin/useradd -g machines -c "%u machine account" -d /var/lib/samba -s /bin/false %u
# This allows Unix groups to be created on the domain controller via the SAMR
# RPC pipe.
; add group script = /usr/sbin/addgroup --force-badname %g
############ Misc ############
# Using the following line enables you to customise your configuration
# on a per machine basis. The %m gets replaced with the netbios name
# of the machine that is connecting
; include = /home/samba/etc/smb.conf.%m
# Some defaults for winbind (make sure you're not using the ranges
# for something else.)
; idmap uid = 10000-20000
; idmap gid = 10000-20000
; template shell = /bin/bash
# Setup usershare options to enable non-root users to share folders
# with the net usershare command.
# Maximum number of usershare. 0 (default) means that usershare is disabled.
; usershare max shares = 100
# Allow users who've been granted usershare privileges to create
# public shares, not just authenticated ones
usershare allow guests = yes
username map = /etc/samba/smbusers
security = user
; encrypt passwords = yes
; guest ok = no
; guest account = nobody
#======================= Share Definitions =======================
# Un-comment the following (and tweak the other settings below to suit)
# to enable the default home directory shares. This will share each
# user's home directory as \\server\username
;[homes]
; comment = Home Directories
; browseable = no
omment = DATA
path = /media/data
browsable = yes
writable = yes
guest ok = yes
# By default, the home directories are exported read-only. Change the
# next parameter to 'no' if you want to be able to write to them.
; read only = yes
# File creation mask is set to 0700 for security reasons. If you want to
# create files with group=rw permissions, set next parameter to 0775.
; create mask = 0700
# Directory creation mask is set to 0700 for security reasons. If you want to
# create dirs. with group=rw permissions, set next parameter to 0775.
; directory mask = 0700
# By default, \\server\username shares can be connected to by anyone
# with access to the samba server.
# Un-comment the following parameter to make sure that only "username"
# can connect to \\server\username
# This might need tweaking when using external authentication schemes
; valid users = %S
# Un-comment the following and create the netlogon directory for Domain Logons
# (you need to configure Samba to act as a domain controller too.)
;[netlogon]
; comment = Network Logon Service
; path = /home/samba/netlogon
; guest ok = yes
; read only = yes
# Un-comment the following and create the profiles directory to store
# users profiles (see the "logon path" option above)
# (you need to configure Samba to act as a domain controller too.)
# The path below should be writable by all users so that their
# profile directory may be created the first time they log on
;[profiles]
; comment = Users profiles
; path = /home/samba/profiles
; guest ok = no
; browseable = no
; create mask = 0600
; directory mask = 0700
[printers]
comment = All Printers
browseable = no
path = /var/spool/samba
printable = yes
; guest ok = no
; read only = yes
create mask = 0700
# Windows clients look for this share name as a source of downloadable
# printer drivers
[print$]
comment = Printer Drivers
path = /var/lib/samba/printers
; browseable = yes
; read only = yes
; guest ok = no
# Uncomment to allow remote administration of Windows print drivers.
# You may need to replace 'lpadmin' with the name of the group your
# admin users are members of.
# Please note that you also need to set appropriate Unix permissions
# to the drivers directory for these users to have write rights in it
; write list = root, @lpadmin
[data]
comment = data
path = /media/data
writeable = yes
; browseable = yes
guest ok = yes

When working with Samba, a popular software suite used for file and print services, you may encounter errors such as “NT_STATUS_ACCESS_DENIED” or missing usershares. These errors can prevent you from accessing shared resources on a network. In this article, we will guide you through a step-by-step process to resolve these issues.
To fix the Samba Windows Share error «NT_STATUS_ACCESS_DENIED» and the issue of missing usershares, you can try reinstalling Samba, configuring the Samba settings correctly, creating the usershare directory if it’s missing, setting the correct permissions for the directory, restarting the Samba service, and connecting to the Samba share using the smbclient command. If these steps don’t resolve the issues, further troubleshooting may be required.
- Understanding the Errors
- Prerequisites
- Step 1: Reinstall Samba
- Step 2: Configure Samba
- Step 3: Check for Missing usershares
- Step 4: Set Correct Permissions
- Step 5: Restart Samba Service
- Step 6: Connect to the Samba Share
- Conclusion
Understanding the Errors
Before we dive into the solutions, it’s important to understand what these errors mean:
- NT_STATUS_ACCESS_DENIED: This error typically occurs when you’re trying to access a Samba share, but the server denies your request due to incorrect permissions or configurations.
- Missing usershares: This error indicates that the system cannot find the specified usershare directory, usually located at
/var/lib/samba/usershares/.
Prerequisites
Before starting, ensure that you have administrator access to the server where Samba is installed. You also need to have a basic understanding of Linux terminal commands.
Step 1: Reinstall Samba
The first step is to ensure that Samba is correctly installed. If there are any issues with the installation, it’s a good idea to purge the existing installation and reinstall it.
sudo apt-get purge samba
sudo apt-get install samba
The sudo command gives you superuser privileges, apt-get purge removes the software and its configuration files, and apt-get install installs the software.
Step 2: Configure Samba
Next, you need to check the Samba configuration file located at /etc/samba/smb.conf. This file contains all the settings related to Samba.
Add the following line under the [global] section:
netbios name = somethinglessthan15charsThe netbios name directive sets the NetBIOS name of the server, which should be less than 15 characters.
Step 3: Check for Missing usershares
If the usershare directory is missing, you can create it manually using the touch command:
sudo touch /var/lib/samba/usershares/publicThe touch command creates a new file if it doesn’t exist.
Step 4: Set Correct Permissions
Setting the correct permissions for the usershare directory is crucial. You can set the permissions using the chmod command:
sudo chmod 777 /var/lib/samba/usershares/publicThe chmod 777 command gives read, write, and execute permissions to all users.
Step 5: Restart Samba Service
After making these changes, you need to restart the Samba service for the changes to take effect:
sudo service smbd restartThe service command is used to run a System V init script, in this case, the smbd script which controls the Samba service.
Step 6: Connect to the Samba Share
Finally, try connecting to the Samba share using the smbclient command:
smbclient \\\\localhost\\public -U publicThe smbclient command is a client that can ‘talk’ to a Samba server. It offers an interface similar to that of the ftp program.
If you’re still experiencing issues, check the Samba log file (/var/log/samba/log.%m) and the auth.log file for any error messages. These logs can provide valuable insights into what might be causing the problem.
Conclusion
In this article, we’ve covered how to fix the “NT_STATUS_ACCESS_DENIED” error and the missing usershares error in Samba. By following these steps, you should be able to resolve these issues and successfully connect to your Samba share. If you’re still having trouble, consider seeking help from the Samba community.
You can check if Samba is installed on your system by running the command dpkg -s samba. If Samba is installed, it will display information about the package. If it is not installed, it will show an error message.
The Samba configuration file is located at /etc/samba/smb.conf. You can access it using a text editor, such as nano or vi, by running the command sudo nano /etc/samba/smb.conf.
You can restart the Samba service by running the command sudo service smbd restart. This command will restart the Samba daemon and apply any changes made to the configuration file.
You can check the Samba version installed on your system by running the command smbd -V or samba -V. This will display the version information of the installed Samba package.
The Samba log file is located at /var/log/samba/log.%m, where %m represents the name of the client machine. You can view the log file by running the command sudo tail -f /var/log/samba/log.%m. This will display the contents of the log file in real-time.
To change the permissions of a Samba share, you can modify the valid users parameter in the Samba configuration file. This parameter specifies the users or groups that have access to the share. After making changes to the configuration file, remember to restart the Samba service for the changes to take effect.
To add a new user to Samba, you can use the smbpasswd command. Run the command sudo smbpasswd -a username and provide a password for the user when prompted. This will add the user to the Samba password database.
To remove a user from Samba, you can use the smbpasswd command with the -x option. Run the command sudo smbpasswd -x username, replacing username with the name of the user you want to remove. This will remove the user from the Samba password database.
You can list the shared folders in Samba by running the command smbclient -L //localhost -U username, replacing username with a valid Samba username. This will display a list of shared folders on the local Samba server.
To set up a password-protected Samba share, you need to modify the Samba configuration file and add the desired share configuration. Within the share configuration, set the valid users parameter to specify the users or groups allowed access. After making the changes, restart the Samba service for the configuration to take effect.
 Ошибки сетевого доступа в Windows — вещь довольно неприятная, тем более что не все умеют их правильно диагностировать и исправлять. При том, что интернет кишит различными способами самой разной степени сомнительности. Поэтому мы решили подробно разобрать одну из типовых ситуаций, показав как процесс диагностики, так и различные способы решения проблемы, каждое из которых имеет свои особенности, в частности влияние на безопасность. Такой подход позволит не только выяснить причины ошибки и устранить ее, но и поможет подойти к этому вопросу осознанно, полностью представляя последствия своих действий.
Научиться настраивать MikroTik с нуля или систематизировать уже имеющиеся знания можно на углубленном курсе по администрированию MikroTik. Автор курса, сертифицированный тренер MikroTik Дмитрий Скоромнов, лично проверяет лабораторные работы и контролирует прогресс каждого своего студента. В три раза больше информации, чем в вендорской программе MTCNA, более 20 часов практики и доступ навсегда.
С ситуацией, когда компьютер под ОС Windows не хочет подключаться или перестает подключаться к общим ресурсам на сервере Samba под управлением Linux встретиться можно довольно часто и тому есть объективные причины, которые мы рассмотрим ниже, ну а пока посмотрим на ее внешние симптомы. Система неожиданно сообщает, что она не может получить доступ к указанному ресурсу и выдает абсолютно неинформативную ошибку:
Код ошибки: 0x80004005
Неопознанная ошибка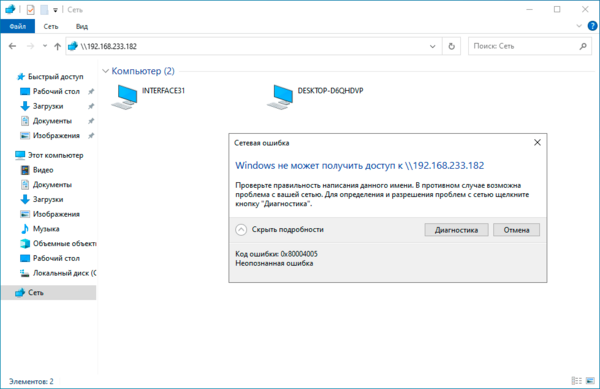
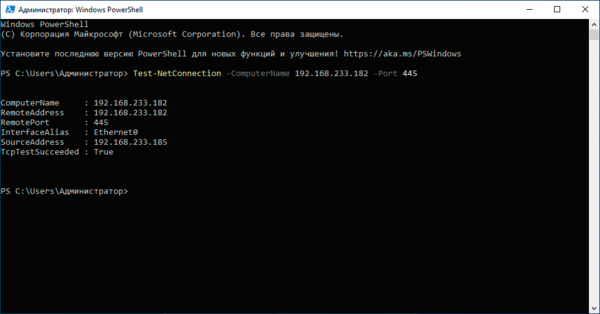
Если попробовать подключиться в консоли, например, командой:
net view \\192.168.233.182Где 192.168.233.182 — адрес искомого сервера, то получим немного другую ошибку:
Системная ошибка 53.
Не найден сетевой путь.
При этом указанный узел нормально пингуется, а проверка доступности 445 порта говорит, что все нормально:
 После этого обычно начинается сетование на кривизну какого-либо из решений (в зависимости от личных предпочтений) и поиск решения в интернете, где можно найти как условно рабочие, так и полную дичь, вроде включения SMB1 и бездумного изменения различных политик и ключей реестра.
Но не будем спешить, вы же не глотаете все подряд из домашней аптечки только почувствовав недомогание? Так и здесь, поэтому будем разбираться.
Но сперва поясним ситуацию по протоколу SMB1:
Протокол SMB1 устарел и небезопасен, в настоящее время отключен на всех современных системах.
Кроме того, даже если вы включите его поддержку, то начиная с Windows 1709 она автоматически отключится после 15 дней неиспользования. В общем: включать SMB1 не нужно, разве что только вам действительно нужна поддержка устаревших клиентов.
В современных версиях Samba протокол SMB1 также отключен и минимальной поддерживаемой версией является SMB2_02, а максимальной SMB3. Это параметры по умолчанию и проверить их можно командами:
testparm --parameter-name="min protocol"
testparm --parameter-name="max protocol"
Настройки по умолчанию достаточно актуальны, и мы не советуем отдельно задавать версии протоколов без особой на то нужды. SMB2_02 — обозначает младшую версию протокола SMB2, а SMB3 указывает на старшую доступную версию, таким образом поддерживаются все системы начиная с Windows Vista и Server 2008. Причиной ошибки SMB1 быть не может.
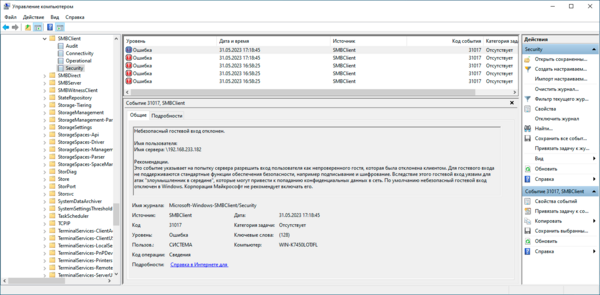
Поэтому не занимаемся ерундой, а ищем истинную причину, в этом нам поможет Журнал событий. Раскрываем последовательно Журналы приложений и служб — Microsoft — Windows — SMBClient и в журнале Security находим ошибку 31017:
Небезопасный гостевой вход отклонен.Рекомендации.
Это событие указывает на попытку сервера разрешить вход пользователя как непроверенного гостя, которая была отклонена клиентом.
Для гостевого входа не поддерживаются стандартные функции обеспечения безопасности, например подписывание и шифрование.
Вследствие этого гостевой вход уязвим для атак "злоумышленник в середине", которые могут привести к попаданию конфиденциальных данных в сеть.
По умолчанию небезопасный гостевой вход отключен в Windows. Корпорация Майкрософт не рекомендует включать его.
 После чего все становится на свои места. Нет никаких чудес, просто политики безопасности Windwos не позволяют подключаться к серверу с анонимным гостевым доступом. Кстати, это относится не только к Samba.
Теперь, когда есть понимание происходящего мы можем выбрать одно из двух решений указанной проблемы.
Решение №1. Отключаем гостевой доступ на сервере Samba
С точки зрения безопасности это наиболее правильное решение, которое позволит получать доступ к общим ресурсам не снижая уровень безопасности сети. Для этого внесем некоторые изменения в конфигурационный файл Samba, обычно он располагается в /etc/samba/smb.conf. Прежде всего найдем и приведем к следующему виду директиву:
map to guest = neverА в настройках каждого общего ресурса укажем:
guest ok = noВозможно, вам еще придется выполнить некоторые настройки, скажем, завести пользователей и назначить им права, для всего этого рекомендуем воспользоваться нашей статьей:
Настройка файлового сервера Samba на платформе Debian / Ubuntu
Сохраняем все изменения и проверяем конфигурацию на ошибки:
testparmЗатем перезапускаем службу:
systemctl restart smbdПосле чего повторно пробуем подключиться и сразу видим окно для ввода учетных данных:
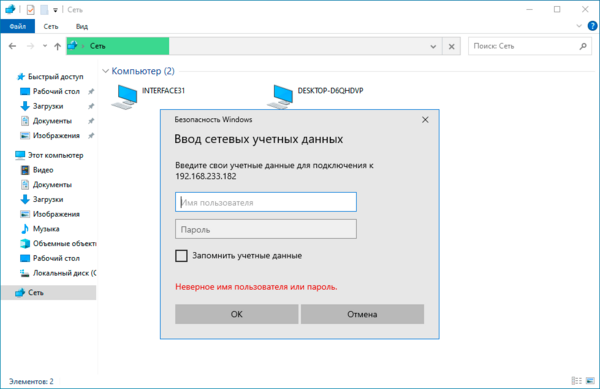 Проблема решена, ресурсы файлового сервера Samba снова доступны.
Решение №2. Разрешаем небезопасный гостевой вход в Windows
Если Решение №1 вас по каким-либо причинам не устраивает, и вы осознанно хотите понизить уровень безопасности вашей сети, то можно пойти другим путем и разрешить небезопасный гостевой вход.
Запустим редактор групповой политики (gpedit.msc) и перейдем в Конфигурация компьютера — Административные шаблоны — Сеть — Рабочая станция Lanman и переводим политику Включить небезопасные гостевые входы в положение Включено.
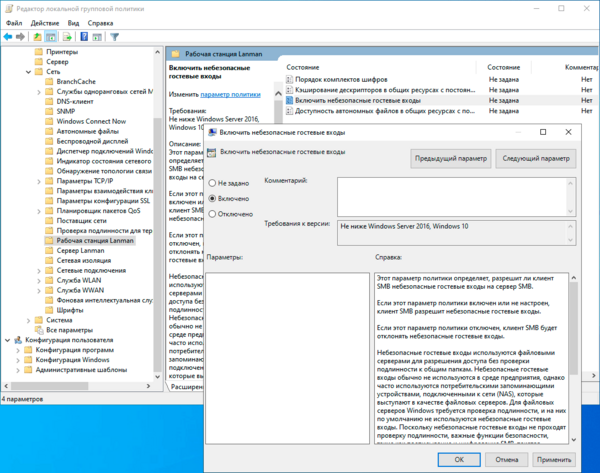
После чего вам потребуется перезапустить службу Рабочая станция или перезагрузить компьютер.
Альтернативой этому способу будет внесение изменений через реестр:
reg add "HKLM\SYSTEM\CurrentControlSet\Services\LanmanWorkstation\Parameters" /v AllowInsecureGuestAuth /t REG_DWORD /d 1Затем перезапустим службу:
net stop LanmanWorkstation && net start LanmanWorkstationПосле чего можем продолжать привычно использовать общие сетевые ресурсы с гостевой моделью доступа.
 Какой вывод можно сделать после прочтения данного материала? Прежде всего понять, что любые сетевые ошибки имеют под собой вполне определенную причину, а не являются воздействием некой неведомой силы. И эти причины имеют свойство отображаться в журналах и логах.
Решений таких проблем также может быть несколько, каждое из которых может иметь свои достоинства и недостатки. Поэтому не нужно хватать первый попавшийся рецепт из интернета, а следует разобраться в причинах и выбрать из доступных вариантов тот, который будет вас наиболее устраивать.
Научиться настраивать MikroTik с нуля или систематизировать уже имеющиеся знания можно на углубленном курсе по администрированию MikroTik. Автор курса, сертифицированный тренер MikroTik Дмитрий Скоромнов, лично проверяет лабораторные работы и контролирует прогресс каждого своего студента. В три раза больше информации, чем в вендорской программе MTCNA, более 20 часов практики и доступ навсегда.