If you want to learn more about web design and development, installing Internet Information Services (IIS) on your Windows 10 computer is a good method. IIS is a free Windows Feature included in Windows 10, so why not use it?
IIS is a full-featured web and FTP server with some powerful admin tools, strong security features, and can be used to host ASP.NET and PHP applications on the same server. You can even host WordPress sites on IIS.
There are three ways to install and set up a website in IIS on Windows 10; using the Graphical User Interface (GUI), PowerShell, or Windows CMD. We’ll be using each method to do a basic installation of IIS.
Install IIS Using The GUI
This is the point-and-click method to set up a website in IIS. It’s the ideal method if you haven’t learned PowerShell or Windows commands.
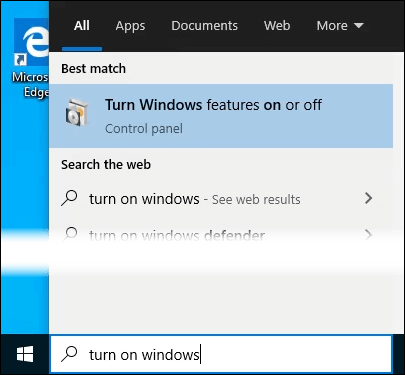
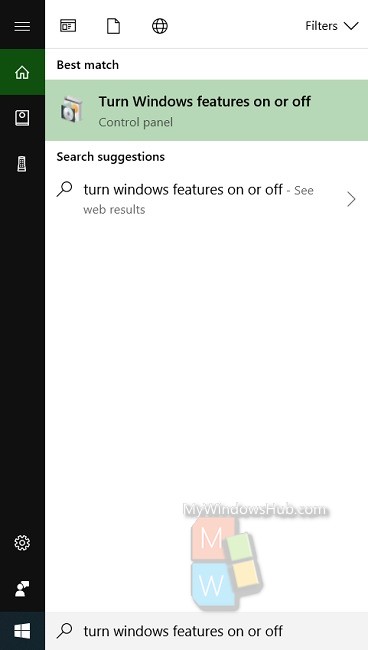
- Start typing “turn on windows” in the Search bar. The Turn Windows features on or off utility will show as a result. Click on it.
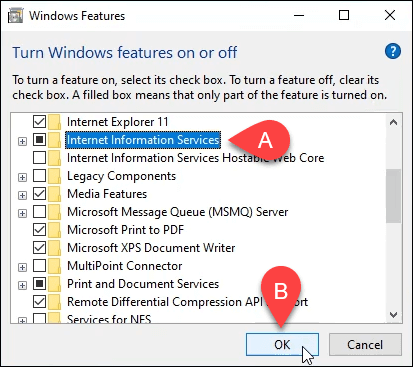
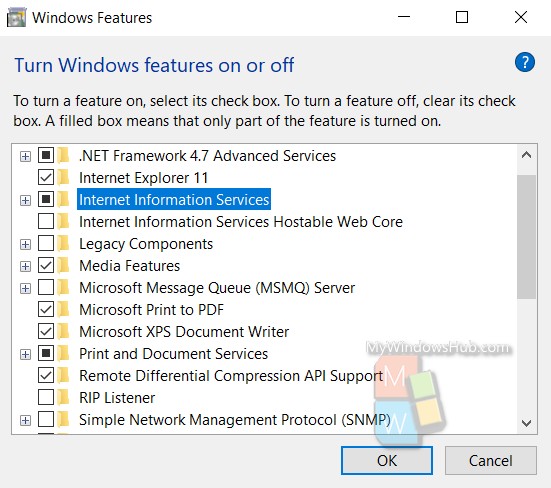
- The Windows Features window will open. It may take a bit for the different features to load. Once it does, click on the checkbox next to Internet Information Services and then click the OK button.
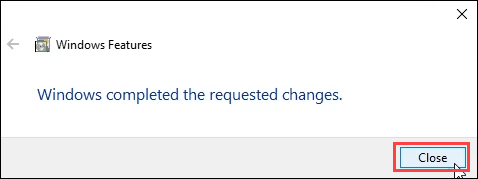
- The installation will begin and can take several minutes. Once it’s completed, click on the Close button.
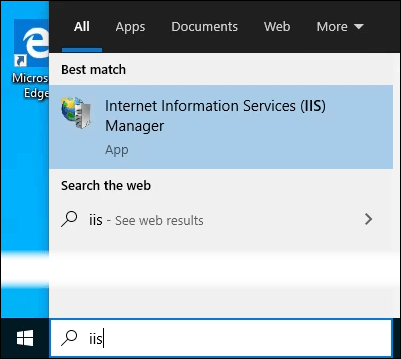
- To ensure that IIS is installed and working, type IIS in the Search bar near the Start button. You’ll see the Internet Information Services Manager as a result. Click on that to open it.
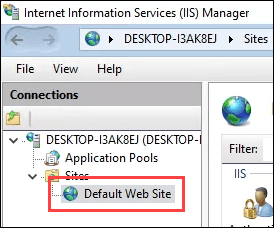
- When IIS Manager opens, look in the left pane of the window under Connections. Expand the tree menu until you see Default Web Site. That’s a placeholder site that is installed with IIS. Click on it to select it.
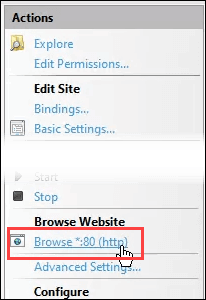
- On the right side of the IIS Manager look under the Browse Website section. Click on Browse *:80 (http). That will open the default web site in your default web browser.
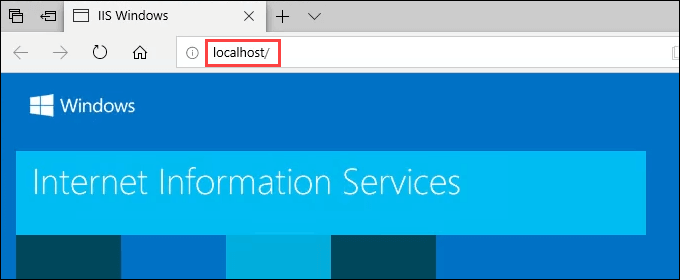
- You’ll see a web page like the following. Notice in the address bar that it says localhost. That’s the address to type in to go to your new website.
Create Your First Web Page for IIS
Before we go into the other two methods of installing IIS, let’s see where the files that make your website are stored. We’ll also make a very basic web page. Once you know how to do this, you’ll know the basics to jump into learning web design and development.
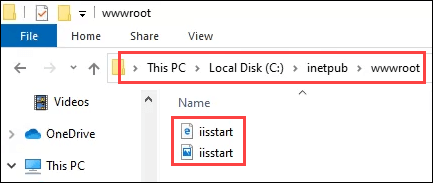
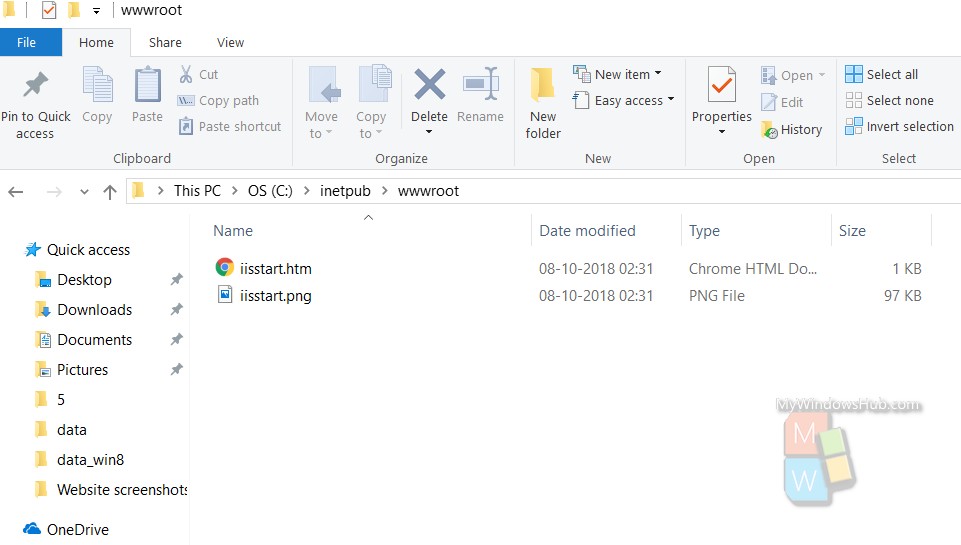
- After IIS is installed, open File Explorer. Navigate to C:\intepub\wwwroot. That’s where the files that make up the website need to be stored. You’ll see the default IIS web page file, iisstart.html, and the image shown on the page, iisstart.png. This is where you’ll save your first web page.
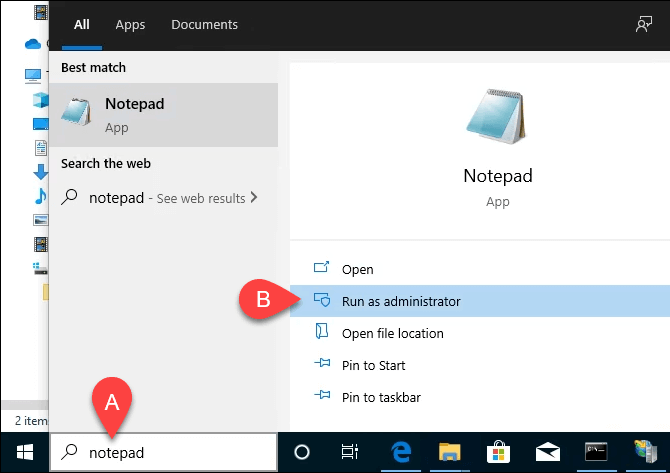
- Open Notepad as administrator. To save to the wwwroot location, you must be an administrator.
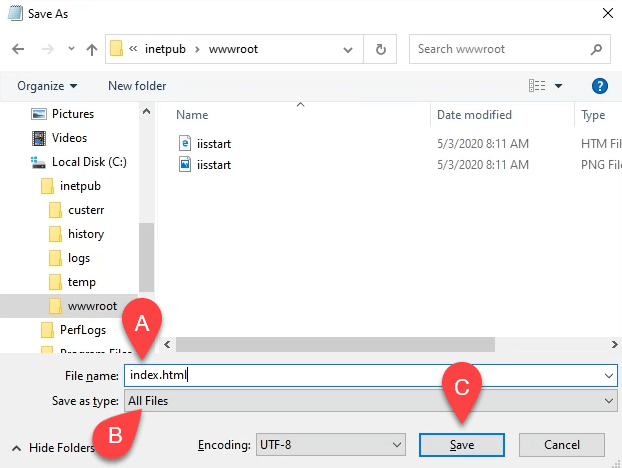
- Save the file to the wwwroot location. Name it index.html and change the Save as type: to All Files. Then click the Save button.
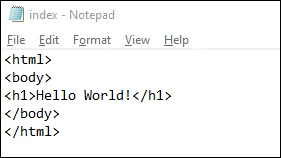
- Now that it’s saved as the right filetype, let’s put some content in it. Enter the following HTML code for a very basic web page and save it:
<html>
<body>
<h1>Hello World!</h1>
</body>
</html>
- Go back to the web browser that has the default IIS web page. Click on the refresh button. You will now see your first web page.
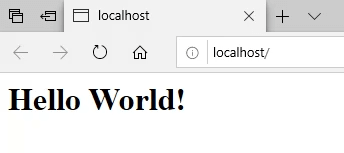
That’s it! You’ve just created and published your first website on IIS.
Install IIS Using Windows Commands
We can reduce the process of installing IIS to a one-line command. It can be done in either Windows Command Prompt or using PowerShell. We’ll show you how to do it with Windows command first, but learning PowerShell would be of great benefit in the future.
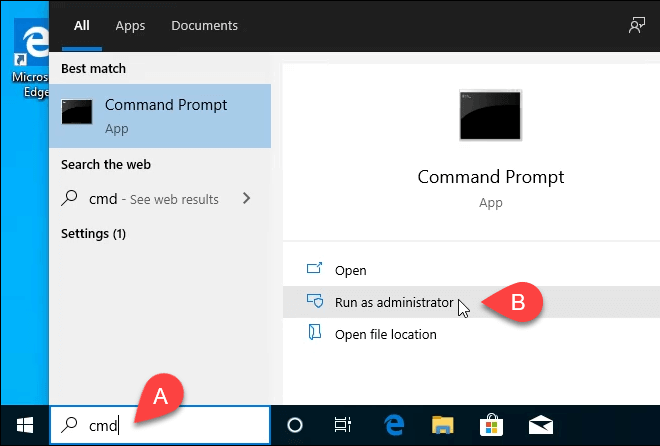
- Type cmd in the search bar and the top result should be Command Prompt. Click on Run as administrator.
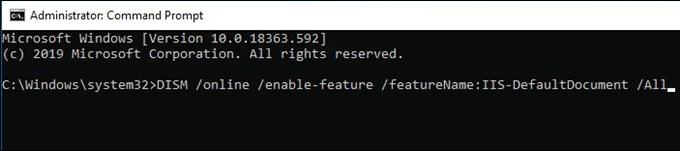
- Type in the command DISM /online /enable-feature /featureName:IIS-DefaultDocument /All and press Enter.
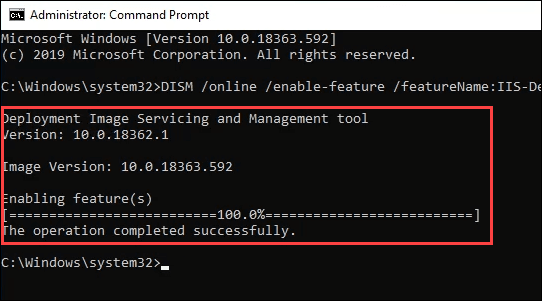
- You’ll see a progress bar appear. Once it reaches 100.0% and you see the message, “The operation completed successfully.” you can close the Command Prompt. IIS is installed.
- Check to ensure you can open the IIS Manager and that the installation worked, using steps 4-7 from the Install IIS Using The GUI section.
Install IIS Using PowerShell
Learning to do things like installing IIS in PowerShell is a huge benefit for two reasons. One, it’s the easiest and fastest way to do most administrative tasks in Windows. Two, you can save your PowerShell commands, known as cmdlets, as a script and run them anytime on any Windows computer or server.
- Type powershell in the search bar and one of the results should be PowerShell ISE. Click on Run as administrator.

- Type the cmdlet Enable-WindowsOptionalFeature -Online -FeatureName IIS-WebServerRole -NoRestart and run it. You’ll see a progress bar start. Once it’s complete, check to make sure IIS is installed and working.
- This step is optional, but you can save this as a PowerShell script and then run it anytime. Work with the script and add different parameters. Eventually, you’ll have an IIS install script that sets things up exactly as you want it, every time, with a single click.
You’re The Web Now!
This is just the beginning of what you can do with making your own website in IIS. Look into using IIS for FTP file transfer or media hosting as well. Also, look into Microsoft’s Web Platform Installer for simplified ways to install and learn things like WordPress, PHP, Python, and more.
In this tutorial, we are going to learn how to host a website in local IIS in windows 10. IIS or Internet Information Services are used to host ASP.Net Web applications to either show your development progress for a client or for a test run of your websites. If you are a freelancer and want to show your sites to your customer, IIS might be your best and easiest way.
Also visit : how to enable IIS How to enable Internet Information Services
Before we start make sure that you have enable IIS on your Windows machine. If not, follow the step provided below.
I. Enable IIS on Windows 10
It’s really easy to enable Internet Information Services in Windows 10. Internet Information Services (IIS) is a Microsoft-developed extended web server that may be used with Windows NT; also, ASP.NET developers will want to enable IIS , since it is required to host ASP.NET. IIS has an interactive user interface that makes configuring the server simple.
To enable IIS and the required IIS components on Windows 10, do the following:
- Open Control Panel and click Programs and Features » Turn Windows features on or off.
- Enable Internet Information Services.
- Expand the Internet Information Services feature and verify the web server components that is needed for IIS to work. Refer to the required IIS component listed below.
- Click OK.
Required IIS components
- Web Management Tools
- IIS 6 Management Compatibility
- IIS Metabase and IIS 6 configuration compatibility
- IIS Management Console
- IIS 6 Management Compatibility
- World Wide Web Services
- Application Development Features
- .NET Extensibility 4.5
- ASP.NET 4.5
- ISAPI Extensions
- ISAPI Filters
- WebSocket Protocol
- Common HTTP Features
- Default Document
- Static Content
- Security
- Basic Authentication
- Request Filtering
- Windows Authentication
- Application Development Features
II. How to Check IIS Version on Windows 10
- Open Run Command using the shortcut Win Key + R.
- Search for inetmgr.
- Internet Information Services(IIS) manager will open.
- Click on Help.
- Go to “About Internet Information Services“
- “About Internet Information Services manager dialog box will now open, where you can view details on about your IIS.
III. Deploy ASP.NET MVC on IIS
- First, open your IIS Manager by going to the start menu and searching for Internet Information Services(IIS) and open Internet Information Services from the search result. Refer to the image shown below.
You may also use Run then input inetmgr to open IIS Manager.
2. In your IIS manager, expand the sites folder and right click on Default Web Sites. Then select Explore to open the root directory.
3. Once the root directory is open, we can create a folder for our ASP.NET directory location. wwwroot is the default IIS directory, but if you want to select different location, you can specify it later after we are done creating the build files for our ASP.NET MVC Application. In this tutorial, this is the directory that I use. wwwroot » MySites.
4. Now, it’s time to create build file for our sample ASP.NET App. In my case I just pick-up a random project I created from my previous tutorial, you may check it out this link for a sample ASP.NET App “Login App using Form Authentication in ASP.NET MVC“. You may also create a new project just to test IIS deployment.
This is how my sample Web Application looks like.
5. Open your project in Visual Studio and navigate to the solution explorer. Right-click on your project name and select publish.
6. In the Publish Web Window choose Profile and create name for your publish profile.
7. To customize the profile name for this setting you may set a familiar name to easily identify it for the next time you deploy this application. Enter your desired publish profile name. Then press “OK”.
8. Click “Next” to proceed. Select File System as your publish method.
9. Select your published directory. In my case, it is C:\inetpub\wwwroot\MySites, which is the default website directory of IIS. Then click “Open.”
10. Lastly click on the publish button to proceed. See the image below.
11. It may take a while to finish an application to publish. Once, done you can see the notification from the Output windows like the screenshot shown below.
IV. Convert your website to IIS Application
Navigate back to your IIS Manager and go to Sites » Default Web Sites. Then search for your folder name where we published our websites. In my case, I name it MySites. Right-click on the folder name MySites and select Convert to Application.
You’re done!! To open your website application right click on MySites. Select Manage Application then choose browse.
Browser will popup and display your deployed ASP.NET Application. See the image below.
You may also access your websites using your local IP ex. http://192.168.1.2/MySites
Summary
In this tutorial, we have learn how to host a website in local IIS in windows 10. We also lear how we can enable and configure IIS on windows 10. If you wanted to share your website to your team on your local network you can visit this article to know how you can configure IIS to use your local IP address Deploy and Share ASP NET Core WebApp to a Local Network using IIS
That’s it you have successfully publish your website into IIS. Hopefully, this article will give you an idea and can be used with your future project.
KEEP CODING!
Also Read :
Best Computer Services Brisbane
Sony Ericsson Mobile
-
Служба поддержки SSL.com -
19 мая 2020 -
IIS, Другое, Windows
Время, необходимое: 15 минут
Это руководство поможет вам настроить новый веб-сайт в Internet Information Services (IIS). Эти шаги показаны в IIS 10 в Windows 10 Enterprise, но те же основные процедуры применяются к IIS 7 и 8.
- Откройте диспетчер IIS.
Открытые Internet Information Services (IIS) Manager. Вы можете быстро найти его, набрав «IIS» в поле поиска.

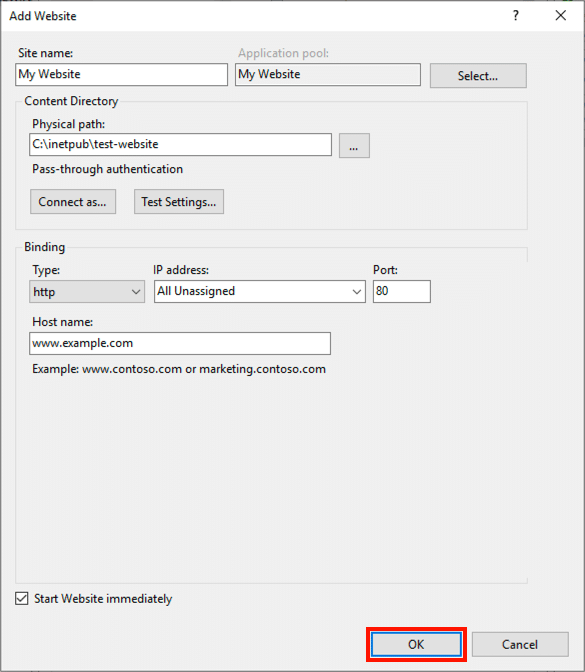
- Добавить сайт.
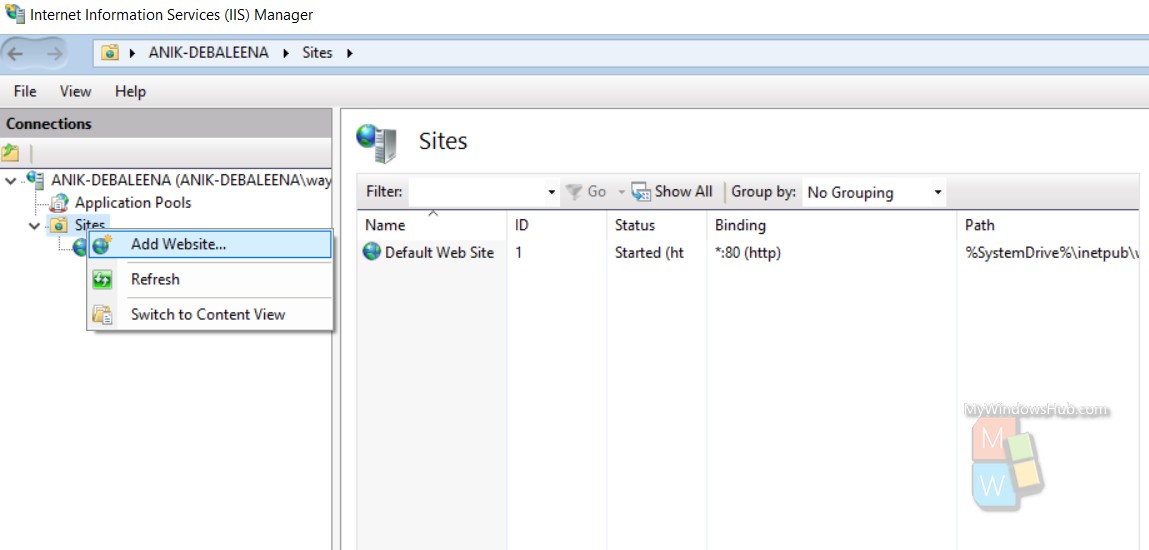
Разверните каталог вашего компьютера, щелкнув > слева от значка на левой панели. Затем щелкните правой кнопкой мыши Сайтов и Добавить сайт…

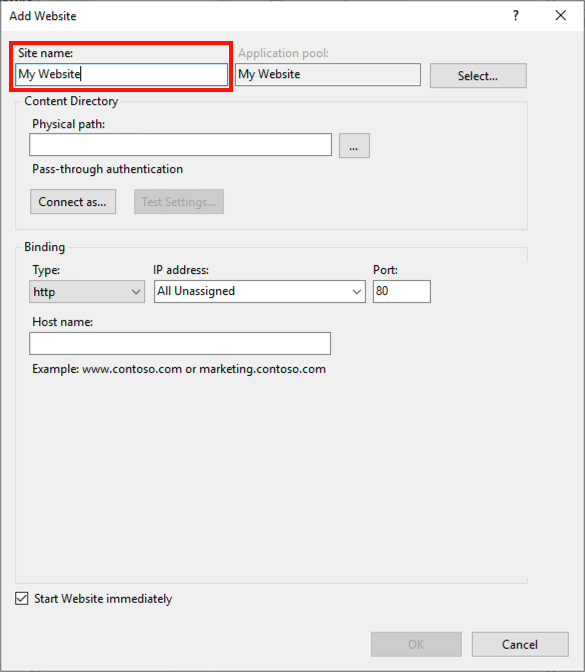
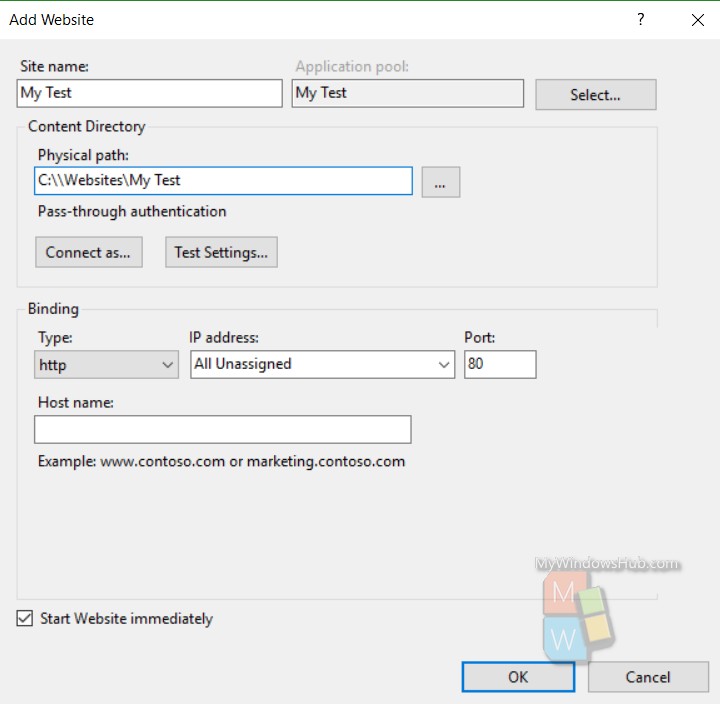
- Создать имя сайта.
Цена на Добавить сайт окно откроется. Во-первых, добавьте легко запоминаемое имя для веб-сайта в Название сайта поле.

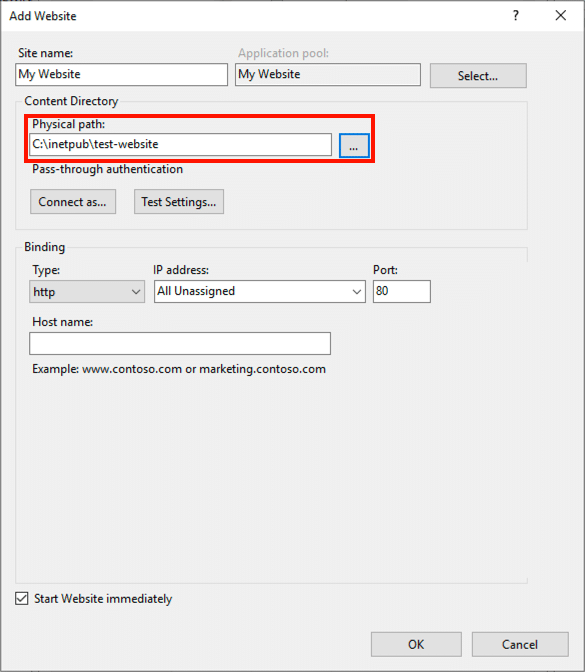
- Добавьте физический путь.
Перейдите в каталог, содержащий файлы вашего веб-сайта, чтобы он появился в Физический путь поле.
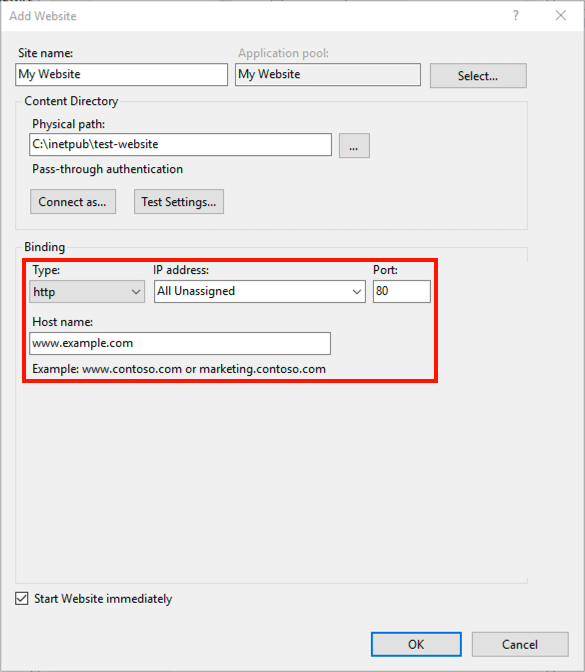
- Установите параметры привязки.
Под переплет, выберите Тип (HTTP или HTTPS), IP-адрес, порт, и Имя хоста.
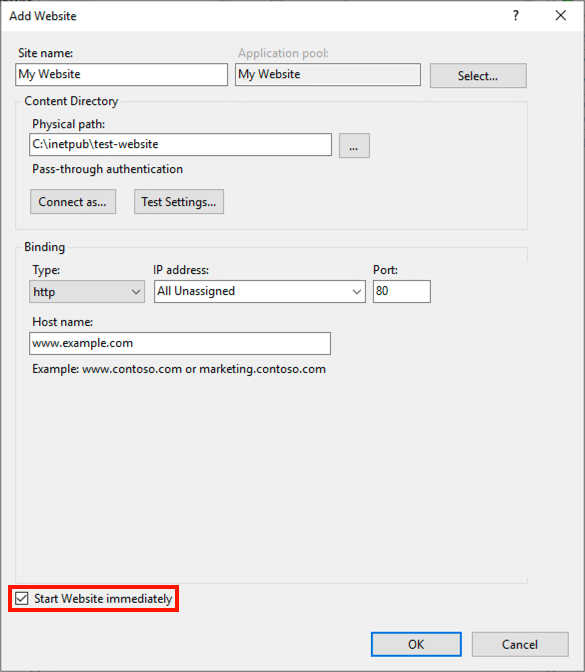
- Решите, стоит ли запускать сайт.
Если вы хотите сразу запустить сайт, убедитесь, что Начать сайт немедленно проверено. Если нет, снимите флажок.
- Закончить.
Нажмите OK Кнопка, чтобы закончить создание вашего нового сайта.
- Следующие шаги.


Спасибо, что выбрали SSL.com! Если у вас возникнут вопросы, свяжитесь с нами по электронной почте по адресу Support@SSL.com, вызов 1-877-SSL-SECURE, или просто нажмите ссылку чата в правом нижнем углу этой страницы. Вы также можете найти ответы на многие распространенные вопросы поддержки в нашем база знаний.
Служба поддержки SSL.com
Автор — администратор контента
Все сообщения
Связанные как Tos
Подпишитесь на рассылку новостей SSL.com
Что такое SSL /TLS?
Воспроизвести видео
Подпишитесь на рассылку новостей SSL.com
Не пропустите новые статьи и обновления с SSL.com
Начало:
0. HTTPS: что это за протокол, знакомство
1. Криптография: простейшие термины этой науки
2. Система шифрования с открытым ключом
3. Зачем нужны центры сертификации при асимметричном шифровании
4. Зачем нужны самозаверенные сертификаты открытого ключа
5. Windows 10: хранилища сертификатов и инструменты для работы с ними
У меня уже был настроен локальный веб-сервер IIS. Изначально я включил его в прошлом году. Недавно устанавливал для него интерпретатор языка PHP, а также экспериментировал с СУБД «MySQL». Статический сайт и веб-приложение запускал по протоколу HTTP по известному URL-адресу http://localhost/, он же http://localhost:80/, так как по умолчанию для общения по протоколу HTTP используется порт 80.
Теперь решил поэкспериментировать с локальным подключением по протоколу HTTPS.
В принципе, план подключения выглядит несложным:
1) Создать самозаверенный сертификат открытого ключа;
2) Установить этот сертификат на веб-сервер IIS;
3) Создать привязку (по-английски «binding») сайта с протоколом HTTPS, использующим самозаверенный сертификат открытого ключа, установленный в пункте 2 на веб-сервер IIS.
Сложность в том, чтобы создать правильный самозаверенный сертификат открытого ключа, при использовании которого браузер посчитает соединение с сайтом безопасным.
Создание самозаверенного сертификата открытого ключа с помощью диспетчера служб IIS
Я управляю веб-сервером IIS с помощью программы «Диспетчер служб IIS» (это основной способ, но не единственный, конечно). Программу эту, как обычно, открываю из строки поиска рядом с кнопкой «Пуск» операционной системы «Windows 10».
Окно «Диспетчера служб IIS» поделено на три части: слева — древовидное меню «Подключения», справа — меню «Действия» и в центре — главное меню с возможными модулями настроек. Вид пунктов в центральном меню можно поменять, доступны 4 режима: сведения, значки (по умолчанию), плитка, список (при этом можно еще поменять группировку пунктов: по категории, по области применения). Состав пунктов центрального меню зависит от выбора пункта в левом меню «Подключения». Состав пунктов в правом меню зависит и от выбора пункта в левом меню, и от выбора пункта в центральном меню.
Для выполнения первых двух пунктов плана (создание самозаверенного сертификата открытого ключа и установка этого сертификата на веб-сервер IIS) следует в левом меню «Подключения» выбрать веб-сервер (не следует веб-сервер путать с сайтом, это разные пункты в этом меню). После этого в центральном меню сформируется список пунктов, касающихся настройки веб-сервера. В центральном меню следует открыть пункт «Сертификаты сервера». Вот как это выглядит у меня:

После открытия пункта «Сертификаты сервера» в центральном меню откроется таблица установленных на сервер сертификатов. У меня она пуста. В правом меню сформируется список действий, которые можно совершить в рамках функции «Сертификаты сервера». Среди этих действий в правом меню следует выбрать пункт «Создать самозаверенный сертификат…». Вот как это выглядит у меня:

При выборе пункта «Создать самозаверенный сертификат…» откроется окно, в котором следует ввести информацию, которая нужна для создания самозаверенного сертификата:

Как видно из иллюстрации выше, всего лишь нужно ввести «понятное имя» сертификата и указать название подхранилища сертификатов, в которое будет помещен созданный самозаверенный сертификат. Я указал имя «localhost» и оставил выбранным подхранилище сертификатов «Личный». После нажатия на кнопку «ОК» в правом нижнем углу окна (эта кнопка станет активной после ввода «понятного имени») самозаверенный сертификат будет создан и появится в таблице «Сертификаты сервера», из которой можно будет просмотреть его свойства.
Также этот сертификат можно увидеть в подхранилищах «Личное» и «Доверенные корневые центры сертификации», если воспользоваться сохраненной консолью «certlm.msc». Еще этот сертификат можно просмотреть в подхранилище «Доверенные корневые центры сертификации» (но не в «Личное»), если воспользоваться сохраненной консолью «certmgr.msc». (См. об этом подробнее предыдущий пост.)
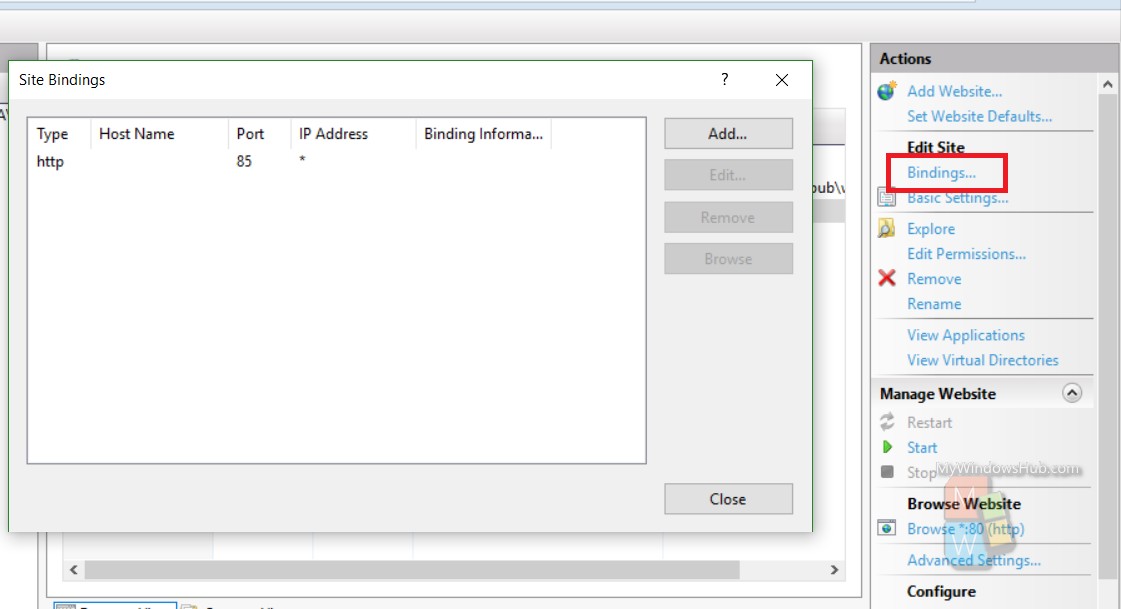
Осталось выполнить третий пункт плана (создать привязку сайта к протоколу HTTPS с нужными свойствами). Для этого сначала в левом меню следует выбрать сайт, для которого нужно создать привязку. У меня сайт один (вообще их может быть множество на одном веб-сервере), поэтому запутаться сложно. В правом меню действий сформируется соответствующий список действий, из которого следует выбрать пункт «Привязки…». Вот как это выглядит у меня:

После выбора пункта «Привязки…» откроется окно «Привязки сайта»:

В этом окне с помощью кнопки «Добавить…» вызовем окно «Добавление привязки сайта»:

На иллюстрации выше я обвел красным маркером те свойства, на которые следует обратить внимание в первую очередь. Я выбрал тип привязки (HTTPS), порт уже был выбран по умолчанию как 443. И самое главное — я выбрал из выпадающего списка самозаверенный сертификат с именем «localhost», который создал ранее. Остальные пункты я оставил в том состоянии, в котором они были по умолчанию. После этого можно нажать на кнопку «OK» внизу окна, чтобы сохранить привязку сайта. Окно «Добавление привязки сайта» закроется. После этого можно закрыть окно «Привязки сайта» с помощью кнопки «Закрыть» в правом нижнем углу окна. Окно «Привязки сайта» будет закрыто.
Настройка закончена.
Тестирование работы сайта по протоколу HTTPS
Открыть сайт можно либо напрямую в браузере, введя в адресную строку браузера URL-адрес https://localhost/ или URL-адрес https://localhost:443/. Либо можно в «Диспетчере служб IIS» при выбранном в левом меню «Подключения» сайте в правом меню «Действия» выбрать пункт «Обзор *:443 (https)» и после этого нужная страница откроется в браузере. При этом одновременно останется доступ из браузера к этому же сайту по протоколу HTTP через порт 80.
Вот что я получил в своем браузере «Microsoft Edge» (на движке «Chromium»):

То, что показано на иллюстрации выше, не значит, что настройка веб-сервера IIS была выполнена неправильно. Наоборот, всё было сделано так, как следует. Если нажать на кнопку «Advanced», браузер выдаст дополнительную информацию об ошибке:
This server couldn’t prove that it’s localhost; its security certificate is from IlyaComp. This may be caused by a misconfiguration or an attacker intercepting your connection.
Однако, будет открыта и дополнительная ссылка «Continue to localhost (unsafe)», пройдя по которой, мы всё-таки попадем на сайт.
Ссылка по теме:
https://learn.microsoft.com/en-us/iis/manage/configuring-security/how-to-set-up-ssl-on-iis
Причина ошибки
Дело в том, что хоть сама настройка веб-сервера IIS была выполнена правильно, но неправильно сфомирован самозаверенный сертификат. Веб-сервер IIS не дал нам при создании самозаверенного сертификата достаточного доступа к свойствам создаваемого сертификата. Вот как выглядит окно свойств созданного самозаверенного сертификата у меня (кстати, отмечу, что по умолчанию созданный сертификат имеет срок действия в один год; после окончания этого срока этот сертификат нужно будет удалить и создать новый, с новым сроком действия):

«Понятное имя» ни на что не влияет, оно нужно лишь для представления сертификата в списках. Кроме этого «понятного имени» у сертификата есть два более важных свойства: «Кому выдан» (оно же «Получатель сертфиката», оно же «Субъект») и «Кем выдан» (оно же «Поставщик», оно же «Издатель»). В случае самозаверенного сертификата значения этих двух свойств совпадают. Веб-сервер IIS, создавая самозаверенный сертификат, вписал в эти свойства имя моего компьютера — «IlyaComp», не спрашивая у меня, согласен ли я на это или нет.
Как видно из расширенного текста ошибки, приведенного выше (в разделе тестирования), указанный браузер считает, что имя получателя сертификата (субъекта) должно совпадать с именем домена сайта (в случае локального сайта это «localhost»). Только тогда браузер посчитает соединение с шифрованием с помощью этого самозаверенного сертификата безопасным и не станет выдавать вышеуказанное сообщение об ошибке (в общем-то, это даже не ошибка, а предупреждение).
Как исправить эту ошибку
Самозаверенный сертификат, созданный выше, я удалил (как и привязку сайта, в которой был указан этот сертификат). Удаление сертификата возможно прямо из списка «Сертификаты сервера» (работа с ним была показана выше) программы «Диспетчер служб IIS».
Очевидно, что следует создать самозаверенный сертификат с нужными свойствами другим способом. Этот способ должен позволить задавать значения любых свойств самозаверенного сертификата.
Продолжение следует…
If you are planning to build a website or web application using ASP.NET , then you may want to install Internet Information Services(IIS) on your local machine for development and testing purpose. IIS was previously known as Internet Information Server. It is nothing but an extensive webserver developed by Microsoft Corporation. IIS is compatible with Windows NT family and plethora of other services like HTTP, HTTP/2, HTTPS, FTP, FTPS, SMTP and NNTP. Check out the article below to learn how to install IIS and setup a website on IIS:
1. Open Cortana, and type Turn Windows Features On or Off. Select the settings from the search results.
2. Now scroll down and find out Internet Information Services in the list. If it is not installed, then there will be an empty check box. Check the option. Next, click OK. Here, an important thing to note is that you have to keep in mind is that checking the main checkbox will not install all the sub files. For example, it will not install the FTP Server. To include that in your install option, click on the plus sign and expand the options. Check the individual sub files and then tap OK. Also, make sure that the Windows Process Activation Services is also checked. If not, then do it.
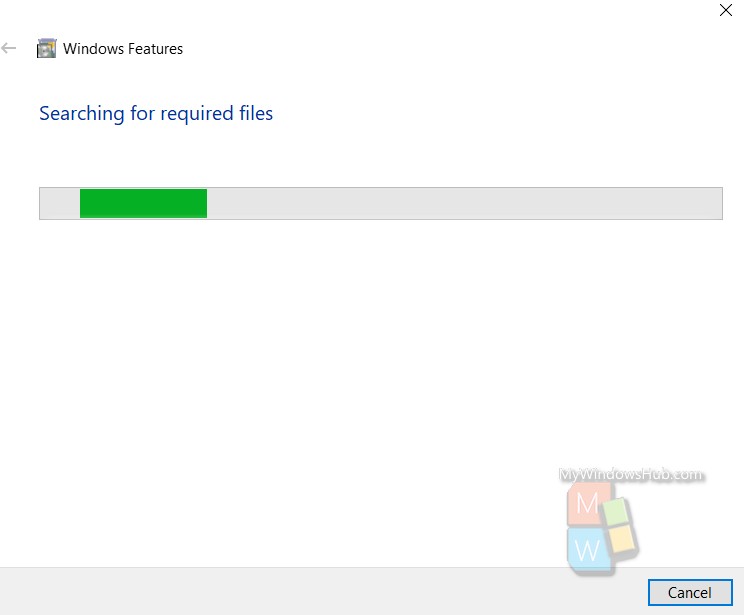
3. The Windows 10 device will then start searching for the required files on the computer.
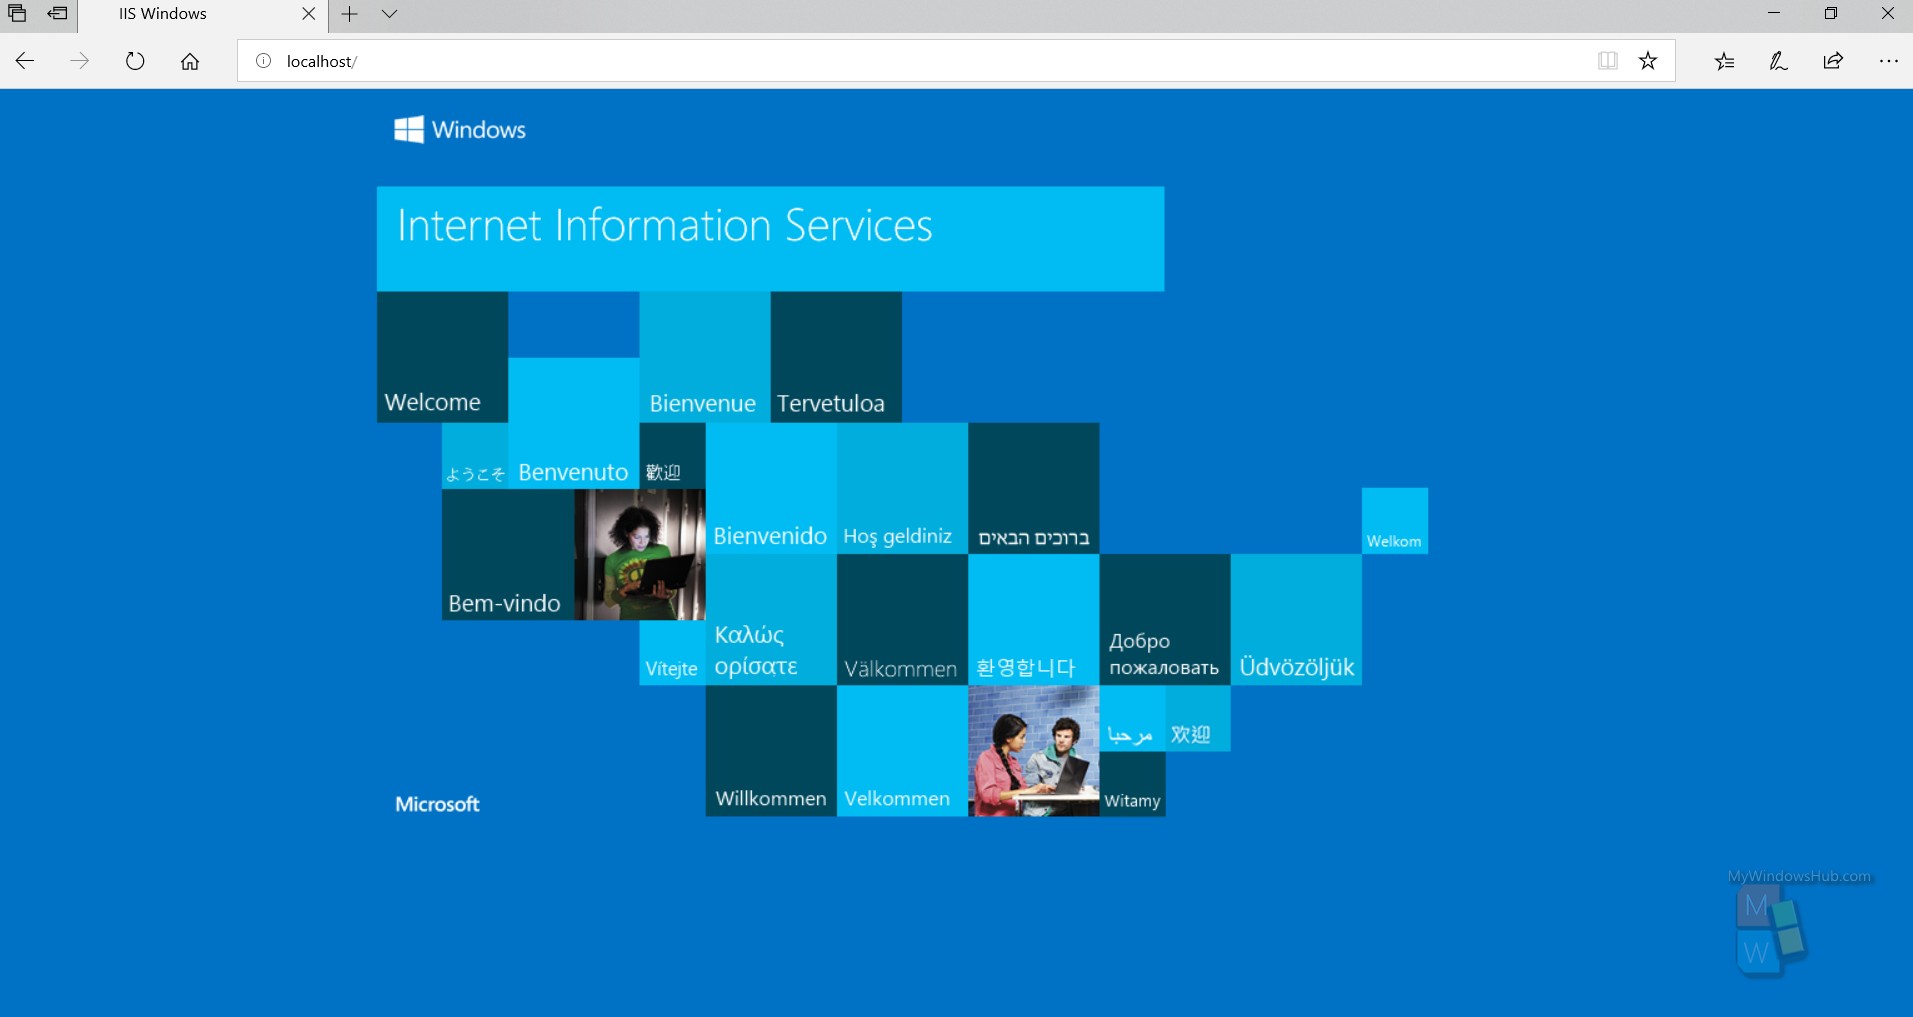
4. Once, you have finished installing and rebooted the computer. You can load the default website by going to your IE and typing in your web browser //localhost. This should open the IIS 10 default web page.
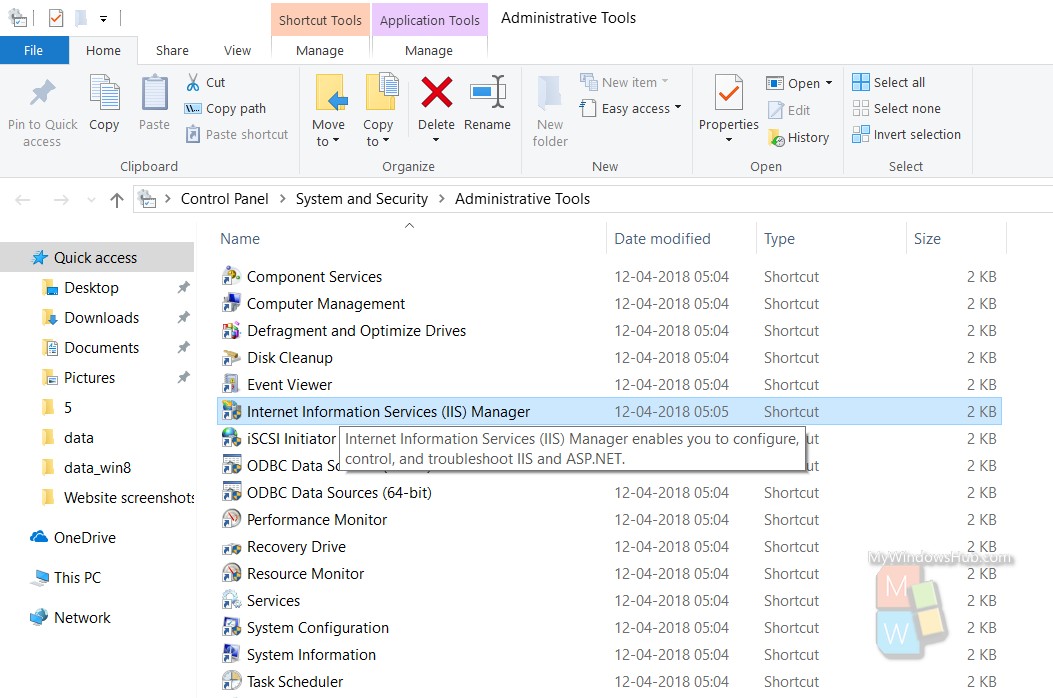
5. Next, open Cortana and type Administrative Tools. The Administrative Tools of Control Panel opens. Here you will see Internet Information Services (IIS) Manager.
6. On the left hand side of the Administrative Tools panel, you can expand the server to see the list of sites. Expand and To start, you only have the Default Web Site, which is stored under C:\inetpub\wwwroot.
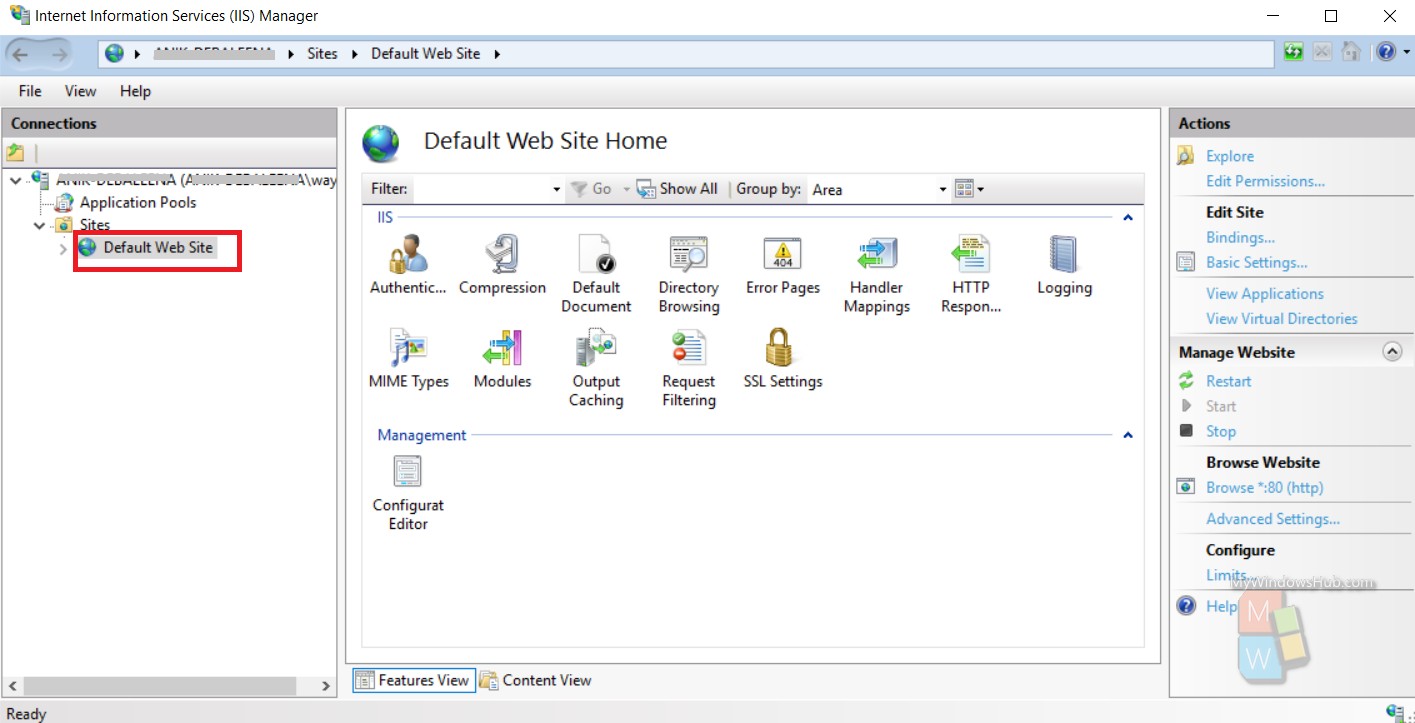
7. You can check it under the location in This PC, C:\inetpub\wwwroot , you will find the default web site.
8. Now, if you want to setup a new website in Internet Information Services 10, right-click on Sites and choose Add Website.
9. Next, create a name for your website and add the location of your PC where the web files are located.
10. Select the website name under the Sites panel. Tap on Bindings on the right panel, under the Edit Site menu. Specify a host name if your computer has a static public IP address with DNS records for the domain name. The Domain name should point to that particular IP Address.
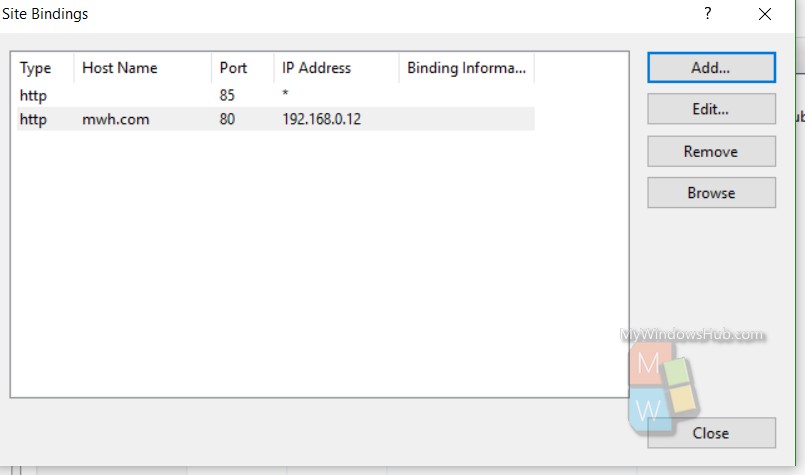
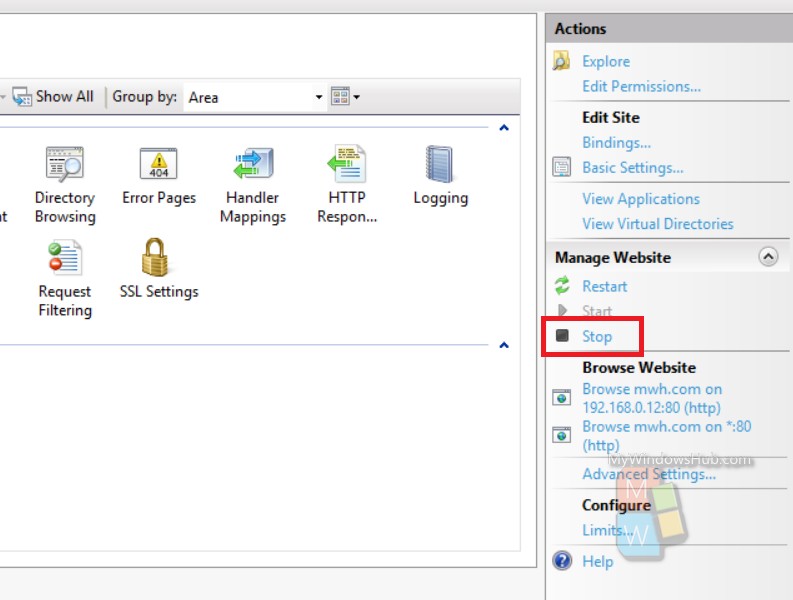
Click OK. You will get a warning that another site is also using the same settings and pointing to the same site. In the Right panel, you will find the Stop option under manage website section.
Now launch the test website. Now you can start developing and testing your own websites or web applications. Once the final version is ready to be deployed in live environment, you can search for good web hosting services for Windows to host your website or web application.