This article discusses how to install and configure the Remote Access Server RustDesk under Windows Server. The guide is written for Windows Server Core but is just as applicable to Windows Server with a GUI.
Introduction
RustDesk is a remote access rendezvous point server which allows a remote support agent to connect to a remote computer remotely while providing screen sharing, remote control and clipboard support. RustDesk is an open source equivalent to the obnoxiously expensive “TeamViewer”, LogMeIn123 and others.
Prerequisites
This article assumes that:
- You have a clean install of Windows Server 2016, 2019 or 2022.
- You are running on Server Core and wish to do everything via the command line (everything in the guide is fully applicable to Server GUI, and can be executed from the command line or manually using the GUI interfaces where appropriate).
- You are running RustDesk on a dedicated server / virtual machine using a dedicated user account
Note: As of writing, it does not seem possible to run RustDesk as a native Windows Service (it immediately exits out if you try to launch it through a service user account). You must either run it manually as an application within a user account or within a user account via the pm2 process manager. Both methods are outlined below. - You have already configured NAT/PAT port forwards from your router to your virtual machine as appropriate to your environment.
TCP: 21115, 21116, 21117, 21118, 21119
UDP: 21116
Installation
- Download and install the current version of the Visual C++ Runtime 2015 – 2022 Library for x64 (version 14 is the specific version required).
Download: Microsoft Visual C++ Runtime - It is recommended that you do not use the default administrator account to run RustDesk. If you do not wish to use the Administrator account, create a dedicated user for RustDesk to run with on your domain or on the local machine (recommended).
To create a user on the local machine:net user <username> <password> /ADD
- To add this user to the Administrators group:
net localgroup Administrators <username> /ADD
- Setup automatic logon to Windows by editing and using the following commands (if you are not on a domain, you can omit DefaultDomainName value)
reg add "HKEY_LOCAL_MACHINE\SOFTWARE\Microsoft\Windows NT\CurrentVersion\Winlogon" /t REG_SZ /v "DefaultUserName" /d "Plex" /f

reg add "HKEY_LOCAL_MACHINE\SOFTWARE\Microsoft\Windows
NT\CurrentVersion\Winlogon" /t REG_SZ /v "DefaultPassword" /d
"your_password_here" /f

reg add "HKEY_LOCAL_MACHINE\SOFTWARE\Microsoft\Windows
NT\CurrentVersion\Winlogon" /t REG_SZ /v "DefaultDomainName" /d
"your_domain_here" /f

reg add "HKEY_LOCAL_MACHINE\SOFTWARE\Microsoft\Windows NT\CurrentVersion\Winlogon" /t REG_SZ /v "AutoAdminLogon" /d "1" /f
- Create and enable the necessary firewall rules to allow clients to connect to RustDesk. To do this in PowerShell:
New-NetFirewallRule -Name RustDesk-TCP -DisplayName "RustDesk-TCP" -Description "RustDesk TCP Rules" -Direction Inbound -Protocol TCP -LocalPort 21115-21119 -Action Allow
New-NetFirewallRule -Name RustDesk-UDP -DisplayName "RustDesk-UDP" -Description "RustDesk UDP Rules" -Direction Inbound -Protocol UDP -LocalPort 21116 -Action Allow
Enable-NetFirewallRule -Name RustDesk-TCP
Enable-NetFirewallRule -Name RustDesk-UDP
- Download the latest Windows x64 binary of the RustDesk installer
Download: RustDesk Server - Create the folder
C:\Program Files\RustDeskmkdir "%ProgramFiles%\RustDesk"
- Extract hbbr.exe and hbbs.exe into
C:\Program Files\RustDesk
Using node.js & pm2
If you wish to use node.js and pm2 to manage the process within the user account follow this section. If you do not, skip to the next section.
- Download and install the current version of node.js*. The basic installation is sufficient (without installing Chocolaty). Once installed, log off and then back in again to refresh your path environment variables on any open command and PowerShell prompts.
Download: Node.js - Install pm2 process manager by entering the following commands
npm install -g pm2
npm install pm2-windows-startup -g
pm2-startup install
- Register the two RustDesk services with pm2
pm2 start "C:\Program Files\RustDesk\hbbs.exe" -- --relay-servers <RelayServerIpOrFqdn>:21117
pm2 start "C:\Program Files\RustDesk\hbbr.exe"
pm2 save
Note: If you wish to use a key to provide an additional layer of security for your server. change the first line above to:
pm2 start "C:\Program Files\RustDesk\hbbs.exe" -- --relay-servers <RelayServerIpOrFqdn>:21117 --key <YourKey>
- Test using a RustDesk client
If you made a mistake and need to change the pm2 parameters use the following commands to delete the recordspm2 delete "C:\Program Files\RustDesk\hbbs.exe" pm2 delete "C:\Program Files\RustDesk\hbbr.exe"
Then re-add the entry(s) as in step 10 and re-save by entering
pm2 save.
To view the process list enterpm2 list - Check that pm2 was successfully able to start the services and to view the current daemon status’ (and use Ctrl + C on the keyboard to close).
pm2 log hbbr
pm2 log hbbs
Without using node.js and pm2
If you do not want to use node.js and pm2 to manage your install, you can use my RustDesk Service Scripts to start, stop and restart RustDesk on your server.
Note: The following is only applicable to Server Core. For GUI Windows Server, add a shortcut to C:\Program Files\RustDesk\Start-RustDesk.cmd in the Startup folder or add an entry to the same file under HKCU\SOFTWARE\Microsoft\Windows\CurrentVersion\Run
- Download my RustDesk tools zip
Download: RustDesk-Tools (1KB) - Extract the contents of the zip file into
C:\Program Files\RustDesk - Use notepad to edit the
Start-RustDesk.cmdscript file and set the value for the relayServer IP/FQDN to match your environment.
If you wish to use a key to secure your server, add--key <YourKey>to the end of the hbbs.exe line e.g.start "HBBS-RustDesk" /min "%ProgramFiles%\RustDesk\hbbs.exe" --relay-servers %relayServer%:%relayPort% --key <YourKey>
- Enter the command:
reg add "HKCU\SOFTWARE\Microsoft\Windows\CurrentVersion\Run" /t REG_SZ /v "10" /d "C:\Program Files\RustDesk\Start-RustDesk.cmd" /f
- Restart the server and RustDesk should automatically load as two minimised windows in the bottom left of the Server Code screen
- Test using a RustDesk client
Rustdesk server Install Script
Easy install Script for Rustdesk on linux, should work on any 64bit (32bit arm will install rustdesk server only) debian or centos based system supporting systemd.
For Rustdesk visit https://rustdesk.com
You can use Hetzner to test this with a $20 credit using this referal code https://hetzner.cloud/?ref=p6iUr7jEXmoB
How to Install the server
Please setup your firewall on your server prior to running the script.
Make sure you have got access via ssh or otherwise setup prior setting up the firewall, command for UFW is:
ufw allow proto tcp from YOURIP to any port 22
If you have UFW installed use the following commands (you only need port 8000 if you are using the preconfigured install files):
ufw allow 21115:21119/tcp
ufw allow 8000/tcp
ufw allow 21116/udp
sudo ufw enable
Run the following commands:
wget https://raw.githubusercontent.com/dinger1986/rustdeskinstall/master/install.sh
chmod +x install.sh
./install.sh
Choose your preferences from the options given in the script.
Please Note:
If you allow the script to create preconfigured install files (with your IP/DNS and key set) it will install gohttpserver using port 8000 for you to easily download the install scripts.
How to update the server
Run the following commands:
wget https://raw.githubusercontent.com/techahold/rustdeskinstall/master/update.sh
chmod +x update.sh
./update.sh
Rustdesk windows powershell install script
Generates a powershell script for install grabbing WAN IP and Key currently in /opt/rustdesk but will be moved to a web url for easy deployment.
Tips
If you want to restart the services use the following commands:
sudo systemctl restart rustdesksignal
sudo systemctl restart rustdeskrelay
RustDesk Remote Desktop – бесплатное приложение для удаленного доступа и управления компьютером или мобильным устройством. Сервис удаленного рабочего стола с открытым исходным кодом работает «из коробки» и не требует настройки.
Установка собственного сервера rustdesk возможна в двух вариантах, с использованием Docker/Podman и без его использования. Docker/Podman, нужен только чтобы запустить rustdesk-server в качестве контейнера докеров, по этому решайте сами нужно оно вам или нет. Я буду устанавливать без докера.
Ставить будем на debian 11.5 без использования графики, по этому ставим только базовые пакеты.

После базовой установки доустанавливаем пакеты которые нам пригодятся:
# apt update
# apt install ssh nano mc net-tools wget sudo
Настраиваем статический IP адрес в нашей ОС если она у вас так же как у меня находится за NAT`ом.
# nano /etc/network/interfaces
# The primary network interface
allow-hotplug eth0
iface eth0 inet static
        address Ваш IP
        netmask Ваша сетевая маска
        gateway Ваш шлюз
        dns-nameservers Ваши DNS сервера
Перезагружаем ОС, проверяем что интернет есть и приступаем к установке сервера rustdesk.
# wget https://raw.githubusercontent.com/dinger1986/rustdeskinstall/master/install.sh
# chmod +x install.sh
# ./install.sh
Во время установки инсталлер спросит у вас некоторые данные, например как вы хотите подключаться к серверу по IP адресу или по DNS имени, я выбрал по IP адресу.

А так же создать релей или нет. Я выбрал 1

При этом в веб интерфейсе сервера rustdesk появятся два пакета настроек c своими сценариям установок для Ваших клиентов.

После успешной установки скрипты сообщит вам логин и пароль для подключения в веб интерфейс сервера.

На это установка сервера завершена, теперь нужно открыть следующие порты на вашем роутере:
TCP: (21115, 21116, 21117, 21118, 21119)
UDP: (21116)
Далее идем за ПК клиента и настраиваем клиентскую часть. Заходим в параметры — ID/Сервер ретрансляции

В появившемся окне вводи IP адрес нашего сервера, остальные параметры клиент сам «подтянет».

This article discusses how to install and configure the Remote Access Server RustDesk under Windows Server. The guide is written for Windows Server Core but is just as applicable to Windows Server with a GUI.
Introduction
RustDesk is a remote access rendezvous point server which allows a remote support agent to connect to a remote computer remotely while providing screen sharing, remote control and clipboard support. RustDesk is an open source equivalent to the obnoxiously expensive “TeamViewer”, LogMeIn123 and others.
Prerequisites
This article assumes that:
- You have a clean install of Windows Server 2016, 2019 or 2022.
- You are running on Server Core and wish to do everything via the command line (everything in the guide is fully applicable to Server GUI, and can be executed from the command line or manually using the GUI interfaces where appropriate).
- You are running RustDesk on a dedicated server / virtual machine using a dedicated user account
Note: As of writing, it does not seem possible to run RustDesk as a native Windows Service (it immediately exits out if you try to launch it through a service user account). You must either run it manually as an application within a user account or within a user account via the pm2 process manager. Both methods are outlined below. - You have already configured NAT/PAT port forwards from your router to your virtual machine as appropriate to your environment.
TCP: 21115, 21116, 21117, 21118, 21119
UDP: 21116
Installation
- Download and install the current version of the Visual C++ Runtime 2015 – 2022 Library for x64 (version 14 is the specific version required).
Download: Microsoft Visual C++ Runtime - It is recommended that you do not use the default administrator account to run RustDesk. If you do not wish to use the Administrator account, create a dedicated user for RustDesk to run with on your domain or on the local machine (recommended).
To create a user on the local machine:net user <username> <password> /ADD
- To add this user to the Administrators group:
net localgroup Administrators <username> /ADD
- Setup automatic logon to Windows by editing and using the following commands (if you are not on a domain, you can omit DefaultDomainName value)
reg add "HKEY_LOCAL_MACHINESOFTWAREMicrosoftWindows NTCurrentVersionWinlogon" /t REG_SZ /v "DefaultUserName" /d "Plex" /f

reg add "HKEY_LOCAL_MACHINESOFTWAREMicrosoftWindows
NTCurrentVersionWinlogon" /t REG_SZ /v "DefaultPassword" /d
"your_password_here" /f

reg add "HKEY_LOCAL_MACHINESOFTWAREMicrosoftWindows
NTCurrentVersionWinlogon" /t REG_SZ /v "DefaultDomainName" /d
"your_domain_here" /f

reg add "HKEY_LOCAL_MACHINESOFTWAREMicrosoftWindows NTCurrentVersionWinlogon" /t REG_SZ /v "AutoAdminLogon" /d "1" /f
- Create and enable the necessary firewall rules to allow clients to connect to RustDesk. To do this in PowerShell:
New-NetFirewallRule -Name RustDesk-TCP -DisplayName "RustDesk-TCP" -Description "RustDesk TCP Rules" -Direction Inbound -Protocol TCP -LocalPort 21115-21119 -Action Allow
New-NetFirewallRule -Name RustDesk-UDP -DisplayName "RustDesk-UDP" -Description "RustDesk UDP Rules" -Direction Inbound -Protocol UDP -LocalPort 21116 -Action Allow
Enable-NetFirewallRule -Name RustDesk-TCP
Enable-NetFirewallRule -Name RustDesk-UDP
- Download the latest Windows x64 binary of the RustDesk installer
Download: RustDesk Server - Create the folder
C:Program FilesRustDeskmkdir "%ProgramFiles%RustDesk"
- Extract hbbr.exe and hbbs.exe into
C:Program FilesRustDesk
Using node.js & pm2
If you wish to use node.js and pm2 to manage the process within the user account follow this section. If you do not, skip to the next section.
- Download and install the current version of node.js*. The basic installation is sufficient (without installing Chocolaty). Once installed, log off and then back in again to refresh your path environment variables on any open command and PowerShell prompts.
Download: Node.js - Install pm2 process manager by entering the following commands
npm install -g pm2
npm install pm2-windows-startup -g
pm2-startup install
- Register the two RustDesk services with pm2
pm2 start "C:Program FilesRustDeskhbbs.exe" -- --relay-servers <RelayServerIpOrFqdn>:21117
pm2 start "C:Program FilesRustDeskhbbr.exe"
pm2 save
Note: If you wish to use a key to provide an additional layer of security for your server. change the first line above to:
pm2 start "C:Program FilesRustDeskhbbs.exe" -- --relay-servers <RelayServerIpOrFqdn>:21117 --key <YourKey>
- Test using a RustDesk client
If you made a mistake and need to change the pm2 parameters use the following commands to delete the recordspm2 delete "C:Program FilesRustDeskhbbs.exe" pm2 delete "C:Program FilesRustDeskhbbr.exe"
Then re-add the entry(s) as in step 10 and re-save by entering
pm2 save.
To view the process list enterpm2 list - Check that pm2 was successfully able to start the services and to view the current daemon status’ (and use Ctrl + C on the keyboard to close).
pm2 log hbbr
pm2 log hbbs
Without using node.js and pm2
If you do not want to use node.js and pm2 to manage your install, you can use my RustDesk Service Scripts to start, stop and restart RustDesk on your server.
Note: The following is only applicable to Server Core. For GUI Windows Server, add a shortcut to C:Program FilesRustDeskStart-RustDesk.cmd in the Startup folder or add an entry to the same file under HKCUSOFTWAREMicrosoftWindowsCurrentVersionRun
- Download my RustDesk tools zip
Download: RustDesk-Tools (1KB) - Extract the contents of the zip file into
C:Program FilesRustDesk - Use notepad to edit the
Start-RustDesk.cmdscript file and set the value for the relayServer IP/FQDN to match your environment.
If you wish to use a key to secure your server, add--key <YourKey>to the end of the hbbs.exe line e.g.start "HBBS-RustDesk" /min "%ProgramFiles%RustDeskhbbs.exe" --relay-servers %relayServer%:%relayPort% --key <YourKey>
- Enter the command:
reg add "HKCUSOFTWAREMicrosoftWindowsCurrentVersionRun" /t REG_SZ /v "10" /d "C:Program FilesRustDeskStart-RustDesk.cmd" /f
- Restart the server and RustDesk should automatically load as two minimised windows in the bottom left of the Server Code screen
- Test using a RustDesk client
Удалённый доступ к компьютеру — это когда вы сидите у себя дома и со своего компьютера управляете чужим: двигаете мышкой, создаёте папки, нажимаете клавиши и т. д. Обычно это нужно для техподдержки: если у родных проблемы с компьютером, но вам не хочется ехать к ним физически. Или если у вас компьютер на работе, а вам нужно получить к нему доступ из дома.
Программ для удалённого доступа много — недавно мы делали подборку. Проблема в том, что все они работают через чужой сервер. Если он перестанет работать, сервис закроется или решит уйти из России, удалённого управления не будет. Например, из России ушёл сервис TeamViewer — самый популярный сервис удалённого доступа.
Сегодня мы поднимем собственный сервер удалённого доступа, чтобы ни от кого не зависеть.
Что нам понадобится
Мы будем использовать RustDesk — бесплатную программу с открытым исходным кодом для удалённого управления компьютером. Её можно поставить на свой сервер и компьютеры и ни от кого не зависеть.
Софт для удалённой работы состоит из двух частей — серверной и клиентской. Серверная часть — это такой виртуальный центр связи, который соединяется с компьютерами и передаёт данные с одного компьютера на другой. Серверная часть ставится на сервере — для этого мы будем использовать учебный сервер для виртуального хранилища.
Клиентская часть устанавливается и запускается на тех компьютерах, где нам нужен удалённый доступ — для управления или чтобы кто-то смог к нам удалённо подключиться.
У RustDesk есть и то и другое, поэтому установим всё по очереди.
Устанавливаем серверную часть
Чтобы установить что-то на сервер, нам нужно сначала получить к нему доступ. Чаще всего доступ к серверу настраивают по SSH и работают из командной строки, поэтому мы будем делать точно так же: подключимся к серверу и введём нужные команды.
Идём на официальный гитхаб проекта, берём оттуда скрипт установки серверной части и вставляем его в командную строку сервера:
wget https://raw.githubusercontent.com/dinger1986/rustdeskinstall/master/install.sh
chmod +x install.sh
./install.sh

Во время установки у нас спросят: IP или DNS — выбираем IP:

Дальше скрипт нам предложить скачать HTTP-сервер, который нужен для работы программы. Соглашаемся и вводим 1:

Когда всё будет готово, скрипт отдаст нам пароль администратора и публичны ключ — они нам понадобятся в будущем:

Устанавливаем программу на компьютер
Заходим на официальный сайт RustDesk и скачиваем программу для своей операционной системы. Мы зашли на сайт с макбука, поэтому нам сразу предложили скачать версию для MacOS:

После запуска программа сразу предлагает настроить разрешение на снимки экрана и универсальный доступ (в Windows такого нет, там с этим всё проще):

Нажимаем «Настроить», заходим в системные настройки, нажимаем замочек внизу и ставим галочку напротив RustDesk:

Теперь укажем адрес нашей серверной части, которую мы установили раньше. Для этого нажимаем на три точки, выбираем «ID/Сервер трансляции» и вводим там IP-адрес нашего сервера. Он совпадает с адресом, по которому мы подключались по SSH, а ещё этот адрес сообщаем нам сам сервер при установке:


Внизу сразу меняется статус подключения на «Готово» — это значит, что сервер и клиент нашли друг друга и готовы работать вместе.
Теперь точно так же устанавливаем и настраиваем эту программу на том компьютере, которым мы хотим удалённо управлять. После этого на одном из них вводим ID другого, нажимаем «Подключиться»:

Вёрстка:
Кирилл Климентьев
![]()
Servers •
Build •
Docker •
Structure •
Snapshot
[English] | [Українська] | [česky] | [中文] | [Magyar] | [Español] | [فارسی] | [Français] | [Deutsch] | [Polski] | [Indonesian] | [Suomi] | [മലയാളം] | [日本語] | [Nederlands] | [Italiano] | [Português (Brasil)] | [Esperanto] | [한국어] | [العربي] | [Tiếng Việt] | [Ελληνικά]
Нам нужна ваша помощь для перевода этого README и RustDesk UI на ваш родной язык
Общение с нами: Discord | Twitter | Reddit

Еще одно программное обеспечение для удаленного рабочего стола, написанное на Rust. Работает из коробки, не требует настройки. Вы полностью контролируете свои данные, не беспокоясь о безопасности. Вы можете использовать наш сервер ретрансляции, настроить свой собственный, или написать свой.
RustDesk приветствует вклад каждого. Ознакомьтесь с docs/CONTRIBUTING-RU.md в начале работы для понимания.
Как работает RustDesk?
СКАЧАТЬ ПРИЛОЖЕНИЕ

Бесплатные общедоступные серверы
Ниже приведены бесплатные публичные сервера, используемые по умолчанию. Имейте ввиду, они могут меняться со временем. Также стоит отметить, что скорость работы сети зависит от вашего местоположения и расстояния до серверов. Подключение происходит к ближайшему доступному.
| Расположение | Поставщик | Технические характеристики |
|---|---|---|
| Сеул | AWS lightsail | 1 vCPU / 0.5GB RAM |
| Сингапур | Vultr | 1 vCPU / 1GB RAM |
| Даллас | Vultr | 1 vCPU / 1GB RAM |
| Германия | Hetzner | 2 vCPU / 4GB RAM |
| Германия | Codext | 4 vCPU / 8GB RAM |
| Финляндия (Хельсинки) | 0x101 Cyber Security | 4 vCPU / 8GB RAM |
| США (Эшберн) | 0x101 Cyber Security | 4 vCPU / 8GB RAM |
Зависимости
Настольные версии используют sciter для графического интерфейса, загрузите динамическую библиотеку sciter самостоятельно.
Windows |
Linux |
MacOS
Мобильные версии используют Flutter. В будущем мы перенесем настольную версию со Sciter на Flutter.
Первичные шаги для сборки
-
Подготовьте среду разработки Rust и среду сборки C++.
-
Установите vcpkg, и правильно установите переменную
VCPKG_ROOT- Windows: vcpkg install libvpx:x64-windows-static libyuv:x64-windows-static opus:x64-windows-static
- Linux/MacOS: vcpkg install libvpx libyuv opus
-
Запустите
cargo run
Как собрать на Linux
Ubuntu 18 (Debian 10)
sudo apt install -y g++ gcc git curl wget nasm yasm libgtk-3-dev clang libxcb-randr0-dev libxdo-dev libxfixes-dev libxcb-shape0-dev libxcb-xfixes0-dev libasound2-dev libpulse-dev cmake
Fedora 28 (CentOS ![8)]()
sudo yum -y install gcc-c++ git curl wget nasm yasm gcc gtk3-devel clang libxcb-devel libxdo-devel libXfixes-devel pulseaudio-libs-devel cmake alsa-lib-devel
Arch (Manjaro)
sudo pacman -Syu --needed unzip git cmake gcc curl wget yasm nasm zip make pkg-config clang gtk3 xdotool libxcb libxfixes alsa-lib pipewire
Установка vcpkg
git clone https://github.com/microsoft/vcpkg
cd vcpkg
git checkout 2021.12.01
cd ..
vcpkg/bootstrap-vcpkg.sh
export VCPKG_ROOT=$HOME/vcpkg
vcpkg/vcpkg install libvpx libyuv opus
Исправление libvpx (для Fedora)
cd vcpkg/buildtrees/libvpx/src
cd *
./configure
sed -i 's/CFLAGS+=-I/CFLAGS+=-fPIC -I/g' Makefile
sed -i 's/CXXFLAGS+=-I/CXXFLAGS+=-fPIC -I/g' Makefile
make
cp libvpx.a $HOME/vcpkg/installed/x64-linux/lib/
cd
Сборка
curl --proto '=https' --tlsv1.2 -sSf https://sh.rustup.rs | sh
source $HOME/.cargo/env
git clone https://github.com/rustdesk/rustdesk
cd rustdesk
mkdir -p target/debug
wget https://raw.githubusercontent.com/c-smile/sciter-sdk/master/bin.lnx/x64/libsciter-gtk.so
mv libsciter-gtk.so target/debug
VCPKG_ROOT=$HOME/vcpkg cargo run
Смените Wayland на X11 (Xorg)
RustDesk не поддерживает Wayland. Смотрите этот документ для настройки Xorg в качестве сеанса GNOME по умолчанию.
Как собрать с помощью Docker
Начните с клонирования репозитория и создания docker-контейнера:
git clone https://github.com/rustdesk/rustdesk
cd rustdesk
docker build -t "rustdesk-builder" .
Затем каждый раз, когда вам нужно собрать приложение, запускайте следующую команду:
docker run --rm -it -v $PWD:/home/user/rustdesk -v rustdesk-git-cache:/home/user/.cargo/git -v rustdesk-registry-cache:/home/user/.cargo/registry -e PUID="$(id -u)" -e PGID="$(id -g)" rustdesk-builder
Обратите внимание, что первая сборка может занять больше времени, прежде чем зависимости будут кэшированы, но последующие сборки будут выполняться быстрее. Кроме того, если вам нужно указать другие аргументы для команды сборки, вы можете сделать это в конце команды в переменной <OPTIONAL-ARGS>. Например, если вы хотите создать оптимизированную версию, вы должны запустить приведенную выше команду и в конце строки добавить --release. Полученный исполняемый файл будет доступен в целевой папке вашей системы и может быть запущен с помощью:
Или, если вы используете исполняемый файл релиза:
Пожалуйста, убедитесь, что вы запускаете эти команды из корня репозитория RustDesk, иначе приложение не сможет найти необходимые ресурсы. Также обратите внимание, что другие cargo подкоманды, такие как install или run, в настоящее время не поддерживаются этим методом, поскольку они будут устанавливать или запускать программу внутри контейнера, а не на хосте.
Структура файлов
- libs/hbb_common: видеокодек, конфиг, обертка tcp/udp, protobuf, функции fs для передачи файлов и некоторые другие служебные функции
- libs/scrap: захват экрана
- libs/enigo: специфичное для платформы управление клавиатурой/мышью
- src/ui: графический пользовательский интерфейс
- src/server: сервисы аудио/буфера обмена/ввода/видео и сетевых подключений
- src/client.rs: одноранговое соединение
- src/rendezvous_mediator.rs: свяжитесь с rustdesk-server, дождитесь удаленного прямого (обход TCP NAT) или ретранслируемого соединения
- src/platform: специфичный для платформы код
Скриншоты


The following installation instructions will only supply the experimental (public) branch’s server files since legacy got removed December 2016. (8 December 2016)
Contents
- 1 Dedicated server
- 1.1 Installation
- 1.2 Configuration & running
- 1.2.1 Command line parameters
- 1.2.2 RCON
- 1.2.3 Server Commands
- 1.2.4 Ban list
- 2 Linux Scripts Resources
- 2.1 LinuxGSM Rust Server
- 2.1.1 Features
- 2.1.2 Supported Servers
- 2.1.3 Links
- 2.1 LinuxGSM Rust Server
- 3 Windows Resources
- 3.1 Rust Server Manager [PAID]
- 3.2 Other
Dedicated server
Installation
- Install SteamCMD
- Start SteamCMD
- Log in with a Steam account or anonymously:
login anonymous or username - Select install folder:
force_install_dir PATH:SteamCMDrust_server - Run:
app_update 258550 validateto download the public branch of rust dedicated server
- Log in with a Steam account or anonymously:
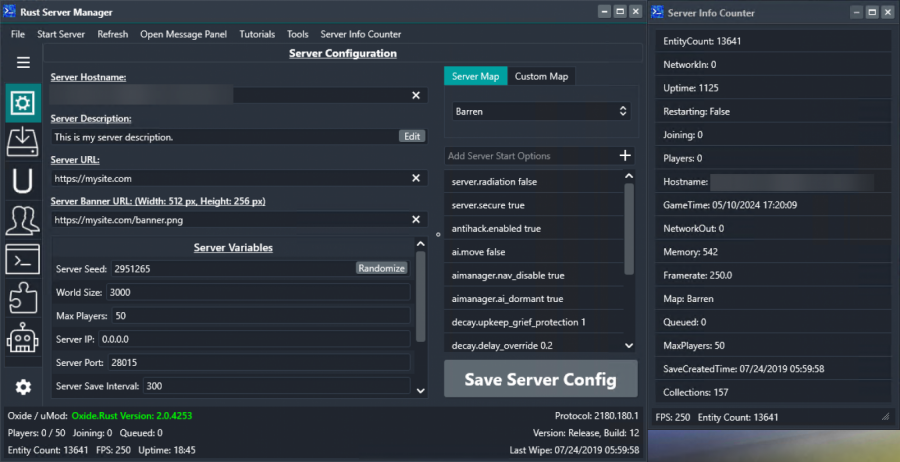
Configuration & running
You can run the Rust DS with ./RustDedicated -batchmode (Linux) or rust_server.exe -batchmode (Windows).
Command line parameters
The startup command can be appended with the following startup parameters:
| parameter | default | description |
|---|---|---|
+server.ip
|
0.0.0.0
|
Sets the Server IP. Leave it to 0.0.0.0 unless you have multiple IPs. |
+server.port
|
28015
|
Sets the port the server will use. (default 28015 UDP) |
+rcon.ip
|
0.0.0.0
|
Sets the RCON IP. |
+rcon.port
|
28016
|
Port to listen to for RCON. |
+rcon.web
|
0
|
If set to true, use websocket rcon. If set to false use legacy, source engine rcon. |
+server.tickrate
|
10
|
Server refresh rate — Not recommended to go above 30. |
+server.hostname
|
"Your Server Name"
|
The displayed name of your server. |
+server.identity
|
"my_server_identity"
|
Changes path to your server data rust/server/my_server_identity. Useful for running multiple instances. |
+server.maxplayers
|
50
|
Maximum amount of players allowed to connect to your server at a time. |
+server.worldsize
|
3000
|
Defines the size of the map generated (min 1000, max 6000) |
+server.seed
|
50000
|
Is the map generation seed. |
+server.saveinterval
|
600
|
Time in seconds for server save. |
+rcon.password
|
"YourPassword"
|
Sets the RCON password |
-logfile
|
gamelog.txt
|
If you’re using a script, you’d better put the current date as a filename, otherwise, it’ll be erased on every start. |
-silent-crashes
|
-
|
Won’t display a crash dialog and will restart automatically if server is installed as service. |
For example:
-batchmode +server.ip 0.0.0.0 +server.port 28015 +server.tickrate 10 +server.hostname "Your Server Name" +server.identity "your_server_identity" +server.seed 793197 +server.maxplayers 50 +server.worldsize 3000 +server.saveinterval 600 +rcon.ip 0.0.0.0 +rcon.port 28016 +rcon.password "Your_Rcon_Password" -logfile "logfilename.log"
RCON
To use RCON (Remote console) you can either type directly in the CMD, or join the server and press F1 to open the console. (requires authlevel 1 or 2)
To add yourself as admin (authlevel 2) type «ownerid YourSteamId64» in the Command Prompt and re-join the server, or add it to the users.cfg located in ../server/serveridentity/cfg.
Otherwise, you can use RustAdmin, a nice remote RCON client (recommended).
When the server is up and running, you can issue the commands from the Server Commands list below.
Server Commands
Here is a RAW list of available commands. You can put them either in your server.cfg (then reboot the server), or input them using RCON.
If you want the values to be permanent then save it using the command server.writecfg
Last update: 31 August 2017
> Commands
bradley.enabled If set to false (0) it will disable the APC. Default is (1)
ai.think If set to False, bears and wolfs are only hostile on attack (True)
ai.move If set to False, animals will stop moving (recommended for performance boost) (True)
ai.sensetime It's no use to change this value (1)
ai.frametime no description (5)
ai.tickrate Changes the tickrate of animals (5)
antihack.enabled Enables / disables antihack (True)
antihack.admincheat Are admins allowed to use their admin cheat (True)
antihack.objectplacement Use antihack to verify object placement by players (True)
antihack.modelstate Use antihack to verify model state sent by players (True)
antihack.userlevel 0 = users, 1 = admins, 2 = developers (2)
antihack.enforcementlevel What happens if player is above 'antihack.maxviolation' - 0 = no enforcement, 1 = kick, 2 = ban (1)
antihack.maxdesync Max allowed client desync, lower value = more false positives (1)
antihack.relaxationrate The rate at which violation values go back down (0.1)
antihack.relaxationpause The time before violation values go back down (10)
antihack.maxviolation Violation value above this results in enforcement (100)
antihack.noclip_protection 0 = disabled, 1 = ray, 2 = sphere, 3 = curve (3)
antihack.noclip_reject Whether or not to reject movement when noclip is detected (True)
antihack.noclip_penalty Violation penalty to hand out when noclip is detected (0)
antihack.noclip_stepsize Movement curve step size, lower value = less false positives (0.1)
antihack.noclip_maxsteps Movement curve max steps, lower value = more false positives (5)
antihack.speedhack_protection 0 = disabled, 1 = enabled (1)
antihack.speedhack_reject Whether or not to reject movement when speedhack is detected (False)
antihack.speedhack_penalty Violation penalty to hand out when speedhack is detected (50)
antihack.speedhack_forgiveness Speed threshold to assume speedhacking, lower value = more false positives (2)
antihack.speedhack_deltatime Time interval to calculate speed in, lower value = more false positives (0.2)
antihack.speedhack_tickets Required number of speeding tickets to trigger a violation (15)
antihack.speedhack_history Speeding ticket history length (20)
antihack.flyhack_protection 0 = disabled, 1 = simple, 2 = advanced (2)
antihack.flyhack_reject Whether or not to reject movement when flyhack is detected (False)
antihack.flyhack_penalty Violation penalty to hand out when flyhack is detected (50)
antihack.flyhack_forgiveness Distance threshold to assume flyhacking, lower value = more false positives (2)
antihack.projectile_protection 0 = disabled, 1 = speed, 2 = speed + entity, 3 = speed + entity + LOS (3)
antihack.projectile_penalty Violation penalty to hand out when projectile hack is detected (0)
antihack.projectile_forgiveness Projectile speed forgiveness in percent, lower value = more false positives (0.5)
antihack.projectile_padding Projectile hit distance padding in meters, lower value = more false positives (5)
antihack.projectile_serverframes Projectile server frames to include in delay, lower value = more false positives (2)
antihack.projectile_clientframes Projectile client frames to include in delay, lower value = more false positives (2)
antihack.projectile_tickets Required number of projectile line of sight tickets to trigger a violation (10)
antihack.melee_protection 0 = disabled, 1 = initiator, 2 = initiator + target, 3 = initiator + target + LOS (3)
antihack.melee_penalty Violation penalty to hand out when melee hack is detected (0)
antihack.melee_forgiveness Melee distance forgiveness in percent, lower value = more false positives (0.5)
antihack.melee_padding Melee hit distance padding in meters, lower value = more false positives (2)
antihack.melee_serverframes Melee server frames to include in delay, lower value = more false positives (2)
antihack.melee_clientframes Melee client frames to include in delay, lower value = more false positives (2)
antihack.melee_tickets Required number of melee line of sight tickets to trigger a violation (2)
antihack.eye_protection 0 = disabled, 1 = distance, 2 = distance + LOS (2)
antihack.eye_penalty violation penalty to hand out when eye hack is detected (0)
antihack.debuglevel 0 = silent, 1 = print max violation, 2 = print every violation (1)
batching.colliders *EXPERIMENTAL* Rust batches colliders to get around the maximum collider limit. To improve server performance you can unbatch (batching.colliders 0) colliders until they reach 250k. (True)
batching.collider_vertices no description (10000)
batching.collider_submeshes no description (1)
batching.verbose no description (0)
chat.enabled Enable or disable chat displaying (True)
chat.serverlog Enable or disable chat logging (True)
construct.frameminutes How many minutes before a placed frame gets destroyed (30)
craft.instant Enable or disable instant crafting (False)
debug.checktriggers Debug triggers (False)
decay.tick Larger amount increases the applied decay damage to entity. (600)
decay.scale 1 = normal decay, 0,5 = 50%, 0 = turn decay off (1)
decay.debug Debugmode (False)
env.time Shows in-game time. If value declared, will change the server time (values: 0 - 24)
env.day Displays the day of the month. Pointless to change this value (12)
env.month Displays the month. Pointless to change this value (6)
env.year Displays the year. Pointless to change this value (2024)
fps.limit The maximum number of frames to render per second (256)
gc.interval Changes the interval between garbage collects. (-1)
heli.lifetimeminutes The amount of time the helicopter is allowed to stay in minutes. (15)
heli.guns Enables / disables the helicopters minigun. If set to 0, the helicopter will shoot rockets only. (1)
heli.bulletdamagescale Changes the bullet damage of the helicopter. Higher value = more damage (1)
heli.bulletaccuracy Changes the accuracy of the bullets. Higher value = less accuracy (2)
net.visdebug Turns on debug display of network visibility (False)
physics.droppedmode The physics mode that dropped items and corpses should use. good, tempgood or fast. fast + tempgood might cause objects to fall through other objects. (good)
physics.sendeffects Send effects to clients when physics objects collide (True)
physics.bouncethreshold no description (2)
physics.sleepthreshold no description (0.005)
physics.solveriterationcount The default solver iteration count permitted for any rigid bodies (default 7). Must be positive (3)
physics.steps The amount of physics steps per second (16)
pool.skins no description (False)
sentry.targetall Target everyone regardless of authorization (False)
sentry.hostileduration How long until something is considered hostile after it attacked (120)
server.ip Sets the IP of the server. Should be stated in the startup parameters
server.port Sets the IP of the server. Should be stated in the startup parameters
server.maxplayers Changes the maximum amount of player slots.
server.hostname Sets the Servername. example: server.hostname "My Rust Server"
server.identity Changes path to your server data. (my_server_identity)
server.level Sets the map of the server (Procedural Map) values: Barren, Craggy Island, Hapis, Savas Island
server.seed Sets the the map generation seed.
server.salt Prints the server.salt
server.worldsize Changes the map size (3000). values: 1000 - 6000. 3000 equals 9km². (3000m^2)
server.saveinterval Interval between the server saves the map. (300)
server.secure Enables / disables Valve Anti Cheat security. (True)
server.tickrate Changes the server tickrate. Going higher than 30 is not recommended. (30)
server.entityrate Tickrate. Recommended to leave it at 16. (16)
server.cycletime no description (500)
server.official Only whitelisted server by Facepunch can use this command (False)
server.globalchat If set to false, only people within voice range can read each others messages. (True)
server.stability If set to false, building blocks will have 100% stability no matter how high you build. (True)
server.radiation Disables / enables server radioation (True)
server.itemdespawn Time until an item despawn (180)
server.pve Enables / disables PvE mode (False)
server.description Command used to write a server description. Make n to make a new line
server.headerimage Sets the serverbanner - picture must be 500x256
server.logoimage Sets the servers logo image - Image is shown in the server browser and rust+ app
server.url Sets the server 'Webpage'
server.branch no description ()
server.eac Enables / disables Easy Anti Cheat (1)
server.queriespersecond no description (2000)
server.ipqueriespermin no description (30)
server.meleedamage Changes the melee damage in percent - 1 = 100, 0.5 = 50%, 0 = 0% (1)
server.arrowdamage Changes the arrow damage in percent - 1 = 100, 0.5 = 50%, 0 = 0% (1)
server.bulletdamage Changes the bullet damage in percent - 1 = 100, 0.5 = 50%, 0 = 0% (1)
server.bleedingdamage Changes the bleeding damage in percent - 1 = 100, 0.5 = 50%, 0 = 0% (1)
server.meleearmor Changes the scale of protection against melee damage from clothing and armor in percent - 1 = 100, 0.5 = 50%, 0 = 0% (1)
server.arrowarmor Changes the scale of protection against arrow damage from clothing and armor in percent - 1 = 100, 0.5 = 50%, 0 = 0% (1)
server.bulletarmor Changes the scale of protection against bullet damage from clothing and armor in percent - 1 = 100, 0.5 = 50%, 0 = 0% (1)
server.bleedingarmor Changes the scale of protection against bleeding damage from clothing and armor in percent - 1 = 100, 0.5 = 50%, 0 = 0% (1)
server.updatebatch How many entity updates should we send per loop. Setting this > 1000 might cause lag when a player first joins your server. (128)
server.planttick Plants tick every x seconds. This is how many seconds between ticks. (60)
server.planttickscale Setting this to 2 will make plants grow, fruit and die two times faster than normal. (1)
server.respawnresetrange Distance from sleeping bag to reset other sleeping bags/beds. (50)
server.maxunack Max amount of unacknowledged messages before we assume we're congested (4)
server.maxflood Max amount of ticks to receive per second before we assume a client is flooding us (1000)
server.netcache Use network caching (True)
server.netcachesize Informational, the size of the network cache (in bytes) (2214666)
server.savecachesize Informational, the size of the save cache (in bytes) (2264944)
server.combatlogsize The size of the combat log (100)
server.idlekick Number of minutes until idle players are kicked (30)
server.idlekickmode 0 = no idle kick, 1 = kick if server full, 2 = always kick (1)
server.idlekickadmins 1 = admins can get idle kicked (0)
server.maxreceivetime no description (20)
server.compression no description (False)
server.netlog no description (False)
spawn.min_rate no description (0,2)
spawn.max_rate no description (2)
spawn.min_density no description (0,2)
spawn.max_density no description (2)
stability.verbose no description (0)
stability.strikes no description (10)
stability.collapse no description (0.05)
stability.accuracy no description (0.001)
time.fixeddelta Fixed delta time in seconds (0.0625)
time.maxdelta The minimum amount of times to tick per frame (0.33)
vis.damage Turns on debug display of damages (False)
vis.attack Turns on debug display of attacks (False)
vis.protection Turns on debug display of protection (False)
vis.weakspots Turns on debug display of weakspots (False)
vis.triggers Show trigger entries (False)
vis.hitboxes Turns on debug display of hitboxes (False)
vis.lineofsight Turns on debug display of line of sight checks (False)
xmas.enabled no description (True)
xmas.spawnrange no description (50)
xmas.giftsperplayer no description (2)
rcon.print If true, rcon commands etc will be printed in the console (False)
find Search for a command
status Print out currently connected clients
stats Print out stats of currently connected clients
kick Kicks a player from the server. usage: kick {playername} {reason} example: kick Frank "stop crying"
kickall Kicks everyone from the server.
ban Permanently bans a player from the server. usage: ban {playername} {reason} example: ban Frank "stop crying"
moderatorid ( void ) no description
ownerid ( void ) no description
removemoderator ( void ) no description
removeowner ( void ) no description
banid ( void ) no description
unban ( void ) no description
players Print out currently connected clients etc
say Sends a message in chat
users Show user info for players on server.
banlist List of banned users (sourceds compat)
banlistex List of banned users - shows reasons and usernames
listid List of banned users, by ID (sourceds compat)
mutevoice no description
unmutevoice no description
mutechat no description
unmutechat no description
playerlist Get a list of players
bans List of banned users
serverinfo Get a list of information about the server
batching.refresh_colliders no description
batching.status no description
chat.tail Return the last x lines of the console. Default is 200
chat.search Search the console for a particular string
console.tail Return the last x lines of the console. Default is 200
console.search Search the console for a particular string
data.export no description
flushgroup Takes you in and out of your current network group, causing you to delete and then download all entities in your PVS again
breakheld Break the current held object
breakitem Break all the items in your inventory whose name match the passed string
hurt Damage yourself
entity.debug_toggle no description
entity.nudge no description
entity.create Create entities, you must be playing in the server, use F1 to open console. Example entity list: http://text-share.com/view/43244684
env.addtime Add (in hours) time to spawn choppers / airdrops without changing the server in-game time
gc.collect no description
gc.unload no description
global.restart Restart the server - with x seconds warning. If no seconds given, server restarts after 5 minutes. (300 seconds)
global.quit Stops the server and closes the command prompt.
global.report no description
global.objects no description
global.textures no description
global.colliders no description
global.error no description
global.queue no description
global.sleep no description
global.injure no description
global.spectate no description
global.teleport no description
global.teleport2me no description
global.teleportany no description
global.teleportpos no description
global.cleanup no description
global.version no description
global.sysinfo no description
global.breakitem no description
heli.drop Spawns a helicopter at a specific players posititon (heli.drop <steamid 64 bit, steam name>)
heli.calltome Forces a helicopter to spawn off map and fly to your position
heli.call Calls in a helicopter to roam the map like normal
heli.strafe Forces helicopter to target a specific player (heli.strafe <steamid 64 bit, steam name>)
hierarchy.ls no description
hierarchy.cd no description
hierarchy.del no description
inventory.give no description
inventory.giveall no description
inventory.giveto no description
inventory.giveid no description
inventory.givearm no description
pool.print_memory no description
pool.print_prefabs no description
pool.print_assets no description
pool.clear_memory no description
pool.clear_prefabs no description
pool.clear_assets no description
server.stop Stops the server
server.backup Backup server folder
server.writecfg Writes config files
server.fps Prints current server fps
server.save Force save the current game
server.readcfg no description
spawn.fill_populations no description
spawn.fill_groups no description
spawn.report Prints some information about entities already spawned on the server
weather.clouds no description
weather.fog no description
weather.wind no description
weather.rain Modify rain intensity, values between 0-100 (auto)
xmas.refill no description
global.dump no description
Ban list
Banned users will be stored in cfg/bans.cfg.
Linux Scripts Resources
LinuxGSM Rust Server
![]()
Linux Game Server Managers
LinuxGSM is the command line tool for quick, simple deployment and management of dedicated game server, using SteamCMD.
Features
- Backup
- Console
- Details
- Installer (SteamCMD)
- Monitor
- Alerts (Email, Pushbullet)
- Update (SteamCMD)
- Start/Stop/Restart server
Supported Servers
There are now 70+ different game servers supported and rising. For a full list visit the website.
Links
Website: https://linuxgsm.com/lgsm/rustserver/
GitHub Repo: https://github.com/GameServerManagers/LinuxGSM
Windows Resources
Rust Server Manager [PAID]
Rust Server Manager is a premium tool to help you create and manage your dedicated Rust Servers. It provides you with all the tools that you need to set up and manage your rust server.
Features
- Graphical Config Editor with more server options.
- Server Installer (Multi Branch support).
- Server Updater (Update your server manually or automatically).
- Server Verify (Verify your server files if you think something is missing).
- Wipe Manager (Wipe your server along with the chosen data to wipe).
- uMod / Oxide support.
- Full uMod / Oxide Control (Config editor, plugin editor, plugin config editor).
- Plugin Updater.
- Joining List — Get and manage a list of player joining your server.
- Queued List — Get and manage players in queue to join your server.
- Player Manager — Manage online and offline players
- The list of features are too long to add here but there is a (probably outdated) list on the website: https://rustservermanager.com/
Compatible With:
- Windows 10, 8.1, 8 and 7.
- Windows Server 2016, 2012 and 2008. (2008 untested)
Buy Here: https://rustservermanager.com/
Other
Facepunch’s online rcon client
- https://facepunch.github.io/webrcon/#/home
Для настройки клиентского ПО требуется первоначальная установка программы RustDesk под вашу операционную систему:
1) Выбор дистрибутива под вашу ОС:


2) После установки Вам потребуется ввести информацию о нашем сервере.
Для этого в открытой программе радом с «ID» нажимаем на троеточие, в появившемся меню выбираем ID/Сервер ретрансляции (ID/Relay Server)

3) Ввод данных о сервере.
ID-Сервер (ID-Server): rd.albion-it.ru
Сервер ретрансляции (Server Relay): rd.albion-it.ru
API-Сервер (API-Server): https://rd.albion-it.ru
Key: ncZXc7MSmyBTzG3AYpEUCwQjO28qFFeGmjzKP2VCb2E=

Установка и настройка в полуавтоматическом режиме.
Windows PowerShell
1) Открыть меню пуск и набрать в строке поиска PowerShell, запустить от прав Администратора, нажав правой кнопкой мыши на значке программы.
2) В открытом от прав Администратора PowerShell ввести команду:
Set-ExecutionPolicy Bypass и нажать в английской раскладке букву А (Да для всех)

3) Далее не закрывая окна PowerShell скачать скрипт в архиве *.zip, по ссылке на диск С:/ если скачали в другое место нужно скопировать его с того места куда он был скачан на диск C:/. Файл скрипта требуется разархивировать на диск C:/
4) После скачивания и разархивирования в корень диска C:/ пишем в окне название скрипта, который мы скачали и запускаем его, нажав Enter, после чего программа автоматически с качается, установится, и самостоятельно настроится.
C:/WindowsAgentAIOInstall.ps1

По завершению работы скрипта наш сервер выдаст вам RustDesk-ID номер, по которому мы можем к вам подключится, используя пароль, который обновляется по правилам безопасности, а также сам первый пароль RustDesk-Password, после выполнения скрипта окно PowerShell можно закрыть, и в меню «Пуск» увидеть установленную программу RustDesk.
Установка и настройка в автоматическом режиме.
Windows PowerShell
1) В открытом от прав Администратора PowerShell ввести команду:
Set-ExecutionPolicy Bypass и нажать в английской раскладке букву А (Да для всех)
2) Cкачать скрипт в архиве *.zip, по ссылке на диск С:/ если скачали в другое место нужно скопировать его с того места куда он был скачан на диск C:/. Файл скрипта требуется разархивировать на диск C:/
3) После скачивания и разархивирования в корень диска C:/ пишем в окне название скрипта, который мы скачали и запускаем его, нажав Enter, после чего программа автоматически с качается, установится, и самостоятельно настроится.
C:/rd-albion.ps1

По завершению работы скрипта наш сервер выдаст вам RustDesk-ID номер, по которому мы можем к вам подключится, используя пароль, который обновляется по правилам безопасности, а также сам первый пароль RustDesk-Password, после выполнения скрипта окно PowerShell можно закрыть, и в меню «Пуск» увидеть установленную программу RustDesk.
После завершения настройки вы можете сообщить нам свой ID для удаленного решения любый ваших задач, в удаленном формате.
RustDesk — это приложение, предлагающее нам практически те же функции, что и в TeamViewer, AnyDesk или Windows Удаленный рабочий стол, но главное преимущество — это бесплатное приложение с открытым исходным кодом.

RustDesk представлен как одна из лучших альтернатив, доступных для Windows и Linux к известному TeamViewer. Это приложение с открытым исходным кодом, большое сообщество пользователей доступны через Reddit, Discord и GitHub, которые шифруют сквозные соединения.
Это позволяет пользователям создать свой сервер для установления соединений или использования одного из общедоступных серверов, которые приложение предоставляет нам. Если мы хотим создать свой собственный сервер, если мы не доверяем безопасности, предлагаемой Ржавчина стол, мы должны загрузить дополнительное приложение.
Помимо того, что он доступен для Windows и Linux, он также работает на macOS и iOS/iPadOS и Android мобильные устройства.
Какие функции он предлагает?
RustDesk — интересная альтернатива TeamViewer, поскольку она предлагает нам практически те же функции, что и старое приложение для удаленного доступа.
Удаленный доступ к рабочему столу
С RustDesk мы можем удаленный доступ пользовательский интерфейс, как если бы мы были физически перед ним, но с учетом того, что, в зависимости от скорости соединения, действия могут занять больше или меньше времени, чтобы отразиться на нашем экране, а не на удаленном компьютере.
Пользовательский контроль
В то время как TeamViewer предлагает только один тип доступа, по крайней мере, в бесплатной версии, с RustDesk мы можем создать разные типы пользователей , каждый из которых имеет разные типы доступа к команде, к которой они подключены. Таким образом ограничивается взаимодействие самых неопытных пользователей или пользователей с ограниченным доступом.
Делиться файлами
Совместное использование файлов между двумя командами — одна из функций, которые приложение RustDesk также предоставляет нам. Эта функция, которая также доступна в TeamViewer, позволяет нам передавать большие файлы не прибегая к таким платформам, как WeTransfer и им подобным, платформам хранения, FTP-серверам
Многоплатформенная
Один из самых интересных моментов этого приложения, не говоря уже об интересных функциях, которые оно нам предлагает, заключается в его мультиплатформенной поддержке. RustDesk доступен для Windows в 32-битной и 64-битной версиях, для Linux, macOS, iOS/iPadOS и Android .
Кроме того, также доступна портативная версия, версия, совместимая с Windows только на компьютерах с 64-разрядными версиями.
Сквозное шифрование
Как и любая платформа для обмена сообщениями, которая обеспечивает сквозное шифрование сообщений, RustDesk также шифрует соединения между компьютерами которые делают связь. Таким образом, друзья инопланетянина не смогут расшифровать все данные, которые циркулируют между обоими компьютерами.
большое сообщество
Чтобы приложение с открытым исходным кодом было успешным, сообщество должно его поддерживать. В случае с RustDesk мы можем найти очень большое сообщество пользователей, сообщество, которое мы можем найти через Discord , Отредактировать и GitHub.
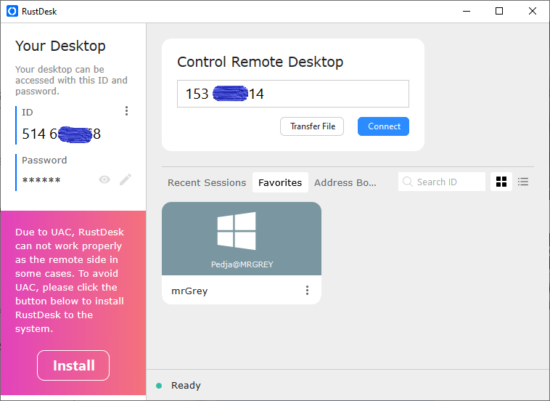
Как это работает
Из-за ограничений Windows на некоторых компьютерах через контроль учетных записей (UAC) переносная версия предлагает нам установить приложение для Windows вместо использования этой версии. Если у вас не возникнет проблем с производительностью, мы можем без проблем использовать эту версию.
В процессе установки нет никакой тайны. Нам просто нужно указать путь, куда мы хотим установить приложение, поставить соответствующие галочки, если мы хотим создать прямой доступ и доступ к приложению с рабочего стола и нажать на кнопку Принять и установить кнопку.
Вы закончили работу с приложением, оно откроется автоматически и покажет нам интерфейс, разделенный на три раздела:

Ваш рабочий стол
Идентифицировано с нашего компьютера через общедоступные серверы RustDesk вместе с соответствующим паролем, паролем, который мы можем автоматически изменить на новый или установить тот, который мы хотим использовать, щелкнув значок карандаша.
Удаленное управление рабочим столом
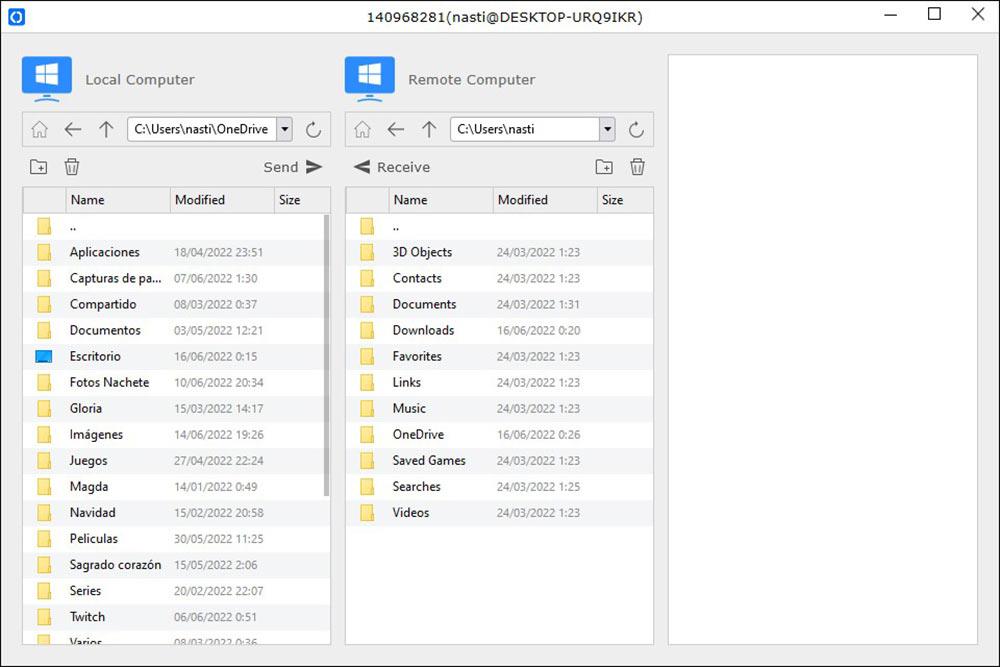
Удаленное подключение к компьютеру . Этот раздел расположен в правой части окна приложения. Чтобы удаленно подключиться к компьютеру с помощью общедоступных серверов RustDesk, мы должны ввести идентификатор целевого компьютера и нажать «Подключиться». Далее приложение запросит пароль доступа компьютера, к которому мы собираемся подключиться.
Если мы хотим передавать файлы вместо использования удаленного подключения к рабочему столу другого компьютера, вместо нажатия кнопки «Подключиться», мы нажимаем кнопку «Передать файл». Затем он запросит у нас пароль компьютера, с которого мы хотим передавать файлы, и откроет панель, аналогичную панели FTP-приложений, откуда мы можем передавать файлы между двумя компьютерами.
консоль журнала
Через этот раздел мы можем получить доступ ко всем соединениям, которые мы установили с другими компьютерами. Кроме того, это также позволяет нам создавать адресную книгу других компьютеров и устанавливать ряд избранных соединений. Если количество оборудования, которое мы храним, очень велико, мы можем использовать окно поиска по ID.
Скачай бесплатно
Использование и загрузка как клиента RustDesk в его клиентской версии для использования общедоступного сервера, так и версии, позволяющей нам создать собственный сервер, совершенно бесплатны. Из RuskDesk веб-сайт Честного ЗНАКа , вы можете скачать клиентское приложение по адресу:
- Windows 10 и Windows 11 в 64-битной версии
- Windows 7,8.X и Windows 10 в 32-разрядной версии
- Портативная версия для Windows
- MacOS
- ОС iOS/iPad
- Android
В этот GitHub ссылка, вы можете найти последние доступные версии RustDesk для всех операционных систем, в которых он доступен.
На момент публикации этой статьи приложение для создания собственных серверов RustDesk для Windows и Linux в настоящее время доступно только в 64-битных версиях, версии, которые вы можете скачать по этой ссылке. ссылке .
альтернативы
- Windows Remote Desktop — идеальное решение для пользователей, которые хотят подключаться только к компьютерам под управлением Windows, если на удаленном компьютере установлена Pro-версия Windows.
- TeamViewer , старейшее кроссплатформенное командное приложение для удаленного подключения в мире вычислительной техники, доступное бесплатно на его веб-сайте. веб-сайт Честного ЗНАКа для некоммерческого использования.
- AnyDesk — еще одна интересная альтернатива RustDesk, которая, как и TeamViewer, предлагает нам бесплатную версию для некоммерческого использования. с веб-сайта .
Skraćena veza: https://pedja.supurovic.net/veza/10515

RustDesk (https://rustdesk.com/ , https://github.com/rustdesk ) is Open source virtual/remote desktop software like TeamViewer or AnyKey. It is on par with them in functionality, except that RustDesk is Open software, meaning free. It gains large popularity, as it does job well, and especially because commercial alternatives became unreasonably expensive unacceptable for noncommercial or low profile use.
Actually, there is one more big difference – You can host RustDesk on your own. This makes you independent from third parties. It makes it even more favorable.
Author of RustDesk actually recommends using self hosted servers for simple reason – public servers that are available, and free to use, actually do cost money. Switching to self hosted servers lowers costs of public servers.
How it works
Simplified said, you run two RustDesk Clients so they connect to RustDesk host. If you want access to other client you have to use it’s ID to connect to it. All communication goes through RustDesk host. Clients can be behind NAT routers as they do not communicate directly, but they use connections to the host.
This of, course, can also work in local network, without need of Internet. There is also option that clients, if they realize they actually can see each other, switch to communicate directly, without use of a host.
Requirements
Being independent means you are becoming responsible for providing resources and availability of the service. For small scale needs, that is not huge requirements and is perfectly doable. What you must have is modest computer available to install server and reasonable Internet connection.
If you need to allow connections to your local server from public Internet, internet connection, public IP and options to set NAT are must. You also can alternatively use some small scale bare bone hosting or cloud service. Server works fine on Linux and Windows platforms.
What is needed
At RustDesk site you will find instructions for several ways to install server on supported platforms. I will be practical and focus on just one, that I did. As installation did not go smooth until I understand lots of stuff that were new to me, I am writing this down as notes to myself but I hope other could gain from it.
As RustDesk host should run as an service the first you need NSSM (Non-Sucking Service Manager). It’s name is appropriate. It really makes installing service easy and neat. You can get it from http://nssm.cc/ .
Other thing you need is actualy RustDesk server. You can get it from https://github.com/rustdesk/rustdesk-server/releases/tag/1.1.6. That is version that is actual now, but you should check if there is newer version. Beware that Windows compiled binaries are not promptly available for all versions.
Presumptions
Lets assume you have local network and you want to allow RustDesk clients to access each other both in public and local network. That means you have local Windows PC that will act as RustDesk server and internet connection with static public IP address. Local network is behind NAT router. You will use dedicated domain for service named rustdesk.mydomain.org. You have a router which allows you to set NAT rules and that also acts as DNS for local network with option to set static DNS entries.
Here are so many variations that can apply here so we will not go more into details. I assume that if you are going to install RestDesk server you know enough about networking, and can manage with information provided in this tutorial.
Installation
Installation goes in few steps.
Setting up network
Set up domain rustdesk.mydomain.org to point to public IP address assigned to your router. That would allow clients from internet to search for the server in your network. Lets assume that rustdesk.mydomain.org points to IP 94.214.56.108. That is address that all RustDesk clients located on Internet should connect to to access your self hosted RustDesk Server.
Make sure local computer, that is going to became server, is set to static IP address. It is important that that address does not change. You can do it by assigning IP in DHCP server on router or by assigning IP manually to the network interface on computer. Let’s assume that local IP is 192.168.1.4. That is address all RustDesk clients within local network should use to access your self hosted RustDesk Server.
Set NAT rules in router to forward incoming connections on TCP ports 21115 to 21119 and 8000 and UDP port 21116 to point to local IP address you assigned to the server computer.
Make static DNS entry in router that would point domain rustdesk.mydomain.org to local IP address you assigned to the server (assumed to be 192.168.1.4). This allows clients in your local network to also see the server on that domain. Although domain is the same, IP address they get would be different from IP that clients on the public Internet would see. What matters is that they deal with the same domain.

Possible simplification
You can simplify this settings if you set RustDesk server outside of your network, on some bare bone hosting or cloud server. That way you will not have to deal with router, NAT and static DNS. Your server would have public IP, visible from everywhere, and you would simply point domain rustdesk.mydomain.org to that IP.
Unpacking
Create directory somewhere on the disk to store RustDesk server files. It may be any directory as long as it is accessible. Let’s say we choose it to be C:\RustDeskServer\.
Download NSMM and extract nsmm.exe to this directory. You will find 32bit and 64bit version in downloaded archive. Choose appropriate one. Just place nsmm.exe into C:\RustDeskServer\.
Downloaded archive of RustDesk server will contain just two files: nbbr.exe and nbbs.exe. Extract them both into C:\RustDeskServer\.
Setting up host
Open command prompt and position it to the install directory using command:
cd C:\RustDeskServer\
Install RustDesk router service first
nssm.exe install "RustDesk hbbr service" C:\RustDeskServer\hbbr.exe -k _
Then install Rendezvous server
nssm.exe install "RustDesk hbbs service" C:\RustDeskServer\hbbs.exe -r rustdesk.mydomain.org -k _
Note that you have to use full path to service executables.
Both services should install without error. Then you start them
nssm.exe start "RustDesk hbbr service"
nssm.exe start "RustDesk hbbs service"
And that is it. You installed RustDesk Server.
Check if there is firewall on computer that prevents accessing server ports (TCP ports 21115 to 21119 and 8000 and UDP port 21116). Those should be accessible from the local network and also from internet through the NAT router. For TCP ports you can simply try telnet to server address and chosen port. If it connects that means port is accessible. If one port is accessible, that usually means all ports are.
Side notes
When starting services there are two parameters used.
-k specifies that client must use public security key. Clients that do not have key or have wrong key would not be accepted.
If you omit this parameter when starting service, keys would not be required, or better say, they wold be ignored. All connections would be insecure.
However, to connect to specified self hosted server, client still has to have security key in file name. In that case key may be anything as it would be ignored. It is strongly recommended to enforce usage of security keys, like this tutorial shows.
-r specifies address of rendezvous server. It actually may be a list of servers. It seems that when client connects to host it returns this list of rendezvous servers for clients to use to connect to each other. In other tutorials I found out that ip address 0.0.0.0 is used for this purpose. I guess it has special meaning, maybe that rendezvous server is the same as router server.
Well, in this configuration with clients on both sides of NAT that 0.0.0.0 address does not work. Clients cannot connect to each other. I solved this by using domain instead of IP. As domain is set to point to different IP regarding if client is on Internet or in local network, that meant they all connected properly to rendezvous server and they could connect to each other.
As this parameter accepts list of addresses, it is possible that it would work if both public and local IP address are listed so that client would use one it can access. I did not test that way as I do not like hard coding IP addresses. I like to use domains instead.
I guess this is not an issue if RustDesk host is directly on public IP as then all clients would see it the same. Lets say this is quirk important for hosting RustDesk behind NAT.
Setting up RustDesk Client
RustDesk client has to be set up to access your self hosted RustDesk Server.
First, make sure you have no RustDesk Client installed. That is important! This cannot work with RustDesk client that is installed. You have to use Portable version. If you have installed RustDesk Client deinstall it (do not worry, you will not loose ID).
Download portable RustDesk Client from https://rustdesk.com/ and unpack rustdesk.exe (it would probably have version number in file name) wherever you want. Desktop would be fine. RustDesk Client version I did this with is 1.1.9.
RustDesk Client by default connects to the public host, but we need it to connect to our local host so we have to set it up. It is a bit unusual, but configuration is done by changing file name.
Filename should contain two information: address of the host and security key. Address of the host is domain we already prepared – rustdesk.mydomain.org.
To get a security key check content of the directory where server is located – C:\RustDeskServer\. Two new files should be there that are created when server was installed: id_ed25519 and id_ed25519.pub. Those are private and public keys for secure connection.
Open id_ed25519.pub in some text editor and copy line of character that is inside. That is security key. Lets say key looks like this: rvIZyRt2259R3OklpnjPHxKOruTuOJAYKG4fkdwKcNI=
Copy rustdesk.exe to a file with new name:
rustdesk-host=rustdesk.mydomain.org,key=rvIZyRt2259R3OklpnjPHxKOruTuOJAYKG4fkdwKcNI=.exe
Yes I know, looks odd, but that is how it is supposed to look. Now, when you run this program it will check it’s own exe name and extract address of the host and security key (That is interesting way to keep configuration within single file, right?).
So, you now can copy this file to any computer you want to use your RustDesk Server.
Important note: check if security key contains some characters that are not allowed to be used in Windows file name like ~ “ # % & * : < > ? / \ { | } or so. If it does contain such characters the you would not be able to name file.
To resolve this, stop RustDesk Server using these commands:
nssm.exe stop "RustDesk hbbr service"
nssm.exe stop "RustDesk hbbs service"
While they are stopped delete files id_ed25519 and id_ed25519.pub and then start services again.
nssm.exe start "RustDesk hbbr service"
nssm.exe start "RustDesk hbbs service"
That would create new files. Check content of id_ed25519.pub and if it is not suitable, just repeat process. Unsuitable characters show rarely.
So how to use it?
Using RustDesk Client with self hosted server is the same as with public server. The only difference is that you use different sever.
Remember, only clients connected to the same server can communicate. So when, you need to access someone else’s PC, just send to him file rustdesk-host=rustdesk.mydomain.org,key=rvIZyRt2259R3OklpnjPHxKOruTuOJAYKG4fkdwKcNI=.exe (of course your file would have different name) and let him use that to connect to your server.
Problems?
Well yes, there may be a problems. Due to way RustDesk Client works it is not possible to run two clients connecting different servers at the same time. Yes, you can run RustDesk Client multiple times and connect it to several remote clients at the same time as long as all are connecting to the same server.
Most usual issue is that someone already has installed RustDesk Client that connects to public server. If that is the case he must deinstall that client. If he needs to connect to public server too, he can just copy exe you provided into new file named rustdesk.exe. That one would be portable and it would connect to the public server. He just must may attention that he cannot have running two clients connected to self hosted and public server at the same time. One that is run first would work, other one would go crazy.
Once RustDesk Client is started it is hart to tell which one it is. There is no visual clues to let you know which server you are connected to. You may check About option, but it just shows if it is configured to use private server, but not that it is actually using it. I hope, author would deal with this in the future releases.
If you meet some other issue, it may help to check configuration and logs of RustDesk Client they are located in directory %appdata%\RustDesk.