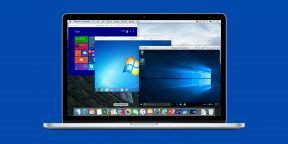
Running Windows software on your Mac isn’t as tough as you’d think. Here are the most popular ways to run Windows programs on macOS, including the best method for most people.
Mac software is awesome, but there’s no denying that Windows software is widespread. Thus, many Mac users find themselves needing to run Windows-only apps from time to time.
Maybe you need to use a specific piece of software that only runs on Windows, or just miss something from your Windows days. Whatever the case, you have options for running Windows programs on your Mac.
Here’s an overview of them all, plus our favorite method that will suit most people.
1. Virtual Machines
Virtual machines allow you to run operating systems inside a piece of software. The virtual OS thinks it’s running on a real computer, but you have full control over it thanks to the virtualization software. On macOS, you’ll find three big VM names: Parallels, VMware Fusion, and VirtualBox.
Parallels offers the best VM user experience, especially for beginners. You don’t have to configure anything or even download Windows yourself during the setup — the software does it all for you. Coherence mode lets you run Windows apps right alongside Mac apps, even pinning them to your Dock, and get Windows out of the way. Indeed, Parallels has surged ahead of VMware Fusion.
The biggest downside is the cost. Parallels costs $80, while VirtualBox is free. However, VirtualBox requires you to perform the setup yourself. It also isn’t quite as smooth as Parallels, since the latter was specifically designed for macOS. Our complete guide to VirtualBox will help you if you decide to try it, though.
We recommend giving the 14-day free trial of Parallels a try and deciding if it’s worth the cost to you. If you don’t want to pay, VirtualBox is your best bet for having a copy of Windows at the ready. Thankfully, you can download the Windows 10 installation media and use it without having to even activate the OS.
Pros
- Opening a virtual machine doesn’t require you to reboot your PC.
- Running Windows programs alongside Mac apps is a breeze.
- Parallels offers an impressively smooth experience.
- You can scale how much space the virtual hard drive uses.
Cons
- Parallels is expensive.
- VM graphics performance is poor so this isn’t a good solution for playing Windows games on your Mac.
- VirtualBox takes a bit of tinkering to set up.
- Older Macs might not have enough resources to keep a VM running smoothly.
2. Boot Camp
While virtual machines let you run a copy of Windows inside software, Boot Camp lets you install Windows right onto your Mac. Also known as dual-booting, this lets you run Windows and macOS side by side on one hard drive.
The Boot Camp Assistant in macOS walks you through the entire process. This will partition your hard drive and install Windows so you can reboot into it. We’ve covered how to download a Windows installer for Boot Camp and everything you need to know about running Windows on your Mac if you decide to go with this method.
One drawback to dual-booting with Boot Camp is that you can’t run Windows and Mac programs side-by-side. Whenever you need Windows, you’ll need to restart your Mac and boot into Windows. However, this leads to better performance than a virtual machine, because Windows can utilize all of your machine’s resources.
Pros
- No additional cost.
- Offers the best performance for running games and other intensive Windows software.
Cons
- You must reboot every time you want to access Windows programs.
- Can take up a good bit of disk space.
3. Wine
Both of the above solutions involve actually using the Windows OS to run Windows programs. But Wine is different. It’s a compatibility layer that lets you run Windows software on macOS and Linux. Wine is a lighter solution than an installation of Windows, if you just need to use a program or two. But it doesn’t come without its own set of problems.
Wine isn’t guaranteed to work with all programs. Some may work perfectly, while others will crash or fail to run at all. You can check the Wine Application Database to see if your preferred apps will work. Another problem is that the vanilla Wine program requires some tweaking that will likely confuse new users.
The best way to try Wine is with the third-party WineBottler, which adds some much-needed conveniences.
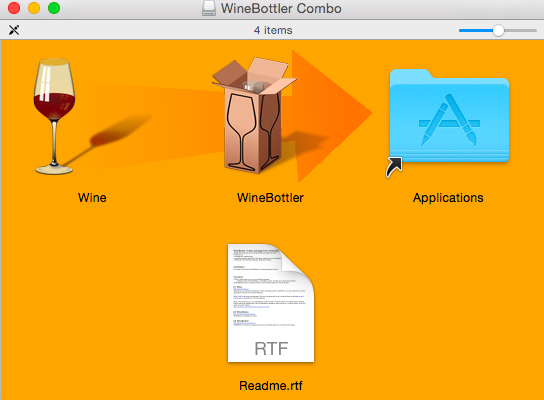
Download WineBottler and open the DMG file when complete. In the resulting window, drag and drop both the Wine and WineBottler icons to your Applications folder just like you’d install other software. Launch WineBottler, and you’ll see some programs that you can install right away, such as Internet Explorer on Mac.
To open other Windows programs, download them as EXE files from safe and reputable download sites. Right-click and choose Open With > Wine and Wine can run them directly. Remember that not all programs will work under Wine, so you may have to try some Wine troubleshooting if one fails.
Wine is best if you need to run a Windows program or two and is worth keeping around for those times. But if you need to run many Windows programs, you’re better off with another method.
Pros
- Free and fast install.
- Some common Windows software works out of the box.
- Doesn’t require installing Windows.
Cons
- Not guaranteed to work with all software.
- Even supported programs may have problems.
4. CrossOver
CrossOver is a paid tool that’s based on Wine. It features a solid user interface, allowing you to simply type the name of the Windows software you want to install and handles it all for you. Since it’s commercial software, you can also ask the developers about adding support for a new piece of software if you’re a subscriber.
But compared to your other options here, CrossOver really doesn’t offer the best package for most people’s needs. If you need to run several Windows programs, you’re better off with using a VM. Boot Camp will give you better performance for games, and Wine is free for testing one-off programs. At $40 minimum for CrossOver, we recommend skipping this one.
Pros
- Marginally better support and interface than WineBottler.
- Focuses on supporting popular programs.
Cons
- Cost is a lot to pay when WineBottler is free.
- Based on Wine, so may still have bugs.
- Not great for running lots of Windows software.
5. Remote Access
If none of the above solutions work for you, why not attack the problem in a different way? Those who have a Windows computer already can simply use a remote control software to access Windows from their Mac.
TeamViewer is a free and powerful remote control tool that will do this job just fine. If you use Chrome, Chrome Remote Desktop is equally as solid.
All you need to do is install your chosen tool on both your Mac and Windows PC, sign into your account on both machines, and you can access your Windows computer whenever you need to.
Depending on your internet connection you may experience some latency, and keyboard shortcuts may cause a bit of confusion. High-intensity programs like games aren’t ideal over a remote connection, either. But if you just want to perform an action in Windows or need access to a specific program, remote access is easy and free.
Pros
- Free and easy to set up.
- Doesn’t take up space on your Mac.
- Windows programs are guaranteed to work since they’re running on a Windows machine.
Cons
- Requires you to have a Windows PC that’s always on.
- A poor internet connection can hamper the experience.
- It’s hard to use demanding programs over a remote connection.
Don’t Forget Web Apps
While you can’t run Windows apps through your browser, it’s worth mentioning that so much software is available online and doesn’t require an install. No matter if you’re using macOS, Linux, or Chrome OS, these tools all work through any browser.
If you prefer Microsoft Office to the iWork suite, you can use Office Online at no cost. Online image editing tools offer an alternative to Windows apps like Paint.NET. And online collaboration tools let you communicate with others without anyone installing software. These give you a way to run alternative software if you don’t like the Mac offering available.
The Easiest Way to Run Windows Programs on a Mac
We’ve taken a look at the five most common ways to run Windows software on your Mac. But which is the easiest? As it turns out…
Unless you’re playing games, running a virtual machine is the best way for most people to access Windows software on macOS.
Using a virtual machine lets you open Windows software alongside Mac apps, all without rebooting your Mac. And it’s more reliable than Wine, making it the best way to run Windows on Mac.
Whether you should use Parallels or Virtualbox for your VM depends on your needs. If you don’t mind paying, aren’t comfortable with setting up your own VM, or want the absolute best experience, go with Parallels. Those who have some experience with VMs or don’t have extra money to spend will do fine with Virtualbox.
How Do You Run Windows Software on Your Mac?
Just because a virtual machine is the best method for the average user to use Windows apps on a Mac, it doesn’t mean it’s the best solution for you. Let’s review the five methods in turn to summarize what kind of user can benefit from each:
- Virtual Machine: Best for anyone who wants to use a variety of Windows software along with their Mac apps without having to reboot into Windows. Doesn’t offer powerful performance for games.
- Boot Camp: Best for those who need their machine’s full power when running Windows, like when playing video games. Inconvenient to reboot into Windows.
- Wine: Handy to keep around if you only run a handful Windows programs on your Mac. Inferior to a VM if you want to run lots of apps, as many don’t work in Wine.
- CrossOver: Not worth paying for over Wine. You’re better off with a VM.
- Remote Desktop: Worth setting up if you have a Windows PC already. May have problems with network latency. Using a VM is cheaper than buying a dedicated PC for this.
Now, let’s move on from Windows apps to Mac apps. Do you want to run multiple copies of apps on your Mac? You have a handful of ways to do that.
Пользователей Windows гораздо больше и среди обычных людей, и среди архитекторов и дизайнеров интерьера, поэтому большая часть программ написаны именно под винду: какой-то профессиональный софт полностью недоступен на macOS — как, например, Revit и 3ds Max, — а какой-то работает с ограничениями, как некоторые плагины для SketchUp и Rhino.
Чтобы пользоваться этими программами, не обязательно менять компьютер — можно установить на Mac вторую систему. Рассказываем, как.
Самые распространённые способы установить Windows-программы на Mac — это использование программы Boot Camp, создание виртуальной машины и установка программы-эмулятора. В этой статье мы рассмотрим все инструменты, посмотрим на их преимущества и недостатки и расскажем, как с ними работать.
Так как способы установки для разных Mac отличаются, то сперва нужно понять, какой у вас процессор: для разных процессоров доступны разные способы. Определить версию процессора можно в меню Apple, нажав на значок яблока в левом верхнем углу:
eng: About This Mac → Overview → Processor / Chip.
рус: Об этом Mac → Обзор → Процессор / Чип.
В строке будет указано, Intel или Apple.
-
Вкладка «Обзор» на Mac с процессором Intel
-
Вкладка «Обзор» на Mac с процессором Apple
Boot Camp
Этот способ подходит только для Mac с процессорами Intel.
Boot Camp — это предустановленная (по умолчанию встроенная) программа в macOS, которая позволяет устанавливать Windows на Mac в качестве дополнительной системы. При включении или перезагрузке компьютера вы сможете выбрать, какую систему запустить — macOS или Windows.
Boot Camp поддерживает следующие модели: MacBook 2015 и новее, MacBook Air и Pro 2012 и новее, Mac mini и iMac 2012 и новее, Mac Pro 2013 и новее, iMac Pro все модели.
Несмотря на то, что Boot Camp встроен в macOS по умолчанию, Windows надо устанавливать отдельно.
Что потребуется для установки
→ Образ Windows 64-bit и лицензионный ключ.
→ Поддерживаемый Mac с операционной системой 10.11 El Capitan и новее.
→ Флешка объёмом не менее 16 ГБ.
→ Свободное дисковое пространство объёмом не менее 64 ГБ. Для оптимальной работы нужен объём не менее 128 ГБ.
→ Учётная запись Microsoft: её лучше создать заранее здесь.
Способы установки Windows 10 и Windows 11 отличаются.
Как установить Windows 10
1. Скачайте образ Windows 10 с сайта Microsoft по этой ссылке.
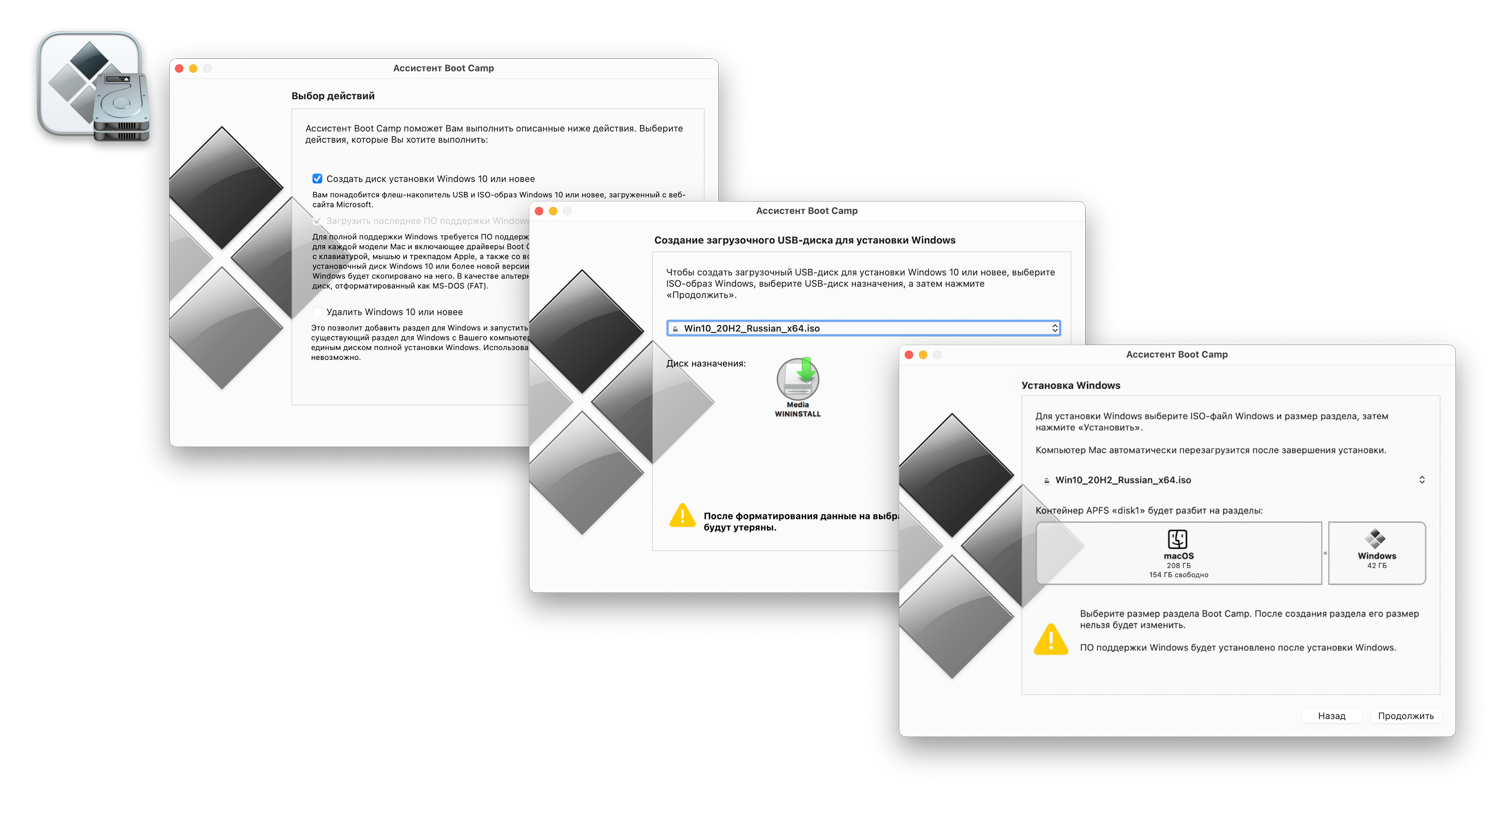
2. Запустите ассистент Boot Camp, его можно найти в папке Utilities (Утилиты) или через поиск Spotlight. Вставьте флешку и следуйте инструкциям на экране. Помните, что во время установки Windows c флешки будут стёрты все данные.
3. Когда Boot Camp предложит разделить диск для установки Windows, укажите нужный объём памяти. Помните, что после установки изменить объём раздела Windows нельзя.
4. Продолжите процесс установки, следуя указаниям установщика Windows.
5. После установки Windows пройдите этапы настройки операционной системы. Когда ОС будет готова и загрузится, она предложит скачать компоненты Boot Camp для Windows. Обязательно это сделайте, а после установки перезагрузите компьютер.
Как установить Windows 11
Для установки Windows 11 требуется специальный чип TPU 2.0, который отвечает за шифрование дисков и безопасную загрузку. В Mac этого чипа нет, так как используются технологии шифрования Apple, из-за этого установка Windows 11 напрямую недоступна. Нужно обмануть Boot Camp, выдав Windows 11 за 10. Сделать это можно только с помощью сторонних инструментов.
Внимание!
Этот способ подойдёт только продвинутым пользователям. Если вы ни разу не работали с терминалом1 или дисковой утилитой2 и не понимаете, что это такое, лучше установите Windows 10.
1. Скачайте образы Windows 10 и 11 с сайта Microsoft. По этой ссылке можно скачать Windows 10, а по этой ссылке — Windows 11. Язык операционных систем должен быть одинаковым.
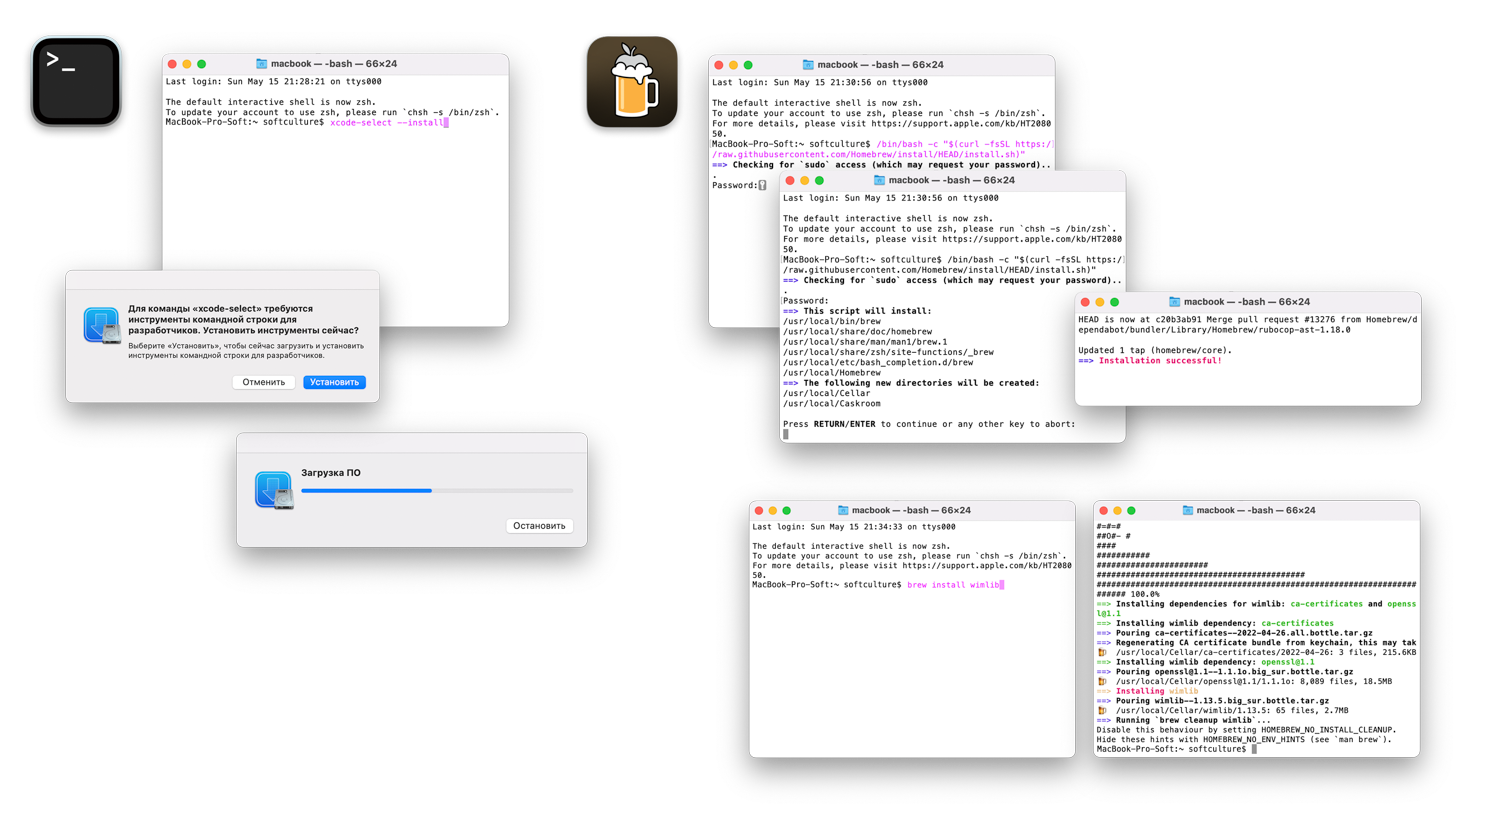
2. Установите командную строку Xcode:
Открыть терминал → прописать команду <xcode-select —install>* → Enter.
Согласитесь с условиями установки и дождитесь окончания загрузки. Для загрузки может потребоваться VPN.
* Треугольные скобки <…> использованы для отделения команды от основного текста. Их не нужно использовать, прописывая команду.
3. Установите Homebrew — компонент для загрузки дополнительных инструментов macOS:
Перейдите по ссылке и скопируйте код строки с сайта Homebrew → вставьте код в терминал → Enter.
Когда появится строчка Password, введите пароль от компьютера и нажмите Enter. В процессе установки нужно будет ещё раз нажать Enter. По завершении установки Homebrew появится сообщение Installation Successful.
4. Теперь нужно установить дополнительную библиотеку расширений Homebrew:
Открыть терминал → прописать команду <brew install wimlib>.
Дождитесь установки библиотеки и можете закрыть терминал.
5. Создать Windows 11 для обмана Boot Camp. Сначала работа с Windows 10:
Создать на рабочем столе папку Win11 → открыть образ диска загруженной Windows 10 → скопировать содержимое папки → вставить в папку Win11 .
В папке Win11:
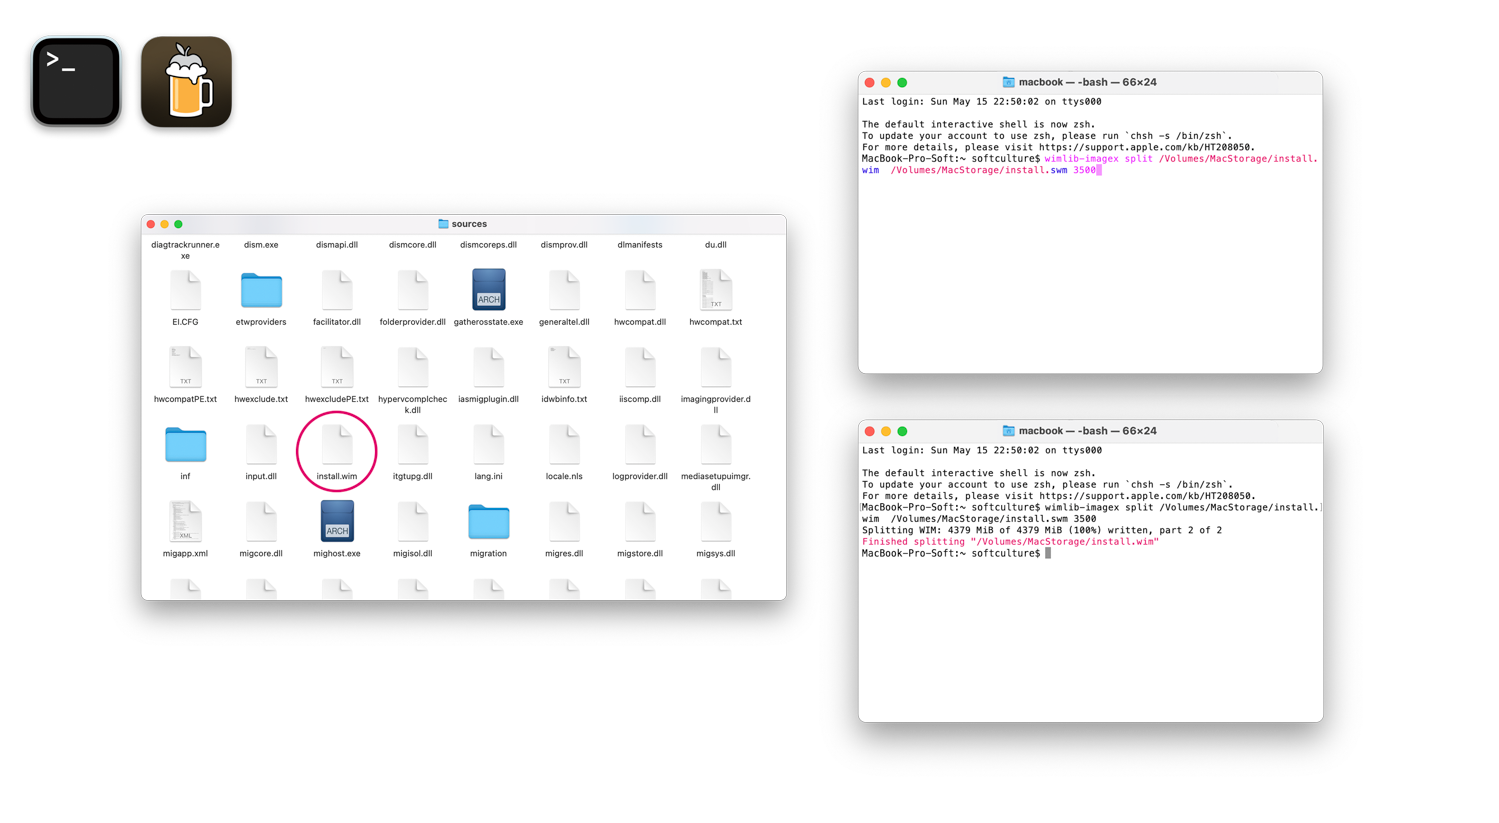
Найти папку sources → удалить файл instal.wim.
6. Образ диска Windows 10 больше не нужен, его можно извлечь:
eng: Finder → клик правой кнопкой мыши по образу диска → Extract.
рус: Finder → клик правой кнопкой мыши по образу диска → Извлечь.
7. Работа с Windows 11:
Открыть образ диска Windows 11 → папка sources → перетащить на рабочий стол файл instal.wim.
Извлеките образ диска Windows 11.
8. Создание SWM-файла для обмана Boot Camp:
Открыть терминал → прописать команду <wimlib-imagex split>* → Space (Пробел) → перетащить файл instal.wim в окно терминала → Space (Пробел) → снова перетащить файл instal.wim в окно терминала → изменить расширение файла с .WIM на .SWM → Space (Пробел) → прописать команду <3500>* → Enter.
Начнётся процесс преобразование файла, в конце которого появится сообщение Finished splitting. Затем на рабочем столе появятся файлы instal.swm и instal2.swm. Файл instal.wim больше не нужен, его можно удалить.
* Треугольные скобки <…> использованы для отделения команды от основного текста. Их не нужно использовать, прописывая команду.
9. Создать образ Windows 11 в оболочке Windows 10:
Открыть папку Win11 → папка sources → перетащить файлы instal.swm и instal2.swm в папку.
10. Превратить папку с набором файлов в образ диска:
eng: Disk Utility → File → Image → Image from Folder → выбрать папку Win 11.
рус: Дисковая утилита → Файл → Новый образ → Образ из папки → выбрать папку Win 11.
Проверьте настройки создания диска:
Поле Encryption (Шифрование) — нет, поле Image Format (Формат диска) — DVD/CD master (мастер DVD/CD).
После этого нажмите Save (Сохранить) и дождитесь окончания процесса. На рабочем столе появится файл Win11.cdr. Дисковая утилита больше не нужна — её можно закрыть.
11. Теперь измените образ диска Windows 11 так, чтобы его смог прочитать Boot Camp.
Открыть терминал → прописать команду <hdiutil makehybrid -iso -joliet -o>* → Space (Пробел) → перетащить файл Win11.cdr в окно терминала → поменять расширение файла с .CDR на .ISO → Space (Пробел) → ещё раз перетащить файл Win11.cdr → Enter.
* Треугольные скобки <…> использованы для отделения команды от основного текста. Их не нужно использовать, прописывая команду.
Начнётся преобразование файла. Когда процесс закончится, на рабочем столе появится файл Win11.iso. Теперь у вас есть подходящий установочный файл Windows. Папка Win11 и файл Win11.cdr больше не нужны, их можно удалить.
12. Установить Windows:
Запустить Boot Camp → вставить флешку → следовать инструкциям на экране.
Помните, что во время установки образа Windows c флешки будут стёрты все данные.
13. В окне Установка Windows выберите созданный установочный файл Win11.iso. Когда Boot Camp предложит разделить диск для установки Windows, укажите нужный объём памяти. Помните, что после установки изменить объём раздела Windows нельзя.
14. Продолжите процесс установки, следуя указаниям установщика Windows. После установки Windows пройдите этапы настройки операционной системы. Когда ОС будет готова и загрузится, она предложит скачать компоненты Boot Camp для Windows. Обязательно сделайте это, а после установки перезагрузите компьютер.
Плюсы и минусы Boot Camp
Переключаться между разными операционными системами можно во время перезагрузки или включения. Как только компьютер начнёт включаться, нужно зажать клавишу ⌥Option (Alt). Когда появится экран загрузки разных дисков, выберите необходимый и запустите его с помощью клавиши Enter. Также можно выбрать основную операционную систему, которая будет запускаться по умолчанию:
eng: System Preferences → Startup Disk → выбрать систему для загрузки компьютера.
рус: Системные настройки → Загрузочный диск → выбрать систему для загрузки компьютера.
Как удалить Windows
Windows нужно удалять только через Boot Camp. Если вы просто сотрёте диск с Windows или воспользуйтесь сторонними инструментами, то рискуете повредить файловую систему macOS и потерять доступ ко всем своим файлам.
eng: запустить macOS → открыть Boot Camp → Remove Windows 10 or later version → Restore.
рус: запустить macOS → открыть Boot Camp → Удалить Windows 10 и новее → Восстановить.
Помните, что при этом удалятся все файлы и программы в Windows. Если нужно сохранить какие-то файлы, сделайте это до удаления. Файлы можно перенести в macOS:
Finder → диск BOOTCAMP → скопировать все нужные файлы.
В Windows с дисками macOS работать нельзя — они будут недоступны в этой системе, поэтому сохранить файлы в Windows можно только на внешние накопители или в облако.
После удаления Windows хранилище, выделенное под работу системы, объединится с основным хранилищем — память на диске снова будет целиком отдана под macOS.
Виртуальная машина
Виртуальная машина — это специальная программа, которая позволяет запускать одну операционную систему внутри другой. То есть можно запустить Windows как приложение в macOS. Виртуальная машина преобразует команды одной операционной системы в команды другой — на это требуются ресурсы (мощность процессора и видеокарты, постоянная память, оперативная память) и время, поэтому некоторые программы, которые требуют прямого доступа к железу, не будут работать.
Виртуальная машина использует все ресурсы компьютера, но вынуждена делить их с основной операционной системой — из-за этого производительность виртуальной системы оказывается ниже, чем системы, установленной отдельно.
Существуют разные виртуальные машины. Они отличаются между собой по способу работы, цене и доступным функциям. Самые популярные решения — Parallels Desktop, VirtualBox и VMware Fusion. Почитать подробнее о каждой из них вы можете на сайтах разработчиков.
Большинство гайдов в интернете посвящены Parallels Desktop. Это удобная и простая в освоении программа, доступная за плату. Инструкций по работе с Parallels Desktop в сети довольно много, поэтому в этом гайде мы расскажем о бесплатной Open Source программе UTM.
Этот способ подходит для всех Mac, но способы установки для Mac с процессорами Intel и Apple немного отличаются.
Что потребуется для установки
→ Образ Windows 64-bit и лицензионный ключ.
→ Программа для виртуализации.
→ Учётная запись Microsoft: её лучше создать заранее здесь.
Как установить на Mac с процессорами Intel
1. Перейдите по ссылке и скачайте виртуальную машину UTM. Установите программу.
2. Скачайте ISO-образ Windows с сайта Microsoft. По этой ссылке можно скачать Windows 10, а по этой ссылке — Windows 11.
3. Запустите UTM, а затем:
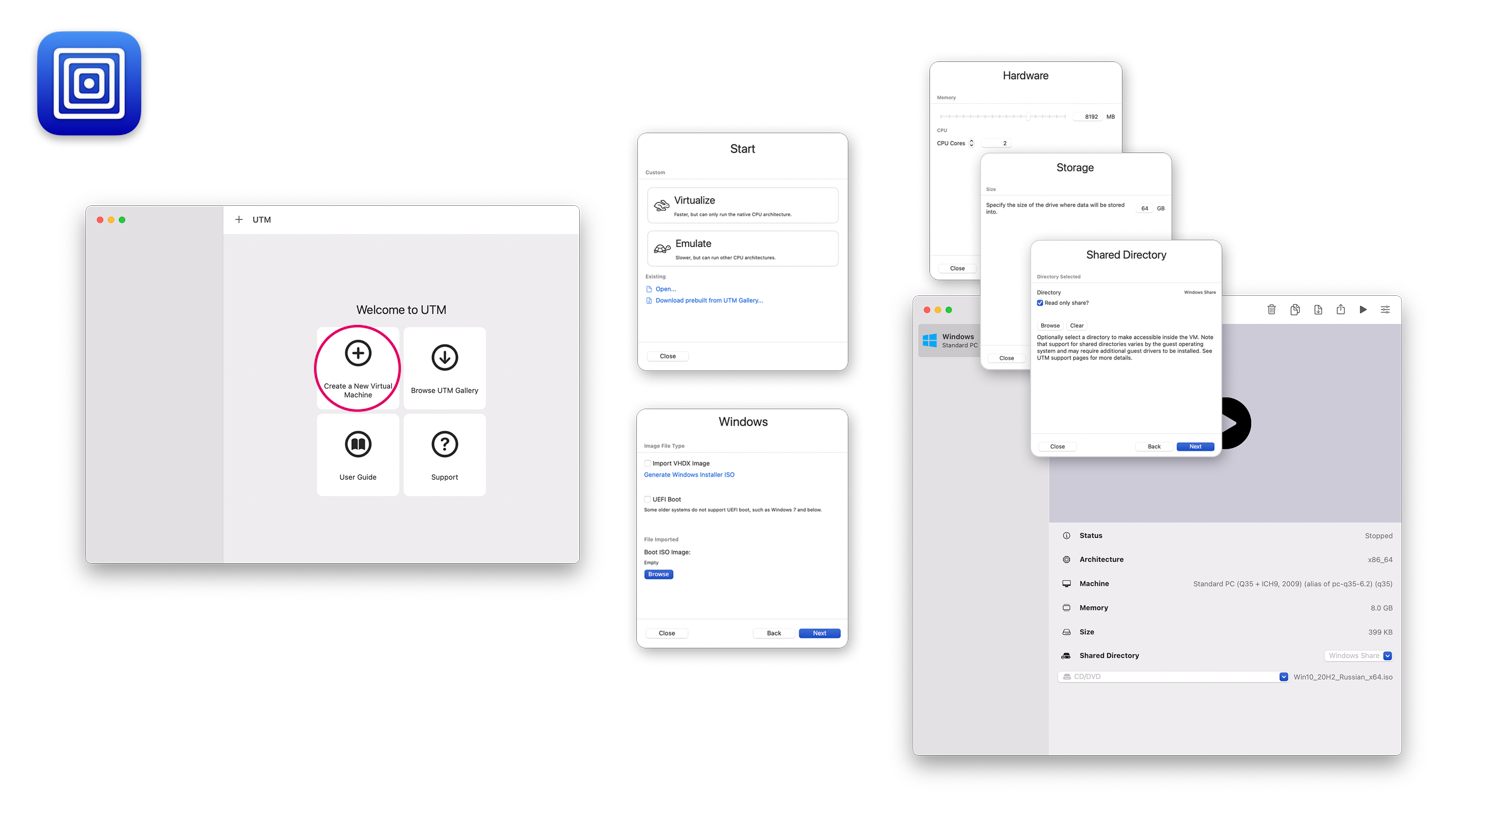
Create a New Virtual Machine → Virtualize → Windows → Browse → выберите скачанный установщик Windows с расширением .ISO.
4. Настройте количество ресурсов, которые вы готовы выделить для работы виртуальной машины: объём оперативной памяти и количество ядер процессора. Лучше выделить минимум половину. Количество доступных ресурсов можно посмотреть в системном меню About This Mac (Об этом Mac).
Если вы не разбираетесь в железе, то рекомендуем прочесть нашу обзорную статью обо всех компонентах компьютера.
Обязательно выберите общую папку для обмена файлами. Если какие-то параметры нужно будет поменять, это можно сделать позже в настройках виртуальной машины.
5. Во время первого запуска виртуальной машины начнётся установка Windows. Продолжите процесс установки, следуя указаниям установщика Windows. Во время установки Wi-Fi будет недоступен.
6. После установки Windows пройдите этапы настройки операционной системы. Когда ОС будет готова и загрузится, вам нужно будет скачать и установить драйвера для корректной работы Windows по этой ссылке.
7. Откройте UTM и выберите созданную виртуальную машину:
CD/DVD → Browse → папка с загруженными драйверами Spice Guest Tools.
В окне Windows в разделе This PC (Этот компьютер) появится диск с драйверами.
8. Откройте диск и установите драйвера. После установки перезагрузите виртуальную машину. Wi-Fi заработает и появится общая папка, которую вы выбрали на этапе настройки. Также можно будет поменять язык системы.
Как установить на Mac с процессорами Apple
Установка Windows на этот тип устройств имеет ограничения, так как устанавливается не классическая система Windows, а её модификация для ARM-процессоров. Нельзя будет запустить некоторые программы, драйвера и плагины. Полный список ограничений можно посмотреть здесь. Также на Mac с процессорами Apple можно установить только Windows 11.
1. Перейдите по ссылке и скачайте виртуальную машину UTM. Установите программу.
2. Запустите UTM, а затем:
Create a New Virtual Machine → Virtualize → Windows → поставить галочку Import VHDX Image → Download Windows 11 for ARM.
Откроется сайт Microsoft. Войдите в свою учётную запись и зарегистрируйтесь в программе Windows Insider Preview по этой ссылке. Теперь загрузите Windows 11 с этой страницы.
3. Как только скачается Windows, вернитесь в UTM:
Browse → выбрать установщик Windows 11 с расширением .VHDX.
4. Настройте количество ресурсов, которые вы готовы выделить для работы виртуальной машины: объём оперативной памяти и количество ядер процессора. Лучше выделить минимум половину. Количество доступных ресурсов можно посмотреть в системном меню About This Mac (Об этом Mac). Также выберите общую папку для обмена файлами. Если какие-то параметры нужно будет поменять, это можно сделать позже в настройках виртуальной машины.
5. Во время первого запуска начнётся установка Windows. Продолжите процесс установки, следуя указаниям установщика Windows. Во время установки Wi-Fi будет недоступен.
6. После установки Windows пройдите все этапы настройки операционной системы.
Когда ОС будет готова и загрузится, вам нужно будет скачать и установить драйвера для корректной работы Windows по этой ссылке.
7. Откройте UTM и выберите созданную виртуальную машину:
CD/DVD → Browse → выбрать папку с загруженными драйверами Spice Guest Tools.
В окне Windows в разделе This PC (Этот компьютер) появится диск с драйверами.
8. Откройте диск и установите драйвера. После установки перезагрузите виртуальную машину. Wi-Fi заработает и появится общая папка, которую вы выбрали на этапе настройки. Также можно будет поменять язык системы.
Плюсы и минусы виртуальной машины
Выключать Windows стоит только через меню «Пуск», и уже потом закрывать UTM.
Переключаться между операционными системами можно как между обычными приложениями на Mac.
Как удалить Windows
1. Запустите UTM и нажмите на значок корзины внутри программы: виртуальная машина будет удалена.
2. Помните, что удалятся все файлы и программы, установленные на Windows. Если нужно сохранить какие-то файлы, сделайте это до удаления. Файлы можно перетащить из окна Windows в macOS, и они скопируются — или можно воспользоваться общей папкой.
Эмуляция
Эмулятор — это специальная программа, которая имитирует работу компонентов компьютера одной операционной системы внутри другой. В отличие от виртуальной машины эмулятор не использует все ресурсы компьютера и не преобразует команды. Эмулятор пытается сымитировать полноценный компьютер со всем его железом и другой операционной системой — из-за этого производительность эмуляции намного ниже, чем у виртуальной машины.
Также эмуляторы менее стабильны, так как программная имитация железа всегда приводит к ошибкам. Полноценной ОС и доступа к её функциям у вас не будет: вы сможете лишь получить прослойку, позволяющую запустить Windows-приложение прямо в macOS.
Самые популярные Windows-эмуляторы для macOS — Crossover и Wine. Crossover — платный, но простой в освоении эмулятор, который имеет пресеты (уже созданные наборы) настроек для разных программ. Wine распространяется бесплатно, но требует определённых знаний для установки и работы. О работе с ними написано довольно много материалов, поэтому в этом обзоре мы решили рассказать о бесплатной Open Source программе Wineskin Winery, которая подходит для всех Mac.
Что потребуется для установки
→ Эмулятор.
→ Windows-программа для эмуляции.
Как установить эмулятор Wineskin
1. Перейдите по ссылке и скачайте Wineskin Winery. Распакуйте архив и перенесите приложение в папку Applications (Программы).
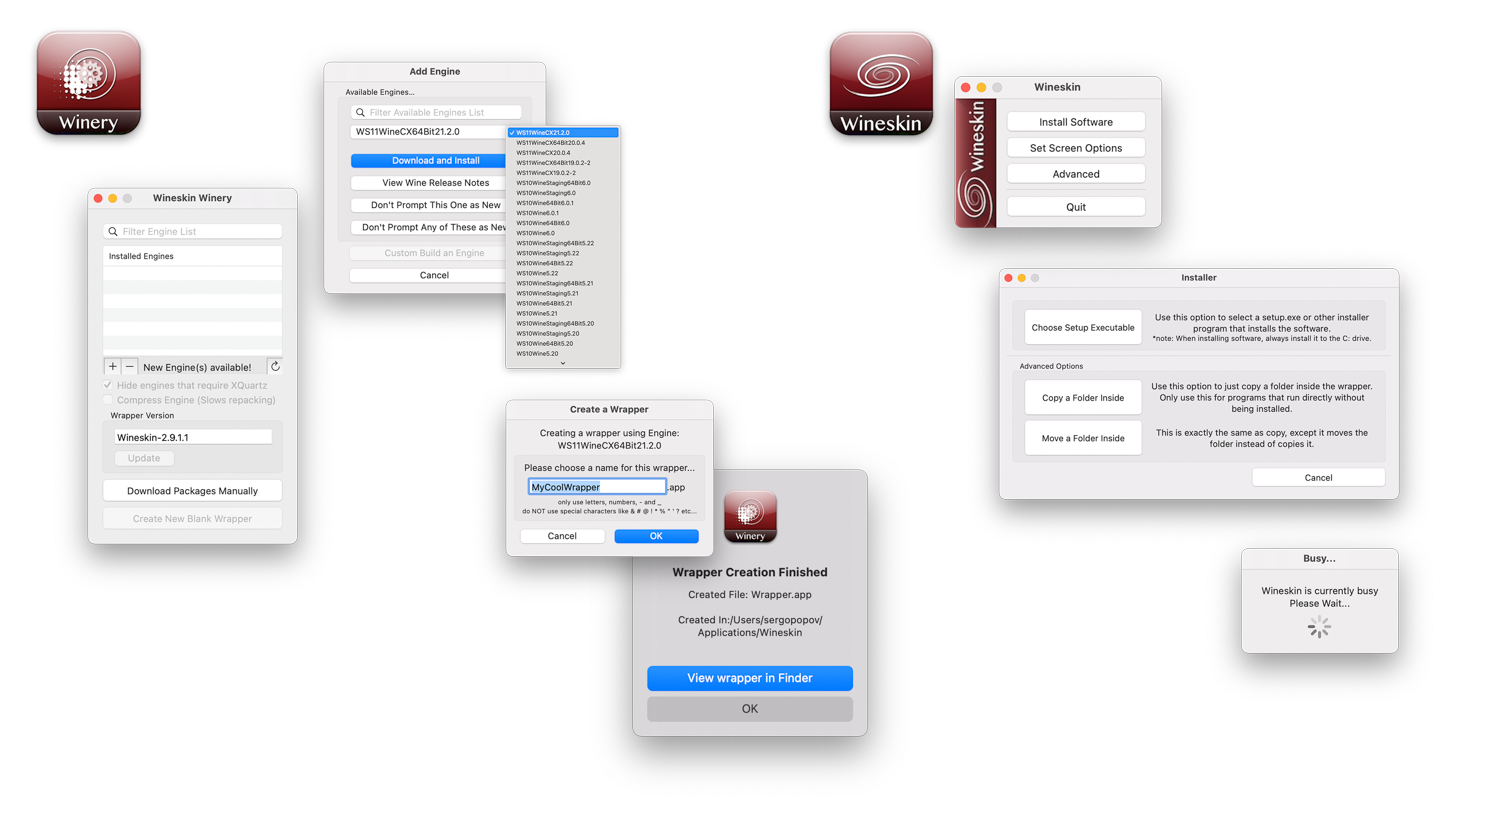
2. Запустите Wineskin Winery. Проверьте раздел Update: если там есть обновления, установите их. А затем:
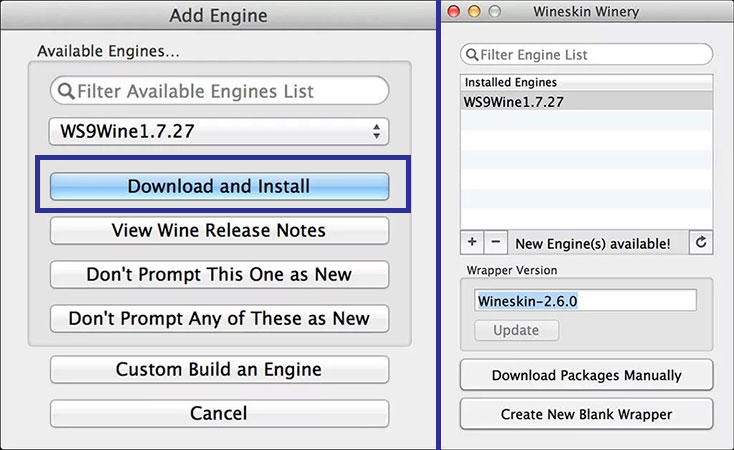
Engine → нажмите + → выберите и добавьте движок эмуляции (лучше самый свежий) → Download and Install.
3. Вы скачали движок эмулятора, теперь можно создать программу:
Create New Blank Wrapper → дождаться создания → OK → View Wrapper in Finder → запустить программу → Install Software → Choose Setup Executable → выбрать в Finder установочный файл Windows-программы с расширением .EXE или .MSI.
4. Пройдите этапы настройки и установки программы. В конце откроется окно ожидания финальной настройки эмуляции. Нажмите OK, чтобы вернуться в начальное меню, а затем нажмите Quit.
5. Если у эмулятора не возникло проблем с установкой, новое приложение можно будет найти в Launchpad (Панель запуска приложений) или через Spotlight.
Плюсы и минусы эмуляции
Эмулятор подходит для простых программ и утилит — например, для справочника СП или программ для расчёта строительных конструкций. Тяжёлый профессиональный софт корректно работать не будет.
Найти установленные программы можно через Spotlight: для этого в поиске укажите Wineskin и ищите папку с этим названием — внутри неё будут все установленные программы.
Как удалить Windows-программы
Удалить оболочку вместе с Windows-программой можно так же, как и обычные программы на Mac: воспользоваться специальными утилитами или удалить программы через Finder из папки Wineskin.
Какой способ установки Windows-приложений выбрать
Мы рассмотрели три способа запуска Windows-приложений на Mac. У каждого из способов есть свои плюсы и минусы, и в идеале нужно иметь под рукой все три инструмента. Однако такой вариант подойдёт не всем из-за того, что требует большого объёма памяти. Рассказываем о самых распространённых сценариях и предпочтительных методах установки.
Сценарий 1. Работа с простыми или устаревшими программами
Если вы планируете работать с утилитами, справочниками документации или каким-то устаревшим софтом — например, вам нужна очень старая версия Microsoft Word 2003 года или справочник нормативных документов, — вам подойдёт эмуляция. Несмотря на большие потери на имитацию работы Windows-компьютера, такие программы не требовательны к железу и будут работать корректно, не отбирая много ресурсов у основной системы.
Сценарий 2. Стандартная работа с программами
Если вы планируете работать с современными и нетребовательными к железу программами, которые недоступны на macOS — например, программой «Солярис» для расчёта инсоляции, — тут может подойти эмулятор или виртуальная машина. Если программа запускается без ошибок на эмуляторе, и компьютер не превращается в реактивный самолёт с высокими оборотами вентиляторов, то эмулятор — отличное решение. Если программа работает некорректно, компьютер очень сильно тормозит, а система охлаждения работает на пределе, то стоит воспользоваться виртуальной машиной.
Сценарий 3. Параллельная работа с программами
Если вы планируете работать параллельно с несколькими программами в macOS и Windows, то лучше использовать виртуализацию. В этом случае нужно не забывать, что программа, запущенная на виртуальной машине, будет довольствоваться меньшей мощностью компьютера, так как часть ресурсов заберёт основная система, запущенные в ней программы и виртуальная машина Windows. В зависимости от требовательности софта может понадобиться дополнительная настройка ресурсов для виртуальной машины. Например — большой объём оперативной памяти.
Сценарий 4. Работа с профессиональным софтом
Если вы планируете работать с профессиональными программами, вроде Revit, то скорее всего ресурсов виртуальной машины не хватит, и нужно будет устанавливать Windows через Boot Camp. Этот способ не подходит владельцам Mac с чипами Apple. Стоит сначала попробовать установку виртуальной машины, и если программа начнёт тормозить, перейти к Boot Camp. Использование виртуальной машины подойдёт тем, кто планирует работать с программами, которые доступны на macOS и Windows, но некоторые плагины для этих программ доступны только для Windows — например, часть плагинов для Rhino и SketchUp недоступны на macOS и не имеют аналогов. В таком случае вы будете работать с плагинами в Windows, а с результатом работы плагинов — уже в macOS.
Сценарий 5. Работа с тяжёлым софтом
Если вы планируете работать с ресуроёмкими программами, вроде 3ds Max, то тут потребуется вся мощность железа и нужно использовать только Boot Camp. Помните, что железо Mac хорошо работает только в связке с macOS, и мощности этого железа в Windows может не хватить. Но если вы хотите пойти дальше и работать в чём-то ещё более требовательном — например, в Lumion или D5 Render, — то лучше в принципе отказаться от Mac или приобрести отдельный компьютер с Windows для решения этих задач.
There are various tools for running Windows programs on Mac, some of which do not require the Microsoft operating system to be installed.
Today, in order to run Windows programs on Mac, there is no need to install the Microsoft operating system on Apple products, and it is easy to install Windows programs on Mac through emulators and peripheral tools developed for this purpose. In the following article, we will discuss how to do this along with introducing the best current options.
How to run Windows programs on Mac With Wineskin
The Wineskin application is one of the best options for providing the necessary environment for installing Windows programs on Mac, which is completely free for Apple computer owners. Also, unlike similar examples such as Wine, this project is constantly receiving updates and can be used on MacOS version 13 and products based on Apple’s proprietary chips.
The easiest way to install Wineskin on Mac OS is to use Homebrew. If you haven’t installed this tool on your PC or laptop in the past, you can download and install it by entering the following command in Terminal.
/bin/bash -c "$(curl -fsSL https://raw.githubusercontent.com/Homebrew/install/HEAD/install.sh)"
- After the Homebrew installation process is complete, enter the following command in the terminal and press the “Enter” key.
echo 'eval $(/opt/homebrew/bin/brew shellenv)' >> /Users/$USER/.zprofile- Next, type the command below in the terminal and press the “Enter” key again to install the Wineskin application on the system.
brew install --cask --no-quarantine gcenx/wine/unofficial-wineskinWineskin application configuration
After installing the Wineskin application according to the steps mentioned above, you will still not be able to run Windows programs on Mac, and you must first apply the appropriate settings. You will be able to launch the new app by running “Wineskin Winery.app” in the Applications folder or using Spotlight on macOS.
- Inside the Wineskin application, click on the “+” sign at the bottom of the Installed Engines title to display the “Add Engine” window.
- From the drop-down menu, select the latest available version and then press the “Download and Install” button.
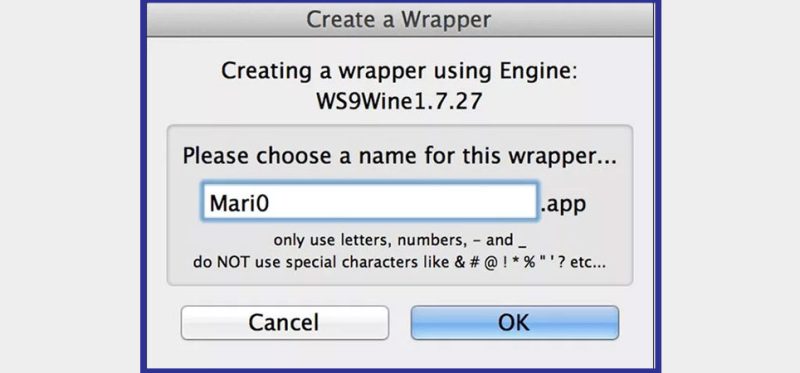
- In the opened window, you can define a desired name for the new engine and then click “OK“.
- The time required to download and install the new engine depends on your internet speed.
- After the download and installation of the new engine are complete, a notification will be displayed. Now it’s time to click on the “Create New Blank Wrapper” option.
- In the new window, enter a name in the specified box. Note that you will need this name in the next steps; So it is better to choose a short title.
- After typing the desired name, click on the “OK” button. Next, you will be asked to install two packages for the correct operation of the application.
- Mono package for running “Net” programs. Windows is used on Mac and the “Gecko” package is also used to display HTML-based content.
- After the process of receiving and installing the mentioned packages is completed, a Wrapper will be created.
- By default, you can see the “Wrapper” created at the address because; But clicking on it will not result.
- Applications > Wineskin > [your wrapper]
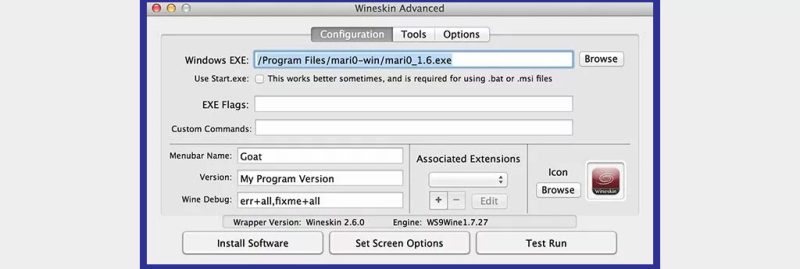
- For this purpose, right-click on it and then select “Show Package Contents“. Next, from among the displayed items, click on the “Wineskin” option.
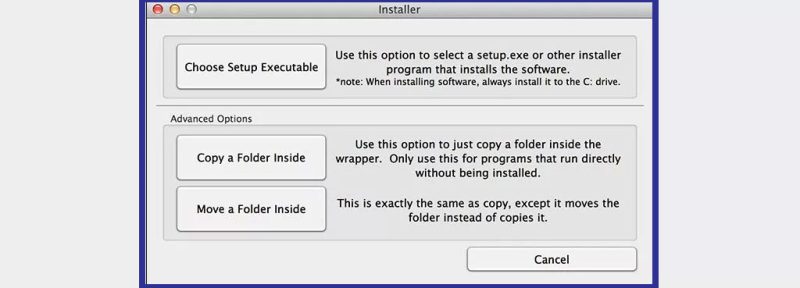
- Then select “Install Software” and “Choose Setup Executable” options in the next windows.
- Finally, a window will open where you can define the “EXE” file address of the desired application.
- You can now exit “Wineskin” and use the displayed launchpad to run Windows applications on your Mac.
- Also, if the desired application does not need to be installed, you can choose “Copy a Folder Inside” instead of “Choose Setup Executable” in the previous steps and then specify the app folder.
How to run Windows programs on Mac With Wineskin with Parallels Desktop
“Parallels Desktop” application is another option for installing Windows programs on Mac. Of course, this tool installs Windows 11 alongside MacOS; But thanks to the “Coherence” feature, after the initial configuration, the user will no longer need to interact with the Microsoft operating system. How to work with the said app is mentioned below.
- First, download the “Parallels Desktop” application installation file using this link and install it on your Mac computer.
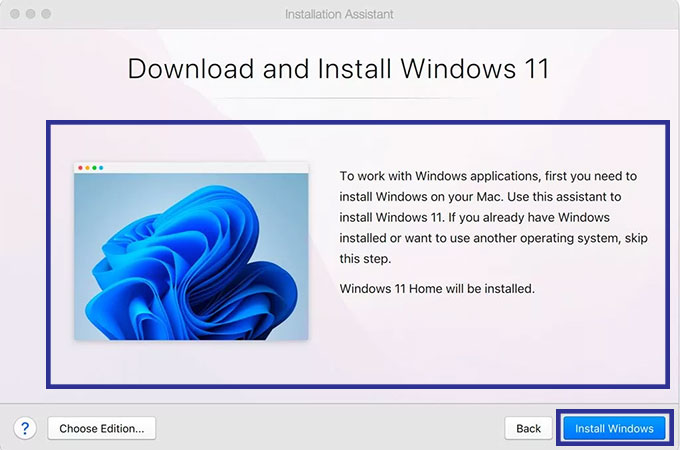
- At the first login to the app, select the “New” option and then click on “Get Windows 11 from Microsoft“.
- Finally, press the “Install Windows” key and wait until the process of receiving and installing the operating system is completed. Note that in this case, you will need a legal Windows license.
If you want to install Windows from another file, select “Install Windows or another OS from DVD or image file” in the previous step and then continue the installation process. Note that the selected file must be in ISO format.
- After the process is completed, you can create a new Windows 11 virtual machine and then install your desired applications on it.
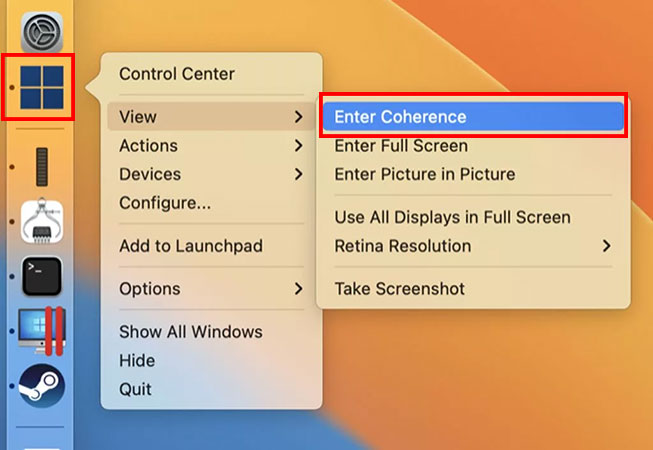
- Now right-click on the Windows icon in the dock and select “Enter Coherence” from the “View” menu.
Now the Windows desktop will be hidden, But you can still continue to use apps based on it. You can have all the apps installed through “Parallels Desktop” in the Applications folder or through the Spotlight tool. When this feature is enabled, Windows apps will run like native Mac software. It is worth noting that the Windows 11 virtual machine is still running in the background, But it does not affect the user experience.
Frequently asked questions about How to run Windows programs on Mac
- What is the best program to install Windows 11 on Mac?
The Parallels Desktop tool provides the possibility of installing Windows alongside MacOS for users in recent versions of Apple’s operating system and products based on this company’s proprietary chip.
- What is the best way to run Windows programs on Mac?
Using external tools like WineSkin or Parallels Desktop can be the easiest way to run Windows apps.
- Is it possible to run Windows programs on Mac without installing the operating system?
Yes; Using the Wineskin application, you can use Windows programs on Mac without installing the Microsoft operating system.
In this article, we talked about “How to run Windows programs on Mac” and we are waiting for your experiences to use these methods. Please share your thoughts with us.
Идея совместить несовместимое кажется бредовой только до того момента, пока вам не понадобится какое-нибудь специфичное приложение, которого нет на Mac, или пока не захочется зарубиться в свежий игровой хит.
Даже самым ярым поклонникам OS X иногда бывает нужно воспользоваться «вражеской» Windows. Ситуации бывают разные: от необходимости пользоваться банковскими клиентами и корпоративным ПО до запуска игр. Есть масса способов запустить приложения, написанные под Windows, при помощи как сторонних инструментов, так и фирменных решений Apple.
Условно их можно разделить на три категории: полноценная установка Windows, использование виртуальных машин и эмуляторов программной среды Windows. У каждого варианта есть свои преимущества и недостатки, поэтому мы рассмотрим их все, чтобы вы могли выбрать самый удобный именно для вас.
Установка Windows с помощью Boot Camp
Специально для горемык, не способных порвать все связи с Windows, Apple создала утилиту «Ассистент Boot Camp», с помощью которой можно подготовить свой Mac к установке Windows и, собственно, установить её. При этом на диске создаётся отдельный раздел, позволяющий обеим ОС работать независимо друг от друга.
Вам потребуются 50 ГБ свободного места и загрузочный диск Windows. Сам процесс установки очень прост, нужно лишь следовать подсказкам мастера и дождаться завершения. После перезагрузки вы получите в своё распоряжение полноценную версию Windows, как на обычном ПК. Останется установить необходимые приложения или игры — и можно пользоваться. Подробнее о требованиях и поддерживаемых версиях можно узнать здесь.
Преимущества Boot Camp
- Производительность. Поскольку все ресурсы Mac использует только одна ОС, мы получаем максимальное быстродействие.
- Совместимость. Благодаря полноценной Windows обеспечивается полная совместимость с любыми приложениями и играми.
Недостатки Boot Camp
- Необходимость перезагрузки. Для запуска Windows всякий раз придётся перезагружать Mac.
- Отсутствие интеграции. Windows не поддерживает файловую систему HFS+, а значит, получить из неё доступ к файлам OS X будет нельзя, равно как и наоборот.
Использование виртуальных машин
Этот способ имеет много общего с предыдущим, но немного отличается в реализации. С ним мы также получаем полноценную ОС, но устанавливается она не на реальное «железо», а на виртуальное. Специальное ПО (виртуальная машина) эмулирует аппаратную платформу для запуска Windows, отбирая часть ресурсов Mac, и получается, что одна ОС работает внутри другой.
Существует несколько виртуальных машин, как платных, так и бесплатных. По принципу работы они аналогичны, а отличия незначительны и больше заключаются в функциональных возможностях. Windows устанавливается из образа загрузочного диска или физического носителя. Выбираем количество ресурсов, которыми вы готовы поделиться с гостевой ОС (процессор, память, дисковое пространство), а дальше как обычно устанавливаем Windows и нужные приложения и используем в оконном или полноэкранном режиме, в любой момент переключаясь между OS X и Windows.
Parallels Desktop
Пожалуй, самая популярная среди «маководов» виртуальная машина. Parallels регулярно обновляется, всегда работает с актуальными версиями OS X и Windows и обладает дополнительными функциями вроде гибридного режима, когда на экране одновременно отображаются интерфейсы OS X и Windows, а приложения запускаются независимо от их принадлежности. Кроме того, программа умеет запускать Windows из разделов Boot Camp, что удобно, если нужно получить доступ к каким-либо приложениям или данным без перезагрузки.
Недостаток программы заключается в том, что Parallels не бесплатна. Младшая версия обойдётся вам в 79,99 доллара.
VMware Fusion
Ещё одно коммерческое решение для виртуализации ОС. Ключевой фишкой VMware Fusion является мастер обмена, позволяющий перенести всю среду с вашего Windows-ПК в виртуальную машину и продолжить использование приложений уже на Mac. Установленная Windows имеет общий с OS X буфер обмена, а также доступ к файлам и сетевым ресурсам. Её приложения полностью интегрируются с функциями OS X (Spotlight, Mission Control, Exposé). Кроме того, поддерживается запуск Windows из раздела Boot Camp.
VMware Fusion стоит 6 300 рублей, но перед покупкой вы можете изучить её возможности в бесплатной пробной версии.
VirtualBox
Если в ваши планы не входят дополнительные траты на запуск Windows-приложений, то ваш выбор — VirtualBox от Oracle. По сравнению с платными аналогами она обладает гораздо меньшими возможностями, но для простых задач вполне годится. На интеграцию с системными функциями OS X рассчитывать не стоит, но базовые вещи вроде общего буфера обмена и доступа к сетевым ресурсам здесь доступны. Бесплатность VirtualBox полностью оправдывает все её ограничения.
Преимущества виртуальных машин
- Одновременная работа двух ОС. Для запуска Windows-приложений не нужно перезагружать Mac.
- Общий доступ к файлам. Поскольку Windows работает внутри OS X, проблема с поддержкой файловых систем отсутствует.
Недостатки виртуальных машин
- Низкая производительность. Из-за того, что ресурсы Mac делятся между двумя ОС, быстродействие приложений значительно ниже, особенно на не самых новых компьютерах.
- Проблемы совместимости. Некоторые приложения (чаще всего игры), требующие прямого доступа к «железу», могут работать некорректно или не работать вовсе.
Использование эмуляторов
С эмуляторами всё совсем иначе, нежели с виртуальными машинами и Boot Camp. Вернее, у них есть что-то общее с виртуальными машинами, только эмулируют они не Windows целиком, а лишь те её программные компоненты, которые необходимы для работы нужного приложения. Полноценной ОС и доступа к её функциям у нас не будет: мы получаем некий слой совместимости, позволяющий запустить Windows-приложение прямо в среде OS X.
Все эмуляторы работают по одному и тому же принципу. Инициализируется установка приложения через setup.exe, а далее в её процессе настраиваются необходимые параметры запуска и автоматически загружаются нужные библиотеки. После этого на Launchpad появляется иконка приложения, которое будет работать так же, как и все нативные программы OS X.
WineBottler
Этот эмулятор может превратить .EXE-файл в совместимое с OS X приложение. Также WineBottler позволяет автоматически загружать некоторые уже настроенные Windows-приложения. Он полностью бесплатен и совместим с OS X El Capitan.
Wineskin
Ещё один эмулятор, который, как и предыдущий, использует библиотеки Wine для создания портов. По сравнению с предыдущим решением, Wineskin имеет больше настроек и позволяет более тонко задать параметры. Подробно о его настройке и использовании мы рассказывали в отдельной статье.
CrossOver
Коммерческий эмулятор, команда разработчиков которого уже адаптировала и настроила для вас множество популярных Windows-приложений и игр. CrossOver обладает дружелюбным интерфейсом, а также избавляет от необходимости копаться в настройках и разбираться с возможными ошибками. Единственный минус — он платный. Лицензия стоит 20,95 доллара, но есть 14-дневный пробный период.
Преимущества эмуляторов
- Не нужна лицензия Windows. Эмуляторы запускают приложения через слой совместимости, поэтому лицензионная копия ОС не нужна.
- Производительность. Опять же, из-за экономии ресурсов, которые в виртуальных машинах расходуются на запуск полноценной Windows, мы получаем более высокую производительность по сравнению с ними.
Недостатки эмуляторов
- Сложность настройки. Для использования Windows-приложений их сначала нужно настроить, а это далеко не всегда бывает просто, особенно с играми.
- Проблемы совместимости. В некоторых случаях приложения (чаще ресурсоёмкие) могут работать неправильно или не работать совсем.
Что выбрать
Что же в итоге выбрать из такого многообразия? Однозначного ответа на этот вопрос нет. В каждом конкретном случае нужно отталкиваться от ваших нужд, но в целом рекомендации следующие.
- Boot Camp подойдёт в первую очередь геймерам, а также тем пользователям, которым нужна максимальная производительность и совместимость с софтом. Перезагружаем Mac — и получаем полноценный компьютер с Windows.
- Виртуальные машины выручат в случаях, когда нужны обе ОС одновременно. Жертвуем производительностью, но избегаем перезагрузок и получаем хорошую интеграцию.
- Эмуляторы можно порекомендовать только для несложных задач и нечастого использования. Например, когда пару раз в месяц вам нужно воспользоваться банк-клиентом или изредка поностальгировать в любимой игре.
Выбирайте для себя самый подходящий вариант, а в комментариях рассказывайте, для каких нужд вы используете Windows-приложения на своём Mac и как их запускаете.
- SWEETNESS
- GUIDES
- NEWS
- REVIEWS
- DEALS
- ABOUT
How to Run Windows Apps on Mac (M1 M2 Included)

We have come a long way in terms of Operating Systems and compatibility. Most popular apps have macOS and Windows versions these days. Alternatively, you can find macOS alternatives for Windows apps or vice versa. However, sometimes, you just cannot find a viable macOS alternative for a Windows application. In these instances, you have to think about ways to run Windows apps on M1/M2 Silicon Macs.
RELATED: Best Virtual Machine Software for Mac
Key Takeaways
- You can install Windows apps on macOS if you cannot find a corresponding macOS app for one of the favorite Windows apps.
- You also have the option to choose between three major methods, including compatibility layers and fully-fledged virtual machines.
- Some of you may have to use a PC just because you need to run a particular app. In this case, running the app on your Mac makes better sense.
- In addition, you do not have to worry about performance, as macOS handles virtual machines well, especially with Apple Silicon chips.
In this guide, we have discussed the three best ways to run Windows apps on macOS. We have also mentioned the pros and cons of each method.
Method #1 Using Parallels Desktop
Parallels Desktop is a virtual machine software available for macOS. Even though you can use this VM app to virtualize various platforms like Windows or Linux, Parallels Desktop offers a few additional features to run Windows on macOS. One of them is called Coherence Mode, which allows the user to open and use Windows apps without keeping the Virtual Machine running in the foreground.
As you can guess, we use the power of Coherence Mode to run Windows apps on Mac. Because this method uses resources from the existing virtual machine, you do not have to worry about performance. In case you do not know, Parallels Desktop is one of the few Microsoft-certified ways to run Windows 11 on ARM Macs, which includes the latest M1/M2 lineups.
Parallels Desktop for Mac starts at $99.99.
How to Use Parallels Desktop to Run Windows Apps on Mac?
Fortunately, you don’t need technical expertise to set up Parallels Desktop to run Windows apps on a Mac. On the other hand, you can follow these easy steps:
- Install Parallels Desktop on your Mac using the directions using the official directions
- Install Windows 11 on Parallels Desktop. You can download Windows 11 directly from Microsoft or upload a custom ISO for your needs.
- Wait for Parallels Desktop to complete installing Windows 11. After that, you can launch the Windows 11 virtual machine on your Mac.
- Go to View > Enter Coherence. At this point, the full-screen virtual machine window will close. You can then launch Windows apps from Launchpad.
- You can also open the Start Menu from the macOS dock to launch applications and other windows.
Of course, you may have to wait a few seconds for the app to launch. Nevertheless, once Parallels Desktop has launched the application, you can expect standard performance from those apps. More importantly, the Windows app you have opened will work as it would on a PC when you have launched it using Coherence Mode on Parallels Desktop.
Pros
- Parallels Desktop lets you run almost any Windows app, including games, on Mac
- You do not have to keep the Windows virtual machine running in the foreground
- It is more performance-optimized than many other ways to run Windows apps
- Parallels Desktop is quite integrated with macOS and offers maximum flexibility
Cons
- You have to set up a Windows 11 virtual machine to use Coherence Mode
- You also have to pay for Parallels Desktop and the Windows 11 license key
To wrap up, we recommend this method to run Windows apps on Mac if you do not mind paying for a paid Windows license in addition to Parallels Desktop. Read our full Parallels Desktop review here.
Method #2 Using CrossOver
CrossOver is another app that lets you run Windows apps on Mac. However, compared to Parallels Desktop, CrossOver works differently. For one, CrossOver does not install a virtual machine on your Mac. Therefore, you do not have to keep the virtual machine running in the background. On the other hand, the CrossOver app creates a unique compatibility layer on top of your macOS system.
CrossOver is available for macOS and Linux. It means you can also use the app to run Windows apps on a Linux system. However, this paid app requires separate subscriptions for each platform. Because you don’t have to pay for the Windows license, the CrossOver method is more affordable. However, you may stumble upon some caveats.
CrossOver for Mac is available for $24.
How to Use CrossOver to Run Windows Apps on Mac?
The following simple steps will help you set up CrossOver for Mac and run Windows apps on your Mac. You can use the method to install any supported app.
- Download CrossOver for Mac from the website and install it on your Mac
- After the installation, open CrossOver and provide the license key (or start a free trial)
- Click the Install button and search for the Windows application that you want to install
- You can also install an unlisted application by providing the installation file and some details
- Once you have found the app, click Install, and CrossOver will do the rest.
- After the installation, you can select the application from the sidebar and open it.
The application should open and work like a native macOS application. It is worth noting that CrossOver for Mac is not a virtual machine emulator. Instead, it understands the commands from the Windows app and translates them so that macOS understands them. However, it also means you cannot access some features you may find with virtual machines.
Pros
- You do not need a Windows license to run Windows apps on your Mac
- CrossOver for Mac offers an optimized library of apps and games you can install
- You get to know about the compatibility status of each app before installing them
- CrossOver for Mac handles the translation process well for top performance
Cons
- CrossOver for Mac does not work with popular apps, causing conflicts
- You cannot access many features that you may otherwise find with VMs
- CrossOver for Mac could use some performance improvements
In conclusion, CrossOver for Mac is a good option if you do not want the hassle of installing a VM on your Mac. You do not have to worry about license keys, either.
A Word about WineHQ
We should also mention that CrossOver is a more improved version of WineHQ, which was a popular solution for running Windows apps on macOS and Linux. However, the macOS client of WineHQ has not been updated for some time, meaning it is not a good idea to use it.
Even if the WineHQ client works on your Mac, it cannot offer maximum performance. Therefore, although WineHQ is a free-of-cost solution, we do not feel comfortable recommending it. But if you are ready to take the risk, feel free to check out WineHQ.
However, please be warned that our experience with WineHQ was not at all close to ideal.
Method #3 Using a Virtual Machine
A Virtual Machine is another way to run Windows apps on Mac. Even though we already mentioned a virtual machine software, Parallels Desktop, you should also consider other options. Fortunately, a variety of virtual machine software solutions are available for macOS. You can choose one of them for your specific purpose.
You can refer to our guide on the best virtual software for Mac if you need a better idea. We have covered free and paid virtual machine software for macOS, including VMWare Fusion Player and Oracle VirtualBox. We have also discussed the pros and cons of these VM tools for Mac.
By the way, you should also consider getting a free emulator to run Windows apps on Mac. UTM is one of the great options and it helps you set up the desired virtual machine within a few minutes.
How to Use Virtual Machines to Run Windows Apps on Mac?
The process is simple. Depending on the virtual machine software, you can complete the installation of the Windows OS in a few minutes. After the installation, you can find a fully-functional Windows system within your Mac. This system is technically complete so that you can install and run any Windows app.
As you can guess, this method lets you run Windows apps with maximum performance if you have a working virtual machine. However, it also means you have to keep the virtual machine ready with updates and, more importantly, license keys.
Pros
- You will have an entire Windows system that you can use almostlike a PC
- A virtual machine supports more apps than compatibility layers do
- You will have more control over how the Windows apps behave on the system
- You can use a variety of installers to set up the apps you want
Cons
- You may have to pay a fee for the virtual machine software, especially the ones like Parallels
- It is also mandatory to pay for the Windows 11 license key, which can be expensive
- Virtual machine software and virtual machine files may take up a lot of space
- Running a virtual machine in the foreground is not multi-tasking-friendly
As you can see, using a virtual machine to run Windows apps has its fair share of benefits and caveats. You’d also want some technical expertise to make these machines work fine.
FAQs
Can I run Windows apps on my Mac?
You can run Windows apps on your Mac with the right third-party tools. You can choose between two major options: virtual machines and compatibility layers. Both these methods make it possible to run MS Windows apps on your Mac without rebooting. Some dedicated options like Parallels Desktop offer advanced options as well.
What is the best application to run Windows apps on Mac?
You can use multiple apps to run Windows apps on Mac, based on your requirements. But, in our opinion, you have two major choices. If you want maximum performance and compatibility, you should use Parallels Desktop for Mac. On the other hand, if you are looking for maximum savings and standard compatibility, you can use CrossOver or UTM.
Is it a good idea to run Windows on Mac?
It is a great idea to run Windows on Mac if you have the proper hardware and software. For instance, if you own an M1/M2 MacBook, iMac, or Mac mini, you can expect maximum performance from virtual machines. It is also possible to run these virtual machines using powerful tools like Parallels Desktop and VMWare Fusion Player. In conclusion, running Windows on Mac is better than getting a new PC.
Conclusion
We honestly believe this guide helped you find an effective way to run Windows apps on Mac. All the ways we have mentioned are working properly at this time, meaning you can rely on them for the best speed and compatibility. But, as we always say, ensure the solution is cut out for your requirements.
READ NEXT
- Parallels Desktop Vs. CrossOver for Mac
- How to Run Windows Games on macOS with CrossOver
- Best Virtual Machine Software for Mac
- Parallels Desktop Vs. VMWare Fusion
Share This Article
Related Posts
Page load link
