Today, Microsoft announced the general availability of Windows Server 2016, and with it, Docker engine running containers natively on Windows. This blog post describes how to get setup to run Docker Windows Containers on Windows 10 or using a Windows Server 2016 VM. Check out the companion blog posts on the technical improvements that have made Docker containers on Windows possible and the post announcing the Docker Inc. and Microsoft partnership.
Before getting started, It’s important to understand that Windows Containers run Windows executables compiled for the Windows Server kernel and userland (either windowsservercore or nanoserver). To build and run Windows containers, a Windows system with container support is required.
Windows 10 with Anniversary Update
For developers, Windows 10 is a great place to run Docker Windows containers and containerization support was added to the the Windows 10 kernel with the Anniversary Update (note that container images can only be based on Windows Server Core and Nanoserver, not Windows 10). All that’s missing is the Windows-native Docker Engine and some image base layers.
The simplest way to get a Windows Docker Engine is by installing the Docker for Windows public beta (direct download link). Docker for Windows used to only setup a Linux-based Docker development environment (slightly confusing, we know), but the public beta version now sets up both Linux and Windows Docker development environments, and we’re working on improving Windows container support and Linux/Windows container interoperability.
With the public beta installed, the Docker for Windows tray icon has an option to switch between Linux and Windows container development. For details on this new feature, check out Stefan Scherers blog post.
Switch to Windows containers and skip the next section.

Windows Server 2016
Windows Server 2016 is the where Docker Windows containers should be deployed for production. For developers planning to do lots of Docker Windows container development, it may also be worth setting up a Windows Server 2016 dev system (in a VM, for example), at least until Windows 10 and Docker for Windows support for Windows containers matures.
For Microsoft Ignite 2016 conference attendees, USB flash drives with Windows Server 2016 preloaded are available at the expo. Not at ignite? Download a free evaluation version and install it on bare metal or in a VM running on Hyper-V, VirtualBox or similar. Running a VM with Windows Server 2016 is also a great way to do Docker Windows container development on macOS and older Windows versions.
Once Windows Server 2016 is running, log in, run Windows Update to ensure you have all the latest updates and install the Windows-native Docker Engine directly (that is, not using “Docker for Windows”). Run the following in an Administrative PowerShell prompt:
Install-PackageProvider -Name NuGet -MinimumVersion 2.8.5.201 -Force
Install-Module -Name DockerMsftProvider -Force
Install-Package -Name docker -ProviderName DockerMsftProvider -Force
Restart-Computer -Force
Docker Engine is now running as a Windows service, listening on the default Docker named pipe. For development VMs running (for example) in a Hyper-V VM on Windows 10, it might be advantageous to make the Docker Engine running in the Windows Server 2016 VM available to the Windows 10 host:
# Open firewall port 2375
netsh advfirewall firewall add rule name="docker engine" dir=in action=allow protocol=TCP localport=2375

# Configure Docker daemon to listen on both pipe and TCP (replaces docker --register-service invocation above)
Stop-Service docker
dockerd --unregister-service
dockerd -H npipe:// -H 0.0.0.0:2375 --register-service
Start-Service docker
The Windows Server 2016 Docker engine can now be used from the VM host by setting DOCKER_HOST:
$env:DOCKER_HOST = "<ip-address-of-vm>:2375"
See the Microsoft documentation for more comprehensive instructions.
Running Windows containers
First, make sure the Docker installation is working:
> docker version
Client:
Version:      1.12.1
API version:  1.24
Go version:   go1.6.3
Git commit:   23cf638
Built:        Thu Aug 18 17:32:24 2016
OS/Arch:      windows/amd64
Experimental: true

Server:
Version:      1.12.2-cs2-ws-beta
API version:  1.25
Go version:   go1.7.1
Git commit:   62d9ff9
Built:        Fri Sep 23 20:50:29 2016
OS/Arch:      windows/amd64
Next, pull a base image that’s compatible with the evaluation build, re-tag it and to a test-run:
docker pull microsoft/windowsservercore
docker run microsoft/windowsservercore hostname
69c7de26ea48
Building and pushing Windows container images
Pushing images to Docker Cloud requires a free Docker ID. Storing images on Docker Cloud is a great way to save build artifacts for later user, to share base images with co-workers or to create build-pipelines that move apps from development to production with Docker.
Docker images are typically built with docker build from a Dockerfile recipe, but for this example, we’re going to just create an image on the fly in PowerShell.
"FROM microsoft/windowsservercore `n CMD echo Hello World!" | docker build -t <docker-id>/windows-test-image -
Test the image:
docker run <docker-id>/windows-test-image
Hello World!
Login with docker login and then push the image:
docker push <docker-id>/windows-test-image
Images stored on Docker Cloud available in the web interface and public images can be pulled by other Docker users.
Using docker-compose on Windows
Docker Compose is a great way develop complex multi-container consisting of databases, queues and web frontends. Compose support for Windows is still a little patchy and only works on Windows Server 2016 at the time of writing (i.e. not on Windows 10).
To develop with Docker Compose on a Windows Server 2016 system, install compose too (this is not required on Windows 10 with Docker for Windows installed):
Invoke-WebRequest https://dl.bintray.com/docker-compose/master/docker-compose-Windows-x86_64.exe -UseBasicParsing -OutFile $env:ProgramFiles\docker\docker-compose.exe
To try out Compose on Windows, clone a variant of the ASP.NET Core MVC MusicStore app, backed by a SQL Server Express 2016 database. A correctly tagged microsoft/windowsservercore image is required before starting.
git clone https://github.com/friism/Musicstore
...
cd Musicstore
docker-compose -f .\docker-compose.windows.yml build
...
docker-compose -f .\docker-compose.windows.yml up
...
To access the running app from the host running the containers (for example when running on Windows 10 or if opening browser on Windows Server 2016 system running Docker engine) use the container IP and port 5000. localhost will not work:
docker inspect -f "{{ .NetworkSettings.Networks.nat.IPAddress }}" musicstore_web_1
172.21.124.54
If using Windows Server 2016 and accessing from outside the VM or host, simply use the VM or host IP and port 5000.
Summary
This post described how to get setup to build and run native Docker Windows containers on both Windows 10 and using the recently published Windows Server 2016 evaluation release. To see more example Windows Dockerfiles, check out the Golang, MongoDB and Python Docker Library images.
Please share any Windows Dockerfiles or Docker Compose examples your build with @docker on Twitter using the tag #windows. And don’t hesitate to reach on the Docker Forums if you have questions.
More Resources:
- Sign up to be notified of GA and the Docker Datacenter for Windows Beta
- Docker for Windows Server
- Learn more about the Docker and Microsoft partnership
You can run any application in Docker as long as it can be installed and executed unattended, and the base operating system supports the app. Windows Server Core runs in Docker which means you can run pretty much any server or console application in Docker.
TL;DR
Update! For a full walkthrough on Dockerizing Windows apps, check out my book Docker on Windows and my Pluralsight course Modernizing .NET Apps with Docker.
Check out these examples:
- openjdk:windowsservercore — Docker image with the Java runtime on Windows Server Core, by Docker Captain Stefan Scherer
- elasticsearch:nanoserver — Docker image with a Java app on Nano Server
- kibana:windowsservercore — Docker image with a Node.js app on Windows Server Core
- nats:nanoserver — Docker image with a Go app on Nano Server
- nerd-dinner — Docker image with an ASP.NET app on Windows Server Core
- dotnetapp — Docker image with a .NET Core app on Nano Server
The 5 Steps
Lately I’ve been Dockerizing a variety of Windows apps — from legacy .NET 2.0 WebForms apps to Java, .NET Core, Go and Node.js. Packaging Windows apps as Docker images to run in containers is straightforward — here’s the 5-step guide.
1. Choose Your Base Image
Docker images for Windows apps need to be based on microsoft/nanoserver or microsoft/windowsservercore, or on another image based on one of those.
Which you use will depend on the application platform, runtime, and installation requirements. For any of the following you need Windows Server Core:
- .NET Framework apps
- MSI installers for apps or dependencies
- 32-bit runtime support
For anything else, you should be able to use Nano Server. I’ve successfully used Nano Server as the base image for Go, Java and Node.js apps.
Nano Server is preferred because it is so drastically slimmed down. It’s easier to distribute, has a smaller attack surface, starts more quickly, and runs more leanly.
Being slimmed down may have problems though — certain Windows APIs just aren’t present in Nano Server, so while your app may build into a Docker image it may not run correctly. You’ll only find that out by testing, but if you do find problems you can just switch to using Server Core.
Unless you know you need Server Core, you should start with Nano Server. Begin by running an interactive container with
docker run -it --rm microsoft/nanoserver powershelland set up your app manually. If it all works, put the commands you ran into a Dockerfile. If something fails, try again with Server Core.
Derived Images
You don’t have to use a base Windows image for your app. There are a growing number of images on Docker Hub which package app frameworks on top of Windows.
They are a good option if they get you started with the dependencies you need. These all come in Server Core and Nano Server variants:
- microsoft/iis — basic Windows with IIS installed
- microsoft/aspnet — ASP.NET installed on top of IIS
- microsoft/aspnet:3.5 — .NET 3.5 installed and ASP.NET set up
- openjdk — OpenJDK Java runtime installed
- golang — Go runtime and SDK installed
- microsoft/dotnet — .NET runtime and SDK installed.
A note of caution about derived images. When you have a Windows app running in a Docker container, you don’t connect to it and run Windows Update to apply security patches. Instead, you build a new image with the latest patches and replace your running container. To support that, Microsoft release regular updates to the base images on Docker Hub, tagging them with a full version number (10.0.14393.693 is the current version).
Base image updates usually happen monthly, so the latest Windows Server Core and Nano Server images have all the latest security patches applied. If you build your images from the Windows base image, you just need to rebuild to get the latest updates. If you use a derived image, you have a dependency on the image owner to update their image, before you can update yours.
If you use a derived image, make sure it has the same release cadence as the base images. Microsoft’s images are usually updated at the same time as the Windows image, but official images may not be.
Alternatively, use the Dockerfile from a derived image to make your own «golden» image. You’ll have to manage the updates for that image, but you will control the timescales. (And you can send in a PR for the official image if you get there first).
2. Install Dependencies
You’ll need to understand your application’s requirements, so you can set up all the dependencies in the image. Both Nano Server and Windows Server Core have PowerShell set up, so you can install any software you need using PowerShell cmdlets.
Remember that the Dockerfile will be the ultimate source of truth for how to deploy and run your application. It’s worth spending time on your Dockerfile so your Docker image is:
- Repeatable. You should be able to rebuild the image at any time in the future and get exactly the same output. You should specify exact version numbers when you install software in the image.
- Secure. Software installation is completely automated, so you should make sure you trust any packages you install. If you download files as part of your install, you can capture the checksum in the Dockerfile and make sure you verify the file after download.
- Minimal. The Docker image you build for your app should be as small as possible, so it’s fast to distribute and has a small surface area. Don’t install anything more than you need, and clean up any installations as you go.
Adding Windows Features
Windows features can be installed with Add-WindowsFeature. If you want to see what features are available for an image, start an interactive container with docker run -it --rm microsoft/windowsservercore powershell and run Get-WindowsFeature.
On Server Core you’ll see that .NET 4.6 is already installed, so you don’t need to add features to run .NET Framework applications.
.NET is backwards-compatible, so you can use the installed .NET 4.6 to run any .NET application, back to .NET 2.0. In theory .NET 1.x apps can run too. I haven’t tried that.
If you’re running an ASP.NET web app but you want to use the base Windows image and control all your dependencies, you can add the Web Server and ASP.NET features:
RUN Add-WindowsFeature Web-server, NET-Framework-45-ASPNET, Web-Asp-Net45
Downloading Files
There’s a standard pattern for installing dependencies from the Internet — here’s a simple example for downloading Node.js into your Docker image:
ENV NODE_VERSION="6.9.4" `
    NODE_SHA256="d546418b58ee6e9fefe3a2cf17cd735ef0c7ddb51605aaed8807d0833beccbf6"

WORKDIR C:/node

RUN Invoke-WebRequest -OutFile node.exe "https://nodejs.org/dist/v$($env:NODE_VERSION)/win-x64/node.exe" -UseBasicParsing; `
    if ((Get-FileHash node.exe -Algorithm sha256).Hash -ne $env:NODE_SHA256) {exit 1} ;
The version of Node to download and the expected SHA-256 checksum are captured as environment variables with the ENV instruction. That makes it easy to upgrade Node in the future — just change the values in the Dockerfile and rebuild. It also makes it easy to see what version is present in a running container, you can just check the environment variable.
The download and hash check is done in a single RUN instruction, using Invoke-WebRequest to download the file and then Get-FileHash to verify the checksum. If the hashes don’t match, the build fails.
After these instructions run, your image has the Node.js runtime in a known location — C:\node\node.exe. It’s a known version of Node, verified from a trusted download source.
Expanding Archives
For dependencies that come packaged, you’ll need to install them as part of the RUN instruction. Here’s an example for Elasticsearch which downloads and uncompresses a ZIP file:
ENV ES_VERSION="5.2.0" `
    ES_SHA1="243cce802055a06e810fc1939d9f8b22ee68d227" `
    ES_HOME="c:\elasticsearch"

RUN Invoke-WebRequest -outfile elasticsearch.zip "https://artifacts.elastic.co/downloads/elasticsearch/elasticsearch-$($env:ES_VERSION).zip" -UseBasicParsing; `
    if ((Get-FileHash elasticsearch.zip -Algorithm sha1).Hash -ne $env:ES_SHA1) {exit 1} ; `
    Expand-Archive elasticsearch.zip -DestinationPath C:\ ; `
    Move-Item c:/elasticsearch-$($env:ES_VERSION) 'c:\elasticsearch'; `
    Remove-Item elasticsearch.zip
It’s the same pattern as before, capturing the checksum, downloading the file and checking the hash. In this case, if the hash is good the file is uncompressed with Expand-Archive, moved to a known location and the Zip file is deleted.
Don’t be tempted to keep the Zip file in the image, «in case you need it». You won’t need it — if there’s a problem with the image you’ll build a new one. And it’s important to remove the package in the same RUN command, so the Zip file is downloaded, expanded and deleted in a single image layer.
It may take several iterations to build your image. While you’re working on it, it’s a good idea to store any downloads locally and add them to the image with
COPY. That saves you downloading large files every time. When you have your app working, replace theCOPYwith the proper download-verify-deleteRUNpattern.
Installing MSIs
You can download and run MSIs using the same approach. Be aware that not all MSIs will be built to support unattended installation. A well-built MSI will support command-line switches for any options available in the UI, but that isn’t always the case.
If you can install the app from an MSI you’ll also need to ensure that the install completed before you move on to the next Dockerfile instruction — some MSIs continue to run in the background. This example from Stefan Scherer’s iisnode Dockerfile uses Start-Process ... -Wait to run the MSI:
RUN Write-Host 'Downloading iisnode' ; \
    $MsiFile = $env:Temp + '\iisnode.msi' ; \
    (New-Object Net.WebClient).DownloadFile('https://github.com/tjanczuk/iisnode/releases/download/v0.2.21/iisnode-full-v0.2.21-x64.msi', $MsiFile) ; \
    Write-Host 'Installing iisnode' ; \
    Start-Process msiexec.exe -ArgumentList '/i', $MsiFile, '/quiet', '/norestart' -NoNewWindow -Wait
3. Deploy the Application
Packaging your own app will be a simplified version of step 2. If you already have a build process which generates an unattended-friendly MSI, you can can copy it from the local machine into the image and install it with msiexec:
COPY UpgradeSample-1.0.0.0.msi /

RUN msiexec /i c:\UpgradeSample-1.0.0.0.msi RELEASENAME=2017.02 /qn
This example is from the Modernize ASP.NET Apps — Ops Lab from Docker Labs on GitHub. The MSI supports app configuration with the RELEASENAME option, and it runs unattended with the qn flag.
With MSIs and other packaged deployment options (like Web Deploy) you need to choose between using what you currently have, or changing your build output to something more Docker friendly.
Web Deploy needs an agent installed into the image which adds an unnecessary piece of software. MSIs don’t need an agent, but they’re opaque, so it’s not clear what’s happening when the app gets installed. The Dockerfile isn’t an explicit deployment guide if some of the steps are hidden.
An xcopy deployment approach is better, where you package the application and its dependencies into a folder and copy that folder into the image. Your image will only run a single app, so there won’t be any dependency clashes.
This example copies an ASP.NET Web app folder into the image, and configures it with IIS using PowerShell:
RUN New-Item -Path 'C:\web-app' -Type Directory; `
    New-WebApplication -Name UpgradeSample -Site 'Default Web Site' -PhysicalPath 'C:\web-app'

COPY UpgradeSample.Web /web-app
If you’re looking at changing an existing build process to produce your app package, you should think about building your app in Docker too. Consolidating the build in a multi-stage Dockerfile means you can build your app anywhere without needing to install .NET or Visual Studio.
See Dockerizing .NET Apps with Microsoft’s Build Images on Docker Hub.
4. Configure the Entrypoint
When you run a container from an image, Docker starts the process specified in the CMD or ENTRYPOINT instruction in the Dockerfile.
Modern app frameworks like .NET Core, Node and Go run as console apps — even for Web applications. That’s easy to set up in the Dockerfile. This is how to run the open source Docker Registry — which is a Go application — inside a container:
CMD ["registry", "serve", "config.yml"]
Here registry is the name of the executable, and the other values are passed as options to the exe.
ENTRYPOINTandCMDwork differently and can be used in conjunction. See how CMD and ENTRYPOINT interact to learn how to use them effectively.
Starting a single process is the ideal way to run apps in Docker. The engine monitors the process running in the container, so if it stops Docker can raise an error. If it’s also a console app, then log entries written by the app are collected by Docker and can be viewed with docker logs.
For .NET web apps running in IIS, you need to take a different approach. The actual process serving your app is w3wp.exe, but that’s managed by the IIS Windows service, which is running in the background.
IIS will keep your web app running, but Docker needs a process to start and monitor. In Microsoft’s IIS image they use a tool called ServiceMonitor.exe as the entrypoint. That tool continually checks a Windows service is running, so if IIS does fail the monitor process raises the failure to Docker.
Alternatively, you could run a PowerShell startup script to monitor IIS and add extra functionality — like tailing the IIS log files so they get exposed to Docker.
5. Add a Healthcheck
HEALTHCHECK is one of the most useful instructions in the Dockerfile and you should include one in every app you Dockerize for production. Healthchecks are how you tell Docker if the app inside your container is healthy.
Docker monitors the process running in the container, but that’s just a basic liveness check. The process could be running, but your app could be in a failed state — for a .NET Core app, the dotnet executable may be up but returning 503 to every request. Without a healthcheck, Docker has no way to know the app is failing.
A healthcheck is a script you define in the Dockerfile, which the Docker engine executes inside the container at regular intervals (30 seconds by default, but configurable at the image and container level).
This is a simple healthcheck for a web application, which makes a web request to the local host (remember the healthcheck executes inside the container) and checks for a 200 response status:
HEALTHCHECK CMD powershell -command `
    try { `
     $response = iwr http://localhost:80 -UseBasicParsing; `
     if ($response.StatusCode -eq 200) { return 0} `
     else {return 1}; `
    } catch { return 1 }
Healthcheck commands need to return 0 if the app is healthy, and 1 if not. The check you make inside the healthcheck can be as complex as you like — having a diagnostics endpoint in your app and testing that is a thorough approach.
Make sure your
HEALTHCHECKcommand is stable, and always returns0or1. If the command itself fails, your container may not start.
Any type of app can have a healthcheck. Michael Friis added this simple but very useful check to the Microsoft SQL Server Express image:
HEALTHCHECK CMD [ "sqlcmd", "-Q", "select 1" ]
The command verifies that the SQL Server database engine is running, and is able to respond to a simple query.
There are additional advantages in having a comprehensive healthcheck. The command runs when the container starts, so if your check exercises the main path in your app, it acts as a warm-up. When the first user request hits, the app is already running warm so there’s no delay in sending the response.
Healthchecks are also very useful if you have expiry-based caching in your app. You can rely on the regular running of the healthcheck to keep your cache up-to date, so you could cache items for 25 seconds, knowing the healthcheck will run every 30 seconds and refresh them.
Summary
Dockerizing Windows apps is straightforward. The Dockerfile syntax is clean and simple, and you only need to learn a handful of instructions to build production-grade Docker images based on Windows Server Core or Nano Server.
Following these steps will get you a functioning Windows app in a Docker image — then you can look to optimizing your Dockerfile.
Table of Contents
- 1 Can you run Windows 10 in a Docker container?
- 2 Can I run Windows in a Docker container on Linux?
- 3 Can I run Windows Docker image on Ubuntu?
- 4 Is it possible to run Windows on Docker?
- 5 How do I run a Docker container in Ubuntu?
- 6 How do I run a Docker image in Ubuntu?
- 7 How do I open Docker in Ubuntu?
Can you run Windows 10 in a Docker container?
If you want to run Windows containers, you’ll need Windows as the host operating system / kernel. Even then, windows containers only run windows server and nano. You can’t run windows 10 in a container.
Can I run Windows in a Docker container on Linux?
No, you cannot run Windows containers directly on Linux. But you can run Linux on Windows. You can change between OS containers Linux and Windows by right clicking on the Docker in the tray menu. Containers use the OS kernel.
Can I run Windows Docker image on Ubuntu?
At this time, no, Docker for Windows Server 2016 does not support GUI-based applications. This is because Windows containers are based on either Nano or Core Server, which do not allow users to start up a GUI-based interface nor RDP into the container.
Can you run Windows inside a container?
You can run any application in Docker as long as it can be installed and executed unattended, and the base operating system supports the app. Windows Server Core runs in Docker which means you can run pretty much any server or console application in Docker.
How do I run Docker on Windows?
Docker Desktop for Windows
- Get Docker Desktop for Windows. Get Docker Desktop for Windows.
- Install. Double-click Docker for Windows Installer to run the installer.
- Run. Open a command-line terminal like PowerShell, and try out some Docker commands!
- Enjoy.
- Documentation.
Is it possible to run Windows on Docker?
You can run both Linux and Windows programs and executables in Docker containers. The Docker platform runs natively on Linux (on x86-64, ARM and many other CPU architectures) and on Windows (x86-64). Docker Inc. builds products that let you build and run containers on Linux, Windows and macOS.
How do I run a Docker container in Ubuntu?
To get information about Docker version, run the following command. 8. To get a list of all available Docker commands run docker on your terminal. $ docker Usage: docker [OPTIONS] COMMAND A self-sufficient runtime for containers Options: –config string Location of client config files (default “/home/tecmint/.
How do I run a Docker image in Ubuntu?
Run an interactive Ubuntu container
- Run a Docker container and access its shell. docker container run –interactive –tty –rm ubuntu bash.
- Run the following commands in the container.
- Type exit to leave the shell session.
- For fun, let’s check the version of our host VM.
Can I run Ubuntu container on Windows?
It is now possible to run Docker containers on Windows 10 and Windows Server, leveraging Ubuntu as a hosting base. It is now possible to do so using the power of Docker technology and Hyper-V virtualization on Windows.
How do I run a Docker image in Windows 10?
Run a Windows container using Windows Admin Center First, open the container host you want to manage, and in the Tools pane, select the Containers extension. Then, select the Images tab inside the Container extension under Container Host. In the Pull Container Image settings, provide the image URL and the tag.
How do I open Docker in Ubuntu?
Install Docker
- Log into your system as a user with sudo privileges.
- Update your system: sudo yum update -y .
- Install Docker: sudo yum install docker-engine -y.
- Start Docker: sudo service docker start.
- Verify Docker: sudo docker run hello-world.
A Step-by-Step Guide to Containerizing a Windows Virtual Machine — with RDP Access — on a Linux Docker Platform with KVM Hypervisor
Background
Recently, I was tasked with developing a PoC of a lab environment where students can access their pre-installed and pre-configured machines — Linux and Windows — to do necessary training exercises. I wanted to make the access to all machines uniform over HTTP/HTTPS (browser-based). While the web-based access to machines can easily be implemented using a platform like Guacamole, the greater challenge was how to deploy the machines in a way that utilizes system resources — particularly, CPU, RAM, and HDD — efficiently and with speed. It became evident by that point that technology like Docker containerization is the best way to go. However, that presented other challenges.
Each of Windows and Linux machines have their own containerization requirements — as will be discussed in the next section. Natively, one cannot run Linux and Windows containers simultaneously on the same Docker daemon. After some research, the solution that presented itself as the most viable was to install each Windows machine as a virtual machine inside a single Linux container. From the perspective of the Docker daemon, all containers are Linux-based. However, some of those containers run a hypervisor, and on top of which there is a Windows VM. Even though a container with a VM in it takes more disk space than other containers, the efficiency in saving disk space when we have many containerized VMs is still high compared to running un-containerized VMs.
Ultimately, I wanted to access a containerized Windows machine using RDP, and enjoy the full remote desktop access to that machine. Unfortunately, there are not satisfactory detailed tutorials and complete walkthroughs that explain the entire procedure easily and clearly. And I had to face many small challenges along the way. During my research, I have also seen many people — on various technical forums — struggling with such an implementation and expressing their frustration! I hope that this document serves as a complete guide to solving that problem.
Why Containerizing a VM: Our Use Case
You might be asking yourself why would someone want to install a VM inside a Container? It looks strange at first since the Container layer seems unnecessary and one can simply install the VM directly on the base OS. However, there are different reasons why this can be a solution and a necessary requirement.
Our particular use case involves spinning up multiple identical Windows VMs to be used by different users. Had we wanted a single VM only, then, there would not be any need to containerize it. But since we want to create many identical VMs, we will save tremendous resources (HDD, RAM, and CPU) by containerizing those VMs.
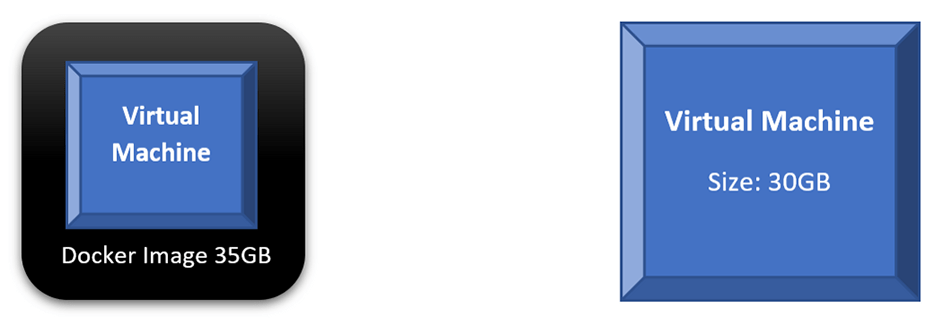
If we compare the scenario where we run a single VM directly on our base OS to a scenario of containerizing that VM, we will find out that both will consume similar disk space and other resources. In fact, every time we want to run the containerized VM, we will do two steps: run the container and then power on the VM. The following diagram shows those two scenarios; a direct VM occupies 30GB on the HDD, while the Docker Image occupies 35GB. Not much benefit — in terms of saving system resources — is achieved here.
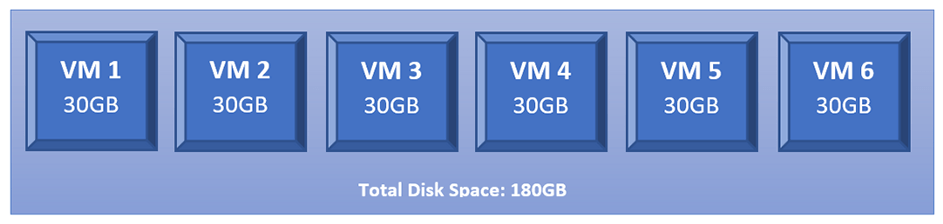
However, what happens if we want to run 6 copies of our intended VMs? We will have to create 6 copies of that VM where each occupies the same disk space as the original one. Thus, if the original VM is 30GB, having 6 copies will occupy 180GB on the HDD.
This changes dramatically when we containerize each of those identical VMs. This is the added value of Docker containerization technology. And it owes its value to how Docker differentiates between two main concepts: images and containers. Images are read-only and form the base of containers. Containers created from the same Image share the same read-only core (i.e., the image), while each container adds its own read-write layer that interacts with the read-only image. For more discussion on the difference between Images and Containers, please check this document: <click here>
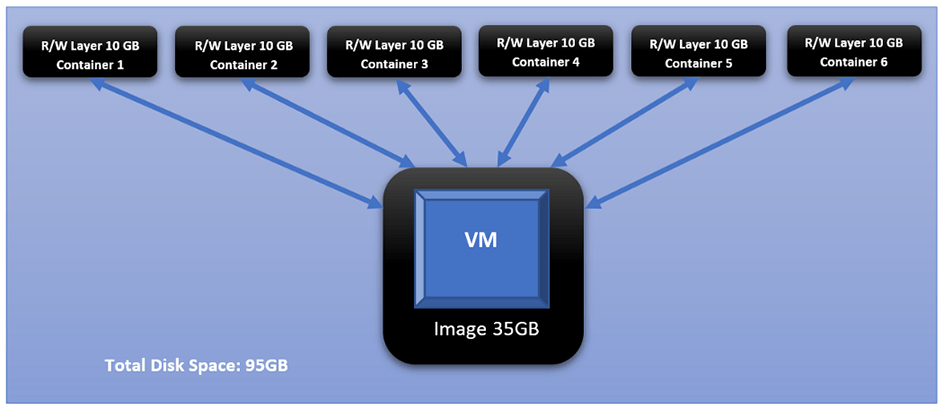
If we take the 35GB Docker Image, in our example, and creates 6 Containers from it, each Container will create its own read-write layer through which will access the read-only image. At the time of creation, that R/W layer has 0 size; however, as the user starts interacting with the Container — doing things like powering on the VM — that layer’s size starts increasing. And if we assume that all dynamic changes in a single layer have accumulated size of 10GB, that means all 6 containers have added a total of 60BG on top of the original 35GB of the image.
Challenges
Challenge 1 Windows containers on Windows platform, and Linux containers on Linux platform
One of the biggest obstacles you face with Docker, and containerization in general, is that you cannot have Linux and Windows containers running simultaneously on the same platform (i.e., same Docker daemon). The reason for this is that Docker is an OS-Level Virtualization; meaning, its main function is to contain and isolate applications as they run on an Operating System. The Docker daemon provides each container with any necessary kernel-level properties so that the containerized application can run. Because of that, containers running Linux services/applications need to run on a Linux platform, and containers running Windows services/applications need to run on a Windows platform.
The Windows Docker Desktop has the feature of providing a Linux Subsystem; and in this case, running a Linux container can ultimately run on Windows. However, we should note that if this feature is enabled, only Linux containers can run while Windows containers cannot. One has to switch off this feature to run Windows containers; and in this scenario, Linux containers cannot run. It is still not possible to run both Linux and Windows containers simultaneously on the same platform.
If one needs to have Linux and Windows containers running simultaneously and communicating with others, a possible solution is to have each group run on their respective platform, then, configure the network routing, NAT, and port-forwarding rules.
Challenge 2 Windows Docker containers cannot be accessed through RDP or VNC, i.e., no graphical desktop
Even if we decided to have two separate platforms — Windows platform for Windows containers, and Linux platform for Linux containers — with appropriate network configuration, we will face the challenge that Windows containers cannot have a desktop environment. This is a fact for all Windows containers. They are designed and built to run services and applications, and they can be accessed using PowerShell/CMD command-line interface.
Unlike the Linux system where the Desktop environment is an installable service, Windows Desktop comes bundled directly with the OS as shipped by Microsoft. And when it comes to Windows-based containers, Microsoft has published certain images (known as base images) which form the base of any Windows container. Those base images do not come up with a Desktop service, and one does not have the luxury to install it later as an add-on.
For more information about Windows containers/images, <Click Here>
Architecture Overview
Our ultimate goal here is to have a fully running Windows OS, accessible through RDP, and containerized and managed by Docker daemon. And to achieve that, we will have the following:
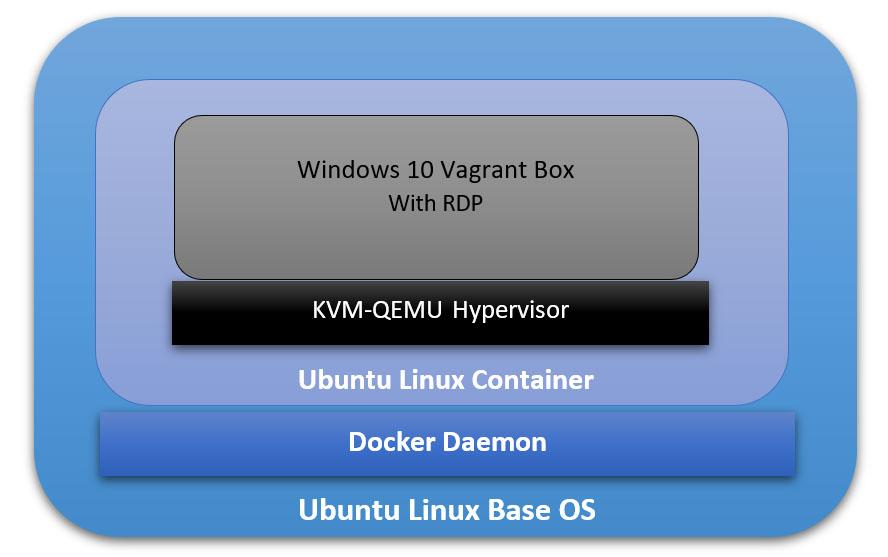
- The Base Operating System: it will be the main platform hosting everything else. In our particular example, it will be an Ubuntu 18.04 Linux machine.
- The Docker Daemon: this is the containerization platform installed on the Base OS. Through Docker, we will create our final “image” out of which we will spawn many containers.
- A Docker Image with an Operating System: This OS will be part of every created container, and its main function is to run a hypervisor on which the Windows VM will be running. In our case here, we will use the Ubuntu:18.04 Docker Image (available on Docker Hub).
- A Hypervisor on the Docker Image: Inside the Ubuntu Docker Image, we will also have a Hypervisor that will allow us to install the Windows VM later. In our particular case, we will use the KVM-QEMU hypervisor.
- The Windows Virtual Machine: this is the machine we are going to access at the end through RDP. In our example, we will use a pre-packaged Windows 10 Vagrant Box available at (https://app.vagrantup.com/peru/boxes/windows-10-enterprise-x64-eval)
Installing Docker on the Main Platform
The first thing we need to do is to install Docker into our main Operating System. For the sake of this tutorial, our main system is Ubuntu 20.04 (Linux Kernel 5.4.0–40-generic) with 70GB HDD, 4GB RAM, and 2 CPU Cores.
Follow the following steps to install Docker:
[1] Update the apt package index and install packages to allow apt to use a repository over HTTPS:
sudo apt-get update

sudo apt-get install apt-transport-https ca-certificates curl gnupg-agent software-properties-common
[2] Add Docker’s official GPG key:
curl -fSSL https://download.docker.com/linux/ubuntu/gpg | sudo apt-key add

sudo apt-key fingerprint 0EBFCD88
[3] Set up the stable Docker’s repository:
sudo add-apt-repository "deb [arch=amd64] https://download.docker.com/linux/ubuntu $(lsb_release -cs) stable"sudo apt updateNote: This is an important step after adding the new repository in Step 3.
[5] Install the latest version of Docker Engine:
sudo apt install docker-ce -yNote: You don’t need to install docker-ce-cli or containerd.io packages since they are installed directly with the docker-ce package.
[6] Start Docker now and configure it to automatically start after a reboot:
sudo systemctl start docker

sudo systemctl enable docker
Building the Right Docker Image
Now that Docker is installed, we can start building the image that will be the base for our Container on which we will have the VM. The first section below explains how to build this image manually without using a Dockerfile. Then, in the second section, I will explain how to automate building the image using a Dockerfile.
However, before building the image, we need to check if our system supports virtualization. Since our Container will run a hypervisor, it will not work unless the main platform supports virtualization. Otherwise, we will face an error later on when trying to install the VM. We can run the following command:
sudo egrep -c '(vmx|svm)' /proc/cpuinfoIf the output is a number greater than 0, then, you are good to proceed further. Otherwise, you need to make sure virtualization (VT-x) is enabled in the BIOS settings. If your main platform is itself a virtual machine, make sure VT-x is enabled through the virtualization software.
- Enable VT-x in VMWare Workstation
- Enable VT-x in Virtualbox
Building the Image without a Dockerfile
[1] Pull the core Docker image ubuntu:18.04:
sudo docker pull ubuntu:18.04Note: to verify that the image has been added successfully, issue the following command:
sudo docker image ls
[2] Run a Container (with the name ubuntukvm) from the Image ubuntu:18:04 with some privileged parameters:
sudo docker run --privileged -it --name ubuntukvm --device=/dev/kvm --device=/dev/net/tun -v /sys/fs/cgroup:/sys/fs/cgroup:rw --cap-add=NET_ADMIN --cap-add=SYS_ADMIN ubuntu:18.04 /bin/bashSince we will install a hypervisor (QEMU-KVM) in this container, we need to run it with certain parameters as follows:
— device=/dev/kvm will map the device /dev/kvm in the main OS inside the Container.
— device=/dev/net/tun will map the device /dev/net/tun in the main OS inside the Container.
—v /sys/fs/cgroup:/sys/fs/cgroup:rw will map the directory /sys/fs/cgroup in the main OS inside the Container, and the Container will have read-write permissions on that directory.
— cap-add=NET_ADMIN will add network admin capabilities to the Container.
— cap-add=SYS_ADMIN will add system admin capabilities to the Container.
Once the command runs successfully, you should be inside the Container with a shell prompt:
root@<container_id>:/#[3] Inside the Container, update the apt package index:
root@<container_id>:/# apt-get update -y[4] Inside the Container, install the hypervisor package QEMU-KVM and Libvirt:
root@<container_id>:/# apt-get install -y qemu-kvm libvirt-daemon-system libvirt-devYou don’t have to install libvirt-clients and bridge-utils as they would already be installed along with libvirt-daemon-sys.
The libvirt-dev is an important package specially to run Vagrant Boxes on.
[5] Change group ownership of /dev/kvm:
root@<container_id>:/# chown root:kvm /dev/kvmNote: the device /dev/kvm must be owned by the group kvm, and any user who needs to run VMs needs to be part of the kvm group.
[6] Start the Libvirt services:
root@<container_id>:/# service libvirtd start

root@<container_id>:/# service virtlogd start
[7] Install the Linux Image package which contains any necessary Kernel modules:
root@<container_id>:/# apt-get install -y linux-image-$(uname -r)Note: this is an important step. There are certain modules (e.g., ip_tables and ip6_tables) that are needed at a later stage; and if they are missing, an error message would be generated.
[8] Install the curl package (it is used to download the Vagrant application):
root@<container_id>:/# apt-get install curl -y[9] Install the net-tools package (it provides ipconfig utility):
root@<container_id>:/# apt-get install net-tools -y[10] Download and run the latest version Vagrant application:
root@<container_id>:/# apt-get install jq -y

root@<container_id>:/# vagrant_latest_version=$(curl -s https://checkpoint-api.hashicorp.com/v1/check/vagrant  | jq -r -M '.current_version')

root@<container_id>:/# echo $vagrant_latest_version

root@<container_id>:/# curl -O https://releases.hashicorp.com/vagrant/$(echo $vagrant_latest_version)/vagrant_$(echo $vagrant_latest_version)_x86_64.deb

root@<container_id>:/# dpkg -i vagrant_$(echo $vagrant_latest_version)_x86_64.deb
Note 1: The above commands perform the following actions:
— Install the JSON Query parser tool, jq, which will be used in the next command.
— Get the Vagrant latest version value and store it in the environment variable vagrant_latest_version.
— Download the latest version of Vagrant package.
— Install the downloaded Vagrant package.
Note 2: It is very important and critical that you download and install Vagrant in this method. Do NOT get it from the Ubuntu repository (or any other Linux repositories, like Red Hat’s) using the command apt-get install vagrant. The reason for this is that the WinRM library is not shipped with Vagrant packages provided by Linux distribution and is shipped natively with the official package. WinRM library is needed to run Windows Vagrant boxes.
[11] Install the Vagrant Libvirt plugin:
root@<container_id>:/# vagrant plugin install vagrant-libvirt[12] Download and install Windows10 Vagrant box:
root@<container_id>:/# mkdir /win10

root@<container_id>:/# cd /win10

root@<container_id>:/win10# vagrant init peru/windows-10-enterprise-x64-eval

root@<container_id>:/win10# VAGRANT_DEFAULT_PROVIDER=libvirt vagrant up
the vagrant init command will download a Vagrantfile which contains the instructions fof building the Vagrant box.
the vagrant up command will build the box. Please note that this command takes some time. The particular Vagrant box we are downloading here (peru/windows-10-enterprise-x64-eval) has a size of 5.62 GB.
once the above command finishes execution, type the following command which will attempt to access the box over RDP. Even though it will fail (since there is no RDP client installed in the Container), we will get the IP address of the Vagrant box:
root@< container_id >:/win10# vagrant rdp==> default: Detecting RDP info…
 default: Address: 192.168.121.68:3389
 default: Username: vagrant
==> default: Vagrant will now launch your RDP client with the connection parameters
==> default: above. If the connection fails, verify that the information above is
==> default: correct. Additionally, make sure the RDP server is configured and
==> default: running in the guest machine (it is disabled by default on Windows).
==> default: Also, verify that the firewall is open to allow RDP connections.
An appropriate RDP client was not found. Vagrant requires either
`xfreerdp` or `rdesktop` in order to connect via RDP to the Vagrant
environment. Please ensure one of these applications is installed and
available on the path and try again.
[13] Set up iptables port forwarding rules:
If you want to access the RDP port on the Vagrant box from out the Container, this is an important step. By default, the Vagrant application configures firewall rules to allow access only from within the Container to the Vagrant box and vice versa. Machines outside the Container do not have any access to the Vagrant box. We would like to set up the rules in such a way to allow our main OS (Ubuntu) to access the Vagrant box on RDP. The following diagram logically illustrates this:

Add the following rules to NAT/Port Forward connections from the main OS to the container on port 3389 to be forwarded to the Vagrant Box on port 3389:
root@<container_id>:/# iptables -A FORWARD -i eth0 -o virbr1 -p tcp --syn --dport 3389 -m conntrack --ctstate NEW -j ACCEPT

root@<container_id>:/# iptables -A FORWARD -i eth0 -o virbr1 -m conntrack --ctstate ESTABLISHED,RELATED -j ACCEPT

root@<container_id>:/# iptables -A FORWARD -i virbr1 -o eth0 -m conntrack --ctstate ESTABLISHED,RELATED -j ACCEPT

root@<container_id>:/# iptables -t nat -A PREROUTING -i eth0 -p tcp --dport 3389 -j DNAT --to-destination 192.168.121.68

root@<container_id>:/# iptables -t nat -A POSTROUTING -o virbr1 -p tcp --dport 3389 -d 192.168.121.68 -j SNAT --to-source 192.168.121.1
After that, we should remove the rules that reject all traffic to/from virb1 interface; these rules take precedent over our newly inserted rules:
root@<container_id>:/# iptables -D FORWARD -o virbr1 -j REJECT --reject-with icmp-port-unreachable

root@<container_id>:/# iptables -D FORWARD -i virbr1 -j REJECT --reject-with icmp-port-unreachable

root@<container_id>:/# iptables -D FORWARD -o virbr0 -j REJECT --reject-with icmp-port-unreachable

root@<container_id>:/# iptables -D FORWARD -i virbr0 -j REJECT --reject-with icmp-port-unreachable
if you mess up the iptables, or if the communication is problematic later, you may want to clear up all tables and then add the rules (mentioned above) on a clean slate. To clear the iptables, issue the following:
root@<container_id>:/# sudo iptables-save > $HOME/firewall.txt

root@<container_id>:/# sudo iptables -X

root@<container_id>:/# sudo iptables -t nat -F

root@<container_id>:/# sudo iptables -t nat -X

root@<container_id>:/# sudo iptables -t mangle -F

root@<container_id>:/# sudo iptables -t mangle -X

root@<container_id>:/# sudo iptables -P INPUT ACCEPT

root@<container_id>:/# sudo iptables -P FORWARD ACCEPT

root@<container_id>:/# sudo iptables -P OUTPUT ACCEPT
[14] Commit all Changes to Create a New Image:
Up to this point, we have a fully running Container with the desired Windows VM. However, we cannot transfer or store that Container. In addition, we cannot create multiple copies of this Container without going through all the steps we have done so far. For this reason, we need to commit the changes to a new Docker Image. The Image can be transferred or stored. Multiple Containers can be created — instantiated — almost immediately.
To commit the changes to a new Image, we need first to exit the Container:
root@<container_id>:/win10# exit

$ sudo docker ps -a
Take note of the Container ID; and then, issue the following command:
$ sudo docker commit <container_id> ubuntukvmNote 1: You can substitute the name “ubuntukvm” with any name you like. This will be the name of the new Image.
Building the Image Using a Dockerfile
Instead of building the Image in a manual way — as shown in the previous section, we can automate the whole process using a Dockerfile.
[1] Prepare the Dockerfile:
In a new directory, create a Dockerfile (with the name Dockerfile), and write the following commands in it. Mostly, they are the same commands we have executed individually in the previous section:
[2] Prepare a Startup Shell Script (startup.sh):
This file will be copied to the Image and will run automatically every time you instantiate a Container from that Image. The script will assign certain permissions and startup the necessary services. In addition, it will create the iptables rules that will port forward RDP traffic.
[3] Build the Container from the Docker file:
sudo chmod +x startup.sh

sudo docker build -t ubuntukvm:latest -f Dockerfile .
[4] Instantiate a Container and Run it:
sudo docker run --privileged -it --name kvmcontainer1 --device=/dev/kvm --device=/dev/net/tun -v /sys/fs/cgroup:/sys/fs/cgroup:rw --cap-add=NET_ADMIN --cap-add=SYS_ADMIN ubuntukvm bashTesting the RDP Access
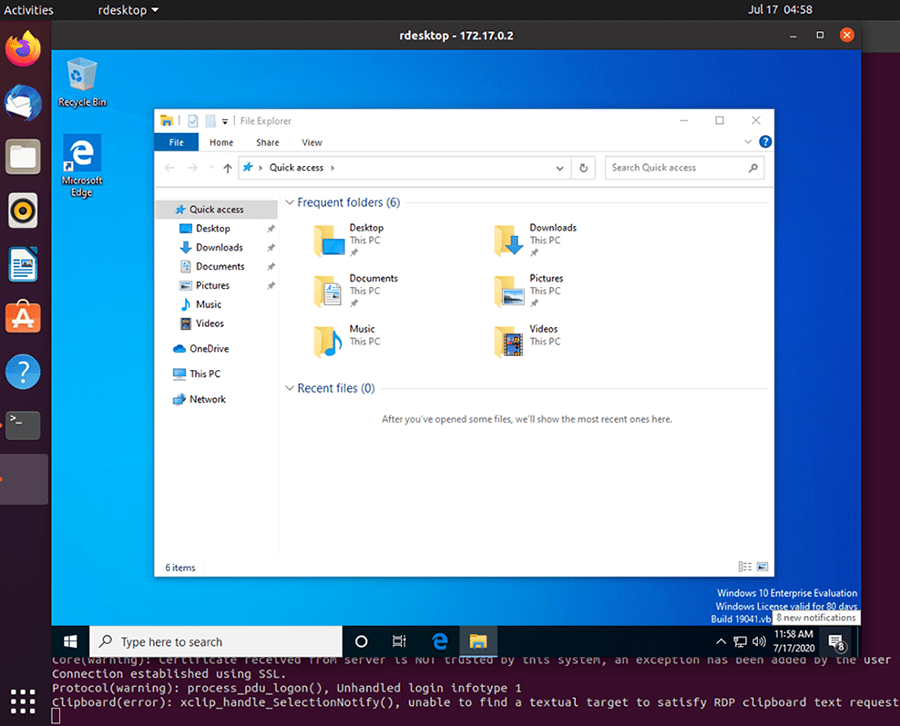
By now, we should be able to access the RDP service on the Windows Vagrant box by connecting to the IP address of the Docker container. To test that port 3389/tcp (RDP) is reachable from the main OS, we will use a simple Nmap command.
First, if you are inside the Docker container, press Ctrl+p+q to put the Container in the background while running; this should return you to the main OS terminal prompt:
root@<container_id>:/win10# <Ctrl+p+q>

$ sudo nmap -Pn -p 3389 172.17.0.2
Next, we need to install an RDP client for Linux. A popular one is RDesktop:
sudo apt-get install rdesktopFinally, we can access the Windows VM:
sudo rdesktop 172.17.0.2The Windows Vagrant box that we have installed has two built-in accounts:
- Username: vagrant Password: vagrant
- Username: Administrator Password: vagrant
Conclusion
I hope this post has been a comprehensive guide to containerize a virtual machine. There are different advantages of running a VM in a Container; one of them is running multiple Containers simultaneously. You can automatically build the desired image using a Dockerfile, or you can build it manually by running each command individually. We have covered both ways in this post.
Name already in use
A tag already exists with the provided branch name. Many Git commands accept both tag and branch names, so creating this branch may cause unexpected behavior. Are you sure you want to create this branch?
1
branch
1
tag
Code
-
Use Git or checkout with SVN using the web URL.
-
Open with GitHub Desktop
-
Download ZIP
Latest commit
Files
Permalink
Failed to load latest commit information.
Type
Name
Latest commit message
Commit time
Windows in docker container
A implementation of windows OS (x64) based on vagrant VM, libvirt and docker compose. The VM is created inside a container using vagrant and libvirt. This strategy makes the deployment of windows OS trivial and plug and play.
Prerequisites
- docker >= 24
- docker-compose >= 1.18
Deployment Guide
- Create/Update the environmental file
.env
# Vagrant image settings
MEMORY=8000 # 8GB
CPU=4
DISK_SIZE=100
- Create
docker-compose.yml
version: "3.9"

services:
  win10:
    image: ghcr.io/vaggeliskls/windows-in-docker-container:latest
    env_file: .env
    stdin_open: true
    tty: true
    privileged: true
    cap_add:
      - NET_ADMIN
      - SYS_ADMIN
    volumes:
      - /sys/fs/cgroup:/sys/fs/cgroup
    devices:
      - /dev/kvm
      - /dev/net/tun
    ports:
      - 3389:3389
- Run:
docker-compose up -d

Remote Desktop
For debugging purposes or testing you can always connect to the VM with remote desktop softwares.
Some software that used when developed was
- Linux: rdesktop
rdesktop <ip>:3389or remina - MacOS: Windows remote desktop
- Windows: buildin
Remote Windows Connection
User login
The default users based on vagrant image are
- Administrator
- Username: Administrator
- Password: vagrant
- User
- Username: vagrant
- Password: vagrant
References
- Windows Vagrant Tutorial
- Vagrant image: peru/windows-server-2022-standard-x64-eval
- Vagrant by HashiCorp
- Windows Virtual Machine in a Linux Docker Container