Quick Links
- Run Windows in a Virtual Machine
- Use Wine to Run Windows Apps With Wineskin
- Use CrossOver Mac to Run Windows Apps
- Use Boot Camp to Install Windows on an Intel Mac
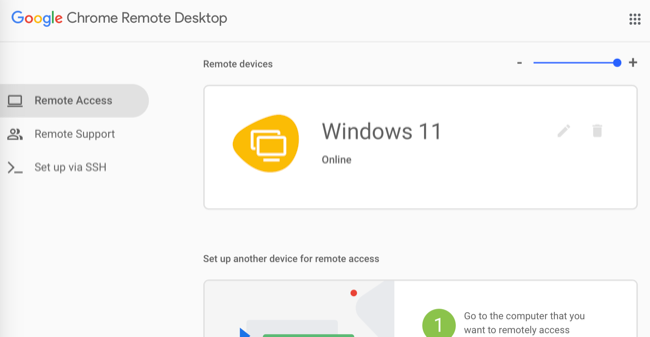
- Access Windows Remotely With Remote Desktop Tools
- Consider Looking For Native Mac Alternatives
Key Takeaways
We recommend using virtual machine software like Parallels to run Windows software on a Mac. If you have an Intel Mac, you can get the best performance by installing Windows in Boot Camp. You can also use Wine via Wineskin or CrossOver Mac, or access Windows software via a remote desktop solution.
It’s surprisingly easy to run Windows apps on a Mac, and you don’t always need to run Windows to do so. Use these solutions to play PC games, run productivity software, or access Windows tools that lack a native Mac version.
Run Windows in a Virtual Machine
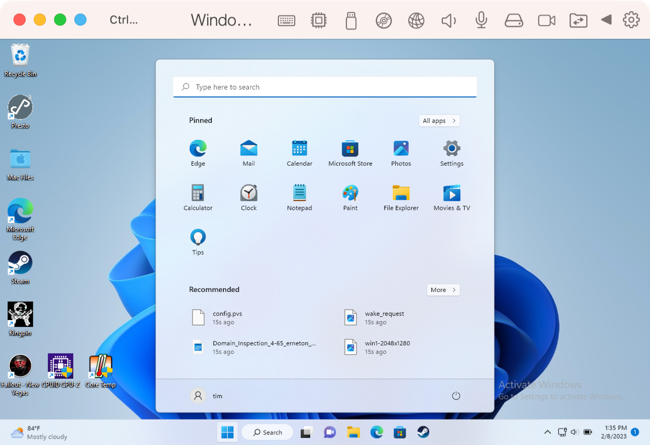
One of the easiest ways of running Windows apps is to use a virtual machine. This involves running Windows on top of macOS by virtualizing the hardware required to do so. Software installed in a virtual machine behaves as if it’s installed natively on a Windows PC which means that compatibility is excellent, particularly in Windows 11.
If you have a modern Mac model with an Apple Silicon chip (M1, M2, and similar,) you will be limited to the Windows 11 on ARM release, which performs surprisingly well. This ARM version of Windows has compatibility with 64-bit apps written for the «standard» x86 version of Windows, which means that Windows 11 on ARM can run almost any app you throw at it without experiencing much of a performance penalty.
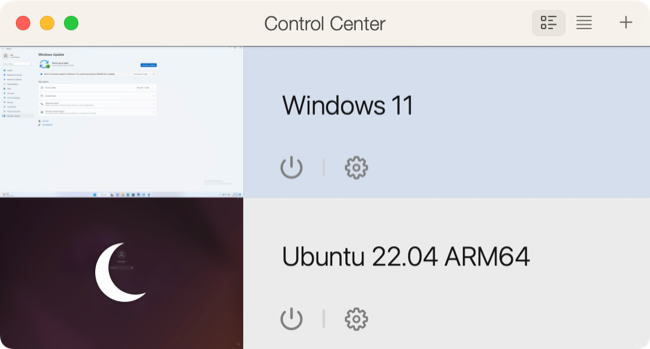
If you have an Intel Mac, then you’ll be able to run the more widely used x86 version of Windows in a virtual machine instead. You can also use virtualization to run other operating systems on top of macOS, including Linux distributions or other macOS installations.
If you want the smoothest virtualization experience, you’ll need to open your wallet. Parallels Desktop will download, install, and set up Windows 11 for you in a matter of minutes. It also supports 3D acceleration for games on Apple Silicon, which other solutions lack. Check out our review of Parallels Desktop for more details. Other virtualization options include VMware Fusion (with a free version of VMware Fusion Player), VirtualBox, and UTM.
Virtualization is useful since you can just launch an app and have access to Windows in moments. Apps like Parallels have modes that allow you to effectively hide the Windows UI and use apps as if they were running natively on your Mac. Many virtualization apps don’t require that you sacrifice disk space for your virtual machine, unlike a dedicated Windows installation.
These virtual machine apps don’t come with a Windows product key. You can install and use Windows 11 without a product key, but if you want to get rid of the pesky «Activate Windows» reminder, you’ll also need to pay Microsoft for a license.
Use Wine to Run Windows Apps With Wineskin
Wine is a compatibility layer that allows Windows software to run on top of macOS. It works by translating Windows API calls in real time so performance in apps that use Wine is generally very good. That said, not all apps will work, and some will exhibit odd behavior. Apps are more likely to crash or behave in unexpected ways compared to virtualization or running Windows natively.
That said, Wine might just be the solution you’ve been looking for. You don’t need to install Windows natively, which means you don’t need to dedicate disk space to Windows or run additional virtualization software. Wine apps appear on your desktop and in your dock just like native Mac apps do.
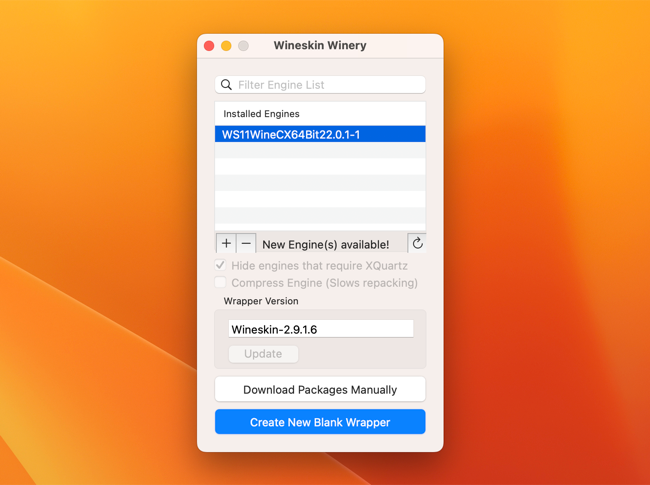
The Wine project is still under active development, but Mac packages are no longer maintained. Fortunately, you can use a community-maintained tool called Wineskin to create wrappers for your Windows apps. It is recommended that you install and maintain Wineskin using Homebrew, a package manager for macOS.
You can easily install Homebrew on your Mac using a few Terminal commands. With that out of the way, install Wineskin by running the following in Terminal:
brew install --cask --no-quarantine gcenx/wine/unofficial-wineskin
This will install the Wineskin Winery app on your Mac, which you can then use to create wrappers and start installing Windows software. Wineskin works on both Intel and Apple Silicon Mac using Apple’s Rosetta 2 transpiler.
Use CrossOver Mac to Run Windows Apps
Also built on Wine, CrossOver Mac is paid software that can help simplify the process of getting a Windows application working on your Mac. Available with a free trial, CrossOver Mac costs $74 and walks you through the process of installing Windows software with installation profiles available for many popular apps. Where apps lack profiles, CrossOver can help you make your own.
CrossOver is particularly popular among gamers who want to run Windows games on Apple hardware. CrossOver works on both Intel and Apple Silicon models, though Mac owners with Apple’s ARM-based chips will (currently) need to rely on Rosetta 2, which can introduce a small performance penalty.
You can use the free trial of CrossOver to test out any apps before you buy, and it’s cheaper than buying a Windows license (or a premium virtualization tool like Parallels Desktop). You can use a single CrossOver license to run Windows apps on macOS, Linux, and ChromeOS too.
Use Boot Camp to Install Windows on an Intel Mac
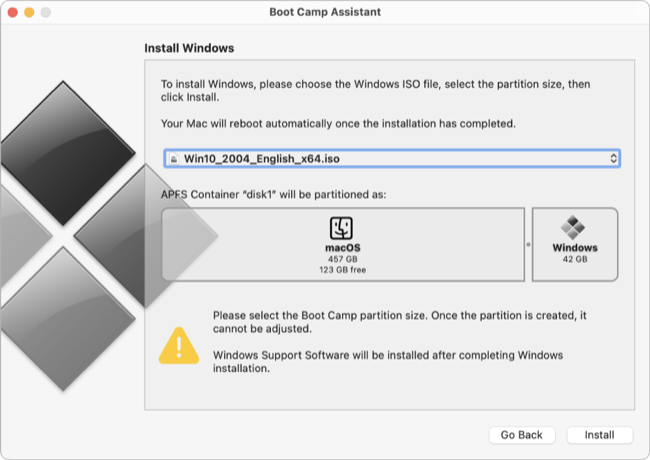
If you have an Intel Mac, you can install Windows natively on your Mac using Boot Camp, Apple’s dual-boot Windows partitioning tool. If you have a modern Apple Silicon Mac with an M1, M2, or later chip, then you won’t be able to use Boot Camp, which means you can’t install Windows natively. (Windows 11 on ARM can’t be installed directly on a Mac; you can only install it in a virtual machine.)
Intel Mac owners will find the Boot Camp Assistant under Applications > Utilities. Run it and follow the instructions to partition your drive for a Windows installation. Boot Camp officially supports Windows 10 only, since Windows 11 requires Trusted Platform Module 2.0 (TPM 2.0) support.
You may be able to install Windows 11 by creating a custom .ISO if you’re desperate to do so. These machines are still getting Windows updates (for now) though Microsoft has started displaying watermarks on machines that don’t make the grade.
Running Windows natively has some benefits and drawbacks, assuming your Mac is compatible in the first place. You’ll need to reboot every time you want to use Windows, which can be a hassle. You’ll also need to sacrifice a good chunk of your available drive space to Windows if you want to install a decent amount of software.
On the plus side, performance is as good as it gets since you’ll be using the full potential of your hardware in a native Windows environment. If gaming is your main use for Windows, this is arguably your best choice.
Do you have a Windows PC already but are simply looking for a way to interact with it on your Mac? Maybe your Windows machine is in a bedroom, but you primarily use your Mac in the study. Remote desktop software lets you make use of the hardware you already have—remotely over a network.
This can work both over the internet or over a local network, but keep in mind that using a machine over the internet can incur a severe latency penalty. You might be able to help fix a friend’s computer over the internet or check for files in your documents folder, but you wouldn’t want to play games or use most software in this way.
Local network connections will be far more stable, particularly if you have a wired network inside your house. Wireless will work too, but Wi-Fi is subject to all sorts of interference and bottlenecks. Faster is always better, whether you’re networking over a cable or the airwaves.
The apps required to accomplish this are largely the same, regardless of the connection type. Microsoft’s Remote Desktop lets you connect to your Windows 10 or Windows 11 machine using dedicated apps for macOS or iPad and iPhone (as well as other Windows computers.)
If you use Google’s Chrome browser then Chrome Remote Desktop is worth a shot. It’s a completely free remote desktop app that uses your Google Account for remote access using a browser extension. DWService is another free solution that provides access to your computer via a web page. Other free remote access tools include AnyDesk and TigerVNC.
Consider Looking For Native Mac Alternatives
If none of the solutions above appeal to you, it might be worth putting in some time to hunt for a suitable Mac alternative that runs natively. You can use websites like Alternative To, ask on message boards like Apple Support Community or r/MacApps or simply scour the web in your favorite search engine.
You might even find the app you’re looking for in our list of Mac apps you should be using everyday.
- SWEETNESS
- GUIDES
- NEWS
- REVIEWS
- DEALS
- ABOUT
How to Run Windows Apps on Mac (M1 M2 Included)

We have come a long way in terms of Operating Systems and compatibility. Most popular apps have macOS and Windows versions these days. Alternatively, you can find macOS alternatives for Windows apps or vice versa. However, sometimes, you just cannot find a viable macOS alternative for a Windows application. In these instances, you have to think about ways to run Windows apps on M1/M2 Silicon Macs.
RELATED: Best Virtual Machine Software for Mac
Key Takeaways
- You can install Windows apps on macOS if you cannot find a corresponding macOS app for one of the favorite Windows apps.
- You also have the option to choose between three major methods, including compatibility layers and fully-fledged virtual machines.
- Some of you may have to use a PC just because you need to run a particular app. In this case, running the app on your Mac makes better sense.
- In addition, you do not have to worry about performance, as macOS handles virtual machines well, especially with Apple Silicon chips.
In this guide, we have discussed the three best ways to run Windows apps on macOS. We have also mentioned the pros and cons of each method.
Method #1 Using Parallels Desktop
Parallels Desktop is a virtual machine software available for macOS. Even though you can use this VM app to virtualize various platforms like Windows or Linux, Parallels Desktop offers a few additional features to run Windows on macOS. One of them is called Coherence Mode, which allows the user to open and use Windows apps without keeping the Virtual Machine running in the foreground.
As you can guess, we use the power of Coherence Mode to run Windows apps on Mac. Because this method uses resources from the existing virtual machine, you do not have to worry about performance. In case you do not know, Parallels Desktop is one of the few Microsoft-certified ways to run Windows 11 on ARM Macs, which includes the latest M1/M2 lineups.
Parallels Desktop for Mac starts at $99.99.

How to Use Parallels Desktop to Run Windows Apps on Mac?
Fortunately, you don’t need technical expertise to set up Parallels Desktop to run Windows apps on a Mac. On the other hand, you can follow these easy steps:
- Install Parallels Desktop on your Mac using the directions using the official directions
- Install Windows 11 on Parallels Desktop. You can download Windows 11 directly from Microsoft or upload a custom ISO for your needs.
- Wait for Parallels Desktop to complete installing Windows 11. After that, you can launch the Windows 11 virtual machine on your Mac.
- Go to View > Enter Coherence. At this point, the full-screen virtual machine window will close. You can then launch Windows apps from Launchpad.
- You can also open the Start Menu from the macOS dock to launch applications and other windows.
Of course, you may have to wait a few seconds for the app to launch. Nevertheless, once Parallels Desktop has launched the application, you can expect standard performance from those apps. More importantly, the Windows app you have opened will work as it would on a PC when you have launched it using Coherence Mode on Parallels Desktop.
Pros
- Parallels Desktop lets you run almost any Windows app, including games, on Mac
- You do not have to keep the Windows virtual machine running in the foreground
- It is more performance-optimized than many other ways to run Windows apps
- Parallels Desktop is quite integrated with macOS and offers maximum flexibility
Cons
- You have to set up a Windows 11 virtual machine to use Coherence Mode
- You also have to pay for Parallels Desktop and the Windows 11 license key
To wrap up, we recommend this method to run Windows apps on Mac if you do not mind paying for a paid Windows license in addition to Parallels Desktop. Read our full Parallels Desktop review here.
Method #2 Using CrossOver
CrossOver is another app that lets you run Windows apps on Mac. However, compared to Parallels Desktop, CrossOver works differently. For one, CrossOver does not install a virtual machine on your Mac. Therefore, you do not have to keep the virtual machine running in the background. On the other hand, the CrossOver app creates a unique compatibility layer on top of your macOS system.
CrossOver is available for macOS and Linux. It means you can also use the app to run Windows apps on a Linux system. However, this paid app requires separate subscriptions for each platform. Because you don’t have to pay for the Windows license, the CrossOver method is more affordable. However, you may stumble upon some caveats.
CrossOver for Mac is available for $24.

How to Use CrossOver to Run Windows Apps on Mac?
The following simple steps will help you set up CrossOver for Mac and run Windows apps on your Mac. You can use the method to install any supported app.
- Download CrossOver for Mac from the website and install it on your Mac
- After the installation, open CrossOver and provide the license key (or start a free trial)
- Click the Install button and search for the Windows application that you want to install
- You can also install an unlisted application by providing the installation file and some details
- Once you have found the app, click Install, and CrossOver will do the rest.
- After the installation, you can select the application from the sidebar and open it.
The application should open and work like a native macOS application. It is worth noting that CrossOver for Mac is not a virtual machine emulator. Instead, it understands the commands from the Windows app and translates them so that macOS understands them. However, it also means you cannot access some features you may find with virtual machines.
Pros
- You do not need a Windows license to run Windows apps on your Mac
- CrossOver for Mac offers an optimized library of apps and games you can install
- You get to know about the compatibility status of each app before installing them
- CrossOver for Mac handles the translation process well for top performance
Cons
- CrossOver for Mac does not work with popular apps, causing conflicts
- You cannot access many features that you may otherwise find with VMs
- CrossOver for Mac could use some performance improvements
In conclusion, CrossOver for Mac is a good option if you do not want the hassle of installing a VM on your Mac. You do not have to worry about license keys, either.
A Word about WineHQ
We should also mention that CrossOver is a more improved version of WineHQ, which was a popular solution for running Windows apps on macOS and Linux. However, the macOS client of WineHQ has not been updated for some time, meaning it is not a good idea to use it.
Even if the WineHQ client works on your Mac, it cannot offer maximum performance. Therefore, although WineHQ is a free-of-cost solution, we do not feel comfortable recommending it. But if you are ready to take the risk, feel free to check out WineHQ.
However, please be warned that our experience with WineHQ was not at all close to ideal.
Method #3 Using a Virtual Machine
A Virtual Machine is another way to run Windows apps on Mac. Even though we already mentioned a virtual machine software, Parallels Desktop, you should also consider other options. Fortunately, a variety of virtual machine software solutions are available for macOS. You can choose one of them for your specific purpose.
You can refer to our guide on the best virtual software for Mac if you need a better idea. We have covered free and paid virtual machine software for macOS, including VMWare Fusion Player and Oracle VirtualBox. We have also discussed the pros and cons of these VM tools for Mac.
By the way, you should also consider getting a free emulator to run Windows apps on Mac. UTM is one of the great options and it helps you set up the desired virtual machine within a few minutes.

How to Use Virtual Machines to Run Windows Apps on Mac?
The process is simple. Depending on the virtual machine software, you can complete the installation of the Windows OS in a few minutes. After the installation, you can find a fully-functional Windows system within your Mac. This system is technically complete so that you can install and run any Windows app.
As you can guess, this method lets you run Windows apps with maximum performance if you have a working virtual machine. However, it also means you have to keep the virtual machine ready with updates and, more importantly, license keys.
Pros
- You will have an entire Windows system that you can use almostlike a PC
- A virtual machine supports more apps than compatibility layers do
- You will have more control over how the Windows apps behave on the system
- You can use a variety of installers to set up the apps you want
Cons
- You may have to pay a fee for the virtual machine software, especially the ones like Parallels
- It is also mandatory to pay for the Windows 11 license key, which can be expensive
- Virtual machine software and virtual machine files may take up a lot of space
- Running a virtual machine in the foreground is not multi-tasking-friendly
As you can see, using a virtual machine to run Windows apps has its fair share of benefits and caveats. You’d also want some technical expertise to make these machines work fine.
FAQs
Can I run Windows apps on my Mac?
You can run Windows apps on your Mac with the right third-party tools. You can choose between two major options: virtual machines and compatibility layers. Both these methods make it possible to run MS Windows apps on your Mac without rebooting. Some dedicated options like Parallels Desktop offer advanced options as well.
What is the best application to run Windows apps on Mac?
You can use multiple apps to run Windows apps on Mac, based on your requirements. But, in our opinion, you have two major choices. If you want maximum performance and compatibility, you should use Parallels Desktop for Mac. On the other hand, if you are looking for maximum savings and standard compatibility, you can use CrossOver or UTM.
Is it a good idea to run Windows on Mac?
It is a great idea to run Windows on Mac if you have the proper hardware and software. For instance, if you own an M1/M2 MacBook, iMac, or Mac mini, you can expect maximum performance from virtual machines. It is also possible to run these virtual machines using powerful tools like Parallels Desktop and VMWare Fusion Player. In conclusion, running Windows on Mac is better than getting a new PC.
Conclusion
We honestly believe this guide helped you find an effective way to run Windows apps on Mac. All the ways we have mentioned are working properly at this time, meaning you can rely on them for the best speed and compatibility. But, as we always say, ensure the solution is cut out for your requirements.
READ NEXT
- Parallels Desktop Vs. CrossOver for Mac
- How to Run Windows Games on macOS with CrossOver
- Best Virtual Machine Software for Mac
- Parallels Desktop Vs. VMWare Fusion
Share This Article
Related Posts
Page load link
There are various tools for running Windows programs on Mac, some of which do not require the Microsoft operating system to be installed.
Today, in order to run Windows programs on Mac, there is no need to install the Microsoft operating system on Apple products, and it is easy to install Windows programs on Mac through emulators and peripheral tools developed for this purpose. In the following article, we will discuss how to do this along with introducing the best current options.
How to run Windows programs on Mac With Wineskin
The Wineskin application is one of the best options for providing the necessary environment for installing Windows programs on Mac, which is completely free for Apple computer owners. Also, unlike similar examples such as Wine, this project is constantly receiving updates and can be used on MacOS version 13 and products based on Apple’s proprietary chips.
The easiest way to install Wineskin on Mac OS is to use Homebrew. If you haven’t installed this tool on your PC or laptop in the past, you can download and install it by entering the following command in Terminal.
/bin/bash -c "$(curl -fsSL https://raw.githubusercontent.com/Homebrew/install/HEAD/install.sh)"
- After the Homebrew installation process is complete, enter the following command in the terminal and press the “Enter” key.
echo 'eval $(/opt/homebrew/bin/brew shellenv)' >> /Users/$USER/.zprofile- Next, type the command below in the terminal and press the “Enter” key again to install the Wineskin application on the system.
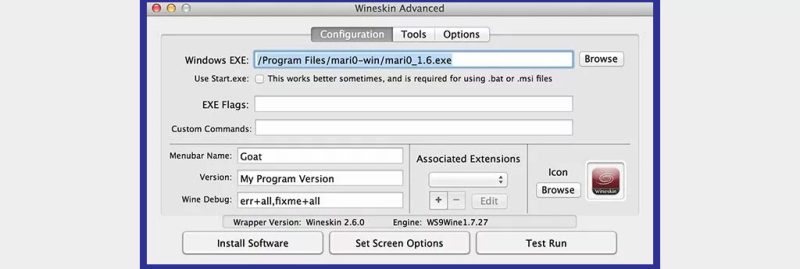
brew install --cask --no-quarantine gcenx/wine/unofficial-wineskinWineskin application configuration
After installing the Wineskin application according to the steps mentioned above, you will still not be able to run Windows programs on Mac, and you must first apply the appropriate settings. You will be able to launch the new app by running “Wineskin Winery.app” in the Applications folder or using Spotlight on macOS.
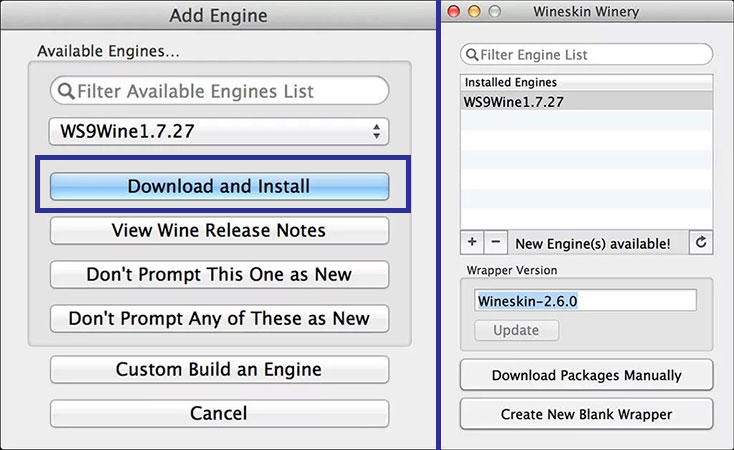
- Inside the Wineskin application, click on the “+” sign at the bottom of the Installed Engines title to display the “Add Engine” window.
- From the drop-down menu, select the latest available version and then press the “Download and Install” button.
- In the opened window, you can define a desired name for the new engine and then click “OK“.
- The time required to download and install the new engine depends on your internet speed.
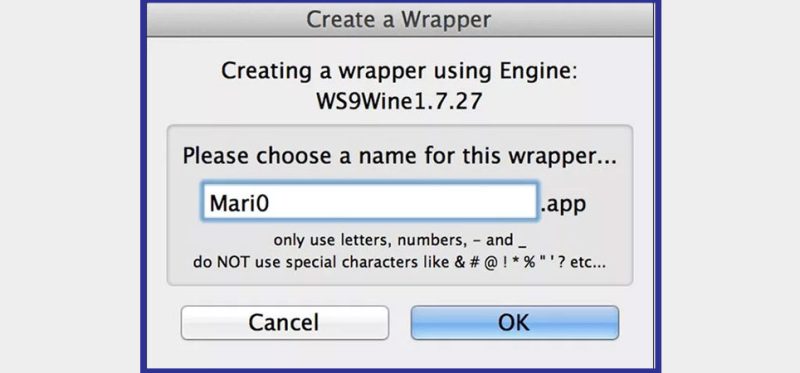
- After the download and installation of the new engine are complete, a notification will be displayed. Now it’s time to click on the “Create New Blank Wrapper” option.
- In the new window, enter a name in the specified box. Note that you will need this name in the next steps; So it is better to choose a short title.
- After typing the desired name, click on the “OK” button. Next, you will be asked to install two packages for the correct operation of the application.
- Mono package for running “Net” programs. Windows is used on Mac and the “Gecko” package is also used to display HTML-based content.
- After the process of receiving and installing the mentioned packages is completed, a Wrapper will be created.
- By default, you can see the “Wrapper” created at the address because; But clicking on it will not result.
- Applications > Wineskin > [your wrapper]
- For this purpose, right-click on it and then select “Show Package Contents“. Next, from among the displayed items, click on the “Wineskin” option.
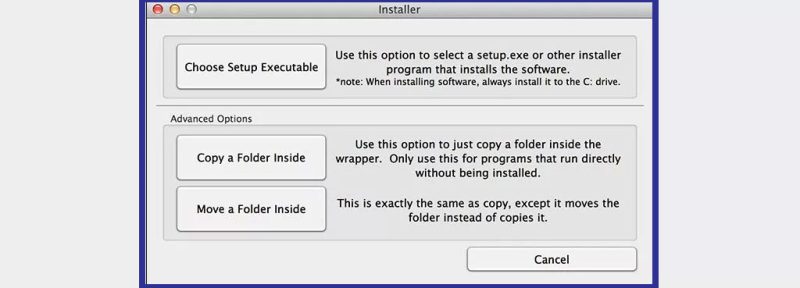
- Then select “Install Software” and “Choose Setup Executable” options in the next windows.
- Finally, a window will open where you can define the “EXE” file address of the desired application.
- You can now exit “Wineskin” and use the displayed launchpad to run Windows applications on your Mac.
- Also, if the desired application does not need to be installed, you can choose “Copy a Folder Inside” instead of “Choose Setup Executable” in the previous steps and then specify the app folder.
How to run Windows programs on Mac With Wineskin with Parallels Desktop
“Parallels Desktop” application is another option for installing Windows programs on Mac. Of course, this tool installs Windows 11 alongside MacOS; But thanks to the “Coherence” feature, after the initial configuration, the user will no longer need to interact with the Microsoft operating system. How to work with the said app is mentioned below.
- First, download the “Parallels Desktop” application installation file using this link and install it on your Mac computer.
- At the first login to the app, select the “New” option and then click on “Get Windows 11 from Microsoft“.
- Finally, press the “Install Windows” key and wait until the process of receiving and installing the operating system is completed. Note that in this case, you will need a legal Windows license.
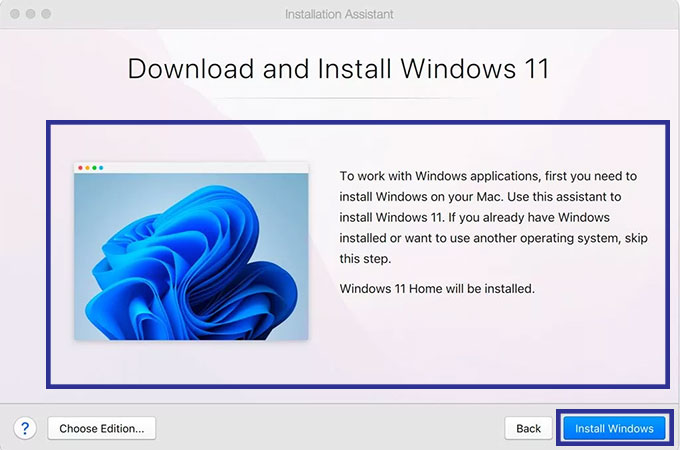
If you want to install Windows from another file, select “Install Windows or another OS from DVD or image file” in the previous step and then continue the installation process. Note that the selected file must be in ISO format.
- After the process is completed, you can create a new Windows 11 virtual machine and then install your desired applications on it.
- Now right-click on the Windows icon in the dock and select “Enter Coherence” from the “View” menu.
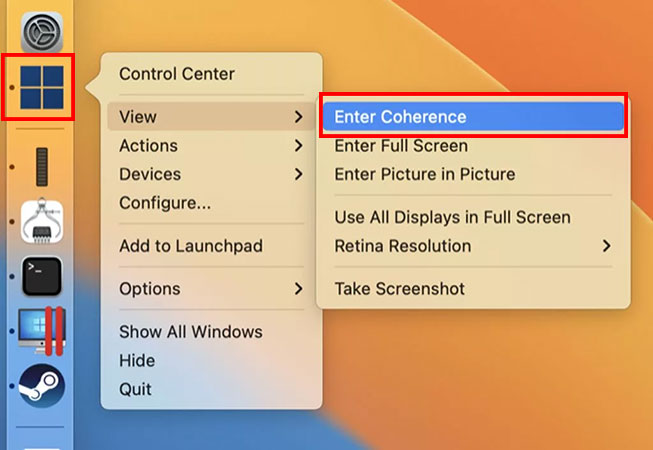
Now the Windows desktop will be hidden, But you can still continue to use apps based on it. You can have all the apps installed through “Parallels Desktop” in the Applications folder or through the Spotlight tool. When this feature is enabled, Windows apps will run like native Mac software. It is worth noting that the Windows 11 virtual machine is still running in the background, But it does not affect the user experience.
Frequently asked questions about How to run Windows programs on Mac
- What is the best program to install Windows 11 on Mac?
The Parallels Desktop tool provides the possibility of installing Windows alongside MacOS for users in recent versions of Apple’s operating system and products based on this company’s proprietary chip.
- What is the best way to run Windows programs on Mac?
Using external tools like WineSkin or Parallels Desktop can be the easiest way to run Windows apps.
- Is it possible to run Windows programs on Mac without installing the operating system?
Yes; Using the Wineskin application, you can use Windows programs on Mac without installing the Microsoft operating system.
In this article, we talked about “How to run Windows programs on Mac” and we are waiting for your experiences to use these methods. Please share your thoughts with us.
macOS can be really great for productivity-related tasks. However, there are still a few applications that require you to have a Windows computer to run them, such as Paint.NET and Notepad++.
What if you could run these apps on your Mac without having to buy a new Windows PC?
Also read: How to play Windows games on a Mac
In this guide, we will show you how to run Windows apps on macOS.
How to run Windows apps on Mac (5 ways)
Parallels

Parallels is easy to use and can help you run Windows apps on Mac. You will be able to run Windows apps without even rebooting your system.
The program offers over 30 tools that can help you simplify your tasks across both Windows and macOS.
It also lets you access your apps and files located on both operating systems.
You can run apps like Microsoft Office, Internet Explorer, etc.
It is compatible with different macOS versions, and you can easily copy-paste files from Windows and macOS seamlessly.
Parallels also lets you use the touch bar in Windows and works well with Apple’s proprietary Boot Camp utility.
VMware Fusion

VMware Fusion is a very versatile software that allows you to install different operating systems, such as Windows 11, Linux, ChromeOS, etc., on your Mac.
You can run any operating system on macOS without even needing to reboot. The program supports features like dark mode and Sidecar, so you can even use your iPad in conjunction with Windows.
Apple’s Metal technology support can be used in this program to support GPU-intensive tasks and games.
The Unity mode can be used to hide your Windows desktop so you can use Windows and Mac applications side by side.
Boot Camp

Boot camp is an Apple proprietary feature that enables users to install Windows on their macOS device and easily switch between both of them. However, only one operating system can be used at a time, and you will need to restart your computer to switch between them.
It is similar to the dual-booting feature supported by Windows computers.
In order to use the Boot Camp feature, just download a copy of Windows 11 and let the program handle the rest.
It will assist in installing the operating system. Since Boot Camp is similar to dual-booting, you can enjoy much better performance since Windows will be able to utilize the hardware of your Mac to its full potential. This can be great if you are looking forward to running demanding applications on Windows on your Mac computer.
However, the inability to run macOS applications and Windows applications side by side can be a deal-breaker for some, as you can only use one operating system at a time.
Wine

Wine is a compatibility layer that derives its origins from Linux and allows you to run Windows programs on other operating systems such as macOS, BSD, and Linux.
The idea behind this program is to rewrite the code of applications so they can run smoothly on other operating systems.
With the help of Wine, you will be able to easily run Windows apps on macOS. However, Wine isn’t perfect, and you won’t be able to run all of the Windows applications, so expect to encounter some bugs when you plan to do so.
You can take a look at the Wine Application Database to find which applications are currently supported.
It is a great way to run Windows applications on macOS since you don’t actually need to install Windows, so you don’t need a Windows license to use the Wine.
CrossOver

CrossOver allows you to run thousands of Windows apps and games on macOS. Moreover, it doesn’t require any virtual machine or Windows license key, and it offers features such as keyboard shortcuts, copy-paste, mission controls, etc.
You can easily set up the program with an easy 1-click installation and use all of your Windows applications with ease.
If a program doesn’t work on CrossOver, then you can contact the developers, and they will make it work for you.
It is a paid application that contributes back to the open-source Wine project that it is based on.
With a starting price of $15.95, CrossOver is well worth the price since it utilizes the true potential of your hardware to run Windows on Mac, and you don’t even need to reboot to run Windows applications.
You can also try it before purchasing by downloading the free trial version of the software. Do check their list of compatible apps first before you decide to purchase.
These are some of the ways that you can use to run Windows programs on macOS.
You can take the help of the software mentioned to smoothly run any Windows applications and even switch between both operating systems seamlessly.
Also read: How to run Windows 11 on M1 Mac
In case you have a spare Windows laptop or computer lying around, then you can use remote desktop software to control and access the Windows machine using your Mac computer. This will save you the hassle of doing things like dual booting or installing software that requires a Windows license.
We hope you find this guide useful, and in case of any doubts, feel free to ask them in the comments section below.
Running Windows applications on a Mac can be a challenge for many users. Whether you need to access a specific program for work or simply want to try out a game that’s only available on Windows, finding a way to run Windows apps on your Mac is essential. Fortunately, there are several methods you can use to achieve this, and in this blog post, we will explore those methods and provide you with a detailed guide on how to do it.
Video Tutorial:
Why You Need to Run Windows Apps on Mac
There are several reasons why you might need to run Windows applications on your Mac. Let’s take a look at a few of them:
1. Compatibility: Many software applications are designed specifically for Windows, and if you’re a Mac user, you may find that certain apps you need or want to use are not available on macOS. Running Windows apps on your Mac allows you to access these programs and use them seamlessly.
2. Work-related tasks: If you work in an environment where certain applications are only compatible with Windows, running them on your Mac becomes essential. This ensures that you can complete all your work-related tasks without needing to switch between two different computers.
3. Gaming: There are countless games available exclusively for Windows. If you’re a passionate gamer and want to play these games on your Mac, finding a way to run Windows apps becomes crucial.
With these reasons in mind, let’s explore the different methods you can use to run Windows applications on your Mac.
Method 1: Using Boot Camp
Running Windows on a Mac can be achieved through Apple’s built-in utility called Boot Camp. Boot Camp allows you to install Windows on a separate partition of your Mac’s hard drive, effectively creating a dual-boot system. Here’s how you can use Boot Camp to run Windows apps on your Mac:
1. Prepare your Mac: Before you begin, make sure your Mac meets the system requirements for running Boot Camp. Also, ensure that you have a Windows installation disc or a Windows ISO file.
2. Open Boot Camp Assistant: Boot Camp Assistant can be found in the Utilities folder within the Applications folder. Launch it to begin the setup process.
3. Partition your disk: Boot Camp Assistant will guide you through the process of partitioning your disk. Allocate enough space for your Windows installation, keeping in mind the requirements of the applications you want to run.
4. Install Windows: Follow the on-screen instructions to install Windows on the newly created partition. You will need to provide your Windows product key during the installation process.
5. Boot into Windows: Once the installation is complete, restart your Mac and hold the Option key while it boots up. Select the Windows partition to boot into Windows.
6. Install Windows apps: Now that you’re running Windows on your Mac, you can install and run any Windows applications you need.
Pros:
1. Full compatibility with Windows applications.
2. You can take advantage of the full capabilities of Windows, including gaming and resource-intensive applications.
3. No need for workarounds or compatibility layers.
Cons:
1. Requires a separate partition and installation of Windows, which can take up a significant amount of disk space.
2. Switching between macOS and Windows requires a complete system restart.
3. Requires a valid Windows license.
Method 2: Using Virtualization Software
Another popular method for running Windows apps on a Mac is to use virtualization software. Virtualization software allows you to run an entire operating system, such as Windows, within a virtual machine on your Mac. This means that you can run Windows alongside macOS without the need to partition your disk. Here’s how you can use virtualization software to run Windows apps:
1. Choose a virtualization software: There are several virtualization software options available, such as Parallels Desktop, VMware Fusion, and VirtualBox. Choose the one that best suits your needs and install it on your Mac.
2. Create a virtual machine: Launch the virtualization software and create a new virtual machine. Follow the software’s instructions to set up the virtual machine, including allocating resources such as RAM and disk space.
3. Install Windows: Once the virtual machine is set up, you can install Windows by either using an installation disc or an ISO file.
4. Install Windows apps: With Windows installed within the virtual machine, you can now install and run any Windows applications you need.
Pros:
1. No need to partition your disk, as the virtual machine runs within macOS.
2. Allows for seamless switching between macOS and Windows.
3. Several virtualization software options to choose from, offering flexibility and customization.
Cons:
1. Performance can be slower compared to running Windows natively on a Mac.
2. Requires a valid Windows license.
3. Resource allocation for the virtual machine may impact the performance of other applications on your Mac.
Method 3: Using CrossOver
CrossOver is a commercial compatibility layer that allows you to run Windows applications on macOS without the need for a Windows license or virtual machine. It utilizes Wine, an open-source compatibility layer, to run Windows programs directly on macOS. Here’s how you can use CrossOver to run Windows apps on your Mac:
1. Install CrossOver: Download and install CrossOver from the official website. CrossOver offers a free trial period, so you can test it out before purchasing a license.
2. Launch CrossOver: Once installed, launch CrossOver on your Mac.
3. Select Windows application: Use the CrossOver interface to select the Windows application you want to run. CrossOver will automatically download any required dependencies and configure the application for use on macOS.
4. Run Windows app: After the setup process is complete, you can run the Windows application directly from within CrossOver.
Pros:
1. No need for a separate Windows license or virtual machine.
2. Simplifies the process of running Windows apps on macOS.
3. CrossOver maintains a database of compatible applications, making it easy to find and install the software you need.
Cons:
1. Not all Windows applications may be compatible with CrossOver.
2. Performance may vary depending on the complexity and resource requirements of the Windows app.
3. Requires purchasing a CrossOver license for long-term use.
Method 4: Using Remote Desktop Software
If you have access to a Windows computer, you can use remote desktop software to connect to that computer from your Mac. This allows you to run Windows apps on the remote machine while accessing them from your Mac. Here’s how you can use remote desktop software to run Windows apps:
1. Install remote desktop software: Install a remote desktop software on both your Mac and the Windows computer you want to connect to. Popular options include Microsoft Remote Desktop, TeamViewer, and AnyDesk.
2. Set up remote desktop connection: Follow the instructions provided by the remote desktop software to set up a connection between your Mac and the Windows computer. This typically involves entering the IP address or hostname of the Windows computer.
3. Connect to the Windows computer: Once the connection is established, you can remotely access the Windows computer from your Mac. You can open and run Windows applications on the remote machine, with the output displayed on your Mac.
Pros:
1. Allows you to run Windows apps without the need for a Windows license or virtual machine.
2. Access Windows applications and files from anywhere with an internet connection.
3. Can be a cost-effective solution if you already have access to a Windows computer.
Cons:
1. Requires a reliable internet connection for smooth remote desktop performance.
2. Performance may vary depending on the speed of the internet connection and the hardware capabilities of the Windows computer.
3. Limited to applications available on the remote Windows computer.
What to Do If You Can’t Run Windows Apps
In some cases, you may encounter issues or limitations that prevent you from running Windows apps on your Mac. Here are a few fixes you can try:
1. Update macOS and Windows: Make sure both your macOS and Windows installations are up to date. Check for updates and install any available updates on both operating systems.
2. Check compatibility: Verify that the Windows application you’re trying to run is compatible with your version of macOS. Sometimes, newer macOS versions may not be fully compatible with older Windows apps.
3. Try alternative software: If a specific Windows app is not working on your Mac, try to find alternative software that offers similar functionality and is designed for macOS.
Bonus Tips
Here are three bonus tips to enhance your experience of running Windows apps on a Mac:
1. Allocate resources properly: When using virtualization software or running Windows via Boot Camp, ensure that you allocate enough resources, such as RAM and disk space, for smooth performance.
2. Use Coherence or Unity mode: Virtualization software like Parallels Desktop and VMware Fusion offer modes like Coherence or Unity that integrate Windows applications seamlessly into the macOS environment. This allows you to run Windows apps as if they were native macOS apps.
3. Use a gaming mouse or controller: If you’re running Windows apps primarily for gaming purposes, consider using a gaming mouse or controller for the best experience.
5 FAQs
Q1: Can I run Windows apps on a Mac without Boot Camp or virtualization software?
A: Yes, you can use alternative methods such as CrossOver or remote desktop software to run Windows apps on a Mac without the need for Boot Camp or virtual machines.
Q2: Can I run Windows and macOS simultaneously on a Mac?
A: Yes, it’s possible to run Windows and macOS simultaneously on a Mac using virtualization software like Parallels Desktop or VMware Fusion.
Q3: Can I play Windows games on a Mac using these methods?
A: Yes, running Windows apps via Boot Camp, virtualization software, or remote desktop software allows you to play Windows games on a Mac. However, keep in mind that performance may vary depending on the capabilities of your hardware and software.
Q4: Do I need to purchase a Windows license to run Windows apps on a Mac?
A: Yes, if you choose to use Boot Camp, you will need a valid Windows license. However, if you opt for virtualization software like Parallels Desktop or CrossOver, a separate Windows license may not be required.
Q5: Which method is the best for running Windows apps on a Mac?
A: The best method depends on your specific needs and preferences. Boot Camp offers the best performance but requires partitioning your disk and a valid Windows license. Virtualization software provides convenience and flexibility but may impact performance. CrossOver is a great alternative if compatibility is a concern, while remote desktop software allows access to Windows apps without the need for local installation.
Final Thoughts
Running Windows applications on a Mac is not only possible but also relatively straightforward, thanks to the methods we discussed in this blog post. Whether you choose to use Boot Camp, virtualization software, CrossOver, or remote desktop software, you can enjoy the benefits of running Windows apps on your Mac. Just remember to consider your specific requirements, compatibility, and performance needs when choosing the method that works best for you. With these methods at your disposal, you can unlock a whole new world of possibilities and seamlessly run Windows apps on your Mac.