Skip to content
Using another operating system from inside Windows has its own advantages. For example, you can test applications belonging to another operating system without having to reboot or even having a secondary computer. You can also use a virtual operating system to run test servers of all kinds – web servers, mail servers, etc.
This is achieved through the use of a virtualization software like VirtualBox or Qemu. Personally, I prefer Qemu over VirtualBox as you do not have to go through too many settings and create configurations to quickly run a virtual operating system. For example, you can run any Linux inside Windows in just 2-3 steps.

Here is how quick the process is:
- First of all install Qemu on your Windows PC. You can download it from https://qemu.weilnetz.de/.
- Optionally, add Qemu binary folder (C:\Program Files\qemu) to the PATH variable of your system. For this, you have to open system settings (Win+Pause), select Advanced System Settings, click on Environment Variables and then add a new path to the system PATH variable. This step makes it easy to use Qemu from anywhere.
- Download any Linux ISO for our use. In this case we will use very small and simple Slax Linux which can be downloaded from https://www.slax.org/. You can use any other Linux flavor if you want.
- Launch a cmd.exe console by pressing Win+R, typing cmd.exe and then pressing Enter.
- Give this command to switch to folder where Slax ISO file is downloaded: CD C:\Slax assuming Slax ISO file (slax-64bit-9.9.1.iso) is placed in that folder.
- This is optional step – needed only if you want to install Linux on a virtual hard drive. Give this command to create a virtual hard drive : qemu-img create slax.img 10G where slax.img is the hard drive image name and 10G is its capacity.

- Finally we can launch Linux using qemu-system-x86_64 -boot d -cdrom slax-64bit-9.9.1.iso -m 1024 where 1024 is the RAM in megabytes allotted to this virtual machine. If you want to use a hard drive image then the command would be qemu-system-x86_64 -hda slax.img -boot d -cdrom slax-64bit-9.9.1.iso -m 1024 where slax.img is the virtual hard drive created in step 6 above.

- Qemu virtual machine will load in a new window and you can switch it to fullscreen if needed. You can find more information about this from Qemu documentation.


As you can see, you can launch Linux ISO in Windows using Qemu in basically one step. But if you want to attach a virtual hard drive, then you may need a few more steps. In my opinion, Qemu is much easier and faster than Virtual Box.
We use cookies on our website to give you the most relevant experience by remembering your preferences and repeat visits. By clicking “Accept”, you consent to the use of ALL the cookies.
Follow the steps below to run Linux Mint in a VM (“virtual machine”) using QEMU on Windows.
- Download and install the QEMU binaries. As of this writing, the latest binaries for a 64-bit Windows system are linked at the URL “https://www.qemu.org/download/#windows”.
- In any convenient location, create a new directory named “LinuxOnQemuTest”.
- Download Linux Mint as an .iso file into the newly creted LinuxOnQemuTest directory. As of this writing, the latest version is available for download via the URL “https://linuxmint.com/”.
- To simplify later steps, rename the newly downloaded iso file to “LinuxMint.iso”.
- Open a command prompt window and navigate to the LinuxOnQemuTest directory.
- In the command prompt, run the command “qemu-img create Disk.img 20G” to create a blank hard disk image file of sufficient size to install Linux Mint (>12.7 GB).
- Run the command “qemu-system-x86_64.exe -boot d -cdrom LinuxMint.iso -m 4G -drive file=Disk.img,format=raw -accel whpx,kernel-irqchip=off”. (Note that this command was tested on a Windows 10 machine with hardware virtualization enabled. If the -accel switch and its argument are omitted, QEMU will run the VM without hardware acceleration in “pure software” mode, but this will likely be too slow for any serious use.)
- On the Linux Mint boot menu that appears, make sure the “Start Linux Mint” item is selected, then press the Enter Key. (As noted in the title bar of the QEMU window, you may have to press Ctrl-Alt-G for the mouse pointer to be released from the window. When you click back on the VM window, make sure to line up the host’s mouse cursor with the guest VM’s mouse cursor, or it will be impossible to move the cursor to some parts of the guest VM window.)
- Verify that Linux Mint starts up correctly.
- If possible, install Linux Mint to the hard drive image file by double-clicking the “Install Linux Mint” icon on the desktop. Follow the prompts to install.
- Once a message is displayed Linux Mint has been installed, close the VM window and run the command “qemu-system-x86_64.exe -m 4G -drive file=Disk.img,format=raw -accel whpx,kernel-irqchip=off” to re-run the VM without booting from the .iso file.
This entry was posted in Uncategorized and tagged Linux, QEMU, virtualization, VMs. Bookmark the permalink.
В прошлой статье я рассказывал про создание и запуск виртуальной машины при помощи QEMU на MacOS, а в этот раз давайте рассмотрим установку Linux на Windows 10 на основе QEMU. Да и как обычно, если тексту с картинками вы предпочитаете видео, то вот мой обзор QEMU на YouTube.
Шаг 1. Устанавливаем QEMU
С официального сайта QEMU можно скачать инсталлятор для Windows. Проверить установилась ли корректно программа, можно запросив версию QEMU следующей командой
qemu-system-x86_64 –version
Если установка программы прошла успешно, то вы увидите что-то вроде такого сообщения

Шаг 2. Прописываем QEMU в переменные окружения
Чтобы удобнее было пользоваться программой я рекомендую прописать путь, где была установлена программа в переменные окружения. В моем случае это “c:\Program Files\qemu”.
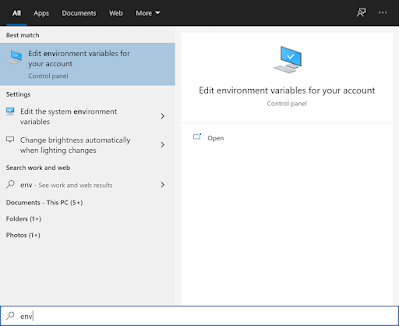
Проще всего это сделать так. В меню “Start/Пуск” написать “env” и выбрать “Edit environment variables for your account”
Выберите переменную Path и нажмите кнопку “ Edit..”
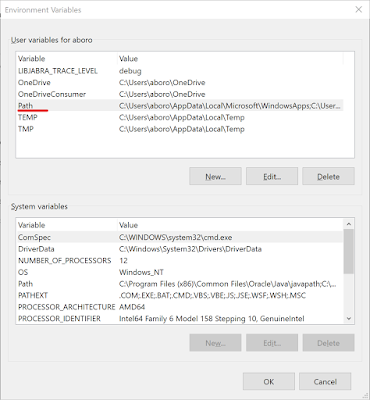
В появившемся окне нажмите кнопку “New” и добавьте путь к QEMU

Шаг 3. Включаем Windows Hypervisor Platform
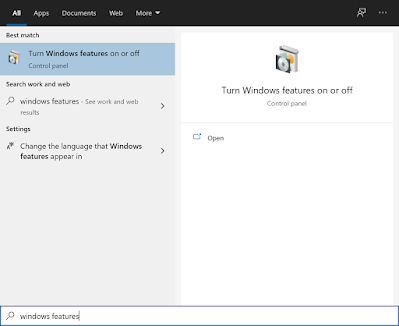
В меню Start/Пуск напишите “windows features”. Выберите пункт “Turn Windows features on or off”
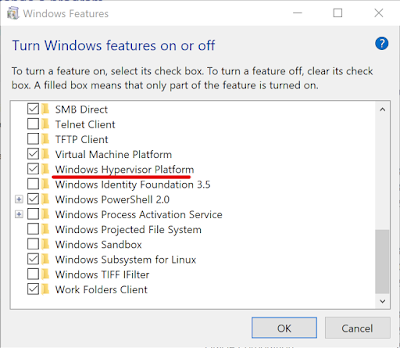
В появившемся окне, в списке найдите и убедитесь, что помечен пункт “Windows Hypervisor Platform”
Шаг 4. Скачиваем iso-файл дистрибутива Linux
Для инсталляции Linux на виртуальную машину потребуется ее дистрибутив в формате ISO, который можно скачать с официального сайта. Я буду ставить Ubuntu Desktop.
Шаг 5. Создаем виртуальную машину
Основные приготовления сделаны. Теперь переходим к созданию виртуальной машины. Первым делом надо создать папку для виртуальной машины. Для удобства работы, скопируйте в нее скачанный ранее iso-файл с Ubuntu. Файл диска виртуальной машины создаётся командой
qemu-img create -f qcow2 ubuntu-20.10-desktop-amd64.qcow2 15G
Эта команда создаст файл виртуальной машины с именем ubuntu-20.10-desktop-amd64.qcow2 в формате QCOW2 на 15 Гб. Изначально файл не будет занимать сразу 15 Гб, а будет значительно меньше однако его предел — 15 Гб. Впрочем, это значение можно будет изменить позже.
Шаг 5. Устанавливаем Ubuntu
После того, как файл диска для виртуальной машины создан можно приступать к инсталляции Ubuntu. Для этого запустим виртуальную машину с подключенным iso-образом Ubuntu.
qemu-system-x86_64 ^
-machine type=q35,accel=whpx ^
-smp 2 ^
-hda ubuntu-20.10-desktop-amd64.qcow2 ^
-cdrom ubuntu-20.10-desktop-amd64.iso ^
-m 4G ^
-vga virtio ^
-usb ^
-device usb-tablet ^
-display default,show-cursor=on
Что означают параметры этой команды
- machine — Эмулируемая машина и тип акселератора. q35 — это один из последних типов машин, а whpx — это акселератор для Windows10.
- smp — Число процессоров для виртуальной машины
- m — Размер оперативной памяти для виртуальной машины
- hda — Ссылка на файл диска
- cdrom — Ссылка на ISO-файл
- vga — Графическая карта
- usb — Разрешает доступ к USB-порту
- device — Добавляем «usb-tablet» как устройство ввода, иначе мышь может не заработать
- display — Включаем отображение курсора мыши на экране. Отключено по умолчанию.
После старта виртуальной машины запустится инсталлятор Ubuntu. По завершению система предложит перегрузиться.

Вместо этого лучше перейти в терминал, в котором запускали виртуальную машину и выйти из QEMU клавишами Сtrl+C.
Шаг 6. Запускаем виртуальную машину
Виртуальная машина с Ubuntu полностью готова, только теперь для запуска нам не нужна ссылка на iso-образ Ubuntu. Поэтому немного модифицируем команду запуска виртуальной машины, убрав из нее параметр cdrom.
qemu-system-x86_64 ^
-machine type=q35,accel=whpx ^
-smp 2 ^
-hda ubuntu-20.10-desktop-amd64.qcow2 ^
-m 8G ^
-vga virtio ^
-usb ^
-device usb-tablet ^
-display default,show-cursor=on
Команда для запуска достаточно объёмная, советую скопировать ее в bat-файл и хранить его в том же директории где и файл диска виртуальной машины. Так будет удобнее запускать.
Here is how I run a minimal version of CentOS 7 on a Windows 7 Enterprise, 64 bits, without being a member of the administrator group (non-admin).
The basic idea is:
- Download qemu for windows and unzip it anywhere
- Download an ISO image of the Linux distribution you want to run
- Create a file that will be your virtual machine hard disk
- Run qemu, booting from the CD image
- Install the OS
- Reboot the virtual machine, this time without the CD image
Networking and fancy graphics are hard to get right. Still struggling, actually…
1. Download QEMU
Use a precompiled binary found on QEMU links page. I used version 2.8.0 for this.
To «install» this version as a non-admin, open a command prompt, issue the command set __COMPAT_LAYER=RunAsInvoker and run qemu-w64-setup-20170131.exe from that prompt. Install in a folder where you have write permissions, like «My Documents» or something.
2. Download an ISO image of Linux
Again, help yourself. I used the Minimal distribution of CentOS 7, the file is called CentOS-7-x86_64-Minimal-1611.iso.
3. Create a virtual hard disk
I used a batch file for this. Copy the following to a file named createvm.bat and adjust the variables to suit your environment:
@echo off
rem ==================================
rem Replace with your values
rem ==================================
set "QEMUDIR=%USERPROFILE%\Documents\Warez\qemu-2.8.0-win64"

rem ==================================
rem Safety net
rem ==================================
if not exist hda.img (
    rem CREATE a virtual hard disk
    "%QEMUDIR%\qemu-img.exe" create hda.img 40G
) else (
    echo file hda.img already exist. Delete or move and try again.
    goto:eof
)
4. Run QEMU, booting from the virtual CD
Use a batch for this one, as you might use it often. Copy the follwing into installvm.bat:
@echo off

rem ==================================
rem Replace with your values
rem ==================================
set "QEMUDIR=%USERPROFILE%\Documents\Warez\qemu-2.8.0-win64"
set "ISOFILE=CentOS-7-x86_64-Minimal-1611.iso"

rem ==================================
rem You can add a w suffix to this if
rem you don't want a console
rem ==================================
set "QEMUBIN=qemu-system-x86_64.exe"

rem ==================================
rem Run the virtual machine
rem ==================================
start "QEMU" "%QEMUDIR%\%QEMUBIN%" -drive file=hda.img,index=0,media=disk,format=raw -cdrom %ISOFILE% -m 2G -L Bios -usbdevice mouse -usbdevice keyboard -boot menu=on -rtc base=localtime,clock=host -parallel none -serial none -name centos -no-acpi -no-hpet -no-reboot
5. Install the OS
I had trouble with the GUI installer. When prompted to install CentOS, hit the TAB key and replace the word quiet at the end of that line with the word text.
Follow the installation instructions on screen. When the installation is finished, the virtual machine will exit. It can take quite a while, especially when running as a non-admin user.
6. Run your Linux image in QEMU
This step is what you will do over and over again to run the VM each time you need it. Copy the follwing into runvm.bat:
@echo off

rem ==================================
rem Replace with your values
rem ==================================
set "QEMUDIR=%USERPROFILE%\Documents\Warez\qemu-2.8.0-win64"

rem ==================================
rem You can add a w suffix to this if
rem you don't want a console
rem ==================================
set "QEMUBIN=qemu-system-x86_64.exe"

rem ==================================
rem Run the virtual machine
rem ==================================
start "QEMU" "%QEMUDIR%\%QEMUBIN%" -drive file=hda.img,index=0,media=disk,format=raw -m 2G -L Bios -usbdevice mouse -usbdevice keyboard -boot menu=on -rtc base=localtime,clock=host -parallel none -serial none -name centos -no-acpi -no-hpet -no-reboot -device e1000,netdev=user.0 -netdev user,id=user.0,hostfwd=tcp::2222-:22
I added a local portforward : if you ssh/putty to localhost:2222, you will reach the SSH daemon of your VM. Beware that firewalld or iptables might block traffic, depending on the way you installed Linux.

Contents
- 1 How To Run Linux Inside Windows Using Qemu
- 2 Windows Inside Of Linux
- 2.1 Conclusion
- 2.1.1 Related image with how to run linux inside windows using qemu
- 2.1.2 Related image with how to run linux inside windows using qemu
- 2.1 Conclusion
Immerse yourself in the fascinating realm of How To Run Linux Inside Windows Using Qemu through our captivating blog. Whether you’re an enthusiast, a professional, or simply curious, our articles cater to all levels of knowledge and provide a holistic understanding of How To Run Linux Inside Windows Using Qemu. Join us as we dive into the intricate details, share innovative ideas, and showcase the incredible potential that lies within How To Run Linux Inside Windows Using Qemu. Here this you and it click to take windows on are another tab windows- official 1 we easily virtualization source page it the even for visit qemu or 64 bit download can getting code- to website download bit- of 32 bit from 64 we download the the qemu it of the Step qemu-weilnetz-de the will platform-
How To Run Linux Inside Windows Using Qemu
How To Run Linux Inside Windows Using Qemu
21 i am trying to use qemu 1.3 for windows to run lubuntu on a usb stick with windows 7. after downloading and unpacking qemu on my usb stick, if i click on qemu.io.exe, i get qemu io.exe> how do i start my downloaded linux .iso file? it sounds basic but its not clear to me from the qemu website. linux virtualization qemu share. How to run linux inside windows using qemu april 12, 2020 trisha using another operating system from inside windows has its own advantages. for example, you can test applications belonging to another operating system without having to reboot or even having a secondary computer.

How To Run The Qemu Emulator And Linux On A Usb Device
How To Run The Qemu Emulator And Linux On A Usb Device
In hyper v manager i set wsl virtual switch to connect to «external network» and choose interface mentioned above. in wsl2 i have installed «ubuntu 20.04». after starting wsl2 i set up a bridge: sudo ip link add br0 type bridge stp state 0 sudo ip link set eth0 master br0 sudo ip addr add 192.168.1.254 20 dev br0 sudo ip link set br0 up. Quick links the command to start qemu the virtual disk the boot iso memory boot order that old legacy system is gone, never to be heard from again. right? but what do you do on the fateful day that someone needs to access data that’s trapped in an old legacy application? if modern applications can’t read the data, you need to run the legacy system. A small tutorial about quickly setting up a linux distro (manjaro) as a virtual machine on windows using qemu.download qemu: qemu.org download dow. Existing wsl install. if you already have wsl installed on your machine, you can update to the latest version that includes linux gui support by running the update command from an elevated command prompt. select start, type powershell, right click windows powershell, and then select run as administrator. enter the wsl update command: powershell.

Qemu For Windows Offline Installer Apps
Qemu For Windows Offline Installer Apps
A small tutorial about quickly setting up a linux distro (manjaro) as a virtual machine on windows using qemu.download qemu: qemu.org download dow. Existing wsl install. if you already have wsl installed on your machine, you can update to the latest version that includes linux gui support by running the update command from an elevated command prompt. select start, type powershell, right click windows powershell, and then select run as administrator. enter the wsl update command: powershell. Step 1: download qemu for windows. from the official website of the qemu, we can download it easily even the source code. visit it and click on the windows tab, it will take you to another page qemu.weilnetz.de to download 32 bit or 64 bit of this virtualization platform. here we are getting the 64 bit. In this article. developers can access the power of both windows and linux at the same time on a windows machine. the windows subsystem for linux (wsl) lets developers install a linux distribution (such as ubuntu, opensuse, kali, debian, arch linux, etc) and use linux applications, utilities, and bash command line tools directly on windows, unmodified, without the overhead of a traditional.
Windows Inside Of Linux
Windows Inside Of Linux
this will show you how to optimize windows inside of linux. when complete, this will make it feel like a native install without linux a small tutorial about quickly setting up a linux distro (manjaro) as a virtual machine on windows using qemu. download qemu: in the first 60 seconds of this video i benchmark virtualbox vs qemu. then follow my quick guide to get qemu working on your denshi decides to make the qemu guide that everyone else was scared of making. a proper guide. qemu: no more virtualbox! in this video, we install a windows (works with windows 10 and windows 11) virtual machine using qemu in this video guide i will show you how to install qemu with graphical user interface or gui (qtemu) on your windows laptop or in this video, we will be learning how to run linux on windows using the new windows subsystem for linux that comes with in this video i will show you a very simple way to run qemu emulator for windows so you can test out your iso images like linux, on this episode of veronica explains, i explain the absolute basics of hypervisors generally, kvm specifically, and virt manager qemu kvm shortly known as quick emulator which is an open source type 2 hypervisor that allows to create and manage virtual checkout all my training at cbt nuggets: bit.ly nc cbt ➡️support networkchuck: bit.ly 2xpaf7u ➡️need help? in this video we will see how to run linux bash on windows 10 using the built in windows subsystem for linux. so we will see
Conclusion
Having examined the subject matter thoroughly, it is evident that post delivers useful knowledge about How To Run Linux Inside Windows Using Qemu. Throughout the article, the writer demonstrates a deep understanding about the subject matter. Notably, the discussion of X stands out as a key takeaway. Thank you for taking the time to the article. If you have any questions, feel free to reach out through social media. I look forward to your feedback. Furthermore, below are some relevant content that might be interesting: