Bootable Window 10 Usb
Use “Rufus” to create Bootable Window 10 USB for Legacy BIOS and UEFI.
1
Download Windows 10
If you have not already, you will need to download a Windows 10 ISO file.
2
Download Rufus
Download the latest version of Rufus, and save its .exe file to your desktop.
3
Connect Usb
Connect the USB flash drive that you want to use for bootable.
4
Launch Rufus
Run the Rufus .exe file, and click on Yes if prompted by UAC.
5
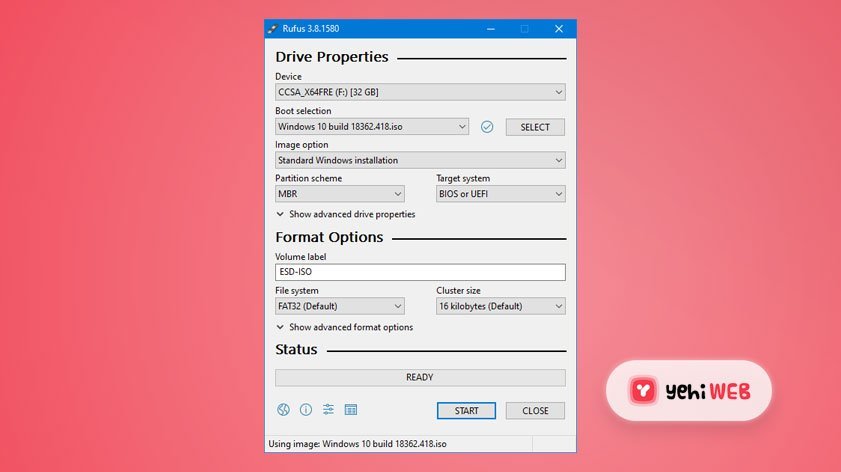
Creating Bootable Usb
- Under Device, select the USB flash drive you want to format and use.
- Under Boot selection, click/tap on the SELECT button, and navigate to and select your 64-bit Download Windows 10 ISO file.
- Under Image option (if available), select Standard Windows installation.
- Under Partition scheme, select MBR.
- Press the Alt + E keys.
- Under the Target system, select BIOS or UEFI.
- Under Volume label, you can enter any name you like for the USB flash drive, or leave the default name.
- Under File system, select FAT32 (if able). If the file is larger than 4GB, you will only be able to select NTFS.
- Under Cluster size, select the (Default) (ex: 16 kilobytes) it has listed.
6
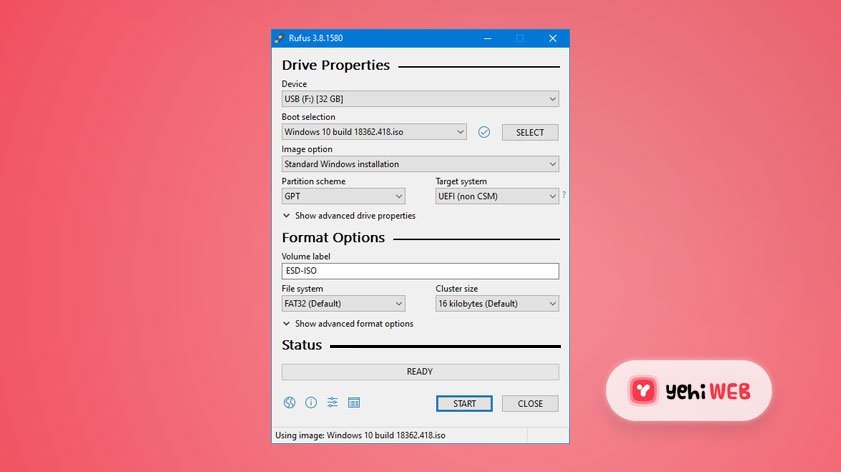
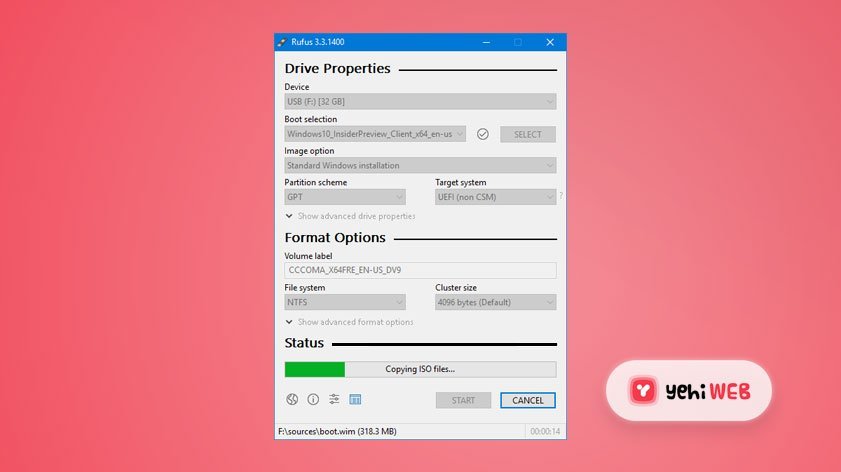
With UEFI
To Create Bootable UEFI USB Flash Drive for Installing Windows 10 only with UEFI
- Under Device, select the USB flash drive you want to format and use.
- Under Boot selection, click/tap on the SELECT button, and navigate to and select your 64-bit Download Windows 10 ISO file.
- Under Image option (if available), select Standard Windows installation.
- Under the Partition scheme, select GPT.
- Under the Target system, select UEFI (non-CSM).
- Under Volume label, you can enter any name you like for the USB flash drive, or leave the default name.
- Under File system, select FAT32 (if able). If the file is larger than 4GB, you will only be able to select NTFS.
- Under Cluster size, select the (Default) (ex: 4096 bytes) it has listed.
7
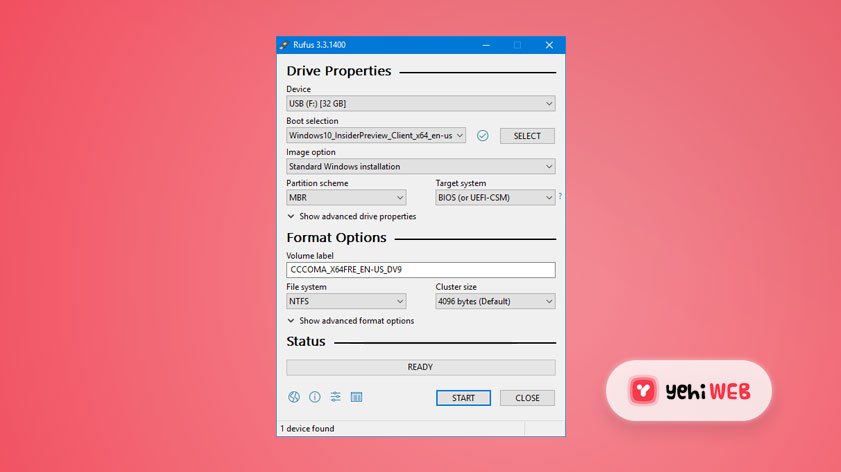
Without UEFI
To Create Bootable USB Flash Drive for Installing Windows 10 only with Legacy BIOS (without UEFI).
A) Set Rufus using the settings below, click/tap on Start, and go to step 9 below. (see screenshot below).
- Under Device, select the USB flash drive you want to format and use.
- Under Boot selection, click/tap on the SELECT button, and navigate to and select your 32-bit or 64-bit Download Windows 10 ISO file.
- Under the Image option (if available), select Standard Windows installation.
- Under the Partition scheme, select MBR.
- Under the Target scheme, select BIOS(or UEFI-CSM).
- Under the Target system, select UEFI (non-CSM).
- Under the Volume label, You can enter any name you like for the USB flash drive, or leave the default name.
- Under the File system, select NTFS.
- Under Cluster size, select the (Default) (ex: 4096 bytes) it has listed.
8
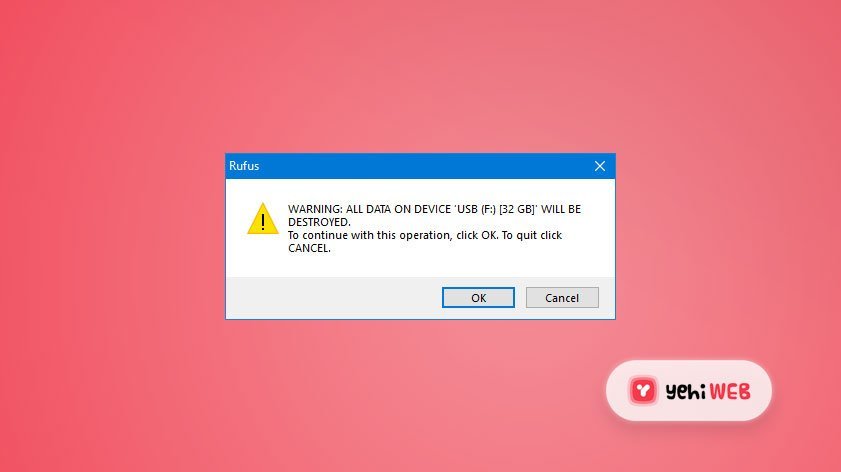
Remove Previous Data
Click on OK to confirm. (see screenshot below)
9
Start Creating Bootaable Usb
Rufus will now start creating the bootable USB flash drive. (see screenshot below)
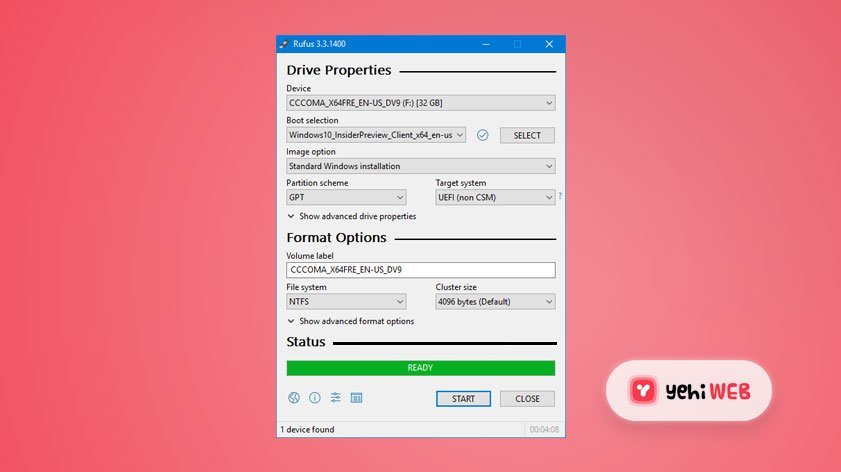
When Rufus is “READY” (finished), you can close Rufus. (see screenshot below)
 При загрузке компьютера или ноутбука с загрузочной флешки, сделанной в программе Rufus, вы можете получить сообщение ERROR: BIOS/LEGACY BOOT OF UEFI-ONLY MEDIA с объяснением причин ошибки на английском и предложением нажать любую клавишу для перезагрузки.
В этой инструкции подробно о том, чем может быть вызвана ошибка, о способах исправить ошибку BIOS LEGACY BOOT OF UEFI ONLY MEDIA и успешно загрузиться с флешки.
- Причина ошибки BIOS LEGACY BOOT OF UEFI ONLY MEDIA
- Загрузка с флешки в режиме UEFI
- Создание флешки Rufus для режима Legacy (BIOS)
- Видео инструкция
Причина ошибки BIOS LEGACY BOOT OF UEFI ONLY MEDIA
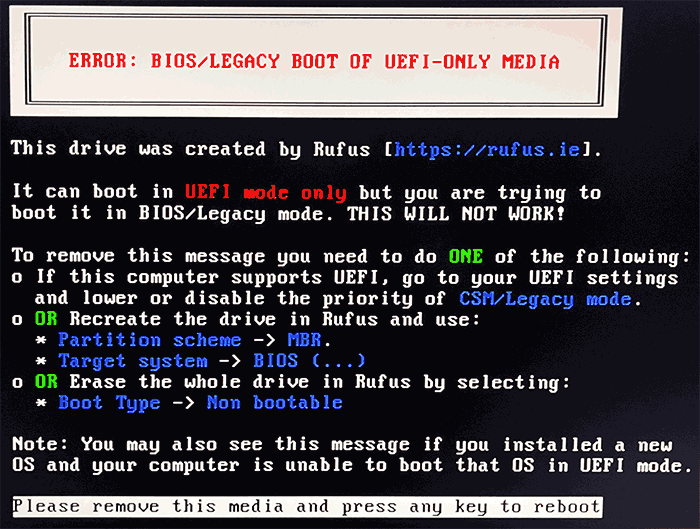
Большинство современных ПК и ноутбуков поддерживают два режима загрузки с загрузочных накопителей: UEFI (EFI) и Legacy (CSM, BIOS, Compatibility Support Mode). При записи загрузочной флешки в Rufus пользователь выбирает, для какого режима её следует записать, по умолчанию (если ничего не выбирать) — для режима UEFI.
В случае, если с такой флешки произвести загрузку в режиме Legacy, вы и увидите сообщение ERROR: BIOS/LEGACY BOOT OF UEFI-ONLY MEDIA, а пояснение на экране с ошибкой предлагает либо изменить режим загрузки в параметрах BIOS/UEFI вашего компьютера, либо перезаписать флешку для другого режима загрузки.
Обратите внимание: даже если вы включили поддержку UEFI загрузки в БИОС вашего компьютера, по умолчанию может быть использован режим Legacy (если он тоже включён), что также приведёт к рассматриваемой ошибке. Дополнительный момент — для загрузочных накопителей, созданных в Rufus, помимо шагов, описанных далее, может потребоваться отключить Secure Boot в БИОС/UEFI.
Загрузка с флешки в режиме UEFI
Самое простое и быстрое решение в нашем случае — выполнить загрузку с флешки в нужном режиме. Это будет работать для любого компьютера с поддержкой режима UEFI (такой режим загрузки начал поддерживаться на большинстве новых устройств примерно с 2012 года).
Как это сделать? — есть два варианта:
- Зайти в БИОС компьютера или ноутбука, затем, обычно на вкладке Boot (но может быть и в других разделах, например, BIOS Features) убедиться, что включен режим загрузки UEFI. Пункт для переключения может называться «UEFI/BIOS Mode», «Boot Mode», а иногда необходимо отключить поддержку загрузки Legacy — установить параметр Legacy Support, CSM Support или Compatibility Support Mode в состояние «Disabled». Для разных вариантов BIOS нужная опция может располагаться слегка в разных местах и иметь разные названия, но обычно её сравнительно несложно найти.

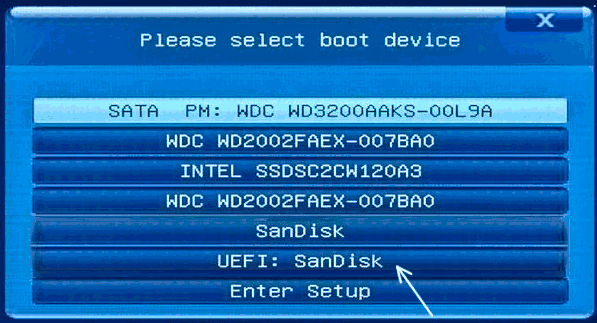
- Использовать Boot Menu при загрузке — обычно клавиша, которую нужно нажать для входа в Boot Menu отображается внизу экрана при начале загрузки компьютера (подробнее: Как зайти в Boot Menu на компьютере или ноутбуке). В Boot Menu вы можете увидеть, что загрузочная флешка отображается два раза: один раз с пометкой UEFI (или EFI), второй — без неё. Выберите с пометкой и тогда загрузка с флешки произойдёт без ошибки.


Создание загрузочной флешки Rufus для режима Legacy BIOS
Если по какой-то причине предыдущий вариант решения не подходит для вашего случая, вы можете пересоздать загрузочную флешку в той же программе Rufus таким образом, чтобы она была подготовлена для режима Legacy (CSM).
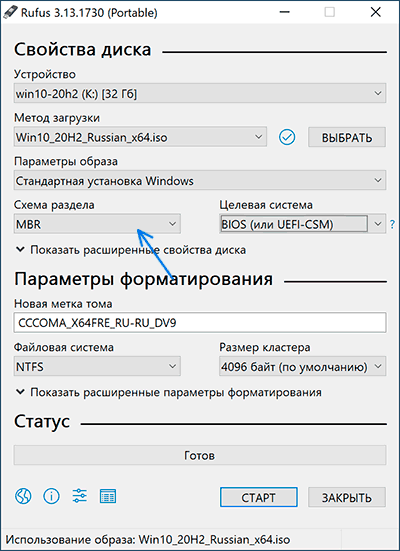
Для этого достаточно в пункте «Схема раздела» выбрать MBR, а в «Целевая система» — «BIOS (или UEFI-CSM)», этот пункт будет выбран автоматически. После записи USB накопителя в таком режиме, при загрузке он не будет вызывать ошибки ERROR: BIOS/LEGACY BOOT OF UEFI-ONLY MEDIA при тех же параметрах загрузки в БИОС, которые вы использовали изначально.
Видео инструкция
Если остаются вопросы или что-то осталось не до конца ясным, задавайте вопросы в комментариях, я постараюсь помочь.
Появляется BIOS LEGACY BOOT OF UEFI ONLY MEDIA, что с этим делать?


Причина возникновения ошибки:
Всего существует два формата записи дистрибутивов на файловой системе NTFS: MBR и GPT
MBR — устаревший стиль таблицы разделов. Он разработан в 1983 году, когда в ходу были системы DOS, но до сих пор работает. Правда, с ограничениями, поэтому подружить его получается не со всеми современными компьютерами и операционными системами.
GPT — современный стандарт разделов диска. Он является частью стандарта UEFI, который разработал компания Intel на замену устаревшему BIOS
Основными преимуществами GPT являются:
-У GPT меньше стадий процедуры загрузки, потому Windows на таких дисках запускается быстрее.
-Более вероятна возможность восстановить данные при повреждении диска
-Увеличивает скорость работы системы
Минус GPT: Несовместимость со старыми устройствами. Система GPT используется примерно с 2010 годов и работает только в режиме UEFI
Как решить ошибку BIOS LEGACY BOOT OF UEFI ONLY MEDIA
Действуйте от первого пункта к последнему:
- Проверка флешки
Для начала перейдите в BIOS во вкладку Boot и проверьте Boot Device Priority
Загрузочная флешка может быть написана 2 раза, в одном варианте написано просто ее название, а в другом “UEFI” или “EFI” перед названием флешки. Для загрузки у вас должна стоять флешка со значением: UEFI,

Сохраняйте изменения клавишей F10. Установка Windows начнется после перезагрузкиЕсли такого варианта с UEFI нет – переходите к следующему пункту
- Включение режима UEFI
Снова перейдите в BIOS, теперь нам нужны настройки Boot (также может быть и в BIOS Features). Найдите пункт UEFI/Bios Boot Mode, или Boot Mode и поставьте UEFI.
Если этого пункта нет – найдите функцию: “Legacy Mode” / “CSM Support” / “Compatibility Support Mode” и поставьте значение DisabledДля разных BIOS местоположение функций и их имя может незначительно отличаться
Если вам удалось найти и поставить значения из этого пункта – сохраняйте изменения клавишей F10 и начинайте установку Windows
Если нет, переходите к следующему
- Если вы не смогли найти в биос пункты выше – значит ваше устройство не поддерживает современный режим загрузки.
Необходимо перезаписывать дистрибутив на флешке в формате MBR:
1) Скачайте дистрибутив с официального сайта инструкция как скачать
2) Скачайте программу Rufus
3) Далее подключите флешку к ПК и запустите Rufus
4) В программе Rufus по кнопке “Выбрать” выберите скачанный дистрибутив
Далее смените схему раздела на MBR
Нажмите “Старт”
5) После окончания процесса можно использовать флешку для установки Windows. Ошибка BIOS LEGACY BOOT OF UEFI-ONLY MEDIA устранена!


![]() Большое спасибо за прочтение статьи. Зарегистрируйтесь сейчас и получите 200 бонусных рублей!
Большое спасибо за прочтение статьи. Зарегистрируйтесь сейчас и получите 200 бонусных рублей!
If you have an UEFI-based computer, you can use Rufus to create a bootable USB drive that will allow you to install Windows 10 using the Legacy bios. This method is compatible with many different systems, including UEFI-based ones. If your system does not support UEFI, you will need to enable UEFI compatibility. To install Windows 10, follow the steps below to create a bootable USB drive.
Download the free Rufus bootable media tool. You can use it to install Windows or Linux on your PC, CD, or DVD. You don’t need much space, and it’s simple to install. You can also use the portable version of the software. You will need to choose a GPT partition scheme for UEFI. When you’re finished, you’ll be prompted to select a partition scheme.
You can download Windows ISO files from Windows. It also supports the Legacy bios, but does not support XP. If you’re running Windows XP, you need to use an older version of Rufus. You’ll need a USB 2.0 or 3.1 or higher to run Rufus. And if you’re using Windows XP, you need the older version of Rufus 3.0 or later.
If you’re looking for ways to install Windows 10 on a machine with a legacy BIOS, you may want to follow the steps outlined below. To boot Windows 10 from a legacy bios computer, you first need to convert the BIOS settings to UEFI. You can do this with the Rufus utility. There are several options to choose from. Then, you can create a bootable USB drive.
The UEFI firmware is designed to perform the same functions as the standard BIOS, but it has more security features and less complex code. These features make it better for your PC. UEFI stands for Unified Extensible Firmware Interface, and is the new standard firmware interface for PCs. It was created by a consortium of more than 140 technology companies, including Microsoft, Intel, and AMD.
To install Windows 10 in Legacy BIOS mode, you can follow the same steps as for UEFI. First, open the Disk Management application. Then, right-click the converted disk and choose Properties. Choose the partition style as GUID Partition Table. In the next step, you can install Windows 10.
Does Rufus Work with UEFI?
Does Rufus Work with UEFI? – If you are wondering whether Rufus is compatible with UEFI, then the answer is yes. Rufus is a free bootable USB flash drive creator and editor. The program is small and supports many languages. If you are experiencing problems with Rufus, you can consult our FAQ for more information. Rufus also offers support for UEFI. This article will explain what the difference is between the two bootable USB creation utilities.
To use Rufus, you need to have a UEFI BIOS installed. Then, you can download the Rufus ISO file from the link below. This link is valid for 24 hours. Once downloaded, Rufus will create bootable USB media for MBR and GPT partitions, as well as UEFI. You can also create bootable USB media for Windows 10 using Rufus. Once downloaded, follow the instructions on your computer to complete the installation.
How Do You UEFI Boot with Rufus?
UEFI boot Windows 10 is possible with a bootable USB flash drive created with the third-party software Rufus. Rufus is a standalone program that doesn’t require installation and can be used offline. This application is a powerful image writer that lets you create installation media like DVDs or ISO files on a USB flash drive. To use Rufus, simply download it and follow the prompts.
Alternatively, you can download Rufus from the official website. You will need to download the portable version of the utility. Once you have the program, open it and click on “Use the built-in installer to create a bootable disk.” You can also choose to create a bootable USB drive. Once the file is extracted, you will need to label it. Next, you’ll need to select the partition scheme. Select either the GPT partition scheme or the MBR partition scheme.
After downloading Rufus, make sure you choose the proper mode for your device. UEFI booting Windows 10 is different from Legacy booting. You can install the Windows 10 operating system either way using Microsoft’s Media Creation Tool or Rufus. If you choose the latter, you’ll be able to boot Windows 10 from the USB drive. Then, connect the bootable USB drive to your target PC. Press F5 during boot to bring up the One-Time-Boot menu. Select the USB HDD option, and click ‘OK’.
How Do I Change My Target System in Rufus?
When creating a bootable USB with Rufus, you should select the partition scheme to use. If you’re creating a USB drive for Windows, make sure to mount it with the drive designator “G”. Rufus will automatically detect the designator and size of your USB drive and prompt you to choose a partition scheme. Once your USB drive is ready, you can change your target system and partition scheme, and even choose a default partition scheme if needed.
First, download Rufus. This free software is available from the Rufus website. Double-click the executable to open it. Next, click the Settings button. Choose “Check for updates” from the drop-down menu. You can also select Daily or a specific date. Then, select Windows 10 or a different operating system. After installing Rufus, your USB will be bootable. You can use it to troubleshoot Windows 10 or perform a clean OS installation.
How Do I Use Rufus on Windows 10?
If you are using a PC with an older BIOS, then you can use the Rufus utility to install the UEFI or legacy bios on your PC. It is very easy to use and is a lightweight program. You can use it to create a bootable USB for Windows 10 and also install the legacy bios. There are a few steps you should follow, depending on the type of bios that you want to install on your PC.
To install UEFI on your computer, you should first determine which hardware supports it. Make sure that you have a 64-bit hard drive, and that the partitioning scheme is GPT. Select the UEFI boot mode by looking for the LegacyUefi column. Once you have found the correct boot mode, select it from the boot menu. You will need to reformat your USB drive after each successful installation. Rufus does not support Windows XP, so you will have to use a previous version of the software or use another tool to install the legacy bios.
How Do I Change My BIOS From Legacy to UEFI?
To change your BIOS from legacy to UEFI, you must use an UEFI-compatible computer. You can easily change the mode in your computer’s BIOS setup by selecting UEFI. If your computer does not support UEFI, you should check the manufacturer’s website to find out if it supports the mode. Once you have installed Rufus, launch the command prompt by pressing the Windows key and typing msinfo32. In the System Summary window, you will see two options: Legacy and UEFI. Select the one that matches your preferences.
UEFI is the newer and faster version of the BIOS. Unlike the legacy version, it does not require the booting of a bootable CD or DVD. It can also be used with older operating systems. It also has a more flexible booting environment than legacy, which is why it’s important to choose a bios that supports both modes. But you don’t need to choose just one or the other. Both modes have their pros and cons.
Is Windows 10 UEFI Or Legacy?
There is no definitive answer to the question, “Is Windows 10 UEFI or legacy bios?” But it’s easy to find out which system your PC is running. To get started, start by running the Disk Management tool in the Control Panel. Here you’ll see which type of partition your computer uses. If your PC is running legacy BIOS, you’ll see “Master Boot Record,” and if you’re using UEFI, you’ll see “GUID Partition Table.”
If you’re running an old version of Windows, you should upgrade to UEFI. Legacy BIOS is less secure because it’s manufacturer-specific, but it’s supported by many networks. Generally speaking, you should use UEFI unless your network requires you to use a legacy BIOS. If you’re using Windows 11, you can skip this part of the guide. Then, if you want to use your existing Windows 10 installation on a new computer, you’ll need to upgrade the BIOS.
When upgrading to Windows 10, the default boot mode will be the Legacy BIOS. You should choose UEFI if you’d like to boot from a CD/DVD, but if you’re not sure, go ahead and use the Legacy BIOS. Both modes have their advantages and disadvantages. You can choose which one suits you best by consulting the System Information in Control Panel. If you don’t know what boot mode your PC is in, you can look at the setup log files and decide which one is better for your needs.
Learn More Here:
1.) Windows Help Center
2.) Windows – Wikipedia
3.) Windows Blog
4.) Windows Central
If you’re like most people, you probably have a few different types of computers at your disposal. Maybe you have a desktop computer that you use for work, a laptop that you take with you on the go, and maybe even a tablet or two. Regardless of the type of computer you have, one thing is certain: each one needs to be able to install Windows 10.
If your computer is using a traditional BIOS, it’s likely that Windows 10 will install and run without any problems. However, if your computer uses UEFI firmware, things can get a bit more complicated. In this article, we’ll show you how to install Windows 10 using both UEFI and legacy BIOS modes on your computer.
Before You Begin
Before starting the installation process, make sure that your computer is properly prepared. This means that you should make sure that the following items are installed: an operating system (OS), drivers for your hardware, and Microsoft Windows 10 software. If any of these items are missing or not up-to-date, the installation process may not work as expected.
To prepare your computer for installation:
- Install the latest version of Microsoft Windows 10 software from https://www.microsoft.com/en-us/windows/downloads/.
- Make sure that all of your hardware drivers are up-to-date by visiting https://www.intel.com/content/www/us/en/support/motherboards-chipsets-and-systems/desktop-pc-hardware-drivers/.
- Install an OS on your computer if it isn’t already installed (for example: Windows 7 or 8).
- If necessary, update all of your hardware drivers after installing an OS by visiting https://www.intel.com/.
- Restart your computer once everything has been installed and updated according to instructions provided by each individual product or driver installer ..
Download the free Rufus bootable media tool. You can use it to install Windows or Linux on your PC, CD, or DVD. You don’t need much space, and it’s simple to install. You can also use the portable version of the software. You will need to choose a GPT partition scheme for UEFI. When you’re finished, you’ll be prompted to select a partition scheme.
You can download Windows ISO files from Windows. It also supports the Legacy bios, but does not support XP. If you’re running Windows XP, you need to use an older version of Rufus. You’ll need a USB 2.0 or 3.1 or higher to run Rufus. And if you’re using Windows XP, you need the older version of Rufus 3.0 or later.
How Do You Use Rufus For Legacy BIOS?
If you’re looking for ways to install Windows 10 on a machine with a legacy BIOS, you may want to follow the steps outlined below. To boot Windows 10 from a legacy bios computer, you first need to convert the BIOS settings to UEFI. You can do this with the Rufus utility. There are several options to choose from. Then, you can create a bootable USB drive.
How Do You Use Rufus For Legacy BIOS?Does Rufus Work with UEFI?How Do You UEFI Boot with Rufus?How Do I Change My Target System in Rufus?How Do I Use Rufus on Windows 10?How Do I Change My BIOS From Legacy to UEFI?Is Windows 10 UEFI Or Legacy?
The UEFI firmware is designed to perform the same functions as the standard BIOS, but it has more security features and less complex code. These features make it better for your PC. UEFI stands for Unified Extensible Firmware Interface, and is the new standard firmware interface for PCs. It was created by a consortium of more than 140 technology companies, including Microsoft, Intel, and AMD.
To install Windows 10 in Legacy BIOS mode, you can follow the same steps as for UEFI. First, open the Disk Management application. Then, right-click the converted disk and choose Properties. Choose the partition style as GUID Partition Table. In the next step, you can install Windows 10.
Does Rufus Work with UEFI?
To use Rufus, you need to have a UEFI BIOS installed. Then, you can download the Rufus ISO file from the link below. This link is valid for 24 hours. Once downloaded, Rufus will create bootable USB media for MBR and GPT partitions, as well as UEFI. You can also create bootable USB media for Windows 10 using Rufus. Once downloaded, follow the instructions on your computer to complete the installation.
How Do You UEFI Boot with Rufus?
UEFI boot Windows 10 is possible with a bootable USB flash drive created with the third-party software Rufus. Rufus is a standalone program that doesn’t require installation and can be used offline. This application is a powerful image writer that lets you create installation media like DVDs or ISO files on a USB flash drive. To use Rufus, simply download it and follow the prompts.
Alternatively, you can download Rufus from the official website. You will need to download the portable version of the utility. Once you have the program, open it and click on “Use the built-in installer to create a bootable disk.” You can also choose to create a bootable USB drive. Once the file is extracted, you will need to label it. Next, you’ll need to select the partition scheme. Select either the GPT partition scheme or the MBR partition scheme.
After downloading Rufus, make sure you choose the proper mode for your device. UEFI booting Windows 10 is different from Legacy booting. You can install the Windows 10 operating system either way using Microsoft’s Media Creation Tool or Rufus. If you choose the latter, you’ll be able to boot Windows 10 from the USB drive. Then, connect the bootable USB drive to your target PC. Press F5 during boot to bring up the One-Time-Boot menu. Select the USB HDD option, and click ‘OK’.
How Do I Change My Target System in Rufus?
When creating a bootable USB with Rufus, you should select the partition scheme to use. If you’re creating a USB drive for Windows, make sure to mount it with the drive designator “G”. Rufus will automatically detect the designator and size of your USB drive and prompt you to choose a partition scheme. Once your USB drive is ready, you can change your target system and partition scheme, and even choose a default partition scheme if needed.
First, download Rufus. This free software is available from the Rufus website. Double-click the executable to open it. Next, click the Settings button. Choose “Check for updates” from the drop-down menu. You can also select Daily or a specific date. Then, select Windows 10 or a different operating system. After installing Rufus, your USB will be bootable. You can use it to troubleshoot Windows 10 or perform a clean OS installation.
If you are using a PC with an older BIOS, then you can use the Rufus utility to install the UEFI or legacy bios on your PC. It is very easy to use and is a lightweight program. You can use it to create a bootable USB for Windows 10 and also install the legacy bios. There are a few steps you should follow, depending on the type of bios that you want to install on your PC.
To install UEFI on your computer, you should first determine which hardware supports it. Make sure that you have a 64-bit hard drive, and that the partitioning scheme is GPT. Select the UEFI boot mode by looking for the LegacyUefi column. Once you have found the correct boot mode, select it from the boot menu. You will need to reformat your USB drive after each successful installation. Rufus does not support Windows XP, so you will have to use a previous version of the software or use another tool to install the legacy bios.
How Do I Change My BIOS From Legacy to UEFI?
To change your BIOS from legacy to UEFI, you must use an UEFI-compatible computer. You can easily change the mode in your computer’s BIOS setup by selecting UEFI. If your computer does not support UEFI, you should check the manufacturer’s website to find out if it supports the mode. Once you have installed Rufus, launch the command prompt by pressing the Windows key and typing msinfo32. In the System Summary window, you will see two options: Legacy and UEFI. Select the one that matches your preferences.
UEFI is the newer and faster version of the BIOS. Unlike the legacy version, it does not require the booting of a bootable CD or DVD. It can also be used with older operating systems. It also has a more flexible booting environment than legacy, which is why it’s important to choose a bios that supports both modes. But you don’t need to choose just one or the other. Both modes have their pros and cons.
Is Windows 10 UEFI Or Legacy?
There is no definitive answer to the question, “Is Windows 10 UEFI or legacy bios?” But it’s easy to find out which system your PC is running. To get started, start by running the Disk Management tool in the Control Panel. Here you’ll see which type of partition your computer uses. If your PC is running legacy BIOS, you’ll see “Master Boot Record,” and if you’re using UEFI, you’ll see “GUID Partition Table.”
If you’re running an old version of Windows, you should upgrade to UEFI. Legacy BIOS is less secure because it’s manufacturer-specific, but it’s supported by many networks. Generally speaking, you should use UEFI unless your network requires you to use a legacy BIOS. If you’re using Windows 11, you can skip this part of the guide. Then, if you want to use your existing Windows 10 installation on a new computer, you’ll need to upgrade the BIOS.
When upgrading to Windows 10, the default boot mode will be the Legacy BIOS. You should choose UEFI if you’d like to boot from a CD/DVD, but if you’re not sure, go ahead and use the Legacy BIOS. Both modes have their advantages and disadvantages. You can choose which one suits you best by consulting the System Information in Control Panel. If you don’t know what boot mode your PC is in, you can look at the setup log files and decide which one is better for your needs.