Оснастка Active Directory Users and Computers (или ADUC) – это одна из наиболее часто используемых консолей управления объектами в домене Active Directory. Вы можете установить mmc оснастку ADUC как на Windows Server, так и на десктопные Windows 10 и 11. Консоль ADUC входит в состав набора компоненту администрирования Microsoft Remote Server Administration Tools (RSAT). В этой статье мы покажем, как установить и использовать консоль управление Active Directory Users and Computers в Windows.
Содержание:
- Установка оснастки RSAT Active Directory в Windows 10 и 11
- Как пользоваться консолью Active Directory?
- Подключение консоли ADUC к домену из рабочей группы
Установка оснастки RSAT Active Directory в Windows 10 и 11
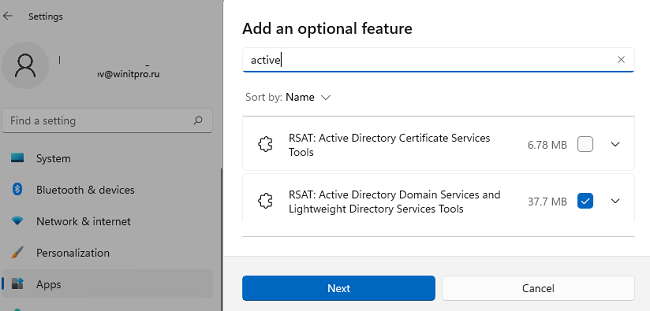
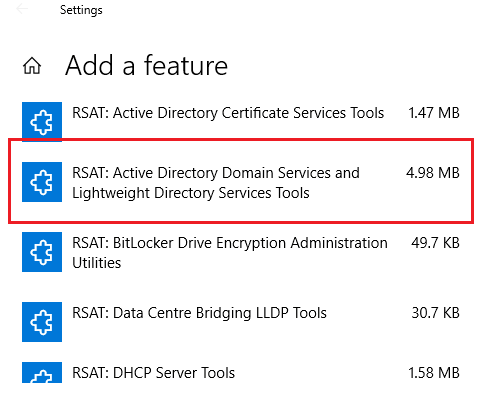
В современных версиях Windows 10 (начиная с билда 1809) и в Windows 11 инструменты администрирования RSAT устанавливаются онлайн в виде Features on Demand. Чтобы установить инструменты администрирования RSAT Active Directory в Windows 10/11, перейдите в Settings -> Apps -> Optional Features -> Add an optional feature (View features).
Наберите в поисковой строке Active Directory и выберите для установки компонент RSAT: Active Directory Domain Services and Lightweight Directory Services Tool.
Нажмите Next-> Install для начала установки.
Windows подключится к серверам Microsoft, скачает и установит набор инструментов для управления Active Directory (включает в себя графические консоли Active Directory, утилиты командной строки и модуль Active Directory PowerShell).
Либо вы можете установить набор компонентов администрирования AD с помощью PowerShell:
Add-WindowsCapability –online –Name Rsat.ActiveDirectory.DS-LDS.Tools~~~~0.0.1.0
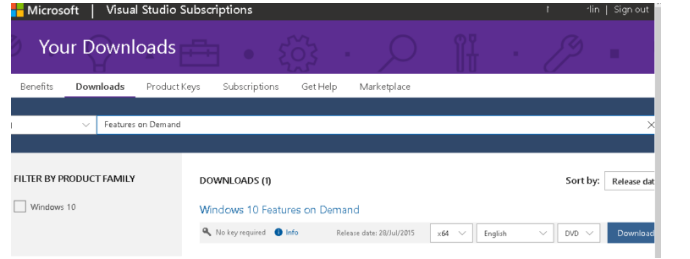
В изолированных сетях, в которых нет доступа в интернет, вы можете установить инструменты RSAT Active Directory с помощью ISO образа Windows 10 Features on Demand (образ FoD можно скачать из кабинета лицензирования Microsoft).
Для установки инструментов Active Directory, из сетевого каталога с содержимым образа FoD выполните команду:
Add-WindowsCapability -Online -Name Rsat.ActiveDirectory.DS-LDS.Tools~~~~0.0.1.0 -LimitAccess -Source \\fs01\Distr\Windows10-FOD\
В предыдущих билдах Windows 10, а также в Windows 8.1, установить RSAT можно с помощью MSU обновления. Скачать RSAT можно здесь:
- RSAT для Windows 10 1803/1709 — https://www.microsoft.com/en-us/download/details.aspx?id=45520
- RSAT для Windows 8.1 — https://www.microsoft.com/en-us/download/details.aspx?id=39296
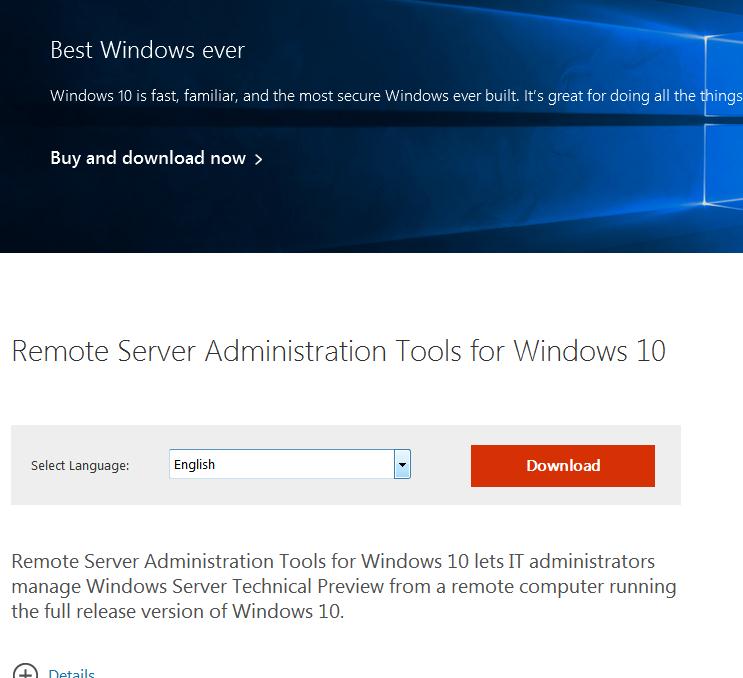
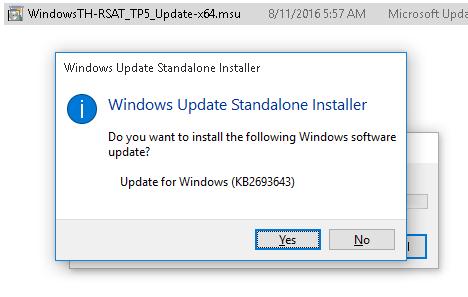
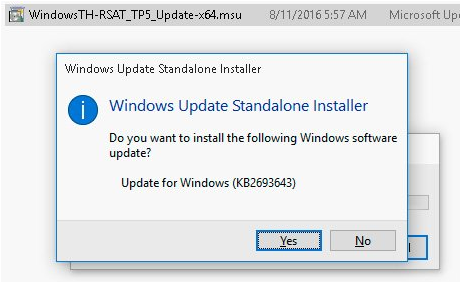
Скачайте версию файла RSAT в зависимости от разрядности вашей операционной системы и установите его. Дважды щелкните по файлу для начала установки:
Или установите MSU файл RSAT из командной строки в «тихом» режиме:
wusa.exe c:\Install\WindowsTH-RSAT_TP5_Update-x64.msu /quiet /norestart
После окончания установки RSAT нужно перезагрузить компьютер.
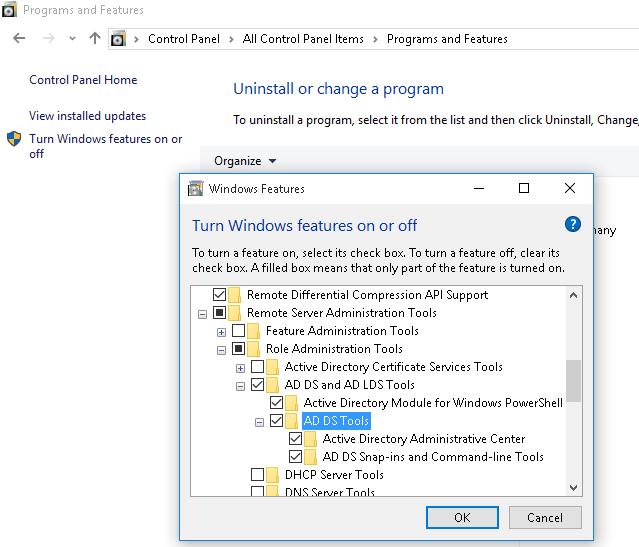
Осталось активировать необходимый функционал RSAT. Для этого:
- Щелкните ПКМ по кнопке Start и выберите Control Panel (Панель управления)
- Выберите Programs and Features (Программы и компоненты)
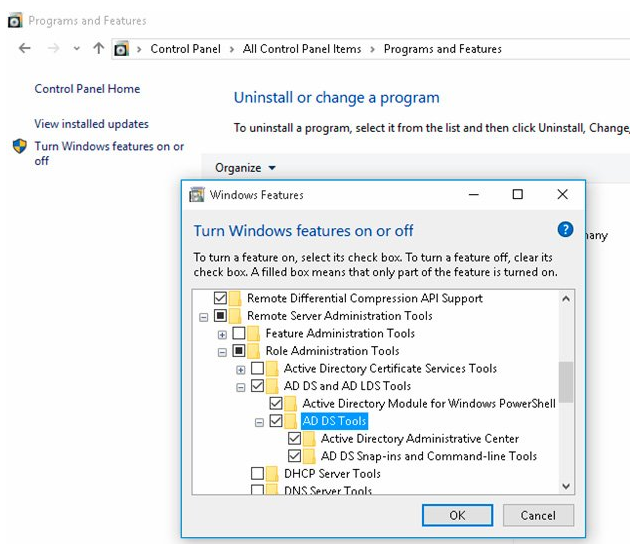
- В левой панели нажмите кнопку Turn Windows features on or off
- В дереве компонентов разверните Remote Server Administration Tools-> Role Administration Tools -> AD DS and AD LDS Tools
- Отметьте раздел AD DS Tools и нажмите OK.

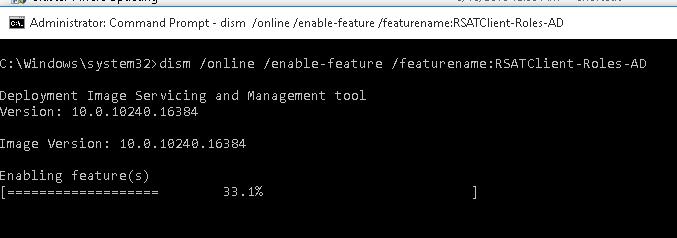
Установка оснастки ADUC также может быть выполнена из командой строки. Последовательно выполните 3 команды:
dism /online /enable-feature /featurename:RSATClient-Roles-AD
dism /online /enable-feature /featurename:RSATClient-Roles-AD-DS
dism /online /enable-feature /featurename:RSATClient-Roles-AD-DS-SnapIns
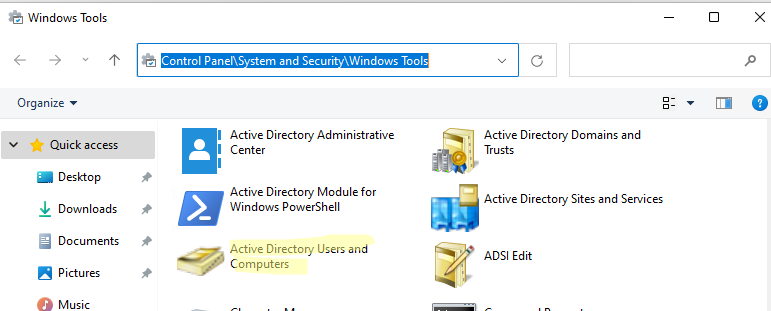
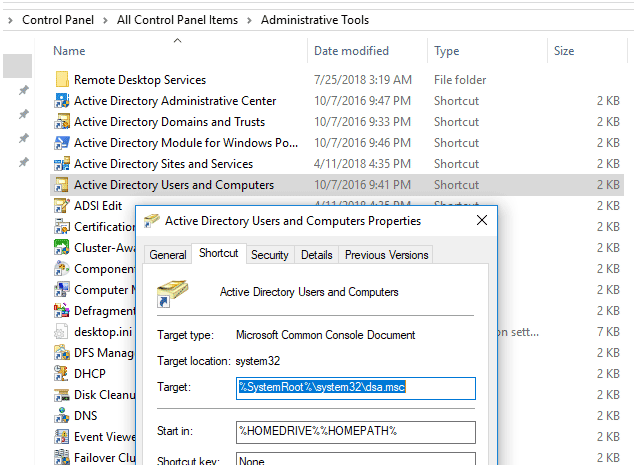
После установки оснасток управления, в разделе Administrative Tools панели управления (Control Panel\System and Security\Windows Tools) появится ссылка на консоль Active Directory Users and Computers.
Как пользоваться консолью Active Directory?
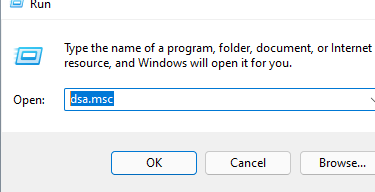
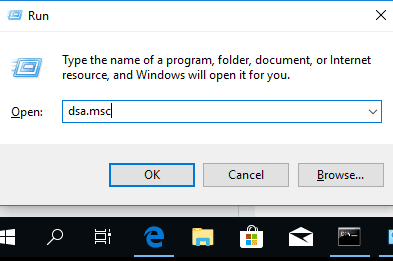
Чтобы запустить консоль ADUC, щелкните по ярлыку в панели управления или выполните команду:
dsa.msc
Все аутентифицированные пользователи домена могут использовать консоль ADUC для просмотра объектов Active Directory.
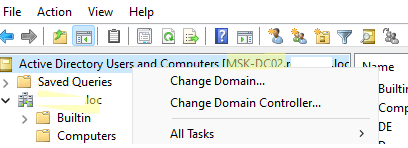
Если ваш компьютер состоит в домене Active Directory, то консоль ADUC подключится к контролеру домена, на основании текущего Logon сервера. Имя контроллера домена, с которого вы получаете информации указано в верху.
Вы можете подключиться к другому контроллеру домена AD или другому домену, щелкнув по корню консоли и выбрав пункт в контекстном меню.
В консоли Active Directory отображается древовидная структура организационных юнитов (Organizational Unit, OU) вашего домена (и отдельный раздел с сохраненными запросами/ Saved Queries AD).
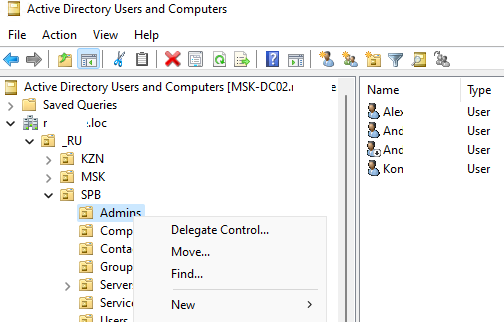
Администратор домена может создавать контейнеры (OU) в соответствии с физической или логической структуры предприятиями. С помощью контекстного меню можно создать новые объекты в AD (пользователей, группы, компьютеры, OU, контакты), переименовать, переместить или удалить объекты. В зависимости от типа объекта, который вы выбрали пункты контекстного меню могут отличаться.
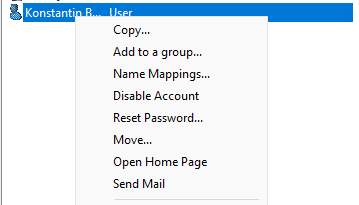
Например, у пользователя есть опции на сброс пароля в AD или блокировку/разблокировку учетной записи.
Вы можете использовать контекстное меню Search для поиска объектов в AD.
Администратор может делегировать права на создание/редактирование/удаление объектов в Active Directory другим пользователям или группам.
С помощью меню View -> Add/Remove columns можно добавить атрибуты объектов, которые вы хотите отображать в консоли ADUC.
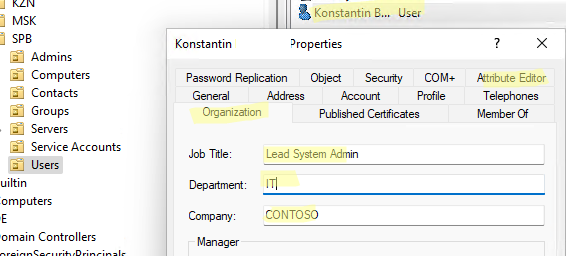
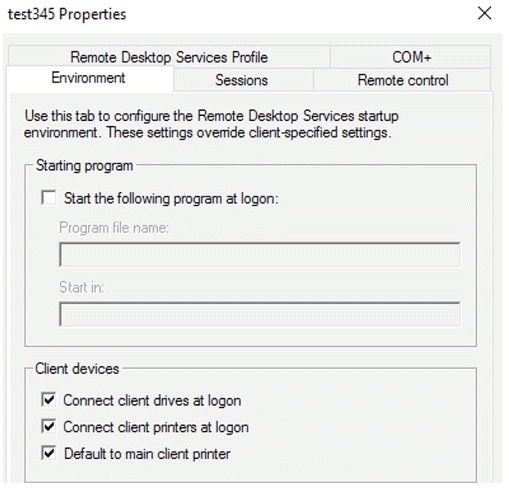
В консоли ADUC можно посмотреть или изменить свойства объектов домена. Например, можно открыть свойства пользователя и изменить его настройки. Часть свойств пользователя находится на соответствующих вкладках, а полный список атрибутов пользователя доступен на вкладке редактора атрибутов AD (Attribute Editor).
Можно добавить отдельную вкладку с фотографией пользователя AD.
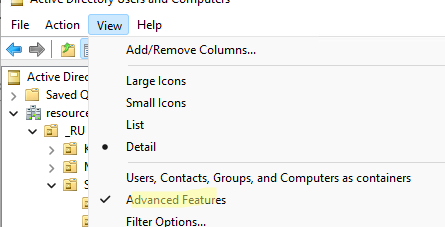
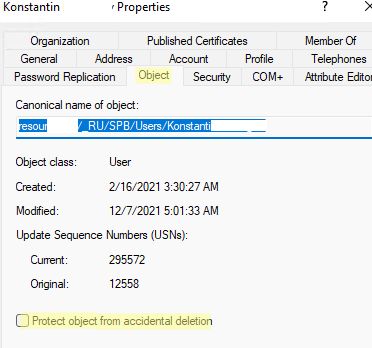
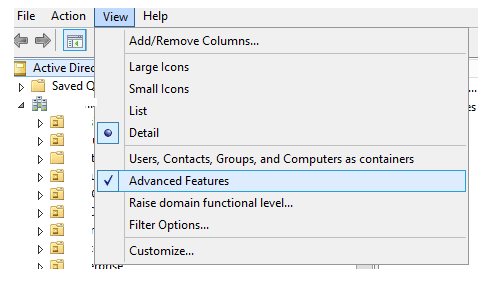
Чтобы показывать системные контейнеры и свойства объектов в оснастке AD (по умолчанию скрыты), включите опцию View -> Advanced features.
После этого у всех объектов появится ряд системных вкладок. Например, на вкладке Object можно получить каноническое имя объекта, дату создания учетной записи и включить опцию защиты от удаления (protect object from accidental deletion).
Подключение консоли ADUC к домену из рабочей группы
Если вы хотите подключится консолью ADUC к контроллеру домена с компьютера, который не включен в домен (состоит в рабочей группе), воспользуйтесь таким методом:
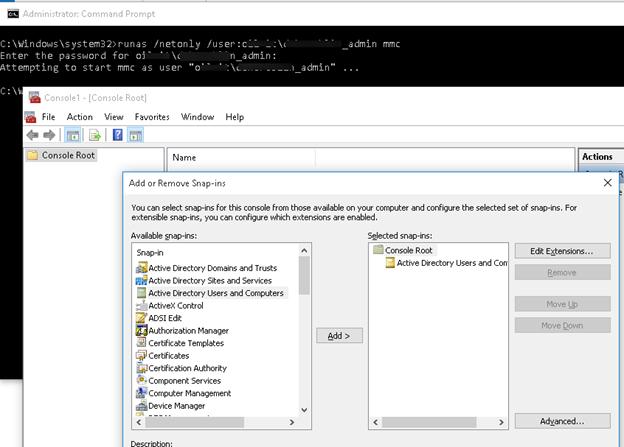
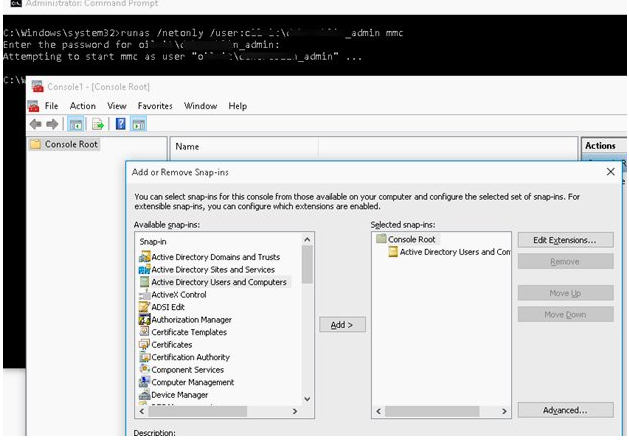
- Запустите командную строку и выполните команду запуска оснастки от имени другого пользователя:
runas /netonly /user:winitpro\aaivanov mmc - В пустой консоли MMC выберите File->Add/Remove Snap-In
- Перенесите оснастку Active Directory Users and Computers в правую панель и нажмите Add;

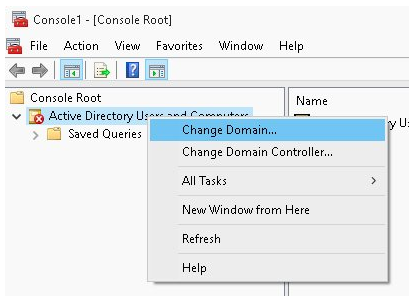
- Чтобы подключится к домену, щелкните по корню консоли и выберите Change domain. Укажите имя домена.

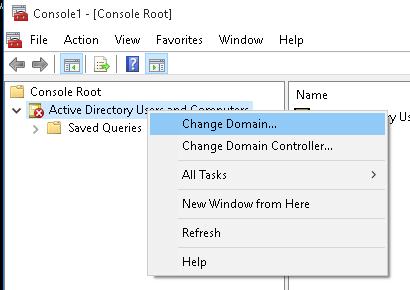
В результате консоль ADUC подключится к контроллеру домена, получит и отобразит структуру контейнеров (OU) данного домена Active Directory.
Any Windows Server administrator must have used the Active Directory Users and Computers (ADUC) Microsoft Management Console on a Domain Controller (DC). Using this console, you can control and manage users, user groups, computers, and the Organizational Units (OUs) in the domain.
The ADUC console is no longer limited to servers anymore. You can install the Active Directory Users and Computers snap-in on a Windows 11 or Windows 10 computer as well, which performs the same functions as the original Server console. This snap-in is part of the Remote Server Administration Tools (RSAT) for Windows operating systems.
We have written separate posts for installing any RSAT tools on Windows 11 and Windows 10. This article focuses on installing specifically the Active Directory Users and computers snap-in on a Windows PC and then using it to manage your domain.
Table of contents
- How to Install Active Directory Users and Computers (ADUC) on Windows
- Install Active Directory Users and Computers from Settings App
- Install Active Directory Users and Computers from Command Prompt
- Install Active Directory Users and Computers from PowerShell
- How to Use Active Directory Users and Computers
- How to Open Active Directory Users and Computers Snap-In
- Connect ADUC to Domain Controller
- Manage Users, Computers, Organizational Unit using ADUC
- What is Active Directory Users and Computers Used For
How to Install Active Directory Users and Computers (ADUC) on Windows
All RSAT tools, including the Active Directory Users and Computers snap-in, allow you to manage the different Active Directory components as if you are on the server itself. This way, you do not always have to access the server, neither physically nor remotely, to perform an action.
You can download and install the Active Directory Users and Computers snap-in using the Settings app, from the Command Prompt, and Windows PowerShell.
Note: On Windows 10 v1803 and older, you must download and install all RSAT tools using the MSI files. You can find the MSI files for your version of Windows here.
Install Active Directory Users and Computers from Settings App
The easiest way to install the ADUC snap-in on a Windows PC is from the settings app. It does involve more steps than the other methods shared below, but this is the only method using the Windows GUI.
Use these steps to install the ADUC snap-in from the Settings app:
-
Navigate to the following:
Settings app >> Apps >> Optional Features
-
Click “View features.”
 Snap-In On Windows 11/10 1")
Add an optional feature -
Search for “Active Directory,” select “RSAT: Active Directory Domain Services and Lightweight Directory Services Tools,” and click Next.
Select Active Directory Users and Computers -
Click “Install.”
Install Active Directory Users and Computers from the Settings app -
Once installed, restart the computer.
 Snap-In On Windows 11/10 1")
 Snap-In On Windows 11/10 2")
 Snap-In On Windows 11/10 3")
The Active Directory Users and Computers snap-in will now be installed. If you prefer installing it using the command line, refer to the sections below. To learn how to use the snap-in, continue reading down.
Install Active Directory Users and Computers from Command Prompt
Below are the simple steps to install Active Directory Users and Computers snap-in using the Command Prompt:
-
Open an elevated Command Prompt instance.
-
Run the following command:
DISM /Online /Add-Capability /CapabilityName:Rsat.ActiveDirectory.DS-LDS.Tools~~~~0.0.1.0 Snap-In On Windows 11/10 4")
Install Active Directory Users and Computers snap-in using Command Prompt
 Snap-In On Windows 11/10 4")
The ADUC snap-in should now be installed. Run the following command in Command Prompt to confirm that the Active Directory Users and Computers snap-in has been installed:
DISM.exe /Online /Get-CapabilityInfo /CapabilityName:Rsat.ActiveDirectory.DS-LDS.Tools~~~~0.0.1.0 Snap-In On Windows 11/10 5")
You should see “Installed” in front of Status.
Install Active Directory Users and Computers from PowerShell
Use the following steps to install the Active Directory Users and Computer snap-in using PowerShell:
-
Launch an elevated PowerShell instance.
-
Run the following command to install ADUC:
Add-WindowsCapability -Online -Name Rsat.ActiveDirectory.DS-LDS.Tools~~~~0.0.1.0Install Active Directory Users and Computers snap-in using PowerShell
 Snap-In On Windows 11/10 6")
The ADUC snap-in should now be installed. To confirm its status, run the following command in PowerShell:
Get-WindowsCapability -Online | Where-Object {$_.Name -like "RSAT.ActiveDirectory*"} Snap-In On Windows 11/10 7")
You should see “Installed” in front of State.
These are all the methods to install the Active Directory Users and Computers snap-in on a Windows 11/10 PC. Let us now continue to see how to use this tool.
How to Use Active Directory Users and Computers
How to Open Active Directory Users and Computers Snap-In
Now that Active Directory Users and Computers is installed, you can open it by searching for it in the Start menu, or running the following in the Run Command box:
dsa.msc Snap-In On Windows 11/10 8")
Alternatively, you can also open the ADUC snap-in through the Control Panel at the following location:
Control Panel >> System and Security >> Windows Tools
 Snap-In On Windows 11/10 9")
If your computer is connected to a domain and you are logged in from an authorized domain account, then the ADUC snap-in will automatically connect to the server. However, if one is not connected, then you must connect to the Domain Controller.
Connect ADUC to Domain Controller
Use these steps to connect to a Domain Controller. You can also use these to change your domain/Domain Controller.
-
From the ADUC console, click “Action,” and then click “Change Domain Controller.”
Change or connect to Domain Controller The Change Directory Server window will now open.
-
Select the “This Domain Controller or AD LDS instance” radio button, then select the Domain Controller from the give list and click Ok.
Select and connect to Domain Controller
 Snap-In On Windows 11/10 10")
 Snap-In On Windows 11/10 11")
The ADUC will now connect to the Domain Controller and populate the fields.
 Snap-In On Windows 11/10 12")
Now that you are connected to the Domain Controller, you can now begin making changes and managing the different components of the domain.
Manage Users, Computers, Organizational Unit using ADUC
 Snap-In On Windows 11/10 13")
You can now begin adding new users, computers, printers, and Organizational Units to the domain. Simply right-click on the OU that you want to add the new device/user to, expand “New”, and select the element that you want to add.
Once you have selected the element to add, the respective window will open, where you can then configure the component to add.
You can now also use other operators to manage the users, devices, and other elements configured inside the domain directly from your Windows PC.
Additionally, you can also manage what you see inside the snap-in. Click “View” from the top menu and select the things that you want to see. You can then also click “Filter options” to open the advanced viewing options.
 Snap-In On Windows 11/10 14")
The list does not end here. There are a bunch of other management options you can perform directly from the ADUC snap-in on a Windows PC. We suggest that you play around to discover all the options. However, we advise caution and only use the console if you know what you are doing.
What is Active Directory Users and Computers Used For
By now, we have a pretty good understanding of what the ADUC snap-in can be used for. However, there is more to it than meets the eye. The Active Directory Users and Computers RSAT tool can be used to perform the following actions:
- Create and manage user accounts, computers, and Active Directory groups.
- View and edit AD object attributes with ADSI Edit.
- Search for AD objects.
- Change or reset user password in Active Directory.
- Create organizational units and build hierarchical structures for AD objects. You can also delegate administrative permission on these OUs to other domain users.
- Delegate administrative permissions.
- Raise domain functional level, and transfer FSMO roles with PowerShell to another domain controller.
From this, it is understood how useful the ADUC snap-in is for administrators that use Windows client PCs.
Internet Explorer was retired on June 15, 2022
IE 11 is no longer accessible. You can reload Internet Explorer sites with IE mode in Microsoft Edge.

IMPORTANT: Starting with Windows 10 October 2018 Update, RSAT is included as a set of «Features on Demand» in Windows 10 itself. See «Install Instructions» below for details, and «Additional Information» for recommendations and troubleshooting. RSAT lets IT admins manage Windows Server roles and features from a Windows 10 PC.
Important! Selecting a language below will dynamically change the complete page content to that language.
-
File Name:
WindowsTH-KB2693643-x64.msu
WindowsTH-KB2693643-x86.msu
Remote Server Administration Tools for Windows 10 includes Server Manager, Microsoft Management Console (MMC) snap-ins, consoles, Windows PowerShell cmdlets and providers, and command-line tools for managing roles and features that run on Windows Server.
IMPORTANT: Starting with Windows 10 October 2018 Update, add RSAT tools right from Windows 10. Just go to «Manage optional features» in Settings and click «Add a feature» to see the list of available RSAT tools.
The downloadable packages above can still be used to install RSAT on Windows 10 version 1607.
-
Supported Operating Systems
Windows 10
**Remote Server Administration Tools for Windows 10 can be installed ONLY on computers that are running the full release of Windows 10 Professional, Windows 10 Enterprise, or Windows 10 Education.** Remote Server Administration Tools cannot be installed on Windows RT, computers with an Advanced RISC Machine (ARM) architecture, or other system-on-chip devices.
Remote Server Administration Tools for Windows 10 runs on both x86- and x64-based editions of the full release of Windows 10, Professional, Enterprise or Education editions. Download and install the version that matches the architecture of the computer on which you plan to install the administration tools. If you are not sure whether your computer is x86- or x64-based, see How to determine whether a computer is running a 32-bit version or 64-bit version of the Windows operating system.
Remote Server Administration Tools for Windows 10 is available in the following languages: cs-CZ, de-DE, en-US, es-ES, fr-FR, hu-HU, it-IT, ja-JP, ko-KR, nl-NL, pl-PL, pt-BR, pt-PT, ru-RU, sv-SE, tr-TR, zh-CN, and zh-TW. If the system UI language of your Windows 10 operating system does not match any of the available RSAT languages, you must first install a Windows 10 Language Pack for a language that is supported by RSAT, and then try installing Remote Server Administration Tools for Windows 10 again.
IMPORTANT: Remove all older versions of Administration Tools Pack or Remote Server Administration Tools—including older prerelease versions, and releases of the tools for different languages or locales—from the computer before you install Remote Server Administration Tools for Windows 10. Only one copy at a time of Remote Server Administration Tools can be installed on a computer. If you have upgraded to Windows 10 from an older release of Windows, you will need to install Remote Server Administration Tools for Windows 10 on the computer; no earlier releases of Remote Server Administration Tools are still installed on a computer that you have upgraded to Windows 10.
Remote Server Administration Tools for Windows 10 includes support for remote management of computers that are running Windows Server. It can be installed on Windows 10, but it cannot be installed on Windows Server.
Earlier releases of Remote Server Administration Tools (such as those for Windows 8.1) are not available—nor do they run—on Windows 10.
Server Manager is included with Remote Server Administration Tools for Windows 10; GUI-based tools that are part of this release of Remote Server Administration Tools can be opened by using commands on the Tools menu of the Server Manager console. To use Server Manager to access and manage remote servers that are running Windows Server 2008, Windows Server 2008 R2, Windows Server 2012, or Windows Server 2012 R2, you must install several updates on the older operating systems. For more information about requirements for using Server Manager to manage remote servers, see Manage multiple, remote servers with Server Manager.
-
NOTE: Please refer to the «Additional Information» section below for troubleshooting and known issue.
———-
To install specific RSAT tools on Windows 10 October 2018 Update or later
Starting with Windows 10 October 2018 Update, RSAT is included as a set of «Features on Demand» right from Windows 10. Do not download an RSAT package from this page. Instead, just go to «Manage optional features» in Settings and click «Add a feature» to see the list of available RSAT tools. Select and install the specific RSAT tools you need. To see installation progress, click the Back button to view status on the «Manage optional features» page.
See the list of RSAT tools available via Features on Demand. In addition to installing via the graphical Settings app, you can also install specific RSAT tools via command line or automation using DISM /Add-Capability.
One benefit of Features on Demand is that installed features persist across Windows 10 version upgrades!
To uninstall specific RSAT tools on Windows 10 October 2018 Update or later
On Windows 10, open the Settings app, go to «Manage optional features», select and uninstall the specific RSAT tools you wish to remove. Note that in some cases, you will need to manually uninstall dependencies. Specifically, if RSAT tool A is needed by RSAT tool B, then choosing to uninstall RSAT tool A will fail if RSAT tool B is still installed. In this case, uninstall RSAT tool B first, and then uninstall RSAT tool A. Also note that in some cases, uninstalling an RSAT tool may appear to succeed even though the tool is still installed. In this case, restarting the PC will complete the removal of the tool.
See the list of RSAT tools including dependencies. In addition to uninstalling via the graphical Settings app, you can also uninstall specific RSAT tools via command line or automation using DISM /Remove-Capability.
———-
To install RSAT for Windows 10 (prior to the October 2018 Update)
IMPORTANT: You can install Remote Server Administration Tools for Windows 10 only on the full release of Windows 10 Professional or Windows 10 Enterprise.
- Download the Remote Server Administration Tools for Windows 10 package that is appropriate for your computer’s architecture. You can either run the installer from the Download Center website, or save the download package to a local computer or share. If you save the download package to a local computer or share, double-click the installer program, WindowsTH-RSAT_WS_1803-x64.msu or WindowsTH-RSAT_WS_1803-x86.msu, depending on the architecture of the computer on which you want to install the tools.
- When you are prompted by the Windows Update Standalone Installer dialog box to install the update, click Yes.
- Read and accept the license terms. Click I accept. Installation requires a few minutes to finish.
NOTE: All tools are enabled by default. You do not need to open Turn Windows features on or off in Windows 10 to enable tools that you want to use.
To turn off specific tools (prior to the October 2018 Update) (not available on RSAT versions 1709 or 1803)
- On the desktop, click Start, click All Apps, click Windows System, and then click Control Panel.
- Click Programs, and then in Programs and Features, click Turn Windows features on or off.
- In the Windows Features dialog box, expand Remote Server Administration Tools, and then expand either Role Administration Tools or Feature Administration Tools.
- Clear the check boxes for any tools that you want to turn off. Note that if you turn off Server Manager, the computer must be restarted, and tools that were accessible from the Tools menu of Server Manager must be opened from the Administrative Tools folder.
- When you are finished turning off tools that you do not want to use, click OK.
To uninstall RSAT for Windows 10 (prior to the October 2018 Update)
- On the desktop, click Start, click All Apps, click Windows System, and then click Control Panel.
- Under Programs, click Uninstall a program.
- Click View installed updates.
- Right-click Update for Microsoft Windows (KB2693643), and then click Uninstall.
- When you are asked if you are sure you want to uninstall the update, click Yes.
-
Recommendations for when to use which RSAT version:
Install RSAT FODs directly from Windows 10:
When installing on Windows 10 October 2018 Update (1809) or later, for managing Windows Server 2019 or previous versions.
See «Install Instructions» section above for details on how to install RSAT Features on Demand (FODs) right from Windows 10.Download and install WS_1803 RSAT package:
When installing on Windows 10 April 2018 Update (1803) or earlier, for managing Windows Server, version 1803 or Windows Server, version 1709.Download and install WS2016 RSAT package:
When installing on Windows 10 April 2018 Update (1803) or earlier, for managing Windows Server 2016 or previous versions.———-
Known issues affecting various RSAT versions:Issue: RSAT FOD installation fails with error code 0x800f0954
Impact: RSAT FODs on Windows 10 1809 (October 2018 Update) in WSUS/SCCM environments
Resolution: To install FODs on a domain-joined PC which receives updates through WSUS or SCCM, you will need to change a Group Policy setting to enable downloading FODs directly from Windows Update or a local share. For more details and instructions on how to change that setting, see this topic.Issue: RSAT FOD installation via Settings app does not show status/progress
Impact: RSAT FODs on Windows 10 1809 (October 2018 Update)
Resolution: To see installation progress, click the Back button to view status on the «Manage optional features» page.Issue: RSAT FOD uninstallation via Settings app may fail
Impact: RSAT FODs on Windows 10 1809 (October 2018 Update)
Resolution: In some cases, uninstallation failures are due to the need to manually uninstall dependencies. Specifically, if RSAT tool A is needed by RSAT tool B, then choosing to uninstall RSAT tool A will fail if RSAT tool B is still installed. In this case, uninstall RSAT tool B first, and then uninstall RSAT tool A. See the list of RSAT FODs including dependencies.Issue: RSAT FOD uninstallation appears to succeed, but the tool is still installed
Impact: RSAT FODs on Windows 10 1809 (October 2018 Update)
Resolution: Restarting the PC will complete the removal of the tool.Issue: RSAT missing after Windows 10 upgrade
Impact: Any RSAT .MSU package installation (prior to RSAT FODs) not automatically reinstalled
Resolution: An RSAT installation cannot be persisted across OS upgrades due to the RSAT .MSU being delivered as a Windows Update package. Please install RSAT again after upgrading Windows 10. Note that this limitation is one of the reasons why we’ve moved to FODs starting with Windows 10 1809. RSAT FODs which are installed will persist across future Windows 10 version upgrades.Issue: DNS Tools missing
Impact: WS_1709 RSAT package users
Resolution: Use the RSAT FODs, or use the WS_1803 or WS2016 RSAT package or apply this workaroundIssue: Cannot turn off individual RSAT components
Impact: WS_1803 and WS_1709 RSAT package users on Windows 10 1803/1709 (April 2018 Update/Fall Creators Update)
Resolution: Use the RSAT FODs, or use the WS2016 RSAT package on Windows 10 1607 (Anniversary Update)Issue: Tabs missing from MMC Properties
Impact: Windows 10 clients before 1607 (Anniversary Update)
Resolution: Update to the latest version of Windows 10 client and reinstall RSATIssue: Shielding Data File Wizard cannot create shielding data files
Impact: WS_1709 RSAT package users on Windows 10 1709 (Fall Creators Update)
Resolution: Use the RSAT FODs, or use the WS_1803 RSAT package on Windows 10 1803 (April 2018 Update), or use the WS2016 RSAT package on Windows 10 1607 (Anniversary Update) to create shielding data files for Windows shielded VMs, or the built-in RSAT tools in Windows Server, version 1709 to create shielding data files for both Windows and Linux shielded VMs.Issue: Template disks created from the Template Disk Wizard do not boot
Impact: WS_1709 RSAT package users on Windows 10 1709 (Fall Creators Update)
Resolution: Use the RSAT FODs, or use the WS_1803 RSAT package on Windows 10 1803 (April 2018 Update), or use the WS2016 RSAT package on Windows 10 1607 (Anniversary Update) to create template disks for Windows shielded VMs, or the built-in RSAT tools in Windows Server, version 1709 to create shielding data files for both Windows and Linux shielded VMs.Issue: IPAM in Server Manager prompts to install even though IPAM is already installed
Impact: IPAM users on Windows 10 1803/1709 (April 2018 Update/Fall Creators Update)
Resolution: Use the RSAT FODs, or use IPAM from an RSAT package installed on Windows 10 1607 (Anniversary Update) or 1703 (Creators Update)
В помощь системным администраторам, компания Microsoft разработала средства удаленного администрирования серверов — Microsoft Remote Server Administration Tools (RSAT).
RSAT содержит ряд инструментов, среди которых самым частым в использовании является — Active Directory Users and Computers (ADUC). В этой статье описана установка RSAT и добавление инструмента по управлению пользователями и рабочими станциями Active Directory в консоль управления Microsoft (MMC) на рабочую станцию c ОС Windows 10.
 Следует учесть, что RSAT вы можете поставить только в полную версию Windows 10 Professional или Windows 10 Enterprise. И на системы, на которых не стоит Microsoft Remote Server Administration Tools, например, RSAT предыдущей версии.
Установка Microsoft Remote Server Administration Tools
В центре загрузок Microsoft по ссылки — https://www.microsoft.com/en-us/download/details.aspx?id=45520 скачиваем «средства удаленного администрирования сервера для Windows 10». После того, как нажмете «Скачать», необходимо будет выбрать пакет RSAT под нужную версию Windows 10 и её разрядность.
После скачивания и установки, в консоли MMC уже становиться доступна ADUC и её функционал. Но сама консоль управления Active Directory будет отсутствовать в разделе средств администрирования Windows. Чтобы добавить компоненты RSAT, необходимо:
- Перезагрузить компьютер.
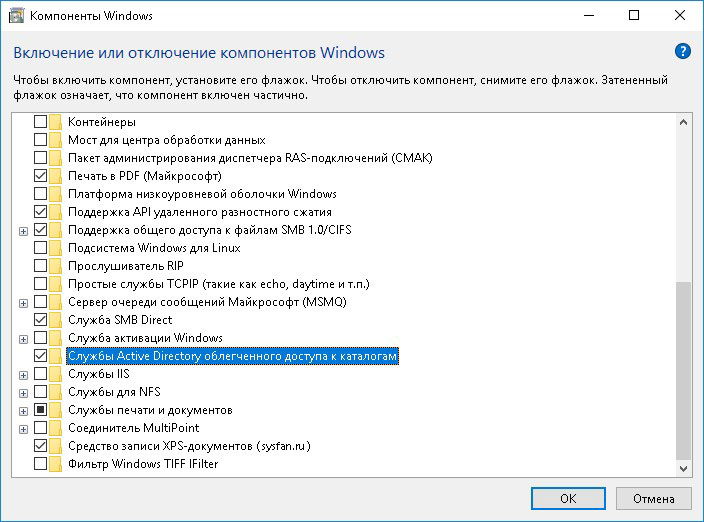
- Выполнить ((Win+R) + OptionalFeatures + Enter).
- В открывшемся окне компонентов Windows, найти «Службы Active Directory…. (AD LDS)» и поставить галочку напротив этого компонента.
Добавление в консоль MMC оснастки Active Directory Users and Computers
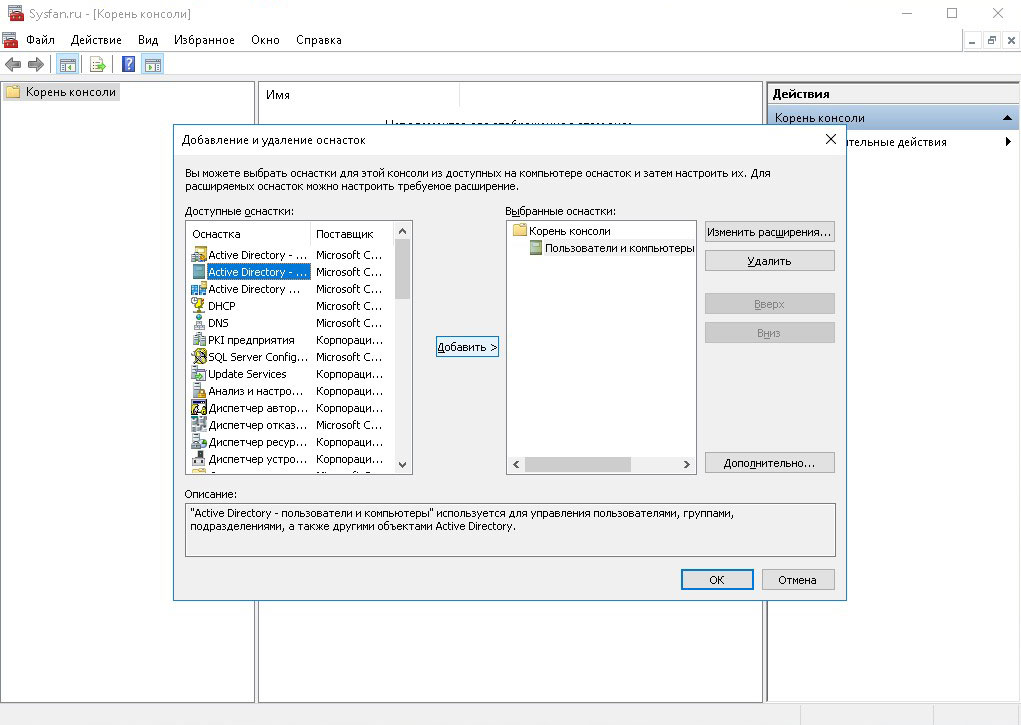
- Открываем саму консоль через диалоговое окно «Выполнить» ((Win+R) + mmc + Enter).
- После открытия консоли жмем Ctrl +M.
- В открывшемся окне «Добавление и удаление оснасток», выбираем инструмент «Active Directory – пользователи и компьютеры» и добавляем его в список с выбранными оснастками.
Желательно, после всех операций, произвести сохранение файла консоли управления MMC на рабочий стол.
Подключение оснастки ADUC к AD через компьютер не присоединенный к домену
Основная задача подключиться к ADUC, либо к консоли MMC от имени другого пользователя.
В windows 10 c этим могут возникнуть трудности. Чтобы их решить, советую прочитать про способы запуска программ от имени другого пользователя в windows 10.
Самым тривиальным способом является зажать клавишу Shift и кликом ПКМ по сохранённому файлу консоли управления MMC вызвать меню, в котором останется только выбрать способ запуск от имени другого пользователя.
Можно это сделать непосредственно с ярлыком ADUC [Панель управления] -> [Администрирование], но телодвижений будет чуть больше.
Для таких операций, соответственно необходимо добавить права в «локальные пользователи и группы» пользователю, через которого хотите открыть консоль MMC, так как компьютер находится не в домене и скептически относится к незнакомцам.
The MMC (Microsoft Management Console) snap-in Active Directory Users and Computers is one of the most important Active Directory domain management tools (ADUC). The ADUC snap-in is used to manage users, groups, machines, and Organizational Units in the Active Directory domain and execute common domain administration activities. When a Windows Server host is promoted to the domain controller during the Active Directory Domain Services (AD DS) role installation, the Active Directory Users and Computers (dsa.msc) console is installed by default.
Before you can utilise the ADUC snap-in in Windows 10, you must first install the Remote Server Administration Tools (RSAT). The RSAT comprises command-line tools, PowerShell modules, and graphical snap-ins for remotely managing Windows Servers, Active Directory, and other Windows Server roles and capabilities.
How to Install Active Directory Users and Computers (dsa.msc) on Windows 10?
RSAT is not installed by default in Windows 10. (and other Windows desktop operating systems). IT administrators can utilise Remote Server Administration Tools (RSAT) to manage roles and components on Windows Server 2019, 2016, 2012 R2, 2012, and 2008 R2 from user workstations running Windows 10, 8.1, 8, and 7. The RSAT is similar to the Windows Server 2003 Administration Tools Pack (adminpak.msi), which was used for remote server management on clients running Windows 2003 or Windows XP. RSAT cannot be installed on PCs running Windows Home editions; instead, Professional or Enterprise editions are required.
The ADUC console installation varies depending on the Windows 10 release.
Installing ADUC in Windows 10 1809 and Newer
In Windows 10 1809 and newer builds, the RSAT pack is added to the Features on Demand (FoD). In order to install ADUC, you can add an optional feature from FoD.
- Press the Start menu > Settings > Apps;
- Select Manage Optional Features > Add features;
- In the list of optional features already installed on your Windows 10 desktop, select RSAT: Active Directory Domain Services and Lightweight Directory Tools, and press Install.
After the RSAT installation completes, you need to restart your computer.
Install ADUC Using Command Prompt
Also, you can install the Active Directory console using the DISM tool. To verify that the RSAT ActiveDirectory component is installed, open a command prompt as an administrator, and run the command:
DISM.exe /Online /Get-CapabilityInfo /CapabilityName:Rsat.ActiveDirectory.DS-LDS.Tools~~~~0.0.1.0Capability Identity : Rsat.ActiveDirectory.DS-LDS.Tools~~~~0.0.1.0
Name : Rsat.ActiveDirectory.DS-LDS.Tools
State : Not Present
Display Name : RSAT: Active Directory Domain Services and Lightweight Directory Services Tools
Description : Active Directory Domain Services (AD DS) and Active Directory Lightweight Directory Services (AD LDS) Tools include snap-ins and command-line tools for remotely managing AD DS and AD LDS on Windows Server.
Download Size : 5.23 MB
Install Size : 17.35 MB
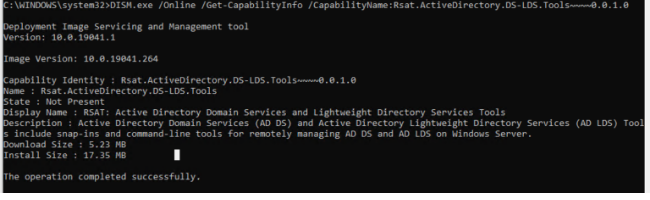
The screenshot above shows the RSAT Active Directory feature is not installed. To install, you need to run the command:
DISM /Online /Add-Capability /CapabilityName:Rsat.ActiveDirectory.DS-LDS.Tools~~~~0.0.1.0

Now check the status of AD RSAT. It should be changed to State: Installed.
Hint. You can also use PowerShell commands to install the Active Directory console.
Get RSAT Active Directory component status:
Get-WindowsCapability -Online | Where-Object {$_.Name -like "RSAT.ActiveDirectory*"}Install it:
Add-WindowsCapability -Online -Name Rsat.ActiveDirectory.DS-LDS.Tools~~~~0.0.1.0

RSAT components are downloaded over the Internet from Windows Update servers. If you want to install RSAT in a disconnected environment (without Internet access), you need to download the Feature on Demand (FoD) ISO image for your Windows 10 release.
To install ADUC offline, you need to mount the FoD iso image to a virtual drive (for example, to drive F:\) and run the installation from local media:
Dism.exe /online /add-capability /source:F: /Rsat.ActiveDirectory.DS-LDS.Tools~~~~0.0.1.0How to Enable Active Directory Tools in Windows 10?
Control Panel can be accessed by right-clicking on the Start button and selecting it.
Choose from a variety of programmes and features.
Select Turn Windows features on or off from the left pane.
Node Expansion AD DS and AD LDS Tools > Remote Server Administration Tools > Role Administration Tools;
Select AD DS Tools and click OK.
However, you can install the AD feature from the command prompt with administrator privileges using the following commands:
dism /online /enable-feature /featurename:RSATClient-Roles-AD

dism /online /enable-feature /featurename:RSATClient-Roles-AD-DS

dism /online /enable-feature /featurename:RSATClient-Roles-AD-DS-SnapIns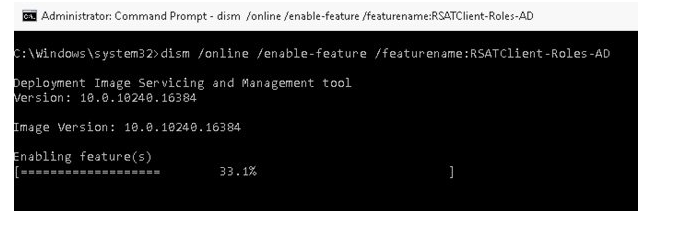
How to Run dsa.msc (Active Directory Users and Computers) on Windows 10?
Go to the Control Panel and pick the Administrative Tools section after the AD Management snap-ins have been installed. As you can see, a new link to Active Directory Users and Computers emerged in the console percent SystemRoot percent system32dsa.msc.
You can now use the ADUC snap-in to connect to any AD domain controller that is available. If your computer is part of an Active Directory domain, the closest domain controller in your AD site will be chosen for you depending on your Logon server. You can also launch the ADUC console by pressing Win+R, typing dsa.msc, and then clicking OK.
DSA.msc: Connecting to DC From Non-domain Computer
If you want to connect to AD from a non-domain computer using the dsa.msc snap-in, you must:
Open a command prompt and type the following command:
runas /netonly /user:Domain_Name\Domain_USER mmcSelect File > Add/Remove Snap-In from the empty MMC Console.
Press OK after adding the Active Directory Users and Computers Snap-In to the right pane.
Connect to the domain with right-click on ADUC > Connect to the domain and enter the domain name.
As a result, in the ADUC snap-in appears the structure of your OU Active Directory domain.
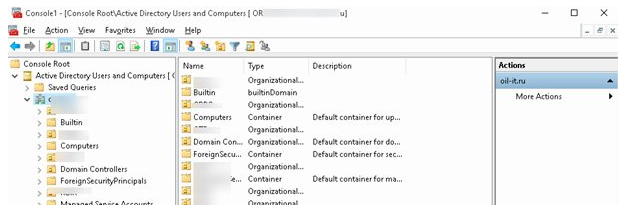
A standard set of AD Organizational Units and containers will appear:
- Saved Queries – saved search criteria that allow you to instantly replay a prior Active Directory search (LDAP filters are supported).
- User accounts that are built-in;
- Computers – the default account container for computers;
- Domain Controllers — domain controllers’ default container;
- ForeignSecurityPrincipals – stores information about trusted external domain objects. These items are typically formed when an object from another domain is added to the current domain’s group;
- Users is the default user account container.
You’ll see a list of objects in the OU when you select it. Security groups, contacts, users, and machines may all be displayed on the ADUC console.
Other containers may be present in the ADUC console, depending on the domain structure. By default, some AD directories are hidden. Select View > Advanced Features from the top menu to see them.
The following additional folders should appear:
- LostAndFound — directory objects, that lost the owner;
- NTDS Quotas — data about the quoting of the directory service;
- Program Data — data stored in the directory service for Microsoft applications;
- System — the built-in system parameters.
You can manually add organisational units to the AD tree.
You can do the following things on the ADUC console:
- User accounts, computers, and security groups can all be created and managed.
- View the characteristics of an AD object;
- User passwords can be changed or reset.
- For AD objects, create organisational units and hierarchical hierarchies. You can provide additional domain users administrative access to these OUs in the future (without granting domain administrator privileges).
- Transfer FSMO duties to another domain controller and raise the domain functional level.
Installing ADUC in Windows 10 Version 1803 and Below
You can download the Remote Server Administration Tools for Windows 10 (version: 1803 1.0, Date Published: 5/2/2018) using the following link.
Tip. As you can see, the RSAT package is available for the latest version of Windows 10 1803. WindowsTH-RSAT_WS_1709 and WindowsTH-RSAT_WS_1803 are used to manage Windows Server 2016 1709 and 1803 respectively. If you use a previous version of Windows Server 2016 or Windows Server 2012 R2/2012/2008 R2, then use the WindowsTH-RSAT_WS2016 package.
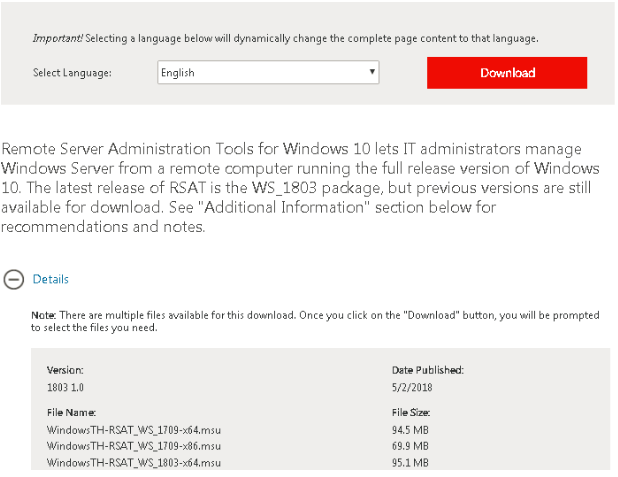
Select Language of your Windows 10 version and click on the Download button. Depending on the bitness of your OS, select the desired *.msu file:
For Windows 10 x86 – download WindowsTH-RSAT_WS2016-x86.msu (69.5 MB);
For Windows 10 x64 – download WindowsTH-RSAT_WS2016-x64.msu (92.3 MB);
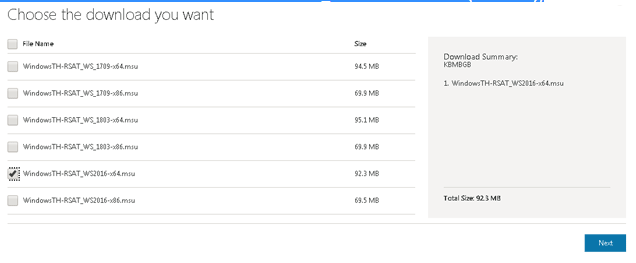
Install the downloaded file (Update for Windows KB2693643) by double-clicking on it.
You can install RSAT from the Command prompt in the silent mode:
wusa.exe c:\Install\WindowsTH-RSAT_WS2016-x64.msu /quiet /norestartIf when installing RSAT the error message This update does not qualify for your computer appears, most likely you are using Windows 10 Home or Single-Language edition (you need a Pro or Enterprise edition).
Dsa.msc: Missing Tabs in Windows 10
Users sometimes complain that some tabs are missing in the ADUC snap-in on Windows 10.
- First, make sure Advanced Features is turned on in the AD view.
- Make sure you’re running the most recent version of Windows 10;
- Make sure you’ve uninstalled any previous versions of RSAT as well as RSAT editions for other languages before installing RSAT. Only one version of Remote Server Administration can be installed on a PC at a time.
- RSAT for Windows 10 is currently only available in English (United States). Before installing RSAT, make sure you have the English (United States) language pack installed if you have a localised version of Windows 10. Place English (United States) at the top of the preferred languages list;
- Manually moving the tsuserex.dll and tsuserex.dll.mui libraries from Windows Server 2012 R2 to Windows 10 machines (to the C:WindowsSystem32 directory) will help in some circumstances. Don’t forget to use the command to register the library:
regsvr32 c:\Windows\System32\tsuserex.dllHow to Add Custom Commands and Views to the Active Directory Console?
You can add your own tools and commands to the Active Directory Users and Computers console to launch external applications.
Create a new text file named ping.bat with the following text and save it to a local disk:
@echo off

Title ping [%1]

Ping.exe %1 –t -8

pause

Create a custom view for the ADUC console:
- Run the command:mmc.exe
- Select File > Add/remove snap-in;
- In the list of available snap-ins, select Active Directory Users and Computers and press Add;
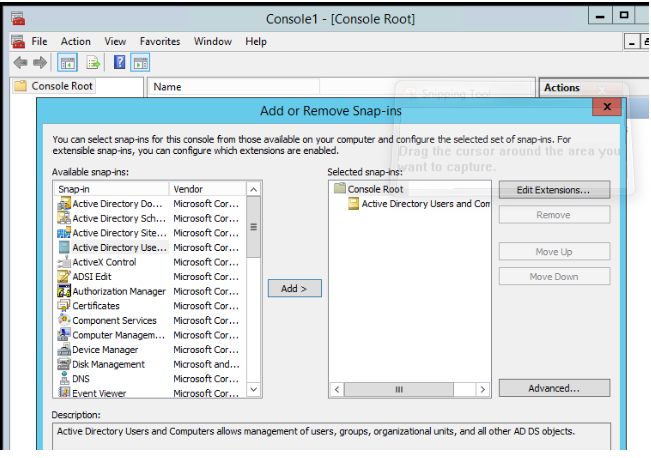
4. Select a container with computers or servers, right-click on it and select New Taskpad View;
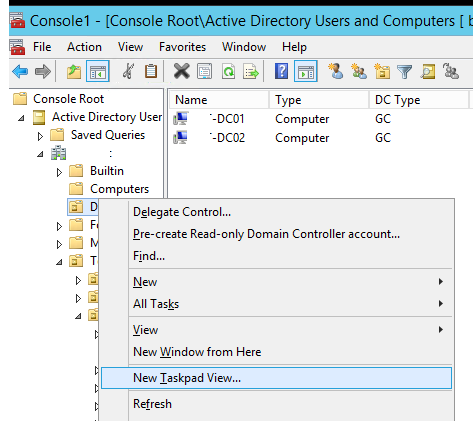
- 5. Press Next;
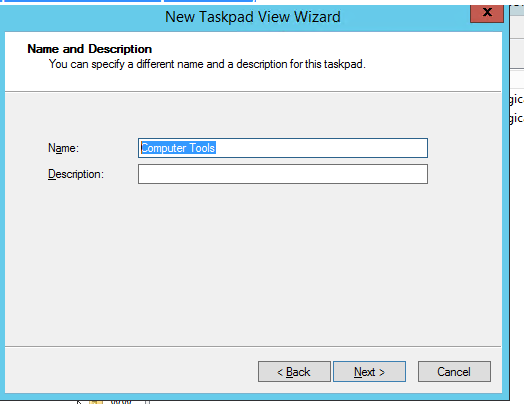
- 6. Select result pane style – Vertical list, List Size – Medium and press Next > Next;

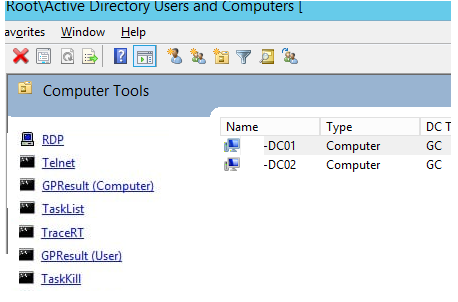
7. Specify the taskpad view name: Computer Tools;
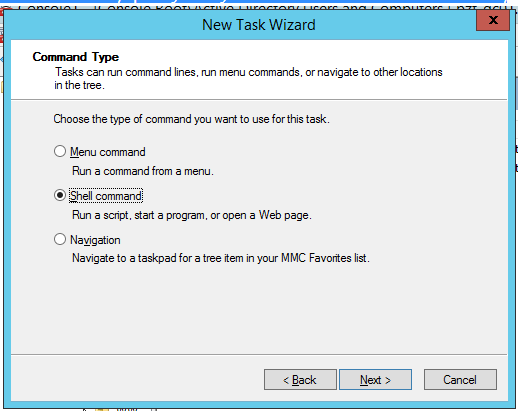
8. In the New Task Wizard window, specify that you want to create a Shell command;
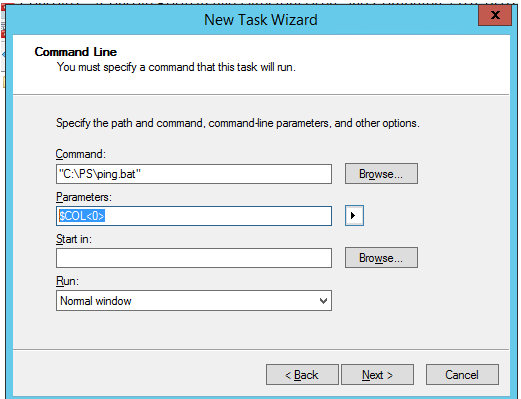
9. In the Command field, specify “C:\PS\ping.bat”, in the Parameters field > $COL<0> (computername field);
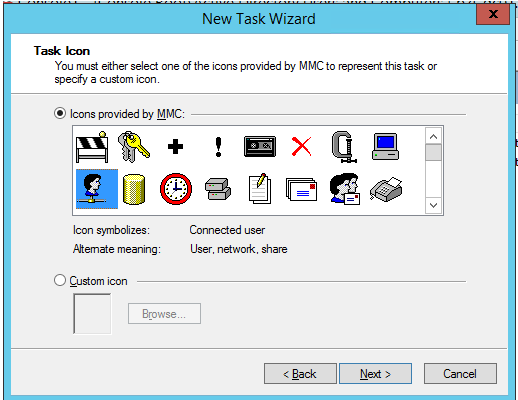
10. Input the Task Name and select icon;
- 11. Press Next > Finish.
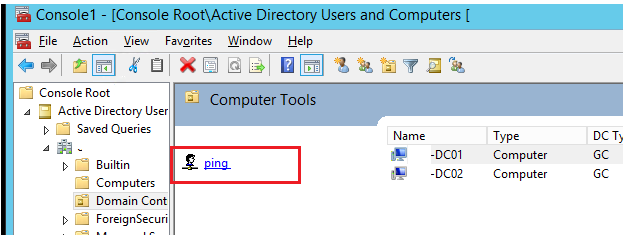
Now, if you select the Computer object in the ADUC console, the Ping button appears in the list of available actions. By clicking this button, you will check the computer’s availability via ICMP protocol (ping).
This way you can add various administration tools to the ADUC console.
Make sure to save your custom ADUC view with additional tools to a separate file custom_aduc_with_tools.msc (File > Save as). Use this file instead dsa.msc to run the ADUC console.