Набор компонентов RSAT (Remote Server Administration Tools / Средства удаленного администрирования сервера) позволяет удаленно управлять ролями и компонентами на серверах Windows Server с обычной рабочей станции Windows. В RSAT входят графические MMC оснастки, утилиты командной строки, и модули PowerShell. Вы можете установить RSAT как на десктопных версиях Windows 10 или 11, так и в Windows Server 2022/2019/2016.
Содержание:
- Установка средств администрирования RSAT в Windows 10 и 11
- Установка RSAT в Windows с помощью PowerShell
- Как установить Remote Server Administration Tools в Windows Server 2022,2019,2016?
- Ошибка 0x800f0954 при установке RSAT в Windows
- Установка RSAT в Windows в офлайн режиме
Установка средств администрирования RSAT в Windows 10 и 11
В Windows 10 и 11 RSAT устанавливаются через графический интерфейс панели Settings -> Apps -> Optionla Features -> Add an optional feature (Параметры Windows -> Приложения -> Дополнительные возможности -> Добавить компонент).
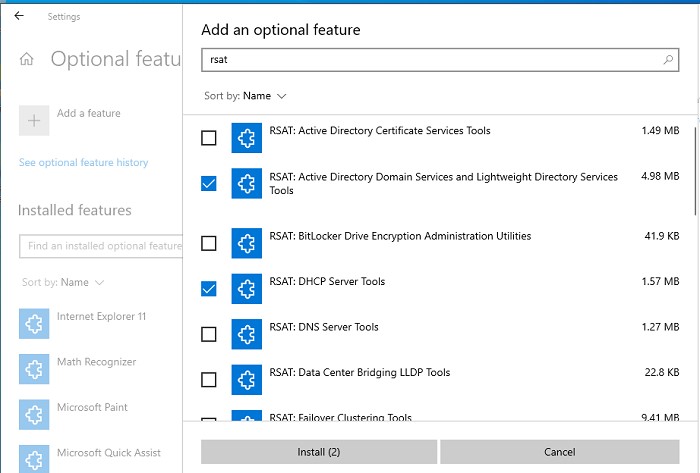
Наберите в поисковой строке RSAT, чтобы вывести доступные компоненты. Вы можете установить в Windows 10/11 следующие инструменты администрирования RSAT:
- RSAT: Active Directory Domain Services and Lightweight Directory Services Tools
- RSAT: BitLocker Drive Encryption Administration Utilities
- RSAT: Active Directory Certificate Services Tools
- RSAT: DHCP Server Tools (настройка и управление DHCP сервером на Windows Server)
- RSAT: DNS Server Tools
- RSAT: Failover Clustering Tools
- RSAT: File Services Tools
- RSAT: Group Policy Management Tools – консоль управления GPO и PowerShell модуль GroupPolicy
- RSAT: IP Address Management (IPAM) Client
- RSAT: Data Center Bridging LLDP Tools
- RSAT: Network Controller Management Tools
- RSAT: Network Load Balancing Tools
- RSAT: Remote Access Management Tools
- RSAT: Remote Desktop Services Tools
- RSAT: Server Manager
- RSAT: Shielded VM Tools
- RSAT: Storage Migration Service Management Tools
- RSAT: Storage Replica Module for Windows PowerShell
- RSAT: System Insights Module for Windows PowerShell
- RSAT: Volume Activation Tools (консоль активации KMS сервера)
- RSAT: Windows Server Update Services Tools
Выберите нужные компоненты RSAT и нажмите Install.
Вы можете установить RSAT только Professional и Enterprise редакциях Windows 10/11, но не в Windows Home.
После установки некоторых компонентов RSAT может потребоваться перезагрузка.
Компоненты RSAT не включены в состав Windows, а поставляются в виде Функции по требованию (Features on Demand). Это значит, что для установки RSAT ваш компьютер должен быть подключен к интернету. Windows загрузит и установит необходимые файлы с серверов Microsoft Update.
В предыдущих версиях Windows (до билда Windows 10 1809) пакет удаленного администрирования серверов RSAT устанавливался в виде отдельного файла MSU обновления, которое нужно было вручную скачивать и установить с сайта Microsoft (https://www.microsoft.com/en-us/download/details.aspx?id=45520)
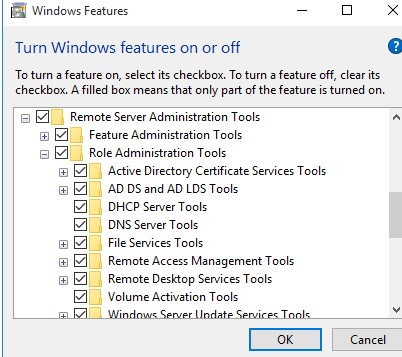
После установки пакета KB2693643 вы можете включить необходимые компоненты RSAT в разделе Control Panel -> Programs and Feature -> Turn Windows features on or off (
optionalfeatures.exe
). Разверните Remote Server Administration Tools и выберите необходимые компоненты для установки.
Если попытаться установить KB2693643 на более новых билдах Windows 10 или 11, появится ошибка:
Windows Update Standalone Installer encountered and error: 0x8024001d
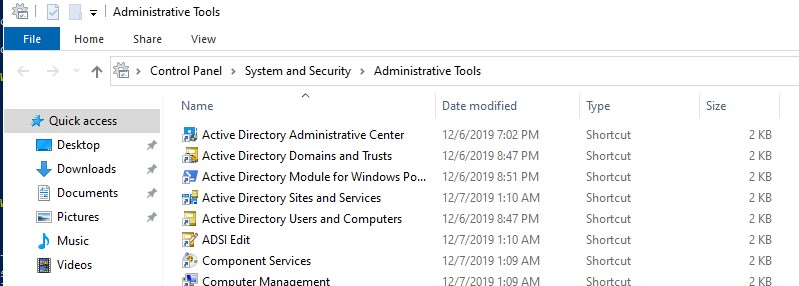
После установки, графические mmc оснастки RSAT будут доступны в панели управления в секции Administrative Tools (Control Panel\System and Security\Administrative Tools) или в папке:
%ProgramData%\Microsoft\Windows\Start Menu\Programs\Administrative Tools
.
Установка RSAT в Windows с помощью PowerShell
Вы можете установить компоненты администрирования RSAT в Windows 10 и 11 с помощью PowerShell.
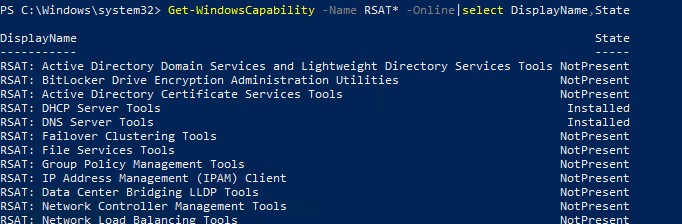
С помощью следующей PowerShell команды можно вывести список компонентов RSAT, установленных на вашем компьютере:
Get-WindowsCapability -Name RSAT* -Online | Select-Object -Property DisplayName, State
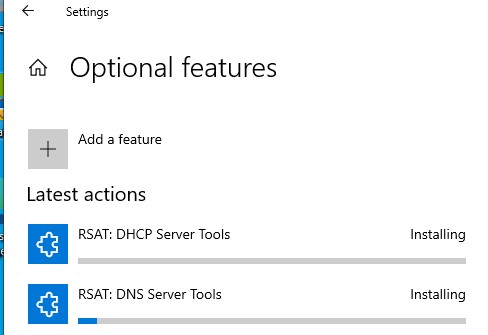
В нашем примере инструменты управления DHCP и DNS установлены (
Installed
), а все остальные модуль RSAT отсутствуют (
NotPresent
).
Для установки RSAT в Windows используется PowerShell командлет Add-WindowsCapability.
Чтобы установить конкретный инструмент RSAT, например инструменты управления AD (в том числе консоль ADUC из модуля Active Directory для Windows Powershell), выполните команду:
Add-WindowsCapability –online –Name Rsat.ActiveDirectory.DS-LDS.Tools~~~~0.0.1.0
Для установки консоли управления DNS и модуля PowerShell DNSServer, выполните:
Add-WindowsCapability –online –Name Rsat.Dns.Tools~~~~0.0.1.0
И т.д.
Add-WindowsCapability -Online -Name Rsat.BitLocker.Recovery.Tools~~~~0.0.1.0
 Add-WindowsCapability -Online -Name Rsat.CertificateServices.Tools~~~~0.0.1.0
Add-WindowsCapability -Online -Name Rsat.DHCP.Tools~~~~0.0.1.0
Add-WindowsCapability -Online -Name Rsat.FailoverCluster.Management.Tools~~~~0.0.1.0
Add-WindowsCapability -Online -Name Rsat.FileServices.Tools~~~~0.0.1.0
Add-WindowsCapability -Online -Name Rsat.GroupPolicy.Management.Tools~~~~0.0.1.0
Add-WindowsCapability -Online -Name Rsat.IPAM.Client.Tools~~~~0.0.1.0
Add-WindowsCapability -Online -Name Rsat.LLDP.Tools~~~~0.0.1.0
Add-WindowsCapability -Online -Name Rsat.NetworkController.Tools~~~~0.0.1.0
Add-WindowsCapability -Online -Name Rsat.NetworkLoadBalancing.Tools~~~~0.0.1.0
Add-WindowsCapability -Online -Name Rsat.RemoteAccess.Management.Tools~~~~0.0.1.0
Add-WindowsCapability -Online -Name Rsat.RemoteDesktop.Services.Tools~~~~0.0.1.0
Add-WindowsCapability -Online -Name Rsat.ServerManager.Tools~~~~0.0.1.0
Add-WindowsCapability -Online -Name Rsat.Shielded.VM.Tools~~~~0.0.1.0
Add-WindowsCapability -Online -Name Rsat.StorageMigrationService.Management.Tools~~~~0.0.1.0
Add-WindowsCapability -Online -Name Rsat.StorageReplica.Tools~~~~0.0.1.0
Add-WindowsCapability -Online -Name Rsat.SystemInsights.Management.Tools~~~~0.0.1.0
Add-WindowsCapability -Online -Name Rsat.VolumeActivation.Tools~~~~0.0.1.0
Add-WindowsCapability -Online -Name Rsat.WSUS.Tools~~~~0.0.1.0
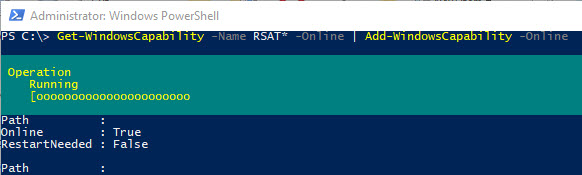
Чтобы установить сразу все доступные инструменты RSAT, выполните:
Get-WindowsCapability -Name RSAT* -Online | Add-WindowsCapability –Online
Также вы можете установить компоненты RSAT с помощью утилиты DISM:
DISM.exe /Online /add-capability /CapabilityName:Rsat.ActiveDirectory.DS-LDS.Tools~~~~0.0.1.0 /CapabilityName:Rsat.GroupPolicy.Management.Tools~~~~0.0.1.0 /CapabilityName:Rsat.WSUS.Tools~~~~0.0.1.0
Чтобы установить только отсутствующие компоненты RSAT, выполните:
Get-WindowsCapability -Name RSAT* -Online | where State -EQ NotPresent | Add-WindowsCapability –Online
Теперь убедитесь, что инструменты RSAT установлены (статус Installed);

Как установить Remote Server Administration Tools в Windows Server 2022,2019,2016?
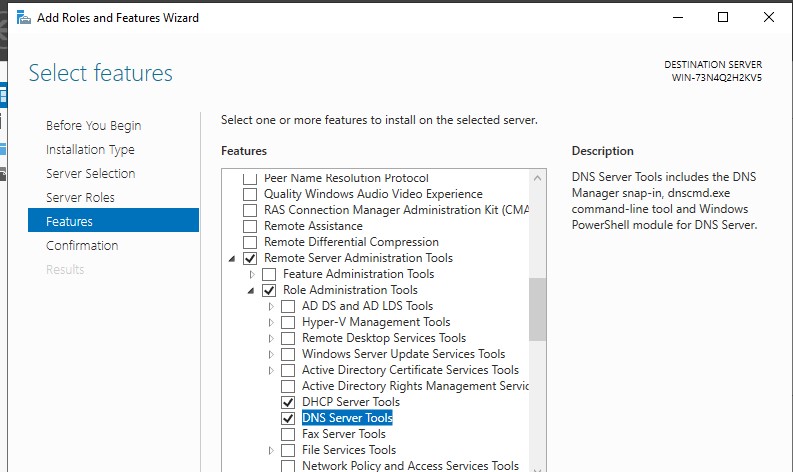
В Windows Server для установки RSAT не нужен доступ в интернет. Компоненты RSAT можно устанавливать при установке соответствующих ролей или фич Windows Server, либо можно установить их через Server Manager (Add roles and Features -> Features -> Remote Server Administration Tools). Все компоненты RSAT разбиты на две секции: Feature Administration Tools и Role Administration Tools. Выберите необходимые компоненты и нажмите Next -> Next.
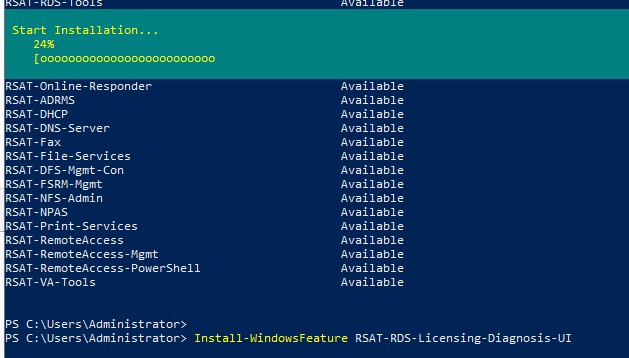
Для установки RSAT в Windows Server используется командлет установки компонентов и ролей — Install-WindowsFeature. Вывести список доступных компонентов RSAT в Windows Server 2022, 2019 и 2016:
Get-WindowsFeature| Where-Object {$_.name -like "*RSAT*"}| ft Name,Installstate
Для установки выбранного компонента RSAT, укажите его имя. Например, установим консоль диагностики лицензирования RDS:
Install-WindowsFeature RSAT-RDS-Licensing-Diagnosis-UI
Установить консоль удаленного управления Hyper-V Manager и PowerShell модуль Hyper-V:
Get-WindowsFeature | Where-Object {$_.Name -like "RSAT-Hyper-V-Tools"}| Install-WindowsFeature -IncludeAllSubFeature
Установленные графические консоли RSAT доступны из Server Manager или через панель управления.
Ошибка 0x800f0954 при установке RSAT в Windows
Если ваш компьютер Windows настроен на получение обновлений с локального сервера обновлений WSUS или SCCM (Configuration Manager) SUP, то при установке RSAT из графического интерфейса, Add-WindowsCapability или DISM вы получите ошибку.
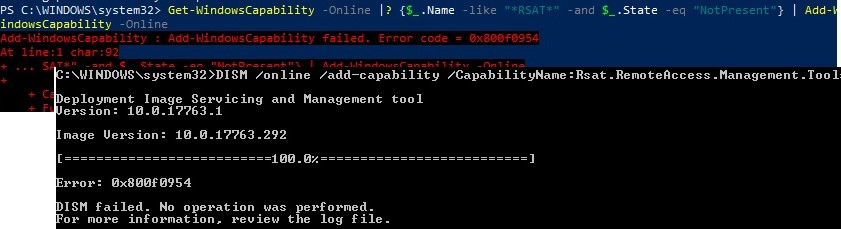
В этом случае Windows будет пытаться загрузить пакет RSAT с вашего локального сервера обновлений и вернет ошибку 0x800f0954:
Чтобы игнорировать локальный WSUS при установке дополнительных компонентов Windows и Features On Demand (в том числе RSAT) нужно настроить специальный параметр групповых политики:
- Откройте редактор локальной GPO –
gpedit.msc
или используйте доменную консоль управления GPO –
gpmc.msc
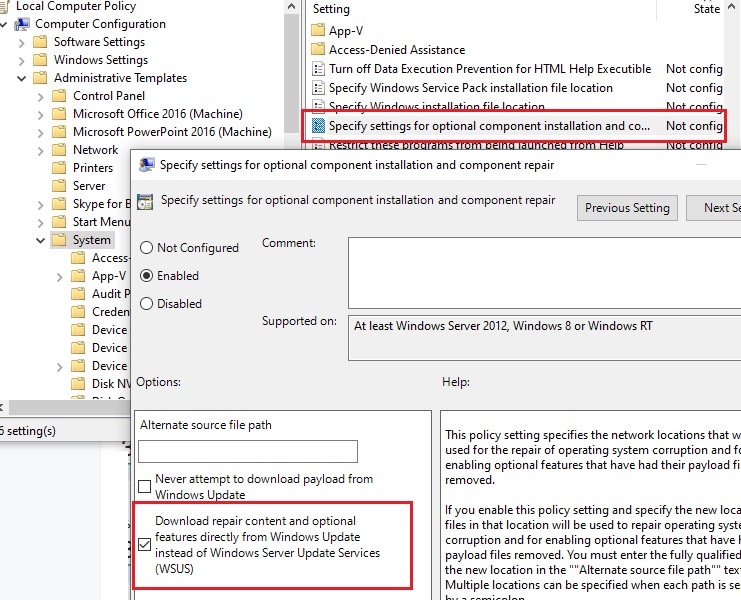
); - Перейдите в раздел Computer Configuration -> Administrative Templates -> System;
- Включите политику Specify settings for optional component installation and component repair, и включите опцию Download repair content and optional features directly from Windows Updates instead of Windows Server Updates Services (WSUS) (опция “Скачайте содержимое для восстановления и дополнительные компненты непосредственно из Центра обновления Windows вместо использования службы WSUS”);

- Сохраните изменения и обновите настройки групповых политик (
gpupdate /force
). - Перезапустите службу Windows Update:
net stop wuauserv
net start wuauserv
Теперь установка RSAT через PowerShell или DISM должна выполняться без ошибок.
Некоторые параметры реестра могут блокировать подключение к Microsoft Update при получении компонентов RSAT. Если при установке RSAT появляется ошибка 0x8024002e, измените значения следующий параметров реестра в ветке
HKLM\SOFTWARE\Policies\Microsoft\Windows\WindowsUpdate
:
- DoNotConnectToWindowsUpdateInternetLocations = 0
- DisableWindowsUpdateAccess = 0
Затем перезапустите службу wuauserv.
Установка RSAT в Windows в офлайн режиме
Если вы не можете открыть прямой доступ с рабочей станции к серверам Microsoft Update, вы можете воспользоваться офлайн установкой RSAT (рекомендуется для корпоративных сетей без прямого доступа в Интернет).

Для офлайн установки RSAT нужно скачать ISO образ диска с компонентами FoD для вашей версии Windows 10/11 с сайта Microsoft или из личного кабинета на сайте лицензирования Microsoft (Volume Licensing Service Center, VLSC):
- Для Windows 10 2004 — https://learn.microsoft.com/en-us/azure/virtual-desktop/language-packs (FOD Disk 1 ISO)
- Для Windows 11 21H2/22H2- https://learn.microsoft.com/en-us/azure/virtual-desktop/windows-11-language-packs (Language and Optional Features ISO)
Например, для Windows 10 2004 x64 нужно скачать образ 19041.1.191206-1406.vb_release_amd64fre_FOD-PACKAGES_OEM_PT1_amd64fre_MULTI.iso (около 5 Гб). Распакуйте образ в сетевую папку. У вас получится набор *.cab файлов, среди которых есть компоненты RSAT.
Теперь для установки компонентов RSAT на рабочей станции Windows нужно указывать путь к данному сетевому каталогу с FoD в параметре -Source:
Add-WindowsCapability -Online -Name Rsat.ActiveDirectory.DS-LDS.Tools~~~~0.0.1.0 -LimitAccess -Source \\msk-fs01\Distr\Windows-FOD\Win101903x64\

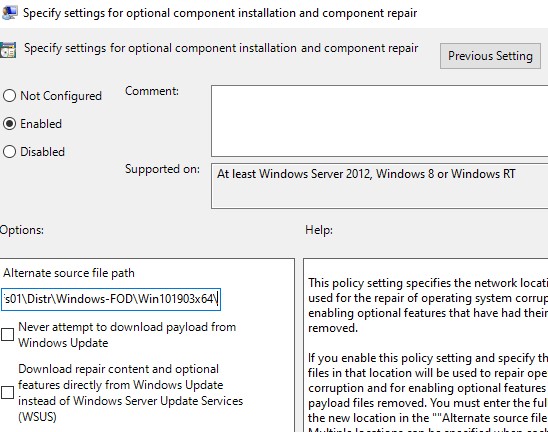
Также вы можете указать путь к каталогу с компонентами FoD с помощью указанной выше групповой политики. Для этого в параметре Alternative source file path нужно указать UNC путь к каталогу с файлами FoD.
Или можете задать этот параметр через реестр отдельной политикой, указав путь к каталогу в параметр LocalSourcePath (тип REG_Expand_SZ) в ветке реестра HKLM\SOFTWARE\Microsoft\Windows\CurrentVersion\Policies\Servicing.
После этого, пользователи смогут самостоятельно устанавливать компоненты RSAT через графический интерфейс добавления компонент Windows 10.
Частые ошибки установки Remote Server Administration Tools в Windows
- 0x8024402c, 0x80072f8f – Windows не может поучить доступ к серверам обновления Windows для получения компонентов RSAT. Проверьте доступ в интернет или установите компоненты из локального образа FoD:
Add-WindowsCapability -Online -Name Rsat.Dns.Tools~~~~0.0.1.0 -LimitAccess -Source E:\RSAT\ - 0x800f081f – проверьте путь к каталогу с компонентами RSAT, указанному в параметре –Source;
- 0x800f0950 – ошибка аналогична 0x800f0954;
- 0x80070490 –проверьте целостность образа Windows с помощью DISM:
DISM /Online /Cleanup-Image /RestoreHealth

Всем привет.
Набор компонентов RSAT (Remote Server Administration Tools/Средства удаленного администрирования сервера) позволяет удаленно управлять серверными ролями и компонентами на серверах Windows Server с обычной рабочей станции. В RSAT входят как графические MMC оснастки, так и утилиты командной строки, и модули PowerShell. Вы можете установить RSAT как на десктопных версиях Windows 10 или 11, так и на платформе Windows Server. В этой статье мы покажем, как установить RSAT в Windows 10 и Windows 11, и в Windows Server 2022/2019/2022 в онлайн и в офлайн режиме через Feature on Demand из графического интерфейса Windows и через консоль PowerShell.
Обычно советуют ставить RSAT либо через отключение WSUS либо GPO. Можно попробовать для начала установить RSAT с временным отключением WSUS:
$UseWUServer = Get-ItemProperty -Path «HKLM:\SOFTWARE\Policies\Microsoft\Windows\WindowsUpdate\AU» -Name «UseWUServer» | Select-Object -ExpandProperty UseWUServer
Set-ItemProperty -Path «HKLM:\SOFTWARE\Policies\Microsoft\Windows\WindowsUpdate\AU» -Name «UseWUServer» -Value 0
Restart-Service «Windows Update»
Get-WindowsCapability -Name «RSAT*» -Online | Add-WindowsCapability –Online
Set-ItemProperty -Path «HKLM:\SOFTWARE\Policies\Microsoft\Windows\WindowsUpdate\AU» -Name «UseWUServer» -Value $UseWUServer
Restart-Service «Windows Update»
Можно попрoбовать правкой GPO через gpedit.msc:
Computer Configuration > Policies > Administrative Templates >System > Specify settings for optional component installation and component repair:
Set it to Enabled
Alternate source file path: <пусто>
Never attempt to download payload from Windows Update: Disabled
Download repair content and optional features directly from Windows Update instead of Windows Server Update Services (WSUS): Enabled
Get-WindowsCapability -Name «RSAT*» -Online | Add-WindowsCapability –Online
Если при установке RSAT вы столкнетесь с ошибкой Add-WindowsCapability failed. Error code = 0x800f0954, или в списке дополнительных компонентов вы не видите RSAT (Компоненты для установки отсутствуют), скорее всего ваш компьютер настроен на получение обновлений со внутреннего WSUS/SCCM SUP сервера. Если вы не можете открыть прямой доступ с рабочей станции к серверам Windows Update, вы можете воспользоваться офлайн установкой RSAT (рекомендуется для корпоративных сетей без прямого доступа в Интернет).
Вот тут как раз мой случай.
Для оффлайн установки RSAT нужно скачать ISO образ диска с компонентами FoD для вашей версии Windows 10 из вашего личного кабинета на сайте лицензирования Microsoft — Volume Licensing Service Center (VLSC). Образ называется примерно так: Windows 10 Features on Demand, version 1903.
Например, для Windows 11 21Н2 x64 нужно скачать образ SW_DVD9_WIN_11_21H2_X64_MULTILANG_LANGPACKALL_LIP_LOF_X22-62148.ISO и распаковать его в сетевую папку (мой диск «H»). У вас получится набор из множества *.cab файлов, среди которых есть компоненты RSAT в папке LanguagesAndOptionalFeatures:
А дальше просто указываем:
dism /online /enable-feature /featurename:Rsat.ActiveDirectory.DS-LDS.Tools~~~~0.0.1.0 /all /Source:H:\LanguagesAndOptionalFeatures\ /LimitAccess
Или в Powershell:
Add-WindowsCapability –online –Name Rsat.ActiveDirectory.DS-LDS.Tools~~~~0.0.1.0 -LimitAccess -Source H:\LanguagesAndOptionalFeatures\
Если наш образ замаплен через RDP-сессию тогда пишем так:
Add-WindowsCapability –online –Name Rsat.ActiveDirectory.DS-LDS.Tools~~~~0.0.1.0 -LimitAccess -Source \\TSCLIENT\H\LanguagesAndOptionalFeatures\
Проверяем результат:
Get-WindowsCapability –online –Name Rsat.ActiveDirectory.DS-LDS.Tools~~~~0.0.1.0 -LimitAccess
Частые ошибки установки Remote Server Administration Tools в Windows:
- 0x8024402c, 0x80072f8f – Windows не может поучить доступ к серверам обновления Windows для получения компонентов RSAT. Проверьте доступ в интернет или установите компоненты из локального образа FoD: Add-WindowsCapability -Online -Name Rsat.Dns.Tools~~~~0.0.1.0 -LimitAccess -Source E:\RSAT\
- 0x800f081f – проверьте путь к каталогу с компонентами RSAT, указанному в параметре –Source;
- 0x800f0950 – ошибка аналогична 0x800f0954;
- 0x80070490 –проверьте целостность образа Windows с помощью DISM: DISM /Online /Cleanup-Image /RestoreHealth
Успехов.

Microsoft has released a new version of Windows 10, dubbed version 21H1. This version brings new functionality that many organizations are eager to utilize. In many organizations, Windows-based devices are joined to Active Directory Domain Services (AD DS), so devices can be managed centrally and end-users can sign-in on any domain-joined device of their liking.
A new Windows version means that Active Directory needs to be properly prepared. In this blogpost, I’ll show you how to prepare Active Directory for Windows 10, version 21H1:
Group Policy
Windows 10, version 21H1 comes with ten new Group Policy settings. To centrally manage Group Policy, you can update the Group Policy Central Store with the new Group Policy template (*.admx) and Group Policy language (*.adml) files. This way, you can centrally manage the versioning of Group Policy templates.
Note:
If your organization doesn’t use the Group Policy Central Store feature, yet, now is a good time to implement it.
You can download the Download Administrative Templates (.admx) for Windows 10 May 2021 Update (21H1) from the Microsoft Download Center. This download includes *.adml files for the Czech, Danish, German, Greek, English, Spanish, Finnish, French, Hungarian, Italian, Japanese, Korean, Norwegian, Dutch, Polish, Portuguese, Russian, Swedish, Turkish and Chinese languages.
Copy the new PolicyDefinitions folder over the existing PolicyDefinitions folder in the Active Directory System Volume (SYSVOL) share to update the Group Policy Central Store.
When you’re a fan of Microsoft’s security baselines, you can download and implement the Security baseline (final) for Windows 10, version 21H1.
Windows Activation
Active Directory-based Activation (ADbA) is available since Windows Server 2012 as a replacement for Microsoft’s Key Management Services (KMS).
Note:
If your organization doesn’t use Active Directory-based Activation, yet, now is a good time to implement it.
You can download the product keys for your organization from the Volume Licensing Service Center (VLSC). Enter the product keys to automatically activate Windows 10 when it comes into scope of your Windows activation method.
Remote Server Administration Tools
In previous Windows 10 version, the Remote Server Administration Tools (RSAT) needed to be downloaded manually to allow admins to manage Windows Server features from these devices. However, since Windows 10, version 1809, the RSAT are included as Features on Demand in Windows 10 itself.
Do not download an RSAT package from this page. Instead, perform the following steps on a device running Windows 10, version 21H1:
- Press the Start button.
- Search for Manage optional features.
Click the search result with the same name - Click Add a feature.
You now see the list of available optional features. - Select and install the specific RSAT tools you need. All RSAT tools names are prefixed with RSAT: , so this makes for easy filtering.
You can install RSAT from the FOD ISOs available from Microsoft. I extracted the contents to a network location and used PDQ Deploy to make a simple deployment package for it. Had to use this approach as I recently setup PAW systems and had to install RSAT without direct internet access.
Dism.exe /online /add-capability /source:\\Win10\2004_FoD /capabilityname:Rsat.ActiveDirectory.DS-LDS.Tools~~~~0.0.1.0
Dism.exe /online /add-capability /source:\\Win10\2004_FoD /capabilityname:Rsat.BitLocker.Recovery.Tools~~~~0.0.1.0
Dism.exe /online /add-capability /source:\\Win10\2004_FoD /capabilityname:Rsat.CertificateServices.Tools~~~~0.0.1.0
Dism.exe /online /add-capability /source:\\Win10\2004_FoD /capabilityname:Rsat.DHCP.Tools~~~~0.0.1.0
Dism.exe /online /add-capability /source:\\Win10\2004_FoD /capabilityname:Rsat.Dns.Tools~~~~0.0.1.0
Dism.exe /online /add-capability /source:\\Win10\2004_FoD /capabilityname:Rsat.FailoverCluster.Management.Tools~~~~0.0.1.0
Dism.exe /online /add-capability /source:\\Win10\2004_FoD /capabilityname:Rsat.FileServices.Tools~~~~0.0.1.0
Dism.exe /online /add-capability /source:\\Win10\2004_FoD /capabilityname:Rsat.GroupPolicy.Management.Tools~~~~0.0.1.0
Dism.exe /online /add-capability /source:\\Win10\2004_FoD /capabilityname:Rsat.IPAM.Client.Tools~~~~0.0.1.0
Dism.exe /online /add-capability /source:\\Win10\2004_FoD /capabilityname:Rsat.LLDP.Tools~~~~0.0.1.0
Dism.exe /online /add-capability /source:\\Win10\2004_FoD /capabilityname:Rsat.NetworkController.Tools~~~~0.0.1.0
Dism.exe /online /add-capability /source:\\Win10\2004_FoD /capabilityname:Rsat.NetworkLoadBalancing.Tools~~~~0.0.1.0
Dism.exe /online /add-capability /source:\\Win10\2004_FoD /capabilityname:Rsat.RemoteAccess.Management.Tools~~~~0.0.1.0
Dism.exe /online /add-capability /source:\\Win10\2004_FoD /capabilityname:Rsat.RemoteDesktop.Services.Tools~~~~0.0.1.0
Dism.exe /online /add-capability /source:\\Win10\2004_FoD /capabilityname:Rsat.ServerManager.Tools~~~~0.0.1.0
Dism.exe /online /add-capability /source:\\Win10\2004_FoD /capabilityname:Rsat.Shielded.VM.Tools~~~~0.0.1.0
Dism.exe /online /add-capability /source:\\Win10\2004_FoD /capabilityname:Rsat.StorageMigrationService.Management.Tools~~~~0.0.1.0
Dism.exe /online /add-capability /source:\\Win10\2004_FoD /capabilityname:Rsat.StorageReplica.Tools~~~~0.0.1.0
Dism.exe /online /add-capability /source:\\Win10\2004_FoD /capabilityname:Rsat.SystemInsights.Management.Tools~~~~0.0.1.0
Dism.exe /online /add-capability /source:\\Win10\2004_FoD /capabilityname:Rsat.VolumeActivation.Tools~~~~0.0.1.0
Dism.exe /online /add-capability /source:\\Win10\2004_FoD /capabilityname:Rsat.WSUS.Tools~~~~0.0.1.0
News and Updates
An update for Microsoft Deployment Toolkit (MDT_KB4564442) has been released: This update fixes a boot loop issue. Details on how to install it are on Michael Niehaus’ blog post here and you can download the fix here. Installation instructions will also be in the walkthrough below. NOTE: If you have existing shares you will need to copy the files from the extracted update to %DeployRoot%\Tools and overwrite the existing files in all shares. You will then need to update the deployment shares and recreate boot media.
Lifecycle Support Notes from Microsoft: If you are using Enterprise or Education editions of Windows 10, from 1809 onwards the YY09 (YYH2) versions of Windows 10 will get 30 months of support and the YY03 versions will only get 18 months. So you may want to consider if you deploy the YY03 versions at all and focus on YY09 releases. Here’s the official information from Microsoft here.
This article is based on current information as of 2021-09-25. I will update it in future as things progress.
In this article as with my previous ones we will walk through installing and configuring Microsoft Deployment Toolkit to build and capture a reference image of Windows 10 version 21H1 using a Hyper-V Virtual Machine. It’s assumed that you have a server or PC ready to install MDT and create a file share for MDT to build the image with, and finally we’ll be focusing on the 64-bit Enterprise edition of Windows 10. Here are the links to the software we’ll be using:
- Windows 10 version 2004 Assessment and Deployment Kit (ADK)
- Windows PE add-on for ADK 2004
- Microsoft Deployment Toolkit (8456)
- Microsoft Deployment Toolkit (8456) Update KB4564442
- Windows 10 version 21H1 x64 | Windows Insider Preview ISO | Volume Licensing Service Center
Additional software which may be useful:
- Rufus
- Remote Server Administration Tools for Windows 10 — Double check that you download the version of RSAT for the version of server you want to administer.
Installing Microsoft Deployment Toolkit and Dependencies
- First, we’ll install the Windows 10 version 2004 ADK. During setup additional files will need to be downloaded, so it may take some time depending on your internet connection.
- On the “Select the features you want to install” screen, select the following:
- Deployment Tools
- Imaging And Configuration Designer (ICD)
- Configuration Designer
- User State Migration Tool (USMT)
- WinPE is a separate install. Install the WinPE add-on by running the adkwinpesetup.exe, there is no specific configuration during the install wizard.
- Now install MDT by running the setup file downloaded earlier. There is no specific configuration during the install wizard.
- Finally, extract the files from MDT_KB4564442, and copy them to
%ProgramFiles%\Microsoft Deployment Toolkit\Templates\Distribution\Toolsreplacing the existing files.
- Open the “Deployment Workbench” from the Start Menu
- Right click on “Deployment Shares”
- Select “New Deployment Share”
- Enter the path for the Deployment Share:
E:\Build - Enter the share name:
Build$ - Give the share a description
- On the Options screen, accept the defaults as you can change them later
- Complete the wizard to create the share
- By default, the share permissions are set the local administrators group. We’ll revisit this later
Adding an Operating System
- Mount the Windows 10 version 21H1 ISO in File Explorer
- Go to “Deployment Workbench” > “Operating Systems”
- Right click and select “New Folder”
- Enter the name “Windows 10 version 21H1 x64” and click through the wizard to create the folder
- Right click again and select “Import Operating System”
- In the wizard, select “Full set of source files” and then enter the root of the mounted ISO as the “Source directory”
- For the destination directory name enter “Windows 10 version 21H1 x64” and complete the wizard
- Go to the “Operating Systems” > “Windows 10 version 21H1 x64” node and rename the new entries added to “Windows 10 version 21H1 Edition x64” for ease of use.
Creating Package Folder for Future Updates
- Go to “Deployment Workbench” > “Packages”
- Create a folder named “Windows 10 version 21H1 x64”
Now we’ll create a selection profile so that the Task Sequence only attempts to install updates for Windows 10 version 21H1 x64 that we make available through MDT.
Creating A Selection Profile
- Expand the “Advanced Configuration” node
- Right click on “Selection Profiles” and select “New Selection Profile”
- Name it “Windows 10 version 21H1 x64”
- On the “Folders” page, tick the “Windows 10 version 21H1 x64” folder under “Packages” and complete the wizard
Importing Applications
If you want to add some applications to be a part of your reference image, here I’ll cover how to add VLC as an example application.
- Go to “Deployment Workbench” > “Deployment Share” > “Applications”
- Right click on “Applications” and select “New Application”
- In the New Application Wizard, choose “Application with source files”
- Give the application the name: VLC
- Enter the “Source” directory of the installation files
- Enter the “Destination” directory: VLC
- For the “Command line” enter anything, we’ll revisit this later
- On the summary page, click “Next” and after the files are copied click “Finish” to complete the wizard
Configuring Applications
- Right click on VLC, go to the Details tab
- Enter the following for the “Quiet install command”:
vlc-setup.exe /S
VLC is now set up to be installed silently by the Task Sequence.
To add other software, you’ll need to repeat the steps above, with the relevant Command line to silently install them. Below are a few command lines for some software I frequently install silently, along with the links to the ‘offline’ installers.
Google Chrome — Enterprise Installer
msiexec /I googlechromestandaloneenterprise64.msi /qn
Adobe Reader — Enterprise Installer
AdobeReaderDC.exe /sAll
We now need to create a new Task Sequence to create a reference image.
Creating a Task Sequence
- In “Deployment Workbench”, go to “Task Sequences”
- Right click and select “New Task Sequence”
- For the ID enter: “W10-21H1”
- Name it “Build Windows 10 21H1”
- Select “Standard Client Task Sequence”
- Select the Operating System “Windows 10 21H1 x64”
- Select “Do not specify a product key at this time”
- Enter an “Organization” name
- Select “Do not specify an Administrator password at this time”
- Complete the wizard
Now we’ll configure the Task Sequence.
Configuring the Task Sequence
- Right click on the “Task Sequence” just created and select “Properties”
- Go to the “Task Sequence” tab on the “Properties” window of the Task Sequence
- Expand the “Preinstall” folder and select the “Apply Patches” item
- Change the “Selection Profile” to “Windows 10 21H1 x64”
- Go to the “State Restore” folder and select “Windows Update (Pre-Application Installation)”
- On the right side of the “Properties” window, go to the “Options” tab
- Uncheck the “Disable this step” tick box and do the same with “Windows Update (Post-Application Installation)”
- If you skipped the “Importing Applications” section, please disable the Install Applications item and go to step 16, if not please continue
- Go to the “Install Applications” item
- In the right side of the “Properties” box, select the “Install a single application” option and click the “Browse…” button
- Select “Google Chrome” and change the name Install Applications to “Google Chrome”
- Install other Applications, copy and paste the “Install Applications” item and repeat steps 13 — 15 for the applications of your choice
- Click “Apply” and close the Task Sequence
Blocking Internet Access to prevent Microsoft Store App Updates
To block internet access to the VM whilst the image is building, we’ll use my Internet Access Control Utility.
Running the script with the -disable switch will create a firewall rule that will block internet traffic on ports 80 and 443.
- First download Internet Access Control Utility from GitHub and copy it to
\\mdt-server\build-share\_custom - In the “Task Sequence” created above, we’ll add the items required to run the PowerShell script
- Go to the “Task Sequence” tab on the “Properties” window of the Task Sequence
- Go to “State Restore” and click on the “Add” button
- Go to “General” > “Run PowerShell Script”
- Name the new item “PS Script — Disable Internet Access”
- Enter
Z:\_custom\Internet-Access-Control.ps1 - Add
-Disableto the Parameters section - Scroll down the Task Sequence to just above the “Imaging” folder
- Once again, add a new “Run PowerShell Script” item
- Name it “PS Script — Enable Internet Access”
- Again, enter
Z:\_custom\Internet-Access-Control.ps1 - Add
-Enableto the Parameters section - Click “Apply” and OK to close the Task Sequence
Next, we’ll create a domain user account for MDT for use as a service account.
Creating a service account for MDT in Active Directory
- Go to “Active Directory Users and Computers”
- Create a user called
mdt_adminand give it a complex password - Go to the Server or PC where the “Deployment Share” is hosted
- Give the user
mdt_admin“Full Control” share permissions and “Full Control” file permissions to all the files and folders in the “Deployment Share”
Next, we need to configure the “Bootstrap.ini” and the “CustomSettings.ini” files to control certain aspects of the deployment environment. The settings below enable auto log in and skip the welcome screen, so these should only be used for lab or closed development environments.
Configuring Bootstrap.ini
- In “Deployment Workbench”, right click the “Deployment Share” and select “Properties”
- Select the “Rules” tab and click the “Edit Bootstrap.ini” button
- Add the settings below to the “Bootstrap.ini”
- Close and Save the Bootstrap.ini
|
|
Configuring CustomSettings.ini
On the “Rules” tab of the “Deployment Share” properties window, add the settings below.
|
|
We now need to create the boot media to boot the VM into the deployment environment.
Creating the Boot Media
- In “Deployment Workbench”, right click on the “Deployment Share”
- Select “Update Deployment Share”
- Select “Completely regenerate the boot images”
- Complete the wizard. It will take some time to create the boot images
Testing and Capturing a Reference Image
To test everything, we need to copy the ISO file that we just generated. It is in the “Boot” folder in the “Deployment Share”. Go to the Server or PC that is hosting the deployment share and navigate to the boot folder. Inside there should be a file named LiteTouchPE_x64.iso. Copy this file to a location where a Hyper-V Virtual Machine will be able to access it.
Create a new VM in Hyper-V with the following configuration:
- For Hyper-V Only: Use Generation 1, not 2 VMs. I’ve had issues reported with Gen2 VMs
- At least 2x vCPUs
- At least 4GB of RAM
- Network Adaptor with access the local network
- Virtual Hard Drive of at least 40GB, preferably on fast media
- Boot from CD using the
LiteTouchPE_x64.isofrom MDT - If using Hyper-V on Windows 10 1709 or above, make sure “Use Automatic Checkpoints” is disabled
Start the VM and it will boot from the LiteTouchPE_x64.iso into the deployment environment. You will be presented with a screen with the name of the “Task Sequence” you created earlier. Select your Task Sequence, click Next and the process will begin. The Task Sequence will install Windows 10 version 21H1, update from the WSUS server, install the optional applications if you added them, and then run Windows Update from the WSUS server again. It will then run SysPrep and attempt to reboot back into the deployment environment from the local disk and send the image to the MDT server.
When this process completes the VM will be shutdown and a file named W10-21H1_YEAR_MONTH_DAY_HOUR_MINUTE.wim will be in the Captures folder in the Deployment Share.
You now have a reference image for Windows 10 version 21H1 and a Microsoft Deployment Toolkit installation, with a deployment share specifically configured for building and capturing reference images. We’ll cover setting up a deployment share and focus on tasks to support deploying Windows to real hardware in this article.
Support My Work
Please consider supporting my work:
- Sign up using Patreon.
- Support with a one-time donation using PayPal.
If you have any questions or comments please leave them below.
-Mike