Was this article helpful?
Yes
No
| 83
people found this helpful in last 30 days
This article provides troubleshooting steps if you can’t access your router.
The easiest way to manage your router’s settings and wireless network is the Nighthawk app. You can use the Nighthawk app to update your router’s firmware or check the speed of your network. To download the app, visit nighthawkapp.com. To check if your product is supported, see Which products support the NETGEAR Nighthawk app?.
Use the following troubleshooting tips for help with accessing your NETGEAR router:
- Make sure you are connected to the router’s WiFi network. The default WiFi settings are located on a label on the bottom or back panel of the router (highlighted yellow in the following example):


- Make sure that you are using the correct web address, user name, and password. For more information, see How do I log in to my NETGEAR home router?.
- Web address: www.routerlogin.net or www.routerlogin.com
- The user name is admin. The password is the one that you specified during setup. The user name and password are case-sensitive.
- If you forgot your admin password, you can recover it with the Password Recovery feature. For more information, see How do I recover my NETGEAR admin password?.
- If you see an error message when attempting to access routerlogin.com or routerlogin.net, visit the following links for instructions on how to clear your browser cache:
- Google Chrome: https://support.google.com/accounts/answer/32050
- Microsoft Edge: https://support.microsoft.com/en-us/help/10607/microsoft-edge-view-delete-browser-history
- Apple Safari: https://support.apple.com/guide/safari/clear-your-browsing-history-sfri47acf5d6/mac
- Mozilla Firefox: https://support.mozilla.org/en-US/kb/how-clear-firefox-cache
- Internet Explorer: https://support.microsoft.com/en-us/help/17438/windows-internet-explorer-view-delete-browsing-history
Note: Using a different browser might also resolve your access error. For example, if you normally use Google Chrome, try accessing the router login page using Microsoft Edge or Mozilla Firefox.
- Temporarily disable any pop-up blockers, firewalls, and ad-blocking software that you use.
- Enter your router’s default IP address in your browser’s address bar instead of routerlogin.com or routerlogin.net.
Note: First, try 192.168.1.1 or 192.168.0.1. If those IP addresses do not work, see one of the following topics:- How to Find Your Router’s IP Address on Any Computer, Smartphone, or Tablet
- Finding your IP address without using the command prompt
- Try connecting to your router in a different way:
- If you’re using WiFi, try using a wired Ethernet connection. You can also try different wireless connections. For example, if you are connected to the 2.4 GHz wireless band, connect to the 5 GHz band.
- Try using a different device (phone, tablet, laptop, desktop).
Note: If you are connected to multiple networks at the same time (wired, wireless, VPN, or a corporate connection), you might not be able to access your router’s web interface. Disconnect from any additional Internet or VPN connections and only connect to your NETGEAR router.
- Power cycle your router, modem, and connected devices (including desktops, laptops, phones, tablets, game consoles).
For more information, see How do I power cycle my home network?.
- If none of the above steps resolve your router access issues, perform a factory reset of the router. For more information, see How do I perform a factory reset on my NETGEAR router?.
Note: After you perform a factory reset, any personalized router settings and configurations that you made are lost. Your router’s admin user name, admin password, WiFi network name (SSID), WiFi password, and security settings return to factory settings.
Follow these steps after you perform a factory reset:
- After factory resetting your router, log in in to your router using the default user name and password.
- Click ADVANCED.
- Under Router Information, make sure that your router’s IP Address is 192.168.1.1 or 192.168.0.1.
- After you regain access to your router, to prevent further login issues, make sure that your firmware is up to date:
- Click ADVANCED > Router Update > Check.
- If new firmware is available, click Yes to update the firmware.
For more information:
- How do I set up and install my NETGEAR router?
- Wireless Networking Setup And Issues
- How to Troubleshoot your NETGEAR Wireless Router Network
Last Updated:01/11/2023
|
Article ID: 27199
Was this article helpful?
Yes No
This article applies to:
- Wireless AC Router Nighthawk (35)
- AC2100
- AC2400
- AC2600
- R6260
- R6350
- R6700
- R6700v2
- R6700v3
- R6800
- R6850
- R6900
- R6900P
- R6900v2
- R7000
- R7000P
- R7100LG
- R7200
- R7300DST
- R7350
- R7400
- R7450
- R7500
- R7500v2
- R7800
- R7850
- R7900
- R7900P
- R7960P
- R8000
- R8000P
- R8300
- R8500
- R8900
- R9000
- RS400
- Wireless AX Router Nighthawk (WiFi 6) (39)
- R6700AX
- R6700AXS
- RAX10
- RAX120
- RAX120v2
- RAX15
- RAX20
- RAX200
- RAX28
- RAX29
- RAX30
- RAX35
- RAX35v2
- RAX36S
- RAX38
- RAX38v2
- RAX40
- RAX40v2
- RAX41
- RAX41v2
- RAX42
- RAX42v2
- RAX43
- RAX43v2
- RAX45
- RAX48
- RAX49S
- RAX5
- RAX50
- RAX50S
- RAX50Sv2
- RAX50v2
- RAX54
- RAX54S
- RAX54Sv2
- RAX70
- RAX75
- RAX78
- RAX80
- Wireless AC Router (21)
- AC1450
- JR6100
- JR6150
- R6020
- R6050
- R6080
- R6100
- R6120
- R6200
- R6200v2
- R6220
- R6220v2
- R6230
- R6250
- R6250v2
- R6300-2CHNAS
- R6300v1
- R6300v2
- R6330
- R6400
- R6400v2
- Nighthawk Pro Gaming (11)
- XR1000
- XR1000-1RNNAS (ENTOUCH)
- XR1000-1RNNAS (GRANDE)
- XR1000-1RNNAS (RCN)
- XR1000-1RNNAS (WAVE)
- XR1000v2
- XR300
- XR450
- XR500
- XR700
- XRM570
- Cable Modem & Gateway (17)
- CG814M
- CG814WG
- CG814WGARM
- CG814WGARMv2
- CG814WGCHA
- CG814WGCHAv2
- CG814WGCOM
- CG814WGCOMv2
- CG814WGCX
- CG814WGCXv2
- CG814WGCXv3
- CG814WGSTv3
- CG814WGTWC
- CG814WGTWCV1
- CG814WGTWCv2
- CG814WGTWv3
- CM212
- DSL Gateway N (31)
- D1500
- D3600
- DGN1000
- DGN1000B
- DGN1000Bv3
- DGN1000SP-1RGUKS
- DGN1000SS-1VGUKS
- DGN1000v3
- DGN2000
- DGN2000B
- DGN2200-4DDAUS
- DGN2200B
- DGN2200Bv3
- DGN2200Bv4
- DGN2200M
- DGN2200M-2TKSAS
- DGN2200MB
- DGN2200T-3BEGES
- DGN2200v1
- DGN2200v3
- DGN2200v4
- DGN3500
- DGN3500B
- DGND3300Bv2
- DGND3300v1
- DGND3300v2
- DGND3700Bv2
- DGND3700v1
- DGND3700v2
- DGND3800B
- DGND4000
- DSL Modem (11)
- D500
- DM111PB
- DM111PBLv2
- DM111PSP-2GTLAS
- DM111PSPv1
- DM111PSPv2
- DM111Pv1
- DM111Pv2
- DM200
- ProLine 6100
- Versalink 7500
- DSL Gateway AC (11)
- D6000
- D6100
- D6200
- D6200B
- D6200v2
- D6300
- D6300B
- D6400
- D7000
- D7000v2
- D7800
- DSL Modem Legacy (25)
- DG632
- DG632B
- DG814
- DG824M
- DG824MB
- DG834B
- DG834Bv2
- DG834Bv3
- DG834Bv4
- DG834GB
- DG834GBv2
- DG834GBv3
- DG834GBv4
- DG834GBv5
- DG834GSPv3
- DG834Gv1
- DG834Gv2
- DG834Gv3
- DG834Gv4
- DG834Gv5
- DG834v1
- DG834v2
- DG834v3
- DG834v4
- DM602
- DSL Gateway G and older (7)
- DG834GT
- DG834GTB
- DG834GU
- DG834GUv5
- DG834GVEN
- DG834GVv1
- DG834GVv2
- DSL Gateway N Legacy (6)
- DG834NB
- DG834NBv2
- DG834Nv1
- DG834Nv2
- DG834PN
- DG834PNB
- WiFi Range Extenders (1)
- PR2000
- Wireless N Router (72)
- CENTRIA (WNDR4700/4720)
- JNDR3000
- JNR1010
- JNR1010v2
- JNR3000
- JNR3210
- JNR3300
- JWNR2000-4EMRUS
- JWNR2000T
- JWNR2000Tv3
- JWNR2000v1
- JWNR2000v2
- JWNR2000v3
- JWNR2000v5
- JWNR2010
- JWNR2010v3
- JWNR2010v5
- R2000
- R4500
- WNDR3300v1
- WNDR3300v2
- WNDR3400-1CANAS
- WNDR3400v1
- WNDR3400v2
- WNDR3400v3
- WNDR3600v3
- WNDR3700v1
- WNDR3700v2
- WNDR3700v3
- WNDR3700v4
- WNDR3700v5
- WNDR37AVv1
- WNDR37AVv2
- WNDR3800
- WNDR4000
- WNDR4300
- WNDR4300v2
- WNDR4500
- WNDR4500v2
- WNDR4500v3
- WNDRMACv1
- WNDRMACv2
- WNR1000-2VCNAS
- WNR1000v1
- WNR1000v2
- WNR1000v3
- WNR1000v4
- WNR1500
- WNR2000-3XFNAS
- WNR2000UPPE
- WNR2000v1
- WNR2000v2
- WNR2000v3
- WNR2000v4
- WNR2000v5
- WNR2020
- WNR2020v2
- WNR2050
- WNR2200
- WNR2500
- WNR3500CEIF
- WNR3500Lv1
- WNR3500Lv2
- WNR3500v1
- WNR3500v2
- WNR500
- WNR612
- WNR612-2EMRUS
- WNR612v2
- WNR612v3
- WNR614
- WNR618
- Legacy Wireless Router (5)
- HR314
- MR314
- MR814v1
- MR814v2
- MR814v3
- Wireless G Router (35)
- JWAGR614
- KWGR614
- WAGR614
- WGB511
- WGM124
- WGR101
- WGR612
- WGR613V
- WGR614-7VCNAS
- WGR614-8CONAS
- WGR614-9UMGRS
- WGR614A
- WGR614B
- WGR614L
- WGR614v1
- WGR614v10
- WGR614v2
- WGR614v3
- WGR614v4
- WGR614v5
- WGR614v6
- WGR614v7
- WGR614v8
- WGR614v9
- WGR615V
- WGR826V
- WGT624SC
- WGT624SCv3
- WGT624v1
- WGT624v2
- WGT624v3
- WGT624v3RV
- WGT624v4
- WGT634U
- WGU624
- Legacy Home Networking (13)
- RH340
- RH348
- RO318
- RP114
- RP334
- RP614v1
- RP614v2
- RP614v3
- RP614v4
- RT311
- RT314
- RT328
- RT338
- Legacy Wireless N Router (10)
- WNR834Bv1
- WNR834Bv2
- WNR834M
- WNR854T
- WNXR2000
- WPN824N
- WPN824v1
- WPN824v2
- WPN824v3
- WPNT834
- Adapters Legacy (2)
- TA612V
- TA612VSP
- Wireless BE Router Nighthawk (WiFi 7) (1)
- RS700
- Wireless AX Router Nighthawk (WiFi 6E) (4)
- RAXE290
- RAXE300
- RAXE450
- RAXE500
How to Find Your Model Number
Read this article in another language:
Looking for more about your product?
Get information, documentation, videos and more for your specific product.
Need to Contact NETGEAR Support?
With NETGEAR’s round-the-clock premium support, help is just a phone call away.
Complimentary Support
NETGEAR provides complimentary technical support for NETGEAR products for 90 days from the original date of purchase.
Contact Support
NETGEAR Premium Support
GearHead Support for Home Users
GearHead Support is a technical support service for NETGEAR devices and all other connected devices in your home. Advanced remote support tools are used to fix issues on any of your devices. The service includes support for the following:
- Desktop and Notebook PCs, Wired and Wireless Routers, Modems, Printers, Scanners, Fax Machines, USB devices and Sound Cards
- Windows Operating Systems (2000, XP or Vista), MS Word, Excel, PowerPoint, Outlook and Adobe Acrobat
- Anti-virus and Anti-Spyware: McAfee, Norton, AVG, eTrust and BitDefender
Learn More
ProSUPPORT Services for Business Users
NETGEAR ProSUPPORT services are available to supplement your technical support and warranty entitlements. NETGEAR offers a variety of ProSUPPORT services that allow you to access NETGEAR’s expertise in a way that best meets your needs:
- Product Installation
- Professional Wireless Site Survey
- Defective Drive Retention (DDR) Service
Learn More
Power cycling your PC should do the trick here
by Farhad Pashaei
As a technophile, Farhad has spent the last decade getting hands-on experience with a variety of electronic devices, including smartphones, laptops, accessories, wearables, printers, and so on. When… read more
Updated on
- If the Netgear router login is not working, it might be due to malware on your PC.
- Power cycling the electronic devices and routers can be the easiest fix for this type of problem.
- Another excellent solution is to update your browser.
When it comes to wifi routers, Netgear routers are among the best, yet users have experienced issues such as Netgear router login not working.
This makes it impossible for users to log into routerlogin.net. Fortunately, there are ways to solve this problem, and we will show you how in this guide.
Why is my Nighthawk router login page not working?
Below are some of the potential causes of this issue, as reported by users:
- Wrong login details: In most circumstances, the problem is caused by a user typing the wrong username and password. You need to double-check and probably make the password visible while typing.
- Outdated browser: Even the best browsers for all devices misbehave when they are outdated. Hence, you need to update your browser to ensure it is not the cause of this issue.
- Presence of malware: Sometimes, this problem can be down to the activities of viruses. The solution to this is to perform a malware scan with top-notch antivirus software.
How do I find my Netgear router login?
Finding the Netgear router login page is pretty straightforward. You only need to visit routerlogin.net on a browser on any device connected to the router.
Another option is to type http://192.168.1.1 in the address bar on your browser and hit Enter. This will bring up the login page.
How can I fix the Netgear router login if it’s not working?
Listed below are some basic troubleshooting steps to try before proceeding to the sophisticated fixes in this section:
How we test, review and rate?
We have worked for the past 6 months on building a new review system on how we produce content. Using it, we have subsequently redone most of our articles to provide actual hands-on expertise on the guides we made.
For more details you can read how we test, review, and rate at WindowsReport.
- Restart your router and PC.
- Power cycle your router.
- Double-check your credentials.
- Change the device you are trying to login with.
- Use a different connection mode (switch wired connection from wireless and vice versa).
If this does not work, you can now delve into the solutions below:
1. Update the firmware
- Connect your computer to your router with an Ethernet cable.
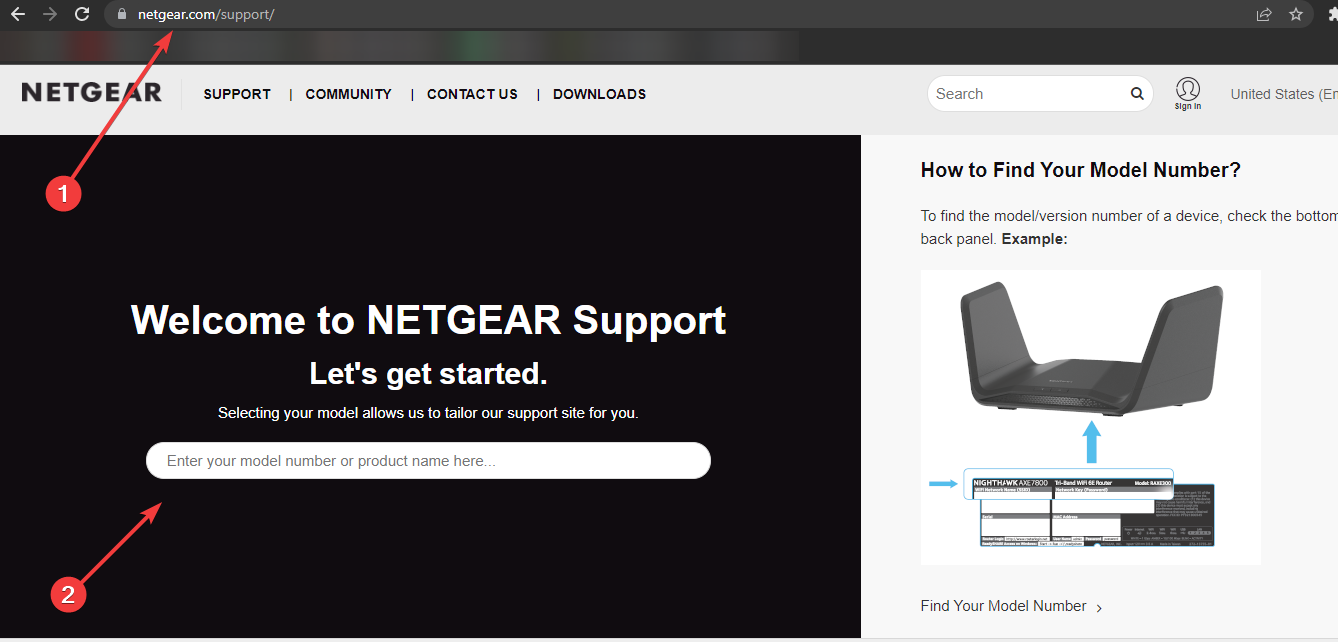
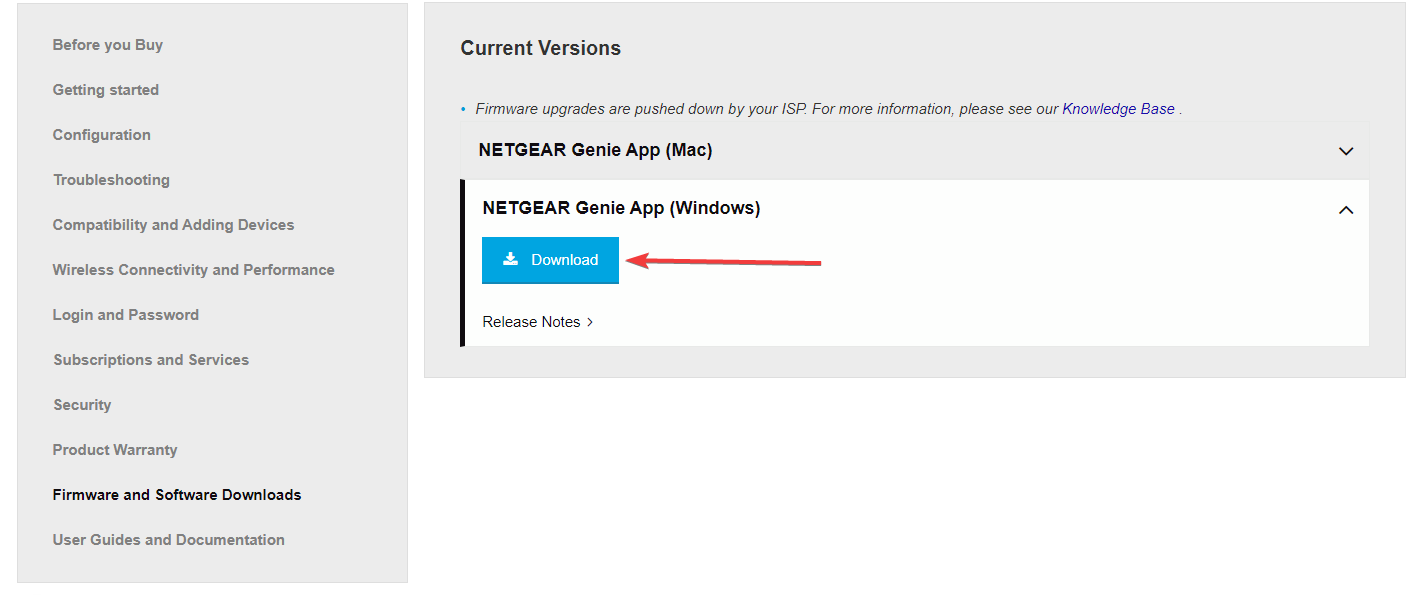
- Visit NETGEAR Support and enter your router’s Model Number or Product Name.

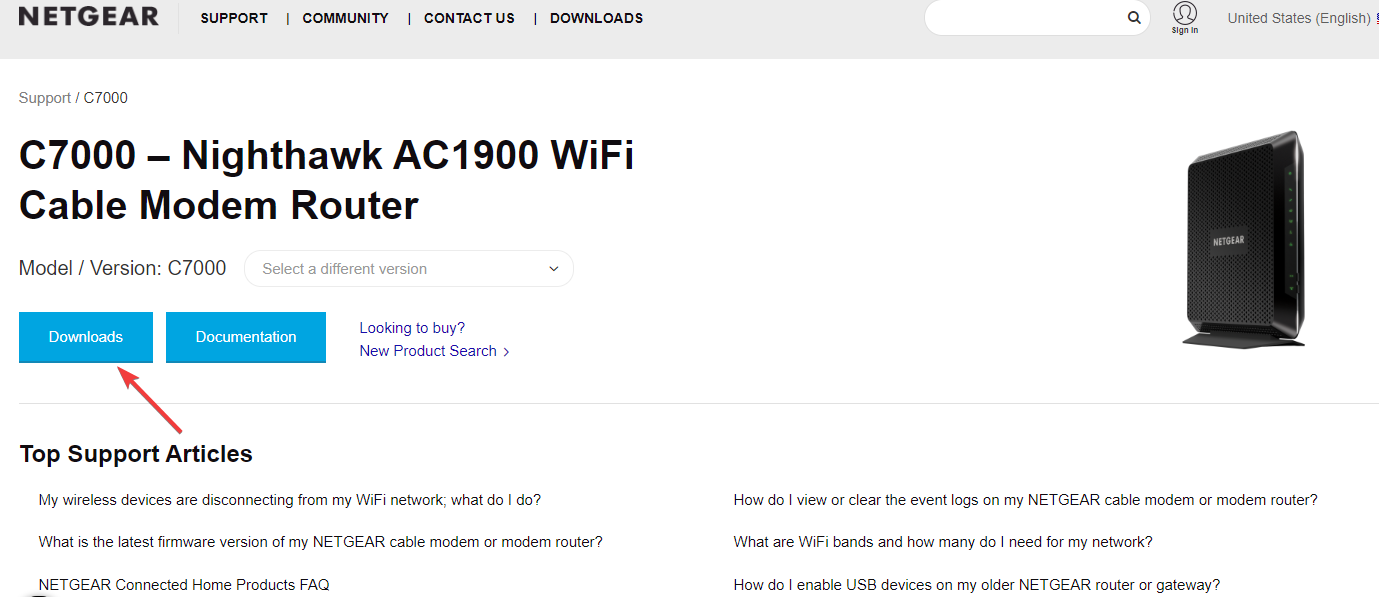
- Click Downloads.

- Select a firmware version and click Download.

- Unzip the file if needed.
- Enter routerlogin.net into a web browser, and a login page displays.
- Type in the router admin username and password.
- The default username is admin. The password is the one you specified the first time you logged in. The username and password are case-sensitive.
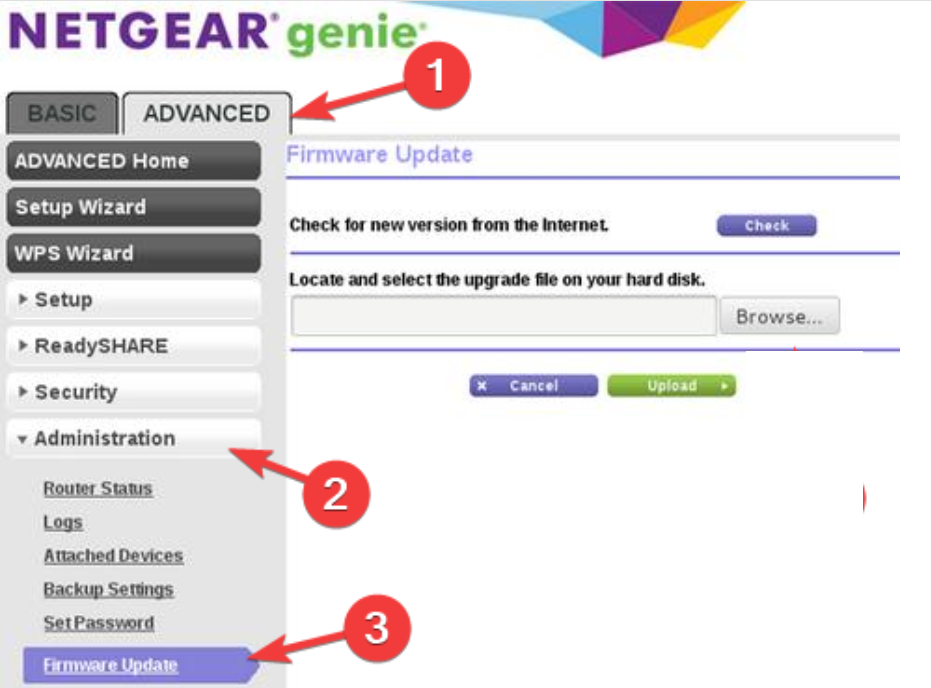
- Select ADVANCED, then Administration.
- Now, select Firmware Update or Router Update.

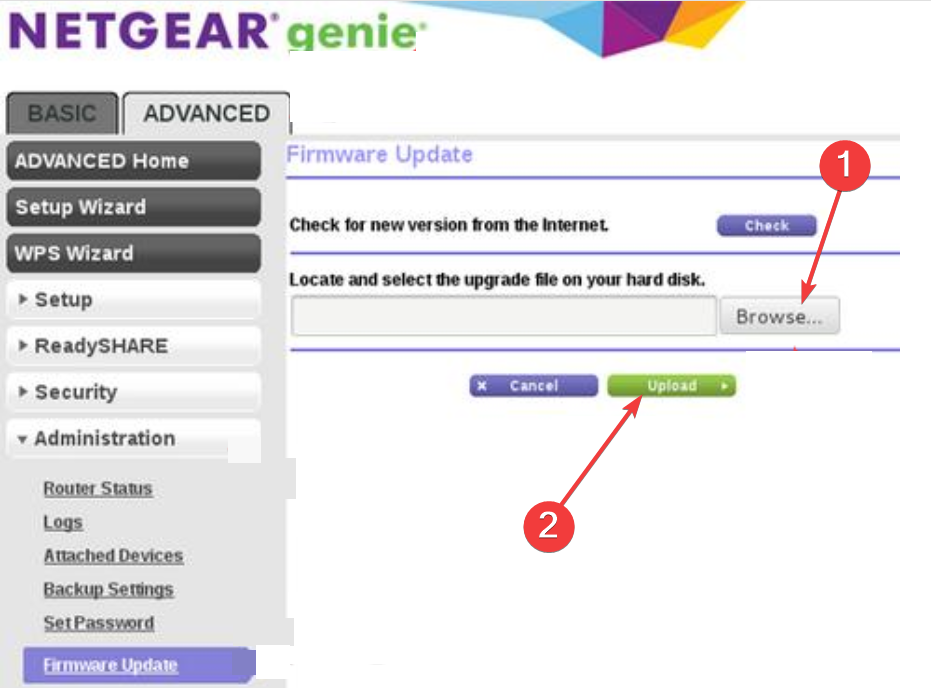
- Click Choose File or Browse, then locate and select the firmware file that ends in .img or .chk.
- Finally, click the Upload button.
Some models might use slightly different navigation, like Settings and then Administration.
Do not attempt to go online, turn off the router, or do anything else with the router until it has completed the firmware update.
2. Update your web browser
2.1. Chrome
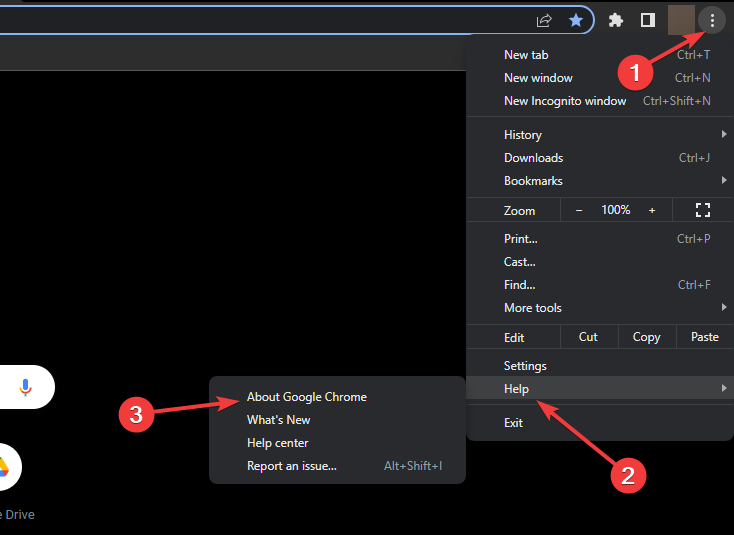
- Open the Google Chrome browser.
- Click the Chrome settings in the upper-right corner of the screen.
- From the drop-down menu that appears, select Help, then select About Google Chrome.

- Chrome checks for updates in the next window and displays the most recent version.
2.2. Mozilla Firefox
- Open the Mozilla Firefox browser.
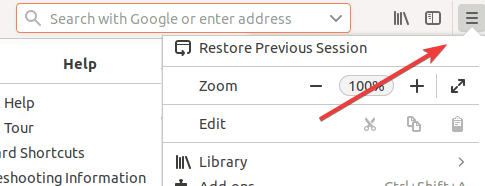
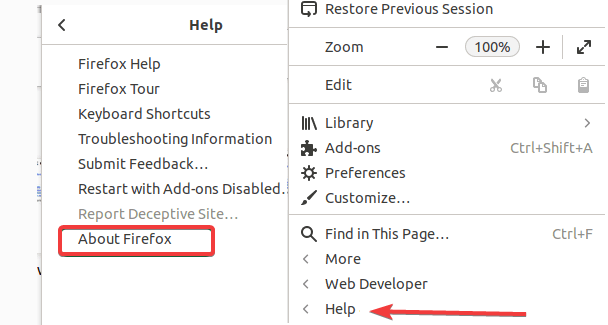
- Click the Open menu button in the upper-right corner of the screen.

- In the menu that appears, click the Help option at the bottom. Select About Firefox.

- Firefox looks for updates and presents the current version in the next window.
2.3. Microsoft Edge
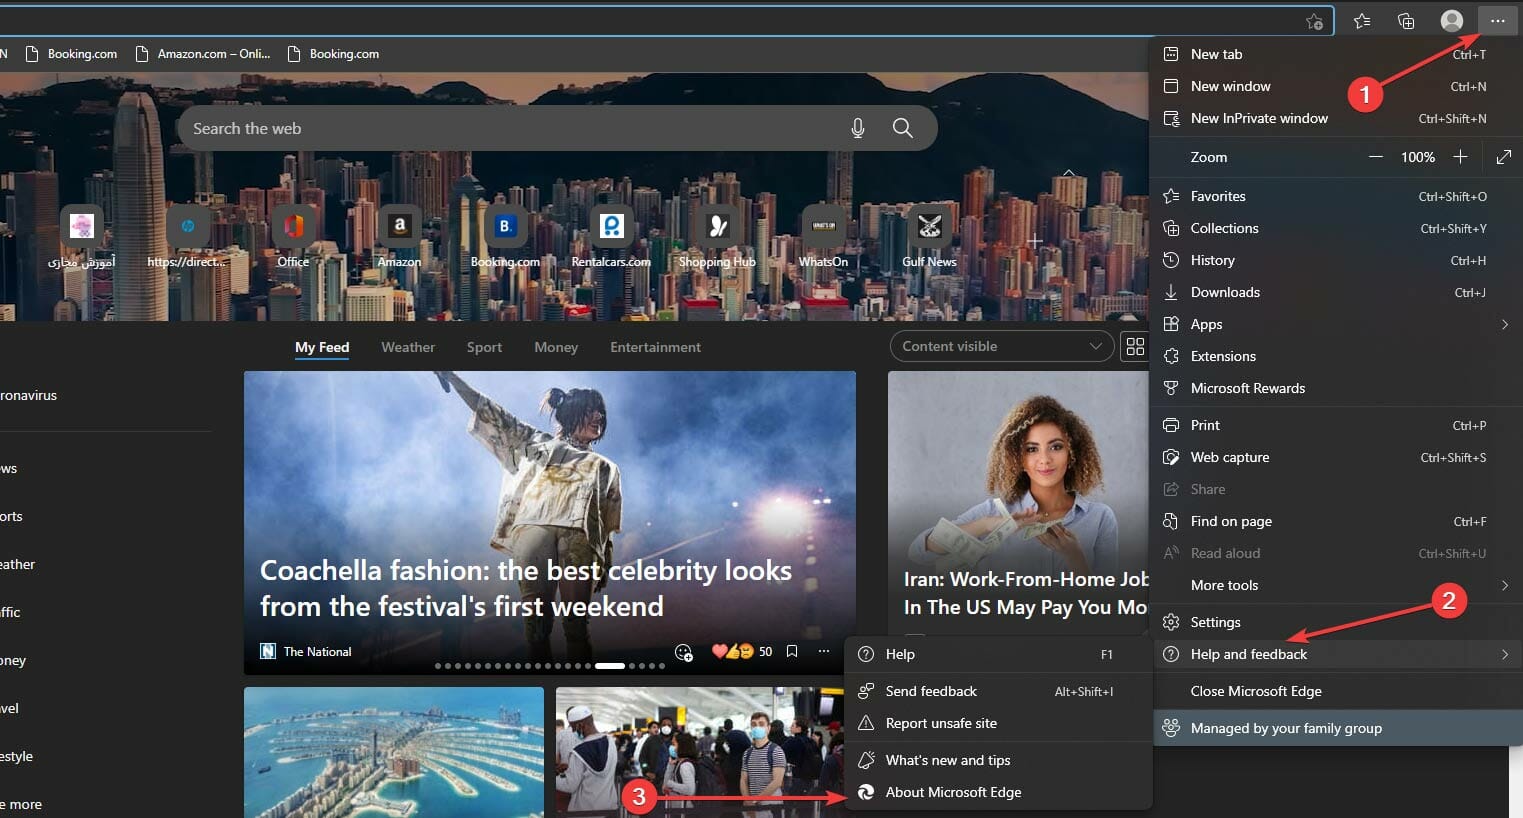
- Open the Microsoft Edge browser.
- Click the Microsoft Edge More menu in the upper-right corner of the browser window.
- Move the mouse pointer over Help and feedback near the bottom of the drop-down menu that appears, then select About Microsoft Edge from the side menu.

- If Edge isn’t up to date when the next window starts, it will update automatically.
Out-of-date browsers may cause the Netgear router login default not to work. Thus, keeping the browser up to date may solve the issue.
In addition, you can try fixing the router login issue by clearing your browser cache to erase accumulated data or cookies. To perform this task successfully, it’s advised to use the most efficient cookie and cache cleaner software.
If you need to resolve the Netgear login error and navigate without interruptions, you can switch to a more secure browser like Opera.
You will enjoy future-proof functionalities like free VPN security and ad-blocker, social media integrated apps, or seamless file-sharing options.
⇒ Get Opera
- Fix: ATA/SATA Hard Drive not Detected in BIOS
- Spacebar, Enter, and Backspace are Not Working on Windows 11 [Fix]
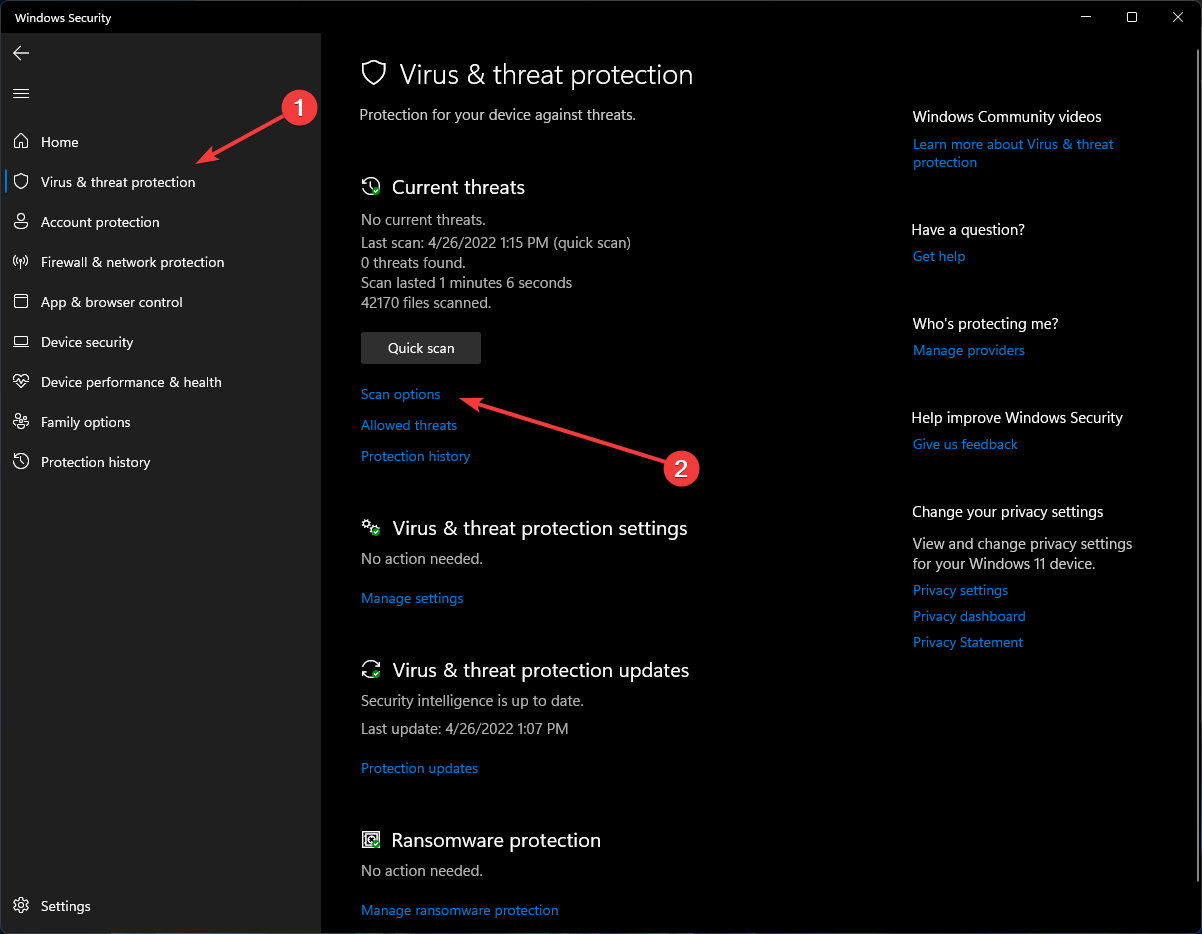
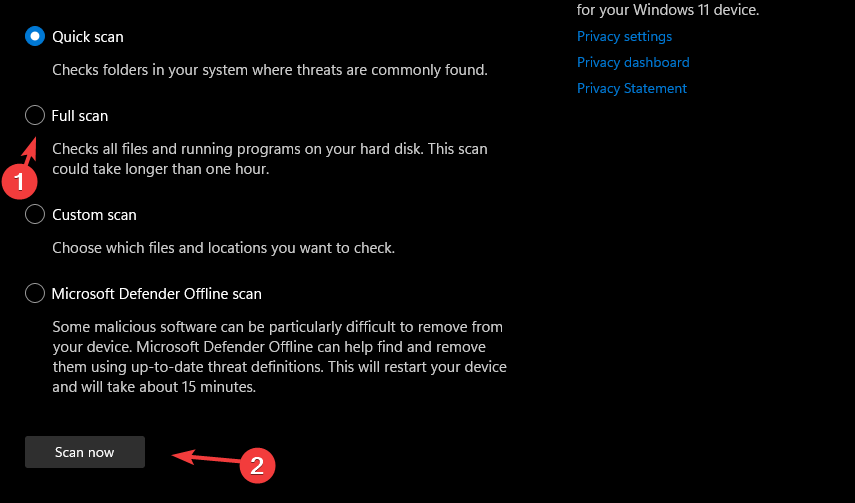
3. Run a virus scan
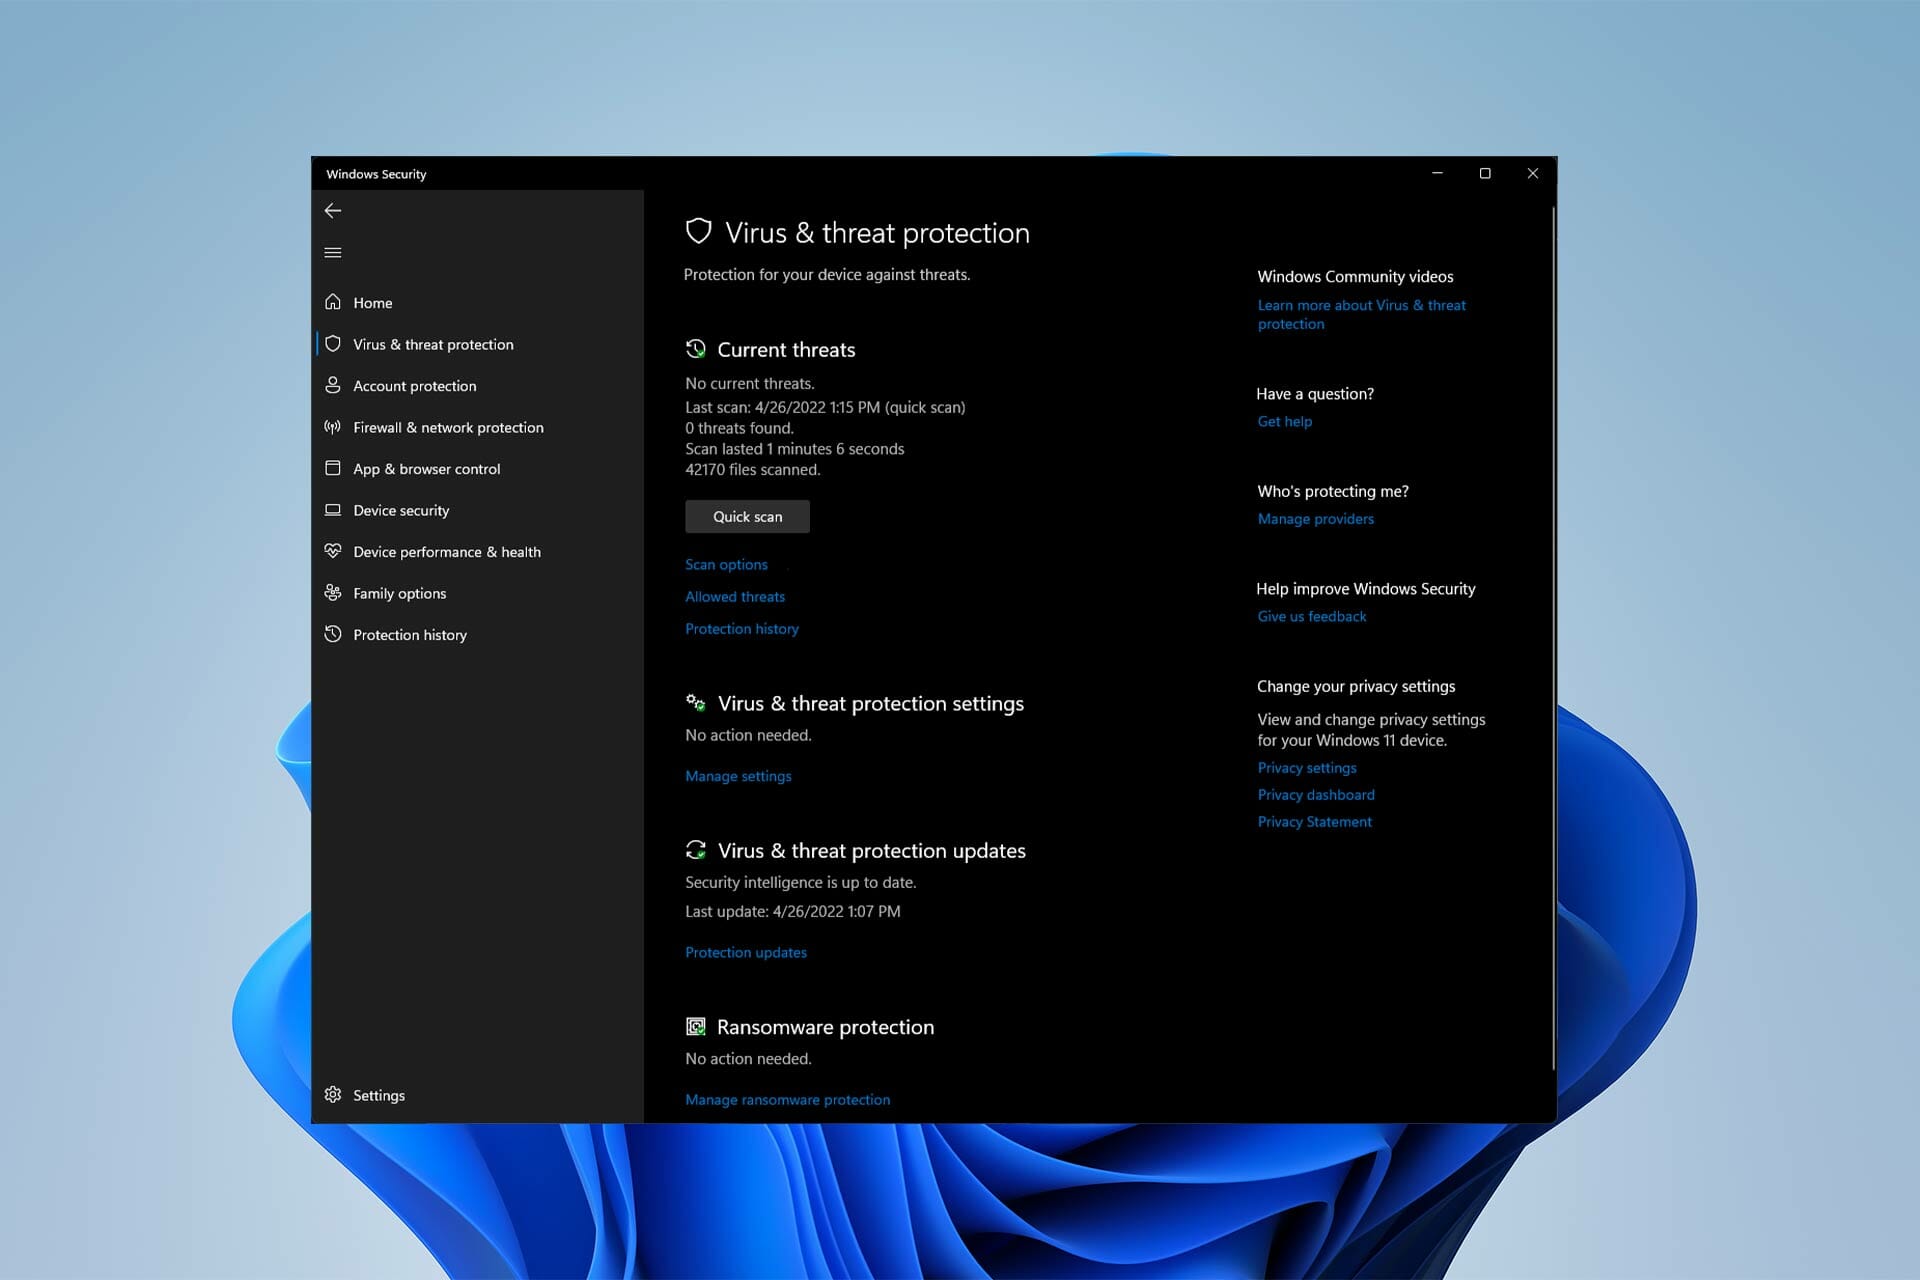
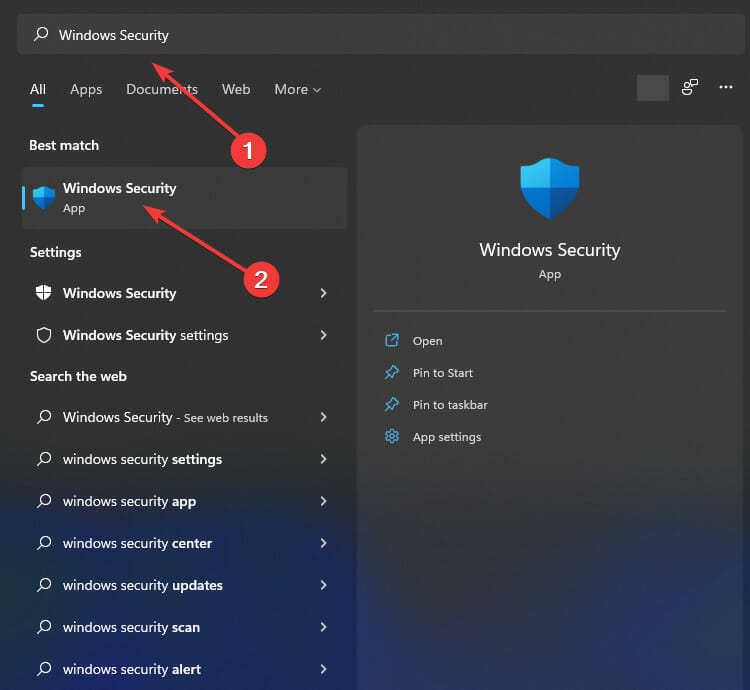
- Search for Windows Security in the Start menu and click the top result to open the app.

- Click on Virus & threat protection. Under the Current threats section, click on Scan options.

- Select the Full scan option to check the entire system for viruses and any other type of malware.
- Click the Scan now button.

Several new malware strains attach themselves to drivers to avoid detection by anti-malware scanners.
If malware was linked to a WiFi driver and disrupted its processes, your computer will be unable to connect to WiFi, resulting in the Netgear router admin login not working.
For those seeking a professional antivirus, we recommend downloading ESET NOD32 software.
While it can defend you against various viruses with multilayered proactive protection, unlike most antiviruses, it does not slow down your computer, making it one of the best anti-virus programs available.
We have reached the end of this detailed guide on fixing the Netgear router login not working issue. Hopefully, you were able to solve the problem before exhausting the solutions therein.
If you’re encountering Netgear wireless adapter problems in Windows 10, this article might help.
Let us know the method you took to resolve the Netgear router logging not working issue in the comments section below.
![]()
Роутеры Netgear — WNR2200, JNR3210, WNR3500L, WNR3800, WNDR4500, R6200, R6300 — на последних версиях прошивки имеют одну весьма удобную особенность — свой хостнейм в локальной сети: routerlogin.net. Что это такое? Если говорить простым языком — имеется ввиду, что теперь для входа в веб-интерфейс роутера не обязательно вводить IP-адрес в адресной строке браузера (http://192.168.1.1 или http://192.168.0.1) — достаточно просто набрать routerlogin.net, и Вы увидите тот же Веб-интерфейс.
Для чего это вообще нужно и не проще ли делать вход по 192.168.1.1, как на остальных?! На самом деле, наличие хостнейма очень удобно — не надо запоминать IP-адрес роутера — достаточно только хостнейм. К тому же, это нововведение в первую очередь связано с переводом провайдеров на IPv6 и, соответственно, переводом роутеров на Протокол TCP/IPv6. Действительно — одно дело вводить IPv6-адрес роутера типа fe80::4a5b:39ff:fe1a:e457, и совсем другое -хостнейм: routerlogin.net.
Но до массового перехода на IPv6 ещё дело не дошло, а у пользователей возникают проблемы ещё и на IPv4 — они не могут попасть в веб-интерфейс роутера Netgear по адресу: http://routerlogin.net — в браузере выдается ошибка — «сервер не найден» или «веб-страница недоступна».
Причина такого явления скорее всего в следующем:
Если у Вас до этого уже был опыт в настройке модемов или роутеров, то Вы должны знать, что у большинства сетевых устройств IP-адрес в локальной сети: 192.168.1.1 или 192.168.0.1. На модемах и роутерах Netgear по умолчанию запущен DHCP-сервер и прописывать IP-адрес вручную не нужно — сетевая плата должна сама получить IP-адрес и адреса DNS-серверов.
Но иногда пользователи вручную прописывают IP-адрес, маску и шлюз, не указывая при этом DNS-сервер. Это и есть самая частая ошибка. Если в качестве основного DNS-сервера не прописать IP-адрес роутера (192.168.1.1 или 192.168.0.1), то роутер не будет доступен по хостнейму routerlogin.net. А вот если попробуете сделать вход на http://192.168.1.1 или http://192.168.0.1, то веб-интерфес роутера будет доступен. Проверить какой прописан адрес DNS-сервера можно следующим образом. Нажимаем комбинацию клавиш Win+R и в строке «Открыть» пишем команду ncpa.cpl — откроется папка Сетевые подключения. Находим «Подключение по локальной сети», через которое роутер подключен к компьютеру и кликаем на нем правой кнопкой мышки:
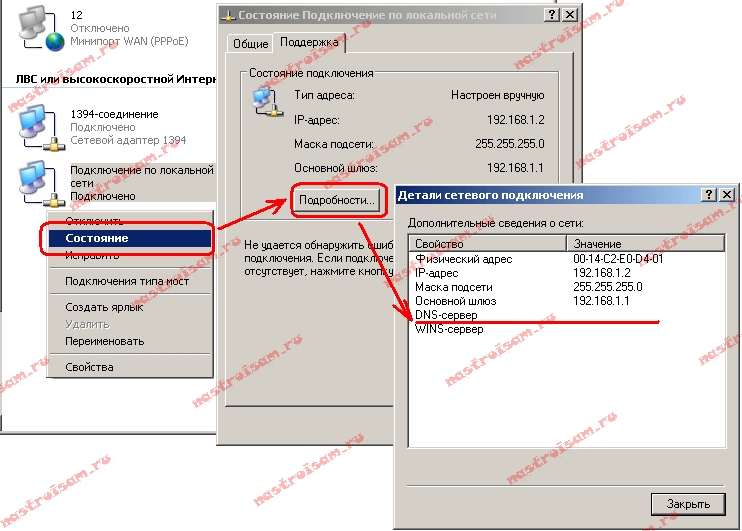
Выбираем пункт меню «Состояние», откроется окно «Состояние Подключения» — там нажимаем кнопку «Подробности» (В случае Windows 7 и Windows 8 — «Сведения»). В открывшемся окне обратите внимание на строчку DNS-сервер v4. Если в этой строке нет значения, то Вам нужно прописать вручную адрес DNS-сервера. Чтобы это сделать, снова кликаем правой кнопкой мыши на Подключении по локальной сети, в контекстном меню выбираем пункт «Протокол Интернета версии 4 (TCP/IP v4)»:
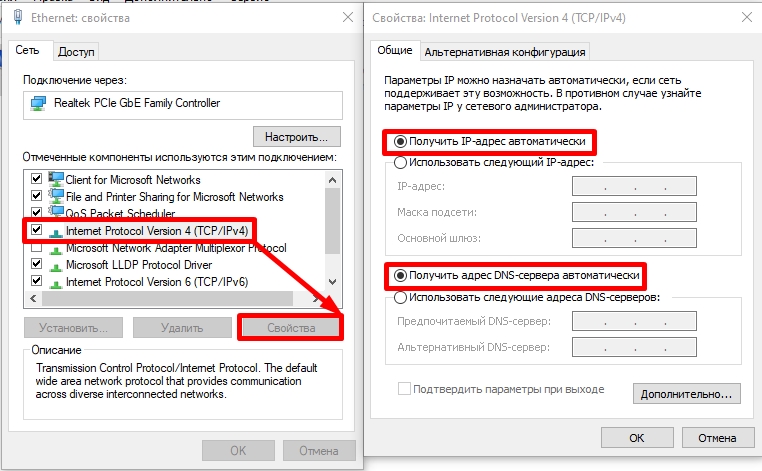
В окне «Свойства Протокола Интернета версии 4 (TCP/IP v4)» нужно в строке «Предпочитаемый DNS-сервер» прописать IP-адрес роутера — 192.168.1.1 или 192.168.0.1. Нажимаем кнопку ОК. Теперь роутер должен быть доступен по адресу http://routerlogin.net.
Если же роутер недоступен ни по http://routerlogin.net, ни через http://192.168.1.1 — это уже другое и в этом случае Вам должна помочь статья Как войти на 192.168.1.1 по admin/admin.
Примечание: Внимание — вводите адрес сервера правильно — routerlogin.net. Если вы введете routerlogin.ru, routerlogin.dk, routerlogin.com, то роутер будет недоступен, так как это неправильные хостнеймы. Так же, в адресной строке браузера не надо вводить http:// или www.
![]()
Загрузить PDF
![]()
Загрузить PDF
Вход в маршрутизатор Netgear позволяет изменить стандартное имя пользователя и пароль, настроить сетевые параметры, усилить безопасность и включить такие функции, как родительский контроль. Учетные данные по умолчанию для всех маршрутизаторов Netgear одинаковы.
-
1
Осмотрите маршрутизатор Netgear. Найдите стикер, где указаны учетные данные по умолчанию. На большинстве маршрутизаторов Netgear можно найти наклейку с адресом доступа, а также именем пользователя и паролем по умолчанию.
-
2
-
3
Введите «admin» в качестве имени пользователя и «password» в качестве пароля. Это стандартные учетные данные для маршрутизаторов Netgear.
- Если учетные данные по умолчанию окажутся недействительными, значит, имя пользователя и пароль были изменены. Следуйте инструкциям во второй части этой статьи, чтобы вернуть маршрутизатор Netgear к заводским настройками.
-
4
Нажмите «ОК» после ввода учетных данных. Войдите в свой маршрутизатор и измените настройки по своему усмотрению.[1]
Реклама


-
1
Перезапустите маршрутизатор Netgear, если учетные данные по умолчанию окажутся недействительны. Сброс маршрутизатора к исходному состоянию восстановит заводские настройки, вернув изначальные имя пользователя и пароль.
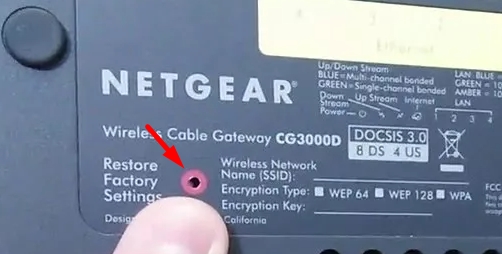
- Включите маршрутизатор и найдите кнопку «Restore Factory Settings» (Восстановить заводские настройки) на задней или боковой панели маршрутизатора.
- Возьмите ручку или скрепку и удерживайте кнопку «Restore Factory Settings» нажатой в течение семи секунд, пока индикатор питания не начнет мигать.
- Отпустите кнопку, а затем подождите, пока маршрутизатор перезапустится. Индикатор питания перестанет мигать и снова начнет гореть зеленым или белым.
- Повторите шаги со 2 по 4 в первой части статьи, чтобы войти в маршрутизатор Netgear.[2]
-
2
Если у вас не получается войти, попробуйте взять другой кабель Ethernet или использовать порт Ethernet на маршрутизаторе. В некоторых случаях неисправный кабель или порт Ethernet может мешать доступу к настройкам маршрутизатора.[3]
-
3
Попробуйте изменить IP-адрес компьютера, если у вас все еще не получается открыть панель администратора для маршрутизатора Netgear. Обновление IP-адреса иногда помогает установить соединение между компьютером и маршрутизатором. Выполните следующие действия, чтобы обновить свой IP-адрес на компьютере под управлением Windows или Mac OS X.
-
4
Если у вас не получается войти в свой маршрутизатор Netgear, попробуйте отключить на компьютере все брандмауэры и блокираторы всплывающих окон. Поскольку маршрутизаторы Netgear используют в своих веб-интерфейсах JavaScript, брандмауэры и блокировщики всплывающих окон могут заблокировать доступ к панели администратора.
- Выполните следующие действия, чтобы отключить брандмауэр на компьютере и отключите блокировщик всплывающих окон в браузере для входа в маршрутизатор Netgear.
Реклама


Об этой статье
Эту страницу просматривали 33 595 раз.
Была ли эта статья полезной?
Скорее всего вы попали на эту страницу, когда пытались зайти в настройки роутера Netgear (Login). Ещё раз попробуйте зайти в Web-интерфейс используя одну из представленных ссылок:
- www.routerlogin.net
- www.routerlogin.com
- 192.168.1.1
Далее вас попросят ввести логин (по умолчанию: admin) и пароль (по умолчанию: admin или password) – эти данные можно подсмотреть на этикетке под корпусом. Если вы все равно не можете зайти в настройки, читаем инструкцию ниже.
СОВЕТ! После того как вам удастся зайти в админ-панель вам нужно будет настроить аппарат – об этом подробно написано тут.
Содержание
- Первые действия
- Все равно не заходит
- Задать вопрос автору статьи
Первые действия
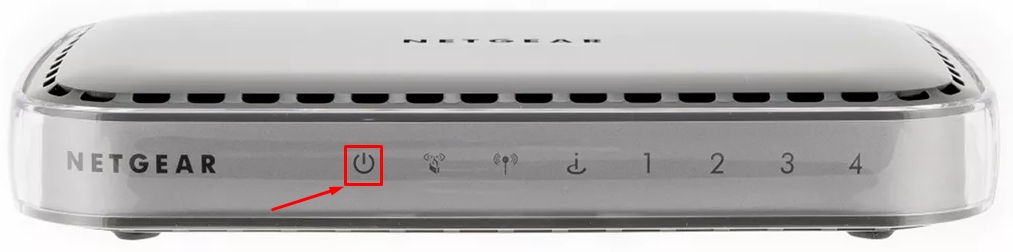
Убедитесь, что роутер включен в розетку, а также включена кнопка питания. При активации устройства на нем должен гореть индикатор питания.
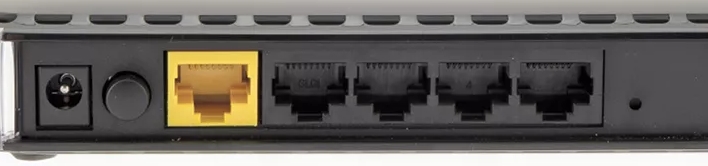
Блок питания подключается в отдельный круглый порт. Не забудьте также подключить устройство в локальные порты (компьютеры, ноутбуки, телевизоры и т.д.) – их обычно 4 (или более) штуки. Вход для интернет кабеля, куда вставляется провод от провайдера, обычно выделен среди всех цветом, и он такой один. Опять же не забудьте про кнопку включения.
Ещё раз повторюсь, чтобы войти в настройки роутера, вы должны быть подключены к его сети. Для этого можно использовать кабель, подключившись к локальному LAN порту (можно выбрать любой вход – это не важно) или использовать Wi-Fi. После включения по умолчанию роутер сразу же будет раздавать WiFi сеть. Имя сети, а также пароль от неё и другие дополнительные данные находятся на этикетке под корпусом. Нас интересуют строки:
- WiFi Network Name (SSID) – это имя сети по умолчанию
- Network Key (Password) – это пароль.
Если вы ранее меняли эту данные в настройках, то подключайтесь к беспроводной сети как обычно. Ещё раз попробуйте зайти в настройки, используя те самые ссылки в начале статьи.

Все равно не заходит
Нам нужно проверить – какие настройки стоят у вашего адаптера.
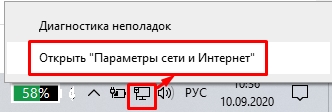
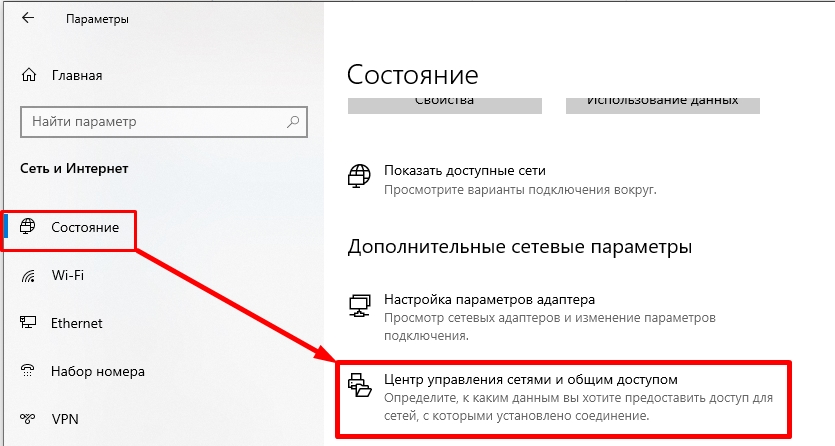
- Нажимаем по сетевому подключению в правом нижнем углу и выбираем «Открыть параметры сети и интернета». Если у вас семерка, то выбираем «Центр управления сетями и общим доступом».
- В Windows 10 данный пункт находится на вкладке «Состояние».
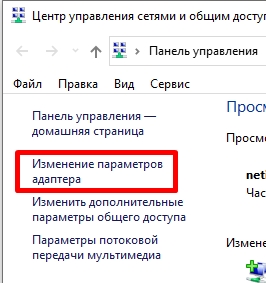
- Слева выбираем «Изменение параметров адаптера».
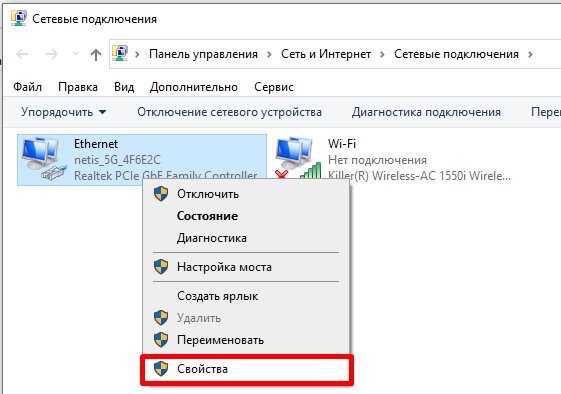
- Кликните правой кнопкой по тому подключению, которое вы используете и зайдите в «Свойства».
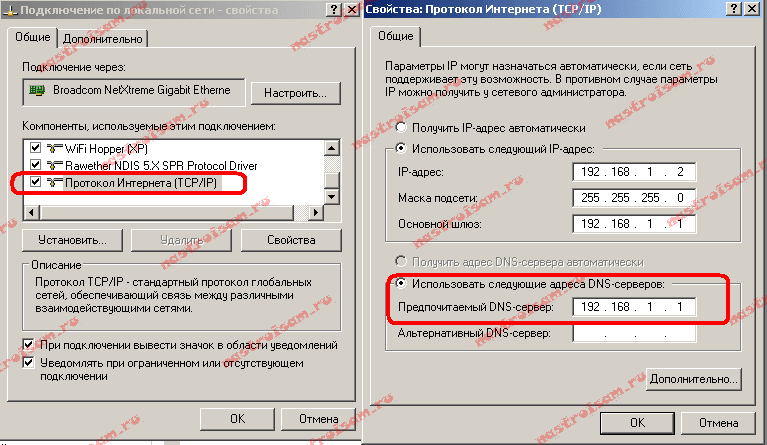
- Найдите строку 4 протокола (TCP/IPv4) нажмите один раз и зайдите в «Свойства». Далее установите такие же настройки как на картинке ниже и нажмите два раза «ОК».
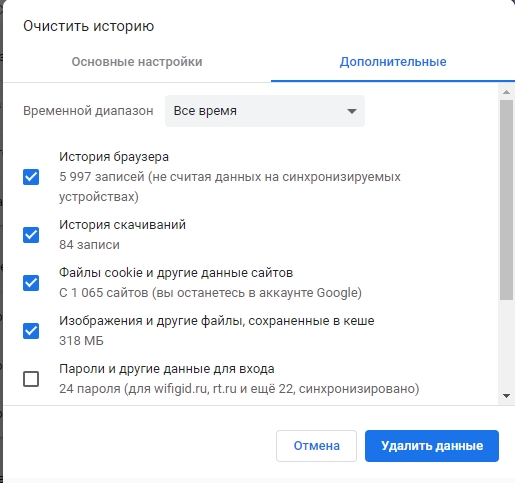
Ещё раз пробуем зайти. Если это не поможет и у вас вылезает ошибка, то находясь в браузере вам нужно очистить полностью кэш и историю посещения. Для этого найдите на клавиатуре клавиши «Ctrl», «Shift» и «Delete» (Del) – нажмите на них одновременно. Вылезет окошко очистки истории и кэша. Обязательно отметьте следующие пункты:
- История браузера.
- История скачиваний.
- Файлы cookie и другие данные сайтов.
- Изображения и другие файлы, сохраненные в кеше.
- Настройки сайтов.
- Данные приложений.
Нажмите по кнопке очистки. После этого перезагрузите браузер и попробуйте зайти в настройки маршрутизатора. Если проблема остается, то попробуйте использовать другой браузер, который у вас установлен на компьютере. Можно также попробовать стандартный IE. Если вы подключены по Wi-Fi, то попробуйте подключиться по проводу. Аналогично можно попробовать другой тип сети – например, если вы подключены к сети 5 ГГц, то попробуйте подключиться к 2.4. Если у вас включены какие-то программы, которые используют VPN подключение – выключите их.
Попробуйте обновить драйвер на сетевую карту и беспроводной модуль. Если у вас нет поблизости интернета, то придется искать хорошего друга, который сможет вам в этом помочь. Вот инструкции, которые вам в этом помогут:
- Сетевая карта
- Wi-Fi модуль
Попробуйте перезагрузить роутер и сам компьютер или ноутбук. Попробуйте зайти в настройки маршрутизатора с другого устройства, например, с телефона или планшета (используем любой мобильный браузер). Если проблема все также остается, а с другого устройства вы не можете зайти внутрь, то попробуйте сбросить маршрутизатор до заводских настроек. Для этого вам нужно найти кнопку сброса «Reset» – она может находиться где угодно – её нужно зажать ровно на 10 секунд. Обычно она утоплена в корпус и для сброса вам понадобится что-то тонкое типа булавки или скрепки.