
Максим aka WisH
Высшее образование по специальности «Информационные системы». Опыт работы системным администратором — 5 лет.
Задать вопрос
Различных роутеров существует много. Разные модели имеют свои особенности установки и настройки, которые стоит учитывать перед покупкой или перед самим монтажом. Лучше изучать все данные о роутере заранее, чтобы потом он не преподнес сюрпризов. Сегодня поговорим о Netgear N300. Сама фирма не очень известная в России, но роутеры от неё иногда встречаются в использовании. Разберем способы установки и настройки этих моделей.
Содержание
- Wi-Fi роутер Netgear N300
- Как настроить Netgear N300
- Первое подключение роутера
- Вход в веб-интерфейс
- Настройка интернета
- Параметры Wi-Fi сети
- Прочие возможности маршрутизатора
- Обновление прошивки
- Сброс установок на заводские
- Заключение
Wi-Fi роутер Netgear N300
Стоит начать с того, что роутеров модели нетгир н300 вообще не существует. Причина такой путаницы в коробках, в которых продаются маршрутизаторы этой фирмы. На неё крупными буквами написано название самой фирмы – Netgear, а также класс вайфая – N300. Название же конкретной модели пишется ниже и не таким крупным шрифтом, так что многие просто его пропускают. Для примера посмотрите на картинку, на ней название модели WNR2000v5 не сразу и увидишь.

К семейству N300 относятся следующие модели от этого производителя: WNR2200, WNR2020, JWNR2000. Почти все модели, начиная с 2000, могут работать на такой скорости вайфая. Проблема в том, что N300 – это общепринятое обозначение максимальной скорости Wi-Fi. N300 – это всего лишь класс Wi-Fi. Обозначает стандарт 802.11n (Wi-Fi 4) с максимальной скоростью доступа по Wi-Fi до 300 Мбит/с.

Если не понимаете, какая конкретно у вас модель роутера, то данные об этом найдете на наклейке на нижней части роутера.
Из-за этого, к N300 относятся не только роутеры этой фирмы, но и любые другие, если они соответствуют условиям. Так что N300 часто можно увидеть на коробках любых производителей. На коробках пишут самые выдающиеся характеристики маршрутизаторов, самыми крупными буквами, чтобы привлечь внимание покупателя. Из-за этого часто люди и не знают какую модель роутера купили, если производитель не позаботился о крупной надписи на роутере или на коробке.
Из-за разброса в моделях роутеров подобрать одну инструкцию для всех невозможно. Даже если само название фирмы производителя уже отсекает все остальные фирмы, все равно остается несколько моделей от самого нетгира. Из-за этого полную и четкую инструкцию составить не получится, но сами шаги по настройке маршрутизатора будут одинаковыми у всех моделей.
Первое подключение роутера
Выберите место для установки роутера. В месте установки не должно быть влажно, слишком холодно или жарко. Под батареей роутеры ставить не стоит, как и на улице, если роутер не приспособлен к определенной температуре, то долго в таких условиях не проработает. После выбора места установите роутер и подключите к нему кабель провайдера, он втыкается в синий порт.

Остальные разъемы используйте для подключения компьютера, ноутбука или телевизора. Для первой настройки лучше использовать проводное подключение, так меньше шансов на то, что произойдет какой-то сбой из-за нестабильной связи. Последним подключите провод питания.
Вход в веб-интерфейс
После подключения всех кабелей к маршрутизатору потребуется войти в веб-интерфейс. Откройте браузер и введите верхней строке адрес роутера. Для этого используйте компьютер, подключенный к маршрутизатору через провод или подключитесь к автоматически созданной беспроводной сети, если маршрутизатор умеет её создавать. На этом этапе сразу найдите все данные, которые потребуются для настройки. Просмотрите инструкцию провайдера, найдите тип подключения и данные для входа.

Возможно несколько адресов для подключения:
- 192.168.0.1
- routerlogin.net
- routerlogin.com
- orbilogin.net
Если ни один из этих адресов не подошел, то переверните сам роутер и посмотрите данные на наклейке на нижней части. Здесь написан адрес для входа, логин и пароль по умолчанию, данные доступа к беспроводной сети и другая информация об устройстве.
Если и эти данные не подойдут, то это значит, что роутер когда перенастраивали, так что потребуется вспомнить, какие настройки были заданы и ввести их. Или сбросить Netgear N300, но об этом ниже.
Настройка интернета
Теперь переходим к самой настройке интернета. У разных прошивок и разных моделей инструкция будет отличаться, но общая последовательность шагов у этого производителя одна и та же. Разберем настройку интернета на примере одной модели, если у вас с этой инструкцией будут различия, то лучше найдите последовательность настройки параметров под свою модель роутера.

Так выглядит стартовое меню. При первом подключении везде или почти везде будет «Не подключен». Интернет придется настраивать, если только у вашего провайдера не стоит тип подключения «Динамический адрес». Беспроводную сеть и остальные параметры также потребуется настроить.

Для более подробной настройки щелкните левой кнопкой мыши по значку интернета. Откроется что-то вроде опросника для определения типа подключения. Вам все равно потребуется знать тип подключения или те данные, которые для него требуются, чтобы правильно ответить на вопросы:
- Первый пункт определяет, нужен ли логин и пароль для доступа в сеть. Если нужны, то потребуется их ввести.
- IP-адрес Интернет-порта потребуется устанавливать, если роутеру нужно задать определенное имя. В остальных случаях оставляйте автоматическое получение.
- IP-адрес DNS-сервера. Аналогично прошлому пункту.
- MAC-адрес маршрутизатора. В некоторых случаях для авторизации используется адрес. Его можно скопировать с компьютера или ввести вручную.
Если такой способ настройки вам не подошел, то переходите в расширенный режим, жмите на «Интернет» и вручную устанавливайте тип подключения и вводите все требуемые данные. Для большинства провайдеров хватает быстрой настройки через домашнюю страницу.
Параметры Wi-Fi сети
На главном экране нажмите на раздел «Беспроводная сеть». Откроется окно с более подробными настройками. Если роутер с самого начала имеет предустановленную сеть и пароль, то некоторые параметры уже заданы. Если же нет, то некоторые настройки потребуется активировать и задать им значения. В качестве региона указывайте Россию, если есть или Европу, если нет.

В строке «Имя» задайте то имя, которое станет отображаться для всех в качестве названия вашей беспроводной сети. Устанавливайте автоматический выбор канала или же ставьте тот, что загружен меньше всех. Для проверки загрузки каналов потребуется использовать отдельную программу на ноутбуке.
Тыкать наугад конкретный канал – плохая идея. Если он загружен, то получите низкую скорость вайфай и сбои в работе.
В режиме работы устанавливайте максимальную скорость или ту, с которой работают ваши девайсы. Выбирайте указанные параметры безопасности и не забудьте поставить пароль. Слишком простой не задавайте, пароли из одних цифр или целых слов не безопасны, перебором их взламывают быстро.
Прочие возможности маршрутизатора
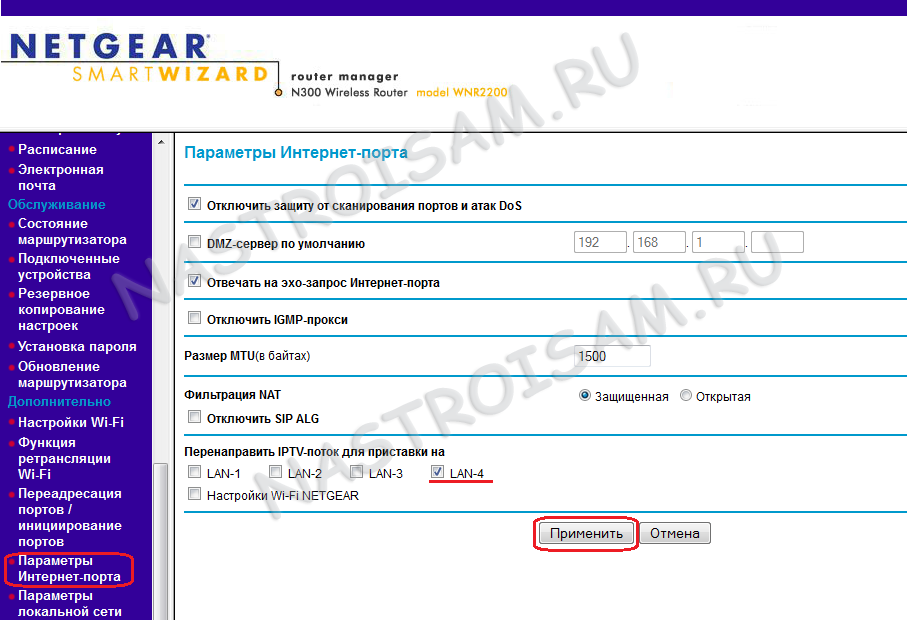
Для использования дополнительных параметров в верхней части меню перейдите в расширенный режим. Теперь в левой части окна нажмите на «Настройки» – раскроется список из нескольких пунктов. Первые несколько штук относятся к более подробной настройке интернета и вайфая. Попробуйте зайти в «Параметры Интернет-порта».

В указанном стрелкой разделе поставьте галку на тот порт, который хотите использовать для трансляции IPTV. Также, выше этого раздела есть настройки для демилитаризованной зоны, настройки безопасности и несколько других параметров. Трогать их не рекомендуется, если не понимаете, за что отвечает каждый раздел.
Обновление прошивки
По умолчанию в настройках роутера стоит галочка, которая позволяет проверять обновления каждый раз, когда вы заходите в веб-интерфейс своего роутера. Если такой способ вам не подходит, то переходите в расширенные настройки, в левом столбце выбирайте «Администрирование» и там выбирайте «Обновление».

В верхней строке вы вручную можете проверить наличие обновлений и загрузить их. Если хотите поставить какую-то неофициальную прошивку или будете использовать заранее загруженный файл, то нажмите на кнопку «Обзор» и укажите путь до файла. Далее примените настройки и дождитесь окончания обновления. Пока оно идет, не выключайте и не перезагружайте роутер.
Сброс установок на заводские
Найдите на задней панели кнопку «Reset». Нажмите на неё чем-то тонким, но не острым и подержите 10 секунд. Диоды на роутере мигнут и снова начнут работать, а сам маршрутизатор перезагрузится. После этого все настройки интернета и вайфая сбросятся, так что в роутер придется заходить по тем параметрам, которые написаны на нижней стороне маршрутизатора.

Заключение
N300 – обозначение вайфай, которое ставится на коробки и роутеры, чтобы показать его максимальную скорость. Из-за стремления рекламщиков выделить скорость, многие путают это обозначение с номером модели, хотя таких моделей и нет. Из-за того, что подобным страдают разные производители, сложно подобрать общий алгоритм настройки.
Нетгир же обладает похожим интерфейсом на всех своих моделях, так что для него написать общую инструкцию оказалось возможно. Если же что-то оказалось непонятно или разобрано недостаточно подробно, то найдите инструкцию под свою модель роутера. Охватить весь спектр устройств, даже от одного производителя непросто, лучше разбирать отдельные модели с их особенностями в отдельных статьях.
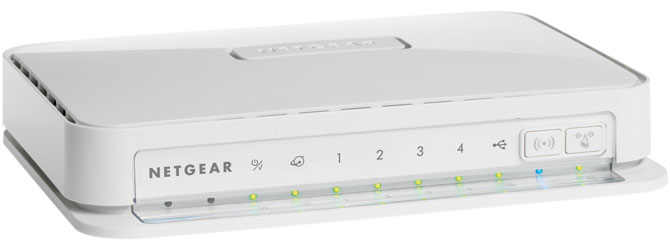
Маршрутизатор Netgear WNR2200 — очередной дорогой роутер с весьма заурядными способностями. Полноценной поддержкой Wi-Fi стандарта 802.11n сейчас уже никого не удивишь, впрочем как и USB 2.0 портом. Единственное что более-менее интересно в этом девайсе, так это встроенный менеджер закачек Green Downloader, умеющий качать torrent’ы и устаревший eDonkey. А в остальном — это весьма простенький роутер, который при цене почти в 2000 рублей не умеет тегировать трафик (Vlan) — хорошо хоть есть возможность выделить порт под IPTV-приставку. Настройки роутера тоже весьма несложные.
Адрес устройства в сети стандартный — 192.168.1.1, соответственно веб-интерфейс устройства доступен по адресу http://192.168.1.1:
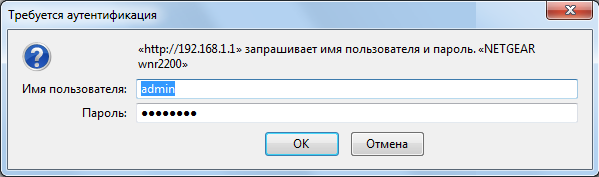
Логин и пароль на доступ — admin / admin соответственно. Для настройки Интернет-соединения переходим в раздел «Настройка» => «Основные настройки». Если Вам нужно настроить PPPoE-подключение (Ростелеком, Дом.ru, ТТК) — ставим галочку Да в ответ на вопрос» Требуется ли при подключении вводить имя пользователя и пароль», а затем выбираем тип подключения «PPPoE»:

Далее вводим логин и пароль на подключение к Интернет выданные провайдером, «Режим подключения» выбираем «Всегда включено».
IP-адрес DNS-серверов ставить «Получать автоматически от провайдера».
Если у Вас подключение от Дом.ru — ставьте галочку «Использовать MAC-адрес от компьютера», т.е. у этого провайдера есть ограничения по MAC-адресам. Нажимаем кнопку Применить.
Если у Вас Билайн то тип подключения надо выбирать L2TP:
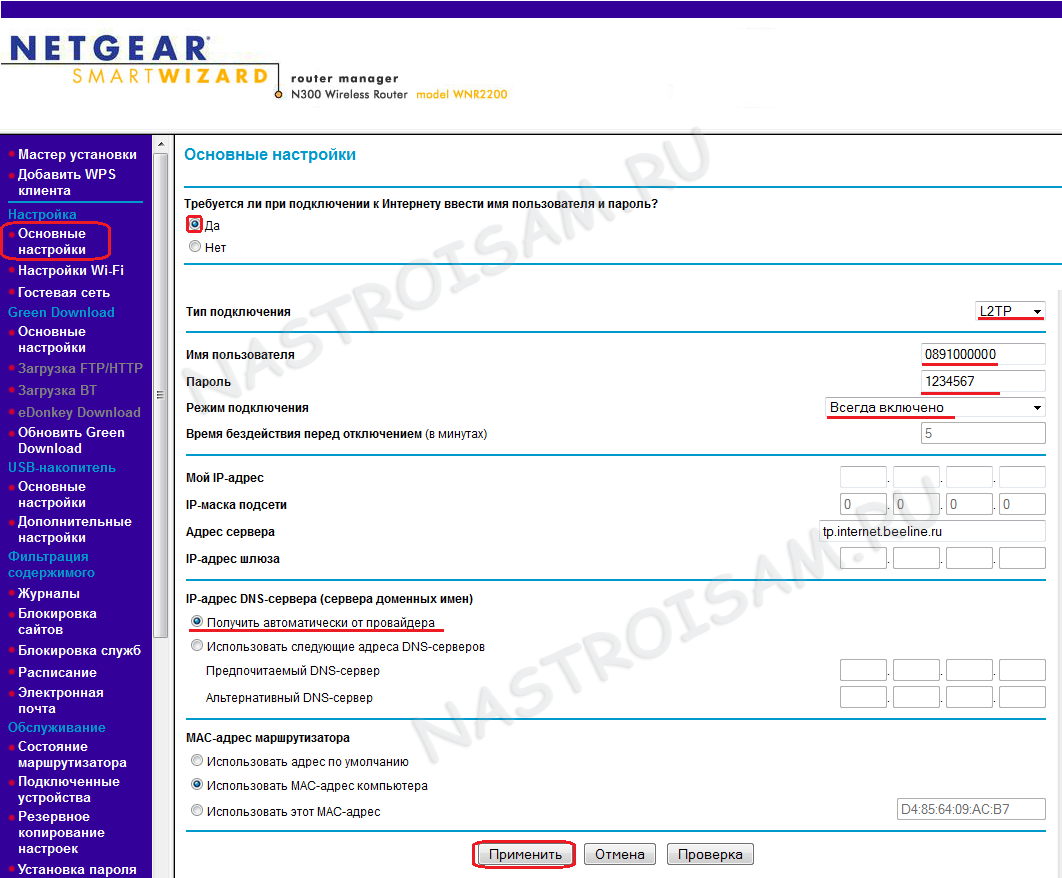
В поля Имя пользователя и Пароль вводим данные из договора, «Режим подключения» выбираем «Всегда включено». Внимание — обязательно необходимо ввести «Адрес сервера» — tp.internet.beeline.ru. DNS-адрес выбираем «Получать автоматически». Нажимаем кнопку «Применить».
Настройка Wi-Fi.
Для настройки Wi-Fi необходимо перейти в раздел «Настройка»=>»Настройки Wi-Fi»:
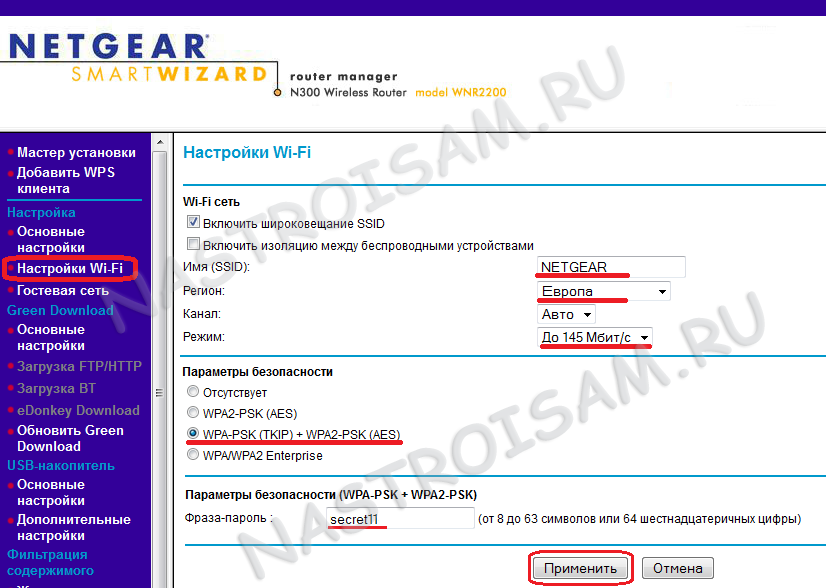
Здесь необходимо ввести идентификатор беспроводной сети — SSID — он может быть любым буквенным или цифирным значением. «Регион» — «Европа»; «Канал» — «Авто»; «Режим» — «До 145 Мбит/с».
Шифрование либо смешанный «WPA-PSK + WPA2-PSK» либо, что безопаснее, «WPA2-PSK». Ниже вводим кодовую фразу-пароль и нажимаем кнопку «Применит»ь.
Настройка IPTV.
Чтобы выделить порт для подключения IPTV-приставки Вам необходимо перейти в раздел «Дополнительно» => «Параметры Интернет-порта»:
Внизу страницы ищем пункт «Перенаправить IPTV-поток для приставки на» — и выбираем LAN-порт в который подключим приставку. Нажимаем «Применить».
Проброс портов.
Для проброса порта на wnr2200 необходимо перейти в раздел «Дополнительно» => «Переадресация портов/Инициализация портов».
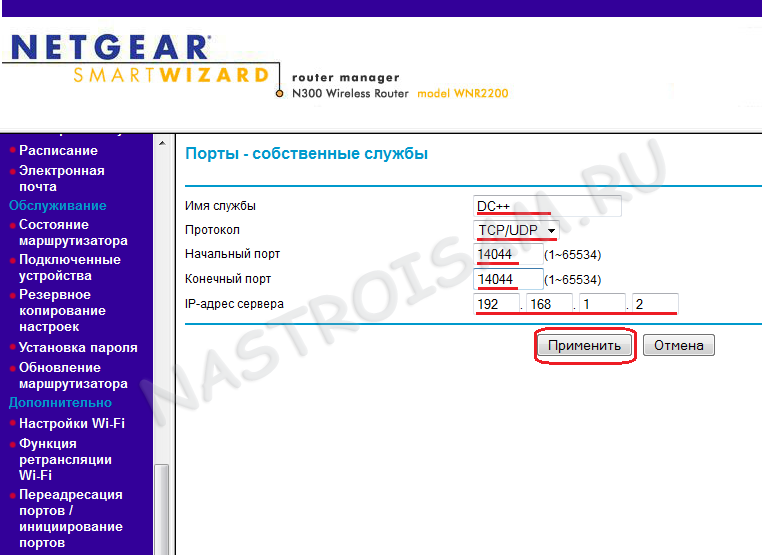
Нажимаем кнопку Добавить (под таблицей) для создание нового правила проброса. На открывшейся странице указываем следующее:
Имя службы — указываем имя программы для которой создаем правило.
Протокол — выбираем из списка TCP/UDP;
Начальный порт и Конечный порт — указываем номер порта, который надо пробросить. В нашем примере это порт 14044;
IP-адрес сервера — отмечаем этот пункт точкой и указываем IP-адрес компьютера, на котором установлена программа для которой пробрасываем порт. В нашем примере это адрес 192.168.1.2;
После заполнения всех полей нажимаем внизу Применить.
![]()
N300 Wireless Router with USB WNR2200 User Manual
NETGEAR, Inc.
350 E. Plumeria Drive
San Jose, CA 95134 USA
202-10667-01 September 2010 v1.0

© 2010 by NETGEAR, Inc. All rights reserved.
Product Registration, Support, and Documentation
Register your product at http://www.NETGEAR.com/register. Registration is required before you can use our telephone support service. Product updates and Web support are always available by going to:
http://www.netgear.com/support.
Setup documentation is available on the CD, on the support website, and on the documentation website. When the wireless router is connected to the Internet, click the Knowledgebase or the Documentation link under Web Support in the main menu to view support information.
Trademarks
NETGEAR and the NETGEAR logo are registered trademarks, and RangeMax and Smart Wizard are trademarks of NETGEAR. Inc. in the United States and/or other countries. Microsoft, Windows, and Windows NT are registered trademarks and Windows Vista is a trademark of Microsoft Corporation. Other brand and product names are registered trademarks or trademarks of their respective holders.
Statement of Conditions
In the interest of improving internal design, operational function, and/or reliability, NETGEAR reserves the right to make changes to the products described in this document without notice.
NETGEAR does not assume any liability that may occur due to the use or application of the product(s) or circuit layout(s) described herein.
Certificate of the Manufacturer/Importer
It is hereby certified that the N300 Wireless Router with USB WNR2200 has been suppressed in accordance with the conditions set out in the BMPT-AmtsblVfg 243/1991 and Vfg 46/1992. The operation of some equipment (for example, test transmitters) in accordance with the regulations may, however, be subject to certain restrictions. Please refer to the notes in the operating instructions.
Federal Office for Telecommunications Approvals has been notified of the placing of this equipment on the market and has been granted the right to test the series for compliance with the regulations.
Bestätigung des Herstellers/Importeurs
Es wird hiermit bestätigt, daß das N300 Wireless Router with USB WNR2200 gemäß der im BMPT-AmtsblVfg 243/ 1991 und Vfg 46/1992 aufgeführten Bestimmungen entstört ist. Das vorschriftsmäßige Betreiben einiger Geräte (z.B. Testsender) kann jedoch gewissen Beschränkungen unterliegen. Lesen Sie dazu bitte die Anmerkungen in der Betriebsanleitung.
Das Bundesamt für Zulassungen in der Telekommunikation wurde davon unterrichtet, daß dieses Gerät auf den Markt gebracht wurde und es ist berechtigt, die Serie auf die Erfüllung der Vorschriften hin zu überprüfen.
Regulatory Compliance Information
This section includes user requirements for operating this product in accordance with National laws for usage of radio spectrum and operation of radio devices. Failure of the end-user to comply with the applicable requirements may result in unlawful operation and adverse action against the end-user by the applicable National regulatory authority.
ii
v1.0, September 2010

NOTE: This product’s firmware limits operation to only the channels allowed in a particular Region or Country. Therefore, all options described in this user’s guide may not be available in your version of the product.
Europe – EU Declaration of Conformity
Marking by the above symbol indicates compliance with the Essential Requirements of the R&TTE Directive of the European Union (1999/5/EC). This equipment meets the following conformance standards:
EN300 328, EN301 893, EN301 489-17, EN60950
A printed copy of the EU Declaration of Conformity certificate for this product is provided in the WNR2200 product package.
Europe – Declaration of Conformity in Languages of the European Community
|
Cesky [Czech] |
NETGEAR Inc. tímto prohlašuje, že tento Radiolan je ve shode se základními |
|
|
požadavky a dalšími príslušnými ustanoveními smernice 1999/5/ES. |
||
|
Dansk |
Undertegnede NETGEAR Inc. erklærer herved, at følgende udstyr Radiolan overholder |
|
|
[Danish] |
de væsentlige krav og øvrige relevante krav i direktiv 1999/5/EF. |
|
|
Deutsch |
Hiermit erklärt NETGEAR Inc., dass sich das Gerät Radiolan in Übereinstimmung mit |
|
|
[German] |
den grundlegenden Anforderungen und den übrigen einschlägigen Bestimmungen der |
|
|
Richtlinie 1999/5/EG befindet. |
||
|
Eesti |
Käesolevaga kinnitab NETGEAR Inc. seadme Radiolan vastavust direktiivi 1999/5/EÜ |
|
|
[Estonian] |
põhinõuetele ja nimetatud direktiivist tulenevatele teistele asjakohastele sätetele. |
|
|
English |
Hereby, NETGEAR Inc., declares that this Radiolan is in compliance with the essential |
|
|
requirements and other relevant provisions of Directive 1999/5/EC. |
||
|
Español |
Por medio de la presente NETGEAR Inc. declara que el Radiolan cumple con los |
|
|
[Spanish] |
requisitos esenciales y cualesquiera otras disposiciones aplicables o exigibles de la |
|
|
Directiva 1999/5/CE. |
||
|
Ελληνική |
ΜΕ ΤΗΝ ΠΑΡΟΥΣΑ NETGEAR Inc. ΔΗΛΩΝΕΙ ΟΤΙ Radiolan ΣΥΜΜΟΡΦΩΝΕΤΑΙ |
|
|
[Greek] |
ΠΡΟΣ ΤΙΣ ΟΥΣΙΩΔΕΙΣ ΑΠΑΙΤΗΣΕΙΣ ΚΑΙ ΤΙΣ ΛΟΙΠΕΣ ΣΧΕΤΙΚΕΣ ΔΙΑΤΑΞΕΙΣ ΤΗΣ |
|
|
ΟΔΗΓΙΑΣ 1999/5/ΕΚ. |
||
|
Français |
Par la présente NETGEAR Inc. déclare que l’appareil Radiolan est conforme aux |
|
|
[French] |
exigences essentielles et aux autres dispositions pertinentes de la directive 1999/5/CE. |
|
|
Italiano [Italian] |
Con la presente NETGEAR Inc. dichiara che questo Radiolan è conforme ai requisiti |
|
|
essenziali ed alle altre disposizioni pertinenti stabilite dalla direttiva 1999/5/CE. |
||
|
Latviski |
Ar šo NETGEAR Inc. deklarē, ka Radiolan atbilst Direktīvas 1999/5/EK būtiskajām |
|
|
[Latvian] |
prasībām un citiem ar to saistītajiem noteikumiem. |
|
|
Lietuvių |
Šiuo NETGEAR Inc. deklaruoja, kad šis Radiolan atitinka esminius reikalavimus ir kitas |
|
|
[Lithuanian] |
1999/5/EB Direktyvos nuostatas. |
|
|
iii |
v1.0, September 2010

|
Nederlands |
Hierbij verklaart NETGEAR Inc. dat het toestel Radiolan in overeenstemming is met de |
|
[Dutch] |
essentiële eisen en de andere relevante bepalingen van richtlijn 1999/5/EG. |
|
Malti [Maltese] |
Hawnhekk, NETGEAR Inc., jiddikjara li dan Radiolan jikkonforma mal-htigijiet |
|
essenzjali u ma provvedimenti ohrajn relevanti li hemm fid-Dirrettiva 1999/5/EC. |
|
|
Magyar |
Alulírott, NETGEAR Inc. nyilatkozom, hogy a Radiolan megfelel a vonatkozó alapvetõ |
|
[Hungarian] |
követelményeknek és az 1999/5/EC irányelv egyéb elõírásainak. |
|
Polski [Polish] |
Niniejszym NETGEAR Inc. oświadcza, że Radiolan jest zgodny z zasadniczymi |
|
wymogami oraz pozostałymi stosownymi postanowieniami Dyrektywy 1999/5/EC. |
|
|
Português |
NETGEAR Inc. declara que este Radiolan está conforme com os requisitos essenciais |
|
[Portuguese] |
e outras disposições da Directiva 1999/5/CE. |
|
Slovensko |
NETGEAR Inc. izjavlja, da je ta Radiolan v skladu z bistvenimi zahtevami in ostalimi |
|
[Slovenian] |
relevantnimi določili direktive 1999/5/ES. |
|
Slovensky |
NETGEAR Inc. týmto vyhlasuje, _e Radiolan spĺňa základné po_iadavky a všetky |
|
[Slovak] |
príslušné ustanovenia Smernice 1999/5/ES. |
|
Suomi |
NETGEAR Inc. vakuuttaa täten että Radiolan tyyppinen laite on direktiivin 1999/5/EY |
|
[Finnish] |
oleellisten vaatimusten ja sitä koskevien direktiivin muiden ehtojen mukainen. |
|
Svenska |
Härmed intygar NETGEAR Inc. att denna Radiolan står I överensstämmelse med de |
|
[Swedish] |
väsentliga egenskapskrav och övriga relevanta bestämmelser som framgår av direktiv |
|
1999/5/EG. |
|
|
Íslenska |
Hér með lýsir NETGEAR Inc. yfir því að Radiolan er í samræmi við grunnkröfur og aðrar |
|
[Icelandic] |
kröfur, sem gerðar eru í tilskipun 1999/5/EC. |
|
Norsk |
NETGEAR Inc. erklærer herved at utstyret Radiolan er i samsvar med de |
|
[Norwegian] |
grunnleggende krav og øvrige relevante krav i direktiv 1999/5/EF. |
FCC Requirements for Operation in the United States
FCC Information to User
This product does not contain any user serviceable components and is to be used with approved antennas only. Any product changes or modifications will invalidate all applicable regulatory certifications and approvals
FCC Guidelines for Human Exposure
This equipment complies with FCC radiation exposure limits set forth for an uncontrolled environment. This equipment should be installed and operated with minimum distance of 20 cm between the radiator and your body.
This transmitter must not be co-located or operating in conjunction with any other antenna or transmitter.
iv
v1.0, September 2010

FCC Declaration Of Conformity
We NETGEAR, Inc., 350 East Plumeria Drive, San Jose, CA 95134, declare under our sole responsibility that the model WNR2200 N300 Wireless Router with USB WNR2200 complies with Part 15 of FCC Rules. Operation is subject to the following two conditions:
•This device may not cause harmful interference, and
•This device must accept any interference received, including interference that may cause undesired operation.
Federal Communication Commission Interference Statement
This equipment has been tested and found to comply with the limits for a Class B digital device, pursuant to Part 15 of the FCC Rules. These limits are designed to provide reasonable protection against harmful interference when the equipment is operated in a commercial environment. This equipment generates, uses and can radiate radio frequency energy and, if not installed and used in accordance with the instructions, may cause harmful interference to radio communications. Operation of this equipment in a residential area is likely to cause harmful interference in which case the user will be required to correct the interference at his own expense.
If this equipment does cause harmful interference to radio or television reception, which can be determined by turning the equipment off and on, the user is encouraged to try to correct the interference by one or more of the following methods:
•Reorient or relocate the receiving antenna.
•Increase the separation between the equipment and the receiver.
•Connect the equipment into an electrical outlet on a circuit different from that which the radio receiver is connected.
•Consult the dealer or an experienced radio/TV technician for help.
FCC Caution:
Any changes or modification not expressly approved by the party responsible for compliance could void the user’s authority to operate this equipment.
This product will be used for indoor operations.
This device meets all the other requirements specified in Part 15E, Section 15.407 of the FCC Rules. Operation is subject to the following two conditions: (1) This device may not cause harmful interference, and (2) this device must accept any interference received, including interference that may cause undesired operation.
IMPORTANT NOTE:
Radiation Exposure Statement:
This equipment complies with FCC radiation exposure limits set forth for an uncontrolled environment. This equipment should be installed and operated with minimum distance 20cm between the radiator and your body.
This transmitter must not be co-located or operating in conjunction with any other antenna or transmitter.
The availability of some specific channels and/or operational frequency bands are country dependent and are firmware programmed at the factory to match the intended destination. The firmware setting is not accessible by the end user.
v
v1.0, September 2010

Industry Canada Statement
This device complies with RSS-210 of the Industry Canada Rules. Operation is subject to the following two conditions:
(1) This device may not cause harmful interference, and (2) this device must accept any interference received, including interference that may cause undesired operation.
IMPORTANT NOTE:
Radiation Exposure Statement:
This equipment complies with IC radiation exposure limits set forth for an uncontrolled environment. This equipment should be installed and operated with minimum distance 20cm between the radiator and your body. The device and its antenna(s) must not be co-located or operated in conjunction with any other antenna or transmitter.
This Class B digital apparatus complies with Canadian ICES-003.
Cet appareil numérique de la classe B est conforme à la norme NMB-003 du Canada.
The Country Code Selection feature is disabled for products marketed in the United States and Canada.
Caution:
N300 Wireless Router with USB WNR2200
Tested to Comply with FCC Standards
FOR HOME OR OFFICE USE
Modifications made to the product, unless expressly approved by NETGEAR, Inc., could void the user’s right to operate the equipment.
Maximum Wireless Signal Rate Derived from IEEE Standard 802.11 Specifications
Actual data throughput will vary. Network conditions and environmental factors, including volume of network traffic, building materials and construction, and network overhead, lower actual data throughput rate.
vi
v1.0, September 2010

Product and Publication Details
|
Model Number: |
WNR2200 |
|
Publication Date: |
September 2010 |
|
Product Family: |
Wireless Router |
|
Product Name: |
N300 Wireless Router with USB WNR2200 |
|
Home or Business Product: |
Home |
|
Language: |
English |
|
Publication Part Number: |
202-10667-01 |
vii
v1.0, September 2010

N300 Wireless Router with USB WNR2200 User Manual
Contents
|
About This Manual |
|
|
Conventions, Formats, and Scope ………………………………………………………………………… |
xi |
|
How to Print This Manual ……………………………………………………………………………………. |
xii |
|
Revision History …………………………………………………………………………………………………. |
xii |
|
Chapter 1 |
|
|
Configuring Your Internet Connection |
|
|
Using the Setup Manual ……………………………………………………………………………………. |
1-1 |
|
Logging In to Your Wireless Router …………………………………………………………………….. |
1-2 |
|
Selecting a Language for Your Screen Display …………………………………………………….. |
1-4 |
|
Using the Setup Wizard …………………………………………………………………………………….. |
1-6 |
|
Viewing or Manually Configuring Your ISP Settings ………………………………………………. |
1-6 |
|
Chapter 2 |
|
|
Safeguarding Your Network |
|
|
Planning Your Wireless Network ………………………………………………………………………… |
2-1 |
|
Wireless Placement and Range Guidelines ……………………………………………………. |
2-2 |
|
Wireless Security Options ……………………………………………………………………………. |
2-3 |
|
Manually Configuring Your Wireless Settings ………………………………………………………. |
2-4 |
|
Configuring WEP Wireless Security ………………………………………………………………. |
2-8 |
|
Configuring WPA, WPA2, or WPA/WPA2 Wireless Security …………………………… |
2-10 |
|
Using Push ‘N’ Connect (WPS) to Configure Your Wireless Network …………………….. |
2-12 |
|
Using a WPS Button to Add a WPS Client ……………………………………………………. |
2-13 |
|
Using PIN Entry to Add a WPS Client ………………………………………………………….. |
2-14 |
|
Configuring Advanced WPS Settings …………………………………………………………… |
2-16 |
|
Connecting Additional Wireless Client Devices After WPS Setup ………………………….. |
2-17 |
|
Adding More WPS Clients ………………………………………………………………………….. |
2-17 |
|
Adding Both WPS and Non-WPS Clients …………………………………………………….. |
2-17 |
|
Restricting Access to Your Router …………………………………………………………………….. |
2-19 |
|
Adding Guest Networks …………………………………………………………………………………… |
2-20 |
|
Contents |
vii |
v1.0, September 2010

N300 Wireless Router with USB WNR2200 User Manual
Chapter 3
Protecting Your Network
|
Protecting Access to Your Wireless Router ………………………………………………………….. |
3-1 |
|
Changing the Built-In Password ……………………………………………………………………. |
3-2 |
|
Restricting Access by MAC Address …………………………………………………………………… |
3-2 |
|
Blocking Access to Internet Sites ……………………………………………………………………….. |
3-4 |
|
Blocking Access to Internet Services ………………………………………………………………….. |
3-6 |
|
Configuring a User-Defined Service ………………………………………………………………. |
3-7 |
|
Scheduling Blocking …………………………………………………………………………………………. |
3-8 |
|
Configuring E-mail Alert and Web Access Log Notifications …………………………………… |
3-9 |
|
Viewing Logs of Web Access or Attempted Web Access ……………………………………… |
3-10 |
|
Setting the Time …………………………………………………………………………………………….. |
3-11 |
|
Chapter 4 |
|
|
Using Network Monitoring Tools |
|
|
Upgrading the Router Firmware …………………………………………………………………………. |
4-1 |
|
Upgrading Automatically to New Router Software …………………………………………… |
4-3 |
|
Upgrading Manually to New Router Software …………………………………………………. |
4-3 |
|
Viewing Wireless Router Status Information ………………………………………………………… |
4-5 |
|
Connection Status ………………………………………………………………………………………. |
4-7 |
|
Statistics ……………………………………………………………………………………………………. |
4-8 |
|
Viewing a List of Attached Devices …………………………………………………………………….. |
4-9 |
|
Managing the Configuration File ……………………………………………………………………….. |
4-10 |
|
Backing Up and Restoring the Configuration ………………………………………………… |
4-10 |
|
Erasing the Configuration …………………………………………………………………………… |
4-11 |
|
Enabling Remote Management Access …………………………………………………………….. |
4-12 |
|
Traffic Meter ………………………………………………………………………………………………….. |
4-14 |
|
Chapter 5 |
|
|
Customizing Your Network Settings |
|
|
Using the LAN Setup Options …………………………………………………………………………….. |
5-1 |
|
Using the Router as a DHCP Server ……………………………………………………………… |
5-4 |
|
Address Reservation …………………………………………………………………………………… |
5-4 |
|
Using a Dynamic DNS Service …………………………………………………………………………… |
5-5 |
|
Configuring the WAN Setup Options …………………………………………………………………… |
5-7 |
|
Setting Up a Default DMZ Server ………………………………………………………………….. |
5-8 |
|
Configuring Static Routes ………………………………………………………………………………….. |
5-9 |
|
Contents |
viii |
v1.0, September 2010

N300 Wireless Router with USB WNR2200 User Manual
|
Allowing Inbound Connections to Your Network …………………………………………………. |
5-11 |
|
How Your Computer Accesses a Remote Computer through Your Router ……….. |
5-11 |
|
How Port Triggering Changes the Communication Process ……………………………. |
5-13 |
|
How Port Forwarding Changes the Communication Process ………………………….. |
5-14 |
|
How Port Forwarding Differs from Port Triggering …………………………………………. |
5-15 |
|
Configuring Port Forwarding to Local Servers …………………………………………………….. |
5-16 |
|
Adding a Custom Service …………………………………………………………………………… |
5-17 |
|
Editing or Deleting a Port Forwarding Entry ………………………………………………….. |
5-18 |
|
Configuring Port Triggering ……………………………………………………………………………… |
5-18 |
|
Wireless Repeating (Also Called WDS) …………………………………………………………….. |
5-22 |
|
Wireless Repeating Function ……………………………………………………………………… |
5-23 |
|
Setting Up the Base Station ……………………………………………………………………….. |
5-24 |
|
Setting Up a Repeater Unit ………………………………………………………………………… |
5-25 |
|
Chapter 6 |
|
|
Fine-Tuning Your Network |
|
|
Assessing Your Speed Requirements …………………………………………………………………. |
6-2 |
|
Optimizing Your Network Bandwidth …………………………………………………………………… |
6-3 |
|
Optimizing Wireless Performance ………………………………………………………………………. |
6-5 |
|
Changing the MTU Size ……………………………………………………………………………………. |
6-6 |
|
Quality of Service (QoS) ……………………………………………………………………………………. |
6-7 |
|
Using WMM QoS for Wireless Multimedia Applications ……………………………………. |
6-8 |
|
Configuring QoS for Internet Access ……………………………………………………………… |
6-8 |
|
Universal Plug and Play ………………………………………………………………………………….. |
6-13 |
|
Chapter 7 |
|
|
USB Storage |
|
|
USB Drive Requirements ………………………………………………………………………………….. |
7-1 |
|
File Sharing Scenarios ……………………………………………………………………………………… |
7-2 |
|
USB Storage Basic Settings ………………………………………………………………………………. |
7-4 |
|
Editing a Network Folder ……………………………………………………………………………… |
7-6 |
|
Configuring USB Storage Advanced Settings ………………………………………………………. |
7-7 |
|
Creating a Network Folder …………………………………………………………………………… |
7-9 |
|
ReadyShare Access ……………………………………………………………………………………….. |
7-10 |
|
Unmounting a USB Drive ………………………………………………………………………………… |
7-10 |
|
Specifying Approved USB Devices …………………………………………………………………… |
7-11 |
|
Contents |
ix |
v1.0, September 2010
![]()
N300 Wireless Router with USB WNR2200 User Manual
|
Connecting to the USB Drive from a Remote Computer ………………………………………. |
7-12 |
|
Locating the Internet Port IP Address ………………………………………………………….. |
7-12 |
|
Accessing the Router’s USB Drive Remotely Using FTP ……………………………….. |
7-12 |
|
Connecting to the USB Drive with Microsoft Network Settings ……………………………… |
7-12 |
|
Enabling File and Printer Sharing ……………………………………………………………….. |
7-13 |
|
Chapter 8 |
|
|
Troubleshooting |
|
|
Quick Tips ……………………………………………………………………………………………………….. |
8-1 |
|
Troubleshooting Basic Functions ……………………………………………………………………….. |
8-3 |
|
Cannot Access the Router Main Menu ………………………………………………………………… |
8-4 |
|
Cannot Access the Internet ……………………………………………………………………………….. |
8-5 |
|
Troubleshooting a Network Using the Ping Utility …………………………………………………. |
8-6 |
|
Testing the LAN Path to Your Router …………………………………………………………….. |
8-7 |
|
Testing the Path from Your Computer to a Remote Device ………………………………. |
8-8 |
|
Problems with Date and Time ……………………………………………………………………………. |
8-8 |
|
Wireless Connectivity ……………………………………………………………………………………….. |
8-9 |
|
Using Your Wireless Card Setup Program ……………………………………………………… |
8-9 |
|
Setting Up and Testing Basic Wireless Connectivity ……………………………………… |
8-10 |
|
Restoring the Default Configuration and Password ……………………………………………… |
8-13 |
|
Appendix A |
|
|
Default Configuration and |
|
|
Technical Specifications |
|
|
Restoring the Default Factory Configuration Settings …………………………………………… |
A-1 |
|
Technical Specifications …………………………………………………………………………………… |
A-3 |
|
Appendix B |
|
|
Related Documents |
Index
v1.0, September 2010

N300 Wireless Router with USB WNR2200 User Manual
About This Manual
The user manual provides information for configuring the features of the NETGEAR® N300 Wireless Router with USB WNR2200 beyond initial configuration settings. Initial configuration instructions can be found in the NETGEAR Wireless Router Setup Manual. You should have basic to intermediate computer and Internet skills.
Conventions, Formats, and Scope
The conventions, formats, and scope of this manual are described in the following paragraphs:
•Typographical conventions. This manual uses the following typographical conventions:
|
Italic |
Emphasis, books, CDs |
|
Bold |
User input, IP addresses, GUI screen text |
|
Fixed |
Command prompt, CLI text, code |
|
Italic |
URL links |
•Formats. This manual uses the following formats to highlight special messages:
 Note: This format is used to highlight information of importance or special interest.
 Tip: This format is used to highlight a procedure that will save time or resources.
Warning: Ignoring this type of note might result in a malfunction or damage to the equipment, a breach of security, or a loss of data.
xi
v1.0, September 2010

N300 Wireless Router with USB WNR2200 User Manual
•Scope. This manual is written for the WNR2200 router according to these specifications:
|
Product Version |
N300 Wireless Router with USB WNR2200 |
|
Manual Publication Date |
September 2010 |
For more information about network, Internet, firewall, and VPN technologies, see the links to the NETGEAR website in Appendix B, “Related Documents.”
Note: Product updates are available on the NETGEAR, Inc. website at
http://www.netgear.com/support.
How to Print This Manual
To print this manual, your computer must have the free Adobe Acrobat reader installed in order to view and print PDF files. The Acrobat reader is available on the Adobe Web site at http://www.adobe.com.
Tip: If your printer supports printing two pages on a single sheet of paper, you can save paper and printer ink by selecting this feature.
Revision History
NETGEAR, Inc. is constantly searching for ways to improve its products and documentation. The following table indicates any changes that might have been made since the WNR2200 router was introduced.
Table 1-1. Publication Revision History
|
Version |
Date |
Description |
|
v1.0 |
September 2010 |
Original publication. |
xii
v1.0, September 2010

N300 Wireless Router with USB WNR2200 User Manual
Chapter 1
Configuring Your Internet Connection
This chapter describes how to configure your WNR2200 router Internet connection. When you install your wireless router using the Resource CD as described in the NETGEAR Router Setup Manual, these settings are configured automatically for you. This chapter provides instructions on how to log in to the wireless router for further configuration.
Note: NETGEAR recommends using the Smart Wizard™ on the Resource CD for initial configuration, as described in the NETGEAR Wireless Router Setup Manual.
This chapter includes:
•“Using the Setup Manual”
•“Logging In to Your Wireless Router” on page 1-2
•“Selecting a Language for Your Screen Display” on page 1-4
•“Using the Setup Wizard” on page 1-6
•“Viewing or Manually Configuring Your ISP Settings” on page 1-6
Using the Setup Manual
For first-time installation of your wireless router, refer to the NETGEAR Router Setup Manual. The Setup Manual explains how to launch the NETGEAR Smart Wizard on the Resource CD to step you through the procedure to connect your router, modem, and computers. The Smart Wizard will assist you in configuring your wireless settings and enabling wireless security for your network. After initial configuration using the Setup Manual, you can use the information in this Reference Manual to configure additional features of your wireless router.
For installation instructions in a language other than English, see the language options on the
Resource CD.
|
Configuring Your Internet Connection |
1-1 |
v1.0, September 2010

N300 Wireless Router with USB WNR2200 User Manual
Logging In to Your Wireless Router
You can log in to the wireless router to view or change its settings.
Note: Your computer must be configured for DHCP. For help with configuring DHCP,  see the documentation that came with your computer or see the link to the online
document in “Preparing Your Network” in Appendix B.
To log in to the wireless router:
1.Type http://www.routerlogin.net, or http://www.routerlogin.com, or the router’s LAN IP address (default is 192.168.1.1) in the address field of your browser, and then press Enter. A login window displays:
Figure 1-1
2.Enter admin for the router user name and your password (or the default, password). For information about how to change the password, see “Changing the Built-In Password” on page 3-2.
Note: The router user name and password are not the same as any other user name or password you might use to log in to your Internet connection.
|
Configuring Your Internet Connection |
1-2 |
v1.0, September 2010

N300 Wireless Router with USB WNR2200 User Manual
The Checking for Firmware Updates screen displays unless you previously cleared the Check for Updated Firmware Upon Log-in check box.
Figure 1-2
If the router discovers a newer version of the software, you are asked if you want to upgrade to the new software (see “Upgrading the Router Firmware” on page 4-1 for details). If no new firmware is available, the following message displays.
Figure 1-3
|
Configuring Your Internet Connection |
1-3 |
v1.0, September 2010

N300 Wireless Router with USB WNR2200 User Manual
3. The Basic Settings screen displays showing the wireless router’s settings.
Figure 1-4
If the wireless router is connected to the Internet, you can click the Knowledge Base link or the Documentation link under Web Support to view support information or the documentation for the wireless router. If you do not click Logout, the wireless router waits for 5 minutes after no activity before it automatically logs you out.
Selecting a Language for Your Screen Display
Using the Select Language drop-down menu, located in the upper right corner of the Router Manager screen, you can display the router manager screens in any of languages shown in Figure 1-5:
|
Configuring Your Internet Connection |
1-4 |
v1.0, September 2010

N300 Wireless Router with USB WNR2200 User Manual
Figure 1-5
The language is set to English by default. The default language, as well as German, Spanish, and Portuguese are always stored in flash memory. When you select a language other than those automatically stored in flash memory, if you are connected to the Internet at the time you select it, that language is also stored in memory.
•If you are connected to the Internet and select a language that is not already stored in flash memory, the language is downloaded from the NETGEAR server and stored in the current language partition of flash memory.
•If you are not connected to the Internet when you select a language, you can only select as the current language one of the languages that is stored in flash memory.
To specify a language to be used on your router manager screens, do the following:
1.Expand the list and select the language you want.
2.Click Apply.
|
Configuring Your Internet Connection |
1-5 |
v1.0, September 2010

N300 Wireless Router with USB WNR2200 User Manual
The language you select is then downloaded and displayed in the language selection box, and your screen display will be in the selected language.
Note: If you are not connected to the Internet and select a language that is not stored  in flash memory, your selection may fail. If you see a “download fails”
message after your language selection, make sure you are connected to the Internet and make your selection again.
Using the Setup Wizard
You can manually configure your Internet connection using the Basic Settings screen, or you can allow the Smart Setup Wizard to detect your Internet connection. The Smart Setup Wizard searches your Internet connection for servers and protocols to determine your ISP configuration.
This feature is not the same as the Smart Wizard on the Resource CD that is used for installation. To use the Smart Setup Wizard to assist with configuration or to verify the Internet connection settings, follow this procedure:
1.From the top of the main menu, select Setup Wizard.
2.Select Yes for the Auto-Detect Connection Type, and then click Next to proceed.
3.Enter your ISP settings, as needed.
4.At the end of the Setup Wizard, click Test to verify your Internet connection. If you have trouble connecting to the Internet, see Chapter 8, “Troubleshooting.”
Viewing or Manually Configuring Your ISP Settings
To view or configure the basic settings:
1.Log in to the wireless router as described in “Logging In to Your Wireless Router” on page 1-2.
2.On the Basic Settings screen, select Yes or No depending on whether your ISP requires a login. This selection changes the fields available on the Basic Settings screen.
•Yes. If your ISP requires a login, select the encapsulation method. Enter the login name. If you want to change the login time-out, enter a new value in minutes.
•No. If your ISP does not require a login, enter the account name, if required, and the domain name, if required.
|
Configuring Your Internet Connection |
1-6 |
v1.0, September 2010
N300 Wireless Router with USB WNR2200 User Manual
3.Enter the settings for the IP address and DNS server. If you enter or change a DNS address, restart the computers on your network so that these settings take effect.
4.If no login is required, you can specify the MAC Address setting.
5.Click Apply to save your settings.
6.Click Test to test your Internet connection. If the NETGEAR website does not appear within one minute, see Chapter 8, “Troubleshooting”.
When your Internet connection is working, you do not need to launch the ISP’s login program on your computer to access the Internet. When you start an Internet application, your wireless router automatically logs you in.
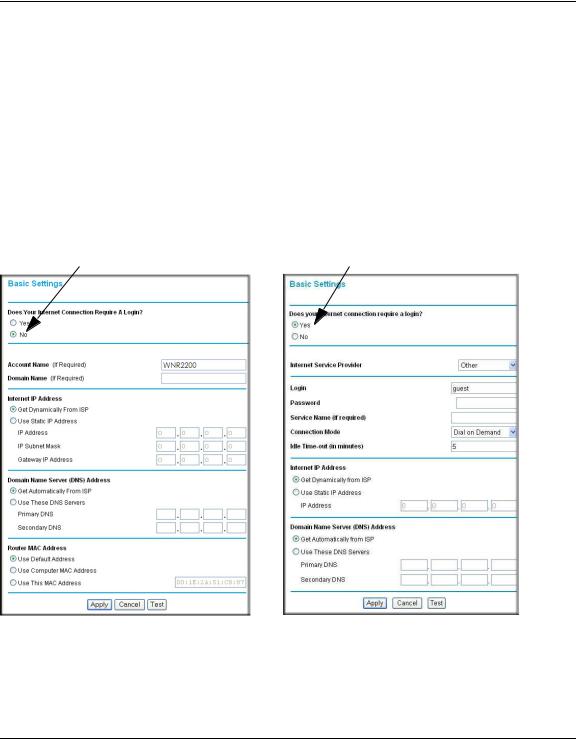
The fields that are displayed depend on whether or not your Internet connection requires a login.
|
ISP does not require login |
ISP does require login |
Figure 1-6
The following table explains the fields in the Basic Settings screen.
|
Configuring Your Internet Connection |
1-7 |
v1.0, September 2010
![]()
|
N300 Wireless Router with USB WNR2200 User Manual |
||
|
Table 1-1. Basic Settings screen fields |
||
|
Settings |
Description |
|
|
Does Your ISP Require a Login? |
• Yes |
|
|
• No |
||
|
These fields |
Account Name |
Enter the account name provided by your ISP. This might also |
|
appear only if no |
(If required) |
be called the host name. |
|
login is required. |
||
|
Domain Name |
Enter the domain name provided by your ISP. |
|
|
(If required) |
||
|
These fields |
Internet Service Provider |
• PPTP (Point to Point Tunneling Protocol). This is used |
|
appear only if |
primarily in Austrian DSL services. |
|
|
your ISP |
• Telstra Bigpond. This setting is only for older cable modem |
|
|
requires a login. |
service accounts that still require a Bigpond Login utility. |
|
|
Telstra has discontinued this type of account. Those with |
||
|
Telstra DSL accounts and newer cable modem accounts |
||
|
should select No for Does Your Internet Connection |
||
|
Require A Login?. |
||
|
• Other. This is the default setting. It is for PPPoE (Point to |
||
|
Point Protocol over Ethernet), the protocol used by most |
||
|
DSL services worldwide. |
||
|
Login |
The login name provided by your ISP. This is often an e-mail |
|
|
address. |
||
|
Password |
The password provided by your ISP. |
|
|
Service Name |
If your ISP provided a Service Name, enter it here. |
|
|
Connection Mode |
Specify when the router will connect to and disconnect from |
|
|
the Internet. |
||
|
• Always On. The router logs in to the Internet immediately |
||
|
after booting and never disconnects. |
||
|
• Dial on Demand. The router logs in only when outgoing |
||
|
traffic is present and logs out after the idle time-out. |
||
|
• Manually Connect. The router logs in or logs out only when |
||
|
you click Connect or Disconnect in the Router Status |
||
|
screen. |
||
|
Idle Timeout (In minutes) |
If you want to change the Internet login time-out, enter a new |
|
|
value in minutes. This determines how long the wireless router |
||
|
keeps the Internet connection active after there is no Internet |
||
|
activity from the LAN. Entering an Idle Timeout value of 0 |
||
|
(zero) means never log out. |
||
|
Configuring Your Internet Connection |
1-8 |
v1.0, September 2010

N300 Wireless Router with USB WNR2200 User Manual
Table 1-1. Basic Settings screen fields (continued)
|
Settings |
Description |
|
|
Internet IP Address |
• Get Dynamically from ISP. Your ISP uses DHCP to assign |
|
|
your IP address. Your ISP automatically assigns these |
||
|
addresses. |
||
|
• Use Static IP Address. Enter the IP address that your ISP |
||
|
assigned. Also enter the IP subnet mask and the gateway IP |
||
|
address. The gateway is the ISP’s wireless router to which |
||
|
your wireless router will connect. |
||
|
Domain Name Server (DNS) Address |
The DNS server is used to look up site addresses based on |
|
|
their names. |
||
|
• Get Automatically from ISP. Your ISP uses DHCP to |
||
|
assign your DNS servers. Your ISP automatically assigns |
||
|
this address. |
||
|
• Use These DNS Servers. If you know that your ISP does |
||
|
not automatically transmit DNS addresses to the wireless |
||
|
router during login, select this option, and enter the IP |
||
|
address of your ISP’s primary DNS server. If a secondary |
||
|
DNS server address is available, enter it also. |
||
|
This field |
Router MAC Address |
The Ethernet MAC address that will be used by the wireless |
|
appears only if |
router on the Internet port. Some ISPs register the Ethernet |
|
|
no login is |
MAC address of the network interface card in your computer |
|
|
required. |
when your account is first opened. They will then accept traffic |
|
|
only from the MAC address of that computer. This feature |
||
|
allows your wireless router to masquerade as that computer |
||
|
by “cloning” its MAC address. |
||
|
• Use Default Address. Use the default MAC address of the |
||
|
router (normally the LAN MAC address). |
||
|
• Use Computer MAC Address. The wireless router will |
||
|
capture and use the MAC address of the computer that you |
||
|
are now using. You must be using the one computer that is |
||
|
allowed by the ISP. |
||
|
• Use This MAC Address. Enter the MAC address that you |
||
|
want to use. |
||
|
Configuring Your Internet Connection |
1-9 |
v1.0, September 2010

Chapter 2
Safeguarding Your Network
For a wireless connection, the SSID, also called the wireless network name, and the wireless security setting must be the same for the wireless router and wireless computers or wireless adapters. NETGEAR strongly recommends that you use wireless security.
Warning: Computers can connect wirelessly at a range of several hundred feet. This can allow others outside of your immediate area to access your network.
This chapter includes:
•“Planning Your Wireless Network”
•“Manually Configuring Your Wireless Settings” on page 2-4
•“Using Push ‘N’ Connect (WPS) to Configure Your Wireless Network” on page 2-12
•“Connecting Additional Wireless Client Devices After WPS Setup” on page 2-17
•“Restricting Access to Your Router” on page 2-19
Note: For information about restricting access to USB storage devices, see “Configuring USB Storage Advanced Settings” on page 7-7.
Planning Your Wireless Network
For compliance and compatibility between similar products in your area, the operating channel and region must be set correctly.
To configure the wireless network, you can either specify the wireless settings, or you can use WiFi Protected Setup (WPS) to automatically set the SSID and implement WPA/WPA2 security.
•To manually configure the wireless settings, you must know the following:
– SSID. The default SSID for the wireless router is NETGEAR.
2-1
v1.0, September 2010

N300 Wireless Router with USB WNR2200 User Manual
–The wireless radio frequency (2.4GHz or 5GHz) that each wireless adapter supports.
–Wireless security option. To successfully implement wireless security, check each wireless adapter to determine which wireless security option it supports.
See “Manually Configuring Your Wireless Settings” on page 2-4.
•Push ‘N’ Connect (WPS) automatically implements wireless security on the wireless router while, at the same time, allowing you to automatically implement wireless security on any WPS-enabled devices (such as wireless computers and wireless adapter cards). You activate WPS by pressing a WPS button on the wireless router, clicking an onscreen WPS button, or entering a PIN number. This generates a new SSID and implements WPA/WPA2 security.
Note: NETGEAR’s Push ‘N’ Connect feature is based on the Wi-Fi Protected Setup (WPS) standard (for more information, see http://www.wi-fi.org). All other Wi- Fi-certified and WPS-capable products should be compatible with NETGEAR products that implement Push ‘N’ Connect.
To set up your wireless network using the WPS feature:
–Use the WPS button on the side of the wireless router (there is also an onscreen WPS button), or enter the PIN of the wireless device.
–Make sure that all wireless computers and wireless adapters on the network are Wi-Fi certified and WPA or WPA 2 capable, and that they support WPS configuration.
See “Using Push ‘N’ Connect (WPS) to Configure Your Wireless Network” on page 2-12.
Wireless Placement and Range Guidelines
The range of your wireless connection can vary significantly based on the physical placement of the wireless router. The latency, data throughput performance, and notebook power consumption of wireless adapters also vary depending on your configuration choices.
For best results, place your wireless router according to the following guidelines:
•Near the center of the area in which your PCs will operate.
•In an elevated location such as a high shelf where the wirelessly connected PCs have line-of- sight access (even if through walls).
•Away from sources of interference, such as PCs, microwave ovens, and 2.4 GHz cordless phones.
•Away from large metal surfaces.
|
Safeguarding Your Network |
2-2 |
v1.0, September 2010

N300 Wireless Router with USB WNR2200 User Manual
•Put the router in a vertical position to provide the best side-to-side coverage. Put the router in a horizontal position to provide the best up-and-down coverage.
•If using multiple access points, it is better if adjacent access points use different radio frequency channels to reduce interference. The recommended channel spacing between adjacent access points is 5 channels (for example, use Channels 1 and 6, or 6 and 11).
The time it takes to establish a wireless connection can vary depending on both your security settings and placement. WEP connections can take slightly longer to establish. Also, WEP encryption can consume more battery power on a notebook computer.
Wireless Security Options
Indoors, computers can connect over 802.11g wireless networks at a maximum range of up to 300 feet. Such distances can allow for others outside your immediate area to access your network.
Unlike wired network data, your wireless data transmissions can extend beyond your walls and can be received by anyone with a compatible adapter. For this reason, use the security features of your wireless equipment. The WNR2200 router provides highly effective security features which are covered in detail in this chapter. Deploy the security features appropriate to your needs.
There are several ways you can enhance the security of your wireless network:
Wireless data security options
Range: up to 300 foot radius
1)Open system: easy, but no security.
2)WEP: security, but some performance impact.
3)WPA-PSK: strong security.
4)WPA2-PSK: very strong security.
Figure 2-1
•WEP. Wired Equivalent Privacy (WEP) data encryption provides data security. WEP Shared Key authentication and WEP data encryption block all but the most determined eavesdropper. This data encryption mode has been superseded by WPA-PSK and WPA2-PSK.
•WPA-PSK (TKIP), WPA2-PSK (AES). Wi-Fi Protected Access (WPA) using a pre-shared key to perform authentication and generate the initial data encryption keys. The very strong authentication along with dynamic per frame re-keying of WPA makes it virtually impossible to compromise.
|
Safeguarding Your Network |
2-3 |
v1.0, September 2010

N300 Wireless Router with USB WNR2200 User Manual
For more information about wireless technology, see the link to the online document in “Wireless Networking Basics” in Appendix B.
Manually Configuring Your Wireless Settings
You can view or manually configure the wireless settings for the wireless router in the Wireless Settings screen. If you want to make changes, make sure to note the current settings first.
Note: If you use a wireless computer to change the wireless network name (SSID) or wireless security settings, you will be disconnected when you click Apply. To avoid this problem, use a computer with a wired connection to access the wireless router.
To view or manually configure the wireless settings:
1.Log in to the wireless router at its default LAN address of http://www.routerlogin.net with its default user name of admin, and default password of password, or using whatever password and LAN address you have chosen for the wireless router.
|
Safeguarding Your Network |
2-4 |
v1.0, September 2010

N300 Wireless Router with USB WNR2200 User Manual
2. Select Wireless Settings from the main menu to display the Wireless Settings screen:
Figure 2-2
The settings for this screen are explained in Table 2-1 on page 2-6.
3.Select the region in which the wireless router will operate.
4.For initial configuration and test, leave the other settings unchanged.
5.To save your changes, click Apply.
|
Safeguarding Your Network |
2-5 |
v1.0, September 2010

N300 Wireless Router with USB WNR2200 User Manual
6.Configure and test your computers for wireless connectivity.
Program the wireless adapter of your computers to have the same SSID and wireless security settings as your wireless router. Check that they have a wireless link and are able to obtain an IP address by DHCP from the wireless router. If there is interference, adjust the channel.
Table 2-1. Wireless Settings
|
Settings |
Description |
|
|
Region Selection |
The location where the router is used. Select from the countries in |
|
|
the drop-down list. Note: In the US, the region is pre-selected as |
||
|
the United States. |
||
|
Wireless Network |
Enable SSID |
The SSID of any wireless access adapter must match the SSID |
|
Broadcast |
you configure in the wireless router. If they do not match, you will |
|
|
not get a wireless connection to the wireless router. |
||
|
Clear this check box to disable broadcast of the SSID, so that only |
||
|
devices that know the correct SSID can connect. Disabling SSID |
||
|
broadcast nullifies the wireless network discovery feature of some |
||
|
products such as Windows XP. |
||
|
Name (SSID) |
This is the wireless network name. Enter a 32-character |
|
|
(maximum) name in this field. This field is case-sensitive. |
||
|
In a setting where there is more than one wireless network, |
||
|
different wireless network names provide a means for separating |
||
|
the traffic. Any device that you want to participate in a wireless |
||
|
network must use the SSID. |
||
|
Channel |
The wireless channel fields determine the operating frequency |
|
|
used for the 11N or 11G wireless networks. Do not change the |
||
|
wireless channel unless you experience interference (shown by |
||
|
lost connections or slow data transfers). If this happens, you might |
||
|
need to experiment with different channels to see which is the |
||
|
best. |
||
|
Mode |
Specify the wireless mode to be used. The options are: |
|
|
• Up to 54 Mbps. Legacy mode, using a maximum speed of up to |
||
|
54 Mbps for b/g networks. |
||
|
• Up to 150 Mbps. Neighbor friendly mode, for reduced |
||
|
interference with neighboring wireless networks. Provides two |
||
|
transmission streams with different data on the same channel at |
||
|
the same time, but also allows 802.11b and 802.11g wireless |
||
|
devices. This is the default value for the 2.4 GHz b/g/n wireless |
||
|
network. |
||
|
• Up to 300 Mbps. Performance mode, using a maximum |
||
|
Wireless-N speed of up to 300 Mbps. |
||
|
Safeguarding Your Network |
2-6 |
v1.0, September 2010

|
N300 Wireless Router with USB WNR2200 User Manual |
|
|
Table 2-1. Wireless Settings (continued) |
|
|
Settings |
Description |
|
Security Options |
• None. You can use this setting to establish wireless connectivity |
|
before implementing wireless security. NETGEAR strongly |
|
|
recommends that you implement wireless security. |
|
|
• WEP (Wired Equivalent Privacy). This option is only available for |
|
|
“Up to 54 Mbps” wireless mode. For other wireless modes, this |
|
|
option is disabled. Use encryption keys and data encryption for |
|
|
data security. Select 64-bit or 128-bit encryption. See |
|
|
“Configuring WEP Wireless Security.” When you select this |
|
|
option, these additional areas appear on your screen: |
|
|
• Security Encryption (WEP). Select the Authentication |
|
|
Type (Automatic or Shared Key) and the Encryption |
|
|
Strength (64 bit or 128 bit). |
|
|
• Security Encryption (WEP) Key. Enter the Passphrase, |
|
|
select a key, and click Generate. |
|
|
• WPA-PSK [TKIP] (WiFi Protected Access Pre-Shared Key). |
|
|
This option is only available for “Up to 54 Mbps” wireless mode. |
|
|
For other wireless modes, this option is disabled. Allow only |
|
|
computers configured with WPA to connect to the wireless |
|
|
router. When you select this option, this additional area appears |
|
|
on your screen: |
|
|
• Security Options (WPA-PSK). Enter the WPA |
|
|
passphrase (Network key). The passphrase must be |
|
|
between 8 and 63 ASCII characters or exactly 64 hex |
|
|
digits. |
|
|
• WPA2-PSK [AES] (Wi-Fi Protected Access with 2 Pre-Shared |
|
|
Keys). Allow only computers configured with WPA2 to connect to |
|
|
the wireless router. When you select this option, this additional |
|
|
area appears on your screen: |
|
|
• Security Options (WPA2-PSK). Enter the WPA |
|
|
passphrase (Network key). The passphrase must be |
|
|
between 8 and 63 ASCII characters or exactly 64 hex |
|
|
digits. |
|
|
• WPA-PSK [TKIP] + WPA2-PSK [AES]. Allow computers |
|
|
configured with either WPA-PSK or WPA2-PSK security to |
|
|
connect to the wireless router. When you select this option, this |
|
|
additional area appears on your screen: |
|
|
• Security Options (WPA-PSK + WPA2-PSK). Enter the |
|
|
WPA passphrase (Network key). The passphrase must |
|
|
be between 8 and 63 ASCII characters or exactly 64 hex |
|
|
digits. |
|
|
Safeguarding Your Network |
2-7 |
v1.0, September 2010

N300 Wireless Router with USB WNR2200 User Manual
Table 2-1. Wireless Settings (continued)
|
Settings |
Description |
|
• WPA/WPA2 Enterprise. Allow computers configured with either |
|
|
WPA-PSK or WPA2-PSK security to connect to the wireless |
|
|
router. When you select this option, this additional area appears |
|
|
on your screen: |
|
|
Security Options (WPA/WPA2 Enterprise) |
|
|
• WPA Mode. Select the WPA Mode from the drop-down |
|
|
list (WPA [TKIP], WPA2 [AES], or WPA [TKIP + WPA2 |
|
|
[AES]). |
|
|
• RADIUS server IP Address. Enter the IP address of the |
|
|
RADIUS server. |
|
|
• RADIUS server Port. The RADIUS server port number is |
|
|
listed in this field. |
|
|
• RADIUS server Shared Secret. Enter the Shared |
|
|
Secret. |
Configuring WEP Wireless Security
Note: WEP security is only available when you select Up to 54 Mbps on the Wireless Settings screen.
Note: If you use a wireless computer to configure wireless security settings, you will be disconnected when you click Apply. Reconfigure your wireless computer to match the new settings, or access the wireless router from a wired computer to make further changes.
To configure WEP data encryption:
1.Log in to the wireless router at its default LAN address of http://www.routerlogin.net with its default user name of admin, and default password of password, or using whatever password and LAN address you have chosen for the wireless router.
|
Safeguarding Your Network |
2-8 |
v1.0, September 2010
![]()
N300 Wireless Router with USB WNR2200 User Manual
2.From the main menu, select Wireless Settings to display the Wireless Settings screen. Set the Security Options by selecting the WEP radio button in the Security Options section:
Figure 2-3
3. Select the Authentication Type: Automatic or Shared Key.
Note: The authentication scheme is separate from the data encryption. You can select an automatic authentication scheme, which may not run authentication, but still leaves the data transmissions encrypted. If you require strong security, use both the Shared Key and WEP encryption settings.
4.Select the Encryption Strength setting:
•WEP 64-bit encryption. Enter 10 hexadecimal digits (any combination of 0–9, a–f, or A–F).
•WEP 128-bit encryption. Enter 26 hexadecimal digits (any combination of 0–9, a–f, or A–F).
5.Enter the encryption keys. You can manually or automatically program the four data encryption keys. These values must be identical on all computers and access points in your network:
|
Safeguarding Your Network |
2-9 |
v1.0, September 2010

N300 Wireless Router with USB WNR2200 User Manual
–Passphrase. To use a passphrase to generate the keys, enter a passphrase, and click Generate. This automatically creates the keys. Wireless stations must use the passphrase or keys to access the wireless router.
 Note: Not all wireless adapters support passphrase key generation.
–Key 1 – Key 4. These values are not case-sensitive. You can manually enter the four data encryption keys. These values must be identical on all computers and access points in your network. Enter 10 hexadecimal digits (any combination of 0–9, a–f, or A–F).
6.Select which of the four keys will be the default.
Data transmissions are always encrypted using the default key. The other keys can be used only to decrypt received data. The four entries are disabled if WPA-PSK or WPA authentication is selected.
7.Click Apply to save your settings.
Configuring WPA, WPA2, or WPA/WPA2 Wireless Security
To set up wireless security, you can either manually configure it in the Wireless Settings screen, or you can use Wi-Fi Protected Setup (WPS) to automatically set the SSID and implement WPA/ WPA2 security (see “Using Push ‘N’ Connect (WPS) to Configure Your Wireless Network” on page 2-12.
Both WPA and WPA2 provide strong data security. WPA with TKIP is a software implementation that can be used on Windows systems with Service Pack 2 or later. NETGEAR recommends using WPA2 with AES, which provides the strongest security. WPA2 with AES is a hardware implementation; see your device documentation before implementing it. Consult the product documentation for your wireless adapter for instructions for configuring WPA settings.
Note: If you use a wireless computer to configure wireless security settings, you will be disconnected when you click Apply. If this happens, reconfigure your wireless computer to match the new settings, or access the wireless router from a wired computer to make further changes.
|
Safeguarding Your Network |
2-10 |
v1.0, September 2010

N300 Wireless Router with USB WNR2200 User Manual
To configure WPA or WPA2 in the wireless router:
1.Log in to the wireless router at its default LAN address of http://www.routerlogin.net with its default user name of admin and default password of password, or using whatever password and LAN address you have chosen for the wireless router.
2.Select Wireless Settings from the main menu.
3.On the Wireless Setting screen, select the radio button for the WPA or WPA2 option of your choice.
Figure 2-4
4.The settings displayed on the screen depend on which security option you select.
5.For WPA-PSK or WPA2-PSK, enter the passphrase.
6.For WPA/WPA2 Enterprise, enter the settings for the Radius server. For WPA-802.1x or WPA2-802.1x, these settings are required for communication with the primary Radius server.
•WPA Mode. Select WPA [TKIP], WPA2 [AES], or WPA [TKIP] + WPA2 [AES].
•RADIUS Server IP Address. The IP address of the Radius server. The default is 0.0.0.0
•RADIUS Server Port. Port number of the Radius server. The default is 1812.
•RADIUS Server Shared Secret. This shared key is shared between the wireless access point and the Radius server during authentication.
7.To save your settings, click Apply.
|
Safeguarding Your Network |
2-11 |
v1.0, September 2010

N300 Wireless Router with USB WNR2200 User Manual
Using Push ‘N’ Connect (WPS) to Configure Your Wireless Network
If your wireless clients support Wi-Fi Protected Setup (WPS), you can use this feature to configure the wireless router’s SSID and security settings and, at the same time, connect the wireless client securely and easily to the wireless router. Look for the symbol on your client device (computers that will connect wirelessly to the wireless router are clients). WPS automatically configures the network name (SSID) and wireless security settings for the wireless router (if the wireless router is in its default state) and broadcasts these settings to the wireless client.
Note: NETGEAR’s Push ‘N’ Connect feature is based on the Wi-Fi Protected Setup (WPS) standard (for more information, see http://www.wi-fi.org). All other Wi-Fi- certified and WPS-capable products should be compatible with NETGEAR products that implement Push ‘N’ Connect.
Some considerations regarding WPS are:
•WPS supports these types of wireless security: None, WPA-PSK, WPA2-PSK, and WEP (with the authentication type set to Automatic on the Wireless Settings screen). WEP security with shared key authentication is not supported by WPS.
•If your wireless network will include a combination of WPS capable devices and non-WPS capable devices, NETGEAR suggests that you set up your wireless network and security settings manually first, and use WPS only for adding additional WPS capable devices. See “Adding Both WPS and Non-WPS Clients” on page 2-17.
A WPS client can be added using the Push Button method or the PIN method.
•Using the Push Button. This is the preferred method. See the following section, “Using a WPS Button to Add a WPS Client” on page 2-13.
•Entering a PIN. For information about using the PIN method, see “Using PIN Entry to Add a WPS Client” on page 2-14.
|
Safeguarding Your Network |
2-12 |
v1.0, September 2010

N300 Wireless Router with USB WNR2200 User Manual
Using a WPS Button to Add a WPS Client
Any wireless computer or wireless adapter that will connect to the wireless router wirelessly is a client. The client must support a WPS button, and must have a WPS configuration utility, such as the NETGEAR Smart Wizard or Atheros Jumpstart.
To use the wireless router WPS button to add a WPS client:
1.Log in to the wireless router at its default LAN address of http://www.routerlogin.net with its default user name of admin and default password of password, or using whatever LAN address and password you have set up.
2.On the wireless router main menu, select Add a WPS Client, and then click Next. The following screen displays:
WPS button
Figure 2-5
By default, the Push Button (recommended) radio button is selected.
3.Either press the WPS button on the side of the wireless router, or click the onscreen button. The wireless router tries to communicate with the client for 2 minutes.
4.Go to the client wireless computer, and run a WPS configuration utility. Follow the utility’s instructions to click a WPS button.
5.Go back to the wireless router screen to check for a message.
|
Safeguarding Your Network |
2-13 |
v1.0, September 2010

N300 Wireless Router with USB WNR2200 User Manual
The wireless router WPS screen displays a message confirming that the client was added to the wireless network. The wireless router generates an SSID, and implements WPA/WPA2 wireless security. The wireless router will keep these wireless settings unless you change them, or you clear the Keep Existing Wireless Settings check box in the WPS Settings screen.
Figure 2-6
6.Note the new SSID and WPA/WPA2 password for the wireless network. You can view these settings in the Wireless Settings screen. See “Manually Configuring Your Wireless Settings” on page 2-4.
To access the Internet from any computer connected to your wireless router, launch a browser such as Microsoft Internet Explorer or Mozilla Firefox. You should see the wireless router’s Internet LED blink, indicating communication to the ISP.
Note: If no WPS-capable client devices are located during the 2-minute time frame, the SSID will not be changed, and no security will be implemented on the wireless router.
Using PIN Entry to Add a WPS Client
Any wireless computer or wireless adapter that will connect to the wireless router wirelessly is a client. The client must support a WPS PIN, and must have a WPS configuration utility, such as the NETGEAR Smart Wizard or Atheros Jumpstart.
The first time you add a WPS client, make sure that the Keep Existing Wireless Settings check box on the WPS Settings screen is cleared. This is the default setting for the wireless router, and allows it to generate the SSID and WPA/WPA2 security settings when it implements WPS. After WPS is implemented, the wireless router automatically selects this check box so that your SSID and wireless security settings remain the same if other WPS-enabled devices are added later.
|
Safeguarding Your Network |
2-14 |
v1.0, September 2010

N300 Wireless Router with USB WNR2200 User Manual
To use a PIN to add a WPS client:
1.Log in to the wireless router at its default LAN address of http://www.routerlogin.net with its default user name of admin and default password of password, or using whatever LAN address and password you have set up.
2.On the wireless router main menu, select Add a WPS Client (computers that will connect wirelessly to the wireless router are clients), and then click Next. The Add WPS Client screen displays:
Figure 2-7
3.Select the PIN Number radio button.
4.Go to the client wireless computer. Run a WPS configuration utility. Follow the utility’s instructions to generate a PIN. Take note of the client PIN.
5.From the wireless router Add WPS Client screen, enter the client PIN number, and then click
Next.
–The wireless router tries to communicate with the client for 4 minutes.
–The wireless router WPS screen displays a message confirming that the client was added to the wireless network. The wireless router generates an SSID, and implements WPA/ WPA2 wireless security.
6.Note the new SSID and WPA/WPA2 password for the wireless network. You can view these settings in the Wireless Settings screen. See “Manually Configuring Your Wireless Settings” on page 2-4
To access the Internet from any computer connected to your wireless router, launch a browser such as Microsoft Internet Explorer or Mozilla Firefox. You should see the wireless router’s Internet LED blink, indicating communication to the ISP.
Note: If no WPS-capable client devices are located during the 4-minute time frame, the SSID will not be changed and no security will be implemented on the wireless router.
|
Safeguarding Your Network |
2-15 |
v1.0, September 2010

N300 Wireless Router with USB WNR2200 User Manual
Configuring Advanced WPS Settings
From the Advanced menu, select Advanced Wireless Settings to display the following screen:
Figure 2-8
The WPS Settings area displays the wireless router PIN, and allows you to Disable Router’s PIN and to Keep Existing Wireless Settings for the wireless network.
By default, the Keep Existing Wireless Settings check box is unchecked. This allows the wireless router to automatically generate the SSID and WPA/WPA2 security settings when it implements WPS. After WPS is implemented or changes in wireless settings are applied, the wireless router automatically selects this check box so that your SSID and wireless security settings remain the same if you add WPS-enabled devices or if you manually add non WPS-capable devices later.
Note: If you clear the Keep Existing Wireless Settings check box, all wireless settings and connections will be lost.
|
Safeguarding Your Network |
2-16 |
v1.0, September 2010

N300 Wireless Router with USB WNR2200 User Manual
Connecting Additional Wireless Client Devices After WPS
Setup
You can add more WPS clients to your wireless network, or you can add a combination of WPSenabled clients and clients without WPS.
Adding More WPS Clients
Note: Your wireless settings remain the same when you add another WPS-enabled client, as long as the Keep Existing Wireless Settings check box is selected in the Advanced Wireless screen (listed under the Advanced heading in the wireless router main menu). If you clear this check box, when you add the client, a new SSID and passphrase will be generated, and all existing connected wireless clients will be disassociated and disconnected from the wireless router.
To add a wireless client device that is WPS-enabled:
1.Follow the procedures in “Using a WPS Button to Add a WPS Client” on page 2-13 or “Using PIN Entry to Add a WPS Client” on page 2-14.
2.To view a list of all devices connected to your wireless router (including wireless and Ethernet-connected), see “Viewing a List of Attached Devices” on page 4-9.
Adding Both WPS and Non-WPS Clients
For non-WPS clients, you cannot use the WPS setup procedures to add them to the wireless network. You must record, and then manually enter your security settings (see “Manually Configuring Your Wireless Settings” on page 2-4).
To connect a combination of non-WPS enabled and WPS-Enabled clients to the wireless router:
1.Restore the wireless router to its factory default settings (press and hold the Reset button on the back of the router for 5 seconds).
When the factory settings are restored, all existing wireless clients are disassociated and disconnected from the wireless router.
2.Configure the network names (SSIDs), select the WPA/PSK + WPA2/PSK radio button on the Wireless Settings screen (see “Manually Configuring Your Wireless Settings” on page 2-4). and click Apply. On the WPA/PSK + WPA2/PSK screen, select a passphrase and click Apply. Record this information to add additional clients.
|
Safeguarding Your Network |
2-17 |
v1.0, September 2010

N300 Wireless Router with USB WNR2200 User Manual
3.For the non-WPS devices that you want to connect, open the networking utility and follow the utility’s instructions to enter the security settings that you selected in Step 2 (the SSID, WPA/ PSK + WPA2/PSK security method, and passphrase).
4.For the WPS devices that you want to connect, follow the procedure “Using a WPS Button to Add a WPS Client” on page 2-13 or “Using PIN Entry to Add a WPS Client” on page 2-14.
The settings that you configured in Step 2 are broadcast to the WPS devices so that they can connect to the wireless router.
Note: To make sure that your new wireless settings remain in effect, verify that the Keep Existing Wireless Settings checkbox is selected in the WPS Settings screen.
5.To view a list of all devices connected to your wireless router (including wireless and Ethernet-connected), see “Viewing a List of Attached Devices” on page 4-9.
|
Safeguarding Your Network |
2-18 |
v1.0, September 2010
![]()
N300 Wireless Router with USB WNR2200 User Manual
Restricting Access to Your Router
You can use the Advanced Wireless Settings screen to enable or disable the wireless router. From the main menu, select Advanced Wireless Settings to display the following screen:
Figure 2-9
•Enable Wireless Router Radio.
You can completely turn off the wireless portion of the wireless router. For example, if you use your notebook computer to wirelessly connect to your wireless router, and you take a business trip, you can turn off the wireless portion of the wireless router while you are traveling. Other members of your household who use computers connected to the wireless router via Ethernet cables can still use the wireless router. To do this, clear the Enable Wireless Router Radio check box on the Advanced Wireless Settings screen, and then click Apply. (You can also turn the wireless portion of the router by pressing the Wireless button on the front of the router.)
The Fragmentation Threshold, CTS/RTS Threshold, and Preamble Mode options are reserved for wireless testing and advanced configuration only. Do not change these settings.
|
Safeguarding Your Network |
2-19 |
v1.0, September 2010

N300 Wireless Router with USB WNR2200 User Manual
•WPS Settings. For information about WPS settings, see “Using Push ‘N’ Connect (WPS) to Configure Your Wireless Network” on page 2-12.
•Restricting access by MAC address. You can use a Wireless Card Access List to restrict access. See “Restricting Access by MAC Address” on page 3-2.
Adding Guest Networks
Adding a guest network allows visitors at your home to use the Internet without having to know your wireless security key. You can add a guest network to the wireless network.
To add a guest network, do the following:
1. Select Guest Network from the Setup menu. The Guest Network Settings screen appears
Figure 2-10
2.Select any of the following Wireless settings:
–Enable Guest Network – When this check box is selected, the guest network is enabled, and guests can connect to your network using the SSID of this profile.
|
Safeguarding Your Network |
2-20 |
v1.0, September 2010

N300 Wireless Router with USB WNR2200 User Manual
–Enable SSID Broadcast – If selected, the Wireless Access Point broadcasts its name (SSID) to all Wireless Stations. Stations with no SSID can adopt the correct SSID for connections to this Access Point.
–Enable Wireless Isolation – If selected, the wireless client under this SSID can only access the Internet, and cannot access other wireless clients, even clients under the same SSID, Ethernet clients, or this device.
–Allow Guest to access MY Local Network – If selected, any user who connects to this SSID can access local networks associated with the router like users in the primary SSID.
3.Give the wireless network a name.
The name is case-sensitive and can be up to 32 characters. The same name must be assigned to all wireless devices in your network. NETGEAR recommends that you change the name to a different value.
4.Select a Security option from the list.
5.Click Apply to save your selections.
|
Safeguarding Your Network |
2-21 |
v1.0, September 2010

Chapter 3
Protecting Your Network
This chapter describes how to use the content filtering and reporting features of the N300 Wireless Router with USB WNR2200 to protect your network. You can find these features by selecting the items under Content Filtering in the wireless router main menu.
This chapter includes the following sections:
•“Protecting Access to Your Wireless Router”
•“Restricting Access by MAC Address” on page 3-2
•“Blocking Access to Internet Sites” on page 3-4
•“Blocking Access to Internet Services” on page 3-6
•“Scheduling Blocking” on page 3-8
•“Viewing Logs of Web Access or Attempted Web Access” on page 3-10
•“Configuring E-mail Alert and Web Access Log Notifications” on page 3-9
•“Setting the Time” on page 3-11
Protecting Access to Your Wireless Router
For security reasons, the wireless router has its own user name and password. Also, after a period of inactivity for a set length of time, the administrator login automatically disconnects. When prompted, enter admin for the wireless router user name and password for the wireless router password. You can use procedures in the following sections to change the wireless router password and the amount of time for the administrator’s login time-out.
Note: The user name and password are not the same as a user name or password you might use to log in to your Internet connection.
NETGEAR recommends that you change this password to a more secure password. The ideal password should contain no dictionary words from any language, and should be a mixture of both upper and lower case letters, numbers, and symbols. Your password can be up to 30 characters.
3-1
v1.0, September 2010
 Loading…
Populaire ondersteuningsartikelen
Populaire ondersteuningsvideo’s
-

How to Troubleshoot your NETGEAR Wireless Network
-
How to Change your Network Name and Password
-
How to Setup Genie Remote Management

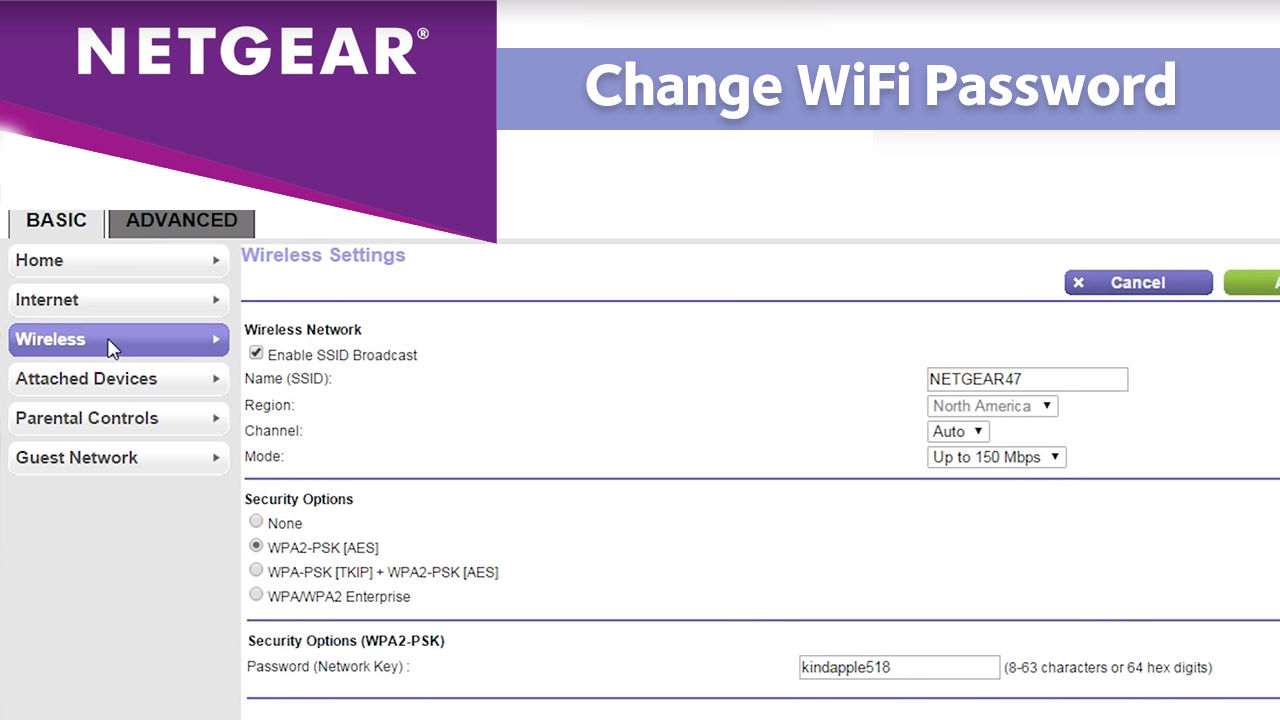
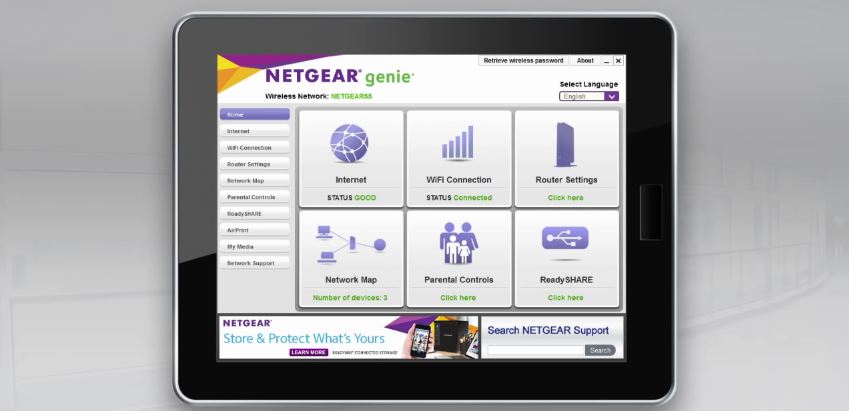
Videos
-
How to Troubleshoot your NETGEAR Wireless Network
-
How to Forget a WiFi Network on iPhone
-
How to Forget a WiFi Network on Android
-
How to Forget a WiFi Network on PC
-
How to Forget a WiFi Network on Mac


Videos
-
How to Setup Remote Access on NETGEAR Nighthawk Routers with genie
Videos
-
How to Change your Network Name and Password
-
How to Login to your NETGEAR Router’s Web Interface | PC and Mac

Artikelen
И хотя роутеры Netgear далеко не так популярны в нашей стране, но у них есть искренние поклонники. На нашем сайте уже были обзоры некоторых их моделей, но большая часть читателей просит одного – настроить роутер Netgear N300. Конечно, наш портал WiFiGid поможет вам в этом просто деле, но сначала немного огорчу. Как? Читайте дальше.
Мы и другие читателя очень ценят, когда кто-то делится своим опытом или вопросами в комментариях. Рекомендую и вам поделиться там своим мнением, проблемами при настройке и другими моментами, которые вообще стоит упомянуть. Спасибо!
Содержание
- Роутеры Netgear N300?!
- Куда идти?
- Настройка роутера по шагам
- Шаг 1 – Подключение
- Шаг 2 – Вход в настройщик
- Шаг 3 – Настройка интернета
- Шаг 4 – Настройка Wi-Fi
- Шаг 5 – Дополнительные настройки
- Официальная инструкция
- Задать вопрос автору статьи
А вот теперь минута огорчения:
Роутеров Netgear N300 не существует!
Точнее они существуют, но это не точное название модели. N300 – это всего лишь класс Wi-Fi. Обозначает стандарт 802.11n (Wi-Fi 4) с максимальной скоростью доступа по Wi-Fi до 300 Мбит/с. О чем речь? Да о том, что вы попали сюда, скорее всего не указав точное название модели своего роутера. Т.е. роутеров в классе N300 много, а некоторые из них даже вовсе не «нетгировские», и у них могут быть разные интерфейсы и способы настройки.
Например, роутер N300 WiFi Router (WNR2020) – здесь N300 является общим классом, а вот WNR2020 уже название модели.
Поэтому настоятельно рекомендую поискать инструкцию конкретно под свою модель – можно на нашем сайте, можно на YouTube, можно на других площадках. Так вам будет гораздо проще сориентироваться и наделать меньше проблем с настройками. Ну и соответственно никакого обзора и характеристик здесь не будет – за этим уже нужно обращаться на официальный сайт или в другие наши статьи по конкретным моделям.
Куда идти?
Я уже сказал, что лучшим вариантом будет найти точную инструкцию под свою модель, но просто так бросить вас я не могу, ведь все роутеры настраиваются примерно одинаково, а меняются лишь интерфейсы и адреса входов в настройки. Суть же сохраняется.
Поэтому рекомендую обратить вам внимание на эту общую статью настройки роутеров Netgear.
Там действительно предоставлено много информации по подключению роутеров, поэтому далее я предлагаю рассмотреть общий процесс настройки в очень кратком виде.
Настройка роутера по шагам
Примерный план действий при подключении любого роутера, которому мы будет придерживаться и далее:
- Подключение проводов
- Вход в настройщик
- Настройка интернета
- Настройка Wi-Fi
- Дополнительные настройки
Шаг 1 – Подключение
Для начала настройки вам нужно правильно подключить роутер:
- Включить его в питание – тут все просто, на этом этапе сложно что-то перепутать.
- Подключить провод интернета – провод интернета вставляется в порт WAN на задней стороне роутера (он обычно синего цвета и один). Именно через этот порт роутер будет брать интернет и раздавать его на другие устройства.
- Устройство, с которого мы будем производить настройку (компьютер, ноутбук, телефон) нужно подключить НАПРЯМУЮ к роутеру. Лучше всего сделать это по проводу Ethernet (телефоны пролетают) – подключаем его в любой порт LAN (обычно желтые и их несколько). Но некоторые роутеры позволяют настраивать сразу и через Wi-Fi (а тут можно и с телефона) – название Wi-Fi сети и пароль от нее обычно расположены на наклейке на дне роутера.
- Все остальные устройства, которые нужно подключить по проводу (компьютер, телевизор, консоль, IPTV приставка) подключаем в LAN порты. Обычно, не важно куда именно. Ограничение может касаться только IPTV приставки – для нее изначально роутеры выделяют отдельные порты (как правило последний), но все это можно будет переназначить в настройках.

Шаг 2 – Вход в настройщик
У нас на сайте уже есть очень подробная статья по входу в настройщик Netgear, там же изложены варианты исправления возможных ошибок. Рекомендую ознакомиться с ней.
Так как вы уже поняли, что роутеры N300 могут очень даже сильно отличаться друг от друга, нам понадобятся сведения об адресах входа. Где это взять? Переворачиваем роутер и смотрим наклейку на дне:
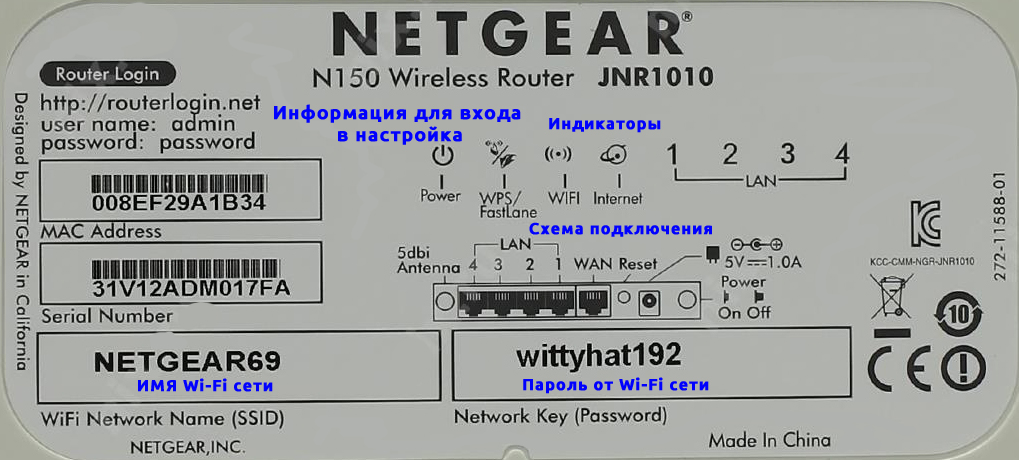
Обычные адреса входа (смело открываем их в браузере, при условии, что вы подключены напрямую к роутеру – мобильный и прочий интернет здесь не нужны):
- 192.168.0.1
- routerlogin.net
- routerlogin.com
- orbilogin.net
Здесь подобраны самые встречающиеся варианты, можно пробовать по порядку. Но лучше глянуть на наклейку – на ней все указано. На входе в настройщик у вас обычно спрашивают логин и пароль. Обычно они такие:
- Логин: admin
- Пароль: password ИЛИ admin
Если пароль вдруг не подходит от того, что указан на наклейке, вспомните – а настраивал ли этот роутер кто-то до вас? Если да – спросите пароль у него или сделайте сброс на заводские настройки. Для сброса на заводские настройки на задней панели есть специальная кнопочка Reset (очень часто расположена в отверстии, подобраться туда можно чем-нибудь тонким) – во включенном состоянии нажимаем и удерживаем ее в течение 10 секунд, и роутер благополучно становится как новеньким, а пароль снова подходит.
Шаг 3 – Настройка интернета
Далее я будут показывать настройки для нового интерфейса. Владельцам других интерфейсов я рекомендую не отчаиваться – ищите что-то похожее (а оно есть везде) или же перейдите по рекомендованной выше ссылке для общей статьи про настройку – там мы старались подобрать все интерфейсы.
Будем считать, что у вас удалось войти в настройщик. Теперь нам нужно подключить интернет. Главная страница настройщика выглядит так:
Обратите внимание на значок «Интернет». У некоторых он подключен сразу (когда ваш провайдер использует тип подключения Динамический IP или DHCP). Так что если у вас здесь все хорошо, рекомендую просто переходить в следующий раздел.
В общем же случае щелкаем по этому значку и попадаем вот на такой опросник:
Кратко пробежимся по каждому пункту:
- Требуется ли при подключении к Интернету ввести имя пользователя и пароль? Тут важно найти свой договор с провайдером или позвонить ему – нужно узнать тип подключения, логин, пароль и прочие данные (при их необходимости). Т.е. если у вас там ничего не нужно, оставляем вариант НЕТ, а интернет уже должен работать. Но если есть хотя бы логин и пароль, нужно ставить ДА, а далее уже выбирать тип подключения (PPPoE, L2TP, PPTP) – еще раз отправляю в договор с провайдером или в его техподдержку, сами вы это из головы не придумаете.
- IP-адрес Интернет-порта. Это нужно, если ваш тип подключения включает в себя задание вашего IP-адреса. Бывает нужно, на том же Ростелекоме через PPPoE можно ничего не заполнять.
- IP-адрес DNS-сервера. Здесь тоже можно все оставить автоматическим, но я люблю переключать на альтернативные DNS, чтобы они сразу применялись на все свои устройства. Если не разбираетесь – оставляем как есть.
- MAC-адрес маршрутизатора. Способ подключения «Динамический IP» не требует ввода логина и пароля провайдера, но зачастую он привязан к вашему MAC-адресу (отражается в договоре). Именно в этой настройке его можно изменить.
Если заполните все грамотно, интернет появится. Теперь остается только настроить Wi-FI.
Шаг 4 – Настройка Wi-Fi
Если заметили, то на скриншоте стартового экрана есть раздел «Беспроводная сеть». Вот сюда-то нам и нужно перейти:
Заполняем все примерно как на рисунке. В качестве примечания отмечу, что поле SSID – это название вашей Wi-Fi сети, которое будет видно всем. А вот канал можно оставить в режиме АВТО. Не забудьте создать пароль! Кстати, потом, зайдя сюда, можно будет спокойно поменять пароль.
Шаг 5 – Дополнительные настройки
Здесь хотелось бы коротко пробежаться по другим полезным настройкам.
IPTV. Помните, я говорил, что IPTV приставку нужно подключать в отдельный порт? Это настраивается по следующему пути настройщика: «Расширенный режим – Настройки – Параметры Интернет-порта»:
Вот и все премудрости современной настройки роутеров. При желании можете задать пароль на вход в настройки роутера – чтобы никакой другой злой хацкер не залез в эти настройки и ничего вам не поломал. При этом рекомендую записать этот пароль себе отдельно, а то есть риск забыть, а потом все снова сбрасывать на заводские настройки.
Официальная инструкция
Предлагаю к ознакомлению официальную инструкцию одного из роутеров Netgear семейства N300. Вдруг так будет понятнее.
Скачать