Описание
Легкий для развертывания надежной и защищенной беспроводной сети маршрутизатор DIR-330 со встроенным коммутатором 10/100 Мбит/с и межсетевым экраном является идеальным решением для малых и домашних офисов (SOHO).
Настраиваемый интерфейс
DIR-330 имеет интуитивно-понятный Web-интерфейс пользователя, для работы с которым необходимо установить утилиту управления D-Link. Настройка устройства может осуществляться только пользователями с учетной записью администратора сети, дающей привилегии чтения/записи.
Расширенные функции аппаратного обеспечения
DIR-330 может подключаться к кабельному или DSL-модему для высокоскоростного доступа к Интернет. Также это устройство может служить в качестве полнодуплексного 4-портового 10/100 Мбит/с коммутатора, позволяющего подключить до 4 устройств, оснащенных интерфейсами Ethernet. Для расширения проводной сети необходимо просто добавить дополнительные коммутаторы. Этот маршрутизатор может работать в качестве беспроводной точки доступа 802.11g/802.11b для подключения беспроводных устройств к сети. Кроме того, DIR-330 позволяет создать частную виртуальную сеть и подключить до 4 удаленных пользователей, обеспечив безопасный удаленный доступ к центральной сети через Интернет-соединение.
Безопасность корпоративного уровня
Для защиты сети DIR-330 использует шифрование по протоколу WPA™ или WPA2™. А также для предотвращения потенциальных атак из сети Интернет это устройство оснащено встроенным двойным активным межсетевым экраном (SPI и NAT). По мере роста потребностей малого бизнеса в сетевых услугах возникает необходимость также обеспечить и надежное решение по безопасности сети. Беспроводной маршрутизатор D-Link 802.11g (DIR-330) обеспечивает высокий возврат инвестиций, благодаря надежным функциям безопасности, гибкой настройке и высокой степени защиты домашних сетей и сетей малых офисов.
Маршрутизатор может выполнять функции базовой станции для подключения к беспроводной сети устройств, работающих по стандартам 802.11b и 802.11g.
Характеристики
Стандарты
• IEEE 802.3
• IEEE 802.11g
• IEEE 802.3u
• IEEE 802.11b
Порты
• 4 порта LAN 10/100 Мбит/с
• 1 порт USB 1.1
• 1 порт WAN
Режим работы межсетевого экрана
• Режим 3 уровня: режим маршрутизатора, режим NAT
• Переадресация портов
• Network Address Translation (NAT)
• Port Address Translation (PAT)
Типы подключения WAN
• Static IP
• Dynamic IP
• PPPoE
• L2TP
• PPTP
• DualAccess PPPoE
• DualAccess PPTP
Безопасность
• Количество туннелей: 100 (IPSec, PPTP, L2TP)
• IPSec NAT-Traversal
• IPSec LAN-to-LAN / Roaming User
• IPsec Dead Peer Detection
• PPTP/L2TP сервер
• Алгоритмы шифрования: DES
• IPSec/PPTP/L2TP Pass-through
• XAUTH/X.509 (расширенная аутентификация) для аутентификации IPSec
Функции безопасности межсетевого экрана
• Stateful Packet Inspection (SPI)
• База данных внутренних пользователей (150 записей)
• Network Address Translation (NAT)
Сетевые сервисы
• Статические IP-адреса
• Двойной доступ PPTP/PPPoE
• PPPoE для xDSL
• Статическая маршрутизация
• DHCP-клиент для WAN-интерфейса
• DNS Resolving of Remote Gateway
• Встроенный DHCP-сервер
• Dynamic DNS
Управление устройством
Internet Explorer v6 или выше, Firefox 1.5 или выше
Индикаторы
• Power
• LAN
• Status
• WLAN
• WAN
• USB
Антенна
Две съемные внешние всенаправленные антенны с коэффициентом усиления 2dBi
Диапазон частот
2400 — 2497 МГц
Скорость беспроводного соединения*
• 802.11b: 11, 5.5, 2, и 1 Мбит/с
• 802.11g: 54, 48, 36, 24, 18, 12, 9, и 6 Мбит/с
Выходная мощность передатчика
(Типичная выходная мощность передатчика при комнатной температуре)
802.11b
• 19 dBm (+/-2dB) для 11, 5.5, 2 и 1 Мбит/с
802.11g
• 17 dBm (+/-2dB) для 6 до 36 Мбит/с
• 16 dBm (+/-2dB) для 48 Мбит/с
• 15 dBm (+/-2dB) для 54 Мбит/с
Чувствительность приемника
(типичная при PER < 8% для пакета размером 1000 байт и комнатной температуре)
802.11b
• –86dBm for 11Mbps @ 8% PER
• –87dBm for 5.5Mbps @ 8% PER
• –88dBm for 2Mbps @ 8% PER
• –90dBm for 1Mbps @ 8% PER
802.11g
• –84dBm для 6 Мбит/с
• –82dBm для 9 Мбит/с
• –80dBm для 12 Мбит/с
• –78dBm для 18 Мбит/с
• –77dBm для 24 Мбит/с
• –74dBm для 36 Мбит/с
• –70dBm для 48 Мбит/с
• –68dBm для 54 Мбит/с
Сертификаты
• FCC Class B
• IC
Сертификаты
Заказ
DIR-330 Беспроводной маршрутизатор 802.11g со встроенным 4-портовым коммутатором 10/100 Мбит/с
DS-601 Программное обеспечение для удаленного доступа (лицензия для одного пользователя)
DS-605 Программное обеспечение для удаленного доступа (лицензия для пяти пользователей)
Изображения
DIR-330A1
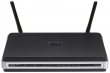
Вид спереди
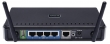
Вид сзади
Загрузки
Смотрите также
Wi-fi роутера D-link DIR-330, настройку которого мы разберем в этой статье, — относительно недорогой и надежный маршрутизатор. Он пришел на смену снятому с производства DI-804HV, обладает теми же опциями плюс поддержка wi-fi.
Содержание
- Характеристики
- Локальная сеть – настройка подключения
- Подключаем к компьютеру
- Авторизируемся в интерфейсе роутера D-Link DIR-330
- Меняем пароль на wi-fi
- Настраиваем PPTP
- Настройка PPTP со статическим IP-адресом
- Настраиваем L2TP
- Настраиваем L2TP со статическим IP
- Настраиваем PPPOE
- Настраиваем PPPOE со статическим IP
- Настройка подключения к wi-fi
Характеристики
Интерфейсы WAN
• 1 порт 10/100BASE-TX Ethernet
Интерфейсы LAN
• 4 порта 10/100BASE-TX Ethernet
Скорость беспроводного соединения wi-fi
• 802.11b: 11, 5.5, 2, и 1 Мбит/с
• 802.11g: 54, 48, 36, 24, 18, 12, 9, и 6 Мбит/с
Локальная сеть – настройка подключения
Прежде, чем мы начнем настраивать роутер, посмотрим как настроено подключение по локальной сети. Вот что для этого нужно.
Windows 7
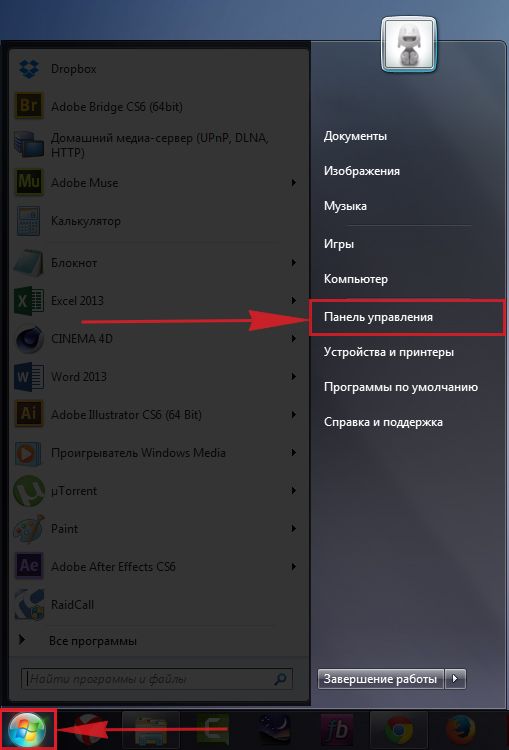
1. Нажимаем на “Пуск” потом “Панель управления“.
2. Жмём на “Просмотр состояния сети и задач“.

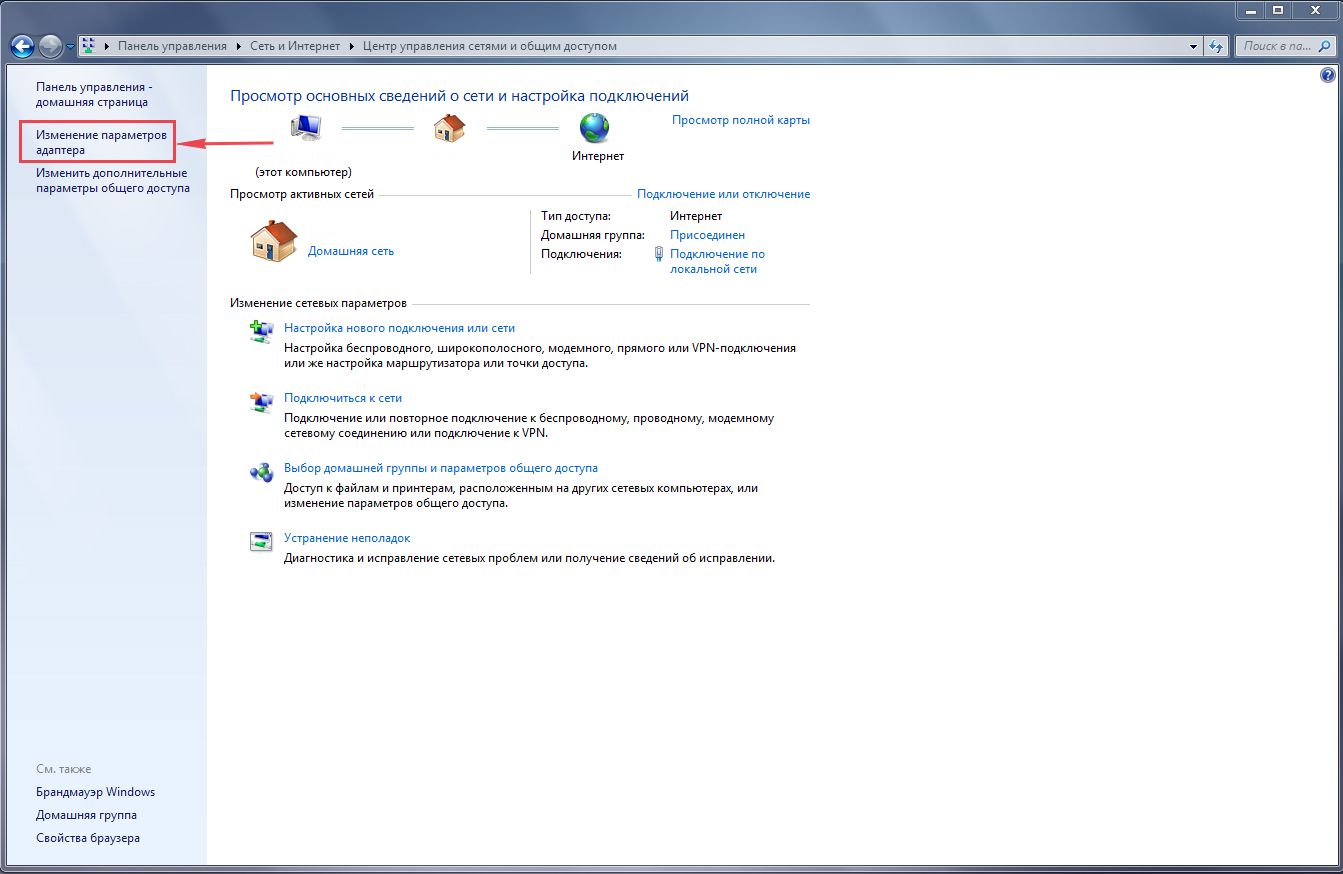
3. Нажимаем на “Изменение параметров адаптера“.
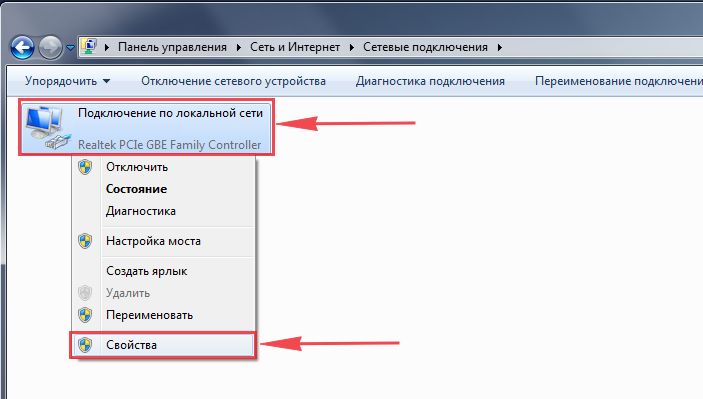
4. Открылось окно – здесь мы видим “Подключение по локальной сети“. Жмём по нему правой кнопкой мыши, и выбираем “Свойство“.
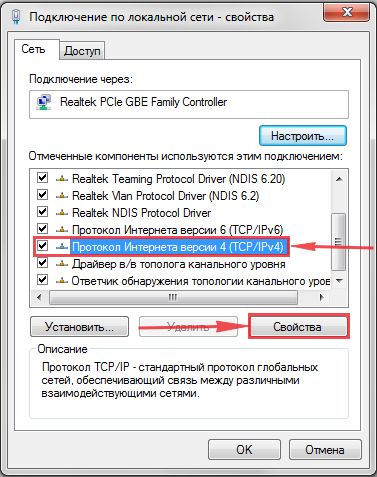
5. Теперь выберем “Протокол Интернета версии 4 (TCP/IPv4)” и жмём “Свойство“.
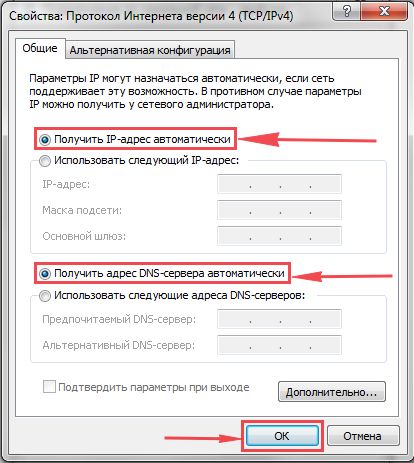
6. Открылось окно – здесь нужно проставить галки “Получить IP-адрес автоматически” и “Получить адрес DNS-сервера автоматически“, после жмём кнопку “Ok“.
Windows 10
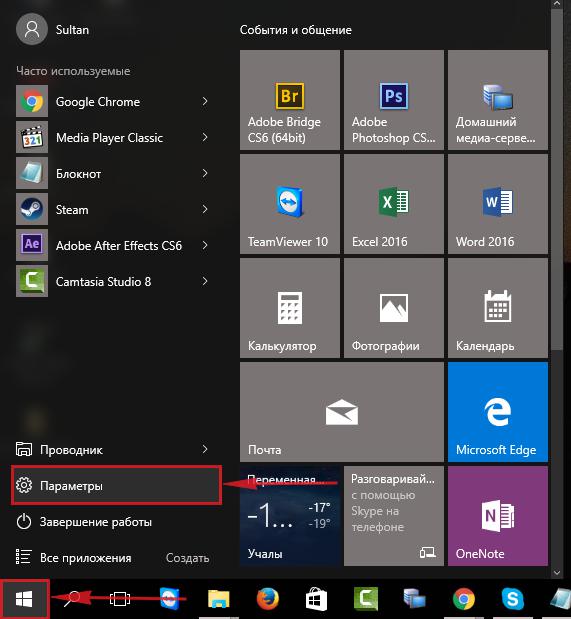
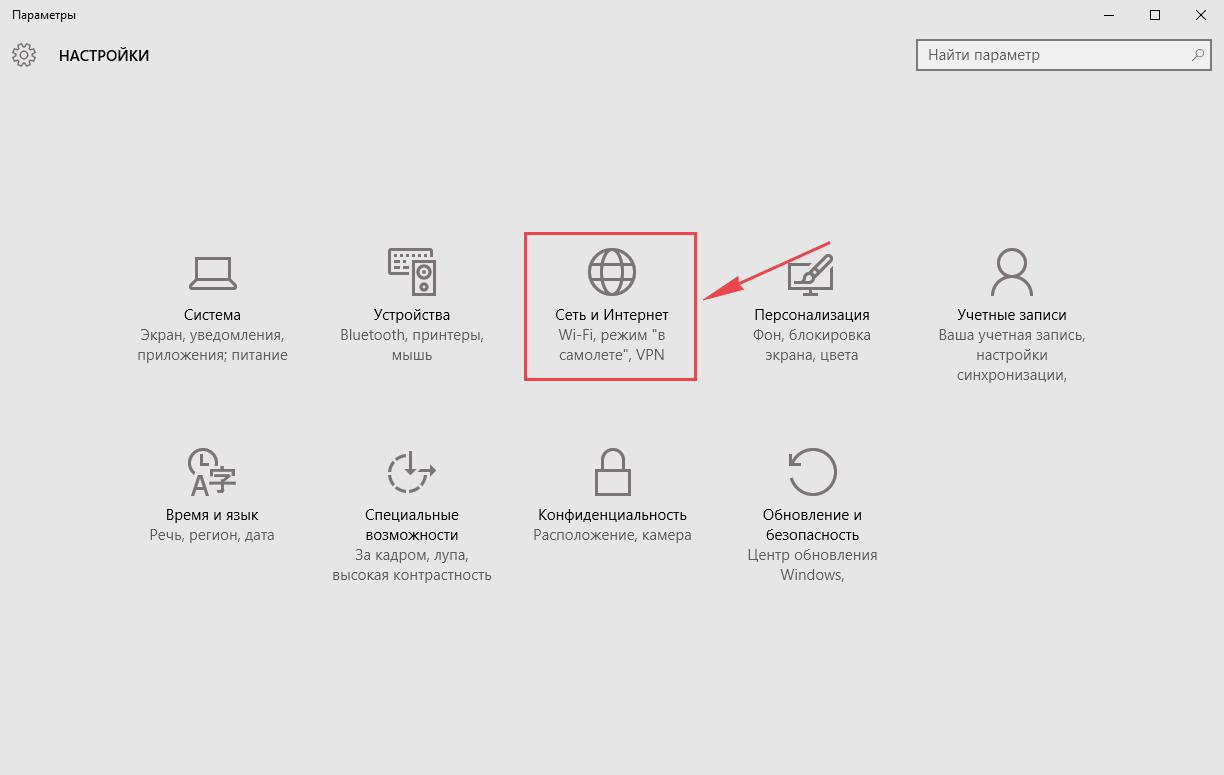
1. Нажимаем на “Пуск” потом “Параметры“.
2. Жмём на “Сеть и Интернет“.
3. Выберем “Ethernet” и нажмём на “Настройка параметров адаптера“.

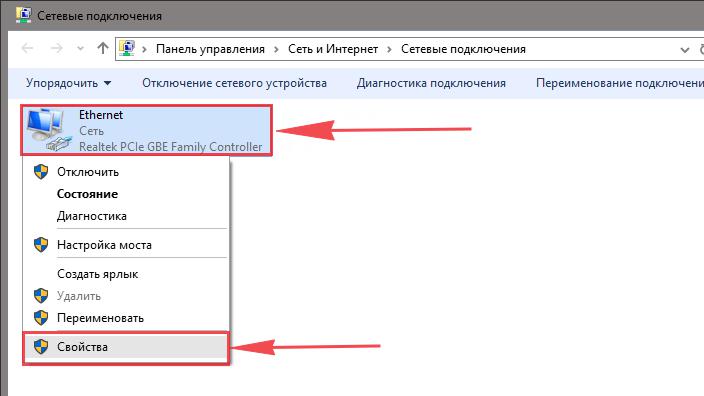
4. Открылось окно – здесь мы видим “Ethernet“. Жмём по нему правой кнопкой мышки, и выбираем “Свойство“.
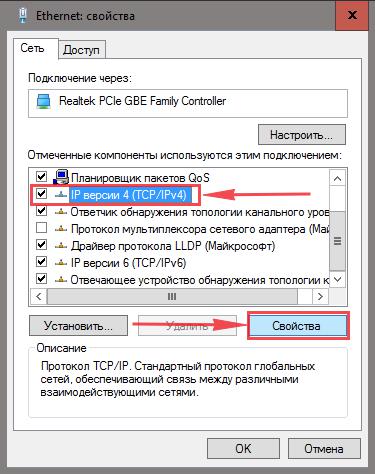
5. Теперь выбираем “IP версии 4 (TCP/IPv4)” и жмём “Свойство“.
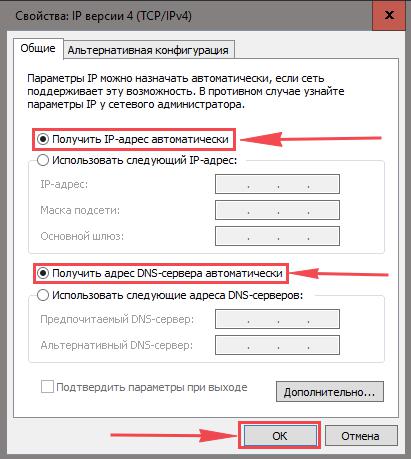
6. Открылось окно – здесь вам нужно проставить галки “Получить IP-адрес автоматически” и “Получить адрес DNS-сервера автоматически“, после жмём кнопку “Ok“.
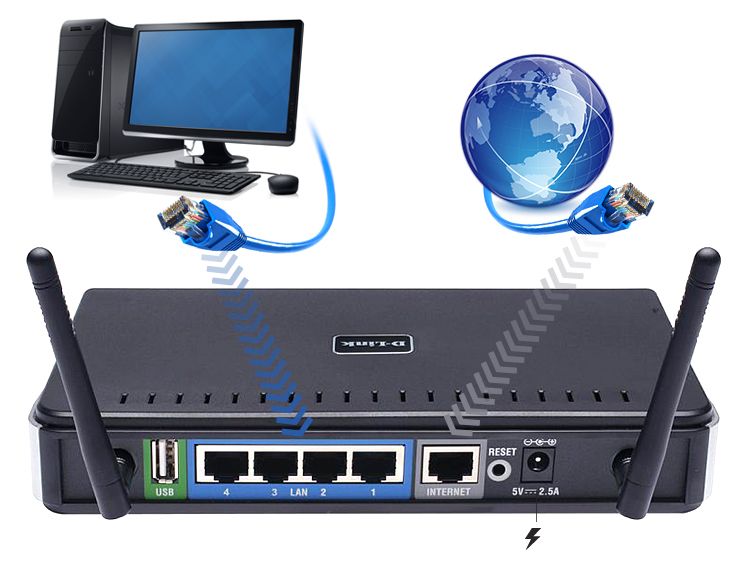
Подключаем к компьютеру
Теперь нам нужно подключить роутер D-Link DIR-330 либо к компьютеру, либо к ноутбуку. Чтобы это сделать, вам нужно подсоединить кабель, который был протянут вашим провайдером к разъему роутера, где есть надпись “INTERNET”. Берем кабель, шедший вместе с роутером, один конец его подключаем к пк, либо к ноутбуку, другой подсоединяем к синему порту роутера. Также не забываем подключить кабель питания.
Авторизируемся в интерфейсе роутера D-Link DIR-330
После того, как вы подключили роутер, нужно через браузер (Mozilla Firefox, Google Chrome, Internet Explorer, Safari и т.д.) войти в его веб-интерфейс и в адресной строке ввести ip-адрес роутера: 192.168.0.1 (не открывается)

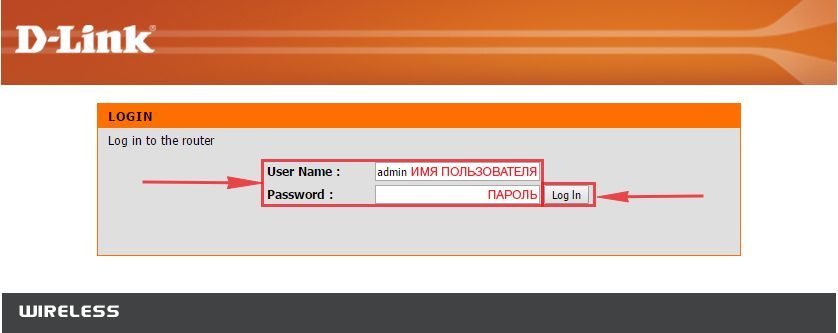
Если вы все сделали правильно, то роутер будет запрашивать имя пользователя и пароль. По умолчанию на роутерах D-link обычно установлены:
- Имя пользователя – admin
- Пароль – оставляем пустым
Вводим данные и жмём “Log in“
После того как мы попали в веб-интерфейс роутера, нам нужно настроить наше оборудование. Сперва установим пароль на wi-fi, дабы защитить беспроводное соединение. Теперь вам потребуется информация о том, какой тип подключения используется для выхода в интернет – PPOE, L2TP или PPTP . Узнайте это, связавшись с организацией которая предоставила вам услугу интернет, то есть с провайдером. Давайте приступим к настройке роутера.
Меняем пароль на wi-fi
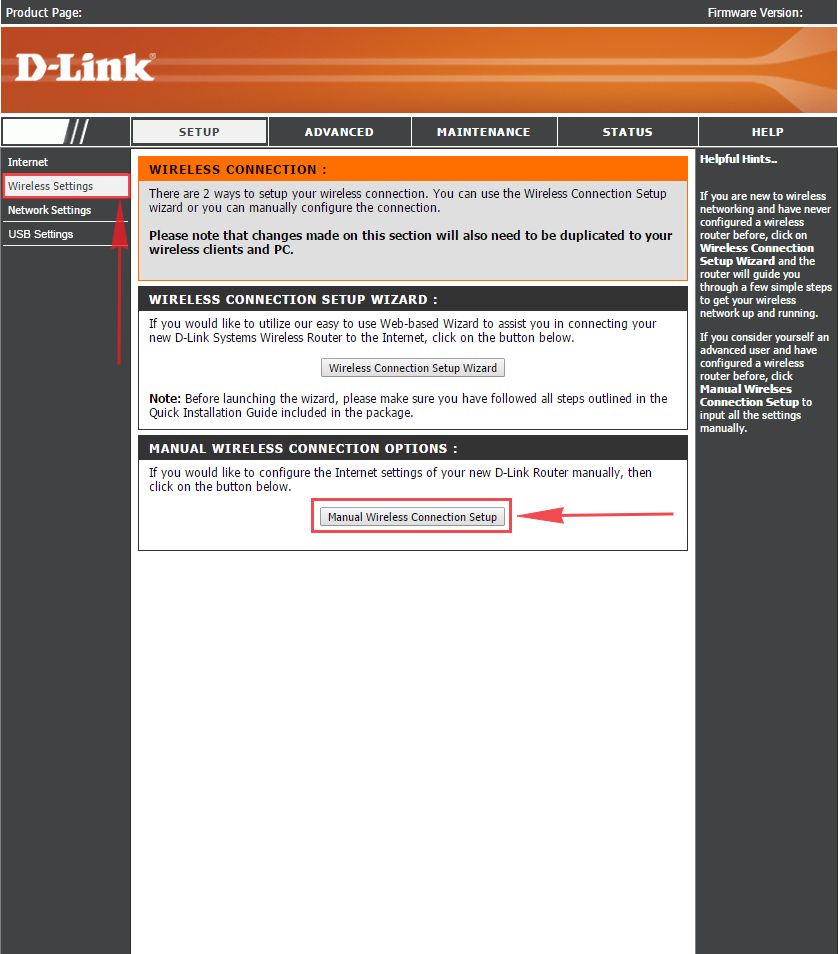
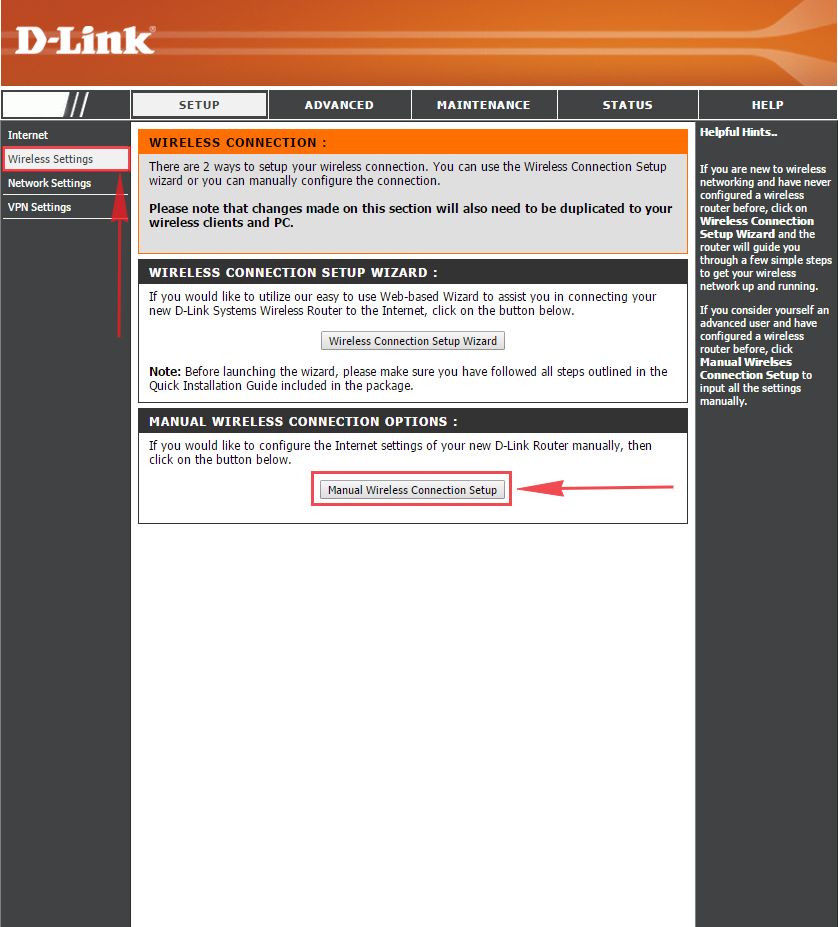
1. Выберем в Веб-интерфейсе вкладку меню “Wireless Settings“, потом “Manual Wireless Connection Setup“.
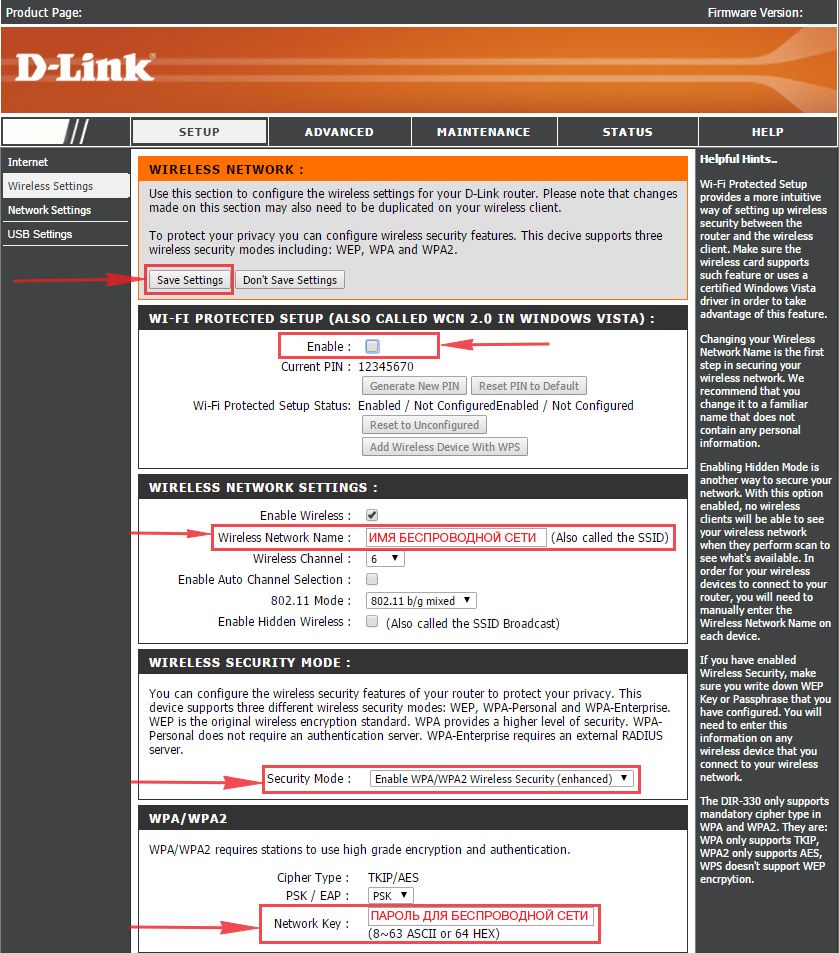
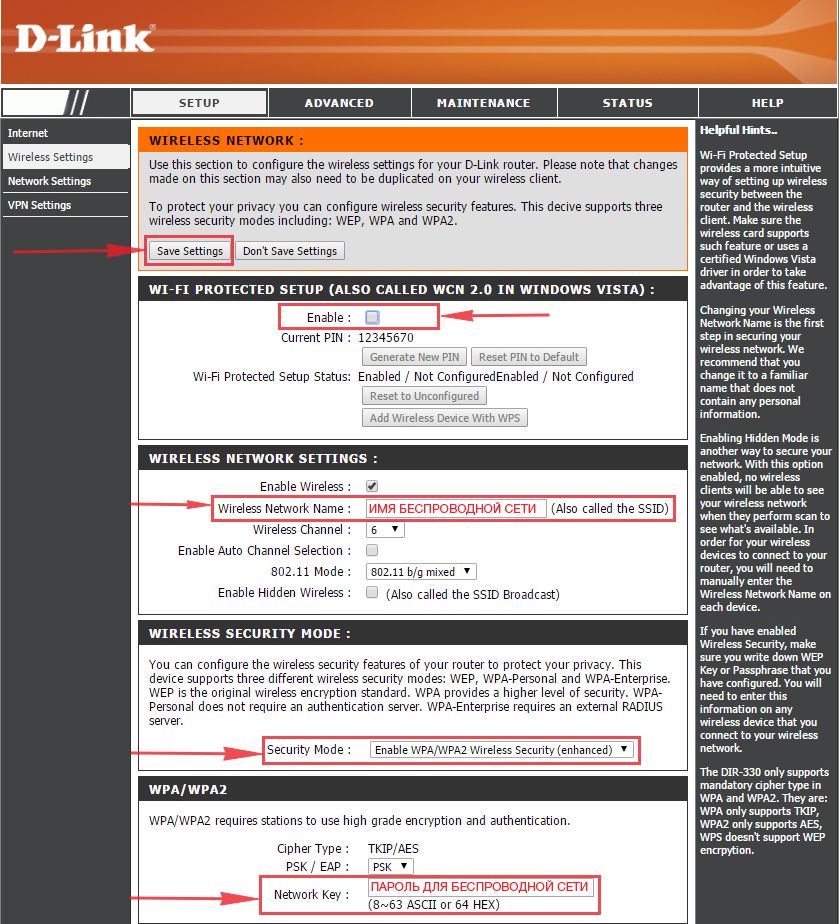
2. В пункте “WI-FI PROTECTED SETUP” убираем галку включения этой настройки: “Enable“.
3. В строчке ниже “Wireless Network Name:” придумайте и введите имя Вашей сети wi-fi, это имя в дальнейшем станет выделяться, как только Вы будете подключаться к сети.
4. Выберите ниже “Security Mode:” – “Enable WPA/WPA2 Wireless Security“.
5. В “Network Key:” придумайте и введите пароль.
6. В конце жмём “Save Settings“.
Настраиваем PPTP
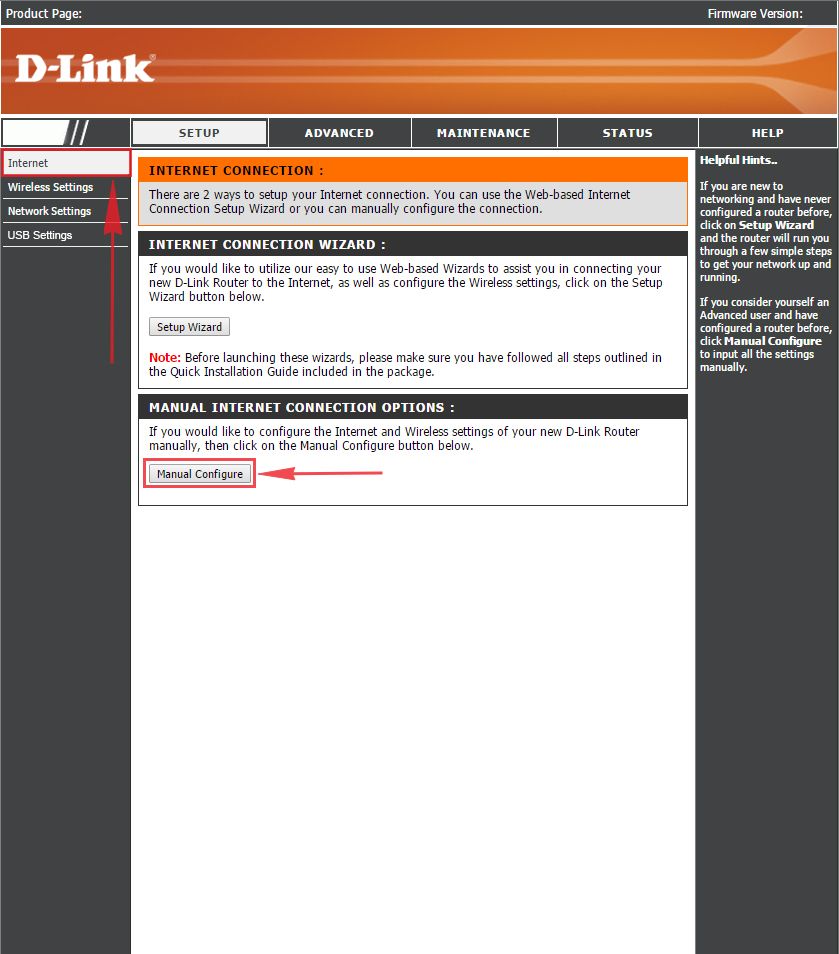
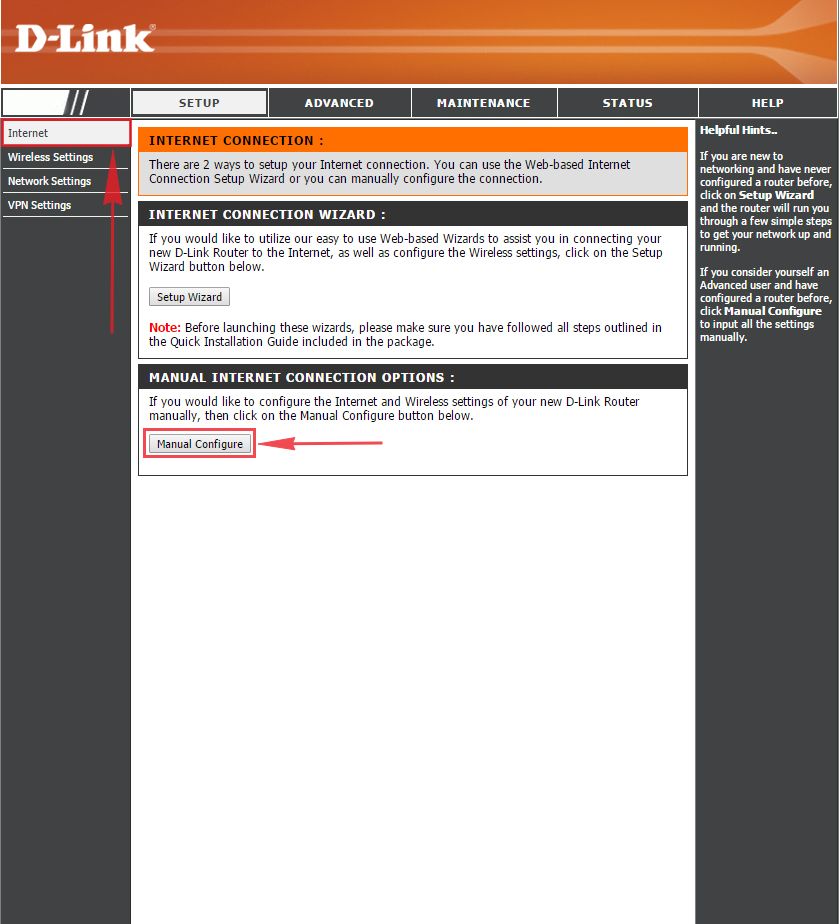
1. Заходим во вкладку меню “Internet“, потом нажимаем “Manual Configure“.
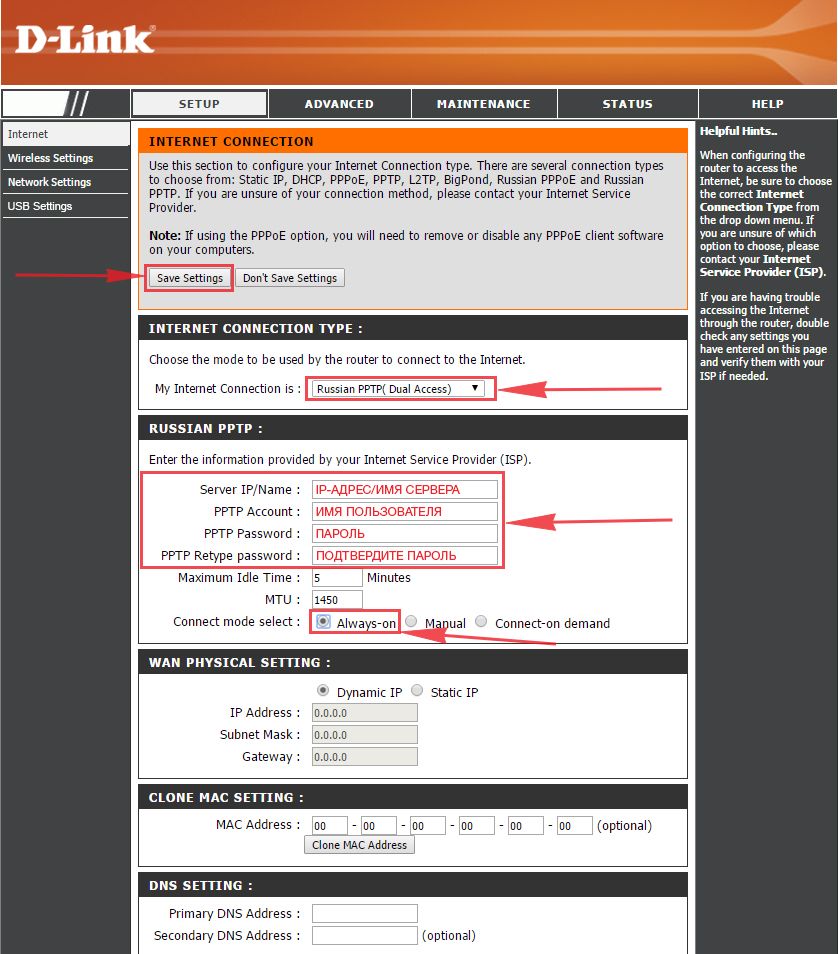
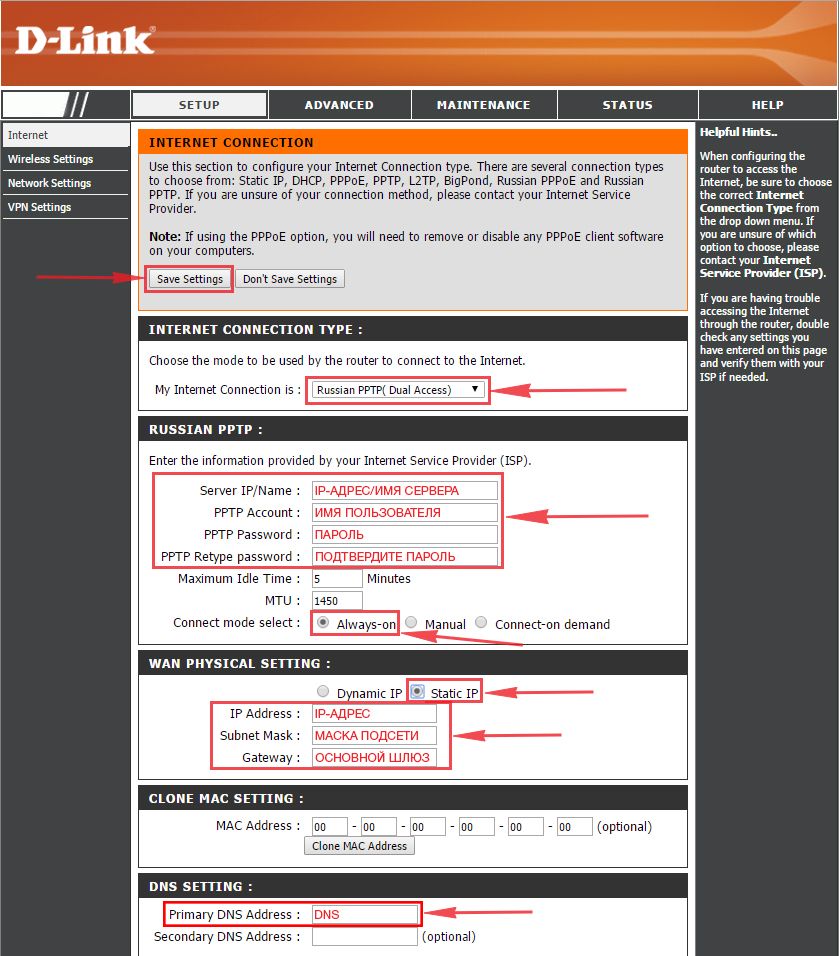
2. В пункте “My Internet Connection is:” выберем “Russia PPTP (Dual Access)“.
3. Ниже Вам предложат ввести ip сервера в строку “Server IP/Name:“, логин(имя пользователя) в строку “PPTP Account:“, пароль в строку “PPTP Password:” и подтвердить пароль в строке “PPTP Retype password:“.
Все эти данные должен вам предоставить провайдер, то есть те у кого вы заказали услугу интернет. Проверьте ваш договор с провайдером, эти данные там должны быть. Если их нет, то свяжитесь с ним, например, по телефону и спросите про них.
4. Поставьте галку на “Connect mode select:” – “Always-on“, это позволит установить постоянное подключение к интернету.
5. В самом конце нажимаем на кнопку “Save Settings“.
Настройка PPTP со статическим IP-адресом
Настройка подключения PPTP со статическим IP-адресом на роутере D-Link DIR-330. Статический ip адрес предоставляется в двух случаях: вы юридическое лицо, либо вы заказали доп. услугу у провайдера.
1. Заходим во вкладку меню “Internet“, потом нажимаем “Manual Configure“.
2. В пункте “My Internet Connection is:” выберем “Russia PPTP (Dual Access)“.
3. Ниже Вам предложат ввести ip сервера в строку “Server IP/Name:“, логин(имя пользователя) в строку “PPTP Account:“, пароль в строку “PPTP Password:” и подтвердить пароль в строке “PPTP Retype password:“.
4. Поставьте галку на “Connect mode select:” – “Always-on“, это позволит установить постоянное подключение к интернету.
5. Это подключение использует статический ip-адрес, поэтому ставим галку “Static IP“
6. Пишем ip-адрес в строку “IP Address:“, маску подсети в строку “Subnet Mask:“, основной шлюз в строку “Gateway:” и DNS в строку “Primary DNS Address:“. Все эти данные должен вам предоставить провайдер, то есть те у кого вы заказали услугу интернет.
Проверьте ваш договор с провайдером, эти данные там должны быть. Если их нет, то свяжитесь с ним, например, по телефону и спросите про них.
7. В самом конце нажимаем на кнопку “Save Settings“.

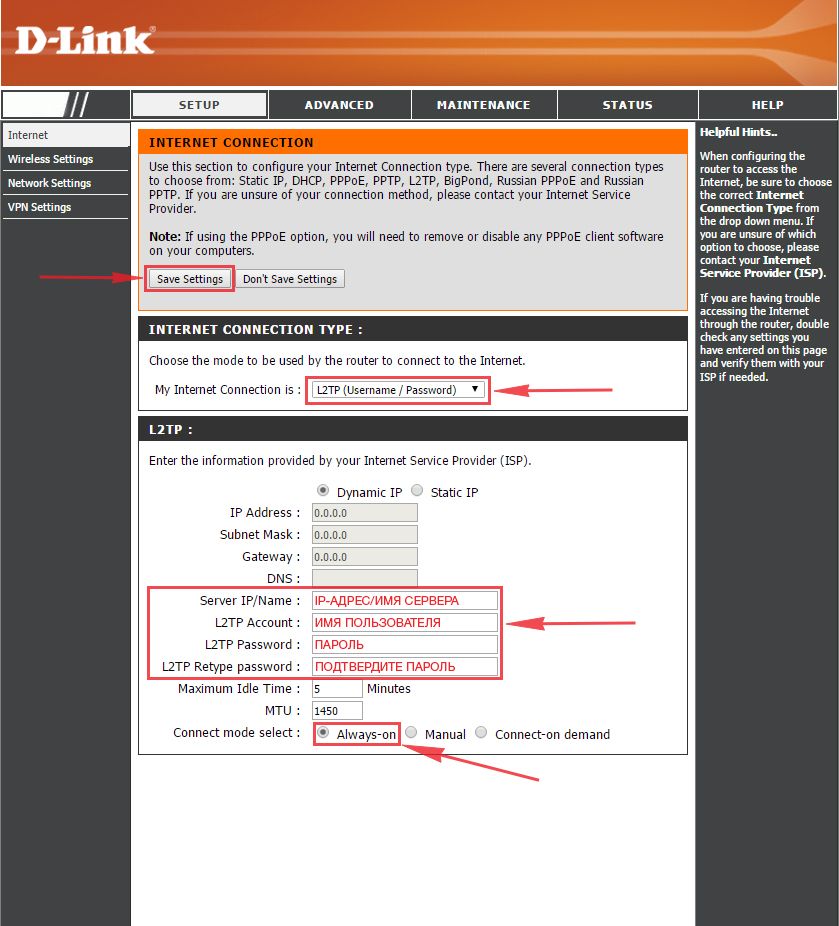
Настраиваем L2TP
1. Заходим во вкладку меню “Internet“, потом нажимаем “Manual Configure“.
2. В пункте “My Internet Connection is:” выберем “L2TP“.
3. Ниже Вам предложат ввести ip сервера в строку “Server IP/Name:“, логин(имя пользователя) в строку “L2TP Account:“, пароль в строку “L2TP Password:” и подтвердить пароль в строке “L2TP Retype password:“. Все эти данные должен вам предоставить провайдер, то есть те у кого вы заказали услугу интернет.
Проверьте ваш договор с провайдером, эти данные там должны быть. Если их нет, то свяжитесь с ним, например, по телефону и спросите про них.
4. Поставьте галку на “Connect mode select:” – “Always-on“, это позволит установить постоянное подключение к интернету.
5. В самом конце нажимаем на кнопку “Save Settings“.

Настраиваем L2TP со статическим IP
Настройка подключения L2TP со статическим IP-адресом на роутере D-Link DIR-330. Статический ip адрес предоставляется в двух случаях: вы юридическое лицо, либо вы заказали доп. услугу у провайдера.
1. Заходим во вкладку меню “Internet“, потом нажимаем “Manual Configure“.
2. В пункте “My Internet Connection is:” выберем “L2TP“.
3. Это подключение использует статический ip-адрес, поэтому ставим галку “Static IP“.
4. Пишем ip-адрес в строку “IP Address:“, маску подсети в строку “Subnet Mask:“, основной шлюз в строку “Gateway:” и DNS в строку “Primary DNS Address:“.
5. Ниже Вам предложат ввести ip сервера в строку “Server IP/Name:“, логин(имя пользователя) в строку “L2TP Account:“, пароль в строку “L2TP Password:” и подтвердить пароль в строке “L2TP Retype password:“. Все эти данные должен вам предоставить провайдер, то есть те у кого вы заказали услугу интернет.
Проверьте ваш договор с провайдером, эти данные там должны быть. Если их нет, то свяжитесь с ним, например, по телефону и спросите про них.
6. Поставьте галку на “Connect mode select:” – “Always-on“, это позволит установить постоянное подключение к интернету.
7. В самом конце нажимаем на кнопку “Save Settings“.

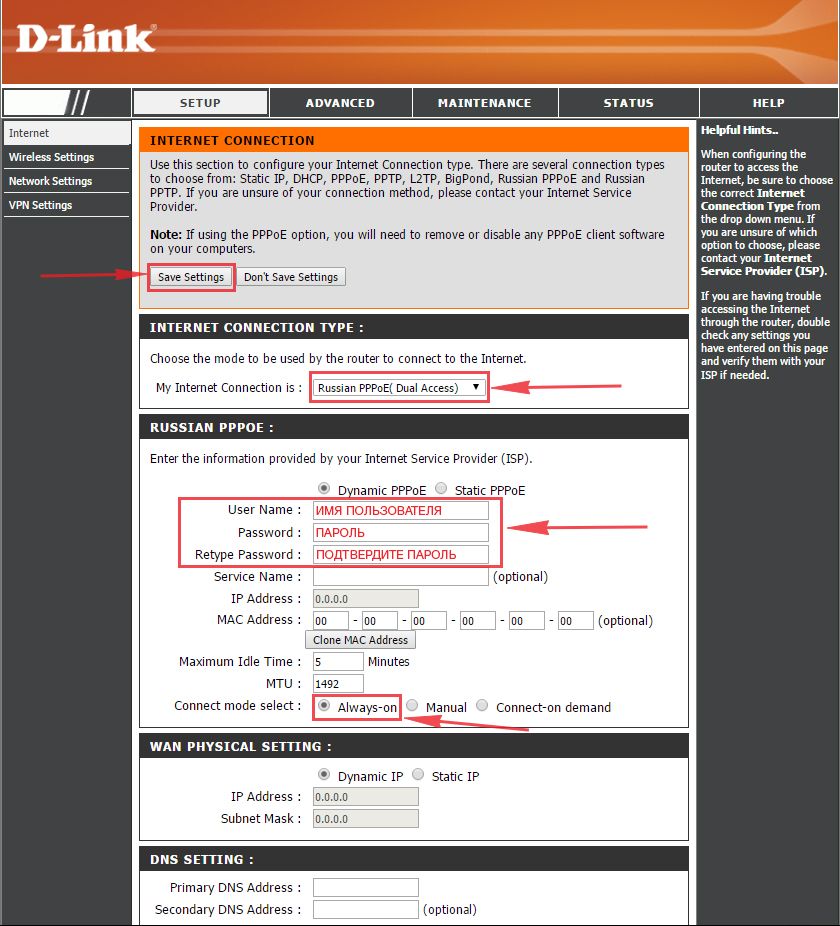
Настраиваем PPPOE
1. Заходим во вкладку меню “Internet“, потом нажимаем “Manual Configure“.
2. В пункте “My Internet Connection is:” выберем “Russia PPPOE (Dual Access)“.
3. Напишем ниже логин(имя пользователя) в строку “User Name:“, пароль в строку “Password:” и подтвердим пароль в строке “Retype password:“. Все эти данные должен вам предоставить провайдер, то есть те у кого вы заказали услугу интернет.
Проверьте ваш договор с провайдером, эти данные там должны быть. Если их нет, то свяжитесь с ним, например, по телефону и спросите про них.
4. Поставьте галку на “Connect mode select:” – “Always-on“, это позволит установить постоянное подключение к интернету.
5. В самом конце нажимаем на кнопку “Save Settings“.

Настраиваем PPPOE со статическим IP
Настройка подключения PPPOE со статическим IP-адресом на роутере D-Link DIR-330. Статический ip адрес предоставляется в двух случаях: вы юридическое лицо, либо вы заказали доп. услугу у провайдера.
1. Заходим во вкладку меню “Internet“, потом нажимаем “Manual Configure“.
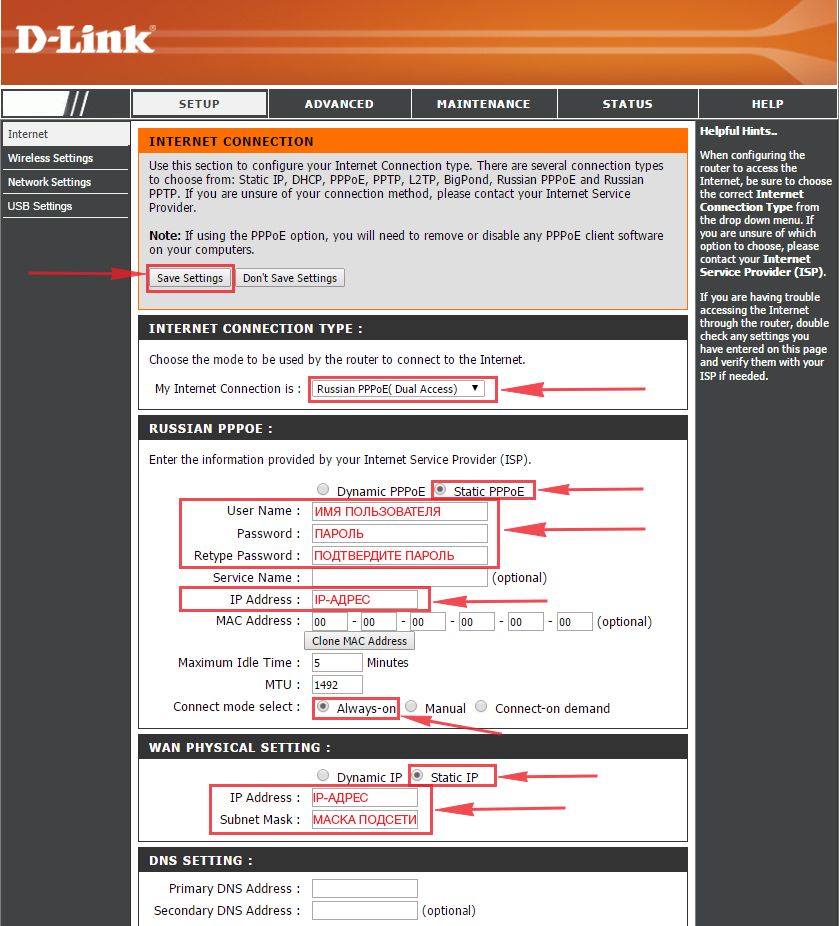
2. В пункте “My Internet Connection is:” выберем “Russia PPPOE (Dual Access)“.
3. Это подключение использует статический ip-адрес, поэтому ставим галку “Static PPPOE“.
4. Пишем логин(имя пользователя) в строку “User Name:“, пароль в строку “Password:” и подтвердим пароль в строке “Retype password:“.
5. Укажем ip-адрес в строке “IP Address:“
6. Поставьте галку на “Connect mode select:” – “Always-on“, это позволит установить постоянное подключение к интернету.
7. Поставим галку “Static IP“
8. Пишем ip-адрес в строку “IP Address:” он будет тем же, что указали выше, маску подсети в строку “Subnet Mask:“. Все эти данные должен вам предоставить провайдер, то есть те у кого вы заказали услугу интернет.
Проверьте ваш договор с провайдером, эти данные там должны быть. Если их нет, то свяжитесь с ним, например, по телефону и спросите про них.
9. В самом конце нажимаем на кнопку “Save Settings“.
Настройка подключения к wi-fi
Так как вы подключили и настроили свой роутер, непременно нужно подключить ноутбук или компьютер к wi-fi, теперь давайте рассмотрим подключение к беспроводной сети в двух операционных системах, это Windows 10 и Windows 7.
Windows 7
1. На рабочем столе в нижнем углу справа, вы должны увидеть индикатор беспроводной сети (wi-fi), кликните по нему левой кнопкой мышки.

2. Появится окошко с беспроводными сетями. Выберите ту сеть, которой вы давали имя во время настройки роутера. В моем примере, эта сеть называется “Natsu“.

3. Как только вы выберете сеть, поставьте галку напротив “Подключаться автоматически” и после нажмите
“Подключение“.

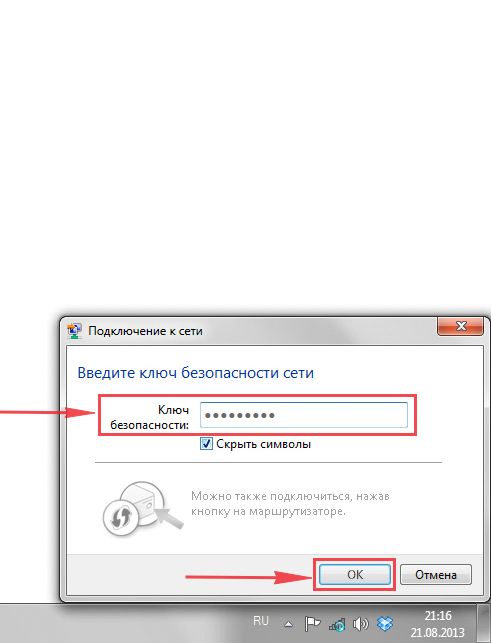
4. В любом случае, нужно указать “Ключ безопасности” это пароль wi-fi. Его вы указали при настройке роутера. Как только вы указали ключ, жмите “OK“.
5. Подождите некоторое время, и вы подключитесь к вашей беспроводной сети.

Windows 10
1. На рабочем столе в нижнем углу справа, вы должны увидеть индикатор беспроводной сети (wi-fi), кликните по нему левой кнопкой мышки.

2. Появится окошко с беспроводными сетями. Выберите ту сеть, которой вы давали имя во время настройки роутера. В моем примере, эта сеть называется “Bruh“.

3. Как только вы выберете сеть, поставьте галку напротив “Подключаться автоматически” и после нажмите
“Подключение“.

4. В любом случае нужно указать “Ключ безопасности” это пароль wi-fi. Его вы указали при настройке роутера. Как только вы указали ключ, жмите “Далее“.

5. Подождите некоторое время, и вы подключитесь к вашей беспроводной сети.

Содержание:
- Настройка подключения по локальной сети
- Подключение роутера D-Link DIR-330 к компьютеру
- Авторизация роутера D-Link DIR-330
- Настройка пароля на wi-fi
- Настройка PPTP
- Настройка PPTP со статическим IP-адресом
- Настройка L2TP
- Настройка L2TP со статическим IP-адресом
- Настройка PPPOE
- Настройка PPPOE со статическим IP-адресом
- Смена пароля web-интерфейса
- Сброс пароля web-интерфейса
- Обновление прошивки
- Подключение компьютера к wi-fi
Настройка подключения по локальной сети
Перед тем, как приступить к настройке роутера, проверим настройки подключения по локальной сети. Для этого:
Windows 7
1. Нажмем на «Пуск«, «Панель управления«.
2. Нажимаем на «Просмотр состояния сети и задач«.
3. Жмем на «Изменение параметров адаптера«.
4. В открывшемся окне мы видим «Подключение по локальной сети«. Нажимаем по нему правой кнопкой мыши, выбираем «Свойство«.
5. Из списка выбираем «Протокол Интернета версии 4 (TCP/IPv4)» и нажимаем «Свойство«.
6. В открывшемся окне Вам нужно выставить галочки «Получить IP-адрес автоматически» и «Получить адрес DNS-сервера автоматически«, затем нажимаем кнопку «Ok«.
Windows 10
1. Нажмем на «Пуск«, «Параметры«.
2. Нажимаем на «Сеть и Интернет«.
3. Выбираем «Ethernet» и нажимаем на «Настройка параметров адаптера«.
4. В открывшемся окне мы видим «Ethernet«. Нажимаем по нему правой кнопкой мыши, выбираем «Свойство«.
5. Из списка выбираем «IP версии 4 (TCP/IPv4)» и нажимаем «Свойство«.
6. В открывшемся окне Вам нужно выставить галочки «Получить IP-адрес автоматически» и «Получить адрес DNS-сервера автоматически«, затем нажимаем кнопку «Ok«.
Подключение роутера D-Link DIR-330 к компьютеру
Следующим шагом будет подключение роутера D-Link DIR-330 к Вашему Ноутбуку либо Персональному компьютеру. Для этого Вам необходимо подключить кабель, который Вам провел провайдер к порту роутера, где подписано «INTERNET». Кабель, который шел в комплекте с роутером, один конец подключаем к ноутбуку либо компьютеру, другой конец подключаем к одному из четырех портов роутера синего цвета. И да, не забудьте подключить кабель питания.
Авторизация роутера D-Link DIR-330
Итак, подключили роутер, теперь Вам нужно через любой браузер (будь это Google Chrome, Mozilla Firefox, Internet Explorer, и т.д.) попасть в его web-интерфейс. Для это открываем браузер и в адресной строке вбиваем адрес роутера: 192.168.0.1
После Мы видим, что роутер требует авторизоваться, т.е. запрашивает имя пользователя и пароль. По умолчанию на старых моделях роутера D-Link установлены:
- Имя пользователя — admin
- Пароль — оставляем пустым
Итак, вбиваем данные и нажимаем «Log in«

Настройка роутера D-Link DIR-330.
И вот наконец мы попали на Web-интерфейс роутера и теперь Вам необходимо произвести настройки оборудования. Первым делом обезопасим беспроводную сеть, установив пароль на wi-fi. Затем Вам необходимо будет узнать какой тип подключения используется для входа в интернет, это PPTP, L2TP либо PPPOE. Узнать можно позвонив Вашему провайдеру (это организация, с которым Вы заключили договор для предоставления услуги интернет). Итак, начнем настройку роутера.
Предлагаю Вашему вниманию посмотреть подробную видео-инструкцию по настройке роутера D-Link DIR-330:
Настройка пароля на wi-fi на роутере D-Link DIR-330.
1. Выбираем на Web-интерфейсе в меню вкладку «Wireless Settings«, затем «Manual Wireless Connection Setup«.
2. В пункте «WI-FI PROTECTED SETUP» убрать галочку включающую данную настройку: «Enable«.
3. Ниже в строке «Wireless Network Name:» придумать и указать имя Вашей беспроводной сети, данное имя в дальнейшем будет светиться, когда Вы будите подключаться к сети.
4. Ниже выберем «Security Mode:» — «Enable WPA/WPA2 Wireless Security«.
5. Ниже в «Network Key:» придумываем и вбиваем пароль.
6. После нажимаем «Save Settings«.
Настройка PPTP на роутере D-Link DIR-330.
1. Переходим в меню во вкладку «Internet«, затем «Manual Configure«.
2. В пункте «My Internet Connection is:» выбираем «Russia PPTP (Dual Access)«.
3. Ниже Вам предложат указать ip-адрес сервера в строке «Server IP/Name:«, имя пользователя в строке «PPTP Account:«, пароль в строке «PPTP Password:» и подтверждение пароля в строке «PPTP Retype password:«.
Все вышеперечисленные данные Вам предоставляет провайдер (Организация, которая провела Вам интернет).
Все эти данные обычно прописываются в договоре с провайдером. Если по какой-то причине Вы не смогли их найти, Вам необходимо позвонить на горячую линию Вашего провайдера и узнать как их можно получить.
4. Ставите галочку «Connect mode select:» — «Always-on«, данная настройка будет держать подключение к интернету постоянно.
5. После всех манипуляций с настройками нажимаем кнопку «Save Settings«.

Настройка PPTP со статическим IP-адресом на роутере D-Link DIR-330.
Рассмотрим настройку подключения PPTP со статическим IP-адресом на роутере D-Link DIR-330. Обычно статический IP-адрес предоставляется юридическим лицам, либо как дополнительная услуга к основному тарифу физическим лицам.
1. Переходим в меню во вкладку «Internet«, затем «Manual Configure«.
2. В пункте «My Internet Connection is:» выбираем «Russia PPTP (Dual Access)«.
3. Ниже Вам предложат указать ip-адрес сервера в строке «Server IP/Name:«, имя пользователя в строке «PPTP Account:«, пароль в строке «PPTP Password:» и подтверждение пароля в строке «PPTP Retype password:«.
4. Ставите галочку «Connect mode select:» — «Always-on«, данная настройка будет держать подключение к интернету постоянно.
5. Так как подключение использует статический ip-адрес, выставляем галочку «Static IP«
6. Указываем ip-адрес в строке «IP Address:«, маску подсети в строке «Subnet Mask:«, основной шлюз в строке «Gateway:» и DNS в строке «Primary DNS Address:«. Все вышеперечисленные данные Вам предоставляет провайдер (Организация, которая провела Вам интернет).
Все эти данные обычно прописываются в договоре с провайдером. Если по какой-то причине Вы не смогли их найти, Вам необходимо позвонить на горячую линию Вашего провайдера и узнать как их можно получить.
7. После всех манипуляций с настройками нажимаем кнопку «Save Settings«.
Настройка L2TP на роутере D-Link DIR-330.
1. Переходим в меню во вкладку «Internet«, затем «Manual Configure«.
2. В пункте «My Internet Connection is:» выбираем «L2TP«.
3. Ниже Вам предложат указать ip-адрес сервера в строке «Server IP/Name:«, имя пользователя в строке «L2TP Account:«, пароль в строке «L2TP Password:» и подтверждение пароля в строке «L2TP Retype password:«.
Все вышеперечисленные данные Вам предоставляет провайдер (Организация, которая провела Вам интернет).
Все эти данные обычно прописываются в договоре с провайдером. Если по какой-то причине Вы не смогли их найти, Вам необходимо позвонить на горячую линию Вашего провайдера и узнать как их можно получить.
4. Ставите галочку «Connect mode select:» — «Always-on«, данная настройка будет держать подключение к интернету постоянно.
5. После всех манипуляций с настройками нажимаем кнопку «Save Settings«.
Настройка L2TP со статическим IP-адресом на роутере D-Link DIR-330.
Рассмотрим настройку подключения L2TP со статическим IP-адресом на роутере D-Link DIR-330. Обычно статический IP-адрес предоставляется юридическим лицам, либо как дополнительная услуга к основному тарифу физическим лицам.
1. Переходим в меню во вкладку «Internet«, затем «Manual Configure«.
2. В пункте «My Internet Connection is:» выбираем «L2TP«.
3. Так как подключение использует статический ip-адрес, выставляем галочку «Static IP«
4. Указываем ip-адрес в строке «IP Address:«, маску подсети в строке «Subnet Mask:«, основной шлюз в строке «Gateway:» и DNS в строке «DNS:«.
5. Ниже указываем ip-адрес сервера в строке «Server IP/Name:«, имя пользователя в строке «L2TP Account:«, пароль в строке «L2TP Password:» и подтверждение пароля в строке «L2TP Retype password:«.
Все вышеперечисленные данные Вам предоставляет провайдер (Организация, которая провела Вам интернет).
Все эти данные обычно прописываются в договоре с провайдером. Если по какой-то причине Вы не смогли их найти, Вам необходимо позвонить на горячую линию Вашего провайдера и узнать как их можно получить.
6. Ставите галочку «Connect mode select:» — «Always-on«, данная настройка будет держать подключение к интернету постоянно.
7. После всех манипуляций с настройками нажимаем кнопку «Save Settings«.

Настройка PPPOE на роутере D-Link DIR-330.
1. Переходим в меню во вкладку «Internet«, затем «Manual Configure«.
2. В пункте «My Internet Connection is:» выбираем «Russia PPPOE (Dual Access)«.
3. Ниже указываем имя пользователя в строке «User Name:«, пароль в строке «Password:» и подтверждение пароля в строке «Retype password:«.
Все вышеперечисленные данные Вам предоставляет провайдер (Организация, которая провела Вам интернет).
Все эти данные обычно прописываются в договоре с провайдером. Если по какой-то причине Вы не смогли их найти, Вам необходимо позвонить на горячую линию Вашего провайдера и узнать как их можно получить.
4. Ставите галочку «Connect mode select:» — «Always-on«, данная настройка будет держать подключение к интернету постоянно.
5. После всех манипуляций с настройками нажимаем кнопку «Save Settings«.
Настройка PPPOE со статическим IP-адресом на роутере D-Link DIR-330.
Рассмотрим настройку подключения PPPO со статическим IP-адресом на роутере D-Link DIR-330. Обычно статический IP-адрес предоставляется юридическим лицам, либо как дополнительная услуга к основному тарифу физическим лицам.
1. Переходим в меню во вкладку «Internet«, затем «Manual Configure«.
2. В пункте «My Internet Connection is:» выбираем «Russia PPPOE (Dual Access)«.
3. Так как подключение использует статический ip-адрес, выставляем галочку «Static PPPOE«
4. Ниже указываем имя пользователя в строке «User Name:«, пароль в строке «Password:» и подтверждение пароля в строке «Retype password:«.
5. Указываем ip-адрес в строке «IP Address:«
6. Ставите галочку «Connect mode select:» — «Always-on«, данная настройка будет держать подключение к интернету постоянно.
7. Ставим галочку «Static IP«
8. Указываем ip-адрес в строке «IP Address:» он будет таким же, что указывали выше, маску подсети в строке «Subnet Mask:«.
Все вышеперечисленные данные Вам предоставляет провайдер (Организация, которая провела Вам интернет).
Все эти данные обычно прописываются в договоре с провайдером. Если по какой-то причине Вы не смогли их найти, Вам необходимо позвонить на горячую линию Вашего провайдера и узнать как их можно получить.
9. После всех манипуляций с настройками нажимаем кнопку «Save Settings«.

Смена пароля web-интерфейса на роутере D-Link DIR-330
Предлагаю Вашему вниманию Видео инструкцию по смене пароля на web-интерфейс роутера D-Link DIR-330 на примере роутера D-Link DIR-615.
Сброс пароля web-интерфейса на роутере D-Link DIR-330
В случае, если Вы поставили пароль на web-интерфейс роутера и забыли его, предлагаю Вашему вниманию посмотреть Видео инструкцию по сбросу пароля web-интерфейса на роутере D-Link DIR-330 на примере роутера D-Link DIR-615.
Обновление прошивки на роутере D-Link DIR-330
Предлагаю Вашему вниманию Видео инструкцию по обновлению прошивки на роутере D-Link DIR-330 на примере роутера D-Link DIR-615.
Подключение компьютера к wi-fi
После подключения и настройки роутера, необходимо подключить компьютер к беспроводной сети (wi-fi), рассмотрим подключение к wi-fi в двух операционных системах, это Windows 7 и Windows 10:
Windows 7
Видео инструкция
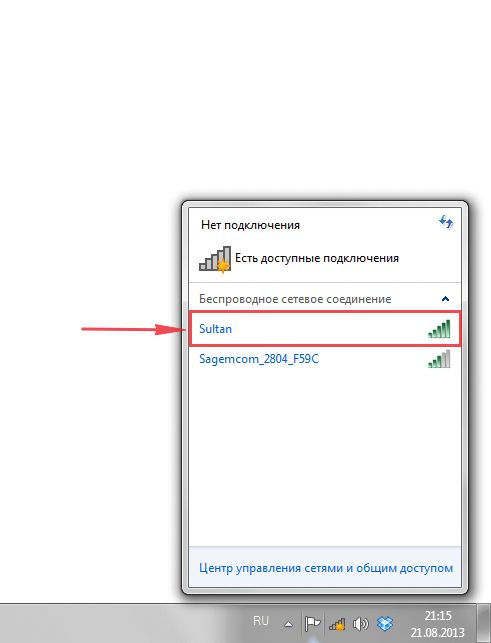
1. В правом нижнем углу рабочего стола находим значок беспроводной сети (wi-fi), щелкаем по нему левой кнопкой мыши.
2. Выскакивает окно со списком доступных беспроводных сетей. Выбираем беспроводную сеть, в моем случае это сеть «Sultan» (Вы выбираете ту сеть, название которой давали при настройке роутера).
3. После выбора сети поставьте галочку напротив «Подключаться автоматически» и нажмите
«Подключение«.
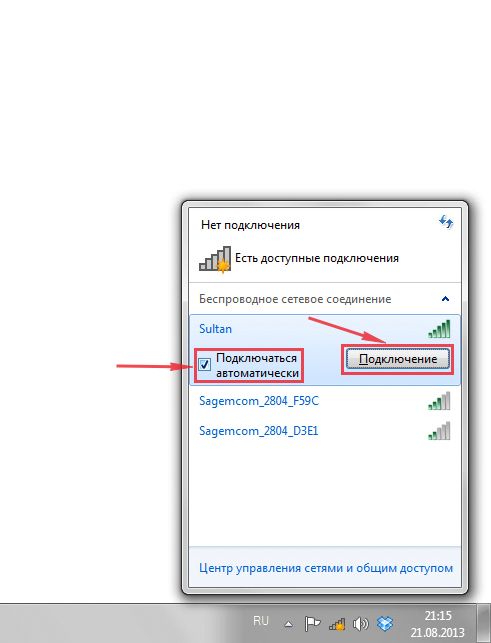
4. Необходимо указать «Ключ безопасности» это пароль беспроводной сети, который Вы указывали при настройке роутера. После того, как Вы указали ключ, нажимаем «OK«.
5. Ждем, возможно, пару секунд и Вы подключились к Вашей беспроводной сети.

Windows 10
Видео инструкция
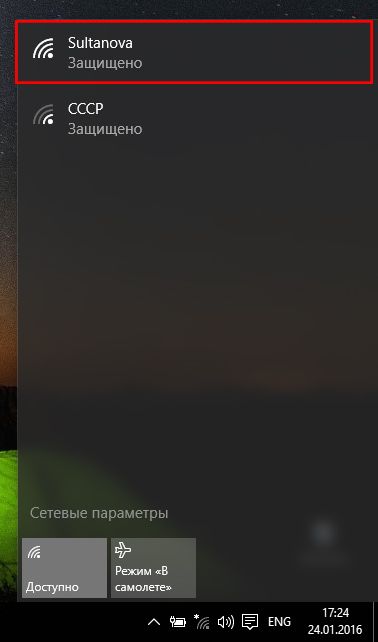
1. В правом нижнем углу рабочего стола находим значок беспроводной сети (wi-fi), щелкаем по нему левой кнопкой мыши.
2. Выскакивает окно со списком доступных беспроводных сетей. Выбираем беспроводную сеть, в моем случае это сеть «Sultanova» (Вы выбираете ту сеть, название которой давали при настройке роутера).
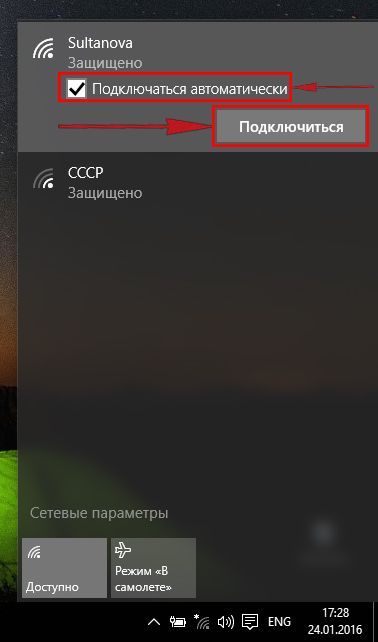
3. После выбора сети поставьте галочку напротив «Подключаться автоматически» и нажмите «Подключиться«.
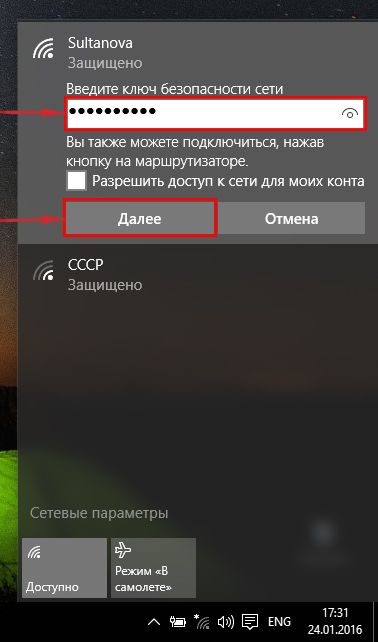
4. Необходимо указать «Ключ безопасности» это пароль беспроводной сети, который Вы указывали при настройке роутера. После того, как Вы указали ключ, нажимаем «Далее«.
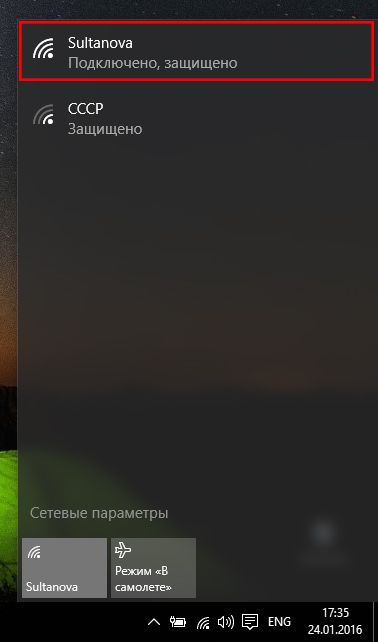
5. Ждем, возможно, пару секунд и Вы подключились к Вашей беспроводной сети.
From DD-WRT Wiki
Jump to: navigation, search

Contents
- 1 Hardware Specifications
- 2 D-Link DIR-330
- 3 DD-WRT, OEM & Other Information
- 4 Forum Threads
- 5 Pictures of Hardware
- 6 Flashing to DD-WRT
- 7 Flashing Back to D-Link Firmware
- 8 Bad Flash Recovery
- 9 JTAG Information
- 10 Random Notes
- 11 User Comments
- 12 Words for the Search engine
[edit] Hardware Specifications
| CPU1: | Broadcom BCM5836PKPBG |
|---|---|
| FLA1: | 8 MiB (SPANSION S29GL064A90TFIR3) |
| RAM1: | 32 MiB (Mira P2S28D40CTP × 2) |
| Switch: | Broadcom BCM5325E |
| ETH chip1: | Broadcom BCM5836P |
| USB Ports | 1x USB 1.1 |
| WI1 chip1: | Broadcom BCM4318 |
| HW Rev: | A1 |
[edit] D-Link DIR-330
Major Edit: 2/10/2010 mpf — Thank you to DarkShadow for starting this Wiki. I am sure he knows how much work is involved with typing tutorials. Originally, there was much information on the DIR-320. Because that router is such a different animal, I deleted all references to it to avoid confusion. The info now in the wiki is exclusive to the DIR-330. I have tried to address all of the topics that were present on the DIR-320 to ensure that none of the small suggestions were lost.
I would strongly suggest if you are looking to install DD-WRT then read this wiki from beginning to end. Make sure you fully understand what is involved. It is very hard to write procedures that cater to both experienced and novice users. Hopefully there is some balance here, but wiki’s are generally geared toward the novice. Step by step instructions are given, but the commands specific to the OS used are not discussed. If you are not familiar with basic commands like ping, telnet, tftp, etc. learn them before you try to install DD-WRT. I honestly do not want to start a debate about which OS to use, but I will offer some suggestions based on my experience writing and testing this wiki. Windows (tested w/XP 32 bit) or Linux (tested w/Ubuntu 9.10 32 bit) can be used for installing firmware, but I would strongly recommend Linux for JTAGing. I did use Windows for some JTAG testing, but the Ubuntu 32 bit 9.10 Live CD proved to be a much more solid environment. That really should not be a suprise to anyone who understands OSs and how they are built. I chose the Live CD because many people may not have Linux installed as a base; this way, anyone can use a Linux environment for a short period of time and have a positive result. Consult the Ubuntu website for how to download, create and use that disk.
Of course, it goes without saying that if anyone finds an error or the procedure needs to be updated please do so.
All testing in this wiki was with Broadcom Generic versions of Brainslayer v24 preSP2 (Build13525)
ht
[edit] DD-WRT, OEM & Other Information
Official D-Link homepage for the product. Here you find the manual as well as the stock firmware releases:
Click here
DD-WRT firmware used during testing of this Wiki:
Click here (not recommended, very old)
There is a file named DIR330 in the directory, it is identical to Mega Generic version. So, either file may be used. See Where do I download firmware? for links to newer builds.
Peacock Thread refered to in many places:
Click here
JTAG software version 2-1-4 used for all testing:
Click here
Direct link to the CFE and NVRAM that you will need for JTAG support:
Click here
OpenWRT wiki page for the Dir-330:
Click here
[edit] Forum Threads
Large thread regarding the debricking of the device. JTAG pin outs in the pics of the next section.
Click here
[edit] Pictures of Hardware
Picture of the PCB hardware release A1 — here with JTAG Pin identification:
Click here
Universal JTAG cable and instructions:
JTAG cable
Instructional JTAG wiki
[edit] Flashing to DD-WRT
How to Install DD-WRT from the DLink OEM screen on firmware 1.12:
- Download the Generic Broadcom Mini version and the Mega version if you want to install that as well. Do not try to install the Mega version directly. Testing showed repeated mixed results including two bricks. Testing always succeeded with Mini installed first. Rename the MINI file to start with ‘dir330’. OK to rename the MINI file to just dir330.bin; again, filename must just start with ‘dir330’.
- If you own a JTAG cable, download version 2-1-4 of tjtag as well just in case things go really astray.
- Make sure your computer is the only device connected to the router. Port 1 was always connected to for testing.
- Do a factory reset on the box. Ref Peacock thread. Router should return to DLink factory setting of 192.168.0.1
- Set your PCs static ip to 192.168.0.25, net mask 255.255.255.0, def gateway 192.168.0.1
- Open a web browser (tested with Firefox 3.6 and IE8)- clear cache, cookies, etc.
- Type in 192.168.0.1 in the web browser
- Login default should be username ‘admin’leave password blank
- Navigate on DLink pages to Maintenance on the top, then Firmware on the right.
- Click <check now> for the latest firmware- wait for this to fail. If you do not do this worthless step, you will receive a file name error on the next step. (So I guess it has some worth?)
- Browse to the renamed DD-WRT MINI firmware file on the webpage — remember, this filename must be renamed to start with ‘dir330’.
- Click <apply>
- Answer ‘OK’ on the popup box
- Wait for 2 mins 10 secs and the router will start flashing the blue light. Eventually, the web browser may say the firmware upgrade is complete and to click continue. Do NOT click the continue button, just move on to the next step.
- Set your PCs static ip to 192.168.1.25, net mask 255.255.255.0, def gateway 192.168.1.1
- Leaving browser window open, then open a terminal or command window.
- Try to ping 192.168.1.1
- After a good ping, telnet into 192.168.1.1
- User name is always ‘root’ password is ‘admin’
- At the ‘#’ prompt, type ‘erase nvram’ hit <enter>
- At the ‘#’ prompt, type ‘exit’ hit <enter>
- Cycle power on the router
- You will see the blue light flash and come on for about 30 seconds, flash again then go off. this is the process of initializing the router and NVRAM.
- Once stable (about 1 min), cycle power on the router again.
- You should now see the blue light flash and come on for only about 8 seconds.
- You should be able to go back to the browser and type in 192.168.1.1 and see the password reset screen. Enter username and password info as required.
- DD-WRT MINI is now installed. Proceed on to install the MEGA version
Continue on for MEGA install:
- Navigate on DD-WRT page to Administration — Firmware Upgrade
- Browse for the MEGA firmware file you wish to install.
- Click <Upgrade>
- Wait, watch and do not touch your system; nothing looks like it is happening for a VERY long time. The screen says ‘Wait’, and they mean it.
- The webpage will count down then stop. It seems like it may even be hanging. Just wait.
- At 9 minutes 30 seconds in, the blue light on the right of the box should come on. At 10 mins, the blue light should be out, and the web page should reload to the Basic Setup Screen. If after 12 minutes you do not see the blue light flash, you can start over, or go to the flash recovery section.
- Technically, you are done. But, erase the NVRAM again just to ensure total success and normal operations.
- In the command/terminal window, you should be able to ping 192.168.1.1
- After a good ping, telnet into 192.168.1.1
- User name is always ‘root’, the password is what you set it to at the end of the MINI install.
- At the ‘#’ prompt, type ‘erase nvram’ hit <enter>
- At the ‘#’ prompt, type ‘exit’ hit <enter>
- Cycle power on the router
- You will see the blue light flash and come on for about 30 seconds, flash again then go off. This is the process of initializing the router and NVRAM.
- Once stable (about 1 min), cycle power on the router again.
- You should now see the blue light flash and come on for only about 8 seconds.
- You should be able to go back to the browser and type in 192.168.1.1 and see the password reset screen. Enter info as required.
- DD-WRT MEGA is now installed and you shall forever be happy.
[edit] Flashing Back to D-Link Firmware
With DD-WRT installed (tested with mini and mega), to go back to D-Link firmware:
- Do a hardware (push the button) reset to return to defaults. Ref Peacock thread. Router should return to 192.168.1.1
- Set your PCs static ip to 192.168.1.25, net mask 255.255.255.0, def gateway 192.168.1.1
- Open a web browser (tested with Firefox 3.6 and IE8)- clear cache, cookies etc.
- Type in 192.168.1.1 in the web browser
- During login, you should set username and password (make them simple) — if not, the hardware reset did not take. Reference the Peacock thread and start over.
- Navigate on DD-WRT page to Administration — Firmware Upgrade, then leave browser window open on this page
- Open a terminal or command window.
- Telnet into the router — 192.168.1.1
- User name is always ‘root’ (no matter what you set above), password is what was just setup on the web login
- At the ‘#’ prompt, type ‘erase nvram’ hit <enter>
- At the ‘#’ prompt, type ‘exit’ hit <enter>
- Do not close terminal/command window, move back to the browser
- Leave ‘after flashing, reset to’ box set to «Don’t reset»
- Browse for the DLink firmware (currently 1.12) you wish to install
- Click <Upgrade>
- Wait, watch and do not touch your system; nothing looks like it is happening for a VERY long time. Your patience will be tested.
- The webpage will count down then stop. It seems like it may even be hanging. Just wait.
- At 8 minutes in, the blue light on the right of the box should come on; at 8 mins 30 seconds, the status light should start blinking. Move on to the next step. If after 10-12 minutes you do not see the blue light flash, you can start over, or go to the flash recovery section.
- Do NOT power down yet; unpredictable results may happen. In the command/terminal window, you should still be able to ping 192.168.1.1
- If you can’t ping the router, it either worked or you will need to recover. Skip down to step 25 to test if it accidently worked.
- If you can ping the router on 192.168.1.1, telnet into 192.168.1.1
- It may hang with no response and there will be no username/pwd prompts. just hit <enter> a few times
- Type ‘erase nvram’, hit <enter>, type ‘exit’, hit <enter>
- Power down the router for 5-10 seconds. Power up the router.
- Once the router is back up after 30 seconds, you should no longer be able to ping 192.168.1.1
- Set your PCs ip to 192.168.0.25, net mask 255.255.255.0, def gateway 192.168.0.1
- Ping test 192.168.0.1
- Type in 192.168.0.1 on the browser; login default should be username ‘admin’ leave password blank
- Should see the default D-Link screen and then that makes you remember why you went to DD-WRT in the first place!
[edit] Bad Flash Recovery
OK, something went wrong with downloading firmware into the DIR-330. Now when you turn on the power, the only lights that come on are the power LED and the Port LED number you are wired to. Don’t panic yet. This procedure may be able to take you to DD-WRT Mega.
- Set your PCs static ip to 192.168.0.25, net mask 255.255.255.0, def gateway 192.168.0.1
- Open a terminal or command window.
- Try to ping address — 192.168.0.2 — If you are NOT successful and there is no response, try to reboot/reset with hardware button. Still no success or changes? Proceed to JTAG section.
- If you can ping 192.168.0.2, you should be able to tftp firmware back into the box. The CFE on this router is waiting on 192.168.0.2 for a firmware upload. Do not waste your time with the emergency reload on 192.168.0.1 web page. Not only may it not work, it may leave you with only JTAGing as an option.
- Decide what you want to install- this tutorial uses DD-WRT Broadcom Generic Mega. Filenames are not critical right now. Suggestions for firmware are either mini, mega or OEM builds. If the OEM build is going to be attempted, see the section on installing the OEM software back into the router. You may need to perform the steps to clear the NVRAM. This procedure is slightly different than with DD-WRT.
- You should be able to tftp in a binary transfer mode to address 192.168.0.2 with your firmware. A tftp Windows XP example would be:
tftp -i 192.168.0.2 PUT dd-wrt.v24_mega_generic.bin
*adjust for another OS or filename accordingly. Your mileage may vary.
- Within 30 seconds it should state that the transfer was successful
- WAIT a total of about 3 mins 30 seconds and the blue light should start flashing.
- Set your PCs static ip to 192.168.1.25, net mask 255.255.255.0, def gateway 192.168.1.1
- Try to ping 192.168.1.1
- After a good ping, telnet into 192.168.1.1
- User name is always ‘root’ password is ‘admin’
- At the ‘#’ prompt, type ‘erase nvram’ hit <enter>
- At the ‘#’ prompt, type ‘exit’ hit <enter>
- Cycle power on the router
- You will see the blue light flash and come on for about 30 seconds, flash again then go off. this is the process of initializing the router and NVRAM.
- Once stable (about 1 min), cycle power on the router again.
- You should now see the blue light flash and come on for only about 8 seconds. Life is good again.
- You should be able to open a browser and go to 192.168.1.1 and see the password reset screen. Enter info as required.
- When the system info screen comes up, verify your MAC has not been corrupted. Your LAN MAC should be one less than the MAC on the bottom of the case. Wireless MAC one more than the MAC on the bottom of the case. It will be obvious because the MAC will be completely different than what is on the bottom of your router.
[edit] JTAG Information
The JTAG process should not be feared, but it most certainly should be respected. You will be working with open unprotected circuit cards, so proper precautions should be maintained with regards to ESDS. If you have never done a chip level type programming, there are some outstanding wiki’s about the subject. JTAG wiki One the great things about this website is the unbelievable wealth of information that is available. Again, if you are new to this, spend some time reading.
There are probably a few configurations that will work for the JTAG setup. What will be discussed here will be a very solid and repeatable setup that worked well for me.
In order to JTAG your router, you will need to either build or purchase a JTAG cable. Tornado recommends the Universal JTAG cable which is listed in his signature on the forum boards and up top in the Pictures section. My own experience with it has been very positive. It can be used in several configurations. I found it to be very solid in performance.
The most difficult part about the JTAG process is that it requires a header on J4 be soldered into the router board. Reference the Pics section above. This can be tricky if you have never performed this type of desoldering and soldering before. Solder needs to be removed from the holes before pins are inserted or a header strip is inserted. I am not going to go into any detail about this, but if you do not know how easy Electro Static Discharge damage can occur you should not be attempting this step.
As mentioned above, Ubuntu 9.10 32bit Live CD was used for all my testing and recovering. I did some testing with Windows XP, but found this platform not as repeatable as Linux.
Up in the information section, there is a link to download the CFE and NVRAM for the DIR-330. You will need both of these in order to JTAG the box. Read and follow the instructions in the post to modify the NVRAM file to include your MAC address. The CFE for this unit looks for the MAC in NVRAM on boot up. The MAC info is right at the beginning of the NVRAM file and the specifics of how to modify it are in the post.
The following steps should help in achieving your goal:
- Plug the router’s power cube into a power strip which contains a switch if you have one. Most power strips have switches built in these days. Configure it so that you have easy access to the switch and the keyboard of the computer you will be working with. You may need to issue commands quickly on power up.
- Do not power up the router at this time. Do not plug any cords into the router other than from the JTAG cable. Do not plug the JTAG cable into the computer/laptop. Do not connect the USB port to the JTAG cable (this is for the universal board listed in the Pictures Section above).
- Using the pictures of the DIR-330 A1 board in the Pictures Section above, connect only to the following pins: nTRST (pin 1), TDI (pin 3), TDO (pin 5), TMS (pin 7), TCK (pin 9) and Ground (pin 2). Use the instructions/wiki for the Universal JTAG board listed above configured for Buffered mode. Triple check your connections.
- Ensure that the TJTAG program, the CFE and the modified NVRAM are located in a directory you can access once the Live CD is booted. This can be locally or on a network drive. You just need to know what directory you are using. The CFE and NVRAM must be named CFE.BIN and NVRAM.BIN and be located in the exact same directory as the tjtag linux program. Commands concerning file names are case sensitive under Linux.
- Boot up the Ubuntu Live CD.
- Open a terminal window.
- Type ‘sudo rmmod lp’ hit <enter>
- navigate to the directory containing the Linux version of the tjtag and the CFE/NVRAM files.
- connect the JTAG cable to the computer.
- connect the mini USB cable on the JTAG board to an open USB port. This is just to supply power to the buffer chip. The light should come on the JTAG board.
- power on the router
- at the prompt, type «sudo ./tjtagv2 -probeonly /wiggler» hit <enter>. Give it several seconds if it does not complete right away.
If you were successful, it should have completed immediately and said «*** REQUESTED OPERATION IS COMPLETE ***». The information should show that the processor (Broadcom BCM4704 KPBG Rev 9 CPU chip) and the Flash chip were detected and that the processor entered DEBUG mode. Let’s assume that happened and press on…
- Use the up arrow key to recall the previous command -«sudo ./tjtagv2 -probeonly /wiggler» hit <enter>. You should get the same results. Wait a few seconds and do it again. If it is responding every time, then you can proceed with the next steps.
- It has been recommended that the CFE and NVRAM be backed up and saved. You should do this at least three times to ensure that the setup is working properly.
- The commands are: «sudo ./tjtagv2 -backup:cfe /wiggler /bypass /silent» and «sudo ./tjtagv2 -backup:nvram /wiggler /bypass /silent». Every time you issue this command, it will write a new file with a unique timestamp in the tjtag directory.
- If the downloaded CFE files all match, and the downloaded NVRAM files all match, then you can proceed on confidently.
- You can compare the CFE files you downloaded to the one you pulled from the link above in the Information Section. If they match, no need to flash the CFE. The NVRAM will not match, but you should see your MAC in the files you downloaded unless it was corrupted.
- From here, you will upload the CFE (if needed) and modified NVRAM with the following commands:»sudo ./tjtagv2 -flash:cfe /wiggler /bypass /silent» and «sudo ./tjtagv2 -flash:nvram /wiggler /bypass /silent»
- Now if things are going really well, just issue the following command: «sudo ./tjtagv2 -erase:kernel /wiggler /bypass /silent»
- You should now be able to proceed to Bad Flash Recovery section above. Before you do, power down the router, unplug the USB cable and then pull the JTAG board off of the PC.
OK, now let’s spend some time working on if you did not detect the CPU or Flash chip. If you did not detect the CPU, go back over the procedure and recheck all of your connections. You can have some wires misplaced and still grab the CPU. The CPU was always detected even if it would not enter debug mode. If you cannot detect the CPU, well… 
- If you detected the CPU (Broadcom BCM4704 KPBG Rev 9 CPU chip) but it was ‘hanging’ on the flash detection or some other area try the following: Turn of the router. Prepare the command «sudo ./tjtagv2 -probeonly /wiggler» but do not hit enter. Power up the router and then hit enter. If it hangs, immediately hit <ctrl>’c’ to kill it, up arrow to recall the command and hit <enter> again. Repeat again and again as fast as possible for 10-15 seconds.
- If the probe command finished properly and detected the chip during one of those attempts, then you will be able to recover by using this technique to erase the corrupted memory. If there is no detection, recheck you connections and try cycling the power on the router and try this process again.
- If after doing this a few times, it may seem like there is a small window for you to ‘catch’ it in for it to work. Repeat the process but now use the following command: «sudo ./tjtagv2 -erase:wholeflash /wiggler /bypass /silent». Again, same as before. On power up, if it does not start working right away, <ctrl>’c’ out of it and resend the command. You may even want to try doing this while holding in the reset button on power up. Eventually, the command will take and it will erase the whole flash.
- Once the whole flash is erased, cycle power on the router and download the CFE and NVRAM as described above. Check communications first with the probe command.
- You should now be able to proceed to Bad Flash Recovery section above. Before you do, power down the router, unplug the USB cable and then pull the JTAG board off of the PC.
Final closing thought on JTAGing; do not try to force detect the memory if you can ‘see’ the CPU but not the Flash on a probe. If tjtag is having trouble ‘talking’ to the CPU, then the CPU is trying to do something else. During the testing it did not seem helpful to force chip detection. Forcing chip detection on erase or writes made it look like it was doing the process when it actually was not.
[edit] Random Notes
- When flashing, do not power down unless explicitly told to do so.
- Pay close attention to the IP numbers referenced in various places. They can be different than other routers, especially during firmware recovery.
- Read each section completely before you begin.
- Be patient; use a stopwatch. Time seems to almost stop while you are waiting to find out if a firmware flash worked.
- Make sure you tell your wife & kids to leave you alone while you flash your router. You do not want to let them see you sweat over something so small and ridiculous.
[edit] User Comments
Edit 2/11/2010 — Corrected for the actual files used for the testing. mpf
[edit] Words for the Search engine
DIR330, DIR-330
This device is NOT RECOMMENDED for future use with OpenWrt due to low flash/ram.
DO NOT BUY DEVICES WITH 4MB FLASH / 32MB RAM if you intend to flash an up-to-date and secure OpenWrt version onto it! See 4/32 warning for details.
1) This device does not have sufficient resources (flash and/or RAM) to provide secure and reliable operation.
This means that even setting a password or changing simple network settings might not be possible any more, rendering the device effectively useless. See OpenWrt on 4/32 devices what you can do now.
2) OpenWrt support for this device has ended in 2022.
19.07.10 was the last official build for 4/32 devices.
![]() D-Link DIR-330 and ASUS WL-500gP V1 have same OpenWrt/LEDE images and almost same hardware.
D-Link DIR-330 and ASUS WL-500gP V1 have same OpenWrt/LEDE images and almost same hardware.
| Version | Launch Date | OpenWrt Versions Supported | Download latest stable version | Model Specific Notes |
|---|---|---|---|---|
| A1 | 2007 | 15.05 & newer | 15.05.1 Asus wl-500gP V1 image | Wan port not working by default, see issues section. Cpu could be overclocked to 300MHz |
![]() With firmware 1.20 100% works.
With firmware 1.20 100% works.
-
Rename openwrt image to DIR330A1_FW123B20.bin
-
Flash it via MAINTENANCE → Firmware Update
-
Using the serial pinout shown below, gain access to serial console. The easiest way is to use an USB data cable for cellphone with USB-to-serial converter inside.
-
Setup TFTP server accessible from the router via TCP/IP.
-
Once in, power up the device, press and hold Ctrl-C until you see cfe prompt CFE>
-
Plug the Ethernet cable into one of LAN ports. If your network have DHCP, type ifconfig eth0 -auto, otherwise type help ifconfig to see how to setup CFE networking.
-
To flash new firmware, type the command
flash -noheader 192.168.0.1:/tftp/firmware.trx flash1.trx
.
Replace 192.168.0.1 with IP of your TFTP server, /tftp/firmware.trx with FULL path to your firmware on it. Whether you should specify full name or not, depends on your TFTP server. Pay attention that you type 1 in flash1.trx, otherwise you might wipe the CFE itself and your only way will be to JTAG.
-
Reflashing will usually take 1 to 2 minutes depending on size of the firmware.
-
When done and CFE> prompt appears again, issue command reboot
-
Turnoff router, hold button for while connecting power. Release button after ~30 sc
-
Set your network connection to 192.168.0.10/255.255.255.0
-
Run d-link utility, set Device IP 192.168.0.1 and User name: admin, Password: empty
→ port.serial general information about the serial port, serial port cable, etc.
How to connect to the Serial Port of this specific device:
Insert photo of PCB with markings for serial port
 Replace EXAMPLE by real values.
| Serial connection parameters for D-Link DIR-330 |
EXAMPLE 115200, 8N1 |
|---|
→ port.jtag general information about the JTAG port, JTAG cable, etc.
How to connect to the JTAG Port of this specific device:
Insert photo of PCB with markings for JTAG port
Casing

USB-to-Serial converter (based on ARK3116S) attached
Board

Unpopulated 14 pin header (J4) is the JTAG header. Another unpopulated JTAG header for the Wi-Fi chipset (J8) with 14 pin.
You can solder a Mini-PCI connnector just between the Wi-Fi chipset and the switch controller.
Sometimes mac could be erased and set to something like 00:90:4c:4f:00:0c
You could find out default mac from the back of the router
nvram set et0macaddr=00:24:01:b1:51:d2 #your mac
nvram commit
reboot
You need to change switch config
via web interface
— change switch config :
| VLAN ID | CPU (eth0) | LAN1 | LAN2 | LAN3 | LAN4 | LAN5 |
|---|---|---|---|---|---|---|
| 1 | tagged | untagged | untagged | untagged | untagged | off |
| 2 | tagged | off | off | off | off | untagged |
— for wan and wan6 change interface from “eth1” to “eth0.2”
via config file
/etc/config/network
config switch
        option name 'switch0'
        option reset '1'
        option enable_vlan '1'

config switch_vlan
        option device 'switch0'
        option vlan '1'
        option ports '0 1 2 3 5t'

config switch_vlan
        option device 'switch0'
        option vlan '2'
        option ports '4 5t'

config interface 'loopback'
        option ifname 'lo'
        option proto 'static'
        option ipaddr '127.0.0.1'
        option netmask '255.0.0.0'

config globals 'globals'
        option ula_prefix 'fd74:a401:7a2e::/48'

config interface 'wan'
        option proto 'dhcp'
        option ifname 'eth0.2'

config interface 'wan6'
        option proto 'dhcpv6'
        option ifname 'eth0.2'
        option reqaddress 'try'
        option reqprefix 'auto'

config interface 'lan'
        option type 'bridge'
        option proto 'static'
        option ipaddr '192.168.1.1'
        option netmask '255.255.255.0'
        option ip6assign '60'
        option ifname 'eth0.1'
In openwrt kmod_usb_ohci seems to cause problems.
Try lede image, looks like it works.
Warning!
Entering wrong values can BRICK your device, making it unbootable!
This instruction for DIR-330 A1 (based on BRCM4704 SoC) ONLY. Check it twice!
You can overclock DIR-330 A1 from 264 to 300 MHz. In fact some routers based on BRCM4704 SoC are running on 300MHz by default, so BRCM 4704 SoC itself is designed to operate at this frequency. However, it is recommended to install heatsink to ensure system stability, because higher frequency means more heat. This will give you about 12% extra CPU horsepower with minimal efforts.
You’ll need nvram package (included in default images).
To set 300MHz CPU frequency, execute as root the following commands:
nvram set clkfreq=300,150
nvram commit
reboot
This tells boot loader to use 300MHz frequency instead.
Once your device has rebooted, you can check it runs with higher clocks:
cat /proc/cpuinfo
Make sure it contains something like:
BogoMIPS : 298.01
(original value 262,96, Default clkfreq=264,132)
Bootlog from LEDE trunk (rev 5217), with fixed vlan config and overclocked cpu.
Decompressing………..done
CFE version 1.0.37 for BCM947XX (32bit,SP,LE)
Build Date: Tue Jan 16 20:33:15 CST 2007 (tony@macpaul-x60)
Copyright (C) 2000,2001,2002,2003 Broadcom Corporation.
Initializing Arena
Initializing Devices.
flash_init () : boot size initialize
Boot partition size = 262144(0x40000)
TOP type flash ..
TOP type flash ..
TOP type flash ..
et0: Broadcom BCM47xx 10/100 Mbps Ethernet Controller 3.131.35.4
rndis0: Broadcom USB RNDIS Network Adapter (P-t-P)
et1: Broadcom BCM47xx 10/100 Mbps Ethernet Controller 3.131.35.4
CPU type 0x29006: 300MHz
Total memory: 32768 KBytes
Total memory used by CFE: 0x80300000 — 0x803A0C90 (658576)
Initialized Data: 0x80336450 — 0x80338C60 (10256)
BSS Area: 0x80338C60 — 0x8033AC90 (8240)
Local Heap: 0x8033AC90 — 0x8039EC90 (409600)
Stack Area: 0x8039EC90 — 0x803A0C90 (8192)
Text (code) segment: 0x80300000 — 0x80336450 (222288)
Boot area (physical): 0x003A1000 — 0x003E1000
Relocation Factor: I:00000000 — D:00000000
Device eth0: hwaddr 00-90-4C-4E-00-0C, ipaddr 192.168.0.2, mask 255.255.255.0
gateway not set, nameserver not set
Loader:elf Filesys:tftp Dev:eth0 File:192.168.0.100:vmlinux Options:(null)
Loading: Failed.
Could not load 192.168.0.100:vmlinux: File not found
Loader:raw Filesys:raw Dev:flash0.os File: Options:(null)
Loading: .. 3864 bytes read
Entry at 0x80001000
Closing network.
Starting program at 0x80001000
[ 0.000000] Linux version 4.9.58 (gtrtfm@debian) (gcc version 5.5.0 (LEDE GCC 5.5.0 r5217-098afa1e1b) ) #0 Tue Oct 31 02:43:10 2017
[ 0.000000] CPU0 revision is: 00029006 (Broadcom BMIPS3300)
[ 0.000000] bcm47xx: Using ssb bus
[ 0.000000] ssb: Found chip with id 0x4704, rev 0x09 and package 0x00
[ 0.000000] ssb: Sonics Silicon Backplane found at address 0x18000000
[ 0.000000] Determined physical RAM map:
[ 0.000000] memory: 02000000 @ 00000000 (usable)
[ 0.000000] Initrd not found or empty — disabling initrd
[ 0.000000] Primary instruction cache 16kB, VIPT, 2-way, linesize 16 bytes.
[ 0.000000] Primary data cache 16kB, 2-way, VIPT, cache aliases, linesize 16 bytes
[ 0.000000] Zone ranges:
[ 0.000000] Normal [mem 0x0000000000000000-0x0000000001ffffff]
[ 0.000000] Movable zone start for each node
[ 0.000000] Early memory node ranges
[ 0.000000] node 0: [mem 0x0000000000000000-0x0000000001ffffff]
[ 0.000000] Initmem setup node 0 [mem 0x0000000000000000-0x0000000001ffffff]
[ 0.000000] Built 1 zonelists in Zone order, mobility grouping on. Total pages: 8128
[ 0.000000] Kernel command line: noinitrd console=ttyS0,115200
[ 0.000000] PID hash table entries: 128 (order: -3, 512 bytes)
[ 0.000000] Dentry cache hash table entries: 4096 (order: 2, 16384 bytes)
[ 0.000000] Inode-cache hash table entries: 2048 (order: 1, 8192 bytes)
[ 0.000000] Memory: 28364K/32768K available (3096K kernel code, 130K rwdata, 372K rodata, 168K init, 282K bss, 4404K reserved, 0K cma-reserved)
[ 0.000000] SLUB: HWalign=32, Order=0-3, MinObjects=0, CPUs=1, Nodes=1
[ 0.000000] NR_IRQS:128
[ 0.000000] MIPS: machine is D-Link DIR-330
[ 0.000000] clocksource: MIPS: mask: 0xffffffff max_cycles: 0xffffffff, max_idle_ns: 12741736309 ns
[ 0.000029] sched_clock: 32 bits at 150MHz, resolution 6ns, wraps every 14316557820ns
[ 0.000129] Calibrating delay loop… 298.59 BogoMIPS (lpj=1492992)
[ 0.070053] pid_max: default: 32768 minimum: 301
[ 0.070438] Mount-cache hash table entries: 1024 (order: 0, 4096 bytes)
[ 0.070497] Mountpoint-cache hash table entries: 1024 (order: 0, 4096 bytes)
[ 0.078045] clocksource: jiffies: mask: 0xffffffff max_cycles: 0xffffffff, max_idle_ns: 19112604462750000 ns
[ 0.078128] futex hash table entries: 256 (order: -1, 3072 bytes)
[ 0.079866] NET: Registered protocol family 16
[ 0.081409] Can’t analyze schedule() prologue at 8030316c
[ 0.126716] clocksource: Switched to clocksource MIPS
[ 0.433444] PCI host bridge to bus 0000:00
[ 0.433531] pci_bus 0000:00: root bus resource [mem 0x40000000-0x7fffffff]
[ 0.433589] pci_bus 0000:00: root bus resource [io 0x0100-0x07ff]
[ 0.433646] pci_bus 0000:00: root bus resource [??? 0x00000000 flags 0x0]
[ 0.433700] pci_bus 0000:00: No busn resource found for root bus, will use [bus 00-ff]
[ 0.433875] ssb: PCI: Fixing up bridge 0000:00:00.0
[ 0.433930] ssb: PCI: Fixing up device 0000:00:00.0
[ 0.433983] ssb: PCI: Fixing latency timer of device 0000:00:00.0 to 168
[ 0.435778] pci 0000:00:01.0: BAR 0: assigned [mem 0x40000000-0x40001fff]
[ 0.439488] PCI: Enabling device 0000:00:01.0 (0000 -> 0002)
[ 0.439548] ssb: PCI: Fixing up device 0000:00:01.0
[ 0.496898] ssb: Found chip with id 0x4318, rev 0x02 and package 0x00
[ 0.598464] can not parse nvram name pci/1/1/ag1(null) with value 255 got -34
[ 0.657794] ssb: Sonics Silicon Backplane found on PCI device 0000:00:01.0
[ 0.658369] NET: Registered protocol family 2
[ 0.660550] TCP established hash table entries: 1024 (order: 0, 4096 bytes)
[ 0.660693] TCP bind hash table entries: 1024 (order: 0, 4096 bytes)
[ 0.660804] TCP: Hash tables configured (established 1024 bind 1024)
[ 0.661326] UDP hash table entries: 256 (order: 0, 4096 bytes)
[ 0.661449] UDP-Lite hash table entries: 256 (order: 0, 4096 bytes)
[ 0.662194] NET: Registered protocol family 1
[ 0.668799] Crashlog allocated RAM at address 0x1f00000
[ 0.673947] workingset: timestamp_bits=30 max_order=13 bucket_order=0
[ 0.696230] squashfs: version 4.0 (2009/01/31) Phillip Lougher
[ 0.696283] jffs2: version 2.2 (NAND) (SUMMARY) (LZMA) (RTIME) (CMODE_PRIORITY) (c) 2001-2006 Red Hat, Inc.
[ 0.729546] io scheduler noop registered
[ 0.729601] io scheduler deadline registered (default)
[ 0.730151] Serial: 8250/16550 driver, 2 ports, IRQ sharing enabled
[ 0.732044] console [ttyS0] disabled
[ 0.752280] serial8250.0: ttyS0 at MMIO 0xb8000300 (irq = 3, base_baud = 4687500) is a 16550A
[ 1.166857] console [ttyS0] enabled
[ 1.191460] serial8250.0: ttyS1 at MMIO 0xb8000400 (irq = 3, base_baud = 4687500) is a 16550A
[ 1.202148] physmap platform flash device: 02000001 at 1c000000
[ 1.208439] physmap-flash.0: Found 1 x16 devices at 0x0 in 16-bit bank. Manufacturer ID 0x000001 Chip ID 0x001001
[ 1.219078] Amd/Fujitsu Extended Query Table at 0x0040
[ 1.224305] Amd/Fujitsu Extended Query version 1.3.
[ 1.229538] physmap-flash.0: Swapping erase regions for top-boot CFI table.
[ 1.236593] number of CFI chips: 1
[ 1.259763] 3 bcm47xxpart partitions found on MTD device physmap-flash.0
[ 1.266569] Creating 3 MTD partitions on «physmap-flash.0»:
[ 1.272370] 0x000000000000-0x000000040000 : «boot»
[ 1.285282] 0x000000040000-0x0000007f0000 : «firmware»
[ 1.295917] 3 trx partitions found on MTD device firmware
[ 1.301547] Creating 3 MTD partitions on «firmware»:
[ 1.306626] 0x00000000001c-0x000000000928 : «loader»
[ 1.317053] 0x000000000928-0x00000012b000 : «linux»
[ 1.327377] 0x00000012b000-0x0000007b0000 : «rootfs»
[ 1.337721] mtd: device 4 (rootfs) set to be root filesystem
[ 1.343519] 1 squashfs-split partitions found on MTD device rootfs
[ 1.349947] 0x0000003a0000-0x0000007b0000 : «rootfs_data»
[ 1.360849] 0x0000007f0000-0x000000800000 : «nvram»
[ 1.376680] libphy: Fixed MDIO Bus: probed
[ 1.381345] b44: Broadcom 44xx/47xx 10/100 PCI ethernet driver version 2.0
[ 1.392053] libphy: b44_eth_mii: probed
[ 1.395985] b44 ssb0:0: could not find PHY at 30, use fixed one
[ 1.402320] Generic PHY fixed-0:00: attached PHY driver [Generic PHY] (mii_bus:phy_addr=fixed-0:00, irq=-1)
[ 1.412317] b44 ssb0:0 eth0: Broadcom 44xx/47xx 10/100 PCI ethernet driver 00:90:4c:4e:00:0c
[ 1.433385] libphy: b44_eth_mii: probed
[ 1.570958] b53_common: found switch: BCM5325, rev 0
[ 1.576075] Broadcom B53 (1) 2:1e: attached PHY driver [Broadcom B53 (1)] (mii_bus:phy_addr=2:1e, irq=-1)
[ 1.585888] b44 ssb0:1 eth1: Broadcom 44xx/47xx 10/100 PCI ethernet driver 00:90:4c:4f:00:0c
[ 1.595686] bcm47xx-wdt bcm47xx-wdt.0: BCM47xx Watchdog Timer enabled (30 seconds, Software Timer)
[ 1.605115] GPIO_WDT: failed to register misc device
[ 1.612590] NET: Registered protocol family 10
[ 1.625434] NET: Registered protocol family 17
[ 1.630261] 8021q: 802.1Q VLAN Support v1.8
[ 1.646124] VFS: Mounted root (squashfs filesystem) readonly on device 31:4.
[ 1.655425] Freeing unused kernel memory: 168K
[ 1.660074] This architecture does not have kernel memory protection.
[ 2.420638] init: Console is alive
[ 2.424758] init: — watchdog —
[ 2.527226] random: fast init done
[ 3.471603] kmodloader: loading kernel modules from /etc/modules-boot.d/*
[ 3.549392] usbcore: registered new interface driver usbfs
[ 3.555322] usbcore: registered new interface driver hub
[ 3.561187] usbcore: registered new device driver usb
[ 3.580582] ehci_hcd: USB 2.0 ‘Enhanced’ Host Controller (EHCI) Driver
[ 3.590944] ehci-platform: EHCI generic platform driver
[ 3.603201] ohci_hcd: USB 1.1 ‘Open’ Host Controller (OHCI) Driver
[ 3.612265] ohci-platform: OHCI generic platform driver
[ 3.617921] ohci-platform ohci-platform.0: Generic Platform OHCI controller
[ 3.625158] ohci-platform ohci-platform.0: new USB bus registered, assigned bus number 1
[ 3.633694] ohci-platform ohci-platform.0: irq 2, io mem 0x18003000
[ 3.713645] hub 1-0:1.0: USB hub found
[ 3.718634] hub 1-0:1.0: 2 ports detected
[ 3.732466] kmodloader: done loading kernel modules from /etc/modules-boot.d/*
[ 3.750941] init: — preinit —
[ 6.148029] b44 ssb0:0 eth0: Link is up at 100 Mbps, half duplex
[ 6.154151] b44 ssb0:0 eth0: Flow control is off for TX and off for RX
Press the [f] key and hit [enter] to enter failsafe mode
Press the [1], [2], [3] or [4] key and hit [enter] to select the debug level
[ 7.207532] b44 ssb0:0 eth0: Link is Up — 100Mbps/Full — flow control off
[ 9.822874] jffs2: notice: (363) jffs2_build_xattr_subsystem: complete building xattr subsystem, 0 of xdatum (0 unchecked, 0 orphan) and 0 of xref (0 dead, 0 orphan) found.
[ 9.841584] mount_root: switching to jffs2 overlay
[ 9.902209] urandom-seed: Seeding with /etc/urandom.seed
[ 10.022489] b44 ssb0:0 eth0: powering down PHY
[ 10.069222] procd: — early —
[ 10.072487] procd: — watchdog —
[ 10.326824] b44 ssb0:0 eth0: Link is Down
[ 10.763220] procd: — watchdog —
[ 10.767614] procd: — ubus —
[ 10.846390] procd: — init —
Please press Enter to activate this console.
[ 11.901009] kmodloader: loading kernel modules from /etc/modules.d/*
[ 11.919255] ip6_tables: (C) 2000-2006 Netfilter Core Team
[ 11.952446] Loading modules backported from Linux version wt-2017-10-06-0-ga7a22fbbd1f0
[ 11.960690] Backport generated by backports.git v4.14-rc2-1-6-gedfb595c
[ 11.973915] ip_tables: (C) 2000-2006 Netfilter Core Team
[ 11.998065] nf_conntrack version 0.5.0 (1024 buckets, 4096 max)
[ 12.123616] xt_time: kernel timezone is -0000
[ 12.491113] PPP generic driver version 2.4.2
[ 12.501767] NET: Registered protocol family 24
[ 12.614775] b43-phy0: Broadcom 4318 WLAN found (core revision 9)
[ 12.710923] b43-phy0: Found PHY: Analog 3, Type 2 (G), Revision 7
[ 12.717256] b43-phy0: Found Radio: Manuf 0x17F, ID 0x2050, Revision 8, Version 0
[ 12.752083] Broadcom 43xx driver loaded [ Features: PNL ]
[ 12.813561] kmodloader: done loading kernel modules from /etc/modules.d/*
[ 26.618542] b44 ssb0:0 eth0: Link is up at 100 Mbps, full duplex
[ 26.624661] b44 ssb0:0 eth0: Flow control is off for TX and off for RX
[ 26.635365] b44 ssb0:0 eth0: Link is Up — 100Mbps/Full — flow control off
[ 26.698194] br-lan: port 1(eth0.1) entered blocking state
[ 26.703688] br-lan: port 1(eth0.1) entered disabled state
[ 26.712549] device eth0.1 entered promiscuous mode
[ 26.717538] device eth0 entered promiscuous mode
[ 26.809705] br-lan: port 1(eth0.1) entered blocking state
[ 26.815203] br-lan: port 1(eth0.1) entered forwarding state
[ 33.386823] b43-phy0: Loading firmware version 666.2 (2011-02-23 01:15:07)
[ 33.552765] IPv6: ADDRCONF(NETDEV_UP): wlan0: link is not ready
[ 33.573110] br-lan: port 2(wlan0) entered blocking state
[ 33.578654] br-lan: port 2(wlan0) entered disabled state
[ 33.585150] device wlan0 entered promiscuous mode
[ 34.177493] IPv6: ADDRCONF(NETDEV_CHANGE): wlan0: link becomes ready
[ 34.184404] br-lan: port 2(wlan0) entered blocking state
[ 34.189961] br-lan: port 2(wlan0) entered forwarding state
BusyBox v1.27.2 () built-in shell (ash)
_________
/ /\ _ ___ ___ ___
/ LE / \ | | | __| \| __|
/ DE / \ | |__| _|| |) | _|
/________/ LE \ |____|___|___/|___| lede-project.org
\ \ DE /
\ LE \ / ————————————————————
\ DE \ / Reboot (SNAPSHOT, r5217-098afa1e1b)
\________\/ ————————————————————
root@LEDE:/#