Я работаю в образовательной организации. У нас есть компьютерный класс с сетью Wi-Fi, в качестве точки доступа выступает роутер ASUS RT-N12 VP. Но как-то он не стабильно работает и не держит нагрузку из 20 компьютеров (может быть конечно это много для него, но всё-таки).
Почитал я отзывы про аналогичные модели роутеров от ASUS, пишут что прошивка у этих моделей не стабильна, часто бывают разрывы. Тогда я задался вопросом альтернативной прошивки. Попалась мне статья «Прошиваем ASUS RT-N12 VP на Tomato из под Ubuntu». Там описано про прошивки tomato-K26-1.28.RT-N5x-MIPSR2-117-* и tomato-K26-1.28.RT-N5x-MIPSR2-124-*. Поискав по названию нашёл на них ссылку. Прошивал прошивкой tomato-K26-1.28.RT-N5x-MIPSR2-117-Max.trx с помощью программы ASUS RT-N12_VP Firmware Restoration version 2.0.0.0.
Всё работает, пока тестируется под нагрузкой, о результатах надеюсь не забуду написать.
Настройка в качестве Wi-Fi точки доступа прошивки Tomato.
Спасибо всем за информацию, которую я по почерпнул, из приведённых статей.
О результатах тестирования могу сообщить, то что примерно на прежнем уровне осталось. Я просто дополнительную информацию узнал, то что обычные роутеры держать только около 10 клиентов. Так что пришлось ещё один роутер ставить, тогда сеть более или менее нормально заработала. Но всё-таки если собираетесь на такое количество клиентов делать Wi-Fi и хотите чтобы стабильно и быстро работало, по моему опыту надо заморочится на роуторе категории выше этого.
Перейти к содержимому
Для начала, окирпичить этот девайс случайно не получится.
Родная прошивка принимает только свои образы, прошить альтернативные прошивки можно из режима восстановления.
В режиме восстановления загрузчик роутера сливает образ по tftp, мне было влом поднимать tftp и я скачал утиль восстановления asus.
Первым делом я поискал прошивку dd-wrt, но ничего дельного не нашел, а то что нашел было эдак 2010 года.
В идеале подошла бы openwrt, там возможностей больше. Поддержка нужного чипсета есть только в нестабильной ветке, после прошивки прекомпиленной версии я заметил что не работает wi-fi, погуглив я понял что там в основном всего 3 драйвера: b43, wl и еще какой-то. В конечном итоге я забил на openwrt и поставил tomato, мне от прошивки нужен был только igmp для нормальной работы iptv и он там есть, в стандартной прошивке не было. Работает вполне стабильно, кстате драйвер там тот же wl, только на ядре 2.6
Привет! Пора отправить роутер в печку. Но перед этим неплохо было бы попытаться прошить его и показать сам процесс нашим читателям WiFiGid. Итак, в горячей теме статьи сегодня прошивка ASUS RT-N12 со всем вытекающим. Будет и стандартное обновление, и некоторые подпольные фишки. Начинаем!
Если у тебя остались какие-то вопросы – добро пожаловать в комментарии, будем решать!
Содержание
- Где скачать прошивку?
- Готовимся к прошивке
- Прошиваем
- Восстановление или настройка
- Задать вопрос автору статьи
Где скачать прошивку?
Если вы не хотите себе ставить что-то первосортное вроде OpenWRT, лучше места для поиска прошивок чем официальный сайт не существует. Но для этого нужно узнать текущую ревизию роутера, т.к. их выпускали несколько видов, а к каждой версии подходит, к сожалению, только ее прошивка.
Для начала нужно узнать эту самую ревизию, для этого переворачиваем роутер, и ищем наклейку с версией:
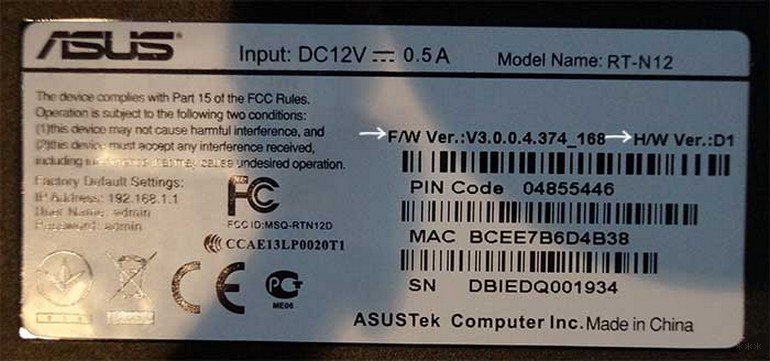
На фото выше обратите внимание на правую метку D1 – это и есть интересующая нас версия. Т.е. полный запрос на случай самостоятельно поиска прошивки в этом случае был бы RT-N12 D1.
Итак:
Официальные страницы для скачивания прошивок по ревизиям:
B1
C1
D1
VP
Если вашей версии нет в этом списке, не расстраивайтесь! Просто вбейте ее в поиск на предложенном сайте по любой из ссылок выше. Это официальный сайт ASUS, и именно там вы без проблем найдете свою модель.
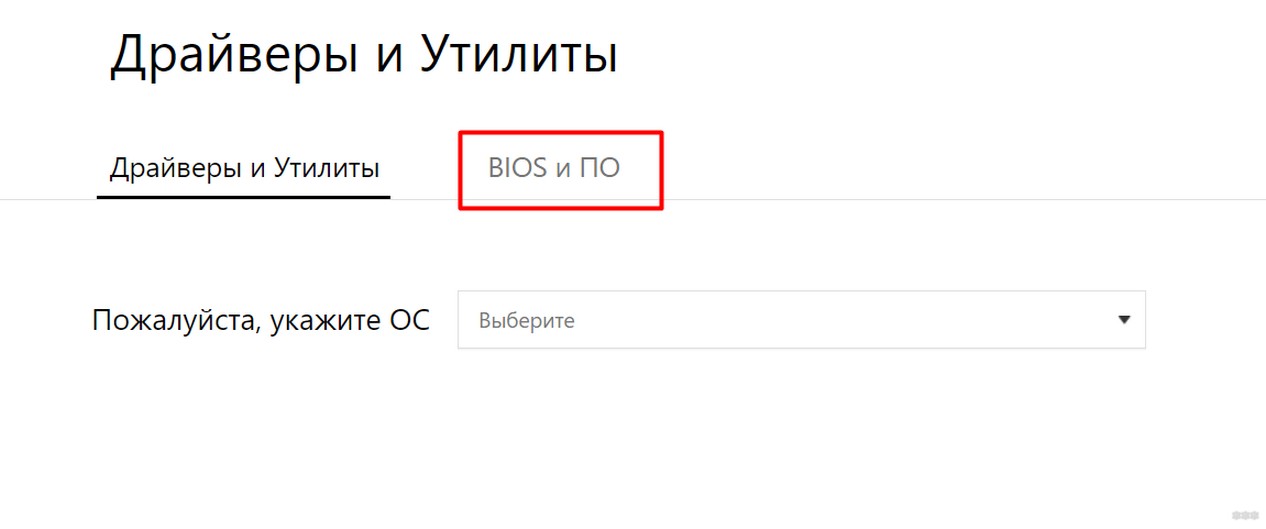
Далее щелкаем по вкладке «BIOS и ПО» (если не открылась сразу):
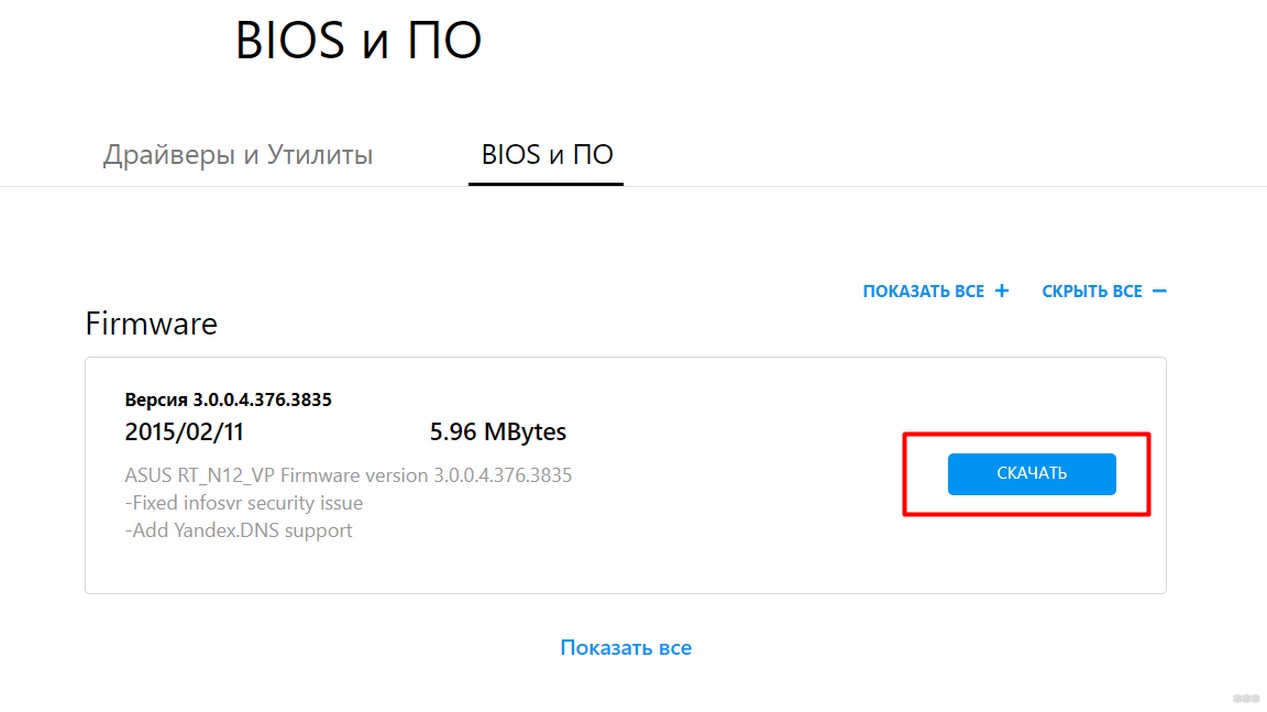
А уже тут выбираем последнюю актуальную версию прошивки, ее и скачиваем:
Готовимся к прошивке
Итак, сам файл прошивки на руках, теперь нужно зайти в конфигуратор и залить файл – делов-то! Давайте пару подготовительных мероприятий:
- Включаем роутер в сеть. Подключаем компьютер или ноутбук к нему по шнуру (разъем в роутере обязательно LAN), кабель провайдера подключать не обязательно, но можно и с ним.
- Заходим в веб-конфигуратор. Для этого переходим по адресу 192.168.1.1 и вводим свои установленные при первой настройке логин и пароль (если это первая настройка – логин и пароль будут admin).
Если не можете вспомнить пароль, на задней панели маршрутизатор есть утопленная в корпус кнопка сброса рядом с правой антенной (правая если смотреть сзади). Включаем роутер, жмем эту кнопку около 10 секунд до перезагрузки роутера, отпускаем. Пароль снова стандартный.
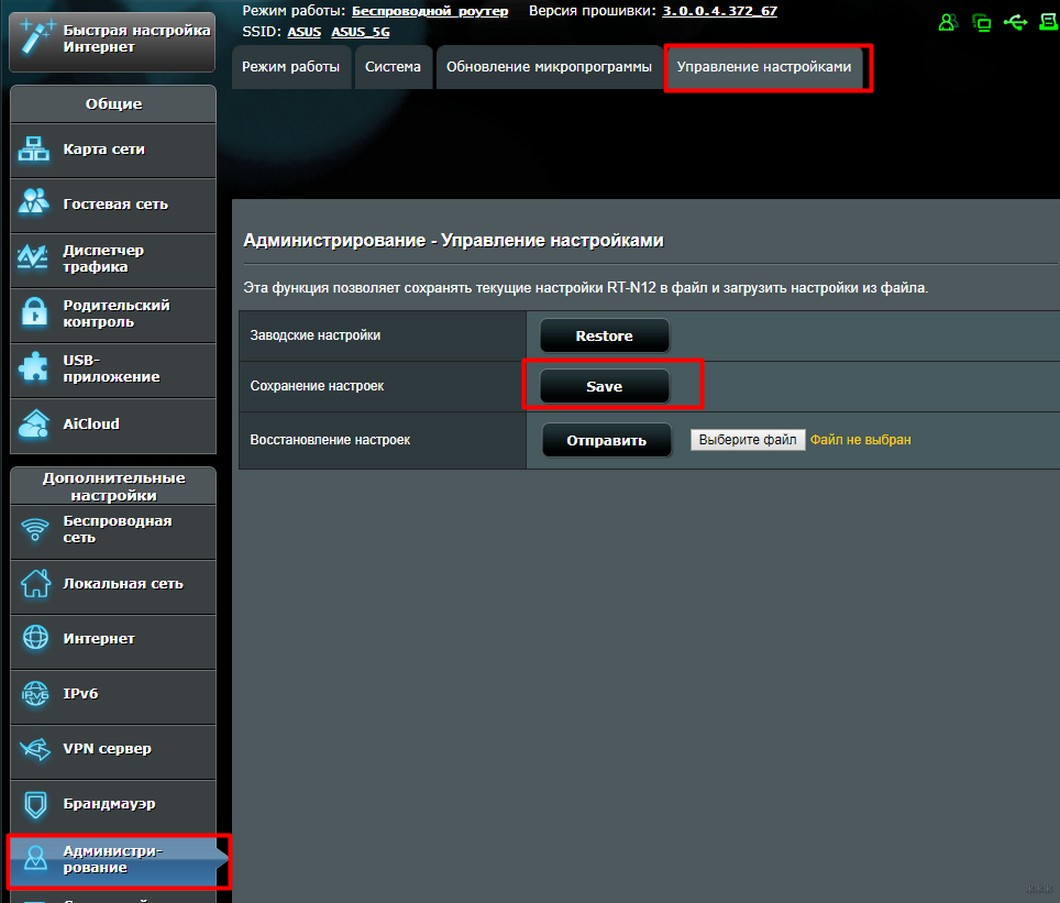
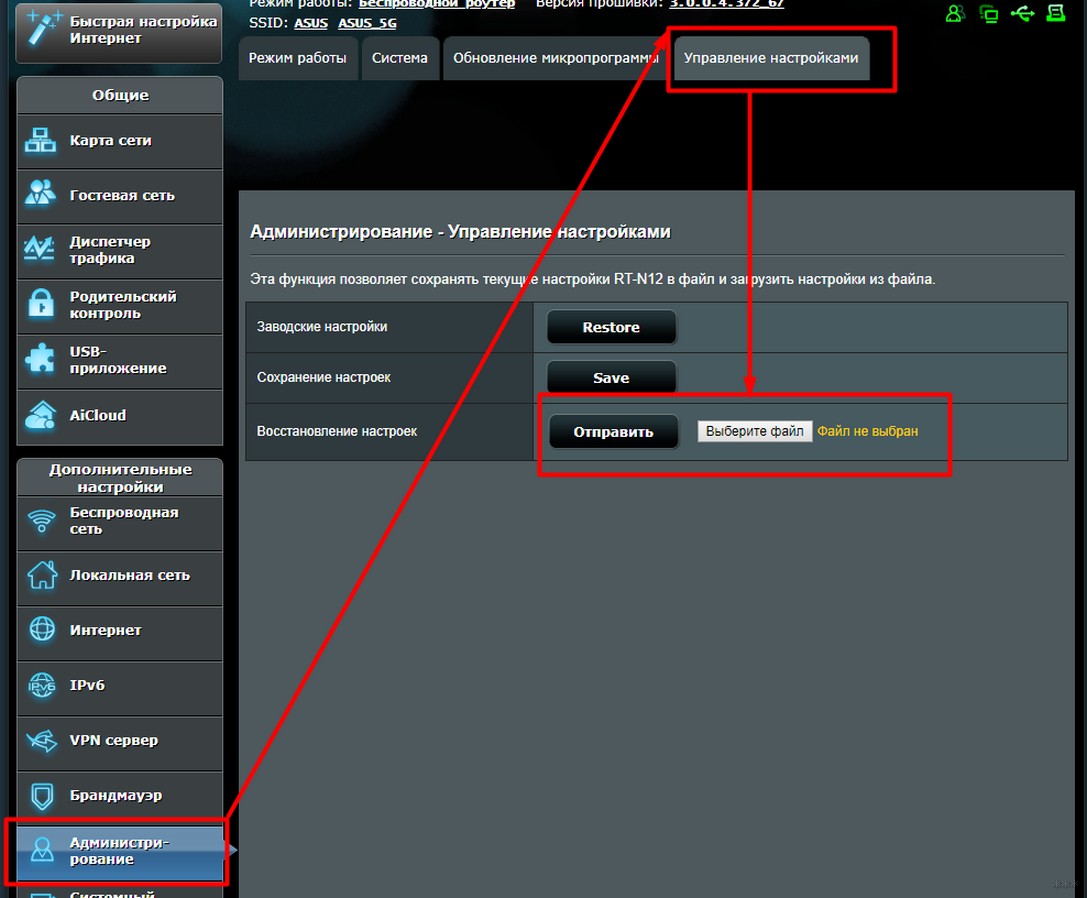
Чтобы потом не мучаться с настройкой роутера, рекомендую сохранить его конфигурацию. Переходим:
Администрирование – Управление настройками
И здесь выбираем Save или сохранить:
Все. Теперь остается только перепрошить роутер.
Прошиваем
В конфигураторе нашего АСУСа переходим по следующим вкладкам:
Администрирование – Обновление микропрограммы
И здесь выбираем наш файл и нажимаем кнопку «Отправить»:
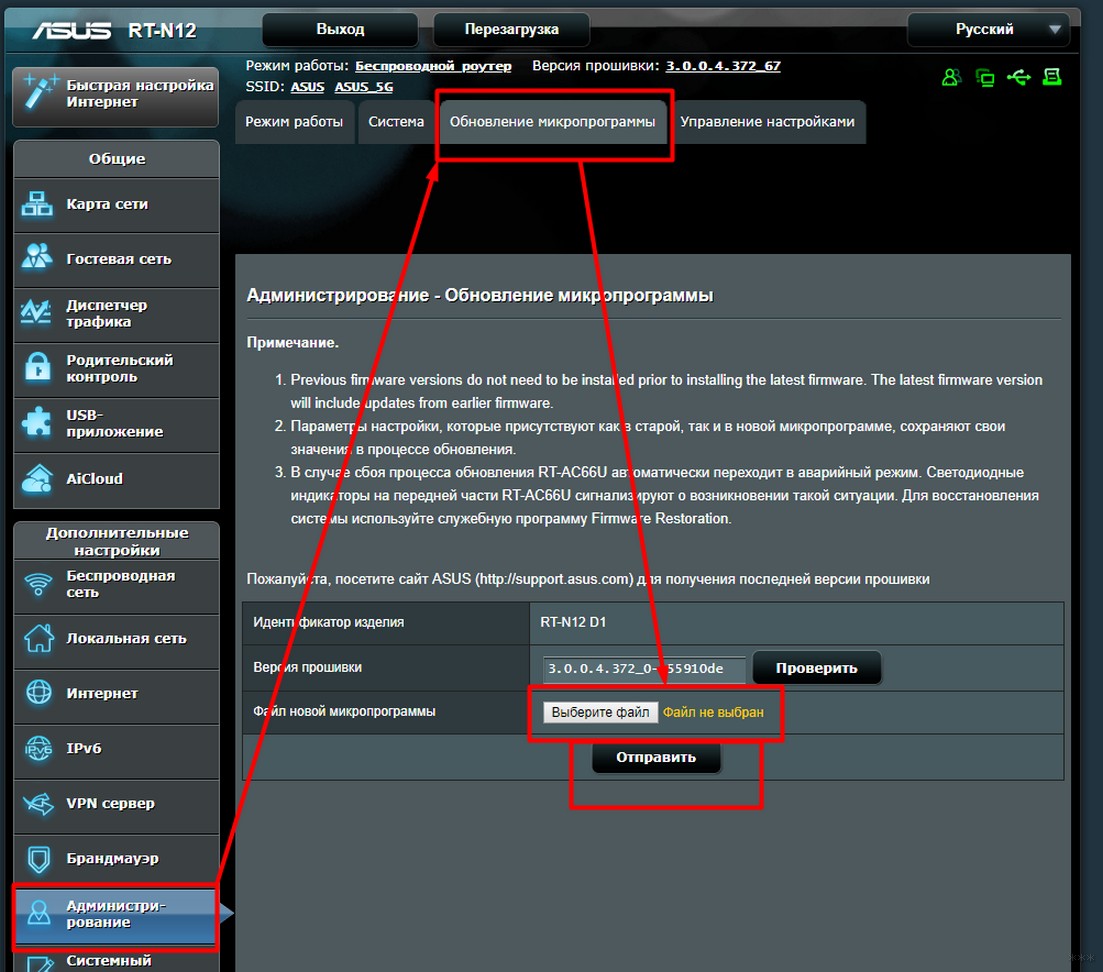
Процесс прошивки займет пару минут, после чего страница обновится.
Не отключайте питание, иначе есть риск получить «кирпич». Если роутер не подает признаков жизни, смотрите процесс восстановления ЗДЕСЬ с помощью Firmware Restoration.
Роутер и сам может найти новую версию прошивки и установить ее без ваших действий – для этого на скриншоте выше нужно нажать кнопку «Проверить». Понизить версию ПО таким образом или залить альтернативную прошивку не получится.
Восстановление или настройка
Теперь самое время восстановить все настройки. Снова идем по старому пути «Администрирование – Управление настройками», но на этот раз заливаем сохраненный файл конфигурации и нажимаем кнопку Отправить:
Если же вы почему-то все забыли сохранить или что-то не выходит: после прошивки все настройки слетают наглухо – и нет больше вашего интернета и вайфая. Самое время их настроить. Здесь не будем вдаваться в детали, тем более у нас уже есть готовая большая статья по настройке именно этой модели с картинками и видео.
Статья по настройке RT-N12 – читаем ЗДЕСЬ

Asus RT-N12 D1
This very lengthy Step-by-Step tutorial is for flashing your Asus RT-N12 D1 with DD-WRT. The RT-N12 D1 is much different for installing DD-WRT than its predecessors, the B1 and C1. Also keep in mind that DD-WRT is NOT officially supported on the Asus RT-N12 D1 so your mileage may vary.
Originally when getting DD-WRT on this router I bricked it a few times. When I finally “thought” I had the process scaled down to a few easy steps it wouldn’t load and I bricked the router again (I actually bricked three separate RT-N12 D1s). Then I realized I had to go through all the crazy steps as I had the first time to get it right. Yes, what you are going to do below will be a real pain in the ass but I have confirmed from three separate RT-N12 D1 routers this does work. If you try and take a shortcut, good luck to you because the steps outlined below were the only way I could consistently load DD-WRT. What? You took a shortcut and bricked your router! If you did try to take a shortcut and bricked your router, head down to the Unbricking Your Asus Rt-N12 D1 towards the bottom of this post.
The process took me countless hours to figure out. Make sure you complete ALL the steps, otherwise things won’t work well.
A few things to keep in mind:
- The Asus RT-N12 D1 has a light for the Wireless status. When flashing DD-WRT on this router the light may or may not stay on. This is irrelevant as the Wireless does work, the light just does not reflect the correct status.
- You must reconfigure the WAN and LAN ports on the back of the router in the section titled How to Reconfigure the Ports on your Asus RT-N12 D1. If you choose not to perform this step….have fun as the router will not work like you think it should.
- As stated earlier, if you bricked your router, head down to Unbricking Your Asus Rt-N12 D1
How to load DD-WRT on the Asus RT-N12 D1
The tools you are going to need are listed below:
- Asus Firmware: Version 3.0.0.4.374.813
- DD-WRT version: dd-wrt.v24-14896_NEWD-2_K2.6_mini_RT-N12.trx
- DD-WRT version: dd-wrt.v24-18774_NEWD-2_K2.6_mini.bin
- The Asus “Firmware Restoration” program (called Rescue.exe)
All of these tools can be found in a ZIP file on my website. Download and then extract these files from here: Asus_RT-N12D1_DD-WRT.zip
Once you have the files downloaded you should be ready to go through these instructions for loading DD-WRT on the Asus RT-N12 D1. I can’t stress enough, this seems stupid to do it the way I have listed below BUT it’s the only way I can successfully and consistently load the firmware.
These steps below are for installing DD-WRT on a brand new Asus RT-N12 D1 with the stock Asus firmware already on there. (If you have bricked your router, you need to first head down to Unbricking Your Asus Rt-N12 D1 which is further down this post otherwise, these instructions won’t work.
- Setup your computer’s NIC to a static address. I suggest using 192.168.1.2.
- Plug your computer into the LAN port marked as “1” on the back of the router. It is VERY important you do NOT plug your computer into LAN Port 4. Make sure it’s in LAN port “1” on the back of the router.
- Using an Internet Browser go to the following address of the Asus firmware:
http://192.168.1.1/Advanced_FirmwareUpgrade_Content.asp
- When prompted enter the username and password. The default for both is “admin”.
This will bring you into the Asus stock firmware where we can upload a TRX file for DD-WRT.
- On this page Browse to the firmware you downloaded: dd-wrt.v24-14896_NEWD-2_K2.6_mini_RT-N12.trx then click on Upload.
- After clicking Upload you’ll have to wait for the firmware to upload. The router will reboot a few times. That’s fine. Just wait, you’ll see the progress bar move. The router will go into a reboot cycle where it reboots over and over. Believe it or not, that’s actually a good thing.
- Once it looks like the router starts the endless boot cycle where it powers up, all lights come on, then go off, etc, etc, turn the router off by pressing the power button OR unplugging it.
- Now we need to install the Asus Firmware Restoration program (It’s the file you downloaded earlier called Rescue.exe). It’s the standard Next, Next, I accept, Finish type of install. At the end of the installation you will be given the choice to Launch the application. Go ahead and do so.
- When the application launches, you need to browse to the location where you have your DD-WRT 18774 mini firmware (remember, that’s what you should have already downloaded). Do NOT hit the Upload button yet. We are just trying to get everything ready.
- Grab a paper clip or something sharp and push and hold the reset button on the back of the router. The router should be powered off or unplugged while doing this.
- Plug the power cord in or power the router back up and with the paper clip still in the reset button. We need to wait for the power light on the router to flash very slowly. It takes about 15-20 seconds before it starts to flash. It flashes in 5 second intervals, 5 seconds on, 5 seconds off.
- After it starts to slowly flash, take the paper clip out of the reset button
- Hit the Upload button on the Asus Firmware Restoration application that you got ready.
- Wait. You will eventually see the application connect to the router and upload the firmware. And then start waiting some more.
- The router should automatically reboot on its own. Wait 2 more minutes and then try to connect to the router via 192.168.1.1. If you are brought to the DD-WRT login to change the password, Congratulations, you got DD-WRT on there.
- You should now be able to pull an IP in the 192.168.1.X subnet and now access the DD-WRT interface. However, keep reading this post because you’re not done yet.
Now the great part is you got DD-WRT on there! Now for the not-so-great part, the WAN port is screwed up on the back. I’ll explain. Typically when looking at the back of the router (or any router for that matter) you will usually see 4 LAN ports and a WAN port (sometimes it’s marked as Internet). When DD-WRT is loaded the ports are mixed up. In actuality the WAN port is a LAN port. And more importantly, LAN 4 is the WAN port. Why is this? It’s probably because the Asus RT-N12 D1 is not officially supported by the DD-WRT development team. If it were supported I suspect the developers of DD-WRT would fix this and make a version for it. No biggie though as we’ll change it. Confused yet? Don’t worry as these instructions below will help get all the ports straightened out so that the WAN port labeled on the back of the router is REALLY the WAN port you’ll plug your modem into.
How to reconfigure the Ports on the back of the router
First and foremost you need to have some type of a telnet client on your computer. If using Windows 7 there is a good change telnet client is not installed. To do that, simply follow the instructions in this link and then head back over once you have a telnet client installed: http://technet.microsoft.com/en-us/library/cc771275%28v=ws.10%29.aspx
1. Plug your computer into LAN port marked as “1” on the back of the router.
2. Open a Command Prompt (In Windows 7, Start–>type cmd in Search box–>Hit Enter key.)
3. Type telnet 192.168.1.1 then hit the Enter key
4. When prompted enter in the username and password of DD-WRT (Remember the DD-WRT defaults are “root” for the login and “admin” as the password.)
5. You will be brought into the DD-WRT telnet interface.
type the following nvram set vlan0ports=”0 1 2 3 5*” then hit the Enter key
type the following nvram set vlan1ports=”4 5” then hit the Enter key
type the following nvram commit then hit the Enter key
type the following reboot then hit the Enter key
6. The unit will reboot and after it comes back up you can plug your Modem into the WAN port and it will work like you would expect it to.
Now, for some more not-so-good news. If you ever reset the router’s firmware to default via Administration–>Factory Defaults–>Restore Factory Defaults OR via telnet and performing an erase nvram command you will have to reconfigure the ports on the back of the router again as they will revert back to the original firmware defaults where the WAN and LAN 4 port on the back of the router are mixed up.
Unbricking Your Asus Rt-N12 D1
Alright, if you’re anything like me you’ve somehow bricked the router (probability through multiple attempts or trying to get DD-WRT on there). We need to get the Stock Asus firmware back on there so we can load up DD-WRT.
Tools you are going to need:
- Asus Firmware: Version 3.0.0.4.374.813
- The Asus “Firmware Restoration” program (called Rescue.exe)
Again, these tools can be found in a ZIP file on my website. Download and then extract these files from here: Asus_RT-N12D1_DD-WRT.zip
1. Setup your computer’s NIC to a static address. I suggest using 192.168.1.2
2. Plug your computer into the LAN port marked as “1” on the back of the router. It is VERY important you do NOT plug your computer into LAN Port 4. Make sure it’s in LAN port “1” on the back of the router.
3. Make sure you unplug the power cord on the back of the router.
4. Install the Asus Firmware Restoration program (It’s the file you downloaded earlier called Rescue.exe). It’s the standard Next, Next, I accept, Finish type of install. At the end of the installation you will be given the choice to Launch the application. Go ahead and do so.
5. When the application launches, you need to browse to the location where you have the stock Asus Firmware (FW_RT_N12_D1_3004374813) you should have already downloaded. Do NOT hit the Upload button yet. We are just trying to get everything ready.
6. Grab a paper clip or something sharp and push and hold the reset button on the back of the router. The router should be powered off or unplugged while doing this.
7. Plug the power cord in or power the router back up and with the paper clip still in the reset button we need to wait for the power light on the router to flash very slowly. It takes about 15-20 seconds before it starts to flash. It flashes in 5 second intervals, 5 seconds on, 5 seconds off)
8. After it starts to slowly flash, take the paper clip out of the reset button
9. Hit the Upload button on the Firmware Restoration application.
10. Wait. You will eventually see the application connect to the router and upload the firmware. And then start waiting some more.
11. The router should automatically reboot on its own. It actually could do this a couple of times. Wait at least 2 minutes before proceeding.
12. Once you have waited 2 minutes, manually power the unit off for 10 seconds and then turn it back on. The router may reboot a couple more times. Wait 2 more minutes
13. Now, the unit won’t work and you probably only see a LAN light and the Power Light. We need to do a 30-30-30 reset for this particular router. This is not easy and I’d suggest reading these steps and then performing them:
For everything that you will be doing the WPS button and the reset button will be pressed for the whole time.
– The router needs to be powered on.
– Press the WPS button and hold it, don’t let go of it.
– Take the paper clip and hold down the reset button, don’t let go of it
– Count to 30.
– With a free finger, hit the power button on the router to turn in off. (Keep in mind you still need to have the WPS button and the reset button still pressed down).
– Count to 30 while the router is powered off.
– Press the power button to turn it back on.
– Count to 30.
– Let go of the WPS button and the Reset button.
– Wait, you will see the router reboot again and if you have done it right you will see the Power light, Wireless light, and the Lan 1 light all lit up.
14. Using only Internet Explorer (do not use Chrome, Firefox, or any other browser) go to the following IP address of the Asus firmware
http://192.168.1.1/Advanced_FirmwareUpgrade_Content.asp
If you are prompted to enter the username and password you unbricked the router. Congratulations! Now head back to Step 3 of How to load DD-WRT on the Asus RT-N12 D1
After tried TomatoUSB by Shibby for a few days, I think it’s quite a great firmware. So, I start this tutorial for anyone that want to try to use it.
1. Download the Firmware by going to shibby website at http://tomato.groov.pl/ Point to DOWNLOAD, then, click at TOMATO FIRMWARE

2. Click at K26RT-N

3. Choose the latest build currently which is build5x-104-EN

4. Choose Asus RT-Nxx (without USB) since Asus RT-N12 doesn’t have USB.

5. Download the tomato-K26-1.28.RT-N5x-MIPSR2-104-Max.trx

6. Now, connect your router to your computer using Ethernet cable. (Plug into Yellow Color which is LAN port, not Blue color which is Cable/DSL/WAN port)
7. Set your computer IP Address manually to 192.168.1.10 (or anything between 192.168.1.2 — 192.168.1.254, do not set it to 192.168.1.1 since it will be the default IP for Asus Router.) Set netmask to 255.255.255.0
8. We will flash it using Asus Firmware Restoration. This will be enter to rescue mode to restore/flash firmware.
8.1 Unplug the power cord of the router.
8.2 Long Press the button «Restore» about 5 seconds and plug in the power cord into the router.
8.3 Hold the «Restore» button until the power is flashing slow, now the router goes into rescue mode.

Asus RT-N12 B1 Wireless N Router

Asus RT-N12 C1 Wireless N Router
9. Open Internet Explorer / Firefox / Safari or any browser. Then, enter 192.168.1.1. the screen below will shows up.

10. Click at «Choose File» and select the file «tomato-K26-1.28.RT-N5x-MIPSR2-104-Max.trx» that we just downloaded. Then, click «Upload«

11. Just wait until it finish. It will show the screen to let you know that the flashing process is done.
12. Now, I recommend you to do hard reset (30/30/30 reset) before start using the router. I found many strange issues with the router after flash without doing hard reset especially when you flashed from DD-WRT firmware. Here is the information how to hard reset the router from DD-WRT :
Hard Reset (aka 30/30/30 reset):
The following procedure will clear out the NVRAM and set dd-wrt back to default values:
- With the unit powered on, press and hold the reset button on back of unit for 30 seconds
- Without releasing the reset button, unplug the unit and hold reset for another 30 seconds
- Plug the unit back in STILL holding the reset button a final 30 seconds (please note that this step can put Asus devices into recovery mode…see note below!)
This procedure should be done BEFORE and AFTER every firmware upgrade/downgrade.
Note : for Asus RT-N12, the Reset button is Restore button.
After done with hard reset, you can now use Tomato by Shibby by going to 192.168.1.1 using your web browser like Internet Explorer, then, login with the following information :
Default User name : root
Default Password : admin

13. Now, I just want to make sure that we really clean the NVRAM. To prevent and strange behavior. Go to Administration -> Configuration. You will see the page below :

14. Choose «Erase all data in NVRAM memory (thorough)» and click OK

Wait for the router to reboot, then, you can enjoy using the router with TomatoUSB by Shibby firmware.
Update (2013.04.06) — Asus RT-N12HP Router :
Tested TomatoUSB By Shibby v108 ( tomato-K26-1.28.RT-N5x-MIPSR2-108-Max.trx ) — on Asus RT-N12HP and it seems to work fine. Below is the screen after flashed :

With Ethernet Ports State in Version 108, it is easier to know exactly which LAN ports in TomatoUSB really map to Physical LAN ports. As you can see that LAN2 in the picture is connected. However, the real physical LAN port I really connected to the router is LAN Port 3. So, it shows the port in the reversed order. (Port 1 in Tomato is actually Port 4 physically. Port 2 in Tomato is actually Port 3 physically.) You may also change the Port Order in TomatoUSB by going into Basic -> Network -> Ethernet Ports State -> Invert Ports Order.
I also checked the original firmware comes with Asus RT-N12HP before flashed to TomatoUSB by Shibby. The TX Power Adjustment is default to 80 mW in Asus Firmware version 3.0.0.4.342 (Released 2013.02.22) as you may see in below image :

Update (2015.05.15) — Asus RT-N12 D1 Router :
Tested TomatoUSB By Shibby v128 ( tomato-K26USB-1.28.RT-N5x-MIPSR2-128-Nocat-VPN.trx ) — on Asus RT-N12 D1 and it seems to work fine. Actually, I tested many D1 routers since v124 and it works great. One thing that you need to do after flash is to Hard Reset (aka 30/30/30 reset). I found multi SSID wireless to be unstable. Hard reset fixed the problem for me.
Update (2016.08.15) — Asus RT-N12HP / RT-N12HP B1 Router :
Tested TomatoUSB By Shibby v138 ( tomato-K26-1.28.RT-N5x-MIPSR2-138-Max.trx ) — on Asus RT-N12HP and RT-N12HP B1 and it seems to work fine. The strange part for RT-N12HP B1 is that there is nothing state on the back of the router about «B1». I know it’s «B1» just because I logged in on web interface and the default router name was ending with «B1»
Source :
— http://tomato.groov.pl/
— http://www.dd-wrt.com/wiki/index.php/Hard_reset_or_30/30/30