У некоторых Интернет-провайдеров иногда возникает необходимость дополнительно прописать статический маршрут. Например, для работы файлообменных сетей DC++ и torrent. Если Вы подключены через роутер, то все настройки маршрутизации делаются на нём, а на компьютере ничего дополнительно указывать не нужно.
А вот если кабель провайдера подключен напрямую в компьютер или через модем в режиме «мост»(Bridge), тогда может возникнуть необходимость прописать статический маршрут, добавив его в таблицу маршрутизации Windows. Чтобы это сделать, Вы должны запустить командную строку с правами Администратора. Для этого надо нажать кнопку «Пуск» и выбрать пункт меню «Программы» -> «Стандартные» -> «Командная строка», либо нажать комбинацию клавиш Win+R и ввести команду «cmd».
В открывшемся черном окне консоли нужно прописать маршруты используя команду route.
Параметры команды:
-f Очистка таблиц маршрутов от записей всех шлюзов. При указании одной из команд таблицы очищаются до выполнения команды.
-p При использовании с командой ADD задает сохранение маршрута при перезагрузке системы. По умолчанию маршруты не сохраняются при перезагрузке. Пропускается для остальных команд, изменяющих соответствующие постоянные маршруты.
-4 Обязательное использование протокола IPv4.
-6 Обязательное использование протокола IPv6.
<command> Одна из следующих команд:
PRINT Печать маршрута
ADD Добавление маршрута
DELETE Удаление маршрута
CHANGE Изменение существующего маршрута
destination Адресуемый узел.
MASK Указывает, что следующий параметр интерпретируется как маска сети.
netmask Значение маски подсети для записи данного маршрута. Если этот параметр не задан, по умолчанию используется значение 255.255.255.255.
gateway Шлюз.
interface Номер интерфейса для указанного маршрута.
METRIC Определение метрики, т.е. цены для адресуемого узла.
Для примера рассмотрим три основных подсети, используемые как локальные:
192.168.0.0/16
10.0.0.0/8
172.16.0.0/16
Соответственно, Вам надо будет прописать 3 вот такие строки:
route -p add 192.168.0.0 mask 255.255.0.0 <ваш_шлюз>
route -p add 10.0.0.0 mask 255.0.0.0 <ваш_шлюз>
route -p add 172.16.0.0 mask 255.240.0.0 <ваш_шлюз>
Например, Ваш шлюз 192.168.50.1, тогда команды будут выглядеть так:
route -p add 192.168.0.0 mask 255.255.0.0 192.168.50.1
route -p add 10.0.0.0 mask 255.0.0.0 192.168.50.1
route -p add 172.16.0.0 mask 255.240.0.0 192.168.50.1
Если возникнет необходимость удалить статические маршруты — просто введите следующие команды:
route delete 192.168.0.0
route delete 10.0.0.0
route delete 172.16.0.0
Маршрутизация в операционной системе Windows 10 позволяет управлять трафиком в сети и определять путь, которым данные будут передаваться от исходного узла к конечному. Настройка маршрутизации может быть полезной при подключении к удаленным сетям, настройке виртуальных частных сетей (VPN) или при решении проблем с соединением. В этой статье мы рассмотрим практическое руководство по настройке маршрутизации в Windows 10.
Шаг 1: Открытие командной строки
Первым шагом в настройке маршрутизации в Windows 10 является открытие командной строки с привилегиями администратора. Чтобы сделать это, выполните следующие действия:
- Нажмите на кнопку «Пуск» в левом нижнем углу экрана Windows.
- В поисковой строке введите «cmd».
- Правой кнопкой мыши щелкните на значок «Командная строка» и выберите «Запуск от имени администратора».
Шаг 2: Отображение существующих маршрутов
Перед началом настройки маршрутизации полезно просмотреть текущие маршруты, чтобы понять текущую конфигурацию сети. Следующая команда позволяет отобразить существующие маршруты:
route print
Команда route print отобразит таблицу маршрутизации, включающую IP-адреса назначения, маску подсети, шлюз по умолчанию и другую информацию о маршруте.
Шаг 3: Добавление нового маршрута
Если вам требуется добавить новый маршрут, вы можете использовать команду route add. Ниже приведен синтаксис этой команды:
route add destination_network mask subnet_mask gateway_ip metric metric_number
Где:
-
destination_network— IP-адрес назначения для нового маршрута. -
subnet_mask— маска подсети для нового маршрута. -
gateway_ip— IP-адрес шлюза, через который проходит трафик. -
metric_number— метрика маршрута, которая указывает его приоритет.
Например, чтобы добавить маршрут к сети 192.168.1.0/24 через шлюз с IP-адресом 192.168.0.1 и установить метрику маршрута равной 2, используйте следующую команду:
route add 192.168.1.0 mask 255.255.255.0 192.168.0.1 metric 2
Шаг 4: Удаление существующего маршрута
Если необходимо удалить существующий маршрут, можно воспользоваться командой route delete. Ниже приведен синтаксис этой команды:
route delete destination_network
Где:
-
destination_network— IP-адрес назначения маршрута, который требуется удалить.
Например, чтобы удалить маршрут к сети 192.168.1.0/24, используйте следующую команду:
route delete 192.168.1.0
Шаг 5: Постоянная настройка маршрутизации
По умолчанию, маршруты, добавленные с помощью команд route add, сохраняются только до перезагрузки системы. Если вам требуется сохранить маршруты после перезагрузки, можно использовать параметр -p (persist). Например:
route -p add destination_network mask subnet_mask gateway_ip metric metric_number
Заключение
Настройка маршрутизации в операционной системе Windows 10 может быть полезной для решения проблем с соединением и управления сетевым трафиком. В этом руководстве мы рассмотрели основные шаги настройки маршрутизации, включая отображение существующих маршрутов, добавление нового маршрута, удаление существующего маршрута и постоянную настройку маршрутизации. Указанные команды и синтаксис могут быть использованы для настройки маршрутизации на компьютерах под управлением Windows 10.
Adding a static route in Microsoft Windows 10 or Server is done by using the route add command.
The following is the general syntax of the route add command we need to follow to add a permanent static route in Windows:
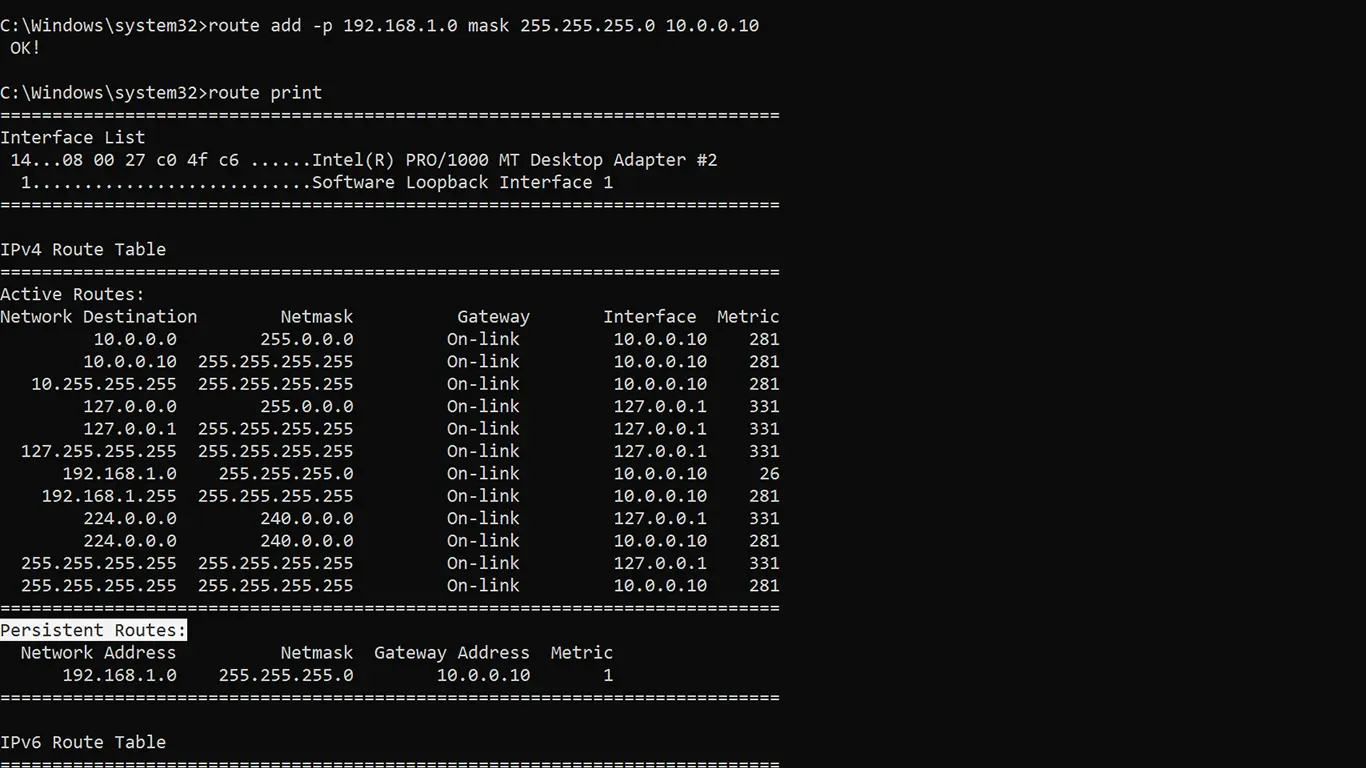
route add -p <destination> mask <subnet-mask> <gateway>For example, the following route command tells the windows to add a new persistent route to the 192.168.1.0/24 network, using 10.0.0.1 as the gateway to reach the network.
route add -p 192.168.1.0 mask 255.255.255.0 10.0.0.1When you want to add a static route to a single host, use the netmask 255.255.255.255.
For example, the following command adds a static route to the destination host 192.168.1.100 with the gateway address 10.0.0.1.
route add -p 192.168.1.100 mask 255.255.255.255 10.0.0.1The most important part of the route add command is the -p option. Without the -p switch, our new route would not be persistent. It will disappear the next time you reboot your Windows PC/Server.
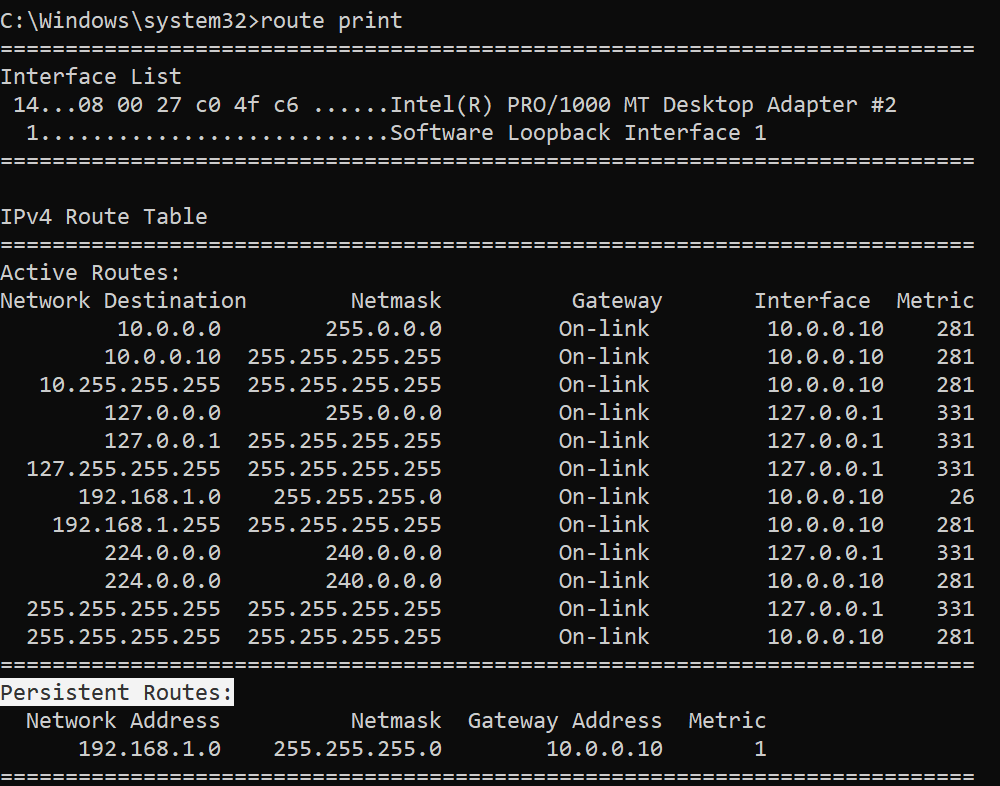
We can print the windows routing table using the route print command. Under the Persistent Routes header, you will see the list of permanent static routes.
Following is another static route example with a metric value:
route add -p 192.168.1.0 mask 255.255.255.0 10.0.0.1 metric 5In case if you have more than one network interface, you could also specify the interface ID using the if command option.
route add -p 192.168.1.0 mask 255.255.255.0 10.0.0.1 if 1When specifying the network interface, you have to provide the interface ID which you can find using the route print command.

Windows hold permanent static routes in the following registry
location: HKEY_LOCAL_MACHINE\SYSTEM\CurrentControlSet\Servi.
ces\Tcpip\Parameters\PersistentRoutes
Sometimes you need to create static route entries to make communication with different networks that are connected via a different gateway. A gateway is simply a network router that routes the network traffic between different networks. When you have more than one gateway (router) on your network, then you may need to implement static route technique on Windows 10/Windows 11 or Windows servers/any Operating system.
A static route will tell the Operating System to send network packets to the appropriate router instead of sending them to the default router. This simple guide shows how to add, delete and modify a static route to the routing table on Windows 11/10 and Microsoft Server Operating Systems.
There are a few useful commands you must know. Route delete, add and print. These commands will be handy to any user who has administrative access and know which router/gateway should be used for which network.
Why Add Static Route?
It mostly depends on the network setup. Usually, you can add these static routes on your default router (if it can support) or core switch. When you have this kind of proper network setup, you do not need to add a static route to each computer separately on the network. But in a few exceptional cases, you may need to implement static routes on individual computers. Here are a few examples.
- You have more than one internet router on the network and you need to send traffic to certain websites (based on their IP addresses) via a different router than the default gateway. Let’s say, for example, all traffic to Netflix can be sent via the 2nd internet router where other website traffic can go through the 1st internet router.
- There are several VLANs or subnets available on the network. Before building the proper routing table on the router or core switch, adding a static route on your Windows computer will help you to test the connectivity see the traffic flow.
- For network security or isolation purpose, certain routes can’t be added to the default gateway device. In this case, as a network administrator, you can add the static route on a local computer to make network communication.
Route Add on Windows 11/10 and Windows Servers
Though there are major changes and interface upgrades in the latest Windows 11, the below steps remain the same.
Make sure you run the below commands on command prompt (or PowerShell) which is opened as Administrator.

Here is the command to add a static route to the routing table.
route ADD destination_network MASK subnet_mask gateway_ip metric_cost
route add 10.10.10.0 mask 255.255.255.0 10.10.29.1
It indicates that any packets to 10.10.10.0 (in class C – 255.255.255.0) network should be forwarded to the 10.10.29.1 router (gateway).
Obviously, the PC/server in which we run this command is in the 10.10.29.0/24 network because it should communicate to the gateway from the same network.
The issue with the above command is when you shut down or restart the computer, these route entries will be removed. To make it permanent and add to the Windows OS routing table, we should use the –p key with the add command. So, adding a persistent (or permanent) static route on Windows 10 command will be like this;
route add –p 10.10.10.0 mask 255.255.255.0 10.10.29.1
Route Print
Route print command is another useful command to view the entries on the routing table and which routes are active at the moment. If you need to modify an entry that is already in the routing table, better to confirm the entries before changing. To do it, use the route print command.
Route print

Also, we can view the persistent routes in a Windows OS by checking the following registry path. Look for the entries in this area before or after modifying any routing table entries.
HKEY_LOCAL_MACHINE->SYSTEM->CurrentControlSet-> Services->Tcpip->Parameters->PersistentRoutes
Route Delete on Windows 11/10 & Windows 2022/2019/2016 Servers
The below command is to delete an existing persistent route from a computer. Even though we added a route entry with the network, network mask and gateway, but to delete, we need to mention the network only. So, it goes like this;
route delete 10.10.10.0
That will delete the 10.10.10.0 route entry from the computer. You do not need to restart the computer to take effect. Adding and deleteting route entries take effect instantly.
Let’s say that after the recent network change, now the network 10.10.10.0 should be routed through the 10.10.29.200 gateway. Obviously, you have to modify the existing route for this network and change the gateway to 10.10.29.200.
So, how to modify the existing route entry? You can’t modify an existing entry.
The simple method is to delete it and add the new entry. So, in this case, you would perform the below commands.
Route delete 10.10.10.0

Route add –p 10.10.10.0 mask 255.255.255.0 10.10.29.200
We hope this simple guide is helpful in understanding the route add, delete and print commands in Windows 10/Windows 11 client PC and other server Operating Systems. Make sure you open the command prompt or PowerShell as Administrator to perform these commands. If you want to use cosmetic variables to identify the fast hops to reach a network, you can use the metric key as described at the Microsoft site here.
Have you ever connected to a VPN and realize that you cannot access some of the network resources that you have at home? Maybe you are not able to access Printer in your local network, or something else.
And other situation is you have a windows machine that is connected to two different networks and you Are not able to access some of the network resources and some of them are working fine.
Then you have a problem with your network routing, in this blog I am going to cover how you can solve those above issues by Reconfiguring the windows routing table.
What is routing?
If you are not familiar with routing then don’t worry, routing is a mechanism to connect two different network Segments to each other.
Suppose you have a network 192.168.1.0/24 and another 10.1.1.0/24. By default, both of those networks cannot talk to each other because both are two different subnets. For both the network to talk to each other, you need to use static routing.
There is something called dynamic routing, which is used by the network devices such as routers, firewall and layer3 switch and even some of the windows server machine.
In this blog, we are focusing on the end host level especially windows static routes.
What is static routing in windows?
A static route is a specific subnet route that is defined by the admins manually to reach a certain destination. You can specify the destination subnet that you want to reach from the host and point to a default gateway. You can add as many static routes as you like.
You can define for example, to reach 192.168.1.0/24 you can go via 10.1.1.1
The static route is usually not needed when you host has only a single interface, the default route will take care of that.
Read also,
Windows 11 on KVM – How to Install Step by Step?
How To Extend Windows Storage in KVM ?
KVM Windows No Sound? – Let’s fix it.
10 Easy Steps To Install Windows Server in Linux KVM
How To Set Static IP On Ubuntu? (GUI and CLI)
What is default route in windows?
If you don’t know the subnet that you want to reach, that’s when you use something called default routes. The default route is mainly configured to reach the internet.
We don’t know the IP addresses that are available on the internet, right?
That means you cannot specify the routes in the routing table, and on the internet, there are millions of IP addresses, and how do I reach those IP address from your local machine?
You can type 0.0.0.0 as the IP subnet and 0.0.0.0 as the mask and point the route to the default gateway. This basically tells the windows host that to reach any subnet apart from the specific subnet you use the default route.
Usually the default route is added to a window hosts or any end hosts for that matter is by configuring the default gateway. If you define a default gateway on the system, that would add a default route pointing to the default gateway.
However, In some situations, it can create a problem, because you may have multiple LAN ports and all are configured with DHCP, as soon as the host receive the IP address via DHCP on all ports, it also add default gateways for all those interfaces. The result is multiple default routes towards multiple gateways. This would create a problem when the end hosts wanted to reach the internet.
how to view the routing table in windows?
Like any network devices, the windows machine also has a local routing table. It can tell you lot of information about the routes that this windows box is aware of.
To view the windows routing table, you can enter the command route print in windows command line prompt. However, that you would display both the IPv4 and IPv6 routing table, and you can also get the route output specific to the IP version.
how do I see ipv4 routes in windows?
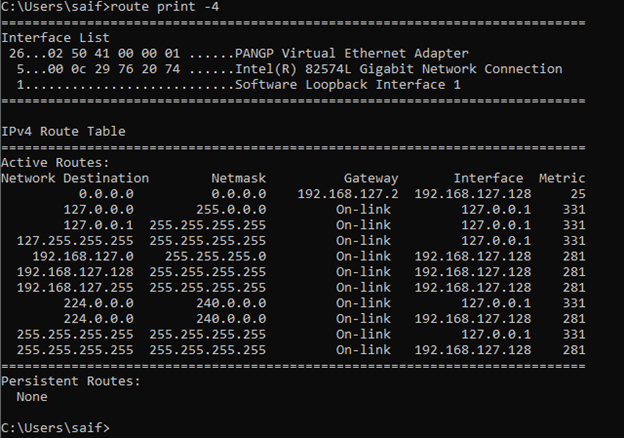
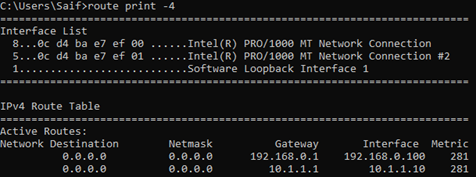
If you wanted to see just the IPv4 routes in windows you can type the command route print -4.
how do I see ipv6 routes in windows?
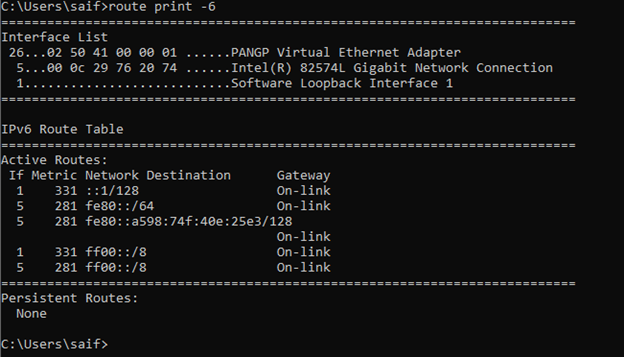
Just like the IPv4 you can also see the IPv6 routes alone in the windows routing table by typing route print -6.
How do you read a Windows routing table?
It’s quite common for anyone to look at the windows routing table and get confused with the information displayed. Let’s go through and explain each one of the items in the windows routing table.
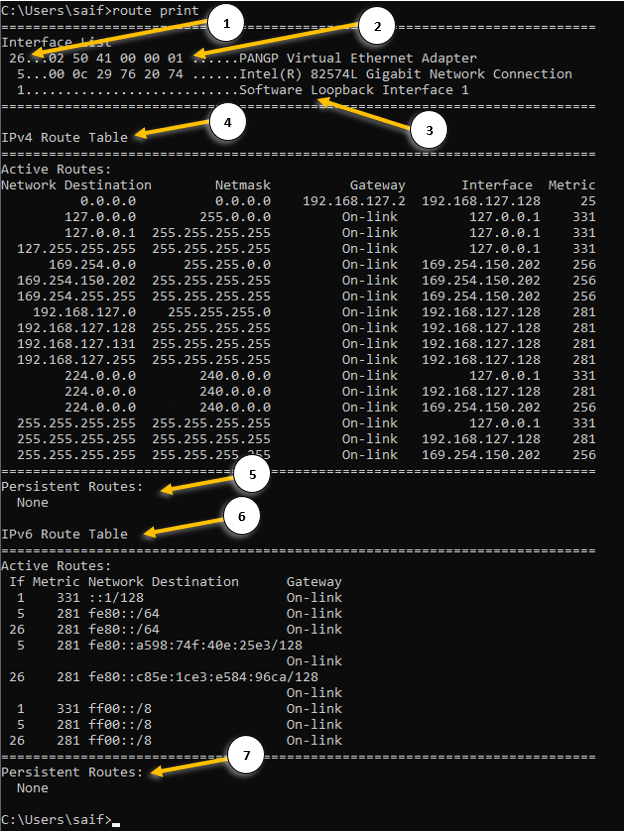
- Interface ID – each interface that you have on your machine will be identified with a unique ID.
- The mac address of the machine – this is the physical address of your network interface card. You can also get the mac address detail by typing ipconfig /all.
- The name of the interface.
- IPv4 routing table – Here you can view the IPv4 routing table.
- Network destination – It shows the destination subnet that this machine can reach currently.
- Netmask – the subnet mask of the network destination IP.
- Gateway – you can see the remote gateway as well as on-link where you are learning this route from.
On-link means, the directly connected routes from its own NIC. - Interface is the place you can see the IP address of each network interface.
- The IP address 127.0.0.1 is the machine’s loopback interface.
- Metric – It is the value that defines the priority of the route, the lower the metric the better.
- Persistent route – This route is defined by the admins and it would never be removed even when you power down the system, read on to learn more about it.
- IPv6 routing table – You can view the IPv6 routing table here.
- IPv6 persistent routes – The same persistent routes available in the Ipv4.
How do I manage multiple gateway in windows?
When you have two interfaces installed on the windows machine, you will have to manage the multiple gateways using static routes. Lets look at how we can configure multiple gateways using the static routes. below are the examples that we are going to configure.
- Validate the internet connectivity.
- Configure primary default gateway for windows 10.
- How to delete the route in windows?
- How to add two default routes in windows?
- How do I add a static route in Windows?
- How do I add a persistent route in Windows?
Validate the internet connectivity.
Before we begin, lets validate the internet connectivity on this host.
Open CMD with admin rights.
Click on the start menu, and type CMD. Right-click and Run as administrator. Click yes on the admin prompt.
Or
- Windows key + R
- Type CMD
- Press CTRL+Shift+Enter
Note: To see the routing table, you don’t need to access the CMD with Admin rights, normal access would do.
Lets try to ping the internet IP, which is 8.8.8.8.

Yes, I can reach the internet and let me check which path it is taking by using a command called tracert
As you can see, it is taking the path 192.168.0.1.
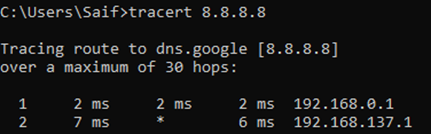
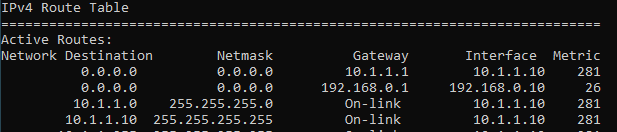
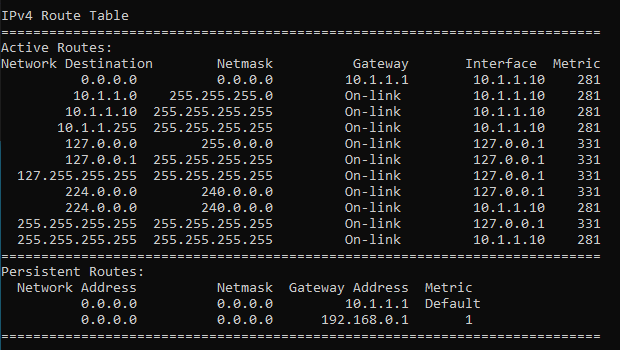
If you look closely at the routing table, you can notice, there are two default routes with same metric. One towards 192.168.0.1 (interface 1)and the other towards 10.1.1.1 (Interface 2) with equal metric.
In this setup, for the first time when you try to access the internet, It will send the packet out to both the interfaces. And it elects the default gateway that it needs to use.
Configure primary default gateway for windows 10.
Since we don’t have access to internet via the interface 2 (10.1.1.1), we shouldn’t be using the default route towards it. To resolve multiple default gateways on your network, you got two options.
Change the metric for the windows interface or Delete the default gateway pointed to the interface 2.
We know that the interface which we wanted to use for the internet is interface 1 (192.168.0.1) and when we look at the metric, we can see that both the interface 1 and 2 has the same metric 281.
In normal windows machine you should be able to see the metric starting from 25, and if you are using windows as a VM you can notice its metric is by default 281. However, when you try to change the metric, you will be able to see windows machine by default would take the metric as 25 though you cannot see them.
To make the interface 1 as the priority one for the internet, you need to lower the metric of it.
All you have to do is, add the metric value of 1 for the interface 1., and that would change the windows metric value to 26 (25+1)
1.Get the interface ID.
When you enter the command route print -4, that will show you the interface list on the top.
And for our interface 1, the ID is 21, and interface 2 is it 25.
To validate the interface you can type ipconfig /all and compare the mac address with the interface list ID’s.

2. Change the interface metric.

3. Validate the configuration.
Lets check the routing table now.
As you can see, the metric changed to 26 for our main interface. From now on, all the internet traffic will go out via the interface 1.
What if the interface 1 goes out?, then by default windows machine will start using the interface2
To simulate the issue, I just unplugged the interface 1 and as you can see, I no longer have the default route towards the interface1.
How to delete the route in windows?
The above scenario will be useful, if you have internet access on both links where the interface 1 has more bandwidth than interface 2.
Since we don’t have internet access at all on interfac2, there is no point in keeping the default route so let’s go ahead plug the interface1 back in and remove the default route connected to the interface2.
- To delete a route in the windows routing table, you can use the command route DELETE.
As we are going to delete the default route pointed to 10.1.1.1, you can use the command below.
route DELETE 0.0.0.0 MASK 0.0.0.0 10.1.1.1

2. Verify the routing table.
We no longer have the default route pointed to 10.1.1.1 gateway.

How to add two default routes in windows?
In our previous scenario where everything was looking good, however when the internet on the interface 1 goes down there is no redundancy in place. So, you decided to add internet over secondary interface.
One of the use cases being, you have internet on interface 1 that has more bandwidth and internet 2 with less bandwidth, in the event of internet 1 goes down, the internet 2 on interface 2 should kick in.
In the routing table, we already have a default route in which we set the metric to 26 previously.

Let’s go ahead and add the second default route with more metric, that way the second default route will be less preferred over the primary link. And when the primary link goes down the secondary one will take care of the internet traffic.
To add the default route you can add the below commands.
route ADD 0.0.0.0 MASK 0.0.0.0 10.1.1.1 -p METRIC 50 -p

The reason I added the metric 50 because, if you add another default route without a metric it would just pick up the default metric that is already used by the other default route.
The newly added route now has the metric of 75 now.

When you have connected to wifi and wired at the same time on your windows 10 PC, you will have two default route with different metric and if you are thinking about prioritising the wifi network over wired, then you check out the article here to know how.
How do I add a static route in Windows?
Alright the internet part has been taken care with default route, now lets talk about the specific static routes towards the server from 1 to 6.
In the servers list, to reach server 1-3 you must go via the interface 2 and the server 3-7 should reach via interface 1.
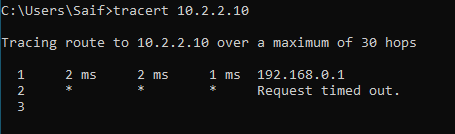
Lets start with the server1, 10.2.2.10 by pinging.
As you can see, we are not able to reach the IP, lets look into the IP table, and I don’t see any IP inside the routing table which is not good.

Currently what’s happening is that, since we do not have a specific route towards 10.2.2.0 it is taking the default route with lower metric on the interface1.
As you can see from the traceroute below.
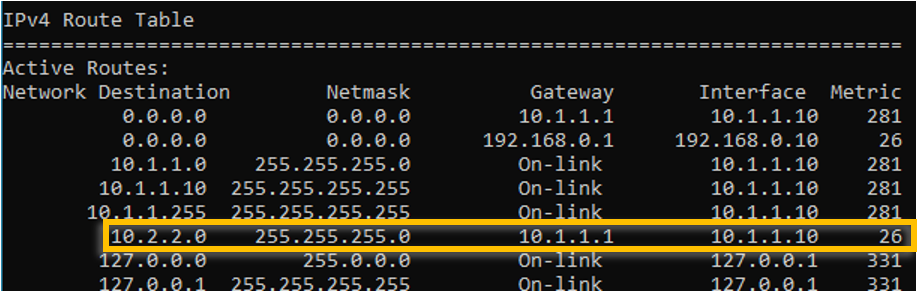
We need to point the 10.2.2.0 towards interface 2.
In CMD add the route as below.
route add 10.2.2.0 mask 255.255.255.0 10.1.1.1
Verify the route table again.
Ping the IP address, as you can see, we are able to reach the iP address via interface 2 now.

How do I add a persistent route in Windows?
We just added a static route in windows and it is working as expected, however what happens if you reboot the machine?
When you reboot the machine, whatever the changes that you made for the routing will be removed. For those routes that are temperoroly it should be fine, but not good for the permanent destination.
To avoid that you can use persistent route in windows. That way the changes that you make on the windows routing table are retained even after you reboot the machine. To add a persistent route, you just have to add -p at the end of the route statement.
route add 10.2.2.0 mask 255.255.255.0 10.1.1.1 -p
From now on all the routes that we are going to add using the persistent command only.
You should be able to see the persistent route on the bottom of the routing table.
Lets add rest of the other IP addresses, before we add the routes, lets verify the reachability.
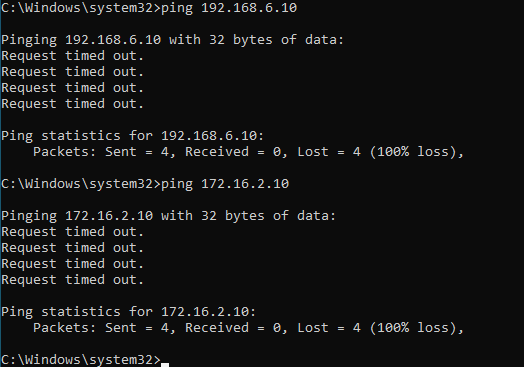
No, both destinations are not reachable now, so lets go ahead and add the routes.
route add 192.168.6.10 mask 255.255.255.0 10.1.1.1 -p
route add 172.16.2.10 mask 255.255.255.0 10.1.1.1 -p
The servers over the interface2 can be reached now, you may test the connectivity using the ping again and it should work just fine.
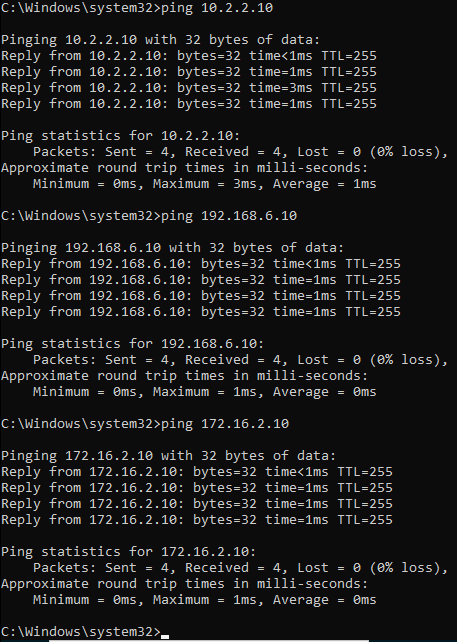
You can also verify the added routes in the windows routing table.
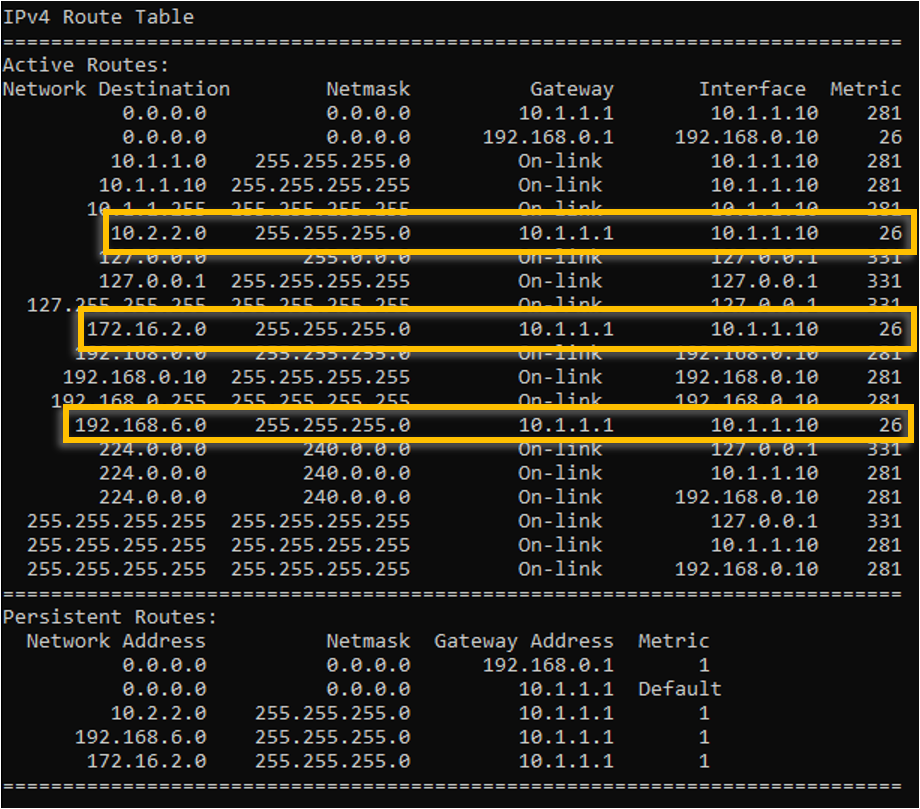
Can we reach the servers 4-6 in interface1 now? As you know we don’t have specific routes for it. If you said the answer is Yes, then you are right!.
let’s send ping to server 4,5 and 6.

As you can see, I am able to reach all three servers just fine, how come we are able to reach those servers even though we don’t have a specific static route for the same.
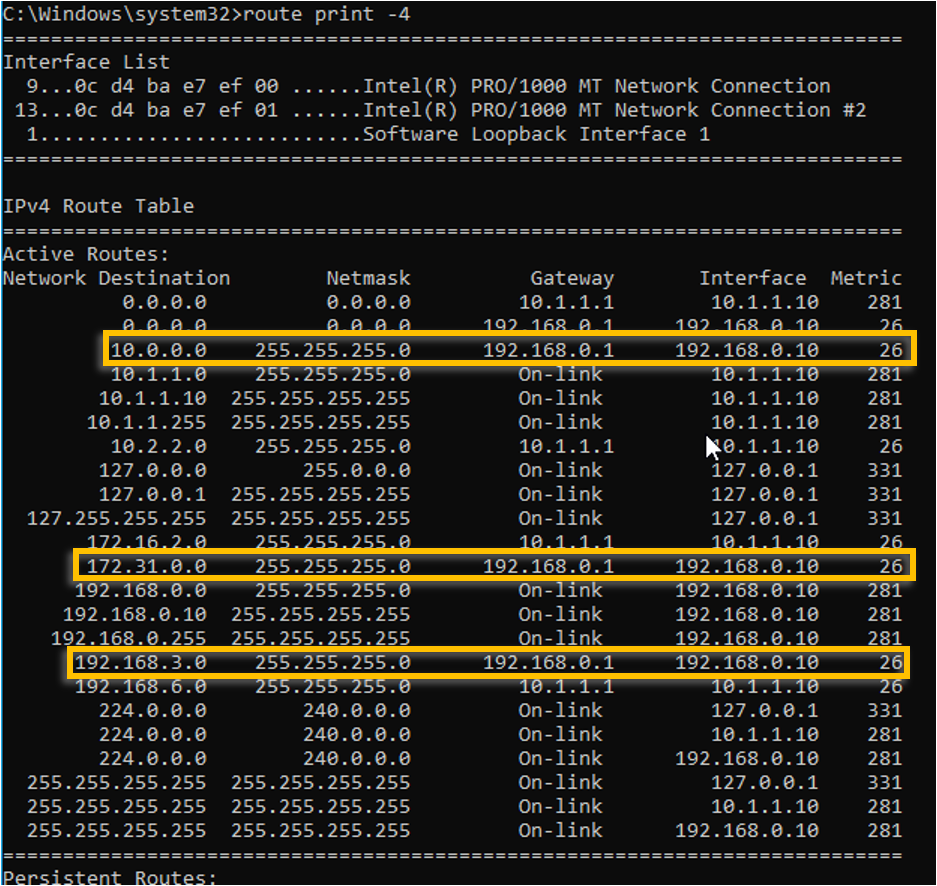
Its because, it is using the same default route on the interface1, so the PC would send the route to the default gateway, and because the gateway knows about the connected route 10.0.0.0/24, 198.168.3.0/24 and 172.0.0.0/24 the windows PC can reach all the servers on the interface1.
This is working great, right?
Yes but no, let me explain.
It is working fine now, but what if you decided to remove the default route on the interface 1, then it will be a problem. Those servers 4-6 going via interface 1 over the default route cannot get to the remote anymore.
It is recommended to add specific static routes that we added for the interface 2 and it should take care of everything. So even if you decide to remove the internet on the interface 1, you can peacefully remove the default route and specific routes will take care of the server reachability.
To add the rest of the servers subnet into the routing, you may add the route statement as below.
route add 10.0.0.0 mask 255.255.255.0 192.168.0.1 -p
route add 172.0.0.0 mask 255.255.255.0 192.168.0.1 -p
route add 192.168.3.0 mask 255.255.255.0 192.168.0.1 -p
Validate the routes.