If you’re having problems with your PC, the following table can help you decide which recovery option to use.
|
Problem |
See this section |
|---|---|
|
Your PC isn’t working well and you recently installed an update |
Remove an installed Windows update |
|
Your PC isn’t working well and it’s been a while since you installed an app or changed system settings |
Reset your PC |
|
Your PC won’t start or is still loading |
Use the Startup Repair function |
|
Your PC won’t start, you haven’t created a recovery drive, and resetting your PC didn’t work |
Use installation media to reinstall Windows 11 |
|
Your PC won’t start and you haven’t created a recovery drive |
Use installation media to restore your PC |
|
Your PC won’t start and you’ve created a recovery drive |
Use a recovery drive to restore or recover your PC |
|
You want to reinstall your previous operating system |
Go back to your previous version of Windows |
|
Your PC isn’t working well and you recently installed an app |
Restore from a system restore point |
|
You suspect your device has been infected |
Use installation media to reinstall Windows 11 |
Click one of the recovery options below and follow the steps to try to get things working again.
If you’ve recently installed a Windows update, uninstall the update to try to resolve the issue.
-
Select Start > Settings > Windows Update > Update history > Uninstall updates .
View update history -
On the list that appears, select update you want to remove, and then select Uninstall.
Important:
-
If you’ve encrypted your device, you’ll need your BitLocker key to reset your PC. If you don’t know your BitLocker key, see Find my BitLocker recovery key.
-
During the resetting process, it is possible that your screen may go black for a long period of time (occasionally upwards of 15 minutes) and that your device may attempt to restart itself during this period. Manually attempting to restart the device yourself during this process could cause the reset to fail. Please be patient!
Resetting reinstalls Windows 11, but lets you choose whether to keep your files or remove them, and then reinstalls Windows. You can reset your PC from Settings, the sign-in screen, or by using a recovery drive or installation media.
Reset your PC from Settings
-
Select Start > Settings > System > Recovery .
Open Recovery settings -
Next to Reset this PC , select Reset PC. Then choose from the options and/or settings in the table below.
|
Option |
What it does |
|---|---|
|
Keep my files > Change settings > Preinstalled apps On |
|
|
Keep my files > Change settings > Preinstalled apps Off |
|
|
Remove everything |
Note: Data erasure On removes files and cleans the drive. If you’re planning to donate, recycle, or sell your PC, use this option. This might take an hour or two, but it makes it harder for other people to recover files you’ve removed. Data erasure Off just removes files. It takes less time, but is less secure. The data erasure functionality is targeted at consumers and does not meet government and industry data erasure standards. |
Reset your PC from the sign-in screen
If you can’t open Settings, you can reset your PC from the sign-in screen. Here’s how:
-
Press Windows logo key + L to get to the sign-in screen. Then restart your PC by pressing the Shift key while you select the Power button > Restart .
-
Your PC will restart in the Windows Recovery Environment (WinRE) environment.
-
On the Choose an option screen, select Troubleshoot > Reset this PC, and then choose one of the options in the previous table.

Startup Repair helps you fix common problems that can prevent Windows from starting up.
Note: If you’ve encrypted your device, you’ll need your BitLocker key to start in safe mode.
First, you need to enter the Windows Recovery Environment (winRE). To do this, you will repeatedly turn your device off, then on:
-
Hold down the power button for 10 seconds to turn off your device.
-
Press the power button again to turn on your device.
-
On the first sign that Windows has started (for example, some devices show the manufacturer’s logo when restarting) hold down the power button for 10 seconds to turn off your device.
-
Press the power button again to turn on your device.
-
When Windows starts again, hold down the power button for 10 seconds to turn off your device.
-
Press the power button again to turn on your device.
-
This time, allow your device to fully start up.
-
Select Advanced options.
-
Now that you’re in winRE, on the Choose an option screen, select Troubleshoot > Advanced options > Startup Repair > Restart.

Important: If you’ve encrypted your device, you’ll need your BitLocker key to use a recovery drive to restore or reset your PC If you don’t know your BitLocker key, see Find my BitLocker recovery key.
If your PC won’t start, you can use a recovery drive to restore from a system restore point or recover your PC. For info on how to create a recovery drive on a working PC, see Create a recovery drive.
To restore or recover using the recovery drive:
-
Connect the recovery drive and turn on your PC.
-
Press Windows logo key + L to get to the sign-in screen, and then restart your PC by pressing the Shift key while you select the Power button > Restart .
-
Your PC will restart in the Windows Recovery Environment (WinRE) environment.
-
On the Choose an option screen, select Troubleshoot, and then select one of the following two options. (If you don’t see the Choose your option screen, your PC might not be set up to boot from a drive. Check your PC manufacturer’s website for info on how to change your PC’s boot order.)

-
To restore from a system restore point, select Advanced Options > System Restore. This won’t affect your personal files, but it will remove recently installed apps, drivers, and updates that might be causing your PC problems.
-
To reinstall Windows 11, select Advanced Options > Recover from a drive. This will remove your personal files, apps and drivers you installed, and changes you made to settings.
For a limited time after upgrading to Windows 11, you’ll be able to go back to your previous version of Windows by selecting Start > Settings > System > Recovery . Next to Go back , select Go back. This will keep your personal files, but it’ll remove apps and drivers installed after the upgrade, as well as any changes you made to settings. In most cases, you’ll have 10 days to go back.
Open Recovery settings
To go back, you’ll need to:
-
Keep everything in the windows.old and $windows.~bt folders after the upgrade.
-
Remove any user accounts you added after the upgrade.
-
Have the USB drive you used to upgrade to Windows 11 (if you used one).
Notes:
-
The option in Settings to go back to your previous version of Windows is only available for a limited time after upgrading.
-
Apps that have been added, removed, or updated after the upgrade might not be available or function properly after going back to the previous version of Windows.
Info for Windows Insiders
If you’re an Insider and the current preview build isn’t working for you, select Start > Settings > System > Recovery . Next to Go back , select Go back. This won’t remove your personal files, but it’ll remove recently installed apps and drivers, and change settings back to their defaults.
Going back to an earlier build won’t remove you from the Insider Program. When the next preview build is ready, it’ll be installed on your PC.
This option takes your PC back to an earlier point in time, called a system restore point. Restore points are generated when you install a new app or driver, and when you create a restore point manually. Restoring won’t affect your personal files, but it will remove apps, drivers, and updates installed after the restore point was made.
-
In the search box on the taskbar, type control panel, and then choose it from the list of results
-
In the Control Panel search box, type recovery.
-
Select Recovery > Open System Restore.
-
In the Restore system files and settings box, select Next.
-
Select the restore point that you want to use in the list of results, and then select Scan for affected programs.
Notes:
-
If you don’t see the restore point that you want to use, select the Show more restore points check box to see more restore points.
-
If you’re not seeing any restore points, it might be because system protection isn’t turned on. Here’s how to check:
-
In the search box on the taskbar, type control panel, and then choose it from the list of results.
-
In the Control Panel search box, type recovery.
-
Select Recovery > Configure System Restore > Configure and see if the Turn on system protection option is selected.
-
If the Turn on system protection option is not selected, system protection isn’t turned on and there aren’t any restore points. In this scenario, you won’t be able to recovery your PC using a system restore point and will need to use one of the other recovery options listed on this page.
-
If the Turn on system protection option is selected, continue with step 6.
-
-
-
-
You’ll see a list of items that will be deleted if you remove this restore point. If you’re OK with the deletions, select Close > Next > Finish.
If you’re having problems with your PC, the following table can help you decide which recovery option to use.
|
Problem |
See this section |
|---|---|
|
Your PC isn’t working well and you recently installed an update. |
Remove an installed Windows update |
|
Your PC isn’t working well and it’s been a while since you installed an app or changed system settings. |
Reset your PC |
|
Your PC won’t start or is still loading |
Use the Startup Repair function |
|
Your PC won’t start, you haven’t created a recovery drive, and resetting your PC didn’t work. |
Use installation media to reinstall Windows 10 |
|
Your PC won’t start and you haven’t created a recovery drive. |
Use installation media to restore your PC |
|
Your PC won’t start and you’ve created a recovery drive. |
Use a recovery drive to restore or recover your PC |
|
You want to reinstall your previous operating system. |
Go back to your previous version of Windows |
|
Your PC isn’t working well and you recently installed an app. |
Restore from a system restore point |
|
You suspect your device has been infected. |
Use installation media to reinstall Windows 10 |
Click one of the recovery options below and follow the steps to try to get things working again.
If you’ve recently installed a Windows update, uninstall the update to try to resolve the issue.
-
Select the Start button, then select Settings > Update & Security > Windows Update > View your update history > Uninstall updates.
View update history settings -
Right-click the update you want to remove, and then select Uninstall.
Important:
-
If you’ve encrypted your device, you’ll need your BitLocker key to reset your PC. If you don’t know your BitLocker key, see Find my BitLocker recovery key.
-
During the resetting process, it is possible that your screen may go black for a long period of time (occasionally upwards of 15 minutes) and that your device may attempt to restart itself during this period. Manually attempting to restart the device yourself during this process could cause the reset to fail. Please be patient!
Resetting reinstalls Windows 10, but lets you choose whether to keep your files or remove them, and then reinstalls Windows. You can reset your PC from Settings, the sign-in screen, or by using a recovery drive or installation media.
Reset your PC from Settings
-
Select the Start button, then select Settings > Update & Security > Recovery .
Open Recovery settings -
Under Reset this PC, select Get started and then choose from the options and/or settings in the table below.
|
Option |
What it does |
|---|---|
|
Keep my files > Change settings > Preinstalled apps On |
|
|
Keep my files > Change settings > Preinstalled apps Off |
|
|
Remove everything |
Note: Remove everything > Change settings gives you two options. Data erasure On removes files and cleans the drive. If you’re planning to donate, recycle, or sell your PC, use this option. This might take an hour or two, but it makes it harder for other people to recover files you’ve removed. Data erasure Off just removes files. It takes less time, but is less secure. |
Reset your PC from the sign-in screen
If you can’t open Settings, you can reset your PC from the sign-in screen. Here’s how:
-
Press Windows logo key + L to get to the sign-in screen, and then restart your PC by pressing the Shift key while you select the Power button > Restart in the lower-right corner of the screen.
-
Your PC will restart in the Windows Recovery Environment (WinRE) environment.
-
On the Choose an option screen, select Troubleshoot > Reset this PC, and then choose one of the options in the previous table.
Startup Repair helps you fix common problems that can prevent Windows from starting up.
Note: If you’ve encrypted your device, you’ll need your BitLocker key to start in safe mode.
First, you need to enter the Windows Recovery Environment (winRE). To do this, you will repeatedly turn your device off, then on:
-
Hold down the power button for 10 seconds to turn off your device.
-
Press the power button again to turn on your device.
-
On the first sign that Windows has started (for example, some devices show the manufacturer’s logo when restarting) hold down the power button for 10 seconds to turn off your device.
-
Press the power button again to turn on your device.
-
When Windows starts again, hold down the power button for 10 seconds to turn off your device.
-
Press the power button again to turn on your device.
-
This time, allow your device to fully start up.
-
Select Advanced options.
-
Now that you’re in winRE, on the Choose an option screen, select Troubleshoot > Advanced options > Startup Repair > Restart.
Important: If you’ve encrypted your device, you’ll need your BitLocker key to use a recovery drive to restore or reset your PC If you don’t know your BitLocker key, see Find my BitLocker recovery key.
If your PC won’t start, you can use a recovery drive to restore from a system restore point or recover your PC. For info on how to create a recovery drive on a working PC, see Create a recovery drive.
To restore or recover using the recovery drive:
-
Connect the recovery drive and turn on your PC.
-
Press Windows logo key + L to get to the sign-in screen, and then restart your PC by pressing the Shift key while you select the Power button> Restart in the lower-right corner of the screen.
-
Your PC will restart in the Windows Recovery Environment (WinRE) environment.
-
On the Choose an option screen, select Troubleshoot, and then select one of the following two options. (If you don’t see the Choose your option screen, your PC might not be set up to boot from a drive. Check your PC manufacturer’s website for info on how to change your PC’s boot order.)
-
To restore from a system restore point, select Advanced Options > System Restore. This won’t affect your personal files, but it will remove recently installed apps, drivers, and updates that might be causing your PC problems.
-
To reinstall Windows 10, select Advanced Options > Recover from a drive. This will remove your personal files, apps and drivers you installed, and changes you made to settings.
For a limited time after upgrading to Windows 10, you’ll be able to go back to your previous version of Windows by selecting the Start button, then select Settings > Update & Security > Recovery and then selecting Get started under Go back to the previous version of Windows 10. This will keep your personal files, but it’ll remove apps and drivers installed after the upgrade, as well as any changes you made to settings. In most cases, you’ll have 10 days to go back.
Open Recovery settings
To go back, you’ll need to:
-
Keep everything in the windows.old and $windows.~bt folders after the upgrade.
-
Remove any user accounts you added after the upgrade.
-
Know the password you used to sign in to Windows 7 or Windows 8.1 (if you used one).
-
Have the USB drive you used to upgrade to Windows 10 (if you used one).
Notes:
-
The option in Settings to go back to your previous version of Windows is only available for a limited time after upgrading.
-
If you go back to Windows 8.1, some apps that came with Windows, like Mail and People, might not work anymore. To fix the apps, reinstall them from the Microsoft Store.
-
Apps that have been added, removed, or updated after the upgrade might not be available or function properly after going back to the previous version of Windows.
Info for Windows Insiders
If you’re an Insider and the current preview build isn’t working for you, select the Start button, then select Settings > Update & Security > Recovery . Under Go back to the previous version of Windows 10, select Get Started. This won’t remove your personal files, but it’ll remove recently installed apps and drivers, and change settings back to their defaults.
Going back to an earlier build won’t remove you from the Insider Program. When the next preview build is ready, it’ll be installed on your PC.
This option takes your PC back to an earlier point in time, called a system restore point. Restore points are generated when you install a new app or driver, and when you create a restore point manually. Restoring won’t affect your personal files, but it will remove apps, drivers, and updates installed after the restore point was made.
-
In the search box on the taskbar, type control panel, and then choose it from the list of results
-
In the Control Panel search box, type recovery.
-
Select Recovery > Open System Restore.
-
In the Restore system files and setting box, select Next.
-
Select the restore point that you want to use in the list of results, and then select Scan for affected programs.
Notes:
-
If you don’t see the restore point that you want to use, select the Show more restore points check box to see more restore points.
-
If you’re not seeing any restore points, it might be because system protection isn’t turned on. Here’s how to check:
-
In the search box on the taskbar, type control panel, and then choose it from the list of results.
-
In the Control Panel search box, type recovery.
-
Select Recovery > Configure System Restore > Configure and see if the Turn on system protection option is selected.
-
If the Turn on system protection option is not selected, system protection isn’t turned on and there aren’t any restore points. In this scenario, you won’t be able to recovery your PC using a system restore point and will need to use one of the other recovery options listed on this page.
-
If the Turn on system protection option is selected, continue with step 6.
-
-
-
-
You’ll see a list of items that will be deleted if you remove this restore point. If you’re OK with the deletions, select Close > Next > Finish.
If you’re having problems with your PC, you can:
-
Refresh your PC to reinstall Windows and keep your personal files and settings. Refresh also keeps the apps that came with your PC and the apps you installed from the Microsoft Store.
-
Reset your PC to reinstall Windows but delete your files, settings, and apps—except for the apps that came with your PC.
-
Restore your PC to undo recent system changes you’ve made.
If you’re having trouble starting (booting) your PC, see Windows Startup Settings (including safe mode), and go to the “Get to Windows Startup Settings in the Windows Recovery Environment” section. You can refresh, reset, or restore your PC from the Windows Recovery Environment.
If you want to back up and restore your personal files, see Back up your Windows PC.
Before you start to refresh or reset your PC
In most cases, once you start to refresh or reset your PC, it’ll finish on its own. However, if Windows needs missing files, you’ll be asked to insert recovery media, which is typically on a DVD disc or thumb drive. If that happens, what you’ll need depends on your PC.
If your PC came with Windows 8.1 or Windows RT 8.1, you’ll need the discs or thumb drive that came with your PC. Check the info that came with your PC to see if your PC manufacturer provided these discs or media. In some cases, you might have created them when you first set up your PC.
If you don’t have either of those, you can make them if you have a USB thumb drive of 16 GB or larger. Having a recovery drive can help you troubleshoot and fix problems with your PC, even if it won’t start. For more info, see Create a USB recovery drive.
If you upgraded your PC to Windows 8.1 or Windows RT 8.1 with a DVD, use that disc. If you don’t have Windows 8.1 or Windows RT 8.1 media, contact Microsoft Support.
Refresh, reset, or restore
Select any of the following for more detailed info.
If your PC isn’t performing as well as it once did, and you don’t know why, you can refresh your PC without deleting any of your personal files or changing your settings.
Note: If you upgraded your PC from Windows 8 to Windows 8.1 and your PC has a Windows 8 recovery partition, refreshing your PC will restore Windows 8. You’ll need to upgrade to Windows 8.1 after the refresh has finished.
Warning: Apps you installed from websites and DVDs will be removed. Apps that came with your PC and apps you installed from Microsoft Store will be reinstalled. Windows puts a list of removed apps on your desktop after refreshing your PC.
To refresh your PC
-
Swipe in from the right edge of the screen, tap Settings, and then tap Change PC settings.
(If you’re using a mouse, point to the upper-right corner of the screen, move the mouse pointer down, select Settings, and then select Change PC settings.) -
Tap or select Update and recovery, and then tap or select Recovery.
-
Under Refresh your PC without affecting your files, tap or select Get started.
-
Follow the instructions on the screen.
If you want to recycle your PC, give it away, or start over with it, you can reset it completely. This removes everything and reinstalls Windows.
Note: If you upgraded your PC from Windows 8 to Windows 8.1 and your PC has a Windows 8 recovery partition, resetting your PC will restore Windows 8. You’ll need to upgrade to Windows 8.1 after the reset has finished.
Warning: All of your personal files will be deleted and your settings will be reset. All apps that you installed will be removed. Only apps that came with your PC will be reinstalled.
To reset your PC
-
Swipe in from the right edge of the screen, tap Settings, and then tap Change PC settings.
(If you’re using a mouse, point to the upper-right corner of the screen, move the mouse pointer down, select Settings, and then select Change PC settings.) -
Tap or select Update and recovery, and then tap or select Recovery.
-
Under Remove everything and reinstall Windows, tap or select Get started.
-
Follow the instructions on the screen.
Note: You’ll be asked to choose whether you want to erase data quickly or thoroughly. If you choose to erase data quickly, some data might be recoverable using special software. If you choose to erase data thoroughly, this will take longer but it makes recovering data less likely.
If you think an app or driver that you recently installed caused problems with your PC, you can restore Windows back to an earlier point in time, called a restore point. System Restore doesn’t change your personal files, but it might remove recently installed apps and drivers.
Notes:
-
System Restore isn’t available for Windows RT 8.1.
-
Windows automatically creates a restore point when you install desktop apps and new Windows updates, if the last restore point is older than 7 days. You can also create a restore point manually at any time.
To restore your PC to an earlier point in time
-
Swipe in from the right edge of the screen, and then tap Search.
(If you’re using a mouse, point to the upper-right corner of the screen, move the mouse pointer down, and then select Search.) -
Enter Control Panel in the search box, and tap or select Control Panel.
-
Enter Recovery in the Control Panel search box, and then tap or select Recovery.
-
Tap or select Open System Restore and then follow the instructions.
If you need additional help refreshing, resetting, or restoring your PC, check out the Repair and Recovery community pages in the Windows forum for solutions that other people have found for problems they’ve experienced.
Need more help?
Want more options?
Explore subscription benefits, browse training courses, learn how to secure your device, and more.
Communities help you ask and answer questions, give feedback, and hear from experts with rich knowledge.
Find solutions to common problems or get help from a support agent.
Все владельцы компьютеров периодически сталкиваются с проблемами работы Windows после установки неправильных драйверов или внесения изменений в операционную систему. Решить эту проблему позволяет создание точек восстановления системы.
Точка восстановления Windows 10 позволяет вернуть компьютер к последнему стабильному состоянию работы компьютера. При создании точки восстановления Windows 10 сохраняет резервную копию системных файлов. Таким образом, вместо того, чтобы полностью переустанавливать Windows после того, как установили какой-то неправильный драйвер или словили вирус, вы можете просто осуществить откат системы.
Точки восстановления создаются перед установкой обновлений Windows, а также автоматически с той периодичностью, которую вы зададите. Чем больше свободного места на жестком диске вы зарезервируете под точки восстановления, тем больше дат восстановления у вас будет на выбор.
Система позволяет вручную создавать точки восстановления Windows 10. Это может потребоваться, например, перед установкой программ, которые могут каким-то образом нарушить работу системы. В случае, если что-то пойдёт не так, владелец компьютера всегда может откатить систему на ту дату, когда всё работало исправно.
Обратите внимание, точки восстановления содержат в себе только резервные копии системных файлов Windows 10, которые влияют на загрузку операционной системы. Личные папки и файлы не включаются в резервные копии. Если вы хотите резервировать ещё и личные файлы, то вам необходимо делать полный образ системы.
Содержание
- Настройки восстановления Windows 10
- Создание точки восстановления Windows 10 вручную
- Настраиваем автоматическое создание точек восстановления
- Откат Windows 10 до точки восстановления
- Откат системы через интерфейс Windows
- Откат системы с помощью инструментов диагностики
- Откат системы с помощью командной строки
- Видео на тему создание точки восстановления Windows 10
Настройки восстановления Windows 10
Для того, чтобы посмотреть текущие настройки восстановления на вашем компьютере нажмите правой кнопкой мыши на меню «Пуск» и зайдите в «Панель управления».

Переходим в раздел «Система и безопасность».

Переходим в раздел «Система».

Кликаем в левой колонке «Защита системы».

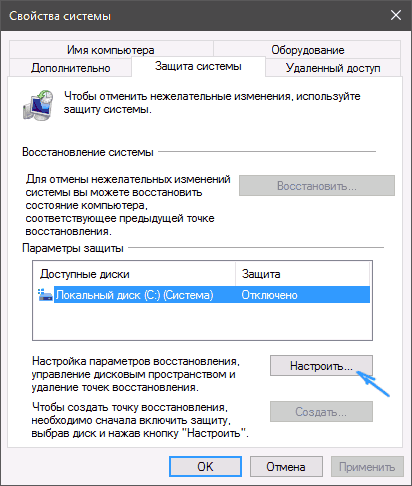
В открывшемся окне указаны параметры защиты для ваших дисков. Состояние отключено означает, что точки восстановления для этого диска не делаются, а включено, когда точки восстановления делаются.

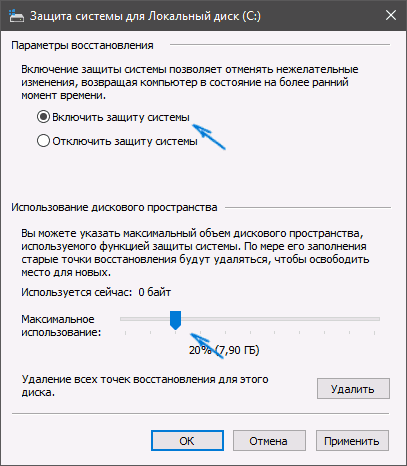
В моём случае точки восстановления делаются только для диска C, на котором и установлена операционная система. Для того, чтобы изменить настройки параметров защиты выберите интересующий вас диск и нажмите кнопку «Настроить».

В верхней части окна вы можете включить или отключить создание точек восстановления Windows 10, а в нижней части указать, какой объем дискового пространства вы готовы зарезервировать под хранение этих резервных копий. Чем больший объем вы укажите, тем больше точек восстановления будет храниться. По мере заполнения этого объема, старые точки восстановления будут стираться, чтобы освободить место для новых. Обычно, достаточно хранить 2-3 точки восстановления системы.
Для того, чтобы освободить место на жестком диске вы можете нажать кнопку «Удалить» для удаления всех сохраненных точек восстановления.
Создание точки восстановления Windows 10 вручную
Для того, чтобы создать точку восстановления Windows 10 на предыдущей вкладке «Защита системы» нажмите кнопку «Создать».

Всплывет окно, в котором вы должны как-то назвать точку восстановления, в моём случае для примера я назвал её «Точка восстановления до установки непонятного драйвера». При этом дата и время создания точки добавятся автоматически. После этого нажмите кнопку «Создать».

Начнётся процесс создания точки восстановления. Обычно он занимает меньше минуты. После завершения появиться окно «Точка восстановления создана успешно» (см. картинку выше). Теперь можно установить тот непонятный драйвер, из-за которого я переживал и в случае неполадок откатить систему с помощью точки восстановления.
Настраиваем автоматическое создание точек восстановления
Как уже было написано выше, Windows 10 автоматически создаёт точки восстановления перед установлением обновлений, а также даёт возможность делать это вручную. Но для подстраховки имеет смысл настроить автоматическое создание точек восстановление в указанный вами промежуток времени, например, каждый день.
Кликните правой кнопкой по меню «Пуск» и зайдите в «Панель управления».

В «Панели управления» в правом верхнем углу выберите «Просмотр» — «Мелкие значки» и кликните по разделу «Администрирование».

Откройте «Планировщик заданий».

Поочередно кликайте двойным щелчком мыши по пунктам «Библиотека планировщика заданий» — «Microsoft» — «Windows» — «System Restore».

В ветке System Restore уже создано правило SR для создания точек восстановления Windows 10. Нам остаётся лишь указать интервал, через который это правило будет срабатывать. Кликните два раза по правилу SR.

В открывшемся окне перейдите на закладку «Триггеры» и нажмите «Создать».

В следующем окне вы можете задать период, когда будут создаваться точки восстановления Windows 10. Можно указать ежедневное создание, еженедельное, ежемесячное, при запуске компьютера или при его выключении и так далее.
Выбирать период создания точек следует исходя из зарезервированного места на жестком диске под хранение резервных копий, так как при заполнении этого объема, самые новые точки восстановления будут стирать самые старые.

После того, как вы выбрали период создания точек восстановления нажмите ОК.
Откат Windows 10 до точки восстановления
Теперь, когда мы научились создавать точки восстановления вручную и автоматически, расскажем вам как восстановить систему после сбоя.
Откатить систему с помощью точек восстановления можно несколькими способами — с помощью интерфейса Windows 10, с помощью командной строки, а также с помощью инструментов диагностики.
Откат системы через интерфейс Windows
Самый лёгкий способ, это когда вы можете запустить Windows 10. В таком случае делаем всё как в начале статьи. Нажмите правой кнопкой мыши на меню «Пуск» и зайдите в «Панель управления». Далее перейдите в раздел «Система и безопасность» — «Система» — «Защита системы». В окне «Защита системы» нажмите кнопку «Восстановить».

Откроется мастер восстановления системных файлов и параметров. Нажмите «Далее».

В следующем окне поставьте галку на пункте «Показать другие точки восстановления». В данном списке отображены все возможные точки восстановления. В левом столбце указаны даты создания точек восстановления. В среднем столбце указано описание, чтобы мы могли идентифицировать точку.
Как видно на скриншоте ниже, точка восстановления под названием «точка восстановления до установки непонятного драйвера», которую я создал во второй главе этой статьи присутствует в списке как последняя созданная.
И наконец в правом столбце указан тип создания точки восстановления (вручную, система или установка), то есть при каких обстоятельствах была создана резервная копия.

Также, вы можете кликнуть на интересующей точки восстановления и нажать «Поиск затрагиваемых программ». В открывшемся окне будет отображен список программ, на которые повлияет откат до данной точки восстановления.
Когда вы выбрали точку восстановления до которой хотим сделать откат системы нажмите «Далее».

В последнем окне мы должны подтвердить выбранную точку восстановления. После нажатия кнопки «Готово», система начнёт процесс восстановления.
Откат системы с помощью инструментов диагностики
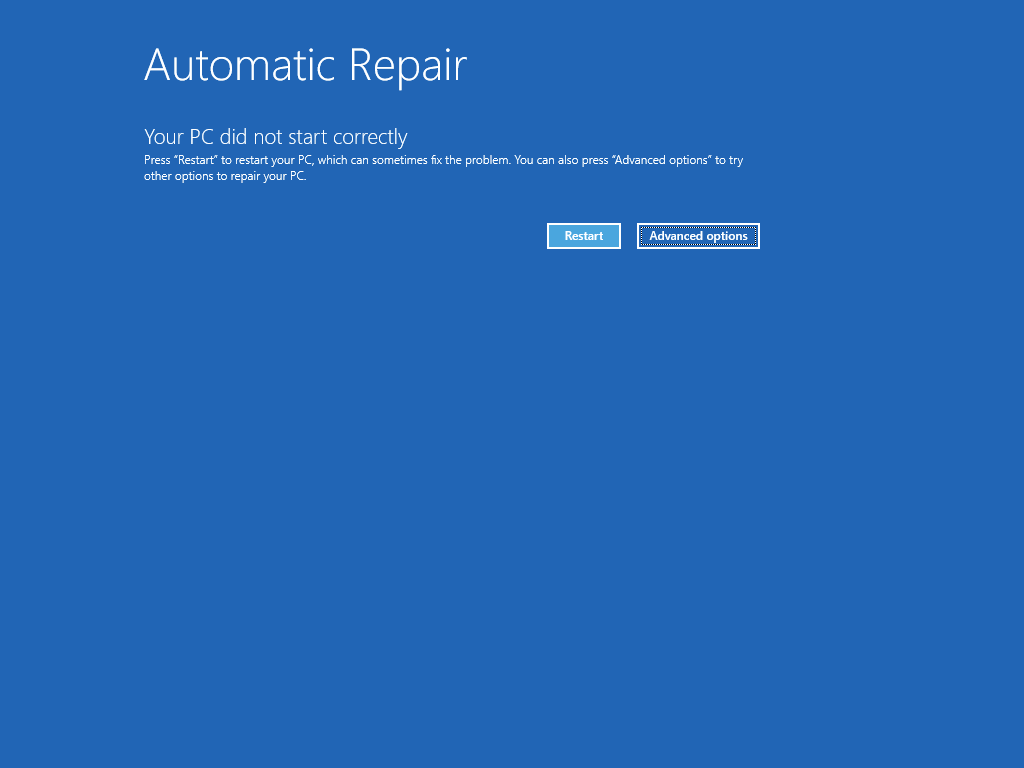
Если Windows 10 не стартует и рабочий стол не загружается, то откат системы можно осуществить с помощью специальной среды Windows 10 по восстановлению системы. При старте компьютера вместо рабочего стола вы увидите предупреждение, что система Windows загрузилась неправильно. Нажмите «Дополнительные варианты восстановления».

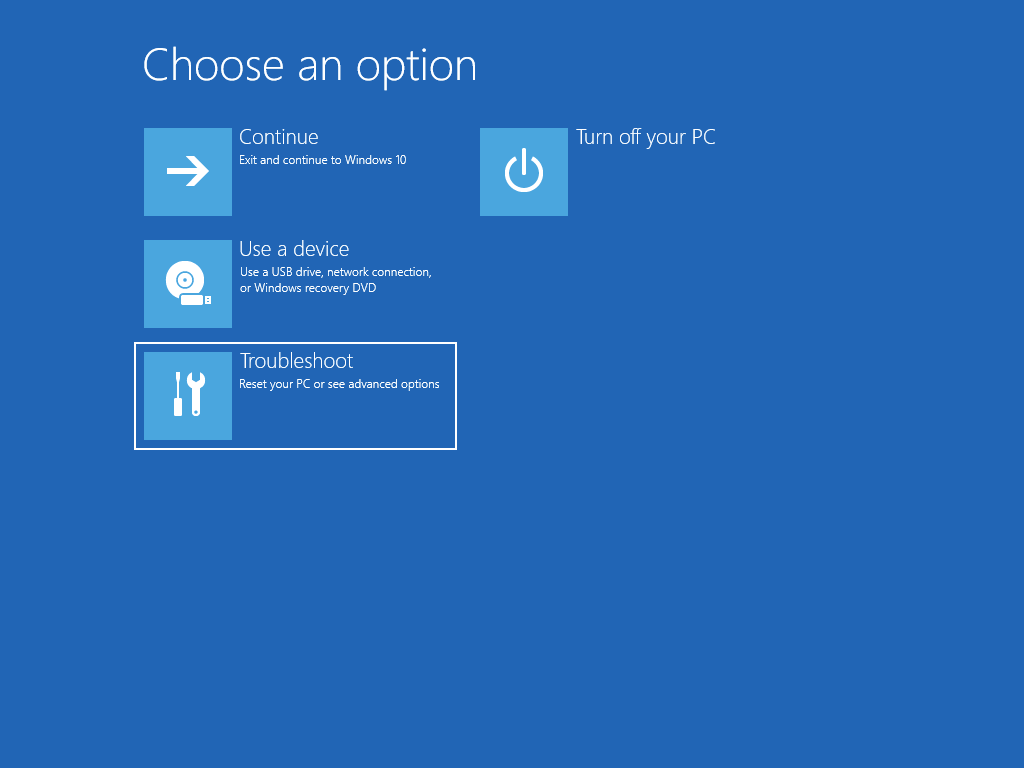
Далее, выберите пункт «Диагностика».

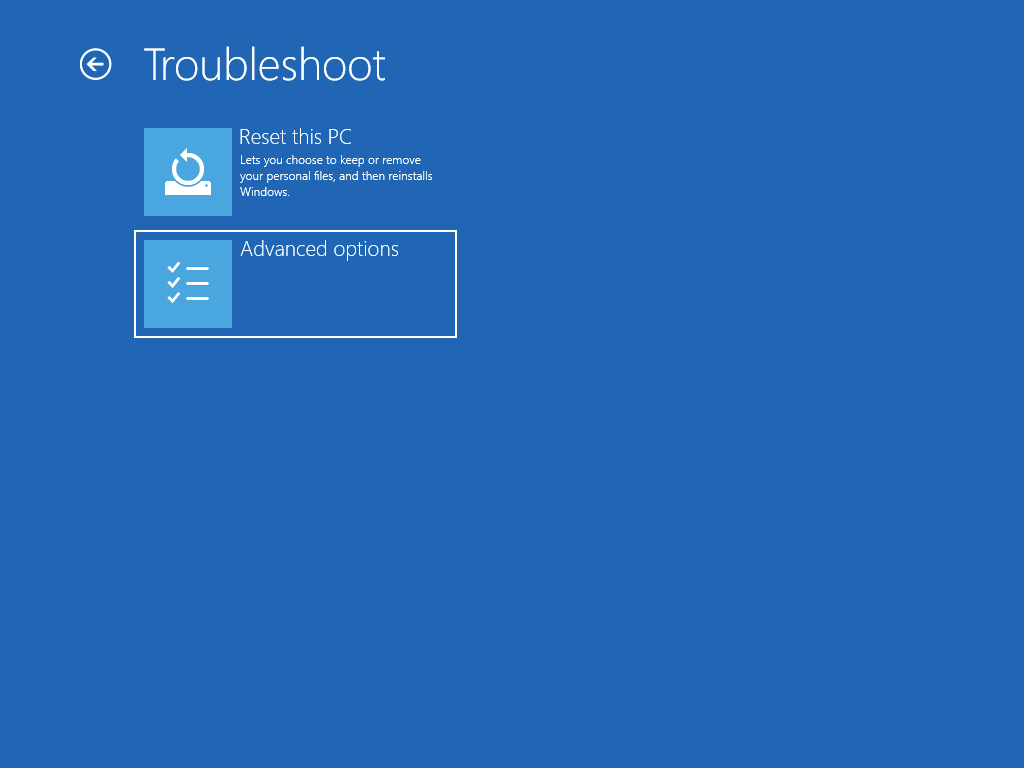
В окне «Дополнительные параметры» кликните по пункту «Восстановление системы».

Вы попадёте в уже привычное окно выбора точек восстановления где вам следует выбрать последнее стабильное состояние системы и нажать ОК.
Откат системы с помощью командной строки
Если рабочий стол Windows 10 не загружается, то можно откатить Windows 10 до последней точки восстановления с помощью командной строки.
Для этого во время компьютера нажимайте F8 пока не появиться список вариантов загрузки компьютера. Выберите «Безопасный режим с поддержкой командной строки».

В открывшейся командной строке напишите rstrui.exe, после чего нажмите Enter.

В результате этой команды у вас запуститься стандартный мастер восстановления системы до точки восстановления в графическом интерфейсе.
Видео на тему создание точки восстановления Windows 10
Ну и напоследок предлагаю вам посмотреть несколько видео, как создать точку восстановления и произвести откат Windows 10 до последней стабильной версии.
 Одна из возможностей восстановления Windows 10 — это использование точек восстановления системы, позволяющих отменить последние изменения в ОС, в том числе в системных файлах и реестре ОС. Создать точку восстановления можно вручную, кроме этого, при соответствующих настройках параметров защиты системы.
В этой инструкции подробно описывается процесс создания точек восстановления, настройки, необходимые для того, чтобы Windows 10 делала это автоматически, а также способы использовать ранее сделанные точки восстановления для отката изменений в драйверах, реестре и параметрах системы. Заодно расскажу, как удалить созданные точки восстановления. Также может пригодиться: Как восстановить отдельные файлы из точек восстановления, Что делать, если восстановление системы отключено администратором в Windows 10, 8 и Windows 7, Как исправить ошибку 0х80070091 при использовании точек восстановления в Windows 10.
Примечание: точки восстановления содержат лишь информацию об изменившихся системных файлах, критичных для работы Windows 10 и записях в реестре, но не представляют собой полный образ системы. Если вас интересует именно создание такого образа, на эту тему есть отдельная инструкция — Как сделать резервную копию Windows 10 и восстановиться из нее.
- Настройка восстановления системы (для возможности создания точек восстановления)
- Как создать точку восстановления Windows 10
- Как откатить Windows 10 из точки восстановления
- Как удалить точки восстановления
- Видео инструкция
Дополнительную информацию по возможностям возврата работоспособности ОС вы можете найти в статье Восстановление Windows 10.
Настройки восстановления системы
Прежде чем начать, следует заглянуть в настройки восстановления Windows 10. Для этого, кликните правой кнопкой мыши по «Пуск», выберите пункт контекстного меню «Панель управления» (Вид: значки), затем «Восстановление».
Нажмите по пункту «Настройка восстановления системы». Еще один способ попасть в нужное окно — нажать клавиши Win+R на клавиатуре и ввести systempropertiesprotection после чего нажать Enter.
Откроется окно настроек (вкладка «Защита системы»). Точки восстановления создаются для всех дисков, для которых защита системы включена. Например, если для системного диска C защита отключена, вы можете включить ее, выбрав этот диск и нажав кнопку «Настроить».
После этого выберите «Включить защиту системы» и укажите количество места, которое вы хотели бы выделить для создания точек восстановления: чем больше места, тем большее количество точек сможет храниться, а по мере заполнения пространства старые точки восстановления будут удаляться автоматически.
Как создать точку восстановления Windows 10
Для того, чтобы создать точку восстановления системы, на той же вкладке «Защита системы», (попасть в которую также можно через правый клик по «Пуск» — «Система» — «Защита системы») нажмите кнопку «Создать» и задайте имя новой точки, после чего еще раз нажмите «Создать». Через некоторое время операция будет выполнена.

Теперь на компьютере содержится информация, которая позволит вам отменить последние сделанные изменения в критически важных системных файлах Windows 10, если после установки программ, драйверов или других действий ОС стала работать неправильно.
Созданные точки восстановления хранятся в скрытой системной папке System Volume Information в корне соответствующих дисков или разделов, однако доступа к этой папке у вас по умолчанию нет.
Как откатить Windows 10 до точки восстановления
А теперь об использовании точек восстановления. Сделать это можно несколькими способами — в интерфейсе Windows 10, с помощью инструментов диагностики в особых вариантах загрузки, в среде восстановления, запущенной с флешки (если компьютер не загружается) и в командной строке.
Самый простой способ, при условии, что система запускается — зайти в панель управления, выбрать пункт «Восстановление», после чего нажать «Запуск восстановления системы».
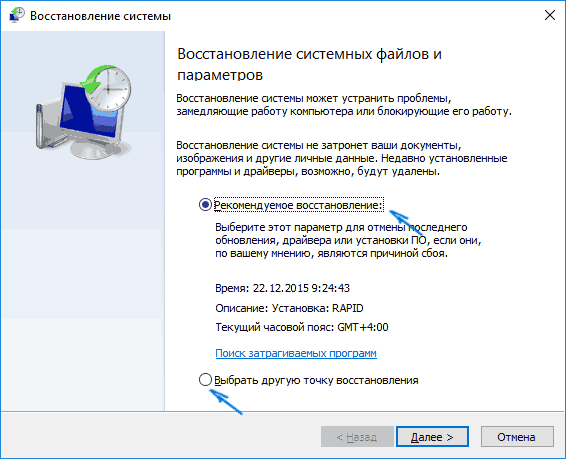
Запустится мастер восстановления, в первом окне которого вам могут предложить выбрать рекомендуемую точку восстановления (созданную автоматически), а во втором (если вы отметите «Выбрать другую точку восстановления» вы сможете сами выбрать одну из созданных вручную или автоматически точек восстановления. Нажмите «Готово» и дождитесь окончания процесса восстановления системы. После автоматической перезагрузки компьютера вам сообщат, что восстановление прошло успешно.

Второй метод использовать точку восстановления — с помощью особых вариантов загрузки, попасть в которые можно через Параметры — Обновление и восстановление — Восстановление или же, еще быстрее, прямо с экрана блокировки: нажать по кнопке «питания» справа внизу, а затем, удерживая Shift, нажать «Перезагрузка».
На экране особых вариантов загрузки выберите пункт «Поиск и устранение неисправностей» — «Восстановление системы» (или «Диагностика» — «Дополнительные параметры» — «Восстановление системы» в более ранних версиях Windows 10), далее вы сможете воспользоваться имеющимися точками восстановления (в процессе потребуется ввод пароля учетной записи).

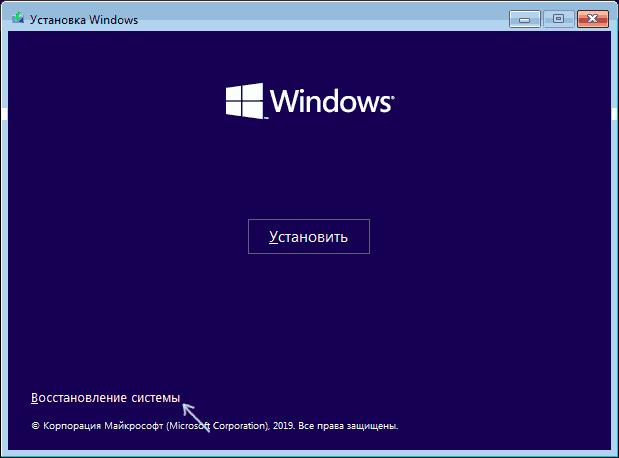
В случае, если Windows 10 не загружается, вы все равно можете использовать точки восстановления: для этого вам понадобится загрузочная флешка с Windows 10 (которую придется сделать на другом компьютере), либо диск восстановления. При использовании загрузочной флешки, достаточно будет выбрать пункт «Восстановление системы» на втором экране программы установки.
В результате вы попадете в среду восстановления, как в предыдущем способе и сможете воспользоваться точками восстановления даже на не запускающемся компьютере.
И еще один способ — запуск отката до точки восстановления из командной строки. он вам может пригодиться в том случае, если единственный работающий вариант загрузки Windows 10 — безопасный режим с поддержкой командной строки.

Просто введите в командную строку rstrui.exe и нажмите Enter для запуска мастера восстановления (он запустится в графическом интерфейсе).
Как удалить точки восстановления
Если вам потребовалось удалить имеющиеся точки восстановления, снова зайдите в окно настройки «Защиты системы», выберите диск, нажмите «Настроить», а затем используйте кнопку «Удалить» для этого. При этом удалятся все точки восстановления для этого диска.
То же самое можно сделать с помощью утилиты очистки диска Windows 10, для ее запуска нажмите Win+R и введите cleanmgr, а после того как утилита откроется, нажмите «Очистить системные файлы», выберите диск для очистки, а затем перейдите на вкладку «Дополнительно». Там вы сможете удалить все точки восстановления, кроме самой последней.

И, наконец, существует способ для удаления конкретных точек восстановления на компьютере, сделать это можно с помощью бесплатной программы CCleaner. В программе зайдите в «Инструменты» — «Восстановление системы» и выберите те точки восстановления, которые хотите удалить.
Видео — создание, использование и удаление точек восстановления Windows 10
И, в завершение, видео инструкция, если же после просмотра у вас останутся вопросы, буду рад ответить на них в комментариях.
Если вас интересует более продвинутое резервное копирование, возможно стоит приглядеться к сторонним средствам для этого, например, Veeam Agent for Microsoft Windows Free.
Read about creating and deleting a restore point, or using it to restore Windows 10.
With the help of a restore point you can recover Windows 10 system files as well as restore operability of the operating system, correct errors that suddenly appeared or restore the system back to the condition at the time of creating the restore point.
By default, Windows creates a new restore point when some changes are made to the computer, a driver or an application is installed etc.
Go to view

How to Create or Delete Restore Point on Windows 10. Restoring Computer To an Earlier Date 📝🔄💻
Contents
- Working With Windows 10 Restore Points
- How to Create a Computer Restore Point Windows 10
- Create a Restore Point Manually
- Adjust Automatic Creation of System Restore Points
- How to Delete a Windows 10 Restore Point
- Deleting All Restore Points But The Latest
- Deleting All Restore Points Including The Latest
- How to Recover The Windows 10 From a Restore Point
- Where Are Restore Point Files Kept?
- A System Restore Point Won’t Generate. What Should I Do?
- How to Recover The Windows 10 From a Restore Point Using The Command Prompt
- How to Recover Restore Points Which Have Been Deleted?
- How to Create a Computer Restore Point Windows 10
- Questions and answers
- Comments
Working With Windows 10 Restore Points
How to Create a Computer Restore Point Windows 10
Create a Restore Point Manually
-
Open Control Panel and go to Recovery / Configure System Restore.

-
Click Create in the System Properties window that opens.

-
Add a description in the following window to identify the restore point. The current date and time of creating a restore point are added automatically.

-
Click Create and wait for the process of creating system restore point to be over.


Adjust Automatic Creation of System Restore Points

- Start Control Panel / Administrative Tools / Task Scheduler.
- In the left window, select Task Scheduler Library / Microsoft / Windows / System Restore.
- Right-click on SR file in the upper window in the middle of the screen and select Properties.
- Select the Triggers tab in the window that opens.
- Click Create and set the required time parameters to create a restore point.

How to Delete a Windows 10 Restore Point
The operating system saves restore points Windows 10 onto the hard disk. A certain part of its volume is allocated for this purpose; older restore points are deleted to make room for new ones as the free space in this area grows less.
The following functions are available for working with restore points:
Deleting All Restore Points But The Latest
- Right-click on the disk where restore points are saved and select Properties / General / Disk Cleanup.
- Wait until the disk cleanup preparation process is complete. Click “Clean Up System Files” and wait until the disk cleanup preparation process is complete again.
-
Click Disk Cleanup, and then in the tab More Options, select System Restore and Shadow Copies.


Deleting All Restore Points Including The Latest
- Open Control Panel / System Properties / System Protection.
-
Select Configure in the System Protection tab (in the window System Properties).

-
Click Delete next to «Delete all restore points for this drive».


How to Recover The Windows 10 From a Restore Point
Attention: recovering your Windows 10 from a restore point affects only system and software settings of the operating system. Using the restore point will delete all programs that have been installed after such restore point was created, but it will not recover files deleted previously.
To recover Windows from a restore point do the following:
-
Open Control Panel / Recovery / Open System Restore and click Next.

-
Select a restore point from the list and click Next.

-
Confirm that you want to start system restore from the restore point and the process will start.


Where Are Restore Point Files Kept?
You can see all available restore points in Control Panel / Recovery / Open System Restore.

Physically, the system restore point files are located in the root directory of your system drive (as a rule, it is C:), in the folder System Volume Information. However, by default users don’t have access to this folder. To go to this directory, you should first make it visible, and then get special rights.
To do it:
-
Open Control Panel / Recovery / File Explorer Options / Folder Views.

-
Uncheck the box next to «Hide protected operating system files» and click Apply. As you do it, the folder System Volume Information will appear in the root directory of disk C:, but access will be denied.

To get access to the folder System Volume Information do the following:
-
Right-click on the folder and select Properties / Security / Advanced.

-
Click Continue to get access permission to Windows system folder which contains system restore point files.

-
Click Add and enter the name of the user which should be granted access rights. Click OK.

-
Check the box in Basic permissions next to «Full control» and click OK.

Now your user account appears in the Permissions list and you have access to the folder System Volume Information.
-


Files and folders in this location cannot be deleted manually because they are protected by the system. If you want to clean up the directory System Volume Information, use standard tools allowing you to delete Windows restore points.
A System Restore Point Won’t Generate. What Should I Do?
Check the status of the Windows service «Volume Shadow Copy». To do it, here is the way:
- Open Control Panel / Administrative Tools / Services.
- Find the service «Volume Shadow Copy».
- Start or activate it; set its startup type as «Automatic» if necessary.

System restore points may not be created on a computer where two operating systems are installed, or when the operating system is damaged by malware or viruses.
How to Recover The Windows 10 From a Restore Point Using The Command Prompt
If there are problems with starting your Windows 10 in the ordinary mode, you can bring your system back to normal by launching a restore point from the Command Prompt.
Go to view
How to Boot Windows 10 in Safe Mode (All Methods) 👨💻⚙️🛠️
To do it:
-
Load Windows in «Safe Mode with Command Prompt»: while the operating system is loading, press F8 and select the corresponding line in Windows Advanced Options Menu.

- Type rstrui.exe in the command prompt and the System Restore windows will open.
-
Select the necessary restore point and click Next.
- Complete the restoration process by following the wizard instructions.

How to Recover Restore Points Which Have Been Deleted?
The operating system saves restore points Windows 10 onto the hard disk. A certain part of its volume is allocated for this purpose; older restore points are deleted to make room for new ones as the free space in this area grows less.
Restore points can also be deleted manually – see above to learn more about it.

Often, recovering Windows results in loss of important files. Restoring Windows with a restore point, rollback to a previous version of the operating system, resetting the computer, errors in backup software, damaged or overwritten system files, file system errors or HDD bad sectors are only some of the things to cause deletion of data.
Windows recovery will restore operability of the operating system but it can result in loss of user files. It is not always possible to restore Windows operability without a clean installation of the operating system which can also cause loss of files.
Download for free and scan your computer with Hetman Partition Recovery. Learn about the program functions and step-by-step guide.
The tool recovers data from any devices, regardless of the cause of data loss.
Have you recovered your Windows 10 operating system from a restore point? Leave your feedback and ask questions in your comments.
![]() Существует несколько способов, позволяющих восстановить Windows 10 с помощью точек восстановления. Откатить систему можно как, используя непосредственно её интерфейс, так и через «Дополнительные параметры» инструментов «Поиска и устранения неисправностей» при загрузке; в командной строке; или же с помощью загрузочной USB-флешки.
Существует несколько способов, позволяющих восстановить Windows 10 с помощью точек восстановления. Откатить систему можно как, используя непосредственно её интерфейс, так и через «Дополнительные параметры» инструментов «Поиска и устранения неисправностей» при загрузке; в командной строке; или же с помощью загрузочной USB-флешки.

Далее наглядно разберём каждый из этих способов и рассмотрим ситуации, когда целесообразно использовать тот или иной вариант.
Интерфейс Windows 10
Далее возможно два варианта развития событий:
- После перезагрузки вы увидите сообщение, что восстановление выполнено успешно;


или
- Вы увидите окно с сообщением об ошибке (0x80070005): «Восстановление системы не было успешно завершено».


Несмотря, что этот способ восстановления, пожалуй, самый простой, однако тут многие пользователи Windows 10 сталкиваются с ошибкой 0x80070005. Её причина, как правило, в установленном антивирусе (avast, Kaspersky, Dr.web и пр.). Чтобы обойти ошибку 0x80070005 и добиться успешного восстановления системы из точки, можно попробовать временно отключить сам антивирус или его отдельные компоненты, отвечающие за защиту ПК. Если это не помогает, то можно временно удалить антивирус и попытаться восстановить систему снова.
Однако, если вы столкнулись с ошибкой 0x80070005, лучше сразу перейти к восстановлению Windows 10 с помощью следующего способа, описанного далее.
Инструменты «Поиска и устранения неисправностей» при загрузке Windows
Данный способ является оптимальным решением, позволяющим откатить Windows 10 к состоянию создания точки восстановления. Он мало отличается от первого из рассмотренных вариантов восстановления, однако наверняка позволит избежать ошибки (0x80070005).
Далее же все шаги аналогичны тем, что были рассмотрены в первом способе:
Компьютер не запускается – используем загрузочную флешку для доступа к точкам восстановления
Если операционная система не запускается, то даже в этом случае есть возможность получить доступ к точкам восстановления и попытаться с их помощью откатить Windows 10 к работоспособному состоянию. Для этого понадобится загрузочная USB-флешка или диск восстановления.
Примечание: загрузочную флешку Windows 10 можно записать используя, например, программы Rufus или UltraISO, или же с помощью официальной утилиты от Microsoft Media Creation Tool (позволяет скачать оригинальный ISO образ Windows 10 напрямую с сайта Майкрософт).
Чтобы получить доступ к точкам восстановления, при использовании загрузочного носителя, достаточно выбрать «Восстановление системы» в окне мастера установки Windows 10 (см. скриншот).

А далее действуем в той же последовательности, что и в предыдущем способе.
Командная строка
Этот альтернативный способ позволяет получить доступ к точкам восстановления Windows через файл rstrui.exe с помощью командной строки.
О том, как создать, удалить, и где хранятся точки восстановления Windows 10, можно прочитать здесь.
А вдруг и это будет интересно:
- Как скрыть файл или папку с помощью Wise Folder Hider
- Как отключить отсрочку автозапуска приложений в Windows 10
- Microsoft Edge: проблемы с Adobe Flash Player в Windows 10
- Как переименовать папку пользователя в Windows 10
- Обзор лучших бесплатных программ для редактирования фото на компьютере
- Как поменять цвет папок в Windows 11, 10, 8, 7 с помощью Folder Painter
Дата: 2019-08-08 | Размещено в Статьи