WSB позволяет восстанавливать из бэкапа как отдельные файлы, так и выполнять восстановление всей системы. Отдельные файлы можно восстановить из графического интерфейса компонента Windows Server Backup. Полное восстановление системы доступно только из Windows Recovery Environment (WinRE). Доступ к WinRE доступен на установочном образе Windows Server OS. При невозможности штатно стартовать ОС, система сама загрузится в WinRE.
Полное восстановление системы из резервного образа на сетевом хранилище
1. Подключаемся к серверу через IP-KVM (iDRAC, IPMI, iRMC), чтобы получить доступ к консоли сервера.
2. Далее входим в Windows Recovery Environment с помощью установочного образа ОС Windows Server. Подключаем образ диска к серверу и загружаемся с него (в разных версиях IP-KVM могут быть различия в интерфейсе, но механизм везде идентичный).
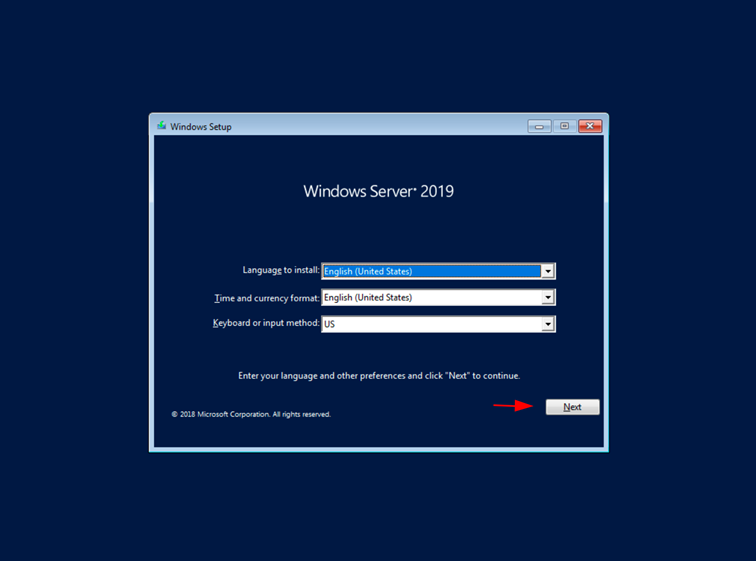
3. После загрузки с диска попадаем в первое окно выбора языка и настройки клавиатуры. Нажимаем Next
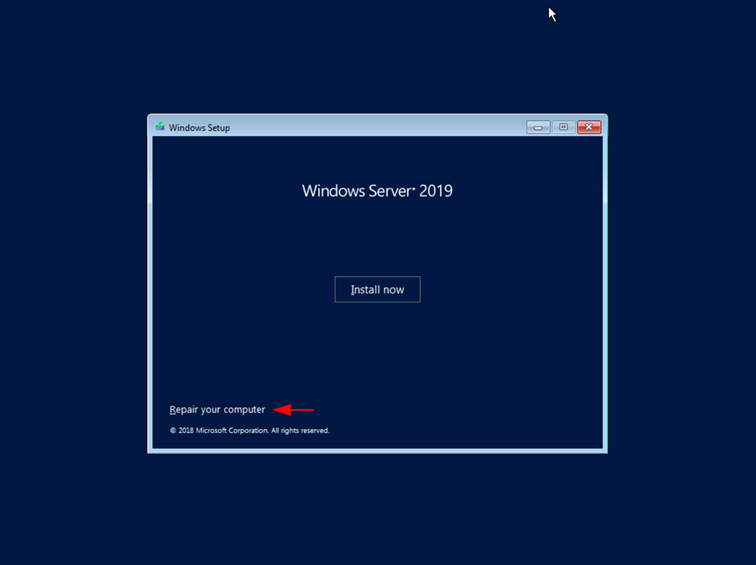
4. На следующем этапе выбираем опцию Repair your computer (Восстановить ваш компьютер)
5. В следующем меню выбираем опцию Troubleshoot

Теперь у нас появилась опция воспользоваться командной строкой, если резервный образ системы хранится на сетевом хранилище. Если бэкап системы находится на диске, тогда перейдите в раздел Полное восстановление образа системы, расположенного на одном из дисков сервера

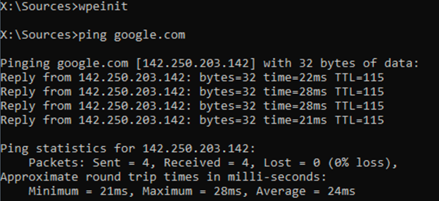
В командной строке придется выполнить несколько команд. Сначала проверим интернет соединение.
Проверка сетевого соединения
Последовательно выполним команды:
wpeinit
ping google.com
Если в ДЦ включен DHCP, то скорее всего соединение доступно и ping пройдет успешно. В таком случае вы можете перейти к пункту подключения сетевого хранилища
Если команда ping показала отсутствие линка, это значит, что вам нужно будет настроить сетевое соединение вручную.
Настройка сетевого подключения
1. Перед настройкой проверяем активный и подключенный интерфейс:
netsh interface show interface
2. Получим список интерфейсов (их может быть несколько). Нам нужно будет зафиксировать имя интерфейса, который Enabled, Connected:

3. Перед выполнением следующей команды узнайте сетевые параметры вашего сервера (эта информация как правило доступна в деталях заказа в персональном кабинете вашего хостинг провайдера). Вам нужен основной ИП адрес, маска и шлюз. Настраиваем интерфейс:
netsh interface ip set address name="Ethernet" static 192.168.0.115 255.255.255.0 192.168.0.1
name=”” — это название интерфейса, которое мы узнали ранее
192.168.0.115 — основной ИП сервера (пример)
255.255.255.0 — маска сети (пример)
192.168.0.1 — шлюз (пример)
4. Далее добавим dns сервер Google командой:
netsh interface ip set dnsserver "Ethernet" static 8.8.8.8
5. Проверяем командой ping google.com наличие подключения к сети (смотри скриншот успешного ping выше).
Подключение сетевого хранилища к серверу
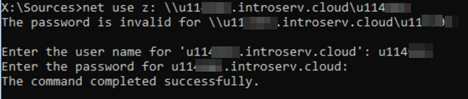
Подключим хранилище командой:
net use z: \\u114***.introserv.cloud\u114***
\\u114***.introserv.cloud\u114*** — адрес сетевого хранилища, замените строку своими данными.
Будет предложено ввести имя и пароль. Вводим ваши актуальные данные. Должны получить сообщение об успехе:
Проверка бэкапов и полное восстановление системы
1. Проверим наличие бэкапов в хранилище:
wbadmin get versions -backupTarget:\\u114***.introserv.cloud\u114***
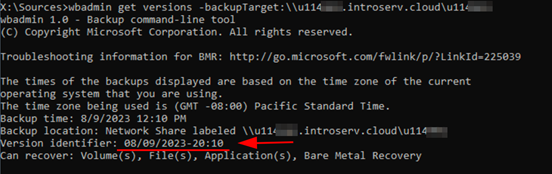
Нас интересуют строки Version identifier. В примере видим, что у нас есть полный бэкап системы от 08.09.2023 20:10
Фиксируем эту информацию в том формате, в котором получили.
Нам доступно 2 варианта восстановления
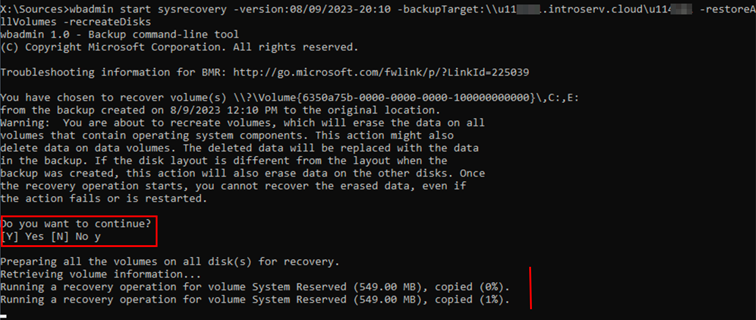
— Восстановление всей системы со всеми разделами на дисках:
wbadmin start sysrecovery -version:08/09/2023-20:10 -backupTarget:\\u114***.introserv.cloud\u114*** -restoreAllVolumes -recreateDisks
-backupTarget: указывает на ваше сетевое хранилище
-version: указывает на выбранный вами бэкап
Опция -restoreAllVolumes указывает, что мы хотим восстановить все разделы
Опция -recreateDisks указывает, что средство восстановления должно пересоздать разделы (Внимание — эта опция сотрет все данные на дисках и запишет на воссозданные разделы данные из бэкапа)
— Восстановление только системного раздела, на котором установлена ОС
Выполняется командой:
wbadmin start sysrecovery -version:08/09/2023-20:10 -backupTarget:\\u114***.introserv.cloud\u114***
Полное восстановление образа системы, расположенного на одном из дисков сервера
1. В пункте меню WinRE в пункте Troubleshoot выбираем пункт System Image Recovery
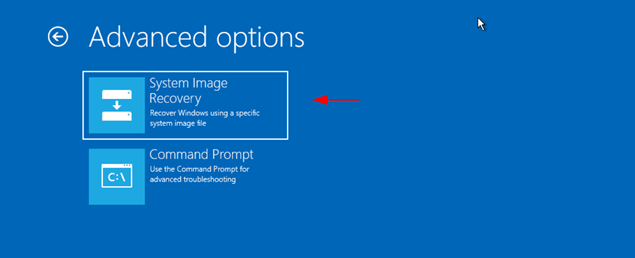
Система постарается просканировать диски сервера на предмет наличия полных бэкапов ОС. Будет предложен последний по времени доступный образ восстановления. Но можно выбрать из списка, если их несколько (Select a system image):
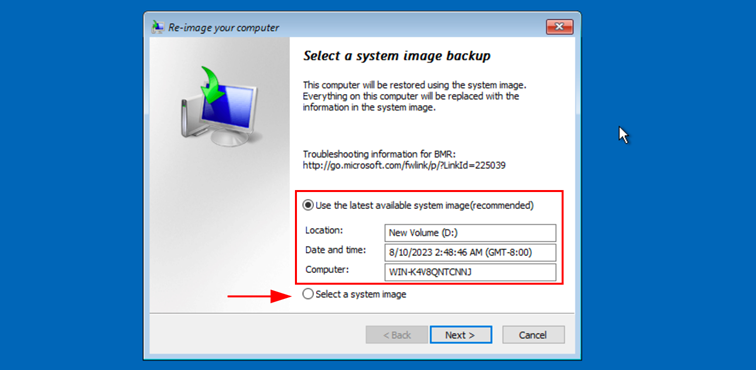
2. Нажимаем Next и попадаем в меню дополнительных опций:
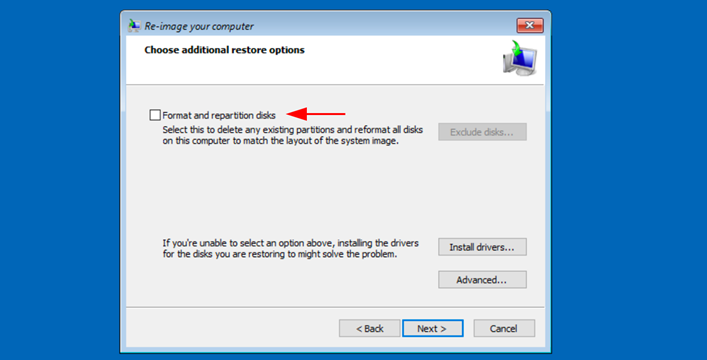
Важно! Если выбрать опцию Format and repartition disks, то утилита переформатирует диски и разделы на сервере, чтобы повторить разделы из бэкапа. Если эту опцию не включать, то утилита восстановления сотрет и заменит данные только в системном разделе, где установлена ОС. Кнопка Exclude disks… при включенной опции Format and repartition disks позволит исключить диски из процесса реформатирования.
3. Затронутые при восстановлении диски и разделы будут указаны в следующем окне:

4. Нажимаем кнопку Finish и дожидаемся завершения восстановления.
Восстановление отдельных папок, разделов или состояния системы
Такая возможность доступна из графического интерфейса компонента Windows Server Backup
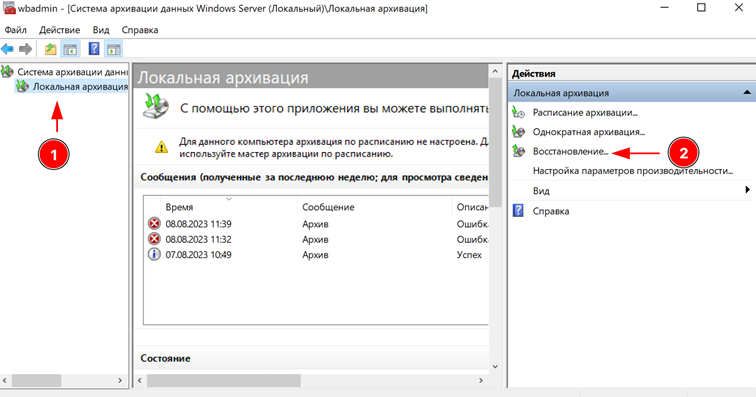
1. Запускаем компонент архивирования: Пуск — Диспетчер серверов — Средства — Система архивации данных Windows Server и выбираем пункт Восстановление…
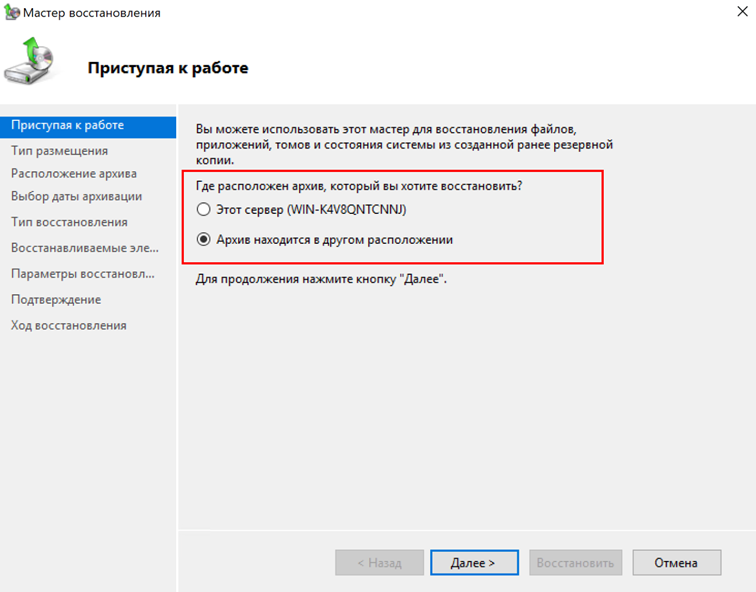
2. Выбираем, где находится бэкап — локально на сервере или в другом расположении, например на сетевом хранилище. В примере рассмотрим вариант с бэкапом на сетевом диске (Удаленная общая папка), выбираем второй пункт:
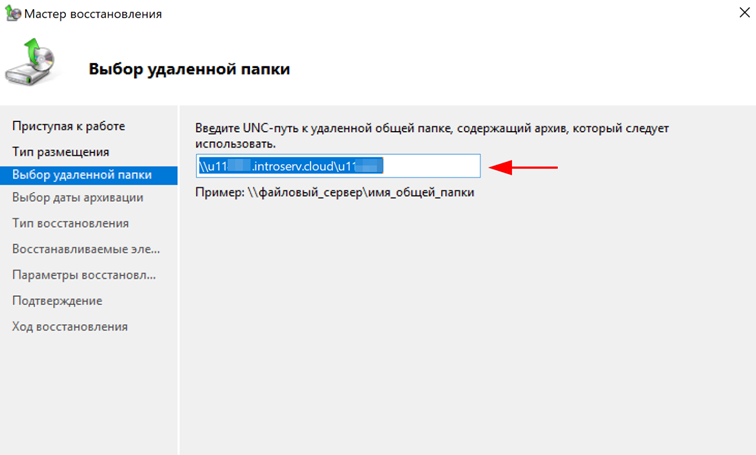
3. Вводим адрес сетевого хранилища:
4. Выбираем дату и время необходимого бэкапа:

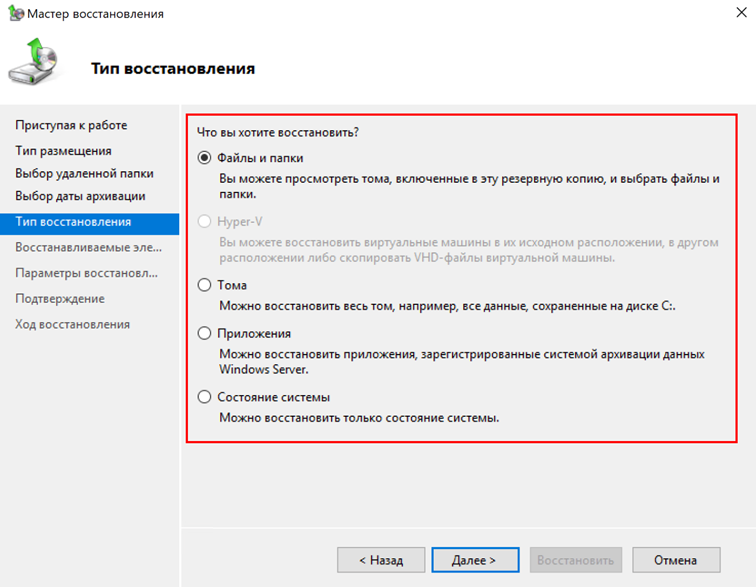
5. Далее выбираем Тип восстановления (На скриншоте есть описание каждого варианта). В примере восстановим Файлы и папки:
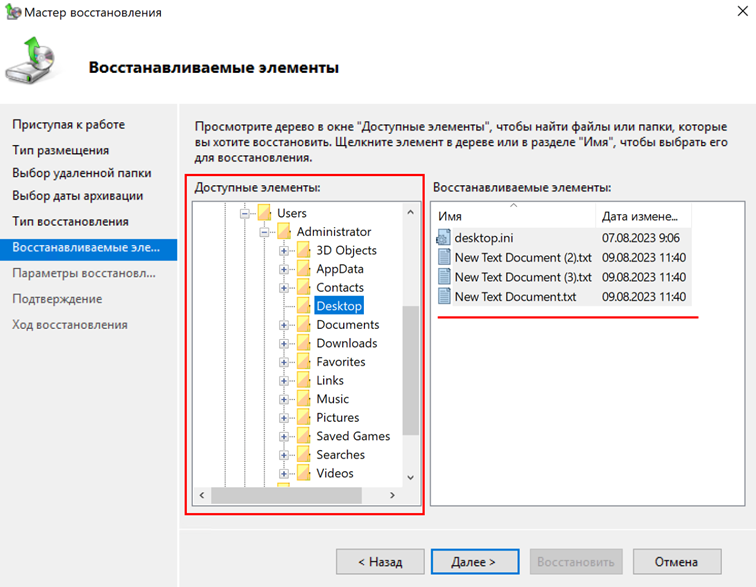
6. Выберем восстановление файлов рабочего стола:
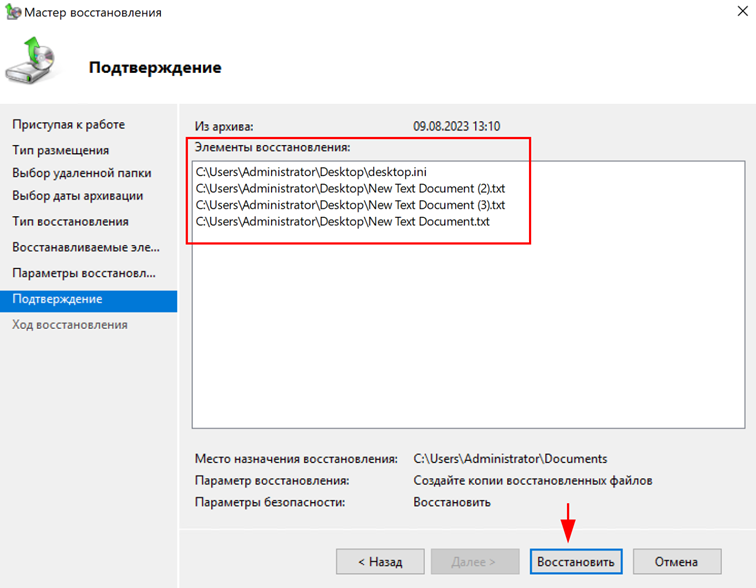
7. Настраиваем опции восстановления:

8. Проверяем и нажимаем Восстановить
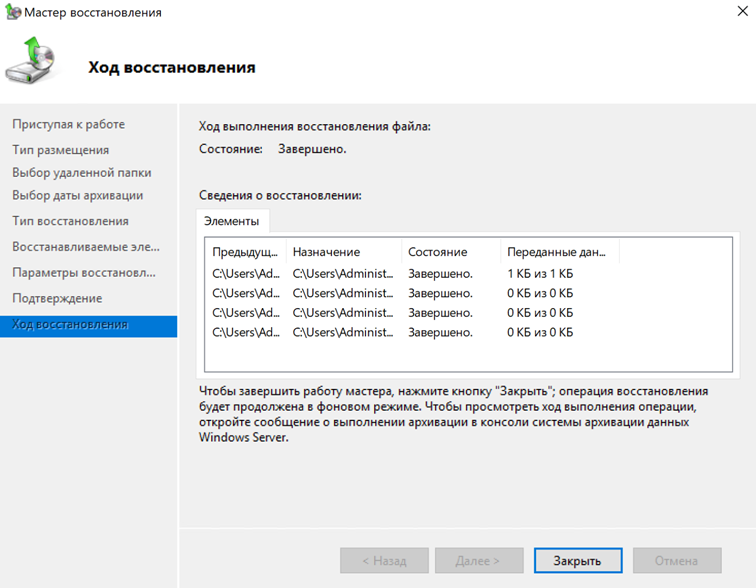
Дожидаемся завершения и выходим из утилиты. Аналогичным образом работают и остальные Типы восстановления
Потеря важных данных или выход из строя операционной системы может произойти по разным причинам. Например, после обновления системы, вирусной атаки, неосторожного удаления, сбоя в работе Windows, ошибок, очистки корзины, форматирования диска и т.д. Если вы столкнулись с одной из этих или других схожих проблем, то не волнуйтесь. Ваша информация не утрачена полностью. Ее можно вернуть, используя несколько простых способов.

Содержание
- Как установить и настроить службу «Система архивации данных Windows Server»?
- Как создать резервную копию Windows Server?
- Настройка расписания архивации Windows Server
- Как восстановить Windows Server из резервной копии?
- Восстановление неработоспособной системы
- Восстановление утерянной информации с помощью сторонней программы
- Вопросы и ответы
- Комментарии
При любом удалении в ОС Windows Server файлы не исчезает мгновенно с жесткого диска. Часто они остаются доступными для восстановления. Например, из служебной папки Корзина, если настроен обычный стандартный способ удаления. Даже в случае безвозвратного удаления, данные все еще можно вернуть. В операционной системе Windows файлы никогда не исчезают бесследно. Дисковое пространство на жестком диске (или другом носителе информации), занимаемое удаленными файлами, не очищается мгновенно. Оно только помечается как свободное и пригодное для последующей записи новых файлов. Поэтому пока не произойдет перезапись пространства на диске под удаленными данными, они могут быть безопасно возвращены.
Вы можете восстановить информацию, вернуть работоспособность или прежний вид системы из подготовленной резервной копии. Если готовой резервной копии нет, то воспользоваться специальной программой для восстановления.
Перейти к просмотру

Как восстановить данные Windows Server, настроить архивацию данных и создать резервную копию 💽🖥️🗄️
Как установить и настроить службу “Система архивации данных Windows Server”?
Резервное копирование Windows Server – важная часть повседневного управления сервером. Резервные копии позволяют восстанавливаться после аварийных ситуаций, когда данные теряются.
Функция архивации данных по умолчанию не установлена в серверной версии ОС Windows. Поэтому для ее установки вам потребуется выполнить простой упорядоченный набор не сложных действий, представленных нами далее.
Откройте главное пользовательское меню «Пуск». Отыщите в упорядоченном перечне программ или в закрепленном наборе плиток служебное приложение «Диспетчер серверов», а потом щелкните его для открытия.

В диспетчере запустите «Мастер добавления ролей и компонентов».

Перед началом работы определите параметры установки, а также убедитесь, что выполнены все основные задачи. А именно, учетная запись администратора защищена надежным паролем, настроены сетевые параметры, установлены новейшие обновления безопасности. Потом нажмите кнопку «Далее».

На следующей странице тип установки не меняем. Оставьте вариант параметра, который задан по умолчанию.

На вкладке “Выбор целевого сервера” также оставьте установленные параметры без изменений.

Переходим на вкладку “Компоненты”. В списке найдите компонент «Система архивации данных Windows Server», отметьте его, установив в связанной ячейке “галочку”, а затем нажмите кнопку «Далее».

Просмотрите заданные параметры установки. Если требуется исключить отдельные компоненты, то нажмите кнопку “Назад”, чтобы внести дополнительные изменения. Потом нажмите кнопку «Установить».

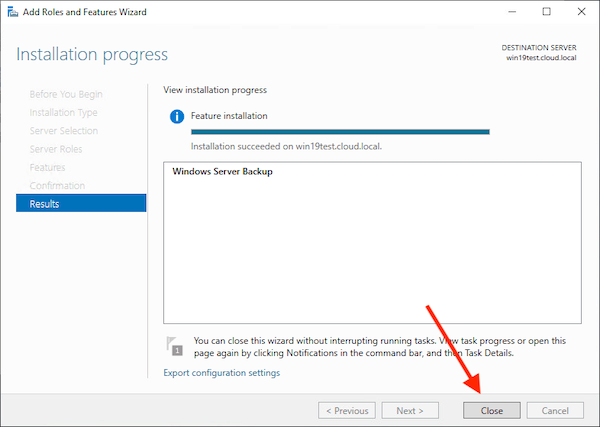
Вы можете наблюдать за ходом установки в выделенном графическом поле. Нажмите на кнопку «Закрыть», как задача будет выполнена.

Установка «Системы архивации данных Windows Server» прошла успешно. Теперь вам доступна функция резервного копирования.
Как создать резервную копию Windows Server?
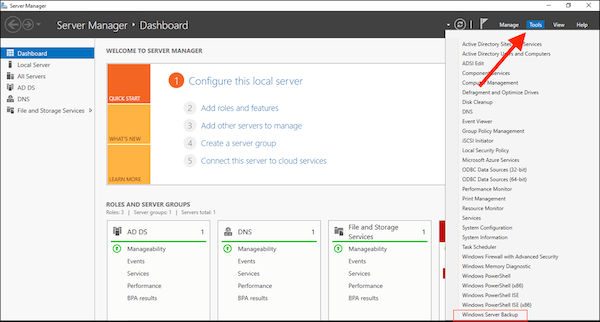
Чтобы создать резервную копию или настроить службу архивации данных по расписанию выполните простой последовательный порядок действий. Откройте служебное приложение «Диспетчер серверов» – «Средства» – «Система архивации данных Windows Server».

Для быстрого запуска введите в поисковой строке приложения «Поиск» фразу «wbadmin.msc» для мгновенного запуска искомой консоли.

В окне консоли доступны следующие функции:
«Настроить расписание архивации», «Однократная архивация», «Восстановление», и «Настройка параметров производительности архивации».

Настройка расписания архивации Windows Server
Для настройки автоматического резервного копирования по расписанию откройте в правой боковой панели «Действия» раздел «Расписание архивации».

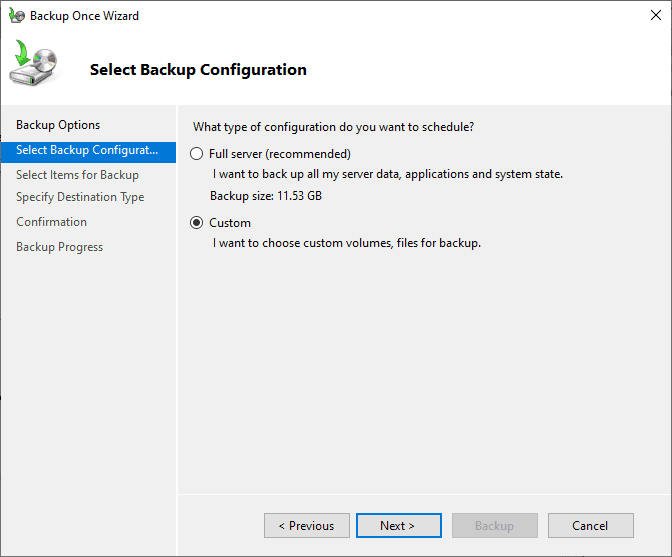
При выборе типа конфигурации укажите рекомендованный способ архивации – «Весь сервер» (резервное копирование всех данных, приложений и общего состояния системы). Или отметьте вариант «Настраиваемый», если нужно выбрать конкретный том или файлы для резервного копирования.

Укажите время архивации и как часто вы хотите ее выполнять. Потом нажмите кнопку «Далее».

Задайте способ хранения архивов, выбрав один из трех вариантов. Можно указать сетевой путь.

При выборе параметра «Архивация в общую сетевую папку» служба выдаст предупреждение. Оно гласит: «При указании удаленной общей папки в качестве назначения для архивации по расписанию будет доступен только последний архив». Следует запомнить, что одновременно может храниться только один архив, поскольку каждый новый будет перезаписывать предыдущий.

На вкладке «Выбор удаленной папки» в поле «Расположение» укажите сетевой путь, потом нажмите кнопку «Далее».

Во всплывающем отдельном окне безопасности введите данные учетной записи для проведения запланированной архивации.

Мастер потребует подтверждения операции. Проверьте параметры заданного расписания и нажмите на кнопку «Готово».

Если вы решили создать только одну копию, то на главной странице консоли в правой боковой панели «Действия» выберите раздел «Однократную архивацию».

Выберите параметр «Настраиваемый тип конфигурации», если планируется выбрать конкретную папку или отдельные файлы.

Теперь добавьте объекты архивации.

Укажите место хранения резервной копии, тип хранилища, место назначения.

Убедитесь в корректности указанных сведений, а потом нажмите кнопку «Архивировать».

Как восстановить Windows Server из резервной копии?
Итак, резервная копия создана. Теперь давайте рассмотрим ситуацию, при которой вам нужно будет выполнить процедуру восстановления Windows Server.
Бывают разные случаи выхода из строя операционной системы. Но если у вас есть готовый бэкап, то вы потратите гораздо меньше времени для восстановления ОС, чем при полной ее переустановке, отладке и дополнительной настройке.
Чтобы восстановить прежнее состояние Windows Server, выполните следующую последовательность шагов. Откройте служебное приложение «Диспетчер серверов».

В меню вкладки «Средвства» выберите раздел «Система архивации данных Windows Server».

На главной странице консоли в правой боковой панели «Действия» выберите раздел «Восстановление»

На странице «Приступая к работе» выберите расположение архива из двух вариантов: «Этот сервер» или «Архив находится в другом расположении».

Укажите сетевую папку или локальный диск, на котором хранится архив.

В выделенном поле выберите, данные какого сервера требуется восстановить, а затем нажмите на кнопку «Далее».

Выберите доступный архив для восстановления.

На следующей вкладке отметьте, что нужно восстановить.

Укажите папку для восстановления, выбрав в окне будущее месторасположение возвращенных элементов, а затем нажмите на кнопку «Далее».

Проверьте выбранные параметры, а потом нажмите на кнопку «Восстановить», чтобы запустить процесс.

Будет подсчитано, сколько файлов подлежит восстановлению, а затем операция будет начата.
Когда процедура будет выполнена, нажмите кнопку «Закрыть».

Восстановление неработоспособной системы
Если у вас есть диск восстановления, то можно восстановиться при помощи него.
Весь процесс состоит из нескольких простых шагов. Подключите установочный USB-накопитель или диск к компьютеру и загрузитесь с него.

В окне установки Windows кликните по ссылке «Восстановление системы».

Потом на странице «Выбор действия» выберите пункт «Поиск и устранение неисправностей».

Затем на странице «Дополнительные параметры» отметьте раздел «Восстановление образа системы».

Выберите целевую операционную систему.

После чего откроется окно «Восстановление компьютера из образа». Укажите в выделенных полях последний доступный образ, а потом нажмите на кнопку «Далее».

Отметку («галочку») напротив пункта «Форматировать и разбить на разделы» можно оставить. Указанный параметр удалит все существующие разделы и произведет повторное форматирование дисков в соответствии со структурой образа.

Нажмите на кнопку «Готово», чтобы начать процесс восстановления из указанного образа.

Во всплывающем системном сообщении подтвердите запуск операции восстановления компьютера из образа, а затем дождитесь завершения процесса.

После перезагрузки сервер будет восстановлен до состояния из последней резервной копии.
Восстановление утерянной информации с помощью сторонней программы
Если информация была утеряна после сбоя или краха операционной системы Windows Server, а резервной копии данных создано не было, то воспользуйтесь сторонней утилитой для восстановления данных.
Из различных вариантов программных инструментов, способных вернуть утраченные файлы, мы рекомендуем использовать наш флагманский продукт Hetman Partition Recovery. Итоговый процент успешно восстановленных файлов Hetman Partition Recovery превышает аналогичные показатели программ конкурентов, когда дело доходит до восстановления файлов после переустановки операционной системы.
Инструмент восстанавливает файлы с любых устройств, независимо от причины потери данных.
Принцип работы программы прост. Утилита сканирует выбранный жесткий диск или внешнее запоминающее устройство. После обнаружения утерянных данных пользователи могут просмотреть каждый файл, выбрать нужные из представленного массива или отметить все, а потом восстановить.
Чтобы восстановить данные исполните следующий пошаговый порядок действий.
Шаг 1. Подключите ваш диск к другому компьютеру с операционной системой Windows, скачайте с официального веб-сайта, а потом установите программу Hetman Partition Recovery.

Обратите внимание, что вам следует перестать использовать свой компьютер. Не сохраняйте любые данные на жесткий диск, на котором находилась важная утраченная информация. Также не рекомендуется переустанавливать операционную систему, иначе данные будут перезаписаны и вы не сможете их вернуть.
Шаг 2. В менеджере дисков отметьте ваше устройство, кликните по нему правой кнопкой мыши, а затем во всплывающем контекстном меню выберите раздел «Открыть».

Сперва попробуйте выполнить «Быстрое сканирование». Это займет меньше времени.

Если в результате быстрого сканирования программа не нашла искомые удаленные файлы, то выполните «Полное сканирование».

Шаг 3. Мастер восстановления данных немедленно просканирует выбранный том диска и отобразит итоговые результаты в правой части окна.

Шаг 4. По завершению сканирования вам нужно лишь отметить удаленные файлы, которые нужно восстановить, а потом нажать кнопку «Восстановить» на ленте графического меню управления программы.

Укажите место, куда следует сохранить возвращенные файлы, затем нажмите «Сохранить».

При желании пользователи могут создать образ диска, чтобы проводить восстановление данных непосредственно с образа. Такой способ повышает шансы вернуть утерянную информацию, так как защищает ее от перезаписи.

Примечание. Множественные сканирования диска могут привести к частичному затиранию данных.

Разные факторы могут повлиять на работу вашего сервера. В результате такого влияния может быть утеряна важная информация, повреждены настройки операционной системы и т.д. Чтобы себя обезопасить следует регулярно создавать резервные копии документов. Windows Server обладает встроенными элементами защиты и позволяет выполнять единовременную или периодическую архивацию пользовательских данных. На примере нашей статьи мы показали, как восстановить работоспособность операционной системы и вернуть утерянную информацию вне зависимости, есть готовая резервная копия или нет.
Windows Server backup is critical to an organization’s disaster recovery plan. Many third-party solutions can provide Windows Server backup software for server backup and backing up Windows Server virtual machines. However, why install Windows Server backup software when you have Windows Server backup features built into the operating system? Let’s look at Windows Server 2022 backup and restore using the built-in Windows Server Backup feature found in Windows.
What is Windows Server Backup software?
The Windows Server Backup software is a Windows Server feature that can be enabled in Windows Server 2022. In looking at the best server backup software, businesses may have the use case to find a solution that is cheap, reliable, and does the job to protect business-critical data from data loss.
With Windows Server Backup, you can create server backup files of your Windows Server. You can also create file and image backups to perform bare metal recovery and other recovery tasks. You can also schedule backups to perform regular backups of your Windows Server operating system.
Windows Server Backup features
Windows Server Backup provides the tools needed for full backup files, creating an entire system backup job, incremental backups, system restore, system state recovery, local backup, backing up individual folders, individual files, full system recovery, and many other backup options.

You can easily use Windows Server Backup to perform daily backups of your Windows Servers either from the Windows Server Backup software GUI or the command line, making it easy to script and perform operations at scale. It is also an intuitive tool that most admins will find easy to use.
It is also
Physical servers or virtual machines
You can use Windows Server Backup to either perform physical server backup or virtual machine backups. On Hyper-V hosts, you can backup VMs using Windows Server Backup with a few limitations. This is not as granular an image backup as you find in third-party software solutions.
However, Windows Server Backup, while it may not be found on the best backup software lists published with all the features of third-party tools, it definitely covers the basics for the Windows Server operating system. It is also used underneath the hood with Windows Server Essentials to perform the server backup tasks.
Windows Server Backup targets
With Windows Server Backup you can target local storage such as a hard disk or remote shared folder storage space to store backups of your Windows Server OS, including Windows Server 2022. While there may be some “hacky” ways to do this, a USB drive is not supported as a backup target for Windows Server Backup. You can also use external drive locations that are mounted as local storage.
Some organizations even create dedicated Windows Server Backup box configurations that house the backups for their Windows Server backups in the environment. Each organization will need to look at how they want to manage backups of their Windows Servers and see what options work best for protecting critical Windows system files, etc.
Installing Windows Server Backup software
The steps to install Windows Server Backup in Windows Server 2022 to restore server data is straightforward. The great news is the handy utility is still available in Windows Server 2022. Using Server Manager, you can easily install Windows Server Backup as part of the Add Roles and Features Wizard in Server Manager.
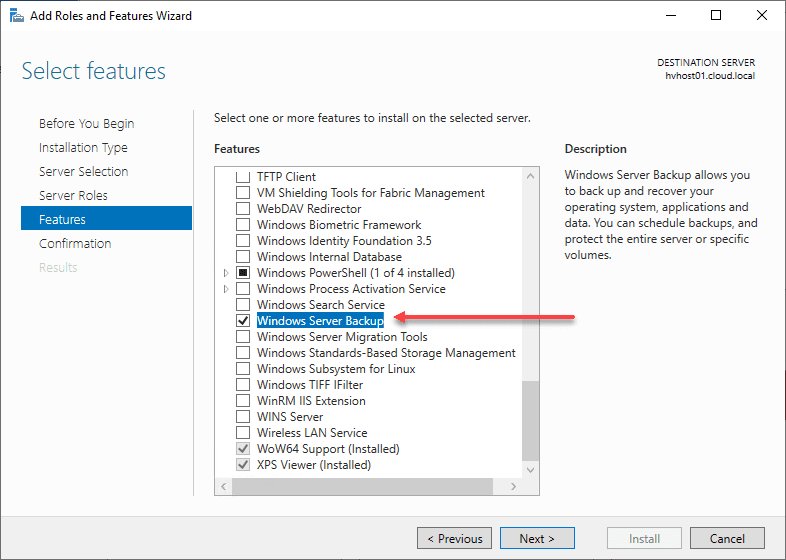
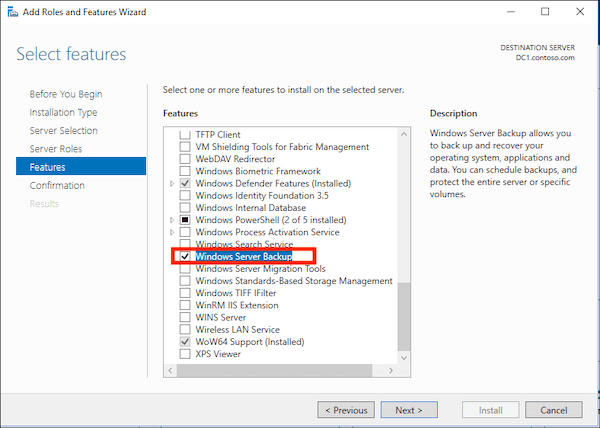
On the Features screen, you will see the Windows Server Backup feature listed.
Add the Windows Server Backup Feature
Launch the Server Manager console and the Add Roles and Features Wizard. On the Features screen, place a checkbox next to Windows Server Backup.
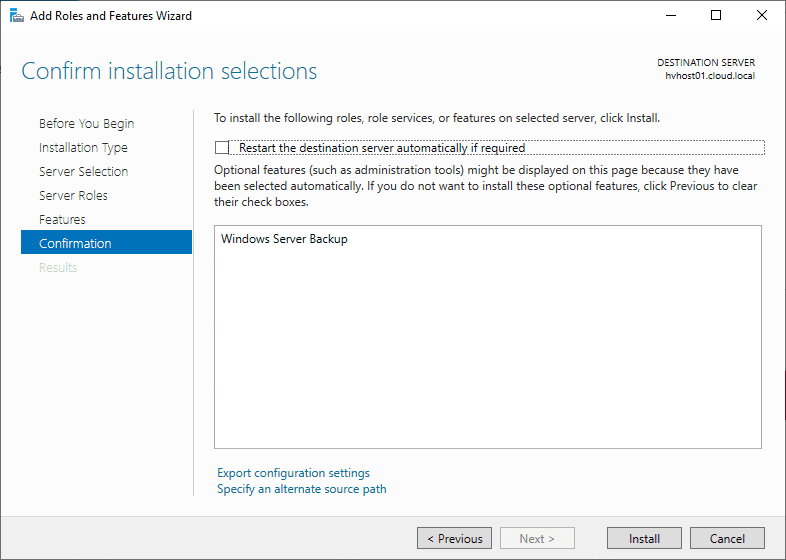
Confirm the installation of Windows SErver BAckup in Windows SErver 2022
Simply Click Next and confirm the installation of Windows Server Backup by clicking Install.
Complete the installation of Windows Server Backup in the Server Manager Add Roles and Features wizard.

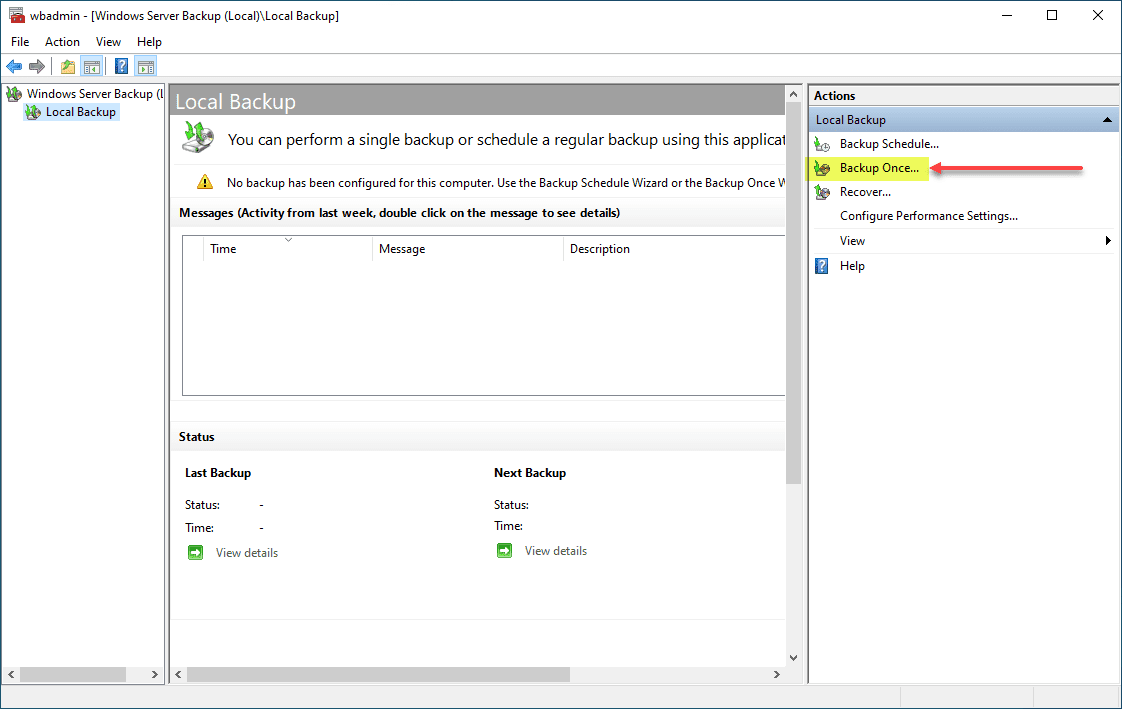
Let’s first go through the Windows Server 2022 Backup using Windows Server Backup. In the Windows Server Backup GUI, we click the Backup Oncebutton.
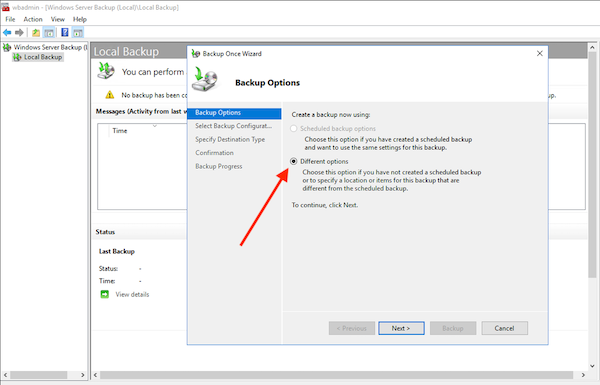
On the Backup Options screen, we configure the options for the backup. Here the different options is selected by default.
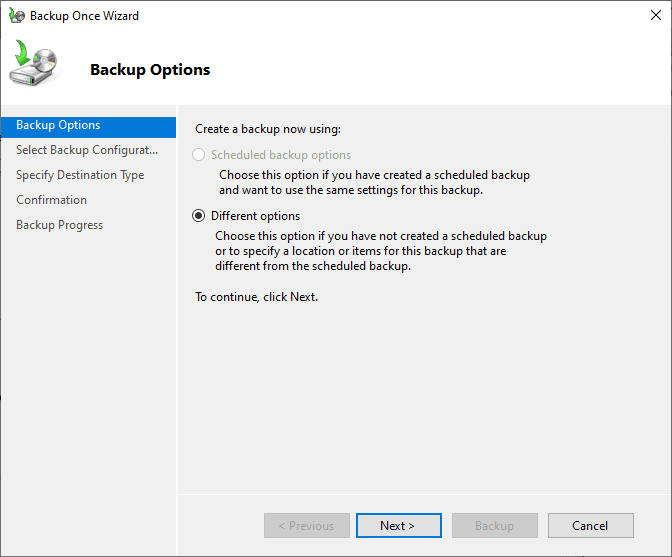
Select full server backup or custom backup options.
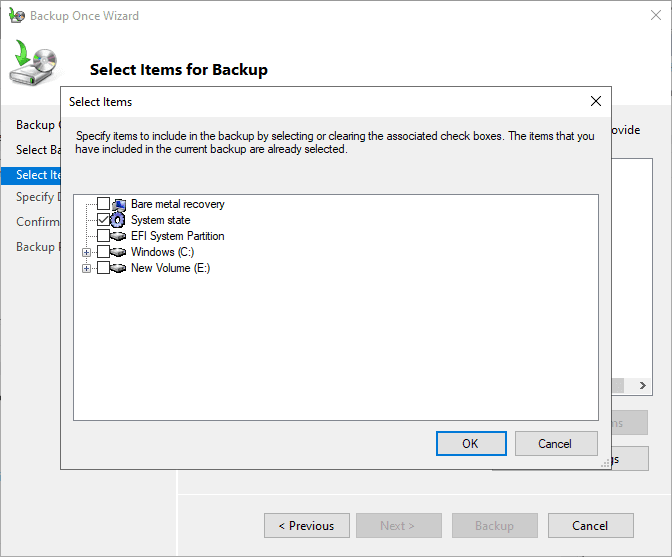
Click the add items option to add items you want to back up with Windows Server Backup.

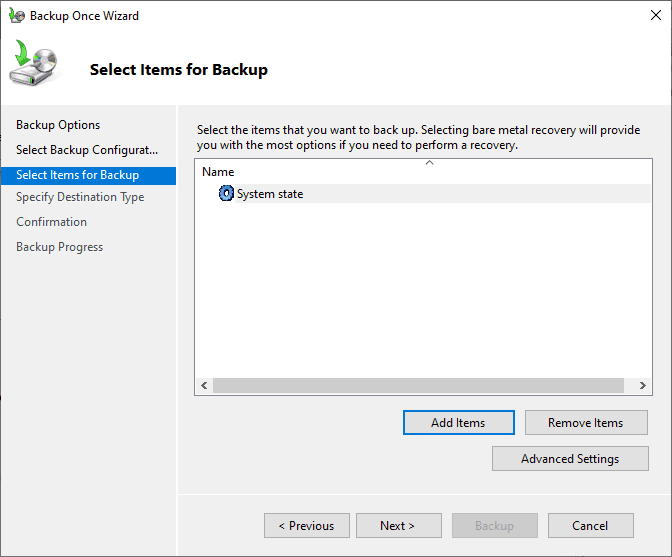
Here we are selecting system state backup job for the items we want to back up. In case you may be wondering what a system state backup contains. It contains the following:
System state Backup contents
Boot files such as ntldr, ntdetect, all files protected by SFP, and performance counter configuration
The Active Directory Domain Controller
SysVol (domain controller only)
Certificate Server (CA only)
Cluster database (cluster node only)
Registry
COM+ class registration database
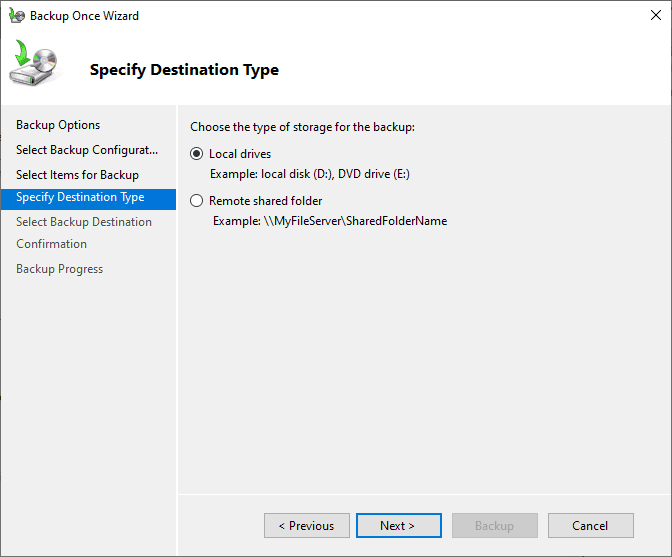
Select the destination type of the Windows Server Backup. These include Local drive backup and Remote shared folder backup.
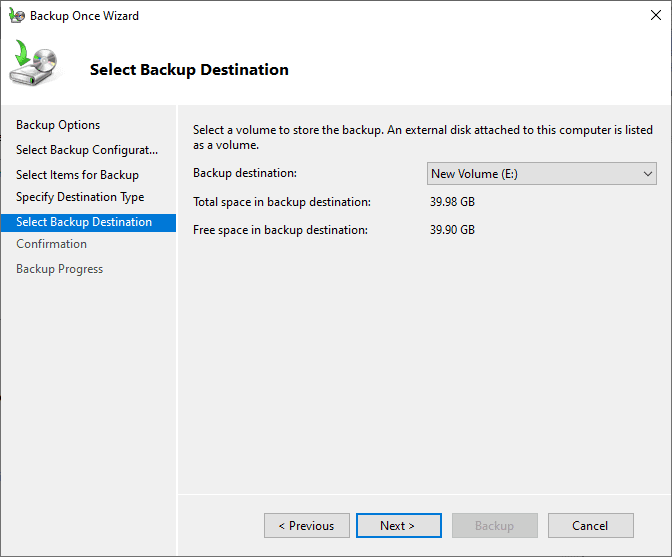
Next, we select the local volume we want to use to store the local backup.
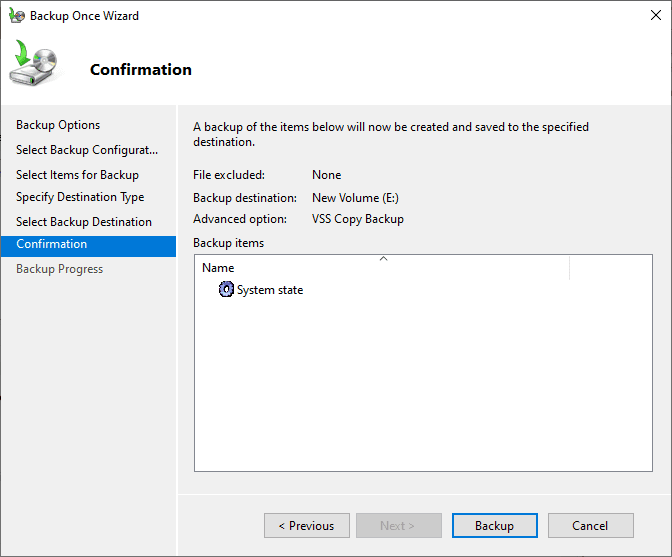
Finally, we are ready to confirm the Windows Server Backup configuration and backup software options and begin the backup. Click Backup to start the backup process.
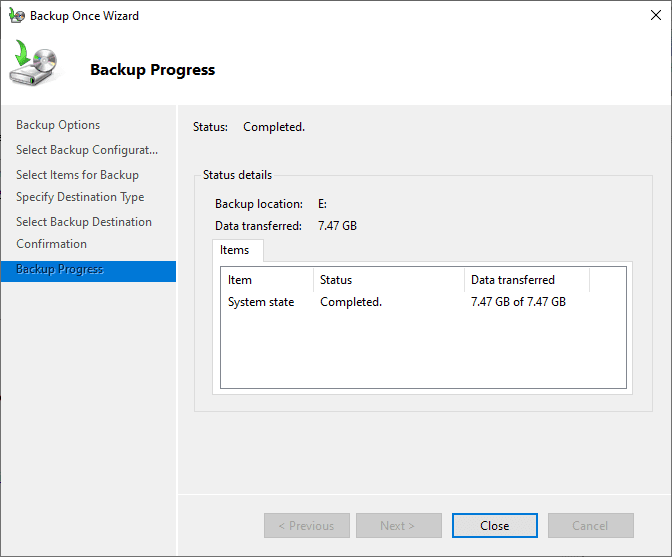
After a while, depending on how much data you have contained in the backup, the backup should complete successfully not long after you initiate the start backup process.
Windows Server 2022 Restore Data using Windows Server Backup
Now let’s look at the recovery options when using Windows Server Backup to recover data when data loss has occurred.
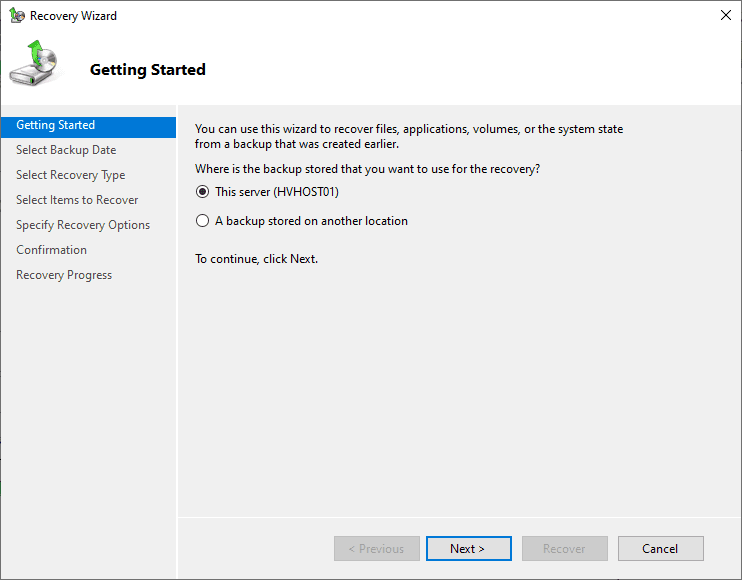
Launch Windows Server Backup and click the Recover button to start looking at your recovery options along with recovery destination. First, it asks where the backup is stored.
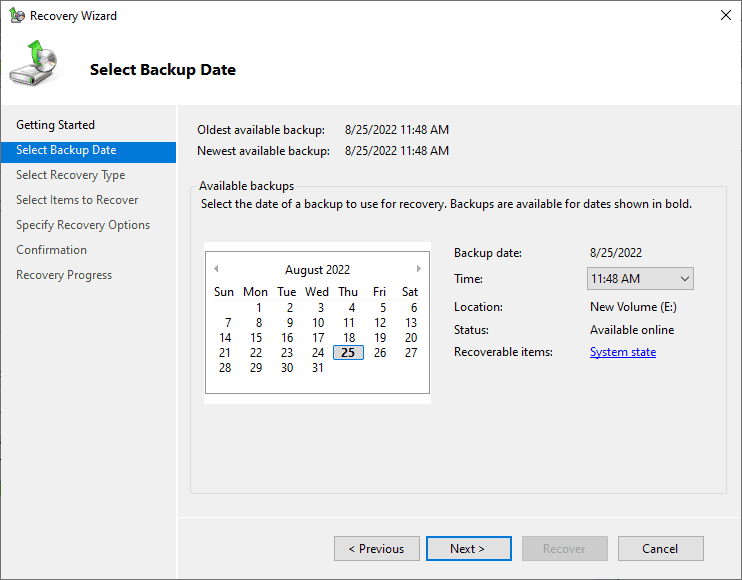
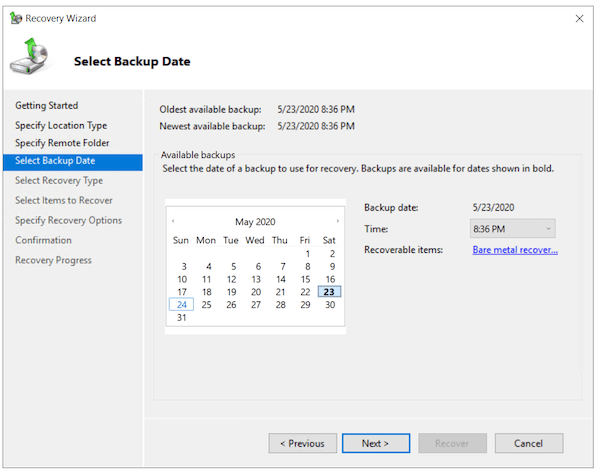
Select the backup date
Select the backup date you want to use for the recovery options.
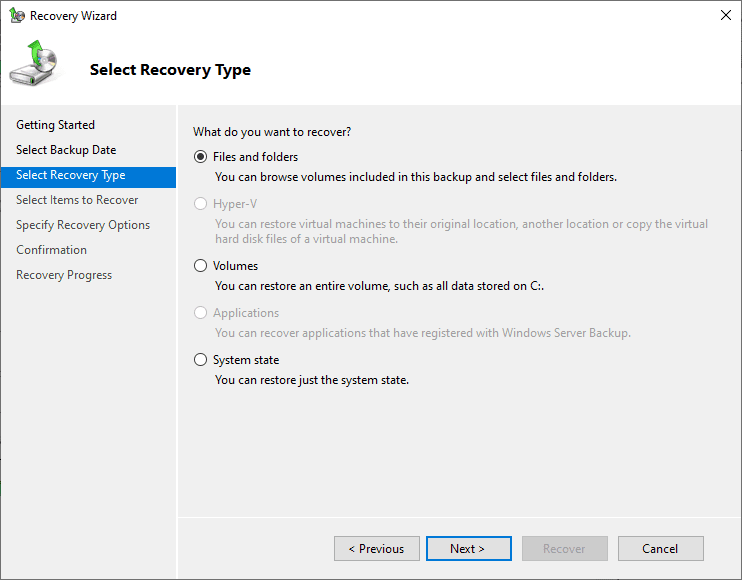
Select the Recovery Type
Next, select the recovery type. You can choose files and folders (recover specific files), volumes, and system state.
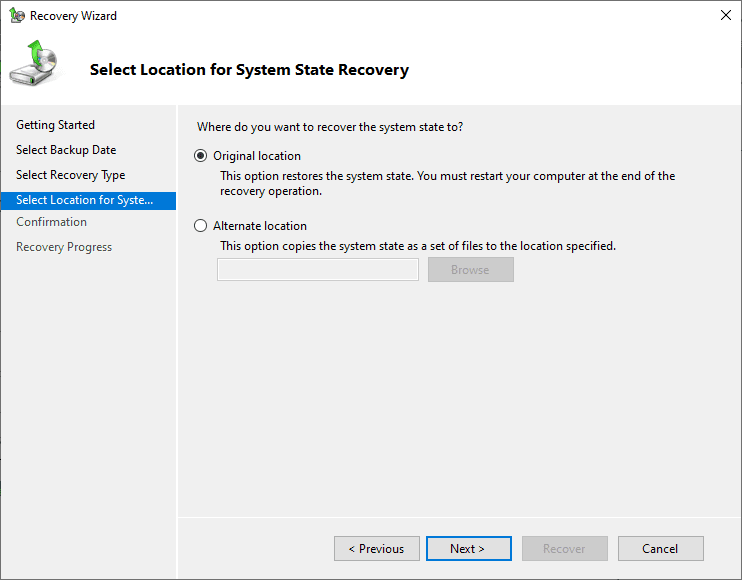
Select the location for the recovery destination
Next, select the original or alternate location for the restore.
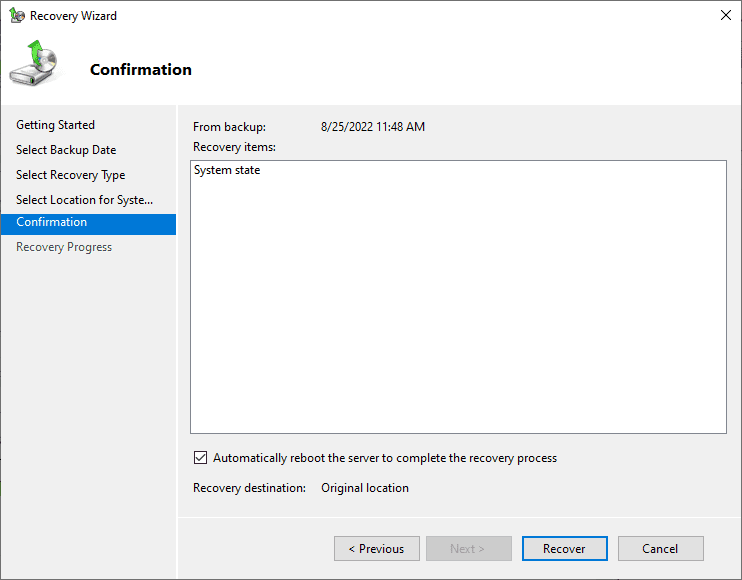
Confirm the recovery operation
Confirm the recovery operation and click Recover.
Wrapping Up
The process involved with Windows Server 2022 Backup and Restore are not too complicated using the Windows Server Backup tool. You can easily back up and recover Windows Server 2022 with the built-in tool and minimize storage costs and other requirements. You can backup and recover just specific files to a network share or local backup in just a few clicks.
Learn more about Windows Server Backup in general here: Windows Server Backup Feature Overview | Microsoft Docs
Backup and restore are the processes of creating and retrieving copies of data. This can be done to external or internal storage and is useful in the event of data loss or corruption. In this article, we will build on our previous article on Windows Server Backup installation and configuration by discussing how to restore a backup in Windows Server 2022.
For the purposes of this article, we will assume that you have a server running Windows Server 2022 that is also a domain controller. We will also assume that you have already taken a full backup of your server.
To restore the backup, you will need to follow these steps:
- Open Server Manager.
- Click Tools > Windows Server Backup.
- Click Recover.
- Select the backup that you want to restore.
- Choose the location where you want to restore the backup.
- Click Next and follow the instructions.
Once the restore process is complete, your server will be restored to the state it was in at the time of the backup.
Note: It is important to test your backups regularly to ensure they work properly. You can do this by restoring a backup to a test server.
Restore the Active Directory Backup on Windows Server
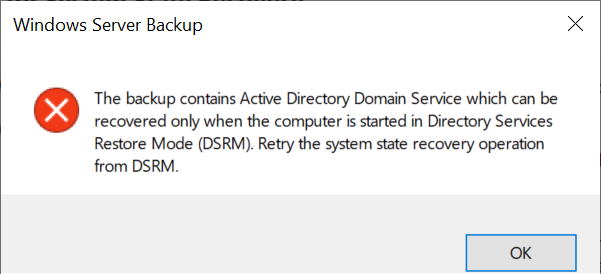
If your backup contains the Active Directory Services, you will get the below notification saying the AD DS only can be recovered when the computer is in DSFM mode.
In this case, you need to enable the Directory Services Restore Mode first. To do that, press Windows + R buttons to open the Run box. Write the MSCONFIG command and enter.
In the System Configuration wizard, click on the Boot option on the top menu.

Click on the Safe boot option, and choose the Active Directory repair. Click on the Apply button and restart your computer.
If a data loss occurs, you can manually recover the data using the backup data. To recover the data with the Windows Server backup, follow the below steps:
- Open the Windows Server Backup from the Start Menu or Server Manager > Tools
- Click on the Local Backup on the left-hand side
- On the right-hand side, click on the Recover option.
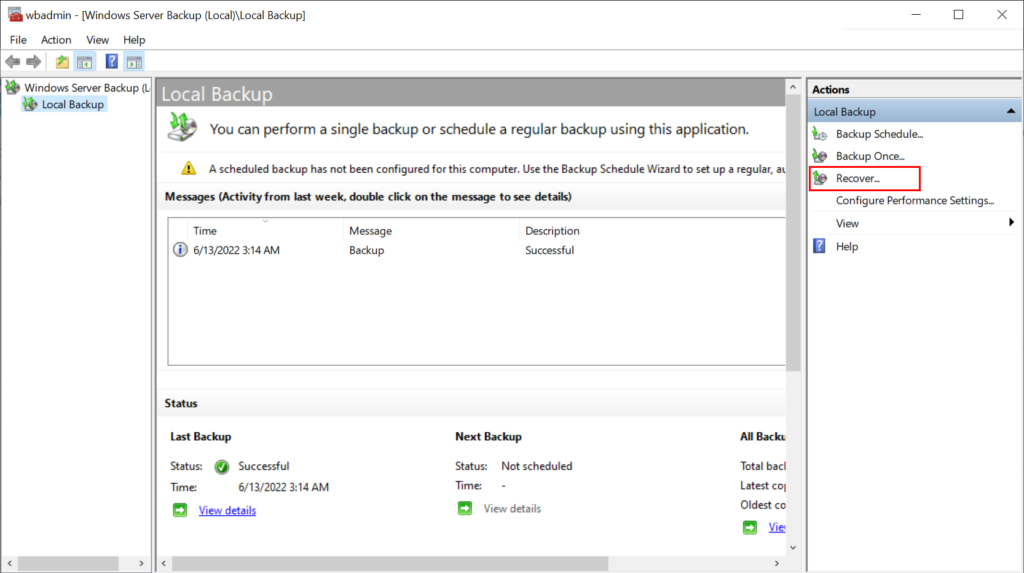
- The Recovery Wizard asks where the backup is stored: this server or another location. Since I have kept the backup on the local drive, I select this server option. To continue, click Next.
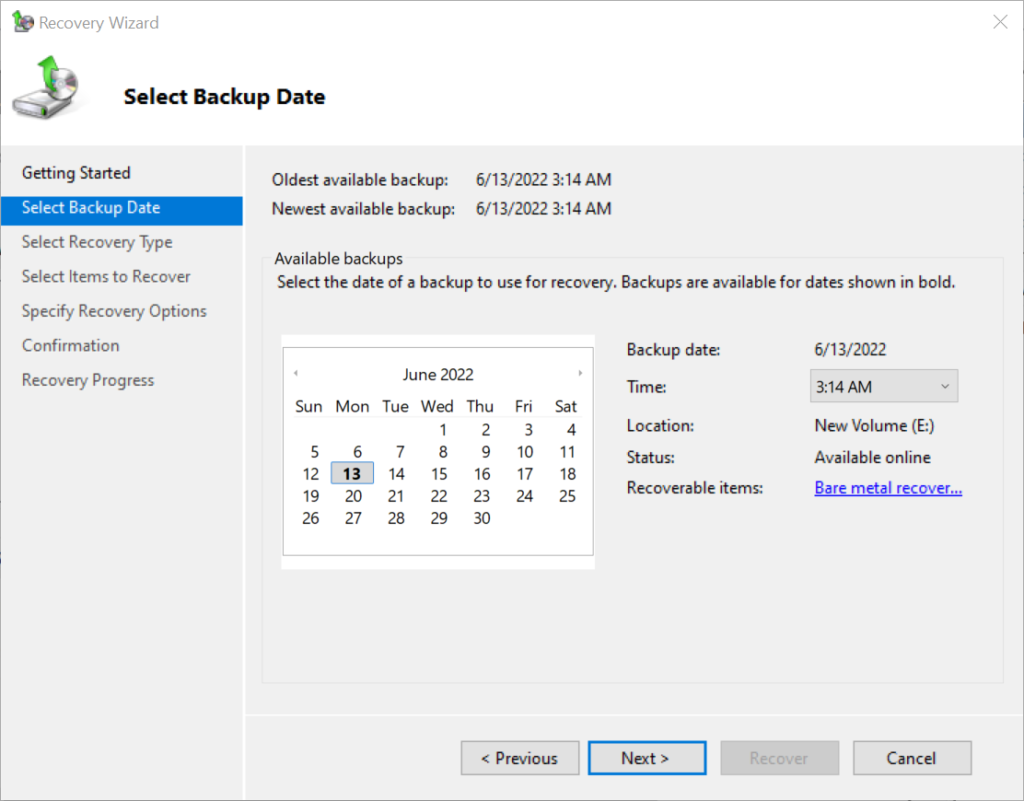
- Select the backup according to the date to use for the recovery. If you have only one copy, that is automatically selected. Click next.
- The new recovery wizard asks what you want to recover. If you select the Folders and files, you must specify the specific files and folders for the recovery. Else, if you choose the Volume, you can restore the entire Volume. Moreover, select the Applications if you want to recover the applications. I prefer the System State to restore system state data.
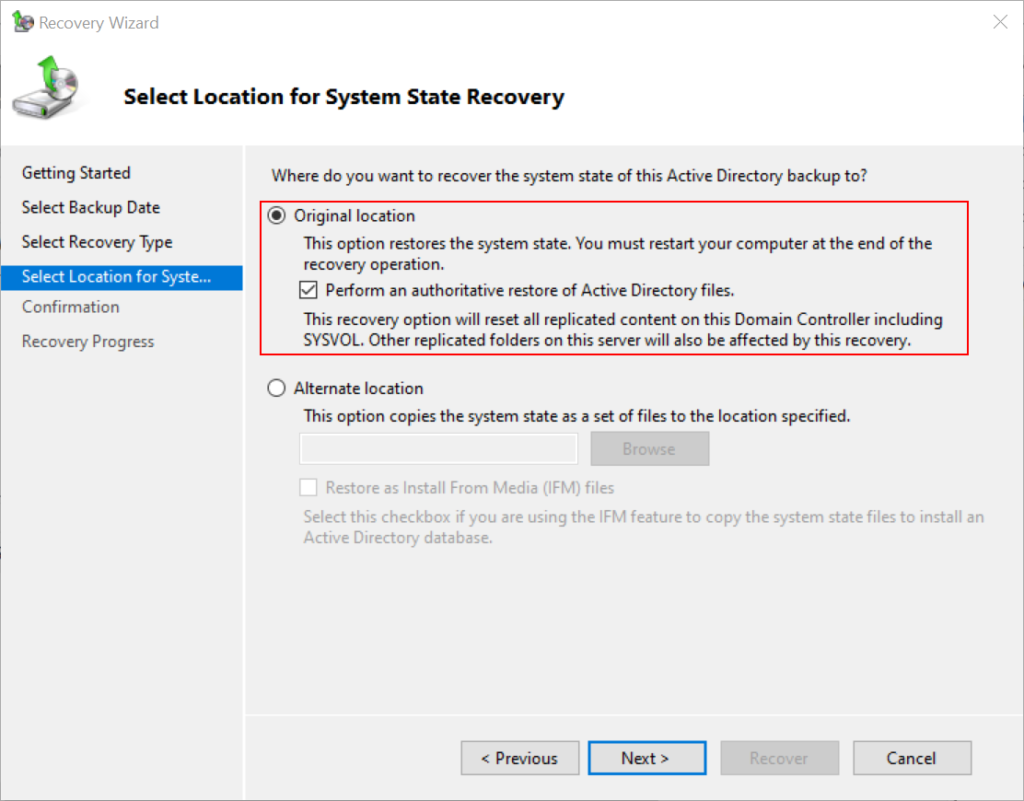
- Select a location for system state recovery. I select the original location and check the authoritative restore of Active Directory files.
- Finally, click on the Recover button to confirm the recovery and start the Recovery process. The process takes a few seconds, and the computer will restart automatically when it is done.
In a nutshell, the steps to back up and restore Windows Server 2022 are as follows:
To back up Windows Server 2022:
- Open Server Manager.
- Click Tools > Windows Server Backup.
- Click Local Backup.
- Click Backup Once in the Action section to open the wizard.
- In the Backup Options dialog, select the files, folders, or volumes that you want to back up.
- In the Backup Destination dialog, select the location where you want to store the backup.
- Click Next and follow the instructions.
To restore Windows Server 2022:
- Open Server Manager.
- Click Tools > Windows Server Backup.
- Click Recover.
- In the Getting Started dialog, select the location where the backup is stored.
- In the Specify Location Type dialog, select the location type.
- In the Specify Remote Folder dialog, type the backup path.
- In the Select Backup Date dialog, select the date of the backup that you want to use for recovery.
- In the Select Recovery Type dialog, select what you want to recover.
- Click Next and follow the instructions.
Here are some additional tips for backing up and restoring Windows Server 2022:
- It is important to test your backups regularly to ensure they work properly. You can do this by restoring a backup to a test server.
- You should back up your data frequently, especially if you have important files or folders.
- You should store your backups in a safe location, such as an external hard drive or a cloud storage service.
Conclusions
To conclude, if you have backed up your files and folders, you can restore them on Windows Server 2022. This article has provided you with the steps on how to do so. I hope this has sharpened your skills, and I welcome your thoughts and questions in the comment section.
Windows Server Backup is a backup tool provided by Microsoft to be installed on servers using Windows Server OS to back up and restore the servers.
In today’s article, we are going in-depth about Windows Server Backup, its features, limitations, how to install Windows Server Backup, and how to back up and restore using Windows Server Backup. Keep reading to find out!
What Is Windows Server Backup (Features and Limitations)
Losing data can come at a high price, which is why creating a backup of your files is essential. It is even more vital to create a backup of your Servers. Servers are essential components for any organization because they collect and serve files or information that users request.
By backing up data, organizations ensure they don’t lose the data in the case of an accident, ransomware, or failure. Windows Server is an operating system built by Microsoft to install on servers. Unlike consumer PCs, servers are powerful machines that run all the time.
Windows Server Backup Features:
- With block-level backups, administrators can back up a full server, specific files, folders, and selected storage volumes as long as the data size is under 2 TB.
- With Windows Server 2008 R2, administrators can create incremental backups faster and smaller in size, restore Windows to dissimilar hardware, and more.
Windows Server Backup Limitations:
- If your server is running a virtualized Windows server, the Windows Server Backup doesn’t recognize and doesn’t back up the configuration and all other hardware settings.
- The backup options are limited, as complete data restoration is only possible with Hyper-V and not with any other hypervisor or VMware.
- Another limitation is that challenges are storing the Windows Server backups on a network location.
How to Install Windows Server Backup
Windows Server Backup is an installable feature for servers using the Windows Server OS.
Here’s how you can install Windows server backup on your server:
Step 1. Access «Server Manager,» and open the «Add Roles and Features Wizard,» then click «Next.»
Step 2. Now in the Installation type section, don’t change the «Role-based» and «Feature-based» installations, and click «Next».
Step 3. Click on «Next» in both the «Server» and «Server Roles» sections.
Step 4. Select «Windows Server Backup» in the features section, and then select «Next.»
Step 5. In the «Confirmation» section, click «Install.» Now the Windows Server Backup feature installation will begin. Wait for it to be completed.
Step 6. Once the installation is complete, click «Close».
How to Back up and Restore Data with Windows Server Backup
Backing up and restoring data from your servers with Windows Server Backup differs from backing up and restoring your PC data.
To know how to properly backup and restore your Windows server data with Windows Server Backup, follow the below steps:
- 1 — Backup Windows Server Data with Windows Server Backup
- 2 — Restore Windows Server Data with Windows Server Backup
1 — Backup Windows Server Data with Windows Server Backup
Since we have installed Windows Server Backup on our servers, here’s how to backup Windows server data using Windows Server Backup:
How to backup data using Windows Server Backup:
Step 1. Open «Server Manager,» then click on «Tools,» and select «Windows Server Backup.» In Windows Server 2008 and Windows Server 2008 R2, open «Start,» select «Administrative Tools,» and click on «Windows Server Backup.»
Step 2. In the User Account Control dialog box, if you are asked to enter credentials to proceed further, enter Backup Operator credentials, and click «OK.»
Step 3. Choose «Local Backup.». In the «Action» menu, select «Backup once.»
Step 4. Select «Different options» in the «Backup options» window, then click «Next.»
Step 5. Now select «Full server (recommended)» in the «Select backup configuration» section, and click «Next.»
Step 6. Now select the backup location where you want to save the backup in the «Select Backup Destination» section.
Step 7. Now, click on «Backup in the Confirmation» section. Then click «Close» once the backup is completed.
2 — Restore Windows Server Data with Windows Server Backup
Here’s how to restore the backup using Windows Server Backup:
Step 1. Launch «Windows Server Backup» and choose choose «Local Backup.»
Step 2. In the «Action» section, select «Recover…» to open the Recovery Wizard.
Step 3. Now, in «Getting Started,» you will be prompted to choose where to restore the data from. Either from the local server or another server.
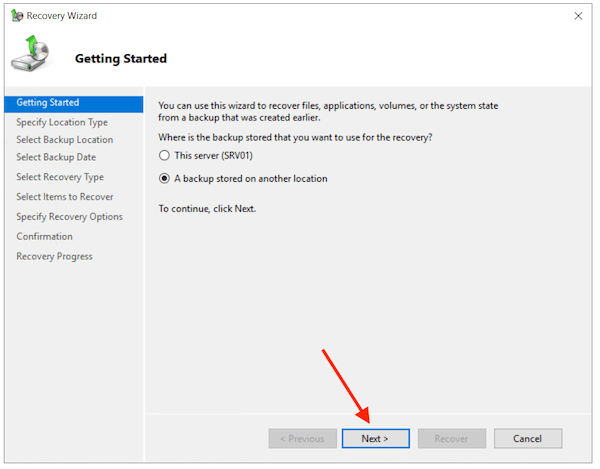
Step 4. If it was stored on a local server, choose «This server» and select the server. Click on «Next» to recover from the local server. If the data is being restored from another server, choose «Another server» and click «Next.» In the «Specify location» type window, choose «Local drives or Remote shared folder,» then click «Next.»
Step 5. Now, in the «Select Backup Date» section, select the backup of the backup you want to recover and click on «Next.»
Step 6. In the «Select Recovery type» section, choose «Application» and click «Next.»
Step 7. Now, in the «Select Application» section, select «Exchange».
Step 8. View the application components by clicking on «View Details» and tick the check box «Do not perform a roll-forward recovery of the application database» if the backup was created recently.
Step 9. Now in the «Specify Recovery Option» section, select where you want to restore the data, and click on «Next.»
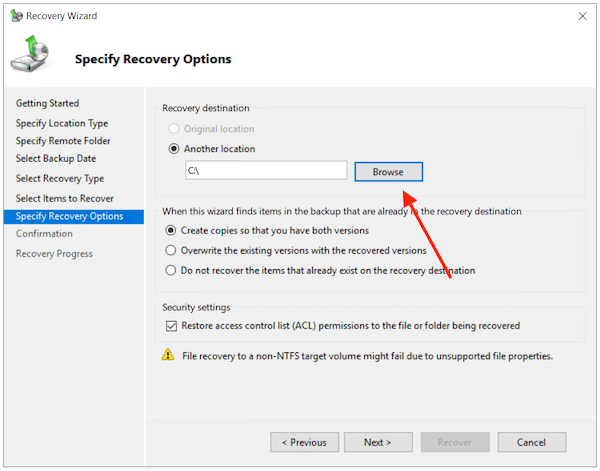
Step 10. Select «Recover to original location» if you want to restore the data directly to the original location. When selecting this option, all the databases that were backed up will be restored to their original locations. Choose «Recover to another location» to select and restore databases and their files individually to another location.
Step 11. In the «Confirmation» section, confirm the recovery settings, and click on «Recover.» You can view the progress of the recovery in the «Recovery Progress» section.

Step 12. Once the recovery has been completed, click on «Close».
Backup and Restore Data with Windows Server Backup Software
EaseUS Todo Backup Enterprise is the perfect solution to replace Windows Server Backup as the backup tool.
With the EaseUS Todo Backup Enterprise, you can schedule automatic backup for specific files or an entire system. A mode called bare-metal recovery can also restore the server if the OS gets damaged, and all of this can be done quickly to ensure servers are quickly restored. You can also clone your hard drive and so much more.
- 1 — Backup Windows Server Data with EaseUS
- 2 — Restore Windows Server Data with EaseUS
The EaseUS Todo Backup Business makes it extremely easy and convenient to back up and restore the Windows Server tool.
If you want to learn how to back up Windows Server 2016/2019/2022/11,10,8,7 with EaseUS Todo Backup Business, follow the step-by-step guide below.
1 — Backup Windows Server Data with EaseUS
First is the full guide to back up Windows Server data with EaseUS. Follow the guide below.
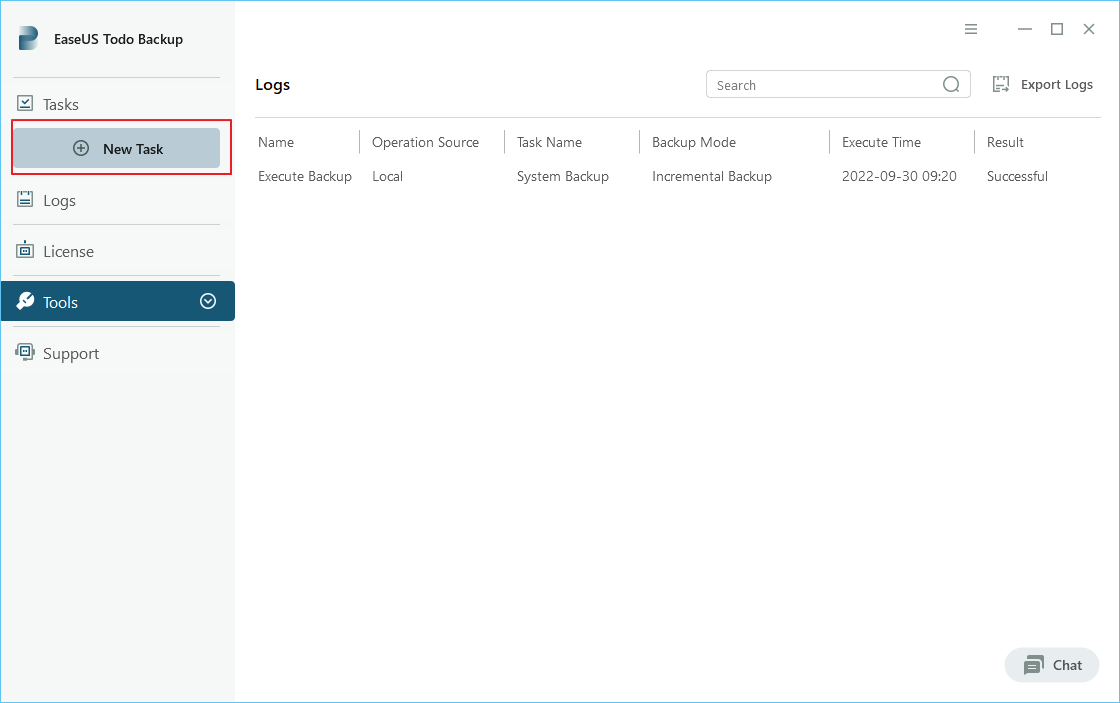
Step 1. Open EaseUS Todo Backup Enterprise. Then click «New Task» to set a new backup.
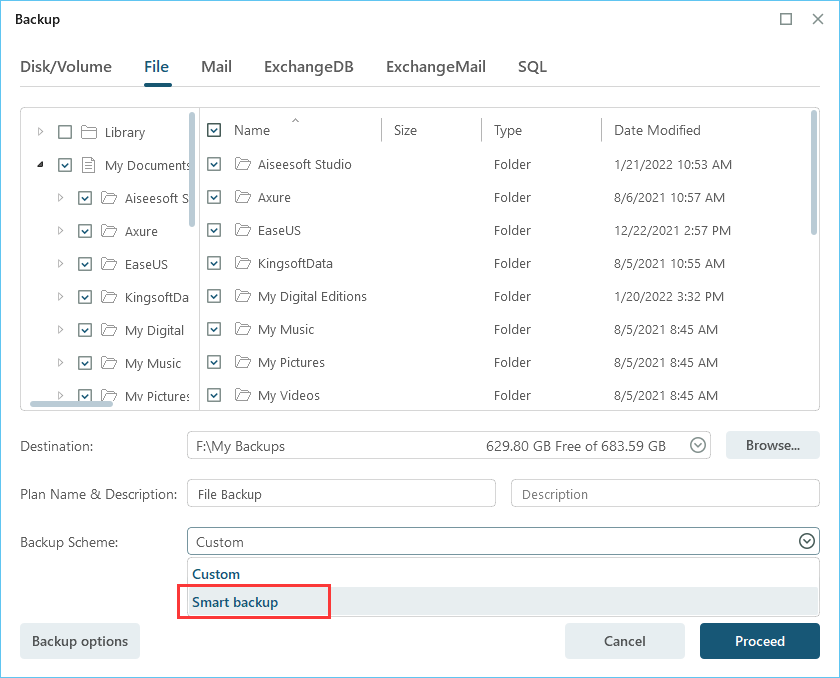
Step 2. Choose «File» as the target among the options at the top. Then select the specific files you want to back up.
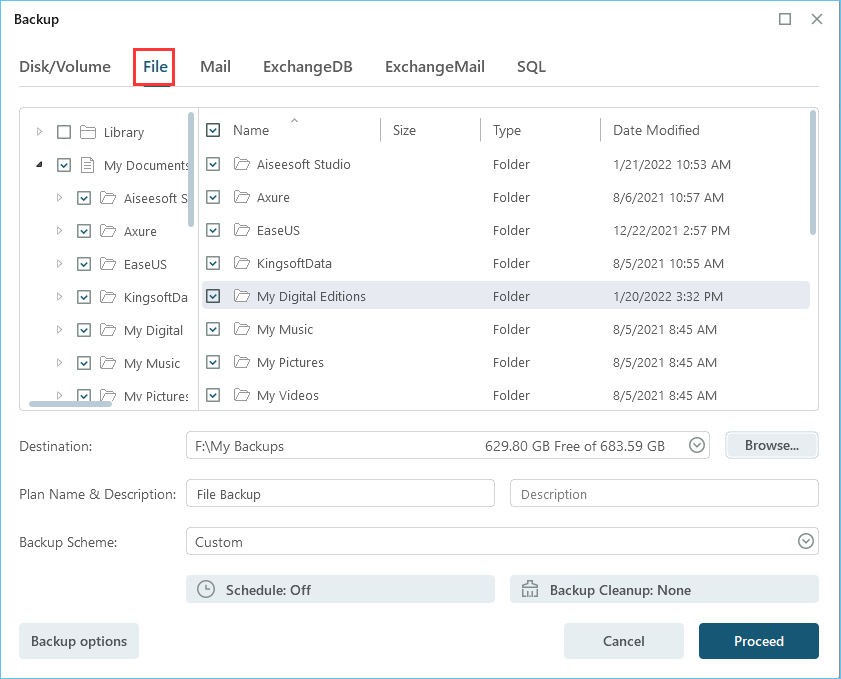
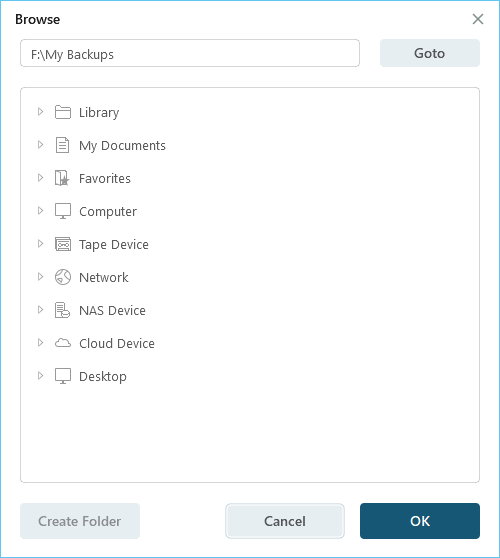
Step 3. Then click «Browser» to choose the destination where you want to put the backup.
Step 4. You can customize your backup scheme by clicking «Schedule: Off«. Here you can see «Schedule«, «Backup cleanup» and «Adcanced Settings«. Click «New» under the «Schedule» catalog.
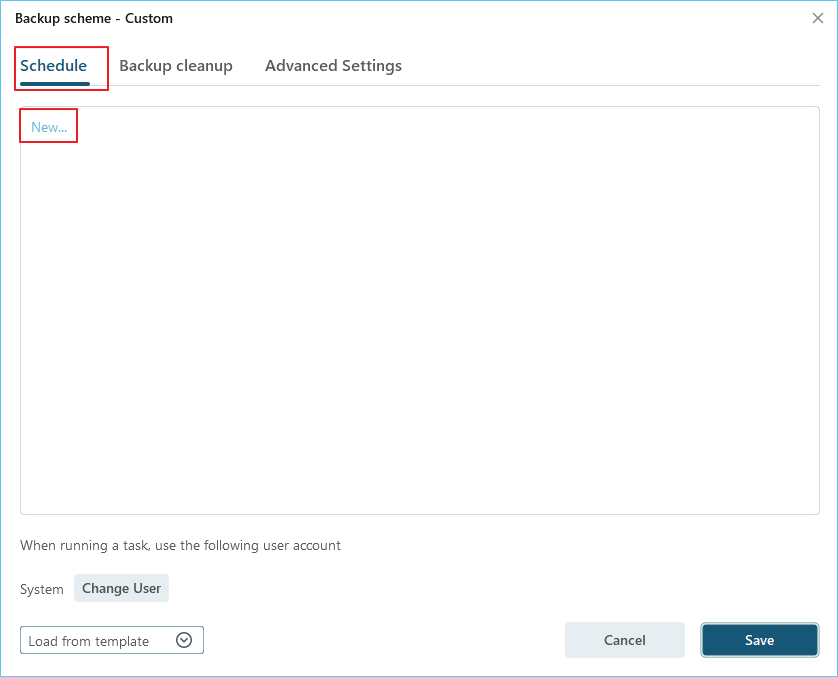
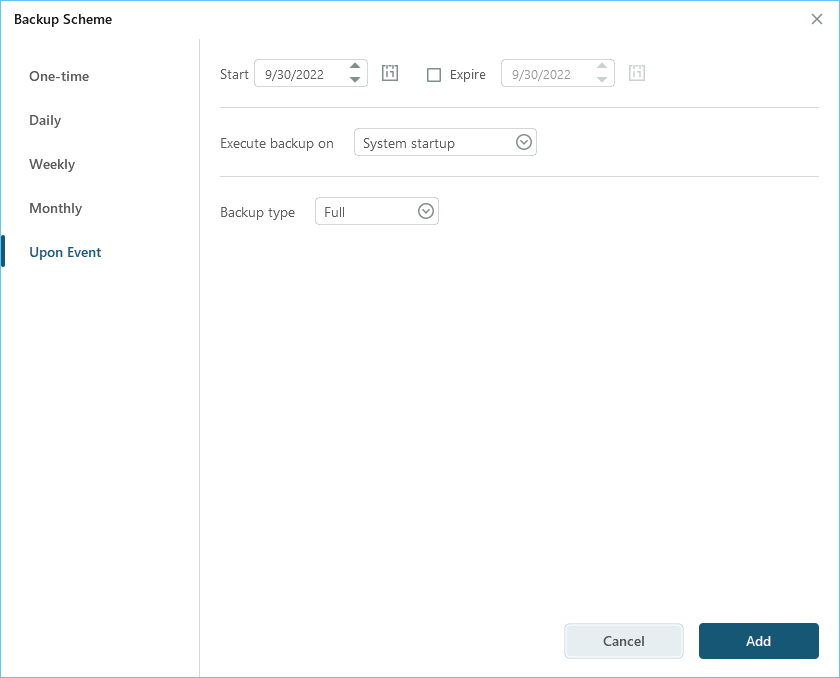
Then set the backup frequency based on your needs.
Or, you can choose the «Smart backup» under the Backup Scheme, which will monitor the selected file changes and backup sutomatically.
Step 5. Click «Backup options» on the bottom-left corner of the interface.
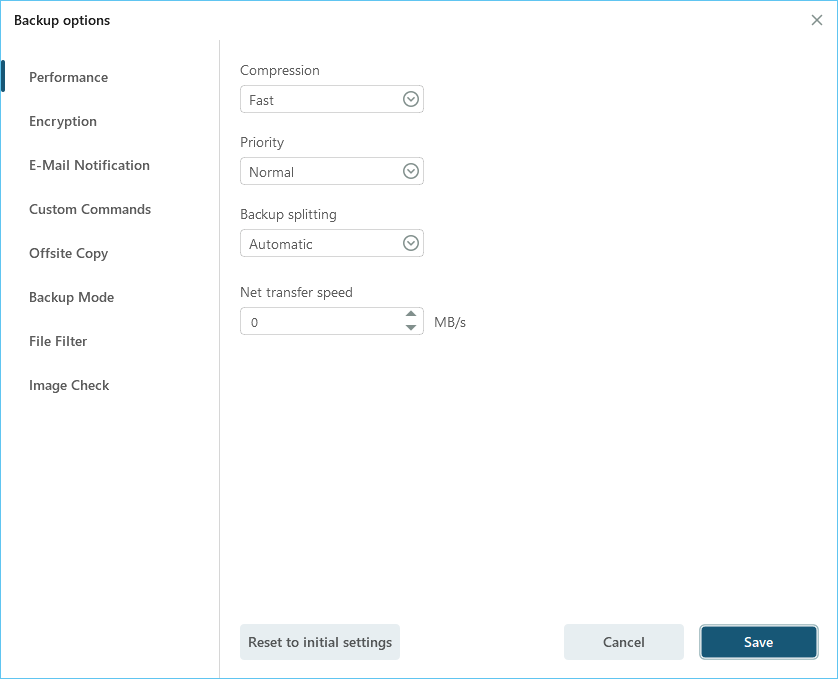
You can change the performance, encryption, e-mail notification, and other options here according to your preferences. When finish, click «Save» to return to the main interface.
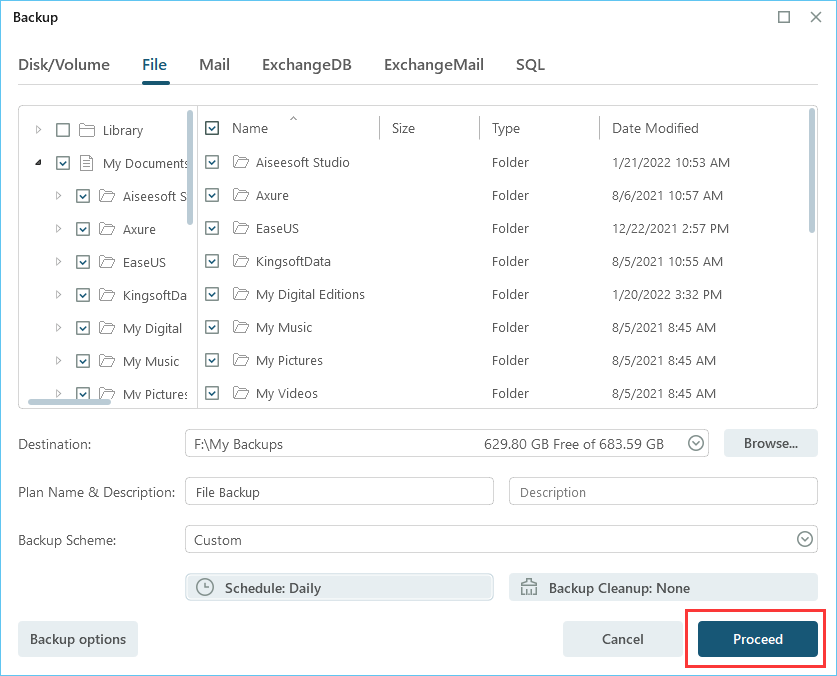
Step 6. When you finish all settings, click «Proceed» to start backing up files.
2 — Restore Windows Server Data with EaseUS
After you have managed to back up Windows Server data, you will need a guide on how to recover it. Here is the step-by-step guide on how to restore Windows Server data with EaseUS.
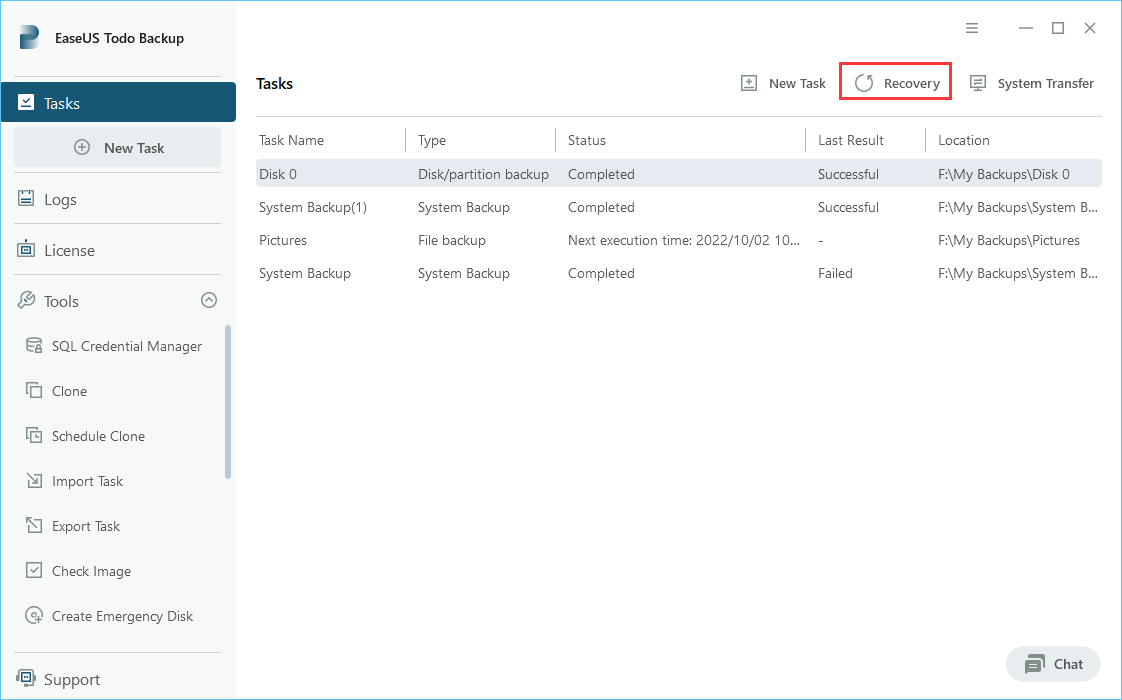
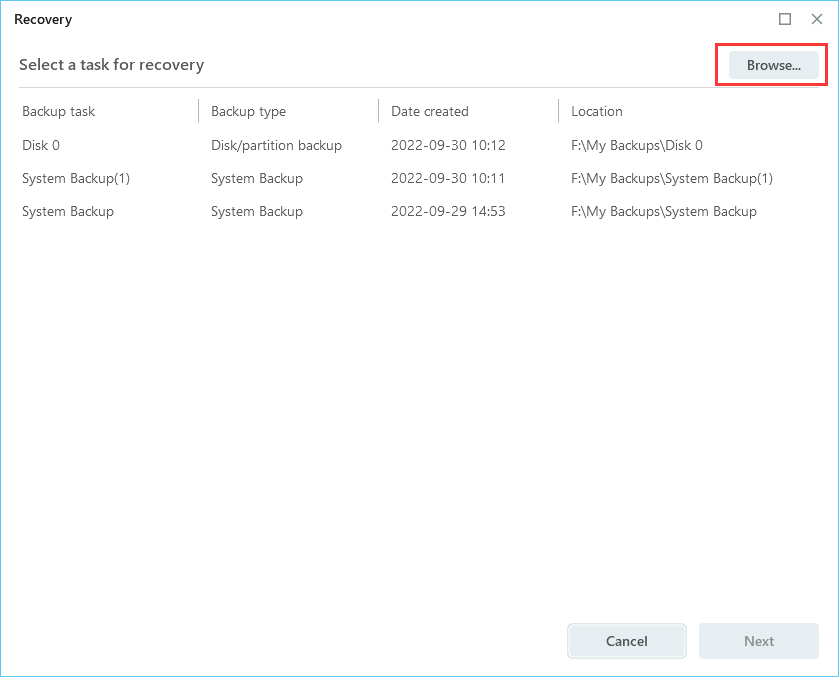
Step 1. Launch EaseUS Todo Backup on your computer. Click on the «Recovery» button.
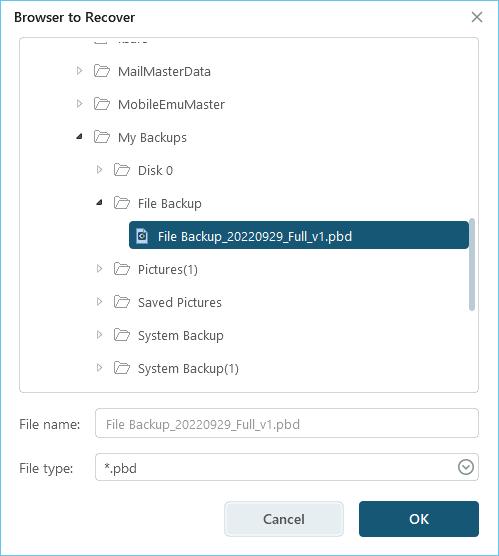
Step 2.Click the «Browser» button on the top-right corner.
Step 3. A window about recovery will come out. Find and choose the file you need to recover, then click «OK«.
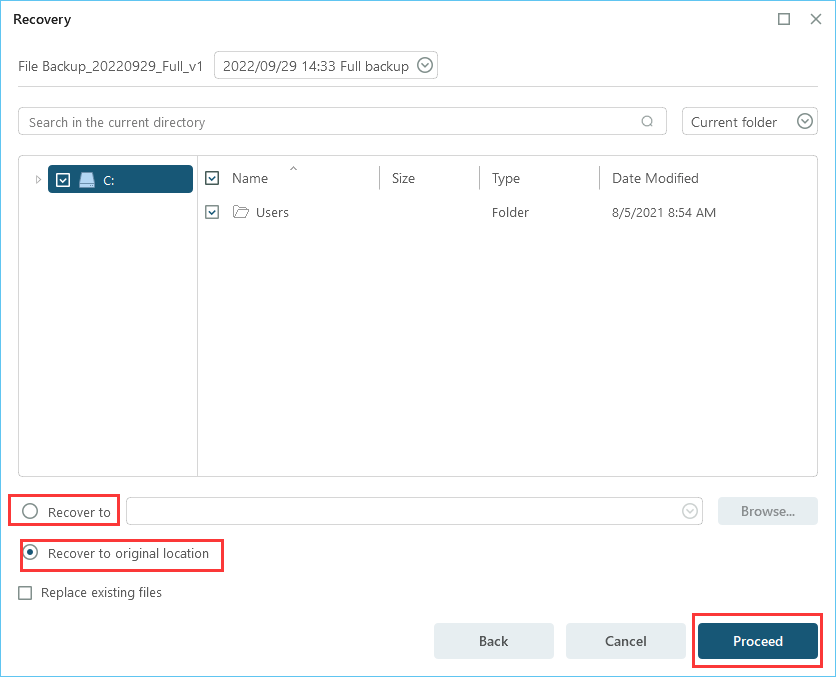
Step 4. You can browser to choose a new place, or recover to original place. Then click on «Proceed» button and the recovery begins.
Conclusion
Windows Server Backup is a free, installable feature to back up servers using the Windows Server OS. It is a great tool to back up and restore your server data, but it has its limitations, which can be a bit challenging and time-consuming if you want to back up the configuration of virtual machines.
Organizations or individuals who need a complete solution for all their server backup and restore needs can download and install EaseUS Todo Backup Business.
The EaseUS Todo Backup Business is far superior and has many tools compared to Windows Server Backup.
We have also answered a few questions regarding Windows Server Backup, which you can find below.
1. How to Stop Windows Server Backup in progress?
- Step 1. Open «Dashboard» and click «Devices» in the navigation bar.
- Step 2. Click the server in the list of computers, then click «Stop backup» for the server in the «Tasks» pane.
- Step 3. Select «Yes» to confirm your decision.
2. How to check the Windows Server backup history?
If you use Windows Server 2012, follow the steps below to check the backup history.
- Step 1. Open a command window after logging in to the Windows Server 2012 system with an administrator account.
- Step 2. To view the backup history, type «wbadmin.exe Get Versions» and press «Enter».
3. Is Windows Server backup free?
Yes, it is. You can use it to back up data without any cost.
4. Where is Windows Server backup in 2019?
You can find it by opening «Server Manager,» then selecting «Tools» from the upper-right column, and choosing «Windows Server Backup.»