by John, Updated on: October 17, 2022
Disk partitions was allocated when installing Windows or by computer manufacturers. Many people are wondering if it’s possible to resize partition in Windows 10 without losing data. Because C drive runs low on disk space, nobody likes to start from scratch. C drive out of space is common issue in Windows 10 laptop/desktop/tablet. To adjust partition size in Windows 10, it is not an easy task to many users. In technical forums, many people ask similar questions such as: «is it possible to re-size disk partition without reinstalling OS, my c drive is full but there is plenty in D«, «Is it safe to resize my Windows 10 drives, will it cause data damage?» In this article I’ll introduce how to resize partition in Windows 10 with native Disk Management tool and best free partition software.
Content:
- Windows 10 HDD/SSD partition resizing tools
- Resize partition in Windows 10 using Disk Management
- Change partition size in Window 10 with free software
There are two kinds of tools to help change partition size in Windows 10: native Disk Management and 3rd-party disk partition software. Disk Management can help you shrink NTFS partition to create new volume. If you want to extend a partition by shrinking another one, you have to run partition software.
Some people like to use Windows native tools thinking they have best compatibility, but it’s not true. Disk Management destroyed my partitions several times when I shrinking partition. Be careful when there are both Primary and Logical partitions on a disk.
To adjust partition size for Windows 10 laptop/desktop/tablet, third party software is much more powerful. However, few partitioning software are safe enough. Therefore, before resizing partition, you’d better make a backup and run the safest tool. Otherwise, your system and partitions may be damaged.
Better than other tools, NIUBI Partition Editor has unique 1 Second Rollback, Virtual Mode and Cancel-at-well technologies to protect system and data. In addition, it is able to clone disk partition without rebooting. Its advanced file-moving algorithm helps resize partition 30% to 300% faster.
How to resize partition in Windows 10 using Disk Management:
Windows 10 Disk Management has no «resize volume» function, partition resizing is realized by Shrink Volume and Extend Volume functions. Note: only NTFS partition is supported. FAT32 and any other types of partitions can’t be resized by this native tool.
To shrink volume in Windows 10:
- Press Windows and X on keyboard and click Disk Management in the list.
- Right click a NTFS partition and select Shrink Volume.
- In the pop-up window, enter the amount of space and then click Shrink to execute.
To extend volume in Windows 10:
- Right click the right adjacent partition (such as D:) and select Delete Volume.
- Right click the left adjacent partition (such as C:) and select Extend Volume.
- Simply click Next in the pop-up Extend Volume Wizard window.
- Confirm the operation and click Finish to proceed.
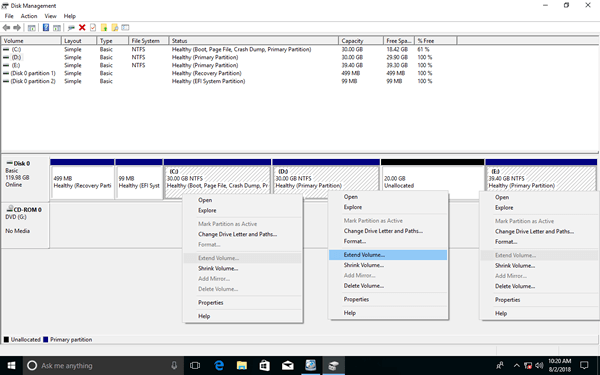
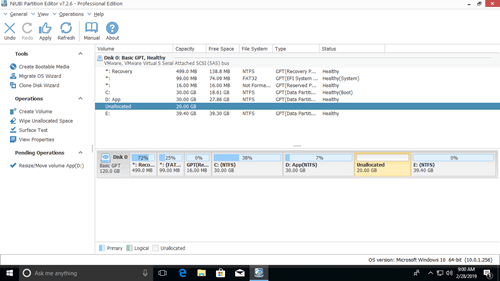
Some people may ask why not shrinking D to extend C drive, because Disk Management has no such ability. The «Extend Volume» function only works when there’s contiguous Unallocated space on the right. «Shrink Volume» function cannot make such required Unallocated space. As you see the screenshot in my computer, after shrinking D drive, Unallocated space is on the right of D. It is nonadjacent to C drive and is on the left of E drive. This is the reason why Extend Volume is disabled for both partitions.
Disadvantages to resize partition in Windows 10 using Disk Management:
- It can only shrink and extend NTFS partition, any other partitions are not supported.
- It can only shrink partition towards left and make Unallocated space on the right.
- It cannot shrink a partition to the point where unmovable files are located.
- It can only extend partition when there’s contiguous Unallocated space on the right.
Change partition size in Window 10 with free partition software
To resize partition in Windows 10 without losing data, NIUBI Partition Editor is better choice. Both NTFS and FAT32 partition can be resized. Unallocated space can be made on either left or right when shrinking partition. This space can be combined to any contiguous and non adjacent partitions on the same disk. It has free edition for Windows 11/10/8/7/Vista/XP home computer users.
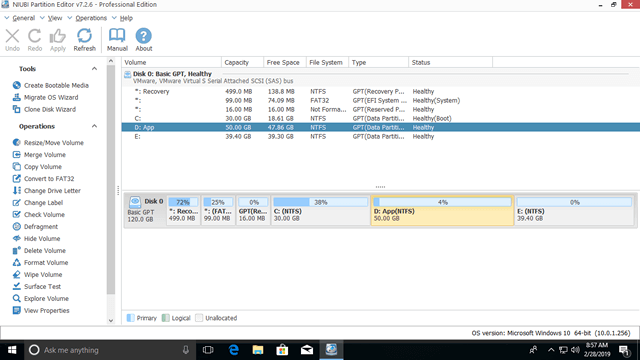
Download the free edition, you’ll see all storage devices with partitions structure and other information on the right, available operations are listed on the left and by right clicking.
How to resize partition in Windows 10 without losing datat:
Right click a partition (here is D:) and select «Resize/Move Volume«, you have two options in the pop-up window.
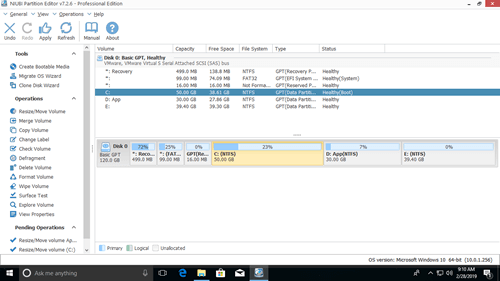
Option 1: If you drag left border towards right in the pop-up window,
Then partition D is resized and Unallocated space is made on the left.
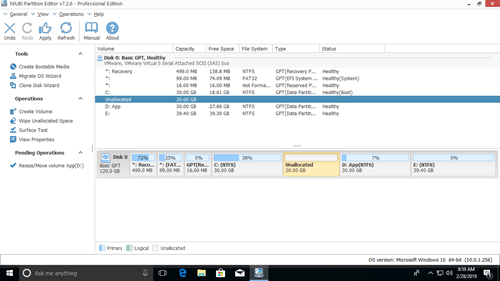
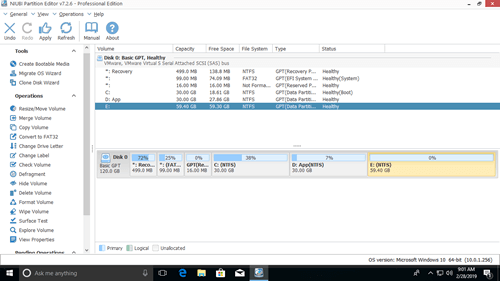
Option 2: If you drag right border towards left in the pop-up window,
Then Unallocated space will be made on the right side of D drive.
If you want to extend C drive partition, follow Option 1 above to make Unallocated space on the left of D. Then right click C: drive and select «Resize/Move Volume» again, drag right border rightwards to combine this Unallocated space.
Then two pending operations are created on bottom left, you need to click Apply on top left to take effect.
If you want to extend partition E, follow Option 2 above to make Unallocated space on the right of D drive. Then right click E: and select «Resize/Move Volume» again, drag left border leftwards to combine the Unallocated space.
If you want to shrink E to extend non adjacent partition C, follow the steps below:
- Shrink drive E: and make Unallocated space on the left side.
- Move Unallocated space from right side of drive D: to the left.
- Add Unallocated space to C drive.
To move Unallocated space from right to the left, right click drive D: and select «Resize/Move Volume», drag the middle of D drive towards right in the pop-up window:
Watch the video guide how to change partition size in Windows 10 without losing data:
Besides resizing partition in Windows 10 computer, NIUBI Partition Editor helps you move, merge, copy, convert, defrag, wipe, hide partition, scan bad sectors and much more.
Download
 Если вам требуется поменять размеры разделов диска HDD или SSD в Windows 11, Windows 10 и предыдущих версиях ОС — увеличить размер раздела, уменьшить его, либо выделить место под дополнительные разделы, сделать это сравнительно легко: в некоторых случаях достаточно прибегнуть к встроенным средствам системы, в других могут потребоваться сторонние программы.
В этой инструкции подробно о способах изменения размеров разделов диска в Windows актуальных версий в управлении дисками, командной строке или с помощью сторонних инструментов. На близкую тему: Как увеличить диск C.
Возможности изменения размеров разделов средствами Windows
В Windows присутствует два инструмента для работы с разделами: «Управление дисками» с графическим интерфейсом и DISKPART — инструмент командной строки. Возможности использования в части изменения разделов ограничены.
Сначала рассмотрим задачи, которые можно выполнить с помощью «Управления дисками». Для запуска утилиты вы можете нажать клавиши Win+R на клавиатуре и ввести diskmgmt.msc, либо нажать правой кнопкой мыши по кнопке «Пуск» и выбрать пункт «Управление дисками».
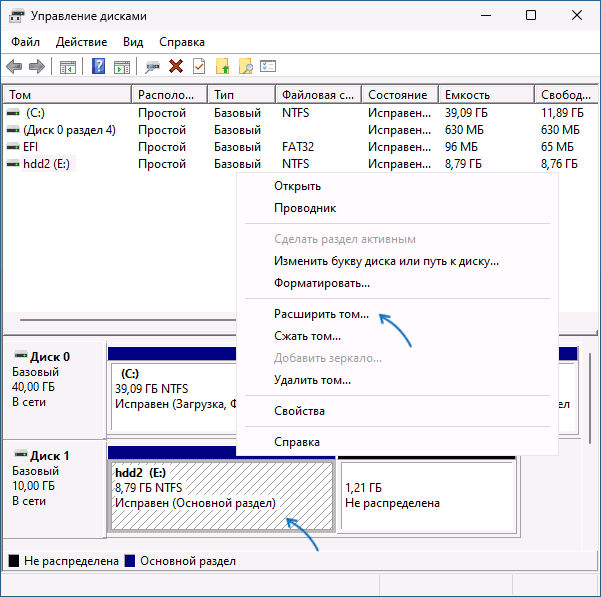
- Для большинства разделов с данными вы можете «Сжать том» — то есть уменьшить размер раздела. Нажмите правой кнопкой мыши по разделу, выберите «Сжать том» и укажите, на сколько его требуется сжать (не более, чем есть свободного места на выбранном разделе, в некоторых случаях — меньше). При этом область, которая высвободилась, будет помечена как «Не распределена» и будет расположена справа от раздела (высвободить её слева средствами системы не получится). Её можно будет использовать для создания нового раздела (с присоединением к другим разделам встроенными средствами системы не все просто).

- Если справа от раздела с данными есть область, которая «Не распределена» (или вы готовы удалить том, находящийся справа, чтобы создать такую область), вы можете расширить том на всю эту область («вправо»), либо на её часть, то есть увеличить размер раздела. Запустить расширение тома так же можно через контекстное меню по правому клику.
- Если область, которая «Не распределена» находится слева от раздела, который нужно увеличить, в некоторых случаях (если это не системный раздел) вы так же можете расширить том. Однако при этом диск будет преобразован в «Динамический», о чём вы увидите соответствующее уведомление. Это не всегда удобно, а потому я бы рекомендовал для таких целей использовать сторонние программы изменения размеров разделов.


Те же действия можно выполнить в командной строке:
- Запустите командную строку от имени администратора, например, используя поиск в панели задач.
- По порядку введите команды, нажимая Enter после каждой
diskpart
list volume
- Обратите внимание на номер тома (раздела), над которым нужно произвести действия (далее — N) и введите команду
select volume N
- Если вам нужно сжать том, используйте команду (размер указываем в мегабайтах)
shrink desired=РАЗМЕР minimum=РАЗМЕР
- Если требуется расширить том, используйте команду
extend size=РАЗМЕР


Все условия о наличии незанятого пространства остаются теми же, что и в «Управлении дисками».
Как можно заметить, встроенные средства системы не позволяют гибко и удобно менять размеры разделов, особенно в случае наличия промежуточных разделов или если требуется выполнить какие-то операции без потери данных на уже имеющихся дисках и без преобразования в динамический диск. Во всех сложных случаях лучше будет воспользоваться сторонними программами.
Увеличение и уменьшение размеров разделов в сторонних программах
Существует множество условно-бесплатных программ, позволяющих гибко менять размеры разделов на дисках в удобном интерфейсе. Среди них:
- Aomei Partition Assistant Standard — есть русский язык интерфейса, функциональна, большинство функций по работе с размерами разделов доступны бесплатно.
- MiniTool Partition Wizard Free — все то же самое, что и для предыдущего варианта, но без русского языка интерфейса.
- DiskGenius — условно бесплатная программа, недавно появился русский язык интерфейса, почти все функции доступны и без приобретения.
- Acronis Disk Director — функциональная и русскоязычная программа, не бесплатная.
Это не полный список и, если вы не знаете, что выбрать, рекомендую использовать эти программы с загрузочной флешки WinPE Sergei Strelec (подробнее можно прочитать здесь), где вы найдете сразу все указанные, а также некоторые дополнительные средства для работы с разделами дисков, в том числе с изменением их размеров в разделе программ «Жесткий диск».

Сам процесс изменения размеров разделов почти одинаков во всех этих программах: обычно достаточно выбрать нужный раздел, а затем — нужное действие в списке инструментов, либо в контекстном меню. Несколько примеров:
- Aomei Partition Assistant — нажмите правой кнопкой мыши по разделу, выберите опцию «Перемещение и изменение размеров разделов», в следующем окне задайте размеры разделов, если нужно забрать часть свободного места от другого раздела, отметьте пункт «Назначьте свободное пространство из раздела в раздел». После настройки размеров, не забудьте нажать «Применить» в главном окне программы.

- Вторая возможность в Aomei Partition Assistant — использование функции «Распределить свободное пространство» для присоединения части свободного пространства с одного раздела к другому.

- DiskGenius — здесь то же самое: достаточно выбрать диск и раздел на нем, нажать правой кнопкой мыши и выбрать пункт «Resize Partiton» (изменить размер раздела), после чего уменьшить раздел (мышью или введя нужные числа), создав свободное пространство в начале или конце раздела, или увеличить его за счет находящегося рядом свободного пространства. Подтвердите изменение размера нажатием кнопки «Start». Если нужно увеличить размер, но свободного пространства нет, первым действием уменьшите соседний раздел, создав свободное пространство с той стороны, которая примыкает к разделу, который нужно расширить, а затем расширьте раздел, который требовалось увеличить.

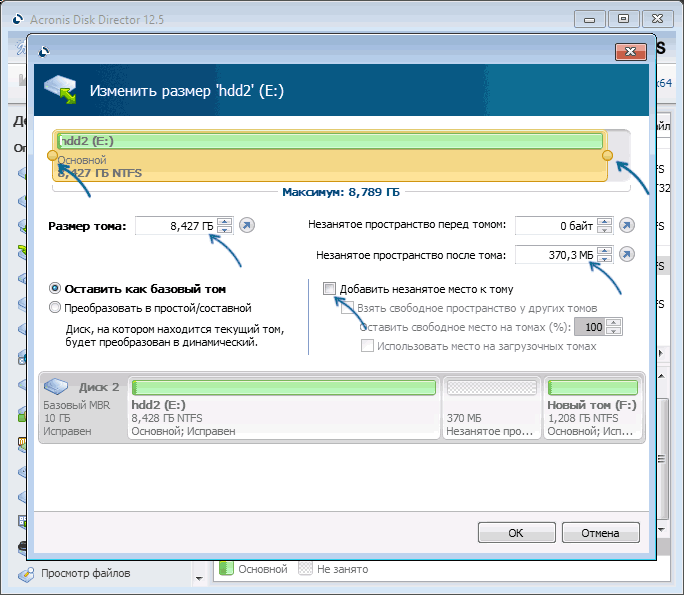
- Acronis Disk Director — достаточно выбрать раздел, затем нажать по нему правой кнопкой мыши и выбрать пункт «Изменить размер тома». После этого вы сможете вручную настроить размер нового тома, введя нужные размеры (за счет свободного от разделов пространства) или с помощью мыши и регулировки в графическом представлении. Если свободного пространства нет, можно поставить отметку «Добавить незанятое место к тому», чтобы использовать свободное место от других разделов.


Как можно заметить, логика действий почти во всех программах примерно одинакова: с уменьшением размера раздела нет никаких проблем, и оно выполняется в пару кликов, а для увеличения раздела в некоторых программах может потребоваться предварительно уменьшить соседний раздел, чтобы рядом с расширяемым появилось незанятое пространство.
Надеюсь, инструкция была полезной. Если остаются вопросы, опишите задачу в комментариях, я постараюсь помочь.
Position: How Tos — Partition Management — How To Resize Partition in Windows 11/10/8/7 Without Data Loss? — 3 Ways
Table of Contents
About resizing partition in Windows 11/10/8/7/XP
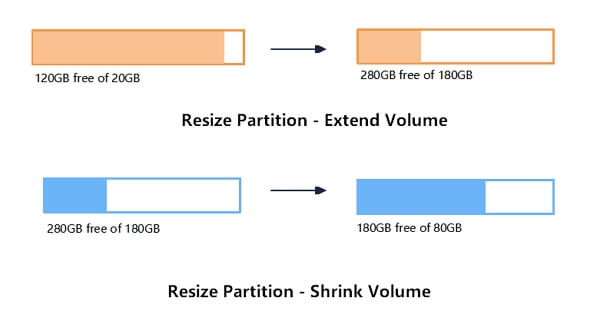
Resizing a partition is the process of changing partition’s size via extending or shrinking it. You can either increase a partition’s size or shrink it based on your needs. Besides, you can also split a partition into two partitions or add free disk space to any existing partition.
A partition, also called drive or volume, is a part of continuous logical space on hard disk. A hard drive can be divided into multiple partitions which can be used to store a variety of files such as operating system and personal data. If your hard drive has very large capacity, and you can create more than one partitions on it, so that you can separate Windows, installed application and individual data by storing files on different partitions.
However, when you partition a hard disk, there might be chances that you are not satisfied with the partition size or number the first time you try. For example, one partition might be too small to hold all your data. If your system partition (Windows drive) is running out of free space, computer may slow down or even cause other issues.
How do I resize a partition in Windows 10 for free? Fortunately, resizing partition in Windows 10, Windows 8, Windows 7, Windows Vista and Windows XP becomes a lot easier than previous versions of Windows systems. We can use system built-in tool to resize volume as well as free partition manage to change partition size without data loss. In this article, we’ll show you different methods to resize partition in Windows.
There are a number of reasons that users want to change partition size, and here we list the most common ones:
- To make best use of disk space: Due to the daily increasing of data amount, some partition may be full of data, while some partition still has large free space. You can move free disk space between to take full advantage of space.
- Low disk space issue appears: You receive error message from Windows, which says «You are running out of disk space on Windows (C:). To free space on this drive by deleting old or unnecessary files, click here…» «You are running out of disk space on Recovery (D:). Click here to see if you can free space on this drive.» Deleting files is not recommended on system partition, for you may delete vital system files and cause system crash. In such situation, you can extend partition to fix the issue.
- There is only one big partition on hard disk. When you buy a new PC, the hard drive is divided into one big partition. You can shrink this volume and create a new partition on unallocated space.
- You want to dual-booting compute. You may want to install another operating system such as Ubuntu on same hard drive, but the partition does not have enough room. Thus you need to extend partition for the installation of new operating system.
Method #1: Resize partition using Disk Management
Disk Management is a Windows built-in utility, first introduced in Windows XP for the purpose of replacing fdisk command. It allows users to view and manage disk volumes on computer. Users can view disk layout, file system, status, capacity, type, etc. Besides, it allows users to create, delete, format extend or shrink partition with easy steps. Now we’ll show you how to resize partition in Windows Disk Management.
Step 1. Open Disk Management: Go to desktop and right-click on This PC («Computer» in Windows 7) icon and click Manage option from context menu. Click Disk Management under Storage from the Computer Management window.
Step 2. Choose the partition you want to resize, right-click on it and select «Shrink Volume» option. If you want to increase the partition size, then choose «Extend Partition«.
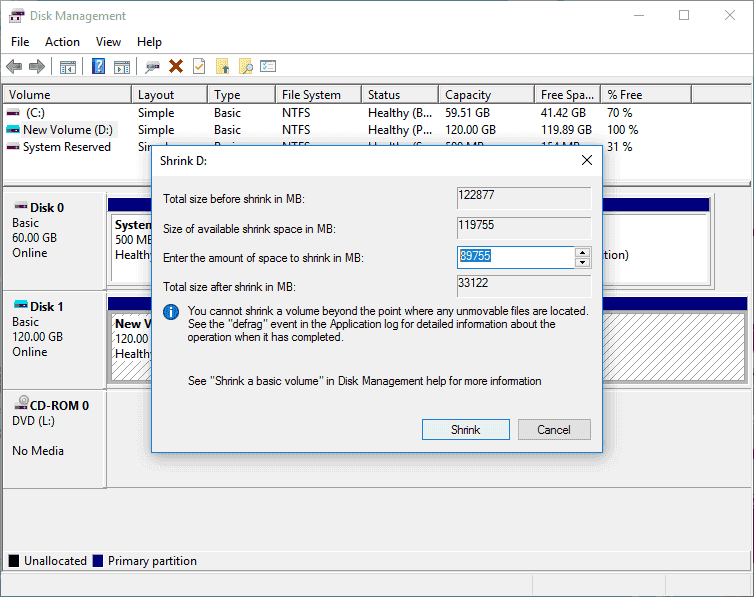
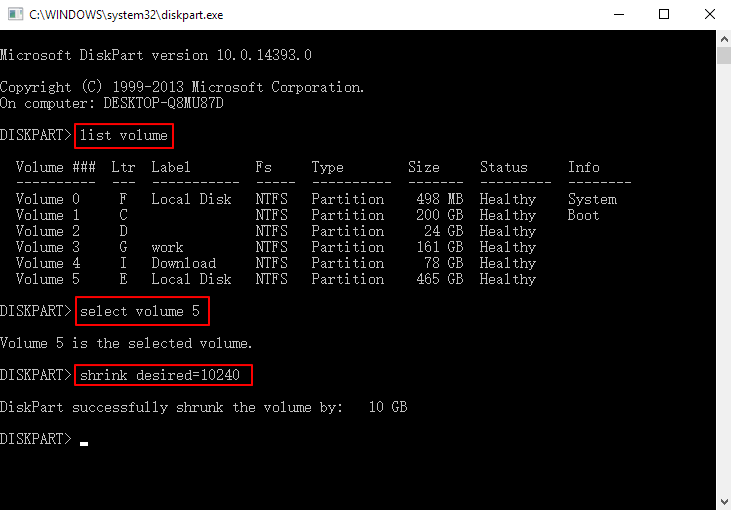
Step 3. Input the space you want to change and click «Shrink button«. When you enter the amount of space to shrink, please note the unit is MB, for example, if you want to shrink 10GB from this volume, you should input 10240.
Method #2: Resize partition with free partition manager
This solution gives three examples to show how to extend and shrink partition as well as add free space to an existing partition without losing data. In this section, we use a free partition manager program to complete these tasks.
Free Download free partition manager to resize partition in Windows
DiskGenius Free is high-end Windows partition manager software, and it is compatible with all versions of Windows systems including PC and server OS. It allows users to create, format, delete and convert partition; it is also able to move, resize, extend, shrink and split partition without damaging a single bit of data.
- It is supportive over different file systems, including NTFS, exFAT, FAT32, FAT12, FAT16, Ext2, Ext3 and Ext4. Thus you can resize partitions formatted into these filesystems.
- Support resizing partition on both MBR and GPT disks.
- Add unallocated space to any existing partition without data loss.
- Create WinPE bootable disk so that you can manage disk and partition when system fails to boot.
- Recover deleted or lost files & partitions from hard drive, USB disk and virtual disk.
Example #1: Extend partition without data loss
This guide below will extend a partition by moving free space from one partition to another without damaging existing data, and steps below also apply to extend C drive.
Step 1. Download and install DiskGenius Free Edition on your computer. Run the software and you can see its interface showing all partitions and disks on your computer with detailed parameters.
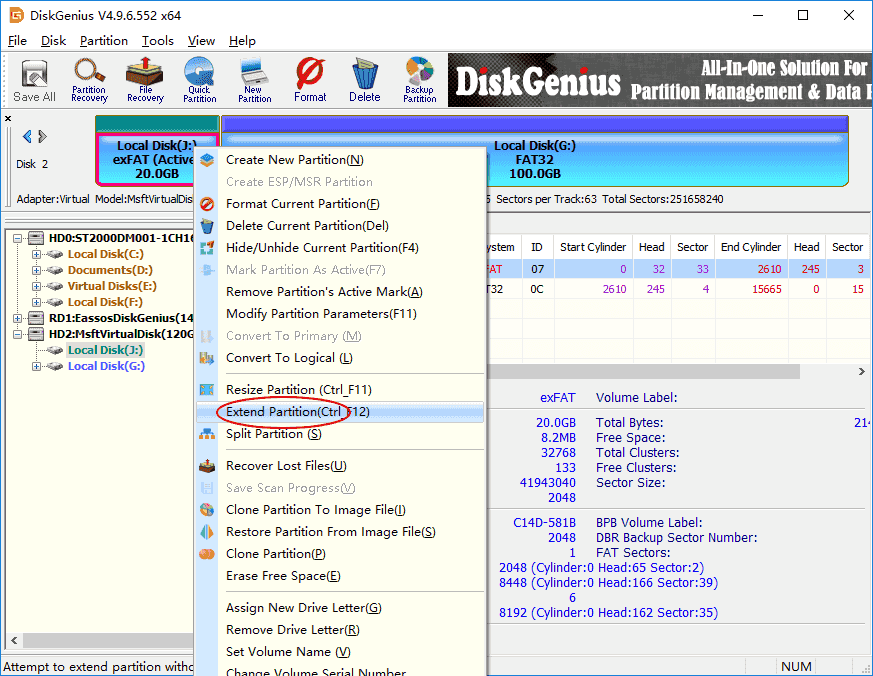
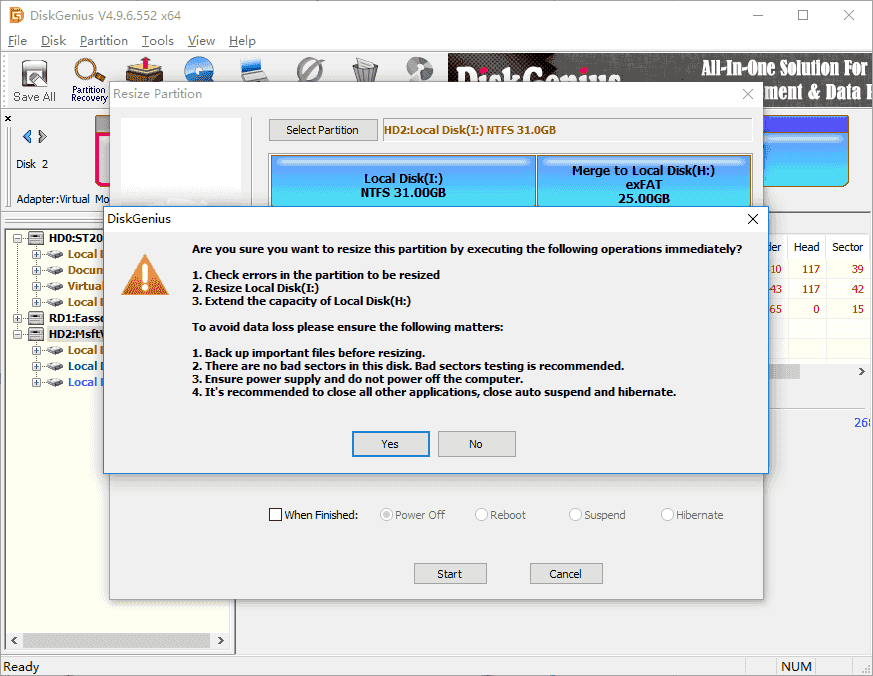
Step 2. Find and right-click on the partition you want to increase size and select «Extend Partition» from the displayed menu.
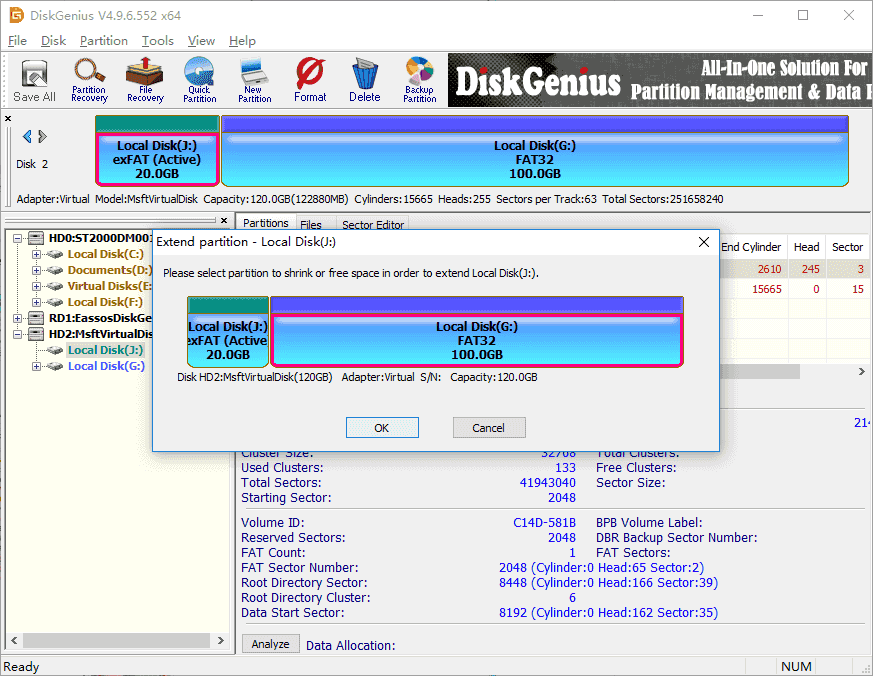
Step 3. Select the partition which contains enough free space and click «OK«, so that you can move free disk space from this volume.
Step 4. Set disk space you want to move between partitions. You can either drag the partition or enter exact number to decide how much free space you want to transfer. Then click «Start» button.
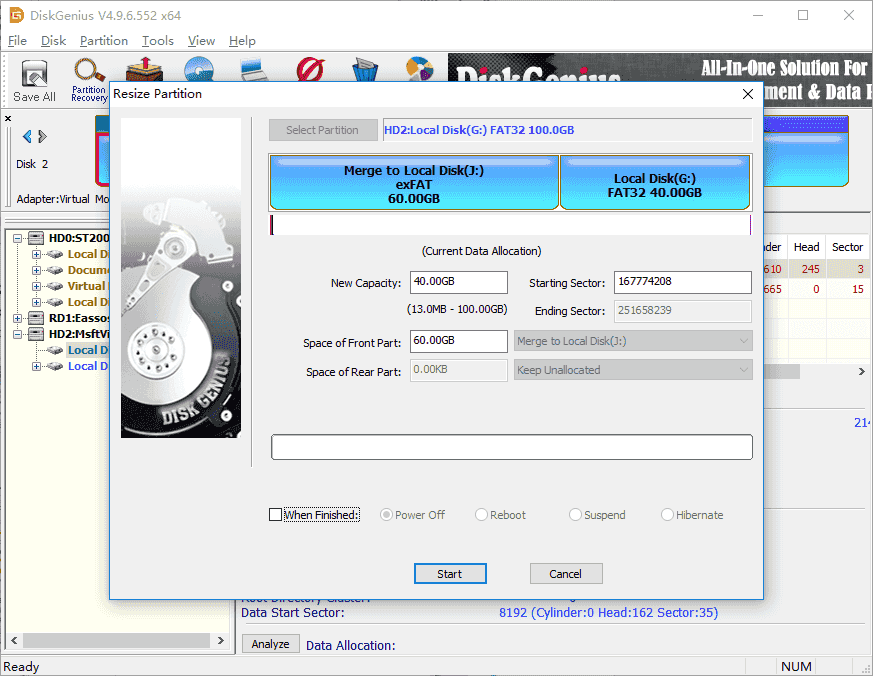
Step 5. The program starts to resize partition based on your settings. Wait for the process to complete.
Example #2: Shrink partition without losing data
This tutorial shows you how to shrink a partition without data loss. The disk space shrunk from the disk can be added to other partitions, kept unallocated or created new partition.
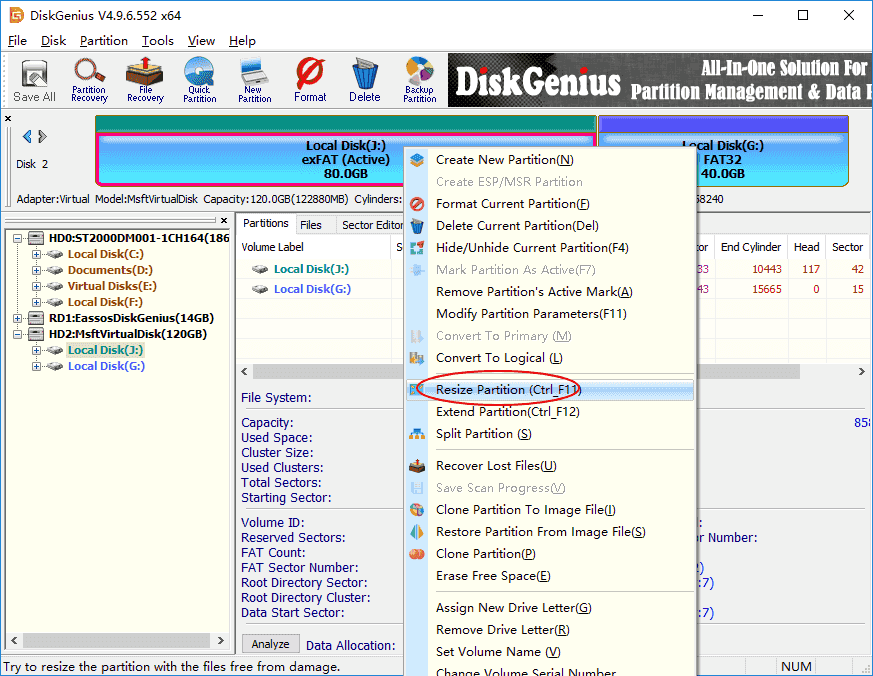
Step 1. Right-click on the partition you want to shrink and select «Resize Partition» from context menu.
Step 2. On the Resize Partition window you can set disk space you want to decrease.
You have three options on the disk space cut from the big partition: «Create New Partition», «Keep Unallocated» and «Merge to Local Disk». You can make the decision in line with your own requirement.
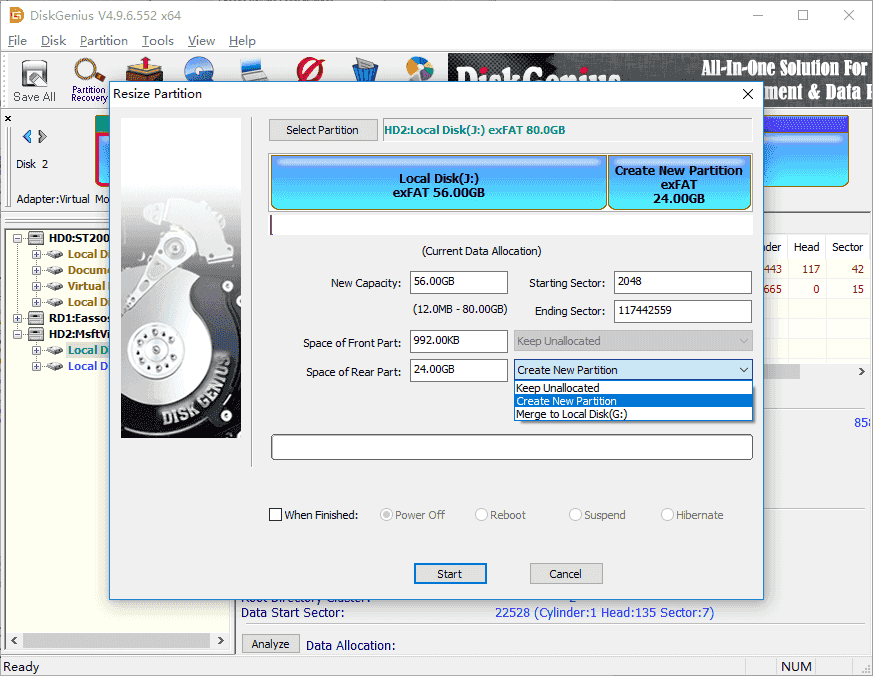
Step 3. Click «Start» button and the program starts to resize the partition based on your settings. Click «Complete» button when the process finishes.
Example #3: Add unallocated space to an existing partition
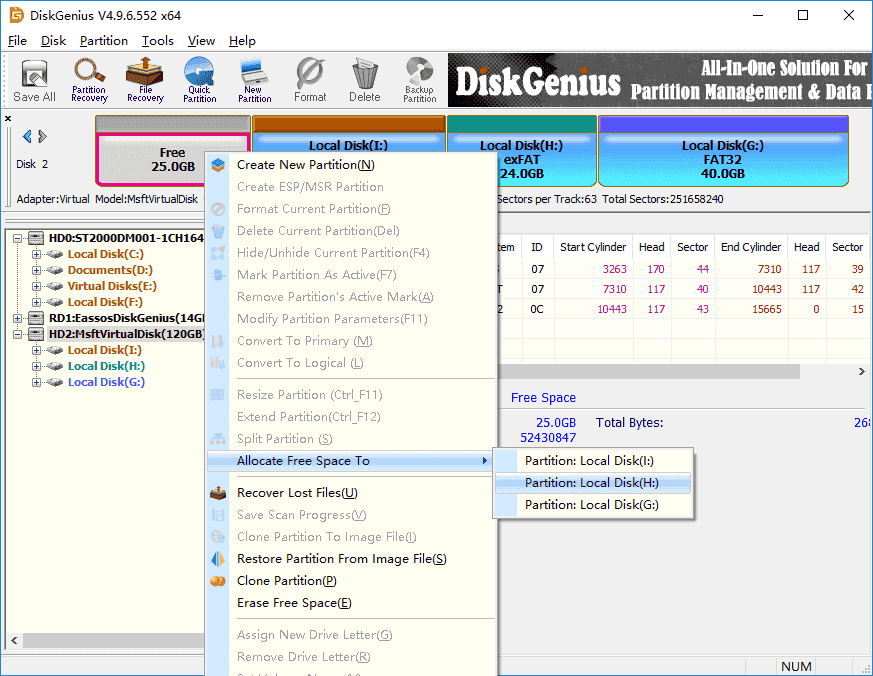
Since system cannot store data on free/unallocated disk space, you need to create new partition on it or add it to current partition so that you can make use of this disk area. Now we’ll show you how to add unallocated space to an existing partition without affecting existing data.
Step 1. Launch DiskGenius free version from your PC, right-click on the unallocated disk space and select «Allocate Free Space To«. Then you can choose which partition to add this free space.
Step 2. DiskGenius prompts operations to be done. Click «Yes» and it starts adding unallocated space to partition.
Method #3: Resize partition via repartitioning hard drive
Repartitioning a hard drive which is not properly partitioned is another solution to change partition size and partition number. During partitioning hard drive you can set partition type, number, size, volume name, drive letter, etc. thus you can arrange partition according to your needs.
Disk partitioning will delete all current partitions and data before creating new volumes, thus you’ll lose all data on the disk which already contains volumes. On this occasion, you need to backup data before repartitioning hard drive. Besides, you also need to reinstall Windows if the disk to be partitioned is the one where Windows is installed.
Before partitioning hard drive, you should plan partition layout in advance, for example, which partition table to use, how many partitions you need and what the partition size you want, etc. As to tools to partition/repartition a disk you can use free partition manager which makes the process intuitive and very simple. You can complete the process with several clicks.
Step 1. Connect the hard drive you want to repartition and launch DiskGenius Free Edition.
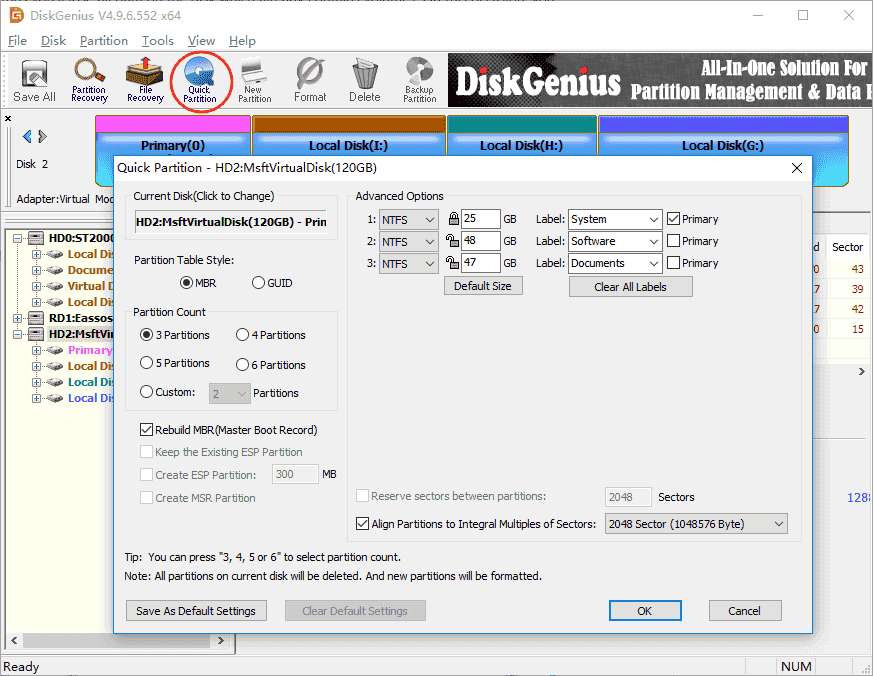
Step 2. Select the disk to be partitioned and click «Quick Partition» button from the toolbar.
Step 3. Select partition number, size, type, 4K alignment, etc. and click «OK» button. Wait for a couple of seconds and the disk will be partitioned successfully.
The do’s and don’ts
Though the partition resizing process is easy and does not cause data loss, there are some things you should pay attention to when resizing partition for data security.
- Backup data all data on partitions you want to resize. Though Disk Management and free partition manager changes partition size without losing data, there are still chances you will lose valuable data if the process gets interrupted due to certain causes.
- While resizing partition, do not read or write data to the partition being resized, especially when the process has to move files.
- The resizing process may take long when partition has large capacity and contains large amount of data. Make sure your computer won’t enter hibernate or sleep mode.
- Make sure the partition you want to extend or shrink does not contain errors, or the resize process might be blocked by these errors.
- Do not shun down before the resizing partition complete, and make sure there is not sudden power failure during resizing process.
Conclusion
As we’ve mentioned it is surprisingly easy to resize partition in Windows 11/10/8/7/XP, and you can either extend or shrink partition depending on your requirement. Both Disk Management and DiskGenius Free Edition can help you resize Windows partition, but the latter one works more efficiently when dealing with complex situations. Don’t be afraid to do it, but also don’t go overhead. Resizing a partition which contains errors may lead to severe issues such as data loss. If you have any questions or need help on resizing partition in Windows 10, please feel free to email our support team.
This page introduces how to resize partition Windows 11/10 (32bit and 64bit) without losing any data. Follow to learn how to shrink volume as well as how to extend partition with unallocated space in Windows 11/10 on your own.
3 Tools to Resize Partition in Windows 11/10:
#1. EaseUS Partition Master — Easiest
#2. Disk Management — Medium
#3. DiskPart Command Lines — Hard

Question 1 — «How can I change partition size in Windows?»
Question 2 — «How can I increase partition size without formatting in Windows 11/10?»
Question 3 — «How do I increase or shrink space in Windows 11/10?»
Resizing partition is a process to re-allocate the disk space in Windows PC so as to extend or shrink partitions, making full use of unallocated spaces on a hard drive or SSD. For example, when the C drive is out of space, you need to resize another partition and add free space into C drive so as to fix this issue.
So how to resize partitions in Windows 11/10/8/7? In the next, we’ll take Windows 11/10 as an example to show you how to manage partition size, including shrink volume and extend partition in Windows 11/10/8/7.
3 Best Tools to Resize Partition in Windows 11/10
Here in this part, we’ll introduce two user-friendly and powerful partition management tools and one administrators’ favoriate tool to help you freely adjust the size of a drive partition.
Here are the 3 best tools that work to resize Windows 11/10 partitions for free:
- #1. EaseUS Partition Master — Easiest
- #2. Disk Management — Medium
- #3. DiskPart Command Lines — Hard
These three Windows 11/10 partition resizing tool allows you to resize hard drive partitions under Windows 11/10 32 bit and 64 bit OS.
If you are a Windows beginner or prefer an all-in-one tool that helps to extend and shrink volume for free in Windows 11/10, pick as EaseUS Partition Master Free as your best choice.
Comparision: EaseUS Partition Master vs. Disk Management vs. Diskpart
Both Disk Management and Diskpart are Windows built-in tools that work to shrink a disk volume, like the system C drive. But they are not as efficient as third-party partition manager software — EaseUS Partition Master.
Here is a brief comparison table that will help you to pick up the best partition management tool for resizing disk partitions in Windows 11/10/8/7:
| Feature Comparison | EaseUS Partition Master | Disk Management | Diskpart Command |
|---|---|---|---|
| Extend Volume | √ |
√ (FAT Not Supported) |
√ (FAT Not Supported) |
| Shrink Volume | √ | √(FAT Not Supported) | √ (FAT Not Supported) |
| Resize Dynamic Volume | √ | √(FAT Not Supported) | √(FAT Not Supported) |
|
Resize Partition (from Head and End of a Partition) |
√ | × | × |
Besides resizing partition, EaseUS Partition Master also supports some advanced disk management features that you may interest in. For example:
- Partition Recovery
- Merge partition
- Convert GPT to MBR
- Move OS to SSD/HDD
- Clone Disk — Upgrade to Bigger HDD/SSD
- Partition a Hard Drive for Free
Now, you can pick up the desired tool and follow the specific tutorials to adjust your partition size in Windows 11/10.
How to Resize Windows 11/10 Partition with EaseUS Partition Master
Applies to: Extend system partition, create, delete, resize/move, copy, merge, split, or format partition in Windows 11/10/8/7.
EaseUS Partition Master is designed for Windows beginners who have no experience in managing disk space on all versions of Windows computers.
Step-by-step Guide to Resize Partition
Now, see the following steps to resize Windows 11/10 partition, including shrink volume and extend volume, with the EaseUS partition management tool for free:
Step 1: Locate and select the target drive/partition
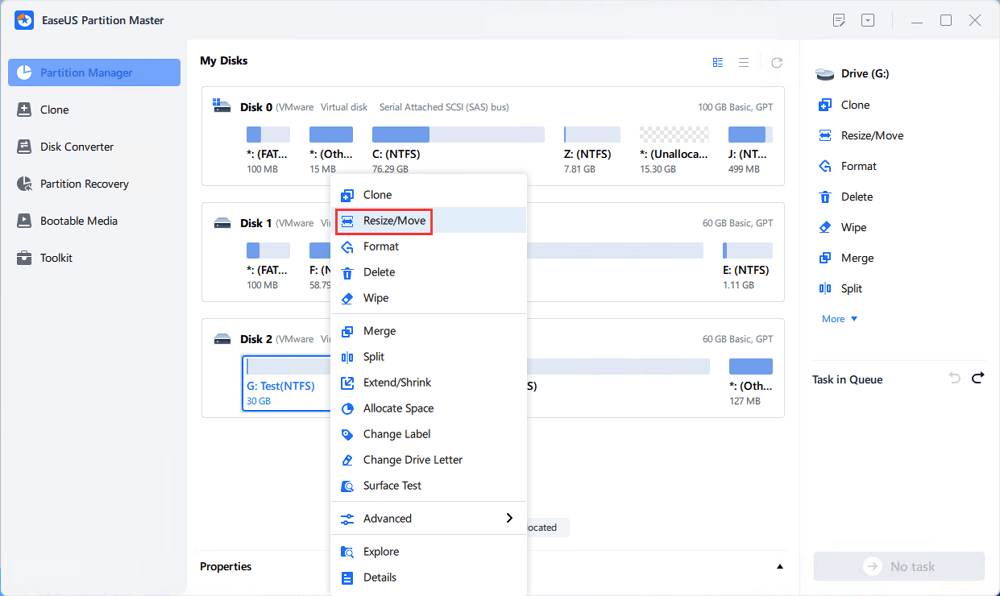
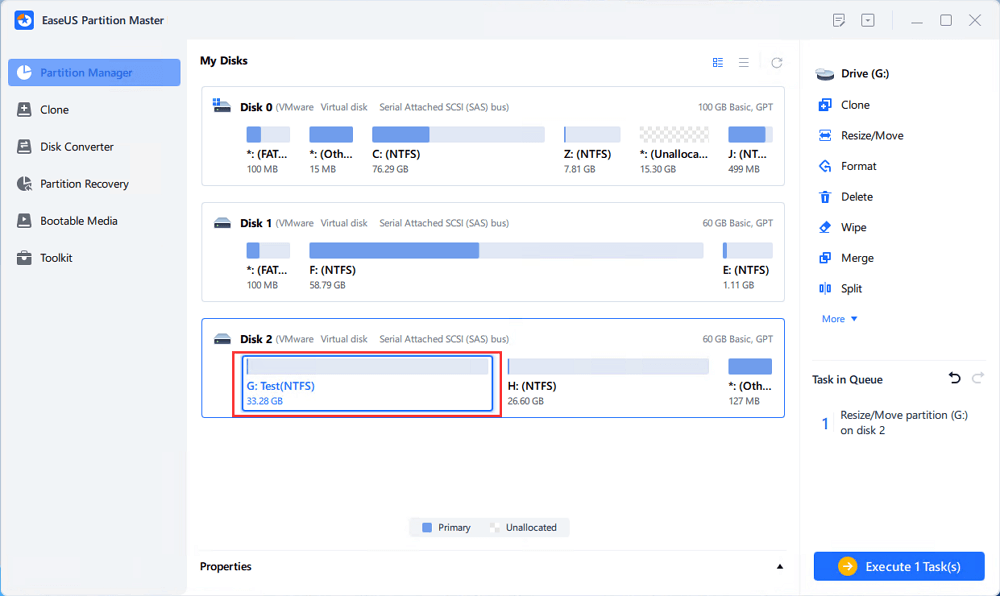
Launch EaseUS Partition Master and go to Partition Manager, select the target drive/partition to adjust its size, right-click on it and choose «Resize/Move».
Step 2: Resize or move the partition
1.To shrink the partition, simply drag one of its ends to free up unallocated space. Once done, click «OK».
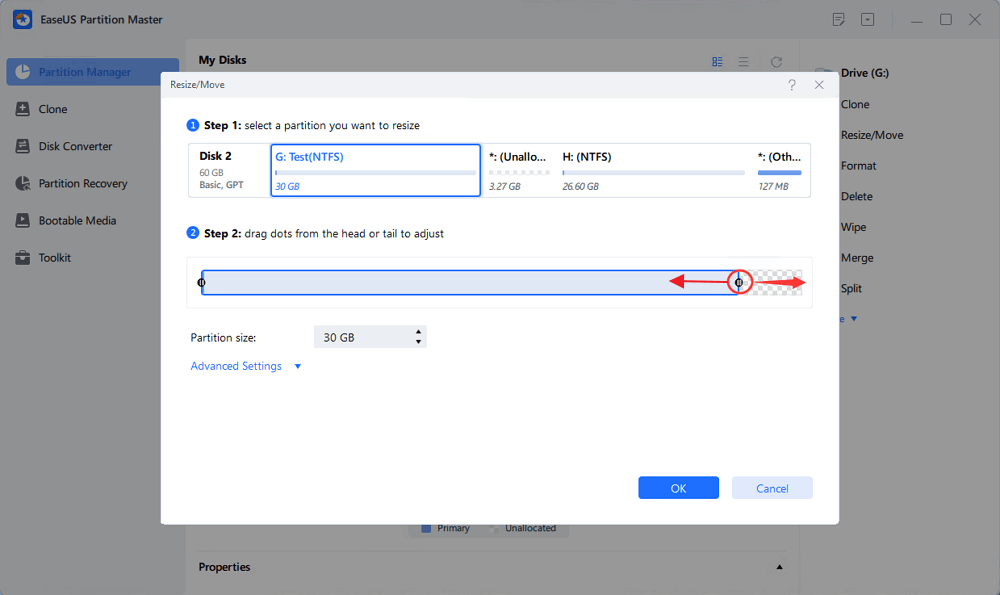
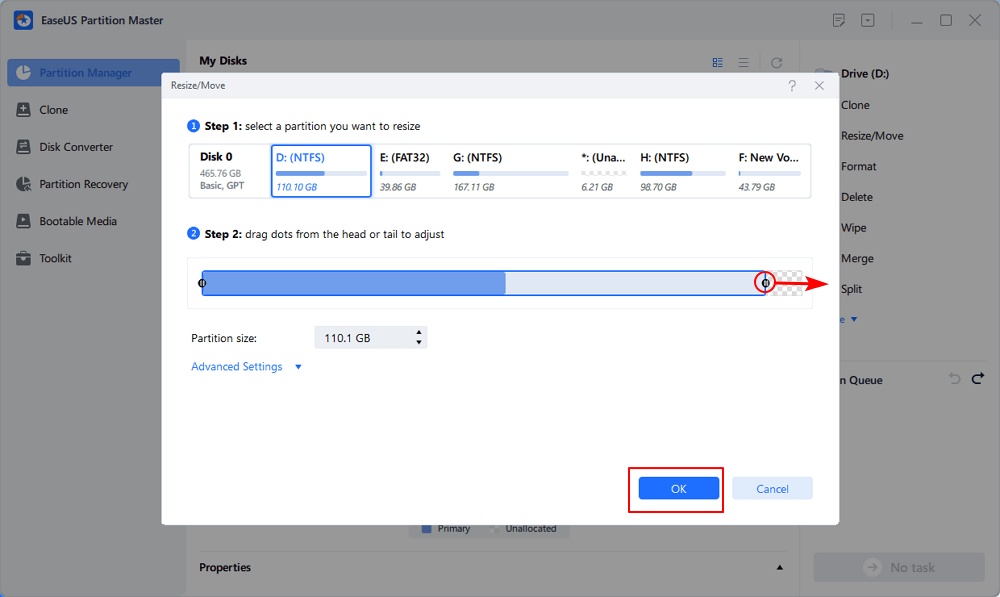
2. To extend the partition, make sure that there is unallocated space aside (if there isn’t, follow the above steps to create some). In the same way, drag your mouse into the unallocated space. Click «OK».
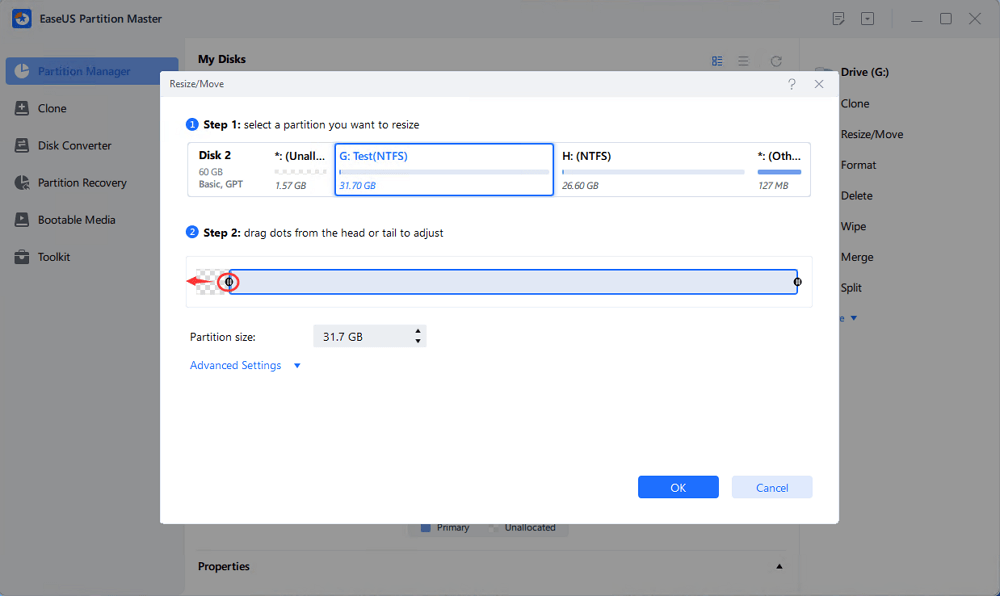
3. To move a partition position, you need to leave unallocated space next to the target partition. If no, free up some unallocated space first.
Right-click the target partition, select «Reize/Move». Then drag the whole partition leftward or rightward to adjust its position. Click «OK» to confirm.
Step 3: Confirm the result and apply changes
At this step, you will see the new disk partition information & diagram.
To save changes, click the «Execute Task» button and then «Apply».

Video Tutorial: Resize and Manage Partition in Windows 11/10
You can also follow this video tutorial to execute more operations in managing Windows 11/10 hard drive via EaseUS Partition Master.
How to Resize Partition in Windows 11/10 Using Disk Management
Applies to: Manually extend, shrink volumes, adjust partition size in Windows 11/10/8/7 for experienced users.
Windows 11/10 built-in Disk Management has the ability to shrink volume and extend volume. For experienced Windows users who know well how to use Disk Management, it’s easy to resize partitions in using this tool.
Here are the steps to just partition size in Disk Management:
Shrink Volume in Windows 11/10 Disk Management:
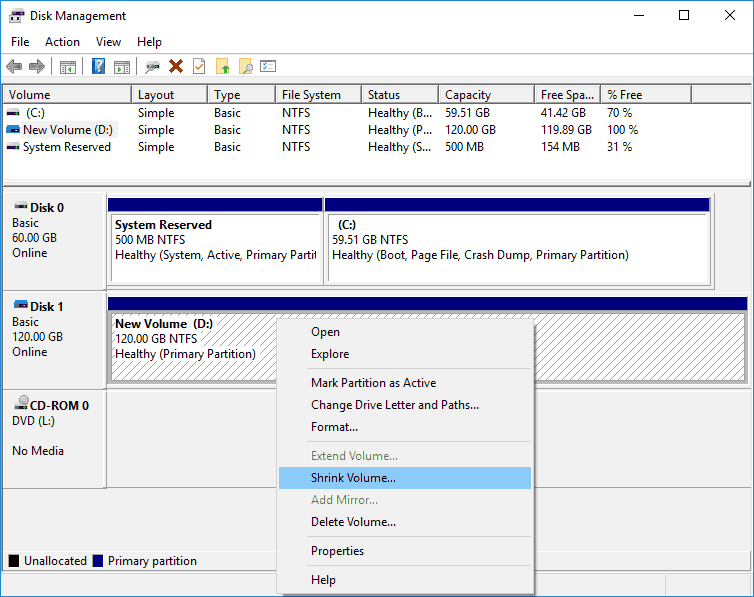
Step 1. Press Windows + X, select «Disk Management» from the list.
Step 2. Right-click the target partition and select «Shrink Volume».
Step 3. In the pop-up window, enter the amount of space and click «Shrink» to execute.

Extend Partition in Disk Management on Windows 11/10
Limit: There must be unallocated space behind your target partition. If not, shrink one right next to your target volume.
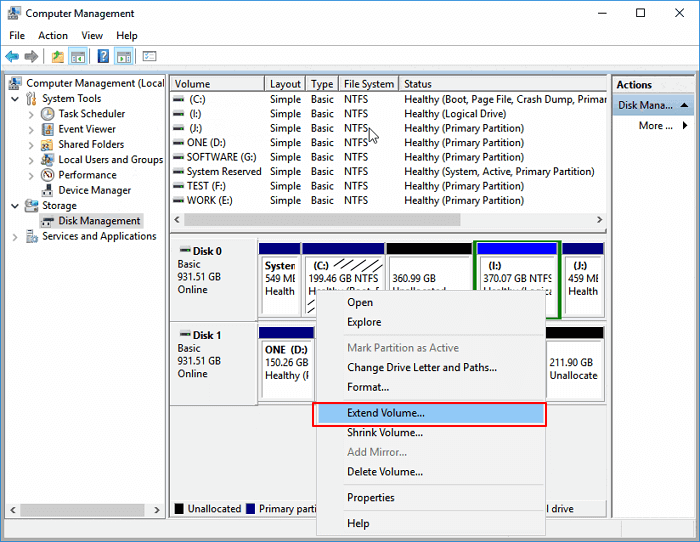
Step 1. Press Windows + X, select «Disk Management» from the list.
Step 2. Right-click the target partition and select «Extend Volume».
Step 3. Click «Next» in the Extend Volume Wizard window.
Step 4. Adjust the space that you need to extend the target volume. Click «Finish» to confirm.
Then Windows 11/10 partition resizing operation is done. You can also repeat the process above to right-click a volume and select «Format», «Delete Volume», «Change Drive Letter and Paths…», etc., to execute more operations on your Windows 11/10 partitions. Disk Management, as you can see, is a powerful utility built-in Windows; share this article to let others know how to use it.
How to Shrink/Extend Volume Windows 11/10 with Diskpart
Applies to: Resize partitions, shrink or extend volume in Windows 11/10 among Windows administrators.
Windows Comand Prompt is usually not seen by most of our users unless they know how to access it. It’s an administrator tool for IT managers to adjust computer settings. It also works to adjust partition size, including extend or shrink partition, delete partition, format partition, and clean hard drive, etc.
If you’re willing to challenge yourself and try to shrink partitions using this way, here’s the full guide.
Shrink Volume using Diskpart in Windows 11/10
Step 1. Press Windows + R to bring up the Run box.
Step 2.Type diskpart and hit Enter.
Step 3. Type the following command lines and hit Enter each time:
- list volume. (Note the number of the volume you want to shrink.)
- select volume X («x» refers to the target volume number.)
- shrink desired
Step 4.Type exit to finish and close Diskpart.
Extend Volume in Windows 10 Using Diskpart
Limit: There must be enough unallocated space behind your target partition. If not, shrink one right next to your target volume.
Step 1. Press Windows + R to bring up the Run box.
Step 2. Type diskpart and hit Enter.
Step 3. Type the following command lines and hit Enter each time:
- list volume. (Note the number of the volume you want to shrink.)
- select volume X(«x» refers to the target volume number.)
- extend size
Step 4.Type exitto close Diskpart.
Besides this, you can also apply Diskpart to format partitions, delete volumes, and even clean a whole hard drive with cmd lines.
The Bottom Line
On this page, we collected 3 best partition resizing tools for Windows 11/10/8/7 users to apply for disk partition management. Among the above three tools, EaseUS Partition Master is beginners’ best shot.
Disk Management is for experienced users. As for Diskpart, if you are not an administrator, we don’t recommend you to try it. It’s hard and not user-friendly. Any mistake may cause serious results.
If you have further questions in resizing Windows 11/10 partitions, check out the FAQs below.
People Also Ask — Windows 11/10 Resize Partition FAQs
1. Can Partition Magic resize Windows 11/10 partition?
Not anymore. Partition Magic runs on Microsoft Windows 98, Me, NT, 2000, and XP, but Windows Server 2003, Windows Vista, Windows 7, Windows Server 2008, Windows Server 2012, Windows 8, and Windows 11/10 are not supported by Norton Partition Magic.
2. What is shrinking a volume?
The shrink operation means the practice of trying to decrease the size of one hard drive partition to create unallocated space which you can use it for many purposes. You can add the unallocated space to the other partition which needs more space or simply create a new partition with a drive letter on the unallocated space.
3. Does shrinking a volume erase data?
As explained, shrinking the volume is to create unallocated space, but it won’t affect the existing data. No matter you are using the Disk Management, EaseUS Partition Master, or DiskPart command, basically no data loss will occur.
4. Cannot shrink partition not enough space
If the disk volume you’re trying to shrink contains unmovable files and those unmovable files are happen to be in the middle of the hard disk, you are likely to receive this error.
5. Cannot shrink a volume beyond the point
When you shrink a partition, certain files like the paging file or shadow copy storage area cannot be automatically relocated, so you cannot decrease the allocated space beyond the point where the unmovable files are located.
На этой странице представлено, как изменить размер раздела Windows 11/10 (32 бит или 64 бит) без потери данных. Следуйте советам, чтобы узнать, как самостоятельно уменьшить объем, а также как расширить раздел с помощью нераспределенного пространства в Windows 11/10.
Как я могу изменить размер раздела в Windows 11/10
1 вопрос — «Как я могу изменить размер раздела в Windows?»
2 вопрос — «Как я могу увеличить размер раздела без форматирования в Windows 11/10?»
3 вопрос — «Как я могу увеличить или уменьшить размер в Windows 11/10?»
Изменение размера раздела — это процесс перераспределения дискового пространства на ПК с Windows, чтобы расширить или уменьшить разделы, полностью используя нераспределенное пространство на жестком диске или SSD. Например, когда на диске C заканчивается место, вам нужно изменить размер другого раздела и добавить свободное место на диск C, чтобы решить эту проблему.
Итак, как изменить размер разделов в Windows 11/10/8/7? Далее мы возьмем Windows 11/10 в качестве примера, чтобы показать вам, как управлять размером раздела, включая уменьшение объема и расширение раздела в Windows 11/10/8/7.
3 лучших инструмента для изменения размера раздела в Windows 11/10
Здесь, в этой части, мы представим два удобных и мощных инструмента управления разделами и один любимый инструмент администраторов, который поможет вам свободно регулировать размер раздела диска.
Вот три лучших бесплатных инструмента, которые работают для изменения размера раздела Windows 11/10:
- #1. EaseUS Partition Master — самый простой
- #2. Disk Management — средний
- #3. DiskPart командные строки — сложный
Эти три инструмента для изменения размера раздела Windows 11/10 позволяют изменять размер разделов жесткого диска в 32-разрядной и 64-разрядной ОС Windows 11/10.
Если вы новичок в Windows или предпочитаете универсальный инструмент, который помогает бесплатно увеличивать и уменьшать объем в Windows 11/10, выберите EaseUS Partition Master Free в качестве наилучшего варианта.
Сравнение: EaseUS Partition Master или Disk Management, или Diskpart
И Disk Management, и Diskpart — это встроенные инструменты Windows, которые работают для уменьшения тома диска, например системного диска C. Но они не так эффективны, как сторонний софт для работы с разделами — EaseUS Partition Master.
Вот краткая сравнительная таблица, которая поможет вам подобрать наилучший инструмент для работы с разделами для изменения размера разделов диска в Windows 11/10/8/7:
| Сравнение функции | EaseUS Partition Master | Disk Management | Diskpart команды |
|---|---|---|---|
| Расширение тома | √ |
√ (FAT не поддерживается) |
√ (FAT не поддерживается) |
| Сужение тома | √ | √ (FAT не поддерживается) | √ (FAT не поддерживается) |
| Изменение размера динамического тома | √ | √ (FAT не поддерживается) | √ (FAT не поддерживается) |
|
Изменение размера раздела (от начала до конца раздела) |
√ | × | × |
Помимо изменения размера раздела, EaseUS Partition Master также поддерживает некоторые расширенные функции управления дисками, которые могут вас заинтересовать. Например:
- Восстановление раздела
- Объединение раздела
- Преобразование GPT в MBR
- Перенос ОС на SSD/HDD
- Клонирование диска — перенос на HDD/SSD большего размера
- Разделить жесткий диск бесплатно
Теперь вы сможете выбрать нужный инструмент и следовать конкретным руководствам, чтобы настроить размер раздела в Windows 11/10.
Как изменить размер раздела Windows 11/10 при помощи EaseUS Partition Master
Применимо к: Расширение системного раздела, создание, удаление, изменение размера/перемещение, копирование, перенос, разделение или форматирование раздела в Windows 11/10/8/7.
EaseUS Partition Master предназначен для начинающих пользователей Windows, у которых нет опыта управления дисковым пространством на всех версиях компьютеров Windows.
Пошаговая инструкция по изменению размера раздела
Далее просмотрите следующие шаги, чтобы изменить размер раздела Windows 11/10, включая уменьшение и увеличение объема, с помощью бесплатного инструмента управления разделами EaseUS:
Видеоурок: Изменение размера раздела и управление им в Windows 11/10
Вы также можете просмотреть этот видеоурок, чтобы выполнить больше операций по управлению жестким диском Windows 11/10 с помощью EaseUS Partition Master.
Как изменить размер раздела в Windows 11/10 с помощью Управления дисками
Применимо к: Увеличение вручную, уменьшение тома, настройка размера раздела в Windows 11/10/8/7 для опытных пользователей.
Встроенное в Windows 11/10 Управление дисками позволяет уменьшать и увеличивать объем. Для опытных пользователей Windows, которые хорошо знают, как использовать Управление дисками, легко изменить размер разделов с помощью этого инструмента.
Вот шаги, чтобы просто размер раздела в управлении дисками:
Уменьшить том в управлении дисками Windows 11/10:
Шаг 1. Нажмите Windows + X и выберите из списка Управление дисками (Disk Management).
Шаг 2. Щелкните правой кнопкой мыши целевой раздел и выберите «Сжать том» («Shrink Volume»).
Шаг 3. Во всплывающем окне введите количество места и нажмите «Сжать» («Shrink»), для выполнения операции.

Расширить раздел в Управлении дисками в Windows 11/10
Ограничение: За вашим разделом должно быть нераспределенное пространство. Если нет, сожмите один прямо рядом с вашим целевым томом.
Шаг 1. Нажмите Windows + X, выберите из списка «Управление дисками» («Disk Management»).
Шаг 2. Правый клик на раздел и выберите «Расширить том» («Extend Volume»).
Шаг 3. Нажмите «Дальше» («Next») в окне мастера расширения тома.
Шаг 4. Установите пространство, необходимое для расширения целевого тома. Нажмите «Готово» («Finish») для подтверждения.

Затем выполняется операция изменения размера раздела Windows 11/10. Вы также можете повторить описанный выше процесс, щелкнув том правой кнопкой мыши и выбрав «Форматировать» («Format»), «Удалить том» («Delete Volume»), «Изменить букву диска и пути…» («Change Drive Letter and Paths…») и т. д., чтобы выполнить дополнительные операции с разделами Windows 11/10.
Как уменьшить/расширить том Windows 11/10 при помощи Diskpart
Применимо к: Изменение размера разделов, уменьшение или увеличение объема в Windows 11/10 среди администраторов Windows.
Командная строка Windows обычно не видна большинству наших пользователей, если они не знают, как получить к ней доступ. Это инструмент администратора для ИТ-менеджеров, для настройки параметров компьютера. Он также работает для настройки размера раздела, включая расширение или сжатие раздела, удаление раздела, форматирование раздела, очистку жесткого диска и т. д.
Если вы готовы бросить вызов себе и попробовать сжать разделы таким образом, вот полное руководство.
Уменьшить том с помощью Diskpart в Windows 11/10
Шаг 1. Нажмите Windows + R, чтобы открыть окно Выполнить (Run).
Шаг 2. Введите diskpart и нажмите Enter.
Шаг 3. Введите следующие командные строки и каждый раз нажимайте Enter:
- list volume. (Запомните номер тома, который вы хотите уменьшить.)
- select volume X («x» относится к номеру целевого тома.)
- shrink desired
Шаг 4. Введите exit, чтобы закончить и закрыть Diskpart.

Расширить том в Windows 10 с помощью Diskpart
Ограничение: За вашим разделом должно быть достаточно нераспределенного пространства. Если нет, сожмите один, находящийся рядом с вашим томом.
Шаг 1. Нажмите Windows + R, чтобы открыть окно Выполнить (Run).
Шаг 2. Введите diskpart и нажмите Enter.
Шаг 3. Введите следующие командные строки и каждый раз нажимайте Enter:
- list volume. (Запомните номер тома, который вы хотите расширить.)
- select volume X («x» относится к номеру целевого тома.)
- extend size
Шаг 4. Введите exit, чтобы закрыть Diskpart.
Помимо этого, вы также можете применить Diskpart для форматирования разделов, удаления томов и даже очистки всего жесткого диска с помощью строк cmd.
Подводя итог
На этой странице мы собрали 3 лучших инструмента для изменения размера разделов, которые пользователи Windows 11/10/8/7 могут применить для управления разделами диска. Среди трех вышеперечисленных инструментов EaseUS Partition Master — лучший выбор для начинающих.
Управление дисками предназначено для опытных пользователей. Что касается Diskpart, если вы не являетесь администратором, мы не рекомендуем вам пробовать его. Это сложно и не удобно. Любая ошибка может привести к серьезным последствиям.
Если у вас есть дополнительные вопросы по изменению размера разделов Windows 11/10, ознакомьтесь с часто задаваемыми вопросами ниже.
Люди также спрашивают: Часто задаваемые вопросы об изменении размера раздела в Windows 11/10
1. Может ли Partition Magic изменить размер раздела Windows 11/10?
Уже нет. Partition Magic работает в Microsoft Windows 98, Me, NT, 2000 и XP, но Windows Server 2003, Windows Vista, Windows 7, Windows Server 2008, Windows Server 2012, Windows 8 и Windows 11/10 не поддерживаются Norton Partition Magic.
2. Что такое сжатие тома?
Операция сжатия означает попытку уменьшить размер одного раздела жесткого диска, чтобы создать нераспределенное пространство, которое вы можете использовать для многих целей. Вы можете добавить нераспределенное пространство к другому разделу, которому требуется больше места, или просто создать новый раздел с буквой диска на нераспределенном пространстве.
3. Удаляет ли сжатие тома данные?
Как объяснялось, сжатие тома создает нераспределенное пространство, но не влияет на существующие данные. Независимо от того, используете ли вы команду «Управление дисками», «EaseUS Partition Master» или «DiskPart», потери данных не произойдет.
4. Не удается сжать раздел, недостаточно места
Если объем диска, который вы пытаетесь сжать, содержит неперемещаемые файлы, и эти неперемещаемые файлы оказались в середине жесткого диска, вы, скорее всего, получите эту ошибку.
5. Невозможно сжать том больше точки
Когда вы сжимаете раздел, некоторые файлы, такие как файл подкачки или область хранения теневых копий, не могут быть автоматически перемещены, поэтому вы не можете уменьшить выделенное пространство за пределами точки, где расположены неперемещаемые файлы.