Updated on November 9th, 2020
This article focuses on resizing Ubuntu partition without data loss, which can be an easy task if you follow steps in this page. Changing Ubuntu partition size can be done by different methods, and you learn two solutions to resize, shrink or extend Ubuntu partition. Also, you can use this guide to resize other Linux partition without losing data.
Resize / extend / shrink Ubuntu partition issue
It is common that partitions are created in unreasonable size or number, and we need to change partition size or number. Such issue happens to both Windows and Linux users. If a partition contains very large disk space, we can move capacity to other partition which is running out of free space. Usually operating system provides basic disk management tool which can resize partition. Besides, you can use third-party partition manager software to do the job, for it supports more files system which are not supported by the operating system running on your computer.
Ubuntu is a popular distribution of Linux operating system, and it is preferred by both individual and business users. Most users likes dual-booting computer by installing Windows and Ubuntu on same computer. Some users may want to resize either Ubuntu partition or Windows partition in order to make best of disk space. Here is a real-world case related to this issue:
“May computer is dual-booting Ubuntu and Windows 10, and all of them work properly without errors. Everything is good except the size of Ubuntu partition. When I set up Ubuntu, I allocated 300GB to the partition. I’m kind of regretting it, as the other partition is running out of space. Is there any way I can shrink Ubuntu partition without destroying data on the partition? If so, how to resize it in Windows or Ubuntu?”
Solutions to resize Ubuntu Linux partition without data loss
Two solutions to resize Ubuntu Linux partition
Since Ubuntu and Windows are different operating system platforms, you can do the partition resizing either under Ubuntu or Windows if your computer is dual-boot. In Ubuntu, you can utilize the built-in tool GParted to move or resize partition. If you feel this method is complicated, you can also resize Linux partition under Windows with the help of third-party software. Both methods mentioned in this article won’t damage data on related partitions, and you choose either solution that suits you better to complete the resizing task.
Notes you should know before changing Ubuntu partition size
There are a few things you need to pay attention:
If you dual boot Windows and Linux and you want to change partition size for Windows partition. For example, you may want to shrink Windows partition and give more disk space to Linux partition. You should resize partition under Windows. Do not trying making changes to your Windows partition with Linux resizing tool, as it is likely to destroy the Windows partition and cause data loss.
Though partition resizing methods introduced in this article do not damage data, it is still advised to backup all of your data before making any changes in case of any unexpected issues. It is easy to backup Ubuntu partition and Windows data, for example, you can clone partition, image partition or just copy important data to a different drive.
Method 1: Change Ubuntu partition size using GParted
This method uses GParted to resize Ubuntu partition. GParted is a free partition editor for graphically managing disk partitions, and it is able to resize, copy and move partition without data loss.
However, if you want to resize Ubuntu system partition, you cannot do it while system is running. In that case, you will need an Ubuntu live CD or USB drive to change the size of system partition.
If you do not have a CD or USB drive, you can create a new Ubuntu live media on your own. To make live CD, you should go to Ubuntu’s office site to download the ISO file and then burn it to your disc (right-click the ISO file and choose Write to Disc); if you want to use USB drive for this task, you can create the live media with Startup Disk Creator. Type “USB” in the searching box and you can find the application. Provide the app with the Ubuntu ISO file and the Live USB drive will be created.
Step 1: Boot your Ubuntu system from the live CD or USB drive you just created.
Insert the live media and restart system, and it should boot from the media. If the live CD or USB does not work correctly, you need to open your computer’s BIOS to change boot order. Make sure the live media is set in the first boot order.
Step 2: Launch GParted. GParted is a Gnome-based partition manager and it is not pre-installed on an Ubuntu system by default. But it is included in the Ubuntu live environment. Thus you can launch it from the Dash.
Step 3: Select proper disk. If there are more than one hard drives on your computer, you need to select the disk which contains the partition you want to resize from the drop-down list at the top-right corner.
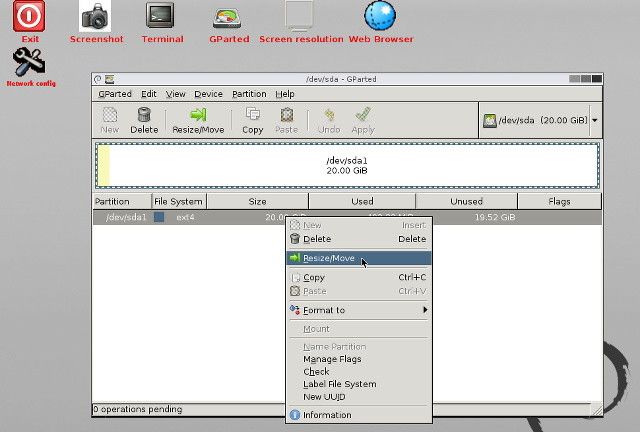
Step 4: Locate and right-click the Ubuntu partition to be resized, and select “Resize/Move” option from context menu.
Step 5: Set partition size you want to change. You can click and drag handles at the side of partition bar or enter the exact number to set the value.
Step 6: Click “Resize/Move” button and wait for the process to complete. You can view progress at the bottom of the GParted window.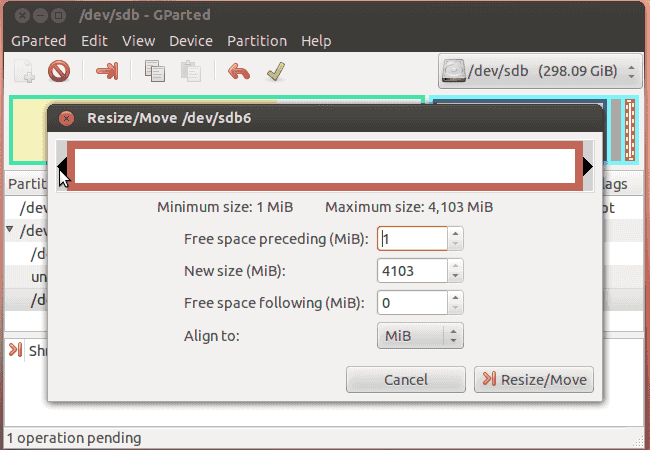
Step 7: Deal with free disk space. Once the partition is shrined, you can see unallocated disk space, and you can either create a new partition on it or add it to current partition.
Method 2: Resize Ubuntu partition without data loss with Eassos PartitionGuru
This method shows how to resize Linux partition without data loss under Windows 10/8/7/XP. Since Windows Disk Management does not support resizing Linux partition, we’ll complete the task with the help of a free Windows partition manager – Eassos PartitionGuru. This partition manager provides full support for Linux partitions and it can do following operations for you:
- Expand/split/resize Linux (ext2/ext3/ext4) partitions without data loss;
- Ext4 recovery: recover deleted/lost ext4/3/2 partitions and restore partition table
- Full access to Linux partition: read & write ext4 Linux partition
- Backup & image ext2/ext3/ext4 Linux partition or hard drive
- Create / format ext2/ext3/ext4 partition in Windows
- Completely wipe data from ext4/3xt3/ext2 partition or disk to protect privacy
Next, we’ll resize Ubuntu partition using this tool. To do that, you need to boot your computer to Windows first.
Step 1: Install and launch Eassos PartitionGuru, and then you can view all disks and partitions in your computer.
Step 2: Select the Linux partition you want to change size, and click “Resize Partition” option from Partition menu.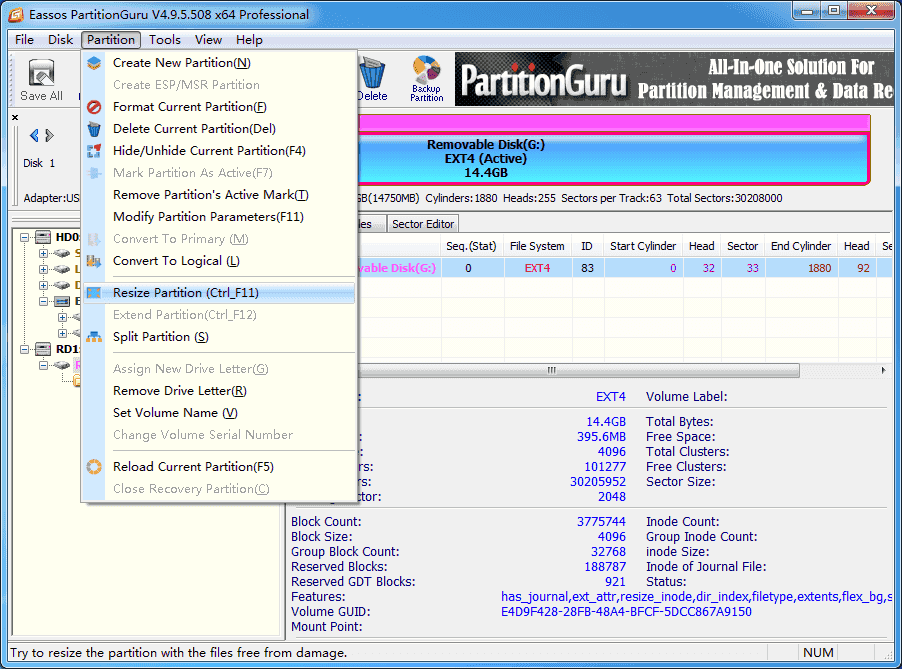
Step 3: Enter partition size you want to change and click Start button.
You can drag the arrow between partitions or enter the exact number to decide the disk capacity you want to transfer.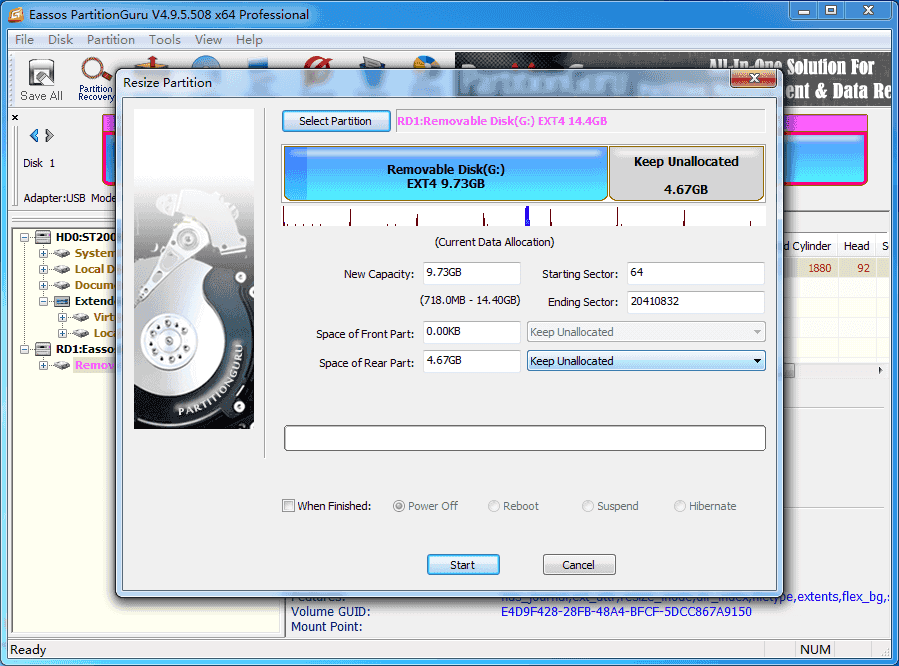
Step 4: Wait for a while and the resizing process completes.
«Does anyone know how to resize ext4 partition under Windows? I find the most common answer is to download Ubuntu operating system, but stitching two OS is not my ideal choice. Can you recommend some solutions to help me resize Linux partition without data loss?»
It is well known that we can use GParted to resize EXT4 partition under Linux operating system. What is the method under the Windows environment? EaseUS Partition Master is a powerful partition manager, which supports several file systems, including NTFS, EXT4, EXT3, EXT2, FAT32, FAT16, FAT12, ReFS. You can resize EXT4 partition in Windows 11/10 easily.
Content
About Resizing EXT4 Partition in Windows 11/10
How to Resize EXT4 Partition in Windows 11/10 with EaseUS Partition Master
FAQ about Resize EXT4 Partition under Windows
About Resizing EXT4 Partition in Windows 11/10
Ext4 is a journaling file system for the Linux system, developed as the successor to EXT3.
Resizing disk partition is useful for improving hard disk performance. Partitioning is convenient for managing disk space and defragmenting disks. Improve the efficiency of the use of disk space without wasting storage space.
Can Windows 11/10 resize ext4 partition
If you visit the technical blog to ask how to resize Linux partition in Windows, many people will suggest to install dual system for your computer. Because Windows does not support ext4 partition under Linux, not to mention resizing EXT4 partition.
Windows still provide two disk partition methods to resize partition — Disk Management and Diskpart cmd. But none of them can create EXT4 partition, even resize EXT4 partition under Windows. You can’t view EXT4 on windows like you see NTFS system on Linux.
Resize EXT4 partition under Windows without losing data
The non-destructive EXT4 partition of the hard disk refers to the adjustment of the partition without destroying the original data in the hard drive (for example, resizing, dividing one area into two areas, adding new partitions, etc.).
Most of the time, there is no risk to partition hard drive. Although, it is still necessary to back up essential data in case of any unexpected disasters. It is recommended to back up the data before proceeding.
We recommend that you choose your EXT4 partitioning software carefully because some partitioning software is not 100% secure. EaseUS Partition Master is a good partition software. It is easy to operate and master.
In this guide, we provide EaseUS Partition Master to resize the EXT4 partition. You can trust this all-in-one partition tools for data security.
EaseUS Partition Master contains many features such as create, merge, create, format, delete partitions. Besides, it can migrate OS, and clone a hard drive.
- Tip
- EXT4 belongs to the Linux system. If you want to resize EXT4 partition on the Windows with EaseUS Partition Master, you need to connect Linux disk as a slave disk to the Windows PC.
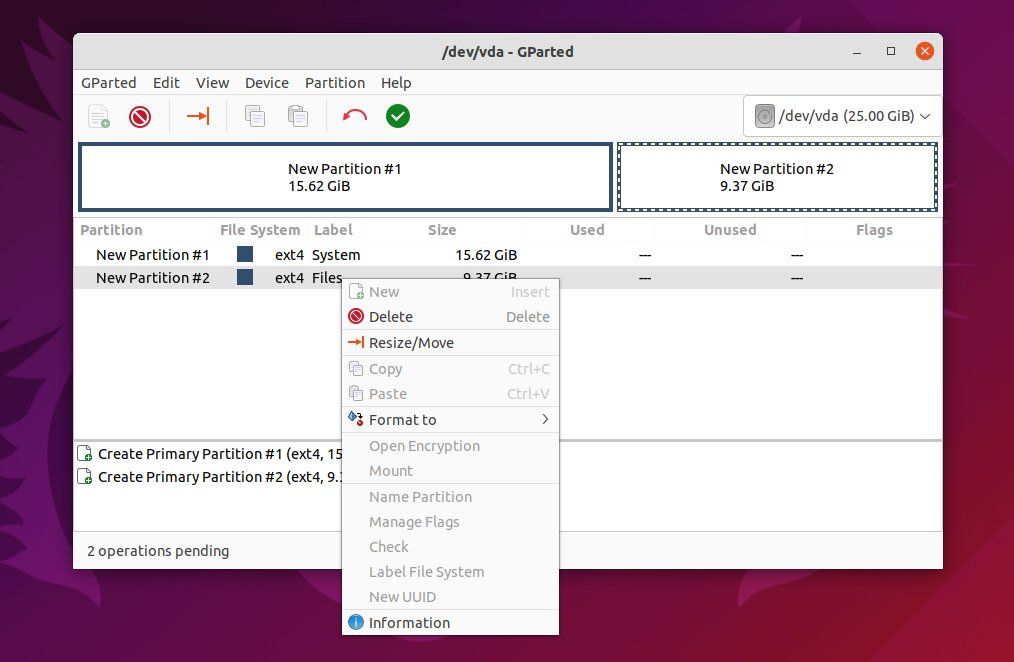
Step 1: Locate and right-click the EXT4 partition, select «Resize/Move».
Step 2: Drag the dot leftward or rightward to resize the partition space.
Or you can drag the whole partition to switch its position with the neighbor unallocated space. And click «OK» to confirm.
Step 3:Click «Execute Task» and click «Apply» to save all the changes.
Furthermore — EXT4 Partition Reader under Windows 11/10
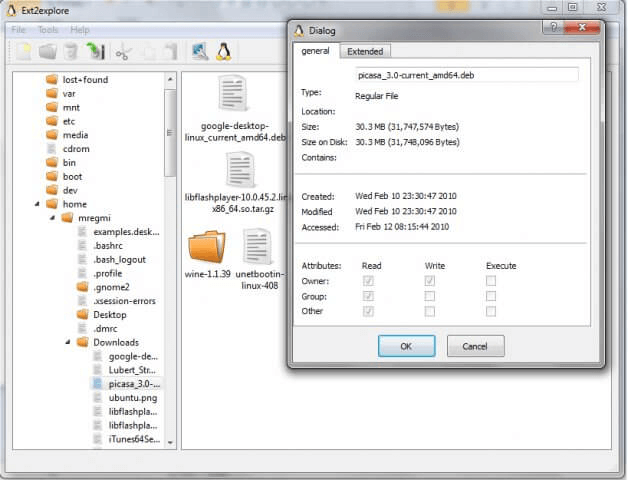
1. The first is Ext2Read.
Ext2Fsd supports EXT2/3/4, but only for read Linux partition.
Features:
- View and copy EXT2/3/4 files and folders.
- LVM2 Support.
- LRU based block cache for faster concurrent access.
- EXT4 Extents support.
- Recursively copy whole directories.
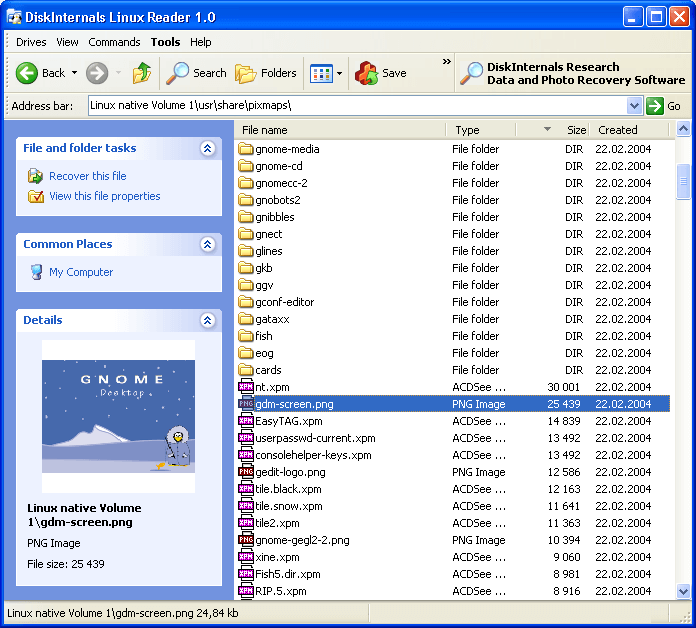
2. The second is DiskInternals Linux Reader for Windows.
Linux Reader supports EXT2/3/4, HFS, and ReiserFS, only for read.
It is a popular and free software product. You can read more file systems including Ext2/3/4, ReiserFS, Reiser4, HFS, HFS+, FAT, exFAT, NTFS, ReFS, UFS2, RomFS(reader), ZFS (preview only*), XFS (preview only*) and Hikvision NAS and DVR (preview only*).
3. The third is Ext2Fsd.
Ext2Fsd is an open-source Linux EXT2/3/4 file system. It supports reading and writing.

Features:
- EXT2/3/4
- Htree index
- Extents
- EXT4
- Uninit_bg
FAQ about resizing EXT4 partition in Windows
1. Can I resize EXT4 Linux partition under Windows?
Windows don’t support EXT4 file system and you can’t read and write data into it. And it is also impossible to resize EXT4 partition under Windows without utilizing a third-party partition tool.
2. Is there any risk of resizing EXT4 partition under Windows?
If your disk has the necessary files, you have better backup your documents. And you can install a third-party partition manager — EaseUS Partition Master. It is designed for Windows to resize EXT4 partition to avoid partition risk.
3. How do I resize EXT4 partition in Windows 10?
- Install and run EaseUS Partition Master.
- Select the EXT4 partition you want to resize.
- Drag the storage bar to set partition size and click OK.
4. Can Windows 10 read and write EXT4 partition?
- Read-only: Ext2Read and DiskInternals Linux Reader.
Ext2Read is an explorer-like utility to explore EXT2/3/4 files. It can also be used to view and copy disk and data.
Linux Reader will act as a bridge between your Windows and Linux Ext2/3/4 file system. This easy-to-use tool runs under Windows and allows you to browse the Linux Ext2/3/4 file system. It also extract files from there, providing an access mode for the resource manager.
- Read and Write: Ext2Fsd
It directly supports reading and writing of ext2/ 3/4 partitions. But support for ext4 is limited.
Making changes to disk partitions without breaking up your system is easy on Linux. Here’s how to do it.
How do you make changes to and resize hard drive partitions without breaking your system and losing all of your files?
There are various ways to use Linux to manage partitions that are either empty, contain personal files, or Linux system files. However, if you need to resize partitions that contain the operating system files for either macOS or Windows, that’s better done using tools geared toward those platforms.
With that caveat out of the way, let’s start resizing partitions.
Modifying a Windows Partition
If you plan on making changes to a Windows partition (for example, because you want to shrink Windows in order to give more space to Linux), then you’ll need to make changes to your Windows partition from within Windows.
Do not touch your Windows partition with the Linux resizing tools! Otherwise, there’s a good chance that it will break your Windows installation, and you will then have to completely reinstall it.
To resize your Windows partition, right-click on the Start menu if you run Windows 10 and up or open the Start menu and right-click on Computer if you run an older version. Then, select Disk Management.
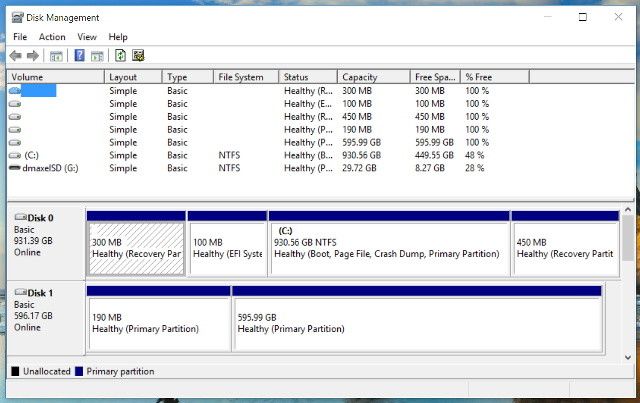
Now, right-click on the partition you want to change, and choose Shrink or Grow depending on what you want to do. Follow the wizard and you’ll be able to safely resize that partition.
Resizing Linux Partitions on Linux
While there are lots of options available for Linux, including a handful of terminal-only tools, let’s focus on GParted, a time-tested graphical tool for manipulating Linux partitions. With GParted, you have three different options that are each better suited for different use cases.
1. Download GParted Live
GParted Live is a specialized distribution based on Debian that allows users to load GParted on any computer via an optical disc or USB flash drive. It does not require any installation—it boots from the media and runs solely in the RAM, but can resize partitions on any hard drives attached to the computer.
If you don’t already have a Linux USB stick lying around, then GParted Live is the quickest option. Even if you already have Linux and a copy of GParted, keep in mind that on Linux, resizing a system partition while it’s running is a bad idea (unlike Windows). Using Gparted Live avoids that issue.
2. Use an Ubuntu Live Disc
This approach is to download the default Ubuntu installation ISO that you can boot from an optical disc or a USB flash drive, but a live version of any other Linux distro is likely to serve just as well. With this, you can boot into a live environment that requires no installation and launch GParted. Ubuntu comes with GParted already included.
Functionally speaking, this method is equally as good as GParted Live. The downside is that downloading the Ubuntu image takes longer than downloading the GParted image. But if you already have a Linux ISO downloaded and ready, or a USB stick that you’ve used to install Linux, then this is actually the faster option.
3. Install GParted on Your Existing System
This is very easy to do because GParted is available in virtually all distributions’ repositories and is the smallest download out of the three options. Ubuntu users can install GParted with the command:
sudo apt install gparted
To install GParted on Arch Linux, run:
sudo pacman -S gparted
Then, simply open GParted, let it scan your hard drives, and right-click on the partitions you’d like to change and pick the corresponding action. Once you’re done modifying the partitions, don’t forget to hit Apply to put your changes into effect.
You should be fine resizing partitions as long as you aren’t changing any system partitions. If you want to do that, you should use one of the above two options.
Resizing Partitions Is Easy on Linux
Resizing partitions really shouldn’t be much of an issue as long as you follow these steps. Of course, it’s still best if you back up all of your data before you make any changes. Chances are, GParted won’t mess up on you, but there’s a chance you might accidentally click on the wrong drive. It’s happened to the best of us.
As a reminder, GParted is hardly your only option. GNOME comes with the excellent GNOME Disks tool. KDE Plasma has the KDE Partition Editor. But if you want a relatively desktop agnostic choice, then GParted is the way to go.
Using a partition manager to resize a Linux partition is not as simple as it may sound. To resize a partition in Windows, you can either use a third-party partition manager or use the built-in Windows Disk Management. This allows you to make the most of the available disk space and optimize the performance of your system. You can also use resizing tools that work in Linux to safely resize your Linux partition.
First, open the Disk Management window. In the ‘Partition’ tab, click on ‘Resize/Move’. In the resulting window, click on a partition and drag it to the right side. You can change the size of a partition by entering the correct number. Once you have made the desired adjustment, click the “Start” button to perform the process. Note that you do not need to delete any data from the partition when resizing it.
Removing the Windows partition will have no effect on booting Windows. Windows will report an error at boot-up if the disk size does not match the records. Once this check is finished, reboot your PC. Using a Linux partition manager, you can resize partitions without affecting Windows boot-up. You can also use the tool CHKDSK to check your disk health. This will allow you to check if there are any errors or other problems.
Can I Extend Ubuntu Partition From Windows?
If you need to increase the size of your Ubuntu partition, you can extend it by booting to Windows. You can use Windows’ Partition Manager to extend the size of your partition. Windows partitions are typically twenty to thirty GB in size. To increase the size of your Ubuntu partition, you need to free up additional disk space. Fortunately, this process is easy, even for beginners. Here are some tips for partitioning your Windows partition.
First, connect your virtual disk to another VM. This will be your source VM and your helper VM. Windows 7 and XP have different methods for extending partitions. Windows XP’s native tools do not allow you to extend partitions in Ubuntu. Windows 7’s tools do the job just fine. Once you have installed your virtual disk, run the partition manager and select Extend Volume.
Can I Increase Linux Partition Size?
How can you increase the size of a Linux partition from Windows? There are a few options. The first option is to edit the partition size in Windows. To do this, you should be logged in as an administrator. Click “Create and format hard disk partitions” and then choose a specific amount for the new partition. Then click “OK” and reboot. The partition should now be larger than its current size.
If you’d like to increase the size of an existing partition, you can use the partition resize/move feature. This will expand the partition size by half. This method will leave you with a partition that has a free space of at least 8 MiB. However, you should note that free space cannot be used for data storage. If you’d prefer to use the partition as it is, you can also shrink the existing partition to free up space.
Alternatively, you can also use the GParted tool to change the size of a partition. GParted is an excellent universal tool for changing the size of a disk partition. Once you’ve identified which partition is MBR and which one is GPT, you can use the partition extender utility to change its size. Once you’ve made the changes, you can check out the free space in Disk Management and Windows Explorer.
How Do I Change Partition Size in Linux?
If you’re wondering how to change partition size in Linux, you’ve come to the right place. First, you need to unmount your disk in order to resize it. In Linux, this is impossible unless you unmount the root device. This can be done using the command hcl detach diskname, where diskname is the name of the disk, for example, /dev/sdb1. To change the size of your partition, type the i partition-number command and then press Enter to execute it.
In addition to the command line, there are several utilities in Linux that allow you to resize disk partitions. For example, fdisk is available on all Linux distributions. It allows you to resize a single partition or multiple partitions. If you need more space, simply specify the size in Gigabytes, Megabytes, or Wise bytes. When using this program, you must make sure that your partition table is GPT or msdos.
Can I resize an EXT4 partition from Windows? Yes, you can! The file system Ext4 was released in April 2009 and is the successor of EXT3. It is an efficient way to manage disk space and defragment disks. Resizing a disk partition is a simple and effective way to optimize hard drive performance. To perform this operation, you must first format the partition in Windows.
Fortunately, there are some built-in tools available to resize partitions. One tool is resize2fs, which was originally designed for Linux systems and has been ported to Windows. To use this tool on Windows, however, you will have to perform a command-line procedure. To use resize2fs, you must have root permissions on the disk.
You cannot create an EXT4 partition in Windows using the Disk Management or Diskpart command. This is because Linux and Windows use different file systems. While Linux supports the NTFS system, Windows isn’t capable of reading the Ext4 file system. That means that you must use third-party software to create an Ext4 partition on Windows. Therefore, Windows cannot create an EXT4 partition with these methods.
How Resize C Drive in Ubuntu?
In Ubuntu, you can resize the C drive by right-clicking it and selecting “resize/move volume.” Then, drag the right border towards the left. This will make a new partition on the C drive and you can combine it with the D drive. Note that you need to set a password. Then, wait for the resizing process to complete. Once the resizing process is complete, you can delete the existing partitions.
If you’re using a Linux operating system, Gparted is the application you need. Once you have installed this application, open a terminal window and follow the installation instructions. Alternatively, you can install Gparted from the Ubuntu primary software repository. It’s part of the “Debian Main” repository, and you’ll need to install apt-get to install it. Make sure you choose the correct installation method, as the installers are not as intuitive.
How Do I Get More Space on Linux?
In Linux, you can manually clear the /tmp directory, but this is not recommended. Your main interest should be the /var directory, which contains files such as ‘/var/log’, ‘/var/cache’, and incremental backups. The latter can take up the entire disk, so deleting this can free up space. To defragment the disk, you need to have root privileges.
You can also use the rmLint tool to scan multiple directories for duplicate files, non-stripped binaries, and broken symbolic links. The program will then generate shell scripts and executable output. This tool automatically removes those files. Once you have used it, you can reboot to enjoy more space on your system. You can then install a virtual disk if you need more space.
The ls command shows the size of each file in a directory, as well as the total amount of space that they take up. This command is also helpful in identifying which directories are taking up most space. You can further narrow down the directory that’s taking up most space by repeatedly typing ‘du’. After doing this, you’ll have a clearer picture of which files and folders are consuming the most space on your disk.
How Do I Make My Ubuntu Partition Bigger?
If you want to increase the size of your Ubuntu partition, you must follow these steps. To do this, you must use a USB drive or live CD. Once you have the live CD, run the partition editor GParted. It is a compact graphical partition editor. The program also acts as a front-end to Linux’s terminal commands. Once you have the partition editor, you must choose a file system to expand or decrease the size of.
You can resize the partition size using Gparted. First, load the partition on the hard drive and click on the right-click menu. Next, check the box labelled “apply changes”.
Learn More Here:
1.) Windows Help Center
2.) Windows – Wikipedia
3.) Windows Blog
4.) Windows Central
-
Home
-
Resize Partition
- The Simplest Way to Resize Ubuntu Partition Under Windows
By Irene |
Last Updated
Some users don’t know how to resize Ubuntu partition when they find the partition size is unreasonably. This article will show you how to resize Ubuntu partition under Windows.
What Is Ubuntu
Ubuntu is a kind of Linux operating system, and it is developed by Mark Shuttleworth on the basis of Debian. This operating system is developed to make it easy to use personal computer.Meanwhile, it also offers server edition for enterprise.
Users who have used Ubuntu know Ubuntu computer can be used once it opens instead of costing much time to install browser, media player, office suite, and other commonly used software, which promotes the ease of use of the system.
Besides, this operating system provides users with many drives of hardware device. Therefore, Ubuntu is preferred by many Linux fans and has become the best Linux operating system.
However, after you use it for a while, they may find the Ubuntu partitions on the device are unreasonable and want to change the sizes of the partitions. Under this situation, many users don’t know how to resize partition Ubuntu as Ubuntu operating system is different form Windows and some Windows disk partition resizer cannot be used in Ubuntu.
Since Ubuntu and Windows are different operating system platforms, the simplest way to resize Ubuntu partition is that you can resize the Ubuntu partition under Windows if your computer is dual-boot.
It is recommended to use reliable third-party tools to resize Ubuntu partition as Windows built-in Disk Management is much limited when you use its Extend Volume or Shrink Volume to resize partition. See: Why Extend Volume Grayed out and How to Quickly Fix It
Ubuntu Resize Partition
Why Do You Choose MiniTool Partition Wizard Free Edtition
As is known to all, there are many excellent partition managers on the market to help Windows users to resize partitions if there is insufficient space and manage disks and partitions. However, most of them do not support this feature.
Luckily, nowadays, dual booting Linux with Windows is always suggestible for the beginners. For this kind of users, they can resize Ubuntu partition under Windows operating system with a third-party partition manager.
You can choose MiniTool Partition Wizard Free Edition to resize Ubuntu partition or Windows partition as this partition manager won’t damage data on related partitions, and you can manage Windows partition and Ubuntu partition at ease with just one partition manager.
How to Resize Ubuntu Partition with MiniTool Partition Wizard?
Note: MiniTool Partition Wizard can only resize FAT and NTFS partition. NTFS data partition can be identified and used in both Windows operating system and Ubuntu, so you can resize a NTFS partition of Ubuntu with MiniTool Partition Wizard.
Here is a tutorial:
Step 1. Download MiniTool Partition Wizard Free Edition by clicking the following button. Install it on your Windows operating system and launch it to get the main interface.
MiniTool Partition Wizard FreeClick to Download100%Clean & Safe
Step 2. This software will list all partitions on your computer. Then, you need to select the Ubuntu partition that you want to change sizes, and click Move/Resize Partition option from left action panel. You can see from the following image.
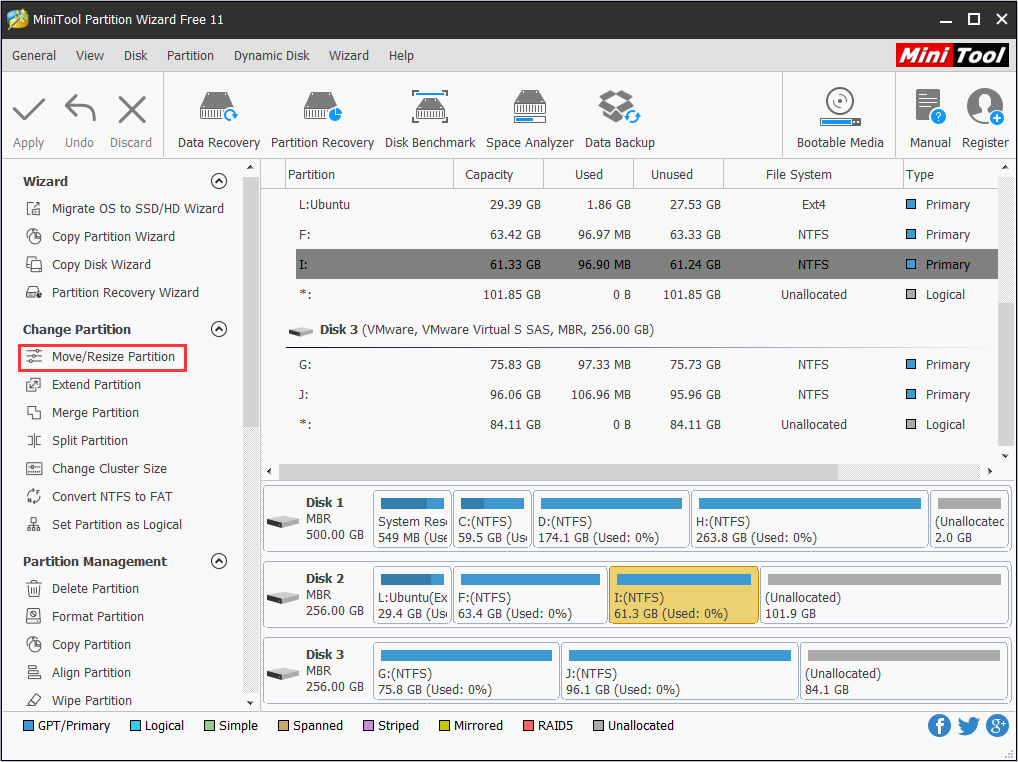
Step 3. In the following interface, drag the partition handle rightwards or leftwards to extend or shrink partition. Then, click OK to go back to the main interface.
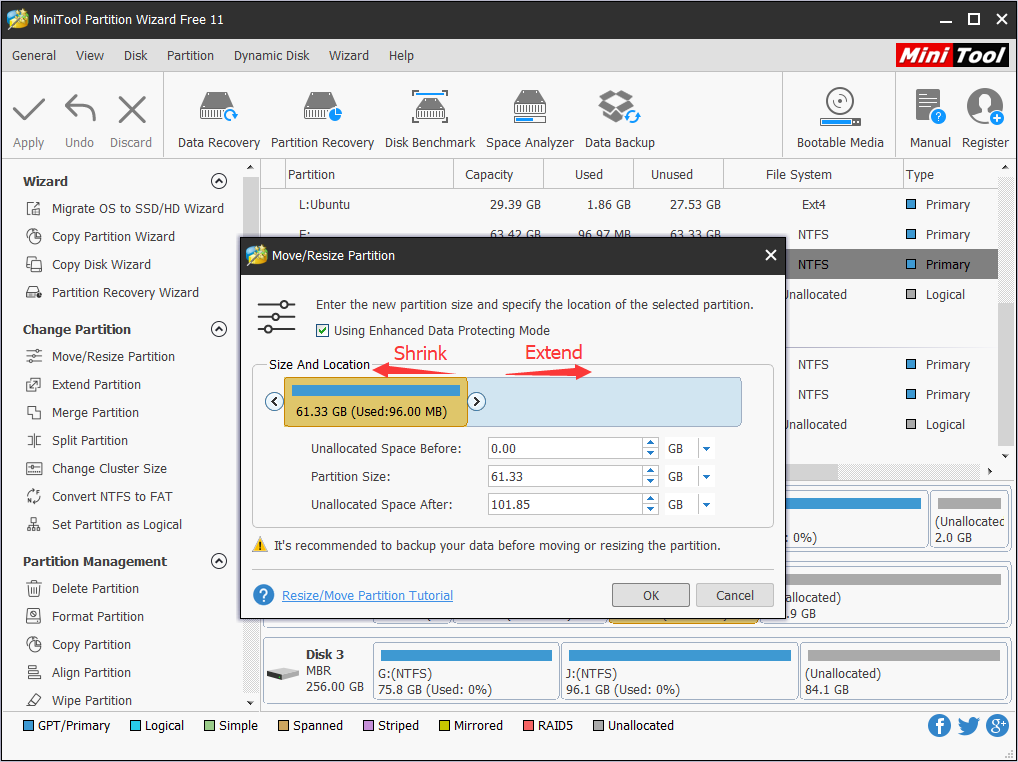
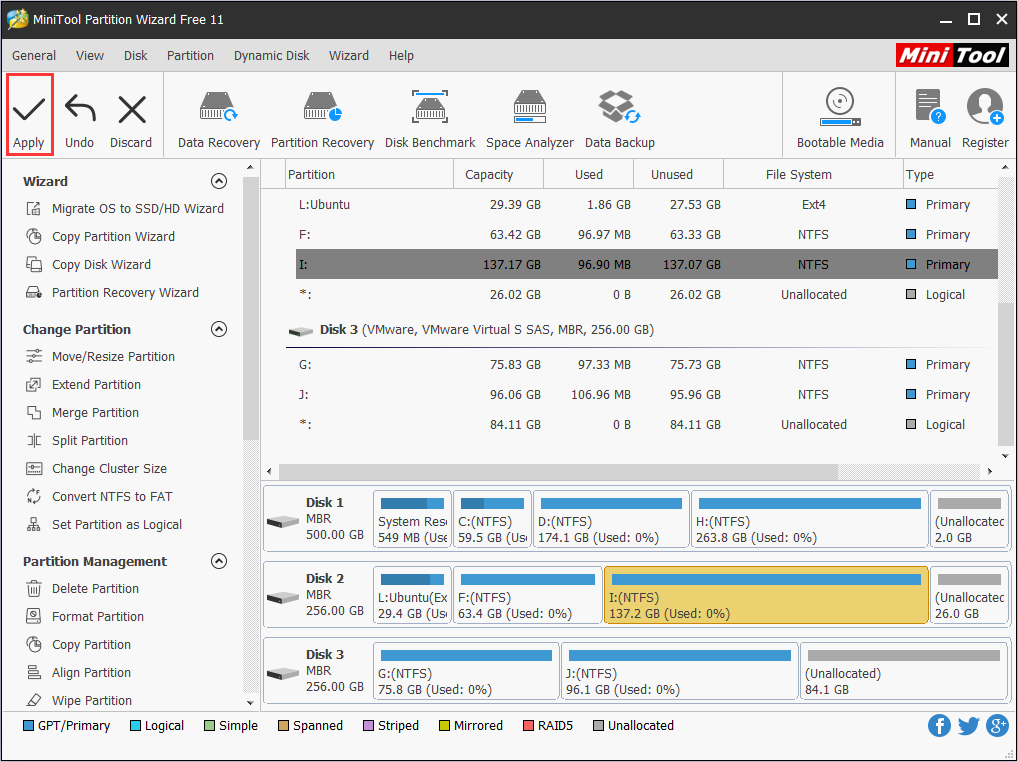
Step 3. Next, click Apply to perform the pending operation.
Note: If you want to complete Ubuntu extend partition task under Windows but there is not unallocated device space, you can use MiniTool Partition Wizard’s Extend Partition feature to extend partition by taking unused space from another partition.
MiniTool Partition Wizard is an excellent professional partition magic for Ubuntu increase partition size! With this tool, I successfully resized my Ubuntu partition under Windows. Are you looking for an Ubuntu partition resizing tool? Try this one.Click to Tweet
Verdict
You see, it is not impossible to resize partition sizes in Ubuntu. If you are an Ubuntu and Windows dual-boot user, you can resize Ubuntu easily with MiniTool Partition Wizard under Windows.
If you have any question about Ubuntu resize partition with MiniTool Partition Wizard, you can leave a message on the following comment zone and we will reply as soon as possible. If you need any help when using MiniTool software, you can contact us via [email protected].
About The Author
Position: Columnist
Irene joined MiniTool in 2018 and has since become a professional in the areas of disk management and Windows tricks. Irene’s expertise allows her to assist clients with managing their hard drives, optimizing their Windows operating system, and troubleshooting any technical issues that arise.