Click or tap the “Uninstall a program” link, found in the Programs section of the Control Panel. The “Programs and Features” window is mostly used to uninstall unwanted apps and programs. Click or tap the “Turn Windows features on or off” option in the column on the left.
Unnecessary Features You Can Turn Off In Windows 10. To disable Windows 10 features, go to Control Panel, click on Program and then choose Programs and Features. You can also access “Programs and Features” by right-clicking on Windows logo and choose it there.
What bloatware should I remove from Windows 10?
Now, let’s look at what apps you should uninstall from Windows—remove any of the below if they’re on your system! QuickTime. CCleaner. Crappy PC Cleaners. uTorrent. Adobe Flash Player and Shockwave Player. Java. Microsoft Silverlight. All Toolbars and Junk Browser Extensions.
How do I fix the most annoying Windows 10?
How to Fix the Most Annoying Things in Windows 10 Stop Auto Reboots. Prevent Sticky Keys. Calm the UAC Down. Delete Unused Apps. Use a Local Account. Use a PIN, Not a Password. Skip the Password Login. Refresh Instead of Reset.
What apps can I safely delete from Windows 10?
What apps and programs are safe to delete/uninstall? Alarms & Clocks. Calculator. Camera. Groove Music. Mail & Calendar. Maps. Movies & TV. OneNote.
Which Windows 10 services can I disable?
So you can safely disable these unnecessary Windows 10 services and satisfy your craving for pure speed. Some Common Sense Advice First. The Print Spooler. Windows Image Acquisition. Fax Services. Bluetooth. Windows Search. Windows Error Reporting. Windows Insider Service.
What happens if I disable Windows features?
Depending on the features you enabled or disabled, Windows may require you reboot your computer for the changes to take effect. You can do this entirely offline and without any Internet connection. The features are stored on your computer and aren’t downloaded when you enable them.
How do I permanently remove bloatware from Windows 10?
Find the application you want to remove, right-click, and select Uninstall. Microsoft has made it simple to remove the more cosmetic items within Windows 10. But you will quickly realize that Microsoft doesn’t consider all apps equal.
What is the best bloatware remover?
1: NoBloat Free. NoBloat Free (Figure A) allows you to successfully (and completely) remove preinstalled bloatware from your device. Getting rid of bloatware is just a matter of locating it in the System apps listing, tapping it, and selecting either Disable, Backup, Backup And Delete, or Delete Without Backup.
What can I delete from Windows 10?
Windows suggests different types of files you can remove, including Recycle Bin files, Windows Update Cleanup files, upgrade log files, device driver packages, temporary internet files, and temporary files.
What are bad things about Windows 10?
Here’s our abridged list of things in Windows 10 that are as bad as stepping on a Lego. Forced Auto Updates. Unusable Start Menu Search. Bloatware and Sponsored Apps. Spying and Privacy Issues. The Registry Rat’s Nest. Installer Vomit. User Interface Dissonance. 21 comments.
What are the problems with Windows 10?
9 Most Common Windows 10 Problems and Their Solutions #1. Stop too much data usage in the background. #2. Minimize notifications. #3. Access Safe mode. #4. Disable Delivery Optimization. #5. Hide the search bar. #6. Disable background apps. #7. Hibernate option not available in power menu. #8.
Why won’t my computer let me type?
Your keyboard won’t type issue could happen just because your keyboard or the system that your computer is running gets stuck somehow. Once your keyboard is not working, you can firstly restart your computer. A simple restart can always solve computer woes.
What preinstalled apps should I uninstall?
Here are five apps you should delete immediately. Apps that claim to save RAM. Apps running in the background eat up your RAM and use battery life, even if they’re on standby. Clean Master (or any cleaning app) Use ‘Lite’ versions of Social media apps. Difficult to delete manufacturer bloatware. Battery savers. 254 comments.
Will there be a Windows 11?
Microsoft has officially announced Windows 11, the next major software update, which will be coming to all compatible PCs later this year. Microsoft has officially announced Windows 11, the next major software update that will be coming to all compatible PCs later this year.
How do I remove all bloatware?
To get rid of any app from your Android phone, bloatware or otherwise, open up Settings and choose Apps and notifications, then See all apps. If you’re sure you can do without something, select the app then choose Uninstall to have it removed.
What services can I disable in msconfig?
Safe-To-Disable Services Tablet PC Input Service (in Windows 7) / Touch Keyboard and Handwriting Panel Service (Windows  Windows Time. Secondary logon (Will disable fast user switching) Fax. Print Spooler. Offline Files. Routing and Remote Access Service. Bluetooth Support Service.
What programs can I disable at startup Windows 10?
You can often prevent a program from automatically starting in its preferences window. For example, common programs like uTorrent, Skype, and Steam allow you to disable the autostart feature in their options windows.
Should I turn off background apps Windows 10?
The choice is yours. Important: Preventing an app from running in the background doesn’t mean you can’t use it. It simply means it won’t be running in the background when you aren’t using it. You can launch and use any app that’s installed on your system at any time simply by clicking its entry on the Start Menu.
How do I turn off Windows features?
To turn Windows features on or off, follow these steps: Click the Start button. Click Control Panel. Click Programs. Click Turn Windows features on or off. If you’re prompted for an administrator password or confirmation, type the password or provide confirmation.
How do I remove Windows features?
Here’s how to turn on or off optional features on Windows 10 using Control Panel: Open Control Panel. Click on Programs. Click the Turn Windows features on or off link. On Windows Features, check or clear the feature you want. Click OK to enable and disable the feature.
What is Windows 10 optional features?
Explaining the Windows 10 Optional Features . Containers: Provides services and tools to create and manage Windows Server Containers. Device Lockdown: Protect against drive writes, have an unbranded boot screen, and filter keyboard strokes—designed for machines in public settings.
- Первым делом: создайте точку восстановления системы
- Удаление встроенных приложений Windows
- Отключение служб Windows 10
В операционных системах Windows всегда присутствовал функционал, о наличии которого многие и не догадывались. Для обычных пользователей некоторые из функций/служб/приложений совершенно бесполезны, т.к. они не устанавливают на свои компьютеры такие программы и не подключают такие устройства, для которых создан этот системный функционал. Но все это системное ПО потребляет ресурсы компьютера, т.к. оно запускается при старте Windows, что не только снижает скорость загрузки системы, но и может приводить к различным тормозам и зависаниям непосредственно во время работы.
Далее мы рассмотрим функционал Windows 10, который, по мнению многих пользователей, можно выключить или вовсе удалить.
Первым делом: создайте точку восстановления системы
Если отключение или удаление тех или иных функций операционной системы приведет к возникновению ошибок или неработоспособности какого-либо связанного с ними системного функционала или установленных программ, создаваемая точка восстановления поможет откатить все изменения назад. Создать ее несложно:
- Запустите программу «Выполнить» путем нажатия комбинации клавиш «Win + R»,скопируйте в нее команду systempropertiesprotection и нажмите «ОК»:

- Откроется окно «Свойства системы». Функция восстановления системы может быть отключена, о чем будет свидетельствовать соответствующая надпись в блоке «Параметры защиты». Если это так нажмите кнопку «Настроить» (пропустите это действие и следующий шаг, если функция восстановления включена).
- Установите переключатель в положение «Включить защиту системы», ниже — переместите ползунок «Максимальное использование» примерно на 20%, затем нажмите кнопку «Применить».
- В окне «Свойства системы» нажмите кнопку «Создать». Откроется небольшое окно — впишите в него любое название для точки восстановления и нажмите «Создать».
Все, точка восстановления создана. Если в будущем потребуется использовать функцию отката системы, нужно будет сделать следующее:
- Выполните команду rstrui в приложении «Выполнить» как описано выше.
- В открывшемся окне переведите переключатель в позицию «Выбрать другую точку восстановления»
- Кликните по названию созданной ранее точки восстановления и нажмите «Далее».
- Ожидайте окончания процедуры.
Удаление встроенных приложений Windows
Речь идет о так называемых Metro-приложениях, устанавливаемых на компьютер вместе с операционной системой. К их числу относятся, например, «3D Builder», «OneNote», «Люди» или «Фотографии». Для удаления некоторых встроенных приложений используется встроенное средство «Установка и удаление программ». Другие удаляются только из оболочки Windows PowerShell, представляющей собой консоль для ввода команд.
Удаление ненужных программ при помощи инструмента «Установка и удаление программ»
Здесь все достаточно просто:
- Откройте поиск у меню «Пуск» и начните вписывать в него запрос «Установка и удаление программ». Кликните по найденному элементу.
- Откроется окно со списком всех установленных на компьютере программ (как встроенных, так пользовательских).
- Кликните один раз по названию программы, которую следует деинсталлировать, затем нажмите на появившуюся кнопку «Удалить».
Удаление программ из PowerShell
Начнем с запуска PowerShell с правами администратора (требуется вход в систему с учетной записи администратора):
- Откройте внутрисистемный поиск, кликнув по значку лупы на панели задач (возле меню «Пуск») или используя сочетание клавиш «Win + S».
- Без кавычек скопируйте в поисковую строку — «PowerShell» — и запустите найденное приложение от имени администратора, кликнув по соответствующему элементу.
- Консоль Windows PowerShell будет запущена. Сначала выведем список всех установленных на компьютере Metro-приложений. Для этого скопируйте в консоль команду Get-AppxPackage | Select Name, PackageFullName и затем нажмите клавишу ввода.
- Это список потребуется нам для определения точного написания удаляемого Metro-приложения. В качестве примера удалим программу «Microsoft YourPhone», предназначенную для подключения к компьютеру смартфона/планшета под управлением Windows 10. Команда на удаление любого приложения имеет следующий вид:
Get-AppxPackage <Полное/краткое имя программы > | Remove-AppxPackage
- Полное имя — это название программы, помещенное в столбец «PackageFullName» выведенного ранее списка приложения. Краткое имя — название программы, которое следует вписывать между двумя звездочками (*). Будем использовать второй вариант. Чтобы удалить Microsoft YourPhone, скопируем в консоль такую команду:
Get-AppxPackage *yourphone* | Remove-AppxPackage
- Операция займет несколько секунд. При успешном удалении в консоли просто не будет никаких сообщений об ошибках.
- Чтобы убедиться в успешности удаления, вновь выполните команду вывода установленных метро приложении: Get-AppxPackage | Select Name, PackageFullName. На скришоте ниже видно, что программы «Microsoft YourPhone» нет на прежнем месте.
Теперь остается проделать все шаги для каждого приложения, которое необходимо удалить. Что конкретно удалять, решайте сами. Но мы можем порекомендовать удаление таких программ, как (в скобках даны названия программ в таком виде, в котором их следует помещать между звездочками в команде удаления):
- «3D Builder» (3dbuilder). Это всего лишь инсталлятор программы «3D Builder», можно удалять.
- «Будильники и часы» (alarms). Встроенный в систему будильник, таймер и секундомер.
- «Новости/спорт/погода/финансы» (bing). Еще забыли добавить — «реклама».
- «Камера» (camera). Встроенное приложение для записи видео и создания фото с веб-камеры.
- «Кортана» (cortana). Не пользуетесь голосовым помощником Windows? Если нет, удаляем.
- «Календарь» и «Почта» (communicationsapps). Если не нужно, удаляем.
- «Карты» (maps). Если устраивают онлайн-карты от Google или Яндекса, эти можно удалить.
- «Загрузить или улучшить Office» (officehub). Еще один инсталлятор.
- «OneNote» (onenote). Если не пользуетесь «Заметками», удаляйте.
- «Люди» (people). Почти невостребованный мессенджер.
- «Загрузить Skype» (skypeapp). Снова инстяллятор, но теперь для Skype.
- «Microsoft Solitaire Collection» (solitaire). Можно оставить любителям собирать карточные пасьянсы.
- «Диспетчер телефонов» (windowsphone). Видимо, снова для владельцев Windows Phone.
- «Панель XBOX» (XboxGamingOverlay). Программа для записи игр с экрана, предназначена для геймеров, но и у них почти не востребована.
- «Кино и ТВ» (zunevideo). Очередной мало востребованный видеоплеер от Windows.
- «Музыка Groove» (zunemusic). А это аудиоплеер.
Количество встроенных программ (как в разделе «Установка и удаление программ», так и в списке PowerShell) может отличаться в разных версиях сборок Windows 10. По любой из них можно найти информацию в интернете и решить — стоит ли ее удалять или нет.
Отключение служб Windows 10
Как и в случае со встроенными программами, в Windows 10 присутствует целый ряд предустановленных служб, которые имеют специфическое предназначение и зачастую оказываются бесполезными для обычных пользователей ПК. Но опять же, перед отключением той или иной службы рекомендуем ознакомиться с ее предназначением. К счастью, удалять их не нужно и при необходимости службу можно легко запустить.
Сам процесс отключение не сложен. Сначала запустим приложение «Службы»:
- Откройте «Диспетчер задач» (комбинация клавиш «Ctrl + Shift + Esc») и перейдите в нем во вкладку «Службы».
- Кликните правой кнопкой мыши по любой службе в списке и выберите из контекстного меню пункт «Открыть службы».
Для примера выключим службу «Удаленный реестр» (она как раз входит в число ненужных большинству пользователей служб):
- Найдите названную службу в списке приложения «Службы» и кликните по ней два раза мышкой, чтобы открыть окно свойств.
- В списке «Тип запуска» окна свойств службы «Удаленный реестр» установите вариант «Отключена», затем нажмите кнопку «Остановить».
- В строке «Состояние» отобразится надпись «Остановлена». Окно свойств можно закрыть и перейти к отключению следующей службы.
Вот список потенциально ненужных служб (в основном здесь собраны те службы, которые включаются при загрузке системы):
- PrintWorkflow. Если нет принтера, а на компьютер не установлены программы для печати, например, в PDF, службу можно отключать.
- Диспетчер печати. То же, что и в предыдущем случае.
- Superfetch. Хоть это и полезная служба (ускоряет запуск часто используемых программ), владельцам SSD-дисков она ни к чему.
- Machine Debug Manager или MDM. Нужна только разработчикам программ.
- Группировка сетевых участников. Не нужна, если компьютер не подключен к локальной сети.
- Диспетчер удостоверения сетевых участников. То же, что и в предыдущем случае.
- Вторичный вход в систему. Если нет необходимости запуска программ от имени других учетных записей Windows, можно отключать.
- Биометрическая служба Windows. Нужна для входа в учетную запись по отпечаткам пальцев и другим биометрическим данным пользователя. Можно отключать, если такие способы авторизации не используются.
- Настройка сервера удаленных рабочих столов. Нужна только пользователям, использующим функционал Windows по удаленному доступу к компьютеру.
- Службы с «Hyper-V» или «HV» в названии. Это комплекс служб, отвечающих за создание и работу виртуальной машины/компьютера. Если данный функционал Windows не используется, их все можно выключить. Просто ищите службы с «Hyper-V» в имени и отключайте их.
- Служба поддержки Bluetooth. Эту и другие службы с «Bluetooth» в названии можно отключить, если к компьютеру не подключаются никакие Bluetooth-устройства.
- Факс. Наверное, никому эта служба, обеспечивающая прием и отправку факсов, не нужна.
- Windows Update Medic Service. Служит для восстановления работы «Центра обновления Windows». Если проблем с обновлениями нет либо они вовсе отключены, эту службу можно выключить.
- Xbox Accessory Management Service. Эту и другие службы с «Xbox» в названии можно отключать, если одноименная приставка от Microsoft не используется или вообще никак не связана с имеющимся компьютером (включая учетные записи Windows).
- Автономные файлы. Обслуживает запросы от различных программ по накопившимся в системе кэш-файлам. Не нужна.
- Журнал событий Windows. Служба, регистрирующая различные события в Windows. Вместе с ней также отключаются еще две службы: «Служба списка сетей» и «Служба сведений о подключенных сетях«. Попробуйте отключить «Журнал событий». Если установленные программы, использующие сеть, нормально работают, все эти службы можно оставить выключенными.
- Обнаружение SSDP (Служба обнаружения SSDP). Имеет смысл отключить службу, если, к примеру, для выхода в интернет не используется мобильный телефон, подключаемый к компьютеру в режиме модема.
- Служба FTP (Майкрософт). В Windows можно создавать свои собственные FTP-серверы. Если в таковых нет нужды, службу можно отключить.
- Служба Windows License Manager. Нужна для проверки лицензий купленных в магазине Microsoft программ. Если таких нет, отключаем службу.
- Служба географического положения. Можно отключить, если нет необходимости предоставлять различным программам данные о своем географическом положении.
- Служба загрузки изображений Windows (WIA). Не нужна, если не используется сканер или веб-камера.
В системном приложении «Службы» также могут присутствовать и другие службы, не перечисленные здесь. Среди них могут быть и те, что запущены установленными программами или драйверами. Чтобы определиться, стоит ли их отключать, рекомендуем поискать информацию о каждой службе в интернете.
Skip to content
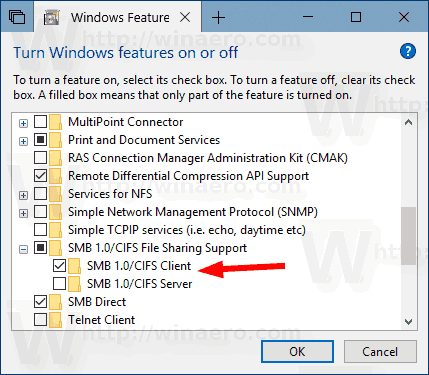
Windows 10 comes with a number of features which are not enabled by default. For example, you can the SMB1 Sharing protocol manually if you really need it. Or, you can remove the XPS Viewer app if you find no use for it. These tasks can be done by managing Optional Features. In this article, we will see how to add or remove Optional features in Windows 10.
Note: The XPS Viewer is no longer installed by default if you install Windows 10 version 1803 from scratch (clean install). If you are using this Windows feature, you need to install it manually.
You can add or remove optional Windows features with Settings, DISM, PowerShell, or by using the appropriate classic Control Panel applet. Let’s review these methods.
To manage optional features in Windows 10, do the following.
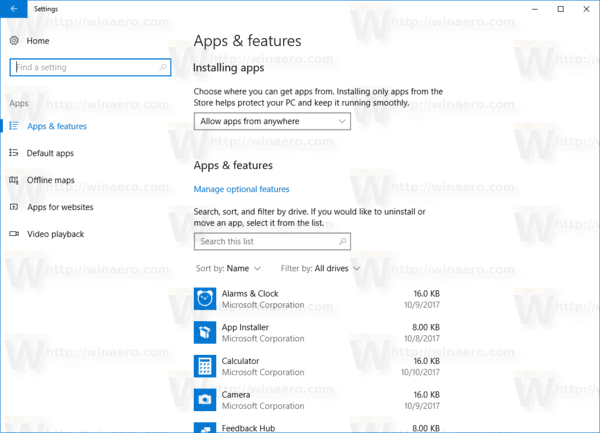
- Open the Settings app.
- Go to Apps > Apps & features.

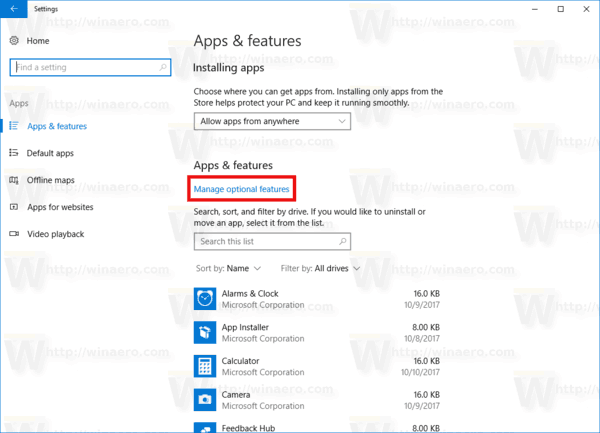
- On the right, click on the link Manage optional features.
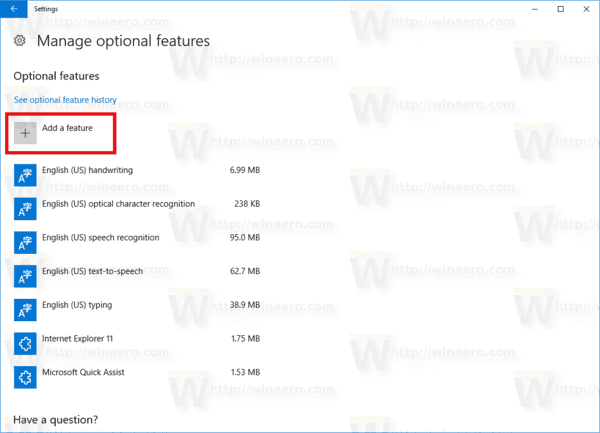
- Click on the button Add a feature at the top of the next page.
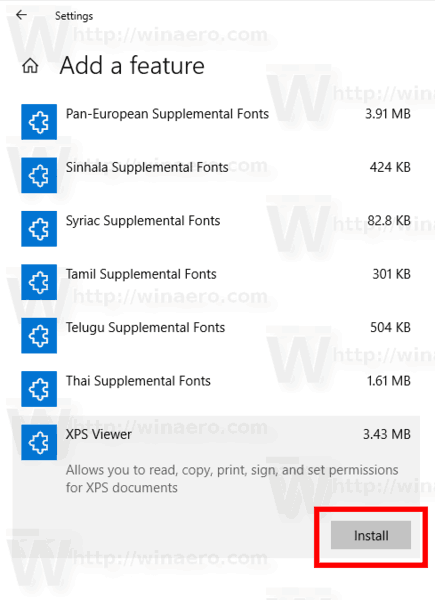
- Find the optional feature you need to install, e.g. XPS Viewer, in the list under Add a feature.
- Select it and click on the Install button.

- To remove an optional feature, select it in the list of the installed feature, and click on the Uninstall button.


Manage optional features using DISM
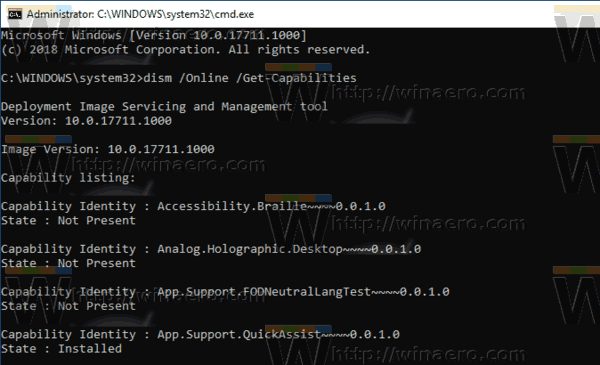
- Open an elevated command prompt.
- Type the following command:
dism /Online /Get-Capabilities.
- Make note of the name of the feature you want to add or remove.
- To add a feature, type
dism /Online /Add-Capability /CapabilityName:<feature name>, e.g.dism /Online /Add-Capability /CapabilityName:XPS.Viewer~~~~0.0.1.0.
- To Remove an optional feature, execute the command
dism /Online /Remove-Capability /CapabilityName:<feature name>, e.g.dism /Online /Remove-Capability /CapabilityName:XPS.Viewer~~~~0.0.1.0.

Manage Optional Features with PowerShell
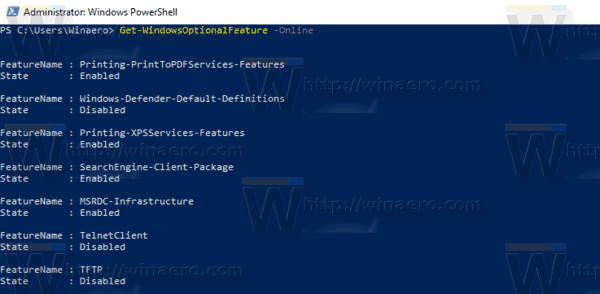
- Open PowerShell as Administrator.Tip: You can add «Open PowerShell As Administrator» context menu.
- Type or copy-paste the following command:
Get-WindowsOptionalFeature -Online.
- Make note of the name of the feature you want to add or remove.
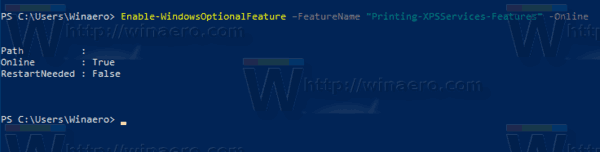
- To add an optional feature, run the command
Enable-WindowsOptionalFeature –FeatureName "name" -All -Online.
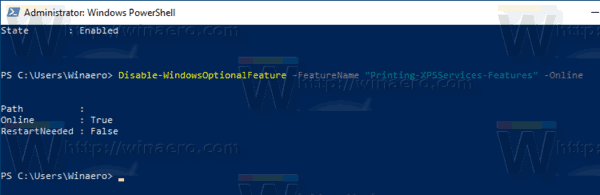
- To remove an optional feature, execute the command:
Disable-WindowsOptionalFeature –FeatureName "name" -Online.
- If prompted to restart the computer to apply, type Y, and hit the Enter key.
Finally, you can use the good old Control Panel applet.
Manage optional features using the Windows Features applet.
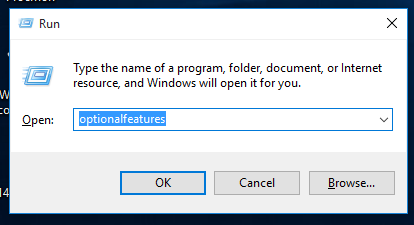
- Press the Win + R keys to open Run and type
optionalfeatures.exeinto the Run box.
- Find the desired feature in the list and check the box to enable it.

- Unckeck the desired feature to remove it.
That’s it.
Support us
Winaero greatly relies on your support. You can help the site keep bringing you interesting and useful content and software by using these options:
If you like this article, please share it using the buttons below. It won’t take a lot from you, but it will help us grow. Thanks for your support!
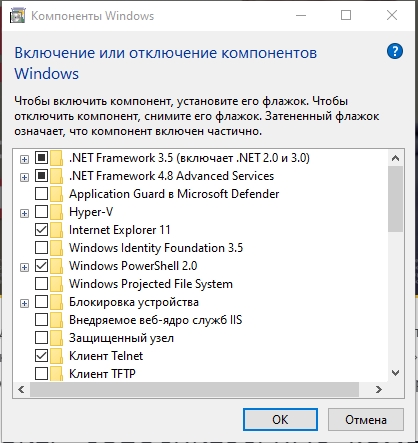
Всем привет! Сегодня мы поговорим про включение и отключение компонентов в системе. Мы посмотрим, как их открыть в любой из существующих версий Windows (10, 11, 7 или 8). Я расскажу вам, как установить или наоборот выключить дополнительные пакеты, которые система использует для работы с определенными программами или протоколами.
Содержание
- Способ 1: Панель управления
- Способ 2: Параметры Windows 10
- Способ 3: Параметры Windows 11
- Способ 4: Командная строка
- Задать вопрос автору статьи
Способ 1: Панель управления

Давайте посмотрим, как же нам открыть раздел Windows Features на любой версии Windows (10, 11, 8, 8.1, 7, XP и т.д.). Для этого мы можем воспользоваться «Панелью управления». Хорошо, что её пока не выпилили на свежих версиях «Окон».
ВНИМАНИЕ! Еще один важный момент – через «Панель управления» можно включить и отключить компоненты, которые уже установлены в системе. Если же вам нужно установить какие-то компоненты, которых еще нет в ОС, то используем вариант с использованием параметров системы (две следующие главы).
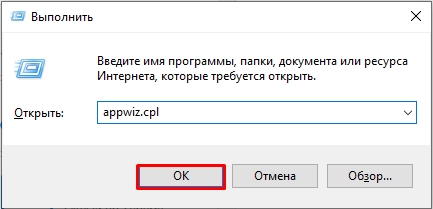
- Одновременно зажимаем клавиши:
+ R
- Теперь открываем пункт:
appwiz.cpl
- Слева выберите ту же ссылку, как на картинке ниже.
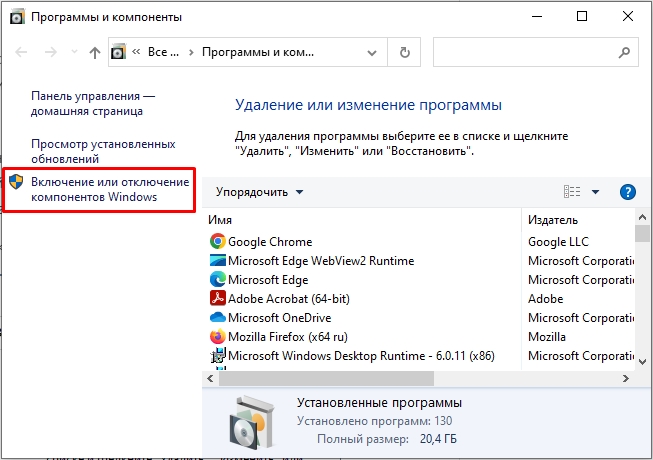
- Теперь включаем или отключаем нужные компоненты и жмем «ОК». Если вас попросят перезапустить систему – сделайте это, чтобы изменения вступили в силу.
Открыть и установить компоненты в Windows 10 можно через стандартное меню системы.
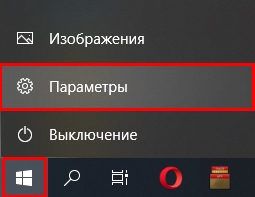
- Откройте «Пуск» и зайдите в «Параметры».
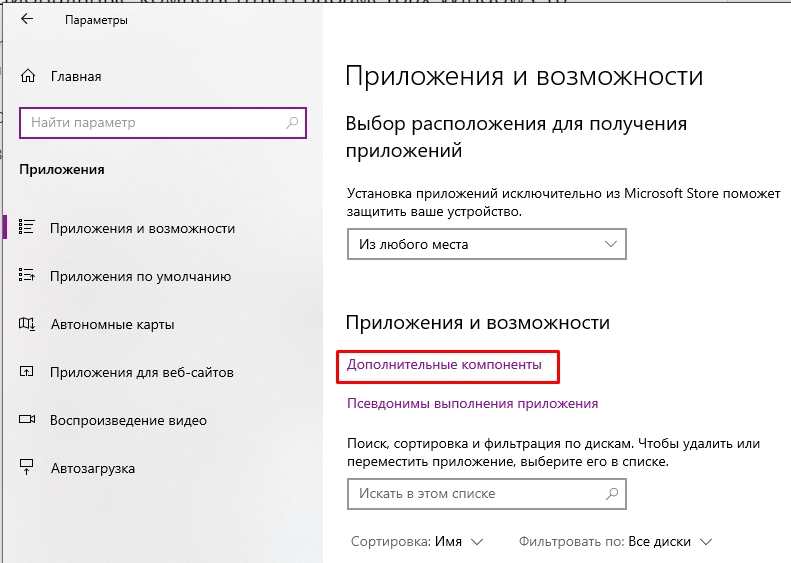
- Среди всего многообразия найдите раздел «Приложения».

- В правой области окошка найдите ссылку «Дополнительные параметры».
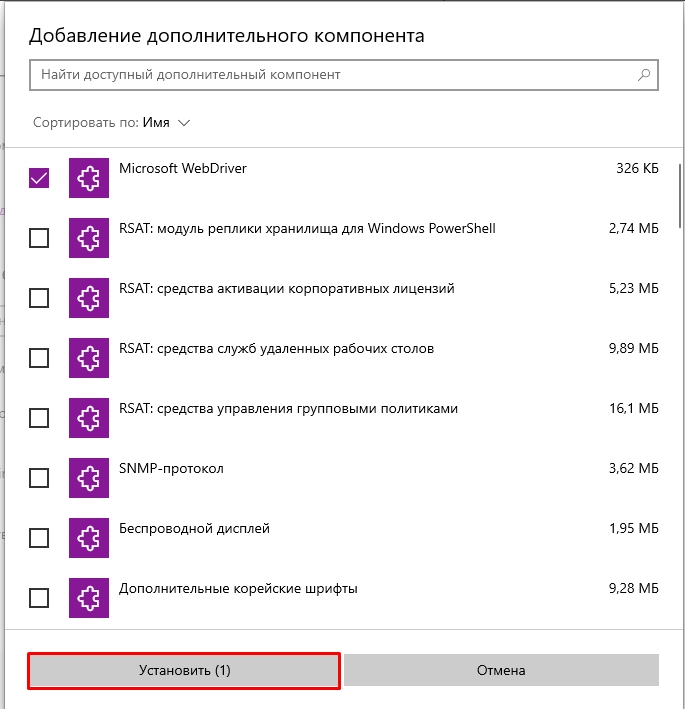
- Если вам нужно добавить пакет, в самом верху нажмите по значку плюсика.
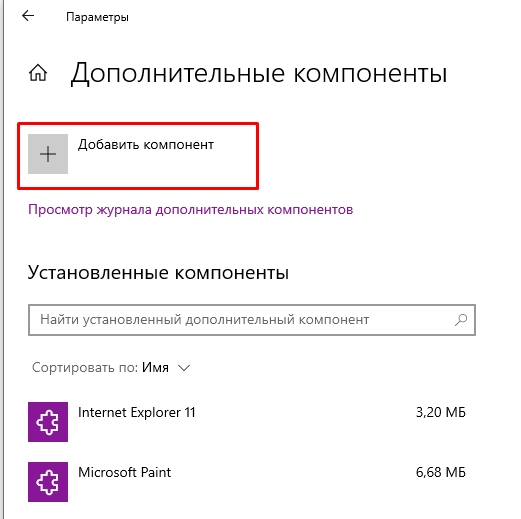
- Выделяем нужный и жмем по кнопке установки. Вы также можете воспользоваться строкой поиска. Компонент будет загружен с сервера и установлен к вам на компьютер.
- Если же вам нужно наоборот удалить пакет – просто выберите его из списка ниже, кликните по нему левой кнопкой мыши и выберите команду «Удалить».
Способ 3: Параметры Windows 11
- Чтобы быстро открыть параметры системы одновременно зажмите две клавиши:
+ I
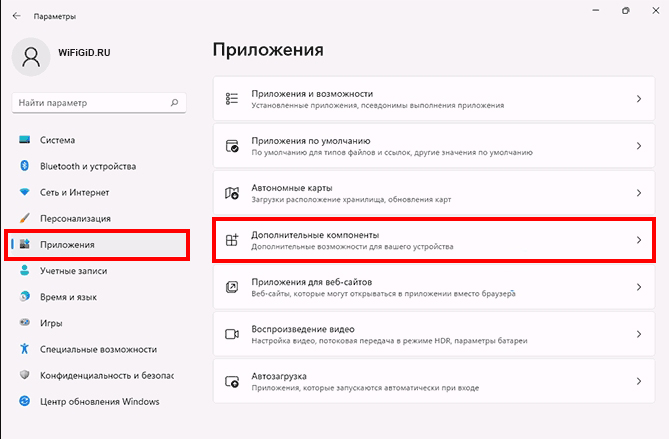
- В левом блоке выберите раздел «Приложения».
- Далее справа находим пункт «Дополнительные компоненты».
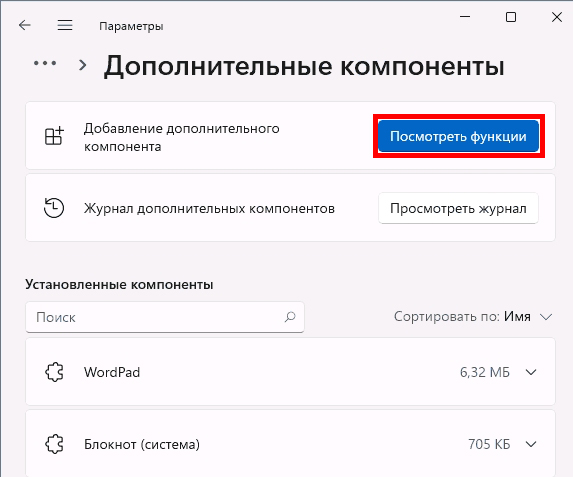
- Внизу вы увидите список уже установленных пакетов, если вам нужно что-то выключить, находим нужный, выделяем и деактивируем. Если же вам нужно что-то установить – в самом верху нажмите по кнопке «Посмотреть функции».
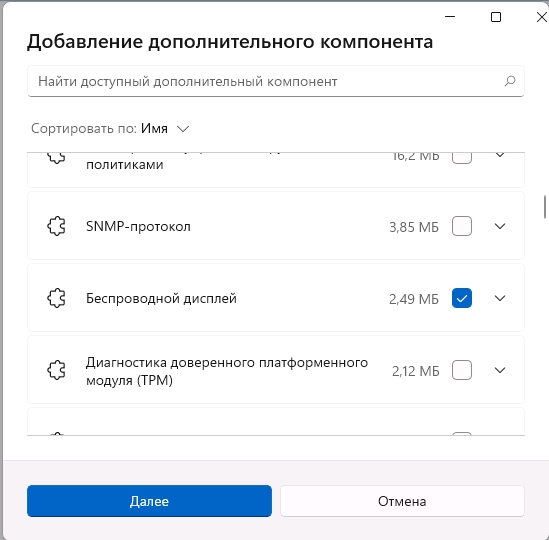
- Все аналогично как и в десятой версии «Окон», находим нужный компонент, выделяем и жмем «Далее». После этого устанавливаем к себе в операционную систему.
Способ 4: Командная строка
Инсталлировать дополнительный пакет можно с помощью консоли. Для этого запускаем командную строку с правами администратора. Сначала нам нужно узнать список всех доступных компонентов. Также вы увидите, что уже установлено. Вводим:
Dism /online /Get-Features
Как только вы нашли нужный пакет, используем команду установки:
Dism /online /Enable-Feature /FeatureName:ИМЯ_КОМПОНЕНТА /All
После этого он будет установлен. Напомню, что таким же образом можно использовать команды для скриптов, которые запускаются из-под Windows. На этом все, дорогие друзья портала WiFiGiD.RU. Если что-то осталось неясным – пишите в комментариях.
The Windows operating system offers several additional features that most of us may not need. But they are there if you need them! In this post, we will see how to Turn Windows features On or Off via the Control Panel, and how to add, remove or manage some Optional Features using Windows 11/10 Settings. PowerShell and Command Prompt methods have also been discussed here.
While the default installation is good for most of us, there may be some features that IT Pro’s, System Administrators or Developers may need. Windows allows you to install and activate such features. You can turn some features on or off using the Control Panel, or you may need to use the Settings app in Windows 11/10 if you need to add some optional features.
What are Optional features?
As the name implies, Windows Optional features are the features that may or may not be required by Windows users. Windows OS has an option to add or remove these features. We have already explained the process to manage Optional features in Windows 11/10 in this article.
How do I add or remove Windows features?
The option to add or remove Windows features is available in the Control Panel or Windows Settings. We have described the process to install Windows features on Windows 11/10 computers above in this post. You can do it in 5 ways.
1] Turn Windows features On or Off using Control Panel
The steps to turn Windows features on or off via Control Panel are the same for both Windows 11 and Windows 10 computers. Hence, it does not matter whether you are a Windows 11 or Windows 10 user, the procedure that we have explained below implies to both of these operating systems.
From the Start Menu, open the Control Panel and click on the Programs and Features applet.

Here on the left side, you will see a link – Turn Windows features on or off. Click on it to open the following panel.
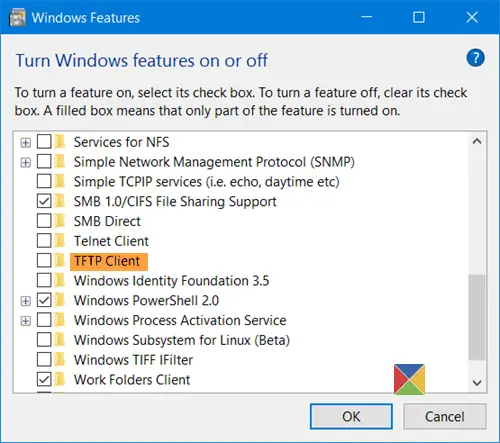
Here you will see the features that are available to you. You may expand a feature by clicking on the ‘+’ sign and select only those features you want to enable. Once you select the feature you want to turn on or deselect one which you want to turn off, click on OK. Windows will start applying the changes and ask you to restart your computer if need be.

On a Windows Pro PC, you will see the following features that you can enable or disable at will.
- .NET Framework 3.5
- .NET Framework 4.6 Advanced Services
- Active Directory Lightweight Services
- Containers
- Data Center Bridging
- Device Lockdown
- Hyper-V
- Internet Explorer 11
- Internet Information Services
- Internet Information Services Hostable Web Core
- Legacy Components like DirectPlay
- Media Features
- Microsoft Message Que Server
- Microsoft Print to PDF
- MultiPoint Connector
- Print and Document Services
- RAS Connection Manager Administration Kit
- Remote Differential Compression API Support
- RIP Listener
- Services for NFS
- Simple Network Management Protocol
- Simple TCPIP services
- SMB 1.0/CIFS Sharing Support
- SMB Direct
- Telnet Client
- TFTP Client
- Windows Identity Foundation 3.5
- Windows PowerShell 2.0
- Windows Process Activation Service
- Windows Subsystem for Linux
- Windows TIFF IFilter
- Work Folders Client
- XPS Services
- XPS Viewer.
See this post if your Turn Windows Features on or off is blank or empty.
2] Manage Optional features via Windows Settings
Windows 11
Windows 11 users have to go through the procedure explained below to manage optional features via Settings.
- Launch Windows 11 Settings app.
- Go to “Apps > Optional features.”
- Install or Optional features as per your requirements.
Let’s discuss these steps in detail.
1] Press Win + I keys to launch the Settings app.
2] In the Settings app, select Apps from the left pane. Now, click on the Optional features tab on the right side.

3] After that, Windows will show you a list of all the optional features installed on your system. If you do not want any of these features, you can uninstall them. For this, click on the down arrow next to the feature that you want to remove and then click on the Uninstall button. Don’t worry you can install the uninstalled feature anytime via the Add an optional feature option.

You have to wait till Windows uninstalls that feature.
4] Now, let’s see how you can install an Optional feature in Windows 11. Microsoft has made some features optional in Windows operating system, as they may or may not be required by the users. Notepad and Wordpad are among the optional features in Windows 11/10. This is the reason why some users have found Notepad or Wordpad missing from their computers.

To install an Optional feature in Windows 11, launch the Settings app and go to “Apps > Optional features.” Now, click on the View features button on the top right side. After that, Windows will show you the list of all the available features that are available for installation on your computer. Now, select a feature from the list and click Next. After that, click Install.

You can also view Optional feature history by clicking on the View history button.
Windows 10
Windows 10 lets you add, remove or manage optional features via its Settings. To access this part, from the WinX Menu, open Settings > System and select Apps & features from the left side.
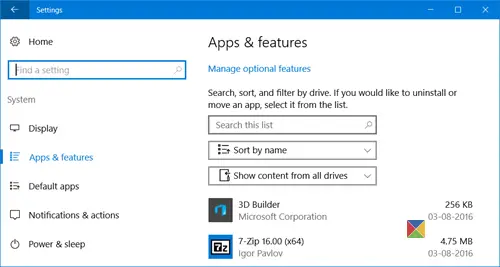
Clicking on the Manage optional features link will open the following box for you.

To remove an app or a feature, select the feature and click on the Uninstall button.
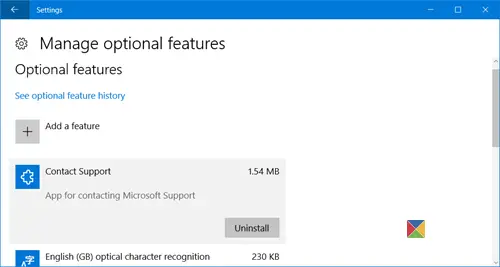
To add a feature, click on the “+ Add a feature” link as shown above. The following window will open.
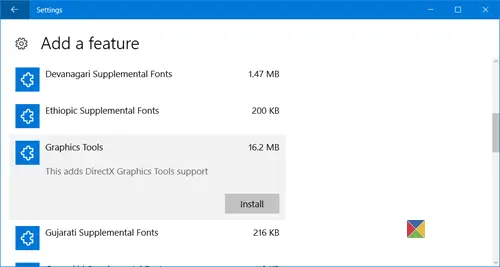
Here you can select the feature and click on the Install button.
Clicking on the See optional feature history will open the following panel, where you will be able to see a history of all the optional features that you added or removed.
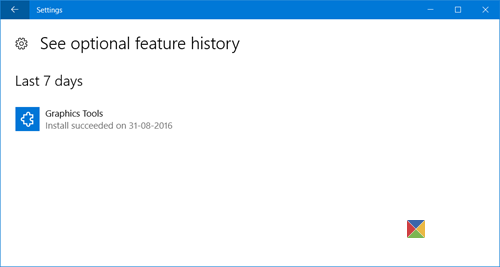
In this way, you can install Graphics Tools, Windows Developer Mode, Fonts and several other optional features like it.
3] Enable or Disable Optional Windows Features using Powershell
Windows Powershell is indeed a very powerful tool. You can do a lot of things with this command line too. While using this, we will first populate the list of available features, then we will be downloading the desired feature, and finally, we will be talking about enabling and disabling that feature.
So first, to populate the list of features, enter this command,
Get-WindowsOptionalFeature -Online
After that, in order to install any feature from the list of features, enter this command:
Get-WindowsOptionalFeature -Online -FeatureName *Type feature name*
Then, to enable any downloaded feature, enter this command,
Enable-WindowsOptionalFeature -Online -FeatureName “Type feature name” -all
Finally, to disable any enabled feature, enter this command,
Disable-WindowsOptionalFeature -Online -FeatureName “Type feature name”
4] Turn On or Off Optional Windows Features using Command Prompt
Start by pressing WINKEY + X button combo or right-click on the Start button and click on Command Prompt (Admin) or just search for cmd in the Cortana search box, right click on the Command Prompt icon and click on Run as Administrator. Click on Yes for the UAC or User Account Control prompt that you get.
Now, type in the following command to populate the list of available features:
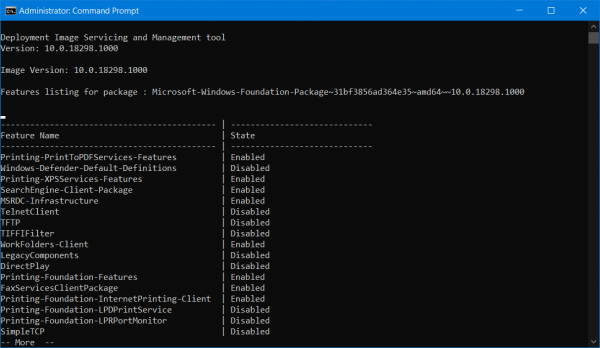
DISM /online /get-features /format:table | more
All you need to do now is copy the name of the feature that you need to enable.
Now, to enable the feature, enter the following command:
DISM /online /enable-feature /featurename:[Enter the name of the feature here] -All
Now, to disable any feature that is enabled on your computer, you need to follow some separate steps.
First, you need to check what all features are enabled. To populate a list of enabled features, enter this command,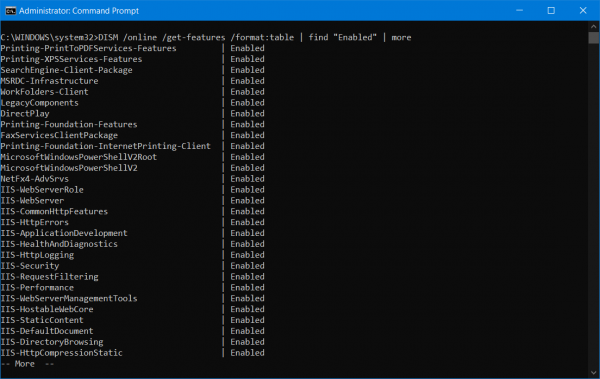
DISM /online /get-features /format:table | find “Enabled" | more
Now, to disable the Enabled feature, enter this command,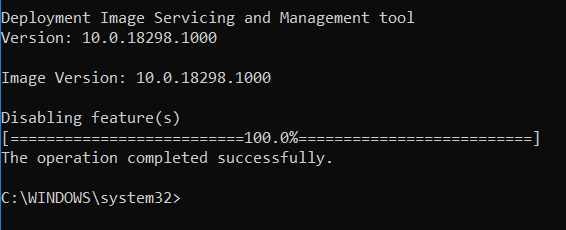
DISM /online /disable-feature /featurename:[Enter the name of the feature here] -All
As a bonus, if you wish to check information in detail about a specific feature, enter this command,
DISM /online /get-featureinfo/featurename:[Enter the name of the feature here]
5] Enable or Disable Optional Windows Features using an external installation source
You can also fetch the latest features from an updated offline source.
This source can be an ISO or any other type of image or just a folder.
For that, all you need to do is decide if you want to use the Command Prompt or Windows Powershell.
If you are using the Command Prompt, enter this command,
Dism.exe /online /enable-feature /featurename:< /All /Source:<Enter the path of the feature here>
And if you tend to use Windows Powershell command line, you can do it too. Just enter this command,
Install-WindowsFeature –Source “<Enter the path of the feature here>”
To get the latest features, you need to get the latest version of the image of the operating system that you are trying to install the feature from.
I hope this helps!
Related: Turn Windows features on or off stuck on Please wait.