On Windows 10, temporary files are those app files stored on your computer to hold information for a short period. In addition, the system has many different temporary file types, including those leftover files after installing a new version, upgrade logs, error reporting, temporary Windows installation files, and more.
Typically, these files won’t cause any issues. However, they can grow quickly using valuable space on the hard drive, which can be the reason preventing you from installing a new version of the operating system, or they can be the reason you are running out of space on your computer. If you use Windows 10, you have a few ways to safely remove temporary files using the Settings app and the Disk Cleanup tool.
This guide will teach you how to quickly delete temporary files on Windows 10 to free up space or reclaim storage space after installing a feature update.
- Delete temporary files on Windows 10 from Settings
- Delete temporary files on Windows 10 from Disk Cleanup
- Delete temporary files on Windows 10 from Temp folder
Delete temporary files on Windows 10 from Settings
To remove temporary files on Windows 10, use these steps:
-
Open Settings on Windows 10.
-
Click on System.
-
Click on Storage.
-
Under the “Local Disk” section, click the Temporary files option.

-
Select the temporary files you want to remove.
-
Click the Remove files button.


Once you complete the steps, junk files will be removed from your computer, freeing up space for more important files.
Delete temporary files automatically
Alternatively, you can use “Storage sense” to automatically free up space by removing those temporary files and content from the recycle bin.
To delete files wasting space automatically using Storage Sense on Windows 10, use these steps:
-
Open Settings.
-
Click on System.
-
Click on Storage.
-
Under the “Storage” section, turn on the toggle switch.

-
(Optional) Click the “Configure Storage Sense or run it now” option to adjust the cleanup settings or run Storage Sense on-demand.


After completing the steps, Storage sense will delete most temporary files and those that have been in the recycle bin for more than 30 days.
Delete temporary files on Windows 10 from Disk Cleanup
If you are getting a message about your device running out of space, you can also use the Disk Cleanup tool to delete temporary files to free up space on your device.
To remove Windows 10 temporary files from Disk Cleanup, use these steps:
-
Open File Explorer.
-
Click on This PC from the left navigation pane.
-
Right-click the drive with the Windows 10 installation and select the Properties option.

-
Click the Disk Cleanup button.

-
Click the “Clean up system files” button.
-
Check the items you want to delete. For example, Temporary Windows Installation Files, Windows upgrade log files, Recycle Bin, Temporary Files, and System created Windows Error Reporting.

-
Click the OK button.
-
Click the Delete Files button.


Once you complete the steps, temporary files will permanently be deleted from your computer, making room for new files.
Delete temporary files on Windows 10 from Temp folder
To clear the temporary files from the Temp folder to free up space, use these steps:
-
Open File Explorer.
-
Type the following path in the address bar and press Enter:
%temp%
-
Click the Select all button from the Home tab.
-
Click the Delete button from the Home tab.

-
Click the Yes button to confirm.

After you complete the steps, Windows 10 will delete the files from the Temp folder, freeing up storage space on your computer.
![]()
Download Article
Free up disk space & speed up your PC by deleting temporary files
![]()
Download Article
- Using Disk Cleanup
- Using Settings
- Clearing Temporary Files Manually
- Video
|
|
|
Windows 10 creates temporary files while you use certain apps to speed up certain processes. However, your PC can create hundreds of temporary files in a day, which take up hard drive space and slow down your computer. For example, an open Microsoft Word document creates a temporary copy of the file every few minutes! This wikiHow will show you how to clear temporary files from your Windows 10 PC using Disk Cleanup, the Settings app, and simple commands in the Run dialog.
Things You Should Know
- Temporary files are mostly harmless, but can fill up your hard drive and make your computer run slow.
- Delete temporary files using the default built-in program called Disk Cleanup.
- You can also manually clear temp files using the Settings app and Run dialog commands.
-

1
Open Disk Cleanup. Search “disk cleanup” in the taskbar’s search box and click the first result, which is the Disk Cleanup app. This is the easiest method for cleaning up temporary files on your Windows 10 computer.
- You can also press the Windows key + S to open the search function if you can’t find it in the taskbar.
-
2
Click the drive you want to clean. The drive you use the most will have the most temporary files.
Advertisement
-
3
Click OK. This will confirm your drive choice.
-
4
Click to check the boxes next to «Temporary Internet Files» and «Temporary Files.» You’ll see how much space they will free up along the right side of the columns.
- Suggested boxes to delete are checked by default; you can leave these checked and delete these files or you can click to uncheck the box and not delete these files.
-
5


Advertisement
-
1
Open your Windows Settings
. You can click on the Start icon and then the gear to open Settings.
-
2
Click System. It’s the computer icon.
-
3
Click Storage. This is near the bottom of the menu on the left.
-
4
Click the drive where Windows 10 is installed. It usually has a Windows logo over the drive icon and might be called “This PC.”
-
5
Click Temporary Files. The number here represents how much space the temporary files are taking up. The next page shows you all the files that are considered temporary files, including files in the Downloads folder, files in the Recycling Bin, and thumbnails.
-
6
Click to check the boxes next to the files you want to delete.
-
7
Click Remove files. You’ll see a progress bar of the deletion.[2]


Advertisement
-
1
Press ⊞ Win+R to open the Run box. This is the most involved method of clearing your temporary files.
-
2
Type “%temp%” in the Run box and press ↵ Enter. You’ll be directed to the folder that contains all the temporary files.
-
3
Select all files and folders. You can click the first file, press and hold ⇧ Shift and click the last file, or you can click the first file and press Ctrl+A to select them all.
-
4
Right-click anywhere in the folder and click Delete. You will need an administrator account to do this.
- All those files are moved into the Recycle Bin and can be restored if needed.
- For more Windows file management, check out our guide on finding hidden files and folders.


Advertisement
Ask a Question
200 characters left
Include your email address to get a message when this question is answered.
Submit
Advertisement
Video
Thanks for submitting a tip for review!
About This Article
Article SummaryX
1. Open Disk Cleanup.
2. Click to check the boxes next to Temporary Internet Files and Temporary Files.
3. Click OK.
Did this summary help you?
Thanks to all authors for creating a page that has been read 298,645 times.
Is this article up to date?
Question: How do I delete temporary files from Windows 10?
“My system lags a lot due to temporary files taking up valuable space on my drive. I want to delete them to free up space on my Windows PC. Can anyone tell me how to delete these temp files? And what is the best way to ensure that I am doing it safely and effectively?”
Temporary files, also referred to as temp or foo files, are files your operating system or program creates to help your computer runs faster and more smoothly. Windows temporary files can be a nuisance, as most often, computers don’t automatically delete them and they can get accumulated over time, therefore taking up storage on your disk space and sometimes leading to system slowing down and crashes. Knowing how to delete temp files in Windows 10/11 will boost the performance of your computer, ensuring it runs without a hitch. In this article, we’ll explain briefly where temp files are stored. We’ll also discuss the five best ways of removing temporary files with manual and automatic methods.

- Part 1: Where Are Temporary Files Stored?
- Part 2: How to Delete Temporary Files in Windows 10/11?
- Method 1: Delete Temporary Files in Windows 10/11 Using Run
- Method 2: Delete Temporary Files in Windows 10/11 from Settings
- Method 3: Auto Delete Temp Files Windows 10/11 by Activating Storage Sense
- Method 4: Delete Temporary Files In Windows 10/11 via Disk Cleanup
- Method 5: Use the Command Line to Delete Temp Files Windows 10/11
- Bonus Tip: How to Recover Deleted Temporary Files in Windows 10/11
- FAQs about Temporary Files in Windows 10/11
Part 1: Where Are Temporary Files Stored?
Before we go through the methods of deleting temporary files, let’s first figure out the question –where are temporary files stored Windows 10/11?
Temp files can be found located in different folders depending on what has creates them. The ones that Windows OS creates are typically stored in the “%system%\Windows\Temp” folder — that’s likely where the majority of temporary files on your computer get stored. Whereas the others that “Users” create are saved in their user profile folder “%userprofile%\AppData\Local\Temp.”
To access and delete these files, you can easily use Windows Search, which we will explain further in the following sections.
When necessary temporary files are not cleared out regularly, they become junk files that build up and slow down your computer. To boot your system’s performance, below we’ve listed five methods to safely delete temp files Windows 10/11. Check them out:
Method 1: Delete Temporary Files in Windows 10/11 Using Run
The first way to delete temporary files Windows 10 manually and completely is by using the system’s in-built Run tool. Here’s how to delete temporary files in Windows 10 using Run:
- Press the Win + R keys together to open the “Run” dialog box.
-
Enter %temp% and Hit “OK”. This will open the Temp folder.
- Select the specific unwanted folders and temp files or select all items by pressing the Ctrl + A keys at the same time.
-
Hit the “Delete” key and select “Yes” when prompted. If it pops up a Folder in Use window, simply click Skip to continue to remove the selected temp files.
The deleted temp files will go into the Recycle bin. If you want to get them permanently deleted, go ahead to the Recycle Bin and empty it.
Method 2: Delete Temporary Files in Windows 10/11 from Settings
Another way to manually remove temporary files from Windows is by navigating to the storage via Settings. Here’s how to delete temporary files in Windows 10/11 from settings:
-
Open Windows Settings 10 by pressing the Win + I keys and navigate to System.
- Select “Storage” on the left-hand pane.
-
Under the Local Disk (C:) section, choose “Temporary files”. If you are unable to see this option, they may be hidden. So select “Show more categories”.
-
You’ll see a list of temp files you can remove. Select all the temporary files you wish to delete and hit “Remove files”.
Your Windows PC will now begin deleting the selected temp files.
Method 3: Auto Delete Temp Files Windows 10/11 by Activating Storage Sense
If you don’t want to delete temp files Windows 10 manually, you can use the Storage Sense feature to remove them automatically and at a set frequency. Here’s how to automatically delete temp files in Windows 10 by activating the Storage Sense:
- Press the Win + I keys to open Settings.
- Navigate to System > Storage.
-
Under Storage, click on “Configure Storage Sense or run it now”.
-
Turn on Storage Sense. Then check the box next to the “Delete temporary files that my apps aren’t using” option.
- After the cleanup settings are adjusted on-demand, click “Clean now” at the bottom, Storage Sense will start freeing up space by deleting most temporary files that have stayed in the recycle bin for more than 30 days.
Note: You can also schedule a disk cleanup and specify whether you want to delete temporary files from the Recycle Bin and Downloads folder as you need.
Method 4: Delete Temporary Files In Windows 10 via Disk Cleanup
If running out of drive space, you can also use the Windows in-built utility –Disk Cleanup to scan and remove temporary files that are no longer necessary. Let’s see how to clear temp files in Windows 10 through Disk Cleanup:
-
Press the Win+ E keys to launch “File Explorer”. Then Choose “This PC.”
-
Right-click on the hard disk and then choose “Properties”.
-
On the General tab, hit “Disk Cleanup.”
-
Under Files to delete, select the files or folders you wish to delete. Alternatively, you can choose “Clean up system files”, Disk Cleanup will calculate how much space the system can free up safely.
-
Press “OK”. Wait for the clean-up to finish and you’re good to go.
Method 5: Use the Command Line to Delete Temp Files Windows 10/11
You can also utilize the Windows Command Prompt to delete temporary files from your Windows. Here’s how to delete temporary files in Windows 10 using CMD:
- Press the Win + S keys and type “CMD” in the search bar that appears.
-
From the results list, right-click Command Prompt and select the Run as administrator option.
-
The CMD windows will appear. Type the command “del /q/f/s %TEMP%\*”and then hit Enter.
- Once the command runs, you’ll see lines of code which indicates that temp files have been deleted from the Temp folder.
Bonus Tip: How to Recover Deleted Temporary Files in Windows 10/11
Sometimes while deleting unwanted temporary files, users may also remove some temp files that are needed by apps. If that has happened to you, you can easily recover them by using third-party software like Tenorshare 4DDiG Windows Data Recovery. It is an all-in-one solution to recover deleted, lost, hidden, and corrupted files from external and internal storage devices. Here’s what more 4DDiG offers:
- Recovers 1000+ file types, including photos, audio, videos, and documents.
- Retrieves data from hard disks, USB drives, Recycle bin, SD cards, and digital cameras.
- Recovers deleted data from lost partitions, system crashes, and virus attacks.
- User-friendly and easy-to-navigate interface.
- Supports all older and newer Windows OS versions.
Here’s how you can use 4DDiG to recover your deleted temporary files:
- Select a Local Disk
- Scan the Local Disk
- Preview and Recover Deleted Temp Files
Download and install the 4DDiG tool on your PC. Launch the tool and choose the drive where you’ve deleted the temp files.
Buy Now
Buy Now
Click “Start». The tool will look for accidentally deleted files. You can also set the target file type from the top right corner.
Once the scanning starts, you can pause or stop it to preview your targeted files. Press “Recover” after you’ve identified your target temp files.
Save the recovered temp files in a safe location on your PC and you’re ready to go.
FAQs about Temporary Files in Windows 10/11
Q1: Why should I delete temporary files?
Over time temporary files take up drive space and can lead to system errors and lagging. So it is necessary to delete redundant temp files to avoid various issues caused by corrupted or infected files stored in your computer and boost system performance.
Q2: Is it safe to delete temporary files?
Yes, it’s perfectly safe to delete unnecessary temp files. Temporary files are created to store temporary information so that the task can be executed smoothly when it is running. And they don’t need to be permanently stored on your computer. But keep in mind that do not remove them when they are running because this may lead to program errors.
Q3: When do you need to delete temporary files?
When you’re running low on storage space, it’s time to delete all or some of the temp files to free up space for other files and data and speed up your computer.
Conclusion
Hopefully, we’ve answered your query “How to delete temporary files in Windows 10” using five proven methods. Temp files are essential to remove because they cause the system to slow down and also take up lots of drive space. Deleting them will help you boost your system performance.
However, if you’ve accidentally deleted some critical data alongside the temp files, you can easily retrieve it through Tenorshare 4DDiG Data Recovery software. It is your go-to tool and the best option for recovering accidentally deleted files from all kinds of storage devices. Recover your files now in just three clicks!
Tenorshare 4DDiG Data Recovery
4DDiG is your second to none choice to recover all lost data on Windows/Mac computer from various loss scenarios like deletion, formatting, RAW, etc. with a higher success rate.
Free Download
Free Download
BUY NOW
BUY NOW
Одной из причин замедления работы компьютера является его переполненная системная память. Для решения проблемы в первую очередь рекомендуется очистить диск от временных файлов.
Для чего нужны временные файлы
Временные файлы — данные, которые создаются как самой ОС, так и утилитами, установленными на компьютере. Приложениям невыгодно хранить большое количество информации в оперативной памяти ПК. Более того, у последней может быть небольшой объём. В связи с этим данные, которые необходимы приложениям для выполнения текущих задач, сохраняются в отдельной системной папке для временных файлов.
Резервные копии документов, которые создаются редакторами из пакета Microsoft Office, являются временными файлами. Если произойдёт сбой в системе или компьютер внезапно отключится, вы сможете продолжить редактировать документ с того места, где закончили, без потери данных.
Нужно ли удалять временные файлы
Временные файлы должны исчезать автоматически после завершения работы приложения. Однако эта функция срабатывает далеко не всегда. Поэтому в памяти компьютера со временем накапливается большое количество временных объектов, которое замедляет работу ПК. От них можно смело избавляться: последствий в виде сбоев в системе не будет.
Ручная очистка системы от временных файлов даже необходима, чтобы освободить компьютер от мёртвого груза. Её обязательно нужно проводить в следующих ситуациях:
- папки в «Проводнике Windows» и программы медленно открываются;
- при закрытии браузера или иной утилиты появляется сообщение в верхней части окна о том, что приложение не отвечает;
- компьютер не так быстро реагирует на щелчки мышью и нажатия на клавиши.
Избавиться от временных файлов в Windows 10 можно несколькими способами. Рассмотрим каждый из них.
Через окно «Параметры»
В Windows 10 есть новая функция для сканирования содержимого жёстких дисков и последующей очистки отдельных файлов и разделов. Воспользоваться ей можно в окне «Параметры»:
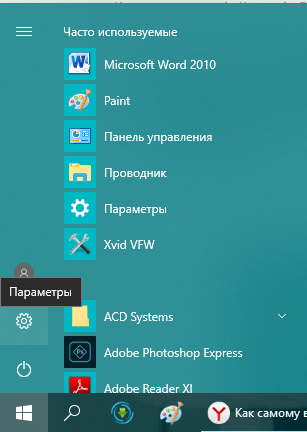
- Нажмите на иконку в виде шестерёнки в меню «Пуск». Она находится над кнопкой выключения. Второй способ запуска более простой: нужно нажать комбинацию клавиш Win + I.

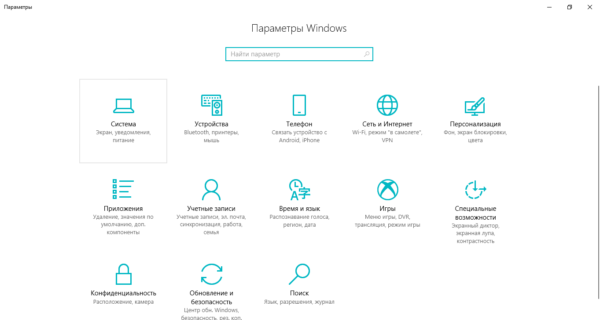
Кликните по шестерёнке, чтобы открыть окно «Параметры» - Выберите плитку «Система».

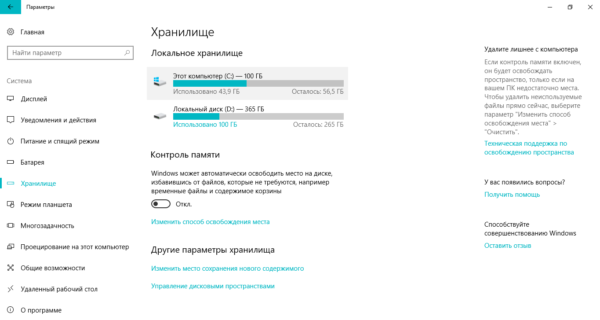
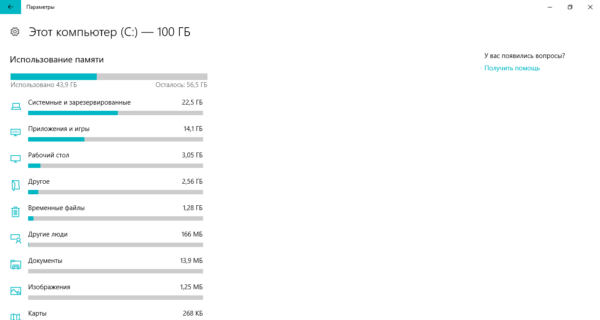
Откройте первый раздел «Система» в окне «Параметры Windows» - Переключитесь на блок «Хранилище».
Запустите системный диск во вкладке «Хранилище» - Так как временные файлы расположены на системном диске, выбираем его, кликнув один раз левой клавишей мыши.
- Система начнёт анализ данных, расположенных на системном диске. Подождите некоторое время.
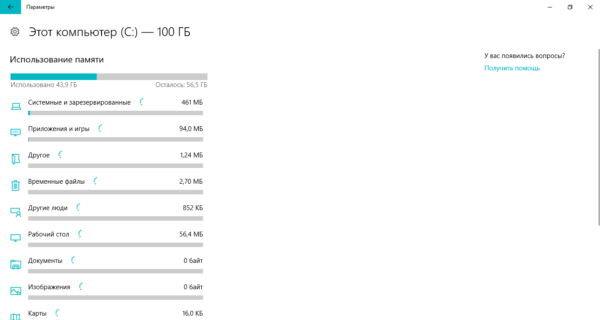
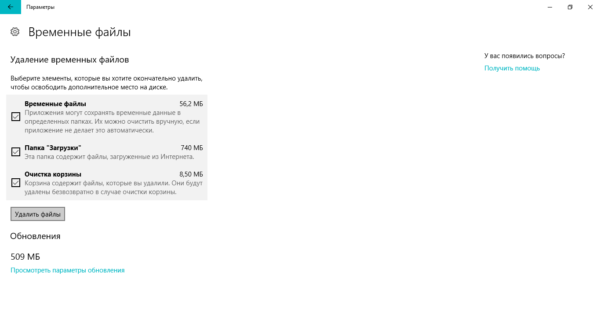
Подождите, пока завершится анализ содержимого системного диска - В результате система покажет, сколько места занимает тот или иной раздел жёсткого диска. Нас интересуют «Временные файлы». Открываем этот блок.
Откройте раздел «Временные файлы», чтобы удалить объекты - Ставим галочки рядом со всеми тремя пунктами. Теперь просто щёлкаем по «Удалить файлы». Ждём, когда процесс очистки закончится.
Выберите все три пункта и нажмите на «Удалить файлы»
Видео: как удалить временные файлы через окно «Параметры»
С помощью специальных утилит для очистки диска
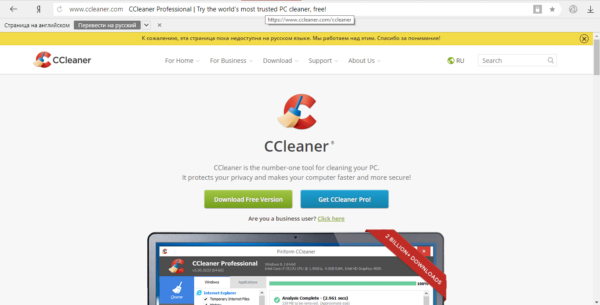
Безвозвратно стереть временные файлы могут и сторонние утилиты, предназначенные для очистки систем от мусорных файлов. Одной из самых известных является CCleaner, разработанная компанией Pirifrom. Ей можно пользоваться бесплатно. Интерфейс переведён на русский язык и интуитивно понятен.
Чтобы удалить временные файлы с помощью CCleaner:
- Запускаем официальный сайт разработчика утилиты CCleaner. Кликаем по зелёной кнопке Download Free Version.

Нажмите на кнопку Download Free Version - Открываем скачанный файл и следуем простой пошаговой инструкции, чтобы установить приложение для очистки. Не забудьте снять галочки с пунктов об установке дополнительного ПО, если оно вам не нужно.
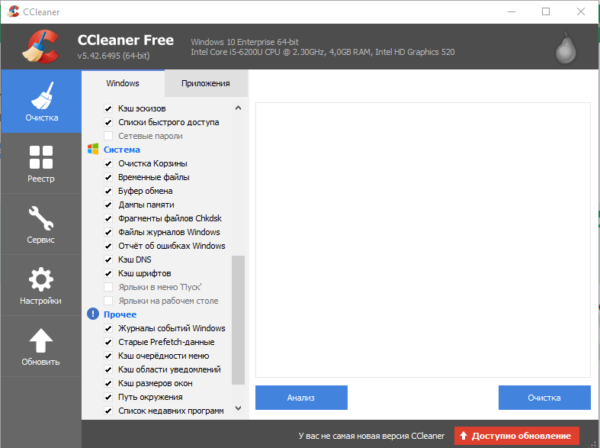
- С помощью иконки CCleaner на «Рабочем столе» запускаем утилиту. Вы сразу же попадаете в нужный раздел «Очистка». В большом перечне пунктов, ставим галочки слева от тех, что нужно очистить. Убедитесь, что в разделе «Система» отмечен элемент «Временные файлы». Во вкладке «Приложения» вы можете по желанию удалить журналы посещений, cookie-файлы браузеров и другую информацию.

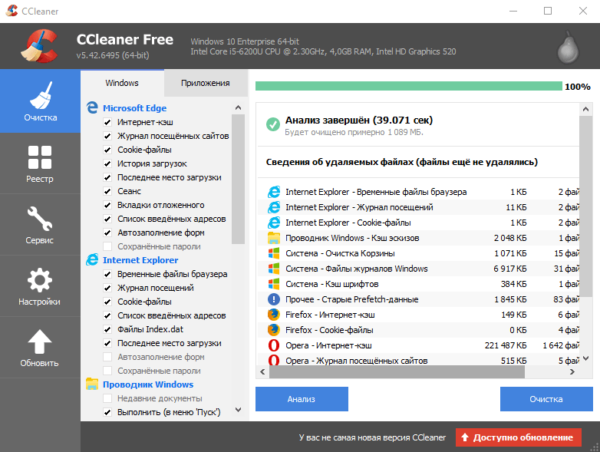
Отметьте пункты, которые должны быть очищены, в том числе и объект «Временные файлы» - Кликаем по «Анализ».
- Когда он завершится, в окне появится список элементов для дальнейшего удаления, а также общий объём памяти, который они занимают.

После анализа в окне появится список файлов для последующего удаления -
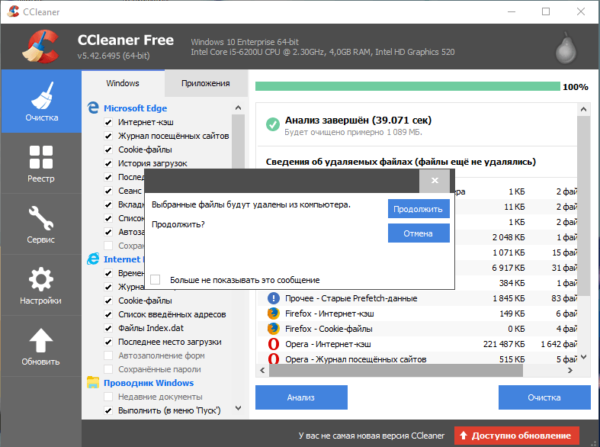
Нажимаем на «Очистка». Подтверждаем своё действие, кликая по «Продолжить».

Кликните по «Продолжить», чтобы подтвердить очистку -
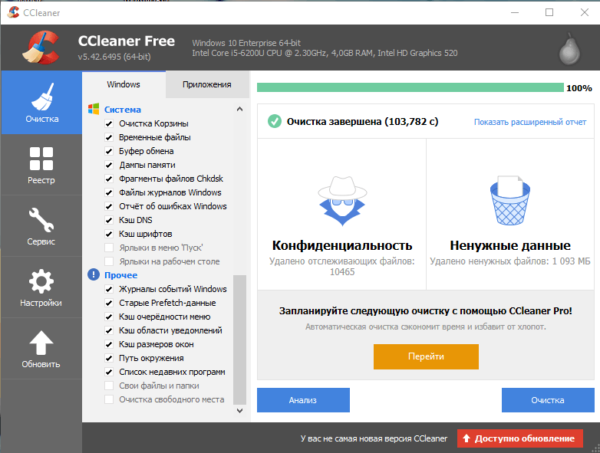
Ждём, когда она закончится. После завершения в окне появится информация об объёме памяти, который был освобождён во время очистки.

После очистки в окне повится сообщение об успешном завершении процедуры
Кроме CCleaner, для очистки временных файлов системы можно использовать такие программы, как Advanced Systemcare, Reg Organizer и другие.
Видео: как очистить систему от временных файлов с помощью CCleaner
За счёт встроенного сервиса «Очистка диска»
В десятой версии осталась доступна встроенная утилита для удаления мусорных файлов под названием «Очистка диска». Она поможет найти и стереть временные файлы, которые не были удалены в окне «Параметры».
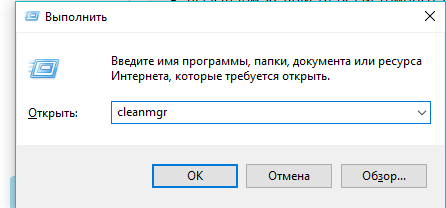
- Зажимаем клавиши Win и R. В поле «Открыть» печатаем команду cleanmgr. Кликаем по «ОК» или жмём на Enter.

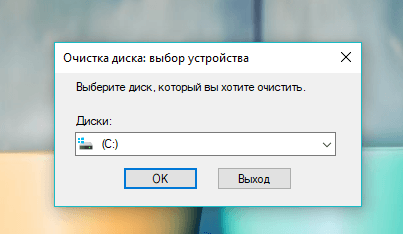
Введите команду cleanmgr в поле «Открыть» - В следующем сером окне выбираем диск С в выпадающем меню. Щёлкаем по «ОК».

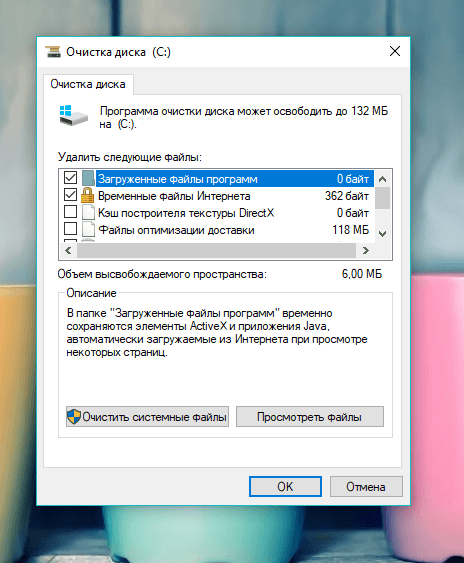
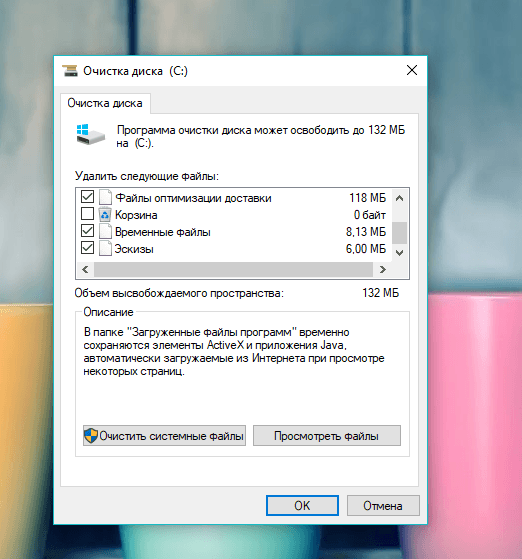
Выберите системный диск в выпадающем меню - В результате на экране возникнет специальное окно «Очистка диска», где будет сразу указан объём данных, который можно удалить из памяти ПК.

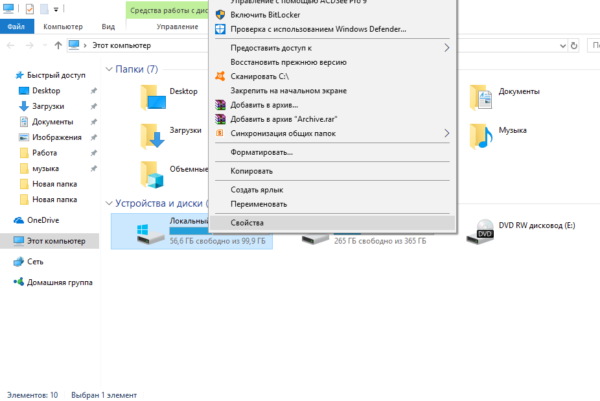
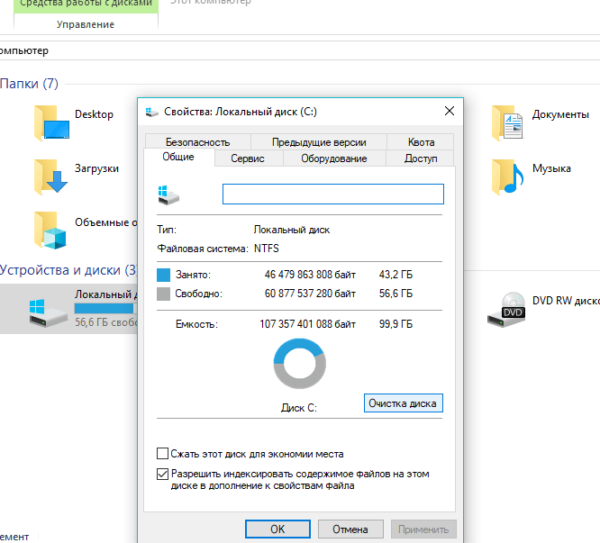
В окне «Очистка диска» сразу показывается объём памяти, который можно освободить - Это же окно можно запустить и другим способом. Откройте «Проводник Windows» через иконку «Этот компьютер» на «Рабочем столе». Кликаем правой кнопкой мыши по системному диску и выбираем пункт «Свойства».

Выберите последний пункт «Свойства» в контекстном меню - Под визуализацией диска будет кнопка «Очистка диска». Щёлкаем по ней.

Нажмите на кнопку «Очистка диска» под изображением диска - Вы можете смело поставить галочки рядом со всеми пунктами в списке. Обязательно должны быть отмечены разделы «Временные файлы» и «Временные файлы Интернета». Теперь кликаем по «ОК».

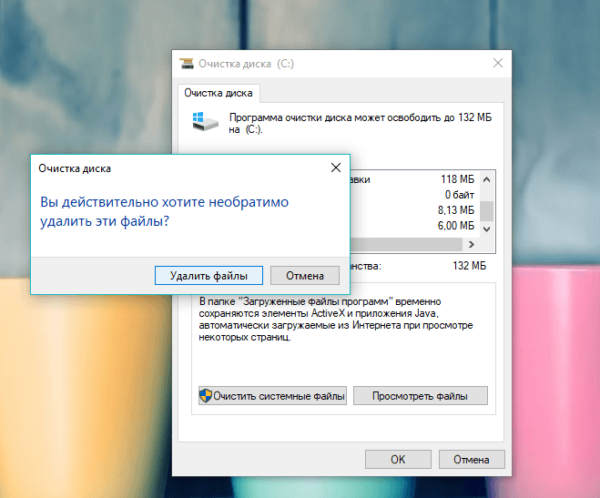
Отметьте обязательно пункт «Временные файлы» и кликните по «ОК» - Щёлкаем по «Удалить файлы» для подтверждения очистки.

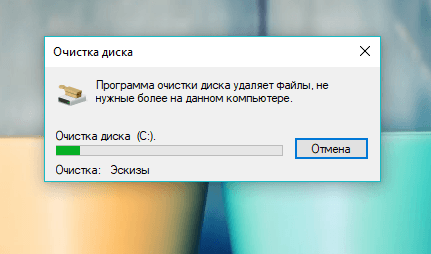
Кликните по «Удалить файлы» - Ждём, когда завершится процесс.

Подождите, пока закончится процесс очистки системы от мусорных файлов
Видео: как удалить временные файлы с помощью «Очистки диска»
Ручная очистка системных папок с временными файлами
Разделы с временными файлами, которые создают утилиты и ОС, хранятся на системном диске. Каждый пользователь Windows 10 может открыть эти папки и убрать оттуда файлы. Однако делать это стоит после завершения работы в приложениях и перед выключением компьютера.
- Вызовите окно «Проводника Windows», используя иконку «Этот компьютер», расположенную на «Рабочем столе».
- Откройте системный диск двойным щелчком мыши.

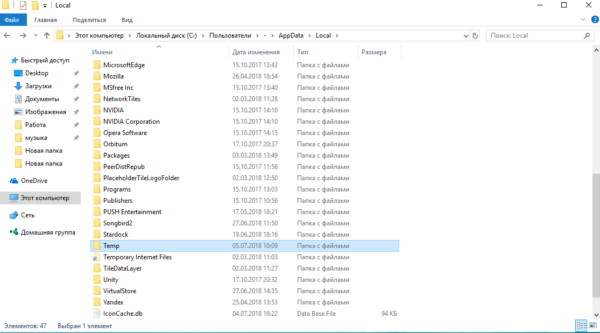
Откройте системный диск в «Проводнике Windows» - Пройдите по пути: «Пользователи» — «Папка с названием вашей учётной записи» — AppData — Local — Temp.

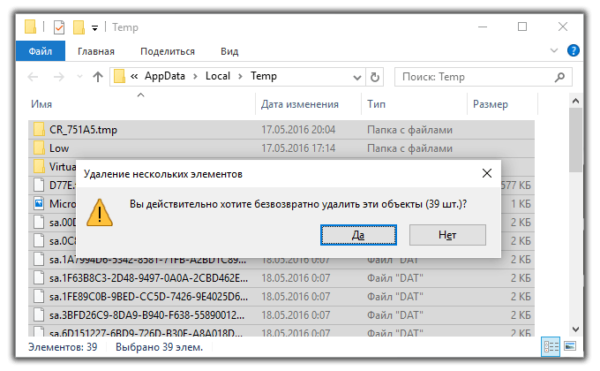
Откройте папку Temp на системном диске - В последней папке нужно выделить все файлы указателем мыши и кликнуть правой кнопкой по ним. В перечне опций выбирается пункт «Удалить». После этого подтверждаем, что хотим безвозвратно удалить объекты.

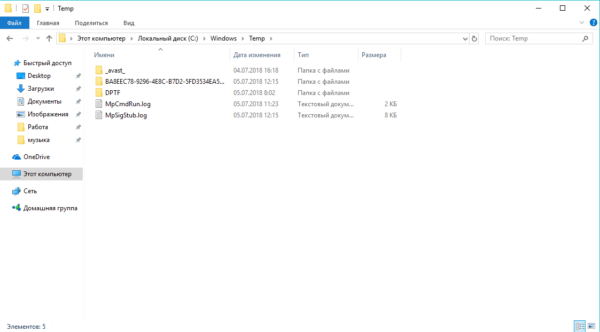
Кликните по «Да», чтобы удалить файлы из папки Temp - Возвращаемся в системный диск. Теперь нужно зайти в другую папку Temp. Открываем сначала раздел Windows, а затем уже Temp. Здесь уже находятся временные файлы операционной системы. Убираем объекты из папки так же, как и в предыдущих шагах этой инструкции.

Удалите содержимое папки Temp в разделе Windows на системном диске - Перезапускаем устройство.
Видео: как стереть файлы в папках Temp
Стереть временные объекты приложений и ОС можно без каких-либо последствий в виде сбоев и медленного запуска программ. Процедура только ускорит работу компьютера. Для удаления можно использовать как встроенные сервисы Windows, так и сторонние утилиты, например, CCleaner или Advanced Systemcare.
- Распечатать
Оцените статью:
- 5
- 4
- 3
- 2
- 1
(5 голосов, среднее: 5 из 5)
Поделитесь с друзьями!
Sometimes, despite having enough RAM, our system lags or hangs. This trouble can be due to storage issues or any extra unnecessary program running in the background. One way to prevent this slowing down of our system is to delete temporary files created automatically as it will boost your system’s performance.
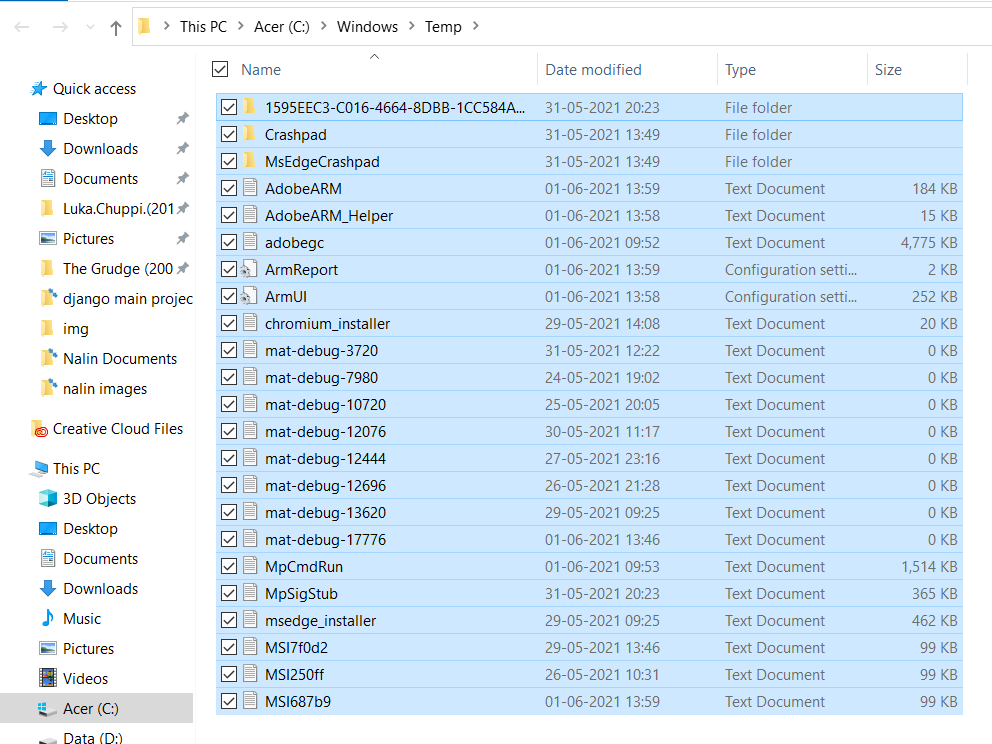
1. Deleting all temp files:
To delete all the temporary files follow the below steps:
Step 1: Press Windows key + R to open the Run command. Then type “temp” in the search field and press OK.
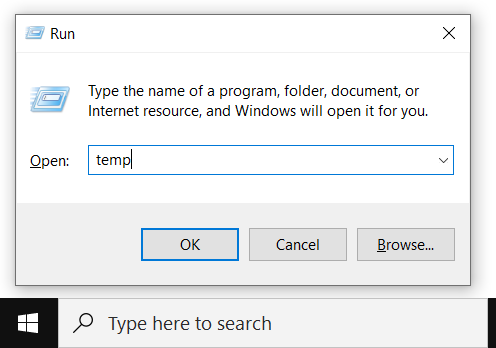
type in “temp” and press ok
Step 2: Now, select all temp files using ctrl + A and then press delete.
Select all and press delete
2. Deleting local temp files:
To delete the local temporary files follow the below steps:
Step 1: Press Windows key + R to open the Run command. Then type “%temp%” in the search field and press OK.
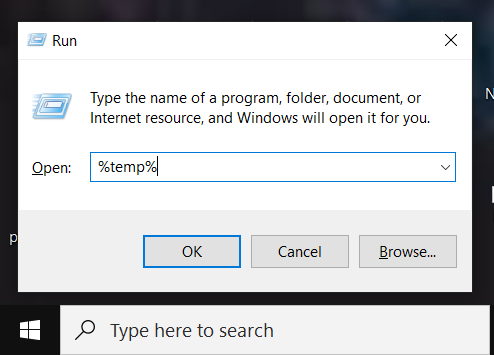
Type %temp% and press OK
Step 2: Now, select all local temp files using ctrl + A and then press delete.
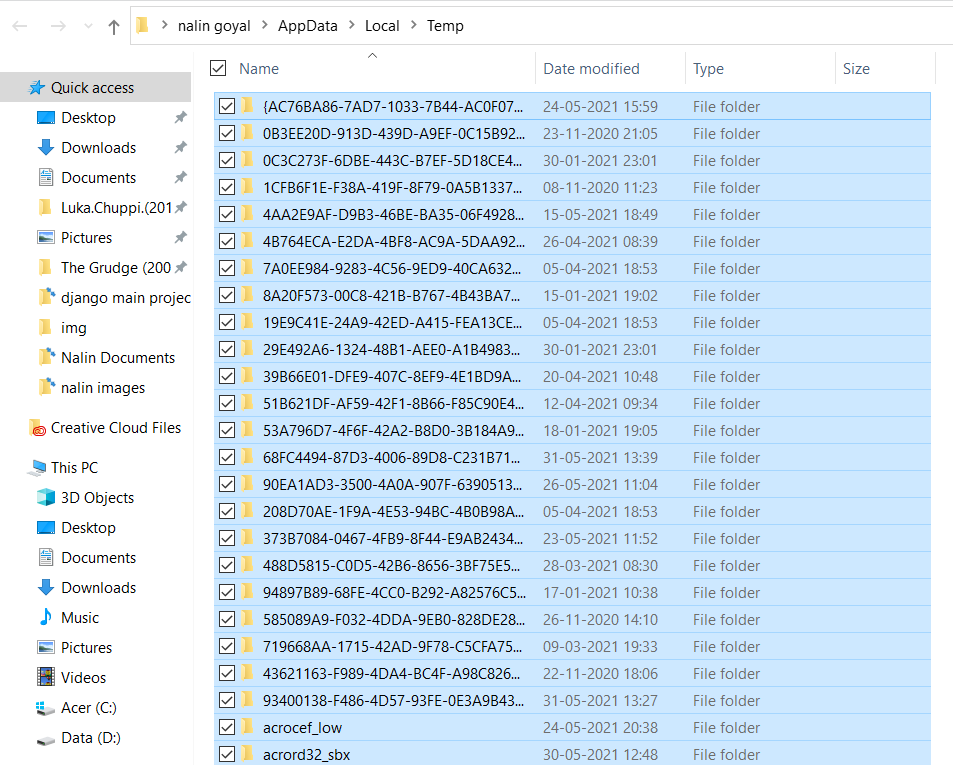
Select all files and press delete
3. Deleting local temp files using Prefetch:
To delete the local temporary files using Prefetch follow the below steps:
Step 1: Press Windows key + R to open the Run command. Then type “Prefetch” in the search field and press OK.
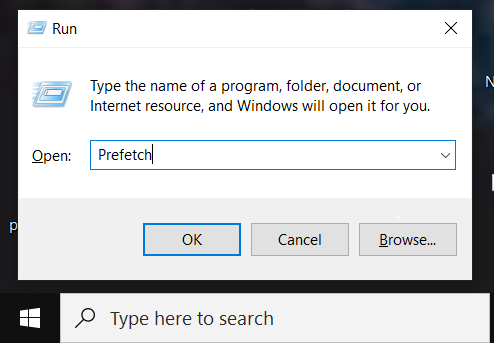
Type “prefetch” and press ok
Step 2: Now, select all prefetch files using ctrl + A and then press delete.
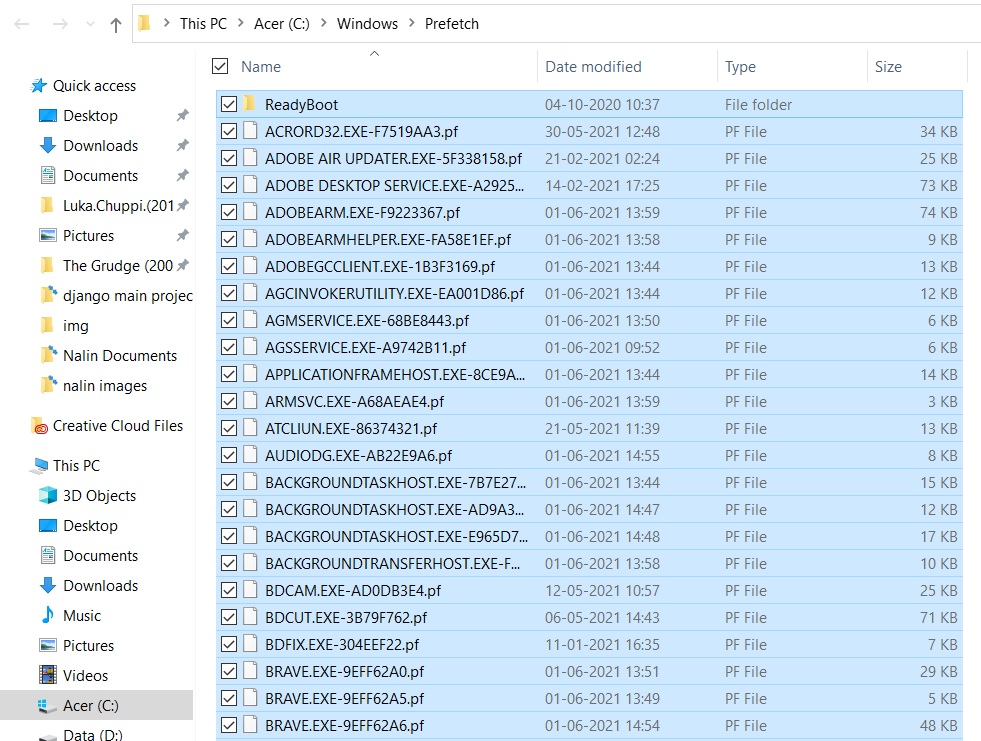
Select all prefetch files and press delete
Finally, delete all the files from recycle bin too. All temporary files are deleted, and now you are good to go!!
Last Updated :
06 Jun, 2021
Like Article
Save Article