Может случиться так, что после установки обновления Windows, обновления качества или обновления функций ваш компьютер с Windows 10 не загружается. В этом случае вам, возможно, придется удалить обновление. В этом посте мы покажем вам, какудалите последнее обновление качества или обновление функции, когда ваш компьютер с Windows 11/10не загрузится, введя Дополнительные параметры.
Чтобы удалить последнее обновление качества или обновление функции, выполните следующие действия:
- Загрузите экран дополнительных параметров запуска.
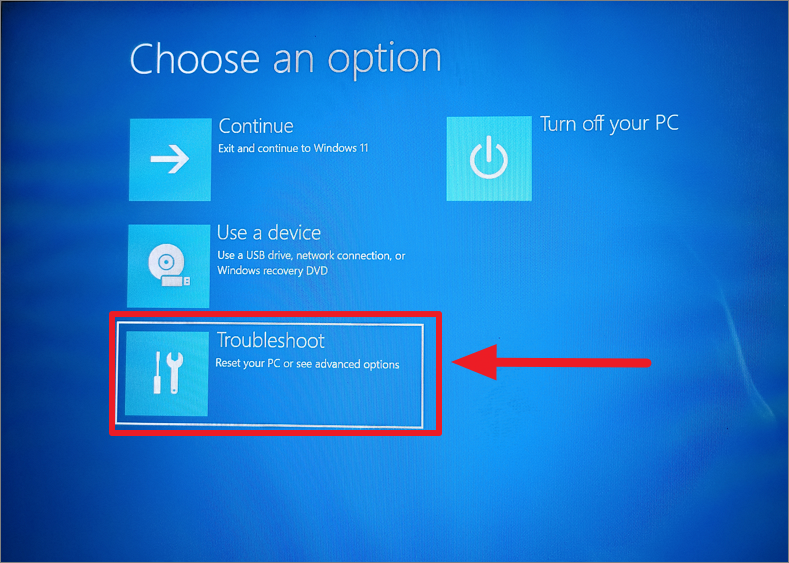
- Выберите Устранение неполадок.
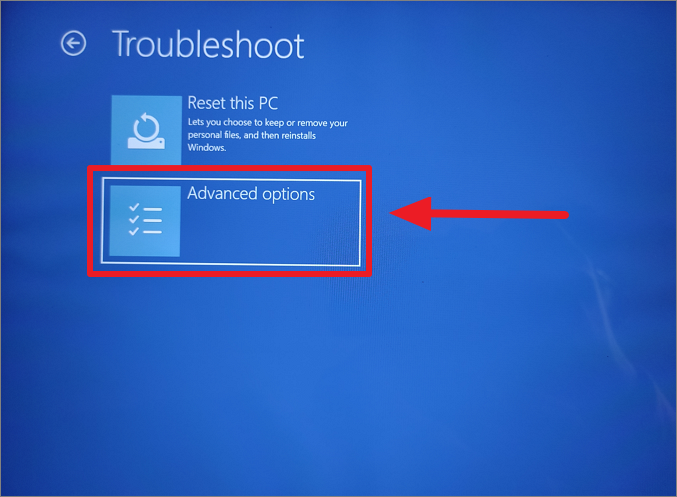
- Выберите дополнительные параметры
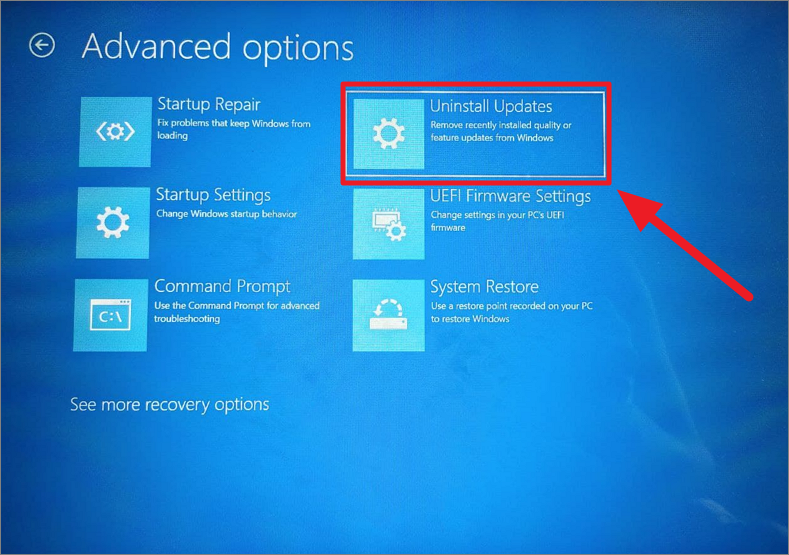
- Нажмите «Удалить обновления».
- Выберите удаление качественного обновления или обновления функции.
- Следуйте инструкциям на экране.
1] Загрузите экран дополнительных параметров запуска.
Поскольку ваша система не загружается нормально, у вас есть три варианта перехода на экран «Дополнительные параметры»:
- Нажмите F2 или F8.: Когда ваш компьютер с Windows загрузится, нажмите F2, чтобы получить доступ к настройкам BIOS, или нажмите F8, чтобы получить доступ к меню загрузки или запуска. Это может варьироваться от OEM к OEM. При доступе к меню загрузки вам, возможно, придется нажать F11, чтобы открыть экран «Выбор параметра». Отсюда вам нужно нажать «Устранение неполадок», а затем «Дополнительные параметры».
- Выключите компьютер трижды.: резко выключите компьютер после включения. Сделайте это несколько раз. После 3-х раз это может заставить Windows подумать, что с вашим компьютером возникла какая-то проблема, и принудительно открыть экран автоматического восстановления. Отсюда вы можете получить доступ к расширенным параметрам запуска.
- Использовать установочный носитель: На первом экране найдите ссылку «Ремонт компьютера». Нажмите здесь. Ваш компьютер загрузится на экран «Дополнительные параметры».
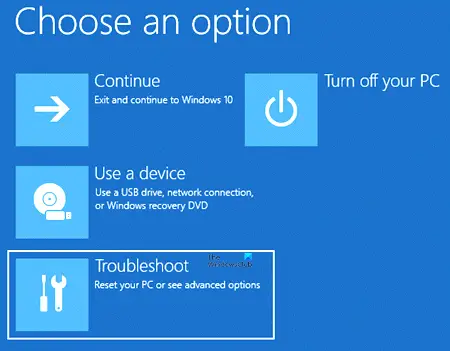
2] Выберите «Устранение неполадок».
Как только вы перейдете в среду восстановления, нажмите «Устранение неполадок».
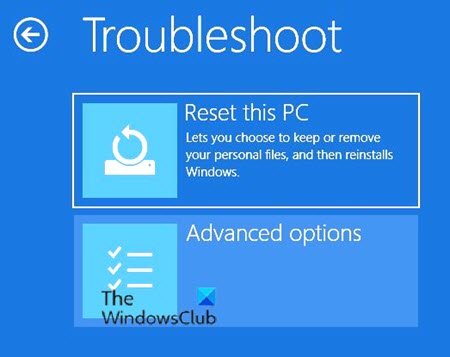
3] Выберите дополнительные параметры.
Далее вам будут предложены два варианта. Выберите Дополнительные параметры.
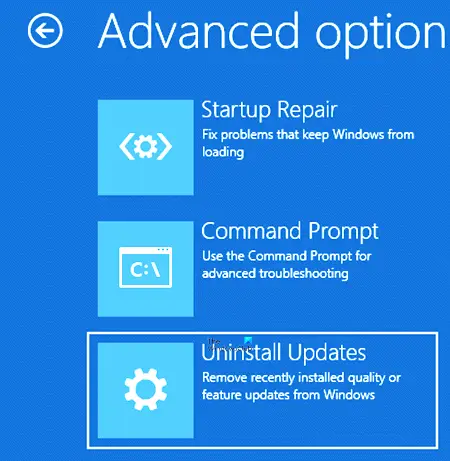
4] Нажмите «Удалить обновления».

На следующем экране выберите «Удалить обновления».
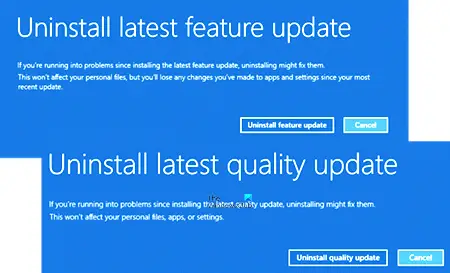
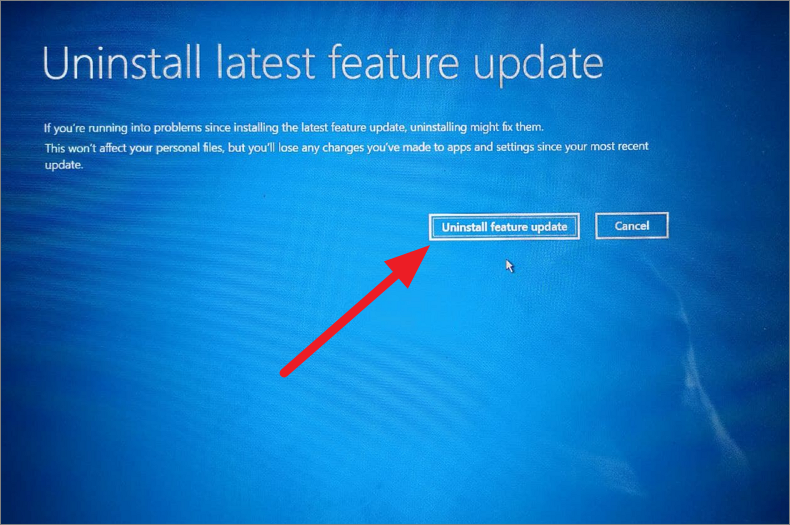
5] Выберите удаление качественного обновления или обновления функции.

В зависимости от ваших требований вы можете выбрать:
- Удалить последнее качественное обновление
- Удалить последнее обновление функции
6] Следуйте инструкциям на экране.

После того, как вы сделаете свой выбор, вам будет предложен экран для выбора конкретного обновления.
Нажмите на него, следуйте инструкциям на экране и подождите, пока Windows удалит проблемное обновление.
После этого ваша система должна перезагрузиться в обычном режиме.
Связанный: Windows зависает на экране входа в систему после обновления.
It may happen that after installing a Windows Update, Quality Update, or Feature Update, your Windows 10 computer does not boot. In this case, you may have to uninstall the update. In this post, we will show you how touninstall the latest Quality Update or Feature Update, when your Windows 11/10 computerwill not boot, by entering Advanced Options.
To uninstall the latest Quality Update or Feature Update, do the following:
- Boot into Advanced Startup Options screen
- Select Troubleshoot
- Select Advanced Options
- Press Uninstall Updates
- Choose to uninstall the Quality Update or Feature Update.
- Follow on-screen instructions.
1] Boot into Advanced Startup Options screen
Since your system does not boot normally, you have the following three options to get to the Advanced Options screen:
- Press F2 or F8: When your Windows PC boots up, press F2 to access your BIOS settings or press F8 to access the boot or startup menu. This can vary from OEM to OEM. When you access the boot menu, you may have to press F11 to open the Choose an option screen. From here you have to press Troubleshoot and then Advanced Options.
- Power-down PC thrice: Abruptly power down the PC when you have powered it up. Do it multiple times. After 3 times this may force Windows to think that there is some problem with your PC, and it will force push the Automatic Repair screen. From here, you can get access to the Advanced Startup Options.
- Use Installation Media: On the first screen, look for a link “Repair your computer.” Click on it. It will boot your computer into the Advanced Options screen.
2] Select Troubleshoot
Once you have reached the Recovery environment, click on Troubleshoot.
3] Select Advanced Options
You will next be offered two options. Select Advanced options.
4] Press Uninstall Updates
On the next screen select Uninstall Updates.
5] Choose to uninstall Quality Update or Feature Update
Depending on what your requirement is, you may opt to:
- Uninstall latest quality update
- Uninstall latest feature update
6] Follow on-screen instructions
Once you have made your choice, you will be offered a screen to select the particular Update.
Click on it, follow the on-screen instructions and wait for Windows to uninstall the problematic update.
Once done, your system should reboot normally.
Related: Windows stuck at the log-in screen after upgrade.
Download Windows Speedup Tool to fix errors and make PC run faster
It may happen that after installing a Windows Update, Quality Update, or Feature Update, your Windows 10 computer does not boot. In this case, you may have to uninstall the update. In this post, we will show you how to uninstall the latest Quality Update or Feature Update, when your Windows 11/10 computer will not boot, by entering Advanced Options.
To uninstall the latest Quality Update or Feature Update, do the following:
- Boot into Advanced Startup Options screen
- Select Troubleshoot
- Select Advanced Options
- Press Uninstall Updates
- Choose to uninstall the Quality Update or Feature Update.
- Follow on-screen instructions.
1] Boot into Advanced Startup Options screen
Since your system does not boot normally, you have the following three options to get to the Advanced Options screen:
- Press F2 or F8: When your Windows PC boots up, press F2 to access your BIOS settings or press F8 to access the boot or startup menu. This can vary from OEM to OEM. When you access the boot menu, you may have to press F11 to open the Choose an option screen. From here you have to press Troubleshoot and then Advanced Options.
- Power-down PC thrice: Abruptly power down the PC when you have powered it up. Do it multiple times. After 3 times this may force Windows to think that there is some problem with your PC, and it will force push the Automatic Repair screen. From here, you can get access to the Advanced Startup Options.
- Use Installation Media: On the first screen, look for a link “Repair your computer.” Click on it. It will boot your computer into the Advanced Options screen.
2] Select Troubleshoot
Once you have reached the Recovery environment, click on Troubleshoot.
3] Select Advanced Options
You will next be offered two options. Select Advanced options.
4] Press Uninstall Updates
On the next screen select Uninstall Updates.
5] Choose to uninstall Quality Update or Feature Update

Depending on what your requirement is, you may opt to:
- Uninstall latest quality update
- Uninstall latest feature update
6] Follow on-screen instructions
Once you have made your choice, you will be offered a screen to select the particular Update.
Click on it, follow the on-screen instructions and wait for Windows to uninstall the problematic update.
Once done, your system should reboot normally.
Related: Windows stuck at the log-in screen after upgrade.
Anand Khanse is the Admin of TheWindowsClub.com, a 10-year Microsoft MVP (2006-16) & a Windows Insider MVP (2016-2022). Please read the entire post & the comments first, create a System Restore Point before making any changes to your system & be careful about any 3rd-party offers while installing freeware.
The New Windows 11 brings the biggest changes in the Windows operating system history with major changes in everything from design to features to improved performance. And the Operating system is constantly improving and changing with every features update and build upgrade.
With all the changes, there’s always the chance that the new operating system might bring bugs, compatibility problems, and poor performance. If you encounter problems with the latest updates or the latest builds on Windows 11, you can uninstall the latest updates or roll back builds to the previous version of the operating system.
In this Windows 11 guide, we will guide you through the steps of rolling back builds and uninstalling updates on Windows 11.
Uninstall Quality Updates on Windows 11
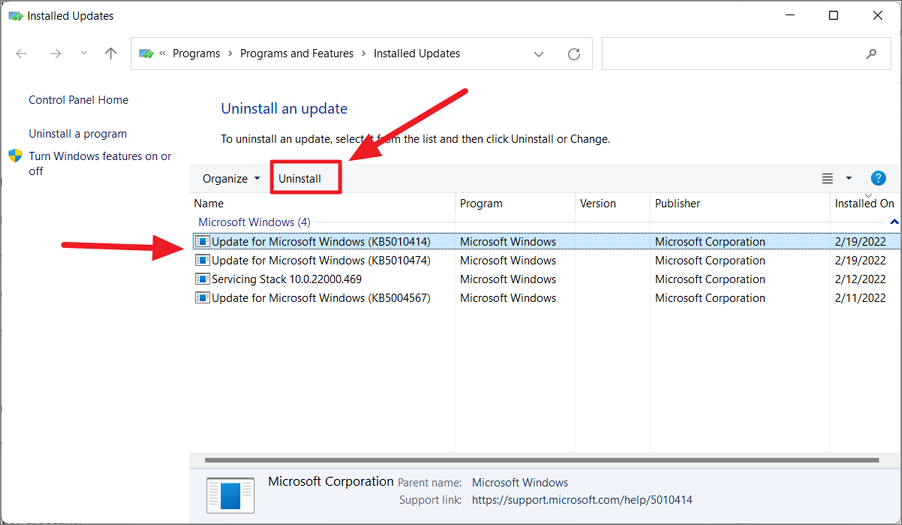
Microsoft releases quality updates for Windows at least once a month to fix stability issues, bugs, security vulnerabilities, and other problems in Windows. However, sometimes, you may experience problems or bugs after installing certain cumulative updates that were not present before the updates. Removing the cumulative updates is the easy way to fix those problems. Here’s how you can do that:
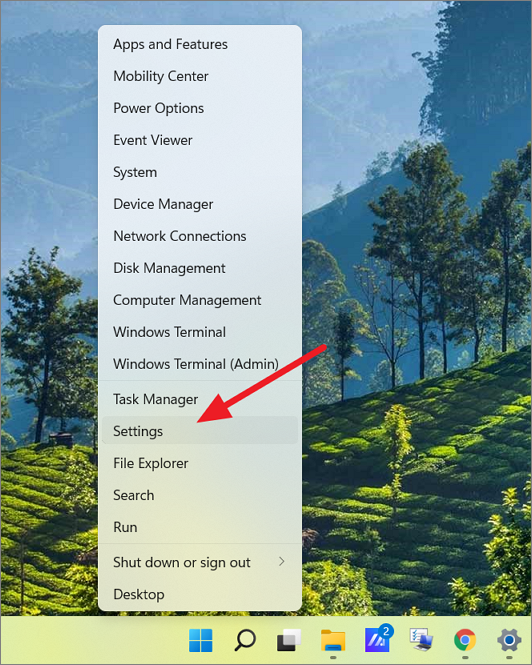
First, launch the Windows Settings app by right-clicking the Start menu and selecting ‘Settings’.
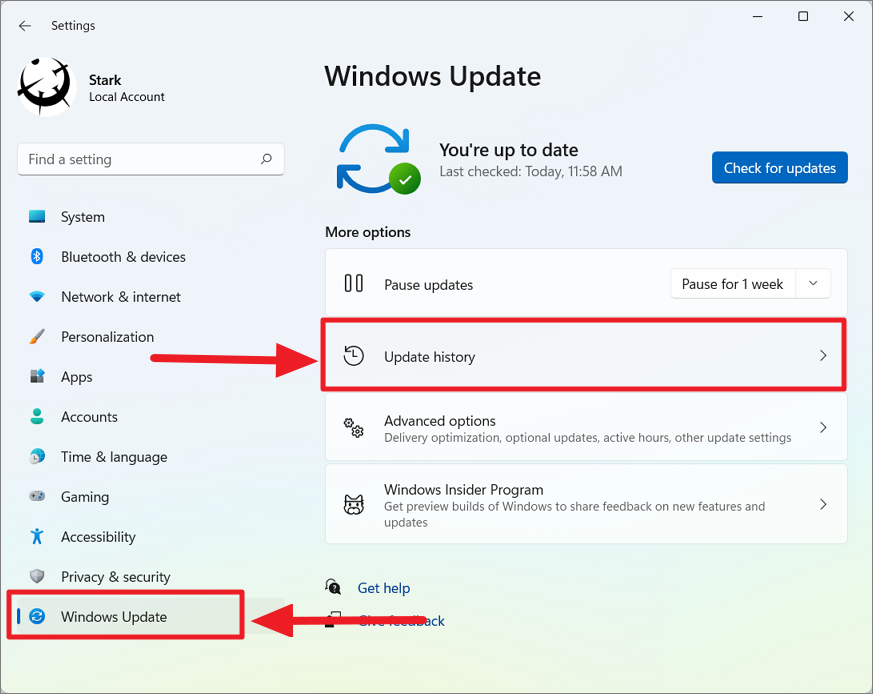
In the Settings app, select ‘Windows Update’ from the left sidebar and click the ‘Update history’ option on the right.
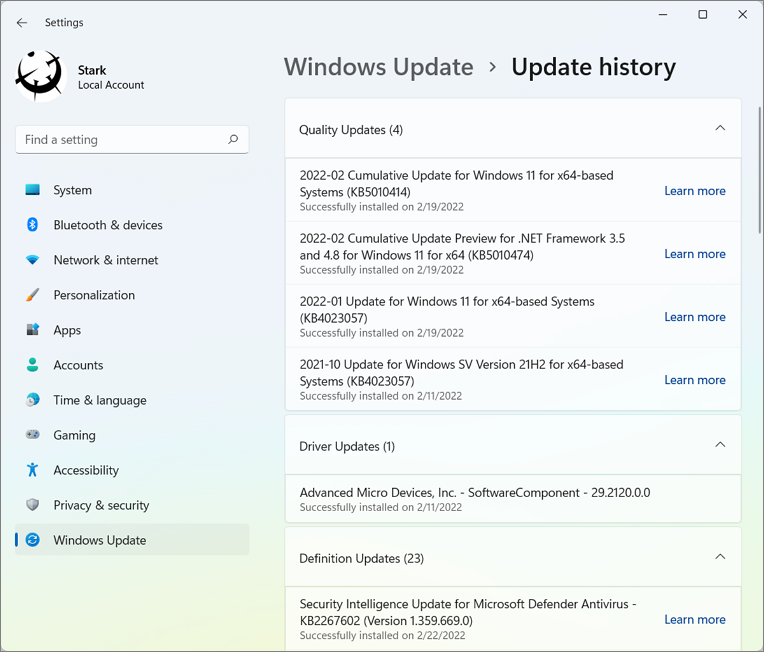
Under the Update history page, you can see the list of features, quality, driver, and security updates you have recently installed on your computer.
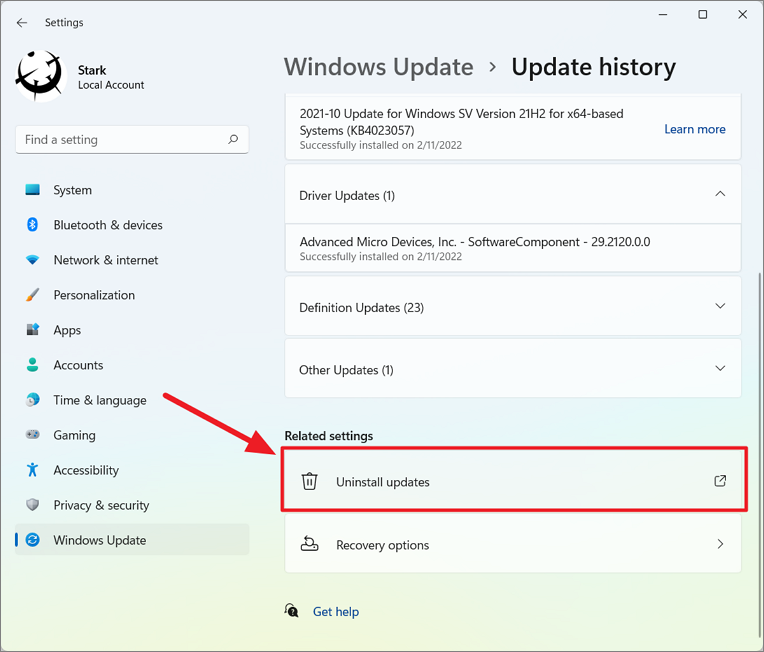
Then, scroll down to the bottom of the Update history settings page, and click ‘Uninstall updates’ under Related settings.
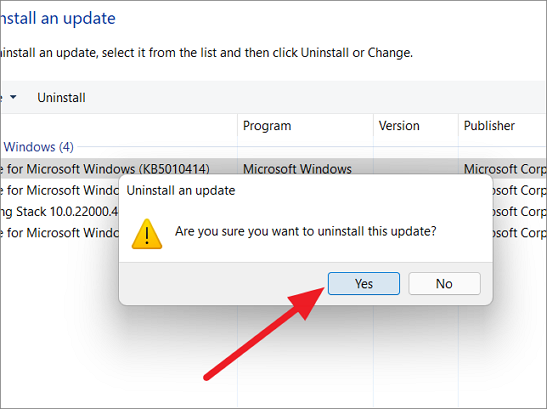
This will launch the ‘Installed Updates’ control panel. Here, select the update that causing the problem from the list and click the ‘Uninstall’ button at the top to remove it. You can also see the dates on which each update is installed, so you can remove the correct update.
When the ‘Uninstall an update prompt appears, click ‘Yes’.
Uninstall Feature Updates or Builds in Windows 11
While quality updates are released monthly, the major feature updates are rolled out once or twice a year (roughly every six months) to Windows 11. These updates upgrade Windows to the latest version or build with new features, security improvements, visual improvements, performance enhancements, and more. Windows 11 versions are also called builds.
If you experience severe compatibility issues, system crashes, bootup problems, or other issues after upgrading your Windows to the latest version, you can roll back to the previous build or version of the Windows 11 OS through Settings.
Before you roll back to the previous build, you should know that after going back you will have to reinstall apps and programs you installed after installing the update. And you will lose all your configurations and settings changes after installing the latest build.
However, there’s a catch, you can only roll back to the version or build of the OS within 10 days after upgradation. Follow these steps to Uninstall feature updates in Windows 11.
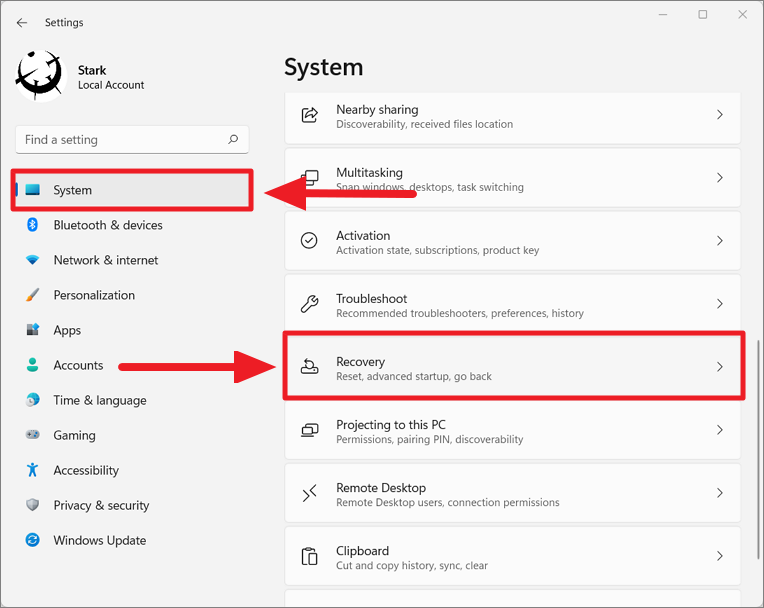
First, click the Start menu and select the ‘Settings’ option.
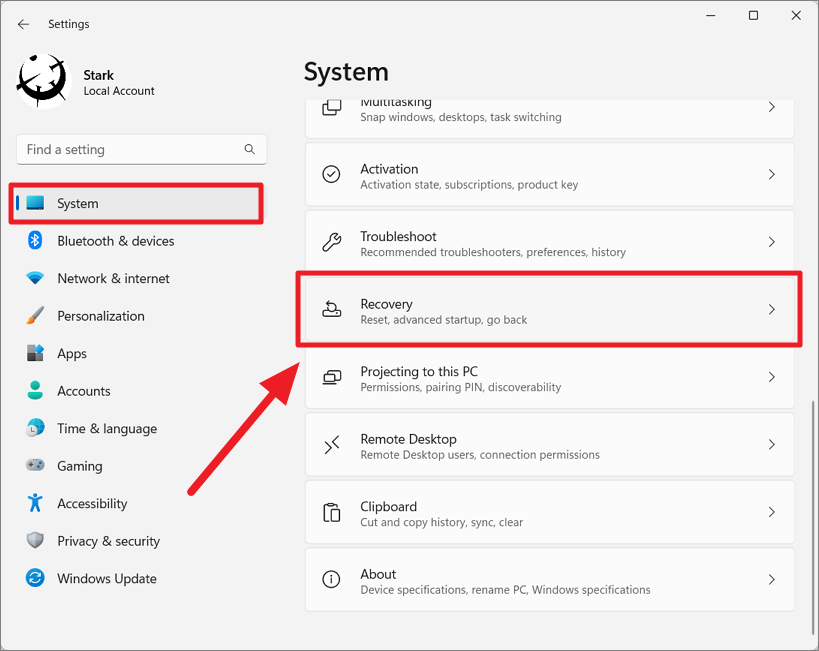
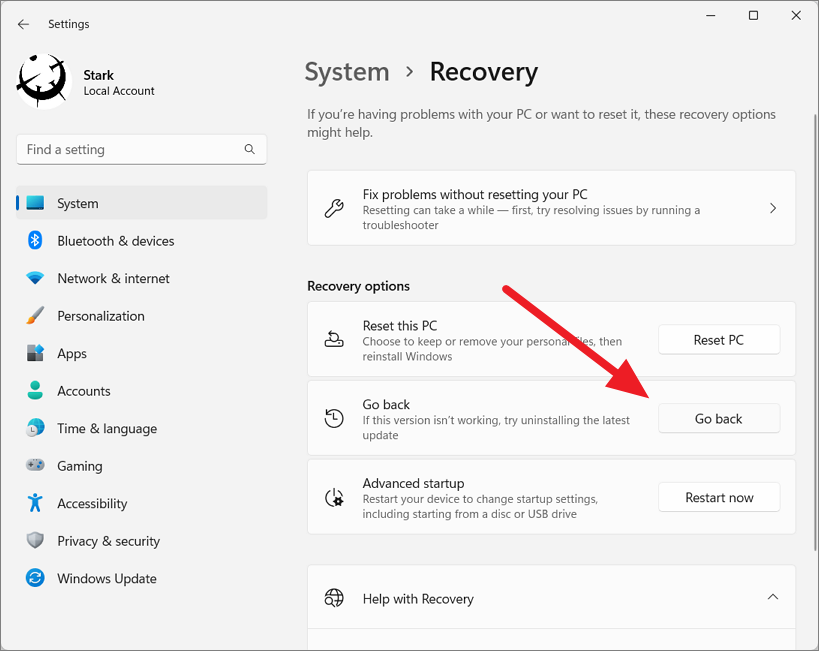
Next, go to the ‘System’ tab on the left pane and then scroll down and select the ‘Recovery’ option.
If it is less than 10 days since the installation of the build or the feature update, you will see the ‘Go Back’ button under the Recovery section. Click the ‘Go back’ button.
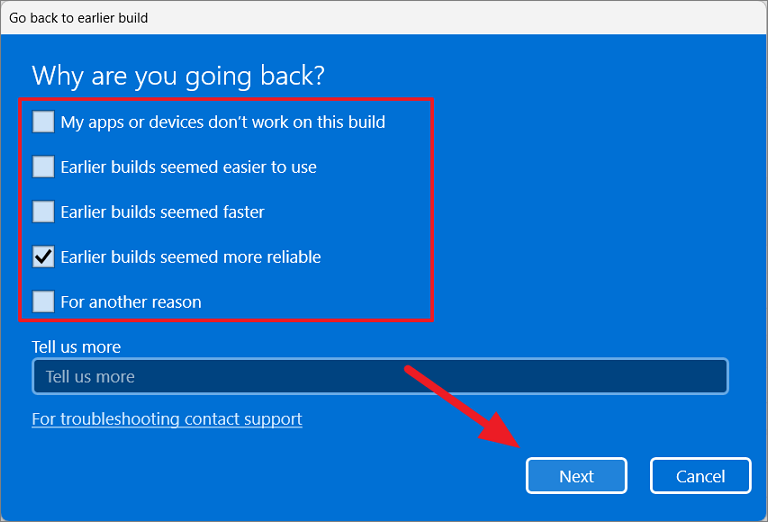
This opens up the ‘Go back to earlier build’ wizard window. On the first page, select a reason why you are going back to the earlier build of Windows 11 and click ‘Next’.
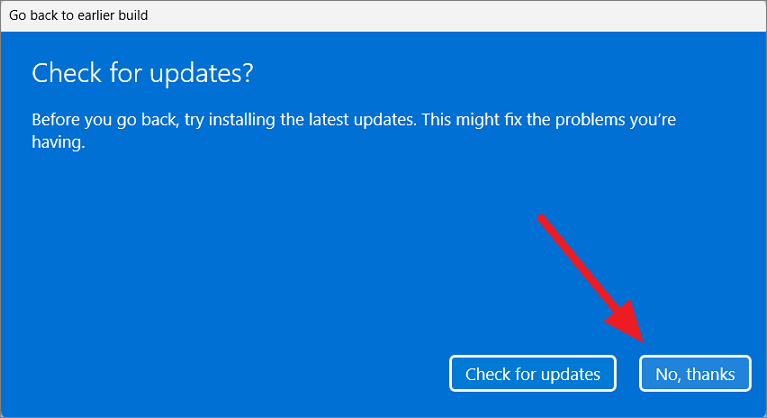
Next, Windows will ask whether you want to check for the latest updates for the current build to try and fix the problems that you are facing. If you want to do that, you can hit the ‘Check for updates option’.
If you decided to roll back to the previous build, click the ‘No, thanks’ button.
Note the information under the ‘What you need to know’ page – This will inform you what will happen when you revert to the previous build. Then, click ‘Next’.
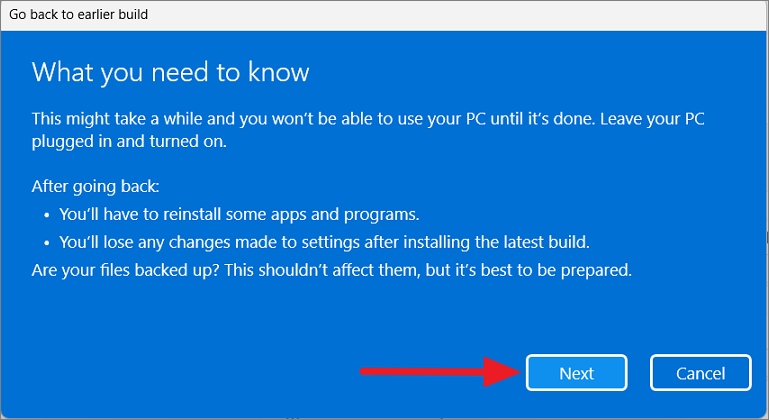
Also, you will be informed that the process will take some time to complete, so make sure your PC is plugged and turned on.
If you have set a password or pin on the previous build and you changed it recently, make sure you know the original password of the old version to sign into that version. Then, click ‘Next.
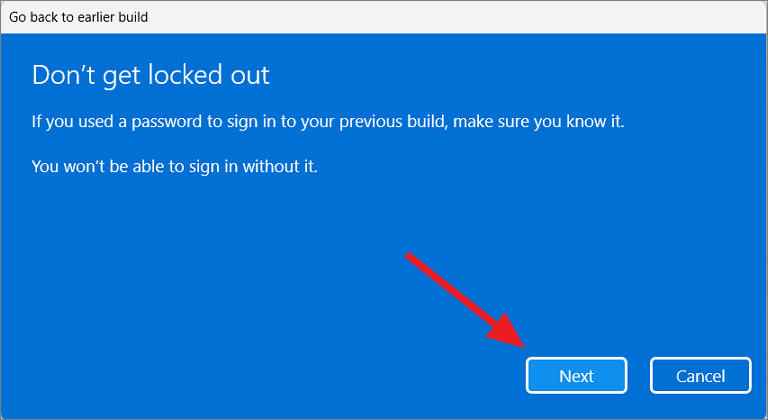
Finally, click the ‘Go back to earlier build’ button to start the process.
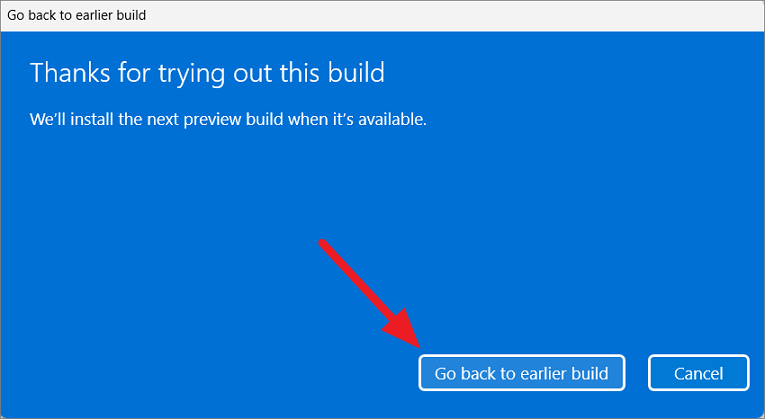
The system will reboot automatically and the setup process will take a while to complete. Once it’s done, your system will revert to the previous version of Windows 11.
Method 2:
If the rollback period of 10 days is over for builds and if the ‘Go Back’ button in the Recovery settings is not accessible or not available, you can try the below method to uninstall quality and feature updates.
Open the Settings app by pressing Win+I shortcut keys and selecting the ‘System’ tab on the left-side panel. Then, scroll down and select the ‘Recovery’ option from the right-side.
Next, click the ‘Restart now’ button under the Recovery options section.
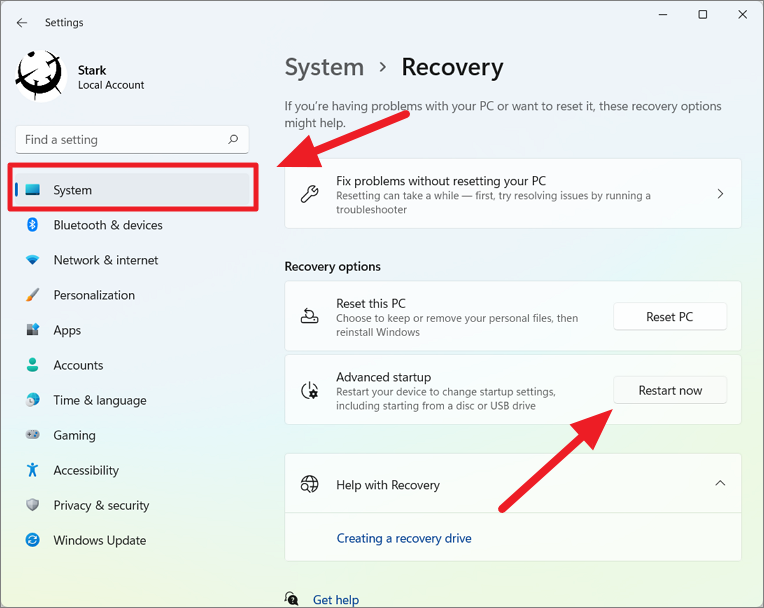
This will prompt a box with the message “We’ll restart your device so save your work”. Now, click ‘Restart Now’ to restart your PC.

If something went wrong with the latest feature update and your computer not even booting up properly to login and access the ‘Advanced startup’ option, you can try the below trick to access the Windows Recovery Environment (Advanced options in the boot menu).
First, restart or start your computer, and as soon as you see the loading screen, hold the power button for 5 sec to shut down the computer. Keep repeating the same process three to four times until you enter the Windows Recovery Environment window.
Now, your PC will boot up to the Windows Recovery Environment. Here, select the ‘Troubleshoot’ option.
After that, select the ‘Advanced options’ option on the next screen.
Then, from the list of options, select the ‘Uninstall updates’ option.
Here, you will see two options, ‘Uninstall Quality updates’ and ‘Uninstall Feature updates’. Now, select the ‘Uninstall feature update’ option.
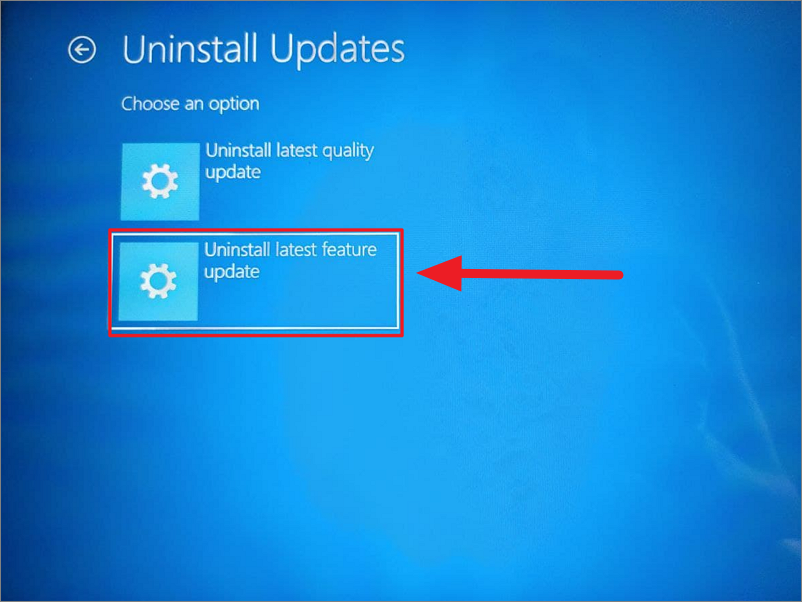
On the last screen, click the ‘Uninstall Latest Feature Update’ button to remove the latest build installed on your Windows 11 computer.
If it has been more than 10 days since you upgraded the version or if the above ‘Uninstall feature update’ option is not available in the Advanced option, you have no choice but to make a clean installation of Windows 11 or use a backup image to restore the previous build.
Block Windows 11 Version/Build Upgrade using Group Policy Editor
After uninstalling the latest build or feature update, Windows will automatically update the version when a new build becomes available. If you are happy with the current version and you don’t want to upgrade to the next version, you can stop Windows from auto-updating version using Group Policy Editor
However, the Local Group Policy Editor tool is only available for Professional, Enterprise, and the Education editions of Windows 11 but not for the Home edition. Here’s how you can block Windows 11 version upgrade using Group Policy Editor:
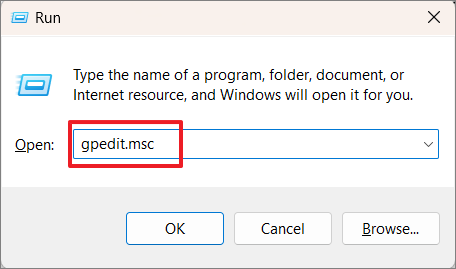
Open the Run window and type gpedit.msc and hit Enter to open Local Group Policy Editor. Or you can search for ‘Edit Group Policy’ in the Windows search and open it.
Then navigate to the following location in the left navigation panel of the Local Group Policy Editor:
Local Computer Policy > Computer Configuration > Administrative Templates > Windows Components > Windows Update > Manage updates offered from Windows Update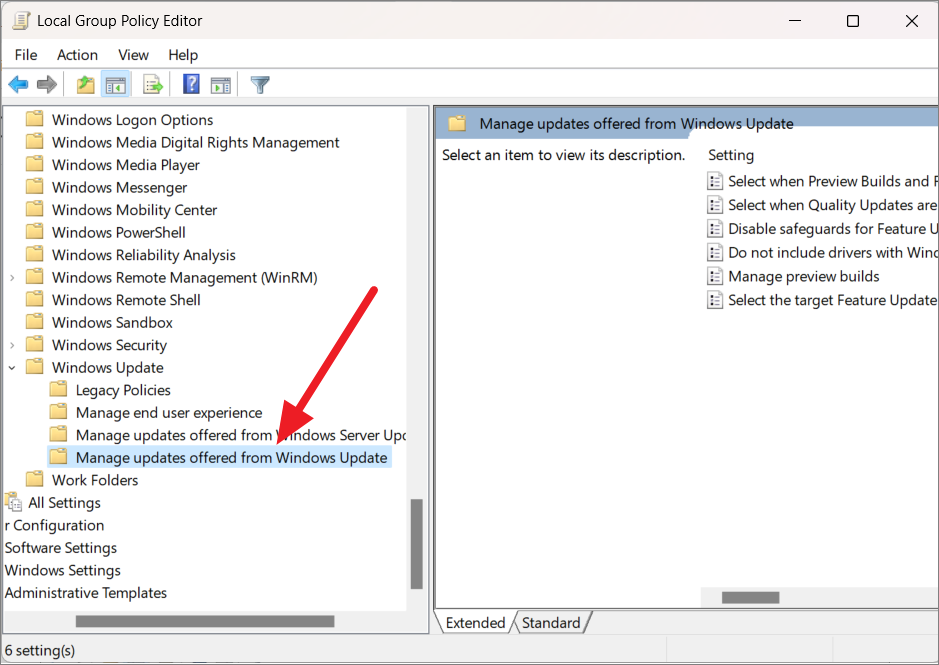
Then, double-click on the ‘Select the target Feature Update version’ policy in the right of the Manage updates offered from the Windows Update folder to edit.
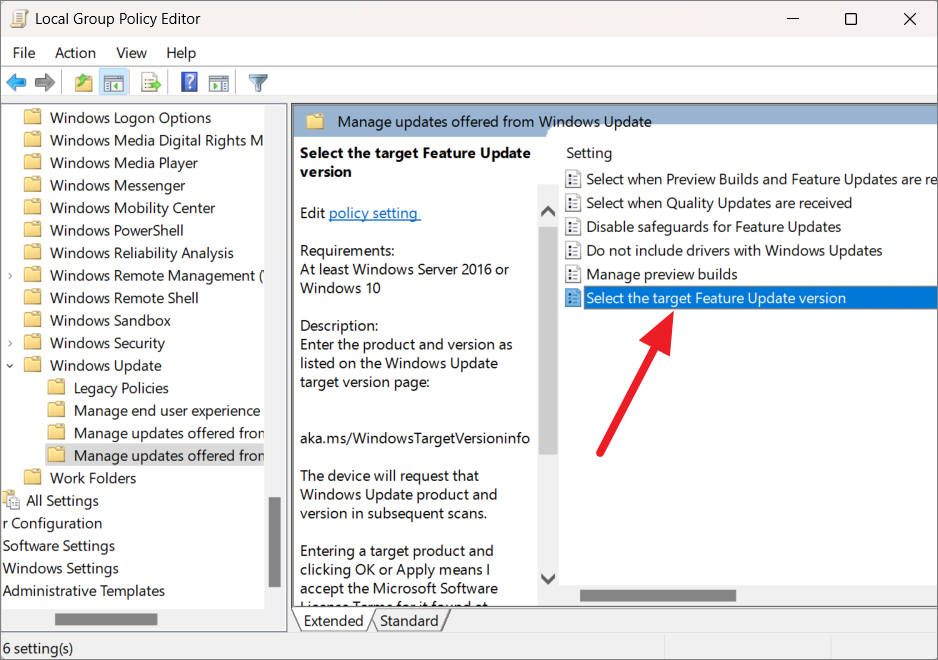
Now, set the policy to ‘Enabled’.
After it’s enabled, enter the below values to the Options:
- Set ‘Which Windows product version would you like to receive feature updates for?’ – Windows 11.
- Set ‘Target version of Feature updates’ – 21H2 or other versions
In the product version field, enter the OS version – Windows 11. For the ‘Target version of Feature updates‘ field, enter the value of the desired feature update version you want to upgrade to or stay with like 21H2 (latest version) or any other specific version.

Then, click ‘Apply’ to save the changes and then click ‘OK’ to close the dialog box. You can now close Local Group Policy Editor and restart your computer to apply the changes. This will force the Window to install feature updates for the specified version if it doesn’t already have it. This will also prevent your system from installing any other Windows 11 version beyond the specified version.
If you ever want to upgrade to Windows 11’s latest version, simply select ‘Not configured’ or ‘Disabled’ for the above policy and click ‘Apply’. Then, restart your system and check for updates.
Extend Windows 11 Build/Version Rollback Period
By default, Windows 11 allows you to go back to the previous version or build of Windows 11 within the first 10 days of build installation. However, if you want to try the current build for more than 10 days and then make a decision, you can extend that Windows 11 rollback period from 10 days to up to 30 or 60 days. Here’s how:
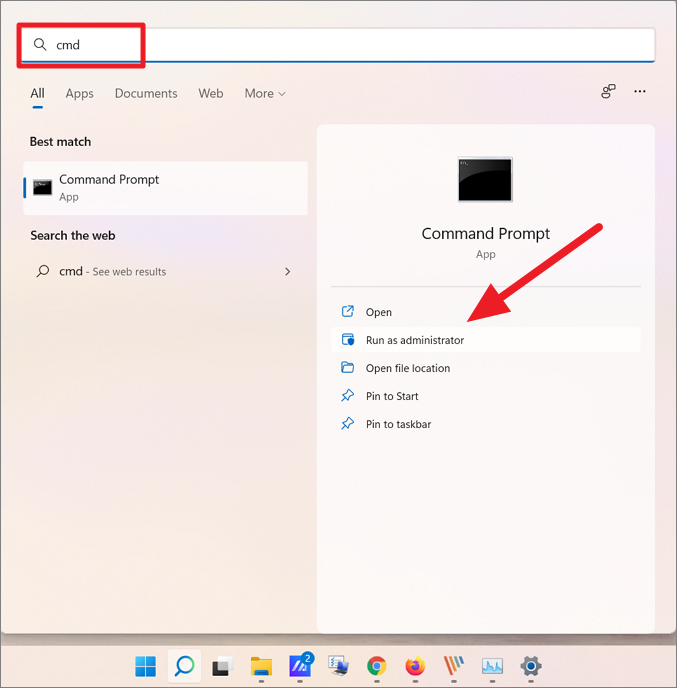
First, type cmd in the Windows search and select the ‘Run as administrator’ option to launch the terminal with administrative privileges.
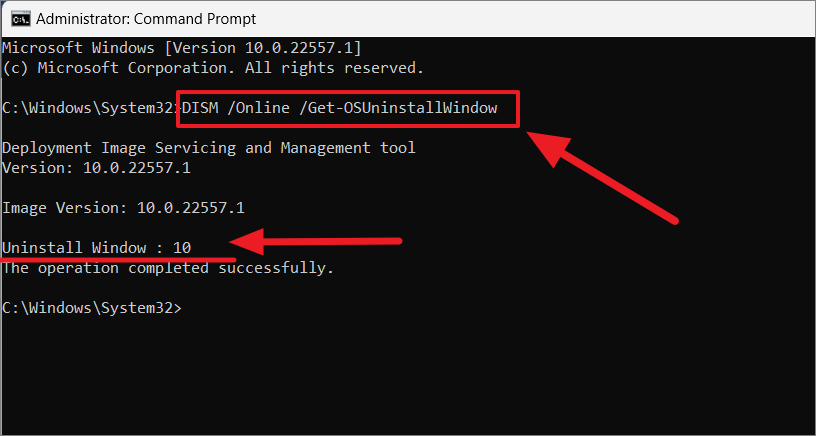
Then, type the below command to check the rollback period or uninstall window and press Enter:
DISM /Online /Get-OSUninstallWindowNow, you will see the ‘Uninstall Window’. As you can see, there are 10 days left in the rollback period.
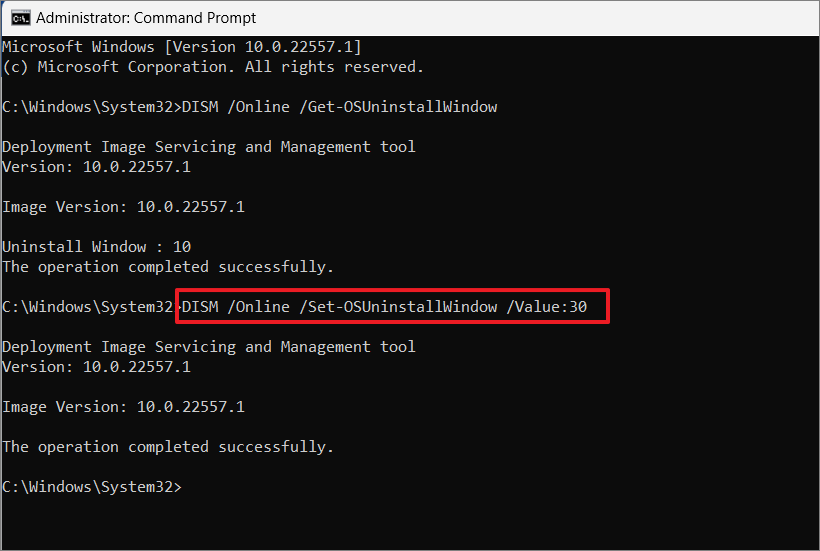
To extend the rollback period to 30 days, type the below command and press Enter:
DISM /Online /Set-OSUninstallWindow /Value:30Here, the Value:30 specifies the number of days you would like to keep the previous build of Windows 11.
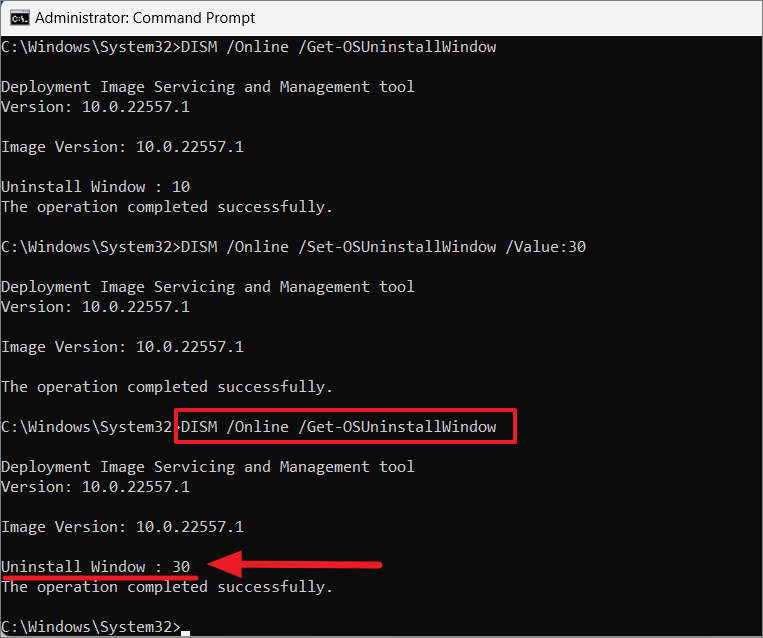
To check and confirm the same roll-back period, type the same command you used above. Now the uninstall windows is changed 30 days.
To extend the rollback period to 60 days, change the value to 60:
DISM /Online /Set-OSUninstallWindow /Value:60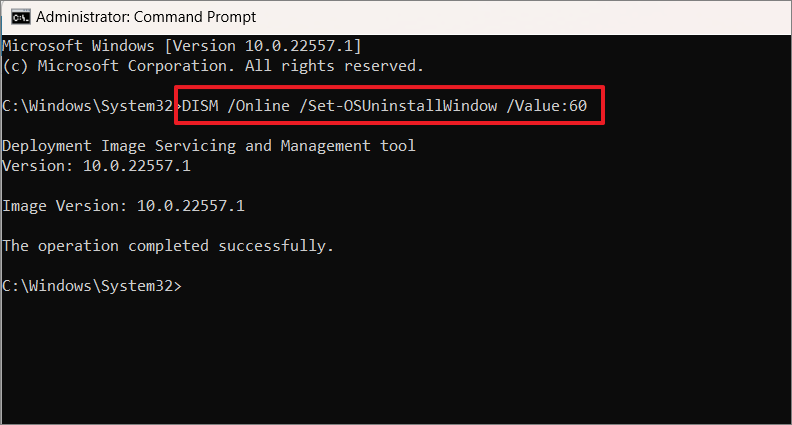
That’s it.
- You can uninstall Windows 10 updates using Settings, Command Prompt, PowerShell, and Advanced startup.
- The easiest way to remove updates is from Settings > Update & Security > View update history > uninstall updates.
- If Windows 10 won’t start, use the Advanced startup options to uninstall the problematic update.
Although Windows 10 updates are meant to fix problems and improve the experience, sometimes these quality patches can cause more issues than they solve. For instance, it is not uncommon to see updates rolling out with bugs breaking features and drives, compatibility problems with software or hardware, and other issues that can negatively affect users.
However, if you come across a problem after applying an update, Windows 10 includes different options to remove a particular update to mitigate the problem using the Settings app, Command Prompt, PowerShell, and even using the Advanced startup options when you cannot access the desktop.
In this guide, you will learn four different ways to remove problematic updates from Windows 10.
- How to uninstall Windows 10 updates using Settings
- How to uninstall Windows 10 updates using Command Prompt
- How to uninstall Windows 10 updates using PowerShell
- How to uninstall Windows 10 updates using Advanced startup options
How to uninstall Windows 10 updates using Settings
To uninstall a quality updates using the Settings app, use these steps:
-
Open Settings on Windows 10.
-
Click on Update & Security.
-
Click on Windows Update.
-
Click the View updates history button.

View update history option -
Click the Uninstall updates option.

Uninstall updates option -
Select the Windows 10 update you want to remove.
-
Click the Uninstall button.

Control Panel Uninstall updates -
Click the Yes button.


Once you complete the steps, the computer will release to apply the changes to revert to the previous state of the device.
How to uninstall Windows 10 updates using Command Prompt
To uninstall a quality update with Command Prompt, use these steps:
-
Open Start.
-
Search for Command Prompt, right-click the top result, and select the Run as administrator option.
-
Type the following command to view the update history and press Enter:
wmic qfe list brief /format:table

Installed updates list -
Check the Windows Update history of your device, and identify the update by its HotFixID and InstalledOn information.
-
Type the following command to uninstall the update from your computer and press Enter:
wusa /uninstall /kb:KBNUMBER
In the command, replace KBNUMBER for the KB number corresponding to the update you are trying to uninstall.
This example removes the update KB5001391 from Windows 10:
wusa /uninstall /kb:5003637

Uninstall Windows 10 updates command -
Click the Yes button.
-
Continue with the on-screen directions (if applicable).


After you complete the steps, the update will be removed from the computer.
How to uninstall Windows 10 updates using PowerShell
To remove Windows 10 updates with PowerShell commands, use these steps:
-
Open Start.
-
Search for PowerShell, right-click the top result, and select the Run as administrator option.
-
Type the following command to install the PowerShell module to update Windows 10 and press Enter:
Install-Module PSWindowsUpdate

PSWindowsUpdate -
Type A to accept and install the module and press Enter.
-
Type the following command to view a list a of the 20 most recent updates and press Enter:
Get-WUHistory | Select-Object -First 20

PowerShell installed updates command -
Type the following command to select and block the update with PowerShell and press Enter:
Remove-WindowsUpdate -KBArticleID KBNUMBER
In the command, make sure to replace KBNUMBER with the update number you want to block.
This example blocks the KB5003191 update:
Remove-WindowsUpdate -KBArticleID KB5003637
-
Type A to accept and install the module and press Enter.


Once you complete the steps, the device may need to restart to complete the process.
If the above instructions do not work, the Command Prompt steps will also work in PowerShell.
How to uninstall Windows 10 updates using Advanced startup options
To uninstall a quality update using the Advanced startup options on Windows 10, use these steps:
-
Start the device in Advanced startup.
Quick tip: Depending on the severity of the problem, you can access the Advanced startup options in a few ways. You can use this guide to learn all the methods to access Advanced startup, and then continue with the steps below.
-
Click on Troubleshoot.

Troubleshoot option -
Click on Advanced options.

Advanced options -
Click on Uninstall Updates.

Uninstall updates from Advanced startup -
Click the Uninstall latest quality update option.

Uninstall latest quality updates -
Sign in using your administrator credentials.
-
Click the Uninstall quality update button.

Advanced startup uninstall quality update option


After you complete the steps, the system will uninstall the latest quality update on your device (if available).
We may earn commission for purchases using our links to help keep offering the free content. Privacy policy info.
All content on this site is provided with no warranties, express or implied. Use any information at your own risk. Always backup of your device and files before making any changes. Privacy policy info.