The purpose of this guide is how to stop or remove the built-in pop-ups ads on Windows 10. You can block ads and pop-ups using a dedicated pop-up blocker or third-party ad-blocking software. However, if you are seeing random pop up ads on your Windows 10 computer like Lock screen, Start menu, Cortana search box, and Action Center & Notifications even when you’re not browsing the web, those tactics will not work. In this guide, you will learn how to stop pop-ups on Windows 10.
Meanwhile, Windows 10 has plenty of built-in advertising. This is not just about the free upgrade offer: you will see advertising in your operating system even if you buy a new PC that comes with a Windows 10 license or pays $200 for a copy of Windows 10 Professional. But you can disable a lot of that.
You Might Also Like: 10 Steps to Improve Windows 10 Performance 2020
Remove Pop-Ups in Microsoft Edge
For Windows 10, Microsoft Edge is the default Web browser. If you encounter pop-up ads when running Microsoft Edge, you can swiftly stop them.
In New Microsoft Edge:
- Open the new Microsoft Edge.
- Click on three menu dots ( …) then select Settings.
- Click Cookies and site permissions on the left side.
- Select Pop-ups and redirects.
- Move the Block toggle to On.
Microsoft Edge
Stop File Explorer Pop-ups
The Developers Update also carried file explorer ads along with it. Occasionally you can see a banner in your file explorer which will seek to convince you to use OneDrive and Office 365. If you find them annoying, you can put a stop to them.
- Press Win + E to open the File Explorer window.
- Click the View tab.
- Select Options on the left-hand side and choose Change Folder and Search Options.
- Select the View tab on Folder Options.
- Uncheck Show sync provider notifications.
- Click Apply and OK.
Stop File Explorer Pop-ups Ads
Remove Pop-ups from The Lock Screen
On the Lock screen, Windows 10 shows ads in two different ways: using the Windows spotlight and using your own custom background. Although you can’t disable advertising when using the Windows spotlight, you can choose to view a custom background image or slideshow that provides an option to prevent Windows 10 and Cortana from displaying ads on the Lock screen.
To stop ads from the Lock screen, do the following:
- Open Settings by pressing Windows + I.
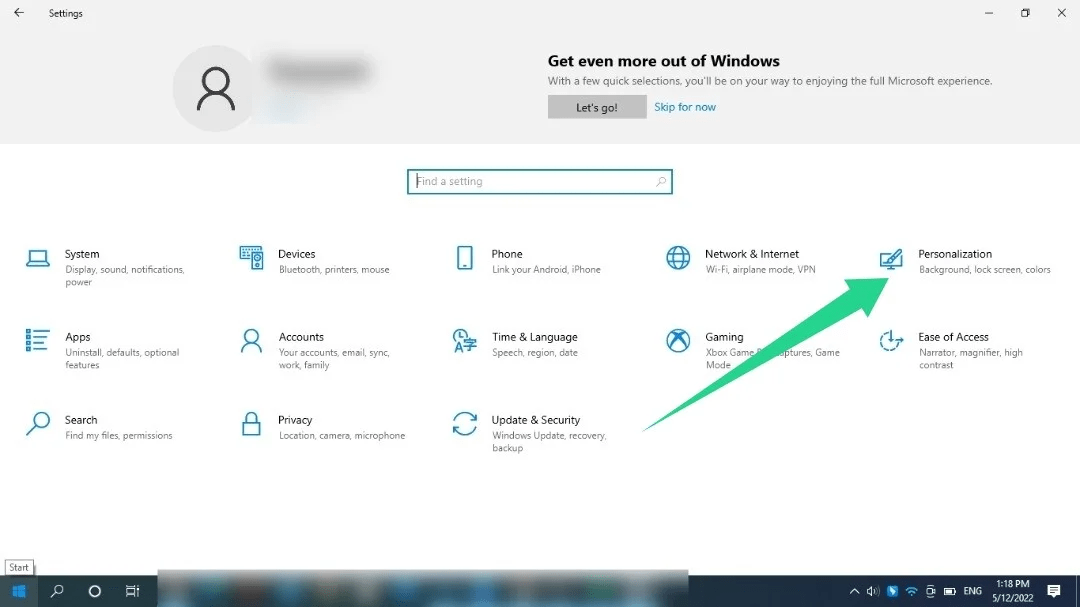
- Click Personalization.
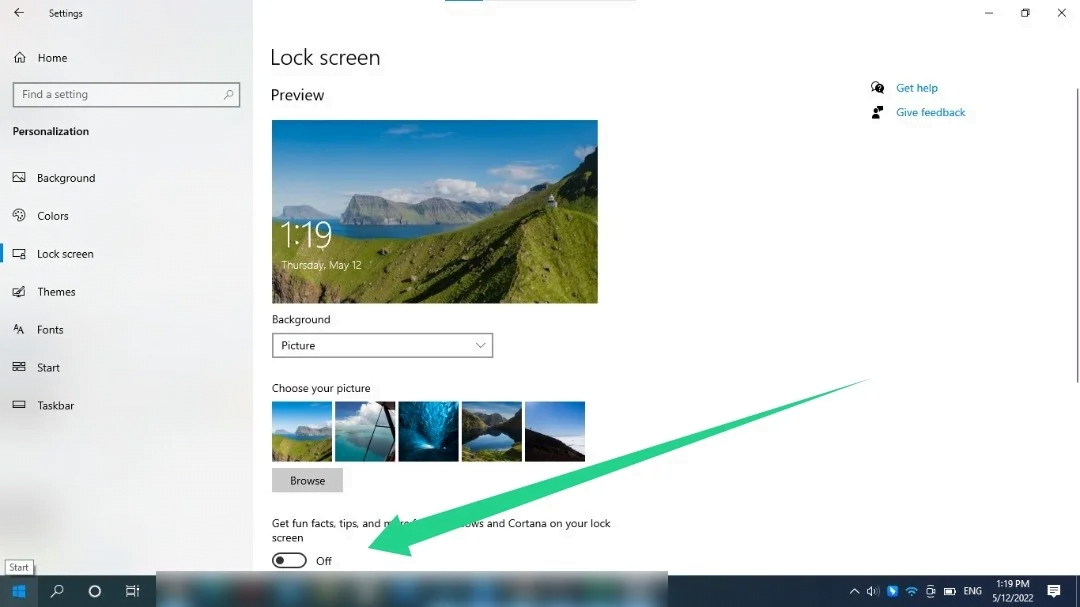
- Click on the Lock screen on the left-hand side pane.
- In the background drop-down, menu select either picture or slideshow.
- Turn off Get fun facts, tips, tricks, and more on your lock screen.
Remove or Stop Pop-ups from The Lock Screen
Remove or Stop Ads for the Start Menu
Microsoft has found a sneaky way to monetize the Start menu. They’re not called “ads,” they’re called “suggested” applications, and it’s a way for Microsoft to get people to use the operating system to get apps and services through the Windows Store.
To remove ads from the Start menu, do the following:
- Open Settings or press Win + I.
- Click on Personalization.
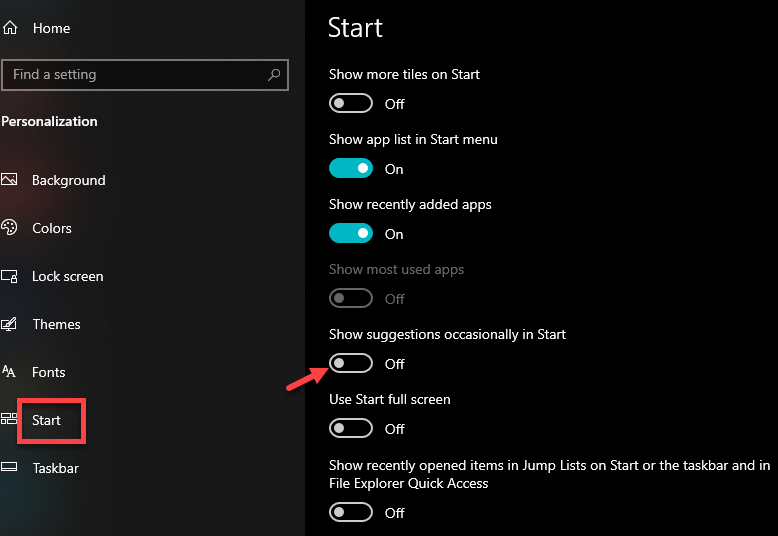
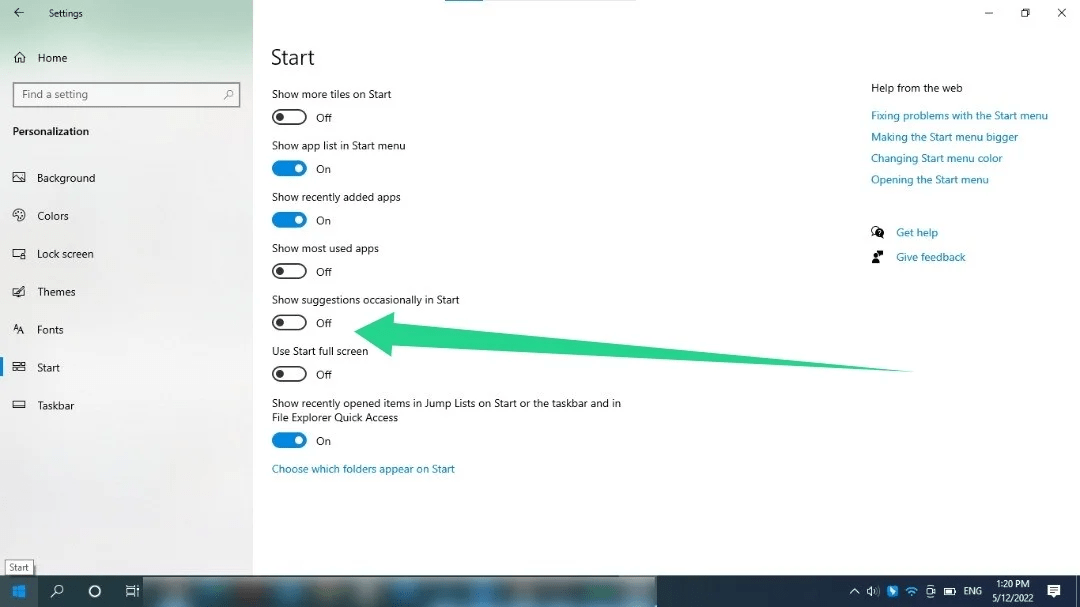
- Click on Start on the left pane.
- Turn off Show suggestions occasionally in Start.
Remove or Stop Ads for the Start Menu
Stop Ads From Actions & Notifications
In the Creators Update, Microsoft added new “suggestions” that appear as notifications. These ads remind you about different Windows features and appear as normal desktop notifications. For example, you might see a notification asking you to set up Cortana. Like other notifications, they are also saved in the Action Center so you can see them later.
To stop ads from notifications & Action Center, do the following:
- Open Settings.
- Click on System.
- Click on Notifications & actions.
- Under Notifications, uncheck both Show me the Windows welcome experience after updates and occasionally when I sign in to highlight what’s new and suggested and Get tips, tricks, and suggestions as you use Windows.
Stop Ads From Actions & Notifications
How to Stop Windows 10 Displaying Targeted Ads
Microsoft also assigns you, in addition to the various advertisements you see in Windows 10, a unique identification number to track your every move in the Windows Store and on applications that target you with specific ads.
If you don’t want Microsoft to display targeted ads, you can change your privacy settings to turn off your advertising ID. However, the operating system will still be able to display ads, just not ads based on your computer behavior.
To stop Microsoft to target you with ads, do the following:
- Open Settings.
- Click on Privacy.
- Click on General on the left pane.
- Turn off Let apps use advertising ID to make ads more interesting to you based on your activity.
Conclusion
That’s it. This guide was all about how to stop built-in pop-ups ads on Windows 10. Once you disable the options mentioned in this guide, you will see a significant reduction in the number of ads across the operating system. Keep in mind, however, that these options will not remove advertisements on those Windows Store apps that are ad-supported. These ads can’t be disabled.
Related Searches:
- windows 10 pop up ads lower right
- how to stop pop-ups on Windows 10 desktop
- ads popping up in bottom right corner of desktop windows 10
- windows 10 ads in notification area
- block ads windows 10 apps
ShaadLife Team
We are professional How-to content writers. As a tech enthusiast and geek, we love to write and share articles about different operating systems such as Android, Windows, macOS, iOS, and some other products like a smartwatch and smart TV.
Adware is a software application, which displays unwanted advertisements automatically while running a program.
Usually, the pop-up window appears as ads, which are generated by the adware. Thus, it hinders and annoys you now and then, as it keeps making endless pop-ups.
Not only that, but it can also lead to security risks, as some malicious or spying programs could also bundle with it.
Some of the intrusive threats associated with this are Computer Viruses, Worms, Trojans, Rootkits, spyware, and more. They perform various undesirable functions like stealing and deleting the data; hijacking core computing functions, and also monitoring the activities of the user without their consent.
Hence, if such programs infect your PC, then they can potentially slow down your device’s performance; consume the undesirably massive volume of data, as they download additional ads; and nevertheless, they can pave the way for the emergence of security threats that will allow tracking your activities online.
Therefore, as a solution we need to remove adware and pop-up ads from Windows 10, to avoid these issues. There are various methods to remove them; we are listing some below.
Check for Add-Ons or Rogue Extensions in your Browser
The adware programs mostly settle in the form of extensions or add-ons in your browser. Removing them can also help get rid of such unwanted programs. Procedures for doing this in particular browsers are as follows.
Click the Chrome menu, at the top right corner of the browser; select More Settings and then click Extensions from the list of options it displays.
Now, check if there are any unrecognizable extensions. If there is any unwanted or unknown extension, then remove them by clicking the Trash icon, next to it.
Check the Start Page, Search Engines, and other Defaults of your Browser
The other well-known tactics of the adware programs to take advantage of your browser is altering the Start Page, Search Engine settings. There is a lot of chances for making your browser prone to hijacking, by this way. Hence, it is better to ensure these settings to remove adware and pop-up ads from Windows 10. How to do this? Read on.
Go to the Settings window, and click the Set Pages option, under the On Startup segment. If any unknown website is put-up there, rather than a blank page or your specified page; then remove them with the help of the Settings button beside it.
You can also verify the search engine settings, by selecting the Manage Search Engines options, under the Search Engine segment. Choose your preferred search engine Default, here.
Check the Auto-Start Programs
Adware can also pin unwanted programs to the Start so that it evokes right away when you start your Windows 10 PC. To check and remove them from the Start settings, carry out the following steps.
Right Click on the Start button and click on the Task Manager option to evoke it.
In the oncoming window, select the Startup tab, to see the list of programs that are set to start when the PC boots.
Check whether there is any adware. For disabling anything unfamiliar, select it and click the Disable button at the bottom of the window.
Uninstall the Unnecessary Programs
If you still see any intrusive ads or pop-ups; then check if there is any unwanted software program installed in your system. For this, get into the Control Panel; click Programs, and then Programs and Features. Check whether there is any unrecognizable software in the list, shown in it. For uninstalling any software just double click on it and restart the PC, once it is uninstalled successfully. This procedure will certainly remove adware and pop-up ads from Windows 10 when done efficiently.
Restore the System
If you are still not successful in removing the adware, then run a System Restore; to roll back the computer to the date when it worked properly. But for this, you should have set a restore point in your system, when it works fine. First, let’s see how to create a restore point.
Type “system restore” in the Windows 10 Search box and select the Create a restore point from the oncoming suggestions. Now the System Properties dialog box will show up Get to the System Protection tab and then click the Configure button.
Then enable the Turn on system protection option, and use the Max Usage slider to determine how much of the PC’s hard disk it can use to store the Restore Points. Usually, 5% to 10% is sufficient. After setting everything, click OK.
If you want to return to a Restore Point: Open the System Properties dialog box again; get to the System Protection tab, and then select System Restore button and follow the instructions. You can also prefer the Scan for affected programs button before proceeding further.
Download and Install MalwareFox Anti-Malware
If you are not satisfied with all the procedures mentioned above; and if the adware persists in your Windows 10 PC; then you have to deal it with a competent, protective software program. MalwareFox is one the best anti-malware, you can download it from its official website. It is a robust program that efficiently discovers and eradicates various adware and malware; rendering a peaceful and secure experience with your PC.
To remove adware and pop-up ads from Windows 10, download MalwareFox. You will get the fully functional product to try for 15 days. Once, you’ve downloaded and installed MalwareFox successfully, let it update its database and signatures. After updating, it is ready to scan your computer for adware and pop-up ads. Click on Scan button to go.
Find and Remove Hidden Malware Viruses on your PC
Contents
- How to Stop Pop-Up Ads on Windows 10
- Method 1: Block Lock Screen Tips and Suggestions
- Method 2: Remove Promotions from the Start Menu
- Method 3: Remove Notification and Taskbar Ads
- Method 4: Use the Registry Editor
- Method 5: Get Rid of File Explorer Ads
- Method 6: Disable Targeted Advertising
- Method 7: Stopping Browser Pop-Ups
- Method 8: Use BoostSpeed Tweak Manager to Manage Pop-Up Notifications.
- Conclusion
- FAQ
- How to Get Rid of Cortana Pop-Up?
- How to Stop Discord Notifications from Popping Up on PC?
- How to Disable Microsoft Family Features Pop-Up?
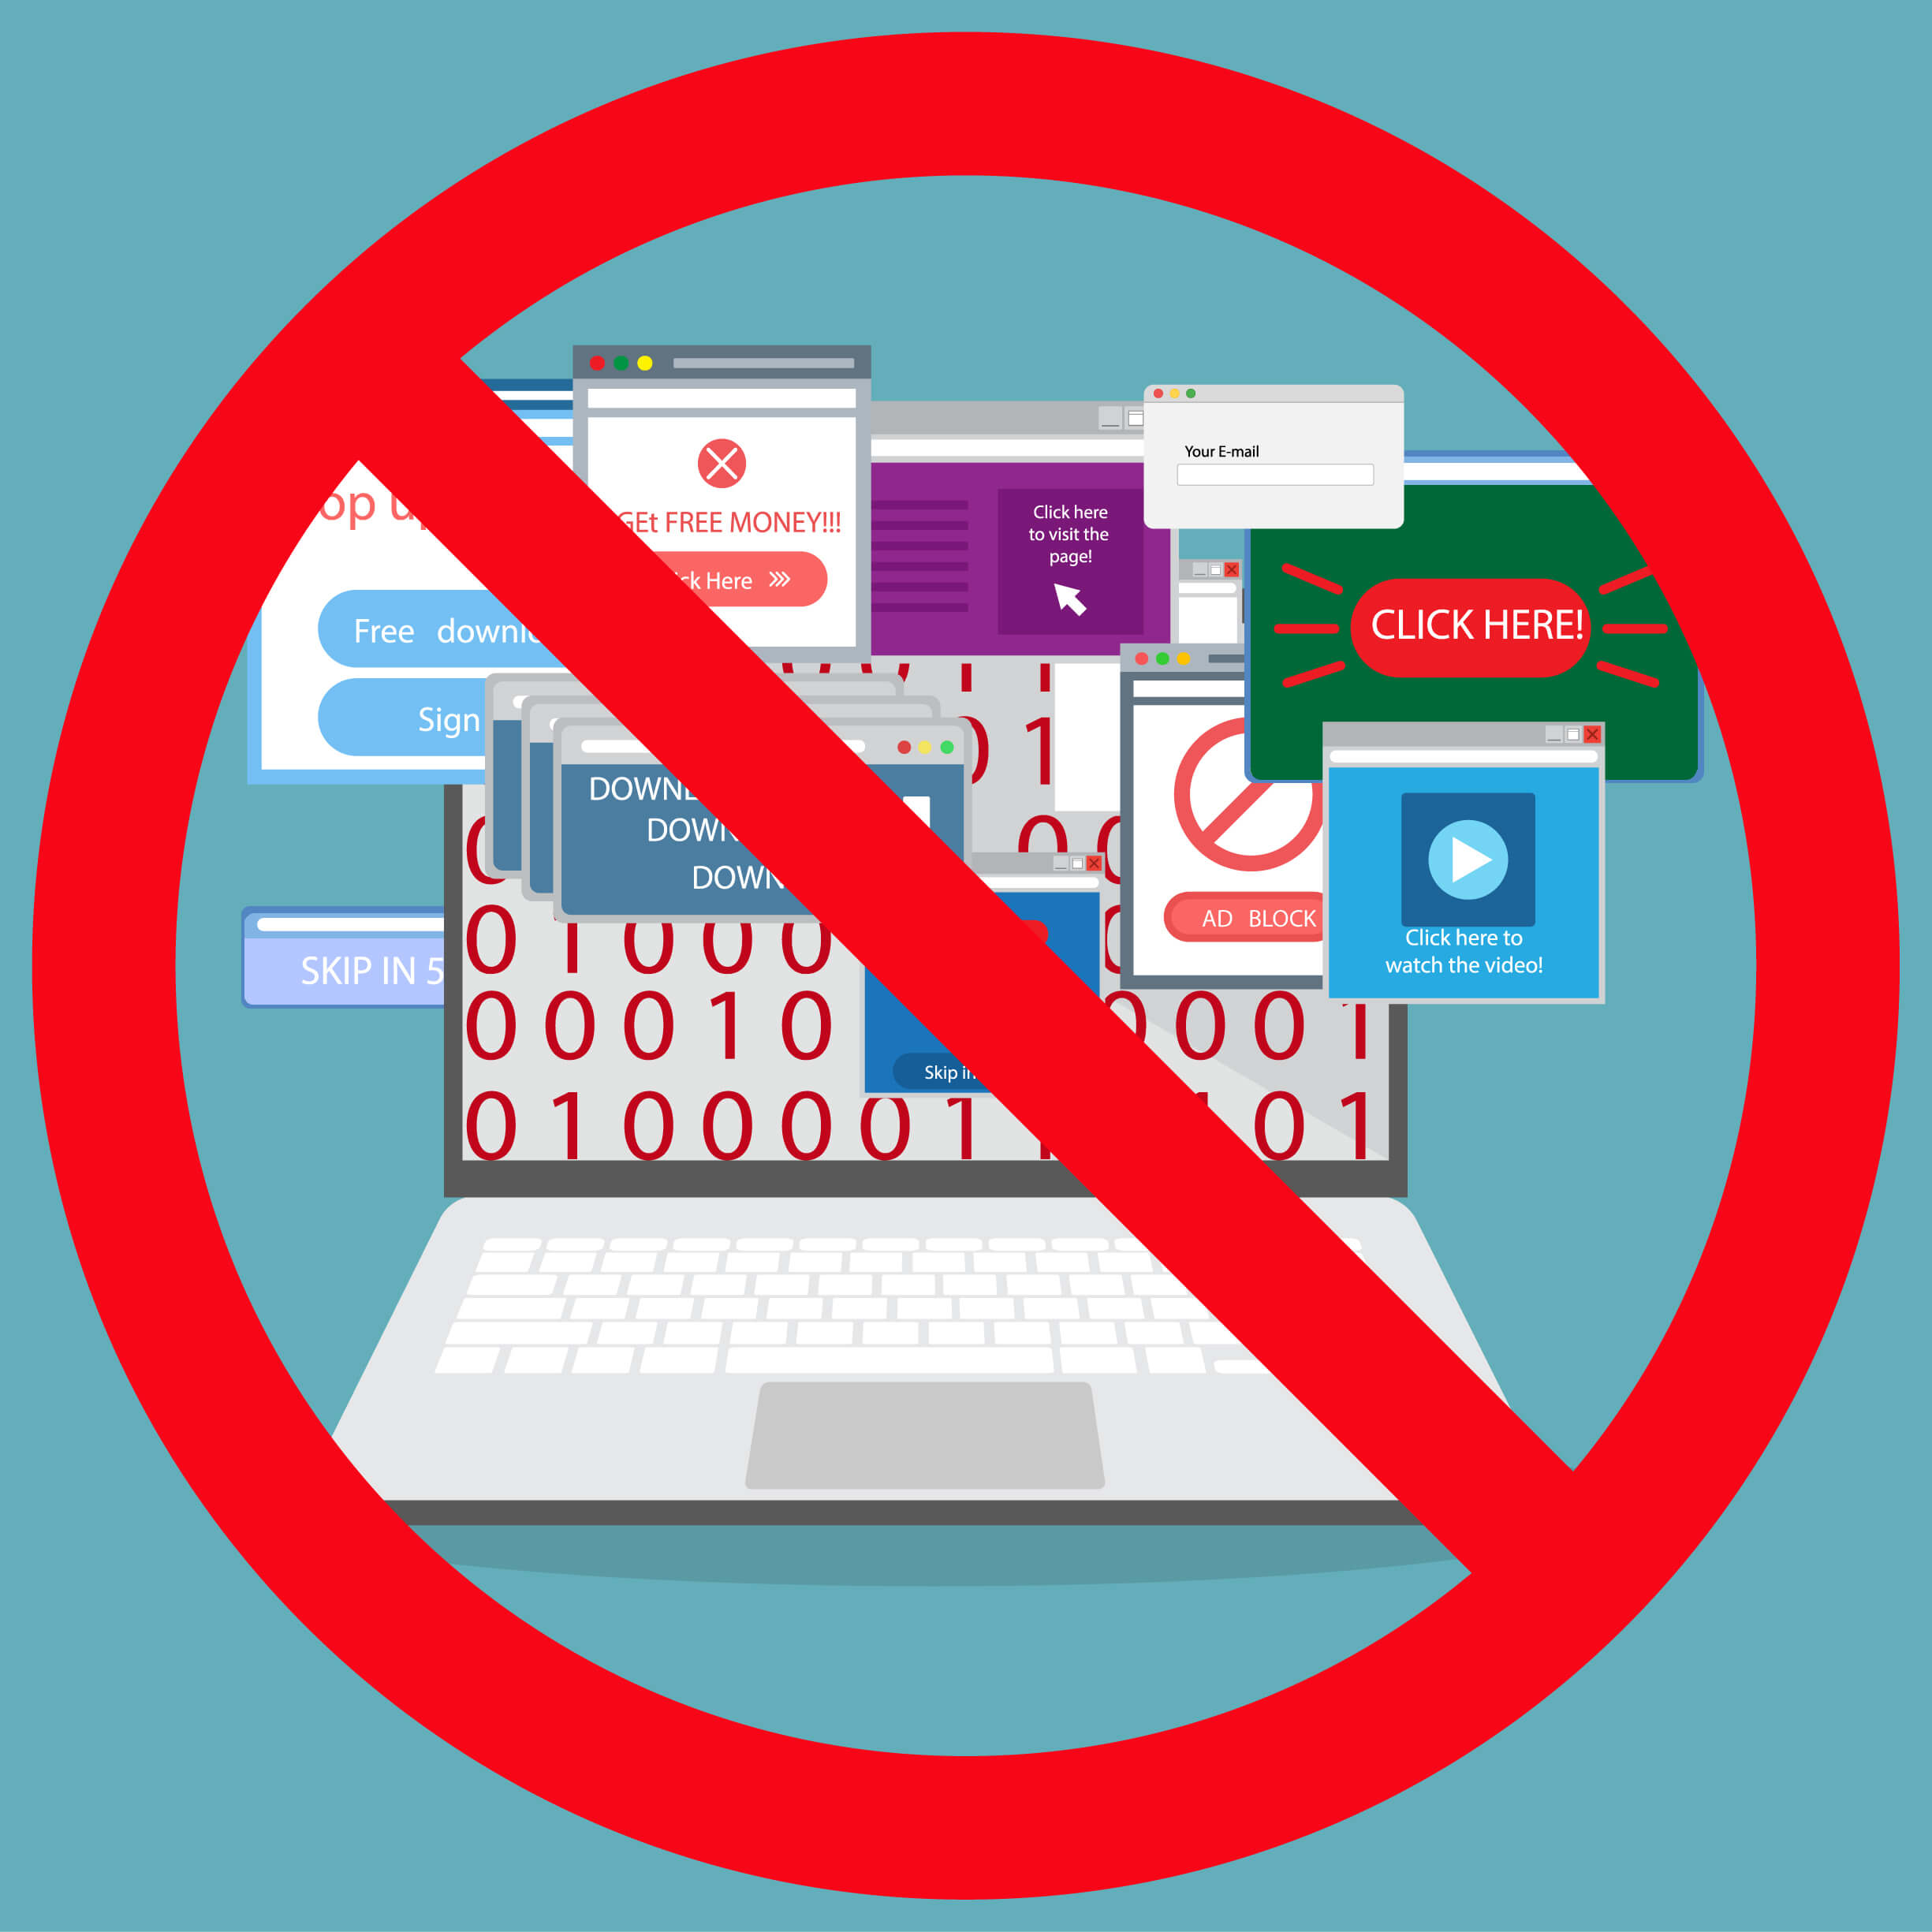
Do you want to know how to stop pop-ups on Windows 10? Windows 10’s ads and notification pop-ups are among its most annoying features.
Microsoft continues to promote paid advertisements that show up at awkward moments and in different areas of the operating system.
These little windows can distract you from work and cover your viewing content. You don’t want to constantly be greeted by interruptions, whether notifications about new apps, updates, or advertisements.
As it turns out, these pop-ups show up on paid and free operating system versions, even after Windows 11’s introduction.
Thankfully, this article shows you how to stop pop-ups on Windows 10.
Let’s begin.
How to Stop Pop-Up Ads on Windows 10
You can take several steps to stop pop-up ads on Windows 10. Let’s go through the steps:
Method 1: Block Lock Screen Tips and Suggestions
Microsoft tries to improve your lock screen’s aesthetics by serving you photos from Bing using the Spotlight feature. However, the random images contain texts that offer “fun facts” about the wallpaper.
Windows could also advise using a Microsoft account or switching to the Edge browser. If you’re uncomfortable receiving details about the photo and additional tips and suggestions, you can make Windows display just the wallpaper without text.
Follow these steps to learn how to stop pop-ups on Windows 10:
- Right-click the “Start” button in your taskbar and click “Settings.”
- Click on “Personalization” after the Settings app appears.
- Go to the screen’s left side and click “Lock Screen.”
- Go to the right side of the screen and toggle off the “Get Fun Facts, Tips, and More.”
Before using Windows Spotlight to see the “Get Fun Facts, Tips, and More” settings, you can use a custom wallpaper for your lock screen.
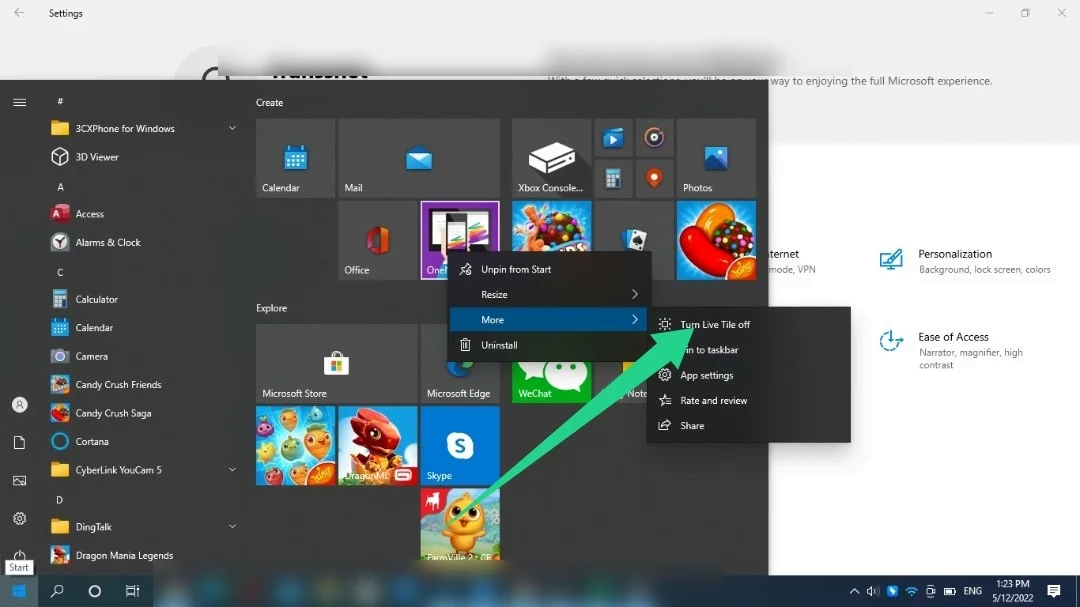
Windows 10’s Start menu contains live tiles and suggested apps. These “suggested apps” include Microsoft’s applications like Skype and Edge.
They also include games from the Microsoft store, such as Candy Crush and DragonML. You can disable the suggestions using the following settings:
- Right-click the “Start” button in your taskbar and click “Settings.”
- Click on “Personalization” after the “Settings” app appears.
- Go to the left of the “Personalization” screen and click “Start.”
- Head to the right side of the screen and toggle off the “Show suggestions occasionally in Start” option.
- You can also turn off pre-installed live tiles stuck on the “Start” screen. Right-click on the tile, hover your cursor over the “More option,” and click “Turn Live Tile Off.”
If the live tile represents an installed app, right-click it and select “Uninstall.”
Extra Tip: You may also see pre-installed applications you don’t need. These include Candy Crush, Instagram, and Twitter. You can remove them by searching for them in “Start,” right-clicking their icons, and selecting “Uninstall.”
Then, follow the prompts that show up to complete the uninstallation process.
Related: How to Uninstall Programs and Delete Unnecessary Files in Windows 10
Method 3: Remove Notification and Taskbar Ads
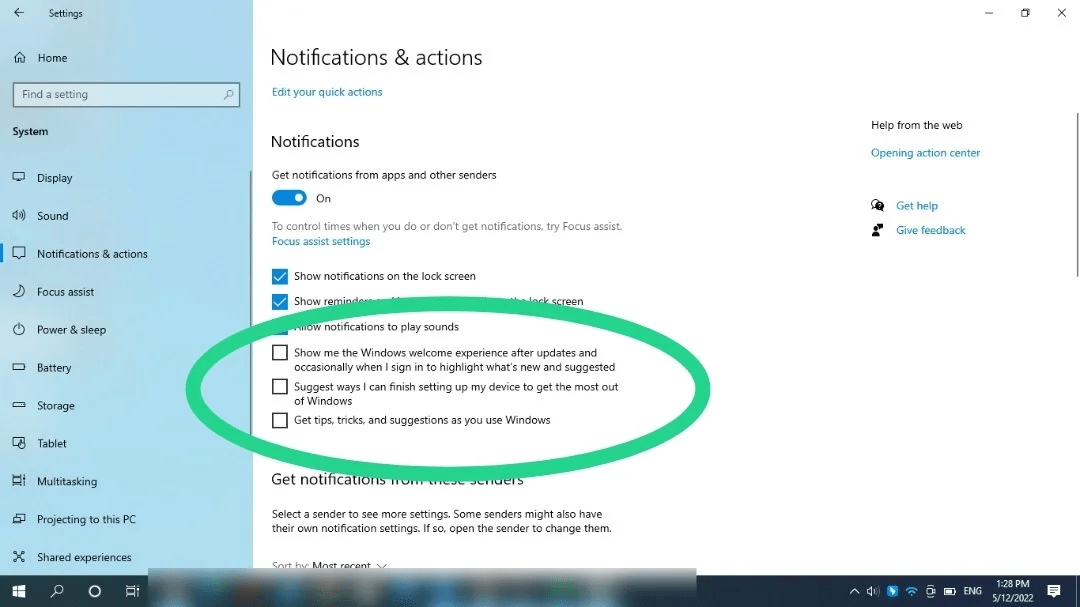
Windows sends ads and tips that pop out like regular Windows notifications. They show you how to use different Windows features and set up specific apps. You can view these notifications via the Actions Center (now Quick Settings interface).
Microsoft also promotes apps like Edge through the taskbar. Follow the guide below to disable these ads and pop-ups:
- Use the “Win + I” shortcut to launch the “Settings” app.
- After “Settings” shows up, click on “System.”
- Select “Notifications and Actions” on the left side of the screen.
- Next, uncheck the box beside “Get tips, tricks, and suggestions as you use Windows.”
You can also uncheck other options such as “Suggest Ways I Can Finish Setting Up My Device” and “Show Me the Windows Welcome Experience.”
Method 4: Use the Registry Editor
If you want to know how to stop pop-ups on Windows 10, you can also turn off Windows 10 notifications by tweaking the Windows registry. You should be careful while using this option, as the registry is sensitive, and the wrong setting can cause severe damage.
If you’re uncomfortable with the Registry editor, skip this method or get an expert to assist you. You should also consider backing up the registry before applying the changes we will show you. Follow these steps:
- Launch the “Run” app using the “Win + R” hotkey.
- Type “regedit” in the Run text box and tap your Enter keyboard button.
- Click on “Yes.”
- Click on “File >> Export” once you see the “Registry Editor.”
- After the “Export Registry File” dialog opens, select “All under Export Range,” enter a file name, and click “Save.”
Open the “Registry Editor,” head to the left pane, and navigate to the following key. Now, follow these steps to turn off notifications: “HKEY_CURRENT_USER\Software\Microsoft\Windows\CurrentVersion\PushNotifications”
Copy and paste the key into your Registry Editor’s address and hit “Enter.”
Now, go to the right side of the screen and double-click the ToastEnabled. After the “Edit DWORD Value” dialog opens, enter “0” in the “Value Data” text box and click “OK.”
Tip: Sometimes, you may need to declutter your system registry, as uninstalled apps may leave unwanted keys behind. These keys, alongside other corrupt keys, can cause configuration issues and slow down your system.
Finding and fixing these keys is an uphill task, even for an expert. However, you can use specialized tools like Registry Cleaner and Registry Defrag to remove the keys and optimize your system registry.
Also Read: What is the Windows Registry And Why Do You Need a Registry Cleaner?
Method 5: Get Rid of File Explorer Ads
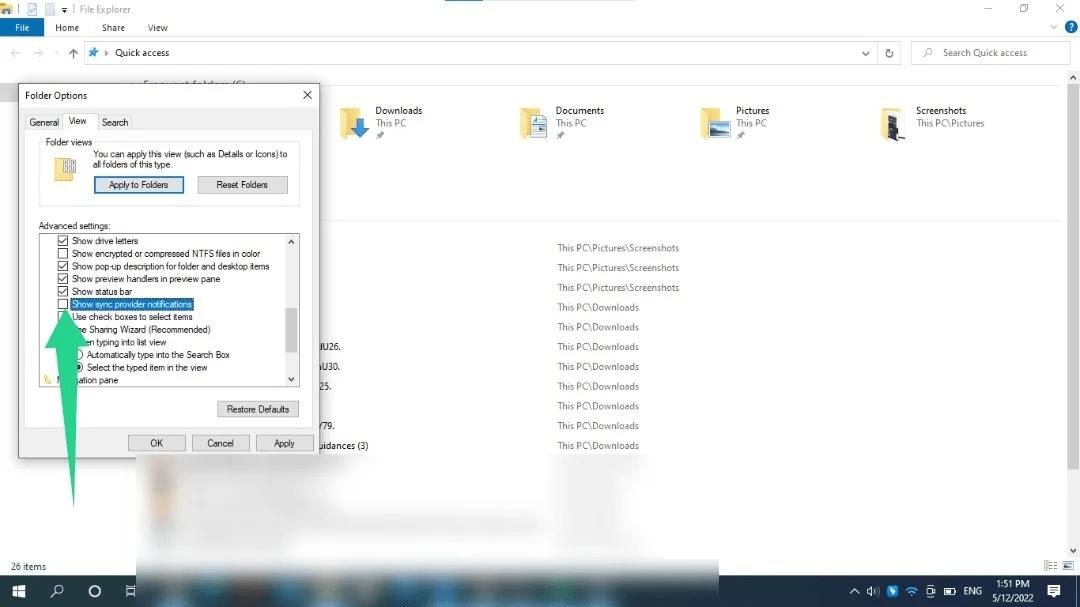
As it turns out, Microsoft didn’t spare File Explorer from ads. The company promotes services like Office 365 and OneDrive, where you can explore your hard drive and files. Thankfully, you can turn off these promotions. Here’s how to stop pop-ups on Windows 10 in File Explorer:
- Launch File Explorer. You can use the “Win + E” shortcut or right-click the Start button and click on File Explorer.
- Go to the top of the File Explorer window, click “View,” and select “Options.”
- Go to the “View” tab in the “Folder Options” dialog box.
- Scroll under “Advanced Settings” and uncheck the “Show sync provider notifications” box.
- Select “Apply” and click on “OK.”
Related: Windows File Explorer Not Responding? Try These Solutions
Method 6: Disable Targeted Advertising
Your computer has an advertising ID used to track your interests and push streamlined ads within specific programs. You can turn off this setting to prevent Windows from gathering information on you. Follow these steps:
- Use the “Win + I” shortcut to launch the “Settings” app.
- Click the “Privacy” icon when the “Settings” app appears.
- Under the “Change privacy options” page, turn off the switch for “Let apps use advertising ID to make ads more interesting to you based on your app activity. (Turning this off will reset your ID.)”
So, if you want to how to stop pop-ups on Windows 10, follow the steps if it works. If not, follow other solutions in this guide.
Also Read: How to Block Personalized Ads Inside of Windows 10 Apps?
Method 7: Stopping Browser Pop-Ups
Sometimes, websites send intrusive pop-ups while you’re browsing. You can disable these pop-ups alongside annoying redirects in your browser’s Settings interface. Let’s show you how to stop pop-ups on Windows 10 in Google Chrome, Mozilla Firefox, and Microsoft Edge.
Chrome:
- Launch Chrome and click on the three-dot menu in the top-right corner.
- Click on “Settings.”
- After the “Settings” page opens, go to the left side and click on “Privacy and Security.”
- Click on “Site Settings” under “Privacy and Security.”
- Scroll through the “Site Settings” page and click on “Pop-Ups and Redirects” under “Additional Permissions.”
- Select “Don’t allow sites to send pop-ups or use redirects.”
Firefox:
If you want to know how to stop pop-ups on Windows 10 in Firefox, use the below steps:
- Launch Firefox and click on the three horizontal lines in the top-right corner.
- Click on “Settings.”
- Select “Privacy and Security” in the left pane of the “Settings” page.
- Go to the right and scroll down to “Permissions.”
- Check the box beside “Block pop-up windows.”
Microsoft Edge:
Here’s how to stop pop-ups on Windows 10 in Edge:
- Launch Microsoft Edge and click on the three dots in the top-right corner.
- Select “Settings.”
- Go to the Settings app’s left side and click “Cookies and Site Permissions.”
- Scroll down under “Site Permissions and click on Pop-Ups and Redirects.”
- Toggle on the “Block” switch.
- You can also click the “Notifications option under Site Permissions” to manage how websites send notifications.
Related: What is the Best Internet Browser?
Method 8: Use BoostSpeed Tweak Manager to Manage Pop-Up Notifications.
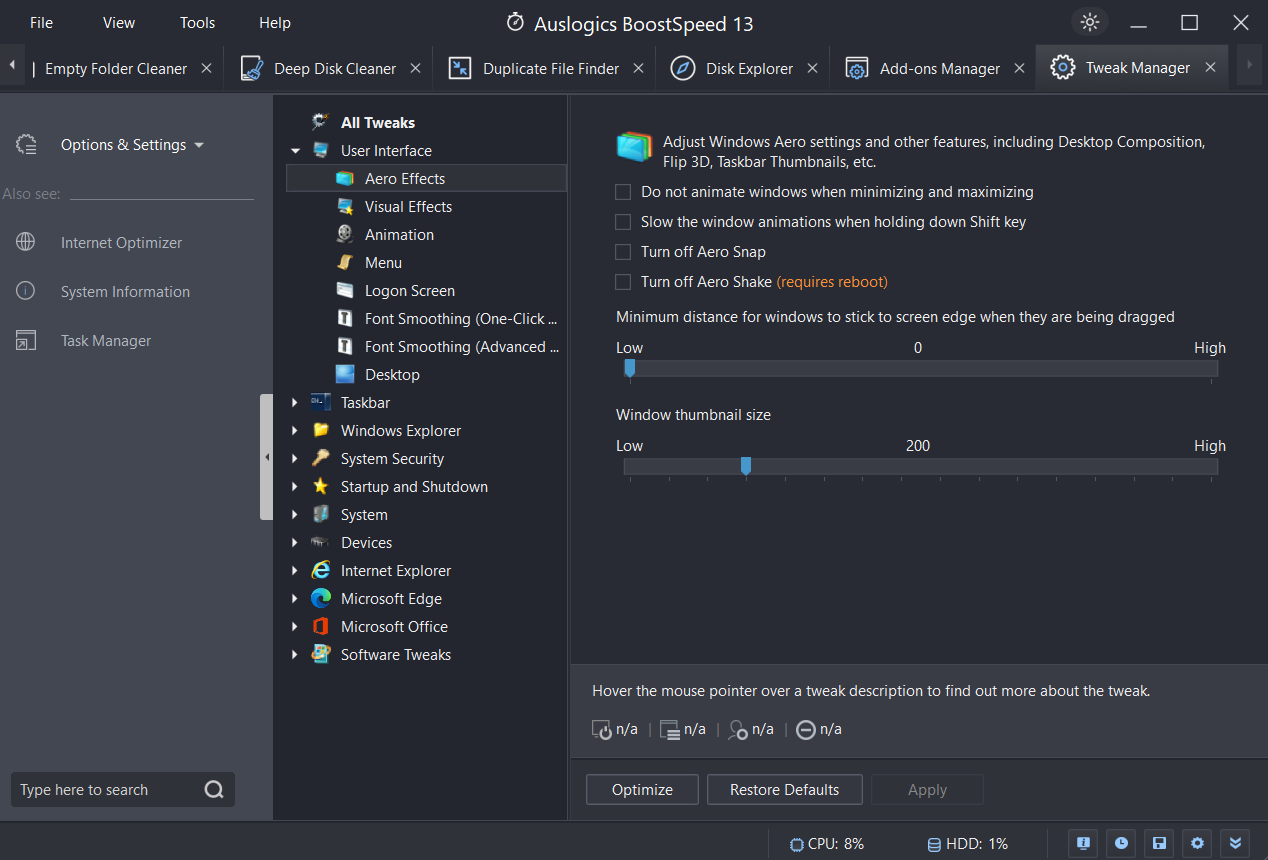
If you want to know how to stop pop-ups on Windows 10, consider BoostSpeed Tweak Manager. It’s an excellent option to stop the annoying pop-up messages on your computer.
This program provides a simple method for configuring notifications, enhancing the stability of your online experience. You can improve your online privacy and stop receiving those annoying ad notifications.
Learn more: Speed Up Slow Computer:Introducing Auslogics BoostSpeed 13
Customizing your PC’s settings is one of BoostSpeed Tweak Manager’s best features. You can choose which alerts you want to receive and which ones you don’t when it comes to them.
This minimizes interruptions and distractions because you control what appears on your screen. Consider downloading the Auslogics BoostSpeed to access this feature and more.
Related: Get the Most out of Auslogics BoostSpeed Free Trial
Conclusion
We’ve looked at the practical ways of how to stop pop-ups on Windows 10. Go through the methods and find the one that works best for you. BoostSpeed Tweak Manager is a powerful tool for managing pop-up notifications and enhancing your online experience.
However, you can use the Auslogics BoostSpeed for so much more. The program allows you to adjust your PC’s settings and choose which notifications you want to receive.
Also, BoostSpeed provides extra advantages, including speeding up PC performance, removing unused files, and protecting privacy. Consider downloading the Auslogics BoostSpeed for more optimal PC performance.
FAQ
How to Get Rid of Cortana Pop-Up?
Right-click the Windows Start button to start, and then choose “Settings.” Go to “System” in the Settings window, then select “Notifications & actions.” Turn off the toggle switch next to “Cortana” by scrolling down and finding it. When you do this, Cortana won’t show pop-up notifications.
How to Stop Discord Notifications from Popping Up on PC?
First, launch Discord and select the gear icon in the lower left corner to access User Settings. Visit the “Notifications” tab on the left sidebar next. You can change various notification settings here.
Go to the “Message Notifications” section and choose “Only @mentions” to stop pop-up notifications. When you do this, you’ll only see pop-up notifications when someone specifically mentions you.
How to Disable Microsoft Family Features Pop-Up?
Click the gear-shaped symbol from the Start button, and go to your computer’s “Settings” menu. Select “Accounts” in the Settings window, then click “Family & other users” on the left. After choosing the family member whose preferences you want to change, click “Manage family settings online.”
Your web browser will launch. Sign in to the browser using your Microsoft account, then choose “Screen time” from the left-hand menu. Here, you can adjust the family features and turn off pop-ups.
Are you annoyed by pop-up messages and unsolicited ads by third parties? Here’s what you need to do to get rid of them on Windows 11. Indeed, Microsoft did good work with Windows 11, and there are a lot of new features to enjoy. From a platform to run Android apps to an intuitive user interface, better app compatibility with Windows 11 brings a lot for its users. However, there are certain things like the continued persistence on injecting ads into Windows 11 is that users don’t like. If you are annoyed with these pop-ups and don’t like viewing ads, you can tweak certain settings to turn off notifications.
Luckily, in this post, we will explain how to block pop-ups on Windows 11. Along with this as an additional tip, we will explain how to avoid being a victim of adware infections and malware. To know more about it, read the post till the end.
Must Read- How To Test If Your Antivirus Is Effective Or Not
Writer’s Tip – How to Keep PC Protected from Threats & Adware?
Alongside disabling pop up from Windows 11 if you are looking for an easy way to deal with adware, spyware, ransomware, and other malicious threats, we suggest you to Systweak Antivirus a try. Using this excellent Windows security tool, you can keep your PC protected from malware, virus, and adware. Moreover, unlike other security tools, that take unwanted space to save definition updates the tool keeps them updated on the cloud and this helps easily scan the latest threats too. Also, Systweak Antivirus comes with Real-time protection and various security shields like Malware Protection, Web Protection – which helps avoid visiting malicious sites, Exploit Protection – to detect the latest threats. What’s more this best security tool for Windows even scans startup items for infections.
To get the robust security tool for Windows, click the download button below.
Once you have Systweak Antivirus downloaded and installed. You need to just select from the scanning and perform the scan. To learn how to use the tool, click here to jump to the section.
How to get rid of pop up ads – Windows 11
Method 1 Disabling Ads From Bloatware
If you don’t like the nagging pop-ups just above the Windows 11 taskbar, urging you to sign up for something you don’t need, take control of them and stop them from going to Windows Settings (Windows key + I) > System > Notifications.
Sift through the list of notifications to see if the message is coming from any of the listed entries. To write about these entries, you might have to do a web search, as Windows 11 does define them clearly.
If you don’t have a particular program and are sure to go to Settings > Apps > Apps & features and find the software in question. Click the three-dot menu for it and select Uninstall.
Method 2 Disable App Notifications
Pop-ups are of different types, ones that have your browser as the source, and then some pop-ups directly come from Windows 11. In this section, we will learn how to disable these notifications and stop them from appearing now and then.
1. Press Windows + I and open Windows Settings.
2. From the left pane, click System.
3. Click Notification from the right side and toggle off the button to stop getting notifications.
4. This will ensure that you don’t receive notifications from apps or senders.
Read Also-How to Stop Spyware From Accessing Your PC
Method 3 Disable Windows Tips and Suggestions
Here’s how to turn off tips and suggestions in Windows 11.
1. Press Windows + I to open Windows Settings.
2. Click System > Notifications
3. Scroll down and uncheck Offer suggestions on how I can set up my device and the Get tips and suggestions when I use Windows options.
In addition to this, right-click the task scheduler and find the ad you want to turn off. Click the three-dot icon and select Turn off all notifications. This will disable ads for the selected software.
Method 4 – Disable Personalized Ads
To show relevant ads, Windows gives a unique advertising ID.
To disable them, go to Settings > Privacy & security > General > toggle the switch next to Let apps show me personalized ads by using my advertising ID.
This is how you can disable what Windows shows. But it isn’t always Windows that does it right? In such cases what can you do?
This is when Systweak Antivirus comes to play. Using this powerful and robust tool you can take care of ads and keep the system clean. To use it follow the steps below:
1. Use the Download Now button below to get the setup file of Systweak Antivirus.
2. Click the executable file to install and run Systweak Antivirus. From the main pane enable Web Protection.
3. Thereafter, click the Scan Types option to choose from the given scanning mode.
You’ll see three different scanning modes –
- Quick Scan– it is the fastest of all the scan modes and is most effective in scheduled scans.
- Deep Scan– checks all the areas of the PC including folders, subfolders, memory, hard drive, and the external drive (if connected). As opposed to Quick and Custom Scan, Deep Scan takes a longer time.
- Custom Scan– gives users the option to select areas to scan. It takes a much longer time than Quick Scan.
Pick any to scan as you wish to. If you are scanning the system after a long we recommend Deep Scan.
4. Let the scanning process complete.
5. When the scanning is done, Systweak Antivirus will show you a list of infected files.
6. Go through the scan results for your satisfaction. By default, all threats will be selected. to Quarantine them click Protect Now.
7. A threat result summary will be displayed.
8. Reboot the PC to save changes.
This will help keep system malware and adware free.
See This- How to Choose the Best Antivirus for Windows 11
Hopefully using the steps explained above and with the help of Systweak Antivirus, you can pop-up ads on Windows 11 and keep your Windows infection-free. Do share your comments about the same in the section below.
Как только веб-браузер перенаправляет на bt0802.всплывающие окна поток, компьютер заражен с рекламное приложение. В bt0802.трансляция всплывающее окно сообщает Пользователю Windows входит в группу высокого риска и должны быть обновлены с последней версией программного обеспечения. В bt0802.трансляция веб-мошенников, пытаясь обмануть пользователей в загрузку вредоносных программ на свой ПК.
Как это bt0802.всплывающий поток случайных, трудно сказать, что всплывающее окно может возникнуть на вашем компьютере, как уже упоминалось выше этой bt0802.всплывающий поток случайных, мошенники используют разные домены и разные сообщения и номера телефонов. Программа также может спровоцировать всплывающие окна на вашем компьютере. Всплывающие окна не просто закрыть, так как они держать появляться сообщение с конкретным предупреждением.
Скачать утилитучтобы удалить pop-up –
Используйте средство удаления вредоносных программ Spyhunter только для целей обнаружения. Узнайте больше о SpyHunter Spyware Detection Tool и шаги для удаления SpyHunter.
Удалить bt0802.всплывающий поток- поддельные оповещения – техподдержки мошенников
Как закрыть bt0802.всплывающий поток
Если всплывающее окно остается на вершине с оповещения в браузере и, кажется, невозможно закрыть предупреждения нужно выполнять этот шаг. После выполнения этого шага, пожалуйста, продолжайте с Malwarebytes до начала фактического удаления рекламного ПО, который вызывает всплывающие окна в браузере.
- Начать Windows Диспетчер задач с помощью сочетания клавиш Ctrl+Альт+дель для Windows 7 или сочетание клавиш Ctrl+шифт+ЭСК для Windows 8.
Также можно нажмите на панели задач правой кнопкой мыши и выберите Диспетчер задач в меню.
- Выберите браузер, который вы используете из списка и щелкните его правой кнопкой мыши, выбрав «завершить задачу». Также можно использовать кнопку «завершить задачу» в нижней части окна.
- Интернет-браузер должен быть закрыт, переходите к следующему шагу, чтобы начать процесс удаления вредоносной программы.
Снять bt0802.всплывающий поток и вредоносных программ с компьютера с помощью malwarebytes
Download malwarebytes для удаления вредоносных программ с вашего ПК. Мы провели множество тестов и удаления вредоносных объектов на зараженном ПК, в том числе Adware, потенциально нежелательных программ и шпионского ПО. Антивирус на сегодняшний день лучший доступный инструмент для удаления вредоносных программ сегодня, чтобы избавиться от вредоносных программ. Программа malwarebytes всегда свободен, чтобы удалить любые вредоносные программы. Программа malwarebytes работает с антивирусным программным обеспечением.
Удалить проблемы с malwarebytes и увидеть результаты для себя!
Скачать утилитучтобы удалить pop-up –
Используйте средство удаления вредоносных программ Spyhunter только для целей обнаружения. Узнайте больше о SpyHunter Spyware Detection Tool и шаги для удаления SpyHunter.
Начать установку программа malwarebytes установочный файл. Нажмите здесь для подробной программой malwarebytes инструкции по установке.
Нажмите кнопку «сканировать сейчас» , чтобы начать поиск вредоносных программ на ваш компьютер.
Программа malwarebytes начнет поиск вредоносных программ на ваш компьютер.
Подождите malwarebytes для завершения сканирования на наличие вредоносных программ. Программы malwarebytes вредоносных программ сканирование обычно занимает от 2 до 5 минут.
После сканирования на наличие вредоносных программ будет завершена, программа malwarebytes будут отображены результаты сканирования вредоносных программ.
Удалить найденное вредоносное ПО malwarebytes и с помощью карантина выбранную кнопку.
Подождите malwarebytes, чтобы переместить все найденное вредоносное ПО на ваш компьютер в карантин.
Программа malwarebytes должен выполнить перезагрузку системы для завершения процесса удаления вредоносных программ.
Сохраните и закройте все рабочие документы или открывать веб-страницы и нажмите кнопку да, чтобы перезагрузить компьютер.
После перезагрузки системы, ваш компьютер чист от вредоносных программ. Оставаться защищенным с помощью malwarebytes против будущих угроз. Программа malwarebytes останавливается Adware, потенциально нежелательных программ, вредоносных веб-страниц, подозрительных загрузок, вирусов, шпионских программ и вымогателей заразить вашу машину.
Помогать другим людям, делиться этой информацией.
Share on FacebookShare на TwitterShare on Google+Send с помощью whatsapp
Скачать утилитучтобы удалить pop-up –
Используйте средство удаления вредоносных программ Spyhunter только для целей обнаружения. Узнайте больше о SpyHunter Spyware Detection Tool и шаги для удаления SpyHunter.
Шаг 1: Остановите все pop-up – процессы в диспетчере задач
- Нажмите и удерживайте Ctrl + Alt + Del, чтобы открыть диспетчер задач
- Перейдите на вкладку Подробности и конец всех связанных с ними процессов pop-up – (выберите процесс и нажмите кнопку завершить задачу)
Шаг 2: Удалите pop-up – сопутствующие программы
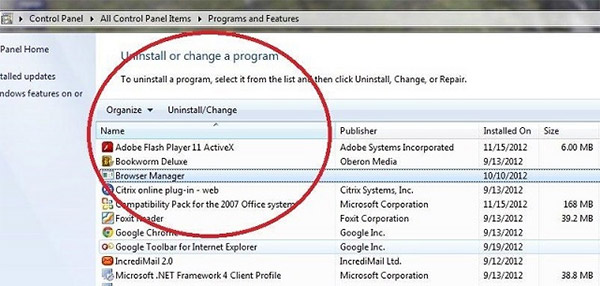
- Нажмите кнопку Пуск и откройте панель управления
- Выберите удалить программу в разделе программы
- Подозрительного программного обеспечения и нажмите кнопку Удалить/изменить
Шаг 3: Удалите вредоносные pop-up – записи в системе реестра
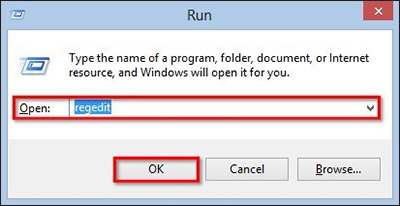
- Нажмите Win + R чтобы открыть выполнить, введите «regedit» и нажмите кнопку ОК
- Если контроль учетных записей пользователей, нажмите кнопку ОК
- Однажды в редакторе реестра, удалите все связанные записи pop-up –
Шаг 4: Устранить вредоносные файлы и папки, связанные с pop-up –
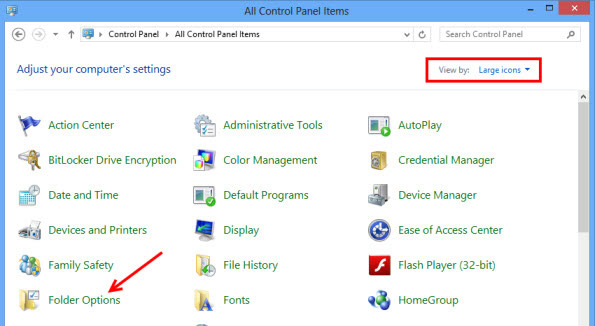
- Нажмите кнопку Пуск и откройте панель управления
- Нажмите Просмотр, выберите крупные значки и откройте свойства папки
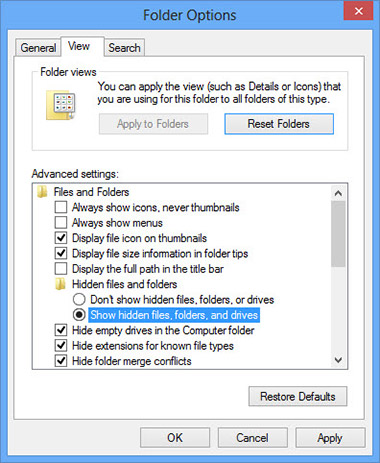
- Перейдите на вкладку Вид, проверить показывать скрытые файлы, папки или драйверы и нажмите кнопку ОК
- Удалить все pop-up – связанные файлы и папки
%AllUsersProfile%\random.exe
%Temp%\random.exe
%AllUsersProfile%\Application Data\random
Шаг 5: Удаление pop-up – из вашего браузера
Internet Explorer
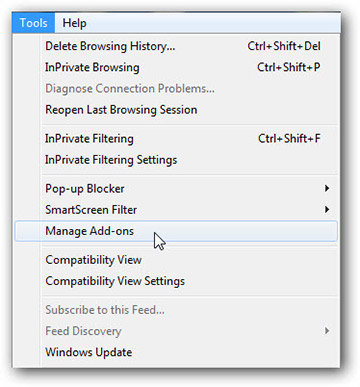
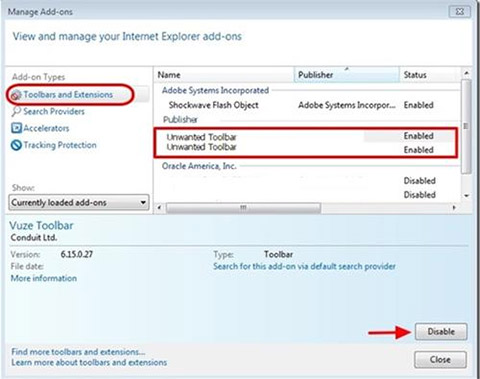
- Запуск Internet Explorer, нажмите на значок шестерни → Управление надстройками
- Выбрать раздел панели инструментов и расширения и отключите подозрительные расширения
Mozilla Firefox
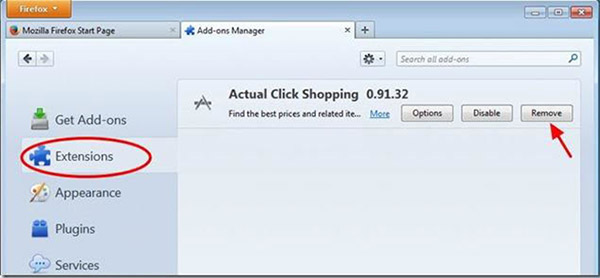
- Откройте Mozilla, нажмите сочетание клавиш Ctrl + Shift + A и перейти к расширения
- Выберите и удалите все ненужные расширения
Google Chrome
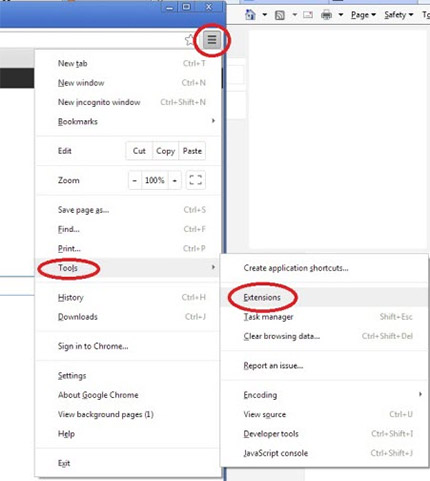
- Откройте браузер, нажмите меню и выберите инструменты → расширения
- Выберите подозрительные надстройки и нажмите на значок корзины для его удаления
* SpyHunter сканера, опубликованные на этом сайте, предназначен для использования только в качестве средства обнаружения. более подробная информация о SpyHunter. Чтобы использовать функцию удаления, вам нужно будет приобрести полную версию SpyHunter. Если вы хотите удалить SpyHunter, нажмите здесь.


