 Иногда пользователи предпочитают работать в Windows 10 без активации и это вполне возможно (об этом в отдельном материале: Можно ли пользоваться Windows 10 без активации, как долго и с какими ограничениями), но через какое-то время в правом нижнем углу экрана появится надпись «Активация Windows» с пояснением: Чтобы активировать Windows, перейдите в раздел Параметры, предполагающим, что вы перейдете в Параметры — Обновления и безопасность — Активация и введете ключ продукта. Однако, убрать надпись с экрана можно и без этого.
В этой инструкции подробно о том, как навсегда убрать надпись Активация Windows на экране Windows 10 несколькими способами — вручную и с помощью сторонних программ, а также дополнительная информация, которая может оказаться полезной.
Убираем надпись «Активация Windows» с помощью редактора реестра
Первый способ — использовать редактор реестра для отключения показа надписи об активации Windows 10. Если вы уже пробовали этот метод, но параметры возвращались в исходное состояние, решение для этого также будет предложено в этом разделе.
Шаги будут следующими:
- Запустите редактор реестра: нажмите клавиши Win+R (Win — клавиша с эмблемой Windows), введите regedit и нажмите Enter.
- Перейдите к разделу реестра
HKEY_LOCAL_MACHINE\SOFTWARE\Microsoft\Windows NT\CurrentVersion\SoftwareProtectionPlatform\Activation
- Обратите внимание на параметр Manual в правой части окна редактора. Дважды нажмите по нему и задайте значение 1.
- Проделайте то же самое для параметра NotificationDisabled

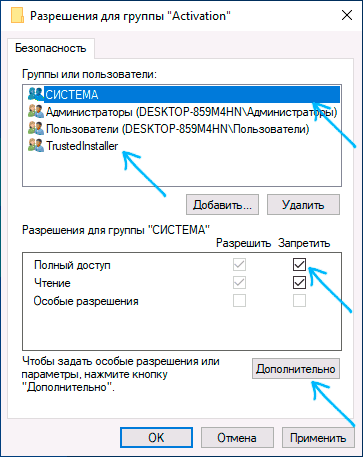
- После перезагрузки надпись исчезнет, но не торопитесь перезагружать: через некоторое время система может убрать ваши изменения. Чтобы этого не произошло, нажмите правой кнопкой мыши по разделу (папке) Activation слева и выберите пункт «Разрешения».
- Выбрав пункты «Система» и «TrustedInstaller» отметьте для них «Запретить» в списке разрешений и нажмите кнопку «Применить».

- Нажмите кнопку «Дополнительно», а на следующем экране нажмите «Отключить наследования», подтвердите, а затем удалите пункты TrustedInstaller и Система, для которых в «Тип» указано «Разрешить».
- Примените сделанные настройки и перезагрузите Windows

Также можно использовать следующий код, чтобы создать reg файл и внести изменения в реестр. В коде больше параметров, чем в шагах, описанных выше:
Windows Registry Editor Version 5.00

[HKEY_LOCAL_MACHINE\SOFTWARE\Microsoft\Windows NT\CurrentVersion\SoftwareProtectionPlatform\Activation]
"ActivationInterval"=dword:000dbba0
"Manual"=dword:00000001
"NotificationDisabled"=dword:00000001
"DownlevelActivation"=dword:00000002
Еще один метод в дополнение к вышеописанному — отключение службы «Быстрая проверка». Сделать это можно в services.msc (установить тип запуска службы в «Отключена», применить и перезагрузить компьютер), либо в редакторе реестра: в разделе реестра HKEY_LOCAL_MACHINE\SYSTEM\CurrentControlSet\Services\svsvc следует изменить параметр Start на 4, а затем перезагрузить компьютер.
Программа Universal Watermark Disabler
Еще один способ убрать надпись «Активация Windows» в углу экрана — использовать простую бесплатную утилиту Universal Watermark Disabler, скачать которую можно с официального сайта https://winaero.com/download.php?view.1794. После загрузки утилиты, распакуйте архив и запустите файл uwd.exe
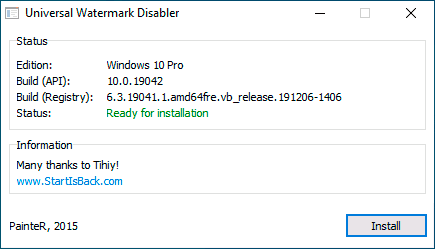
Нажмите кнопку «Install» (может потребоваться подтверждение установки в неподдерживаемой сборке, обычно всё работает), а после этого нажмите «Ок» для выхода из системы.
После автоматического выхода из системы и последующего входа надпись не всегда пропадает, но, если после этого выполнить перезагрузку компьютера или ноутбука — обычно исчезает (но, по моим тестам, не всегда).
Видео инструкция
Надеюсь, один из предложенных способов оказался работоспособным для вашей ситуации и надпись об активации в углу рабочего стола вас больше не побеспокоит.

If you are using a non-activated version of Windows, there’s a high chance that you have seen the “Activate Windows 10 – Go to settings to activate Windows” watermark on your desktop. If you have got the product key from Microsoft Store or a retailer, you can use it to activate your WIndows 10 and that will remove the watermark.
If you don’t have the Product Key and it’s bothering you, you need not worry. Here are some tweaks which will help you hide or remove the Activate Windows watermark permanently.
Why do you get Activate Windows Watermark?
The reason why “Activate Windows” watermark appears is because your system doesn’t have an activated Windows installed. The other reason can be the expiration of your installed Windows product key. Having an activated Windows lets you access several features of Windows 10 like Windows Defender, Microsoft Office Installation, Security updates, personalization features, and more.
The best and easiest way to remove this watermark is to purchase a product key from any online retailer like Microsoft. Entering the product key will remove the Activate Windows watermark, and will let you access all the Windows 10 features.

If you don’t want to purchase any product key and want to get rid of the Activate Windows watermark, then here are few tweaks to remove Actiavte Windows watermark.
ALSO READ:
- How To Export Your Google Photos Library
- How To Fix the “Sim Not Provisioned MM 2” Error
- 11 Incredible Ways To Speed Up Your Slow Windows 10 PC
There are several ways to remove Activate Windows watermark. We will show you all the possible ways to remove Activate Windows watermark without using a product key.
1. Get rid of Activate Windows Watermark using Regedit
To remove the watermark using regedit, do the following:
1. Click Start and type in Regedit and hit Enter. Select “Yes” if prompted by UAC (User Account Control) box.
2. Now, navigate to HKEY_CURRENT_USER > Control Panel > Desktop.
3. Scroll down and find the PaintDesktopVersion and double click it to open.

4. Once opened, make sure that the Hexadecimal option is selected. Then, change the Value data to 0 and click OK to save changes.
5. Now, close the Registry Editor and restart your Windows PC/Laptop.
When you log in to your desktop again, the Activate Windows watermark should be removed.
2. Disable Activate Windows Watermark via Windows PowerShell
Using this method will activate the Windows on temporary basis (90 days/3 months). You might need to use this command again after 90 days to continue removing the Activate Windows watermark. Here’s how you can remove the watermark using PowerShell:
1. Click Start and type in PowerShell. On the right pane, select “Run as Administrator” option. Choose “Yes” if prompted by UAC.

2. Once PowerShell opens, type this command and hit Enter.
slmgr /renew
3. Close PowerShell and restart your Windows PC/Laptop.
Once restarted, you will get rid of the Activate Windows watermark for the next 90 days. If you see the watermark again, run this command again and you will be good to go.
3. Disable Activate Windows Watermark using CMD (Command Prompt)
It is a rare case but activating Test mode can often cause the Activate Windows watermark to appear. If you disable the Test Mode, you can hide the Activate Windows watermark. To turn this off, follow these steps:
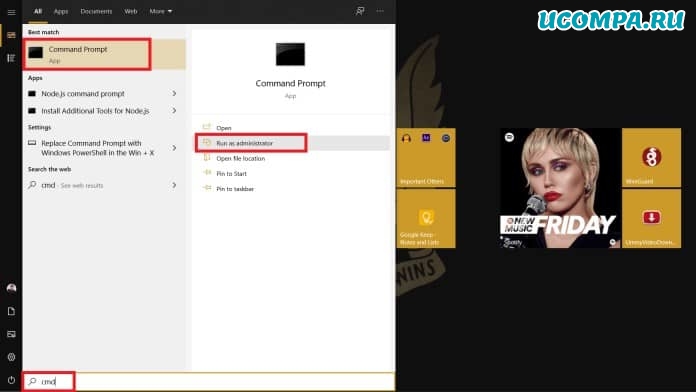
1. Click Start and type in CMD. On the right pane, click on the “Run as Administrator” option. Select “Yes” if prompted by UAC.

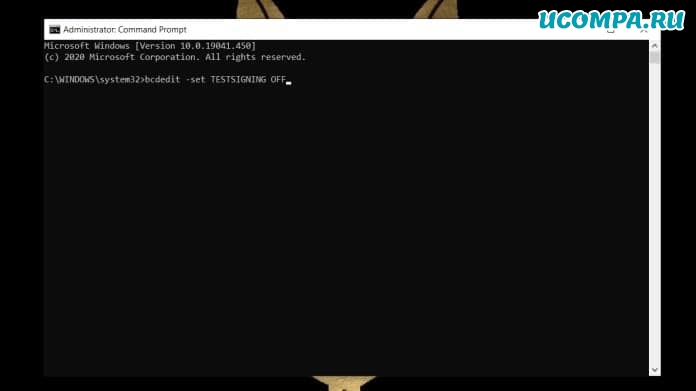
2. Once Command Prompt opens up, type this command and hit Enter.
bcdedit -set TESTSIGNING OFF
3. If everything goes good, you’ll see “Operation completed successfully” as a result. Restart your Windows PC/Laptop.
Once you restart your PC, you’ll see that you got rid of the Activate Windows watermark.
4. Remove Activate Windows Watermark with a Script
Although there are many ways to remove the Activate Windows watermark, one of those methods is using a script. Running this script might get rid of the Activate Windows watermark.
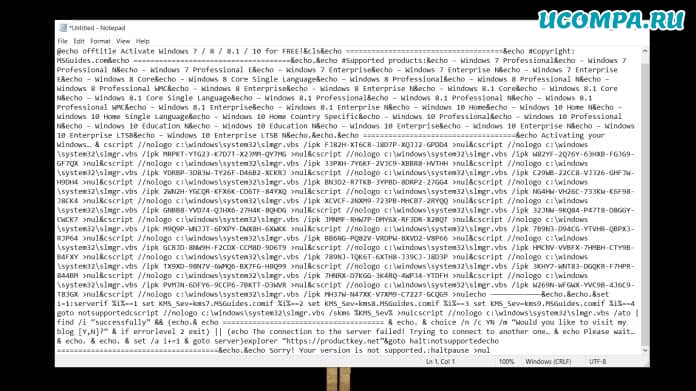
1. Click Start > search for Notepad and hit Enter.

2. Once opened, copy and paste the below text to the Notepad.
@echo offtitle Activate Windows 7 / 8 / 8.1 / 10 for FREE!&cls&echo =====================================&echo #Copyright: MSGuides.com&echo =====================================&echo.&echo #Supported products:&echo – Windows 7 Professional&echo – Windows 7 Professional N&echo – Windows 7 Professional E&echo – Windows 7 Enterprise&echo – Windows 7 Enterprise N&echo – Windows 7 Enterprise E&echo – Windows 8 Core&echo – Windows 8 Core Single Language&echo – Windows 8 Professional&echo – Windows 8 Professional N&echo – Windows 8 Professional WMC&echo – Windows 8 Enterprise&echo – Windows 8 Enterprise N&echo – Windows 8.1 Core&echo – Windows 8.1 Core N&echo – Windows 8.1 Core Single Language&echo – Windows 8.1 Professional&echo – Windows 8.1 Professional N&echo – Windows 8.1 Professional WMC&echo – Windows 8.1 Enterprise&echo – Windows 8.1 Enterprise N&echo – Windows 10 Home&echo – Windows 10 Home N&echo – Windows 10 Home Single Language&echo – Windows 10 Home Country Specific&echo – Windows 10 Professional&echo – Windows 10 Professional N&echo – Windows 10 Education N&echo – Windows 10 Education N&echo – Windows 10 Enterprise&echo – Windows 10 Enterprise N&echo – Windows 10 Enterprise LTSB&echo – Windows 10 Enterprise LTSB N&echo.&echo.&echo ====================================&echo Activating your Windows… & cscript //nologo c:\windows\system32\slmgr.vbs /ipk FJ82H-XT6CR-J8D7P-XQJJ2-GPDD4 >nul&cscript //nologo c:\windows\system32\slmgr.vbs /ipk MRPKT-YTG23-K7D7T-X2JMM-QY7MG >nul&cscript //nologo c:\windows\system32\slmgr.vbs /ipk W82YF-2Q76Y-63HXB-FGJG9-GF7QX >nul&cscript //nologo c:\windows\system32\slmgr.vbs /ipk 33PXH-7Y6KF-2VJC9-XBBR8-HVTHH >nul&cscript //nologo c:\windows\system32\slmgr.vbs /ipk YDRBP-3D83W-TY26F-D46B2-XCKRJ >nul&cscript //nologo c:\windows\system32\slmgr.vbs /ipk C29WB-22CC8-VJ326-GHFJW-H9DH4 >nul&cscript //nologo c:\windows\system32\slmgr.vbs /ipk BN3D2-R7TKB-3YPBD-8DRP2-27GG4 >nul&cscript //nologo c:\windows\system32\slmgr.vbs /ipk 2WN2H-YGCQR-KFX6K-CD6TF-84YXQ >nul&cscript //nologo c:\windows\system32\slmgr.vbs /ipk NG4HW-VH26C-733KW-K6F98-J8CK4 >nul&cscript //nologo c:\windows\system32\slmgr.vbs /ipk XCVCF-2NXM9-723PB-MHCB7-2RYQQ >nul&cscript //nologo c:\windows\system32\slmgr.vbs /ipk GNBB8-YVD74-QJHX6-27H4K-8QHDG >nul&cscript //nologo c:\windows\system32\slmgr.vbs /ipk 32JNW-9KQ84-P47T8-D8GGY-CWCK7 >nul&cscript //nologo c:\windows\system32\slmgr.vbs /ipk JMNMF-RHW7P-DMY6X-RF3DR-X2BQT >nul&cscript //nologo c:\windows\system32\slmgr.vbs /ipk M9Q9P-WNJJT-6PXPY-DWX8H-6XWKK >nul&cscript //nologo c:\windows\system32\slmgr.vbs /ipk 7B9N3-D94CG-YTVHR-QBPX3-RJP64 >nul&cscript //nologo c:\windows\system32\slmgr.vbs /ipk BB6NG-PQ82V-VRDPW-8XVD2-V8P66 >nul&cscript //nologo c:\windows\system32\slmgr.vbs /ipk GCRJD-8NW9H-F2CDX-CCM8D-9D6T9 >nul&cscript //nologo c:\windows\system32\slmgr.vbs /ipk HMCNV-VVBFX-7HMBH-CTY9B-B4FXY >nul&cscript //nologo c:\windows\system32\slmgr.vbs /ipk 789NJ-TQK6T-6XTH8-J39CJ-J8D3P >nul&cscript //nologo c:\windows\system32\slmgr.vbs /ipk TX9XD-98N7V-6WMQ6-BX7FG-H8Q99 >nul&cscript //nologo c:\windows\system32\slmgr.vbs /ipk 3KHY7-WNT83-DGQKR-F7HPR-844BM >nul&cscript //nologo c:\windows\system32\slmgr.vbs /ipk 7HNRX-D7KGG-3K4RQ-4WPJ4-YTDFH >nul&cscript //nologo c:\windows\system32\slmgr.vbs /ipk PVMJN-6DFY6-9CCP6-7BKTT-D3WVR >nul&cscript //nologo c:\windows\system32\slmgr.vbs /ipk W269N-WFGWX-YVC9B-4J6C9-T83GX >nul&cscript //nologo c:\windows\system32\slmgr.vbs /ipk MH37W-N47XK-V7XM9-C7227-GCQG9 >nulecho ————————————&echo.&echo.&set i=1:serverif %i%==1 set KMS_Sev=kms7.MSGuides.comif %i%==2 set KMS_Sev=kms8.MSGuides.comif %i%==3 set KMS_Sev=kms9.MSGuides.comif %i%==4 goto notsupportedcscript //nologo c:\windows\system32\slmgr.vbs /skms %KMS_Sev% >nulcscript //nologo c:\windows\system32\slmgr.vbs /ato | find /i “successfully” && (echo.& echo ====================================== & echo. & choice /n /c YN /m “Would you like to visit my blog [Y,N]?” & if errorlevel 2 exit) || (echo The connection to the server failed! Trying to connect to another one… & echo Please wait… & echo. & echo. & set /a i+=1 & goto server)explorer “https://productkey.net”&goto halt:notsupportedecho ======================================&echo.&echo Sorry! Your version is not supported.:haltpause >nul
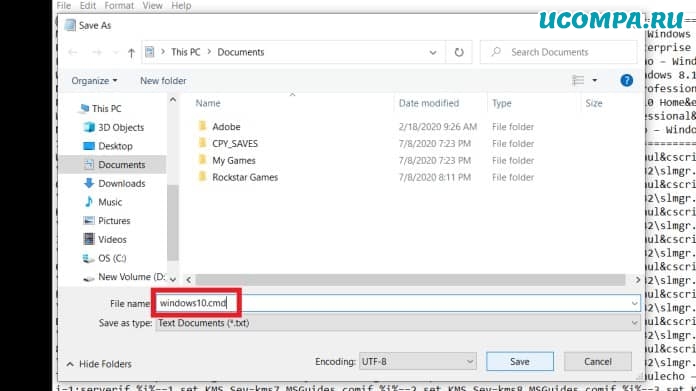
3. After pasting this text, go to File > Save As and give the file name as windows.cmd only. Choose “All files” from the Save as type dropdown menu.
4. Save the file on Desktop for easier access, and click Save.
5. Now close the notepad, and go to the Desktop. Right-click on the “windows.cmd” file and select “Run as administrator.” Choose “Yes” if prompted by UAC.
6. Once the script runs, restart your computer.
After restarting your PC/Laptop, the Activate Windows watermark will be gone.
5. Remove Activate Windows Watermark via Ease of Access
You can also remove the Activate Windows watermark using Ease of Access option, which is built in Windows. Before you go haywire, here’s how to do that.
1. Click Start and search for Ease of Access Display Settings.
2. Scroll down and toggle off “Show desktop background image” option.

3. Restart your PC/Laptop.
Once restarted, your background should be gone along with the Activate Windows watermark as well.
6. Remove Activate Windows Watermark using a BAT (Batch) File
There’s another notepad tweak that will let you remove the Activate Windows watermark, and that is done by creating a Batch (.BAT) file.
1. Click Start and type in Notepad and hit Enter.
2. Once opened, copy and paste the below command in the Notepad.
@echo off
taskkill /F /IM explorer.exe
explorer.exe
exit
3. After pasting this text, go to File > Save As and give the file name as remove.bat only. Choose “All files” from the Save as type dropdown menu.

4. Save the file on Desktop for easier access, and click Save.
5. Now close the notepad, and go to the Desktop. Right-click on the “remove.bat” file and select “Run as administrator.” Choose “Yes” if prompted by UAC.
6. Once the command window opens up and closes off, restart your computer.
After restarting your PC/Laptop, the Activate Windows watermark will be hidden now.
7. Get rid of Activate Windows Watermark by Disabling WIndows 10 Tips
An easy way to disable the Activate Windows watermark permanently, is through disabling Windows 10 Tips. To disable them, follow the process below.
1. Go to Start and click on the Settings (⚙) icon.
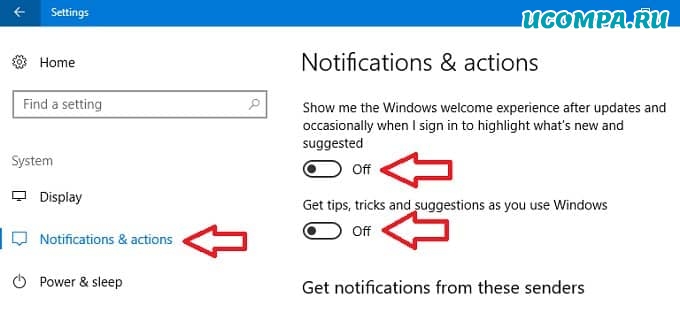
2. Click on Settings, and then click on Notifications & actions from the left pane.
3. Now scroll down and find the option that says “Get tips, tricks, and suggestions as you use Windows” and toggle it OFF.

4. Once done, restart your PC/Laptop.
This shall get rid of the Activate Windows Watermark.
8. Hide Activate Windows Watermark using a Free Third-Party Tool
If none of the above tips worked, your last resort should be a third-party tool to remove the “Activate Windows” watermark. There are many tools available out there. These tools trick Windows to think it’s activated. We don’t recommend using this method, but this should be your last option if nothing works.

1. Download the Universal Watermark Disabler tool using the download link given below.
2. Unzip the file and make sure that all the applications are closed.
3. Double click on uwd.exe file. Click “yes” if prmopted by UAC. A window will popup on your screen.
4. Click on the “Install” button.
If necessary, restart your machine and you will be good to go. The Activate Windows watermark should be gone by now.
Conclusion
These were the 8 ways to remove and hide the Activate Windows watermark. Although, we recommend you to use a Product Key to activate Windows to activate your Windows 10 machine. Concluding this article, we hope we solved your problem when it comes to getting red of the activate windows watermark permanently.
If you have any further queries, let us know in the comments below. We will try our best to resolve them as soon as possible.
For the latest tech news and reviews, follow Tech Baked on Twitter, Facebook, Instagram, and join our Telegram Channel for daily tech news in your inbox.

Доброго здравия, друзья!
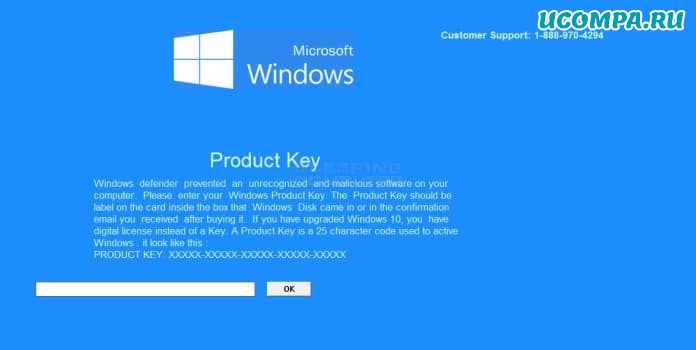
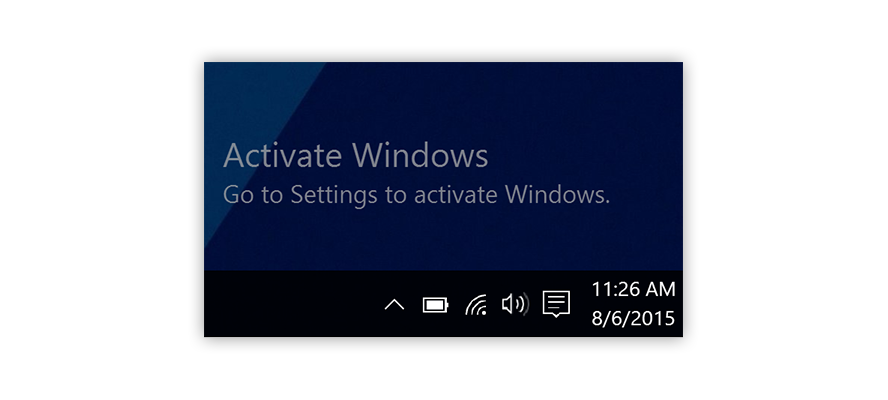
Windows показывает водяной знак «Активировать Windows» в правом нижнем углу не активированного компьютера с Windows.
Если вы используете не активированную Windows 10, скорее всего, вы видели водяной знак «Активировать Windows 10 — перейдите в настройки, чтобы активировать Windows».
Если этот водяной знак вас беспокоит, мы расскажем, как удалить водяной знак активации Windows 10 навсегда.
Причины появления водяного знака активации Windows
Прежде чем перейти к тому, как удалить водяной знак активации Windows, вы должны знать, по каким причинам он появляется на вашем экране.
Есть разные причины для его появления, одна из самых распространенных — когда Windows не активирована/срок действия истек.
Помимо этого, вот еще причины, почему:
- Недействительная лицензия Windows — вы можете ввести ключ, полученный из онлайн-источников, и он просто не работает, потому что его использовали другие. Microsoft использует технологию онлайн-активации для блокировки других пользователей, использующих тот же ключ продукта.
- Несравнимая версия Windows — если вы приобрели ключ для Windows 10 Professional Edition а установили Windows 10 Home Edition на свой компьютер. Хотя ключ действителен на 100%, водяной знак по-прежнему виден из-за несравнимого варианта Windows 10.
Активация Windows также включает некоторые дополнительные функции, которыми вы не сможете воспользоваться, если не активировали Windows на своем компьютере.
Активируя Windows, вы получите обновления Windows, функции безопасности, Защитника Windows и многое другое.
Итак, если у вас есть деньги, вы мгновенно получите ключ с любого авторизованного сайта или даже от Microsoft.
Вы можете активировать Windows с его помощью и вернуться к своим обычным делам.
Однако, если у вас нет ключа, но вы все равно хотите избавиться от этой проблемы.
Прежде чем я расскажу вам о способах убрать водяной знак, хотел бы дать вам совет и помочь!
Если у вас не получится самостоятельно убрать водяной знак, по инструкции и методам в этой статье или Вы просто не хотите тратить время, обратитесь ко мне за услугой «Уберу водяной знак активации Windows». 10-20 минут и я решу Вашу проблему!
Далее представлены 4 простых способа избавиться от водяного знака Windows «Активация» на вашем компьютере.
Метод 1: удалить водяной знак активации Windows с помощью Regedit
Чтобы удалить водяной знак активации Windows с помощью Regedit, выполните следующие действия:
Нажмите «Пуск», введите «Regedit» и нажмите Enter (вам будет предложено UAC*, нажмите «Да»)
* UAC — контроль учетных записей Windows 10
Теперь перейдите в «HKEY_CURRENT_USER — Панель управления — Рабочий стол».
В папке «Desktop» прокрутите вниз, чтобы найти «PaintDesktopVersion», и дважды щелкните по нему, чтобы открыть.
Убедитесь, что выбрано шестнадцатеричное число, и измените значение на «0». Затем нажмите «ОК», чтобы сохранить изменения.
Вы закрываете редактор реестра и перезагружаете компьютер. Когда вы снова войдете на рабочий стол, водяной знак должен быть удален.
Метод 2: удалить водяной знак активации Windows с помощью Windows PowerShell
Этот метод временно активирует Windows на 90 дней (3 месяца), что означает, что вы не увидите активированный водяной знак Windows в течение 90 дней.
Однако через 90 дней вам придется повторить этот метод, чтобы убрать его снова. Вот как:
Нажмите «Пуск», введите «PowerShell», щелкните правой кнопкой мыши и выберите «Запуск от имени администратора» (вам будет предложено UAC, нажмите «Да»).
В окне PowerShell введите следующую команду и нажмите Enter.
slmgr /renew
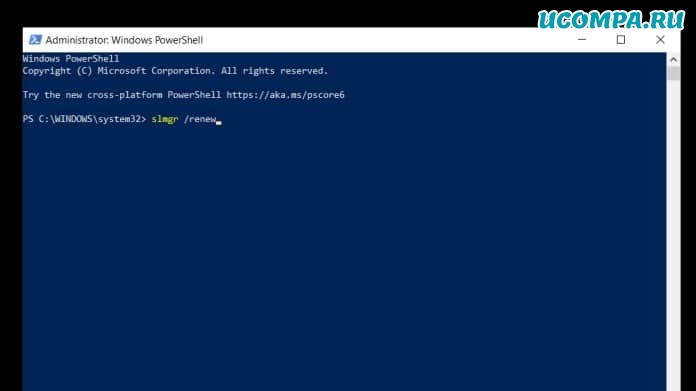
Теперь перезагрузите компьютер, и все будет в порядке в течение следующих 90 дней.
Метод 3: отключить водяной знак активации Windows с помощью скрипта
Мы обсудили несколько способов активации Windows для удаления водяного знака активации Windows.
Вот еще один способ активировать Windows, на этот раз запустив сценарий. Вот как это сделать:
Откройте блокнот на вашем компьютере, скопируйте и вставьте приведенный ниже текст в блокнот.
@echo offtitle Activate Windows 7 / 8 / 8.1 / 10 for FREE!&cls&echo =====================================&echo #Copyright: MSGuides.com&echo =====================================&echo.&echo #Supported products:&echo – Windows 7 Professional&echo – Windows 7 Professional N&echo – Windows 7 Professional E&echo – Windows 7 Enterprise&echo – Windows 7 Enterprise N&echo – Windows 7 Enterprise E&echo – Windows 8 Core&echo – Windows 8 Core Single Language&echo – Windows 8 Professional&echo – Windows 8 Professional N&echo – Windows 8 Professional WMC&echo – Windows 8 Enterprise&echo – Windows 8 Enterprise N&echo – Windows 8.1 Core&echo – Windows 8.1 Core N&echo – Windows 8.1 Core Single Language&echo – Windows 8.1 Professional&echo – Windows 8.1 Professional N&echo – Windows 8.1 Professional WMC&echo – Windows 8.1 Enterprise&echo – Windows 8.1 Enterprise N&echo – Windows 10 Home&echo – Windows 10 Home N&echo – Windows 10 Home Single Language&echo – Windows 10 Home Country Specific&echo – Windows 10 Professional&echo – Windows 10 Professional N&echo – Windows 10 Education N&echo – Windows 10 Education N&echo – Windows 10 Enterprise&echo – Windows 10 Enterprise N&echo – Windows 10 Enterprise LTSB&echo – Windows 10 Enterprise LTSB N&echo.&echo.&echo ====================================&echo Activating your Windows… & cscript //nologo c:\windows\system32\slmgr.vbs /ipk FJ82H-XT6CR-J8D7P-XQJJ2-GPDD4 >nul&cscript //nologo c:\windows\system32\slmgr.vbs /ipk MRPKT-YTG23-K7D7T-X2JMM-QY7MG >nul&cscript //nologo c:\windows\system32\slmgr.vbs /ipk W82YF-2Q76Y-63HXB-FGJG9-GF7QX >nul&cscript //nologo c:\windows\system32\slmgr.vbs /ipk 33PXH-7Y6KF-2VJC9-XBBR8-HVTHH >nul&cscript //nologo c:\windows\system32\slmgr.vbs /ipk YDRBP-3D83W-TY26F-D46B2-XCKRJ >nul&cscript //nologo c:\windows\system32\slmgr.vbs /ipk C29WB-22CC8-VJ326-GHFJW-H9DH4 >nul&cscript //nologo c:\windows\system32\slmgr.vbs /ipk BN3D2-R7TKB-3YPBD-8DRP2-27GG4 >nul&cscript //nologo c:\windows\system32\slmgr.vbs /ipk 2WN2H-YGCQR-KFX6K-CD6TF-84YXQ >nul&cscript //nologo c:\windows\system32\slmgr.vbs /ipk NG4HW-VH26C-733KW-K6F98-J8CK4 >nul&cscript //nologo c:\windows\system32\slmgr.vbs /ipk XCVCF-2NXM9-723PB-MHCB7-2RYQQ >nul&cscript //nologo c:\windows\system32\slmgr.vbs /ipk GNBB8-YVD74-QJHX6-27H4K-8QHDG >nul&cscript //nologo c:\windows\system32\slmgr.vbs /ipk 32JNW-9KQ84-P47T8-D8GGY-CWCK7 >nul&cscript //nologo c:\windows\system32\slmgr.vbs /ipk JMNMF-RHW7P-DMY6X-RF3DR-X2BQT >nul&cscript //nologo c:\windows\system32\slmgr.vbs /ipk M9Q9P-WNJJT-6PXPY-DWX8H-6XWKK >nul&cscript //nologo c:\windows\system32\slmgr.vbs /ipk 7B9N3-D94CG-YTVHR-QBPX3-RJP64 >nul&cscript //nologo c:\windows\system32\slmgr.vbs /ipk BB6NG-PQ82V-VRDPW-8XVD2-V8P66 >nul&cscript //nologo c:\windows\system32\slmgr.vbs /ipk GCRJD-8NW9H-F2CDX-CCM8D-9D6T9 >nul&cscript //nologo c:\windows\system32\slmgr.vbs /ipk HMCNV-VVBFX-7HMBH-CTY9B-B4FXY >nul&cscript //nologo c:\windows\system32\slmgr.vbs /ipk 789NJ-TQK6T-6XTH8-J39CJ-J8D3P >nul&cscript //nologo c:\windows\system32\slmgr.vbs /ipk TX9XD-98N7V-6WMQ6-BX7FG-H8Q99 >nul&cscript //nologo c:\windows\system32\slmgr.vbs /ipk 3KHY7-WNT83-DGQKR-F7HPR-844BM >nul&cscript //nologo c:\windows\system32\slmgr.vbs /ipk 7HNRX-D7KGG-3K4RQ-4WPJ4-YTDFH >nul&cscript //nologo c:\windows\system32\slmgr.vbs /ipk PVMJN-6DFY6-9CCP6-7BKTT-D3WVR >nul&cscript //nologo c:\windows\system32\slmgr.vbs /ipk W269N-WFGWX-YVC9B-4J6C9-T83GX >nul&cscript //nologo c:\windows\system32\slmgr.vbs /ipk MH37W-N47XK-V7XM9-C7227-GCQG9 >nulecho ————————————&echo.&echo.&set i=1:serverif %i%==1 set KMS_Sev=kms7.MSGuides.comif %i%==2 set KMS_Sev=kms8.MSGuides.comif %i%==3 set KMS_Sev=kms9.MSGuides.comif %i%==4 goto notsupportedcscript //nologo c:\windows\system32\slmgr.vbs /skms %KMS_Sev% >nulcscript //nologo c:\windows\system32\slmgr.vbs /ato | find /i “successfully” && (echo.& echo ====================================== & echo. & choice /n /c YN /m “Would you like to visit my blog [Y,N]?” & if errorlevel 2 exit) || (echo The connection to the server failed! Trying to connect to another one… & echo Please wait… & echo. & echo. & set /a i+=1 & goto server)explorer “https://productkey.net”&goto halt:notsupportedecho ======================================&echo.&echo Sorry! Your version is not supported.:haltpause >nul
В блокноте перейдите в раздел «Файл», нажмите «Сохранить как» и назовите файл windows10.cmd (важно, чтобы имя файла оканчивалось на .cmd) и сохраните файл на рабочем столе.
Щелкните правой кнопкой мыши файл windows10.cmd (который мы только что создали) и выберите «Запуск от имени администратора».
Перезагрузите компьютер, чтобы активировать Windows.
Метод 4: отключить водяной знак активации Windows с помощью специальных возможностей
Мы можем удалить водяной знак активации Windows, также используя опцию Windows 10 Ease of Access.
Не запутайтесь, вот как это сделать:
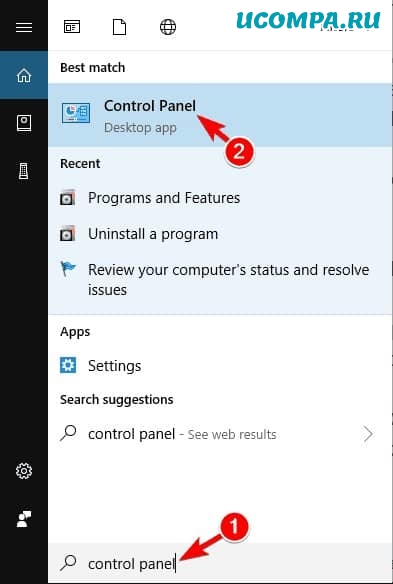
Нажмите на меню «Пуск» и найдите «Панель управления», затем щелкните приложение.
Перейти в «Центр специальных возможностей».

На следующем экране нажмите «Оптимизация изображений на экране».
Теперь прокрутите вниз до нижней части этого экрана, чтобы установить флажок «Удалить фоновые изображения (по возможности)».

Нажмите «ОК» и перезагрузите компьютер.
Водяной знак активации Windows должен исчезнуть.
Метод 5: избавьтесь от водяного знака активации Windows, отключив советы по Windows 10
Еще один способ избавиться от водяного знака активации Windows, особенно в Windows 10 — отключить советы по Windows 10.
Вот как это сделать:
Зайдите в «Пуск» и нажмите «Настройки (кнопка в виде шестеренки)».
Перейдите в систему и нажмите «Уведомления и действия».
Прокрутите вниз и отключите параметр «Показывать приветствие Windows после обновлений и получать советы, рекомендации и предложения при использовании Windows».
Это оно! И все будет хорошо.
Метод 6: избавьтесь от водяного знака активации Windows с помощью CMD
Иногда включение тестового режима в Windows приводит к появлению водяного знака активации Windows.
Если ваш тестовый режим включен, вы можете легко отключить его с помощью CMD. Вот как:
Нажмите «Пуск» и введите «CMD», щелкните правой кнопкой мыши и выберите «Запуск от имени администратора»
(вам будет предложено UAC, нажмите «Да»)
В окне cmd введите команду ниже и нажмите Enter:
bcdedit -set TESTSIGNING OFF
Если все в порядке, вы должны увидеть сообщение «Операция успешно завершена».
Перезагрузите вашу машину. Теперь должно быть все в порядке.
Метод 7: удалить водяной знак активации Windows с помощью сторонних инструментов
Если ничего не помогло, это, вероятно, последний метод, который вы можете попытаться избавиться от водяного знака активации Windows.
Эти бесплатные сторонние инструменты удаляют водяной знак активации Windows, обманывая Windows, полагая, что он был активирован.
Поэтому мы не рекомендуем этот метод, но мы обязаны сообщить вам об этом. Вот как:
1. Универсальное средство отключения водяных знаков (Winaero)
Это программное обеспечение удалит водяной знак активации Windows с вашего компьютера одним нажатием кнопки.
Прежде чем продолжить, убедитесь, что все приложения на вашем компьютере закрыты, и сохраните всю работу. Вот и мы:

- Загрузите «Universal Watermark Disabler» с этой страницы.
- Разархивируйте файл, дважды щелкните uwd.exe и установите его.
- Приложение запустится, а затем автоматически выйдет из системы.
- Снова войдите в свою машину.
- Теперь водяной знак должен быть удален.
2. KMSAuto
Это хорошая альтернатива поддельным ключам продукта Windows.
Его можно использовать для активации не только Windows, но и других продуктов Microsoft, например Office.
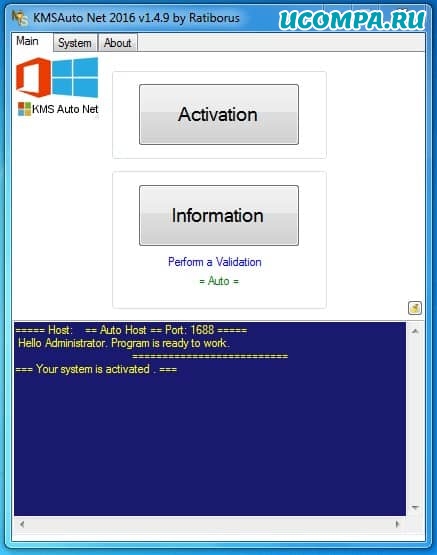
- Загрузите KMSAuto и установите его.
- Откройте программу, нажмите «Активировать Windows».
- Как только это будет сделано, ваш компьютер перезагрузится.
- Это оно! Когда вы снова войдете в систему, Windows будет активирована, и водяной знак активации Windows исчезнет.
Заключение
Итак, это 7 простых способов избавиться от водяного знака активации Windows.
Мы рекомендуем активировать Windows оригинальным серийным ключом.
Тем не менее, мы надеемся, что эта статья навсегда решит вашу проблему «удалить водяной знак активации Windows».
Дайте нам знать, если у вас есть какие-либо вопросы, в разделе комментариев ниже или свяжитесь с нами по электронной почте.
Пожалуйста, оцените страницу:
Мы были полезны? Хотите сказать спасибо?
Пожертвуйте на развитие нашего ресурса!
Спасибо за визит. До скорых встреч!
We’ve all been there, whether you obtained Windows legally, or applied some tricks to install it on your computer without paying a penny. The notorious “Activate Windows” watermark has made many people’s experience with their computers rather unpleasant. It may block your view, embarrass you when trying to record your screen, or distract you when watching movies or playing video games.
Today, we’re going to show you how to remove the “Activate Windows” watermark on Windows 10.
Jump to:
- What Is the “Activate Windows” Watermark?
- How To Remove the “Activate Windows” Watermark Permanently
- Do the Notepad Trick
- Modify Your Registry
- Change Ease of Access Settings
- Use a Windows 10 Watermark Remover
- Activate Your OS
- 1. Activate Using a Product Key
- 2. Activate Using a Digital License
- Summary: How To Remove Activate Windows 10 Watermark
- Watch this video: Your Windows License Will Expire Soon — Activate Windows 10 Permanently
- Final Words
What Is the “Activate Windows” Watermark?
Microsoft, just like any other company, doesn’t like it when its hard work gets pirated, exploited, and re-distributed for free. In an attempt to stop the piracy of their newest operating system, Windows 10, they came up with the idea of placing a watermark in the corner until the user legally activates Windows.
This might not seem like a huge issue, as the watermark doesn’t really get in your way. Instead, it sits on top of every window, app, and even your cursor.
While it’s not a ground-breaking method of stopping piracy, it was enough to drive you here and look up how you can get rid of it. Don’t worry — other than telling you the obvious solution, we’ve compiled some methods to help those who don’t want to spend money to remove the watermark.
It’s worth noting that most of these methods simply remove the “Activate Windows» watermark, and don’t actually activate your system. You still won’t be able to lift limitations such as not being able to customize your PC at all.
With that clarified, let’s get to work and remove the “Activate Windows” watermark on your Windows 10 system.
How To Remove the “Activate Windows” Watermark Permanently
Let’s take a look at how you can get rid of the pesky watermark in the corner of your screen in a few easy steps!
Do the Notepad Trick
One of the easiest and most recognized ways of removing the pesky little watermark in the corner of your screen is doing a simple trick with the pre-installed Notepad app. Yes, the Notepad app you use on a daily.
By pasting some text and using an administrator account, you can easily remove the “Activate Windows” watermark from appearing on your screen. Here’s how to do it.
- Launch the Notepad application and create a new, blank note.
- Copy and paste the following block of text into your Notepad
@echo off
taskkill /F /IM explorer.exe
explorer.exe
exit
- Go to File, then click on Save as. Name the file Activation.bat and change the file format to All files.

- Choose the location where the file becomes easily reachable, and click the Save button. We recommend saving files like this on your Desktop to maximize accessibility.
- Right-click on the file and choose Run as administrator. If you don’t have this option, you’re not signed into an account with admin permissions.

- Restart your device and enjoy life without watermarks!


Check out our complete Guide on How to remove the Activate Windows 10 watermark
Modify Your Registry
The registry is something casual Windows users generally don’t meddle with unless it’s instructed in an online guide like this one! It’s a powerful way to customize your Windows 10 experience on a deeper level, allowing you to meddle with system configuration and application settings.
If this approach suits your style more, follow the next simple steps to remove the “Activate Windows” watermark using registry edits.
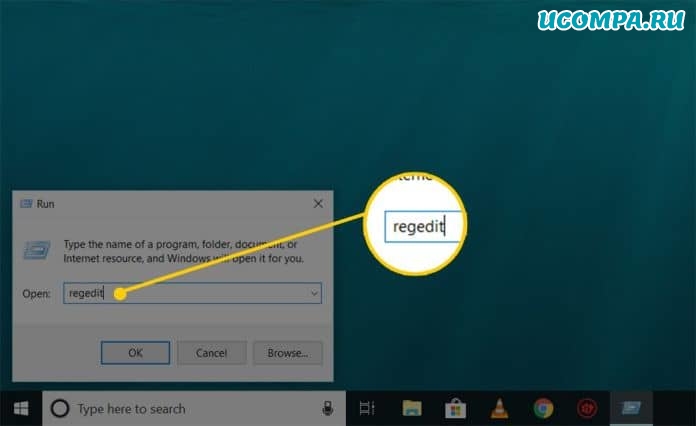
- Press down the Windows + R keys on your keyboard. This will bring up a window called Run.
- Type in regedit and press the OK key to bring up the Registry Editor. We’ll be using this tool to modify registry values.

- You can navigate the Registry Editor by clicking on the arrow symbol next to the name of a folder to expand it. Using this technique, navigate to HKEY_CURRENT_USER\Control Panel\Desktop.

- On the right side of the window, you’ll see a list of values appear while the Desktop folder is selected. Double-click on the PaintDesktopVersion value.

- Change the Value from 1 to 0, and click the OK button to save this modification in your system.
- Restart your PC and enjoy having no watermarks!


Change Ease of Access Settings
Did you know that changing a simple setting in your Windows 10 will immediately get rid of the watermark? If you answered no, you’re not alone. By simply disabling background images with Ease of Access, you can also remove the watermark that comes with Windows 10.
- Press the Windows + S keys on your keyboard to bring up the Search feature, then type in Control Panel.

- Click on the matching result to launch the classic Control Panel app.

- Click on the Ease of Access Center. Make sure your view mode is set to Large icons to see this menu.

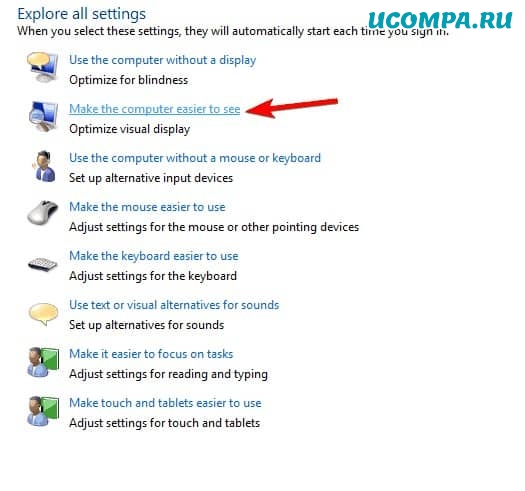
- Click on the Make the computer easier to see link under the Explore all settings section.

- Scroll down until you see Remove background images (where available) and place a checkmark in the box to enable the feature.

- Click Apply and enjoy your watermark-free desktop.


Use a Windows 10 Watermark Remover
Many applications are available online that quickly remove the Windows 10 watermark for you. These applications are often shady and come from all corners of the internet — make sure you download with caution when searching on your own.
Our watermark remover app recommendation is Universal Watermark Disabler. We picked a program that can ensure you never have to see “Activate Windows” in the corner of your screen ever again. When you download it, simply launch it and follow the on-screen instructions.
Tip: Universal Watermark Disabler works for earlier versions of Windows as well. Make sure to give it a recommendation to your fellow tech-gurus who use an older OS.
Activate Your OS
Yes, it’d be unprofessional to not include the true, best way of getting rid of the “Activate Windows” watermark — activating Windows. If you already have a way to validate your copy of the operating system, rejoice! You can activate your system, remove limitations, and never see “Activate Windows” ever again.
You can purchase Windows 10 from the official website, or get a hold of it through various third-party resellers, online stores, and individuals selling a license or product key.
Here’s how you can actually activate Windows 10.
1. Activate Using a Product Key
- Locate your product key. It’s a 24-character long alphanumeric code, which you can find depending on where and how you purchased Windows 10. Look for it:
- In your email inbox.
- On the retailer’s website where you purchased Windows 10 from.
- On a physical piece of paper or sticker.
- Press the Windows + I keys on your keyboard to quickly bring up the Settings window.
- Click on Update & Security.

- Choose Activation from the menu on the left, then click on Change product key.

- Enter your product key and click Next. Wait for Windows 10 to activate and enjoy your operating system without any watermarks or limitations!

2. Activate Using a Digital License
- Press the Windows + I keys on your keyboard to quickly bring up the Settings window.
- Click on Update & Security.
- Choose Activation from the menu on the left, then click on the Go to Microsoft Store option. If you can’t see this button, search Microsoft Store in your search bar.
- If the product page is not opened automatically, search for Windows 10 in the store.
- You’ll see one of two messages on this page:
- Install. Click on the button to get Windows 10 on your computer with a digital license activated.
- Buy. Purchase Windows 10 and have it activated right away. If you’ve already made a purchase, log into your Microsoft account which was used.
- Complete the installation and enjoy an activated, watermark-free system!
Summary: How To Remove Activate Windows 10 Watermark
In this article you’ve learned:
- How to get rid of the Activate Windows watermark
- The complete activate Windows watermark removal
- Why you’re seeing the Activate Windows watermark error
- How to remove Activate Windows permanently
- Windows watermark remover
- Why Activate Windows watermark keeps coming back
- How to remove the Activate Windows 10 watermark permanently
Watch this video: Your Windows License Will Expire Soon — Activate Windows 10 Permanently
Final Words
We believe this guide was able to help you successfully remove the “Activate Windows” watermark from your system. Please note that it’s possible for this watermark to periodically reappear — in this case, just come back and repeat any of these processes. Now, check out our help center for more guides, articles, and troubleshooting ticks and tricks for your better Window user experience. For more articles and help, subscribe to our newsletter. You will be the first to get a hold of our updated articles, discounts, coupons, and more. Subscribe below.
Read more
» How to remove the Activate Windows 10 watermark
» Bypass “An Administrator Has Blocked You From Running This App” Warning
» How To Use Ultimate Windows Tweaker 4 for Windows 10
» What to Do When Windows Update Keeps Failing on Windows 10
The “Activate Windows” watermark reminds you that your Windows 10 version is not activated. This tutorial will guide you through the steps to get rid of the “activate windows watermark” and remove the “Activate Windows 10” message in the bottom right of your desktop.
To remove the “Activate Windows” watermark in Windows 10, open Registry Editor and go to HKEY_CURRENT_USER > Control Panel > Desktop. From there, double click on PaintDesktopVersion and set its value to 0, then click on OK and restart your computer. The “Activate Windows” watermark will be removed after restarting your PC.
Why Do I See The “Activate Windows” Watermark?
The “Activate Windows” watermark on the desktop indicates that your Windows 10 operating system is not activated with a valid license. Microsoft reminds you that your Windows version is not valid and that you need to buy an official valid key for your version of Windows to activate all its features.
Windows 10’s features are one of the reasons you should activate it. Many functions of Windows 10 are only available if the license is activated. Such as your system’s dark mode, Windows Defender & Security, Windows Hello, and plenty of other features.
You won’t be able to install Microsoft Office on a “non-activated” version of Windows 10, and you won’t get any Windows Updates, which means your machine will always be subject to bugs, crashes, and infections.
Method 1: Activate Windows” Watermark With Registry
The most effective method to remove the “activate windows” watermark is to edit the Windows registry. We will disable the capability that allows Windows to write text on the desktop by editing the Windows registry. The activate windows message in the bottom right corner of your desktop will be disabled and hidden as a result of this action.
Follow the steps below to remove the “Activate Windows” watermark in Windows 10.
Total Time: 2 minutes
Click on the Start button, type “Regedit” and hit enter
Click the Start button and type “Regedit” to open Registry Editor, and hit enter. (You will be prompted to open Regedit with administrator privileges, click on Yes)
Go to HKEY_CURRENT_USER > Control Panel > Desktop
In the left panel, go to HKEY_CURRENT_USER > Control Panel > Desktop in the folder tree, make sure to click on Desktop. A list of values will show up in the right panel.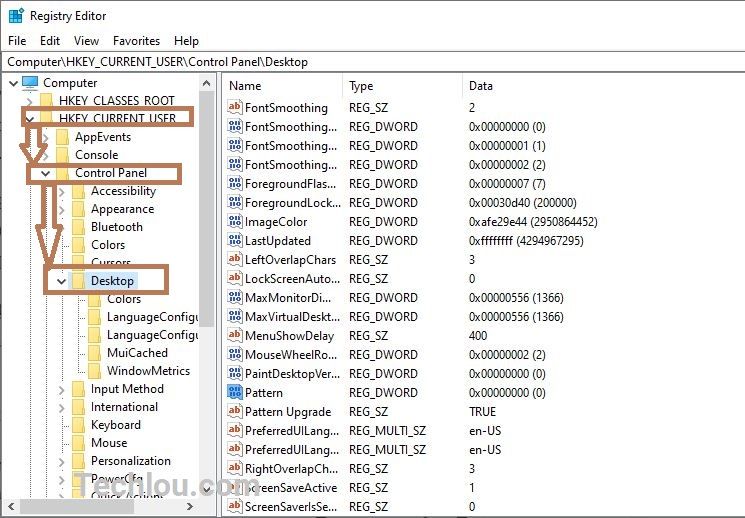
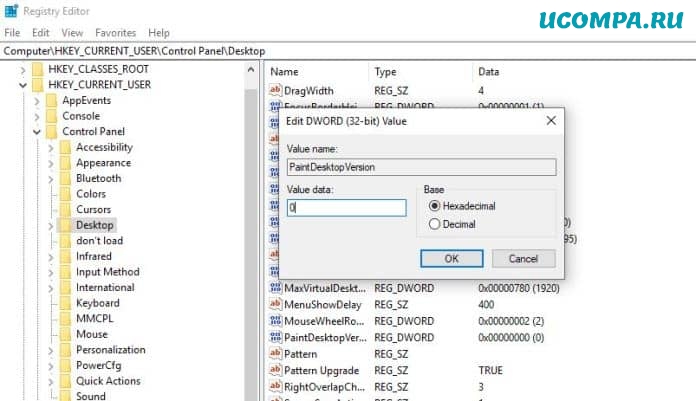
Double click on “PaintDesktopVersion” in the right panel
Scroll down until you find PaintDesktopVersion and double-click on it.
Set the value to 0
Type 0 in the “Value data” textbox. Make sure that the selected base is Hexadecimal.
Click on OK and restart the computer.
Click OK to validate and restart your computer for changes to take effect.
This is how you get rid of and remove the “activate windows” watermark, After restarting your computer the “activate windows” watermark will be removed. (If the watermark reappears after a certain period of time, just run the script again to remove it.)
Method 2: Remove the “Activate Windows” Watermark With a .reg File
To make your life easier, We have made this small .reg script that will automatically remove the activate windows watermark once you click on it.
Follow the steps below to automatically remove the activated windows watermark with a .reg file.
1. Download the script
Click here to download this .zip archive containing a .reg file
2. Unzip the zip file
Uncompress the zip file on your computer (Download 7-zip or Winrar to be able to open the archive)
3. Double click on Remove activate windows watermark.reg
Double click on Remove activate windows watermark.reg to execute it.
4. Click on Yes to confirm
Click on Yes to allow the reg file to edit your Windows Registry.
5. Restart your computer
Restart your computer to apply the modification.
6. The activated windows watermark is now removed
After restarting your computer the “activate windows” watermark should be removed.
All this script does is automatize the registry edition that we have done in the first method.
Method 3: Remove “Activate Windows” Watermark With Powershell
With a single command, you can temporarily activate Windows for 90 days. You can repeat this method every three months and reactivate Windows 10. This solution will remove the activate Windows message for 90 days, which you may then renew.
Follow the steps below to remove the “Activate Windows“ watermark with Powershell.
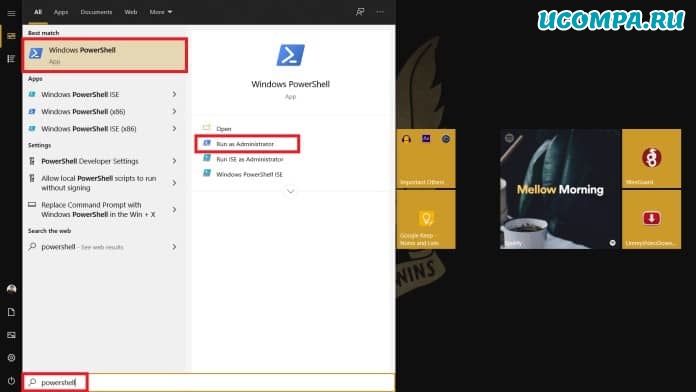
1. Click on Start and type “Powershell”
Click on the Start button or hit the Windows key on your keyboard and type “Powershell“
2. Right-click on “Windows Powershell” and click on “Run as administrator”
Right-click on the “Windows Powershell” and run it as administrator.
3. Type “slmgr /rearm” in Powershell and hit ENTER
In the CMD window type “slmgr /rearm” and hit enter to activate Windows 10 for 90 days.
4. Restart PC to apply changes.
Restart your computer to apply the changes, after Windows 10 starting you will notice that the activate Windows message has been removed.
Method 4: Remove “Activate Windows” Watermark With CMD
One of the easiest and quickest ways to remove the “Activate Windows”watermark is by using to disable the test mode if it’s On. Indeed, Windows 10 has a test mode that if is activated will cause the activation message to show on your desktop.
Follow the steps below to remove the “Activate Windows” watermark using CMD
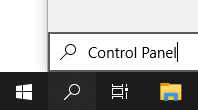
1. Click on Start and type “cmd”
Click on the Start button or hit the Windows key on your keyboard and type “CMD“
2. Right-click on “Command prompt” and click on “Run as administrator”
Right-click on the “Command prompt” and run it as administrator.
3. Type “bcdedit -set TESTSIGNING OFF” in CMD and hit ENTER.
In the CMD window type “bcdedit -set TESTSIGNING OFF” and hit enter.
4. Restart your computer
Restart your PC to apply changes. After restarting, the “activate windows” watermark should be removed.
Method 5: Remove The “Activate Windows” Watermark By Disabling Background Image
One of the ways to get rid of the “activate Windows” watermark is by disabling the background image from the Ease of Access setting.
Follow the steps below to do so:
1. Press Windows key + U to open Ease of Access settings
On your keyboard, Press Windows Key + U to open Ease of Access settings (The windows key is the key that has the Windows logo on it, located generally on the left of the Alt button)
2. Scroll down and TURN OFF “Show desktop background image”
Scroll down the list of options until you find “Show desktop background image” and switch the little button to turn it off.
This will hide the desktop background image and remove the “activate windows” watermark at the same time.
The inconvenience of this method is that you will have a black screen as a background and you will not be able to change the background image.
Method 6: Remove The “Activate Windows” watermark Using Script
Follow the steps below to remove the “activate Windows” watermark on the desktop using a .bat script:
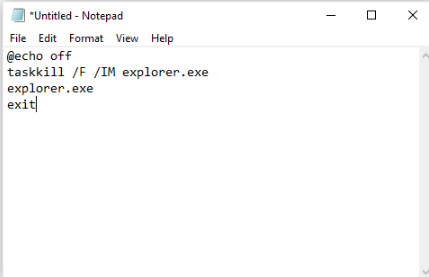
- Open Notepad.
- Type the following commands:
- @echo off
- taskkill /F /IM explorer.exe
- explorer.exe
- exit
- Save the file as activate.bat
- Right-click and click Run as administrator.
- Restart PC.
If the watermark reappears after a certain period of time, just run the script again to remove it.
Method 7 : Activate Windows 10
You can permanently remove the Activate Windows watermark by activating Windows 10 with this simple script.
Follow the steps below to activate Windows 10 with the script and remove the activate windows watermark.
1. Open Notepad
Open Notepad on your Windows
2. Copy and paste the script below
@echo off
title Activate Windows 10 ALL versions for FREE!&cls&echo ============================================================================&echo #Project: Activating Microsoft software products for FREE without software&echo ============================================================================&echo.&echo #Supported products:&echo - Windows 10 Home&echo - Windows 10 Home N&echo - Windows 10 Home Single Language&echo - Windows 10 Home Country Specific&echo - Windows 10 Professional&echo - Windows 10 Professional N&echo - Windows 10 Education&echo - Windows 10 Education N&echo - Windows 10 Enterprise&echo - Windows 10 Enterprise N&echo - Windows 10 Enterprise LTSB&echo - Windows 10 Enterprise LTSB N&echo.&echo.&echo ============================================================================&echo Activating your Windows...&cscript //nologo slmgr.vbs /ckms >nul&cscript //nologo slmgr.vbs /upk >nul&cscript //nologo slmgr.vbs /cpky >nul&set i=1&wmic os | findstr /I "enterprise" >nul
if %errorlevel% EQU 0 (cscript //nologo slmgr.vbs /ipk NPPR9-FWDCX-D2C8J-H872K-2YT43 >nul&cscript //nologo slmgr.vbs /ipk DPH2V-TTNVB-4X9Q3-TJR4H-KHJW4 >nul&cscript //nologo slmgr.vbs /ipk WNMTR-4C88C-JK8YV-HQ7T2-76DF9 >nul&cscript //nologo slmgr.vbs /ipk 2F77B-TNFGY-69QQF-B8YKP-D69TJ >nul&cscript //nologo slmgr.vbs /ipk DCPHK-NFMTC-H88MJ-PFHPY-QJ4BJ >nul&cscript //nologo slmgr.vbs /ipk QFFDN-GRT3P-VKWWX-X7T3R-8B639 >nul&goto server) else wmic os | findstr /I "home" >nul
if %errorlevel% EQU 0 (cscript //nologo slmgr.vbs /ipk TX9XD-98N7V-6WMQ6-BX7FG-H8Q99 >nul&cscript //nologo slmgr.vbs /ipk 3KHY7-WNT83-DGQKR-F7HPR-844BM >nul&cscript //nologo slmgr.vbs /ipk 7HNRX-D7KGG-3K4RQ-4WPJ4-YTDFH >nul&cscript //nologo slmgr.vbs /ipk PVMJN-6DFY6-9CCP6-7BKTT-D3WVR >nul&goto server) else wmic os | findstr /I "education" >nul
if %errorlevel% EQU 0 (cscript //nologo slmgr.vbs /ipk NW6C2-QMPVW-D7KKK-3GKT6-VCFB2 >nul&cscript //nologo slmgr.vbs /ipk 2WH4N-8QGBV-H22JP-CT43Q-MDWWJ >nul&goto server) else wmic os | findstr /I "10 pro" >nul
if %errorlevel% EQU 0 (cscript //nologo slmgr.vbs /ipk W269N-WFGWX-YVC9B-4J6C9-T83GX >nul&cscript //nologo slmgr.vbs /ipk MH37W-N47XK-V7XM9-C7227-GCQG9 >nul&goto server) else (goto notsupported)
:server
if %i%==1 set KMS=kms7.MSGuides.com
if %i%==2 set KMS=kms8.MSGuides.com
if %i%==3 set KMS=kms9.MSGuides.com
if %i%==4 goto notsupported
cscript //nologo slmgr.vbs /skms %KMS%:1688 >nul&echo ============================================================================&echo.&echo.
cscript //nologo slmgr.vbs /ato | find /i "successfully" && (echo.&echo ============================================================================&echo.&echo #My official blog: MSGuides.com&echo.&echo #How it works: bit.ly/kms-server&echo.&echo #Please feel free to contact me at msguides.com@gmail.com if you have any questions or concerns.&echo.&echo #Please consider supporting this project: donate.msguides.com&echo #Your support is helping me keep my servers running everyday!&echo.&echo ============================================================================&choice /n /c YN /m "Would you like to visit my blog [Y,N]?" & if errorlevel 2 exit) || (echo The connection to my KMS server failed! Trying to connect to another one... & echo Please wait... & echo. & echo. & set /a i+=1 & goto server)
explorer "https://techlou.com"&goto halt
:notsupported
echo ============================================================================&echo.&echo Sorry! Your version is not supported.&echo.
:halt
pause >nul
3. Save file as activate.bat
Click on File and save the file as activate.bat. Make sure to select “All Files (*.*)” in the Save file type list and that the encoding is UTF-8.
4. Right-click on saved file and Run as Administrator
Right-click on activate.bat and click on “Run as administrator“
5. Restart PC to activate Windows 10
Restart your computer to apply the activation, after restarting your Windows 10 should be activated and the “activate windows” watermark should be removed.
Note: If you get the message “Sorry! Your version is not supported.” Open CMD as Administrator and type this command “slmgr.vbs /upk” then proceed with the activation.
Method 8: Use Third-Party Software
Last but not least, you can permanently remove the “Activate Windows” watermark using third-party software like Universal Watermark Disabler
Follow the steps below to do so:
- Download and Universal Watermark Disabler
- Unzip the uwd.zip file
- Double click on uwd.exe
- Click on Install
After installation, restart your computer to apply changes, UDW will remove any watermark on your Windows 10 operating system.
Wrap up
In this article, we have seen how to remove and get rid of the “activate windows”watermark using several methods. Please note that none of these methods will replace an activated Windows 10 system with a genuine key. Most of the methods will only help you to hide the “activate windows” message but your Windows is still not activated. Only the Windows activation with a script and Powershell method will help you get your Windows 10 activated and thus benefit from all the features that an activated Windows has to offer (Updates, Fixes, etc).
See also:
- How To Access Desktop Version Of Facebook on Android
- How To Unsubscribe From ALL Youtube Channels At Once.
- How to remove previously synced Google Account from Android Phone
- How to take background out of a picture
- Find Where Is The Hosts File in Windows 10 and Edit it.