 Хеллоу
  У нас спец. задание — обнаружена папка Removable Storage Devices на рабочем столе в Windows 10. Цель — выяснить откуда растут ноги. Первое что узнал — она может исчезнуть после обновления рабочего стола. Нажимаете правой кнопкой по рабочему столу — обновить. Можно еще просто нажать кнопку F5 в открытом рабочем столе. Попробуйте
Один юзер написал — при открытии папки у него показывается все доступные устройства на ПК. Юзер писал на форуме Майкрософт, там же ему посоветовали выполнить перезагрузку, если обновление рабочего стола не поможет.
Вот собственной персоной папка Removable Storage Devices:

Пишут что папка Removable Storage Devices появляется после обновления виндовс. Если попробовать папку именно удалить, то могут быть траблы, так как по нажатию правой кнопкой пункт удаления может тупо отсутствовать:

А вот что пользователи говорят:
- Некоторые пишут что после обновления рабочего стола папка исчезает, но через некоторое время появляется вновь
- На форуме Майкрософт посоветовали откатиться до установки обновления при помощи восстановления системы.
Вроде бы Removable Storage Devices переводится как Сменные устройства хранения.
Майкрософт кажется уже исправила проблему с папкой Removable Storage Devices — то есть это был баг, и он уже исправлен. Нет смысла откатываться назад или восстанавливать систему. Я так понимаю что из Центра обновлений должно прийти обновление, которое исправляет данный баг. Если что — проверьте обновления (окно Параметры).
Может ли папку Removable Storage Devices создавать вирус?
С одной стороны — нет. Но нельзя исключать. Например сегодня мы узнали что папка Removable Storage Devices это просто баг в системе, который на данный момент компанией Майкрософт уже устранен.
Однако данный баг есть или был не на всех ПК. И сегодня, теоритически, вирус может использовать название Removable Storage Devices в своих целях. Если вы поищете в интернете по поводу Removable Storage Devices, то ничего опасного не найдете. В этом и суть — вирус применяет так сказать схему маскировки 
Что делать, если у вас есть мысли о вирусе на компе? Необходимо просканировать ПК на вирусы. Для этого я вам приведу три лучшие утилиты, так называемая золотая тройка  Вот они:
- AdwCleaner. Лучшая утилита по поиску и удалению рекламных вирусов и всякой рекламной нечисти, задача которой — показать вам рекламу любым способом. Для этого может использоваться все — ярлыки, расширения в браузерах, подмена сайтов и так далее. Все это утилита проверяет и при обнаружении чистит от угроз. Рекомендую, реально годная утилита.
- HitmanPro. Похожая на предыдущую утилиту, однако использует немного другие механизмы обнаружения. Проводит более тщательный поиск угроз, иногда находит то, что на самом деле не представляет угрозы, но ничего страшного в этом нет. Советую также к использованию.
- Dr.Web CureIt!. Утилита нацелена в первую очередь уже не на рекламные вирусы, а на серьезные — трояны, черви, бэкдоры, руткиты. Мое мнение — лучшая утилита по поиску и удалению серьезных вирусов, которые могут вывести из строя работу системы. Загружается уже с антивирусными базами и под рандомным названием.
Не подумайте что я рекламирую. Но если у вас нет антивируса, то попробуйте бесплатную версию Касперского. Как по мне — отличный антивирус, который не грузит ПК, но при этом обеспечивает мощную защиту
На этом все. Удачи вам и берегите себя! 
На главную!
04.11.2018
Download Windows Speedup Tool to fix errors and make PC run faster
Sometimes we see folders that are created on their own on our PC. They might be created by the programs we install or the tools we use. There is no need to panic unless they are created by the malware. There is a Removable Storage Device folder that is appearing suddenly on the desktop of some users. It does not harm but such a folder on a desktop is not a usual thing. You might have created a shortcut for the drive but not a removable storage devices folder. In this guide, we show you different ways to remove the removable storage devices folder from the desktop.

Why is there a Removable Storage Device folder on my desktop?
It appears suddenly on the desktop after you have used a removable storage device on your Windows PC. It mostly appears when you have used the files on the removable storage device on your PC and make changes to them without copying them onto your PC. For example, if you have used photos on a removable storage device and edited them on your PC without copying them, you may see the removable storage device folder on your desktop.
If a folder named Removable Storage Devices appears on your desktop and you are wondering how to get rid of it, the following fixes can help you remove it. Any of the below methods can help you fix it.
- Use the Refresh option on desktop
- Restart your PC
- Manually delete the folder
- Use a File Deleter software
- Run a malware scan
Let’s get into the details of each method and delete the Removable Storage Devices folder from Desktop.
1] Use the Refresh option on desktop

When you see the Removable Storage Devices folder on your desktop, you should refresh your desktop and see if it removes the folder. Just right-click on your desktop and select Refresh in the context menu. See if the folder is still there or removed.
Read: Desktop and Taskbar keep refreshing constantly in Windows 11/10
2] Restart your PC
Restarting a device is the most generic fix when we face any issue with it. It works even when you see a removable devices folder on the desktop of your PC. Just close all the programs, eject the removable device (if any), and restart your PC. After the restart check if the folder is gone or not.
Read: Shutdown or Restart Windows without using the mouse cursor
3] Manually delete the folder
If refreshing your desktop or restarting your PC does not work, try to delete the folder manually. You can select the folder and press Delete on the keyboard or use the Shift + Delete buttons to delete it permanently and press Enter to confirm. You can also use the context menu to delete it.
Read: Delete undeletable & locked files, and folders in Windows 11/10
4] Use a File Deleter software
If the Removable Storage Devices folder is still there after trying to manually delete it, you should use a third-party file deleter software to delete it. You can use programs like ForceDelete, ThisisMyFile, Wise Force Delete, or any program of your choice.
5] Run a malware scan
There are some chances that the removable storage devices folder has been created by the malware. We need to eliminate the possibility of it. To do so, you need to run Windows Defender as well as a free malware scan or antivirus program to find and delete such traces. If it is really created by malware, you will see it disappear now.
Read: Managing Files and Folders in Windows 11/10 – Tips & Tricks
These are the different ways using which you can remove the removable storage devices folder from the desktop.
How do I turn off removable storage?
You can turn off removable storage devices on your PC using the Registry Editor, disable USB ports from the Device Manager, disable using Command-line tools, using a third-party program, or using Microsoft Fix It. You can use any of them and turn off removable storage.
Why do I have a removable storage devices folder on my desktop?
There are five different ways to remove the Removable Storage Devices folder from your desktop. For example, you can simply press the F5 button to refresh your computer and remove the corresponding folder immediately. However, if it doesn’t work, you can restart your computer, or delete the folder manually.
Read: Automatically create shortcuts to USB Removable Media on Desktop.
Guru is a Communications graduate with hands-on experience with computers, cameras, and editing tools. A tech enthusiast and a movie buff who loves writing about computers, he dreams of living a life devoid of all tech and modern-day advancements in a forest.
- Возможно, вы заметили в своей папке папку «Съемные устройства хранения» и не знаете, что с ней делать.
- Это призрачная папка, которую нельзя удалить, но определенные методы восстановления или исправления системы могут помочь.
- Вы можете найти полезные руководства по устранению неполадок в нашем специализированном Центре ошибок Windows 10.
- Кроме того, ознакомьтесь с разделом о системных ошибках, где вы найдете дополнительные рекомендации и исправления.

После редактирования некоторых фотографий на своем компьютере или использования SD-карты в качестве дополнительного диска многие пользователи сообщали, что на их рабочем столе внезапно появилась новая папка под названием Removable Storage Devices.
Папка содержит доступные устройства и диски на компьютере (иногда она пуста) и не может быть удалена. На самом деле пользователи не хотели его удалять, опасаясь, что это может повлиять на всю ОС.
Впервые о папке было сообщено еще в 2018 году, и она также была связана с октябрьской Windows 10 того же года, которая вызвала много проблем. Последующие накопительные обновления Windows 10, похоже, не исправили ситуацию.
Хотя точная причина появления этой папки неизвестна, пользователи пробовали несколько способов избавиться от нее, не повредив систему.
Как удалить папку «Съемные устройства хранения»?
1. Обновите рабочий стол.

Это самое простое и наиболее разумное решение, которое многие пользователи применяли для избавления от папки.
А именно, щелкнув правой кнопкой мыши на рабочем столе и выбрав опцию «Обновить», временные файлы должны быть удалены. Это решение удалило папку, но только на определенное время. Многие пользователи упоминали, что папка снова появилась.
В этом случае вы можете попробовать следующее решение.
2. Запустите команду DISM.
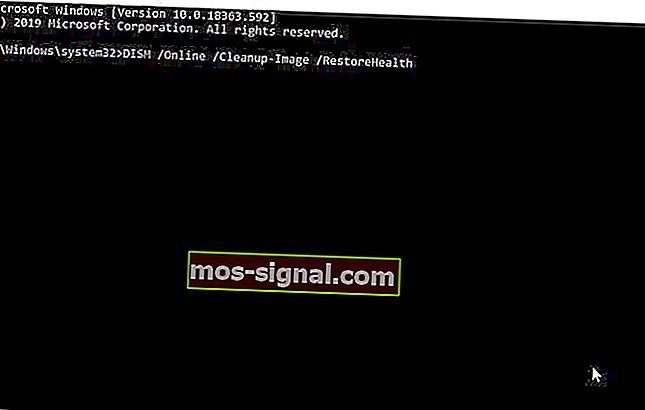
- В строке поиска введите cmd .
- Щелкните Запуск от имени администратора .
- В окне командной строки введите
DISM /Online /Cleanup-Image /RestoreHealthи нажмите Enter .
Процесс должен занять около 10-20 минут и должен исправить все неисправные файлы реестра.
Поскольку возможно, что папка «Съемные устройства хранения» связана с неверно настроенными системными настройками или поврежденными записями в реестре Windows, это сканирование должно устранить проблему.
Прочтите эту статью, чтобы узнать все, что нужно знать об инструменте DISM в Windows 10.
3. Запустите антивирусное сканирование.

На вашем устройстве могут отсутствовать важные обновления или оно может не работать должным образом из-за вируса или вредоносного ПО. На всякий случай мы рекомендуем выполнить тщательное антивирусное сканирование. Вы можете использовать встроенный инструмент безопасности Windows, Защитник Windows или сторонний антивирус.
Итак, это будут рекомендуемые и удобные решения, которые помогут вам удалить папку «Съемные устройства хранения».
Мы пропустили этап перезагрузки, который иногда помогает удалить временные файлы; Кроме того, мы не рекомендуем новую установку ОС, потому что это более сложная работа и, вероятно, не нужна на данном этапе.
Если у вас есть какие-либо комментарии по этой теме, используйте специальный раздел ниже.
Часто задаваемые вопросы: узнайте больше о папках на рабочем столе
- Что такое папка на рабочем столе?
Папка рабочего стола — это обычная папка, в которую входят все файлы, хранящиеся на рабочем столе вашего компьютера. Вы можете исследовать это место с помощью нового проводника Windows 10.
- На рабочем столе плохо сохранять файлы?
Не обязательно. Основная причина, по которой вы сохраняете файлы на рабочем столе, — это легкий доступ. Если вы хотите настроить свой рабочий стол, ознакомьтесь с нашими 8 лучшими программами для настройки рабочего стола Windows 10.
- Рабочий стол на диске C?
Да, папка Desktop находится на диске C. Самый простой способ получить доступ — создать ярлык на рабочем столе. Взгляните на нашу подборку лучших программ быстрого доступа для Windows 10.
You are here: Home / Windows / How To Delete The Removable Storage Devices Folder On Desktop?
Have you noticed any unknown folder named “Removable Storage Devices” on your desktop? Recently, many users have reported of the Removable Storage Devices folder on desktop that has appeared out of nowhere.
This folder is basically a Windows bug that has likely been triggered by incorrect Windows Registry entries or incorrectly configured system settings. In this article, I have discussed how you can delete the Removable Storage Devices folder from your desktop.
We have shown a VIDEO walk through at the end of the post for easy solution.
After working on your computer for some time, like editing photos or transferring files from your flash drive, you may notice the Removable Storage Devices folder on your desktop. If you open this folder, you can find available devices and drives on the computer or the folder may even be empty.
When you try to remove it by using the delete option, you may find it is not working. Exactly why this folder appears remains unknown, but it is definitely a bug. Also, incorrect Windows Registry entries or incorrectly configured system settings, seems some of the likely causes of this bug.
This folder is useless and serves no purpose. You can remove it with some simple methods as mentioned below.
How To Delete The Removable Storage Devices Folder On Desktop?
Here are some simple methods that you can use to remove this folder from your desktop.
Method 1: Restart Your PC
Restarting your PC fixes most minor bugs and errors, including this one. After you restart your computer, you will likely find that the folder has been removed from desktop. This likely happens as restarting clears the system cache of Windows 10.
However, restarting each time this bug appears on your screen is definitely not the most feasible solution. If restarting isn’t a viable option for you, check out the other methods mentioned below.
Method 2: Refresh Desktop
Another method to get rid of this folder is refreshing the desktop. Refreshing the desktop has removed this bug folder for many users. As you know, it is also very easy to perform in Windows 10. The only reason I haven’t made this the 1st method is that it is not foolproof. The bug folder tends to reappear after sometime.
Even though there is a chance that the folder will reappear, it is still a easy temporary solution. To refresh your desktop, follow the steps given below:
- Right-click on the desktop.
- Select the Refresh option from the right-click context menu.
Refresh a couple of times if refreshing the first time doesn’t remove the bug folder.
Method 3: Run SFC And DISM Scan
Another likely cause of this bug folder is corrupted system and Registry files. In this case, restarting or refreshing your computer will only remove the folder temporarily. A more permanent solution would be to run the SFC and DISM scan to fix the corrupted system and Registry files.
To run the SFC and DISM scan, follow the steps given below:
- Type cmd in the Start menu and right-click on the Command Prompt option.
- Select the Run as Administrator option to open an elevated Command Prompt.
- Now, type sfc /scannow and press Enter to run the SFC scan.
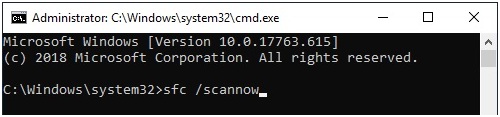
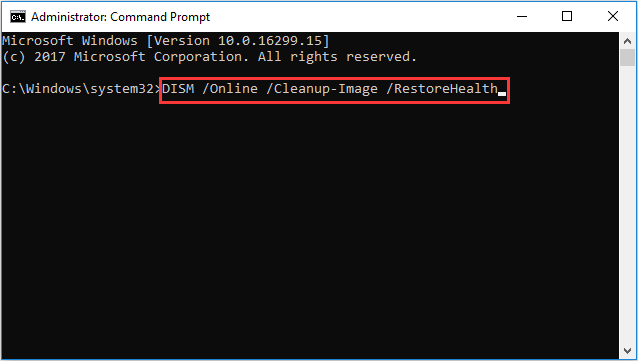
- The SFC scan will take some time to complete so, don’t close it prematurely. After it finishes, restart your computer.
- Now, open the elevated Command Prompt again and type the following command:
DISM /Online /Cleanup-Image /RestoreHealth, and press Enter.
This will run the DISM scan.
- Wait for the DISM scan to finish and then restart the computer.
After running both the SFC scan and DISM scan, you should get rid of the Removable Storage Devices folder on desktop permanently.
Method 4: Run Antivirus Scan
If running the SFC scan and DISM doesn’t remove this bug folder permanently, it is possible that this error folder is being triggered by a virus or malware. If your PC has been infected by a virus or malware, you can try running an antivirus scan to remove it.
Malwarebytes is a powerful anti-malware and antivirus software that you can use in this situation. If you don’t want to install any 3rd party antiviruses, then you can always run the Windows Defender Offline scan, which is very thorough in its removal of malware and viruses.
To run the Windows Defender Offline scan, follow the steps given below:
- Type Windows Security in the Windows search bar and select the top result.
- Click on the Virus & Threat Protection option.
- Select the Scan options in the Current Threats section.
- Scroll down and check the Microsoft Defender Offline scan and select the Scan now option.
- The scan will start now and will approximately take 15-20 minutes. Wait for the scan to finish and don’t close it prematurely. After the scan finishes, Windows will restart automatically.
When Windows boots into the desktop, you will likely find the Removable Storage Devices folder removed from the desktop.
Wrapping Up
So, there you have it. Now you know how to delete the Removable Storage Devices folder on desktop. One or a combination of a couple of the above methods should delete this bug folder from your desktop permanently. If you have any other questions related to this article, ask them in the comment section below.
-
Home
-
News
- What Is Removable Storage Devices Folder and How to Delete It
By Tina |
Last Updated
What is the Removable Storage Devices folder? Can the Removable Storage Devices folder on desktop be deleted? How to delete it? This post from MiniTool will show you what it is and how to delete it.
What Is the Removable Storage Devices Folder?
Some users reported that they have noticed the Removable Storage Devices folder suddenly occurred on their desktop and they do not know what to do with it. Then what is the Removable Storage Devices folder?
The Removable Storage Devices folder on desktop is commonly caused by incorrectly configured system settings or irregular entries in the Windows Registry. The Removable Storage Devices folder desktop is the error that contains details of the error, including why it occurred, which system component or application malfunctioned to cause the error along with some other information.
In general, the error Removable Storage Device folder can be caused by the incorrect or failed installation or uninstallation of software that may have left invalid entries in your Windows registry. It also may be caused by virus or malware attack, improper shutdown due to power failure or other factors, mistaken deletion of the system files or registry entries.
So, the most important thing is to delete the Removable Storage Devices folder. But, do you know how to do that? If not, keep on your reading and we will show you how to delete the Removable Storage Devices folder on startup.
How to Delete Removable Storage Devices Folder?
In this part, we will show you how to delete the Removable Storage Devices folder on desktop.
Way 1. Refresh the Desktop
First of all, to remove the Removable Storage Devices folder, you can choose to refresh the desktop. This way works for most users.
Now, here is the tutorial.
- Right-click on the Desktop.
- Then choose Refresh.
This way will remove the temporary files. After that, you can check whether the Removable Storage Devices folder is removed.
Way 2. Run DISM Tool
As we have mentioned in the above part, the Removable Storage Devices folder may be caused by the improper Windows Registry. So, in order to remove the Removable Storage Device folder desktop, you can choose to run the DISM tool to detect and fix the Windows Registry errors.
Now, here is the tutorial.
- Open Command Prompt and run it as administrator.
- Then type the command DISM /Online /Cleanup-Image /RestoreHealth and hit Enter to continue.
Then this process will take a while. Please wait patiently for the process to be finished. When it is finished, please check whether the Removable Storage Device folder is removed.
Way 3. Run a Virus Scan
If there is virus attack on your computer, you may also come across the Removable Storage Device folder on desktop. In this situation, you can choose to run a virus scan.
Now, here is the tutorial.
- Press Windows key and I key together to open Settings.
- In the pop-up window, choose Update & Security.
- Then choose Windows Defender.
- On the right panel, choose Open Windows Defender Security Center.
- Then select Virus & threat protection.
- Then choose Quick Scan to continue.

When it is finished, reboot your computer and check whether the Removable Storage Devices folder is removed.
Final Words
To sum up, this post has introduced what the Removable Storage Devices folder is and how to fix the Remove Storage Devices folder on desktop. If you have any better idea to remove the Removable Storage Devices folder, you can share it in the comment zone.
About The Author
Position: Columnist
Tina is a technology enthusiast and joined MiniTool in 2018. As an editor of MiniTool, she is keeping on sharing computer tips and providing reliable solutions, especially specializing in Windows and files backup and restore. Besides, she is expanding her knowledge and skills in data recovery, disk space optimizations, etc. On her spare time, Tina likes to watch movies, go shopping or chat with friends and enjoy her life.