 26.04.2021

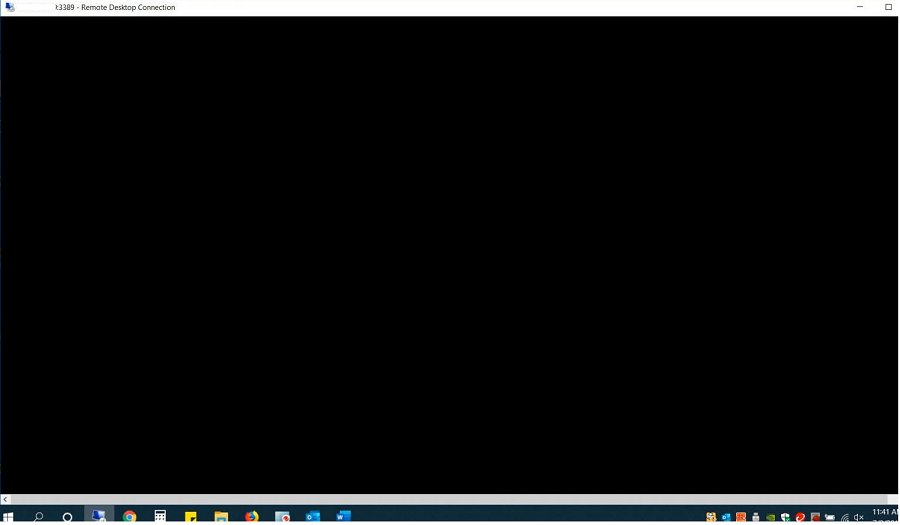
В этой статье мы рассмотрим, что делать, если при RDP подключении к удаленному хосту вместо рабочего стола вы видите черный экран. Эта проблема стала довольно часто встречаться в последних билдах Windows 10 и Windows Server 2019, и я решил оставить тут информацию из внутренней базы знания нашего HelpDesk о типовых способах решения.
Итак, вы пытаетесь подключиться к удаленному компьютеру стандартным RDP клиентом Windows (mstsc.exe) и после ввода имени и пароля вместо рабочего стола вы видите черный экран (BLM).
Причин, из-за которых вместо RDP сессии отображается черный экран довольно много. Как-то диагностировать или классифицировать их довольно сложно.
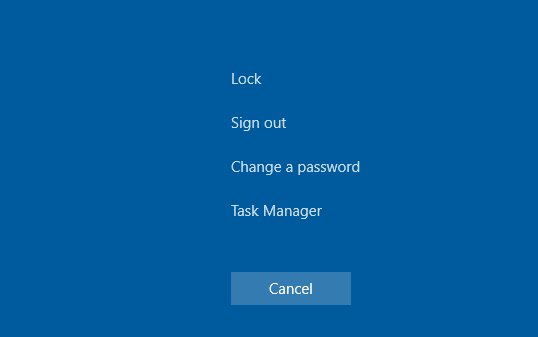
- В RDP сессии нажмите сочетание клавиш
CTRL+ALT+END
(в том числе позволяет сменить пароль в RDP сеансе), а затем нажмите кнопку Отмена. Иногда это позволяет вернуться к рабочему столу RDP сессии. Если это не помогло, запустите из этого экрана диспетчер задач Task Manager и запустите процесс File Explorer (File -> Run new task ->
explorer.exe
-> Ok);
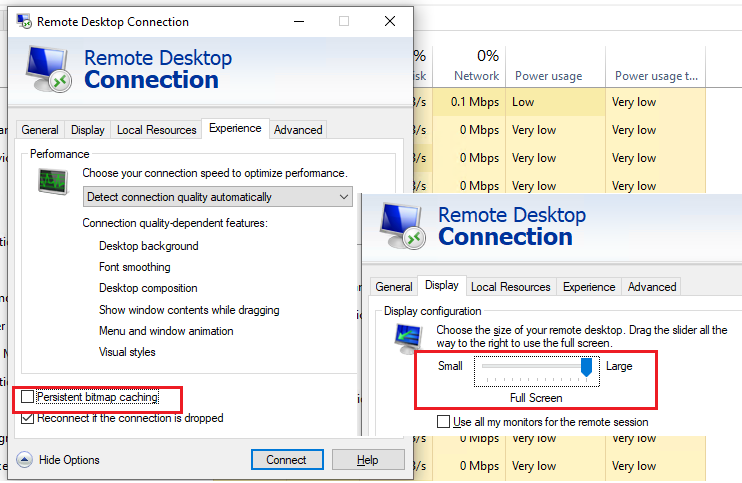
- Проверьте, что в настройках RDP клиента (
mstsc.exe
) отключено кэширование (отключите опцию Persistent bitmap caching на вкладке Experience) и используется разрешение экрана, которое поддерживается удаленным хостом (на вкладке Display выставите меньшее разрешение экрана, или попробуйте режим Full Screen); - Убедитесь, что на вашем и на удаленном компьютере установлены последние версии видеодрайверов. Попробуйте воспользоваться автоматическим обновлением драйверов (если этот режим у вас не отключен), или скачайте и установите драйвер вручную). В некоторых случаях для Windows 10 нужно принудительно выставить режим использования XDDM видео драйвера вместо WDDM. Для этого нужно открыть редактор групповых политик gpedit.msc и в разделе Computer Configuration -> Administrative Templates -> Windows Components -> Remote Desktop Services -> Remote Desktop Session Host -> Remote Session Environment установить значение параметра Use WDDM graphics display driver for Remote Desktop Connections = Disabled (либо тоже самое через реестр:
reg add “HKLM\SOFTWARE\Policies\Microsoft\Windows NT\Terminal Services” /v “fEnableWddmDriver” /t REG_DWORD /d 0 /f
. Обновите групповые политики на RDP сервере; - В Windows Server 2016 с настроенными таймаутами для RDS сессий пару раз сталкивался с жалобами пользователей, что после подключения в отключенную (disconnected) сессию, она не активировалась корректно и они видели черный экран. Здесь поможет только завершение RDP сеанса пользователем самостоятельно (CTRL+ALT+End -> Sign out), либо принудительное завершение сессии администратором (по аналогии со статьей Не удается завершить требуемую операцию при входе по RDP). Либо настройте более агрессивные настройки отключения disconnected сессий;
- Отключите использование протокола UDP 3389 для передачи RDP трафика в дополнение к стандартному RDP порту TCP 3389 (доступно, начиная с Windows Server 2012 R2/Windows 8.1) через параметр Turn off UDP on client на клиенте (Computer Configuration -> Policies -> Administrative Templates -> Windows Components -> Remote Desktop Services -> Remote Desktop Connection Client) или через реестр:
reg add “HKLM\SOFTWARE\Policies\Microsoft\Windows NT\Terminal Services\Client” /v “fClientDisableUDP” /t REG_DWORD /d 1 /f
. Для отключения UDP протокола для RDP трафика на стороне сервера, настройте параметр GPO …Remote Desktop Session Host -> Connections -> Select RDP transport protocols = Use only TCP.

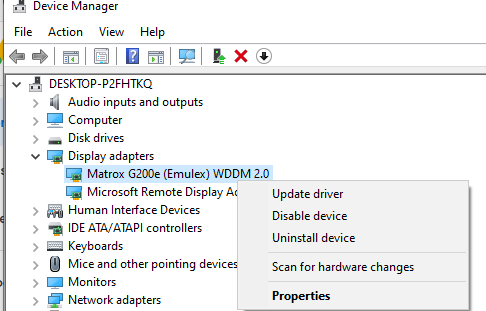 В некоторых случаях для Windows 10 нужно принудительно выставить режим использования XDDM видео драйвера вместо WDDM. Для этого нужно открыть редактор групповых политик gpedit.msc и в разделе Computer Configuration -> Administrative Templates -> Windows Components -> Remote Desktop Services -> Remote Desktop Session Host -> Remote Session Environment установить значение параметра Use WDDM graphics display driver for Remote Desktop Connections = Disabled (либо тоже самое через реестр:
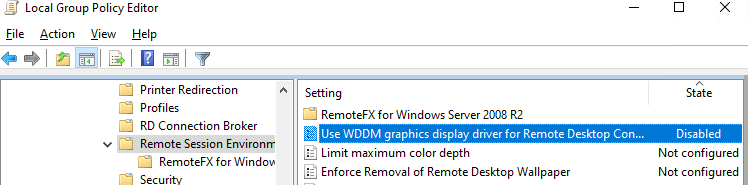
Из более экзотических рекомендаций от Microsoft, которые помогают далеко не всегда, но могут исправить именно источник проблемы:
- Убедитесь, то RDP сервер, клиент и все сетевое оборудование между ними настроены на одинаковый размер MTU;
- Отключите сжатие передаваемых данных в сеансе RDP через редактор локальной GPO – Configure compression for RemoteFX data (Настройка сжатия данных RemoteFX) = Do not use an RDP compression algorithm (Computer Configuration -> Administrative Templates -> Windows Components -> Remote Desktop Services -> Remote Desktop Session Host).
- Если проблема с черным экраном в RDP встречается на Windows Server 2019 и Windows 10 1809+. Откройте Event Viewer и проверьте журнал событий Application and Service Logs –> Microsoft –> Windows –> RemoteDesktopService-RdpCoreTS. Проверьте, есть ли там ошибки вида ‘
Failed GetConnectionProperty’ in CUMRDPConnection::QueryProperty at 2884 err=[0x80004001]
‘, ‘
Connection doesn’t support logon error redirector’ in CUMRDPConnection::GetLogonErrorRedirector at 4199 err=[0x80004001]
. Если такие ошибки встречаются, нужно отключить использование протокола URCP (Universal Rate Control Protocol), который используется для передачи некоторых данных между RDP клиентом и сервером поверх UDP (MS-RDPEUDP2):
reg add “HKLM\SOFTWARE\Microsoft\Terminal Server Client” /v “UseURCP” /t REG_DWORD /d 0 /f
или так
New-ItemProperty 'HKLM:\SOFTWARE\Microsoft\Terminal Server Client' -Name UseURCP -PropertyType DWord -Value 0
Давайте рассмотрим, что делать, если во время RDP подключении к удаленному хосту вы видите не рабочий стол, а черный экран. Проблема особенно часто встречается в ранних версиях Windows 10 и Windows Server 2019. Забегая наперед скажем, что проблема решается.
Причины возникновения проблемы
Почему вместо RDP сессии появляется черный экран?
Диагностировать или присвоить их к категории, то есть классифицировать, достаточно проблематично. Но мы постараемся это сделать:
Во время сессии RDP нажмите CTRL+ALT+END, после чего Отмена. Часто так можно вернуться к рабочему столу RDP сессии. Если не помогает, запускаем диспетчер задач Task Manager и процесс File Explorer (File -> Run new task -> explorer.exe -> Ok);
Проверьте, что в настройках RDP клиента (mstsc.exe) отключено кэширование (выключаем Persistent bitmap caching на вкладке Experience) и используется разрешение экрана.

Оно поддерживается удаленным хостом. Проверьте, что на вашем ПК стоит последняя версия видеодрайвера. Вы можете установить драйвера ручным способом или установить их автоматическое обновление.

Решение проблемы
Для Windows 10 нужно вставить использование XDDM вместо WDDM. Откроем редактор групповых политик gpedit.msc и в разделе Computer Configuration -> Administrative Templates -> Windows Components -> Remote Desktop Services -> Remote Desktop Session Host -> Remote Session Environment ставим значение параметра Use WDDM graphics display driver for Remote Desktop Connections = Disabled. Обновляем групповые политики на RDP сервере.

В Windows Server 2016 с выставленными таймаутами для RDS сессий иногда приходят жалобы пользователей, что после подключения в отключенную (disconnected) сессию, она не активировалась корректно и они видели черный экран. Здесь поможет только завершение RDP сеанса пользователем самостоятельно (CTRL+ALT+End -> Sign out), либо принудительное завершение сессии администратором (по аналогии со статьей Не удается завершить требуемую операцию при входе по RDP). Либо настройте более агрессивные настройки отключения disconnected сессий;
Отключаем использование протокола UDP 3389 для передачи RDP трафика в дополнение к стандартному RDP порту TCP 3389 через параметр Turn off UDP on client на клиенте (Computer Configuration -> Policies -> Administrative Templates -> Windows Components -> Remote Desktop Services -> Remote Desktop Connection Client) или через реестр: reg add “HKLM\SOFTWARE\Policies\Microsoft\Windows NT\Terminal Services\Client” /v “fClientDisableUDP” /t REG_DWORD /d 1 /f . Для отключения UDP протокола для RDP трафика на стороне сервера, настройте параметр GPO …Remote Desktop Session Host -> Connections -> Select RDP transport protocols = Use only TCP.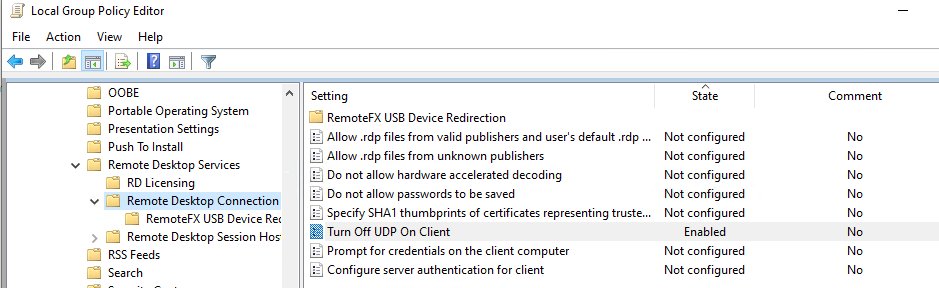
Другие способы
Из более экзотических рекомендаций от Microsoft, которые помогают далеко не всегда, но могут исправить именно источник проблемы:
Проверяем RDP сервер, клиент и все сетевое оборудование между ними. Они должны быть настроены на одинаковый MTU.
Выключаем опцию сжатия данных, которые перелаются, в сеансе RDP через редактор локальной GPO – Configure compression for RemoteFX data (Настройка сжатия данных RemoteFX) = Do not use an RDP compression algorithm (Computer Configuration -> Administrative Templates -> Windows Components -> Remote Desktop Services -> Remote Desktop Session Host).
Если проблема с черным экраном в RDP встречается на Windows Server 2019 и Windows 10 1809+. Откройте Event Viewer и проверьте журнал событий Application and Service Logs –> Microsoft –> Windows –> RemoteDesktopService-RdpCoreTS.
Проверьте, есть ли там ошибки вида ‘ Failed GetConnectionProperty’ in CUMRDPConnection::QueryProperty at 2884 err=[0x80004001] ‘, ‘ Connection doesn’t support logon error redirector’ in CUMRDPConnection::GetLogonerrorRedirector at 4199 err=[0x80004001].
Если есть, отключаем использование протокола URCP (Universal Rate Control Protocol), который используется для передачи некоторых данных между RDP клиентом и сервером поверх UDP (MS-RDPEUDP2): reg add “HKLM\SOFTWARE\Microsoft\Terminal Server Client” /v “UseURCP” /t REG_DWORD /d 0 /f или так New-ItemProperty ‘HKLM:\SOFTWARE\Microsoft\Terminal Server Client’ -Name UseURCP -PropertyType DWord -Value 0
Теперь вы знаете, как можно решить эту проблему.
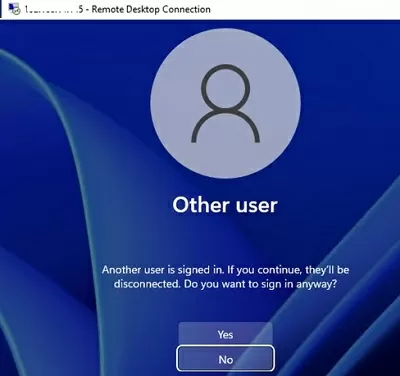
Remote users can connect to their Windows 10 and 11 computers through the Remote Desktop Services (RDP). All you need to do is enable Remote Desktop, grant the user RDP access permissions, and connect to the computer using any remote desktop client. However, the number of concurrent RDP sessions is limited in desktop versions of Windows. Only one active Remote Desktop user session is allowed.
A warning will appear asking you to disconnect the first user’s session if you try to establish a second RDP connection.
Another user is signed in. If you continue, they’ll be disconnected. Do you want to sign in anyway?
Contents:
- Number of Concurrent RDP Connections on Windows
- RDP Wrapper: Enable Multiple RDP Sessions on Windows
- RDP Wrapper Not Working on Windows
- Patch the Termsrv.dll to Enable Multiple Remote Desktop Sessions
- Multiple Concurrent RDP Connections in Windows 10 Enterprise Multi-session
Number of Concurrent RDP Connections on Windows
There are a number of restrictions on the use of Remote Desktop Services in all desktop versions of Windows 10 and 11:
- Only Windows Professional and Enterprise editions can accept remote desktop connections. RDP access is not allowed to Home/Single Language Windows editions;
- Only one simultaneous RDP connection is available. Attempting to start a second RDP session will prompt the user to end the active session;
- If the user is working at the computer console (locally), their local session is disconnected (locked) when they make a remote RDP connection. The remote RDP session will also be terminated if the user logs into Windows from the computer’s console.
The number of concurrent RDP connections on Windows is actually a license limitation. Microsoft prohibits the creation of a workstation-based Terminal RDP server for multiple users to work simultaneously.
If your tasks require the deployment of a terminal server, Microsoft suggests purchasing Windows Server (allows two simultaneous RDP connections by default). If you need more concurrent user sessions, you will need to purchase RDS CALs, install, and configure the Remote Desktop Session Host (RDSH) role or deploy an RDS farm.
Technically, any version of Windows with sufficient RAM and CPU resources can support dozens of remote user sessions simultaneously. On average, an RDP user session requires 150-200MB of memory (excluding running apps). This means that the maximum number of concurrent RDP sessions is limited only by the available resources of the computer.
In this article, we are going to show you three ways to remove the limit on the number of concurrent RDP connections in Windows 10 and 11:
- RDP Wrapper
- Modifying the termsrv.dll file
- Upgrading Windows 10/11 edition to Enterprise for virtual desktops (multi-session)
Note. Any modifications to the operating system that are described in this article are considered a violation of the Windows License Agreement and may be used at your own risk.
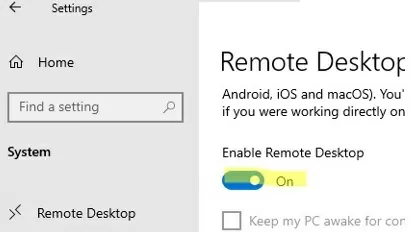
Before you proceed, make sure that the Remote Desktop protocol is enabled in Windows.
- Go to Settings -> System —> Remote Desktop -> Enable Remote Desktop;

- Or use the classic Control Panel: run the command
SystemPropertiesRemoteand check the option Allow remote connection to this computer.
RDP Wrapper: Enable Multiple RDP Sessions on Windows
The RDP Wrapper Library OpenSource project allows you to enable multiple RDP sessions on Windows 10/11 without replacing the termsrv.dll file. This tool acts as a layer between SCM (Service Control Manager) and the Remote Desktop Services. The RDP wrapper doesn’t make any changes to the termsrv.dll file, it simply loads the termsrv with the modified settings.
Thus, the RDPWrap will work even in the case of termsrv.dll file update. It allows you not to be afraid of Windows updates.
Important. Before installing the RDP Wrapper, it is important to make that you are using the original (unpatched) version of the termsrv.dll file. Otherwise, RDP Wrapper may become unstable or not start at all.
You can download the RDP Wrapper from the GitHub repository https://github.com/binarymaster/rdpwrap/releases (the latest available version of the RDP Wrapper Library is v1.6.2). The project hasn’t been updated since 2017, but it can be used in all new builds of Windows 10 and 11. To use the wrapper on modern versions of Windows, simply update the rdpwrap.ini configuration file.
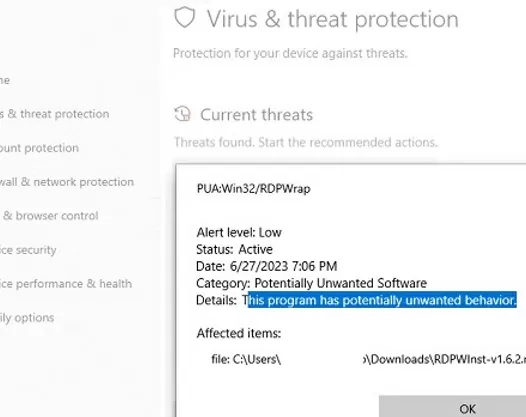
RDP Wrapper is detected as a potentially dangerous program by most antivirus scanners. For example, it is classified as PUA:Win32/RDPWrap (Potentially Unwanted Software) with a low threat level by the built-in Microsoft Defender antivirus. If your antivirus settings are blocking the RDP Wrapper from starting, you will need to add it to the exceptions.
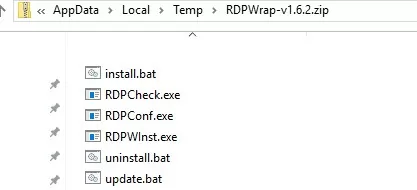
The RDPWrap-v1.6.2.zip archive contains some files:
- RDPWinst.exe — used to install/uninstall an RDP wrapper library;
- RDPConf.exe — RDP Wrapper configuration tool;
- RDPCheck.exe —an RDP check tool (Local RDP Checker);
- install.bat, uninstall.bat, update.bat — batch files to install, uninstall, and update RDP Wrapper.
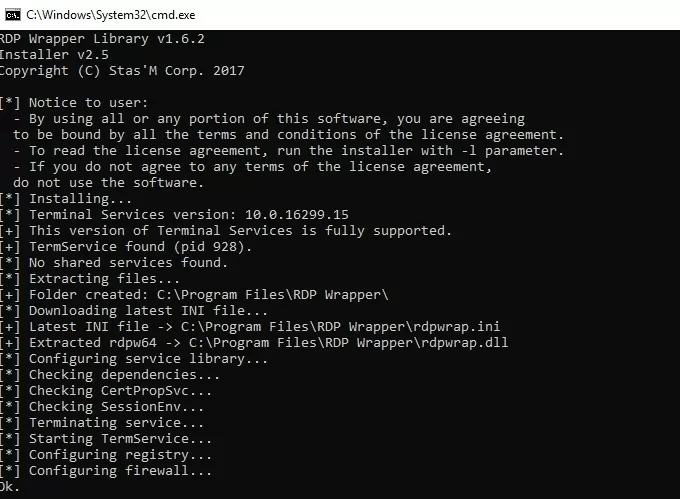
To install RDPWrap, run the install.bat file as an administrator. The program is installed in the C:\Program Files\RDP Wrapper directory.
Run RDPConfig.exe when the installation is complete.
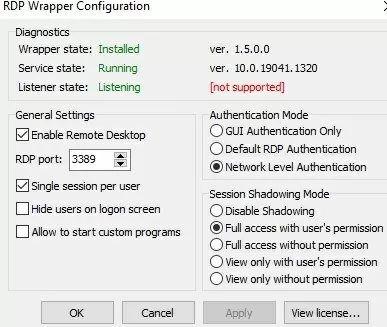
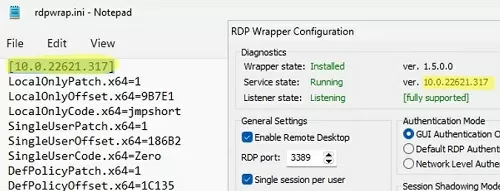
Most likely, immediately after installation, the tool will show that the RDP wrapper is running (Installed, Running, Listening), but not working. Note the red [not supported] warning. It reports that this version of Windows 10 22H2 (ver. 10.0.19041.1949) is not supported by the RDPWrapper.
This is because the rdpwrap.ini configuration file does not contain settings for your Windows version (build). +
✅ Download the latest version of rdpwrap.ini here https://raw.githubusercontent.com/sebaxakerhtc/rdpwrap.ini/master/rdpwrap.ini
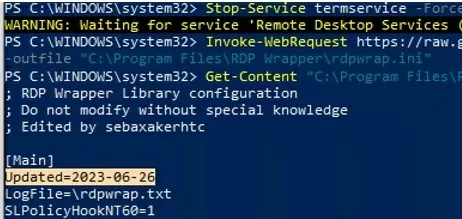
Manually copy the contents of this page into the C:\Program Files\RDP Wrapper\rdpwrap.ini file. Or download the INI file using the PowerShell cmdlet Invoke-WebRequest (you must first stop the Remote Desktop service):
Stop-Service termservice -Force
 Invoke-WebRequest https://raw.githubusercontent.com/sebaxakerhtc/rdpwrap.ini/master/rdpwrap.ini -outfile "C:\Program Files\RDP Wrapper\rdpwrap.ini"
You can create a scheduled task to check for changes to rdpwrap.ini and update it automatically.
This screenshot shows that the latest version of the rdpwrap.ini file (Updated=2023-06-26) is used on the computer.
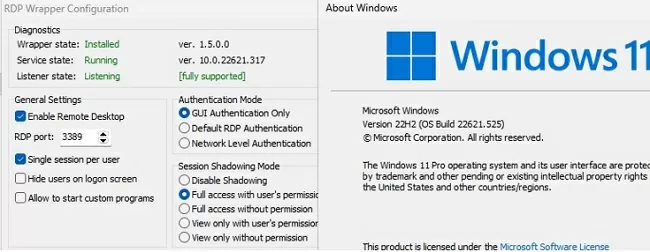
Restart your computer and run the RDPConfig.exe tool. Check that all items in the Diagnostics section are green and that the [Fully supported] message is displayed. The RDP wrapper started successfully on Windows 11 22H2 in my case.
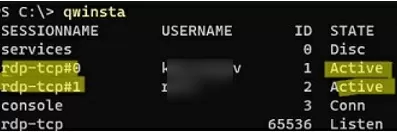
Now try to establish several concurrent RDP sessions with this computer under different user accounts (use your favorite RDP client: mstsc.exe, RDCMan, mRemoteNG, etc).
You can check that two (or more) RDP sessions are active on the computer at the same time by using the command:
qwinsta
rdp-tcp#0         user1                 1  Active
rdp-tcp#1         user2                 2  Active
The RDPWrap tool is supported in all Windows editions, so you can build your own terminal (RDS) server on any Windows device. So you can turn any version of Windows client into a full-featured terminal server.
The following options are available in the RDP Wrapper:
- Enable Remote Desktop
- RDP Port —change the default remote desktop port number (TCP 3389)
- Hide users on logon screen – allow hide the list of users from the Windows Logon Screen;
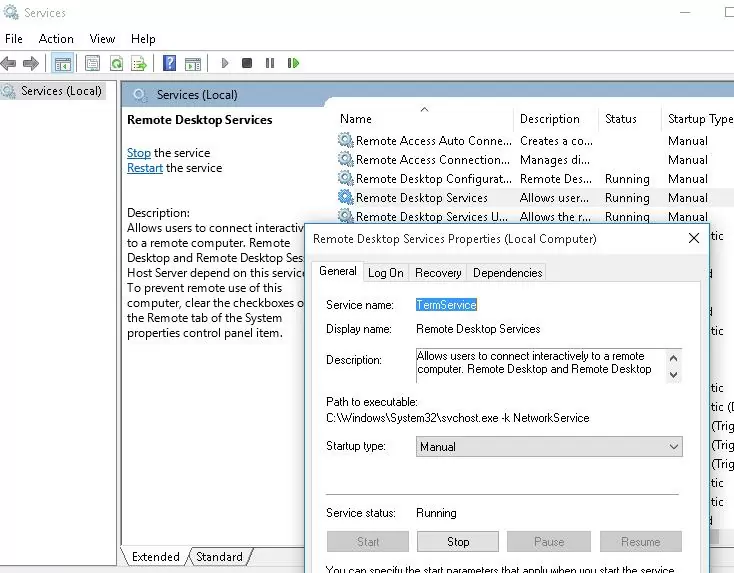
- Single session per user — allow several concurrent RDP sessions under the same user account. This option sets the fSingleSessionPerUser registry value to 0 (
HKLM\SYSTEM\ CurrentControlSet\Control\Terminal Server\fSingleSessionPerUser). This parameter is also configured through the GPO option Restrict Remote Desktop Services to a single Remote Desktop Services session under Computer Configuration > Administrative Templates > Windows Components > Remote Desktop Services > Remote Desktop Session Host > Connections; - The Session Shadowing Mode allows you to configure the remote control (shadow) connection mode to the RDP users’ desktops
RDP Wrapper Not Working on Windows
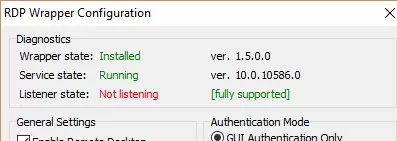
In some cases, the RDP Wrapper may not work as you expect it to and you may not be able to use more than one RDP connection on Windows.
The termsrv.dll file version can be updated during Windows Updates installation. If the description for your version of Windows is missing from the rdpwrap.ini file, then the RDP Wrapper will not be able to apply the necessary settings. In this case, the status [not supported]. will be displayed in the RDP Wrapper Configuration window.
✅ In this case, you must update the rdpwrap.ini file as described above.
If RDP Wrapper does not work after updating the rdpwrap.ini file, try to open the rdpwrap.ini file and look for the section for your version of Windows.
How to understand if your Windows version is supported in rdpwrapper config?
The screenshot below shows that for my version of Windows 11 (10.0.22621.317) there are two sections of settings:
[10.0.22621.317]
...
[10.0.22621.317-SLInit]
...
If there is no section in the rdpwrap configuration file for your version of Windows, try searching the web for the rdpwrap.ini file. Add the configuration settings you found to the end of the file.
If RDP Wrapper does not work after you install security updates or upgrade the Windows build, check that there is no Listener state: Not listening warning in the RDPWrap Diagnostics section.
Try updating the rdpwrap.ini file, and then reinstalling the rdpwrapper service:
rdpwinst.exe -u
 rdpwinst.exe -i
It can happen that when you try to make a second RDP connection as a different user, you will get an error message:
The number of connections to this computer is limited and all connections are in use right now. Try connecting later or contact your system administrator.

In this case, you can use the local Group Policy Editor (gpedit.msc) to enable the “Limit number of connections” option under Computer Configuration -> Administrative Templates -> Windows Components -> Remote Desktop Services -> Remote Desktop Session Host -> Connections section. Increase the ‘RD maximum connection allowed’ value to 999999.
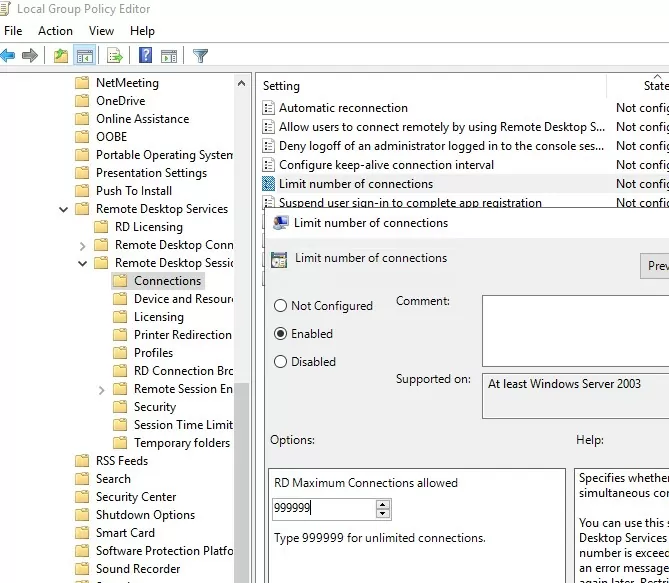
Restart your computer to update the local Group Policy and apply the settings.
Patch the Termsrv.dll to Enable Multiple Remote Desktop Sessions
To remove the limit on the number of concurrent RDP user connections in Windows without using rdpwrapper, you can replace the original termsrv.dll file. This is the main library file used by the Remote Desktop Service. The file is located in the C:\Windows\System32 directory.
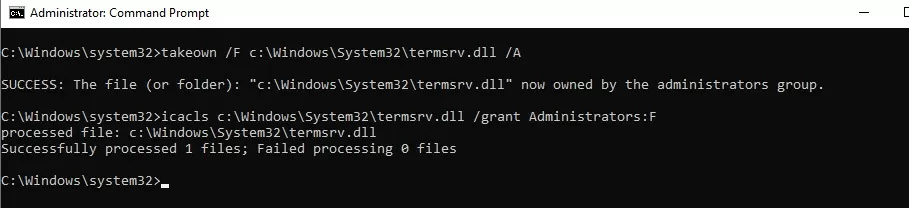
It is advisable to make a backup copy of the termsrv.dll file before editing or replacing it. This will help you to revert to the original version of the file if necessary. Open an elevated command prompt and run the command:
copy c:\Windows\System32\termsrv.dll termsrv.dll_backup
Then you need to take ownership of the termsrv.dll file. To change a file’s owner from TrustedInstaller to the local Administrators group, use the command:
takeown /F c:\Windows\System32\termsrv.dll /A
SUCCESS: The file (or folder): c:\Windows\System32\termsrv.dll now owned by the administrators group
Now use the icacls.exe tool to grant Full Control permissions to the termsrv.dll file for the local Administrators group:
icacls c:\Windows\System32\termsrv.dll /grant Administrators:F
processed file: c:\Windows\System32\termsrv.dll Successfully processed 1 files; Failed processing 0 files.
Now you need to stop the Remote Desktop service (TermService) using the services.msc console or with the command:
net stop TermService
It also stops the Remote Desktop Services UserMode Port Redirector service.
Run the winver command or the following PowerShell command to find your Windows build number:
Get-ComputerInfo | select WindowsProductName, WindowsVersion
In my case, Windows 10 build 22H2 is installed.
Then open the termsrv.dll file using any HEX editor (for example, Tiny Hexer). Depending on the build of Windows you are using, you will need to find and replace the string according to the table below:
| Windows build | Find the string | Replace with |
| Windows 11 22H2 | 39 81 3C 06 00 00 0F 84 75 7A 01 00 |
B8 00 01 00 00 89 81 38 06 00 00 90 |
| Windows 10 22H2 | 39 81 3C 06 00 00 0F 84 85 45 01 00 | |
| Windows 11 21H2 (RTM) | 39 81 3C 06 00 00 0F 84 4F 68 01 00 | |
| Windows 10 x64 21H2 | 39 81 3C 06 00 00 0F 84 DB 61 01 00 | |
| Windows 10 x64 21H1 | 39 81 3C 06 00 00 0F 84 2B 5F 01 00 | |
| Windows 10 x64 20H2 | 39 81 3C 06 00 00 0F 84 21 68 01 00 | |
| Windows 10 x64 2004 | 39 81 3C 06 00 00 0F 84 D9 51 01 00 | |
| Windows 10 x64 1909 | 39 81 3C 06 00 00 0F 84 5D 61 01 00 | |
| Windows 10 x64 1903 | 39 81 3C 06 00 00 0F 84 5D 61 01 00 | |
| Windows 10 x64 1809 | 39 81 3C 06 00 00 0F 84 3B 2B 01 00 | |
| Windows 10 x64 1803 | 8B 99 3C 06 00 00 8B B9 38 06 00 00 | |
| Windows 10 x64 1709 | 39 81 3C 06 00 00 0F 84 B1 7D 02 00 |
Tiny Hexer cannot edit termsvr.dll file directly from the system32 folder. Copy it to your desktop and replace the original file after modifying it.
For example, my build of Windows 10 x64 is 22H2 19045.2006 (termsrv.dll file version is 10.0.19041.1949). Open the termsrv.dll file in Tiny Hexer, then find the text:
39 81 3C 06 00 00 0F 84 75 7A 01 00
and replace it with:
B8 00 01 00 00 89 81 38 06 00 00 90

Save the file and start the TermService.
If something goes wrong and you experience some problems with the Remote Desktop service, stop the service and replace the modified termsrv.dll file with the original version:
copy termsrv.dll_backup c:\Windows\System32\termsrv.dll
👍 The advantage of the method of enabling multiple RDP sessions in Windows 10 or 11 by replacing the termsrv.dll file is that antivirus software will not react to it (unlike RDPWrap, which is detected by many antivirus products as a malware/hack tool/trojan).
👎The disadvantage of this is that you will have to manually edit the file each time you update the Windows build (or if the monthly cumulative patches update the version of termsrv.dll).
Multiple Concurrent RDP Connections in Windows 10 Enterprise Multi-session
Microsoft has recently released a special edition of the operating system called Windows Enterprise Multi-Session (Previously known as Windows 10 Enterprise for Remote Sessions and Windows 10 Enterprise for Virtual Desktops)
The key feature of this edition is that it supports multiple concurrent RDP user sessions out of the box. Although the Windows multi-session edition is only allowed to be run in Azure VMs, you can install this edition on an on-premises network and use that computer as a terminal server (even though this would be against Microsoft’s licensing policies).
The Enterprise Multi-Session edition is available for both Windows 10 and Windows 11.
Next up, we’re going to show you how to upgrade a Windows 10 Pro edition to Windows 10 Enterprise for Virtual Desktop and use it for multiple RDP users simultaneously.
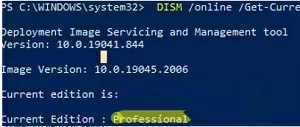
Open a command prompt and check your current edition of Windows (Professional in this example):
DISM /online /Get-CurrentEdition
Upgrade your edition of Windows 10 from Pro to Enterprise with the command:
changepk.exe /ProductKey NPPR9-FWDCX-D2C8J-H872K-2YT43
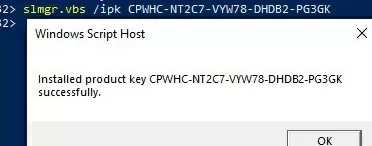
Now install the GVLK key for Windows 10 Enterprise for Remote Sessions:
slmgr.vbs /ipk CPWHC-NT2C7-VYW78-DHDB2-PG3GK
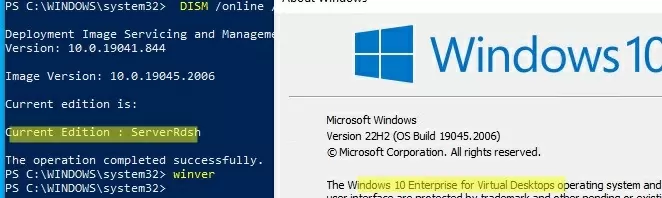
Check that your edition of Windows 10 has now changed to ServerRdsh (Windows 10 Enterprise for Virtual Desktops).
Activate your copy of Windows 10 Enterprise Multi-Session edition on your KMS server:
slmgr /skms kms-srv.woshub.local:1688
 slmgr /ato

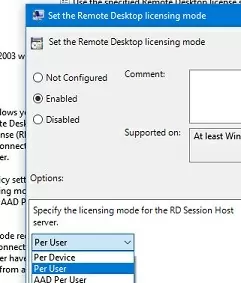
Open the Local GPO Editor (gpedit.msc) and enable Per-User licensing mode in the Set the Remote Desktop licensing mode (Computer Configuration -> Policies -> Administrative Templates -> Windows Components -> Remote Desktop Services -> Remote Desktop Session Host -> Licensing).
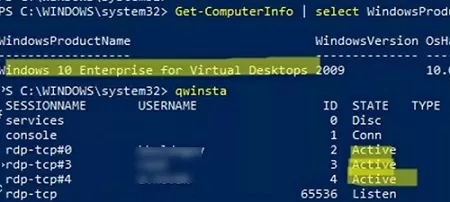
You must restart Windows after activation. Now try connecting to the computer using RDP with different user accounts. As you can see, Windows 10 Enterprise multi-session supports simultaneous RDP connections right out of the box.
Get-ComputerInfo | select WindowsProductName, WindowsVersion, OsHardwareAbstractionLayer
Windows 10 Enterprise for Virtual Desktops 2009 10.0.19041.2728
qwinsta
In this article, we have looked at a number of ways to get rid of the limit on the number of concurrent RDP user connections and run a free terminal server on desktop versions of Windows 10/11. Each method has its own advantages and disadvantages. Which one you choose is up to you.
by Madalina Dinita
Madalina has been a Windows fan ever since she got her hands on her first Windows XP computer. She is interested in all things technology, especially emerging technologies… read more
Updated on
- If the Windows 10 rdp client is not working, you won’t be able to access your remote resources.
- Apparently, this problem occurs when you are trying to update your system to a new build.
- You can fix the RemoteApp display issues Windows 10 by changing the policy using the editor.
- Using a third-party remote desktop app from Anydesk Software can help you avoid this problem.

There are always new bug reports concerning Windows 10 and the Remote Desktop issues are some of them, but we always try to provide you with solutions.
Apparently, one of the bugs is that Remote Desktop applications often fail to work on the latest Windows 10 OS version, as this user reports:
Just upgraded our Win 10 clients to Feature Update 1803 and am having issues with Remote Desktop Applications not rendering some/most drop down menus.
Pre-1803 updated Windows 10 (and all other flavors of Windows) display these menus just fine. For Example: Adobe DC Pro via RDS: Click on File… Drop down does not render BUT you CAN click the menu items as if they are being displayed.
The good news is that the OP managed to find a quick workaround to fix these Remote Desktop issues.
How can I fix the Remote Desktop app issues in Windows 10?
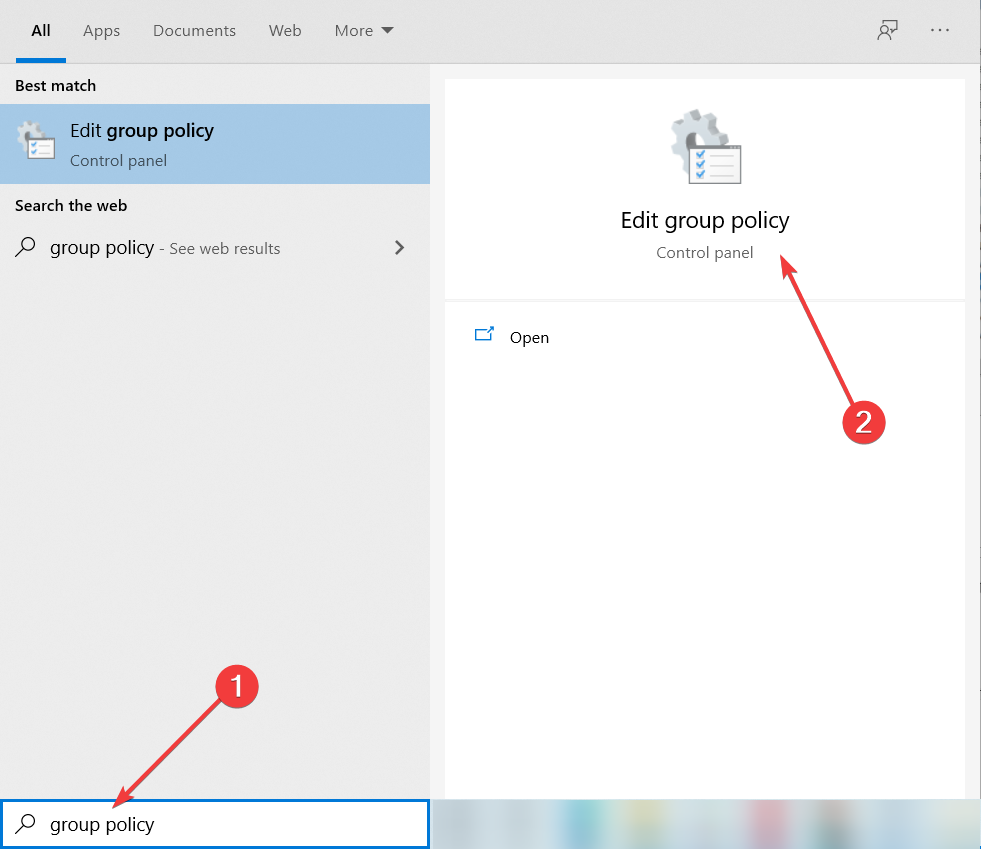
1. Change the Remote Desktop policy
- Press the Windows key + S and type group policy.
- Click on Edit Group Policy from the results.

- Navigate to the following policy key:
Computer Configuration/Policies/Admin Templates/Windows Components/Remote Desktop Services/Remote Desktop Session Host/Remote Session Environment - Set the Use advanced RemoteFX graphics for RemoteApp to Disabled.
Changing the Remote Desktop group policy either locally or via GPO in an AD environment on all Terminal Servers and Remote Session Hosts should fix the problem.
More specifically, you need to disable the Use advanced RemoteFX graphics for RemoteApp key as specified in the steps above.
This quick-fix worked on many environments but keep in mind that it may break other apps.
Just a heads up, the fix for this may break other apps. I have BlueBeam Revu as a Remote app and this fix completely breaks it. Entire window disappears when run in full screen. Restoring it down allows it to be displayed, but as soon as you do anything in the program it goes invisible again.
We hope that you managed to fix the Remote Desktop app problem by using our solutions. If the Remote Desktop stopped, we have another great guide to help you fix that in no time.
The Remote Desktop app is embedded in Windows 10 so you can use it right away but if it starts to develop problems or you need other features, you need to consider other solutions.
If you still haven’t resolved the remote desktop issue, try out the Mikogo third-party tool for remote desktop support and troubleshooting. Therefore, you might also be interested in our list of the best screen-sharing software for Windows 10 that you can use in your collaboration efforts.
Have you encountered any similar Remote Desktop issues after upgrading to Windows 10? Did you fix them in a different manner? Let us know in the comments below.
![]()
Achieving native experience through RDP. Can it reach 60FPS?
🧾 Problem
Your RDP environment has poor performance. Poor performance can include the following, but not limited to:
- Frame drops
- Poor image quality or compression
- High latency
- Disabled GPU (e.g. WebGL unavailable)
💡 Solution
🛠 Materials needed
- A host PC (Remote Desktop Session Host)
- A client device (Remote Desktop Connection Client)
⚠ Disclaimers
This tutorial is written for Remote Desktop Connection Client in mobile devices such as Android or iOS devices. It might have less performance improvements for clients on PC.
📚 Prerequisites
You need a working Remote Desktop setup to configure further. WOL (Wake-on-LAN) configuration for the host PC is recommended since the process requires restarting the host PC.
You would also need administrative rights on your local account in order to change group policy options.
You might need a stable and fast internet connection to see the full performance improvement. Internet connection with speed exceeding 5Mbps is recommended.
🖥 Remote Desktop setup
You need Windows 10 Pro or higher in order to connect with Remote Desktop Protocol.
⚙ GPU Specifications
You need a GPU or its driver supporting DirectX 11 or higher. And to use enhanced graphics on your Remote Desktop session, your system needs to support RemoteFX.
Note: Most of modern GPUs and Windows 10 system supports both.
📱 Client application
You need a client to establish a connection to the host PC. You can get clients for your platform here.
📑 Problem details
😕 Lack of configuration options on mobile clients

Compared to performance options in PC client, mobile clients only have the option to change the resolution. We can maximize the performance by modifying settings from the host PC.
💔 Lack of hardware acceleration using GPU

By default, the display adapter driver for Remote Desktop connection is WDDM. Therefore, you won’t see the GPU installed on your host PC in Device Manager or utilitize its performance. We can disable WDDM graphics on Remote Desktop connection by modifying group policy on the host PC.
📇 Step-By-Step Guide
Step 1. Open Local Group Policy Editor

Press Win + R to open Run. Type gpedit.msc and press OK.
Note: You can also search for Group Policy or gpedit on the start menu.
Step 2. Configure Remote Session Environment settings
In order to achieve smooth experience, we can compress the image from the host PC to reduce the bandwith, which will result in more frames per second.
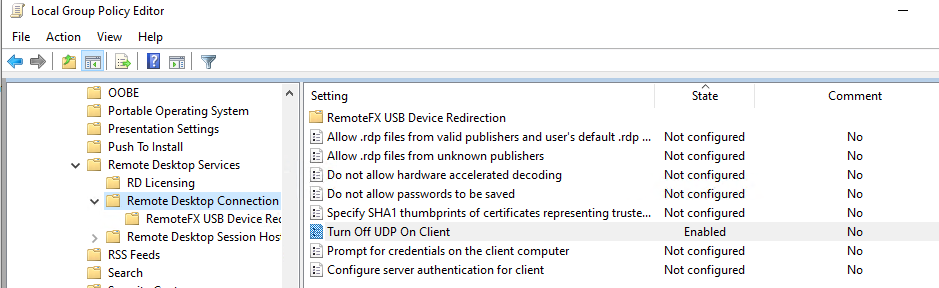
Note: I recommend to set all the settings as I did for maximum framerate, but you can fine tune for your use case.
Step 2.1. Locate Remote Session Environment folder

Navigate to Computer Configuration – Administrative Templates – Control Panel – Remote Desktop Services – Remote Desktop Session Host – Remote Session Environment.
In this folder, you will find all the options you can modify to fine tune your Remote Desktop experience.
Note: The settings in the screenshot above is frame rate optimized settings. You can follow these settings if you are looking for smoothest experience over better image quality.
Disable Use WDDM graphics display driver for Remote Desktop Connections

By disabling this policy setting, Remote Desktop Connections will not use WDDM graphics display driver. In this case, the Remote Desktop Connections will use XDDM graphics display driver.
⚠ Warning: This policy setting change requires restarting the host PC.
Enable Use hardware graphics adapters for all Remote Desktop Services sessions

By enabling this policy setting, all Remote Desktop Services sessions use the hardware graphics renderer instead of the Microsoft Basic Render Driver as the default adapter. This means you will be able to recognize the GPU installed in the host PC from the Remote Desktop session.
Enable Use advanced RemoteFX graphics for RemoteApp

By enabling this policy setting, RemoteApp programs will use advanced graphics, including support for transparency, live thumbnails, and seamless application moves.
Note: This policy setting applies only to RemoteApp programs and does not apply to remote desktop sessions.
Enable Prioritize H.264/AVC 444 graphics mode for Remote Desktop Connections

By enabling this policy setting, the server (host PC) will use H.264/AVC 444 as the codec in an RDP 10 connection where both the client and server can use H.264/AVC 444. This will improve the performance in watching videos encoded in H.264 codec.
Enable Configure H.264/AVC hardware encoding for Remote Desktop Connections

By enabling this policy setting, Remote Desktop Conection will try to use H.264/AVC hardware encoding support for applicable clients. This will improve the performance in watching videos encoded in H.264 codec if the client supports hardware encoding.
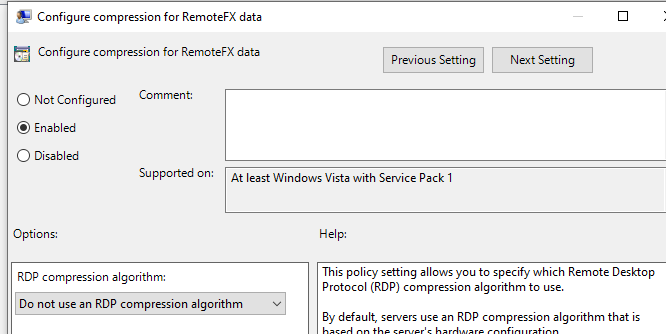
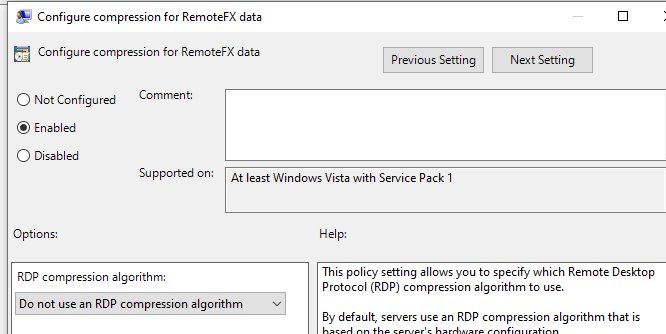
Enable and configure Configure compression for RemoteFX data

By enabling this policy setting, you can specify which RDP compression algorithm to use.
I prioritized frame rates over image quality, so I selected Optimized to use less network bandwidth. This will decrease the network bandwith usage with compressing the image a bit more. From my experience, the image compression wasn’t noticeable but it gave me higher frame rates. I recommend using this option.
If you need better image quality even with lags, you can select Optimized to use less memory or Do not use an RDP compression algorithm option.
Enable and configure Configure image quality for RemoteFX Adaptive Graphics

By enabling this policy setting and set quality to Low, RemoteFX Adaptive Graphics uses an encoding mechanism that results in low quality images. This mode consumes the lowest amount of network bandwidth of the quality modes. This will increase the maximum refresh rate of the Remote Desktop session.
If you need better image quality even with lags, you can select Medium or High option. The performance will depend on your internet connection.
Enable Enable RemoteFX encoding for RemoteFX clients designed for Windows Server 2008 R2 SP1

By enabling this policy setting, you can configure graphics encoding to use the RemoteFX Codec on the Remote Desktop Session Host server. This policy setting applies only to clients that are using Remote Desktop Protocol (RDP) 7.1, and does not affect clients that are using other RDP versions. This will enhance the Remote Desktop experience in certain client version.
Enable and configure Configure RemoteFX Adaptive Graphics

By enabling this policy setting, you can configure the default RemoteFX experience settings.
As mentioned above, I prioritized frame rates over image quality, so I selected Optimize for minimum bandwidth usage. This will decrease the network bandwith usage with compressing the image. From my experience, the image compression wasn’t noticeable for most of the time but it gave me higher frame rates. I recommend using this option.
Disable Use WDDM graphics display driver for Remote Desktop Connections

By disabling this policy setting, Remote Desktop Connections will not use WDDM graphics display driver. In this case, the Remote Desktop Connections will use XDDM graphics display driver. This will enable you to utilitize the performance of your GPU installed on the host PC.
⚠ Warning: This policy setting change requires restarting the host PC.
Step 3. Configure RemoteFX settings
In order to utilitize the GPU installed on the host PC, we have to enable RemoteFX on the host PC first.
What is RemoteFX?
Microsoft RemoteFX is a set of technologies that enhance visual experiences in Remote Desktop Protocol (RDP). It utilitizes the GPU installed on the host PC to render the graphics and compress it over the network to optimize the bandwith usage. It means it uses more of your hardware to make your Remote Desktop environment smoother.
For example, if you are trying to send 1080p 60fps session over the internet without any compression, you would need almost 3 Gbit/s network connection. But with RemoteFX configured, the host PC uses an efficient compression algorithm to reduce the bandwith usage, and also processes it with the installed hardware. And also, since the graphics are rendered from the server, you can use graphic intense applications over Remote Desktop.
Read more: RemoteFX on Wikipedia
Step 3.1. Locate RemoteFX for Windows Server 2008 R2 folder

Navigate to Computer Configuration – Administrative Templates – Control Panel – Remote Desktop Services – Remote Desktop Session Host – Remote Session Environment — RemoteFX for Windows Server 2008 R2.
In this folder, you will find all the options you can modify to fine tune your RemoteFX configurations.
Enable Configure RemoteFX

By enabling this policy setting, RemoteFX will be enabled. RemoteFX will deliver a rich user experience over LAN connections and RDP 7.1.
Enable and configure Optimize visual experience when using RemoteFX

By enabling this policy setting, you can specify the visual experience in Remote Desktop Connection (RDC) connections that use RemoteFX.
For Screen capture rate (frames per second), I selected Highest (best quality) for maximum refresh rate, and for Screen Image Quality, I selected Medium (default) for decent image quality. In my case, selecting Lowest resulted in pixelated graphics in some occasions.
Enable and configure Optimize visual experience for Remote Desktop Service Sessions

By enabling this policy setting, you can specify the visual experience that remote users receive in Remote Desktop Services sessions.
In my case, I watched some videos and photos through the Remote Desktop, so I selected Rich multimedia. You can configure this option to your preferences.
Step 4. Apply changes
After making changes in Local Group Policy Editor, you can just close the window as the settings are automatically applied. If you changed any settings that require restart, restart your host PC once. After your host PC restarts, you can reconnect to the session and compare the differences in refresh rate or image quality.
Bonus: Testing your refresh rate
If you are not sure about whether you are getting 60fps on your Remote Desktop session, you can use testufo.com to test your refresh rate.
Troubleshooting: Still having performance issues?
The problems could be one or more of the following:
- Internet connection speed / latency between client and host
- Driver problems for GPU installed on host PC
- Didn’t restart the host PC after configuration
🚩 Disclaimer: This post was inspired from this post by ceol.