Содержание
- Способ 1: Проверка активности функции
- Способ 2: Предоставление разрешения в брандмауэре
- Способ 3: Изменение состояния связанной службы
- Способ 4: Включение сетевого обнаружения
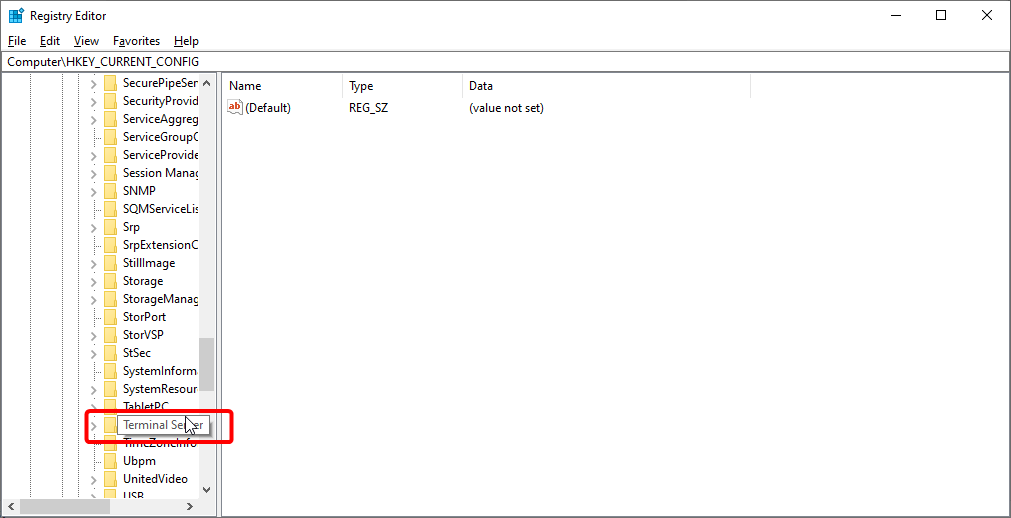
- Способ 5: Редактирование реестра
- Способ 6: Изменение локальной групповой политики
- Способ 7: Внесение изменений в файл «hosts»
- Способ 8: Использование сторонних программ
- Вопросы и ответы
Способ 1: Проверка активности функции
Одна из самых частых причин проблем с работой RDP, то есть удаленным рабочим столом, в Windows 11 связана с отключением самой функции через раздел с системными настройками. Удаленный рабочий стол обязательно должен быть активирован, чтобы иметь возможность не только подключаться, но и принимать входящие соединения.
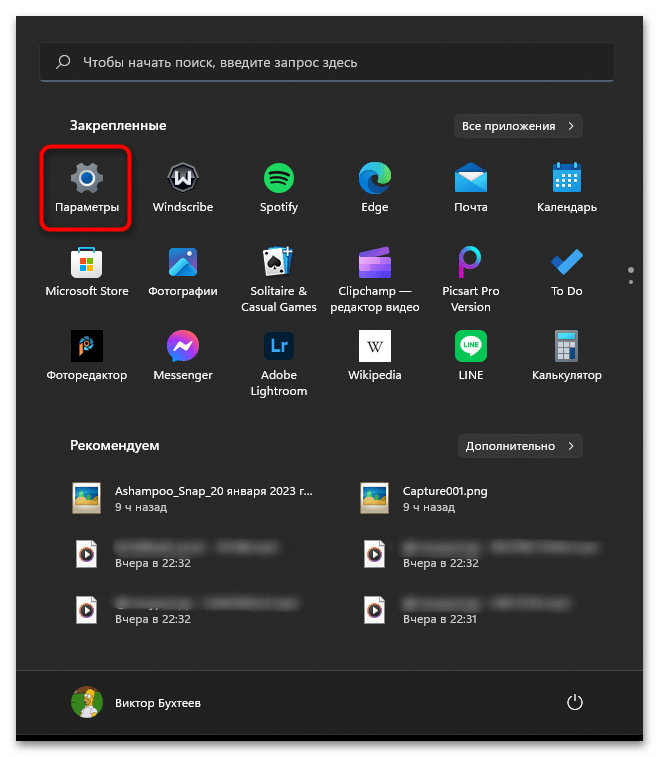
- Проверка активности займет не так много времени, а начать стоит с перехода в «Параметры», щелкнув по значку с шестеренкой в меню «Пуск».
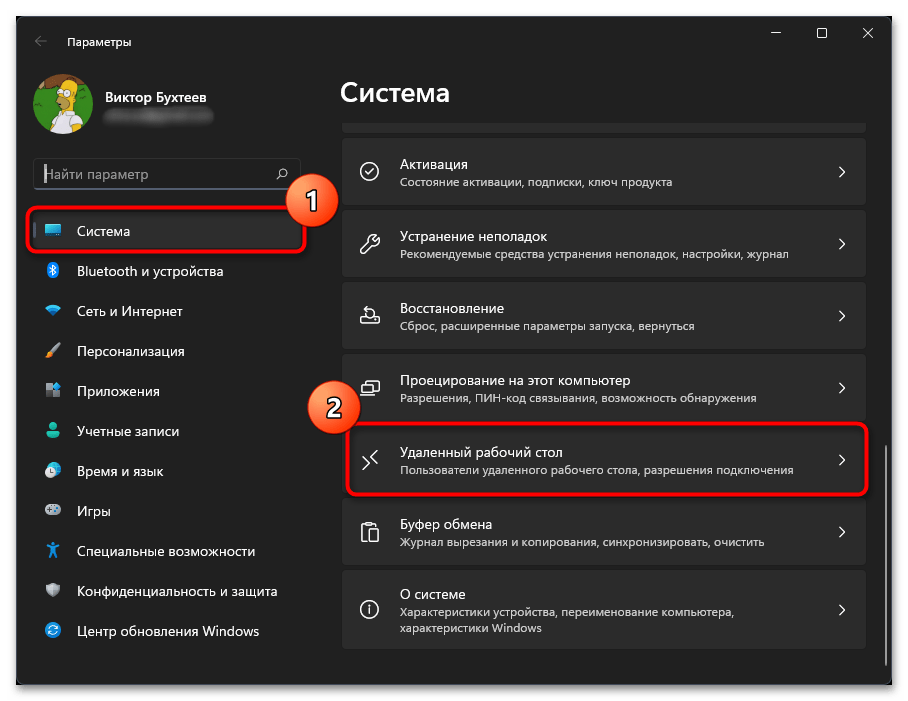
- Далее на панели слева выберите «Система» и в списке отыщите «Удаленный рабочий стол».
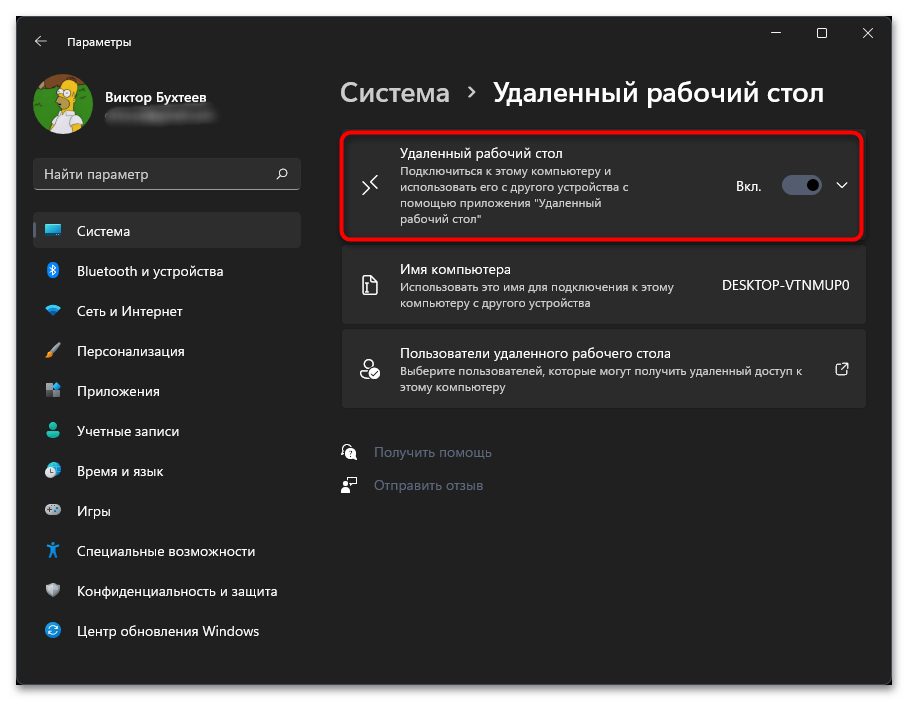
- Перетащите переключатель «Удаленный рабочий стол» в состояние «Вкл.», если сейчас он отключен. Не перезагружайте компьютер, а сразу переходите к проверке подключения, чтобы параметры не сбросились до исходных вместе с отключением нужной службы.
Способ 2: Предоставление разрешения в брандмауэре
Иногда рассматриваемая проблема с RDP в Windows 11 относится к неправильным настройкам брандмауэра, когда для удаленного рабочего стола установлены ограничения при подключении к частной сети. Вам понадобится вручную найти список разрешений, ознакомиться с текущими параметрами и поправить их для предоставления доступа.
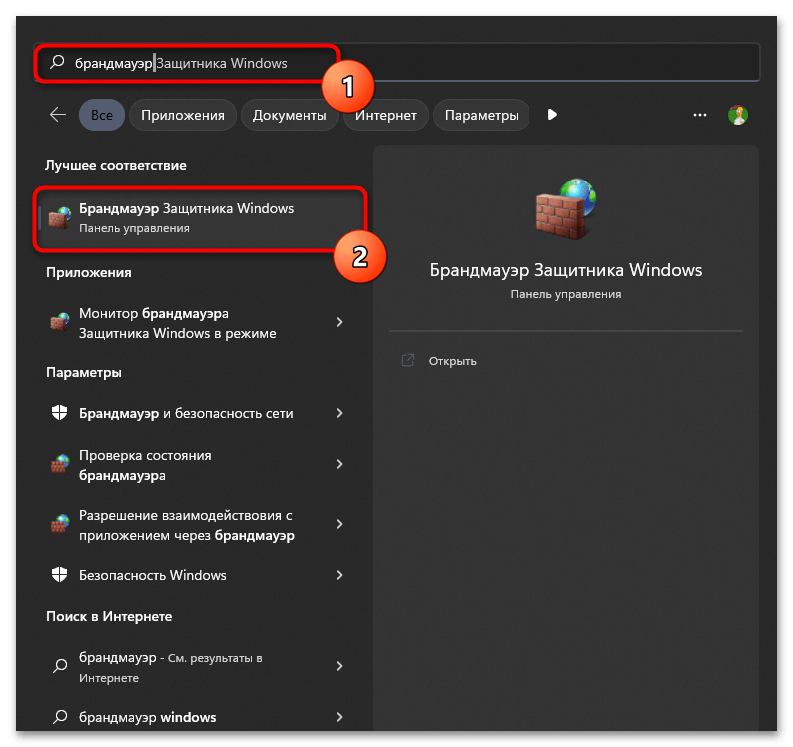
- Проще всего открыть «Брандмауэр Защитника Windows» через поиск в меню «Пуск». Среди результатов вас интересует элемент «Панели управления».
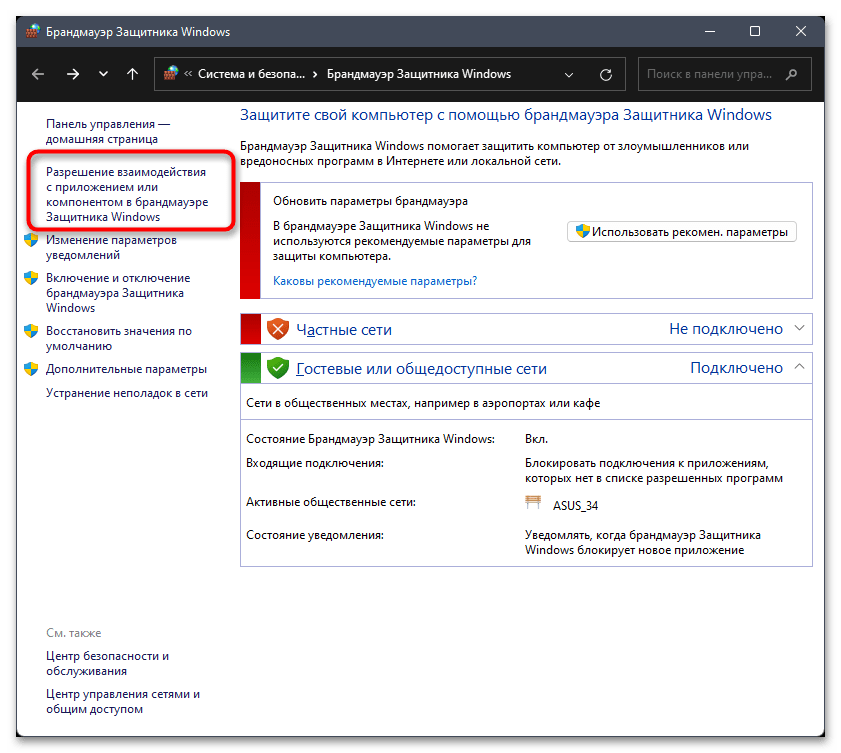
- В новом окне на панели слева нажмите по ссылке «Разрешение взаимодействия с приложением или компонентом в брандмауэре Защитника Windows».
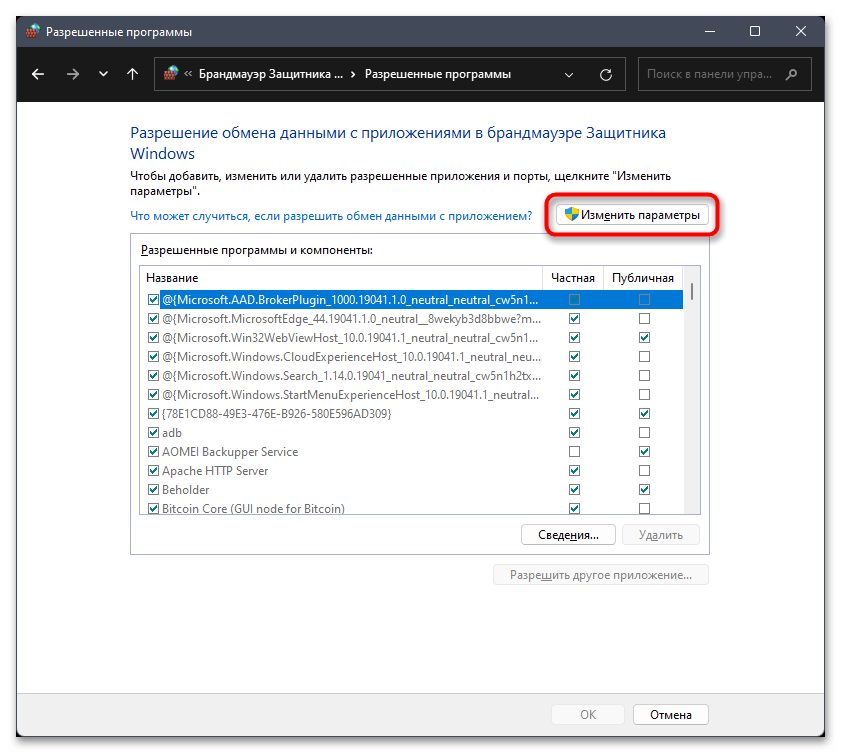
- Нажмите кнопку «Изменить параметры», чтобы включить настройку следующего списка.
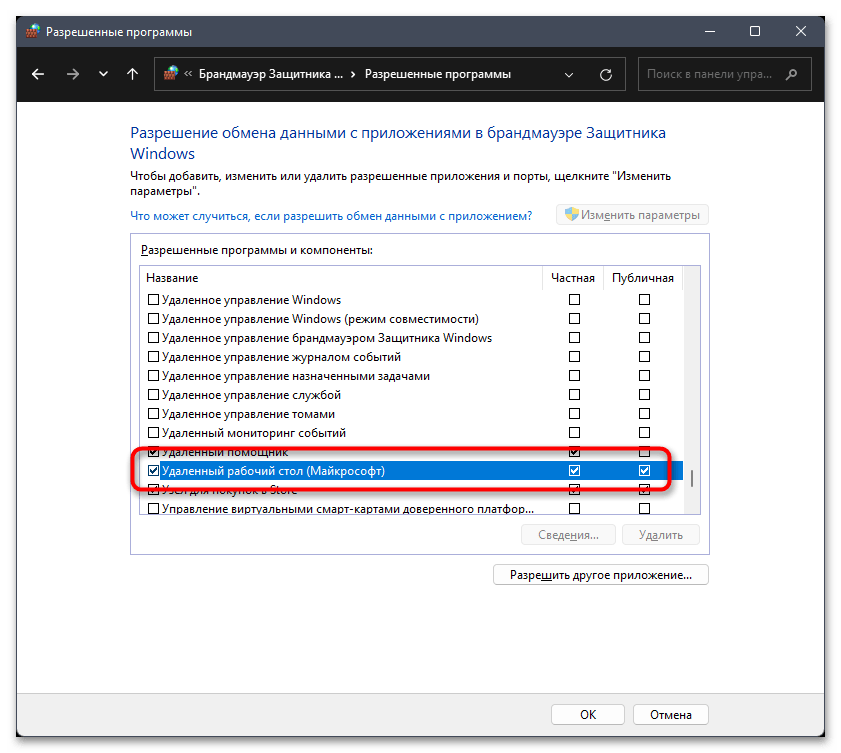
- В нем прокрутите окно вниз и для «Удаленный рабочий стол (Майкрософт)» обязательно поставьте галочки как возле «Частная», так и «Публичная». Перед выходом нажмите «ОК», чтобы настройки были сохранены.
Способ 3: Изменение состояния связанной службы
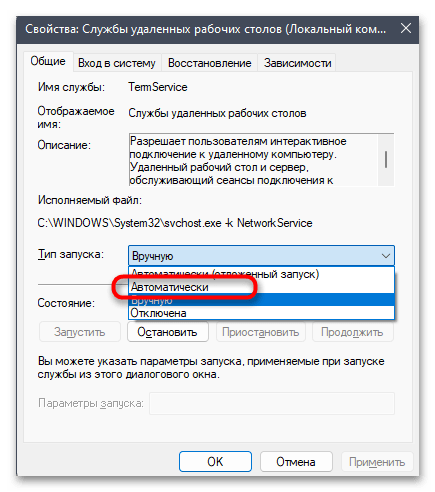
Для работы RDP в Виндовс 11 используется специальная связанная служба. Доступ к удаленному рабочему столу будет предоставлен только в том случае, если эта служба находится в активном состоянии. По умолчанию ее тип запуска установлен как «Вручную», но не всегда она запускается при попытке установить соединение, поэтому настройку нужно изменить на «Автоматически».
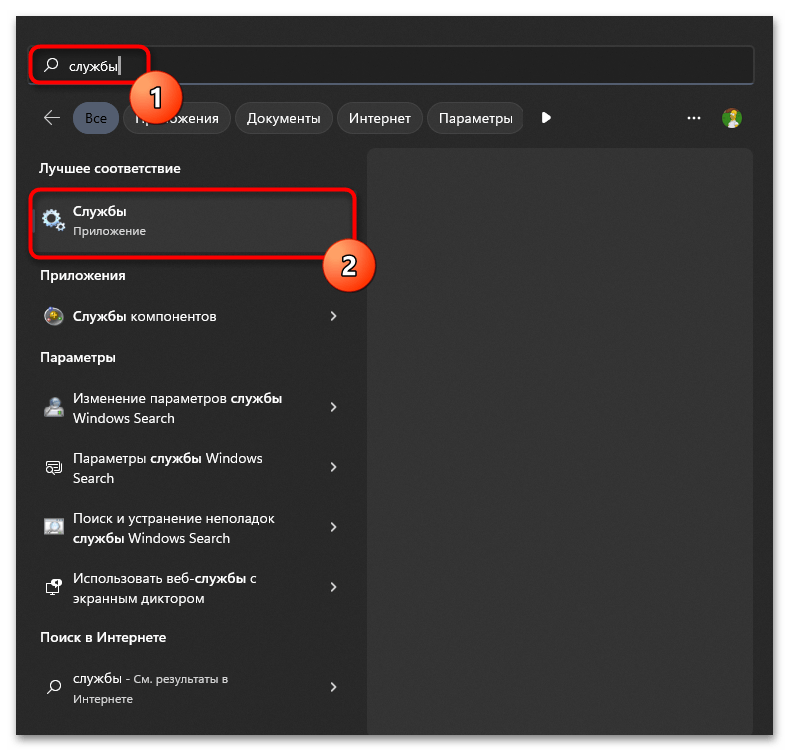
- Для этого в поиске «Пуска» введите «Службы» и запустите данное классическое приложение.
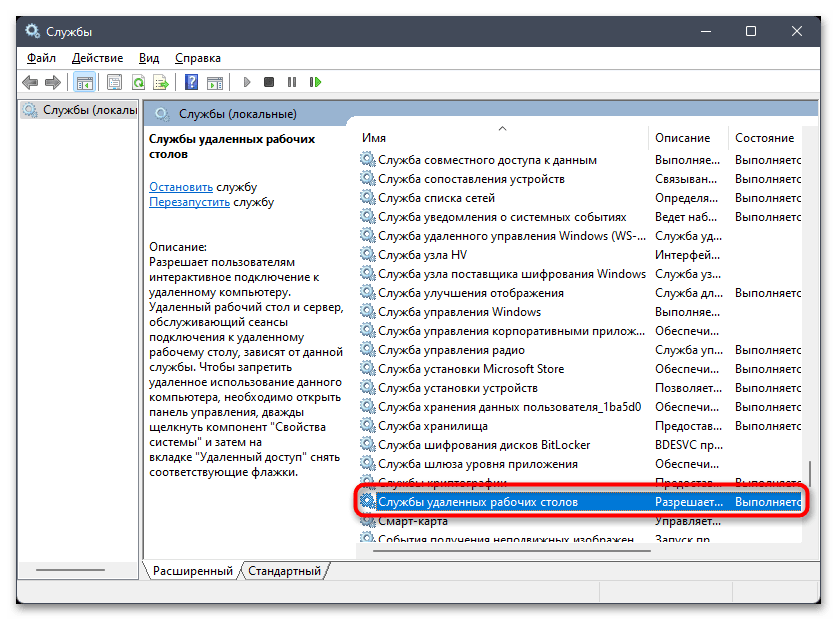
- В списке служб найдите «Службы удаленных рабочих столов» и дважды кликните по этой строке левой кнопкой мыши.
- Разверните список «Тип запуска» и установите значение «Автоматически».
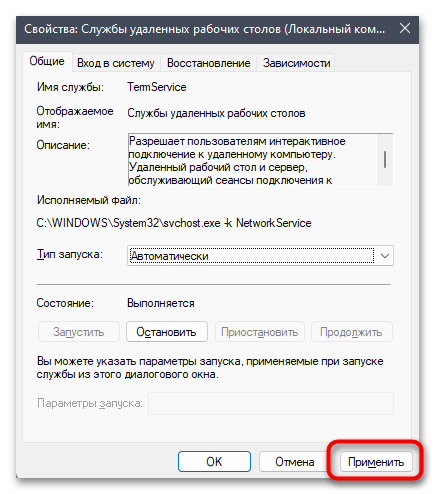
- Перед выходом обязательно щелкните по «Применить» для сохранения настройки. Перезагрузите компьютер и повторите попытку взаимодействия с удаленным рабочим столом.
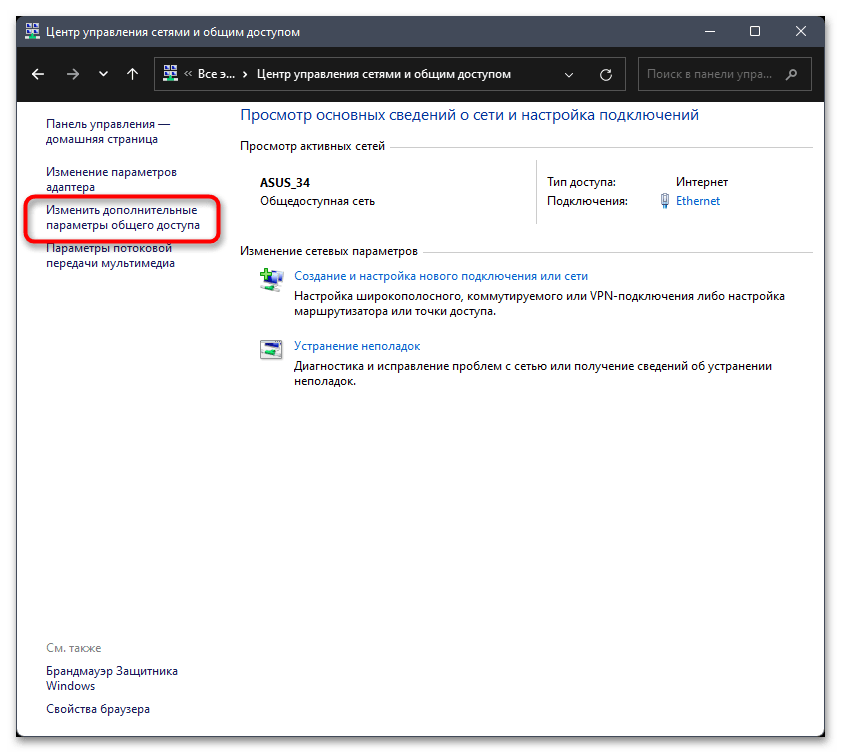
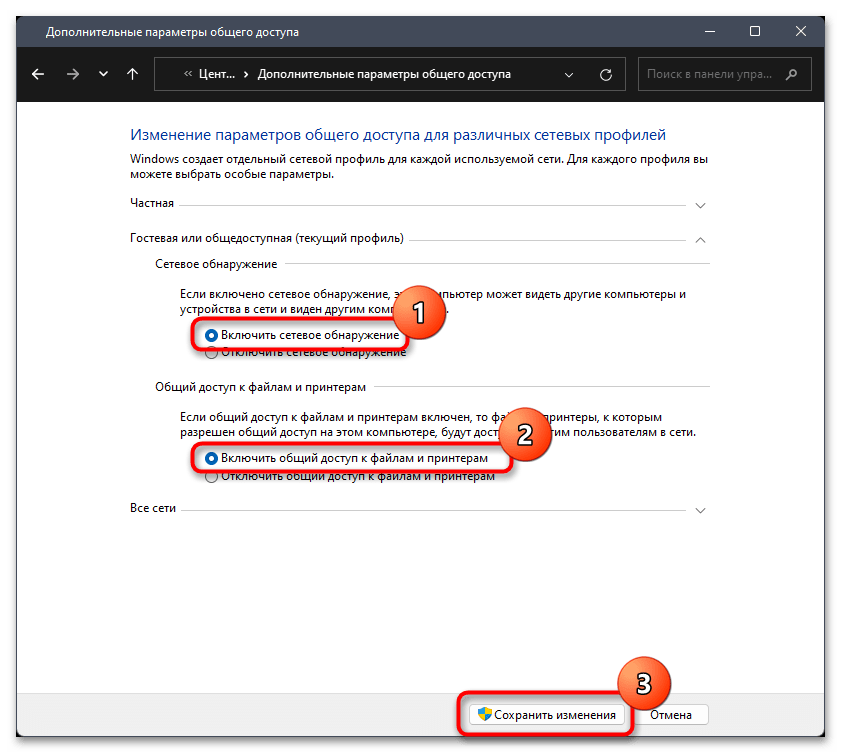
Способ 4: Включение сетевого обнаружения
Следующий метод подразумевает настройку общего доступа, а именно позволит включить сетевое обнаружение. Этот параметр обязательно нужен при использовании удаленного рабочего стола, поэтому его отключенное состояние и может вызывать различные ошибки, связанные с RDP. Выполните следующие действия, чтобы в пару кликов справиться с поставленной задачей.
- Откройте «Пуск» и запустите «Панель управления», отыскав ее через поиск.
- В списке значков найдите «Центр управления сетями и общим доступом», затем перейдите к данному элементу.
- На панели слева вас интересует ссылка «Изменить дополнительные параметры общего доступа».
- Установите маркер «Включить сетевое обнаружение», а также на всякий случай организуйте общий доступ к файлам и папкам. После этого кликните по кнопке «Сохранить изменения».


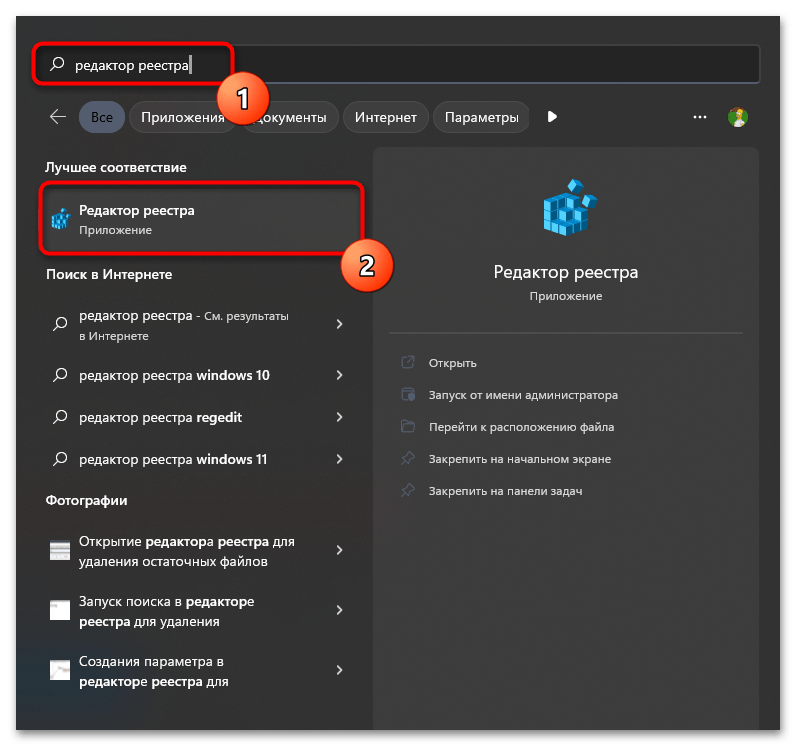
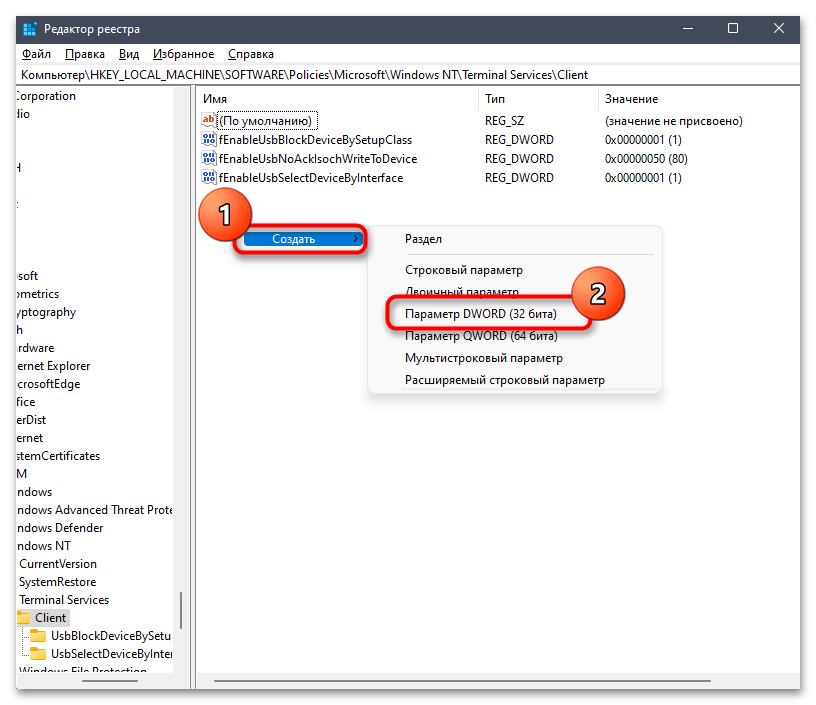
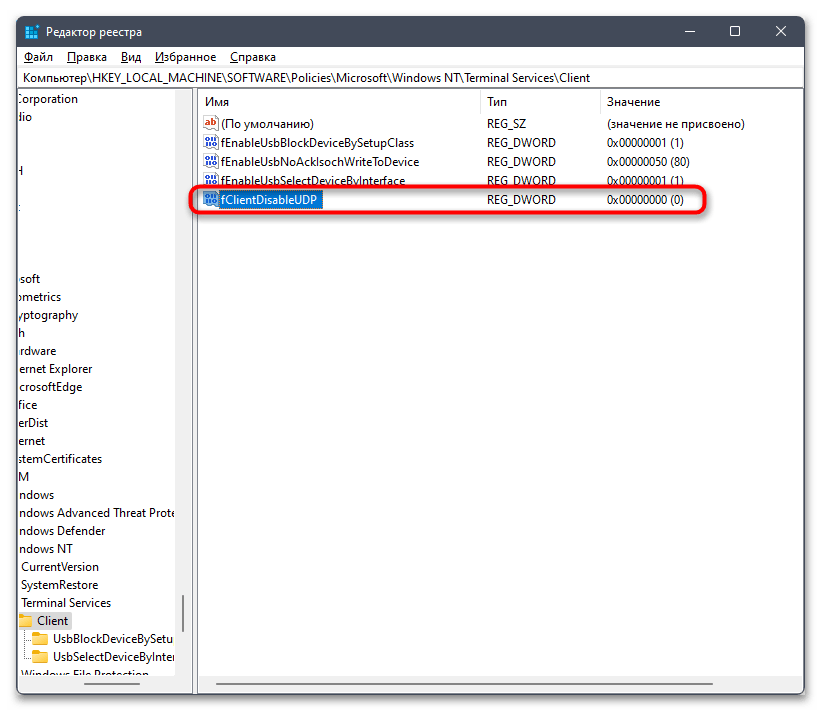
Способ 5: Редактирование реестра
При помощи редактирования реестра пользователь самостоятельно создает параметр, связанный с UDP. Этот протокол через данную настройку понадобится запретить, что позволит избежать большинства проблем, относящихся к RDP. Если изменение не принесет должного результата, параметр можно будет в любой момент удалить без последствий для работы ОС.
- Точно так же, как вы делали это раньше, через поиск в «Пуске» запустите «Редактор реестра».
- В адресную строку вставьте путь
Компьютер\HKEY_LOCAL_MACHINE\SOFTWARE\Policies\Microsoft\Windows NT\Terminal Services\Clientи перейдите по нему. - В корне каталога в правой области нажмите по любому свободному месту правой кнопкой мыши, наведите курсор на пункт «Создать» и выберите «Параметр DWORD (32 бита)».
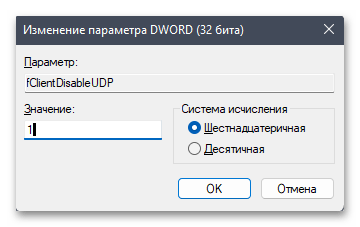
- Задайте для него название «fClientDisableUDP» и дважды кликните для открытия окна редактирования значения.
- Установите значение «1» и нажмите «ОК». Обязательно отправьте компьютер на перезагрузку, чтобы настройка вступила в силу.

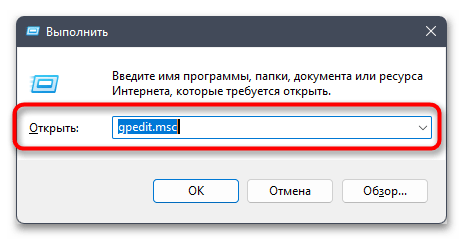
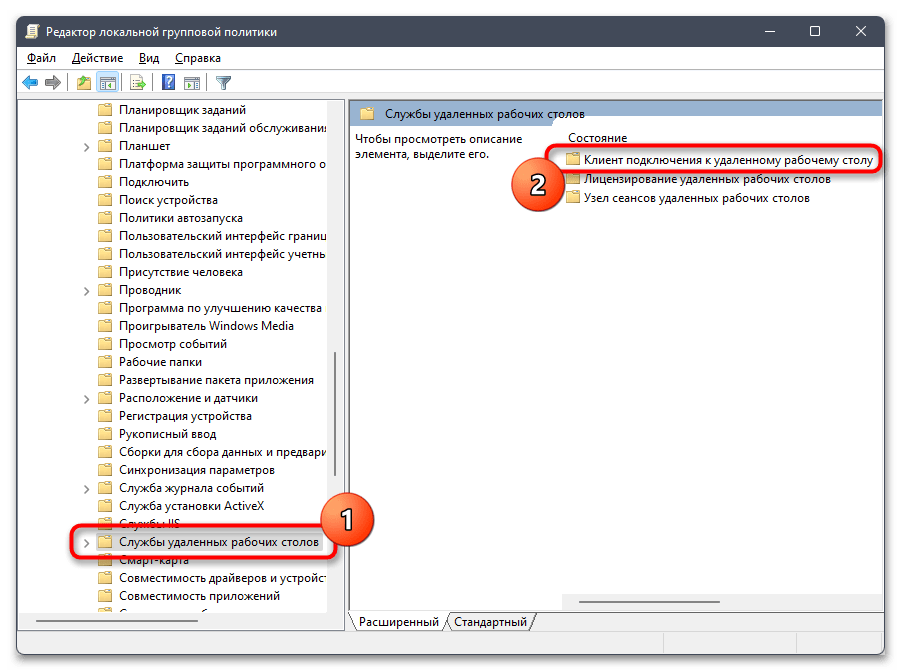
Способ 6: Изменение локальной групповой политики
Рассмотрим еще один метод, связанный с протоколом UDP и его отключением. Вы можете использовать его вместе с предыдущим или вместо, однако учитывайте, что для реализации понадобится доступ к «Редактору локальной групповой политики», а этот компонент активен исключительно в Windows 11 Pro и Enterprise.
- Запустите утилиту «Выполнить», используя для этого стандартное сочетание клавиш Win + R. В поле ввода укажите
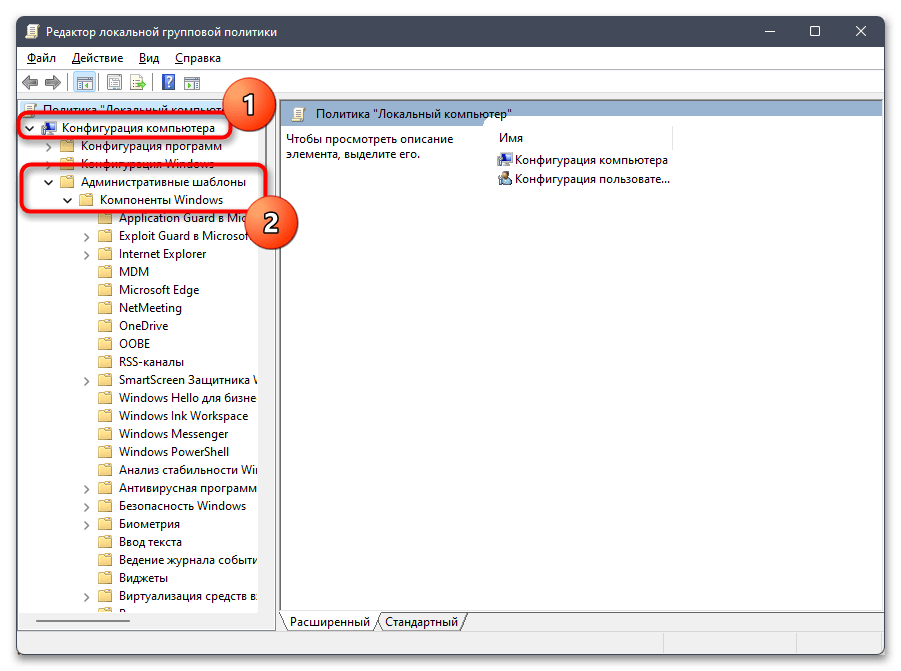
gpedit.mscи нажмите Enter для запуска оснастки. - Разверните раздел «Конфигурация компьютера», в нем выберите каталог «Административные шаблоны» и «Компоненты Windows».
- Далее выберите директорию «Службы удаленных рабочих столов» и перейдите в «Клиент подключения к удаленному рабочему столу».
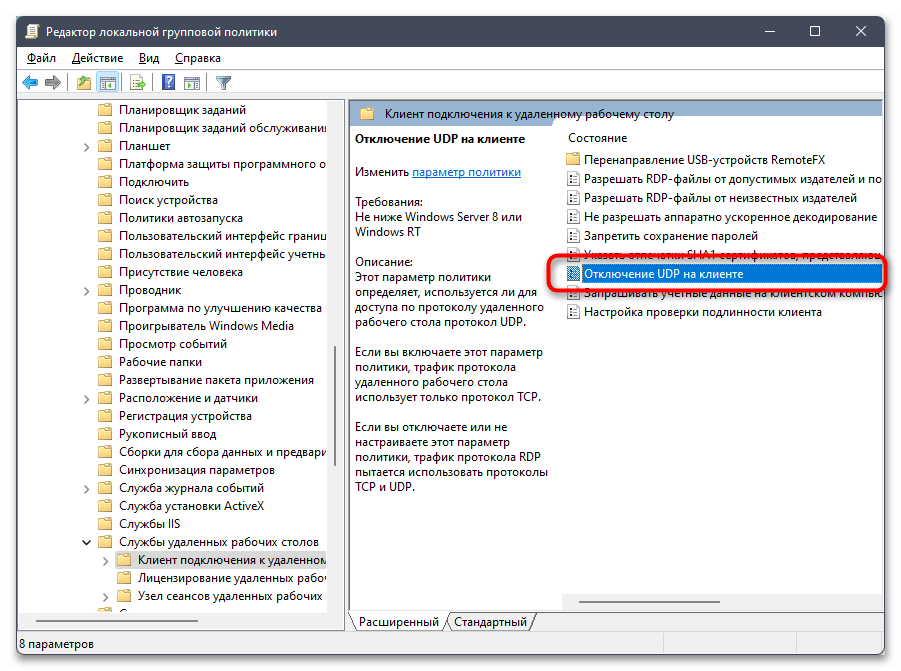
- В данной папке найдите параметр «Отключение UDP на клиенте» и дважды щелкните по нему левой кнопкой мыши, чтобы перейти к изменению значения.
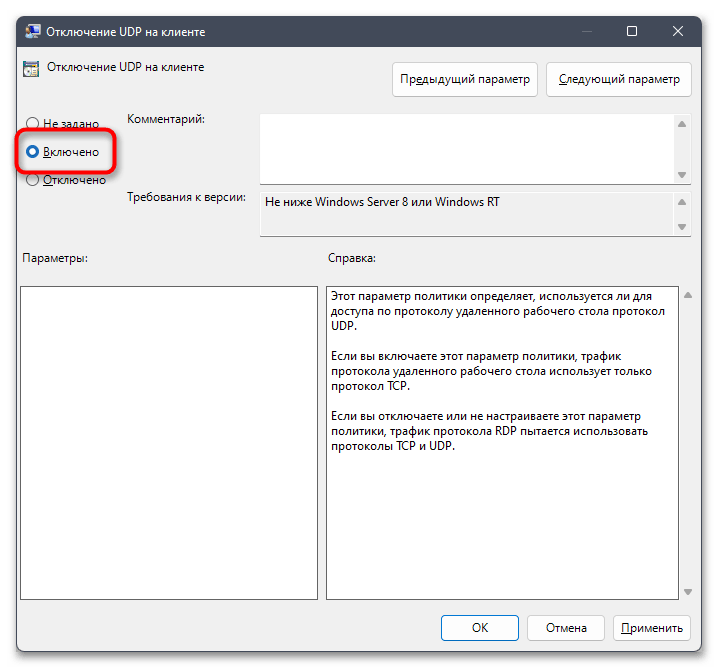
- Установите маркер возле пункта «Включено», примените изменения и перезагрузите компьютер.
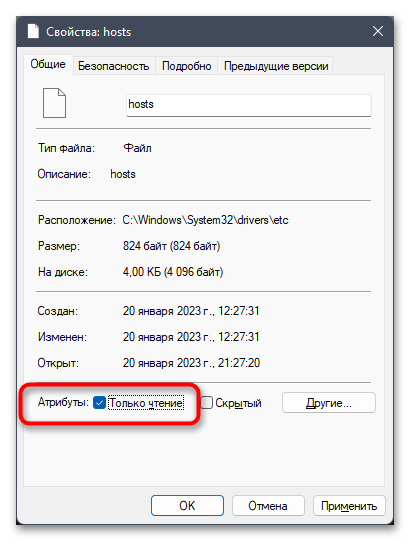
Способ 7: Внесение изменений в файл «hosts»
Эффективность данного метода спорная, однако вы можете проверить его, если ничего из перечисленного выше не помогло. Суть заключается в редактировании файла «hosts» с указанием IP-адреса хоста, к которому вы хотите подключиться. В качестве доменного имени указывается название компьютера или поле оставляется пустым (нужно изменять файл и проверять оба варианта).
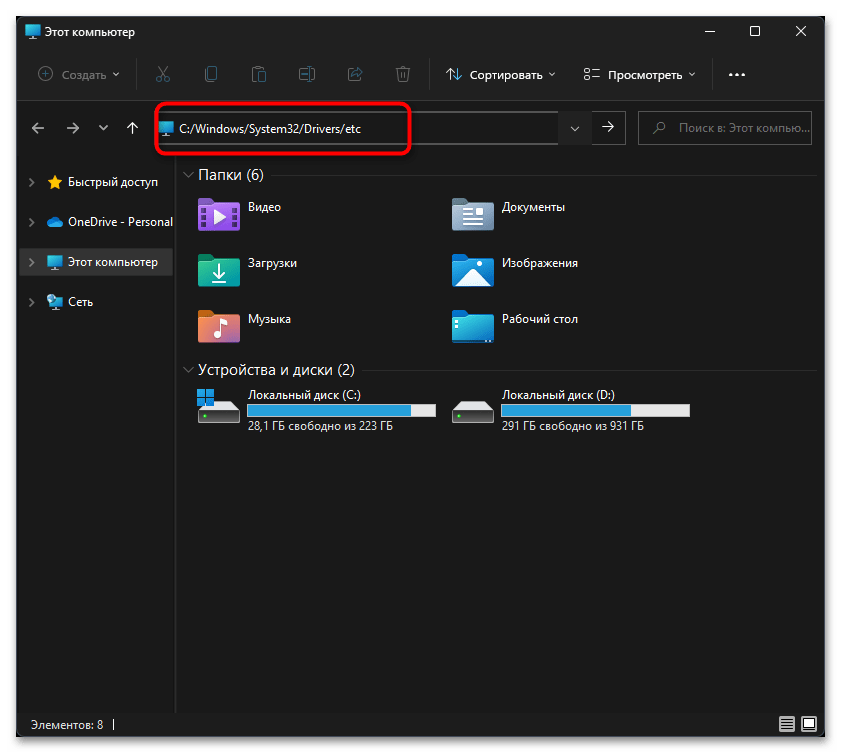
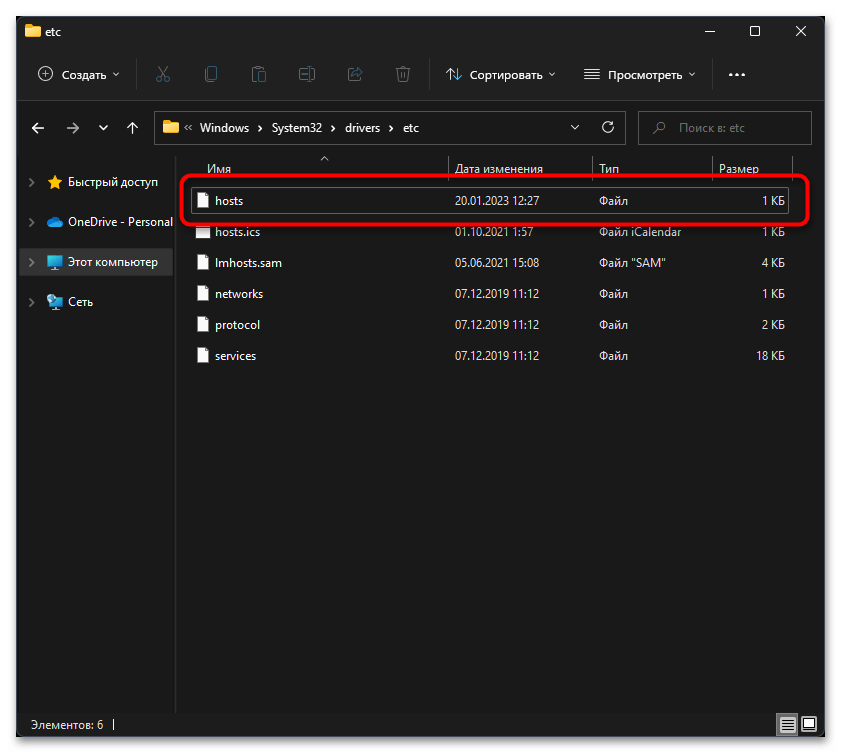
- Для начала откройте «Проводник» и перейдите по пути
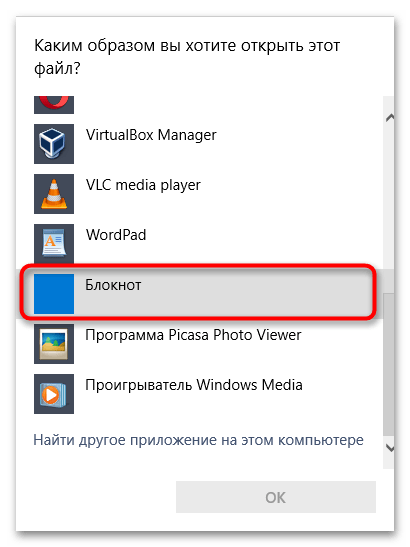
C:/Windows/System32/Drivers/etc. - Дважды щелкните по файлу «hosts», чтобы открыть список с выбором программ для запуска.
- Выберите «Блокнот» или любой удобный для себя текстовый редактор.
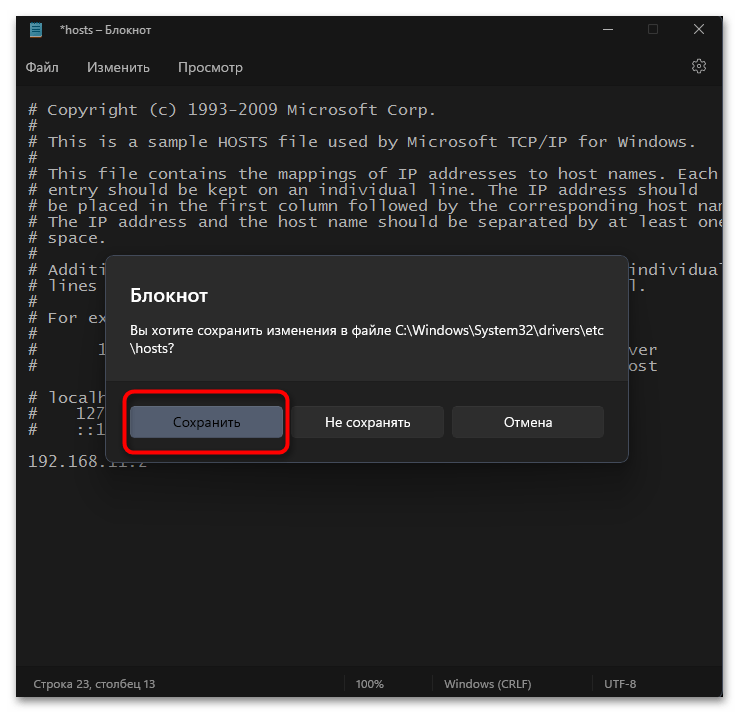
- В конце файла добавьте IP-адрес компьютера, а через пробел название компьютера для подключения (или сначала только адрес).
- Перед выходом обязательно сохраните изменения.
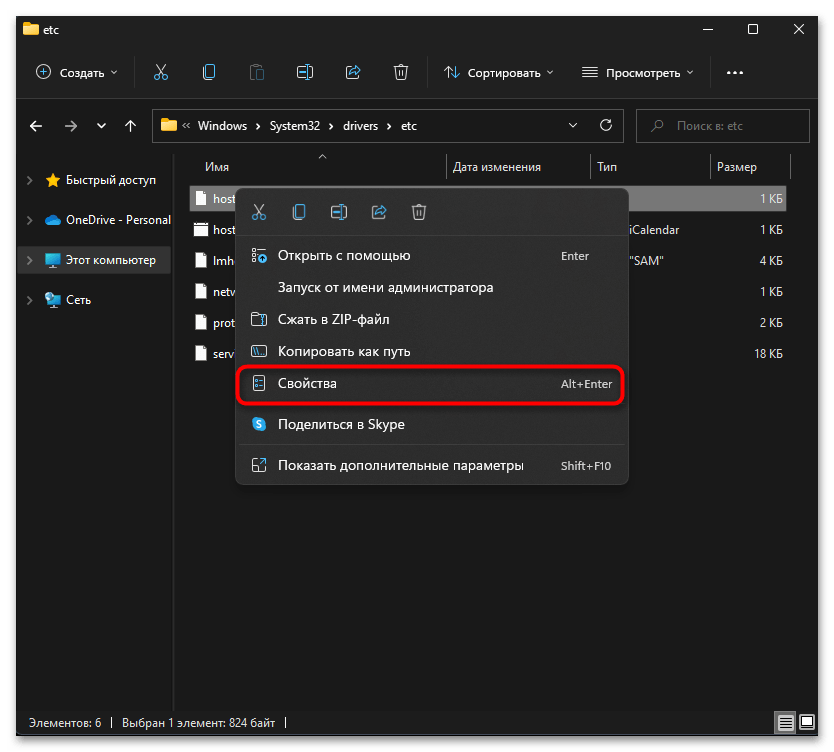
- Если вы получили уведомление о том, что редактирование файла недоступно, сначала понадобится щелкнуть по нему ПКМ и выбрать пункт «Свойства».
- Снимите галочку с пункта «Только чтение» среди атрибутов и сохраните изменения.

Способ 8: Использование сторонних программ
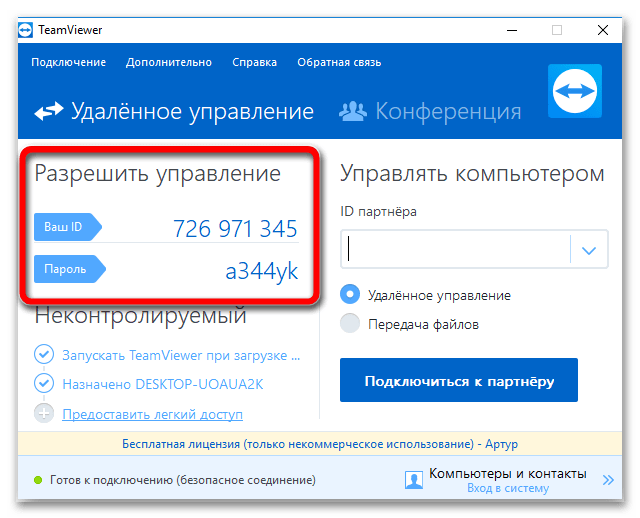
Если ни один из методов так и не позволил решить ситуацию с RDP и подключиться к удаленному рабочему столу так и не получается, рекомендуем заменить стандартное средство на любую стороннюю программу. Она должна быть установленной на двух компьютерах, а подключение осуществляется по идентификатору и установленному паролю. К тому же у такого софта функциональность обычно значительно шире, нежели у стандартного средства ОС. Детальную инструкцию по работе в самом популярном ПО вы найдете по ссылке ниже, а также сможете перейти к чтению материала, где представлены бесплатные его аналоги, ничем не уступающие по функциональности.
Подробнее:
Как пользоваться TeamViewer
Бесплатные аналоги TeamViewer
Еще статьи по данной теме:
Помогла ли Вам статья?
Windows 10 Remote Desktop not working? This post not only introduces the causes of the Windows 10 Remote Desktop not working error but also gives several efficient methods to fix the error. You can get the methods from the MiniTool website.
The Causes of the Windows 10 Remote Desktop Not Working Error
There are multiple causes of the Windows 10 Remote Desktop not working error. And when the error occurs, there is an error message saying that “Remote Desktop can’t connect to the remote computer for one of these reasons”. The following are three reasons:
- Remote access to the server is not enabled.
- The remote computer is turned off.
- The remote computer is not available on the network.
So what are the detail causes of the error? I have listed some of the most common causes below:
- Internet connection is not stable.
- Login credentials are not matching.
- RDP is not working after updating Windows.
- Antivirus or Firewall problem.
- Network Profile problem.
How to Fix the Windows 10 Remote Desktop Not Working Error?
After you have known the causes of the Windows 10 Remote Desktop not working error, you maybe wonder how to fix the error. Then keep reading, and you can find several useful methods.
Method 1: Change Firewall Settings
The first method you should take to fix the Windows 10 Remote Desktop not working error is to change the Firewall settings. Here is the tutorial:
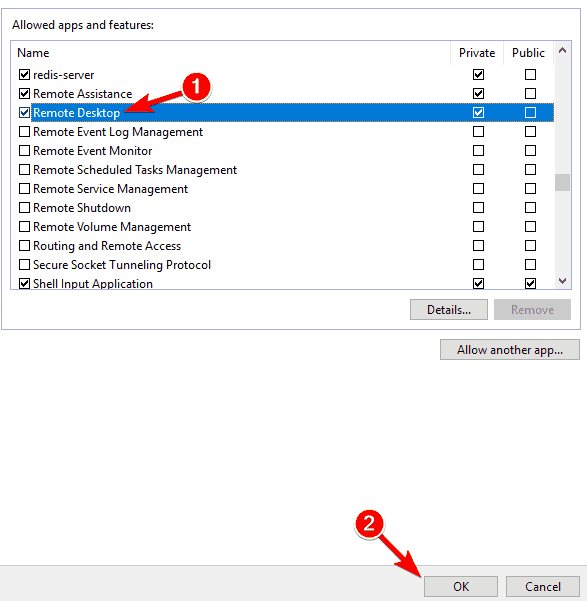
Step 1: Type allow an app through windows firewall in the search box and then click the best match one.
Step 2: Click Change settings on the top right corner.
Step 3: Find Remote Desktop and then check the box under the Private tab. Click OK to save changes.

Step 4: Close the window and then the Remote Desktop connection not working error should be fixed.
Method 2: Allow Remote Desktop Connections If Not Allowed
If the Remote Desktop connections are not allowed in your Windows, then the Windows 10 Remote Desktop not working error will occur.
Follow the instructions to allow Remote Desktop connections:
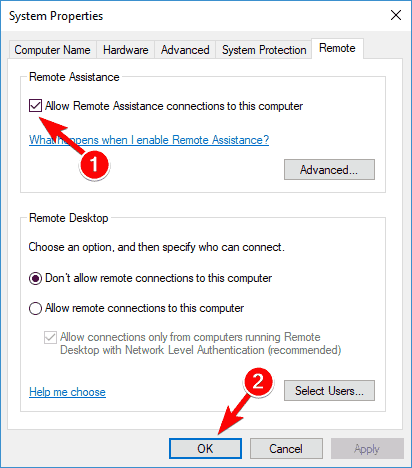
Step 1: Press the Win key and the I key at the same time to open Settings.
Step 2: Click Update & Security and then go to the For developers section.
Step 3: Find Change settings to allow remote connections to this computer in the right panel and then click Show settings next to it.
Step 4: Check the box next to Allow Remote Assistance Connections to this Computer. Click Apply and OK to save changes.
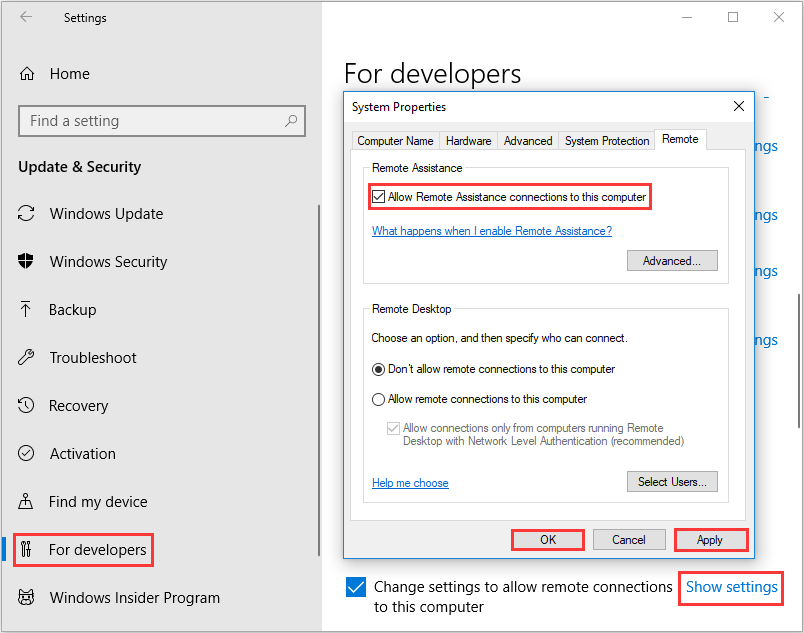
Step 5: Close the window and then the Remote Desktop can’t find the computer error should be fixed.
Method 3: Remove Your Remote Desktop Credentials
When your Remote Desktop credentials are not matching, then the Windows 10 Remote Desktop not working error will occur if you try to connect to another remote computer. Therefore, you should try to reset your Remote Desktop credentials.
Step 1: Type Remote Desktop connection in the search box and click the best match one.
Step 2: Type in the remote computer’s IP address. If there are any credentials saved for this specific computer, you will be given the option to either edit or delete.
Step 3: Click delete to remove the credentials.
Step 4: Retry connect the remote computer and then check if the error is gone.
Method 4: Add the Remote Computer’s IP Address to Your Hosts File
You can also try to add the remote computer’s IP address to your hosts file to fix the Windows 10 Remote Desktop not working error. Here is the tutorial:
Step 1: Type cmd in the search box and then right-click Command Prompt to choose Run as administrator. Click Yes.
Step 2: Type cd C:/Windows/System32/Drivers/etc in the Command Prompt window and then press the Enter key.
Step 3: Type notepad hosts in the window and then press the Enter key to open the hosts file in notepad.
Step 4: Add the remote computer’s IP address to the end of the file. Click File and then choose Save. Click Close.
Step 5: Try to connect remote computer again and then check if the error is gone.
Method 5: Make Changes to the Registry Editor
You can fix the Windows 10 Remote Desktop not working error by making changes to the Registry Editor. Here is the way to make changes:
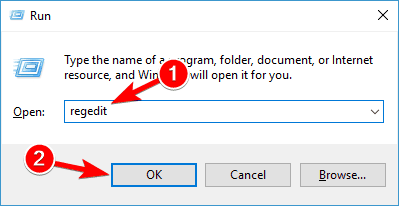
Step 1: Press the Win key and the R key at the same time to open the Run box.
Step 2: Type regedit in the box and then click OK. Click Yes to open Registry Editor.
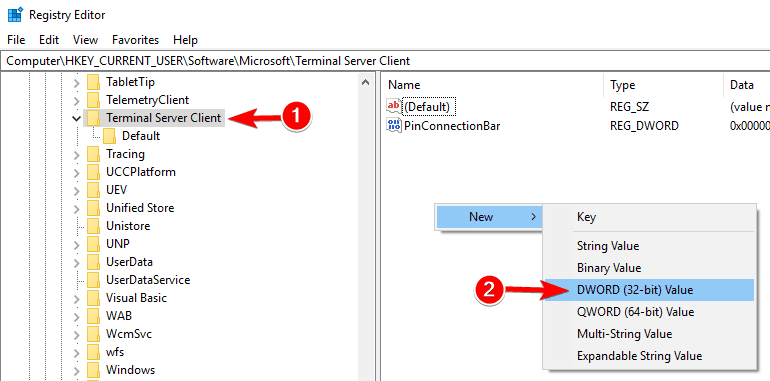
Step 3: Navigate to HKEY_CURRENT_USER\Software\Microsoft\Terminal Server Client.
Step 4: Right-click the empty space on the right side and then choose New > DWORD (32-bit) Value. Name it RDGClientTransport.
Step 5: Double-click this new key to open its Properties. Set Value data to 1 and click OK to save changes.
Step 6: Try to connect the remote computer one more time and check if the error still exists.
Method 6: Change Network Properties
If your network has been set up as Public, then the Windows 10 Remote Desktop not working error may occur. Thus, you can change the network from Public to Private. Follow the instructions below the change network properties:
Step 1: Open Settings and then click Network & Internet.
Step 2: Go to the Status tab and then click Change connection properties in the right panel.
Step 3: Choose Private under Network profile.
Step 4: Retry to connect the remote computer and then see if the error still persists.
Bottom Line
From this post, you can know the causes of the Windows 10 Remote Desktop not working error. Besides, you can find the methods to fix the error. If you cannot connect the remote computer, then you can try the methods mentioned above.
Windows Remote Desktop is a great feature provided by Microsoft in Windows 10 and almost all earlier versions of Windows. Remote Desktop can be used to access the computer over the network. It is also called RDP or Remote Desktop Protocol.
Sometimes RDP in Windows 10 stops working. There are various reasons for this. We will discuss some solutions that you might look for and will help you resolve the issue of RDP in Windows 10 not working.
Pro Tip: If you are in a hurry and don’t have time to troubleshoot, you can use Google Chrome Remote Desktop or TeamViewer 13 as Remote Desktop alternatives.
Otherwise, you can go through the list of possible solutions that may resolve Windows 10 remote desktop not working. Just follow the steps one by one and at the end of each step, see if the remote desktop starts working again.
1. Allow RDP in Windows Firewall
The first time you try to access the remote desktop the windows firewall will not allow you to do so because it is not active by default. It is because of security reasons as it gives security warnings if you try to access your computer from a different device. It may also happen if you are using any other antivirus software that does not let any other device access your computer. So in the case of antivirus the solution may be to uninstall it or stop it from running in the background.
In case of Windows firewall warnings, we have to turn it on
- Type “firewall” in the search and open the Windows Defender Firewall.
- From the left menu click on Allow an app or feature through Windows Firewall.


- Click on change settings
- Now find the Remote Desktop and turn it on

There you go, the Windows firewall will now allow you to connect to this PC remotely using remote desktop protocol.
2. Enable Remote Desktop in Windows Settings
Just like changing the firewall settings, it is necessary that you allow remote connection as well if you are using remote desktop for the very first time. So in order to do this:
- Search for remote settings and you will find Allow Remote connections to your computer, open it by clicking.
- Now in the settings that will open check Allow remote connections to this computer and click OK to save changes.


Remote connections are now enabled and now you can use it for the very first time. In order to use this feature, you have to make sure that your computer is not in hibernation mode or sleep mode, in that case, you won’t be able to connect your computer in remote desktop.
3. Turn off custom scaling
When you try using the remote desktop feature, the scaling feature of windows should be turn off as it might not be compatible with the device that will control your computer. This is a very recommended method as it has helped fix the error of the remote desktop. So in order to turn off the custom scaling follow the method:
- Open the settings You can do that simply by pressing Windows Key + I shortcut.
- Once the settings open, go to the System section.
- Click on Turn off custom scaling and sign out, if it is not already turned off.

Sign in again and try to use remote desktop, hopefully, it will start working.
4. Disable IPv6 protocol
Another option that has worked for many is to disable IPv6 (internet protocol version)on your network adapter. By default, Windows prefers IPv6 over IPv4. So if you are having problems using IPv6 to connect to the servers, you can force your computer to use IPv4 only.
- Open Settings ->Network and Internet -> Ethernet -> Change Adapter options
- Right click on the adapter for which you want to disable it, and select properties.
- Look for the checkbox which says Internet Protocol Version 6 (TCP/IPv6), uncheck it.
- Click on OK, and restart your computer.

There are times when Windows Update will also break the remote desktop connection and create problems for you. We have already written about one recent problem with the RDP authentication error function requested is not supported here.
These are some simple yet useful methods that can help you solve the issue of remote desktop connection. Please share your experiences in the comments below.
Weak internet connection can cause Remote Desktop not to work
by Ivan Jenic
Passionate about all elements related to Windows and combined with his innate curiosity, Ivan has delved deep into understanding this operating system, with a specialization in drivers and… read more
Updated on
- The Remote Desktop connection might not work if remote access to the server is not enabled.
- A quick yet effective way to solve this issue is to allow remote connection on your computer.
- Another simple solution is to remove your credentials from the remote computer.
Remote Desktop is a handy Windows 10 feature which allows us to control our computer from another device.
Of course, to enable the Remote Desktop feature, you need an active internet connection. So, if your computer is not correctly connected to the internet, you won’t be able to use this feature.
However, even some other factors could cause the feature to stop working, and we will talk about these issues and solutions for them in this article.
Why is my remote desktop connection not working?
There are many variations of the remote desktop connection not issue, as reported by users. Below are some of them and the prevalent causes:
- Remote Desktop can’t connect to the remote computer for one of these reasons Windows 10: Sometimes you might get this error message on your PC. If you encounter this problem, try all the solutions in this article.
- Windows 10 RDP client not working: Sometimes, the RDP client won’t work on your PC. This can be due to your system configuration. To fix that, make sure that you’re using a private network.
- RDP this computer can’t connect to the remote computer: This is another common problem with RDP. To fix this issue, check both your antivirus and firewall.
- Remote Desktop not working after Windows 10 upgrade: Sometimes issues with Remote Desktop can occur after installing a Windows update. To fix the issue, remove the update, and the problem will be fixed.
- Unable to connect to remote PC, please verify Remote Desktop is enabled: This is another common problem with Remote Desktop. However, you should be able to fix the problem using one of our solutions.
- Windows 10 Remote Desktop credentials did not work: If you encounter this error on your PC, you might be able to fix it simply by removing your saved credentials.
- Remote Desktop cannot connect error, certificate expired invalid, in the time allotted: There are various errors that can appear while trying to use the Remote Desktop feature. However, you should be able to fix them using one of our solutions.
- Remote Desktop won’t connect over the Internet: This is another problem related to the Remote Desktop feature. If Remote Desktop can’t connect, check your firewall and antivirus settings.
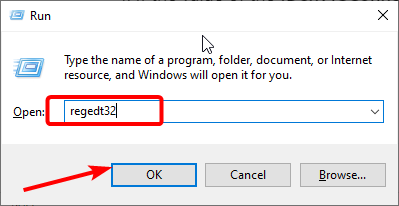
How can I tell if RDP is running?
- Press the Windows key + R to open the Run utility.
- Type regedit32 in the run box and click OK.

- Navigate to the paths below in the left pane:
HKEY_LOCAL_MACHINE\SYSTEM\CurrentControlSet\Control\Terminal ServerHKEY_LOCAL_MACHINE\SOFTWARE\Policies\Microsoft\Windows NT\Terminal Services
- If the value of the fDenyTSConnections is set to 1, RDP is disabled. But if it is cleared to 0, RDP is enabled.
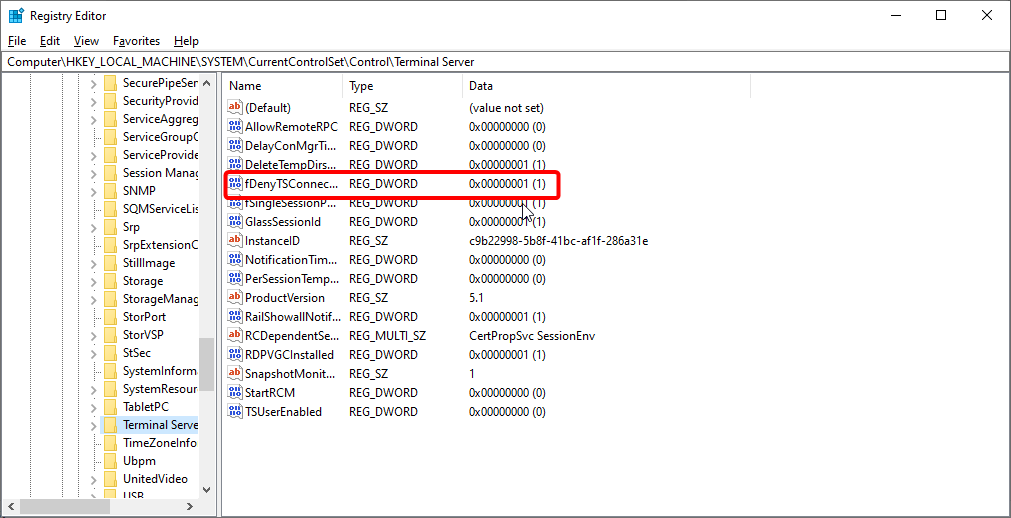
If RDP is disabled, you can enable it to run from here.
What can I do if the remote desktop is not working?
1. Check your internet connection
As mentioned earlier, the Internet is required for Remote Desktop to connect with another device. So, check if everything is okay with your internet connection.
If you determine that you have some problems connecting to the internet, check out our articles about Internet problems and Limited internet connection in Windows 10, and you might find the solution.
2. Check if remote connections are allowed
- Go to Search, type remote settings, and open Allow Remote connections to your computer.

- Check Allow remote connections to this computer and click OK to save changes.

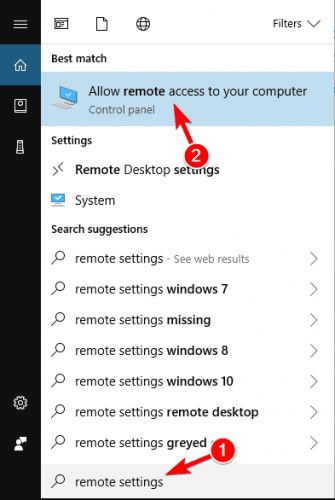
Just like you need to allow Remote Desktop through the Firewall, you also need to enable remote connections on your computer if you’re using this feature for the first time.
Remote connections are now enabled, and you should try to connect again. We also noticed another possible issue that could prevent using Remote Desktop.
If the computer you want to connect to remotely is in the Sleep or Hibernate mode, the connection won’t be possible, so check if the computer is ‘awake,’ and then try to connect again.
3. Remove your credentials from Remote Desktop
- Press Windows key + S and enter remote desktop.
- Click on Remote Desktop Connection from the menu.

- Click the Advanced tab, followed by the Settings button.

- Now, click on Delete Credentials.
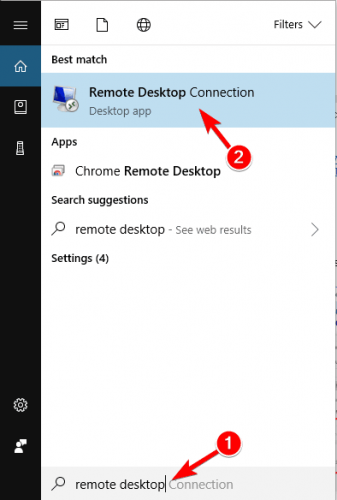
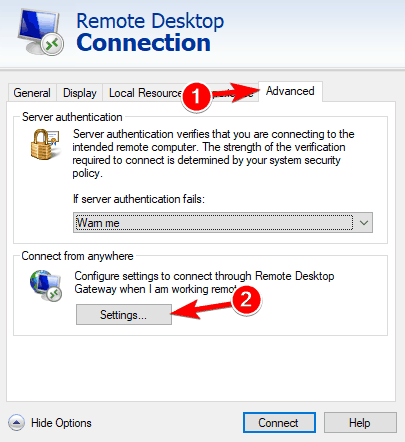
According to users, sometimes Remote Desktop won’t connect due to problems with your credentials. However, you can fix that issue simply by removing the saved credentials.
How we test, review and rate?
We have worked for the past 6 months on building a new review system on how we produce content. Using it, we have subsequently redone most of our articles to provide actual hands-on expertise on the guides we made.
For more details you can read how we test, review, and rate at WindowsReport.
After deleting your credentials, check if the problem persists. Many users reported that this solution fixed the problem, so try it out.
- Fix Windows 7 to Windows 10/11 Remote Desktop Connection
- 5+ best remote desktop tools for poor connections
- Windows 11’s Remote Desktop not working
- 5 best remote desktop software for gaming
- How to use Remote Desktop Connection in Windows 10
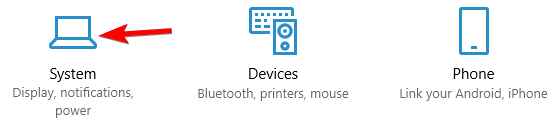
4. Turn off custom scaling
- Press the Windows key + I keys to open Settings.
- Select the System option.

- If custom scaling is turned on, you should see A custom scale factor is set message. Click on Turn off custom scaling and sign out.

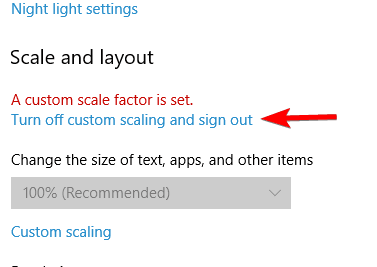
If Remote Desktop doesn’t connect, the problem might be related to custom scaling. Many users use custom scaling on larger monitors, but sometimes this feature can cause issues with Remote Desktop.
Once you sign back in, the scaling should be set to default, and all problems with Remote Desktop will be resolved. Many users reported that this solution worked for them, so we strongly recommend you try it out.
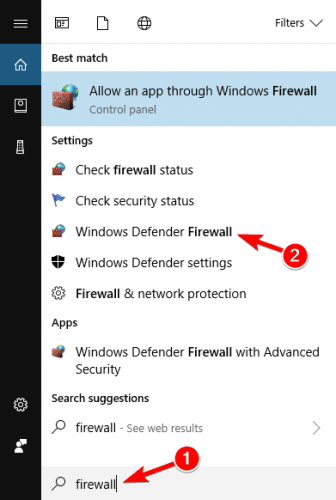
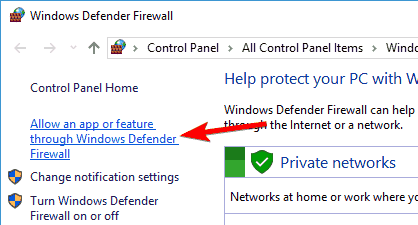
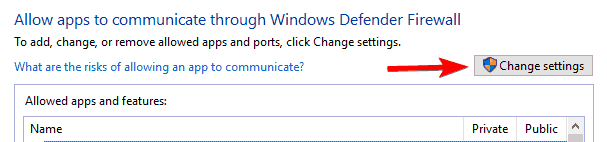
5. Change Firewall Settings
- Go to Search, type firewall, and open Windows Defender Firewall.

- Go to Allow an app or feature through Windows Firewall.

- Click on Change Settings.

- Find Remote Desktop, check it, and click OK to save changes.

Windows Firewall is also one of the most common causes of Remote Desktop problems. If Firewall blocks the Remote Desktop, you won’t be able to connect it with another device.
Now try to connect your computers via Remote Desktop, and it should work.
Remote Desktop is not enabled in Firewall by default, so if you’re running Remote Desktop for the first time, allowing it through Windows Firewall is a must.
In addition to your firewall, it’s essential to check if your antivirus isn’t blocking the Remote Desktop feature.
Sometimes antivirus can interfere with your system and prevent this feature from working correctly. Sometimes, you might have to uninstall your antivirus to fix this issue.
If you’re looking for a new antivirus compatible with Remote Desktop, we suggest you consider changing your antivirus software to ESET NOD32. This software works great with Windows 10 and protects you without interfering with other processes and apps.
6. Make changes to your registry
- Press Windows key + R and type regedit.
- Click OK to start Registry Editor.
- In the left pane, navigate to
HKEY_CURRENT_USERSoftwareMicrosoftTerminal Server Client key - In the right pane, right-click the space and choose New > DWORD (32-bit) Value.
- Enter RDGClientTransport as the name of the new DWORD.

- Double-click the newly created RDGClientTransport DWORD to open its properties.
- Set Value data to 1 and click on OK to save changes.
According to users, you might be able to fix this problem by making one small change to your registry.
After making these changes, check if the problem persists. This might be a slightly advanced solution, but many users reported that it worked for them, so you might want to try it out.
7. Add the IP address and server name to the hosts file
Several users reported that they could not use Remote Desktop due to their host’s file.
According to them, you need to manually add the IP address and server name to the host’s file on your PC to fix the issue.
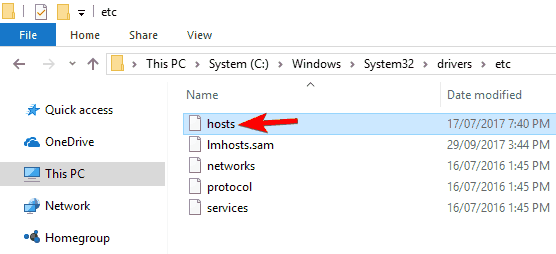
To do that, navigate to This directory and edit the hosts file with Notepad: C:WindowsSystem32Driversetc
Remember that the host’s file is a system file, so if you want to modify it, you’ll need administrative privileges.
For more information on how to modify your host’s file and gain administrative privileges, we strongly recommend checking Access denied when editing the host’s file article.
Once you change your host’s file, the issue with Remote Desktop should be resolved.
8. Check if the 3389 port is enabled
If Remote Desktop won’t connect, the problem might be your firewall. Your firewall can block specific ports to protect your PC, but sometimes your firewall can block particular ports by mistake.
For example, port 3389 is used by Remote Desktop, and if your firewall is blocking this port, you won’t be able to use this feature at all.
If this port is enabled, but the issue still appears, try disabling and enabling your firewall. Sometimes a quick firewall reset can fix the problem, so you might want to try that.
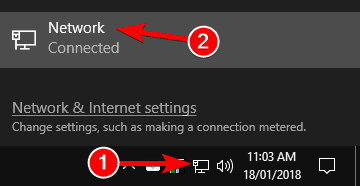
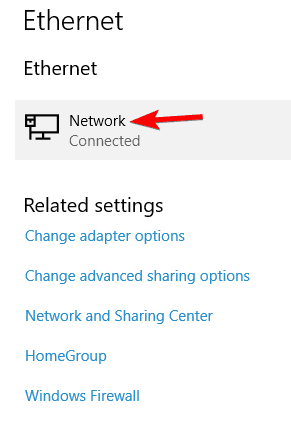
9. Change your connection from Public to Private
- Click the network icon in the bottom right corner of your Taskbar and click on your network connection. In our case, the network connection name is Network, but it might be different on your PC.

- Click on your network connection name.

- Select Private as your network profile.

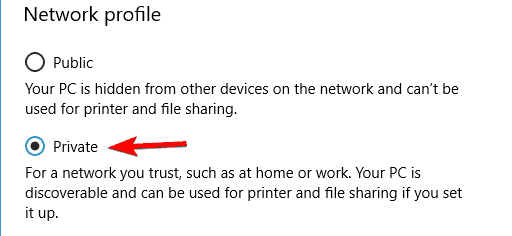
To protect your PC, remote connections are disabled if you use a public connection. After doing that, the problem with the Remote Desktop should be resolved entirely.
Also, if none of the solutions worked, you can use Mikogo to solve the connectivity problems. With this remote desktop software, you get complete security and control of your PC.
How do I force a remote desktop connection?
- Open the Run utility, type regedit32 in the run box, and press Enter.
- Follow the paths below in the left pane:
HKEY_LOCAL_MACHINE\SYSTEM\CurrentControlSet\Control\Terminal ServerHKEY_LOCAL_MACHINE\SOFTWARE\Policies\Microsoft\Windows NT\Terminal Services - If the value of the fDenyTSConnections is set to 1, clear it to 0 to enable RDP.

With this, you can force a Remote Desktop connection on Windows.
Remote Desktop not working over VPN
Remote desktop not connecting through VPN cases are more frequent than you can imagine.
While the potential culprits can be diverse, ranging from connectivity issues (ports, network adapters, and so on) to communication and protocols, the problem is likely caused by an incorrect setup.
Whether the VPN disconnects when Remote Desktop is activated or the Remote Desktop fails with the VPN connected, getting the two of them to collaborate harmoniously is essential.
Here are some quick tips to consider:
- Allow Remote Desktop connections on the server PC
- Create a VPN server using your router
- Set up a VPN connection on the client’s PC
- Connect to the server PC
If you want to find out how to set up a VPN with Remote Desktop Connection on Windows 10/11, we got your back. So don’t be shy to explore the topic and follow the presented instructions.
That’s about it. We hope at least some of these solutions helped you with connection problems with Remote Desktop in Windows 10.
If you have any comments or questions, reach out to the comment section below, and we’ll try to assist you further.
![]()
Download Windows Speedup Tool to fix errors and make PC run faster
Remote Desktop Connection is a built-in feature of the Windows operating system that allows a user to connect to a computer remotely. Some users complain that Remote Desktop is not working in Windows 11 when they want to connect to the computer error. In this article, we will discuss what to do if you get the said error on your Windows computer.

Before moving to the troubleshooting guide, you should know that Remote Desktop is not available on Windows 11 Home Edition. If you want to use Windows’s built-in Remote Desktop tool, you must have Windows 11 Pro or Enterprise edition. In case, you are on Windows 11 Home, you need to unblock it using RDP Wrapper Library.
Generally, the Remote Desktop won’t work when there is a connection error. There can be many reasons for the said error maybe you have not enabled RDP service or your firewall or Antivirus is blocking the service. Some users also reported that they encounter this error after updating their system to Windows 11 22H2 or 2022 version. If you are one of then, follow the suggestions mentioned below if the Remote Desktop is not working on your computer.
- Enable Remote Desktop
- Allow RDP through Windows Defender Firewall
- Edit Registry
- Disable UDP in Group Policy
Let’s try to resolve the issue using the prescribed steps.
1] Enable Remote Desktop
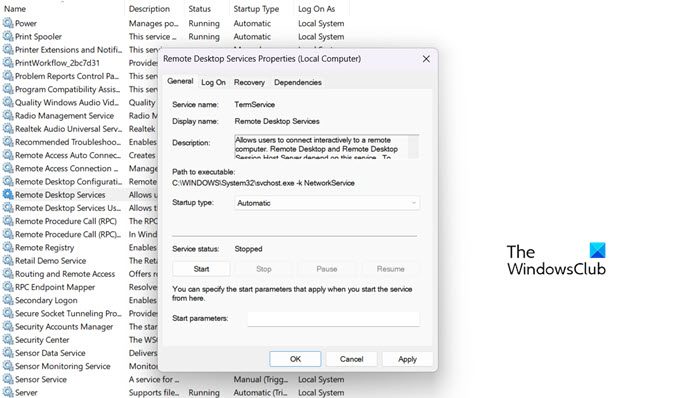
Users do not check whether Remote Desktop Service is enabled or not before connecting to the remote computer and encountering the issue in question. Therefore, we are going to enable the Remote Desktop Service to resolve the issue, and here’s how you can do the same:
- First, open Services by searching it out of the Start Menu.
- Double-click on Remote Desktop Service.
- Select Automatic from the drop-down menu.
- Click on Start.
- Now select Apply > Ok.
Hopefully, this issue will be solved after enabling the Remote Desktop Service. In case, the issue persists, check if Remote Desktop is enabled in Settings or not. To do the same, open Settings, go to System > Remote Desktop, and then enable Remote Desktop.
Related: Remote Desktop can’t find the computer
2] Allow Remote Desktop through Windows Defender Firewall
Windows in-built Firewall is one of the reasons why you are facing the issue as the Remote Desktop connection is getting blocked by it. In such scenarios, you have to allow RDP through Windows Defender Firewall to resolve the issue. Follow the steps prescribed below to do the same.
- First, click the Search button and then type “Firewall & network protection” in the search bar and press enter.
- Click on Allow an app or feature through Windows Defender Firewall
and then click on Change Setting. - Scroll down and select Remote Desktop and allow it through both Public and Private.
Hopefully, after allowing Remote Desktop through Windows Defender Firewall your issue will be resolved. In case, you use a third-party antivirus, make sure to add an exception.
Related: Remote desktop can’t connect to the remote computer.
3] Edit Registry
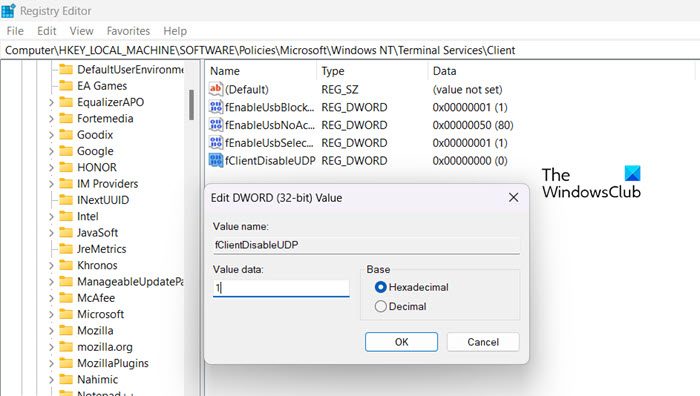
Some users say that the Remote Connection is not working after installing the 22H2 update. This could happen because there is a bug in the Remote Desktop client and it is only trying to use the UDP connection, not TCP. The solution to this issue is to disable UDP by creating a new registry value set to 1.
- Press Windows + R key to open the run dialog box, type Regedit, and press Enter. Locate this path below in the left pane:
Computer\HKEY_LOCAL_MACHINE\SOFTWARE\Policies\Microsoft\Windows NT\Terminal Services\Client
- Right-click on the Client folder and select New > DWORD(32-bit ) Value.
- Name it fClientDisableUDP.
- Now, double-click on fClientDisableUDP, set its value to 1 and click on the OK button.
Hopefully, your issue will be resolved after using methods.
Troubleshoot: Remote Desktop connection issues on Windows.
4] Disable UDP in Group Policy
In case, you find the Registry Editor process a little difficult and you Windows Pro version, another way to disable UDP that you can try is from the Group Policy Editor. To resolve this issue use the prescribed methods.
- Press Windows + R key to open the run dialog box.
- type gpedit.msc and press enter.
- Go to the below path:
Computer Configuration > Administration Templates > Windows Components > Remote Desktop Services > Remote Desktop Connection Client
- Double-click on Turn off UDP on Client in the right pane.
- Now click on Enable radio button and click ok
Hopefully, you are able to resolve the issue using the solutions mentioned in this post.
Read: Best free Remote Desktop software for Windows.
Yusuf is an Engineering graduate from Delhi. He has written over 1000 technical articles and has knowledge of programming languages including Java, and C++, and technologies such as Oracle 12C and MsSQL. Troubleshooting Windows is his favorite past-time.