На чтение 7 мин. Просмотров 2.6k. Опубликовано

Удаленный доступ к экрану – это удобный способ получить доступ к другому компьютеру, как если бы вы сидели перед ним. В OS X и Windows эта возможность встроена прямо в них, что означает, что вы можете легко обмениваться экраном вашего Mac с ПК с Windows, и наоборот.
Если вы используете смешанную сеть, это, скорее всего, комбинация компьютеров Mac и Windows. Для обслуживания файлов может быть установлена машина Linux, но у большинства людей есть Windows или Mac, а иногда и то и другое.
С каждым методом, описанным ниже, мы подключаемся с клиента, который мы установили в нашей системе, к целевому компьютеру. На нашем Mac мы используем приложение Remote Desktop (RDP), а в Windows – RealVNC Viewer.
Эти инструменты позволяют нам подключаться к целевому компьютеру с помощью собственного метода каждой системы. Другими словами, Windows изначально использует RDP, а OS X использует VNC. Это означает, что нам практически не нужно настраивать целевые объекты, поэтому все, как обычно, работает без проблем.
Подключение к ПК с Windows-клиентами с Mac
Ранее мы уже обсуждали, как использовать удаленный рабочий стол для доступа к другим компьютерам Windows в том же доме. Это не так сильно отличается от OS X, но давайте рассмотрим это ради тщательности.
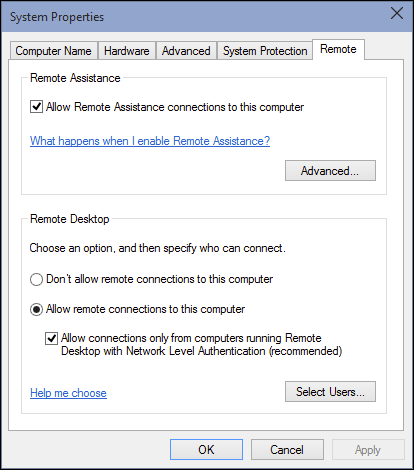
Для подключения к ПК с Windows сначала необходимо включить удаленные подключения. Откройте «Свойства системы» и перейдите на вкладку «Удаленный», затем убедитесь, что «Разрешить удаленные подключения к этому компьютеру» включен.

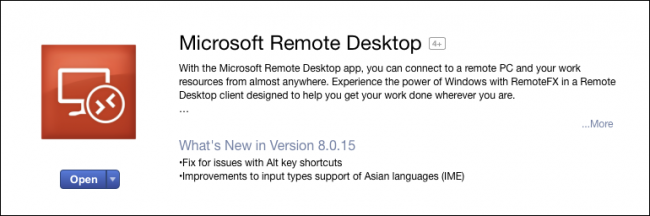
Вы также хотите убедиться, что на вашем Mac установлен клиент удаленного рабочего стола Microsoft. Это доступно в App Store.

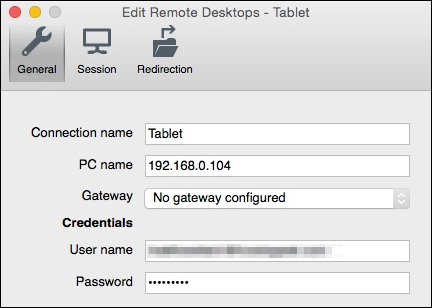
Удаленный рабочий стол будет установлен в папку приложения Mac. В нашем примере мы уже настроили профиль пользователя, который готов к действию. Однако давайте на минутку нажмем «Изменить» и покажем, что с этим связано.

Рядом с «Имя соединения» мы даем ему понятное имя, а «Имя ПК» – это либо имя, которое мы дали целевому ПК, либо его IP-адрес.
Мы не беспокоимся о настройке шлюза, потому что мы подключаемся к нашему ПК в нашей локальной сети. Кроме того, если вы не хотите вводить имя пользователя и пароль при каждом подключении, вы можете добавить их в «Учетные данные». Отсутствие ввода учетных данных означает, что при подключении к компьютеру под управлением Windows вам необходимо будет войти в систему. учетная запись.

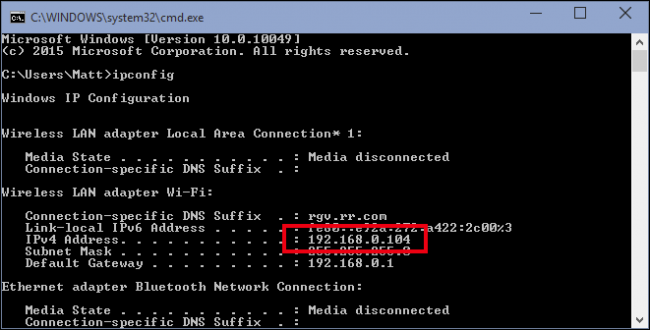
Если вы хотите узнать имя и/или IP-адрес вашего ПК, вам необходимо проверить. Используйте сочетание клавиш «Windows + R», а затем введите «cmd», чтобы открыть командную строку. В командной строке введите «ipconfig» и нажмите «Return». Вы хотите использовать IPv4-адрес, который он вам дает.

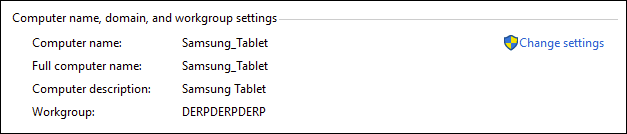
Если вы не помните, как вы называли свой компьютер, вы можете найти эту информацию на панели управления «Система».
Преимущество использования имени компьютера перед IP-адресом состоит в том, что имя остается неизменным, если вы его не измените, тогда как IP-адреса могут изменяться время от времени.
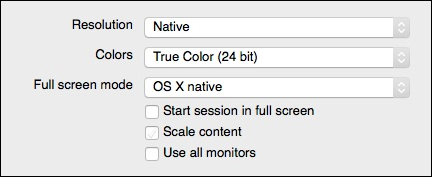
Остальные параметры подключения к удаленному рабочему столу касаются разрешения, цветов и параметров полного экрана.

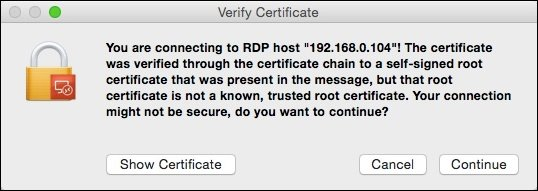
Когда вы подключаетесь к новому клиенту, вы, скорее всего, увидите диалоговое окно «Подтвердить сертификат». Нажмите «Продолжить» для подключения.

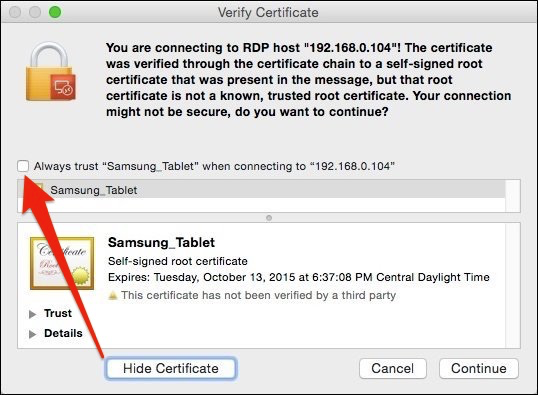
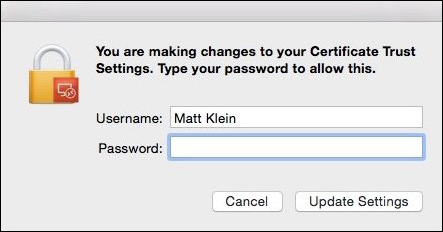
Если вы не хотите видеть это диалоговое окно с предупреждением в будущем, нажмите «Показать сертификат», а затем установите флажок «Всегда доверять…», как показано ниже.

Чтобы подтвердить изменения в настройках доверия к сертификату, вам потребуется ввести системный пароль.

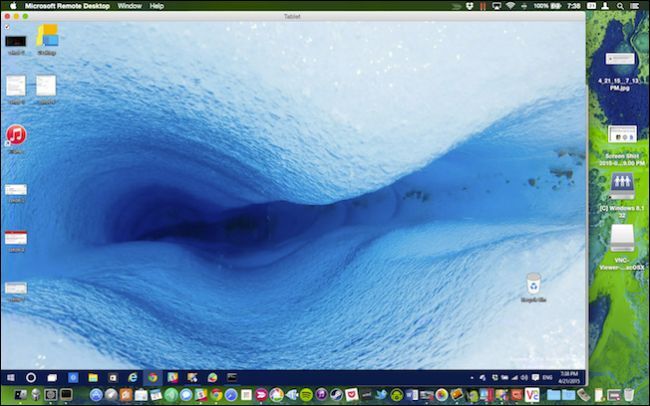
Помните, что если вы ранее ничего не вводили в учетные данные подключения, вы увидите экран входа в систему при первом подключении. После успешного подключения к ПК с Windows с вашего Mac появится рабочий стол Windows.
 Если мы хотим связываться с нашим тестовым компьютером с Windows 10, нам не нужно на самом деле быть там.
Как мы уже упоминали, возможность подключения к машине с Windows – приятное удобство. Например, ваш компьютер под управлением Windows может быть супер мощной машиной, которую вы используете для компиляции или рендеринга. Вы можете использовать удаленный рабочий стол для проверки хода выполнения задания или запуска задач, фактически не находясь физически за компьютером.
Подключение к Mac с ПК с Windows
Подключение к Mac с ПК с Windows немного отличается. Вы не сможете использовать Remote Desktop, но это нормально, потому что есть бесплатный клиент под названием RealVNC viewer, который отлично справляется с задачей.
Как и в случае с Windows, вы сначала должны настроить свой Mac для совместного использования экрана.Откройте панель настроек «Общий доступ» и установите флажок «Общий доступ к экрану».
 Если вы хотите изменить имя вашего компьютера, вы можете нажать кнопку «Редактировать». Вы можете оставить параметры «Разрешить доступ для:» как есть.
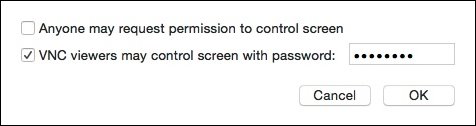
Нажмите «Настройки компьютера…» и убедитесь, что «VNC-зрители могут управлять экраном с паролем». Затем введите простой пароль.
 Пароль может содержать от одного до восьми символов. Это не должно быть сложным, но, по крайней мере, сделать его трудно угадать.
VNC Viewer требует установки, но вам не нужно регистрировать учетную запись, чтобы использовать его.
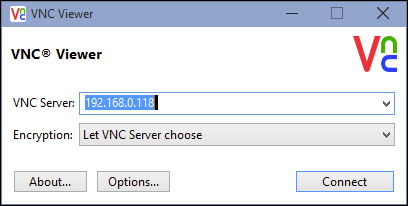
Вспомните из более раннего скриншота, что к экрану нашего Mac можно обратиться по адресу 192.168.0.118 или Matt-Air.local. Если вы не знаете, как получить доступ к вашему Mac, вернитесь к настройкам общего доступа и дважды проверьте информацию в настройках общего доступа к экрану.
Мы вводим «192.168.0.118» в нашем клиенте VNC и оставляем шифрование как есть.

Приложение RealVNC Viewer имеет множество вариантов, которые вы можете просмотреть на досуге. Вы, вероятно, будете в порядке, оставив их без изменений, хотя, если вы хотите, чтобы ваше соединение автоматически открывало полный экран, вам нужно поставить галочку напротив «Полноэкранный режим».
 Честно говоря, мы почти никогда не связываемся с ними. Совместное использование экрана из Windows на Mac, кажется, работает просто отлично.
Мы возвращаемся к нашему соединению и нажимаем кнопку «Подключиться». Появится окно аутентификации, где вам нужно будет ввести простой пароль, который вы создали в настройках «Общий доступ» на вашем Mac.

Когда вы подключаетесь к целевому Mac, вам также необходимо войти в (предположительно вашу) учетную запись пользователя, так же, как мы делали это с Windows (если мы не предоставили свои учетные данные). После входа ваш рабочий стол Mac появится в окне VNC Viewer в том же состоянии, в котором вы его оставили.

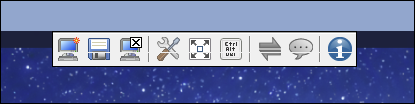
Если вы наведите курсор мыши на верхнюю середину окна, вы можете вызвать дополнительные элементы управления, которые при наведении на них дают подсказку, объясняющую, что делает каждый из них.
 Эта маленькая панель инструментов позволит вам выполнять такие вещи, как закрытие соединения, переход к полноэкранному режиму и многое другое. Наведите курсор на каждую кнопку, чтобы узнать, что она делает.
Вы найдете удобные сочетания клавиш для закрытия и сохранения соединения, а также для изменения параметров и полноэкранную кнопку, чтобы ваш общий рабочий стол занимал весь экран.
Со стороны Mac, значок «Общий экран» появится в строке меню. Это позволяет быстро и легко получить доступ к настройкам общего доступа к экрану или отключить клиентов.

Важно помнить, что совместное использование экрана компьютера действительно подходит только для небольшой работы. Если вы пытались что-то удаленно починить или показать другому пользователю, как это сделать, это идеально, но для выполнения какой-либо значимой работы не так уж много. Вы всегда будете испытывать небольшое отставание и заикание, и с этим ничего не поделаешь.
Однако, как мы уже говорили, он не предназначен для работы в тяжелых условиях. Помните также, что мы показываем наши экраны только локально, а это означает, что если вы выйдете из дома, скажем, чтобы пойти выпить кофе, и вы поймете, что вам нужно подключиться к машине дома, вам нужно знать, как подключитесь к нему через свой роутер. Есть способы сделать это как на Mac, так и на Windows-машинах.
Мы рекомендуем вам ознакомиться с этими статьями для получения дополнительной информации о том, как удаленно подключаться к вашим компьютерам дома. Если у вас есть какие-либо комментарии или вопросы о том, что вы прочитали сегодня, пожалуйста, оставьте свой отзыв на нашем форуме.
Setting up Microsoft Remote Desktop on a Mac


Many reasons exist for establishing a remote desktop connection for Mac computers. More people are working remotely than ever before, and the ability to access and control physically distant computers is becoming increasingly important. Accessing personal files from work, helping a friend fix a problem, or using a work machine while traveling all require the ability to establish remote connectivity.
Unfortunately, starting with Mojave, versions of the macOS operating system no longer provide the Back To My Mac app. This tool furnished users with a simple way to create a remote desktop connection on Mac machines. There are, however, many other methods of connecting to a Mac remotely that can be used by users with any level of computing experience. We are going to show you one of the best ways to remotely access and control a Mac or Windows machine from another computer, your iPad, or an iPhone.
How to set up a remote desktop connection for Mac
The Microsoft Remote Desktop Protocol (RDP) is a popular method of establishing connectivity between two computers used by many third-party solutions like VNC. The protocol lets you access and control desktops, send documents to a printer, run apps, and share files or folders on remote Windows computers. We are going to provide you with the basics to get going with this tool.
But can you use Microsoft Remote Desktop on a Mac? The answer is yes. All you need is the Remote Desktop Client for Mac to connect to Windows computers from a macOS system. The Remote Desktop app is also available for iOS so you can connect to Windows machines from your mobile devices.
How to perform the basic configuration of Microsoft Remote Desktop for Mac:
-
Download the Microsoft Remote Desktop client from the Mac App Store on the machine that requires remote access.

-
Configure the Windows machine that will be accessed remotely for remote connections using the instructions on this Microsoft support page.
-
Add a Remote Desktop connection or a remote resource. This could be the Windows computer you just configured or another available machine or resource. In a business setting, you may have a variety of RemoteApp and Desktop Connections based on your role in the organization.


Top 5 settings to improve your RDP connections
1. Add Workspace for Azure Virtual Desktop and Windows 365
Once you have configured remote desktop from Mac to Windows, you will want access to resources. This can be accomplished by adding a feed to create a workspace that enables quick access to resources available to you. Use the following steps to subscribe to a feed.
- Select Add feed on the Remote Desktop for Mac main page.
- Enter the URL or email address that identifies the feed.
- Select subscribe.
- Sign in with your account credentials when prompted.
Based on how the server delivering the resources has been configured, you can use your email address to have the client search for a URL associated with that address. The following URLs can also be used with Windows 365 or Azure Virtual Desktop instances:
Windows 365 –
https://rdweb.wvd.microsoft.com/api/arm/feeddiscovery
Azure Virtual Desktop –
https://rdweb.wvd.microsoft.com/api/arm/feeddiscovery
Azure Virtual Desktop Classic –
https://rdweb.wvd.microsoft.com/api/feeddiscovery/webfeeddiscovery.aspx
A list of available resources will be displayed after you have signed in. Subscribing to a feed with a remote desktop from Mac to Windows 10 connection gives you access to updates in the resource list made by your system administrator. The resources you can access will often change over time to reflect an organization’s business objectives.
Export and import connections
Remote desktop connection definitions can be exported and later imported so they can be used on different systems. Exported remote desktop configurations are saved in individual RDP files. They are easy to use and save time when setting up multiple remote desktops.
Exporting an RDP file

- Right-click the selected remote desktop in the Connection Center.
- Choose Export.
- Select the location where the RDP file will be saved.
- Click OK.
Importing an RDP file

- Select Connections > Import from the app’s menu bar.
- Navigate to the location of the RDP file.
- Choose Open.
Add remote resources
A remote desktop connection lets users access dedicated session-based desktops, virtual desktops, and RemoteApp programs. These remote resources are made available to the user community by being published using RemoteApp and Desktop Connections.
You need the URL that links to the Remote Desktop Web Access server. The server provides access to the RemoteApp and Desktop Connections and will display a list of available Desktop Connections and RemoteApps.
Use the following steps to add a remote resource to your workspace:
- Select + in the Connection Center.
- Choose Add Remote Resource.
- Provide the requested details for the remote resource:
- • The URL of the Remote Access Web Access server or the feed URL. A corporate email address can also be used which forces the client to search for a server bound to that address.
- • The user name and password that allow access to the Web Access server.
- Choose Save. The available remote resources will be visible and accessible in the Connection Center.
2. Accessing company resources with an RD Gateway
A Remote Desktop Gateway, also called an RD Gateway, is used to provide access from anywhere on the Internet to remote resources located on an internal network. Gateways can be created and managed from the app’s preferences or when you configure a new desktop connection.
Use the following procedure to configure a new gateway in Preferences:

- Select Preferences > Gateways in the Connection Center.
- Click the + button at the bottom of the window.
- Enter the required information:
- • Server name – This is the name of the computer that will be used as the gateway. It can be an IP address, an Internet domain name, or the name of a specific Windows computer. Port information can be appended to the server name.
- • User name – Here you specify the user name and password required for the Remote Desktop Gateway to which you will be connecting. Choosing Use connection credentials supplies the same name and password used for the remote desktop connection for the gateway.
3. Customizing the display resolution
The following steps enable you to customize your display resolution:
- Select Preferences in the Connection Center.
- Choose Resolution and then +.
- Enter the desired height and width and click OK.
You can delete the customized resolution by selecting it and choosing -.
4. Manager User Accounts Setting
User account used for connecting to desktops or remote resources can be saved for reuse. User accounts are created and managed in the Remote Desktop client. Use these steps to create a user account:
- Select Settings > Accounts in the Connection Center.
- Click on Add User Account.
- Enter the user name that will be saved for use with a remote connection. You have a choice of formats and can use
user_name, domain\user_name, or user_name@domain.com
. - Save the password associated with the account. All accounts need to have a password when connecting remotely.
- You can set a descriptive or friendly name to easily identify the account.
- Click Save and then choose Settings.
5. Drive redirection for remote resources
If the setting has been configured to enable it, remote resources can be used together with drive redirection. This feature lets you save files generated by remote apps to your local Mac or MacBook. Your home directory is always used as the redirected folder, and you can use Finder to access locally saved files. In the remote session, the folder appears as a network drive.
FAQ
A Remote Desktop Gateway is a Windows server role that employs RDP to establish secure encrypted connections. The Gateway acts as a sort of VPN by providing point-to-point remote desktop connections.
This error indicates that you are attempting to access a session for which you do not have the proper privileges. This happens if you try to connect to the console or another admin session. Turn off the console switch in the remote desktop/’s advanced settings to resolve this issue. If that doesn’t work, you will need to engage a system administrator to solve the problem. Also sometimes the 0x204 error could appear when macOS users attempt to establish a Remote Desktop Mac connection with a Windows PC.
Mac and Windows keyboards offer the same functionality using different key combinations and keyboard layouts. Examples include:
- The Mac’s Command key is equivalent to the Windows key.
- Ctrl+keystroke combinations on Windows equals Command+keystroke on a Mac.
- Function keys on a Mac are accessible by pressing and holding the FN key.
The default is for the remote session to use the same keyboard locale as the operating system running the client. If this is not the case in your remote session, you may need to manually change the keyboard setting on the remote computer. You can obtain more information about keyboards and locales on this support page.
Время на прочтение
4 мин
Количество просмотров 13K
Привет, Хабр! Меня зовут Холодаев Алексей, я младший системный администратор в Cloud4Y. Сегодня хочу поделиться способом подключения стандартного RDP-клиента Windows к MacOS. Если интересно, ныряйте под кат.
Вы наверняка знаете, что в MacOS есть встроенный VNC сервер, к которому можно подключаться через VNC клиента. Однажды я задумался: а почему бы не использовать стандартный RDP client Windows для подключения к яблочной операционной системе? Немного погуглив, я обнаружил, что существует бесплатный RDP сервер на MacOS — xRDP. Данный сервер легко устанавливается на ОС Linux/Unix. Об установке и настройке этого сервера расскажу далее.
Установку я производил на свой макбук с MacOS Big Sur.
Для начала необходимо установить инструменты командной строки Xcode. Для этого выполняем команду в ПО терминала.
xcode-select --installДалее установим менеджер сторонних пакетов Homebrew командой
$ /usr/bin/ruby -e "$(curl -fsSL https://raw.githubusercontent.com/Homebrew/install/master/install)"Установим библиотеку OpenSSL командой
brew install opensslПосле установки OpenSSL присвоим переменной CPPFLAGS путь к библиотеке, чтобы компилятор смог данную библиотеку найти. Выполним команду
export CPPFLAGS="-I/usr/local/opt/openssl/include"Установим необходимые пакеты командами
brew install automakebrew install libtoolbrew install pkgconfigbrew install nasmУстановим XQuartz – программное средство системы X Window System. Скачать программу можно с официального сайта. После установки необходимо перезайти в систему.
Для удобства работы создадим отдельную папку: mkdir /Users/admin/Documents/xrdp/
Теперь включим встроенный VNC сервер. Для этого перейдём в «Системные настройки»
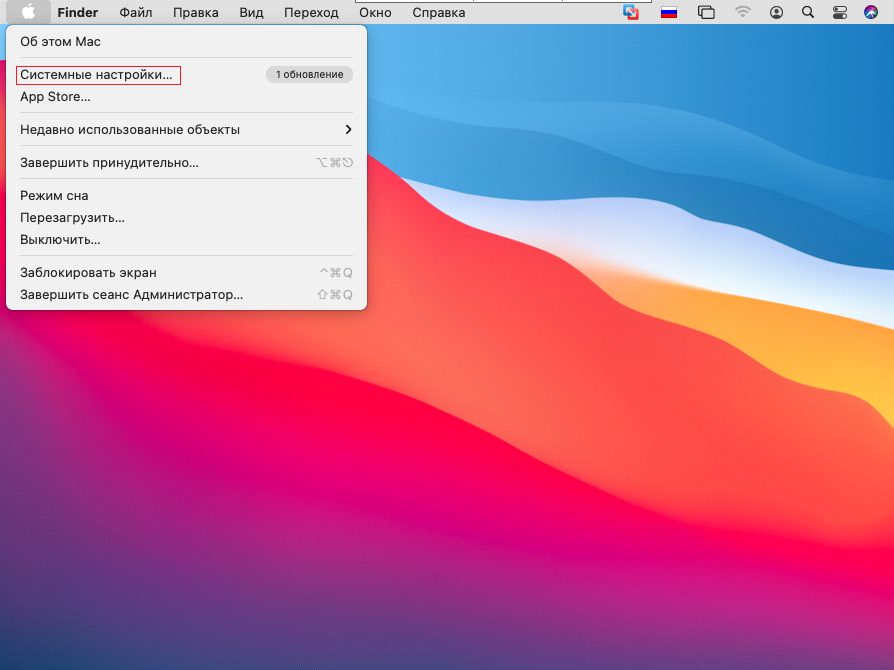
Далее выбираем общий доступ:
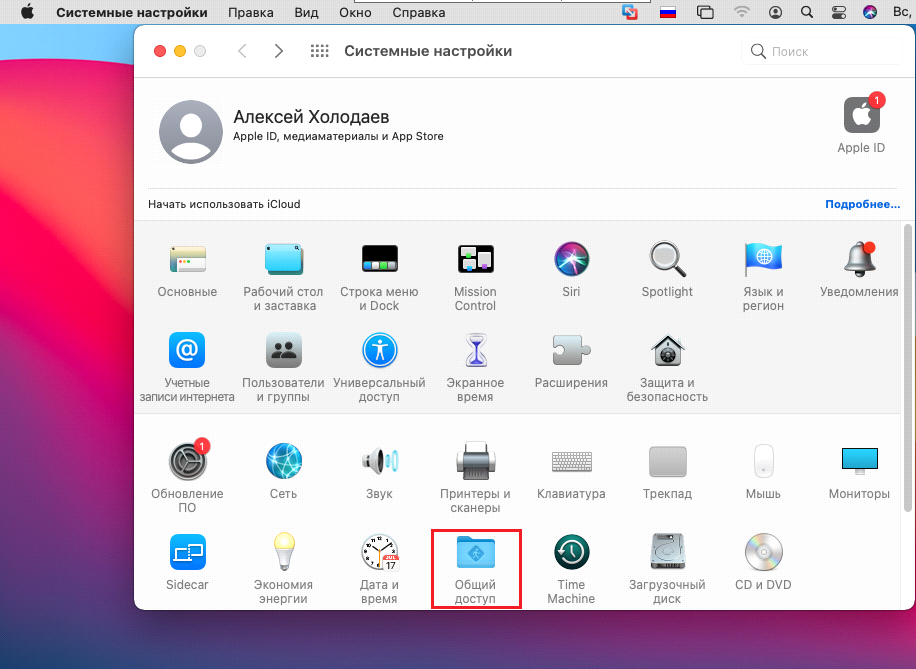
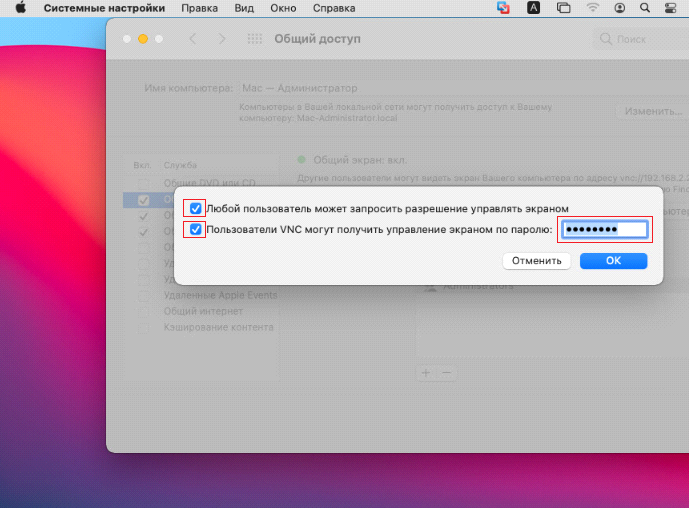
Включаем функцию «Общий экран» и переходим в настройки компьютера

Включаем опцию “любой пользователь может запросить разрешение управлять экраном” и задаём пароль в пункте “Пользователи VNC могут получить управление экраном по паролю”
Теперь загрузим необходимые пакеты.
Нам требуются xRDP и xOrgRDP в формате исходного кода.
Загрузить их можно отсюда (tar.gz архивы). После загрузки переместим данные архивы в папку, которую мы ранее создали, и извлечём их.
cp /Users/admin/Downloads/xrdp-0.9.11.tar /Users/admin/Documents/xrdp/
tar -xvf xrdp-0.9.11.tar
rm xrdp-0.9.11.tar

cp /Users/admin/Downloads/xorgxrdp-0.2.11.tar /Users/admin/Documents/xrdp/
tar -xvf xorgxrdp-0.2.11.tar
rm xorgxrdp-0.2.11.tar
Сборка xRDP
Запустим Bootstrapper и сконфигурируем сборку с помощью OpenSSL. Затем запустим make установщик.
Если вы получаете ошибку на этом шаге, то скорей всего это связано с неправильным экспортом OpenSSL CPPFLAGS.
Сборка xOrgRDP
Запустим Bootstrapper и сконфигурируем сборку так, чтоб она происходила при помощи OpenSSL. Затем запустим make установщик.
cd ../xorgxrdp-0.2.11/
./bootstrap
./configure PKG_CONFIG_PATH=/opt/X11/lib/pkgconfig
make
sudo make install
Если вы столкнулись с ошибкой, убедитесь, что вы перезапустили сессию после установки сервера xQuartz X11. Если вы получаете ошибку /opt/X11/include/xorg/dixfontstr.h:30:10:fatal error ‘X11/fonts/libxfont2.h’ file not found, необходимо поправить файл dixfontstr.h, прописав #include “/opt/X11/fonts/libxfont2.h” вместо #include “/X11/fonts/libxfont2.h”.
xRDP сервер почти готов. Теперь необходимо настроить его. Давайте откроем файл xrdp.ini.
sudo vi /etc/xrdp/xrdp.iniНайдём секцию в файле со всеми типами сессий.
[Xorg]
name=Xorg
lib=libxup.so
username=ask
password=ask
ip=127.0.0.1
port=-1
code=20

[Xvnc]
name=Xvnc
lib=libvnc.so
username=ask
password=ask
ip=127.0.0.1
port=-1
#xserverbpp=24
#delay_ms=2000

[vnc-any]
name=vnc-any
lib=libvnc.so
ip=ask
port=ask5900
username=na
password=ask
#pamusername=asksame
#pampassword=asksame
#pamsessionmng=127.0.0.1
#delay_ms=2000

[neutrinordp-any]
name=neutrinordp-any
lib=libxrdpneutrinordp.so
ip=ask
port=ask3389
username=ask
password=ask
Я буду подключаться через модуль Xvnc. Используем библиотеку libvnc.dylib вместо libvnc.so. Я закомментирую все модули, которые не буду использовать. Вот так будет выглядеть изменённая секция с типами сессий в файле xrdp.ini.
#[Xorg]
#name=Xorg
#lib=libxup.so
#username=ask
#password=ask
#ip=127.0.0.1
#port=-1
#code=20

[Xvnc]
name=Xvnc
lib=libvnc.dylib
username=ask
password=ask
ip=127.0.0.1
port=5900
xserverbpp=24
#delay_ms=2000

#[vnc-any]
#name=RDP to VNC Connector
#lib=libvnc.so
#ip=127.0.0.1
#port=5900
#username=ask
#password=ask
#xserverbpp=24
#pamusername=asksame
#pampassword=asksame
#pamsessionmng=127.0.0.1
#delay_ms=2000

#[neutrinordp-any]
#name=neutrinordp-any
#lib=libxrdpneutrinordp.so
#ip=ask
#port=ask3389
#username=ask
#password=askПримечание: В редакторе vi нажмите клавишу «i», чтобы войти в режим редактирования. Чтобы сохранить и выйти, нажмите «ESC» и введите :wq!
Теперь запустим демоны xRDP и xRDP-sesman. Они находятся по пути /usr/local/sbin/.
Выполним следующие команды:
sudo /usr/local/sbin/xrdpsudo /usr/local/sbin/xrdp-sesmanПробуем подключиться по RDP. Вводим логин и пароль, нажимаем ENTER.
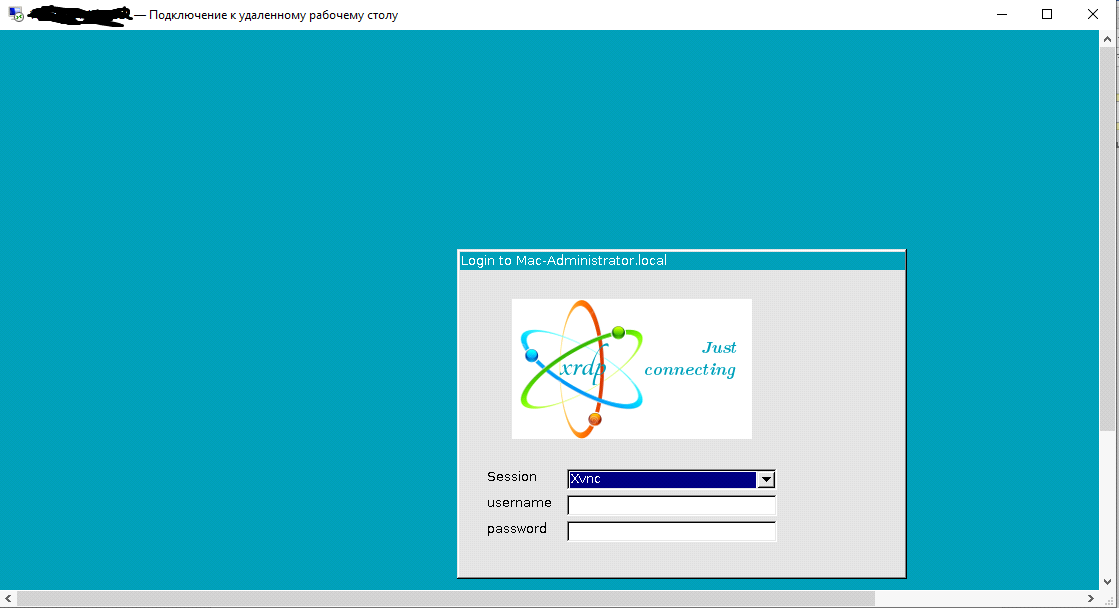
Если у вас появилось окно авторизации MacOS, значит, всё работает правильно.

Если у вас возникают какие-либо ошибки, смотрите логи. Они находятся по пути:
/var/logs/xrdp.log

/var/logs/xrdp-sesman.log
Вот таким способом можно предоставить доступ на MAC OS по протоколу RDP. Спасибо за внимание!
Что ещё интересного есть в блоге Cloud4Y
→ История Game Genie — чит-устройства, которое всколыхнуло мир
→ Как я случайно заблокировал 10 000 телефонов в Южной Америке
→ Странные продукты Apple
→ WD-40: средство, которое может почти всё
→ Как ИИ учится рисовать аниме
Подписывайтесь на наш Telegram-канал, чтобы не пропустить очередную статью. Пишем не чаще двух раз в неделю и только по делу.
Quick Links
- Connecting to Windows PC Clients from a Mac
- Connecting to a Mac from a Windows PC
Sharing your screen remotely is a convenient way to access another computer as if you’re sitting in front of it. OS X and Windows have this ability built right into them, meaning you can easily share your Mac’s screen with Windows PCs, and vice versa.
If you run a mixed network, it’s most likely a combination of Macs and Windows PCs. You might have a Linux machine tossed in there to serve files, but most people have Windows or Macs, and sometimes both.
With each method described below, we’re connecting from a client that we installed on our system to a target computer. On our Mac we’re using the Remote Desktop (RDP) application, and on Windows the RealVNC Viewer.
These tools allow us to connect to the targets computer via each system’s native method. In other words, Windows uses RDP natively while OS X uses VNC. This means we have to do almost no configuring to the targets, so getting everything working is usually hassle-free.
Connecting to Windows PC Clients from a Mac
We’ve previously discussed how to use Remote Desktop to access other Windows computers in the same house. It’s not so much different doing it from OS X, but let’s go through it for the sake of thoroughness.
To connect to a Windows PC, you must first turn on remote connections. Open the System Properties and click the «Remote» tab, then make sure «Allow remote connections to this computer» is enabled.
You also want to make sure you install the Microsoft Remote Desktop client on your Mac. It is available in the App Store.
Remote Desktop will be installed in your Mac’s Application’s folder. In our example, we’ve already set up a user profile, which is ready for action. Let’s take a moment, however, to click «Edit» and show you what’s involved.

Next to «Connection name» we give it a friendly name while the «PC name» is either the name we gave our target PC or its IP address.
We don’t worry about configuring a gateway because we’re connecting to our PC within our local network. Also, if you do not want to enter your user name and password every time you connect, you can add them to the «Credentials.» Not entering any credentials means that when you connect to your Windows machine, you will need to log into an account.
If you want to know what your PC’s name and/or IP address is, you need to check. Use the keyboard shortcut «Windows + R» and then type «cmd» to open a command prompt. In the command prompt, type «ipconfig» and hit «Return.» You want to use the IPv4 address it gives you.
If you can’t remember what you named your computer, you can find that information on the «System» control panel.
The rest of the Remote Desktop connection’s settings concern resolution, colors, and full screen options.
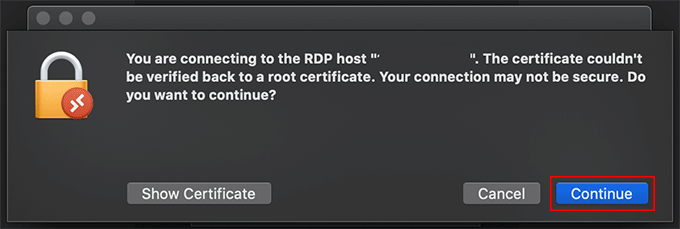
When you connect to a new client, you’ll likely see a Verify Certificate dialog. Click «Continue» to connect.
If you don’t want to see this warning dialog in the future, click «Show Certificate» and then check the «Always trust …» option as shown below.
To confirm changes to your certificate trust settings, you will need to enter your system password.
Remember, if you didn’t previously enter anything in the connection credentials, you will see the login screen when you first connect. Once you’ve successfully connected to your Windows PC from your Mac, your Windows desktop will appear.
As we mentioned, being able to connect to a Windows machine is a pleasant convenience. For example, your Windows PC may be a super beefy machine you use to do compiling or rendering. You can use remote desktop to check on a job’s progress or start tasks without actually being physically at the machine.
Connecting to a Mac from a Windows PC
Connecting to a Mac from a Windows PC is a little different. You’re not going to be able to use Remote Desktop, but that’s okay because there’s a free client called RealVNC viewer that does the trick nicely.
Just like with Windows, you first have to set up your Mac for screen sharing. Open the «Sharing» preference panel and check the box next to «Screen Sharing.»
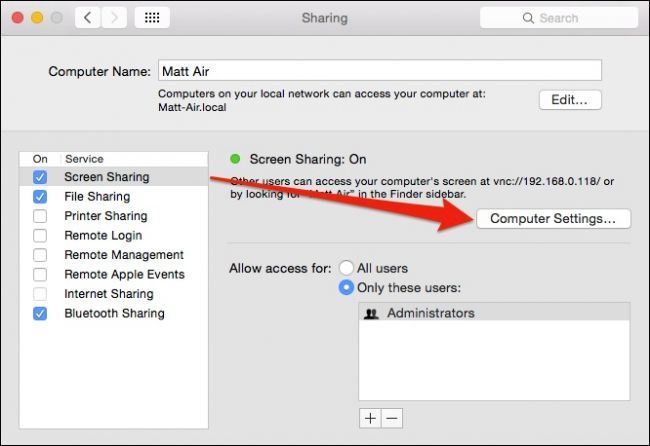
Click «Computer Settings…» and make sure «VNC viewers may control screen with password» is checked. Then enter a simple password.
The VNC Viewer requires installation, but you don’t have to sign up for an account to use it.
Recall from the earlier screenshot that our Mac’s screen can be accessed at 192.168.0.118 or Matt-Air.local. If you’re unsure how to access your Mac, go back to your Sharing preferences and double-check the information on the Screen Sharing settings.
We enter «192.168.0.118» in our VNC client and leave the encryption as it is.
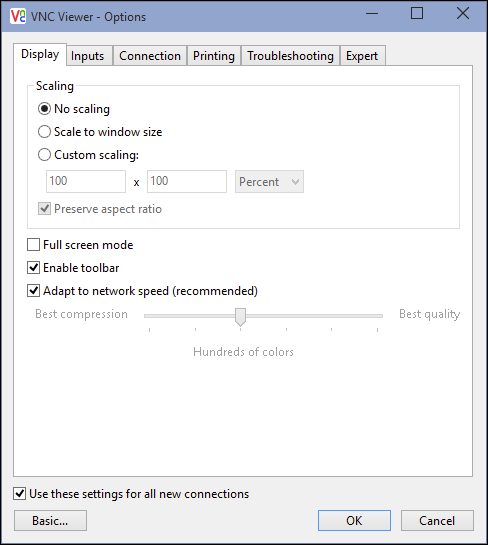
The RealVNC Viewer application has a plethora of options you can peruse at your leisure. You’ll probably be fine leaving them as is, though, if you want your connection to automatically open full screen, you need to tick the box next to «Full screen mode.»
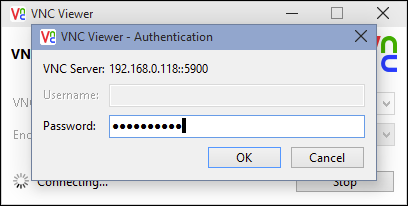
We return to our connection and click the «Connect» button. An authentication box will appear where you will need to enter the simple password you created in the Sharing preferences on your Mac.
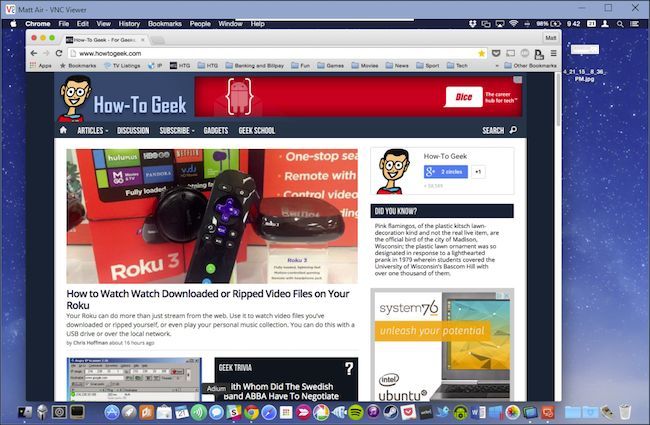
When you connect to the target Mac, you will also need to log into a (presumably yours) user account, just like we had to do with Windows (if we didn’t supply our credentials). Once logged in, your Mac desktop will now appear in the VNC Viewer window in the same state as you left it.
If you mouse to the top-middle of the window, you can spawn extra controls, which when you hover will give you a tooltip explaining what each one does.
You’ll find handy shortcuts to close and save the connection, as well as to change options, and a full-screen button so your shared desktop fills the screen.
On the Mac side of things, a Screen Sharing icon will appear in the menu bar. This lets you quickly and easily access the Screen Sharing preferences or disconnect clients.

It’s important to remember that sharing a computer screen is really only suited for short bits of work. If you were trying to remotely repair something or show another user how to do something, it’s ideal, but to get any meaningful work done, not so much. You will always experience a little bit of lag and stutter, and there’s not a whole lot you can do about that.
Like we said, however, it’s not intended for heavy-duty work. Keep in mind also, we’re only sharing our screens locally, which means that if you leave the house, say to go get coffee, and you realize you need to connect to a machine at home, you’ll need to know how to connect to it through your router. There are ways to do this with a Mac as well as Windows machines.
We encourage you to check out those articles for more information on how to remotely connect to your machines at home. If you have any comments or questions about what you’ve read today, please leave your feedback in our discussion forum.
If you have to use Mac and Windows PCs regularly, you don’t need to physically switch computers to be able to use both of them. You can use Windows Remote Desktop for macOS, to allow you to use both machines at the same time.
Windows Remote Desktop for Mac uses Microsoft’s Remote Desktop Protocol, built into Windows 10, to display your Windows desktop on your macOS screen. You can run Windows apps, change settings, and share files and folders between your Mac and Windows devices.
There are two versions of Windows Remote Desktop for Mac, and which one you should use depends on your current version of macOS. In most cases, you should install Microsoft Remote Desktop for Mac 10.
If it doesn’t work, try the older Microsoft Remote Desktop for Mac 8 app instead, although version 8 is scheduled to be removed from the Mac App Store sometime soon.
- To install it, open the App Store. You can find this in your Launchpad, located in the Dock at the bottom of your screen, or by searching for it in the Spotlight Search tool in the top-right of your screen.
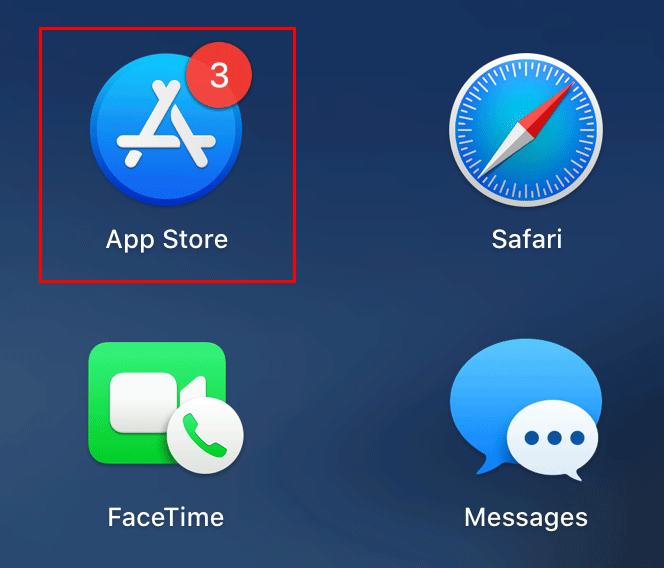
- In the App Store, click on the search bar in the left-hand menu, and type in Microsoft Remote Desktop. Once you’ve located it in the search results, click the Get button to install it.
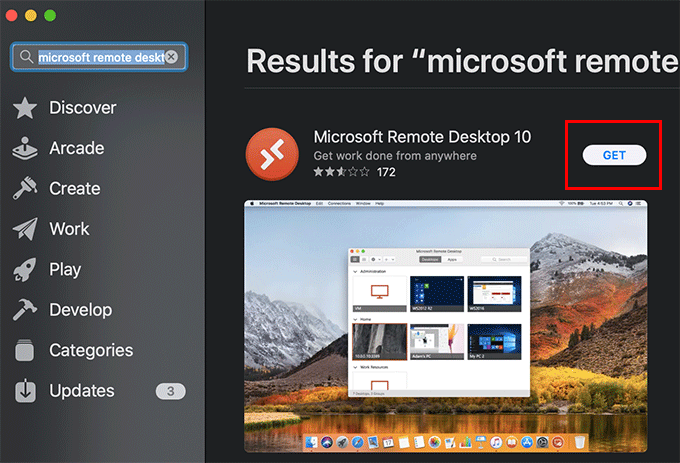
- The Get button will change to a green Install button. Click that too, then approve the installation by providing your Apple ID password. Click the second Get button to continue.
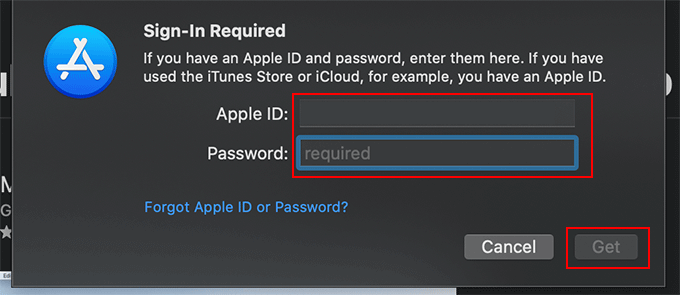
- Once installed, click the Open button, or locate the app in the Launchpad.
You may need to approve some additional permissions once you’ve opened the Microsoft Remote Desktop app. Approve and accept these, and then you can begin using it.
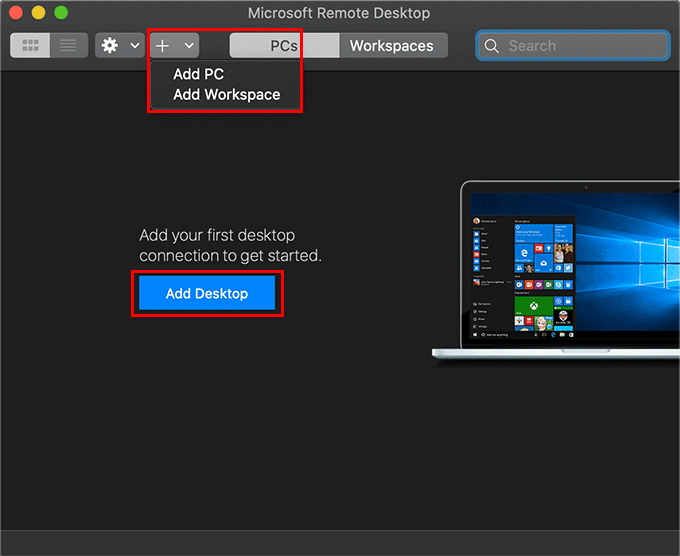
Adding a Remote Desktop Connection
Once you’ve opened the Remote Desktop for Mac, you’ll be able to add a new remote desktop connection.
- Click the Add Desktop button in the center of the window. Alternatively, click the plus button in the top menu, then click Add PC or Add Workspace.
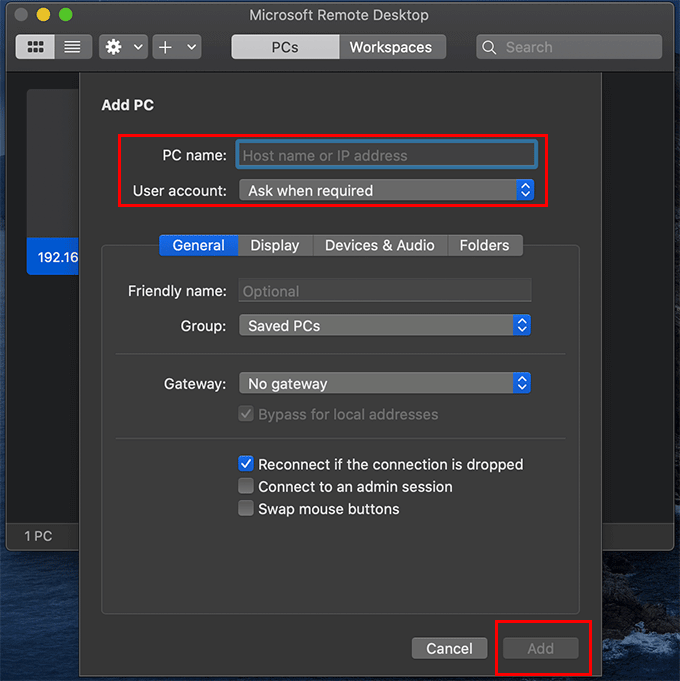
- Fill out the Add PC form with the relevant information for your remote Windows PC. To use the standard RDP settings, start by adding your Windows PC’s IP address in the PC Name text box. Provide a memorable name in the Friendly Name box. Click Add once the settings are confirmed.
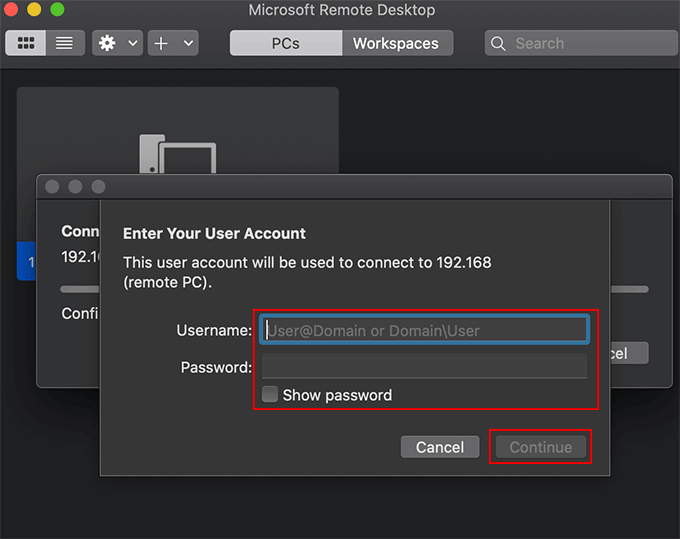
- Your connection will appear, saved and ready to connect in the main Remote Desktop for Mac window. Double-click on the entry to begin your connection. You’ll be asked to provide the username and password for your Windows PC at this point. Provide them, then click Continue to connect.
- If it’s your first connection, you may need to accept a security warning. Make sure you only agree to this if you’re connecting to a server you trust. If you do, click Continue to disregard the message and make the connection.
After a few seconds, the remote desktop connection to your Windows PC will complete and launch, full screen, ready for you to use.
Configuring a Remote Desktop Connection
Further configuration options are available, including the ability to change the quality of the connection and to redirect local devices connected to your Mac to your remote Windows PC.
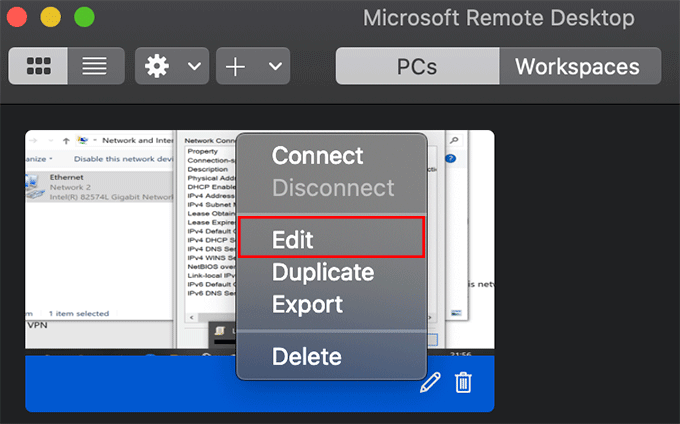
- To edit a saved connection, hover over your server and click the pencil button. Alternatively, right-click on the saved connection and click Edit.
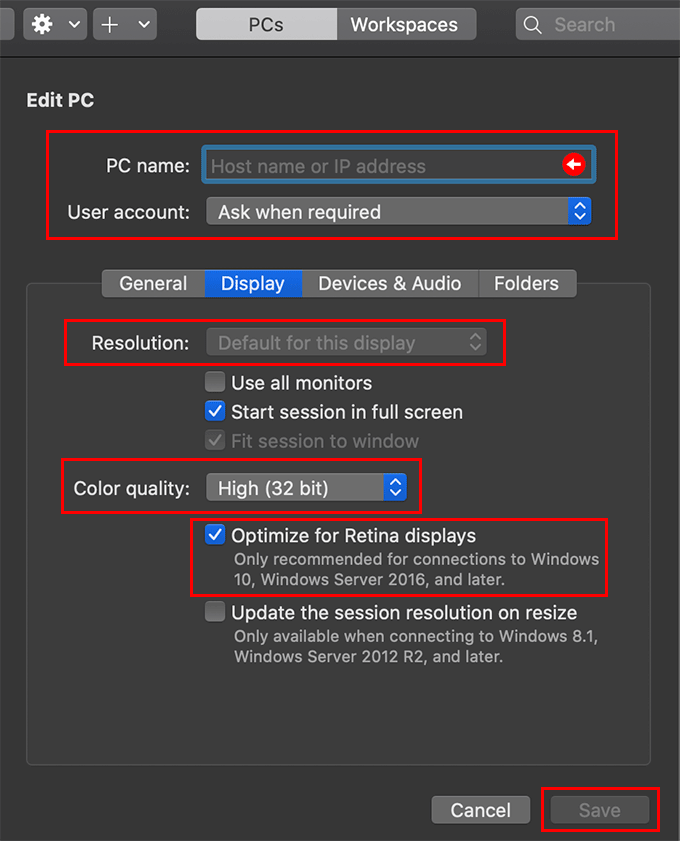
- If you have a Mac with a Retina display, you’ll want to optimize the resolution of your remote connection. In the Display tab, click to enable the Optimize for Retina displays checkbox. You can also customize the color quality of your connection from the Color quality drop-down menu. You can set the overall resolution of your connection from your Resolution drop-down menu. Click Save to complete.
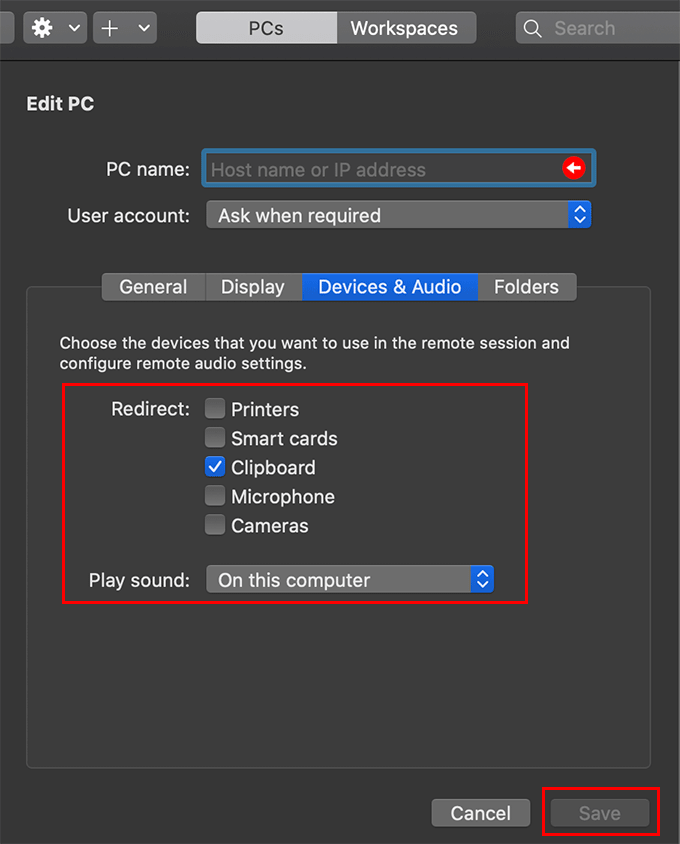
- In the Devices & Audio tab, you can select what local devices you want to be able to access on your remote Windows PC. Click to check any of the checkboxes listed. You can also select whether to play sounds locally or remotely from the Play sound drop-down menu. As before, click Save to complete.
Sharing Files & Folders Between Mac & Windows
It’s also possible to share files and folders between your local Mac computer and your remote Windows PC.
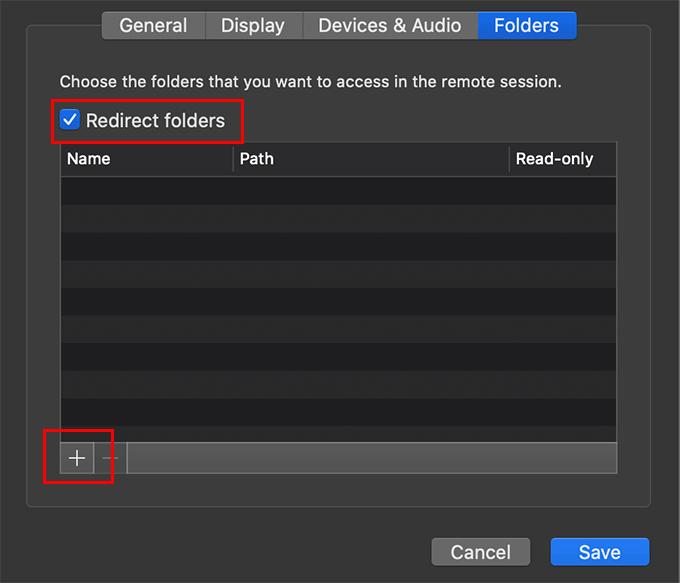
- To do that, right-click your saved server and click Edit, then click the Folders tab. Click the Redirect Folders checkbox, then click the plus button at the bottom of the window.
- Select the folders you want to share in the Finder window, then click Open to add them to your list. If you want to make them read-only, click the checkbox next to each folder entry under the Read-only column. Click Save once you’ve finished adding the folders you want to share.
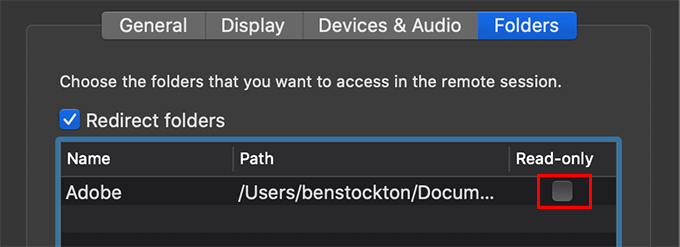
Your shared Mac folders will then appear as network drives, listed as Redirected drives and folders, in the This PC section of Windows File Explorer once you make the connection.
Sharing a Remote Desktop Across Mac Computers
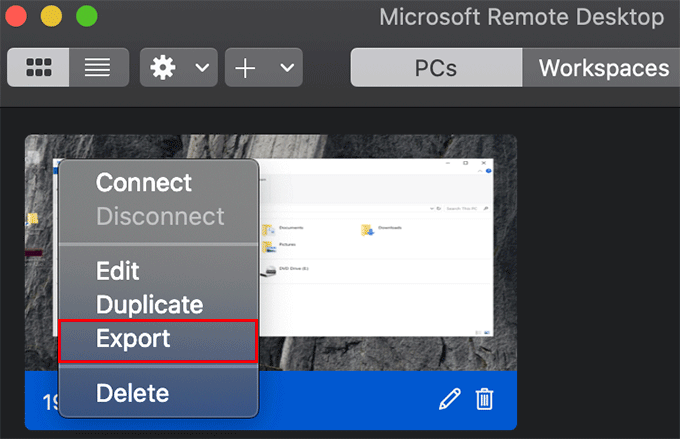
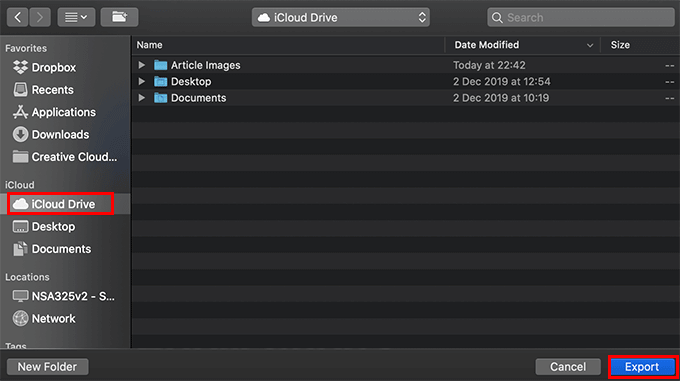
If you have multiple Mac computers and you want to share the same configuration file for your Windows remote desktop, you can save the file and place it in your iCloud storage for you to access.
This requires each Mac computer to use the same Apple ID for iCloud storage.
- To export your remote desktop configuration, right-click your saved connection in the Microsoft Remote Desktop app, then click Export.
- Exporting RDP configuration files removes any saved passwords, which the Microsoft Remote Desktop app will warn you. Accept this warning by clicking Browse.
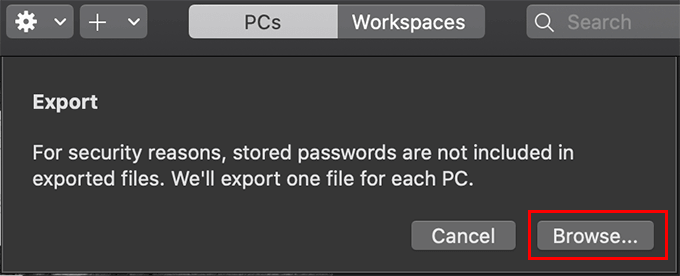
- In the Finder window, click iCloud Drive in the left-hand menu. Save your connection file by clicking Export.
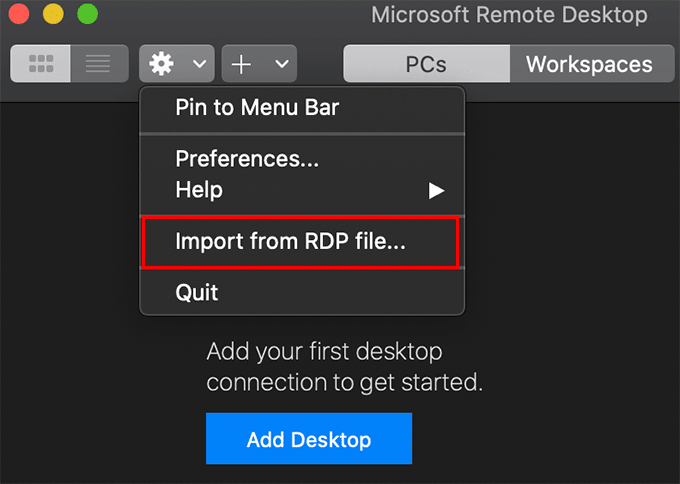
- On another Mac computer, open Microsoft Remote Desktop for Mac, click the Settings icon in the top menu bar, then click Import from RDP file.
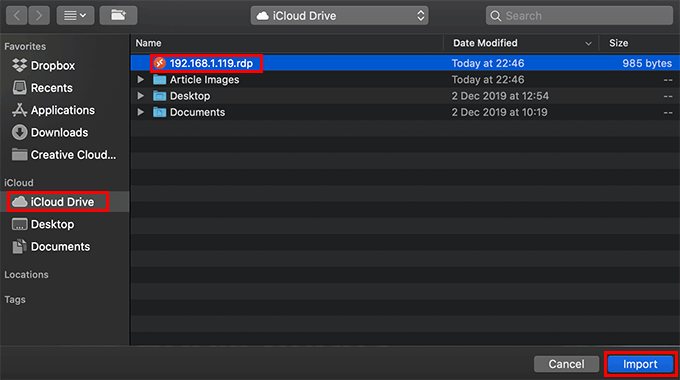
- In the Finder window that appears, click iCloud Drive in the left-hand menu. Find and select your saved RDP file, then click Import.
Once you’ve imported your saved RDP file, you’ll then be able to connect to your remote Windows server as before.