Используйте удаленный рабочий стол на устройстве с Windows, Android или iOS, чтобы дистанционно подключиться к компьютеру с Windows 10. Вот как настроить компьютер для разрешения удаленных подключений, а затем подключиться к настроенному компьютеру.
Примечание: В то время как сервер удаленного рабочего стола (например, компьютер, к которому вы подключаетесь) должен работать под управлением версии Windows Pro, клиентский компьютер (устройство, с которым вы подключаетесь) может работать под управлением любой версии Windows (Pro или Home). или даже другой операционной системы.
-
Включите удаленные подключения на компьютере, к которому требуется подключиться.
-
Убедитесь, что у вас установлена Windows 11 Pro. Чтобы проверить это, выберитеПуск и откройте Параметры . Затем в разделе Система , выберите О системе и в разделе Характеристики Windows найдите Выпуск. Сведения о том, как получить Windows 11 Pro, см. в статьеОбновление Windows Home до Windows Pro.
-
Когда будете готовы, нажмитеПуск и откройтеПараметры . Затем в разделе Система выберите Удаленный рабочий стол, установите для параметра Удаленный рабочий стол значение Включить, затем выберитеПодтвердить.
-
Запишите имя этого компьютера в поле Имя компьютера. Оно понадобится позже.
-
-
Используйте удаленный рабочий стол для подключения к настроенному компьютеру.
-
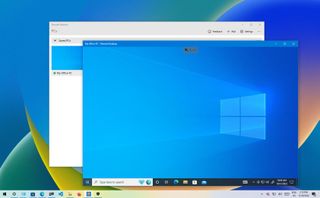
На локальном компьютере с Windows: В поле поиска на панели задач введите Подключение к удаленному рабочему столу и выберите Подключение к удаленному рабочему столу. В окне «Подключение к удаленному рабочему столу» введите имя компьютера, к которому необходимо подключиться (из шага 1), а затем нажмите кнопку Подключиться.
-
На устройстве с Windows, Android или iOS: Откройте приложение «Удаленный рабочий стол» (можно скачать бесплатно в Microsoft Store, Google Play и Mac App Store) и добавьте имя компьютера, к которому вы хотите подключиться (см. шаг 1). Выберите имя удаленного компьютера, которое вы добавили, и дождитесь завершения подключения.
-
-
Включите удаленные подключения на компьютере, к которому требуется подключиться.
-
Убедитесь, что у вас установлена Windows 10 Pro. Чтобы это проверить, перейдите в Пуск > Параметры > Система > О системе и найдите Выпуск. Сведения о том, как получить Windows 10 Pro, см. в статье Обновление Windows 10 Домашняя до Windows 10 Pro.
-
Когда будете готовы, выберите Пуск > Параметры > Система > Удаленный рабочий стол, и выберите Включить удаленный рабочий стол.
-
Запомните имя компьютера в разделе Как подключиться к этому ПК. Оно понадобится позже.
-
-
Используйте удаленный рабочий стол для подключения к настроенному компьютеру.
-
На локальном компьютере с Windows: В поле поиска на панели задач введите Подключение к удаленному рабочему столу и выберите Подключение к удаленному рабочему столу. В окне «Подключение к удаленному рабочему столу» введите имя компьютера, к которому необходимо подключиться (из шага 1), а затем нажмите кнопку Подключиться.
-
На устройстве с Windows, Android или iOS Откройте приложение «Удаленный рабочий стол» (можно скачать бесплатно в Microsoft Store, Google Play и Mac App Store) и добавьте имя компьютера, к которому вы хотите подключиться (см. шаг 1). Выберите имя удаленного компьютера, которое вы добавили, и дождитесь завершения подключения.
-
Включить удаленный рабочий стол
Нужна дополнительная помощь?
Нужны дополнительные параметры?
Изучите преимущества подписки, просмотрите учебные курсы, узнайте, как защитить свое устройство и т. д.
В сообществах можно задавать вопросы и отвечать на них, отправлять отзывы и консультироваться с экспертами разных профилей.
Use Remote Desktop on your Windows, Android, or iOS device to connect to a Windows 10 PC from afar. Here’s how to set up your PC to allow remote connections and then connect to the PC you set up.
Note: While a Remote Desktop server (as in, the PC that you are connecting to) needs to be running a Pro edition of Windows, a client machine (the device you are connecting from) can be running any edition of Windows (Pro or Home), or even a different operating system altogether.
-
Set up the PC you want to connect to so it allows remote connections:
-
Make sure you have Windows 11 Pro. To check this, select Start , and open Settings . Then, under System , select About , and under Windows specifications, look for Edition. For info on how to get Windows 11 Pro, go to Upgrade Windows Home to Windows Pro.
-
When you’re ready, select Start , and open Settings . Then, under System , select Remote Desktop, set Remote Desktop to On, and then select Confirm.
-
Make note of the name of this PC under PC name. You’ll need this later.
-
-
Use Remote Desktop to connect to the PC you set up:
-
On your local Windows PC: In the search box on the taskbar, type Remote Desktop Connection, and then select Remote Desktop Connection. In Remote Desktop Connection, type the name of the PC you want to connect to (from Step 1), and then select Connect.
-
On your Windows, Android, or iOS device: Open the Remote Desktop app (available for free from Microsoft Store, Google Play, and the Mac App Store), and add the name of the PC that you want to connect to (from Step 1). Select the remote PC name that you added, and then wait for the connection to complete.
-
-
Set up the PC you want to connect to so it allows remote connections:
-
Make sure you have Windows 10 Pro. To check this, go to Start > Settings > System > About and look for Edition. For info on how to get Windows 10 Pro, go to Upgrade Windows 10 Home to Windows 10 Pro.
-
When you’re ready, select Start > Settings > System > Remote Desktop, and turn on Enable Remote Desktop.
-
Make note of the name of this PC under How to connect to this PC. You’ll need this later.
-
-
Use Remote Desktop to connect to the PC you set up:
-
On your local Windows PC: In the search box on the taskbar, type Remote Desktop Connection, and then select Remote Desktop Connection. In Remote Desktop Connection, type the name of the PC you want to connect to (from Step 1), and then select Connect.
-
On your Windows, Android, or iOS device: Open the Remote Desktop app (available for free from Microsoft Store, Google Play, and the Mac App Store), and add the name of the PC that you want to connect to (from Step 1). Select the remote PC name that you added, and then wait for the connection to complete.
-
Enable Remote Desktop
Need more help?
Want more options?
Explore subscription benefits, browse training courses, learn how to secure your device, and more.
Communities help you ask and answer questions, give feedback, and hear from experts with rich knowledge.


*This article was updated to accommodate a guide for enabling Remote Desktop on Windows 11.
Microsoft Remote Desktop is most frequently used to provide technical support or control a computer remotely. It allows you to get full access to your Windows PC from another Windows, Mac, or Linux computer in order to transfer files, play video games, operate locally-attached peripherals, etc.
But before using Remote Desktop Protocol (RDP) to connect to a remote device, you should enable Remote Desktop first.
In this guide, we’ll explain how to allow remote desktop access to your computer using the Settings app in Windows 10/11 or the more traditional Control Panel.
Note: Remote Desktop is not available on Windows 10 and Windows 11 Home edition. Remote Desktop is only available for Pro and Enterprise versions. However, you could still use third-party solutions like Chrome Remote Desktop or Teamviewer to set up Remote Desktop on Windows 10/11 Home.
Enable RDP via System Settings in Windows 11
Let’s take a closer look at how to turn on RDP on Windows 11 with the help of the standard Settings app.
- Open Start → Settings.
- In the Settings window, select “System”. Then scroll down and click “Remote Desktop” on the right pane.

- Click the toggle switch button to enable the Remote Desktop on your Windows 11 device. Confirm your action in the pop-up window.


Once done, your PC is set up to connect via RDP. To connect to the remote machine, you can use, for example, the new Remote Desktop app or classic Remote Desktop Connection.
Allow RDP connections on Windows 10 using Settings
Using the Settings app, follow the steps below to enable remote access on Windows 10:
-
Open Settings on a Windows 10 device and select “System”.

-
Click “Remote Desktop”.
-
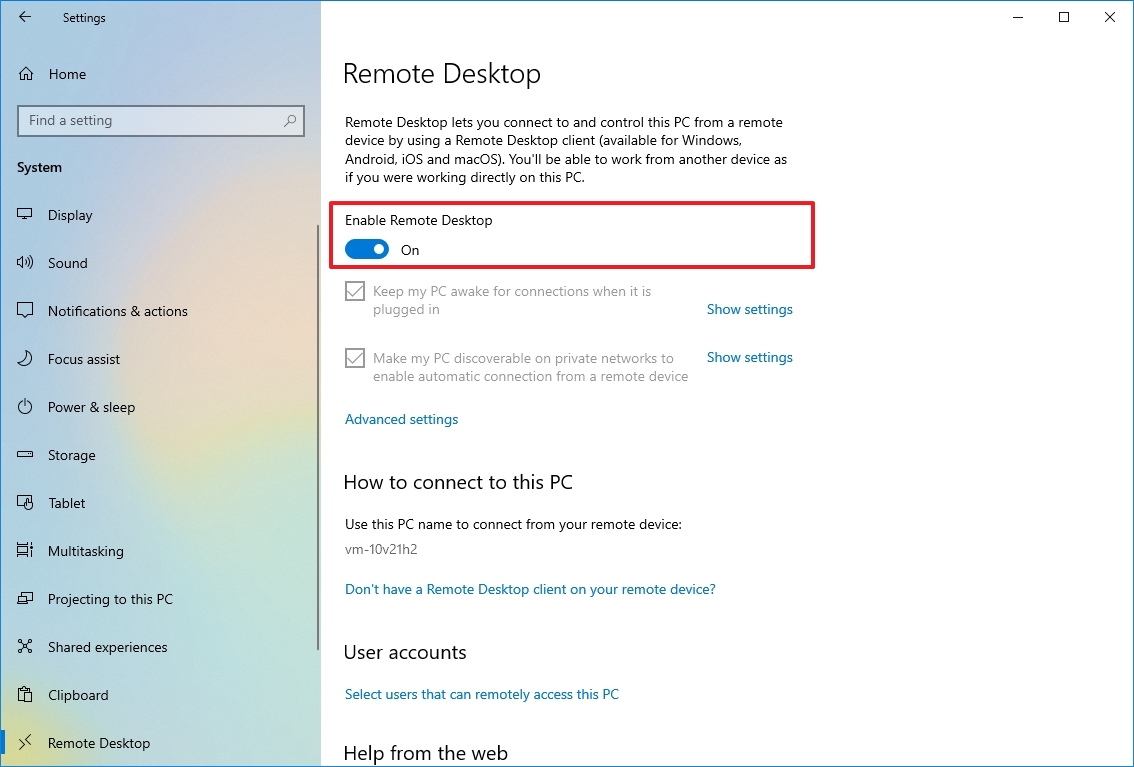
Toggle the “Enable Remote Desktop” switch to “On”.
-
Hit “Confirm”.


Once you’ve allowed Remote Desktop on Windows 10, there will be two additionally enabled options:
- • Keep my PC awake for connection when it’s plugged in.
- • Make my PC discoverable on private networks to enable automatic connection from a remote device.
These settings ensure that users always can connect to the remote machine whenever they like.

If users go to the “Advanced settings” window, they’ll see extra advanced features, like the option to require computers to utilize “Network Level Authentication” when connecting remotely.
This ensures the connections are more secure by restricting access only to those who can authorize the connection with the network before they can access the device.

Users will also find the current Remote Desktop port on the “Advanced settings” page. This information is useful if the user ever needs to reconfigure a router to permit remote desktop access from outside of their network.
Note: By default, the port number is set to 3389.
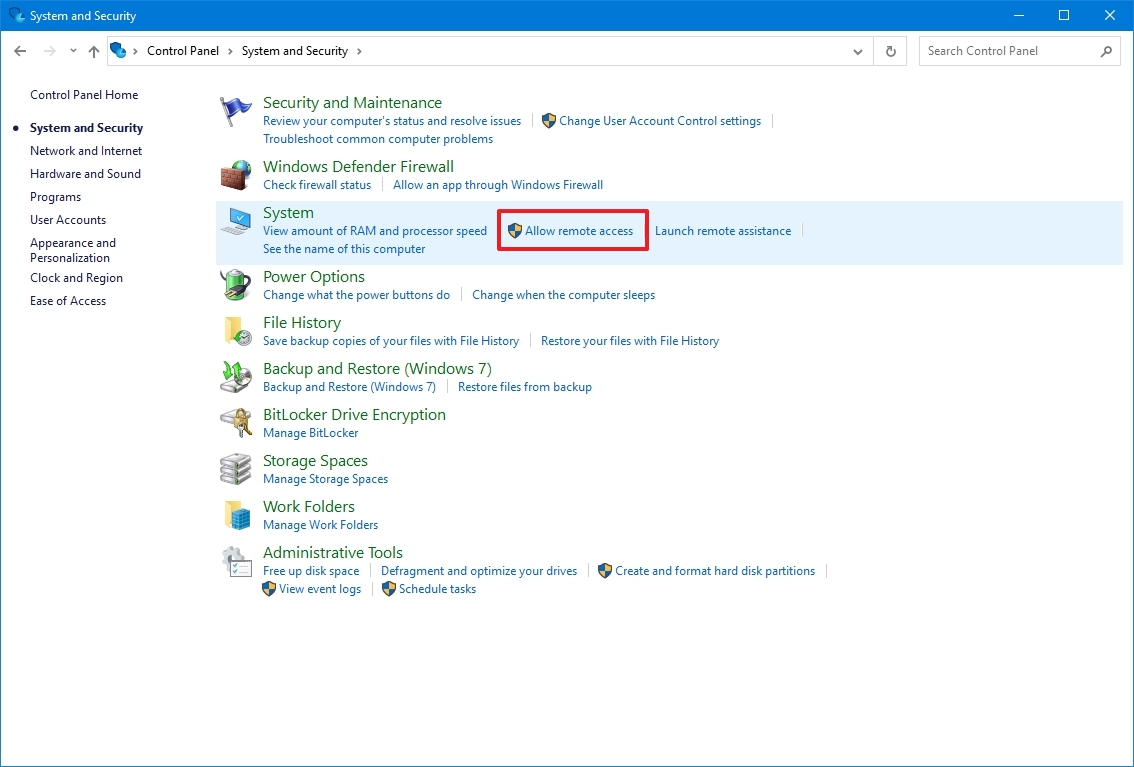
Allow remote connections on Windows 10/11 using the Control Panel
Even though the Settings app is an easy option for enabling remote access, it can also be done using the Control Panel. Below you’ll find the instructions on how to enable remote desktop on Windows 10 or 11 via the Control Panel:
- Open the Control Panel. The most optimal way would be to type in the query in the search box.

- Select “System and Security”.

- Under the “System” section, click “Allow remote access”.

- The System Properties window will appear. In the Remote tab, check the box “Allow Remote Assistance connections to this computer” in the section Remote Assistance. Then, select “Allow remote connections to this computer” in the section Remote Desktop.

- Hit “Apply” and then “OK”.


That’s it! Now, it will be possible to connect to this computer from a remote machine over RDP.
After turning on the remote desktop on Windows 10/11, it’s time to connect to the remote computer using the modern Remote Desktop application (recommended) or with the built-in Remote Desktop Connection (RDC) utility that comes with every Windows version.
If you would then need to disable Remote Desktop access to your Windows 10/11 device, then you should not experience any issues since you will need just to reverse the steps from this guide.
Note: Enabling RDP access in Windows 10/11 via the Control Panel, makes the “Network Level Authentication” option switched on by default (however, it is an option that users should keep on regardless).
Enabling RDP access through the Control Panel is available on previous Windows versions which will allow you to create a remote desktop connection from Windows 10 to Windows 7. However, the Settings app is only present in Windows 10 and 11.
(Image credit: Future)
On Windows 10, the «Remote Desktop» app makes connecting to other computers easy over the local network and internet. It’s also the experience that replaces the built-in legacy «Remote Desktop Connection» program, which is still available.
The app is user-friendly, but depending on the computer you need to establish a connection, the app is only one of the steps since you may have to configure additional settings, including forwarding the appropriate port in the router to connect to another device. Also, there’s a small problem. You can install the Remote Desktop app on any edition of Windows 10. However, the remote desktop protocol (RDP) that makes the connection possible is only available on the «Pro» edition and business variants of the operating system. (Windows 10 Home doesn’t allow remote connections.)
This guide will walk you through the steps to allow remote connections from within the local network or internet and how to use the Remote Desktop app to start a remote session.
How to allow remote connections on Windows 10
Remote Desktop makes it easy to connect to other computers. However, the configuration will depend on whether the connection happens over the local network or through the internet.
Enable remote connections
In a local area network (LAN), you only need to enable the option to allow remote desktop connections on your computer. You can complete this task from the Settings app or Control Panel.
Settings app
To enable the Remote Desktop feature using the Settings app, use these steps:
- Open Settings.
- Click on System.
- Click on Remote Desktop.
- Turn on the «Enable Remote Desktop» toggle switch.
- Click the Confirm button.
Once you complete the steps, remote desktop connections will be allowed on the device. Windows 10 will also add the necessary rules in the built-in Microsoft Defender Firewall. However, you may need to configure the rules manually if you have a third-party security solution.
Control Panel
To enable remote connections on Windows 10, use these steps:
- Open Control Panel.
- Click on System and Security.
- Under the «System» section, click the «Allow remote access» option.
- Click the Remote tab.
- Under the «Remote Desktop» section, check the «Allow remote connections to this computer» option.
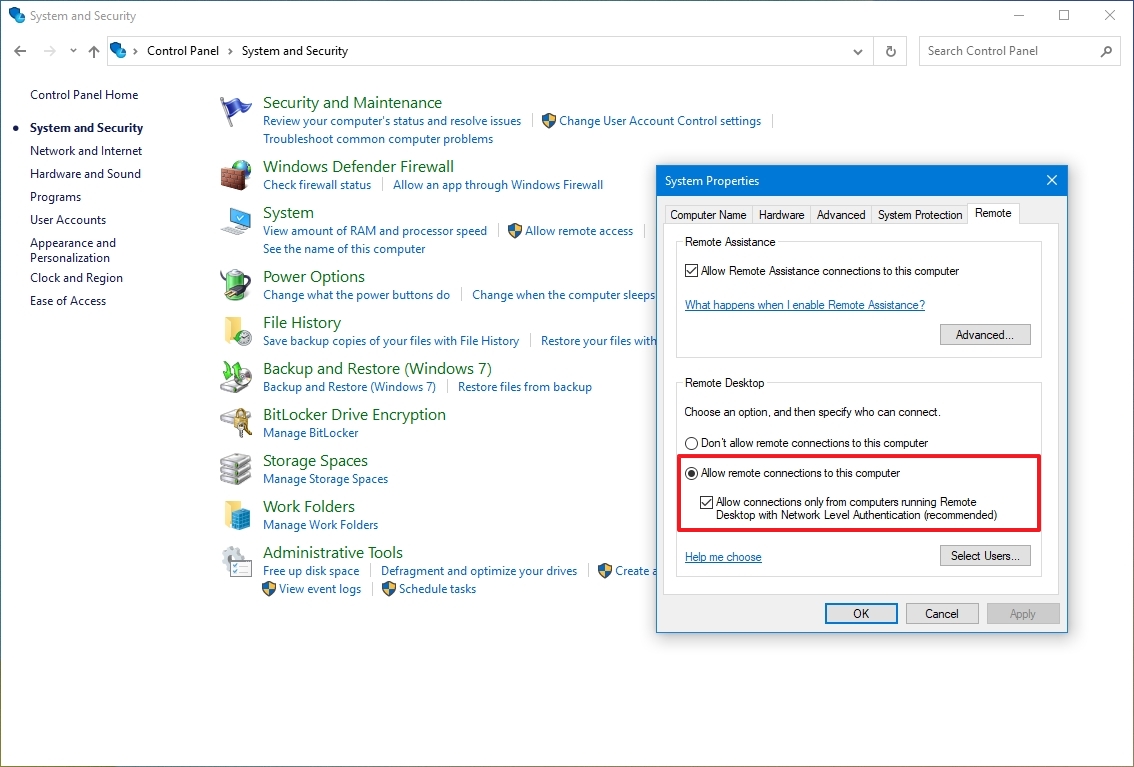
- Check the «Allow connections only from computers running Remote Desktop with Network Level Authentication» option.
- Click the OK button.
- Click the Apply button.
- Click the OK button.
Continue with the steps below if you need to configure a remote desktop using an internet connection. If you have to connect to another device within the local network, skip to the steps below, and continue with the start a remote desktop connection instructions.
Enable remote connections on router
If the remote connection happens over an internet connection, you will also have to configure the router to allow the remote connection. In addition, you will need to know the public address to contact the remote computer.
Configure static IP address
A computer usually receives a dynamic IP address from the DHCP server (router), which means it can change. If you plan to use the remote desktop feature for some time, you may want to configure a static IP address to avoid reconfiguring port forwarding on the router when the device changes the network configuration.
Control Panel
To configure a permanent network configuration, use these steps:
- Open Control Panel.
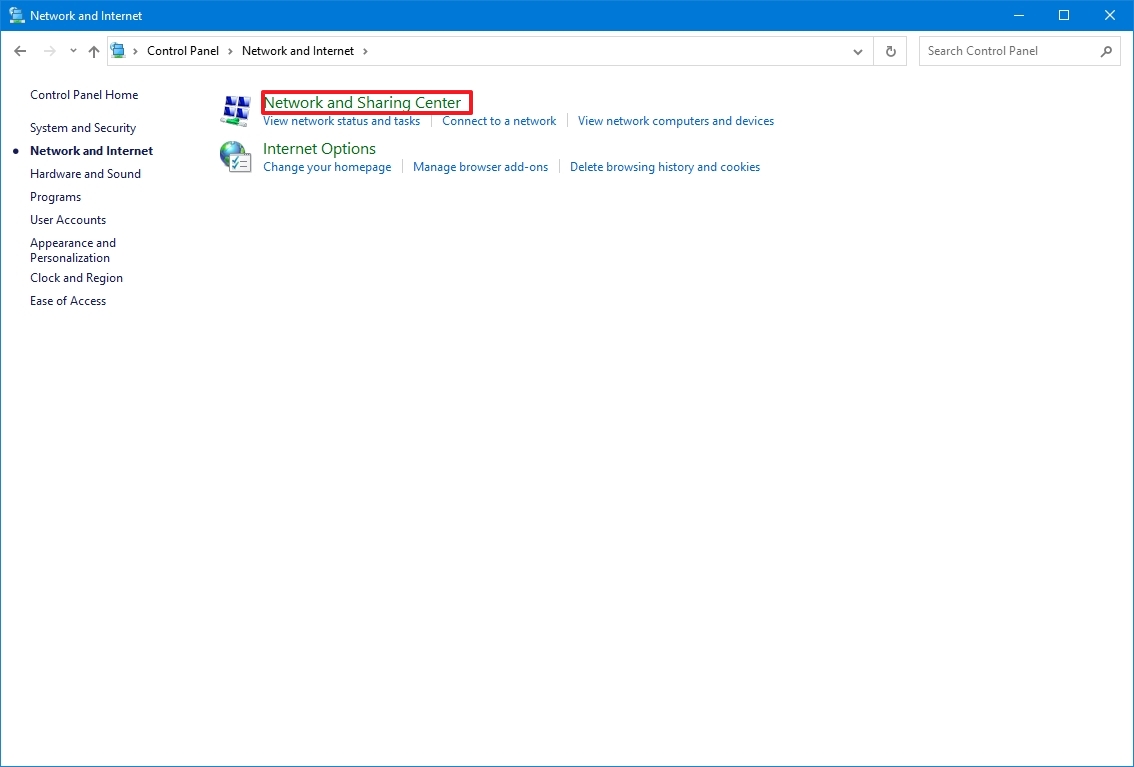
- Click on Network and Internet.
- Click on Network and Sharing Center.
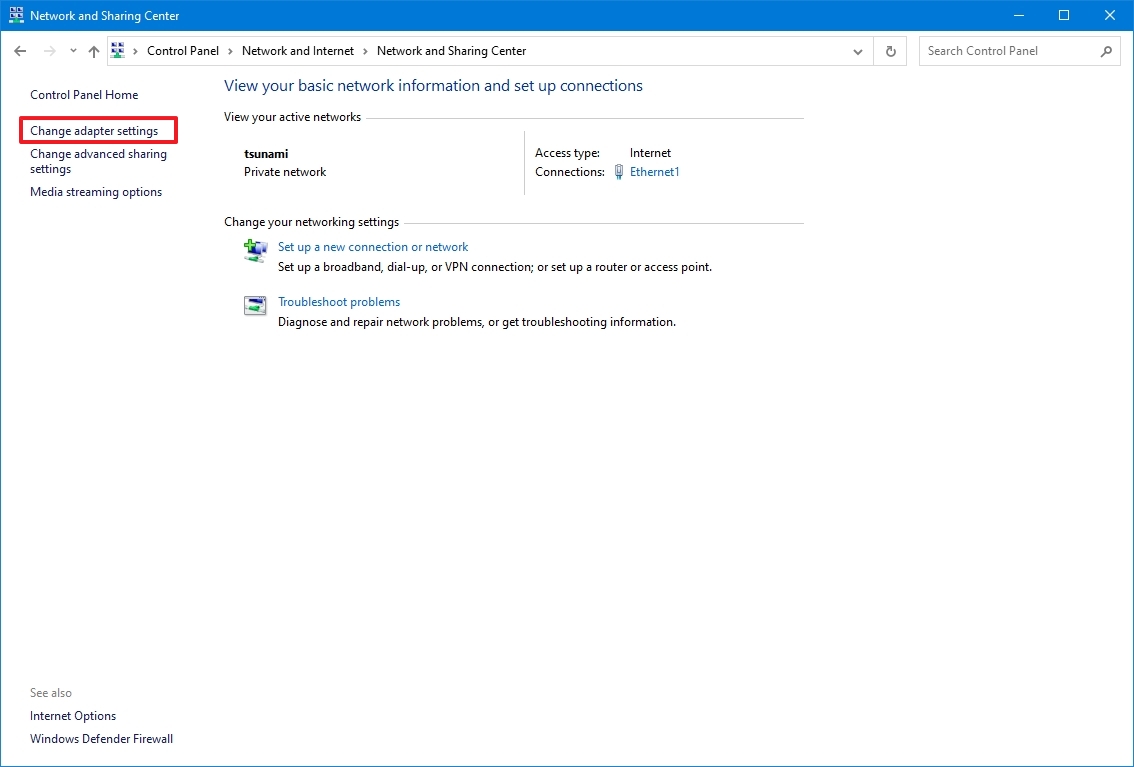
- Click the «Change adapter settings» option from the left navigation pane.
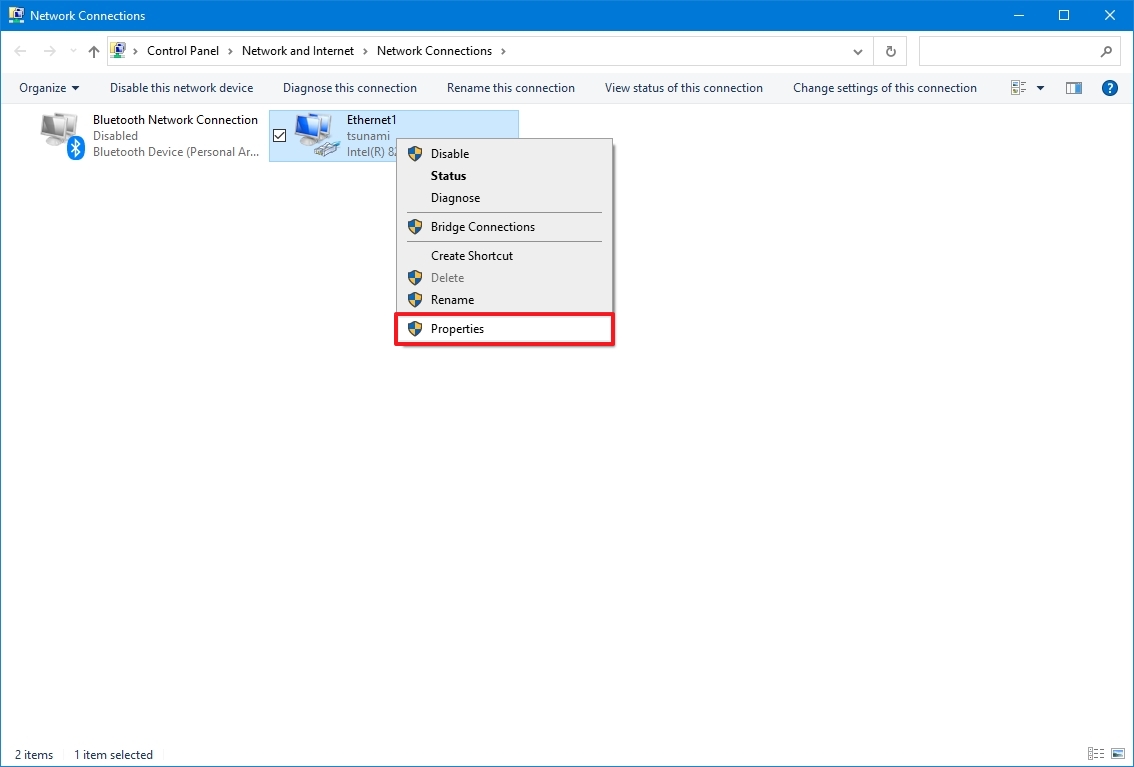
- Right-click the active network adapter and select the Properties option.
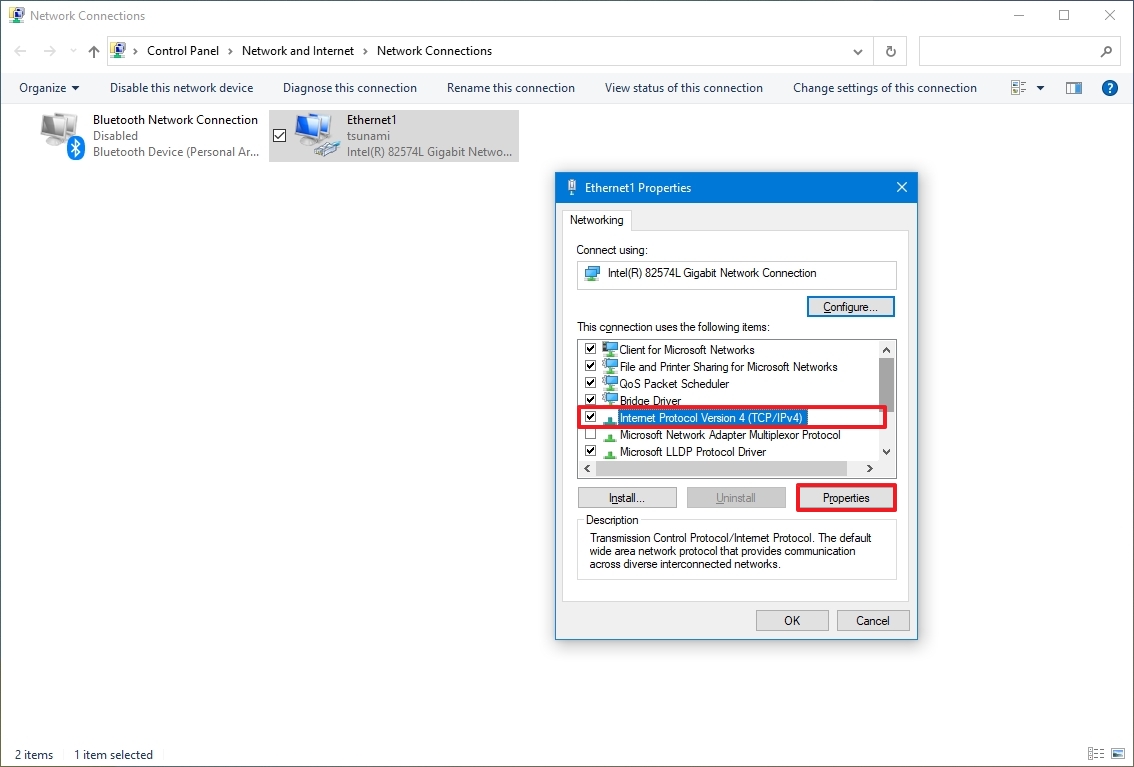
- Select the «Internet Protocol Version 4 (TCP/IPv4)» option.
- Click the Properties button.
- Click the General tab.
- Select the «Use the following IP address» option.
- Specify a local IP address outside the local DHCP scope to prevent address conflicts – for example, 10.1.4.201.
- Quick tip: Usually, you’ll find this information inside the DHCP settings section on the router. Since not every router is created equal, you may need to consult your manufacturer support website for more specific details to find this information. If you’re unsure of the configuration you have to use, use your current TCP/IP configuration as a reference, which you can review with the ipconfig /all command in Command Prompt.
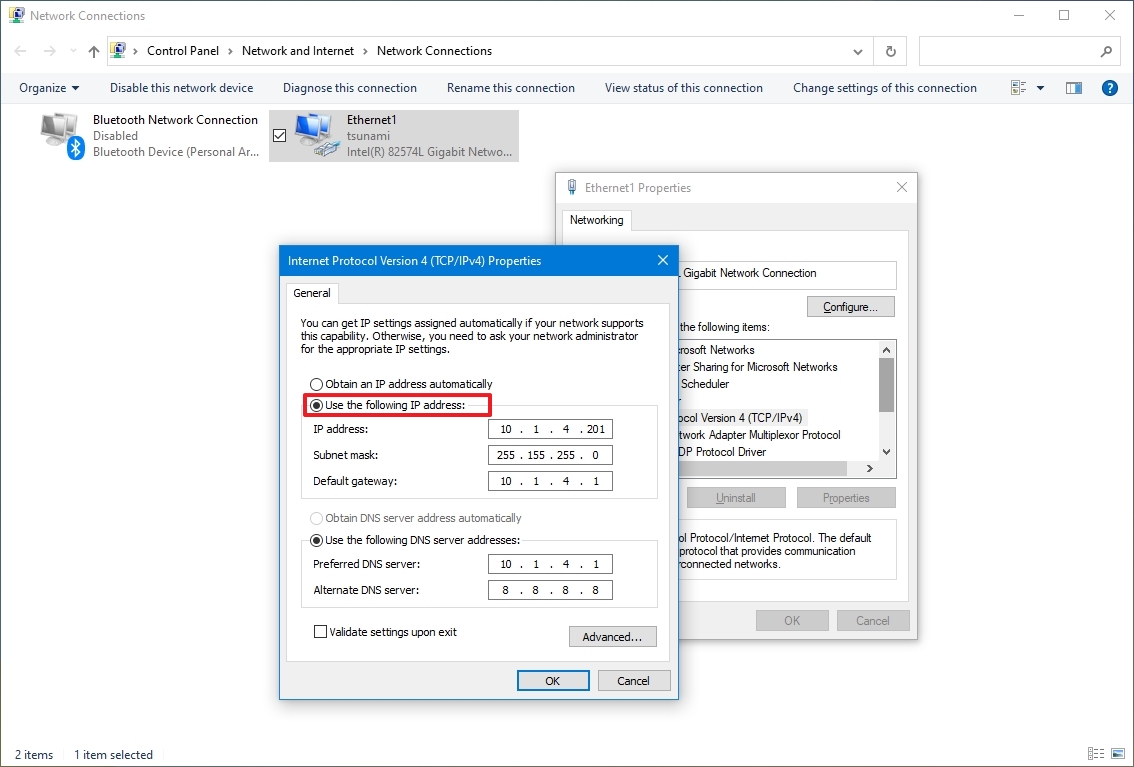
- Specify a subnet mask for the network (255.255.255.0), but the system usually fills this information from you based on the «IP address.»
- Specify the default gateway address, which should be the router’s address — for example, 10.1.4.1.
- Under the «Use the following DNS server addresses» section, in the «Preferred DNS server» field, specify the IP address of your DNS server, which in most cases is also the router’s address — for example, 10.1.4.1.
- Quick tip: If you can’t connect to the internet, try using one of the Google Public DNS addresses (such as 8.8.8.8) for the «Alternate DNS server» option.
- Click the OK button.
- Click the Close button.
After you complete the steps, the network configuration will apply, and the IP settings will never change.
Some routers include a feature to make the current TCP/IP configuration static. If you want to use this option, consult your manufacturer support website for specific steps to complete this task.
Identify network public IP address
You will also need the remote network’s public IP address to contact the device over the internet.
To determine the IP address assigned by the Internet Service Provider (ISP), use these steps:
- Open the web browser.
- Visit Bing.com or Google.com.
- Search for «What’s my IP.»
- Confirm the public IP address in the first result.
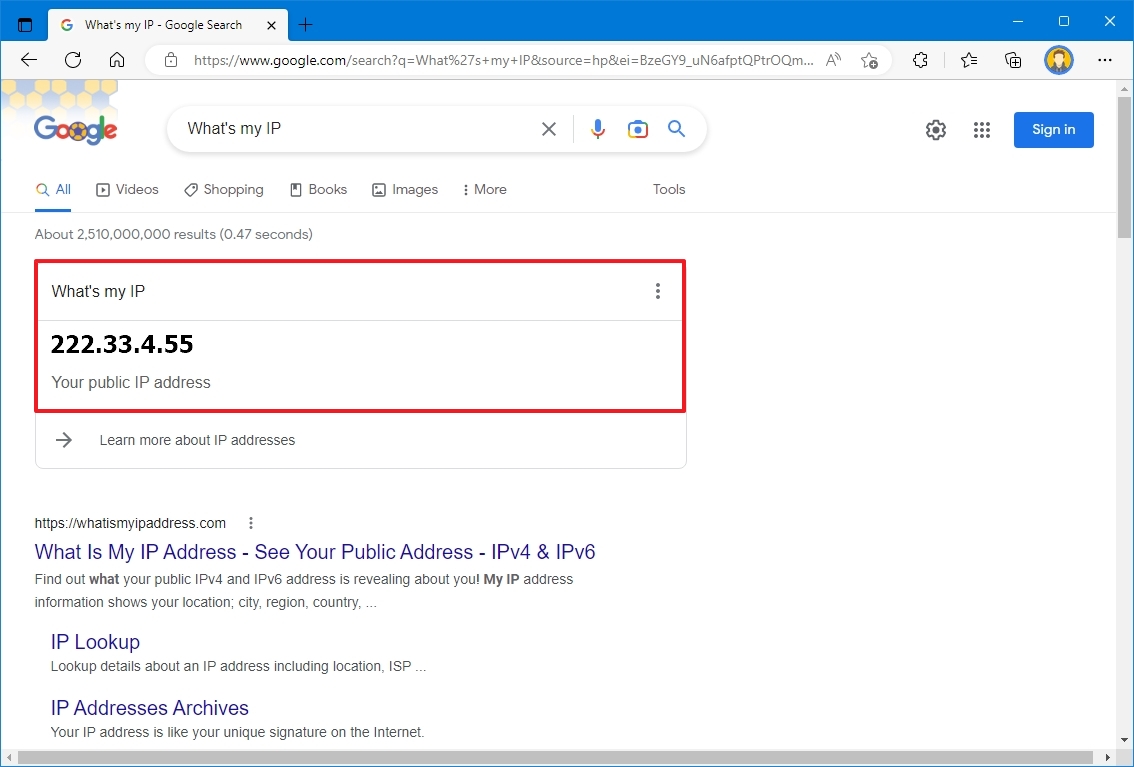
Typically, internet providers also offer dynamic public IP addresses for residential customers, which means that your public IP address may change from time to time.
If you need a more reliable solution, you may want to look into «Dynamic Domain Name System» (DDNS) services (such as DynDNS, OpenDNS, No-IP, or Asus.com for Asus routers), which can track public IP changes. Alternatively, you can also contact your ISP to request a static IP address, which might cost you extra since this is typically a feature reserved for businesses.
Configure port forwarding
You must also forward the TCP port 3389 on the router to allow connections through the internet to the computer in the local network.
Quick note: The router interface experience can vary depending on the manufacturer. However, you can use these instructions as a reference to configure your router. You can always check the manufacturer support website for more specific details.
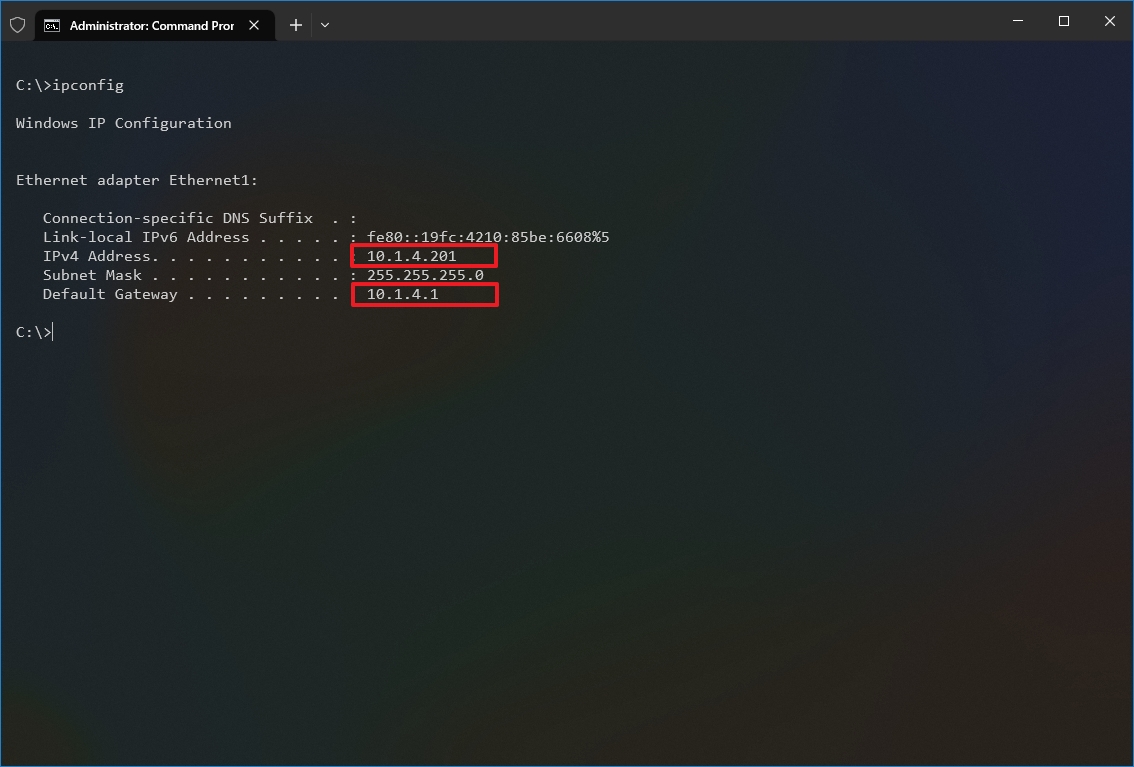
To forward a port on your router, use these steps:
- Open Start.
- Search for Command Prompt and click the top result to open the app.
- Type the following command to check the current TCP/IP configuration and press Enter: ipconfig
- Under the «IPv4 Address» field, confirm the device address — for example, 10.1.4.201.
- Under the «Default Gateway» field, confirm the device gateway address (the router address) — for example, 10.1.4.1.
- Open your preferred browser.
- Type the router’s IP address (default gateway) in the address bar and press Enter.
- Sign in to the router using the correct username and password.
- Quick tip: If you have never done this, and you are using the router provided by the ISP, you may be able to find the information on a sticker attached to the device.
- Open the Port Forwarding settings page.
- Confirm that the Port Forwarding service is enabled (if applicable).
- Under the port forwarding list, click (in this case) the Add profile button.
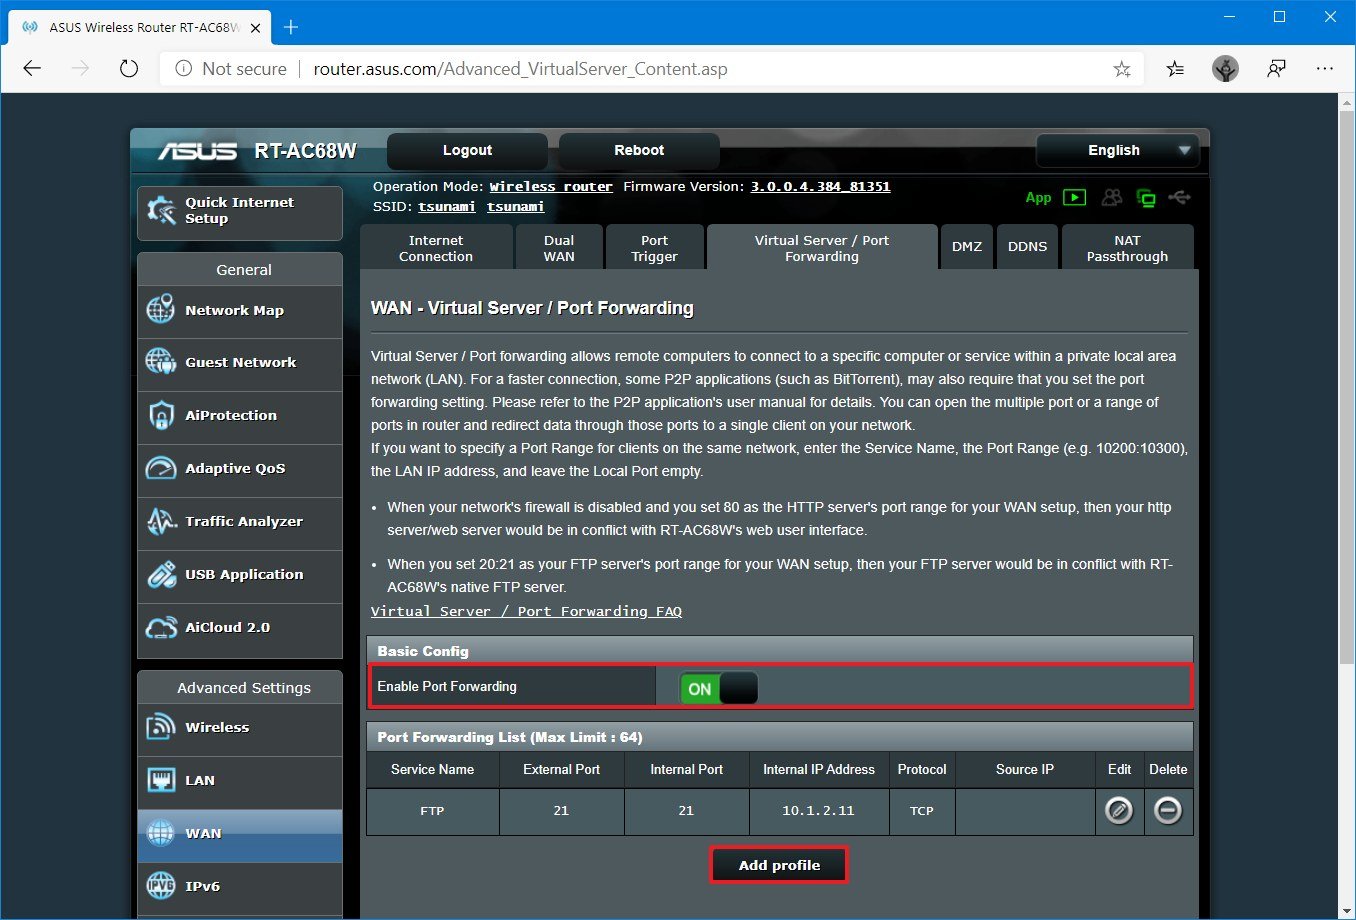
- Create a new port forward with the required information — for example:
- Service name: (optional) Specify the reference name for the service.
- Protocol: TCP.
- External Port: 3389.
- Internal Port: 3389.
- Internal IP Address: Specify the IP address of the computer you’re trying to connect — for instance, 10.1.4.100.
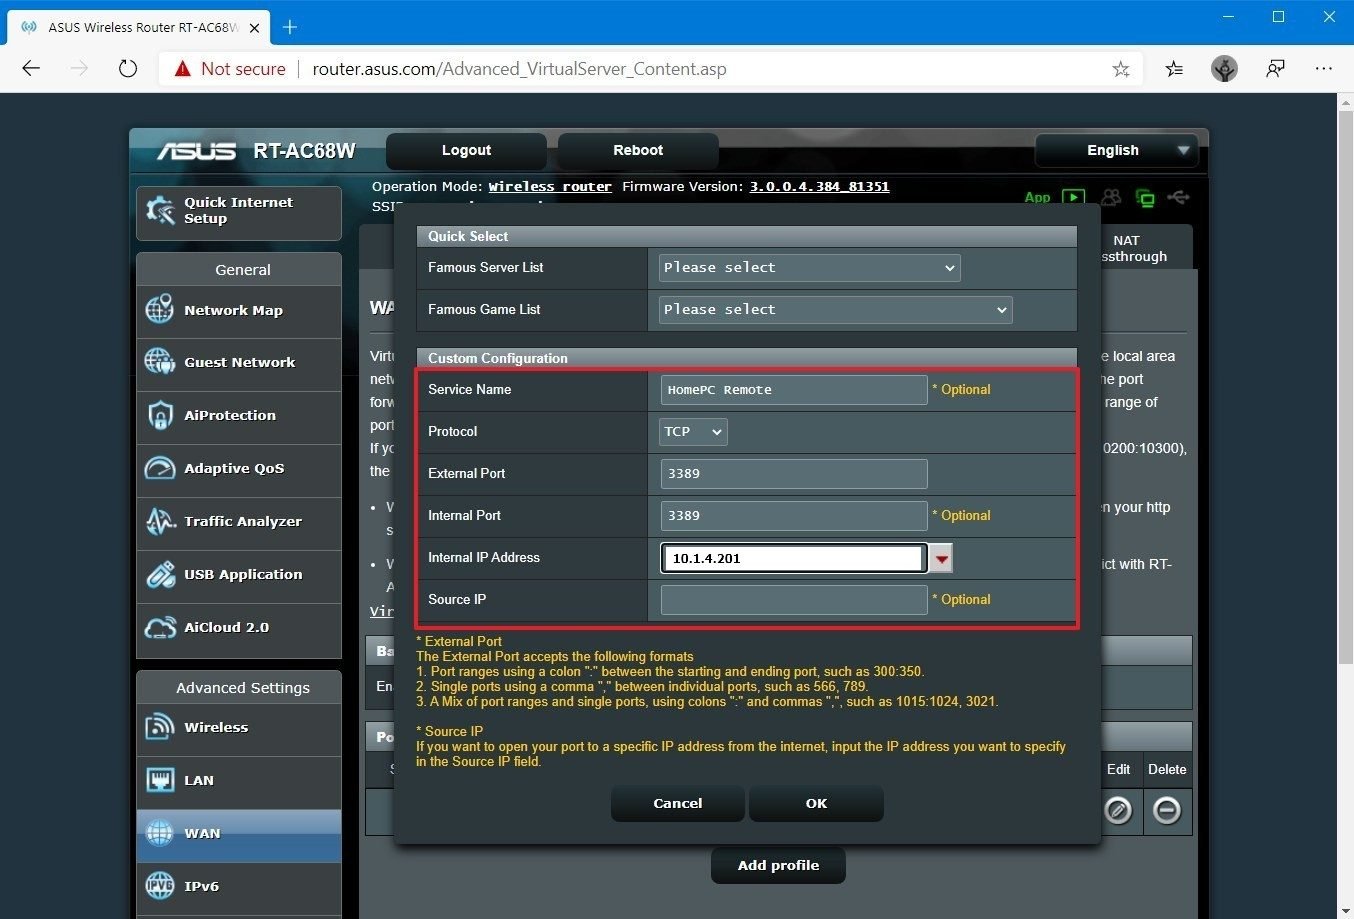
- Click the OK button.
Once you complete the steps, the port will open on the router, allowing remote desktop connections through the internet to that specific device.
How to establish remote desktop connection on Windows 10
After setting up the computer and router, you can initiate a remote connection using the Remote Desktop app on Windows 10.
Install Remote Desktop app
The Remote Desktop app should already be available on Windows 10, but you can always install it from the Microsoft Store.
To install the Remote Desktop app on Windows 10, use these steps:
- Open Microsoft Remote Desktop app page.
- Click the Get (or Install) button.
- Click the Open Microsoft Store button.
- Click the Get (or Install) button.
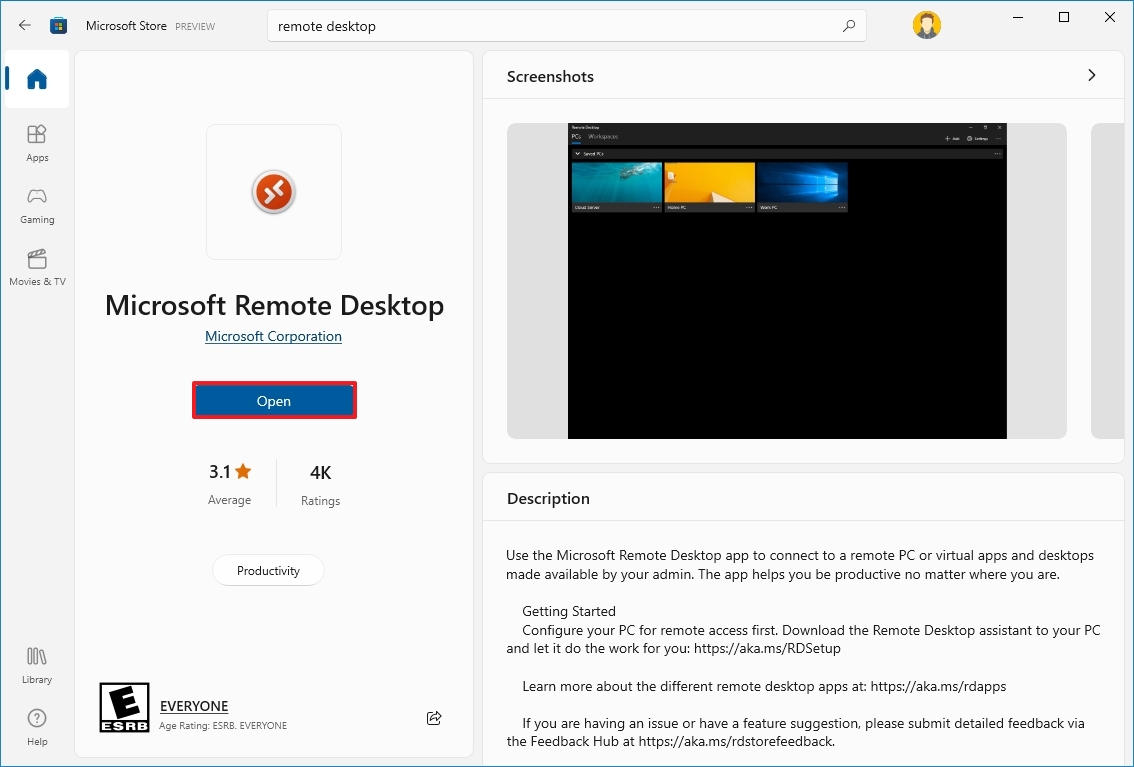
Once you complete the steps, open the app from within the Microsoft Store or Start menu.
Start remote desktop connection
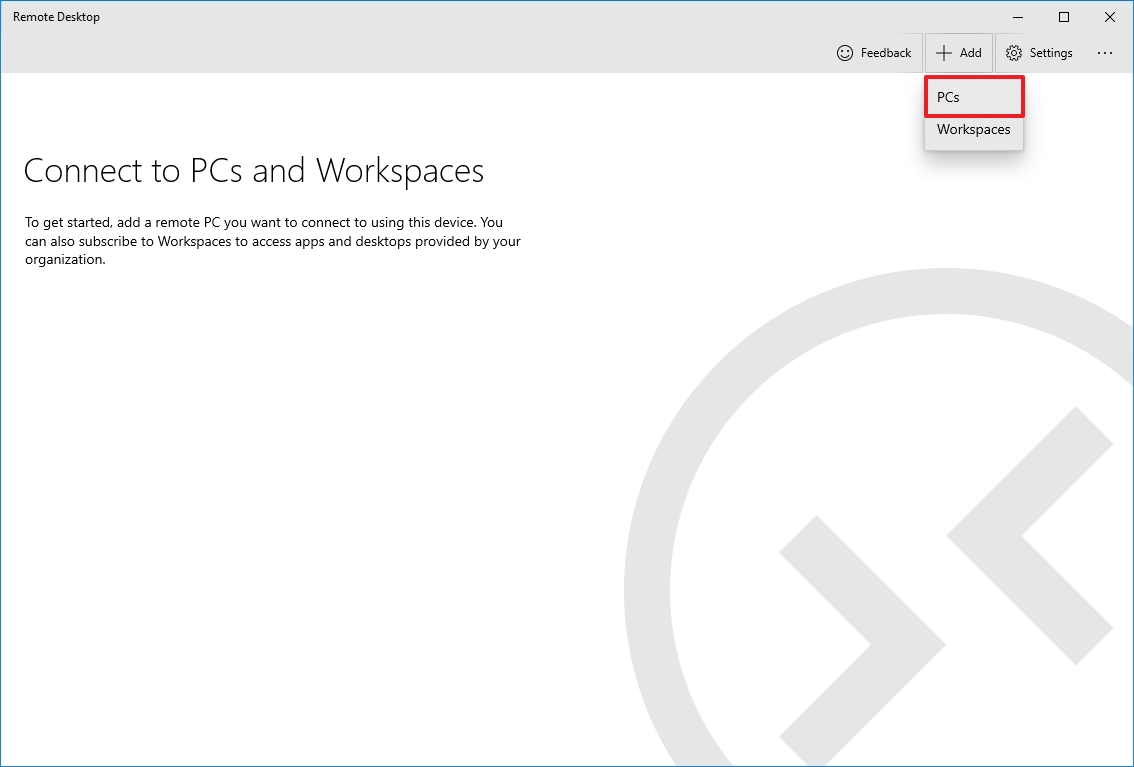
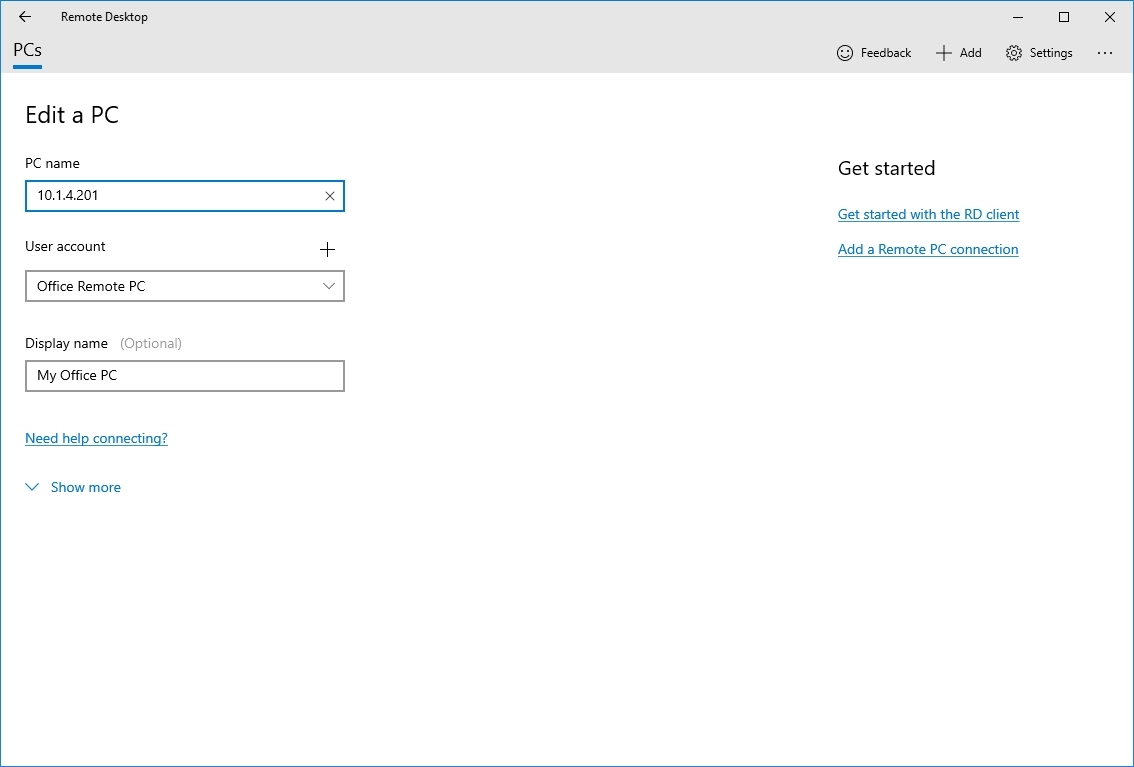
To connect to a computer remotely on Windows 10, use these steps:
- Open the Remote Desktop app.
- Click the + Add button in the top right.
- Click the PCs option.
- Under the «PC name» section, specify the TCP/IP address of the remote computer:
- If the device is inside a private network, enter the local IP address.
- If the device is in a remote network (via the internet), enter the public IP address.
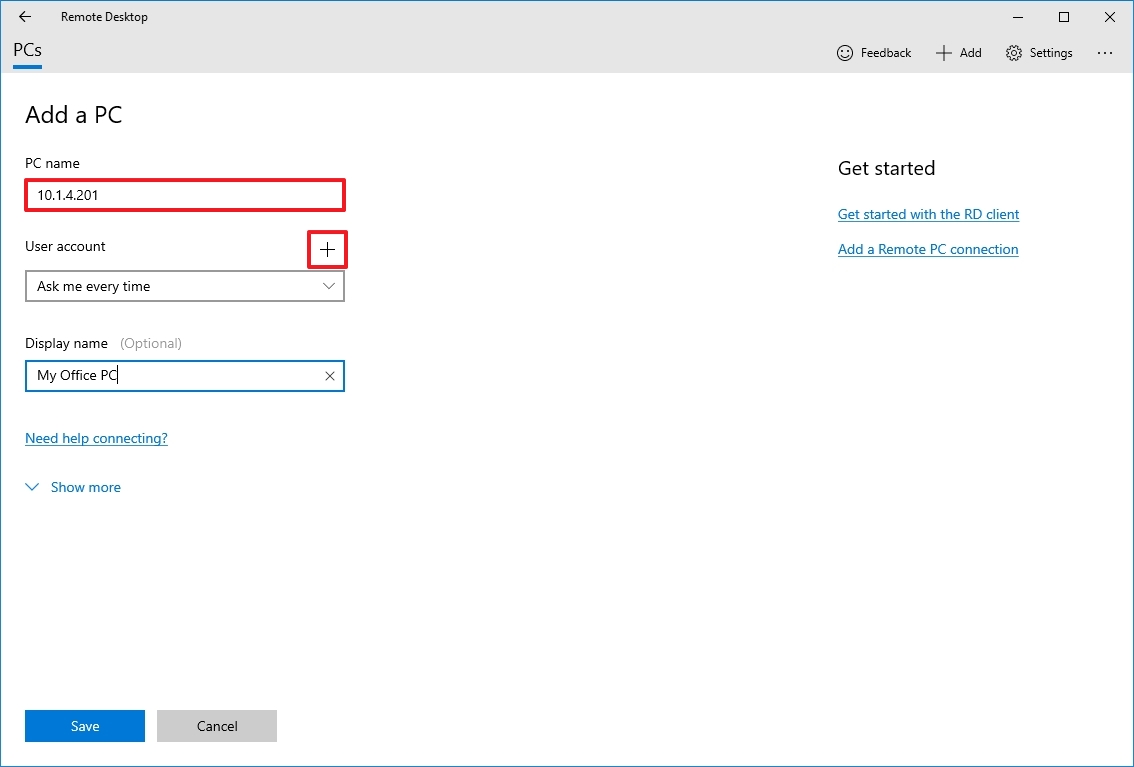
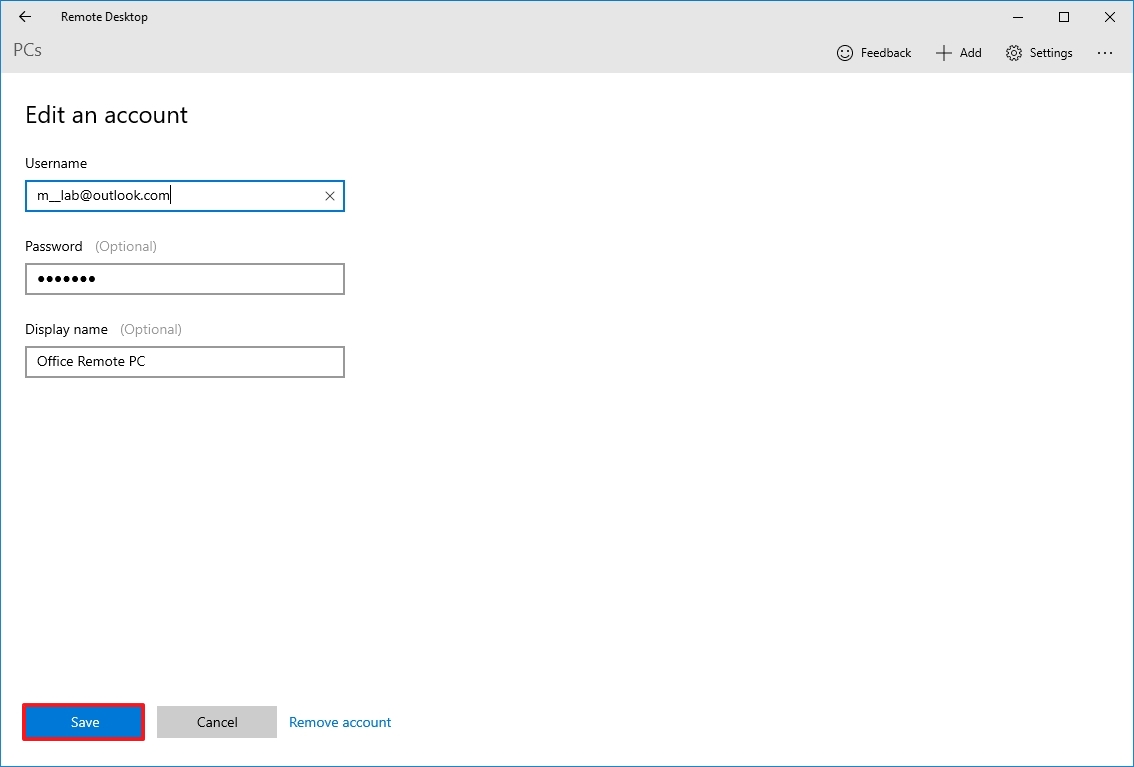
- Under the «User account» section, click the + (plus) button in the top right.
- Confirm the account information to sign in to the remote computer:
- If the remote device is using a Microsoft account, enter that Microsoft account sign-in information.
- If the remote device uses a local account, enter the local username and password to sign in.
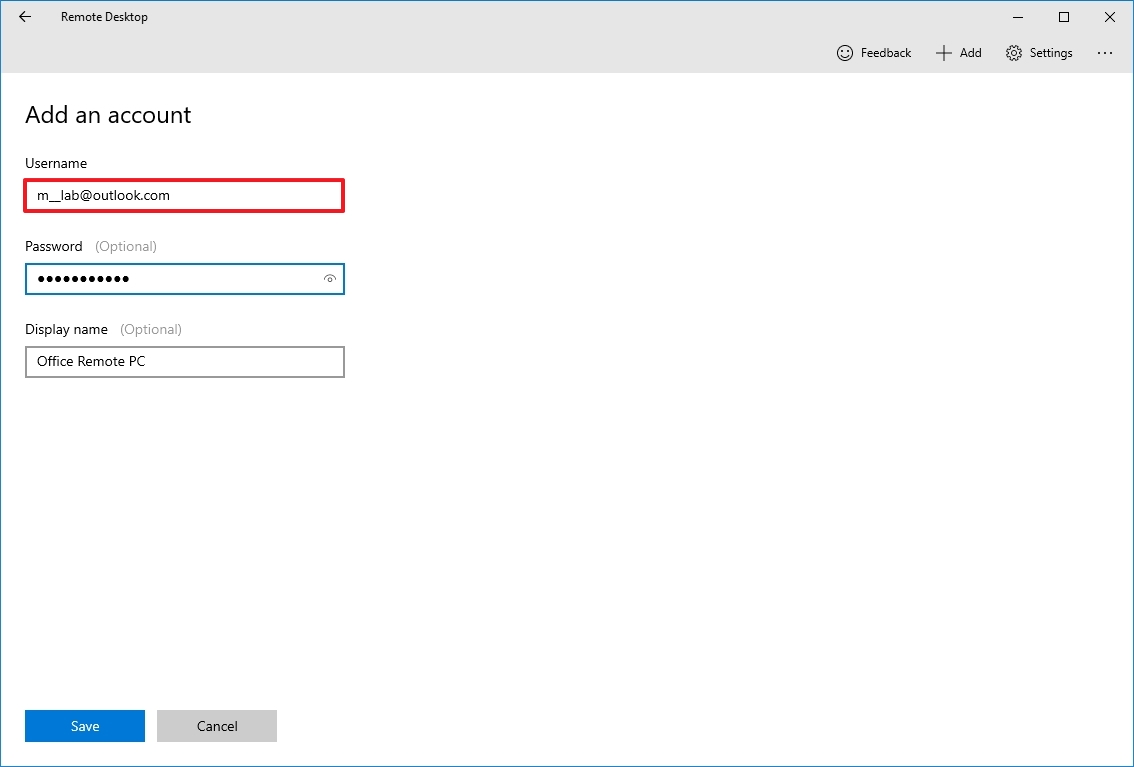
- (Optional) Under the «Display name» section, specify the account settings’ name.
- Click the Save button.
- (Optional) Under the «Display name» section, specify the connection’s name — for example, Office Remote PC.
- Click the Show more option.
- (Optional) Select additional settings as necessary.
- Quick tip: The additional settings include the option to connect using an admin session, set the remote session resolution, and clipboard, among others. Typically, you don’t need to configure these options, and you should only use them depending on the scenario.
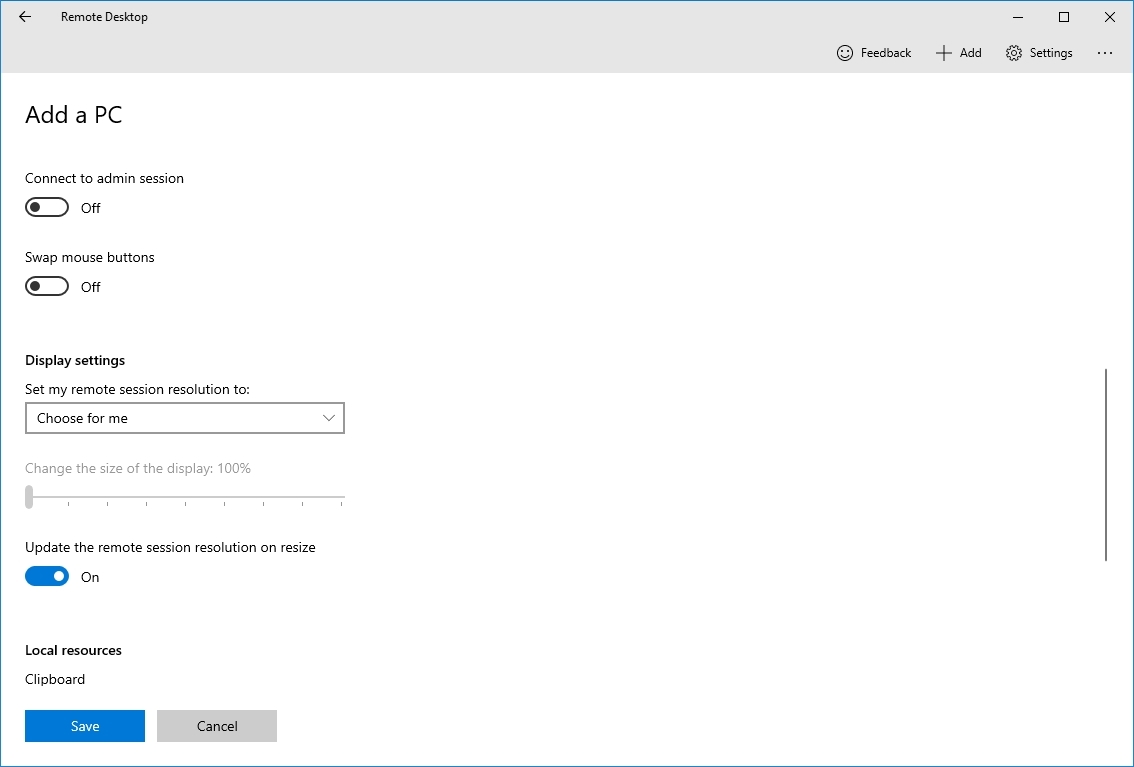
- Click the Save button.
- Under the «Saved Desktops» section, click the connection to start a remote session.
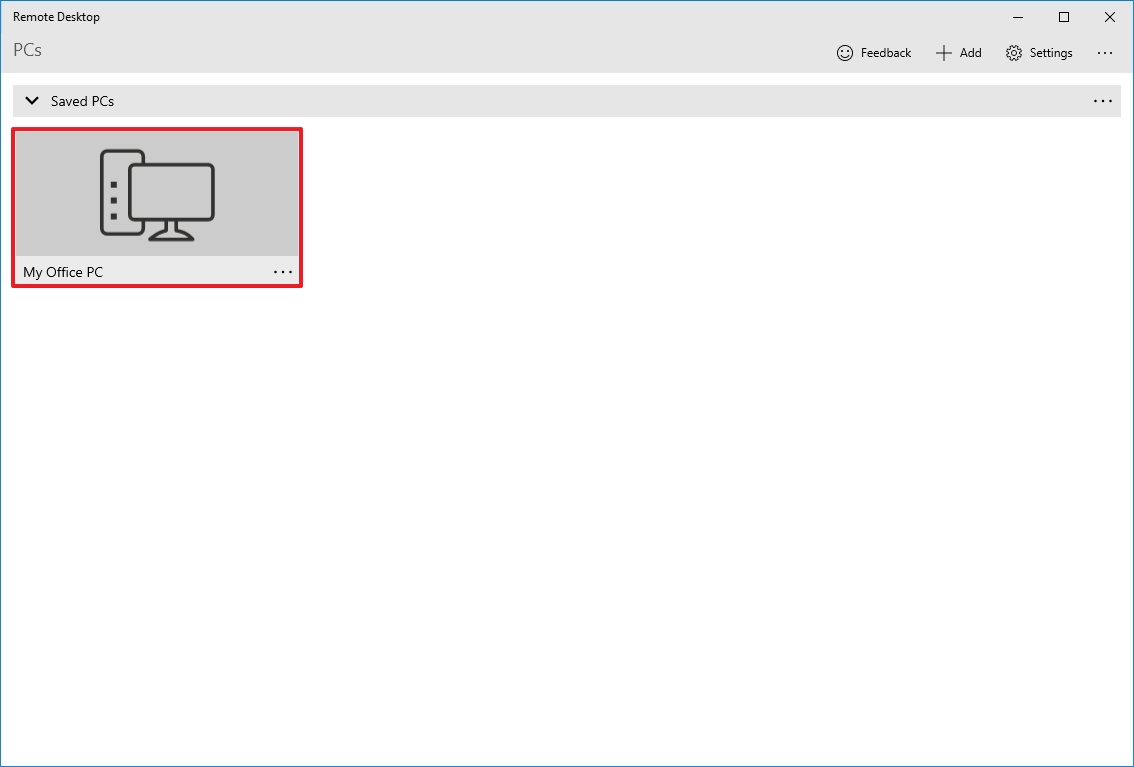
- Check the «Don’t ask about this certificate again» option (if applicable).
- Click the Connect button.
After you complete the steps, the remote connection should establish without problems if everything has been configured correctly.
If you want to terminate the session, you can close the window, click the three-dotted menu button from the top-middle and then click the Disconnect button.
Change app and connection settings
On Windows 10, the Remote Desktop app allows you to customize various settings, including additional configuration options, and modify existing settings.
Change general settings
To change general settings in the Remote Desktop app, use these steps:
- Open the Remote Desktop app.
- Click the Settings button in the top right.
- Select the user account from the list.
- Click the Edit (pen) button to adjust the settings.
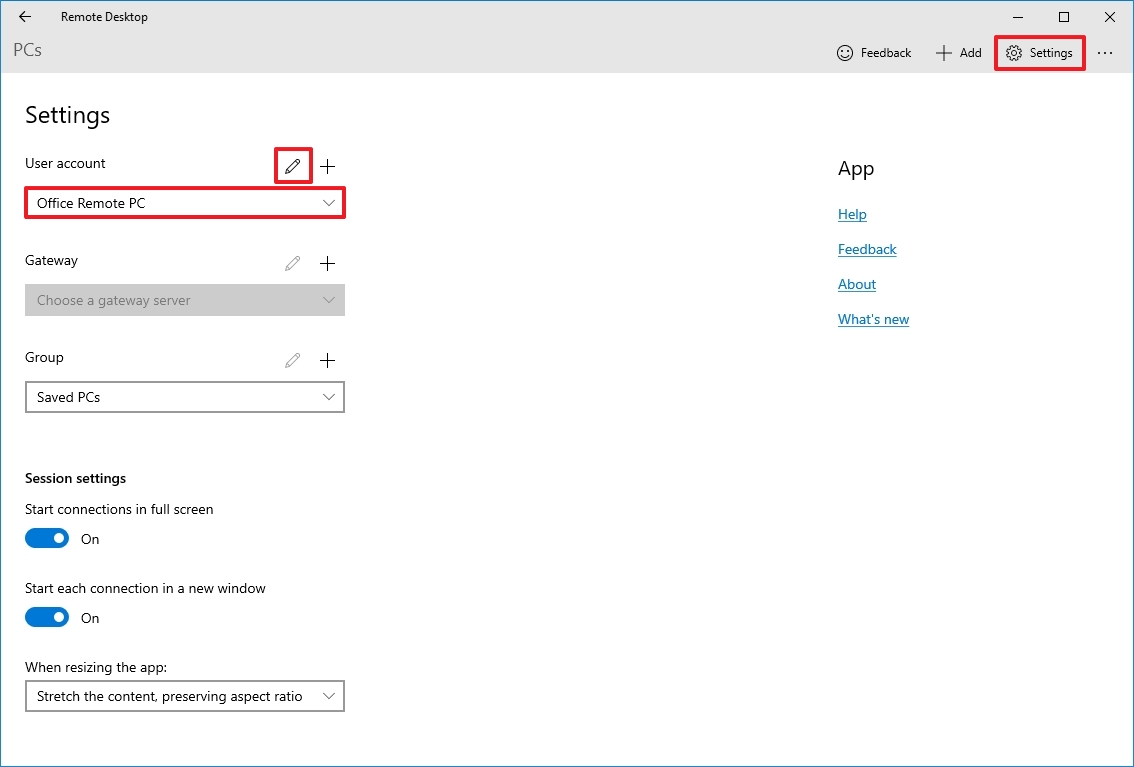
- Click the Save button.
You can also pre-add additional user accounts (with the plus + button) that you can use later to connect to other devices or as a different user.
The Gateway option allows you to set a gateway server, but you’ll rarely need to use this option. Also, the Group option enables you to organize connections into different and more manageable groups.
Change session settings
To change the session settings for Remote Desktop on Windows 10, use these steps:
- Open the Remote Desktop app.
- Click the Settings button in the top right.
- Turn on or off the «Start connections in full screen» toggle switch.
- Turn on or off the «Start each connection in a new window» toggle switch.
- Use the «When resizing the app» drop-down menu to choose how the remote desktop session will look as you resize the app:
- Stretch the content, preserving aspect ratio (recommended).
- Stretch the content.
- Show scroll bars.

- Use the «Use keyboard command with a» drop-down menu to choose whether shortcuts (such as «Ctrl + C» and «Ctrl + V») work only locally or on the remote desktop. Options available include.
- My local PC only.
- My remote session when it’s in full screen (recommended).
- My remote session when it’s in use.
- (Optional) Turn on the «Prevent the screen from timing out» toggle switch.
Alongside editing the account and session settings, you can also enable the option to show a preview of the remote desktop in the connection, which adds a visual queue to make it easier to find the connection in the app.
Change connection settings
To edit the settings of a remote connection, use these steps:
- Open the Remote Desktop app.
- Click the menu (three-dotted) button in the connection and select the Edit option.
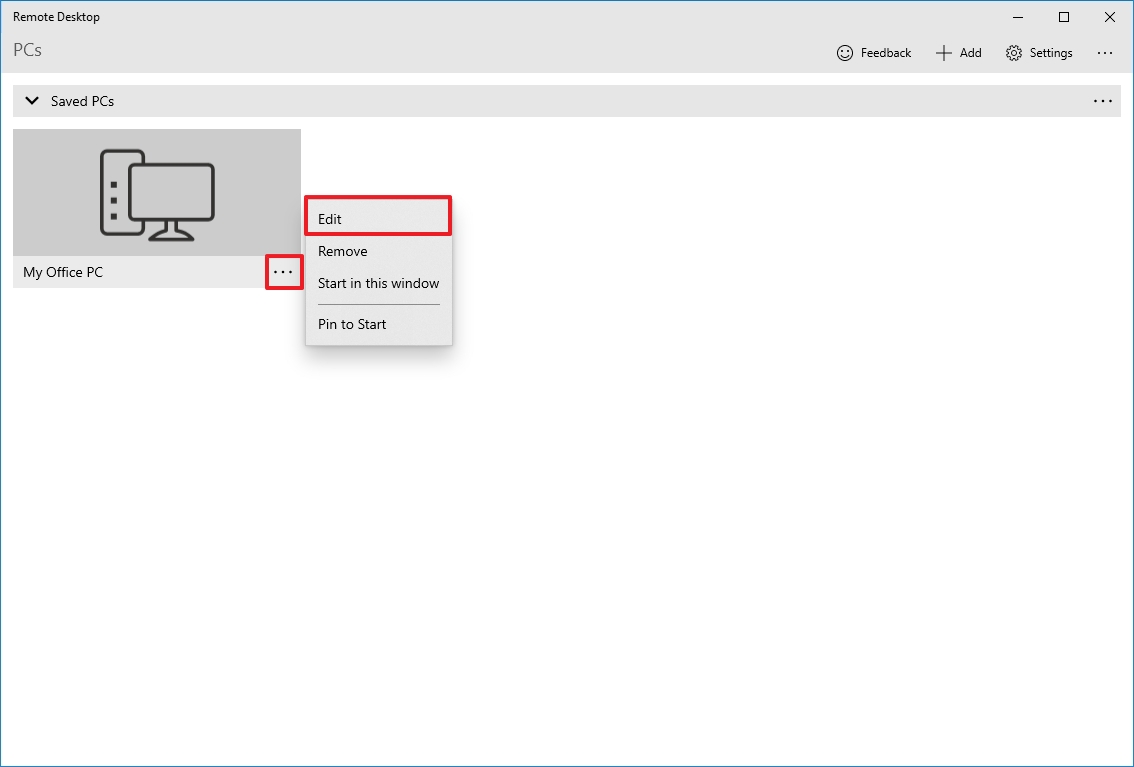
- Change the device name, account, and settings as needed.
- Click the menu (three-dotted) button in the connection and choose the Remove option to delete it.
- Click the menu (three-dotted) button in the connection, and choose the Pin to Start option to quickly access the remote computer from the Start menu.
Once you complete the steps, the settings will save and apply automatically in the connection.
How to troubleshoot remote desktop connection on Windows 10
Typically, you won’t find issues using the Remote Desktop app, but if you cannot connect to a device, you will need to troubleshoot the problem.
Confirm firewall settings
Windows 10 opens the required firewall ports automatically when you configure Remote Desktop, but it might not always be the case. If the connection fails, check the firewall to ensure it’s allowing the Remote Desktop service.
To enable remote connections through the firewall on Windows 10, use these steps:
- Open the Windows Security app.
- Click on Firewall & network protection.
- Click the «Allow an app through firewall» option.
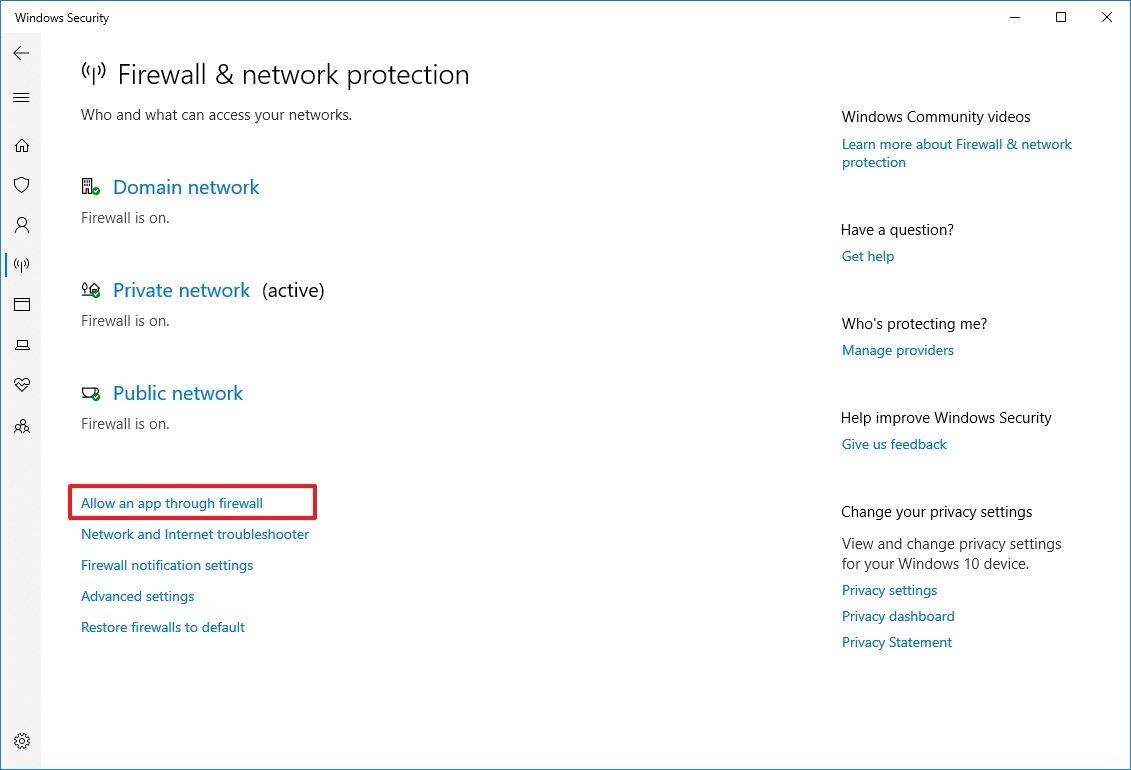
- Click the Change settings button.
- Check the Remote Desktop option and check the options for Private and Public.
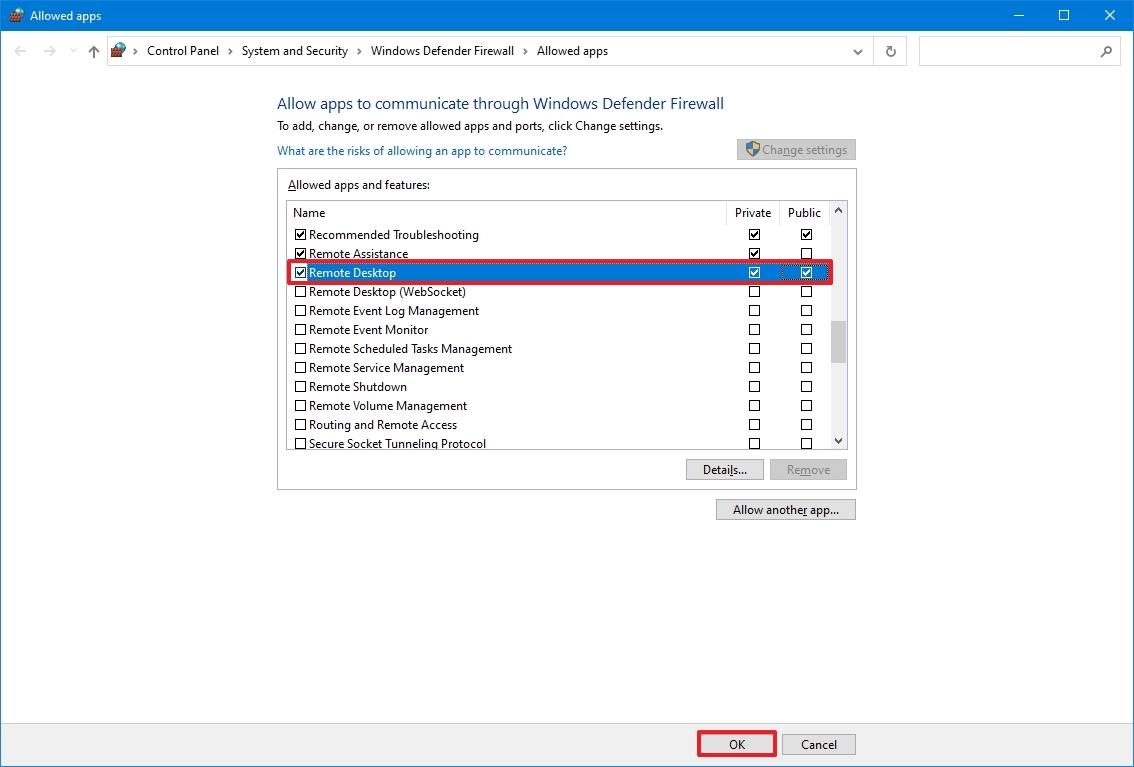
- Click the OK button.
If you have a third-party firewall or antivirus, you may want to disable these security applications to check if you can connect. You may need to check the software support website for more specific details to complete this task.
Unblock the remote connection port
If the settings are correct, and you still can’t connect, there’s a chance the internet provider is blocking the remote desktop port for security reasons. In this case, you may want to contact the ISP directly to resolve the issue.
Use the computer IP address (not the name)
When using the Remote Desktop app, it’s better to use the device’s IP address instead of the computer name. Otherwise, you may stumble upon some resolution issues.
Also, when adding a new computer, remember to enter the appropriate IP address. For example, use the local IP address to connect remotely from within the private network and use the correct public IP address to connect over the internet.
Confirm remote desktop service
You may also be unable to connect because the required remote desktop services are not running on Windows 10.
To determine whether the remote desktop service is running on your device, use these steps:
- Open Start.
- Search for Services and click the top result to open the app.
- Select the «Remote Desktop Service» and check that the «Status» column reads Running.
- If it’s not running, right-click the service and select the Start option.
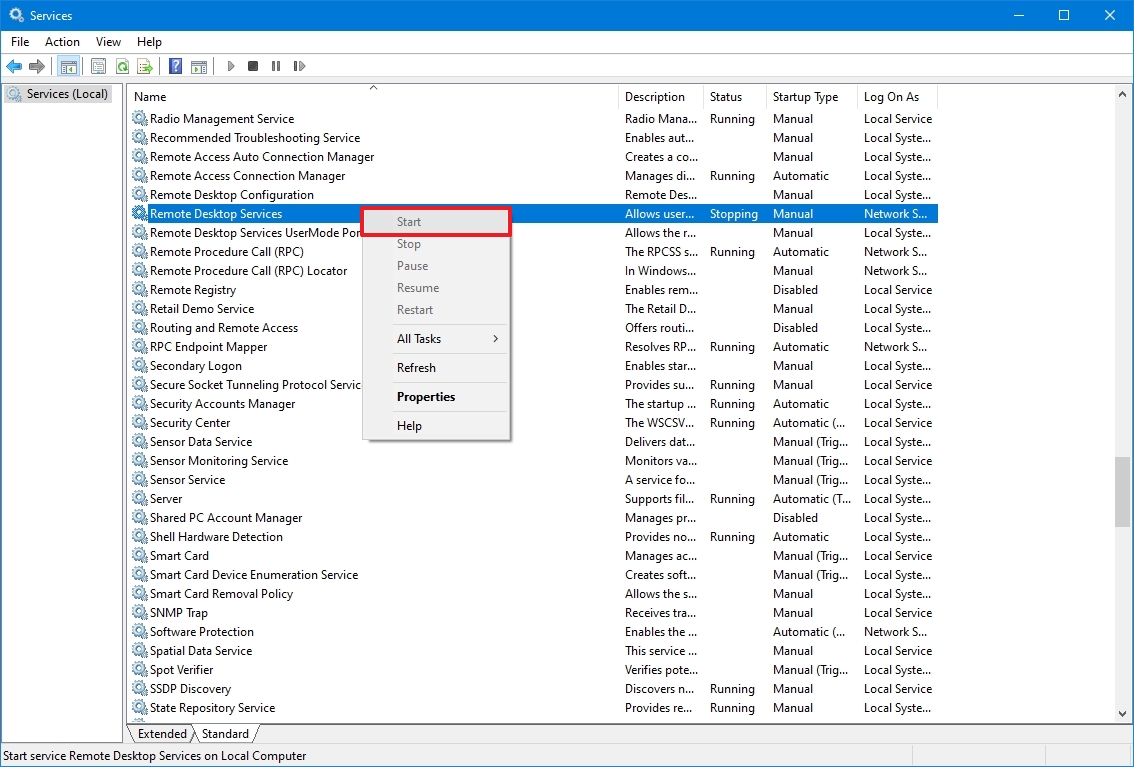
After you complete the steps, you should be able to establish a remote session on Windows 10.
Switch to Internet Protocol Version 4 (TCP/IPv4)
Windows 10 can use both networking stacks, IP version 4 (IPv4) and version 6 (IPv6) — also known as dual-stack — but sometimes, it’ll choose version 6 for the connection, which may cause problems with the remote desktop protocol (RDP).
To set IPv4 as the default networking stack on Windows 10, use these steps:
- Open Control Panel.
- Click on Network and Internet.
- Click on «Network and Sharing Center.»
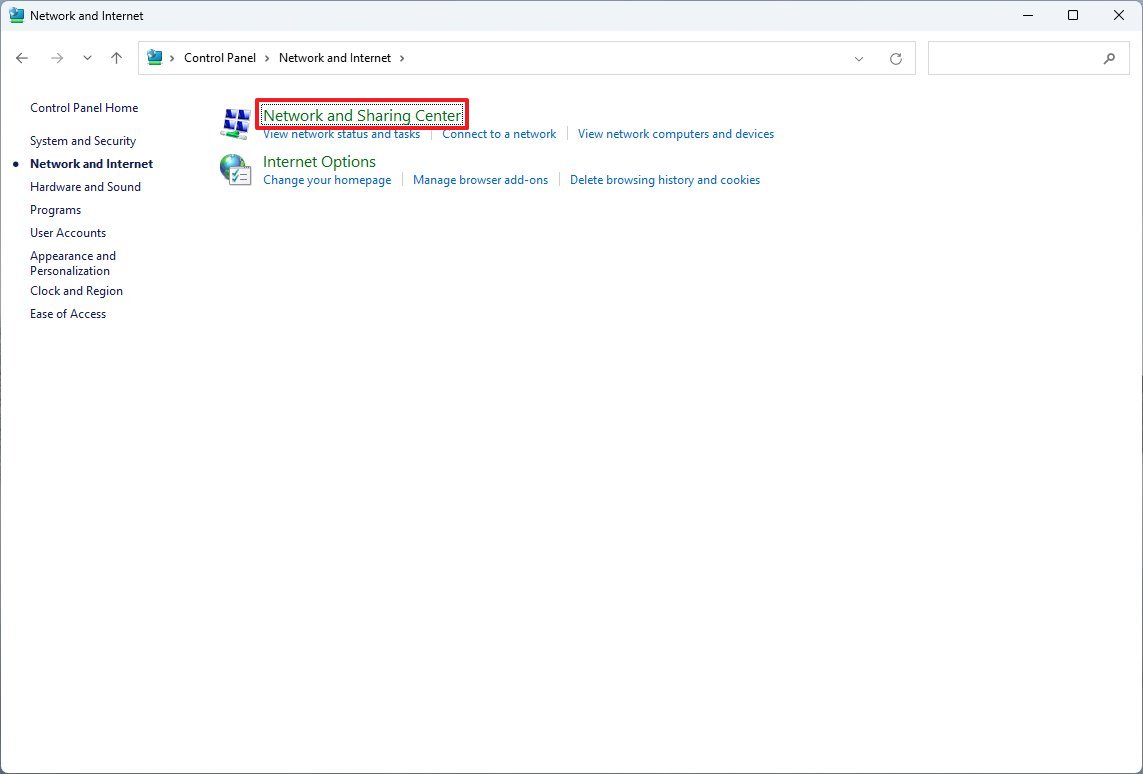
- Click the «Change adapter settings» option from the left navigation pane.
- Right-click the active adapter and select the Properties option.
- Clear the «Internet Protocol Version 6 (TCP/IPv6)» option.

- Click the OK button.
- Restart the computer.
Once you complete the steps, you should now be able to connect using a remote connection.
Use local account instead of Microsoft account
If you try to connect, but the authentication fails, and you are using a Microsoft account, it’s probably a problem with the authentication method. For instance, you may encounter issues if the Microsoft account has the two-step verification or passwordless security feature enabled. You may consider creating and using a local account for remote access if this is the case.
To create a local administrator account on Windows 11, use these steps:
- Open Settings.
- Click on Accounts.
- Click on Family & other users.
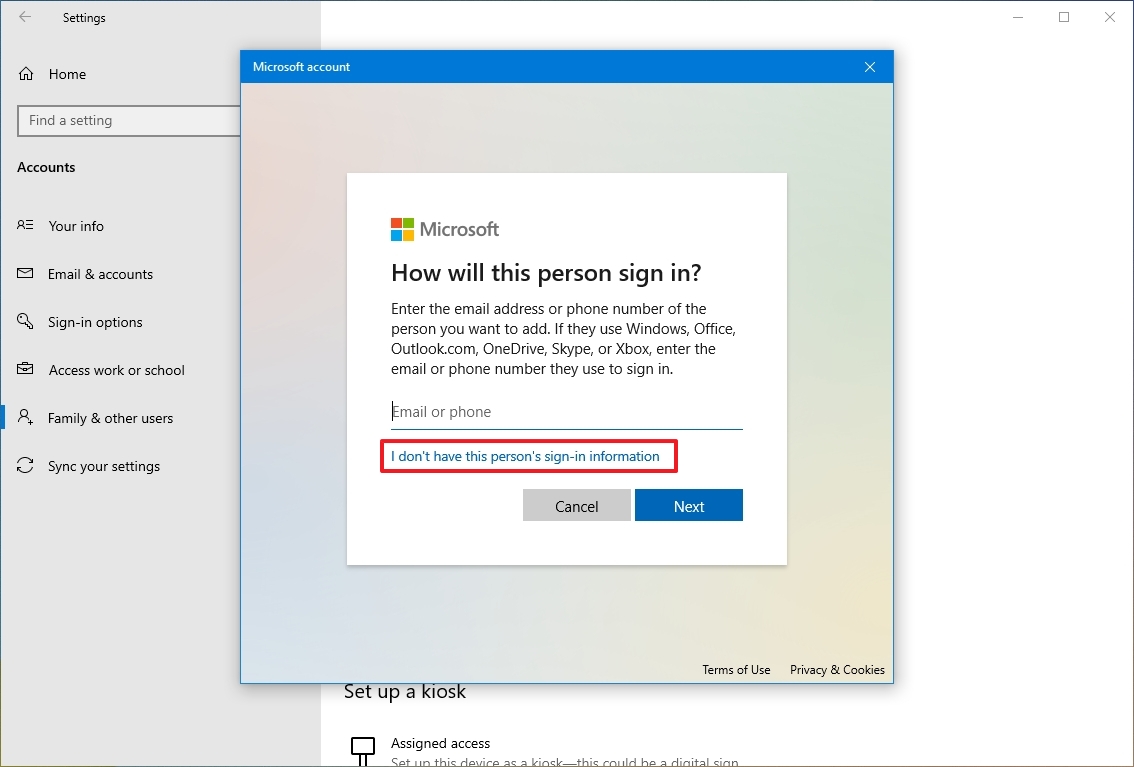
- Under the «Other users» section, click the «Add someone else to this PC» option.
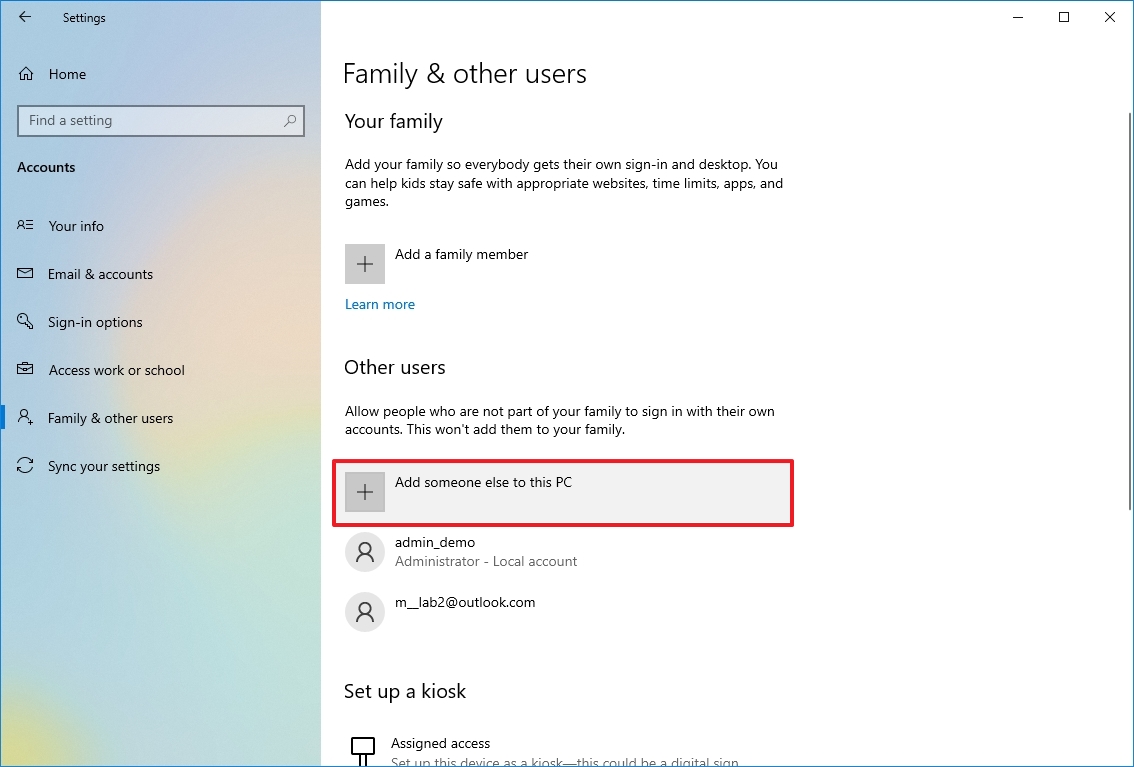
- Click the «I don’t have this person’s sign-in information» option.
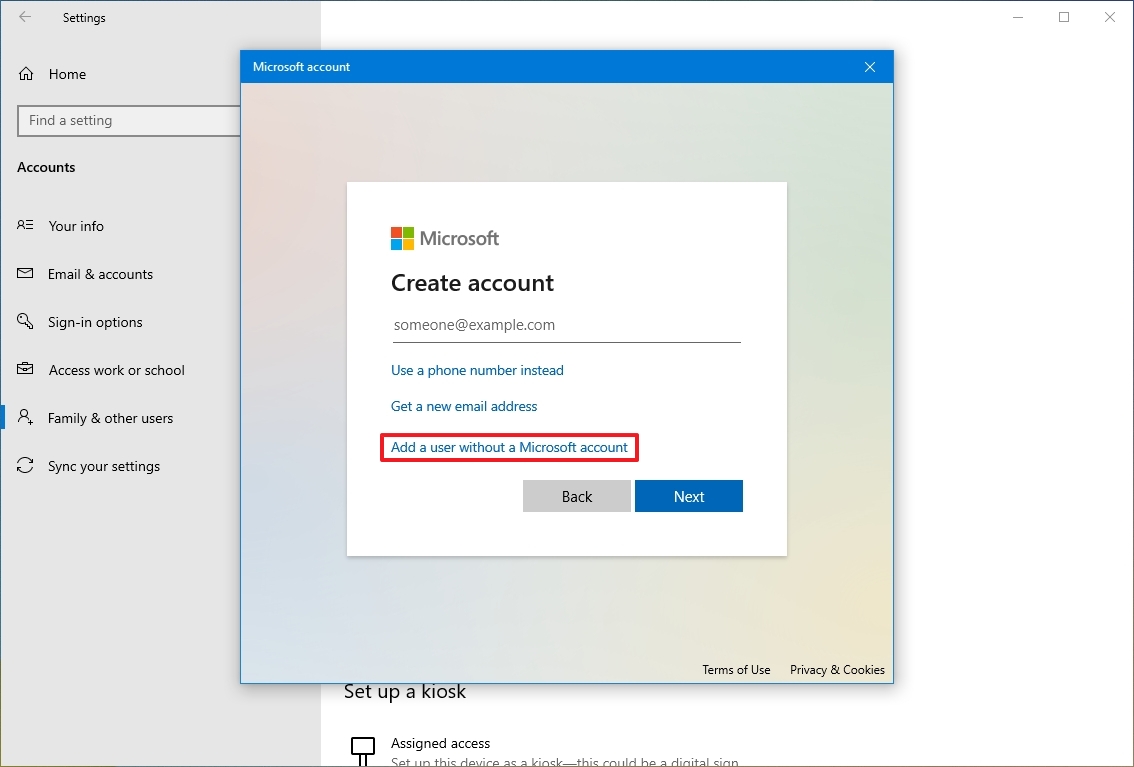
- Click the «Add a user without a Microsoft account» option.
- Confirm the username.
- Create a strong password.
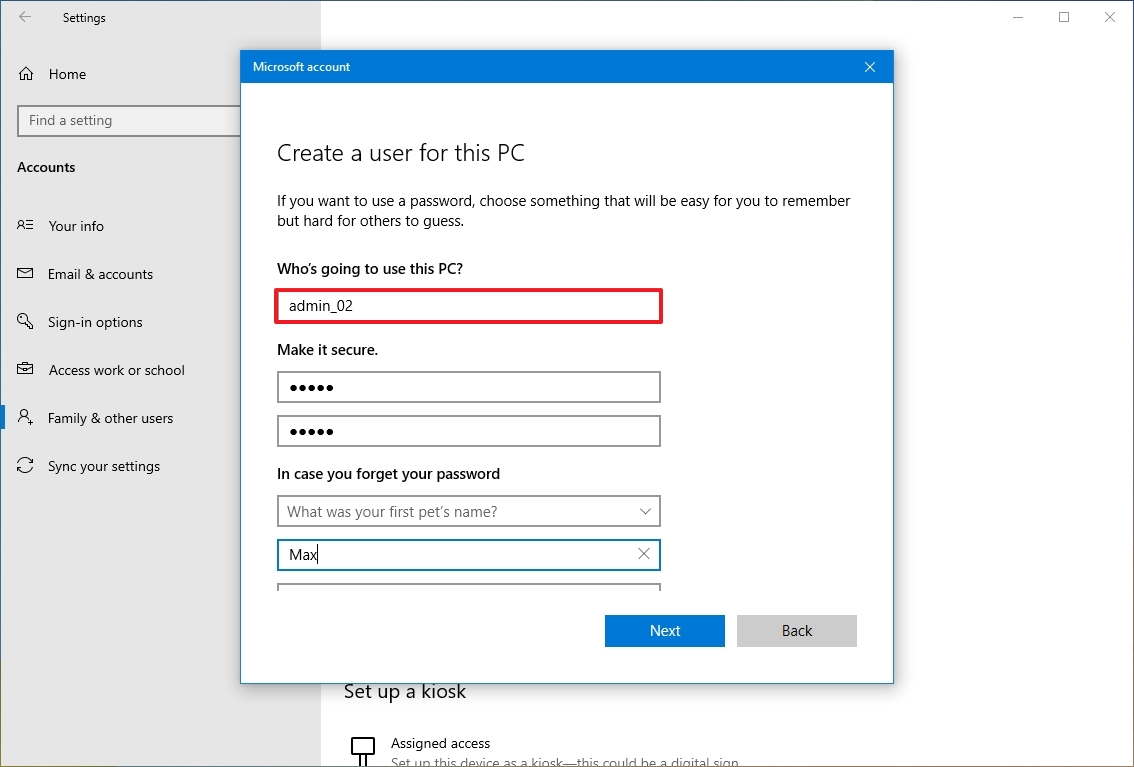
- Complete the security questions to allow password reset from the Sign-in screen.
- Click the Next button.
- Select the newly created account and click the «Change account type» button.
- Choose the Administrator option.
- Click the OK button.
After you complete the steps, you can use the local account information instead of the Microsoft account to connect to a remote desktop session.
We outlined the steps to connect to a device inside a private network and through the internet. However, allowing remote desktop connections (mainly through the internet) could be a security risk.
Remember that having the remote desktop protocol enabled and opening ports could allow malicious individuals to gain unauthorized access to the computer. If you need to use this feature, use a strong password, disable the remote desktop service and remove the port forwarding settings from the router when they are no longer needed.
More resources
For more helpful articles, coverage, and answers to common questions about Windows 10 and Windows 11, visit the following resources:
- Windows 11 on Windows Central — All you need to know
- Windows 10 on Windows Central — All you need to know
All the latest news, reviews, and guides for Windows and Xbox diehards.
Mauro Huculak is technical writer for WindowsCentral.com. His primary focus is to write comprehensive how-tos to help users get the most out of Windows 10 and its many related technologies. He has an IT background with professional certifications from Microsoft, Cisco, and CompTIA, and he’s a recognized member of the Microsoft MVP community.
Традиционный сценарий использования ПК предполагает, что вы подходите к компьютеру, садитесь в кресло и физически контактируете с устройством. Однако есть и другой вариант — настройка RDP Windows 10 и использование удаленного подключения. У такого метода масса достоинств: не нужно тратить время, чтобы добраться до рабочего места, можно со слабого устройства выполнять задачи на более мощном компьютере или даже попросить более компетентного специалиста подключиться и оказать помощь.
Но прежде, чем браться за настройку RDP в Windows 10, убедитесь, что у вас установлена версия Pro или выше: в Home отключены нужные системные компоненты. Плюс, потребуется защитить паролем вашу учетную запись:
- если его нет – установите через соответствующий раздел в Панели управления;
- выберите сложный пароль. Если его можно подобрать за 4 секунды – это плохой пароль.
Включение доступа и добавление пользователей
Первый шаг настройки – корректировка настроек Windows 10, чтобы сделать соединение через интернет с использованием RDP в принципе возможным. Откройте Пуск и нажмите на шестеренку Параметры.

Откройте раздел с настройкой системы.

Просмотрите детальные сведения (можно сразу открыть этот экран комбинацией Win-Pause или Win-Break).

Запомните, какое имя указано для компьютера. Далее перейдите к настройке удаленного доступа.

Если в системе настроено автоматическое переведение в «спячку», то будет показано предупреждение.

Нажмите Электропитание и далее настройки схемы, чтобы убрать помехи к использованию RDP в Win 10.

Выберите из списка «Никогда», если хотите, чтобы ПК был постоянно доступен.

Альтернативный способ – активировать режим повышенной производительности, тогда компьютер не будет отключаться.

В подразделе удаленного рабочего стола разрешите подключаться к компьютеру.

При желании можно провести настройку RDP Windows 10 для нескольких пользователей, нажав кнопку чуть ниже переключателя.

По умолчанию доступ дается администраторам, но можно добавить произвольного пользователя (например, специально созданного для этих целей).

Впишите его имя в системе.

Пользователь появится в списке допуска к RDP.

В зависимости от версии ОС, порядок действий может несколько отличаться. Например, официальное руководство предлагает перейти к параметрам рабочего стола непосредственно в подразделе «Система» или же открыть в браузере адрес «ms-settings:remotedesktop».

Настройка и управление IP
Вместо имени компьютера часто используется IP. Чтобы его просмотреть, правым кликом по значку текущего подключения вызовите Центр управления сетями.

Далее кликните непосредственно по каналу связи с интернетом (например, Ethernet) для просмотра состояния.

В просмотре состояния нажмите Сведения.

Отобразится детальная информация, из которой нужно запомнить или записать IP.

Если адрес выдается динамическим образом, то при повторных включениях ПК он может измениться, и тогда потребуется его каждый раз заново узнавать. Вместо этого, иногда настраивают статический адрес, который остается неизменным при перезагрузках.
Важно! Если у вашей сети есть ответственный администратор, проконсультируйтесь с ним о допустимости такой настройки. Впрочем, это относится и к разрешению удаленного доступа в целом.
В окне просмотра состояния перейдите к свойствам. Далее выберите протокол IPv4 и откройте детальный просмотр.

В качестве адреса укажите значение, которое не попадает в используемый для динамического использования диапазон. Соответствующую настройку можно опять-таки найти в роутере.
Традиционно маска указывается в виде 255.255.255.0, так что IP должен отличаться от адреса шлюза (его не меняем) только последним числом.

В качестве DNS можно указать используемые в вашей сети значения или же воспользоваться публичными сервисами: 8.8.8.8 от Google, 1.1.1.1 от Cloudflare и так далее.
Если используется фиксированный адрес и прямое подключение (то есть у вашего ПК «белый» IP, уточните данную информацию у своего провайдера), его также можно просмотреть при помощи внешних сервисов вроде https://2ip.ru.

Настройка порта RDP
Если система, которой выполняется RDP подключение, находится за роутером, то может потребоваться настройка порта. Для этого стандартным образом подключитесь к роутеру через веб-интерфейс (используемый для этого адрес необходимо уточнить в инструкции к оборудованию). Далее найдите в настройках раздел Port Forwarding (перенаправление портов). Потребуется добавить в него правило со следующими параметрами:
- название может быть произвольным;
- в качестве порта выберите 3389 TCP;
- IP введите от своего ПК;
- локальный порт также пропишите 3389;
- выберите протокол TCP из списка.

После этого станет возможно подключаться удаленно и работать с ПК.
Подключение к удаленному рабочему столу в Windows 10
После настройки для подключения в режиме RDP можно использовать стандартную программу.

Минимальные требования для соединения – указать имя или IP целевого компьютера.

Далее система сама запросит данные для входа в учетную запись. Используйте один из тех аккаунтов, которые добавили на этапе настройки. Можно поставить галочку, чтобы в будущем не вводить их заново.

Если показывается уведомление об отсутствии сертификата, его допустимо проигнорировать (вы же уверены в своем ПК, верно?).

Также в окне подключения можно раскрыть детальные параметры подключения:
Важно! В отличие от настройки RDP на Windows Server 2016, здесь одновременно работать может только один пользователь, независимо от того, прямо за компьютером или удаленно. Так что если попробуете подключиться к системе, куда уже кто-то вошел, появится предупреждение. Можно или отключить активного пользователя, или самому подключиться позже.
Если вам нужно настроить РДП с одновременной работой, переходите на серверные ОС, такие как Windows Server 2012 r2.

После этого откроется окно с удаленной системой. По умолчанию режим полноэкранный, а сверху показывается панель подключения.

Если нажать на ней крестик, то пользователь останется залогинен в удаленной системе.

Чтобы полностью выйти в меню Пуск удаленной машины выберите «Отключиться».

Узнайте также:
- Как открыть RAR файл на Windows 10,
- Настройка роутера с помощью My.Keenetic.
Устранение неполадок при подключении к удаленному рабочему столу
Если брандмауэр Windows не дает соединиться, откройте его настройки в параметрах.

Нажмите на изменение параметров над списком.

Укажите для удаленного рабочего стола обе галочки.
В случае, если не срабатывает подключение по порту, нужно уточнить наличие такой возможности у провайдера.
Если показывается ошибка об отсутствии ответа со стороны ПК, к которому вы подключаетесь – убедитесь, что он вообще включен и что он не ушел в спящий режим.
Также может потребоваться переключить в параметрах, в разделе подключения, тип сети с общественной на доверенный.

Выберите частную, в противном случае компьютер может быть не виден даже при работе по локальной сети.
