В мире ИТ существует уже довольно широкий спектр операционных систем, начиная с серверных, заканчивая операционными системами для мобильных устройств. В обычных пользовательских компьютерах и в серверах довольно часто используются две ОС — Linux и Windows. Поэтому очень часто возникают ситуации, когда приходится подключаться по сети из одной операционной системы к другой для выполнения разнообразных операций.
В этой статье мы рассмотрим варианты подключения к Linux из Windows. Существуют бесплатные и условно бесплатные утилиты вроде AnyDesk или TeamViewer, но установка их довольно тривиальна и не нуждается в дополнительном пояснении. Утилиты подобного рода обладают рядом ограничений при бесплатном некоммерческом использовании, либо их функциональность не удовлетворяет тем или иным потребностям пользователя. Мы рассмотрим полностью бесплатные способы как подключится к Linux из Windows.
Удалённый доступ к Linux с помощью VNC
На сегодняшний день самое популярное удаленное подключение к Linux из Windows, с использованием привычный в Windows графического интерфейса, является VNC (Virtual Network Computing) — утилита, использующая протокол RFB (Remote FrameBuffer — удалённый кадровый буфер). Управление осуществляется путём передачи нажатий клавиш на клавиатуре и движений мыши с одного компьютера на другой и ретрансляции содержимого экрана через компьютерную сеть.
В качестве сервера VNC в данном примере будет использоваться TightVNC, установленный в Ubuntu 20.04. Для установки сервера VNC необходимо выполнить ряд действий:
Шаг 1. Установка рабочей среды XFCE
Xfce — одна из самых легковесных рабочих сред, используемых в Linux, она будет быстро работать даже при слабом и нестабильном сетевом подключении. Установите её с помощью команд:
sudo apt update
sudo apt install xfce4 xfce4-goodies
Шаг 2. Установка TightVNC
Далее установите TightVNC:
sudo apt install tightvncserver
Шаг 3. Настройка пароля
Перед началом выполнения всех действий необходимо задать пароль пользователя VNC. Выполните команду:
vncpasswd
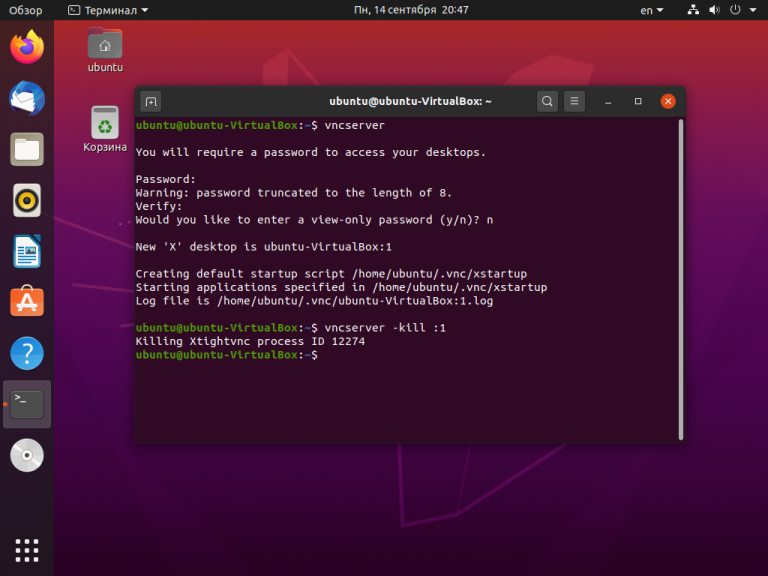
Вам будет предложено создать новый пароль, а также пароль только для просмотра. Откажитесь от второй опции:
Завершите процесс vncserver:
vncserver -kill :1
Шаг 4. Настройка скрипта запуска
Отредактируйте скрипт, который выполняется после запуска VNC-сервера:
nano ~/.vnc/xstartup
Он должен содержать такой текст:
#!/bin/sh

unset SESSION_MANAGER

unset DBUS_SESSION_BUS_ADDRESS

startxfce4 &
Сделайте файл исполняемым:
chmod +x ~/.vnc/xstartup
Шаг 5. Запуск VNC сервера
На этом этапе уже можно запустить VNC-сервер с помощью команды:
vncserver
Шаг 6. Подключение из Windows
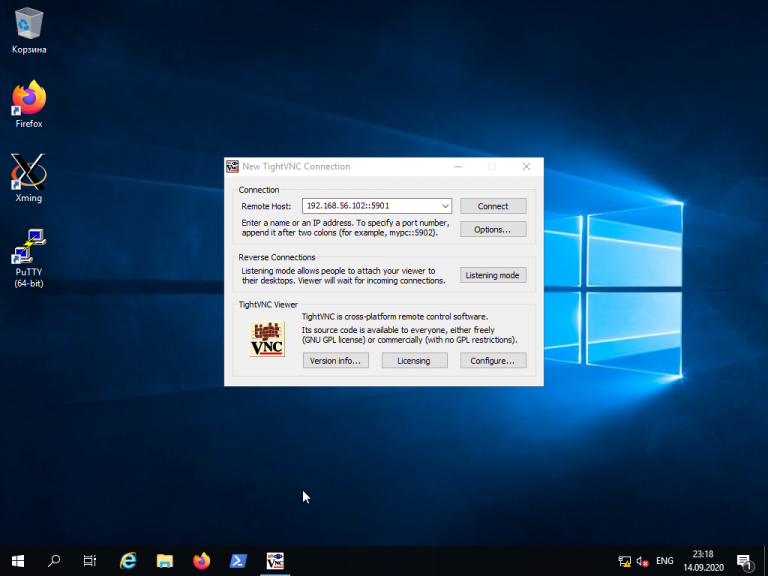
Для того, чтобы подключиться из Windows к вашему Linux-серверу, используйте TightVNC Viewer.
Укажите IP-адрес компьютера, к которому нужно подключиться, и номер порта в поле Remote Host. В данном примере — 192.168.56.102::5901:
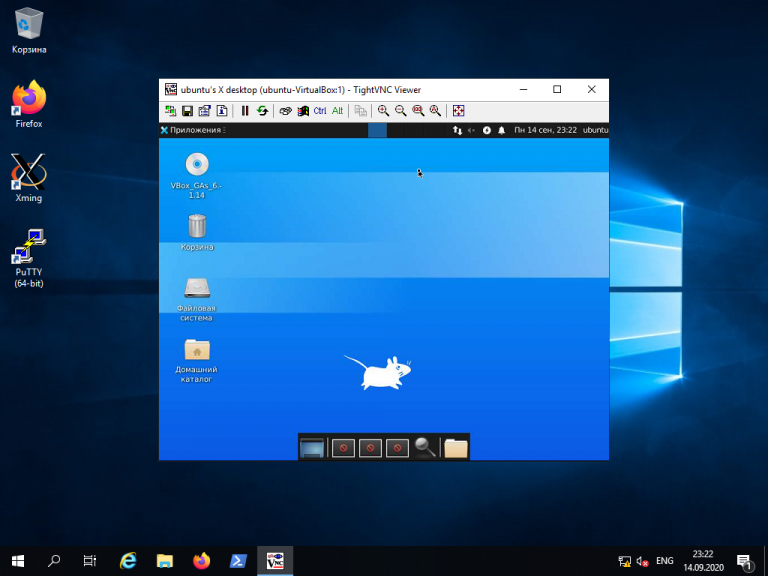
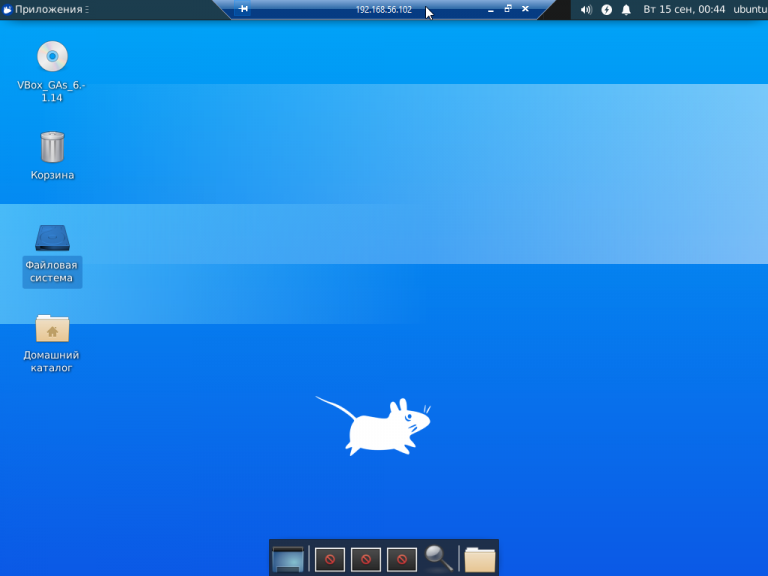
После того, как будет введён пароль, вы должны увидеть рабочий стол Xfce:
Шаг 8. Настройка systemd
Для того, чтобы запуск вашего VNC-сервера добавить в автозагрузку надо использовать systemd. Создайте новый файл сервиса systemd:
sudo nano /etc/systemd/system/vncserver@.service
Его содержимое должно быть следующим:
[Unit]

Description=Systemd VNC server startup script for Ubuntu 20.04

After=syslog.target network.target

[Service]

Type=forking

User=ubuntu

ExecStartPre=-/usr/bin/vncserver -kill :%i &> /dev/null

ExecStart=/usr/bin/vncserver -depth 24 -geometry 800x600 :%i

PIDFile=/home/ubuntu/.vnc/%H:%i.pid

ExecStop=/usr/bin/vncserver -kill :%i

[Install]

WantedBy=multi-user.target
Измените имя пользователя ubuntu и рабочего каталога ubuntu на нужные вам значения. Если у вас запущен VNC-сервер, остановите его:
vncserver -kill :1
Сообщите systemd о появлении нового сервиса:
sudo systemctl daemon-reload
Добавьте запуск вашего нового сервиса в список автозагрузки:
sudo systemctl enable vncserver@1.service
Запустите VNC-сервер:
sudo systemctl start vncserver@1
Использование RDP для удалённого подключения
Помимо VNC, для управления Linux-сервером из Windows можно воспользоваться RDP (Remote Desktop Protocol). Для этого на компьютере с Ubuntu 20.04 установите утилиту xrdp:
sudo apt install xrdp
Для корректной работы сервиса необходимо добавить пользователя xrdp в группу ssl-cert:
sudo adduser xrdp ssl-cert
Установите Xfce:
sudo apt-get install xfce4
Добавьте Xfce в сессии RDP в качестве рабочего стола по умолчанию:
echo xfce4-session >~/.xsession
Перезапустите сервис xrdp:
sudo systemctl restart xrdp.service
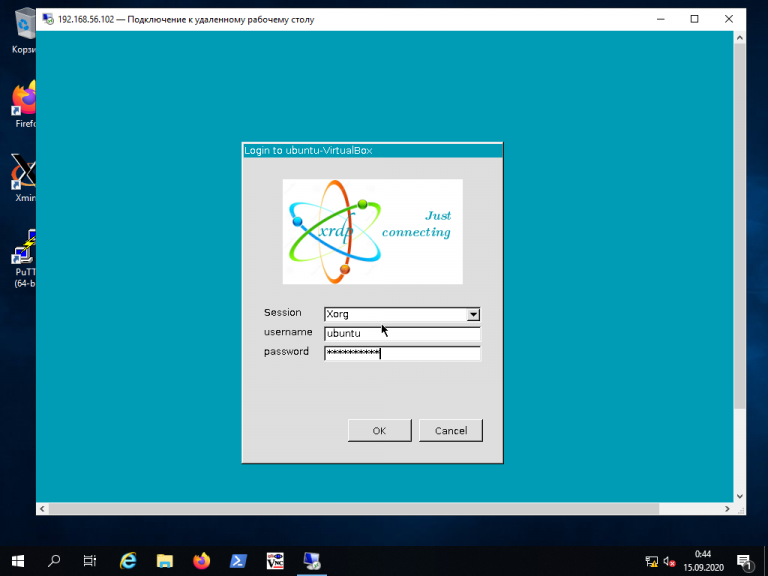
Процедура подключения из Windows к Linux-серверу по протоколу RDP почти ничем не отличается от подключения к удалённым Windows-серверам. Введите IP-адрес сервера, логин и пароль пользователя в Linux:
Если всё сделано правильно, вы увидите рабочий стол Xfce:
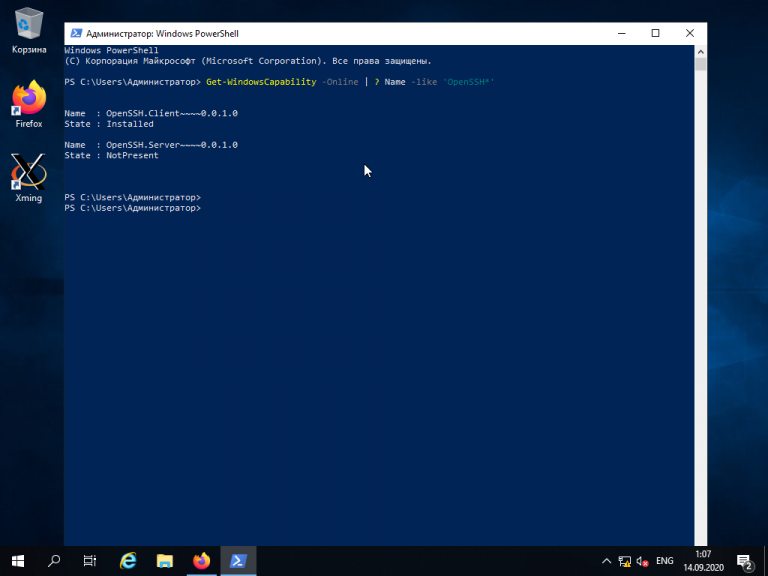
Для подключения к компьютеру под управлением Linux по протоколу SSH из Windows можно воспользоваться PowerShell. Сначала становите OpenSSH Client, если ещё не установлен. Запустите на вашем компьютере PowerShell от имени администратора системы и выполните следующую команду:
Get-WindowsCapability -Online | ? Name -like 'OpenSSH*'
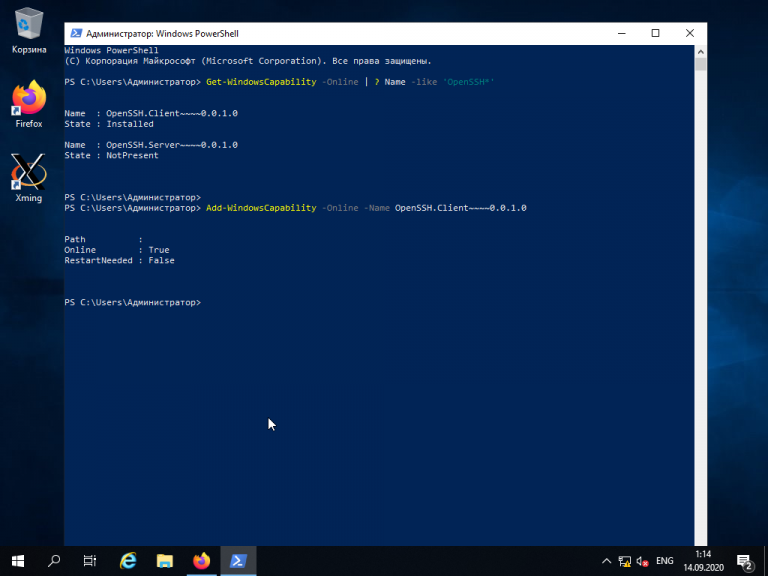
Это необходимо для того, чтобы узнать текущую версию SSH-клиента. В данном примере доступна версия OpenSSH.Client-0.0.1.0. Установите OpenSSH.Client с помощью команды:
Add-WindowsCapability -Online -Name OpenSSH.Client~~~~0.0.1.0
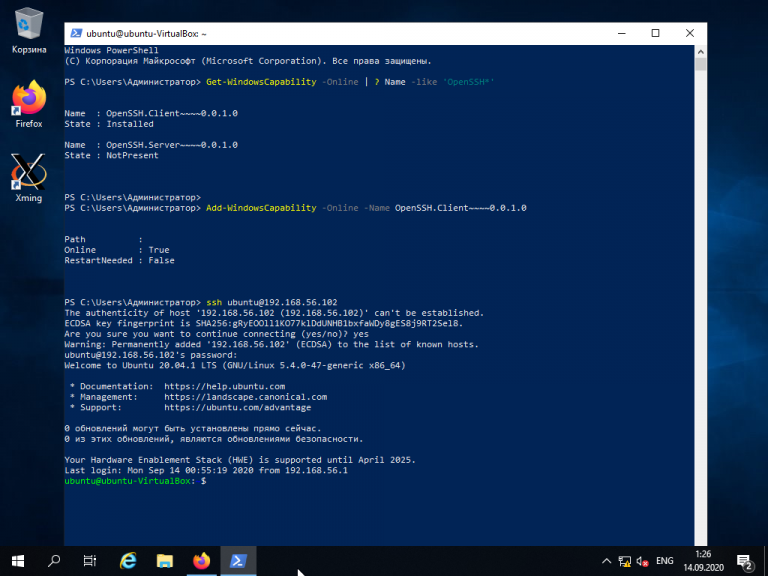
Для того, чтобы подключиться к устройству, на котором запущен SSH-сервер, необходимо ввести имя пользователя и IP-адрес. Команда для подключения по SSH используя PowerShell выглядит так:
ssh ubuntu@192.168.56.1
Здесь ubuntu — имя пользователя на удалённом компьютере, а 192.168.56.1 — IP-адрес Linux-сервера, на котором запущен демон SSH.
При первом подключении необходимо подтвердить использование специального персонального ключа для шифрованного соединения по SSH-протоколу (введите слово Yes), затем введите пароль пользователя (в данном случае для пользователя ubuntu):
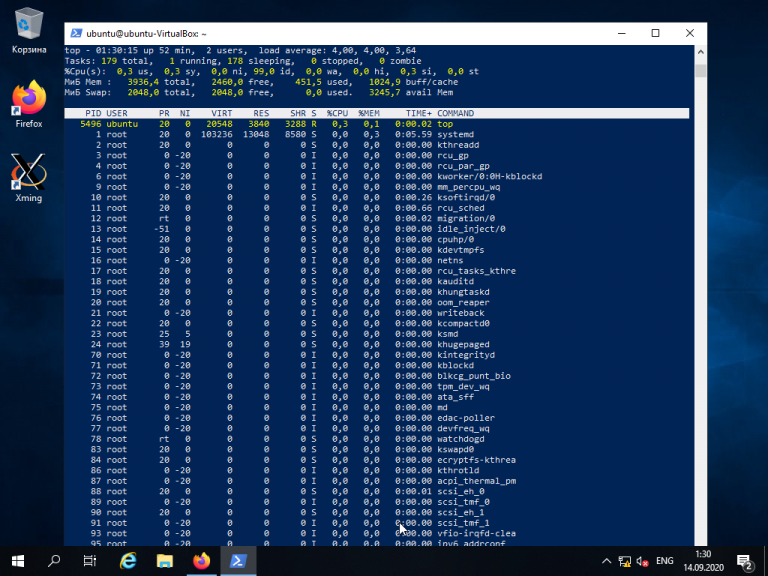
Как видите, соединение прошло успешно. Теперь можно выполнять все команды так же, как если бы вы их выполняли используя стандартный Linux SSH-клиент:
Для завершения терминальной сессии на удалённом компьютере введите команду exit. Теперь вы знаете как выполняется подключение к Linux из Windows по SSH.
Использование Putty для подключения к Linux
Пожалуй, одним из самых популярных способов подключения к Linux из Windows является кроссплатформенная утилита Putty — небольшая по размерам, но очень часто незаменима для подключения по таким протоколам как SSH, Telnet, rlogin и даже с помощью последовательных портов.
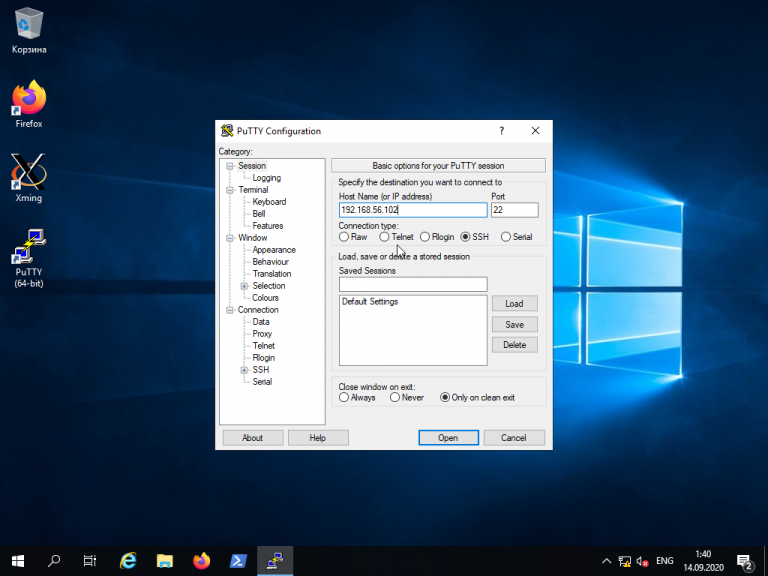
Для обычного подключения к Linux-серверу по протоколу SSH достаточно в поле Host Name (or IP—address) указать его IP-адрес и нажать кнопку Open (в данном примере Linux-сервер имеет IP-адрес: 192.168.56.102):
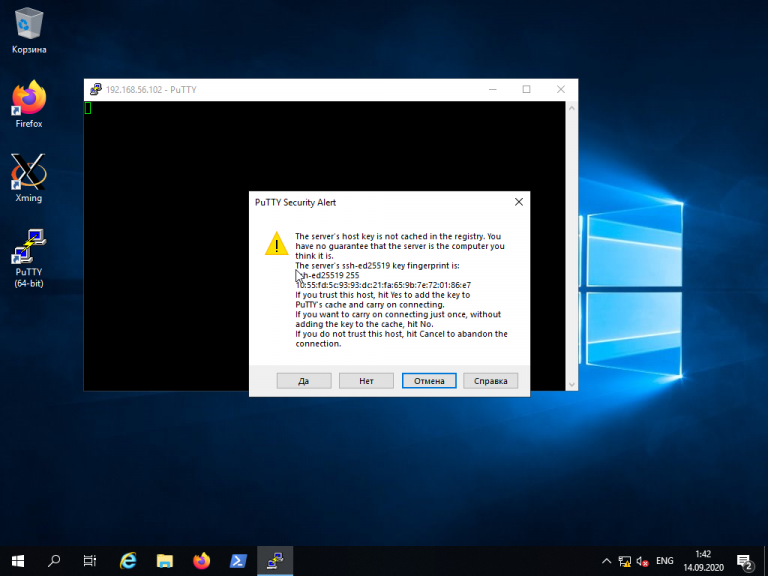
При первом подключении Putty предупредит, что используется специальный ключ безопасности и его нужно добавить в доверенные хосты. Нажмите кнопку Да:
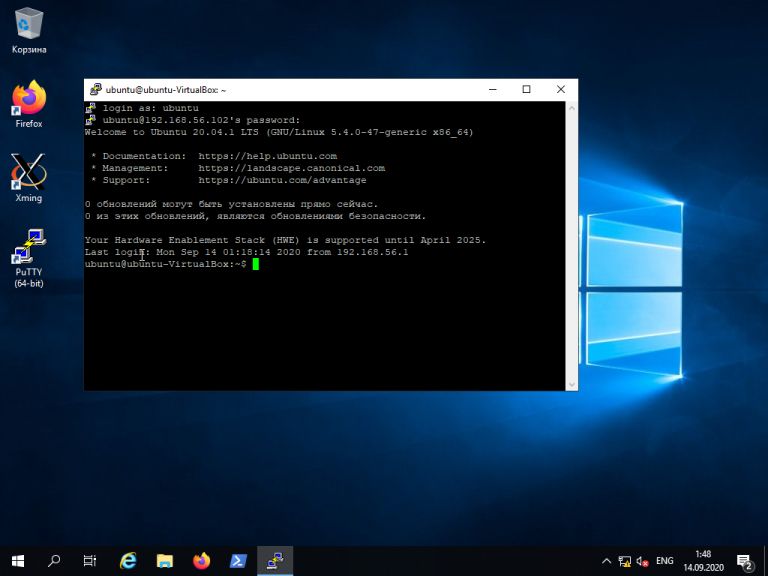
Далее нужно будет ввести логин и пароль. Если всё сделано правильно, запустится удалённая сессия терминала Linux:
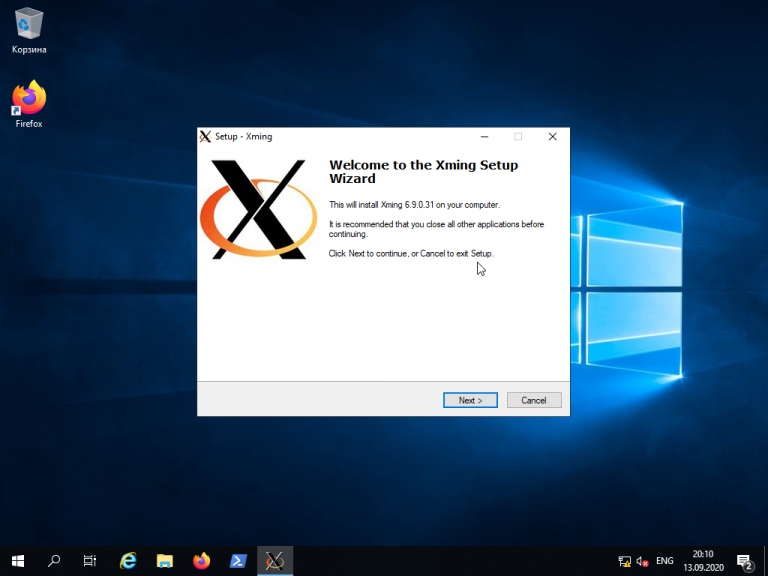
Мало кто знает, что Putty позволяет запустить почти любое приложение, установленное на компьютере с Linux, по сети в Windows. Для этого на компьютере с Windows нужно установить собственный X-сервер. В данном примере воспользуемся Xming.
Скачайте Xming с официального сайта. Установка довольно тривиальная, поэтому не будем на ней останавливаться. Ничего не меняйте в процессе установки. Просто нажимайте кнопку Next до тех пор, пока программа не установится и не запустится:
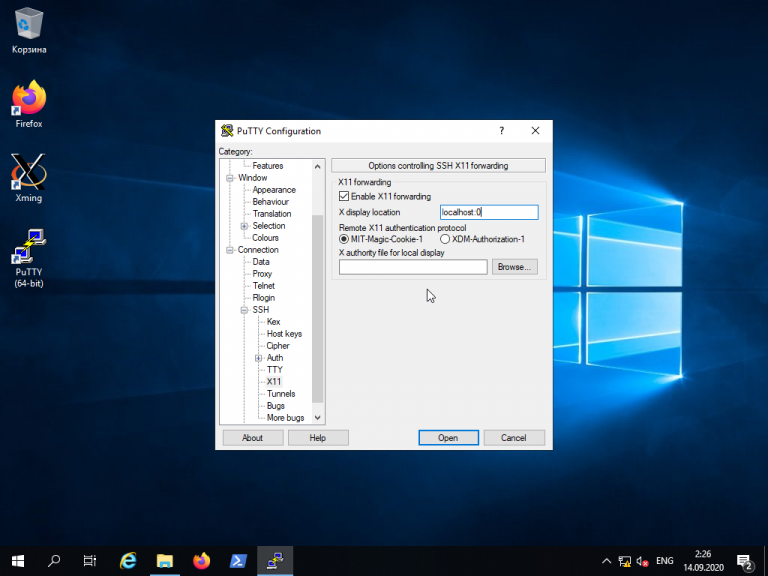
Когда установка Xming завершится, откройте Putty и в настройках сессии для вашего подключения в разделе SSH -> X11 включите флажок напротив опции Enable X11 forwarding, а также, в строке Отображение дисплея X впишите значение localhost:0, после чего откройте сессию подключения с помощью кнопки Open:
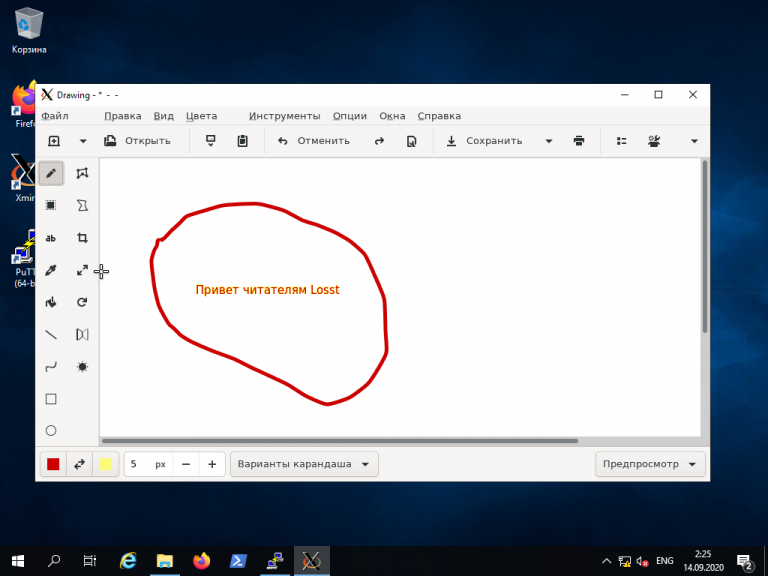
В открывшемся терминале Putty введите консольное название программы, обладающей графическим интерфейсом. В данном примере введено название графического редактора drawing:
drawing &
(Знак & позволит запустить программу в фоновом режиме, в этом случае в окне Putty можно будет выполнять и другие команды):
Как видите, Linux-приложение drawing успешно запустилось по сети на X-сервере, установленном в Windows. С ним можно работать так же, как и с локальным приложением.
Выводы
Сегодня не существует слишком уж больших проблем для подключения к Linux из Windows. Способов существует довольно много. Каждый из них обладает своими достоинствами и недостатками, например, скорость работы VNC, да и других тоже, существенно зависит от скорости сетевого соединения. Существуют также программные средства, позволяющие подключаться к Linux-серверам используя мессенджеры или браузеры.
Обнаружили ошибку в тексте? Сообщите мне об этом. Выделите текст с ошибкой и нажмите Ctrl+Enter.
Статья распространяется под лицензией Creative Commons ShareAlike 4.0 при копировании материала ссылка на источник обязательна .
Microsoft’s Remote Desktop Protocol (RDP) has made Windows to Windows remote desktop connection a breeze as both the client and server are built into Windows operating systems.
Windows to Linux, or vice-versa, is slightly more complicated as you have to set up the Linux system as the client or server first. As our main goal is to access the Linux system remotely, we’ll primarily use RDP server implementations like xrdp or FreeRDP. SSH is a viable option as well for CLI login.
We’ve detailed the necessary steps to set up Remote Desktop from Windows to Linux with these methods, and more, in the sections below.
Table of Contents
Prepare Linux System
First things first, you’ll need the IP Address of the Linux system you’re trying to access remotely. You can use the ip addr command for this. Once you have the IP, you can use your preferred method to set up Remote Desktop on Linux, after which you should skip ahead to Step 2.
GNOME Remote Desktop
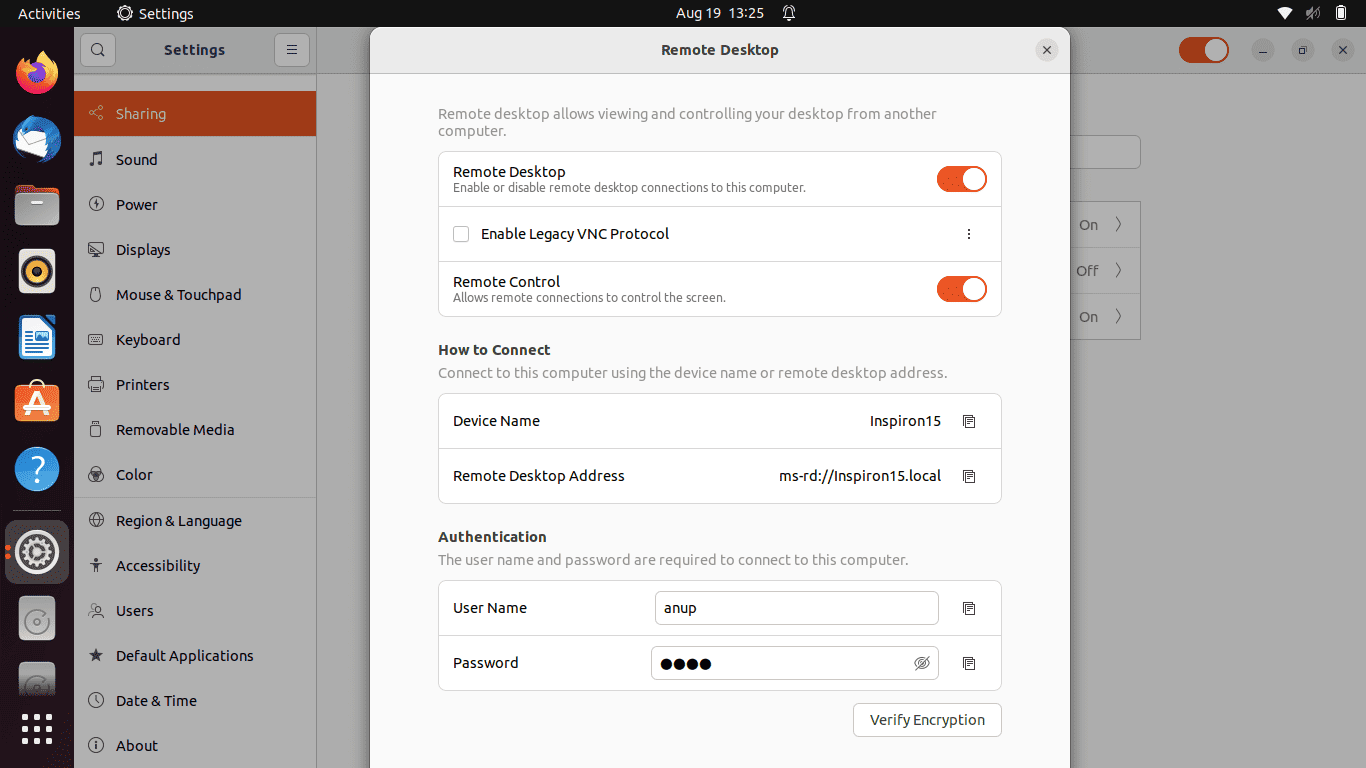
Ubuntu supports desktop sharing by default thanks to GNOME Remote Desktop, which can operate through VNC (LibVNCServer) or RDP (FreeRDP). Setting up remote desktop with this method is extremely simple:
- Open Settings and go to the Sharing tab.
- Enable the Remote Desktop option.
- GNOME Remote Desktop uses RDP by default, but you can enable Legacy VNC protocol if you want.
- Also, note the device name, remote desktop address, user name, and password. These will be necessary later.
Xrdp
Xrdp is an implementation of RDP that supports graphical remoting. Additionally, it also has some useful features like two-way clipboard transfer and the ability to mount local drives on the client machine. Here’s how you can setup xrdp:
- First, install the xrdp package with
sudo apt install xrdp. - Permit xrdp to listen to connections (on port 3389 by default) with
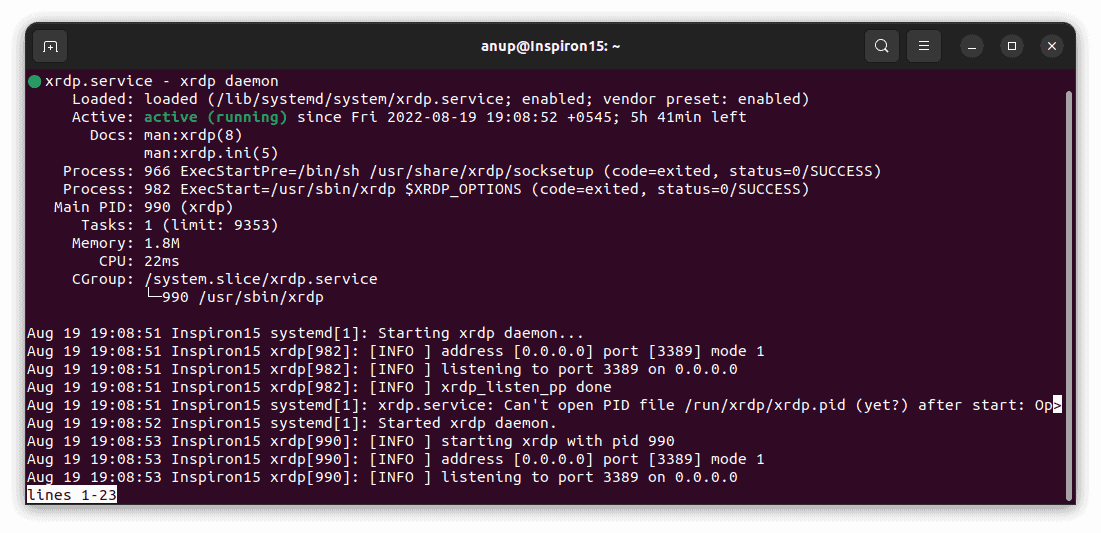
sudo ufw allow 3389. - Now, check the xrdp daemon status with
systemctl status xrdp.service.
If the xrdp daemon is loaded and active (running), you’re good. You should log out of your account and skip ahead to Step 2 for steps for the Windows system.
But users often encounter various errors at this stage. In such cases, you’ll have to troubleshoot the issue and get xrdp running first.
- First, use the following commands to start, restart, then check xrdp’s status:
sudo systemctl start xrdp.service
sudo /etc/init.d/xrdp restart
systemctl status xrdp.service - Failed to start xrdp daemon, possibly address already in use is a common error.
To fix this, entersudo lsof -i tcp:3389and note the PID of the xrdp instance that’s already running. Usekill <PID>to end the process and try starting xrdp now. - Login failed for Display 0.
First, make sure you’re entering the correct login credentials.
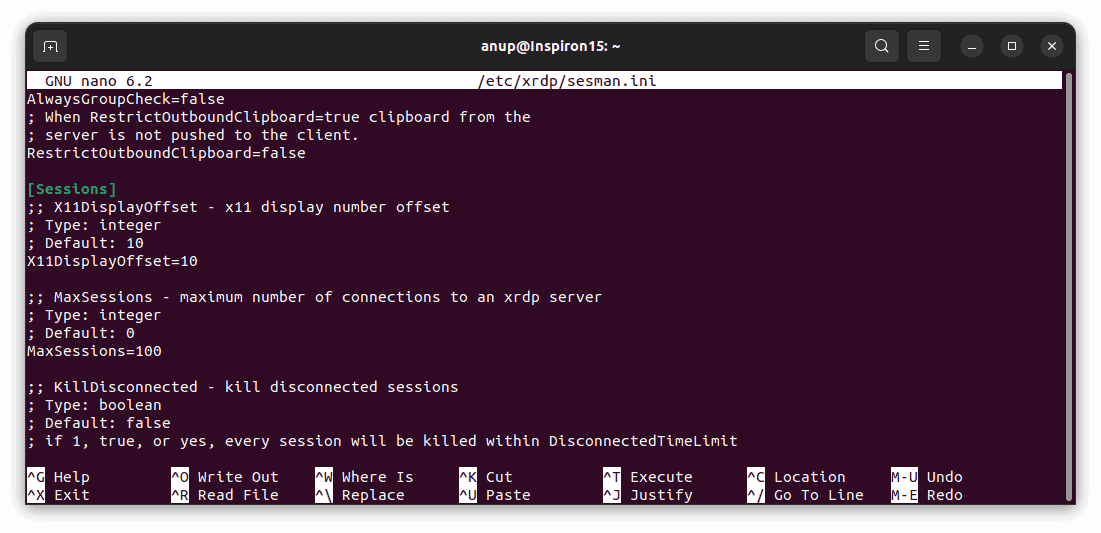
Once you’ve checked that, entersudo nano /etc/xrdp/sesmain.ini. The Max Sessions field should be 50 by default. Change the value to 100 and save the changes.
Repeat the same for/etc/xrdp/sesman.ini, restart the xrdp service, and check if you can connect now. - If you encounter a black screen or internal error when trying to connect, make sure you’re logged out of the Linux system when trying to connect.
SSH
The previous two methods used RDP and VNC for graphical login. But if you’re fine with just CLI access, SSH is a great option. Setting up SSH is very simple; just use the following commands to install, enable, and allow it through the firewall:
sudo apt install sshsudo systemctl enable sshd --nowsudo ufw allow 22/tcp
Before moving on, it’s also worth mentioning that NoMachine is an excellent choice in terms of performance if you’re fine with non-open source options.
Connect From Windows Machine
Both setting up and using Remote Desktop on the Windows machine is very simple. Here are the necessary steps for the RDP methods:
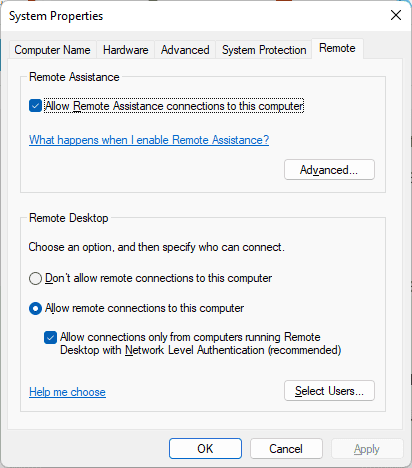
- Press Win + R, type
systempropertiesremote, and press Enter. - Enable the Remote Desktop and Remote Assitance features and press Ok.
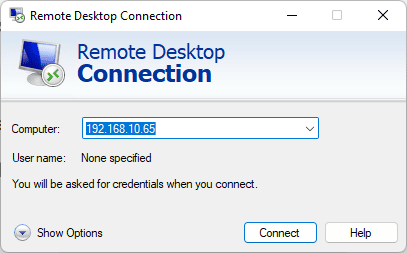
- Press Win + R, type
mstsc, and press Enter. - Optional: Click on Show Options to modify additional settings such as display and audio.
- In the Computer field, enter the Linux system’s IP Address from Step 1 and press Connect.
- Enter the Linux system’s login credentials for authentication.
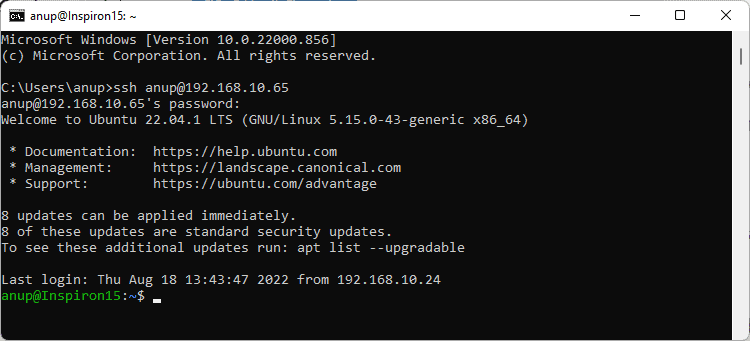
If you’re using SSH, simply enter ssh <user>@<ip> in a command prompt window and enter the password to authenticate and connect.
Setting up a remote desktop connection from Linux to Windows is even simpler. Ubuntu ships with the Remmina remote desktop client, which supports both RDP and VNC protocols. You can also manually install it with sudo apt install remmina remmina-plugin-vnc.
Here’s how you can set up Remote Desktop from Linux to Windows using Remmina:
- Check the section above for steps to ensure Remote Desktop and Remote Assistance are enabled on Windows.
- Use the
ipconfigcommand and note the device’s IP. - Also, use the
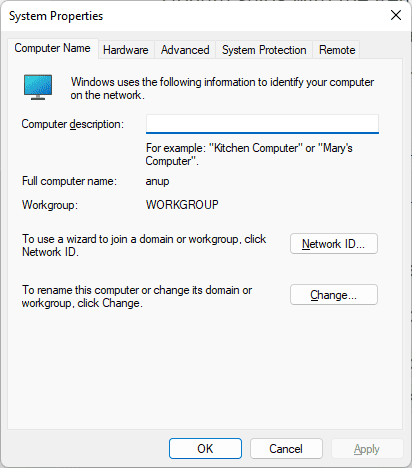
sysdm.cplrun command and note the Workgroup. By default, this will beWORKGROUP. - On Linux, launch the Remmina client.
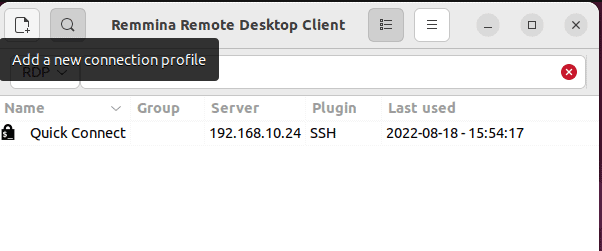
- Click on Add a new connection profile.
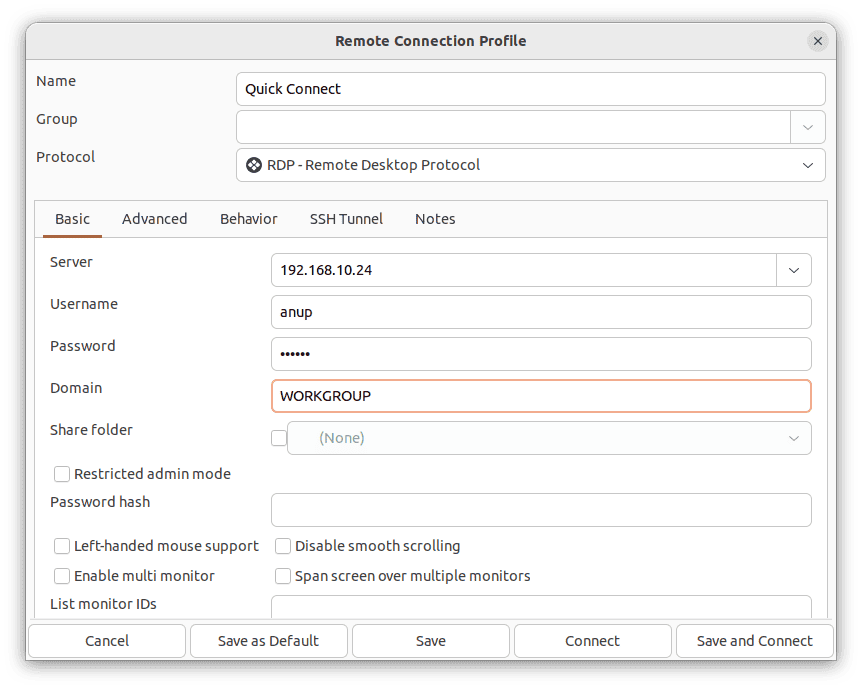
- Enter the IP from Step 2 just above in the server field.
- Fill in the username and password fields for authentication.
- Fill in the workgroup from Step 3.
- Press Connect, or Save and Connect as you prefer.
How to Setup Remote Desktop to Linux VM From Windows?
You can use the same steps that we’ve listed in this article to set up remote desktop from a Windows host to a Linux VM. The only difference is that you must ensure that the host and guest are on the same network. Here’s how you can do so:
- First, check the Windows host’s network configurations with
ipconfig. - Next, launch VMware or whichever hypervisor you’re using.
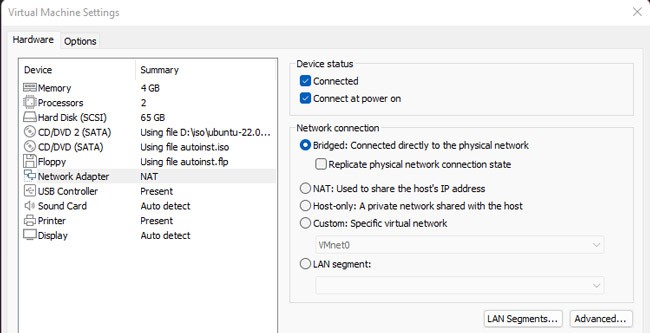
- Right-click the Linux VM and select Settings.
- In the Network Adapter section, set up a Bridged connection and press OK to save the changes.
- Power on the VM and use
ip ato check the IP address. - Assuming the first 3 parts of the address are the same as the Windows host, you should be able to set up the remote connection now.
How to connect Linux remote Desktop to Windows – all possible options

Having reliable remote access is a vital tool for a wide array of business needs – whether that be facilitating remote work options for employees, or providing more efficient customer support.
Remote desktop access has even become a daily necessity for numerous IT professionals who need control over remote devices, or the ability to troubleshoot from afar. Here we will talk about connecting remote desktop Linux to Windows machines and vice versa. Keep reading to get all possible remote desktop linux options.
Connect To Linux From Windows – TOP Methods
A remote connection is more commonly defined by using software that allows someone to remotely control another machine (like a remote desktop to Linux from Windows, or a remote desktop from Linux to Windows). Remote connections also allow users to access software, applications, and files, as well as to conduct system maintenance and troubleshooting resolution.
The methods outlined below work well for all Linux systems other than Ubuntu- which already has a built-in remote desktop tool that supports both RDP and VNC.
For the initial connection, ensure this feature is set up on the physical Ubuntu machine. After following the installation steps for the built-in Ubuntu-compatible remote desktop option, further installation of any additional software won’t be necessary.
Linux Remote Desktop tips
We are going to focus on the specifics of using Remote Desktop Protocol (RDP) on Linux-based servers, i.a., client apps you get to choose from, and some nuances of using remote access tools for Linux in cross-platform environments.
Every user of Debian-derived Linux distribution knows that setting up Kali Linux remote access and successful use of remote desktop clients like TeamViewer or AnyDesk can be tricky at times. Mind that, for starters, you’ll need to download and install all the packages required to enable remote desktop Kali capabilities and update the ones you already have to the latest versions.
After that, you can either use a script to enable XFCE and RDP or do it manually (that takes more time but gives you much more control over the process). This will be enough to access your Kali machine from any other device connected to your local network.
Accessing a remote desktop from Linux Mint machines, especially the configuration of the protocols, may seem overly complicated, but in reality, it’s nothing to be stressed about. For one, Linux Mint has a built-in desktop sharing tool available from the Main Menu. Enable remote access to a machine, and it will be available for connections via SSH terminal for everyone who knows this machine’s IP address. If the toolset provided by a standard remote access client isn’t enough, you can install a third-party client tool, like Vinagre or others, and enjoy localized GUIs, SSH tunneling, request listening option, and many more.
Accessing a remote Linux desktop from a Windows machine sharing a network can be done with just a few simple commands, or by installing easy-to-use software like RDP, Xrdp, Xfce4, TeamViewer, Gnome, Remmina, etc.
Note: Some remote access tools even allow you to access a remote printer or scanner.
Here’re some options to access a remote Linux desktop from a local Windows machine:
- • The “Obtain the IP Address” Method
- • The “RDP” Method
- • The “VNC” Method
- • The “SSH” Method
For those using devices that function over the same network, there are multiple open-source options that help users with remote desktop from Windows to Linux access.
The IP Address Method
Before initiating a Windows to Linux remote desktop connection, users will need to obtain the host machine’s IP address before doing anything else.
To find the IP address of the Linux host, log into the Linux machine, open Terminal, and type the following:
ifconfig
This command will display the Linux machine’s IP address. Users can also locate the IP address by connecting to the network’s router, then browsing the devices by their hostname. Use this information while operating your Windows computer to establish a remote connection.
The “RDP” Method
The simplest option to enable remote connections to Linux desktops is by using the remote access tool built directly into the Windows OS: Remote Desktop Protocol (RDP).
Users must install Xrdp software on their Linux machine to use RDP. Complete installation in person, or with the SSH command. Enter the command as shown below:
sudo apt install xrdp
After that, type “rdp” into the search function, then run the Remote Desktop software on the Windows computer.
From within the Remote Desktop Connection pop-up window, type the Linux computer’s IP address, then click connect.
Note: to manage advanced parameters configuration, click “Show Options”.
The “VNC” Method
Another remote desktop option to try is VNC (Virtual Network Connection). Access a remote device using VNC by installing the dedicated software on both computers. One of the most beloved VNC remote access tools is TightVNC, which is also open-source.
How to use TightVNC to access Linux from Windows
Installing TightVNC can also be done in person or by using the SSH command.
-
Step 1: Enter the following command:
sudo apt install tightvncserver -
Step 2: Users should then run using the command:
sudo tightvncserver -
Step 3: Users must then set the desired password.
-
Step 4: Once the above steps are complete, start the client app on Windows (which can be downloaded from the TightVNC website).
-
Step 5: Type the IP address and port number in the TightVNC window on the Windows OS device.
-
Step 6: Hit “Connect”, then enter the password that was defined in the SSH command section above.
Use SSH
Even though Secure Shell won’t permit remote desktop connections, it’s still an excellent option for remotely installing the software needed to access a Linux desktop remotely. See below to learn how to do it.
Step 1: From the Windows computer, open the Power Menu.
Step 2: Choose “Windows PowerShell”.
Step 3: Type the following command:
ssh [IP_ADDRESS]
Step 4: After accepting the certificate, enter the appropriate username and password.
The connection is now established.
The options described above are excellent for small businesses, anyone working on a smaller network, or those who don’t need frequent access to a remote device.
The Best RDP Linux Clients To Create A Linux to Windows Remote Desktop Connection
This section will help anyone interested in protocols to connect a remote desktop to Windows from Linux.
To start, we’ll begin with using the Windows app, Remote Desktop Connection.
Utilizing the Remote Desktop Protocol (RDP), the Remote Desktop Connection app is included with all Windows OS. RDC allows users to access a Windows PC, or Windows Server remotely.
This is very convenient and cost-effective because organizations can install apps onto one central server, instead of multiple computer systems. Employees can then use those programs by accessing the remote server. This centralization also ensures that maintenance and troubleshooting are much easier processes.
This technology was originally called Terminal Services (TS). In modern times, web systems are far more commonplace- but situations remain where Windows remote applications are still required.
During those instances, Linux users can access Windows computers and servers remotely from their preferred system via RDP client.
There are numerous linux remote desktop clients, and we’ll cover the best of them below:
- • Remmina
- • FreeRDP & rdesktop
- • Anydesk
- • Vinagre
- • RustDesk
- • TeamViewer for Linux
- • TigerVNC
- • VNC Connect
- • Chrome Remote Desktop
After reading the features below, users can select the option that suits their unique needs.
Note: there are some instances where users may prefer to use a VPN for their remote access needs, but this article will solely focus on dedicated remote access software.
Enabling remote desktop on Windows
Users must first set up the machine that they wish to connect with remotely.
While operating the Windows computer that will be remotely connected to, follow the steps below:
Step 1: Login as Administrator;
Step 2: Open the Start menu;
Step 3: Click Settings;
Step 4: When the Settings window opens, open the System category > Remote Desktop;
Step 5: Now enable it;
Please note: users can’t connect with computers running Windows Home edition (like Windows 10 Home). This screen details the information, if that is the case:
Remmina
Remmina supports numerous remote access protocols like RDP, VNC, NX, XDMCP, and SSH. Remmina’s main goal is to help system administrators and travelers that work with multiple remote desktops and/or servers. Remmina is included in the Ubuntu Linux distribution as a default remote desktop client.
FreeRDP and rdesktop
Not only was rdesktop the very first Linux RDP client, but it was also the most popular for many years. However, as of November 2019, the project is searching for a new maintainer.
Alternatively, FreeRDP was initially released in 2009 as a fork of rdesktop. This occurred when Microsoft opened the RDP specifications. As time went on, and FreeRDP grew, it became the standard RDP client on systems lacking native Microsoft clients.
Simply double-click on the computer you want remote access to from the list.
Following the Microsoft Open Specifications, FreeRDP is a free implementation of Remote Desktop Protocol. Said implementation offers the server and client applications, as well as a library that permits other applications to utilize RDP protocol. FreeRDP is both an app and a library, providing reusable features for alternative applications. Aside from rdesktop, the clients listed above utilize FreeRDP’s library.
Please note: The inclusion of rdesktop on this list was intended for informational purposes only, and unless users have a specific scenario in mind, we advise another client that is compatible with the FreeRDP library.
AnyDesk – Remote Desktop Application for Linux
AnyDesk is a fast and lightweight solution that lets users RDP from Linux to Windows. It’s a powerful, cross-platform application with clients for desktop and mobile devices. To establish remote connectivity, you must have AnyDesk installed on both ends of the connection.
The tool supports a wide variety of devices and is compatible with Windows, macOS, Linux, Android, iOS, and ARM devices like Raspberry Pi. AnyDesk is a popular choice as a Linux to Windows remote desktop solution and is used extensively by organizations in education, media, and government. IT professionals and home users also find AnyDesk to be an excellent way to establish RDP connections on a Linux machine.
Interactive remote desktop access is possible with AnyDesk. Your keyboard and mouse can be used to control the remote device’s graphical display. The tool also lets you share your screen for collaboration, presentation, or to enable remote IT support. AnyDesk is an excellent solution for members of the mobile workforce.
Vinagre – Remote Desktop Viewer for Linux
Vinagre is a simple, intuitive, and user-friendly remote desktop client developed for use with the GNOME desktop environment. Its minimalistic design and lack of server application are similar to Remmina. You’ll get the best performance from this application when used with a GNOME-compatible VNC server.
Vinagre is an RDP for Linux solution that also supports the SSH, VNC, and SPICE protocols. The tool does not offer mobile platform clients. This RDP Linux connectivity app can sniff a VNS server on a TCP/IP network and use SSH to tunnel connections. Active sessions can be bookmarked for later use and keyboard shortcuts can be configured. Users can also control the remote screen’s color depth before establishing an active session.
Vinagre is a Linux remote desktop client that employs simple tools to get things done. Establishing a connection involves simply selecting a protocol from a menu and entering the IP address of the target server. Once connected to a remote machine, you have a choice of just viewing its screen or interacting with its graphical interface.
RustDesk – Remote Desktop Software
RustDesk is an open source remote desktop Linux to Windows solution written in the Rust programming language. It’s a nice alternative to proprietary products such as AnyDesk or TeamViewer. In addition to establishing a remote desktop connection, the tool enables you to set up TCP tunneling and transfer files to the client.
RustDesk is a multi-platform tool compatible with the Linux, Windows, macOS, Android, and iOS operating systems. The tool provides functionality right out of the box. All that’s required to establish a connection to a remote client is its ID and password.
TeamViewer for Linux
TeamViewer is considered one of the top Linux RDP to Windows solutions. It’s a multi-platform, cloud-based program that works with virtually all commonly used operating systems.
Strong security is one of TeamViewer’s attractive features. It uses end-to-end AES encryption to keep your data protected. It’s also simple to use for beginners or users without extensive computer skills.
The drawback to TeamViewer is its price. Individual plans start at £32.90 for simple remote access with business plans starting at £61.90 a month. The cost of the tool may put it out of consideration for some users. There is a 14-day free trial during which you can evaluate the product.
TigerVNC – Virtual Network Computing Server
TigerVNC is a free, open source client/server application that supports establishing connectivity using RDP to Linux from Windows computers. It’s a simple and intuitive implementation of Virtual Network Computing (VNC) that lets you connect to a remote machine by entering its IP address. Once connected, you can freely interact with the client’s graphical interface or choose to just view the remote screen.
Security is provided via TLS encryption for data transmission. Advanced authentication extensions are available and the app listens to port 5900 by default.
It provides several options when establishing a connection including color and compression levels, encoding levels, and sharing the clipboard with the remote screen. You can also choose to simply view the remote screen.
TigerVNC is a reliable solution that offers high performance and stable connectivity. This Linux RDP solution can be downloaded from the GitHub Releases Page and is included with several Linux distros like Fedora.
VNC Connect
VNC Connect is a popular tool that uses the VNC connectivity protocol as a foundation and adds extra features like 256-bit AES encryption. Its interface is user-friendly in comparison to some other Linux remote desktop solutions.
VNC Connect is a paid solution, but its most expensive subscription only costs £39.48 a year. A 14-day free trial is available for evaluation, but limited support is offered during the trial period.
The tool can be laggy and may demonstrate poor performance, especially when there is a lot of screen activity. Built-in encryption and multi-factor authentication provide security for your remote sessions.
Chrome Remote Desktop
Chrome Remote Desktop leverages the familiarity of the Chrome browser to provide excellent cross-platform compatibility. It’s a free solution that works on any platform supporting the Chrome browser.
The price for this ease-of-use and compatibility is a lack of features. There is no facility for text chats or file transfers that are staples of other solutions. If you are looking for a simple and free Linux RDP solution, Chrome Remote Desktop is worth a look.
Tags:
Anydesk, Apache Guacamole, Chrome Remote Desktop, Linux, rdesktop, Remmina, RustDesk, Teamviewer, VNC, Windows, Xrdp
Remote access has become an indispensable aspect of modern life, particularly for IT professionals who require remote management of servers. For Windows users, accessing a Linux server can pose difficulties, especially for those unfamiliar with Linux. However, Windows Remote Desktop Connection (RDC) simplifies the process significantly.
RDC is a protocol that enables users to remotely connect to and control a Windows computer as if they were physically present. Linux, conversely, is an open-source operating system extensively used in servers, supercomputers, and embedded systems. In this article, we will explore how to use RDC to connect to a Linux server, the benefits of using RDC to connect to Linux, how to connect Windows RDC to Linux, and the steps required to prepare Linux for RDC.
Why use RDC to connect to Linux?
Remote Desktop Connection (RDC) facilitates the remote control of a computer through a graphical interface, making it particularly advantageous when the user is not physically present or the computer is located elsewhere. Connecting to a Linux server using RDC empowers Windows users to utilize Linux-specific tools and applications that might not be available on Windows. This technique can yield numerous benefits, such as remote management capabilities, better productivity and flexibility, access to Linux-specific software, and cost savings. You can avoid the cost of investing in Linux-specific hardware and software by using your existing Windows computer to manage Linux servers remotely.
Benefits of using RDC to connect to Linux
Connecting to a Linux server via RDC provides numerous advantages, such as:
- Availability of Linux-specific applications and tools
- Remote administration of Linux servers without requiring physical proximity
- Increased efficiency and adaptability, allowing users to work from any location with internet access
- Decreased expenses on hardware and software by enabling the utilization of existing Windows computers instead of investing in Linux-specific equipment and software.
Preparing Linux for RDC
To utilize RDC for connecting to a Linux server, it is crucial to first install and configure the xrdp package on the Linux server. Xrdp is a free and open-source implementation of RDP that permits Linux to accept RDC connections from Windows clients. After installation, it is necessary to set up xrdp to start automatically when the Linux server boots up and configure firewall rules to enable RDC connections.
Connecting to Linux using RDC
When connecting to a Linux server using RDC, you can launch the Remote Desktop Connection app on your Windows computer and input the IP address of the Linux server. Then, you will need to enter your credentials for authentication to the Linux server. After a successful authentication, you can remotely manage the Linux server from your Windows computer.
Steps to connect Windows RDC to Linux
To connect Windows Remote Desktop Connection (RDC) to Linux, you will need to follow these general steps:
- Install an RDP server on your Linux machine such as XRDP, VNC, or TigerVNC.
- Configure the firewall on your Linux machine to allow incoming connections on the RDP port (3389).
- Ensure that the user account on your Linux machine has a password set since some RDP servers may not allow you to connect without a password.
- Find the IP address of your Linux machine by running the ifconfig command in the terminal.
- Launch the Remote Desktop Connection app on your Windows machine.
- Enter the IP address of your Linux machine in the “Computer” field.
- Expand the settings by clicking “Show Options”.
- Adjust the settings under the “Advanced” tab, such as audio playback, display quality, and drive redirection.
- Click “Connect” to start the connection.
- Enter the username and password for your Linux machine when prompted.
If everything is set up correctly, you should now be connected to your Linux machine using RDP.
Troubleshooting RDC to Linux connection issues
If you encounter issues while using Windows RDC to connect to Linux, there are several troubleshooting steps you can take. Some common connection issues include firewall issues, authentication issues, and performance issues. Here are some steps you can follow to troubleshoot these issues:
- Check that the RDP server is installed and running on your Linux machine. You can use commands like systemctl status xrdp or systemctl status vncserver to check the status of your server.
- Ensure that the firewall on your Linux machine is properly configured to allow incoming connections on the RDP port (3389).
- Make sure that the username and password you are using to connect to your Linux machine are correct.
- Check that your Linux machine’s IP address is correct and accessible from your Windows machine. You can check this by pinging the IP address from the Windows command prompt.
- Verify that you are using the correct port number (3389) in your RDP connection settings.
- Temporarily disable any antivirus or firewall software on your Windows machine to see if they might be blocking the connection.
- Check the logs of the RDP server on your Linux machine for any error messages that might indicate what’s causing the connection issue.
- If you are still unable to connect, try using different RDP server or client software to see if that resolves the issue.
By following these steps, you should be able to identify and resolve most issues related to connecting Windows RDC to Linux.
Security considerations for RDC to Linux connection
Ensuring security is crucial when using RDC to connect to a Linux server. To maintain security, it is important to take the following measures:
- Encrypt RDC connections: Ensure that your RDC connections are encrypted using SSL/TLS to prevent eavesdropping and unauthorized access.
- Use strong passwords: Ensure that your Linux server is configured with strong passwords and password policies. This helps prevent brute-force attacks and unauthorized access.
- Limit RDC access: Limit the number of users who have RDC access to the Linux server to minimize the risk of unauthorized access.
- Enable Two-factor authentication: Enable two-factor authentication to add an extra layer of security to your RDC connections.
- Regularly update software: Ensure that all software, including your RDP server and client, are up-to-date with the latest security patches to prevent any potential vulnerabilities from being exploited.
By following these measures, you can ensure that your RDC connections to Linux servers are secure and minimize the risk of unauthorized access.
Conclusion
Windows Remote Desktop Connection (RDC) offers several benefits for users who need to connect to Linux servers, such as access to Linux-specific applications and tools, remote management capabilities, improved productivity and flexibility, and cost savings. However, it is essential to install and configure the RDP server on the Linux machine properly, troubleshoot any connection issues that arise, and prioritize security by implementing SSL/TLS encryption and using strong passwords. By taking these precautions, RDC can be a valuable tool for Windows users seeking to access Linux servers.
Настраивайте удаленное подключение к Ubuntu вместе с Рег.ру! В статье мы опишем варианты удалённого подключения, расскажем, что такое RDP и как настроить удаленный рабочий стол для подключения к Ubuntu из Windows.
Облачные серверы с Ubuntu
Заказывайте Облачный сервер с чистой ОС или стеком LAMP/LEMP. Почасовая оплата, первый платёж — 100 рублей.
Выбрать тариф

Способы удалённо подключиться к Ubuntu из Windows
Есть три основных способа удалённого подключения — через SSH, через VNC (Virtual Network Computing) и c помощью RDP (Remote Desktop Protocol). Для удалённого подключения к Ubuntu лучше всего подойдёт RDP.
RDP — это протокол удалённого управления, который разработала компания Microsoft. Он подходит для удалённой работы пользователя с компьютером или сервером (в том числе с виртуальным сервером), на котором установлен сервис терминальных подключений. С помощью этого встроенного в Windows инструмента можно удалённо подключиться к другим устройствам внутри сети.
Чтобы настроить удаленный доступ к Ubuntu через RDP, нужно знать IP-адрес компьютера или сервера, к которому вы хотите подключиться. Также на Ubuntu нужно установить пакет xrdp и графическое окружение Xfce. После этого вы сможете зайти в Ubuntu из Windows через удалённый рабочий стол.
Установка на Ubuntu xrdp и Xfce
- 1.
- 2.
-
3.
-
4.
Установите пакет xorgxrdp:
sudo apt install xorgxrdp -
5.
Активируйте xrdp:
sudo systemctl enable xrdp -
6.
Проверьте статус xrdp:
sudo systemctl status xrdpСтатус должен быть active:
Установить Ubuntu RDP -
7.
Установите графическое окружение рабочего стола Xfce:
-
8.
Запустите xrdp командой:
sudo systemctl start xrdpСовет
Остановить работу xrdp можно командой sudo systemctl stop xrdp
Готово, вы установили xrdp и Xfce на Ubuntu. Теперь к Ubuntu можно подключиться через удалённый рабочий стол.
Подключение к рабочему столу Ubuntu из Windows
Обратите внимание
Для работы через удалённый рабочий стол вам понадобятся данные учётной записи Ubuntu, а также IP-адрес устройства, к которому вы планируете подключиться. IP-адрес сервера указан в информационном письме, которое пришло на контактный email при заказе услуги, а также в карточке услуги на вкладке «Управление».
-
1.
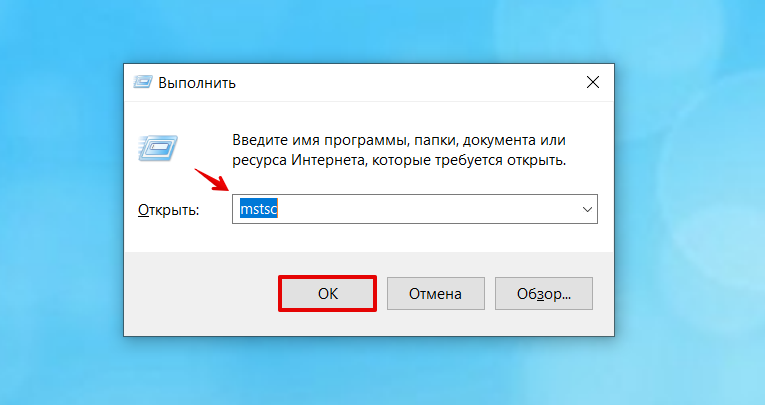
Откройте меню RDP. Для этого нажмите сочетание клавиш Win+R и введите в строку mstsc:
Настройка Ubuntu RDP -
2.
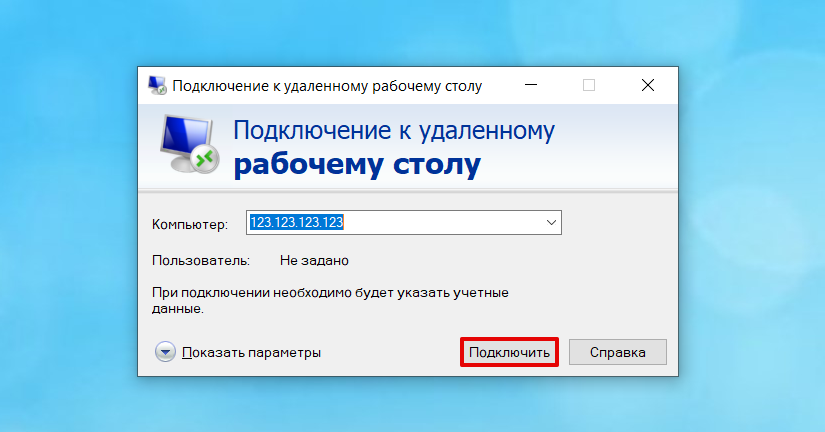
Введите IP-адрес машины, к которой хотите подключиться, и нажмите Подключить:
-
3.
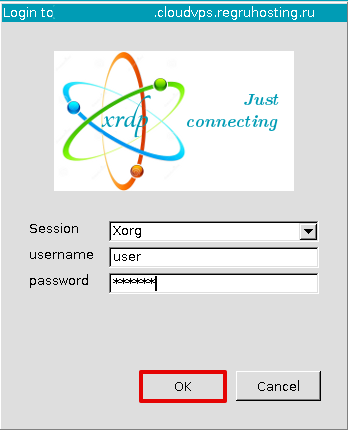
Укажите данные учётной записи Ubuntu, в которой планируете работать, и кликните ОК:
Готово, вы удалённо подключились к Ubuntu из Windows.
Помогла ли вам статья?
Спасибо за оценку. Рады помочь 😊
👍
