Use Redis on Windows for development
Redis is not officially supported on Windows. However, you can install Redis on Windows for development by following the instructions below.
To install Redis on Windows, you’ll first need to enable WSL2 (Windows Subsystem for Linux). WSL2 lets you run Linux binaries natively on Windows. For this method to work, you’ll need to be running Windows 10 version 2004 and higher or Windows 11.
Install or enable WSL2
Microsoft provides detailed instructions for installing WSL. Follow these instructions, and take note of the default Linux distribution it installs. This guide assumes Ubuntu.
Install Redis
Once you’re running Ubuntu on Windows, you can follow the steps detailed at Install on Ubuntu/Debian to install recent stable versions of Redis from the official packages.redis.io APT repository.
Add the repository to the apt index, update it, and then install:
curl -fsSL https://packages.redis.io/gpg | sudo gpg --dearmor -o /usr/share/keyrings/redis-archive-keyring.gpg

echo "deb [signed-by=/usr/share/keyrings/redis-archive-keyring.gpg] https://packages.redis.io/deb $(lsb_release -cs) main" | sudo tee /etc/apt/sources.list.d/redis.list

sudo apt-get update
sudo apt-get install redis
Lastly, start the Redis server like so:
sudo service redis-server startConnect to Redis
You can test that your Redis server is running by connecting with the Redis CLI:
redis-cli
127.0.0.1:6379> ping
PONG#База знаний
-

0
Пошаговое руководство по работе с популярной NoSQL базой данных.
vlada_maestro / shutterstock

Преподаватель Skillbox. Пишет про Java, учит Go. Помнит рассвет PHP и как «грабить корованы».
Просто и быстро установить Redis в ОС Windows позволяет Chocolatey. Это менеджер пакетов в среде Windows, аналогичный apt-get в мире Linux. С его помощью можно устанавливать множество программ и обновлять их, не скачивая каждый раз дистрибутив с сайта.
Действуем по инструкции с официального сайта проекта Chocolatey.
- Windows 7+ / Windows Server 2003+;
- PowerShell v2+. Для установки с сайта требуется как минимум v3 (из-за требований TLS 1.2);
- .NET Framework 4+. Программа попытается установить .NET 4.0, если он не установлен. Минимальная необходимая версия для установки с этого веб-сайта — 4.5 (из-за требований TLS 1.2).
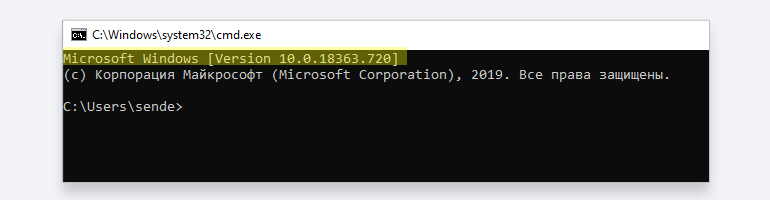
Запустите консоль запуска команд, нажав WIN + R, и введите команду cmd. Если вверху выведена версия Windows, как на скриншоте, этого достаточно.
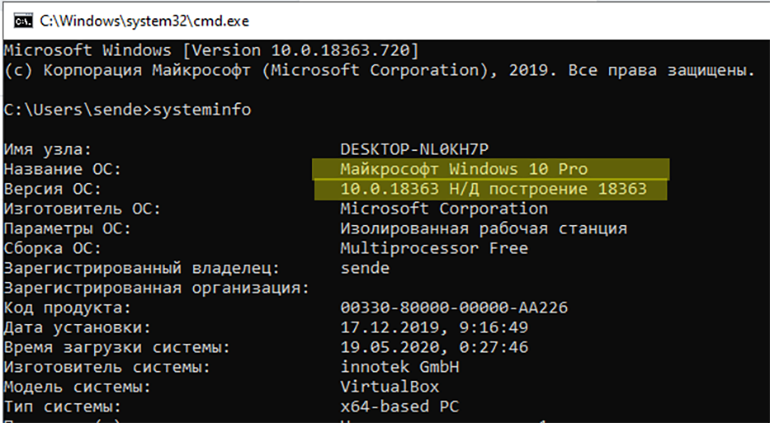
Если нет, введите команду systeminfo. В начале вывода должна появиться версия Windows.
Если у вас установлена версия 7 или выше — переходим к следующему шагу.
Для этого открываем PowerShell, вводим команду $PSVersionTable.PSVersion и получаем ответ:
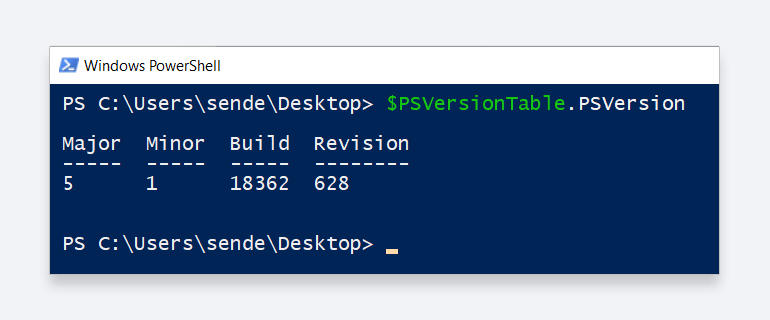
На нашем скриншоте версия PowerShell 5.1. Если у вас версия ниже 3, необходимо установить PowerShell версии 3 (или выше). Инструкция есть по этой ссылке.
Запускаем редактор реестра: нажимаем WIN + R и выполняем команду regedit.
Переходим в раздел
HKEY_LOCAL_MACHINE\SOFTWARE\Microsoft\NET Framework Setup\NDP и смотрим, какие папки там присутствуют:

Если нет такой ветки или отсутствует версия 4.0 и выше, то необходимо её установить. Подробная инструкция находится по этой ссылке.
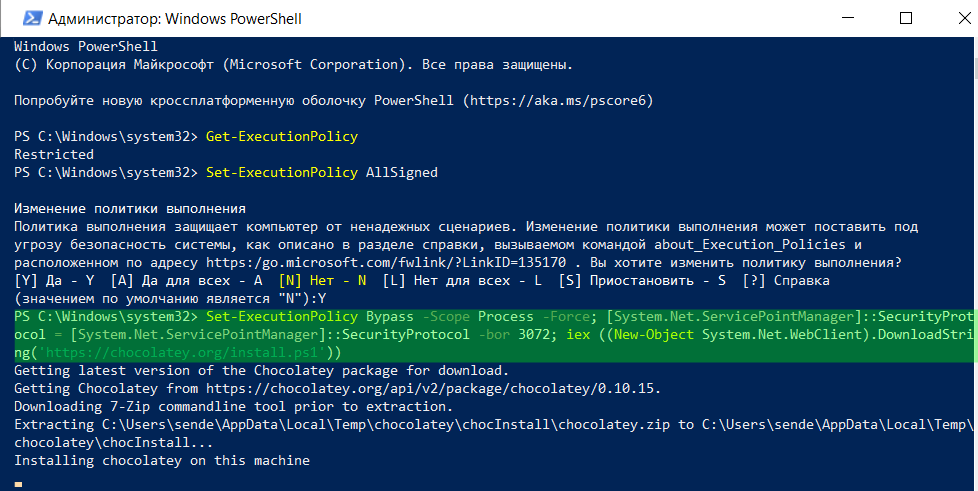
После всех подготовительных действий устанавливаем Chocolatey. Это делается одной командой PowerShell.
Важно! До начала установки необходимо проверить, есть ли на это права. Если прав недостаточно, их нужно добавить.
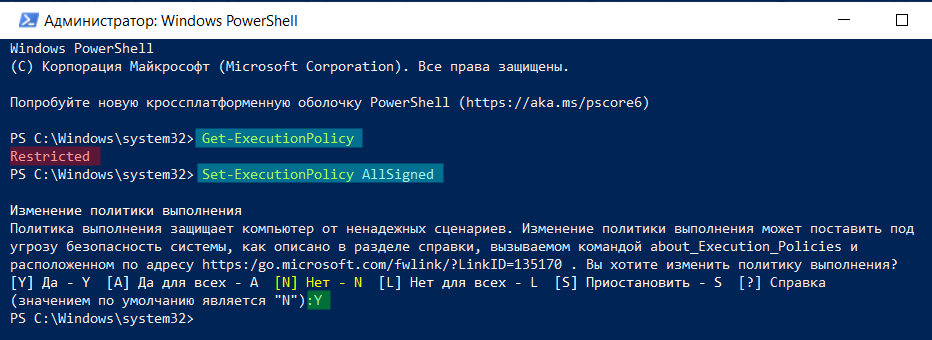
В PowerShell необходимо убедиться, что Get-ExecutionPolicy не является Restricted. Рекомендуется использовать Bypass для снятия ограничений или AllSigned для более безопасного использования.
Выполните команду Get-ExecutionPolicy. Если она вернёт Restricted, запустите Set-ExecutionPolicy AllSigned (рекомендуется) или Set-ExecutionPolicy Bypass -Scope Process.
После этого введите команду установки:
Set-ExecutionPolicy Bypass -Scope Process -Force; [System.Net.ServicePointManager]::SecurityProtocol = [System.Net.ServicePointManager]::SecurityProtocol -bor 3072; iex ((New-Object System.Net.WebClient).DownloadString('https://chocolatey.org/install.ps1'))
Если всё прошло успешно, получим:
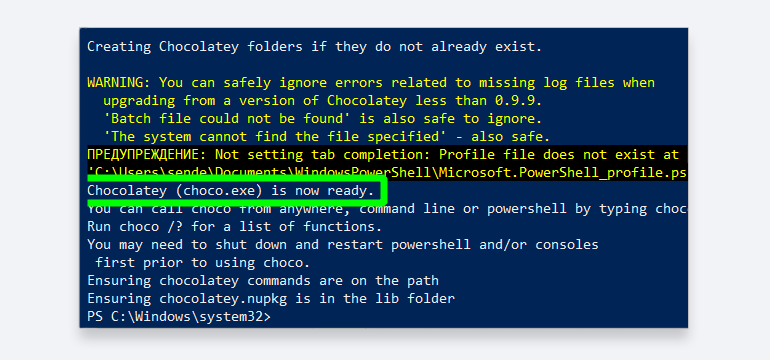
В этом случае можно переходить к установке пакетов приложений. В нашем случае это будет Redis.
Находим в поиске Chocolatey нужный пакет Redis, например, https://chocolatey.org/packages/redis-64/3.0.503 — и копируем (клавиши Ctrl-C) указанную на сайте ссылку для установки:
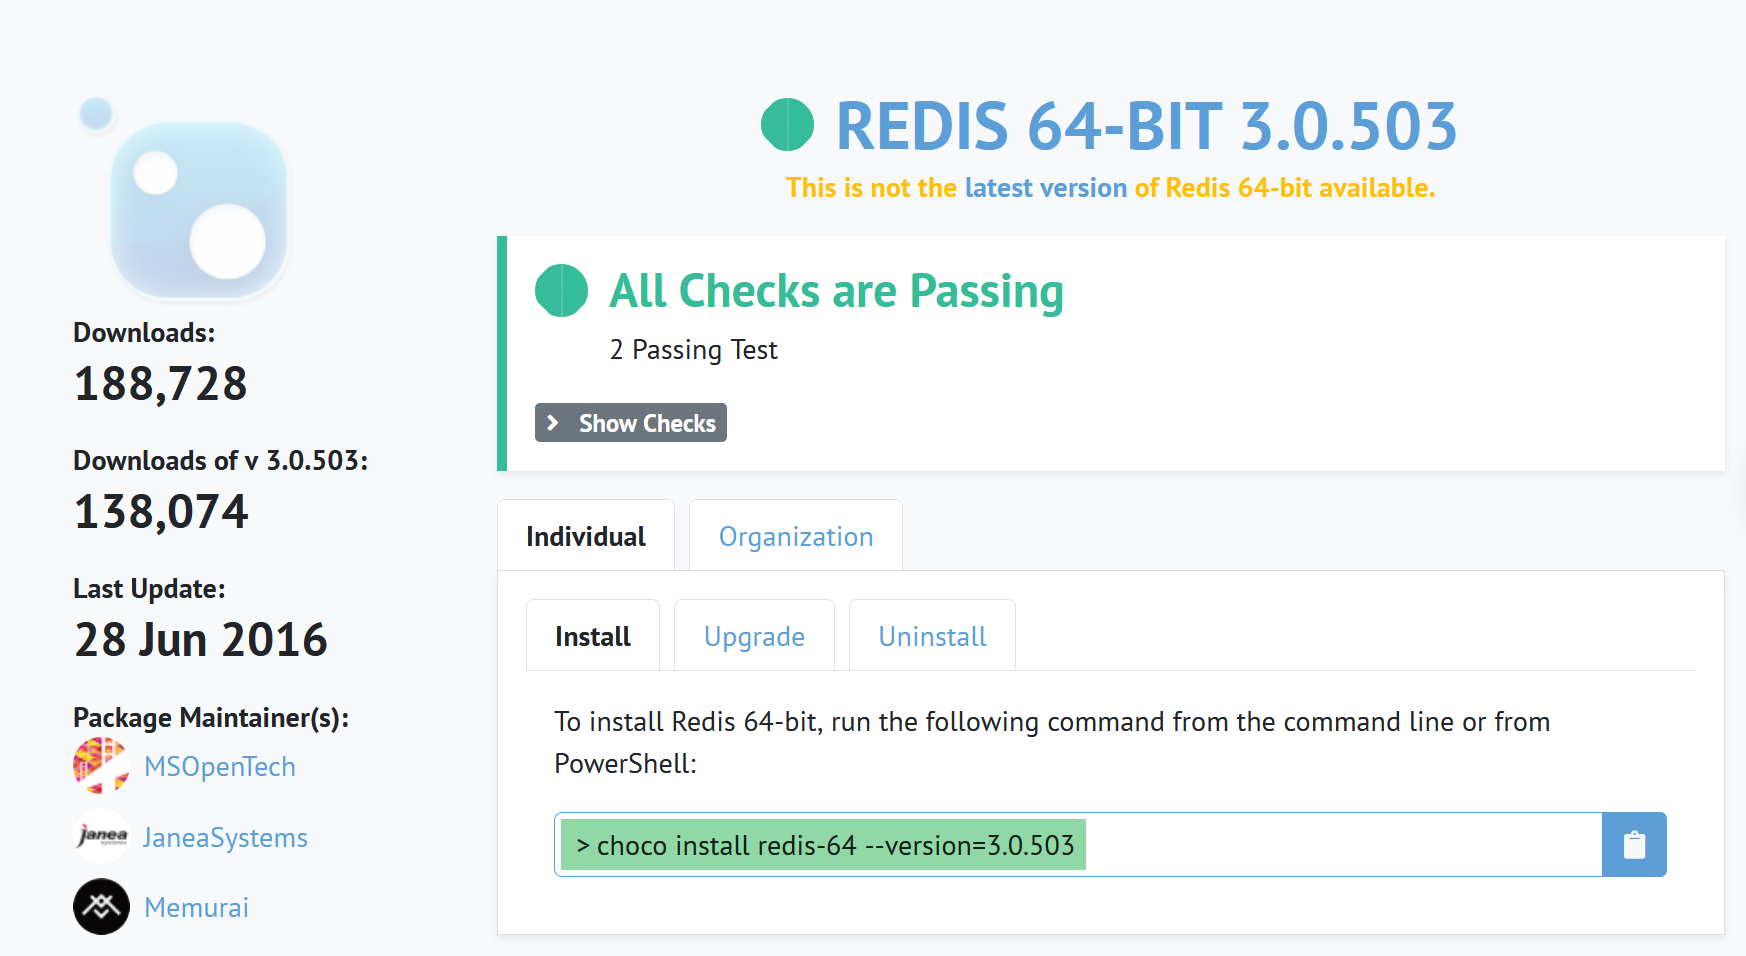
Примечание: после версии 3.0.503 текущий проект был переименован и больше не разрабатывался, однако для знакомства с Redis и её изучения подходит.
Затем вводим скопированную команду из буфера обмена (Ctrl-V) в консоль PowerShell:
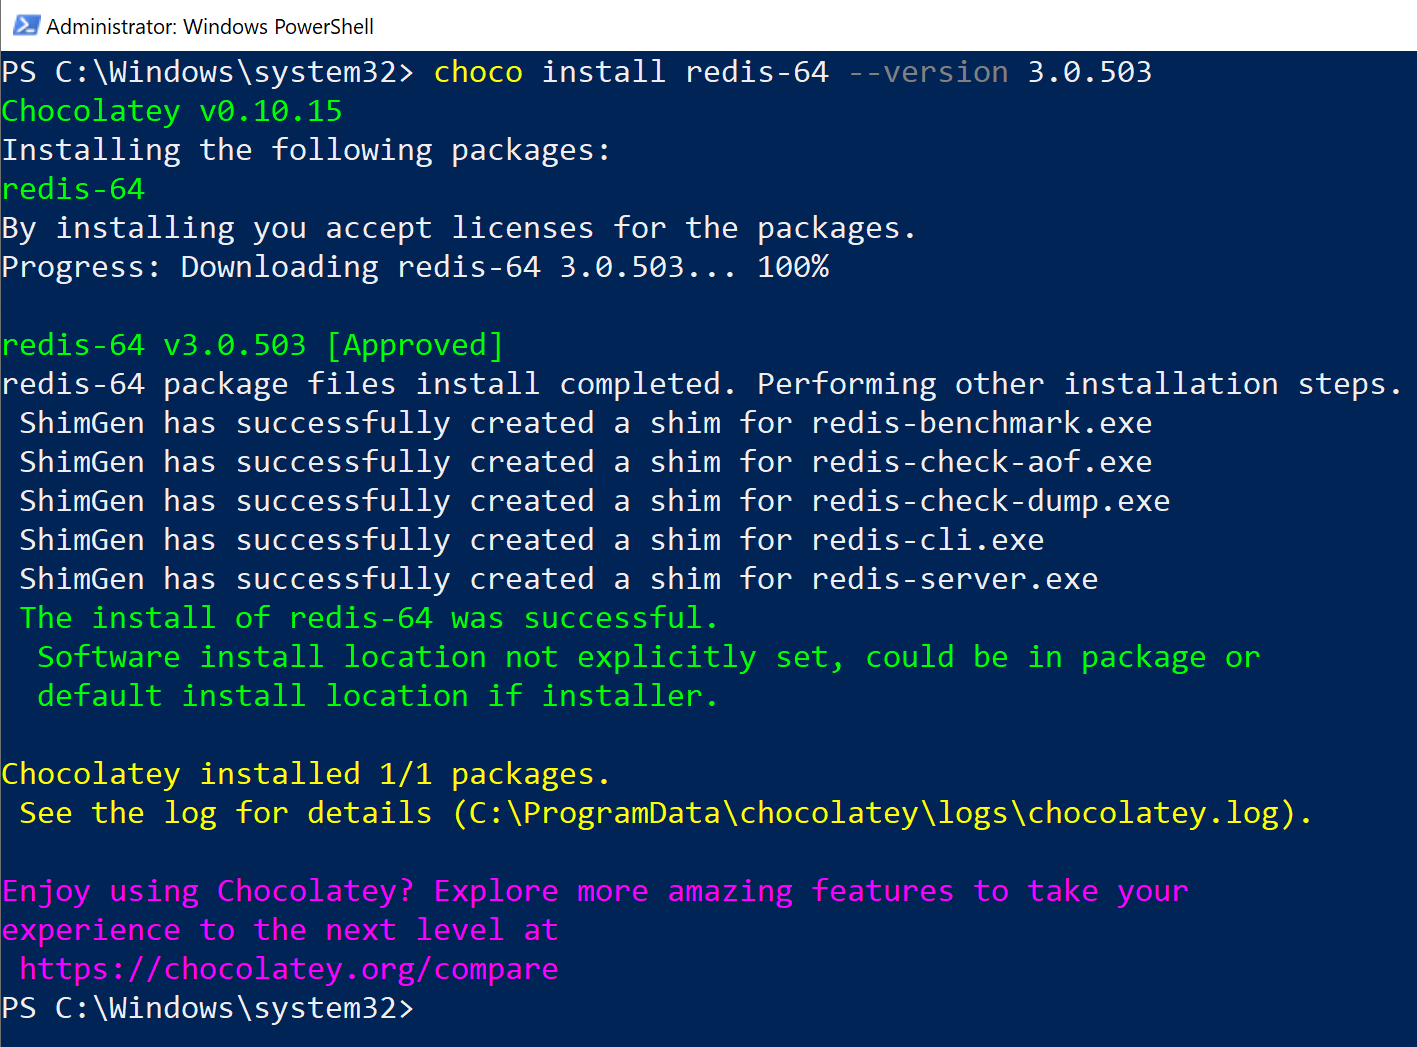
choco install redis-64 --version 3.0.503
Если установка прошла нормально, получаем:
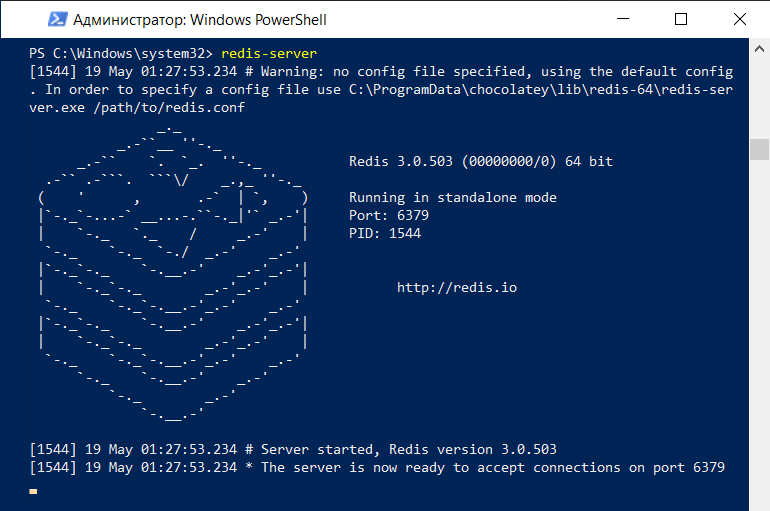
Теперь пробуем использовать Redis. Для этого запускаем сервер, выполнив команду:
Если у вас включён брандмауэр, разрешите в нём доступ к Redis. В консоли PowerShell должно появиться сообщение о том, что сервер Redis работает и принимает соединения.
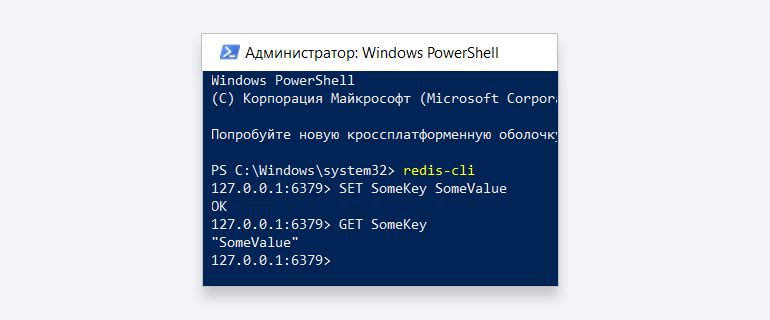
После этого откройте ещё одно окно Powershell, не закрывая окно с запущенным сервером. В новом выполните команду:
Теперь вы можете использовать redis в командной строке для работы с сервером Redis:
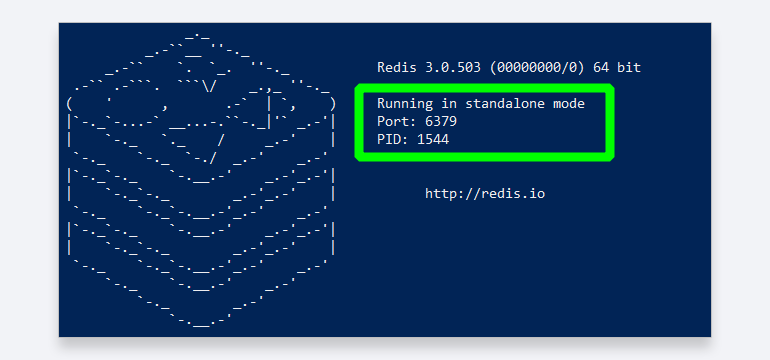
Для использования в коде программы и для связи с сервером вам может понадобиться номер порта для подключения. Его можно найти в окне запуска Redis:

Жизнь можно сделать лучше!
Освойте востребованную профессию, зарабатывайте больше и получайте от работы удовольствие. А мы поможем с трудоустройством и важными для работодателей навыками.
Посмотреть курсы
-
Главная
-
Инструкции
-
Redis
-
Установка и настройка Redis для разных ОС
Redis — это система управления базами данных, которая хранит данные в формате «ключ-значение»: уникальному ключу в БД соответствует некоторое значение. Данные в этой базе данных хранятся в оперативной памяти, благодаря чему запросы обрабатываются быстро.
Согласно рейтингу DB-Engines.com, Redis — это самая популярная СУБД «ключ-значение». Благодаря этому типу, архитектура базы и запросы к ней проще, чем в реляционных баз данных. Однако использовать привычный SQL на стандартном Redis не получится: придется работать с Lua-скриптами или устанавливать модифицированные версии, например RediSQL.
Redis лучше всего использовать в проектах, где нужна база данных с быстрым доступом к данным и простой схемой.
Чтобы вы могли комфортно использовать эту СУБД в своих проектах, мы подготовили материал по установке Redis на три операционные системы: на Windows, Ubuntu и CentOS. По завершении установки мы настроим Redis, после чего СУБД будет готова к работе.
Redis: установка на Windows
Есть два варианта установки Redis на Windows:
- установка портированной версии;
- установка в WSL или Docker.
В этом разделе мы разберем установку портированной версии. Если вы хотите установить в WSL, то:
- руководство по установке и настройке WSL в Windows 10 вы найдете в материале «Как установить Node.js на Windows» в разделе «Установка WSL»;
- инструкция по установке на Ubuntu описана чуть ниже в разделе «Установка на Ubuntu».
Портированная версия для Windows вышла довольно давно: в 2016 году. Она размещена на github и доступна для скачивания всем пользователями. Преимущества установки этой версии заключается в её простоте: для установки не потребуется дополнительная «прослойка» в виде Docker или WSL. Выбирайте порт для Windows, если не хотите усложнять процесс установки и вас устраивает 6-летняя версия.
Установка Redis на Windows
Шаг 1 — заходим в репозиторий на GitHub портированной версии по ссылке: https://github.com/microsoftarchive/redis.
Шаг 2 — переходим на вкладку «Releases».
Шаг 3 — выбираем последний релиз.
Шаг 4 — скачиваем файл с расширением .msi. На изображении он выделен синим цветом:
Шаг 5 — после загрузки откройте файл. Начнется установка.
Шаг 6 — во время установки инсталлятор предложит вам добавить Redis в PATH. Если хотите использовать СУБД из командной строки, проставьте галочку напротив этого пункта.
Шаг 7 — во время выбора порта рекомендуется оставить стандартное значение 6379.
Шаг 8 — после установки необходимо перезагрузить компьютер.
После загрузки компьютера проверим работоспособность Redis. Для этого в командной строке выполняем команду redis-server.
При её выполнении может возникнуть ошибка со следующим сообщением:
Проблема заключается в том, что Windows в автоматическом режиме после установки регистрирует службу, к которой привязывает порт 6379. Когда выполняется команда redis-server, исполнитель обращается к файлу конфигурации и использует порт по-умолчанию, т.е. 6379. Из-за этого возникает ошибка.
Чтобы её решить открываем командную строку и делаем следующее:
- переходим в каталог Redis командой cd;
- запускаем redis-cli.exe;
- выключаем сервер командой shutdown;
- выходим командой exit.
Вот набор команд для стандартного каталога:
После этих действий команда redis-server успешно выполнилась:
Настройки Redis описываются в двух файлах: redis.windows.conf и redis.windows-service.conf.
- Redis.windows-service.conf описывает настройки СУБД, запущенной в качестве службы. Этот формат подразумевает работу в фоновом режиме под управлением операционной системы (запуск при перезагрузке, перезапуск при сбоях и т.п).
- Redis.windows.conf относится к использованию СУБД из командной строки с помощью redis-cli. Это же относится и к использованию СУБД в своих скриптах.
Настройка этих файлов приведет к изменению работы Redis. В нашем случае настроек минимальное количество: СУБД прослушивает любые подключения. Это не совсем безопасно, поэтому позволим подключение к Redis только с localhost. Для этого в файлах конфигурации находим задокументированную строку #bind 127.0.0.1 и удаляем решетку «#»:
Установка Redis: Ubuntu 22.04
Устанавливать Redis на Ubuntu мы будем из официального репозитория. Также, эта инструкция подойдет для установки Redis на Debian.
Шаг 1 — в первую очередь обновим индексы пакетов apt:
sudo apt updateШаг 2 — загружаем Redis:
sudo apt install redis-server -yПроверить работоспособность можно командой sudo systemctl status redis:
Служба активна.
Установка Redis: CentOS 7
Устанавливать Redis будем на CentOS 7. В первую очередь установим EPEL (Extra Packages for Enterprise Linux) — это пакет с дополнительными репозиториями, которые не включены в стандартную версию CentOS. Установим их:
sudo yum install epel-releaseТеперь мы можем установить redis:
sudo yum install redis -yЧерез несколько минут редис будет установлен на компьютер. Чтобы включить редис в автозагрузку, выполняем следующую команду:
sudo systemctl enable redisНастройка Redis осуществляется через изменение конфигурационных файлов. Они для всех версий будут одинаковыми. Поэтому, для наглядной настройки, мы настроим Redis на операционной системе Ubuntu и удаленно подключимся к ней с Windows.
Для осуществления базовой настройки нам необходимо изменить 2 параметра: открыть удаленное подключение и установить пароль.
Шаг 1 — генерируем пароль:
openssl rand 25 | openssl base64 -AВывод:
/37DQhAt5MBq/34Lj24Ppn5LI/UZksAZJQ==Злоумышленники могут перебирать до 150 тысяч паролей в секунду, поэтому важно выбрать надежный пароль. Копируем полученный результат и переходим к конфигурационному файлу.
Шаг 2 — открываем конфигурационный файл:
sudo nano /etc/redis/redis.confШаг 3 — изменяем конфигурацию.
Найдем в конфигурационном файле строку «bind 127.0.0.1 ::1» и закомментируем её с помощью #. Не закрывая файл, найдем строку «protected-mode yes» и заменим её на «protected-mode no». В раздел «Security» после строки #requirepass foobared добавляем строку со сгенерированным паролем:
requirepass /37DQhAt5MBq/34Lj24Ppn5LI/UZksAZJQ==Закрываем файл и сохраняем все изменения.
Шаг 4 — перезапускаем Redis, чтобы изменения вступили в силу:
sudo systemctl restart redis.serviceШаг 5 — с помощью netstat проверяем, какие сетевые интерфейсы прослушивает Redis:
sudo netstat -lnp | grep redis
Шаг 6 — подключаемся удаленно. Попробуем подключиться к базе данных из командной строки Windows:
redis-cli -h 192.168.43.37 -p 6379 -a /37DQhAt5MBq/34Lj24Ppn5LI/UZksAZJQ==Пропингуем СУБД:
192.168.43.37:6379> ping
PONG
И вставим кортеж:
192.168.43.37:6379> set key test
OK
192.168.43.37:6379> get key
"test"
Redis как DBaaS
DBaaS (database as a service) — это база данных, размещенная в облаке. Этот сервис похож на аренду сервера, только вместо виртуальной машины вы получаете базу данных. Такой вариант обладает рядом преимуществ:
- меньшее количество административных хлопот: не нужно обновлять СУБД и обслуживать оборудование;
- легкое масштабирование базы данных: если для вашего проекта потребовалась более производительная БД, то это легко сделать в панели управления;
- быстрый старт: СУБД будет установлена на старте;
- бесперебойная работа.
Заключение
В Timeweb.cloud есть услуга «Облачные базы данных» — уже готовое и настроенное решение. Если вы не хотите отягощать себя административными манипуляциями, то вы можете арендовать базу данных на Redis у Timeweb Cloud. Помимо Redis, Timeweb Cloud может предложить в качестве СУБД MySQL, PostgreSQL и MongoDB.
How to Install Redis on Windows 10 / 11 (Step by Step Tutorial). In this post, we introduce Redis, its features, benefits then move on the Redis installation on Windows 10 / 11.
So, let’s start with how to Install Redis on Windows 10 / 11 (Step by Step Tutorial).
What Is Redis?
")
Redis is an open source, in memory data structure store, database, cache, message broker, and streaming engine. Basically, it provides data structures like strings, lists, hashes, sorted sets and streams. Also, it comprises built in replication, transactions, LRU evictions, Lua Scripting, and different levels of on disks persistency.
In these types, you can run atomic operations, like appending a string, pushing an element to a list, union, and difference, Value incrementation in a hash, or getting the highest ranking members in a sorted set.
Since Redis works with an in memory database, it enables you to achieve top performance. Moreover, based on your use cases, it can persist your data periodically by dumping the dataset to disk or appending each command to a disk based log.
Besides, Redis also supports asynchronous replication with the help of fast, non blocking synchronization and auto reconnection with partial resynchronization on net split.
Features Of Redis
Simply put, Redis provides the following features:
- Transactions – With the help of Redis transaction, you can execute a group of commands centered around MULTI, EXEC, DISCARD, and WATCH orders in a single step.
- Pub/Sub – Subscribe, Unsubscribe, and publish implementation of Publish/ subscription to send their information to the recipient (Subscribed). Instead, when the message shows that channel unintentionally, (if applicable) subscribers, maybe there. Subscribers indicate their interest in one or more channels and receive only the information they have an interest in without knowing the editors (if any). Decommissioning publishers and subscribers allows for greater scalability and dynamic network topology.
- Lua Scripting – The first argument is the script source code. Scripts are written in Lua and run by the Lua 5.1 compiler with Redis.
- Key Eviction – When using Redis as a cache, allowing old data to be automatically deleted when new data added is convenient. This behaviour is well known in the developer community, as it is the default behaviour of the popular Memcached system.
- High Availablity with Redis Sentinel – Redis Sentinel provides high availability for Redis when they do not use Redis Cluster. Basically, Redis Sentinel also provides other side activities such as monitoring, notifications, and acts as a configuration provider for clients.
Benefits of Redis
The advantages of Redis are as follows:
- In Redis, you can store keys and value pairs of up to 512 MB. It means it can support 1 GB for a single entry.
- Redis uses its hashing mechanism known as Redis Hashing. Therefore, you can store data as keys or maps, string fields, and values.
- With Redis, you tend to achieve data replication, a process of setting up master slave cache nodes.
- The Redis cache can withstand failures and also provide uninterrupted services.
- Redis has clients in all formal programming languages.
- Offers a pub/sub messaging system with which you develop into a high performing messaging application.
- With the help of Redis, you can insert big data into its cache effortlessly using mass insertion.
- The Redis protocol makes the process of implementing a client straightforwardly. It is known as RESP (Redis Serialization Protocol).
- Since Redis supports transactions, the commands are executed in a queue rather than one at a time.
Now in this part about how to Install Redis on Windows 10 / 11 (Step by Step Tutorial) is to learn about installation part of Redis.
How to Install Redis on Windows 10 / 11
Certainly, Redis is designed to work with server operating system like, Linux, OS X and BSD and is not compatible with Windows systems. So if you want to install Redis on Windows 10 / 11 then you will need to install Ubuntu operating system on your Windows 10 / 11 system.
As I noted, Windows allows you to easily install Ubuntu operating system from the Microsoft store.
Enable Windows Subsystem for Linux
Before starting, you will need to enable the Windows subsystem for Linux on your Windows 10 / 11. Follow the below steps to enable the Windows Subsystem for Linux:

Step 2 – Click on the Programs. You should see the following screen:

Step 3 – Click on the “Turn Windows features on or off”. You should see the following screen:

Step 4 – Locate and enable the “Windows subsystem for Linux” then click on the OK button to install this feature. Once the installation is finished, you should see the following screen:

Step 5 – Click on the Restart now button to restart your Windows system.
Install Ubuntu 20.04 on Windows 10 / 11
Next step, after enabling Window Subsystem Linux, follow the below steps to install Ubuntu 20.04 via Microsoft store:
Step 1 – Search and open the “Microsoft Store”. Once the Store is open, go to the search bar, type “Ubuntu”. You should see different Ubuntu apps in the following screen:

Step 2 – Select the Ubuntu 20.04. You should see the following screen:

Step 3 – Click on the Get button to download the Ubuntu 20.04. Once the Ubuntu 20.04 is downloaded, you should see the following screen:

Step 4 – Click on the Launch button to start and open a new terminal windows and shows that Ubuntu 20.04 is being installed, and we need to hold on for a while.
Step 5 – After completed the installation, you will be asked to set a username and password for Ubuntu as shown below:

Install Redis
At this point, Ubuntu 20.04 is installed on your Windows 10 / 11. Now, run the following command on the terminal to update the Ubuntu system packages:
Once the system is updated, install the Redis server package using the following command:
apt install redis-server -y
Once the Redis is installed, start the Redis service and enable it to start at system reboot with the following command:
					systemctl start redis-server
systemctl enable redis-server
You can also check the status of the Redis with the following command:
systemctl status redis-server
But, if you want to stop the Redis service, run the following command:
systemctl stop redis-server
At this point, Redis is started and listens on port 6379. You can check the listening port using the following command:
You will get the Redis listening port in the following output:
redis 1123 1 0 13:38 ? 00:00:00 /usr/bin/redis-server 127.0.0.1:6379
How to Connect Redis Server
Together, Redis comes with a redis-cli command-line utility that allows you to connect and manage Redis instance via command line. Run the following command to connect to the Redis server instance:
Once you are connected, you will get the following shell:
Now, ping the Redis service using the following command:
If everything is fine, you will get the following output:
After that, please run the following command to exit from the Redis instance:
Configure Redis for Remote Connection
By default, Redis can be connected only from the local system. So if you want to connect the Redis server from remote machine then you will need to allow the remote connection via Redis configuration file.
Edit the Redis main configuration file using the following command:
nano /etc/redis/redis.conf
And, replaced it with the following line:
Save and close the file then reload the Redis service to apply the changes:
systemctl restart redis-server
redis-cli -h redis-server-ip ping
If everything is fine, you will get the following output:
Thank you for reading How to Install Redis on Windows 10 / 11 (Step by Step Tutorial). We shall conclude.
How to Install Redis on Windows 10 / 11 (Step by Step Tutorial) Conclusion
In this post, we explained how to install Redis on Windows 10 / 11. We also explained how to enable Windows subsystem for Linux and run Redis on Ubuntu instance. Redis is very popular, fast, flexible in memory database with lots of great data structures. Thanks to those features you have one of the most versatile NoSQL databases.
Take a look at more Redis content in our blog here.
Search code, repositories, users, issues, pull requests…
Provide feedback
Saved searches
Use saved searches to filter your results more quickly
Sign up