Introduction
VirtIO Drivers are paravirtualized drivers for kvm/Linux (see http://www.linux-kvm.org/page/Virtio). In short, they enable direct (paravirtualized) access to devices and peripherals for virtual machines using them, instead of slower, emulated, ones.
A quite extended explanation about VirtIO drivers can be found here http://www.ibm.com/developerworks/library/l-virtio.
At the moment these kind of devices are supported:
- block (disks drives), see Paravirtualized Block Drivers for Windows
- network (ethernet cards), see Paravirtualized Network Drivers for Windows
- balloon (dynamic memory management), see Dynamic Memory Management
You can maximize performances by using VirtIO drivers. The availability and status of the VirtIO drivers depends on the guest OS and platform.
Windows OS Support
Windows does not have native support for VirtIO devices included.
But, there is excellent external support through opensource drivers, which are available compiled and signed for Windows:
https://fedorapeople.org/groups/virt/virtio-win/direct-downloads/archive-virtio/?C=M;O=D
Note that this repository provides not only the most recent, but also many older versions.
Those older versions can still be useful when a Windows VM shows instability or incompatibility with a newer driver version.
The binary drivers are digitally signed by Red Hat, and will work on 32-bit and 64-bit versions of Windows
Installation
Using the ISO
You can download the latest stable or you can download the most recent build of the ISO.
Normally the drivers are pretty stable, so one should try out the most recent release first.
You can access the ISO in a VM by mounting the ISO with a virtual CD-ROM/DVD drive on that VM.
Wizard Installation
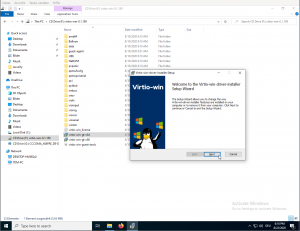
You can use an easy wizard to install all, or a selection, of VirtIO drivers.
- Open the Windows Explorer and navigate to the CD-ROM drive.
- Simply execute (double-click on) virtio-win-gt-x64
- Follow its instructions.
- (Optional) use the virtio-win-guest-tools wizard to install the QEMU Guest Agent and the SPICE agent for an improved remote-viewer experience.
- Reboot VM
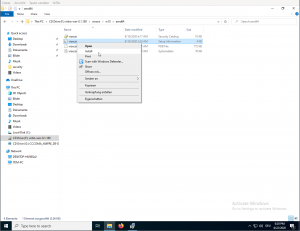
Manual Installation
- Open the Windows Explorer and navigate to the CD-ROM drive.
- There you can see that the ISO consists of several directories, each having sub-directories for supported OS version (for example, 2k19, 2k12R2, w7, w8.1, w10, …).
- Balloon
- guest-agent
- NetKVM
- qxl
- vioscsi
- …
- Navigate to the desired driver directories and respective Windows Version
- Right-click on the file with type «Setup Information»
- A context menu opens, select «Install» here.
- Repeat that process for all desired drivers
- Reboot VM.
Downloading the Wizard in the VM
You can also just download the most recent virtio-win-gt-x64.msi or virtio-win-gt-x86.msi from inside the VM, if you have already network access.
Then just execute it and follow the installation process.
Troubleshooting
Try an older version of the drivers first, if that does not help ask in one of our support channels:
https://pve.proxmox.com/wiki/Get_support
Further Reading
https://docs.fedoraproject.org/en-US/quick-docs/creating-windows-virtual-machines-using-virtio-drivers/index.html
http://www.linux-kvm.org/page/WindowsGuestDrivers
The source code of those drivers can be found here: https://github.com/virtio-win/kvm-guest-drivers-windows
http://www.linux-kvm.org/page/WindowsGuestDrivers/Download_Drivers
See also
- Paravirtualized Block Drivers for Windows
- Paravirtualized Network Drivers for Windows
- Dynamic Memory Management
Important: On Red Hat Enterprise Linux 7, Windows guest virtual machines are supported only under specific subscription programs, such as Advanced Mission Critical (AMC). If you are unsure whether your subscription model includes support for Windows guests, contact customer support.
Paravirtualized drivers enhance the performance of guests, decreasing guest I/O latency and increasing throughput to near bare-metal levels. It is recommended to use the paravirtualized drivers for fully virtualized guests running I/O heavy tasks and applications.
virtio drivers are KVM’s paravirtualized device drivers, available for Windows guest virtual machines running on KVM hosts. These drivers are included in the virtio package. The virtio package supports block (storage) devices and network interface controllers.
The KVM virtio drivers are automatically loaded and installed on the following:
- Red Hat Enterprise Linux 4.8 and newer
- Red Hat Enterprise Linux 5.3 and newer
- Red Hat Enterprise Linux 6 and newer
- Red Hat Enterprise Linux 7 and newer
- Some versions of Linux based on the 2.6.27 kernel or newer kernel versions
Versions of Red Hat Enterprise Linux in the list above detect and install the drivers. Additional installation steps are not required.
In Red Hat Enterprise Linux 3 (3.9 and above), manual installation is required.
Note: PCI devices are limited by the virtualized system architecture. Refer to Guest Virtual Machine Device Configuration for additional limitations when using assigned devices.
Using KVM virtio drivers, the following Microsoft Windows versions are expected to run similarly to bare-metal-based systems:
-
Windows Server versions: See Certified guest operating systems for Red Hat Enterprise Linux with KVM
-
Windows Desktop (non-server) versions:
- Windows 7 (32-bit and 64-bit versions)
- Windows 8 (32-bit and 64-bit versions)
- Windows 8.1 (32-bit and 64-bit versions)
- Windows 10 (32-bit and 64-bit versions)
Note: Network connectivity issues sometimes arise when attempting to use older virtio drivers with newer versions of QEMU. Keeping the drivers up to date is therefore recommended.
Installing the KVM Windows virtio Drivers
This section covers the installation process for the KVM Windows virtio drivers. The KVM virtio drivers can be loaded during the Windows installation or installed after the guest’s installation.
You can install the virtio drivers on a guest virtual machine using one of the following methods:
- hosting the installation files on a network accessible to the virtual machine
- using a virtualized CD-ROM device of the driver installation
disk .isofile - using a USB drive, by mounting the same (provided) .ISO file that you would use for the CD-ROM
- using a virtualized floppy device to install the drivers during boot time (required and recommended only for Windows Server 2003)
This procedure describes installation from the paravirtualized installer disk as a virtualized CD-ROM device.
-
Download the drivers
The virtio-win package contains the virtio block and network drivers for all supported Windows guest virtual machines.
Note: The virtio-win package can be found here. Search for virtio-win and click Download Latest. It requires access to one of the following channels:- RHEL Client Supplementary (v. 7)
- RHEL Server Supplementary (v. 7)
- RHEL Workstation Supplementary (v. 7)
Download and install the virtio-win package on the host with the
yumcommand.# yum install virtio-winThe list of virtio-win packages that are supported on Windows operating systems, and the current certified package version, can be found here.
Note that the Red Hat Enterprise Virtualization Hypervisor and Red Hat Enterprise Linux are created on the same code base, so the drivers for the same version (for example, Red Hat Enterprise Virtualization Hypervisor 3.3 and Red Hat Enterprise Linux 6.5) are supported for both environments.
The virtio-win package installs a CD-ROM image,
virtio-win.iso, in the/usr/share/virtio-win/directory. -
Install the virtio drivers
When booting a Windows guest that uses virtio-win devices, the relevant virtio-win device drivers must already be installed on this guest. The virtio-win drivers are not provided as inbox drivers in Microsoft’s Windows installation kit, so installation of a Windows guest on a virtio-win storage device (
viostor/virtio-scsi) requires that you provide the appropriate driver during the installation, either directly from thevirtio-win.isoor from the supplied Virtual Floppy imagevirtio-win<version>.vfd.
Installing the Drivers on an Installed Windows Guest Virtual machine
This procedure describes installing the virtio drivers with a virtualized CD-ROM after Windows is installed.
Follow this procedure to add a CD-ROM image with virt-manager and then install the drivers.
-
Open virt-manager and the guest virtual machine
Open virt-manager, then open the guest virtual machine from the list by double-clicking the guest name.
-
Open the hardware window
Click
 on the toolbar at the top of the window to view virtual hardware details.
Click Add Hardware at the bottom of the new view that appears.
A wizard opens for adding the new device.
-
Select the ISO file
Ensure that the Select managed or other existing storage radio button is selected, and browse to the virtio driver’s
.isoimage file. The default location for the latest version of the drivers is/usr/share/virtio-win/virtio-win.iso.Change the Device type to IDE cdrom and click Forward to proceed.

-
Reboot
Reboot or start the virtual machine to begin using the driver disk. Virtualized IDE devices require a restart to for the virtual machine to recognize the new device.
-
Open the Device Manager
For information on opening Device Manager, refer to the Windows documentation.
-
Start the driver update wizard
-
View available system devices
Expand System devices by clicking on the arrow to its left.

-
Locate the appropriate device
There are up to four drivers available: the balloon driver, the serial driver, the network driver, and the block driver.
- Balloon, the balloon driver, affects the PCI standard RAM Controller in the System devices group.
- vioserial, the serial driver, affects the PCI Simple Communication Controller in the System devices group.
- NetKVM, the network driver, affects the Network adapters group. This driver is only available if a virtio NIC is configured. Configurable parameters for this driver are documented in Appendix E, NetKVM Driver Parameters.
- viostor, the block driver, affects the Disk drives group. This driver is only available if a virtio disk is configured.
Right-click on the device whose driver you wish to update, and select Update Driver from the pop-up menu.
This example installs the balloon driver, so right-click on PCI standard RAM Controller.
-
Open the driver update wizard
From the drop-down menu, select Update Driver Software to access the driver update wizard.

-
-
Specify how to find the driver
The first page of the driver update wizard asks how you want to search for driver software. Click Browse my computer for driver software.

-
Select the driver to install
-
Open a file browser
Click Browse.
-
Browse to the location of the driver
A separate driver is provided for each combination of operating systems and architectures. The drivers are arranged hierarchically according to their driver type, the operating system, and the architecture on which they will be installed:
driver_type/os/arch/.For example, the Balloon driver for a Windows 7 operating system with an x86 (32-bit) architecture, resides in the
Balloon/w7/x86directory.Once you have navigated to the correct location, click OK.
-
Click Next to continue
The following screen is displayed while the driver installs:
-
-
Close the installer
The following screen is displayed when installation is complete:
Click Close to close the installer.
-
Reboot
Reboot the virtual machine to complete the driver installation.


Installing Drivers During the Windows Installation
You can install the virtio drivers during a Windows installation.
This method allows a Windows guest virtual machine to use the virtio drivers for the default storage device.
-
Install the virtio-win package
# yum install virtio-winNote: The virtio-win package can be found here.
It requires access to one of the following channels:
- RHEL Client Supplementary (v. 7)
- RHEL Server Supplementary (v. 7)
- RHEL Workstation Supplementary (v. 7)
-
Creating the guest virtual machine
Important: Create the virtual machine, as normal, without starting the virtual machine. Follow one of the procedures below.
Select one of the following guest-creation methods, and follow the instructions.
-
Create the guest virtual machine with
virshThis method attaches the virtio driver floppy disk to a Windows guest before the installation.
If the virtual machine is created from an XML definition file with
virsh, use thevirsh definecommand not thevirsh createcommand.-
Create, but do not start, the virtual machine. Refer to Defining a Guest Virtual Machine with an XML File for details on creating virtual machines with the
virshcommand. -
Add the driver disk as a virtualized floppy disk with the
virshcommand. This example can be copied and used if there are no other virtualized floppy devices attached to the guest virtual machine. Note that vm_name should be replaced with the name of the virtual machine.# virsh attach-disk *vm_name* /usr/share/virtio-win/virtio-win.vfd fda --type floppyContinue with step 3.
-
-
Create the guest virtual machine with virt-manager and changing the disk type
-
At the final step of the virt-manager guest creation wizard, check the Customize configuration before install checkbox.

Click Finish.
-
Open the Add Hardware wizard
Click Add Hardware in the bottom left of the new panel.
-
Select storage device
Storage is the default selection in the Hardware type list.

Ensure that the Select managed or other existing storage radio button is selected.
Click Browse.
In the window that opens, click Browse Local.
Navigate to
/usr/share/virtio-win/virtio-win.vfd, and click Select to confirm.Change Device type to Floppy disk.
Click Finish to continue.
-
Confirm settings
Review the device settings.

You have now created a removable device accessible by your virtual machine.
-
Change the hard disk type
Select the disk and click Remove.

Add a new virtual storage device by clicking Add Hardware.
Change the Device type from IDE disk to Virtio Disk.
Click Finish to confirm the operation.
-
Ensure settings are correct
Review the settings for VirtIO Disk 1.

When you are satisfied with the configuration details, click Begin Installation.
Continue with step 3.
-
-
Create the guest virtual machine with
virt-installAppend the following parameter exactly as listed below to add the driver disk to the installation with the
virt-installcommand:--disk path=/usr/share/virtio-win/virtio-win.vfd,device=floppyImportant: If the device you want to add is a disk (that is, not a floppy disk or a CD-ROM), you will also need to add the
bus=virtiooption to the end of the--diskparameter:--disk path=/usr/share/virtio-win/virtio-win.vfd,device=disk,bus=virtioBased on the version of Windows you are installing, append the relevant option to the
virt-installcommand. For a list of Windows versions and the appropriate option, run the following command:osinfo-query osThe following is an example of the option for Windows 7:
--os-variant win7
-
-
Additional steps for driver installation
During the installation, additional steps are required to install drivers.
For information on installing these drivers, refer to the documentation for the version of Windows that you are installing.


После установки гостевой Windows в виртуальную машину на хосте KVM, нужно добавить корректные драйвера (kvm virtio driver). Без этих драйверов гостевая Windows не сможет определить виртуальные сетевые адаптеры и ряд другого оборудования.
Скачайте актуальную версию ISO образа с драйверами KVM для Windows (около 500 Мб):
$ wget https://fedorapeople.org/groups/virt/virtio-win/direct-downloads/stable-virtio/virtio-win.iso -P /vm/kvm/iso/
Создайте конфигурационной файл для монтирования iso образа в виртуальную машину:
$ vi /etc/libvirt/qemu/guest-virtio-drivers.xml
Добавьте в него следующую конфигурацию:
<disk type='file' device='cdrom'>
 <driver name='qemu' type='raw'/>
 <source file='/vm/kvm/iso/virtio-win.iso'/>
 <target dev='hdb' bus='ide'/>
 <readonly/>
 <address type='drive' controller='0' bus='0' target='0' unit='1'/>
</disk>
Чтобы смонтировать ISO образ в виртуальную машину KVM, выполните:
$ virsh update-device test-win1 /etc/libvirt/qemu/guest-virtio-drivers.xml
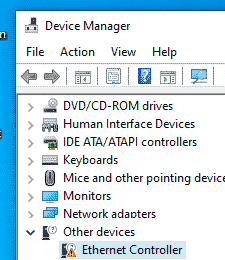
Подключитесь к консоли виртуальной машины Windows, запустите диспетчер устройств и найдите оборудование Ethernet Controller в секции Other Device. Как вы видите, Windows не нашла драйвер для сетевой карты.
Щелкните по контроллеру правой клавишей и выберите: Update Driver -> Browse my computer for driver software, укажите путь к виртуальному CD диску, в который смонтирован ISO образ.
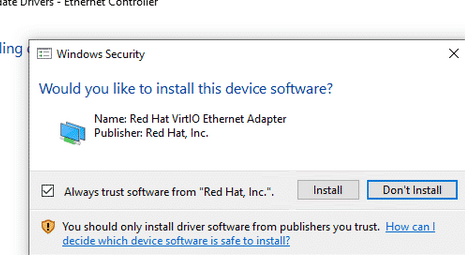
Подтвердите установку драйвера Red Hat VirtIO Ethernet Adapter.
Аналогичным образом установите все остальные драйвера, для оборудования, которое Windows не смогла обнаружить.
- Prerequisites
- About VirtIO drivers
- Supported VirtIO drivers for Microsoft Windows virtual machines
- Adding VirtIO drivers container disk to a virtual machine
- Installing VirtIO drivers during Windows installation
- Removing the VirtIO container disk from a virtual machine
Prerequisites
-
Windows installation media accessible by the virtual machine, such as
importing an ISO into a data volume
and attaching it to the virtual machine.
About VirtIO drivers
VirtIO drivers are paravirtualized device drivers required for Microsoft Windows
virtual machines to run in OpenShift Virtualization. The supported drivers are
available in the container-native-virtualization/virtio-win container disk of the
Red Hat Ecosystem Catalog.
The container-native-virtualization/virtio-win container disk must be attached to the virtual machine as a
SATA CD drive to enable driver installation. You can install VirtIO drivers during
Windows installation on the virtual machine or added to an
existing Windows installation.
After the drivers are installed, the container-native-virtualization/virtio-win container disk can be removed
from the virtual machine.
Supported VirtIO drivers for Microsoft Windows virtual machines
| Driver name | Hardware ID | Description |
|---|---|---|
|
viostor |
VEN_1AF4&DEV_1001 |
The block driver. Sometimes displays as an SCSI Controller in the Other devices |
|
viorng |
VEN_1AF4&DEV_1005 |
The entropy source driver. Sometimes displays as a PCI Device in the |
|
NetKVM |
VEN_1AF4&DEV_1000 |
The network driver. Sometimes displays as an Ethernet Controller in the |
Adding VirtIO drivers container disk to a virtual machine
OpenShift Virtualization distributes VirtIO drivers for Microsoft Windows as a
container disk, which is available from the
Red Hat Ecosystem Catalog.
To install these drivers to a Windows virtual machine, attach the
container-native-virtualization/virtio-win container disk to the virtual machine as a SATA CD drive
in the virtual machine configuration file.
Prerequisites
-
Download the
container-native-virtualization/virtio-wincontainer disk from the
Red Hat Ecosystem Catalog.
This is not mandatory, because the container disk will be downloaded from the Red Hat registry
if it not already present in the cluster, but it can reduce installation time.
Procedure
-
Add the
container-native-virtualization/virtio-wincontainer disk as acdromdisk in the
Windows virtual machine configuration file. The container disk will be
downloaded from the registry if it is not already present in the cluster.spec: domain: devices: disks: - name: virtiocontainerdisk bootOrder: 2 (1) cdrom: bus: sata volumes: - containerDisk: image: container-native-virtualization/virtio-win name: virtiocontainerdisk1 OpenShift Virtualization boots virtual machine disks in the order defined in the
VirtualMachineconfiguration file. You can either define other disks for the
virtual machine before thecontainer-native-virtualization/virtio-wincontainer disk or use the optional
bootOrderparameter to ensure the virtual machine boots from the correct disk.
If you specify thebootOrderfor a disk, it must be specified for all disks
in the configuration. -
The disk is available once the virtual machine has started:
-
If you add the container disk to a running virtual machine, use
oc apply -f <vm.yaml>in the CLI or reboot the virtual machine for the changes
to take effect. -
If the virtual machine is not running, use
virtctl start <vm>.
-
After the virtual machine has started, the VirtIO drivers can be installed from
the attached SATA CD drive.
Installing VirtIO drivers during Windows installation
Install the VirtIO drivers from the attached SATA CD driver during Windows installation.
|
This procedure uses a generic approach to the Windows installation and the |
Procedure
-
Start the virtual machine and connect to a graphical console.
-
Begin the Windows installation process.
-
Select the Advanced installation.
-
The storage destination will not be recognized until the driver is loaded.
ClickLoad driver. -
The drivers are attached as a SATA CD drive. Click OK and browse the CD drive
for the storage driver to load. The drivers are arranged hierarchically
according to their driver type, operating system, and CPU architecture. -
Repeat the previous two steps for all required drivers.
-
Complete the Windows installation.
Removing the VirtIO container disk from a virtual machine
After installing all required VirtIO drivers to the virtual machine, the
container-native-virtualization/virtio-win container disk no longer needs to be attached to the virtual machine.
Remove the container-native-virtualization/virtio-win container disk from the virtual machine configuration file.
Procedure
-
Edit the configuration file and remove the
diskand thevolume.spec: domain: devices: disks: - name: virtiocontainerdisk bootOrder: 2 cdrom: bus: sata volumes: - containerDisk: image: container-native-virtualization/virtio-win name: virtiocontainerdisk -
Reboot the virtual machine for the changes to take effect.
KVM/QEMU Windows guest drivers (virtio-win)
This repository contains KVM/QEMU Windows guest drivers, for both
paravirtual and emulated hardware. The code builds and ships as part
of the virtio-win RPM on Fedora and Red Hat Enterprise Linux, and the
binaries are also available in the form of distribution-neutral ISO
and VFD images. If all you want is use virtio-win in your Windows
virtual machines, go to the
Fedora virtIO-win documentation
for information on obtaining the binaries.
If you’d like to build virtio-win from sources, clone this repo and
follow the instructions in Building the Drivers.
Note that the drivers you build will be either unsigned or test-signed
with Tools/VirtIOTestCert.cer, which means that Windows will not load
them by default. See Microsoft’s driver signing page
for more information on test-signing.
If you want to build cross-signed binaries (like the ones that ship in
the Fedora RPM), you’ll need your own code-signing certificate.
Cross-signed drivers can be used on all versions of Windows except for
the latest Windows 10 with secure boot enabled. However, systems with
cross-signed drivers will not receive Microsoft support.
If you want to produce Microsoft-signed binaries (fully supported,
like the ones that ship in the Red Hat Enterprise Linux RPM), you’ll
need to submit the drivers to Microsoft along with a set of test
results (so called WHQL process). If you decide to WHQL the drivers,
make sure to base them on commit eb2996de or newer, since the GPL
license used prior to this commit is not compatible with WHQL.
Additionally, we ask that you make a change to the Hardware IDs so
that your drivers will not match devices exposed by the upstream
versions of KVM/QEMU. This is especially important if you plan to
distribute the drivers with Windows Update, see the
Microsoft publishing restrictions for more details.