While you may be using Windows 10 for a while, this doesn’t mean you’ve discovered all the operating system’s features. Windows 10 is still new to many users, and most of its features remain undiscovered.
On Windows 10, you don’t need to install screen recording software to record your screen. A built-in feature allows you to record your entire Windows 10 screen-free.
Not only that, but you can also use VLC Media Player to record your desktop screen in easy steps. So, if you are looking for ways to record screens in Windows 10 without installing any software, you are reading the right guide.
Below, we have shared the two best ways to record screen in Windows 10/11. Both of the methods were free and require no additional app installation. So, let’s get started.
Record Windows 10 screen via Game Bar
Xbox Game bar is a gaming feature of Windows 10 that provides you an option to record your screen. While the feature is designed to record gameplay videos, it can also record your desktop screen. Here’s how to record the screen via the Xbox Game bar.
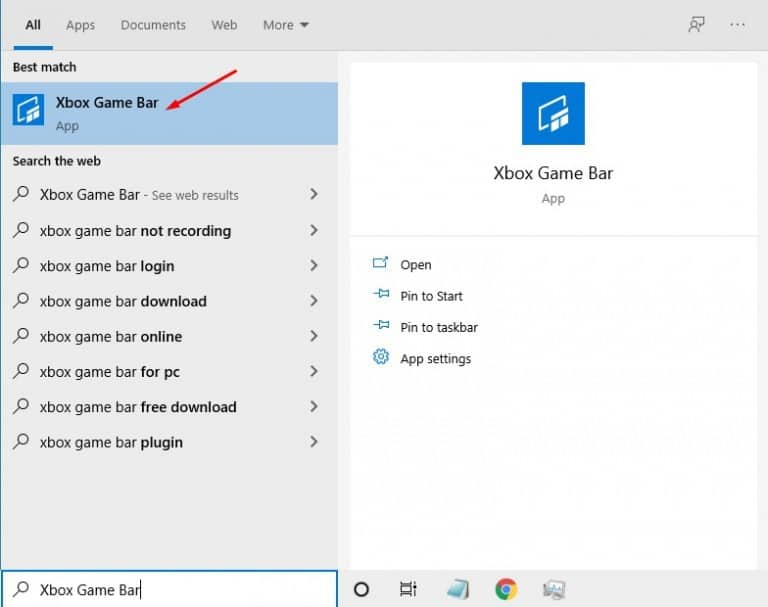
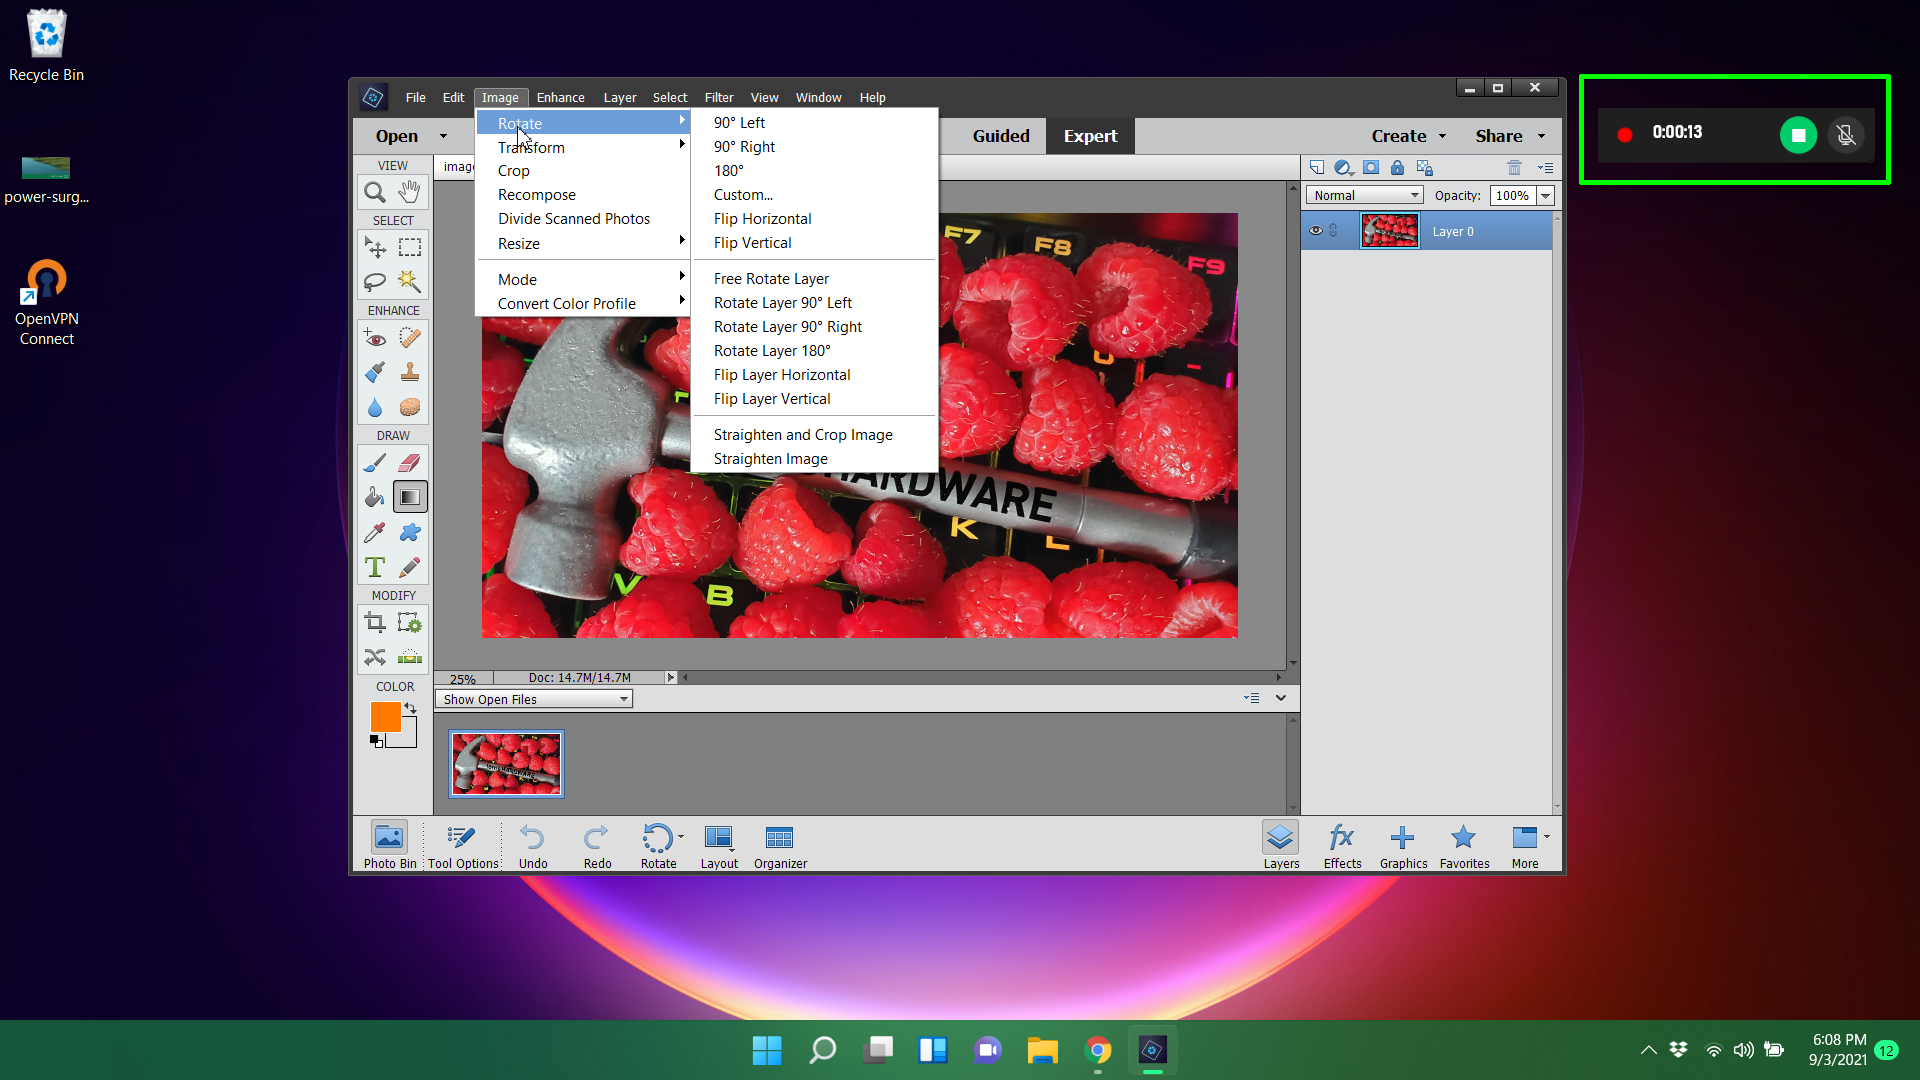
1. First, in your Windows 10, click on the Start button and type Xbox. Next, open the Xbox Game Bar app.
2. Now, you have to press Windows Key + G button on the screen you want to record.
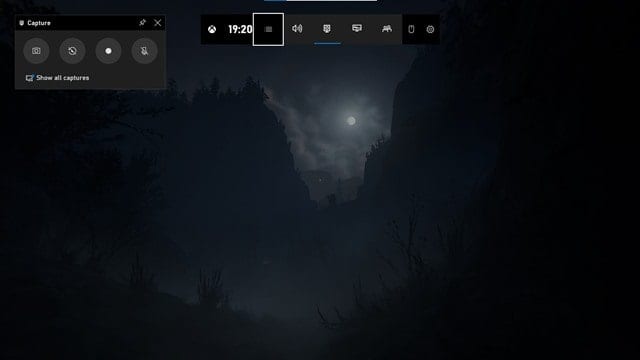
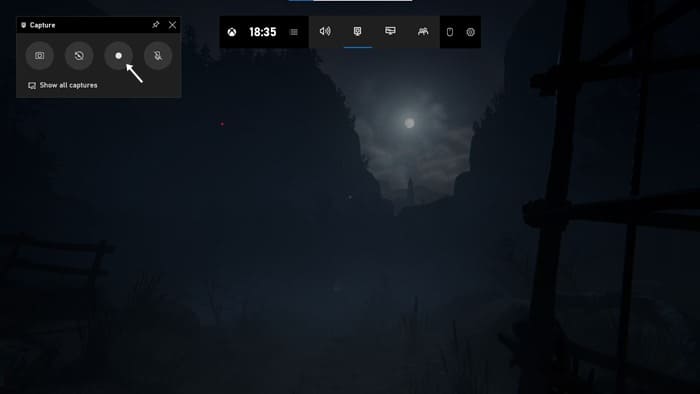
3. Now, you will see many options. You need to click on the Recording button on the Capture widget. This will start the screen recording.
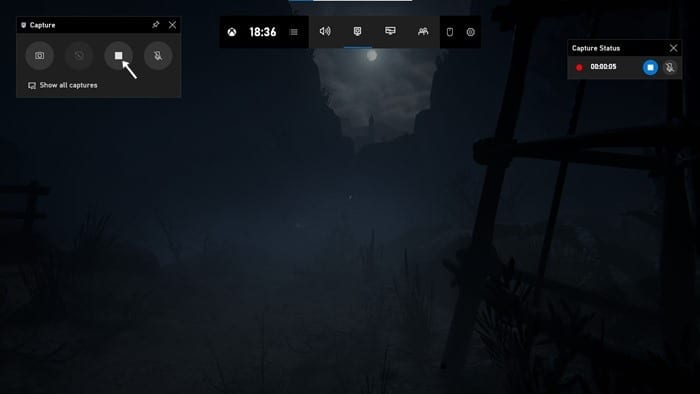
4. To stop the screen recording, click on the Stop button on the same widget.
By default, all your recordings get saved to the folder
“C/Users/Videos/Captures“.
That’s it! You can easily record the screen with the Xbox Game bar on Windows 10. You can also capture screenshots with the same tool.
Using VLC Media Player
With the VLC Media player, you can record the screen easily. You can use this method in Windows 7, 8, 10, and even Windows 11. Here’s how to record your Windows 10 screen using VLC Media Player.
1. First, download and install VLC Media Player on your Windows computer if you don’t have one.
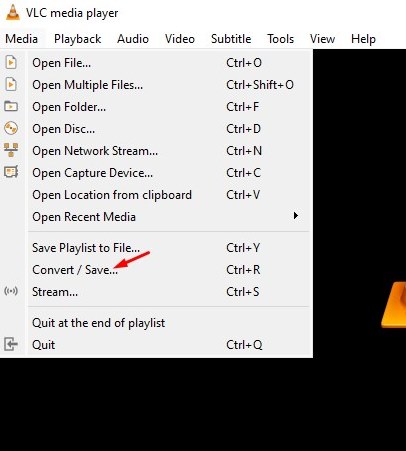
2. Next, click on the Media tab and select the Convert / Save option.
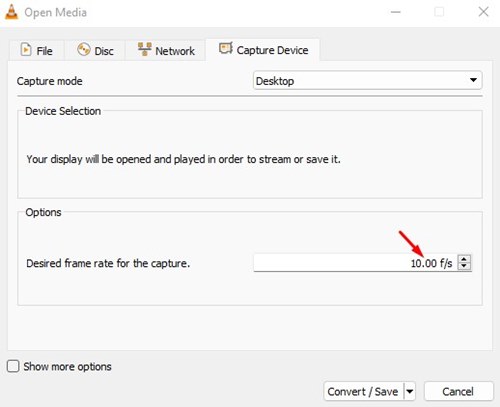
3. Now switch to the Capture Device and select Desktop on the Capture mode.

4. On the Desired frame rate for the capture, set your desired frame rate. 10f/s is recommended.
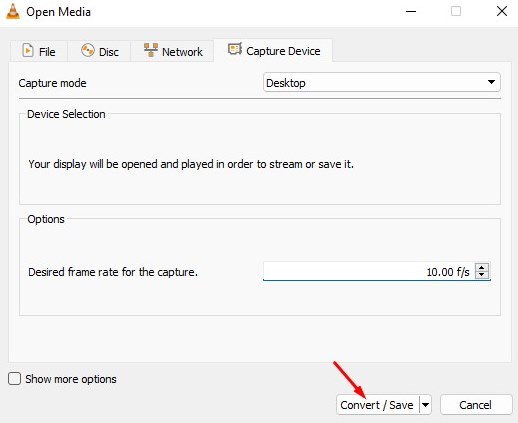
5. Once done, click on the Convert / Save button at the bottom of the Window.
6. On the Convert Window, click the browse button, select the filename, and set the location.
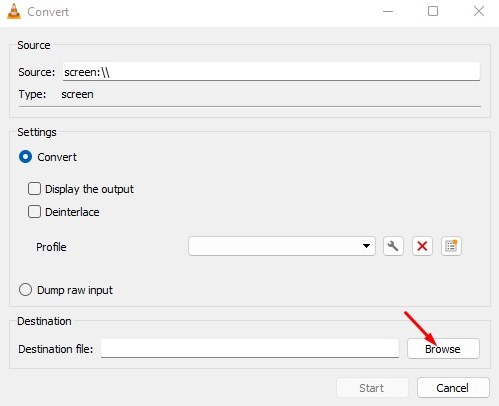
7. Once done, click on the Start button.

That’s it! You are done. Now the screen recording will start. You can now control the screen recording from the VLC’s interface.
That’s it! You are done. This VLC media player method works with every Windows version. You don’t need any additional software to record your desktop screen.
So, this is all about Windows 10 screen recording. We have shared the two best methods to record Windows 10 screen. If you don’t want to go through all hassle and want a straightforward way to record Windows 10 screen, you need to check our article Best Screen Recording Software.
If a picture is worth a thousand words, then a video is worth a million. Whether you’re showing someone how to perform a task in an important application or you want to show off your gaming process, screen recording in Windows is a great way to do it.
Windows 10 and Windows 11 both have screen recording capability built-in as part of the Xbox Game Bar tool, but it has some limitations, including the fact that it can only screen record one app at a time and not the whole desktop. If you have Windows 11 build 22621.1344 or later, the Snipping Tool now has screen recording and allows you to choose a specific region of the desktop, but it’s not a perfect solution either (it doesn’t capture audio, for example). You may also prefer to use a more robust, third-party app as OBS for screen recording if you want more options.
Below, we’ll show you how to record your screen in Windows 10 or Windows 11 using the Xbox Game Bar, the Snipping Tool (latest Windows 11 builds) and OBS. If all you need is a still image, see our article on how to take a screenshot in Windows 10 or 11.
Record the Windows Screen with Xbox Game Bar
Built into both Windows 11 and Windows 10, the Xbox Game Bar has a number of features, including CPU and GPU monitoring. However, its most useful feature is its ability to screen record in Windows, outputting to MP4 format.
XBox Game Bar works as well in other applications such as Chrome as it does in Games, but it only works within a single application at a time and cannot capture the Windows desktop or File Explorer. So, if you want to show someone how to do a task involving multiple programs — for example, programming a web page in a code editor and then viewing it in a browser — you would need to grab multiple videos. And if you want to show them how to do anything in the Windows 11 or 10 UI, such as using the Start menu, you can’t. For those activities, you should use another tool such as OBS, which we’ll show you how to screen record with later in this article.
1. Click into the app you wish to record.
2. Hit the Windows Key + Alt + R to start screen recording. A small recording widget showing how long you’ve been recording appears somewhere on the screen, most likely in a corner. You can also get here by launching the Xbox Gamebar (Windows Key + G) and then finding the capture widget, but the keyboard shortcut is much simpler.
3. Perform whatever actions you want and use your microphone to record audio. You can also mute the mic if you don’t want to capture any sound.
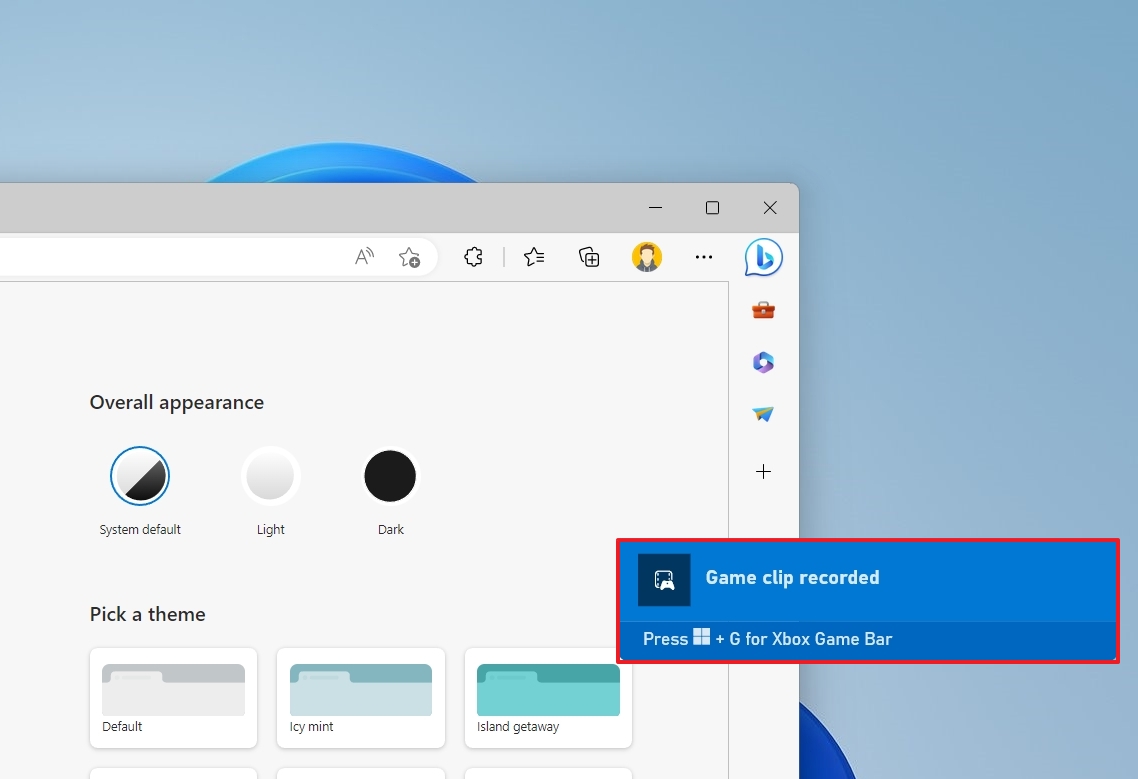
4. Hit the Windows Key + Alt + R again to stop screen recording. You can also hit the stop button on the widget You will get an alert that says «Game clip recorded. If you click on it, you will go into the Gallery section of the Gamebar app and be able to preview the video you captured. You can also find the MP4 file you recorded under your Videos/Captures folder.
Configuring Xbox Gamebar Screen Recording
While the default settings are probably fine for most people, there are a few options you can change.
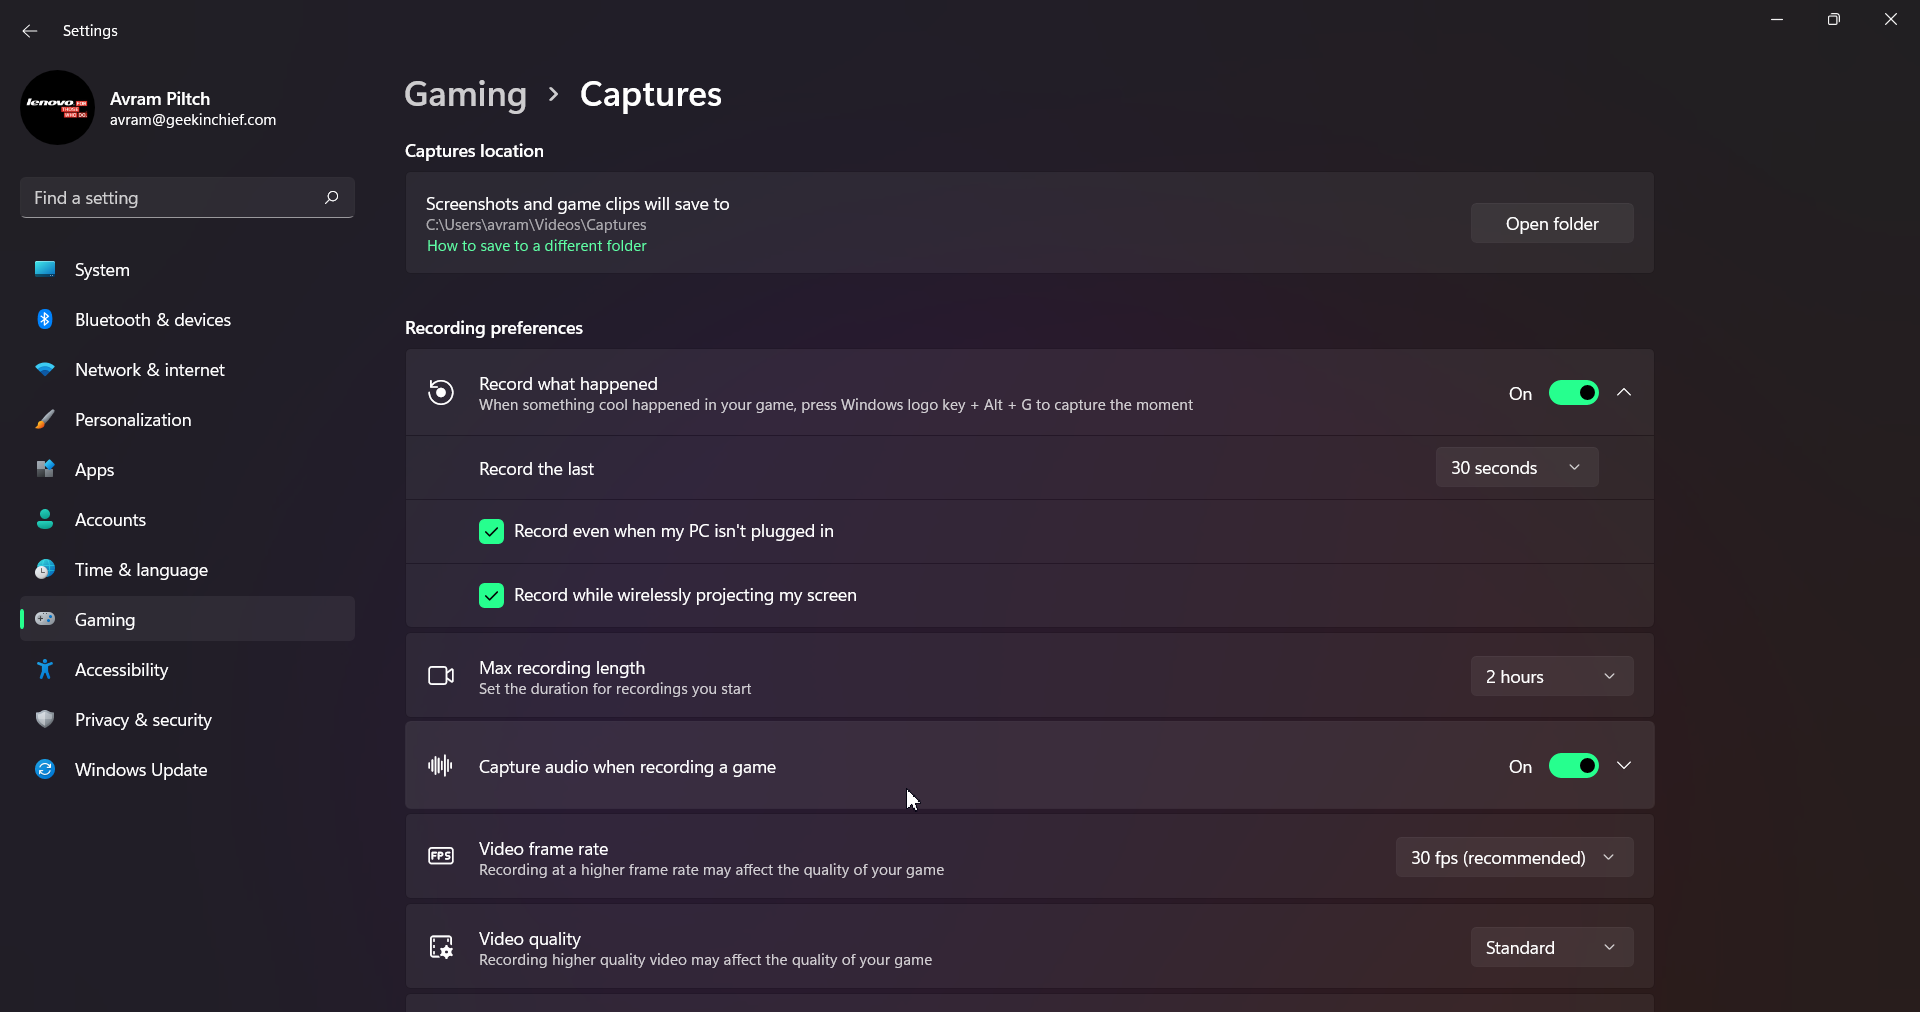
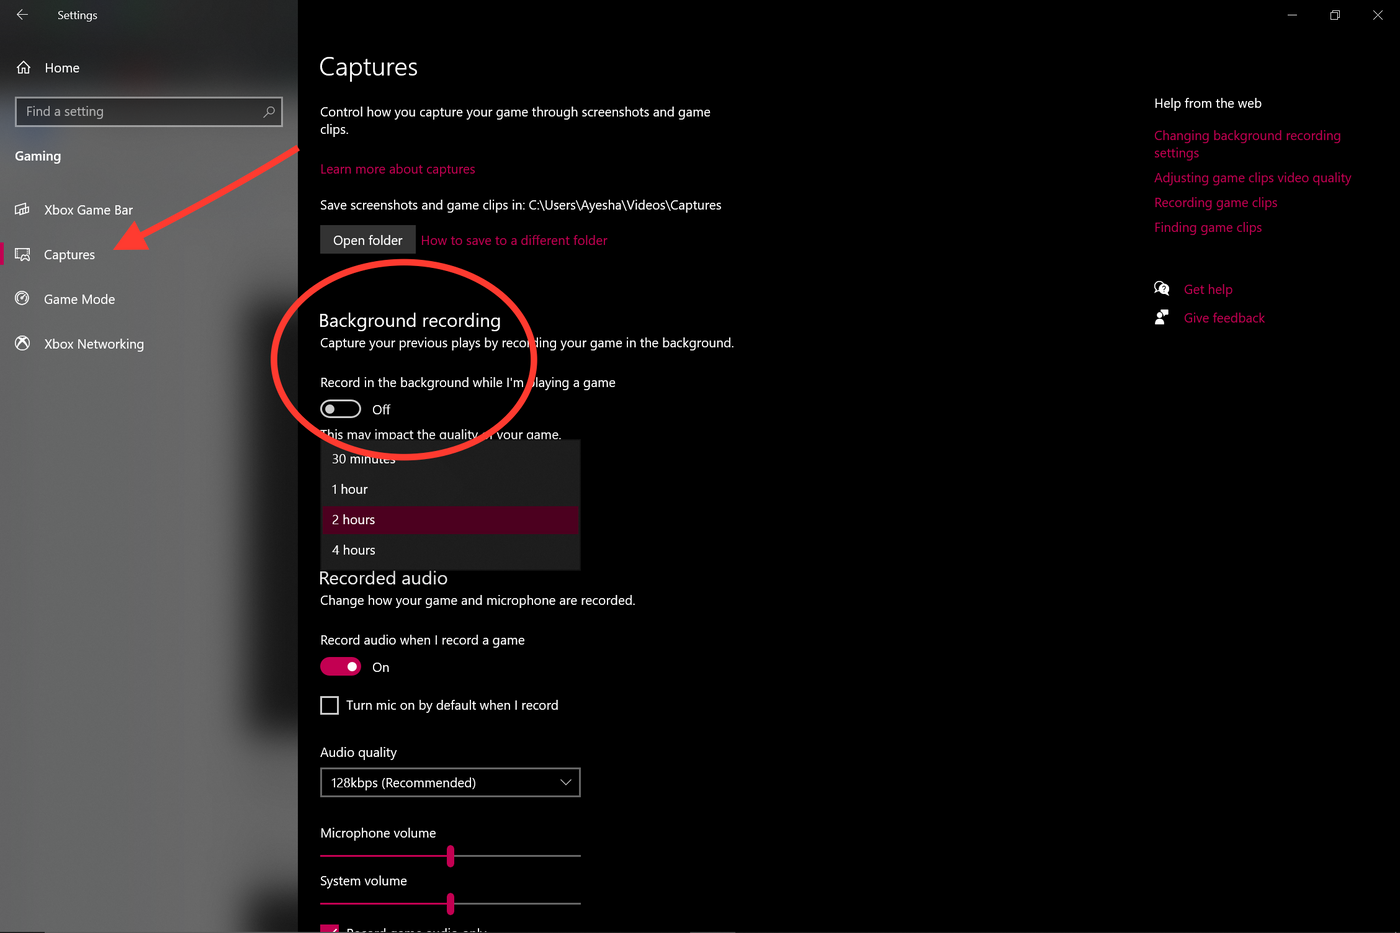
1. Navigate to Settings->Gaming->Captures.
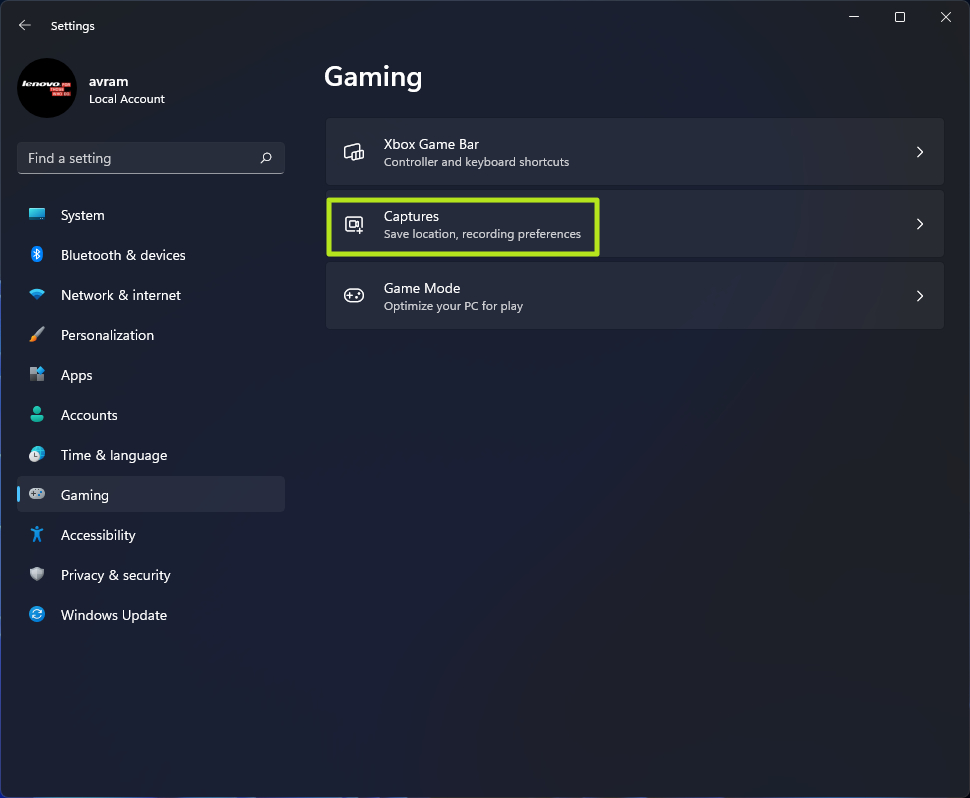
2. Change any of the following settings. Note that though they use the word «game,» the settings should apply to any app you record whether it’s a game or not.
- Record what happened (Win 11) / Background Recording (Win 10): this creates a 30-second (or greater if you change the settings) buffer of automatically recorded content. So if you are playing a game and just had an epic kill, you can hit Windows key + G to launch game bar and you can save the 30 seconds that just passed, even though you weren’t actively screen recording it. Note that the name of this setting is different in Windows 11 than 10, but the feature is the same.
- Max recording length: The amount of time after which screen recording will automatically shut off. I recommend leaving this at the default two hours.
- Capture audio when recording a game: By default, this records the sounds from your mic and the game itself, but excludes background sounds from Windows or your other apps. You can disable the audio recording entirely or enable it to record system sounds or change the balance.
- Video frame rate: defaults to 30 fps, but you can change it to 60 fps.
- Video quality: choose standard or high.
- Capture mouse cursor when recording a game: I recommend leaving this enabled, particularly if you are recording an app that is not a game.
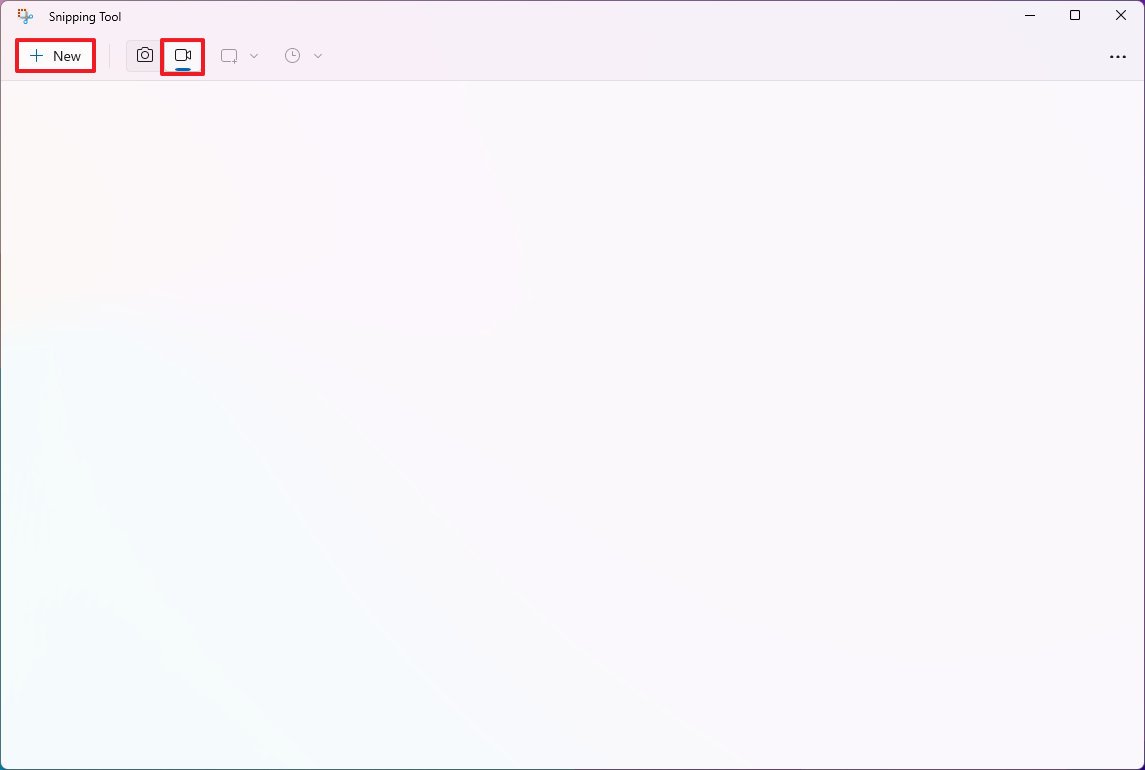
If you have Windows 11 (build 22621.1344) or later, the Snipping Tool has a screen recording option that lets you draw a box around just that portion of the desktop you want to capture. This could be a particular window or, if you’re trying to make a tutorial about using the Start Menu, it could be just the area that that menu takes up. However, if your app’s window might move around or take up the full screen, you can just draw a box around the entire desktop.
To screen record with Windows 11’s Snipping Tool, follow these steps:
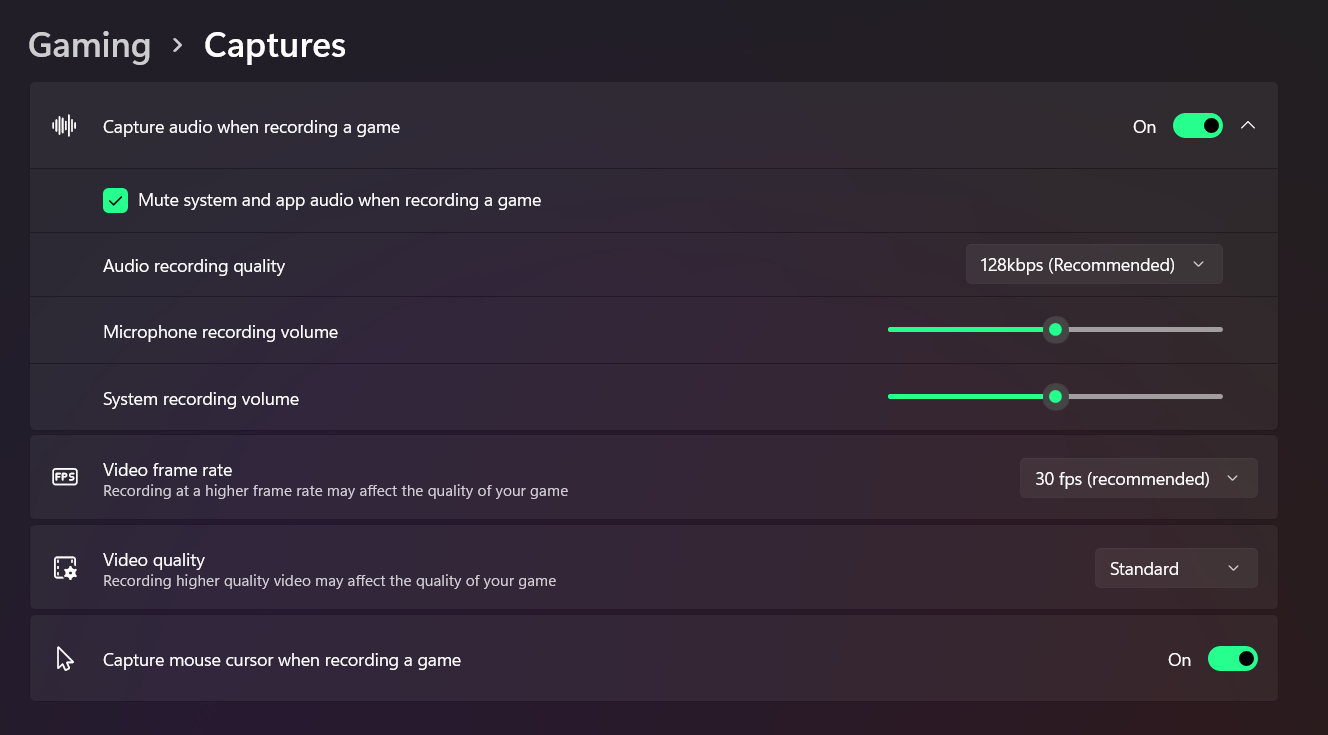
1. Launch Snipping Tool. The easiest way to do this is by searching for «snipping» in Windows search and clicking the top result.
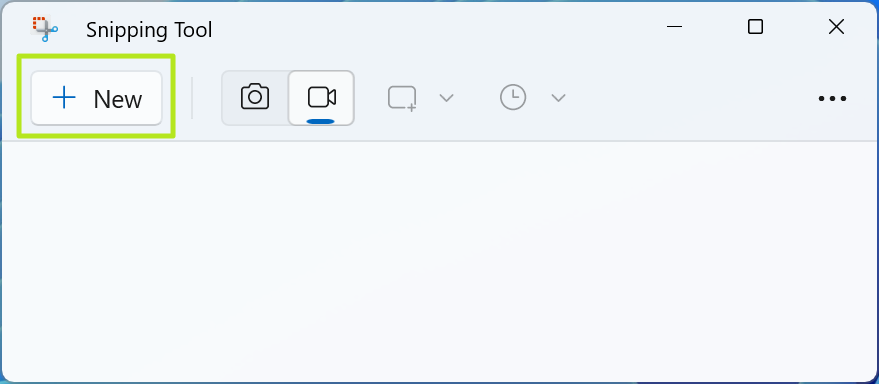
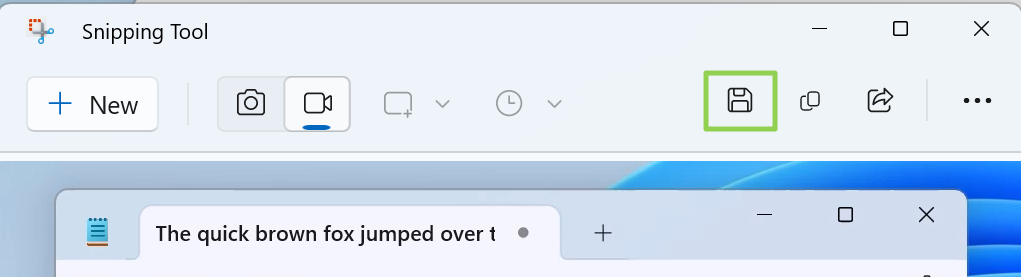
2. Click the video camera icon to enable recording mode (if it’s not enabled already).
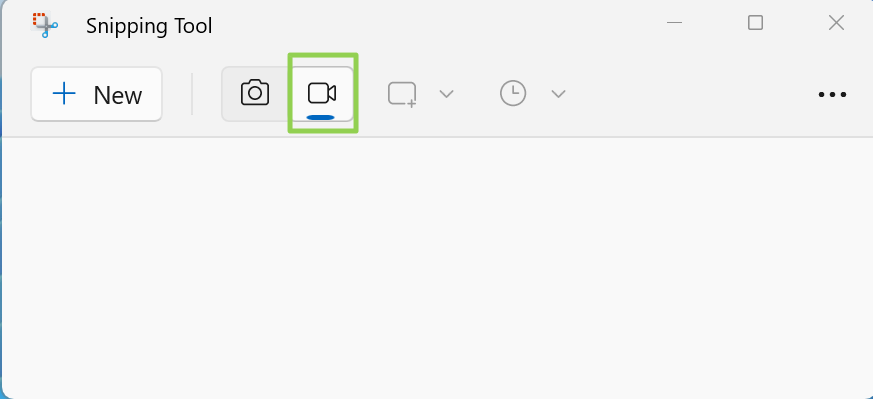
3. Click the New button or hit CTRL+N.
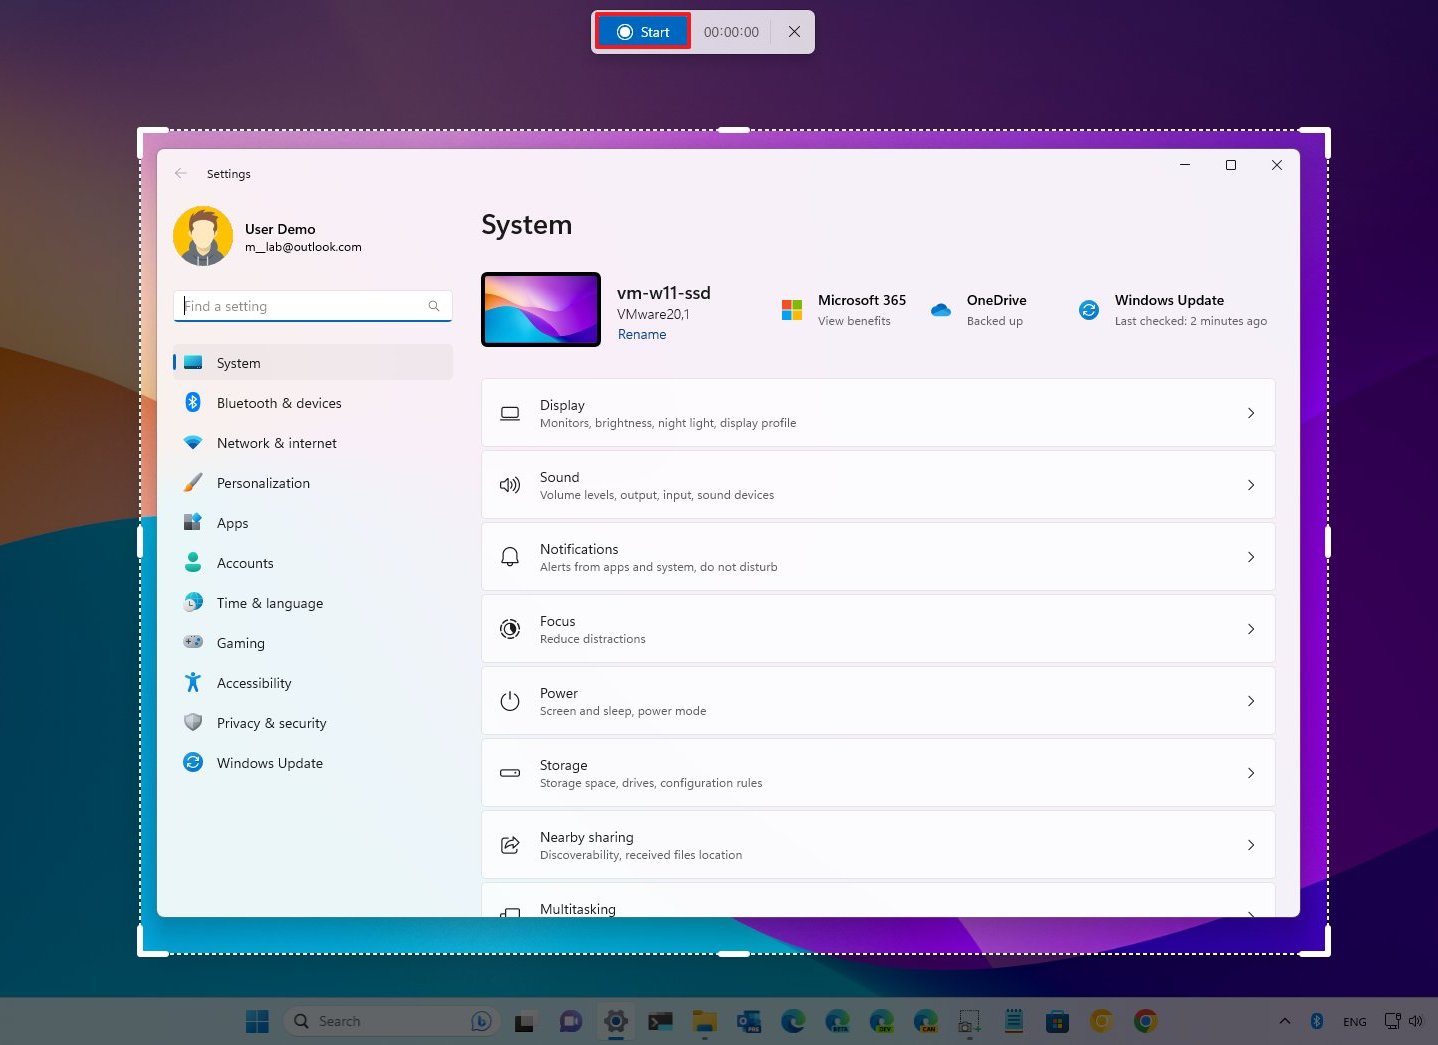
4. Draw a box around the portion of the screen you wish to capture. If it’s the whole screen, draw a box around the entire desktop. If it’s a window, draw around that window.
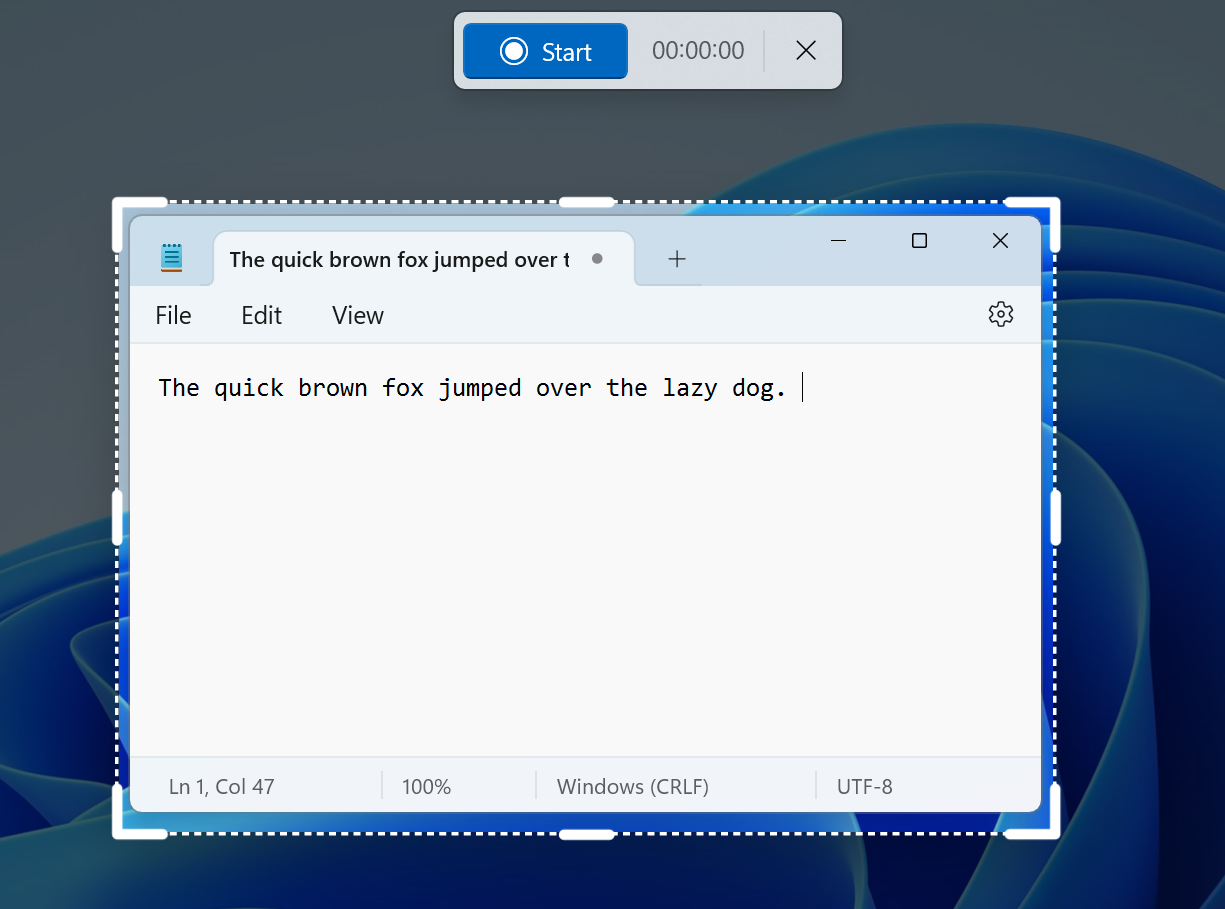
5. Click the Start recording button.

You’ll see a countdown and then the Snipping Tool starts screen recording.
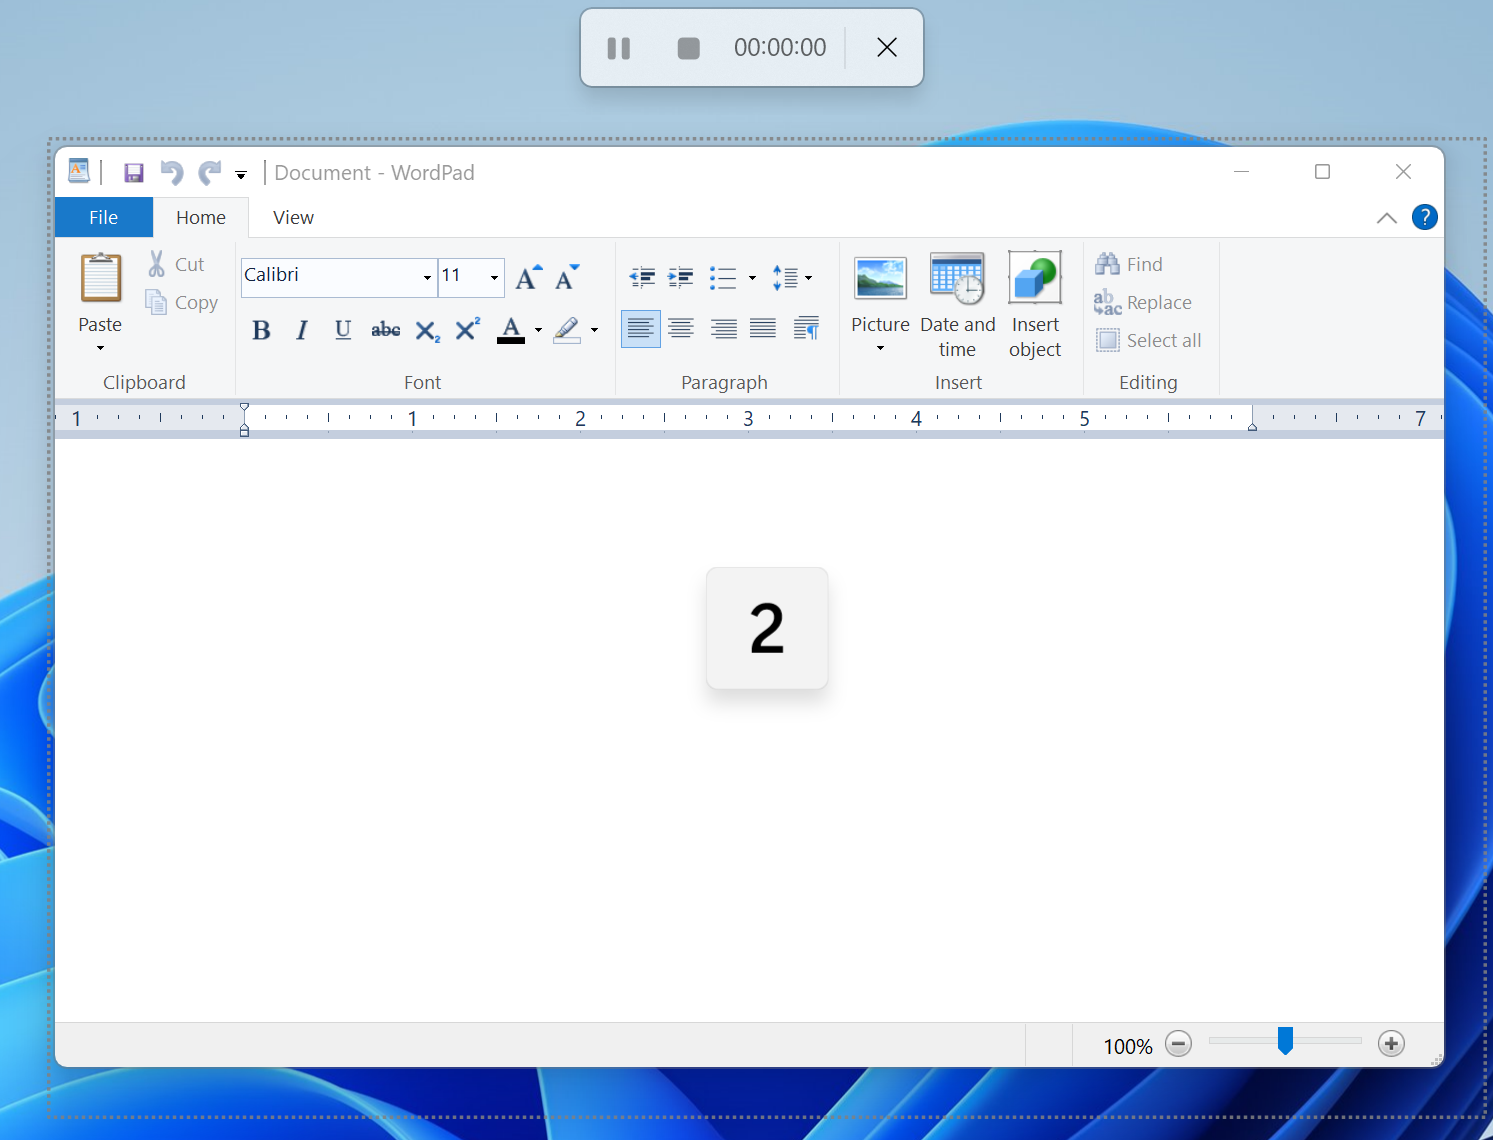
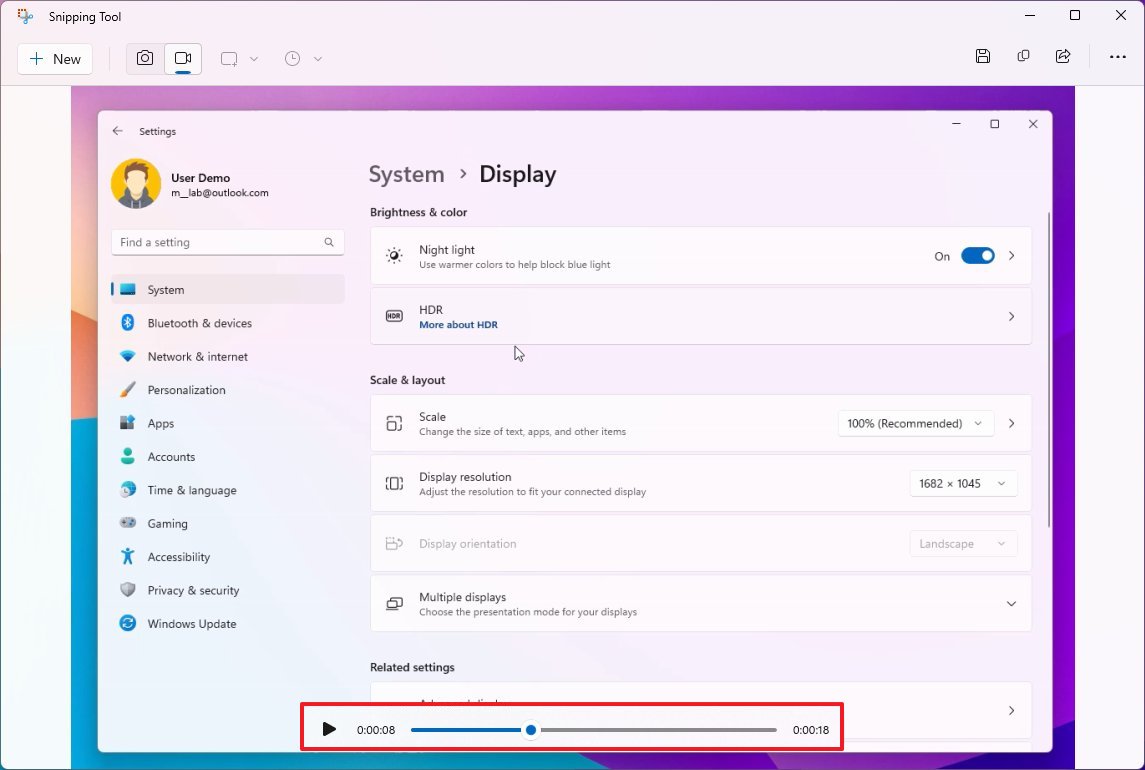
7. Click Stop to stop the recording or Pause to pause it temporarily. I

If you pause it, you can restart the recording by hitting the Play button.

Once you have stopped your screen recording, you will see a preview window where you can play back the video you just created.
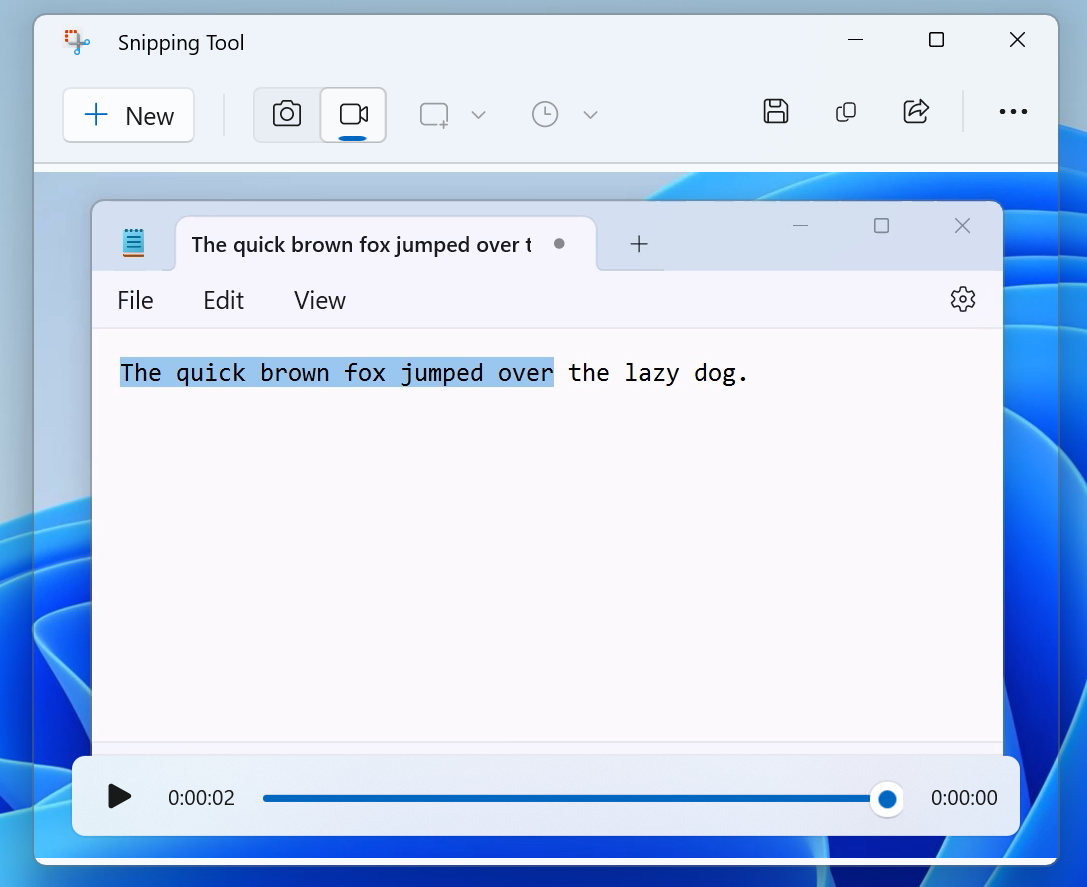
8. Click the Save button or hit CTRL + S to save your screen recording as an MP4 file. That is the only file format it supports. You can also
Recording the Whole Screen with OBS Studio
The biggest drawback to using the Xbox Gamebar to screen record Windows is that it can only work with one app at a time and will not show the desktop or File Explorer. Snipping Tool can capture more but it doesn’t support audio and it is rather feature-limited. To capture your entire desktop and all the windows on it with a full suite of options, you need a third-party app and, while there are many, we like OBS Studio for this purpose.
OBS Studio is very popular in the game streaming community because it’s free and great at broadcasting games out to Twitch and other sites. However, you can also use OBS to record the entire screen in Windows 10 or Windows 11 and save it as an MP4 file, without ever streaming what you do.
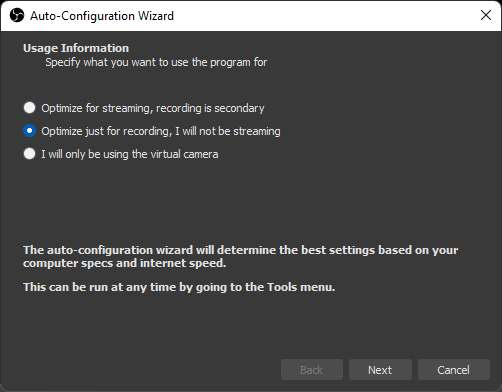
1. Download, install and launch OBS Studio. When you launch OBS for the first time, if you haven’t already, you will be asked whether you want to optimize it for streaming or recording only. If you don’t plan to stream, choose «Optimize just for recording.»
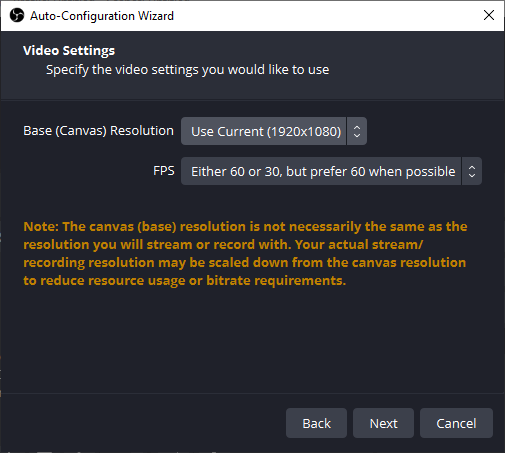
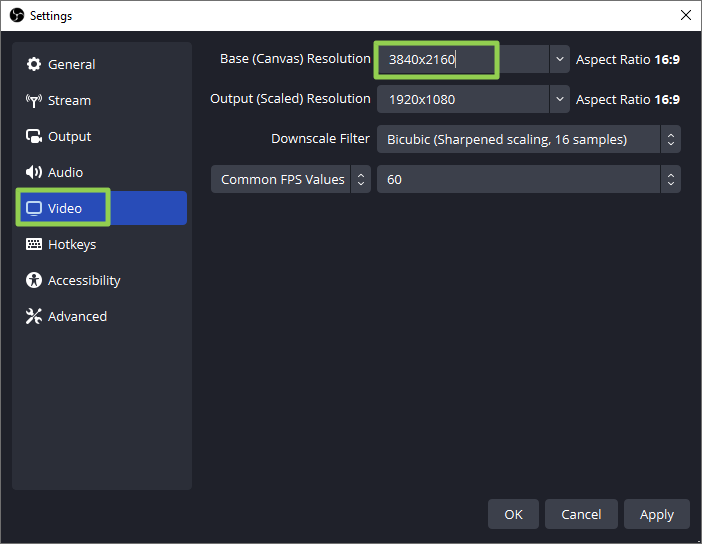
You will also be asked for the base resolution (aka canvas resolution) and frame rate. We recommend choosing the resolution of the screen you plan to capture (it may default to 1080p). If you use a higher resolution screen to capture from than your canvas size, you will not be capturing the full screen.
If, like me, you have a multimonitor set up with different screens of different resolutions, you can always change the canvas size again later.
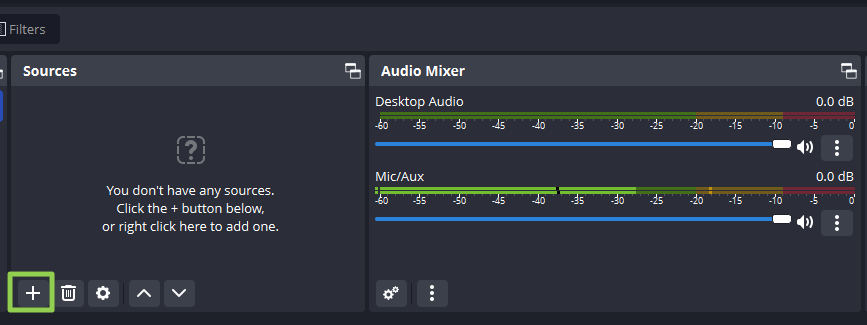
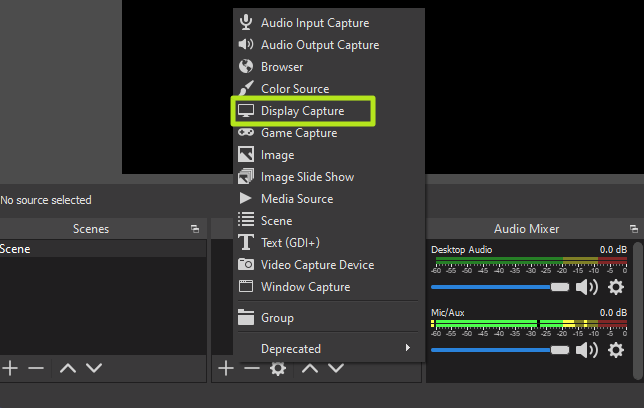
2. Click the Plus icon under Sources to add a new source.
3. Select Display Capture.
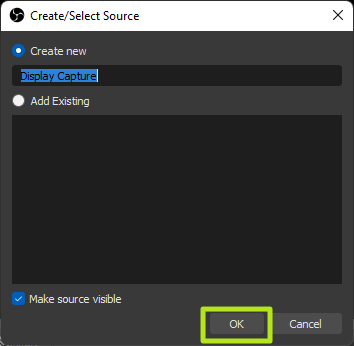
4. Click Ok on the dialog box that pops up. You can give the source a name other than Display Capture if you’d like.
5. Choose a display and click Ok. If you have more than one monitor, this would allow you to have OBS on one screen while recording the activity on another. If you have only one monitor, there’s only one choice.
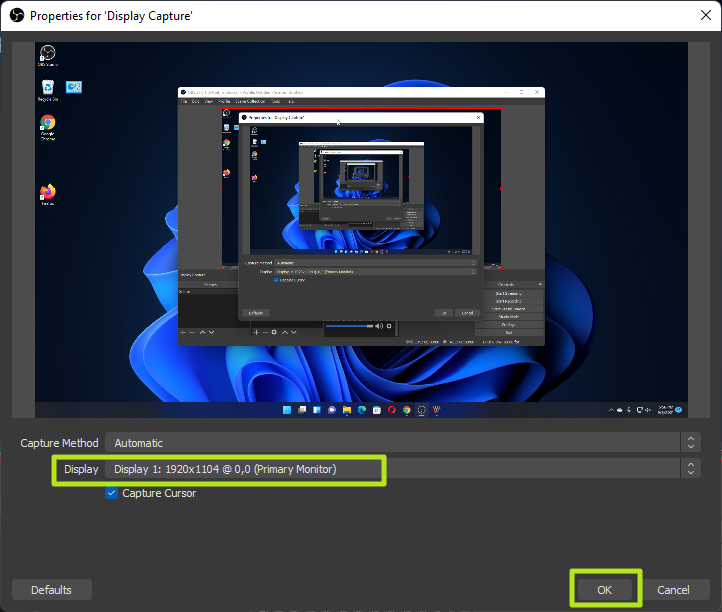
If the display exceeds the bounds of your OBS canvas — for example, you are capturing a 4K display but you have a 1920 x 1080 base resolution — your capture will be cut off. Fix the problem, by going to File->Settings->Video and changing the base resolution there. You can also set the output resolution here. If the base resolution is higher than the output (a 1080p output of a 4K screen), OBS will scale the output down but still keep everything in the frame.
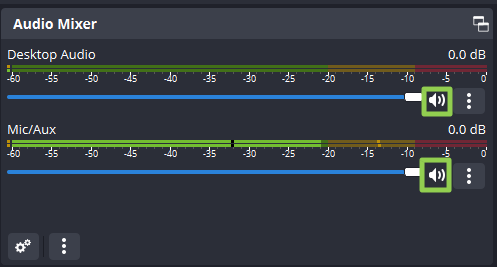
6. Mute the desktop and / or microphone audio if you don’t want either or both of those sounds captured. By default, OBS will capture audio from any applications running on your computer and from your default audio input device. To quiet those, you just click on the speaker icons in the audio mixer.
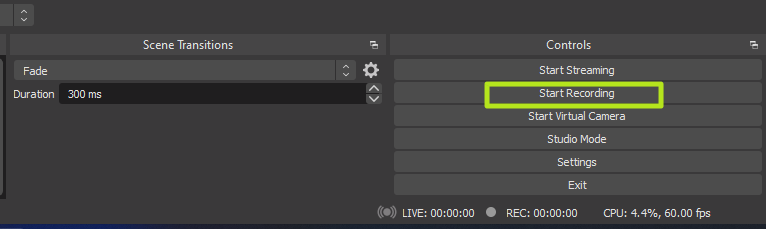
7. Click the Start Recording button in the lower right corner of the screen. Remember that if you didn’t mute the microphone or desktop audio, it will record whatever noise you or the computer makes.
8. Minimize OBS if you are screen recording from the same monitor that OBS is on.
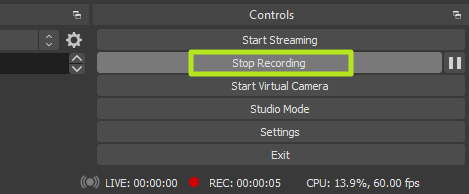
9. Click Stop Recording in OBS when you are finished.
By default, your screen recording videos will be located in the Windows 11 (or 10) Videos folder. They are stored, by default, in the .mkv file format. However, you can change the output to MP4 or MOV files by going to the Settings->Output menu in OBS.
Join the experts who read Tom’s Hardware for the inside track on enthusiast PC tech news — and have for over 25 years. We’ll send breaking news and in-depth reviews of CPUs, GPUs, AI, maker hardware and more straight to your inbox.
Avram Piltch is Tom’s Hardware’s editor-in-chief. When he’s not playing with the latest gadgets at work or putting on VR helmets at trade shows, you’ll find him rooting his phone, taking apart his PC or coding plugins. With his technical knowledge and passion for testing, Avram developed many real-world benchmarks, including our laptop battery test.
Most Popular
These are some of the most convenient solutions to record desktop screen on Windows 11 PC/Laptops.
Method 1: Use the Xbox Game Bar Application

Step 1: Press the Windows key + G on your keyboard to open the game bar application.
Step 2: Now hit the “Start Recording” option from the pop-up box at the top-left corner of the screen. You can even take screenshots on Windows with Xbox Game Bar.

Step 3: To include any verbal clue or narration, you can press the mic button, present on the right-side of the Start recording option.

Step 4: Launch the application or navigate to the window you wish to capture on-screen activities for. Remember Gaming Features aren’t available for Windows desktop or File Explorer.
Step 5: As soon as the recording starts the capture pane and Xbox game bar will be minimized and you will only see the capture status on the right side.

Step 6: If you wish to toggle the recording, you can use Windows key + ALT + R. Alternatively, you can hit the Stop icon from the Capture Status panel.

Step 7: After the clip has been recorded, you will find a banner on the right side of the screen which you can click to see the list of all recordings.

Step 8: Press the Windows key + G to launch the Game bar application and navigate to the Widgets menu. From the drop-down menu, select the Gallery option where you can see all the screen-recorded videos.

You can edit the name of the captured video by hitting the Pencil icon from the right-side panel. You can even open the file location, delete the video, and more.
To directly capture Windows 11 screen, you can use the shortcut: Windows Key + ALT + G. This will record the last 30 seconds of screen activity.
METHOD 2 = Use a Web-Based Screen Recorder
For instant screen recording on Windows 11, 10, 8, 7, and any web browser of your choice, we recommend you take the help of a web-based screen capturing tool, that doesn’t depend on any additional program to run smoothly. The market has tons of options when it comes to choosing the best video screen-capturing utilities that perfectly fit your needs and are pretty effortless to use.
For this purpose, we suggest using Screencastify, it is available for free of cost and offers some great features to record screens with audio, and edit videos to create powerful & professional videos. It has an interactive UI and you can publish the final output directly to YouTube within the app.
Best part? It has no ads and you can save your work to the Cloud – Google Drive!
Let’s follow the step-by-step instructions to learn how this screen recording extension works:
Step 1: Navigate to the official web store and press the ‘Add to Chrome’ button.

Step 2: Once the screen recording extension is added successfully, you need to sign in with your account.

You need to give the necessary permissions to this best screen recorder for PC for accessing webcam and microphone.

Step 3: You can follow the 4-step tutorial to set up and start your recording!

Step 4: Hit the Record button to initiate your first screen recording with Screencastify.

Step 5: You can use different tools featured by the screen recorder for PC during the capturing process. This includes the Pen tool, enabling mouse cursor, stickers, eraser, start webcam, etc.

Step 6: Once you are done capturing Windows 11 screen, hit the ‘End Recording’ button.

In case you want to explore some other options in the category – Best Free Online Screen Recorders, check out here!
METHOD 4: Use Advanced Screen Recorder
Step 1: Download and install Advanced Screen Recorder by clicking on the download button below –

Step 2: After you have installed the software, launch it. Hit the Start Now button and you will see a quick tutorial that shows the step-by-step process of using this best screen recorder for PC.

Step 3: Select the desired screen capture mode and hit the Record button.

Step 4: You can configure the audio recording settings. You can manage whether you want to record the System Sound, via a Microphone or your own voice Webcam recording. Once selected, hit the Start Recording button!

Step 5: A short panel will appear in the bottom-right corner of the screen, where you can check the progress of the screen capturing process.

You can even tinker with various options to add or remove the watermark, set video quality, add a mouse pointer, record audio, set an automatic recording schedule, auto-stop, auto-split recordings & more.

Step 6: Once you’re done recording, click on the stop button to end the recording. It will be saved automatically to a default location. You can also check your recorded videos under the Recordings section.

Isn’t this a convenient choice when it comes to “how to screen record on Windows 11?”. Do share your personal experience with the tool in the comments section below!
Final Words | How to Record Windows Screen on Windows 11 PC
It is very easy to record your screen on Windows 11 PC by using the different inbuilt options or third-party tools. Although Windows 11 Xbox Game bar has certain limitations which can be overcome by using a dedicated screen recorder for PC like Advanced Screen Recorder.
It’s a great utility that helps users for a variety of purposes such as preparing educational material, making tutorials, recording a presentation, gameplay, etc. With the Advanced Screen Recorder, you can take screenshots, and record webcam, system audio, and microphone as well. We highly recommend you try it once to find out the amazing features of this product.
We would like to know your views on this post to make it more useful. So, if you know any other effective method to ‘take screen record on Windows 11’, do let us know in the comment section below.
Share this article with your friends and others & do not forget to follow us on social media – Facebook, Instagram, and YouTube.
(Image credit: Future)
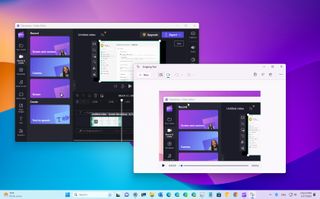
On Windows 11 (or 10), you now have multiple ways to record the screen on your computer using the Snipping Tool, Clipchamp, and Xbox Game Bar app. Although you can find many other free and paid applications if you want something simple to create a presentation, tutorial, or record a problem to share with technical support, the tools that come on every installation of the operating system are perhaps all you need.
However, each solution has its pros and cons. For example, the Snipping Tool app makes it super simple to record the screen and share the capture, but it doesn’t include an audio recording feature.
The Clipchamp app is a web-based video editing application from Microsoft that can screen record the desktop, an app, or a region of the screen. And it also supports audio recording, the ability to show your computer’s camera as part of the recording, and you can edit the video. The only caveat is that it is a freemium application, meaning you will need a Microsoft 365 subscription to unlock all the features. However, you can use it without a subscription to record the desktop with a video resolution of up to 720p.
The Xbox Game Bar hasn’t been designed as a productivity tool but includes a feature that allows you to screen record an application. The downside of this solution is that you can’t record the desktop or File Explorer. However, unlike Snipping Tool, the app allows audio recording.
This how-to guide will walk you through two ways to screen record on Windows 11 without using third-party software.
Screen record with Snipping Tool app
To record the screen or an app with the Snipping Tool app on Windows 11, use these steps:
- Open Start.
- Search for Snapping Tool and click the top result to open the app.
- Click the Record button.
- Click the New button.
- Choose an area of the screen to record.
- Click the Start button.
- Continue with the interaction you want to capture.
- Click the Stop button.
- Quick note: You can click the delete (trash) button to discard the recording and start over.
- (Optional) Click the Play button to playback the screen recording.
- Click the Save button.
- Choose the location to store the recording.
- Click the Save button one more time.
Once you complete the steps, the app will create a video file (without audio) with the screen recording that you can now share with others.
Screen record with Clipchamp
To record the screen on Windows 11 with the Clipchamp app, use these steps:
- Open Start.
- Search for Clipchamp and click the top result to open the app.
- Click the «Create a new video» option from the «Home» tab.
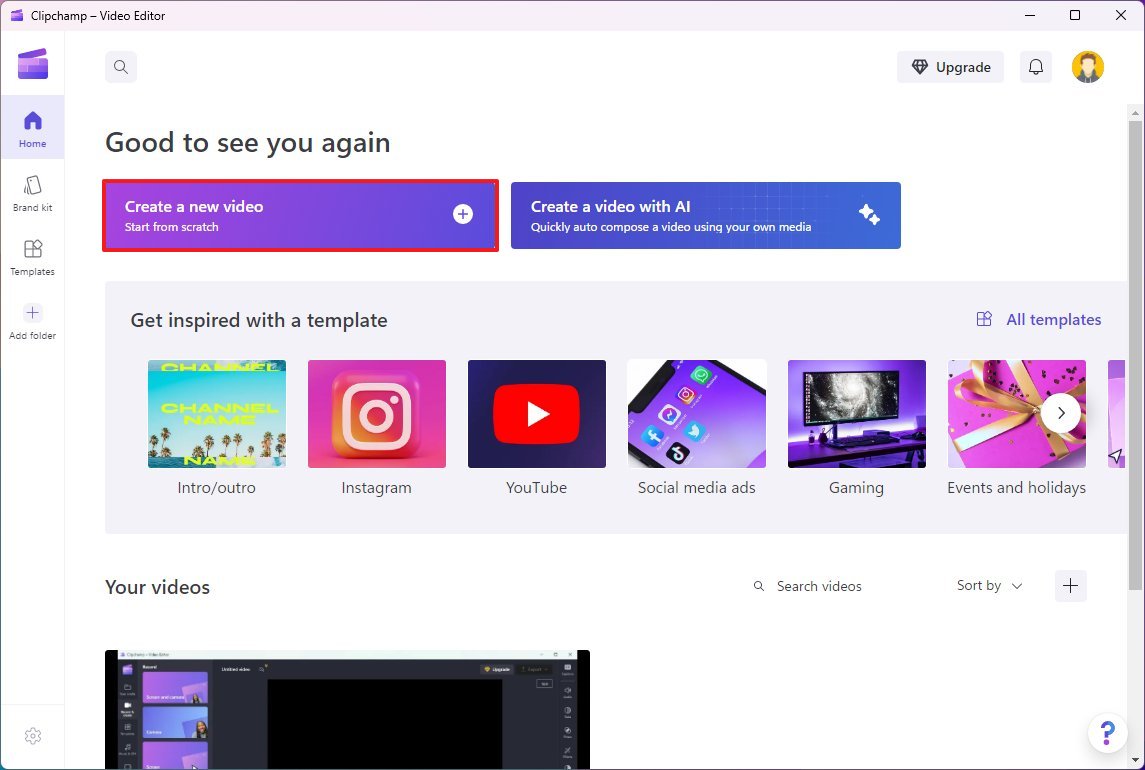
- Quick note: If this is your first time opening the app, you will need to agree to the terms and sign in with your Microsoft account. If you can’t find the app on your computer, you can download it from this page.
- Click on Record & create.
- Under the «Record» section, choose one of the recording options, including «Screen and camera,» «Camera,» or «Screen.»
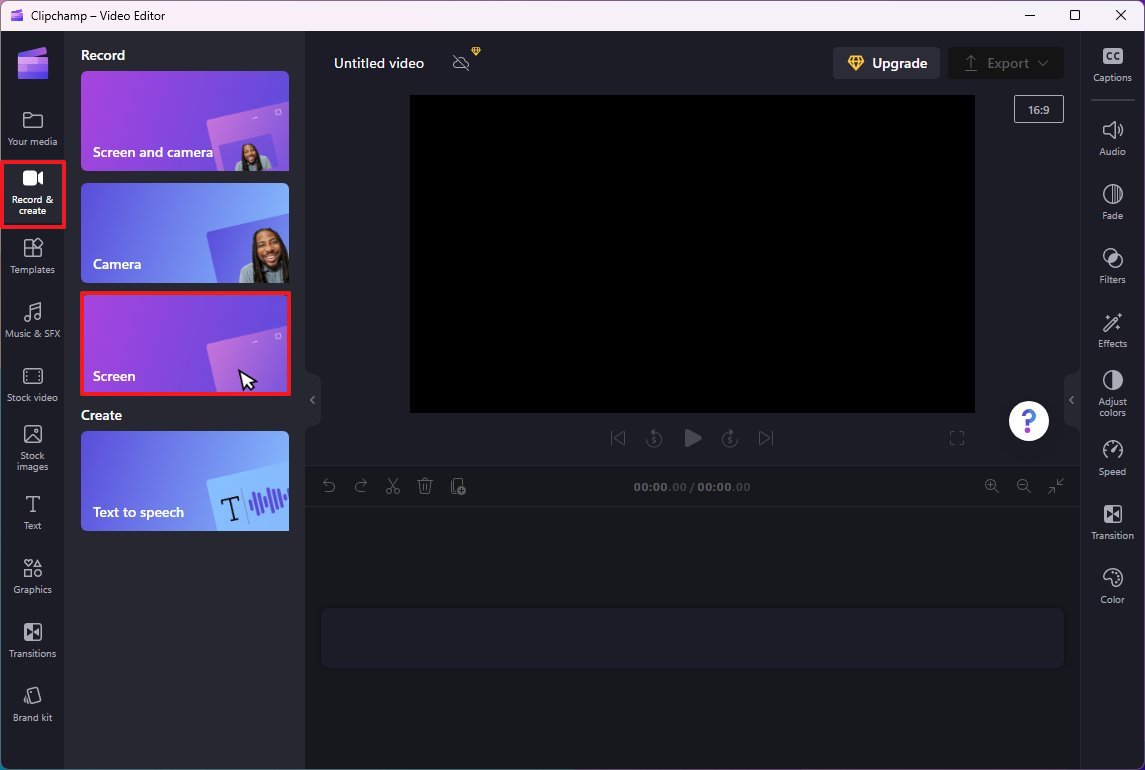
- Click the Record button at the bottom-left corner.
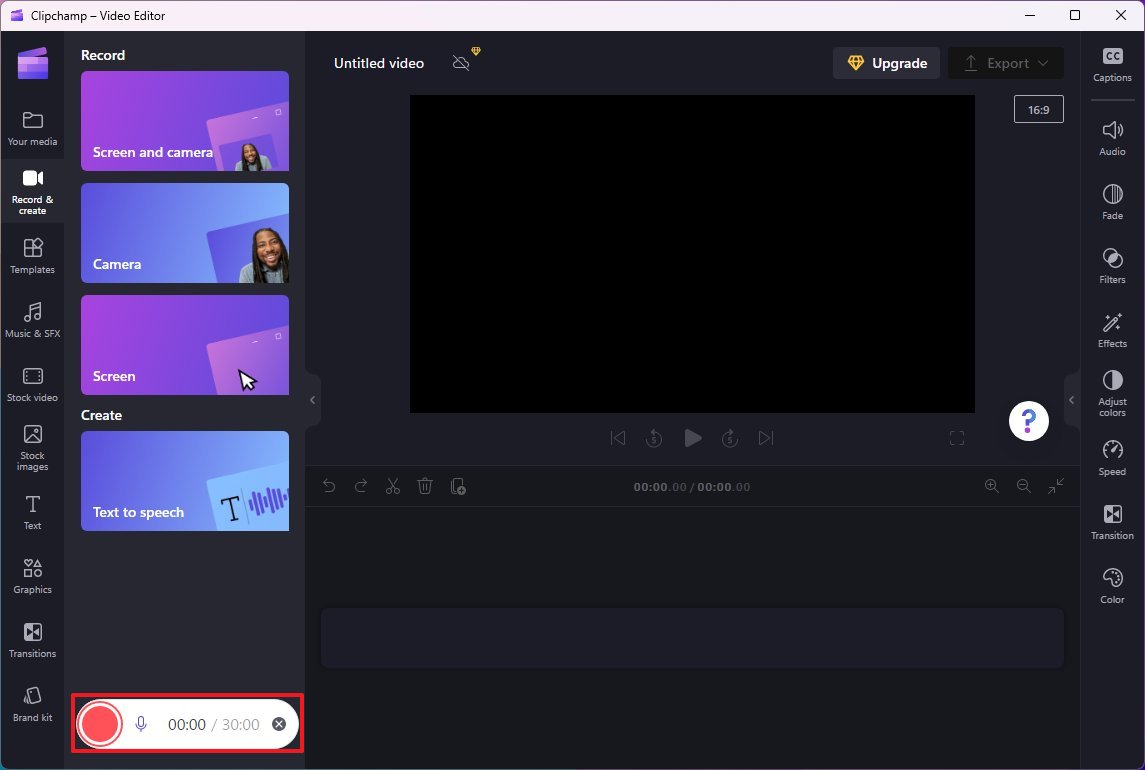
- Choose the area to screen record, including «Tab,» «Window,» or «Entire Screen.»
- Select the screen recording area.
- (Optional) Check the «Share system audio» option (if available).
- Click the Share button.

- Quick note: The share button only means to start recording. You won’t be streaming anything to the world.
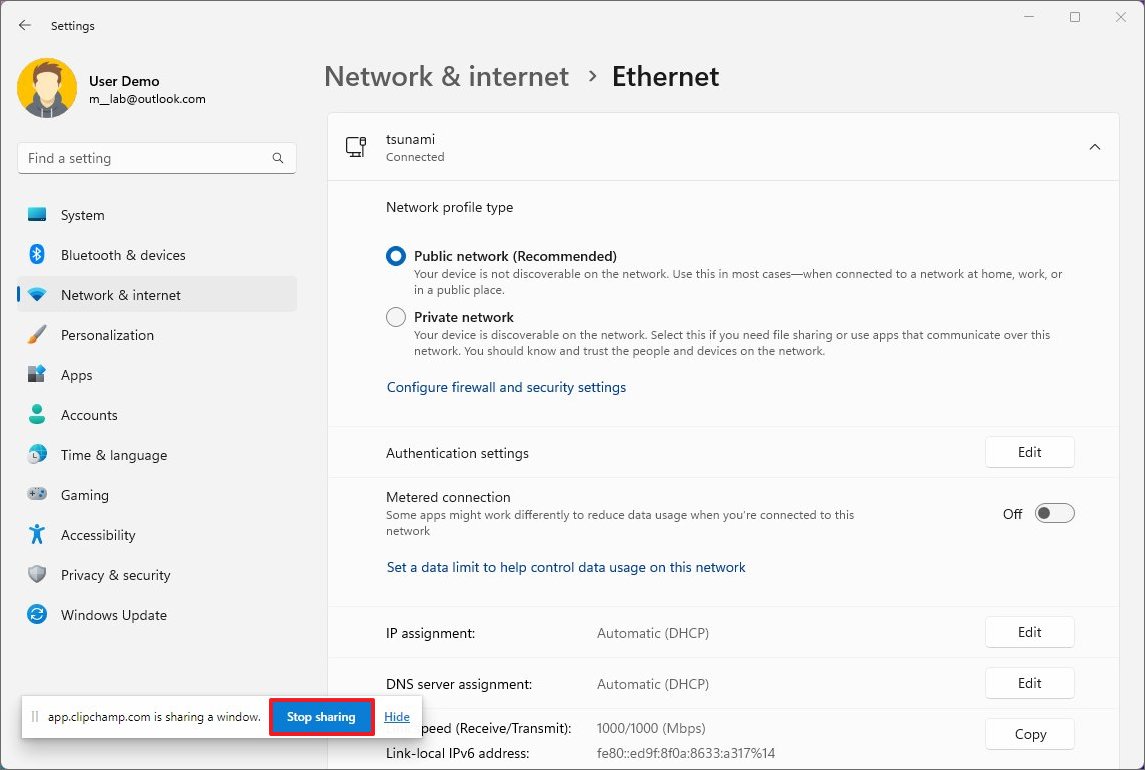
- Continue with the interaction you want to capture.
- Click the «Stop sharing» button.
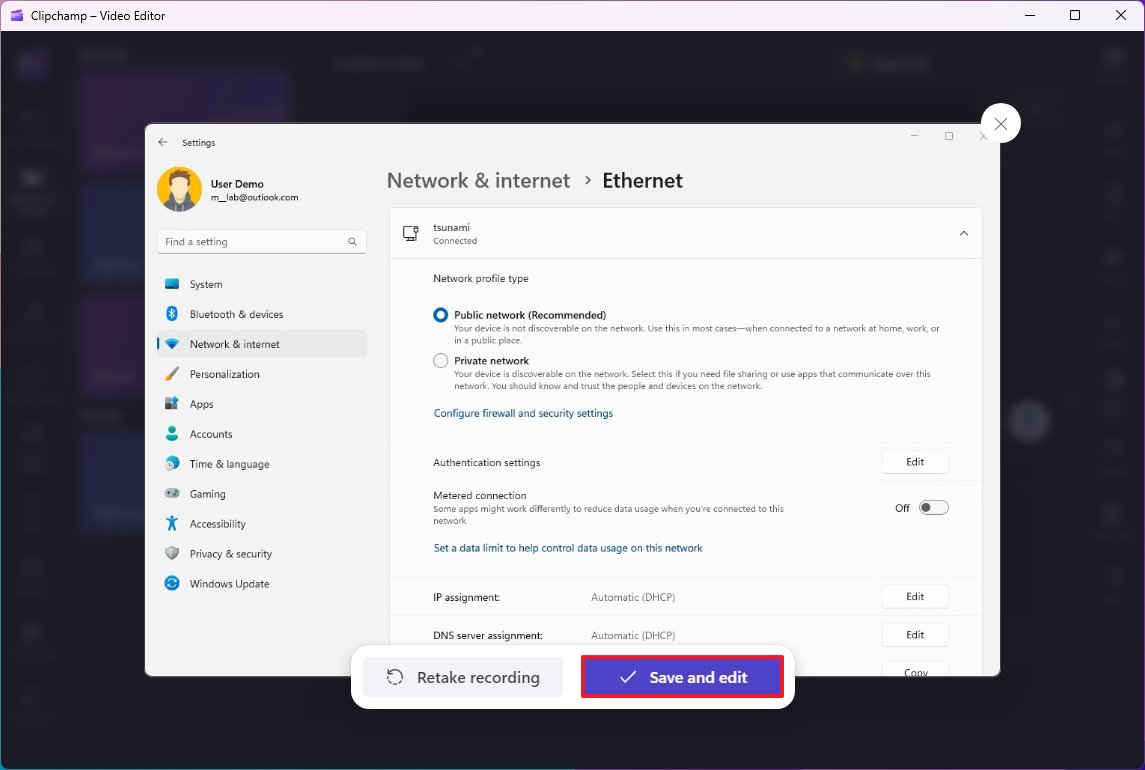
- Click the «Save and edit» button.
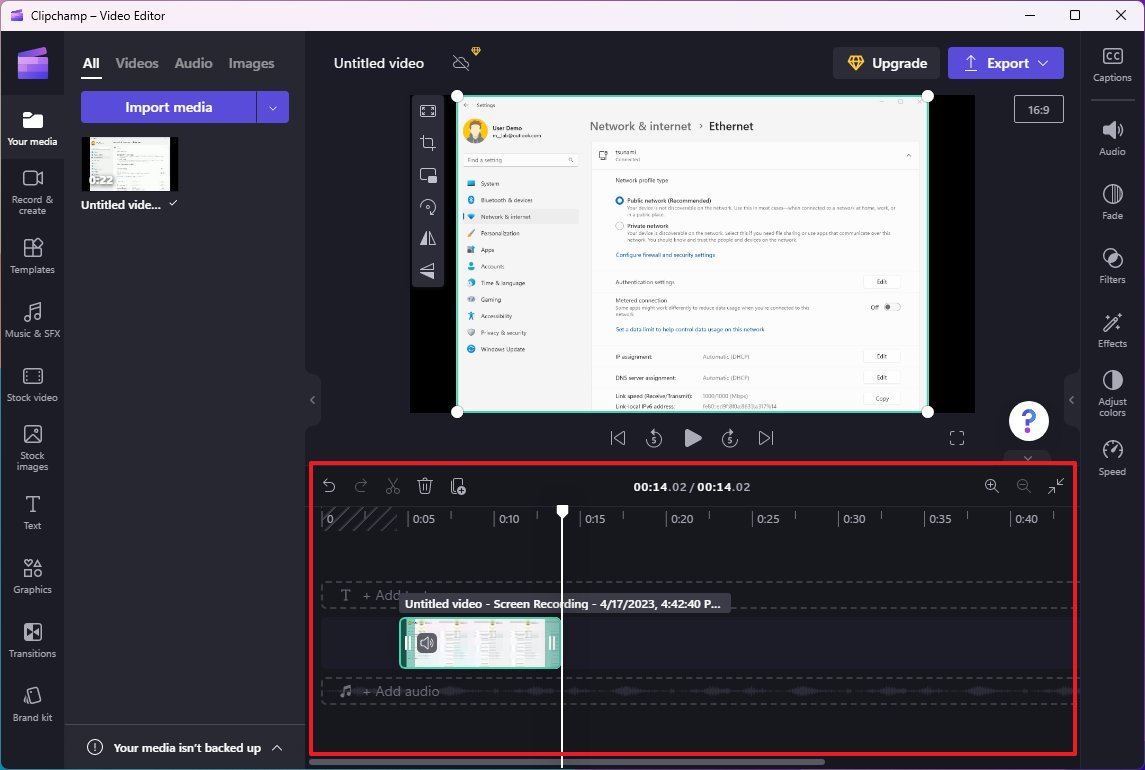
- (Optional) Use the available tools to cut or trim the video, or you can also adjust colors, audio, or video speed.
- Click the Export button from the top-right corner and select the 720p option to save the capture to your computer.
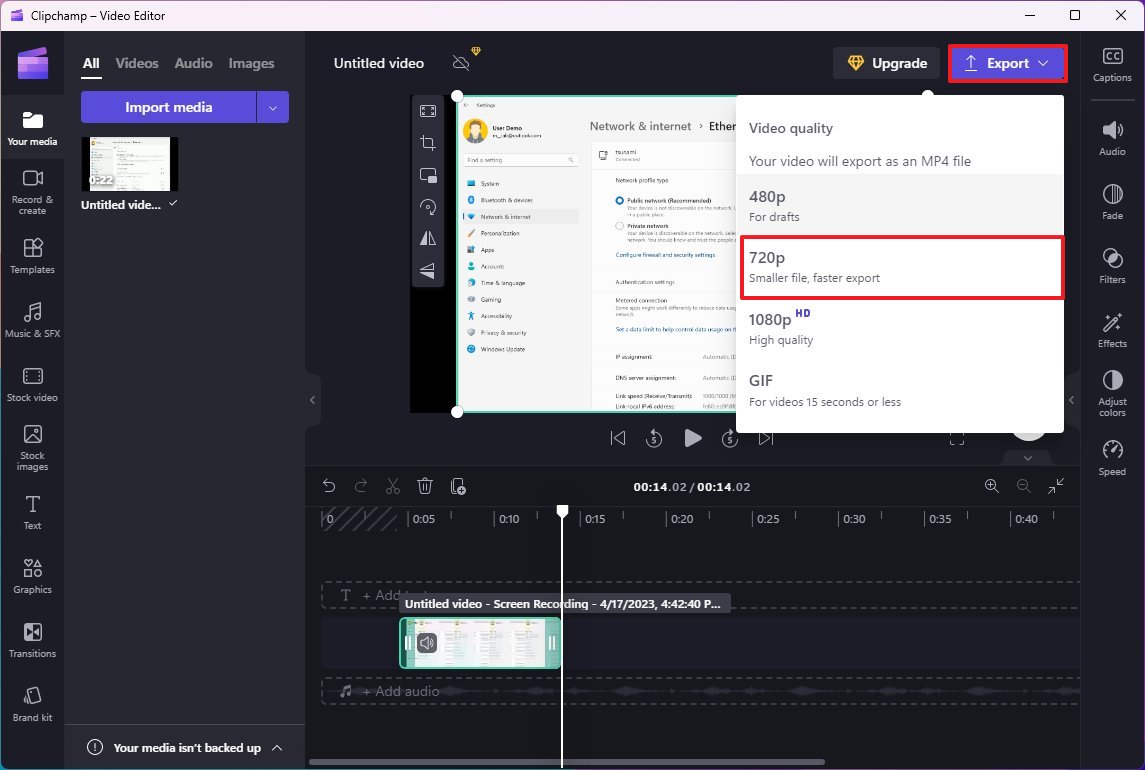
After you complete the steps, the screen recording will save in the «Downloads» folder as a «.mp4» file, which you can share with anyone.
Screen record with Xbox Game Bar
To record the screen with the Xbox Game Bar, use these steps:
- Open any app to record and keep it in focus.
- Use the «Windows key + Alt + R» keyboard shortcut to start the screen recording.
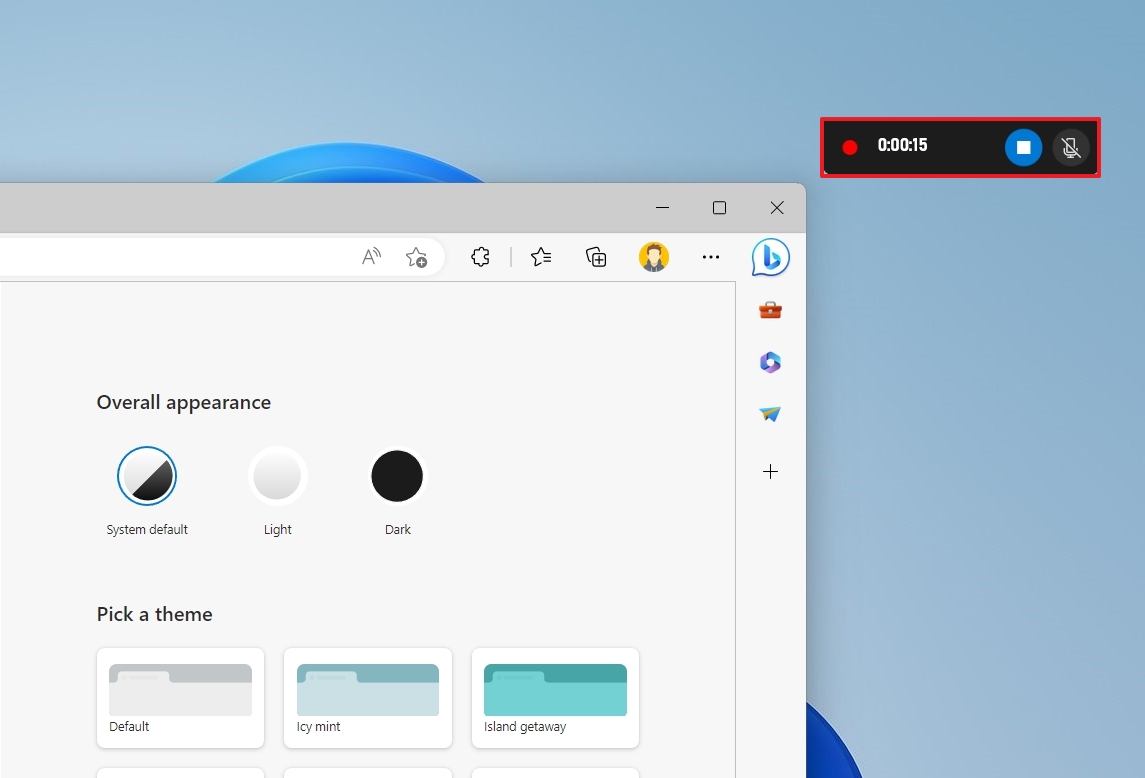
- Quick note: Since you can’t record the desktop or File Explorer, you will have to open the app while keeping it in focus and perform the shortcut.
- Continue with the interaction you want to capture.
- (Optional) Click the microphone button using the available controllers to narrate while recording the video.
- Quick tip: If you can’t record sound, your privacy settings may be blocking the app. You can fix this issue using Settings > Privacy > Microphone and then turn on the toggle switch for Xbox Game Bar to allow access to your microphone.
- Use the «Windows key + Alt + R» keyboard shortcut again to stop the screen recording. Or click the Stop button (or minimize the app) to terminate the session.
After you complete the steps, the screen recording will be saved automatically in the «Captures» folder inside the «Videos» folder.
Alternatively, you can use the «Windows key + G» keyboard shortcut, click the «Show all captures» option, and in the «Gallery» module, click the «Open folder location» button.
More resources
For more helpful articles, coverage, and answers to common questions about Windows 10, visit the following resources:
- Windows 11 on Windows Central — All you need to know
- Windows 10 on Windows Central — All you need to know

Cutting-edge operating system
A refreshed design in Windows 11 enables you to do what you want effortlessly and safely, with biometric logins for encrypted authentication and advanced antivirus defenses.
All the latest news, reviews, and guides for Windows and Xbox diehards.
Mauro Huculak is technical writer for WindowsCentral.com. His primary focus is to write comprehensive how-tos to help users get the most out of Windows 10 and its many related technologies. He has an IT background with professional certifications from Microsoft, Cisco, and CompTIA, and he’s a recognized member of the Microsoft MVP community.
Screen recording is a nifty feature that’s useful for a number of things, especially when it comes to creating tutorials. If a screenshot is worth a thousand words, then screen recording goes several steps further.
Not just that, we will also show you how you can turn your screen recordings into professional videos using InVideo’s online editor.
In this article, we’ll show you
1. How to screen record on Windows 10?
2. How to record video on any Windows 10 or other PCs?
3. Bonus: How to turn your screen recordings into professional videos in minutes?
1. How to screen record on Windows 10?
On Windows 10, you can record your screen using the built-in tool — Game Bar. It was designed essentially to capture PC and Xbox gaming sessions, but it can also be used to record other apps and activities.
First, enable Game Mode on your system:
Step 1: Click on the start menu and then select settings

Step 2: From the Settings window, Click on Gaming.

Step 3: Go to Game Mode and enable Game Mode

Note: To check the maximum duration of how long a screen recording can be, head over to Game Bar’s settings. Click on the Start menu and hit Settings. Click on Gaming. Under Captures will be the option for Background Recording. Select from the maximum recording time drop-down from 30 minutes to 4 hours.
Now you’re all set to record your screen. Windows 10 Game Bar can only support screen recording of one application at a time. This means, you can’t switch to recording another window or ALT + TAB your way after you’ve started recording. Also note that you cannot record your Desktop or File Explorer or Maps.
With that, let’s get down to the steps you can use to record your screen using the Game Bar.
Step 1: Open the app you want to record. Close other windows and make sure there’s no unwanted audio that will sneak its way into your recording.
Step 2: Press the Windows + G on your keyboard. This should open up the Game Bar.

Step 3: In the ‘Capture’ window, click on the Camera icon to take a screenshot. To start recording your screen, click on the circle with the dot (or press Windows + Alt + R).
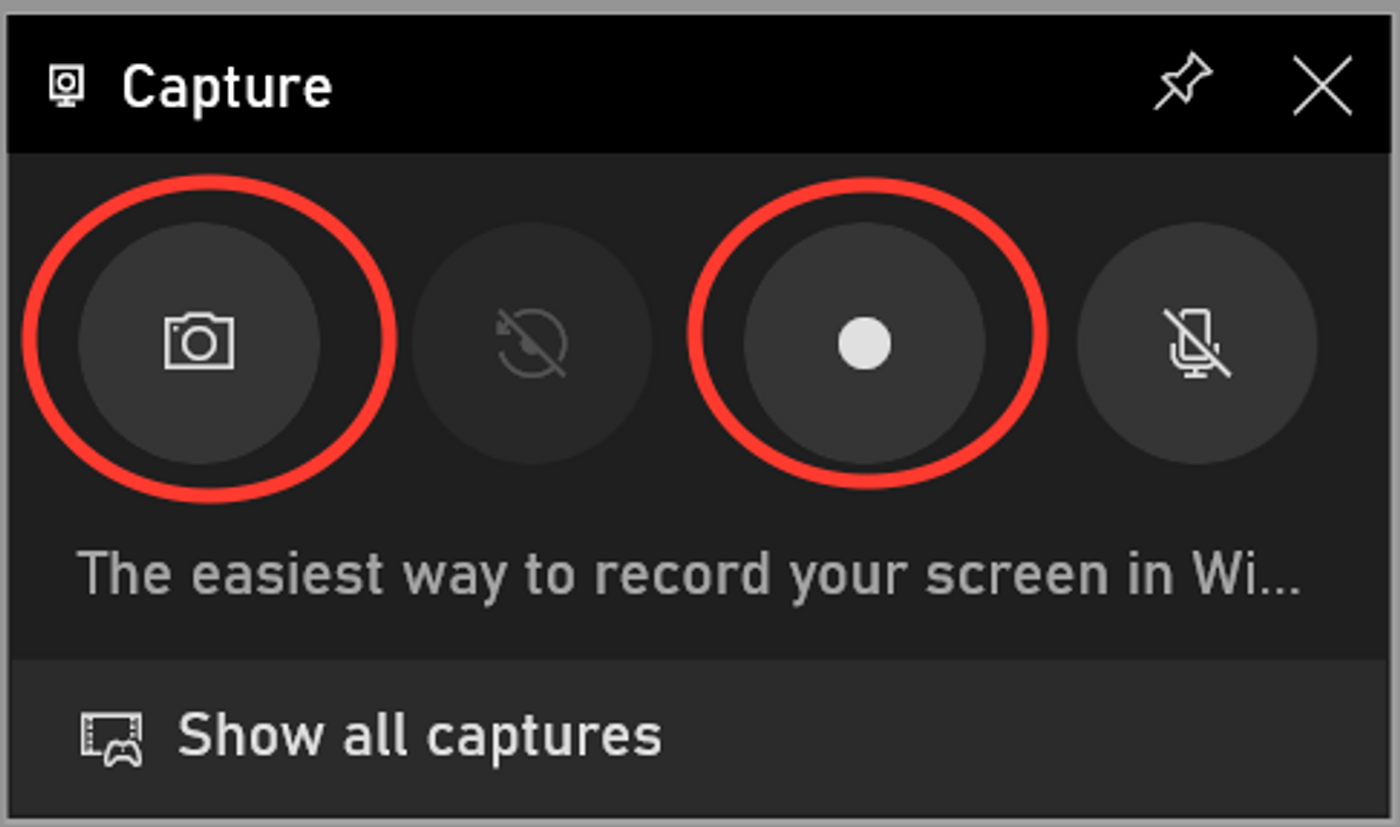
Step 4: Once you start recording, a capture status with a timer, recording controls and a microphone will appear. The mic is to switch on and off external sounds to record commentary. Internal sounds will be recorded by default.
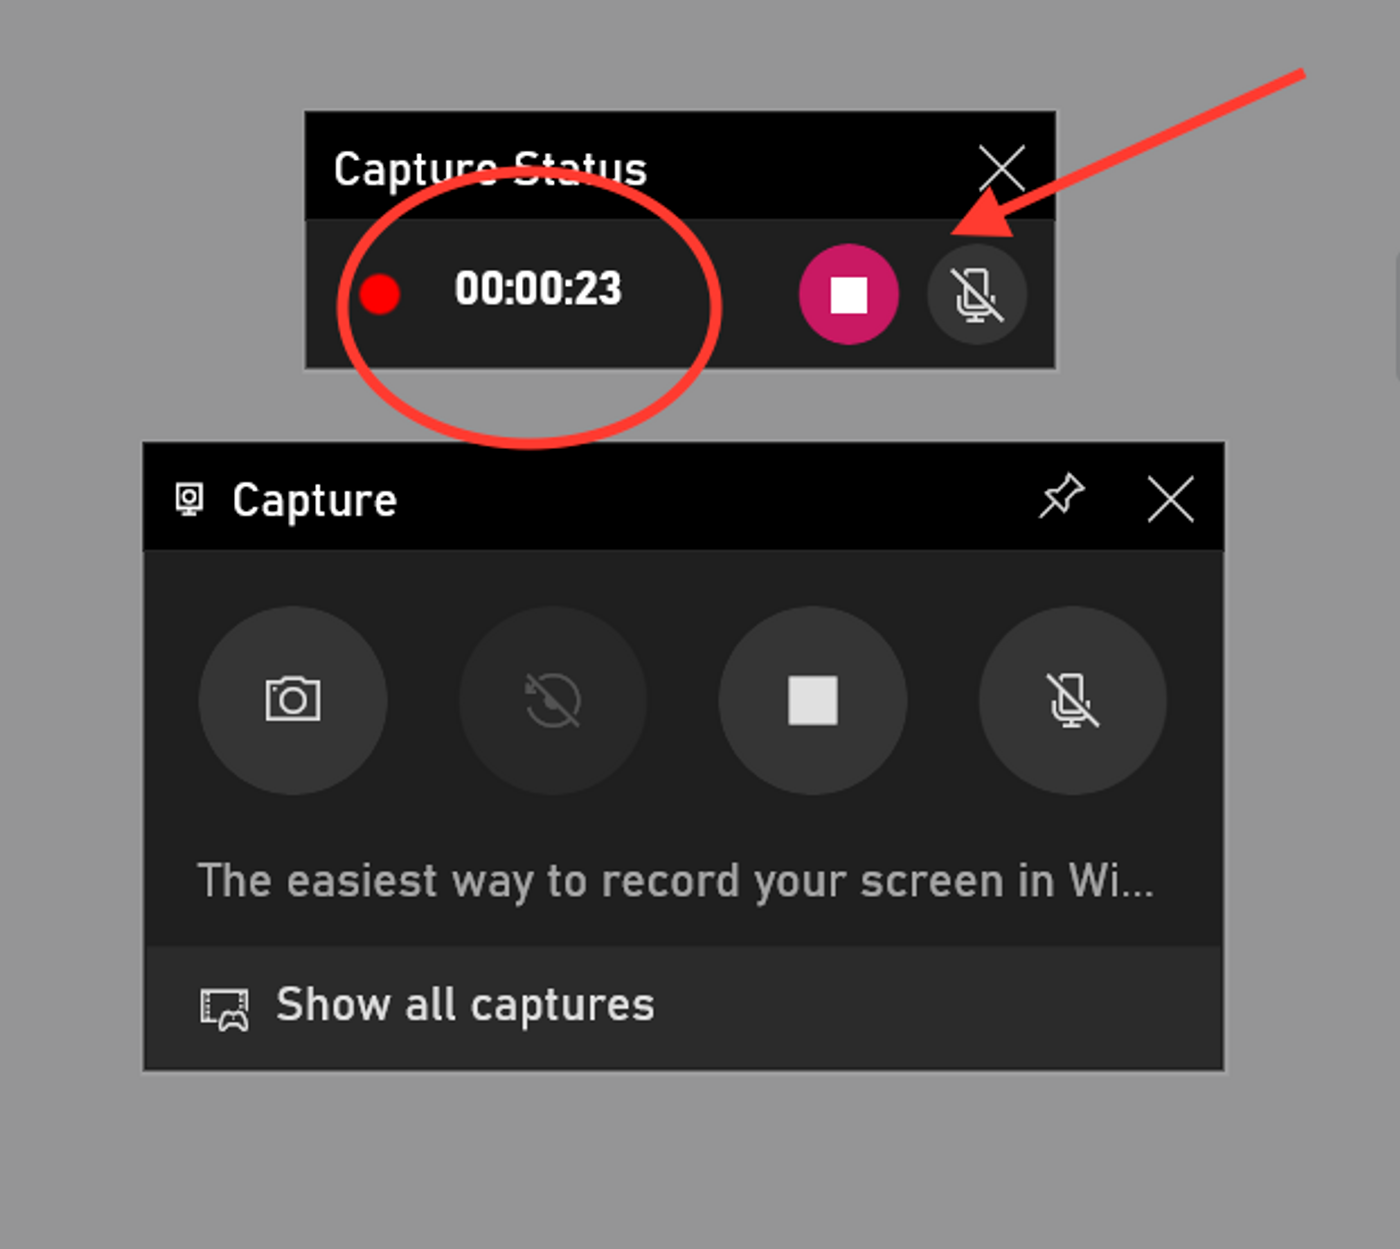
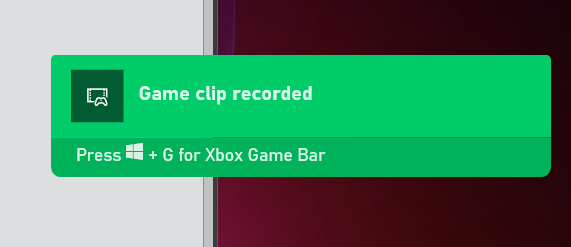
Step 5: Click on the stop button or press Windows + Alt + R again to stop recording.
Step 6: A pop up will appear on the right side saying ‘Game clip recorded’. Click on the pop-up to see that your screen recording is saved in the ‘Captures’ folder in File Explorer.

2. How to record video on Windows 10 or any PC?
Now that we’ve covered screen recording on Windows 10, let’s see how you can record videos on Windows 10 or any other PC.
Just follow these simple steps:
Step1: Hit that start menu and launch the ‘Camera’ app which is also available under the list of All Apps.
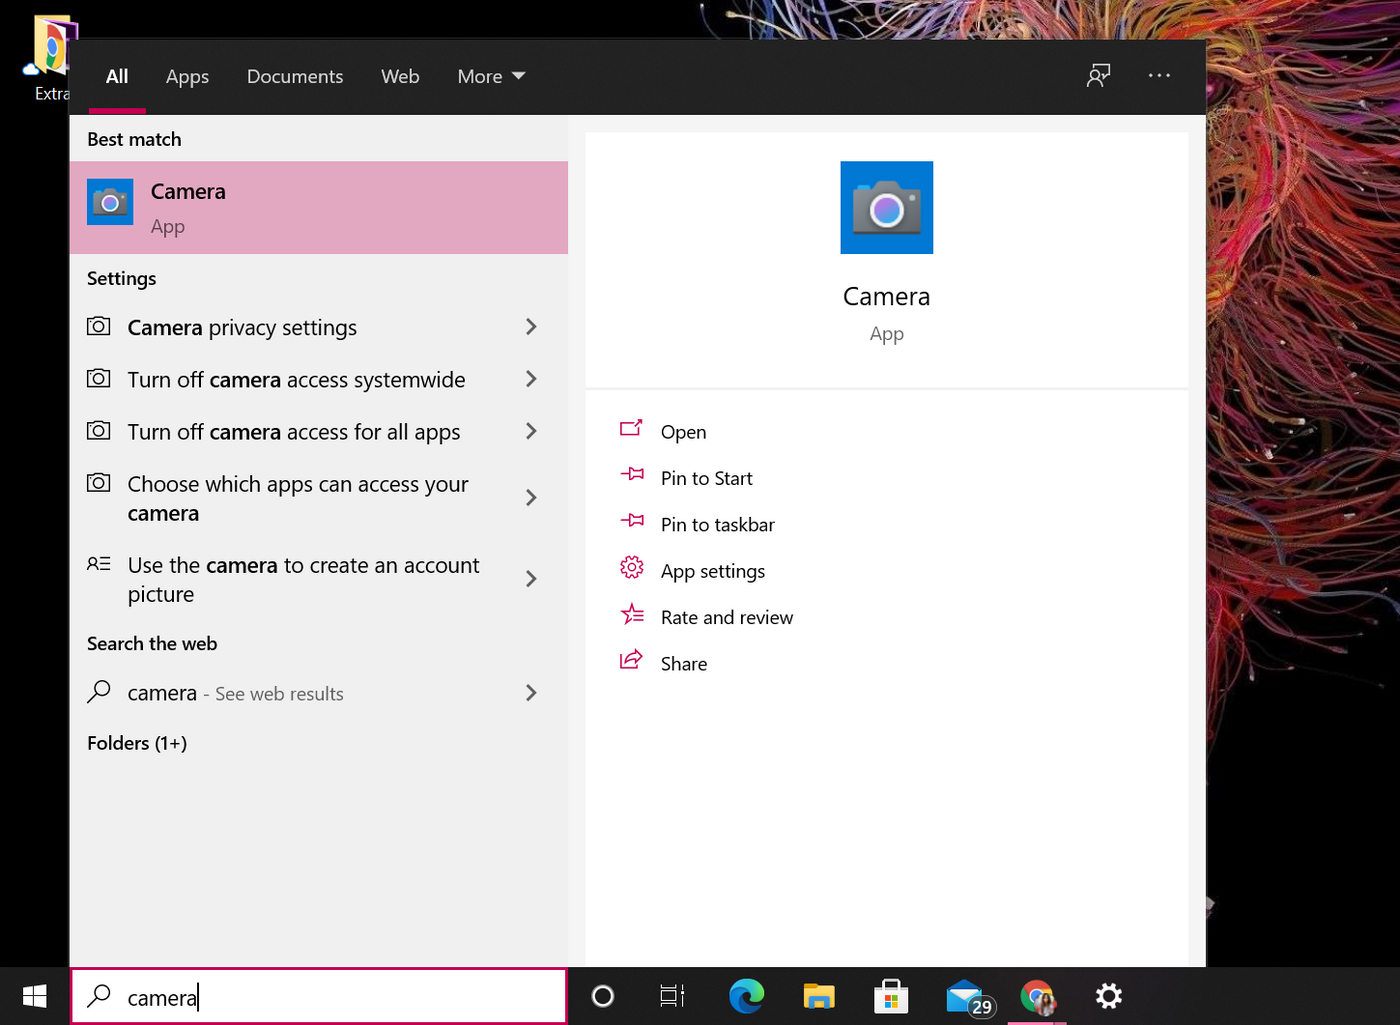
Step 2: Once the camera is opened, there are options on the right to choose from, photo or video mode. The app will allow you to record a maximum of three hours.

Step 3: Once you have finished recording your video, they are saved by default to the Camera Roll folder.

If you’re using a PC to record videos without an in-built camera, you will need to connect a webcam to your PC. Here’s a super easy tutorial to help you screen record and take a video at the same time.
And for better quality and more freedom in terms of video recording duration, a third-party app will be required. Head on over here to see InVideo’s curation of the best webcam recording softwares available right now.
3. BONUS: How to turn your screen recordings into professional videos in minutes?
You’ve got your recording and the screen capture. Now, If you want to make an impact and go the extra mile, you’d want to turn your screen-recordings into fully-edited videos with music and text. That’s where an online video editor like InVideo can come in handy. You can easily create professional-quality videos in minutes even if you’ve never edited a video before.
Here’s how you can use InVideo to make all the difference:
Step 1: Sign-up for an InVideo account if you haven’t already. Click on “Blank Canvas”, select a dimension, then click “Make a Video” to get started.

Step 2: You’ll now be taken to the InVideo editor. Click on the “Upload Media” button or drag and drop your files to the centre to the editor

Step 3: Once uploaded, drag your video to the center in the workspace to begin making your changes. A pop up will ask you if you want to trim your video. Make any changes you want to or use the full version. And now your visuals are all set.
Step 4: Once done, it’s time to pick from InVideo’s in-built collection of music across moods, genres, sfx and more from the music icon located on the left of the screen. Alternatively, if you’d like to add your own music to this project, simply click on the Upload music option on the right of the search bar to upload files from your system.

Step 5: Drag and adjust the timeline — to sync the music to your text and visual elements.

Step 6: Once you’re done tinkering, click on the Download & Share button, select your video’s quality, then hit “Export”.

Step 7: If you’d like to add text to your video, simply click on the text tab from the row of options on the left hand side. Select a from a collection of fonts and typographies.

Step 8: And you’re done! Download the video or share it directly on your social media platforms.

Wrapping up —
There you have it, you’ve learned how to screen record on Windows 10 and you’ve also figured out how to record videos on Windows 10 and other PCs, and you also know how to turn your screen recordings into professional videos using InVideo’s online editor. If you want to further deep-dive into what are the best webcam recording softwares of 2022, check out this post where we cover exactly that.
And if you have any other questions or want to continue the conversation, hop on over to the IV community where you’ll be able to collaborate and learn from 25K other creators and marketers just like you.
FAQs
1. How do I record my screen on Windows 10 for free?
You can record your screen on Windows 10 for free using the in-built tool Game Bar. You can screen record up to 4 hours and a single application at a time. You cannot screen record your desktop or file explorer.
2. Where do screen recordings go in Windows 10?
Your screen recordings are all stored by default in the Captures folder. Head to Gaming from settings. Click on Captures from the options available on the left. All your screenshots and screen recordings are stored here.
3. How long can windows screen record?
With Game Bar, you can record your screen for up to 4 hours at a time.
4. How do I record video and audio on my laptop?
If you’re using a Windows 10 laptop, your machine features the in-built universal app, ‘Camera’ which allows you to record audio and video on a PC. The in-built camera will automatically record all audio while recording.